Briloner Piatto Bedienungsanleitung

Briloner Lamp Piatto

Lesen Sie kostenlos die 📖 deutsche Bedienungsanleitung für Briloner Piatto (22 Seiten) in der Kategorie Lamp. Dieser Bedienungsanleitung war für 2 Personen hilfreich und wurde von 2 Benutzern mit durchschnittlich 4.5 Sternen bewertet

Seite 1/22
MAL 7195-016
Montageanleitung
Mounting instructions
Instruction de montage
Istruzioni di montaggio
Instrucciones de montaje
Montageanledning
Monteringsinstruktion
Montasjeveiledning
 Asennusohje
Montageaanwijzing
 Instrukja monta u ż
ávod k montáži
Návod na použitie
 Montazno navodilo
Szerelési utasítás
Instruc iunile de montaj ţ
Instruções de montagem
Montaj talimati
Mont žas instrukcija ā
Рьководство за монтаж
Инструкция по монтажу
Συναρμολογησης
 ºUputstvo za postavljanje Uputstvo za montažu
¼ Упатството за монтирање
½Udhëzim për instalim
Sicherheitshinweise / Bitte lesen Sie diese Informationen sorgfältig durch, bevor Sie mit der Installation oder Inbetriebnahme dieses
Produkts beginnen. Heben Sie diese Gebrauchsanweisung für spätere Zwecke gut auf.
1. Die Leuchten dürfen nur von autorisiertem Fachpersonal nach den jeweils geltenden Elektro- Installationsvorschriften installiert werden.
2. Der Hersteller übernimmt keine Verantwortung für Verletzungen oder Schäden, die Folge eines unsachgemäßen Gebrauchs der Leuchte sind.
3. Die Pege von Leuchten beschränkt sich auf die Oberächen. Dabei darf keine Feuchtigkeit in Anschlussräume oder an Netzspannung führende
Teile gelangen.
4. Achtung! Vor Beginn der Montagearbeiten die Netzleitung spannungsfrei schalten – Sicherungsautomat ausschalten bzw. Sicherung heraus drehen.
Schalter auf “AUS”.
5. Achtung! Vergewissern Sie sich vor dem Bohren der Befestigungslöcher, dass an der Bohrstelle keine Gas-, Wasser- oder Stromleitungen
angebohrt oder beschädigt werden können.
6. Bei der Montage der Wand- oder Deckenbefestigung ist darauf zu achten, dass das Befestigungsmaterial für den Untergrund geeignet ist und dass
dieser entsprechend tragfähig ist. Für eine unsachgemäße Verbindung des Artikels mit dem jeweiligen Untergrund kann seitens des Herstellers
keine Haftung übernommen werden.
7. Das Symbol der durchgestrichenen Mülltonne auf dem Produkt oder der Verpackung bedeutet, dass dieses Produkt nicht mit dem Hausmüll
entsorgt werden darf. Das Produkt muss stattdessen am Ende seiner Lebensdauer zu einer Annahmestelle für das Recycling von elektrischen und
elektronischen Geräten gebracht werden. Bitte erfragen Sie diese Stelle bei Ihrer zuständigen kommunalen Verwaltung.
8. Schutzklasse II . Diese Leuchte ist besonders isoliert und darf nicht an einen Schutzleiter angeschlossen werden.
9. Bezeichnung der Anschlussklemmen: L = Phase N = Neutralleiter = Schutzleiter.
10. Abdeck- und Endkappen für Netzspannung führende Teile müssen grundsätzlich montiert werden.
11. Leuchte nicht auf feuchtem oder leitendem Untergrund montieren.
12. Stellen Sie sicher, dass Leitungen bei der Montage nicht beschädigt werden.
13. Anschlussart Typ Y: Zur Vermeidung von Gefährdungen darf eine beschädigte äußere flexible Leitung dieser Leuchte ausschließlich vom
Hersteller, seinem Servicevertreter oder einer vergleichbaren Fachkraft ausgetauscht werden.
14. Achtung! Leuchtenteile und Leuchtmittel können während des Betriebs Temperaturen von >60°C erreichen und dürfen daher während des Betriebs
nicht berührt werden.
15 Die Leuchte besitzt den Schutzgrad und ist ausschließlich für den Einsatz im Innenbereich von privaten Haushalten vorgesehen. “IP20“
16. Nicht direkt in die Lichtquelle (Leuchtmittel, LED etc.) hineinschauen.
17. Die Lichtquelle dieser Leuchte ist nicht ersetzbar. Wenn die Lichtquelle ihr Lebensdauerende erreicht hat, ist die gesamte Leuchte zu ersetzen.
18. Farbabweichungen bei LED´s verschiedener Chargen sind möglich. Die Lichtfarbe und Leuchtstärke von LED´s kann sich auch in Abhängigkeit
von der Lebensdauer verändern.
19. Dieser LED-Artikel darf nur an dem beiliegenden Netzteil oder Vorschaltgerät betrieben werden.
20. Dieser Artikel ist nicht geeignet für den Betrieb in dimmbaren Stromkreisen. Er kann mit der beiliegenden Fernbedienung gesteuert werden.
21. Leuchte mit Fernbedienung: Hiermit erklärt , dass der Funkanlagentyp der Richtlinie entspricht. “Briloner Leuchten“ “7195-016“ “2014/53/EU“
Der vollständige Text der EU-Konformitätserklärung ist unter der folgenden Internetadresse verfügbar:
www.briloner.com/984176-briloner-de-wAssets/img/konformitaetserklaerung/CE180323-d1.pdf
22. Das beiliegende Produkt arbeitet mit einer Betriebsfrequenz von und einer Sendeleistung von . “2,4 GHz“ “max. 10 mW“
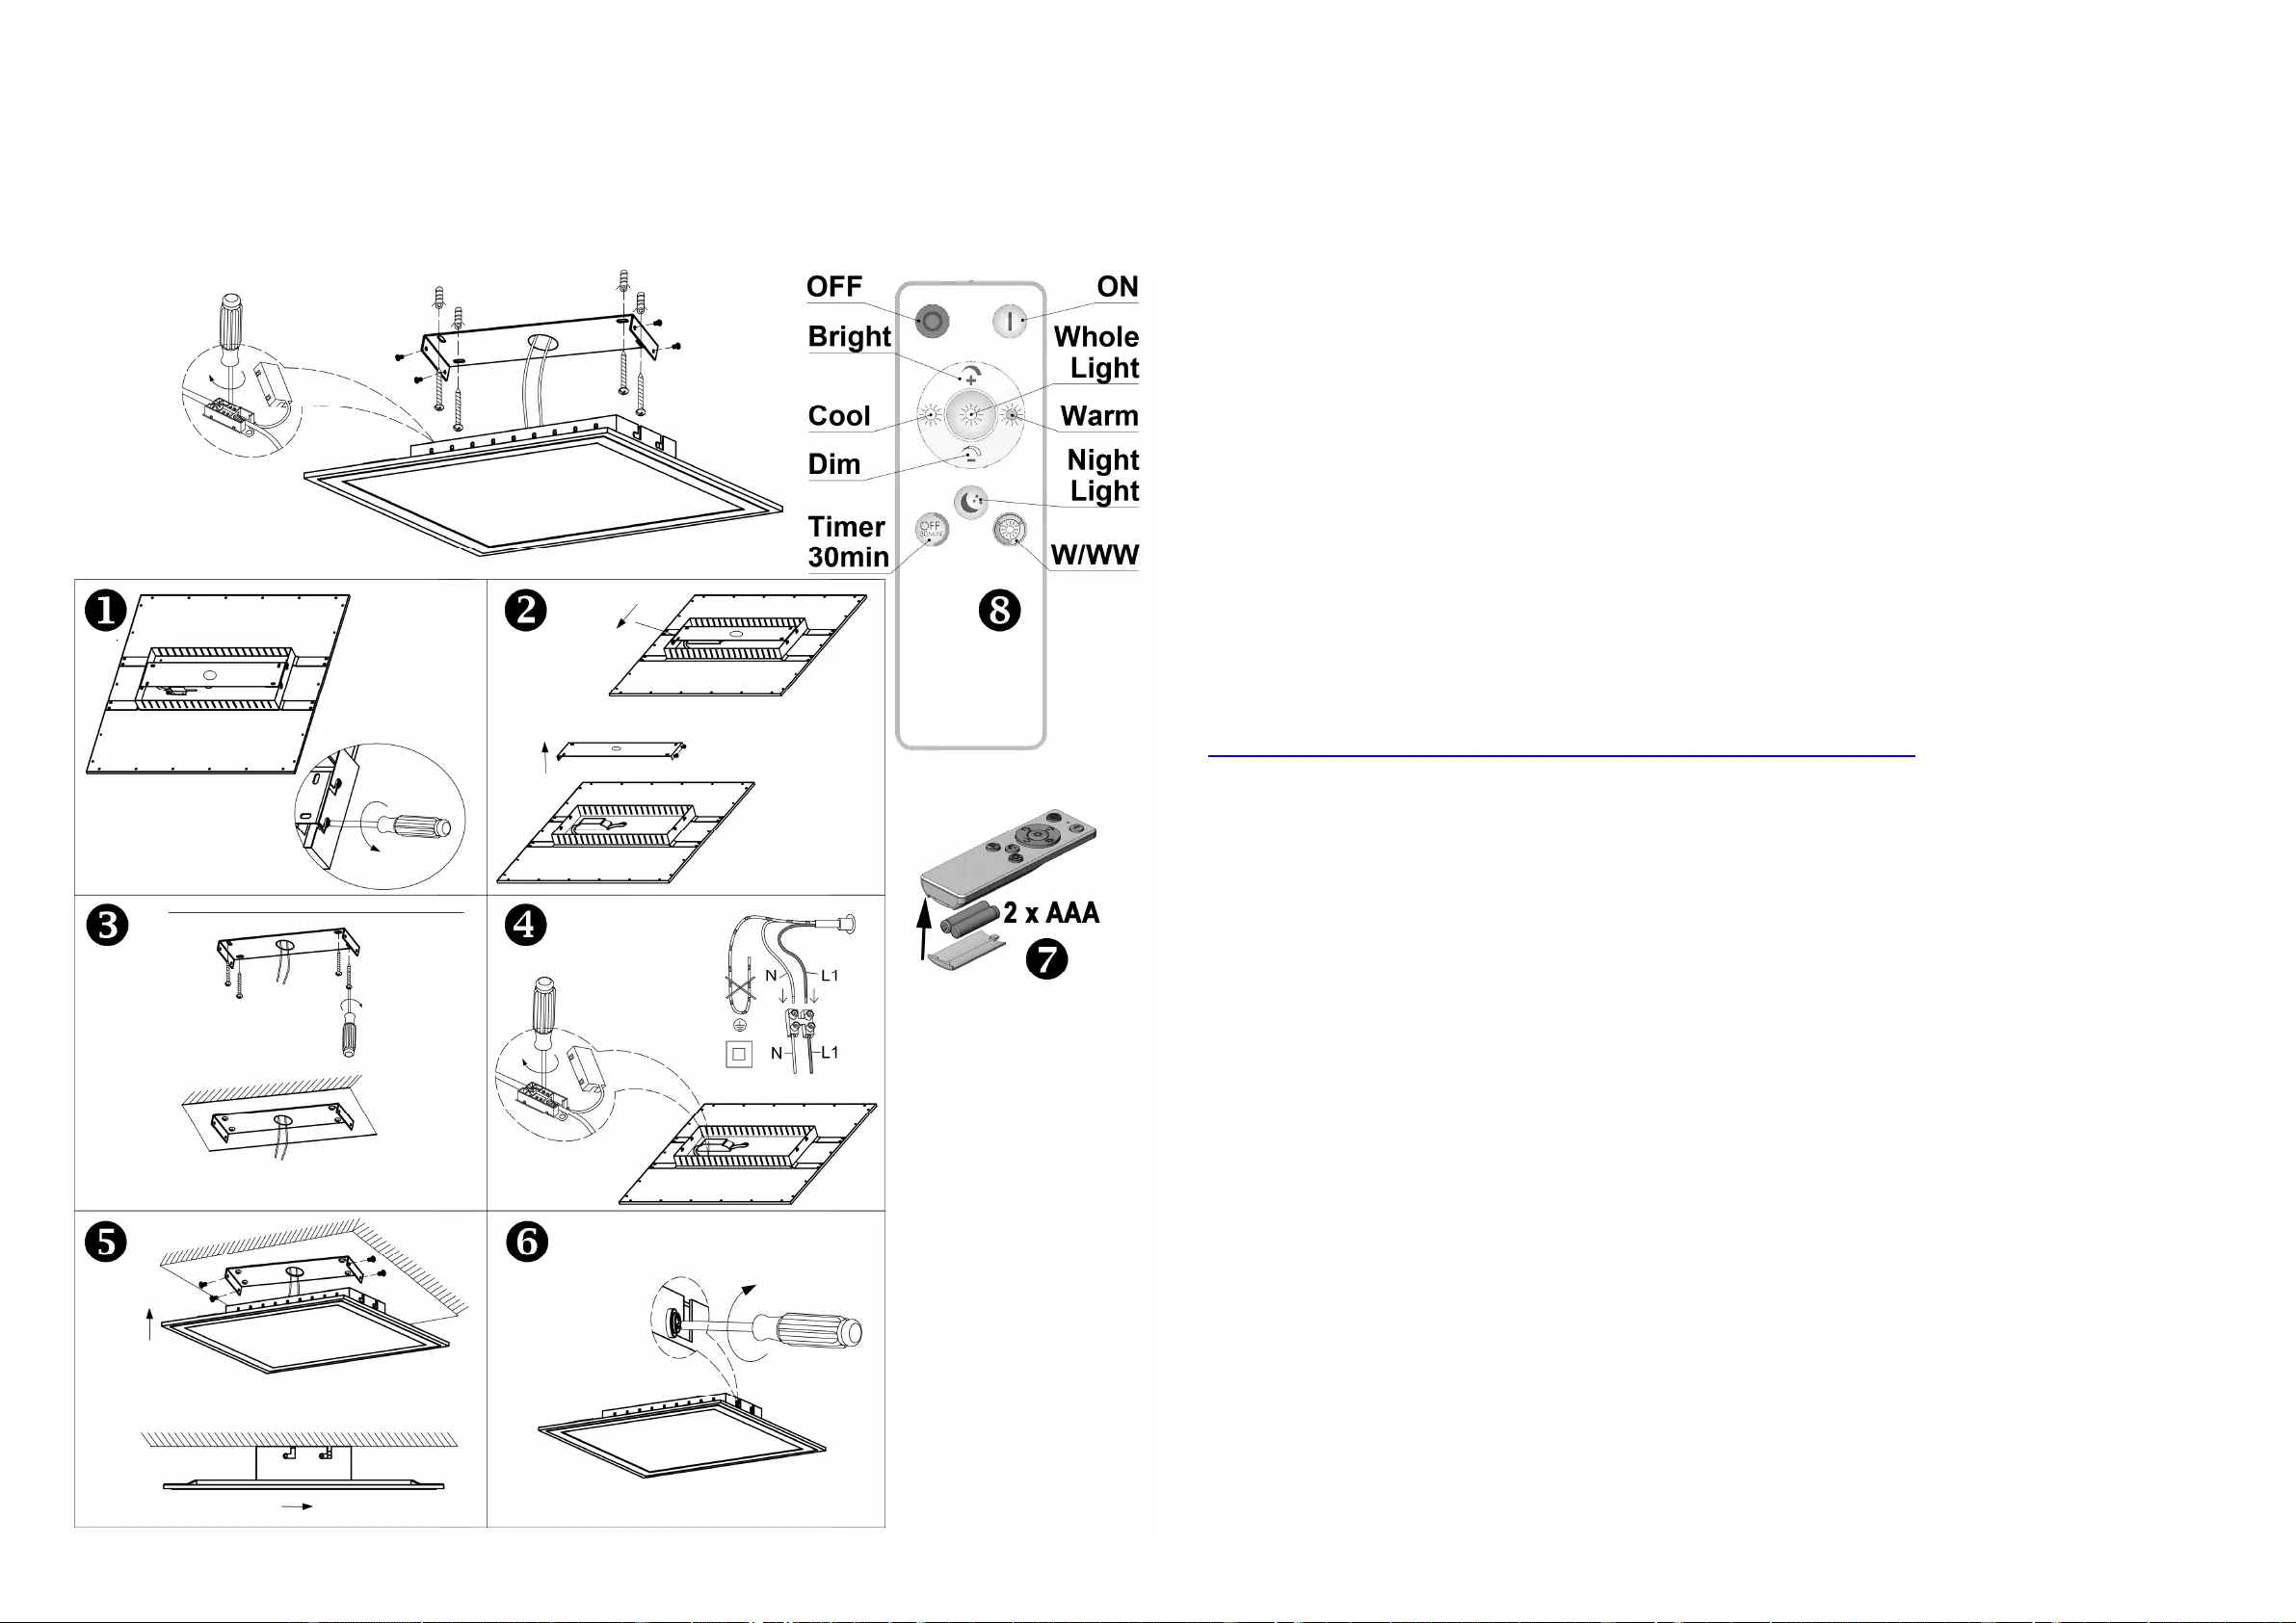
23. Auswählbare Funktionen des Artikels:
24. Der Taster schaltet die Leuchte mit der zuletzt genutzten Schaltstellung ein. Der Taster schaltet die Leuchte aus. “ON“ “OFF“
25. Der Taster schaltet die Leuchte mit einer Farbtemperatur von ca. ein. “Whole Light“ “4000K / 100%“
26. Mit den Tastern und lässt sich die Leuchte in mehreren Stufen oder Stufenlos Auf- oder Abdimmen. “Bright“ “Dim“
27. Mit den Tastern und lässt sich die Farbtemperatur der Leuchte in mehreren Stufen oder Stufenlos nach Kalt-Weiß oder Warm-“Cool“ “Warm“
Weiß verstellen.
28. Der Taster schaltet die Leuchte in einer sehr niedrigen Dimm-Stufe mit einer Farbtemperatur von ca. ein. “Night Light“ “3000K“
29. Der Taster schaltet die Leuchte nach ca. Minuten aus. “Timer“ “30“
30. Der Taster schaltet die Farbtemperatur der Leuchte zwischen Kalt-Weiß und Warm-Weiß um . “W/WW“ (4000K – 6500K – 3000K)
31. Sollte die Ansteuerung des Artikels mit der Fernbedienung nicht möglich sein, dann kann es möglich sein, dass der Artikel neu angelernt werden
muss.
32. Die beiliegende Fernbedienung lässt sich an beliebig vielen Artikeln der gleichen Serie anlernen.
Der Funkempfänger (Leuchte) hat “ “ Speicherplätze zur Verfügung. Es lassen sich somit “ “ Fernbedienungen an einen Empfänger anlernen. 4 4
Sollten an dem Funkempfänger vorher bereits Fernbedienungen angelernt worden sein, wird bei zusätzlichen Speicherungen die erste der “4“
bestehenden wieder aus dem Speicher gelöscht. Anlernen: Leuchte mit dem Wandschalter einschalten und unmittelbar danach den Taster a. “ON“
beginnend in einem Zeitfenster von Sekunden drücken. Die Leuchte bestätigt den Vorgang mit Aufblitzen. Ablernen: Leuchte “30“ “5 x“ “3 x“ b.
mit dem Wandschalter einschalten und unmittelbar danach den Taster beginnend in einem Zeitfenster von Sekunden drücken. “ON“ “ 30“ “5 x“
Die Leuchte bestätigt den Vorgang mit Aufblitzen. “6 x“
33. Batterien oder Akkus dürfen nicht in den Hausmüll. Sie müssen gemäß den Bestimmungen der zuständigen Behörden als Sondermüll entsorgt
werden. Benutzen Sie dazu die vorhandenen Sammelstellen.
34. Ansteuerung der Leuchte über einen externen Lichtschalter
35. Das Einschalten der Leuchte mit einem externen Lichtschalter nach einer Mindest-Ausschaltdauer von ca. Sekunden erfolgt mit einer “5“
Farbtemperatur von . “4000K / 100%“
36. Diese Leuchte ist mit einem elektronischen Umschalter ausgerüstet.
37. Das heißt, dass sich die Farbtemperatur des Leuchtmittels durch das Ein- und Ausschalten der Netzspannung steuern lässt.
a. 1 x Ein
  Es wird mit einer Farbtemperatur von “ “ eingeschaltet. b. 1 x Aus- und innerhalb 1 sec. erneut Ein 4000K / 100%
Es wird auf eine
Farbtemperatur von “ “ umgeschaltet. c. 1 x Aus- und innerhalb 1 sec. erneut Ein 6000K
Es wird auf eine Farbtemperatur von “ 3000K
umgeschaltet. d. Weiteres Aus- und wieder Einschalten durchläuft die einzelnen Stufen erneut. e. Nach einer Ausschaltdauer von mehr als ca. “10“
Sekunden fängt der Zyklus jedes Mal wieder bei der ersten Stufe an.
38. Es ist es nicht von Belang, womit geschaltet wird (Aus-, Wechsel- oder Kreuzschaltung). Entscheidend für die Umschaltung ist das Verbinden und
Trennen der Netzspannung vom Leuchtmittel.
39. Dieser LED-Artikel darf nur an dem beiliegenden Netzteil oder Vorschaltgerät betrieben werden.
Verehrter Kunde
Sollten sich trotz neuester Fabrikationsmethoden und genauesten Qualitätskontrollen wider Erwarten Mängel herausstellen, wenden Sie sich bitte unter
Angabe des Kaufdatums, des Kaufortes und der Artikelnummer des Produktes an folgende kostenlose Hotline: 00800/BRILONER (00800/27456637)
Briloner Leuchten / Im Kissen 2 / 59929 Brilon
Revision 03_01/2019 MAL 7195-016 Page1a
Safety directions / Please read this information carefully before installing or using this product. Please keep this user manual for further reference.
1. The lamps may only be installed by authorized and qualied technicians according the valid regulations for electrical installation.
2. The manufacturer does not accept any responsibility for injuries or damage resulting from improper use of the light.
3. Maintenance of the lights is limited to the surfaces. When doing this, no moisture must come into contact with any areas of the terminal connections or mains voltage control
parts.
4. Attention! Before starting the installation work, make sure that the mains power line is voltage-free – turn o safety cutout or unscrew the protection fuse. The switch must be
“OFF”.
5. Warning! Before drilling the mounting holes, make sure that no gas, water or electricity pipes and wires can be drilled through or damaged in your chosen mounting location.
6. When mounting the wall or ceiling fixture, ensure that the attachment material is suitable for the subsurface and that this surface is capable of carrying the weight of the xture.
The manufacturer is not liable for improper installation of the item on the relevant subsurface.
7. The symbol of the crossed-out garbage can on the product or the packaging means that the product must not be disposed with ordinary household waste. At the end of its
useful life, the product must be returned to a point of acceptance for the recycling of electric and electronic device. Please ask your local municipality for the point of acceptance.
8. Safety class II . This light is specially insulated and must not be connected to an earthed conductor.
9. Description of the supply terminals: L = Phase N = Neutral conductor = Earthed conductor.
10. Protective covers and end covers for mains voltage control parts must always be mounted.
11. Do not install the light on a damp or conductive subsurface.
12. Please make sure that no cables get damaged during the installation work.
13. Connection type Y: In order to eliminate any risks in case of damages, the outer exible cable of this lamp may only be replaced by a special cable or by a cable exclusively
available from the manufacturer, its service representative or a comparable qualied technician.
14. Attention! During operation, lamp parts and illuminants can reach temperatures of more than 60°C. Do not touch during operation!
15 The lights have a protection class rating of and are solely intended for indoor use only of private households. “IP20“
16. Do not look directly into the light source (illuminant, LED, etc.).
17. The light source of this lamp is not replaceable. If the light source has reached the end of its operational life, the entire lamp must be replaced.
18. LED colour deviation when using dierent chargers may occur. The light colour and luminous strength of the LED's can also change as a result of life span level from the lamp.
19. This LED product may only be operated with the enclosed power supply unit or control gear.
20. This article is not suitable for use with dimmable electric circuits. It can be controlled using the accompanying remote control.
21. Lamp with remote control: “Briloner Leuchten“ hereby declares that the radio equipment type “7195-016“ complies with the directive “2014/53/EU“.
The complete text of the EU Declaration of Conformity is available at the following web address:
www.briloner.com/984176-briloner-de-wAssets/img/konformitaetserklaerung/CE180323-d1.pdf
22. This product works with an operating frequency of and a transmission power of “2,4 GHz” “max. 10 mW”.
23. Available functions of the product:
24. The “ ” button switches the lights on with the last switch position to have been used. The “ON OFFbutton switches the lights o.
25. The “Whole Lightbutton switches the lights on with a colour temperature of 4000K / 100%”.
26. The “ ” and “Bright Dim” buttons brighten and dim the lights either in stages or continuously.
27. The “Cool Warm” and ” buttons move the colour temperature closer to cool white or warm white either in stages or continuously.
28. The “Night Light” button switches the lights to their dimmest setting with a colour temperature of approximately “3000K”.
29. The “ ” button switches the lights o after “Timer 30minutes.
30. The “W/WW” button changes the light from cool white to warm white and vice versa (4000K – 6500K – 3000K).
31. Should the control of the article by remote control not be possible, then it may be necessary to train the article once again.
32. The accompanying remote control can be connected to many dierent articles in the same series.
The radio receiver (Lamp) has “ ” storage spaces available. “ ” remote controls can be programmed on the receiver. Should remote controls already be trained for the signal 4 4 “4“
receiver, then the rst record of those available is deleted from the memory store with every additional recording. onnect: Turn on the light at the wall switch and a. C
immediately after press the button “ON“ “5 x“ , beginning in a time window of seconds. The light will conrm the process with a ash “30“ 3 x“ b. . Disconnect: Turn on the
light at the wall switch and immediately after press the button “ON“ “5 x , beginning in a time window of seconds. The light will conrm the process with a ash “30“ “6 x.
33. Batteries or rechargeable batteries are not permitted in domestic waste. They must be decontaminated according to the regulations of the responsible authorities as hazardous
waste. Use the available collection points.
34. Light control via an external light switch
35. The lamp is switched on using an external light switch after a minimum o period of approx. seconds with a colour temperature of “5” “4000K / 100%”.
36. This light is fitted with an electronic changeover switch.
37. This means that the colour temperature of the lamp is controlled by switching the power supply on and o.
a. 1 x on
It will be switched to a colour temperature of “4000K / 100%”. b. 1 x off and within 1 sec. on again
It will be switched to a colour temperature of “6000K”. c. 1 x
o and within 1 sec. on again
It will be switched to a colour temperature of “ ”. d. Further switching on and off of the lamp means having to run through the individual 3000K
stages again. e. After an o period of more than approx. seconds, the cycle begins again at the rst stage each time. “10”
38. It generally does not matter how the lamp is switched on (circuit-breaker, multi-switch connection or cross circuit). Essential for operation is the connection and disconnection of
the lamp from the power supply.
39. This LED product may only be operated with the enclosed power supply unit or control gear.
Consignes de sécurité / Merci de lire ces informations avec attention avant de commencer avec l’installation ou la mise en marche de ce produit. Conservez ce mode
d’emploi pour pouvoir le consulter plus tard en cas de besoin.
1. Les lampes doivent être installées par un personnel spécialisé uniquement, en suivant les instructions d’installation électronique en vigueur.
2. Le fabricant n’est pas responsable des blessures ou des dommages résultant d’une utilisation incorrecte des lampes.
3. Le soin des lampes se limite aux surfaces. Il faut absolument éviter de mettre le secteur de branchements ou la tension du réseau des pièces conductrices en contact avec
l’humidité.
4. Attention! Avant de commencer les travaux de montage, éteindre la tension du cordon d’alimentation– éteindre le disjoncteur ou dévisser les fusibles. Placer le commutateur sur
„OFF“.
5. Attention ! Avant le perçage des trous de fixation, assurez-vous qu'il n'y ait aucun dommage causé aux conduites de gaz, d'eau ou électriques à l’endroit du forage.
6. Lors de l'installation du montage au mur ou au plafond, veillez à ce que le matériel de fixation soit solide et adapté au sous-sol. Le fabricant décline toute responsabilité en cas de
mauvaise connexion de l’article dans le sous-sol
7. Le symbole du bidon d'ordures rayé sur le produit ou l'empaquetage signie que le produit ne doit pas être disposé avec le déchet ordinaire de ménage. À la n de son vie
utile, le produit doit être retourné à un point d'acceptation pour la réutilisation des appareils électroniques ou électriques. Veuillez demander votre municipalité locale pour le
point d'acceptation.
8. Catégorie de protection II . La lampe est spécialement isolée et ne peut pas être raccordée à un câble de protection terre.
9. Description des bornes serre-fils : L = Phase N = Conducteur neutre = Câble de protection terre.
10. Les caches et les embouts de nition pour la tension du réseau des pièces conductrices doivent obligatoirement être montés.
11. Ne pas monter la lampe sur un support humide ou conducteur.
12. Veuillez vous assurer que les cordons ne soient pas abîmés pendant le montage.
13. Type de connexion Y: afin d’éviter tout danger un l abîmé extérieurement ne peut être remplacé que par le fabricant, le revendeur oiciel ou un technicien spécialisé.
14. Attention! Les parties de la lampe et les parties qui éclairent peuvent atteindre des températures supérieures à 60°C pendant leur fonctionnement, et ne doivent donc pas être
touchées pendant leur fonctionnement.
15 Le luminaire possède le degré de protection "IP20" et est exclusivement réservé à une utilisation dans la partie intérieure de domiciles privés.
16. Ne regardez pas directement la source lumineuse (illuminant, LED, etc.).
17. La source lumineuse de ce luminaire ne peut pas être remplacée. Dès que la source lumineuse arrive en n de vie, la totalité du luminaire doit être remplacée.
18. Des écarts de couleur dans le cas de LED de diérents lots sont possibles. La couleur de lumière et l’intensité lumineuse des LED peuvent également se modier en fonction de
la durée de vie.
19. Cet article LED ne doit fonctionner qu'avec le bloc d’alimentation fourni ou avec l'alimentation électronique fournie.
20. Cet article ne convient pas pour un usage en circuit électrique de régulation. Il peut être commandé à distance par télécommande.
21. Lampe avec télécommande: Par la présente, “Briloner Leuchten“ arme que les installations électriques “7195-016“ sont conformes aux normes “2014/53/EU“.
Consultez l'intégralité de la déclaration de conformité de l'UE en suivant ce lien :
www.briloner.com/984176-briloner-de-wAssets/img/konformitaetserklaerung/CE180323-d1.pdf
22. Le produit fourni fonctionne avec une fréquence de service de “2,4 GHz“ et une puissance de transmission de “max. 10 mW“.
23. Fonctionnalités sélectionnables de l'article:
24. Allumez la lampe avec la dernière position de commutation utilisée via le bouton . Le bouton permet d’éteindre la lampe. “ON“ “OFF“
25. Lorsque la lampe est allumée à l’aide du bouton “Whole Light“, celle-ci s’allume avec une température de couleur d’environ “4000K / 100%“.
26. Vous pouvez augmenter ou réduire l’intensité lumineuse en plusieurs étapes ou de façon continue en utilisant les boutons “Bright“ “Dim“ et .
27. Vous pouvez régler la température de couleur de la lampe du blanc froid au blanc chaud en plusieurs étapes ou de façon continue en utilisant les boutons “Cool“ “Warm“ et .
28. Lorsque la lampe est allumée à l’aide du bouton “Night Light“, celle-ci s’allume avec un degré de luminosité très faible et une température de couleur d’environ “3000K“.
29. La lumière s’éteint automatiquement au bout d'environ “30“ minutes grâce au bouton “Timer“.
30. Le bouton “W/WW“ commute la température de couleur de la lumière entre le blanc froid et le blanc chaud (4000K – 6500K – 3000K).
31. Si l'article ne peut pas être mis en marche à l'aide de la télécommande, il est possible que l'article doive être resynchronisé.
32. La télécommande fournie s'adapte à de nombreux autres articles de la série.
Le récepteur radio (Lampe) dispose de " " places de mémorisation. Il est ainsi possible de programmer " " télécommandes vers un récepteur. Si des télécommandes ont 4 4 “4“
été resynchronisées auparavant sur le récepteur radio, un nouvel enregistrement aura pour conséquences d'eacer le premier enregistrement existant de la mémoire.
a. Programmation : Allumez la lampe avec l'interrupteur mural et appuyez immédiatement “5 x sur le bouton pendant “ON“ “30“ secondes. La liason est conrmée lorsque la
lampe clignote “3 x b.. programmation : Allumez la lampe avec l'interrupteur mural et appuyez immédiatement 5 x“ sur le bouton “ON“ pendant secondes. La “30“
déconnexion est confirmée lorsque la lampe clignote “6 x“.
33. Les piles et accus ne doivent pas être éliminés avec les déchets nagers. Ils doivent être éliminés comme déchets spéciaux conformément aux directives dénies par les
autorités compétentes. N'utilisez pour ceci que les points de collecte prévus à cet eet.
34. Commande lumière par l'intermédiaire d'un commutateur lumière externe
35. La lampe s'allume avec un interrupteur externe après un temps d'arrêt minimal de secondes, et produit une température de couleur de “5“ 4000K / 100%“.
36. Cette lampe est équipée d'un interrupteur électronique.
37. Cela signie que la température de couleur de l'ampoule peut être commandée par la mise en marche et la mise à l'arrêt de la tension secteur.
a. 1 x Marche
La mise en marche est eectuée avec une température de couleur de "4000K / 100%". b. 1 x Arrêt et de nouveau Marche en l'espace de 1 s
La commutation
à une température de couleur de "6000K" est eectuée. c. 1 x Arrêt et de nouveau Marche en l'espace de 1 s
La commutation à une température de couleur de "3000K" est
eectuée. d. Une nouvelle mise en marche/à l'arrêt permet de repasser par les diérents niveaux. e. Après une durée d'arrêt de plus de "10" secondes environ, le cycle
recommence à chaque fois à partir du premier niveau.
38. La manière dont la commutation est eectuée (arrêt, commutation va-et-vient ou en croix) est sans importance. Concernant la commutation, il est absolument nécessaire que la
tension secteur soit connectée à l'ampoule et déconnectée de celle-ci.
39. Cet article LED ne doit fonctionner qu'avec le bloc d’alimentation fourni ou avec l'alimentation électronique fournie.
Consigli di Sicurezza / Leggere attentamente le presenti informazioni prima di installare o attivare questo prodotto. Conservare le istruzioni per l’uso per l’ulteriore
impiego.
1. Le luci possono essere installate solo da personale specializzato secondo le vigenti norme di installazione elettrica.
2. Il produttore non si assume alcuna responsabilità per danni o incidenti che si dovessero vericare se non vengono rispettate le corrette istruzioni d’uso.
3. La manutenzione della lampada si limita alle superci esterne. Pertanto assicurarsi che non ci sia umidità nei punti di collegamento o nella tensione di rete dei li di trasmissione.
4. Attenzione! Prima di procedere al montaggio, assicurarsi che non vi sia tensione in rete. Disinserire il dispositivo di sicurezza mettendo l’interruttore in posizione OFF“.
5. Attenzione! Prima di procedere a trapanare i fori per il fissaggio, assicurarsi che nell’area da perforare non vi siano condutture di gas, acqua o corrente che potrebbero venire
perforate o danneggiate.
6. Durante il montaggio su parete o sotto fare attenzione all’idoneità del materiale di ssaggio al sottofondo e alla solididi quest’ultimo. Il produttore non può assumersi alcuna
responsabilità a seguito di un’applicazione scorretta dell’articolo al sottofondo corrispondente.
7. Il simbolo del bidone dell'immondizia cancellato applicato sul prodotto o sulla confezione signica che questo prodotto non deve essere smaltito nei riuti domestici. Deve
essere invece portato ad un punto di raccolta dedito al riciclaggio di apparecchi elettrici ed elettronici. Richiedere l’indirizzo presso l'amministrazione comunale competente.
8. Classe di sicurezza II . Questa lampada è isolata e non può essere collegata al cavo di presa a terra.
9. Denominazione dei morsetti di collegamento: L = Fase N = Neutro = Terra
10. E’ indispensabile applicare le coperture per i li di trasmissione della tensione di rete.
11. La lampada non deve essere installata in zone umide o in condutture semiinterrate.
12. Assicurarsi che i cavi non vengano danneggiati in fase di installazione.
13. Tipo di allacciamento. Tipo Y: Per evitare pericoli è necessario che una linea esterna danneggiata di questa lampada venga sostituita esclusivamente dal produttore, dal suo
servizio di assistenza o da una persona specializzata in materia.
14. Attenzione! I pezzi delle lampade e i dispositivi d’illuminazione possono raggiungere temperature superiori a 60°C durante il funzionamento, per cui non devono essere toccati.
15 La lampada dispone di un grado di protezione “IP20“ ed è pensata esclusivamente per interni e per l’uso privato.
16. Non guardare mai direttamente nella sorgente luminosa (lampadine, LED eccetera etc.).
17. La sorgente luminosa di questa lampada non è sostituibile. Quando la sorgente luminosa avrà raggiunto il termine del suo ciclo vitale, va sostituita l’intera lampada.
18. Sono possibili dierenze di colore nel caso in cui le cariche dei LED siano dierenti. Il colore luminoso dei LED può anche dierire a seconda della durata in servizio.
19. Questo prodotto a LED può essere utilizzato solamente con il trasformatore o ballast in dotazione.
20. Questo articolo non è adatto alla messa in funzione in circuiti regolabili. È possibile controllarlo con il telecomando annesso.
21. Lampada telecomandata: Con la presente “Briloner Leuchten“ dichiara che il tipo di impianto radio “7195-016“ è conforme alla direttiva “2014/53/EU“.
Il testo completo della dichiarazione di conformità UE è disponibile al seguente sito Internet:
www.briloner.com/984176-briloner-de-wAssets/img/konformitaetserklaerung/CE180323-d1.pdf
22. Il prodotto in dotazione funziona con una frequenza di esercizio pari a “2,4 GHz“ e una potenza di trasmissione pari a “max. 10 mW“.
23. Funzioni selezionabili dell’articolo:
24. Il tasto “ON“ accende la lampada riattivandola sull’ultima impostazione di accensione utilizzata. Il tasto “OFF spegne la lampada.
25. Il tasto “Whole Light“ accende la lampada con una temperatura di colore di circa 4000K / 100%“.
26. Con i tasti “Bright“ e è possibile regolare l’illuminazione più chiara o più scura della lampada con diversi gradi o in modalità continua. “Dim“
27. Con i tasti “Cool“ “Warm“ e è possibile modicare la temperatura di colore della lampada con diversi gradi o in modalità continua , portandola a bianco freddo o bianco caldo.
28. Il tasto “Night Light“ accende la lampada attivando un grado di illuminazione molto bassa con una temperatura di colore di circa “3000K“.
29. Il tasto “Timer“ spegne la lampada dopo circa minuti. “30“
30. Il tasto “W/WW modica la temperatura di colore della lampada tra bianco freddo e bianco caldo (4000K 6500K 3000K).
31. Potrebbe essere necessaria una ricongurazione dell’articolo qualora non fosse possibile comandare l’articolo con il telecomando.
32. È possibile registrare il telecomando annesso associandolo a molti articoli a piacere della stessa serie.
Il ricevitore (Lampada) ha ” spazi di memoria disponibili. Possono essere quindi congurati telecomandi su un ricevitore. Qualora siano già stati congurati 4 “4” “4“
telecomandi sul ricevitore radio, il primo di questi verrà eliminato di nuovo dalla memoria nel caso in cui se ne salvino altri. Registrazione: accendere la lampada con a.
l’interuttore a parete e premere subito dopo per “5 x“ volte il pulsante nell’arco di secondi. La lampada lampeggia a conferma della procedura. “ON“ “30“ "3 x"
b. Eliminare registrazione: accendere la lampada con l’interuttore a parete e premere subito dopo per “5 x volte il pulsante nell’arco di secondi. La lampada “ON“ “30“
lampeggia "6 x" a conferma della procedura.
33. Batterie e accumulatori non fanno parte dei rifiuti domestici. Sono rifiuti tossici e devono essere smaltiti secondo le normative locali vigenti. Recarsi quindi negli appositi centri
di raccolta.
34. Comando della lampada tramite interruttore luce esterno
35. L’accensione della lampada con un interruttore esterno dopo un intervallo minimo di interruzione di ca. “5secondi avviene con una temperatura del colore pari a “4000K /
100%“.
36. Questa lampada dispone di un commutatore elettronico.
37. Ciò signica che la temperatura di colore della lampada può essere controllata inserendo e disinserendo la tensione di rete.
a. 1 x ON
viene attivata con una temperatura di colore di “4000K / 100%”. b. 1 x OFF e nel giro di 1 s di nuovo ON
si passa ad una temperatura di colore di ”. 6000K
c. 1 x OFF e nel giro di 1 s di nuovo ON
si passa ad una temperatura di colore di ”. d. Spegnendo e riaccendendo di nuovo vengono ripercorsi i singoli livelli. 3000K
e. Dopo un periodo di spegnimento di più di secondi il ciclo ricomincia ogni volta dal primo livello. 10
38. Non è importante come viene azionata (interrotta, deviata, invertita), determinante per la commutazione è l’inserimento e disinserimento della tensione di rete dalla lampada.
39. Questo prodotto a LED può essere utilizzato solamente con il trasformatore o ballast in dotazione.
MAL 7195-016 Page1b

Produktspezifikationen

Marke: Briloner
Kategorie: Lamp
Modell: Piatto

Brauchst du Hilfe?

Wenn Sie Hilfe mit Briloner Piatto benötigen, stellen Sie unten eine Frage und andere Benutzer werden Ihnen antworten


Bedienungsanleitung Lamp Briloner

Bedienungsanleitung Lamp

Neueste Bedienungsanleitung für -Kategorien-