Heatit WiFi Bedienungsanleitung
Heatit
Thermostat
WiFi
Lesen Sie kostenlos die 📖 deutsche Bedienungsanleitung für Heatit WiFi (4 Seiten) in der Kategorie Thermostat. Dieser Bedienungsanleitung war für 17 Personen hilfreich und wurde von 2 Benutzern mit durchschnittlich 4.5 Sternen bewertet
Seite 1/4
1. INTRODUCTION
Heatit WiFi thermostat is an electronic thermostat for electrical
underfloor heating. The thermostat has a simple user interface and
can be easily programmed via the capacitive buttons. The color screen
displays an accessible user interface. The thermostat has a built-in WiFi
chip that allows you to control it from a user-friendly app. The ”Heatit
WiFi” app is available on Google Play and in the App Store. Works
with Amazon Alexa and Google Home (pending). If you are installing
multiple thermostats in the same house, you may copy the settings
from one thermostat to the next. This simplifies installation.
Heatit WiFi thermostat 16A is equipped with a single-pole switch and
fits into most common frames (e.g. System 55, Elko RS16, Schneider
Exxact). The thermostat can withstand a load of max 16A/3600W
at 230VAC. We recommend a contactor for loads above 13A. The
thermostat may be connected to an external sensor.
2. INSTALLATION
Installation must be done by a qualified electrician in accordance with
the national building codes. Before installation, disconnect any power
to the device mains. During installation of the device, power to the
device must be disconnected AT ALL TIMES!
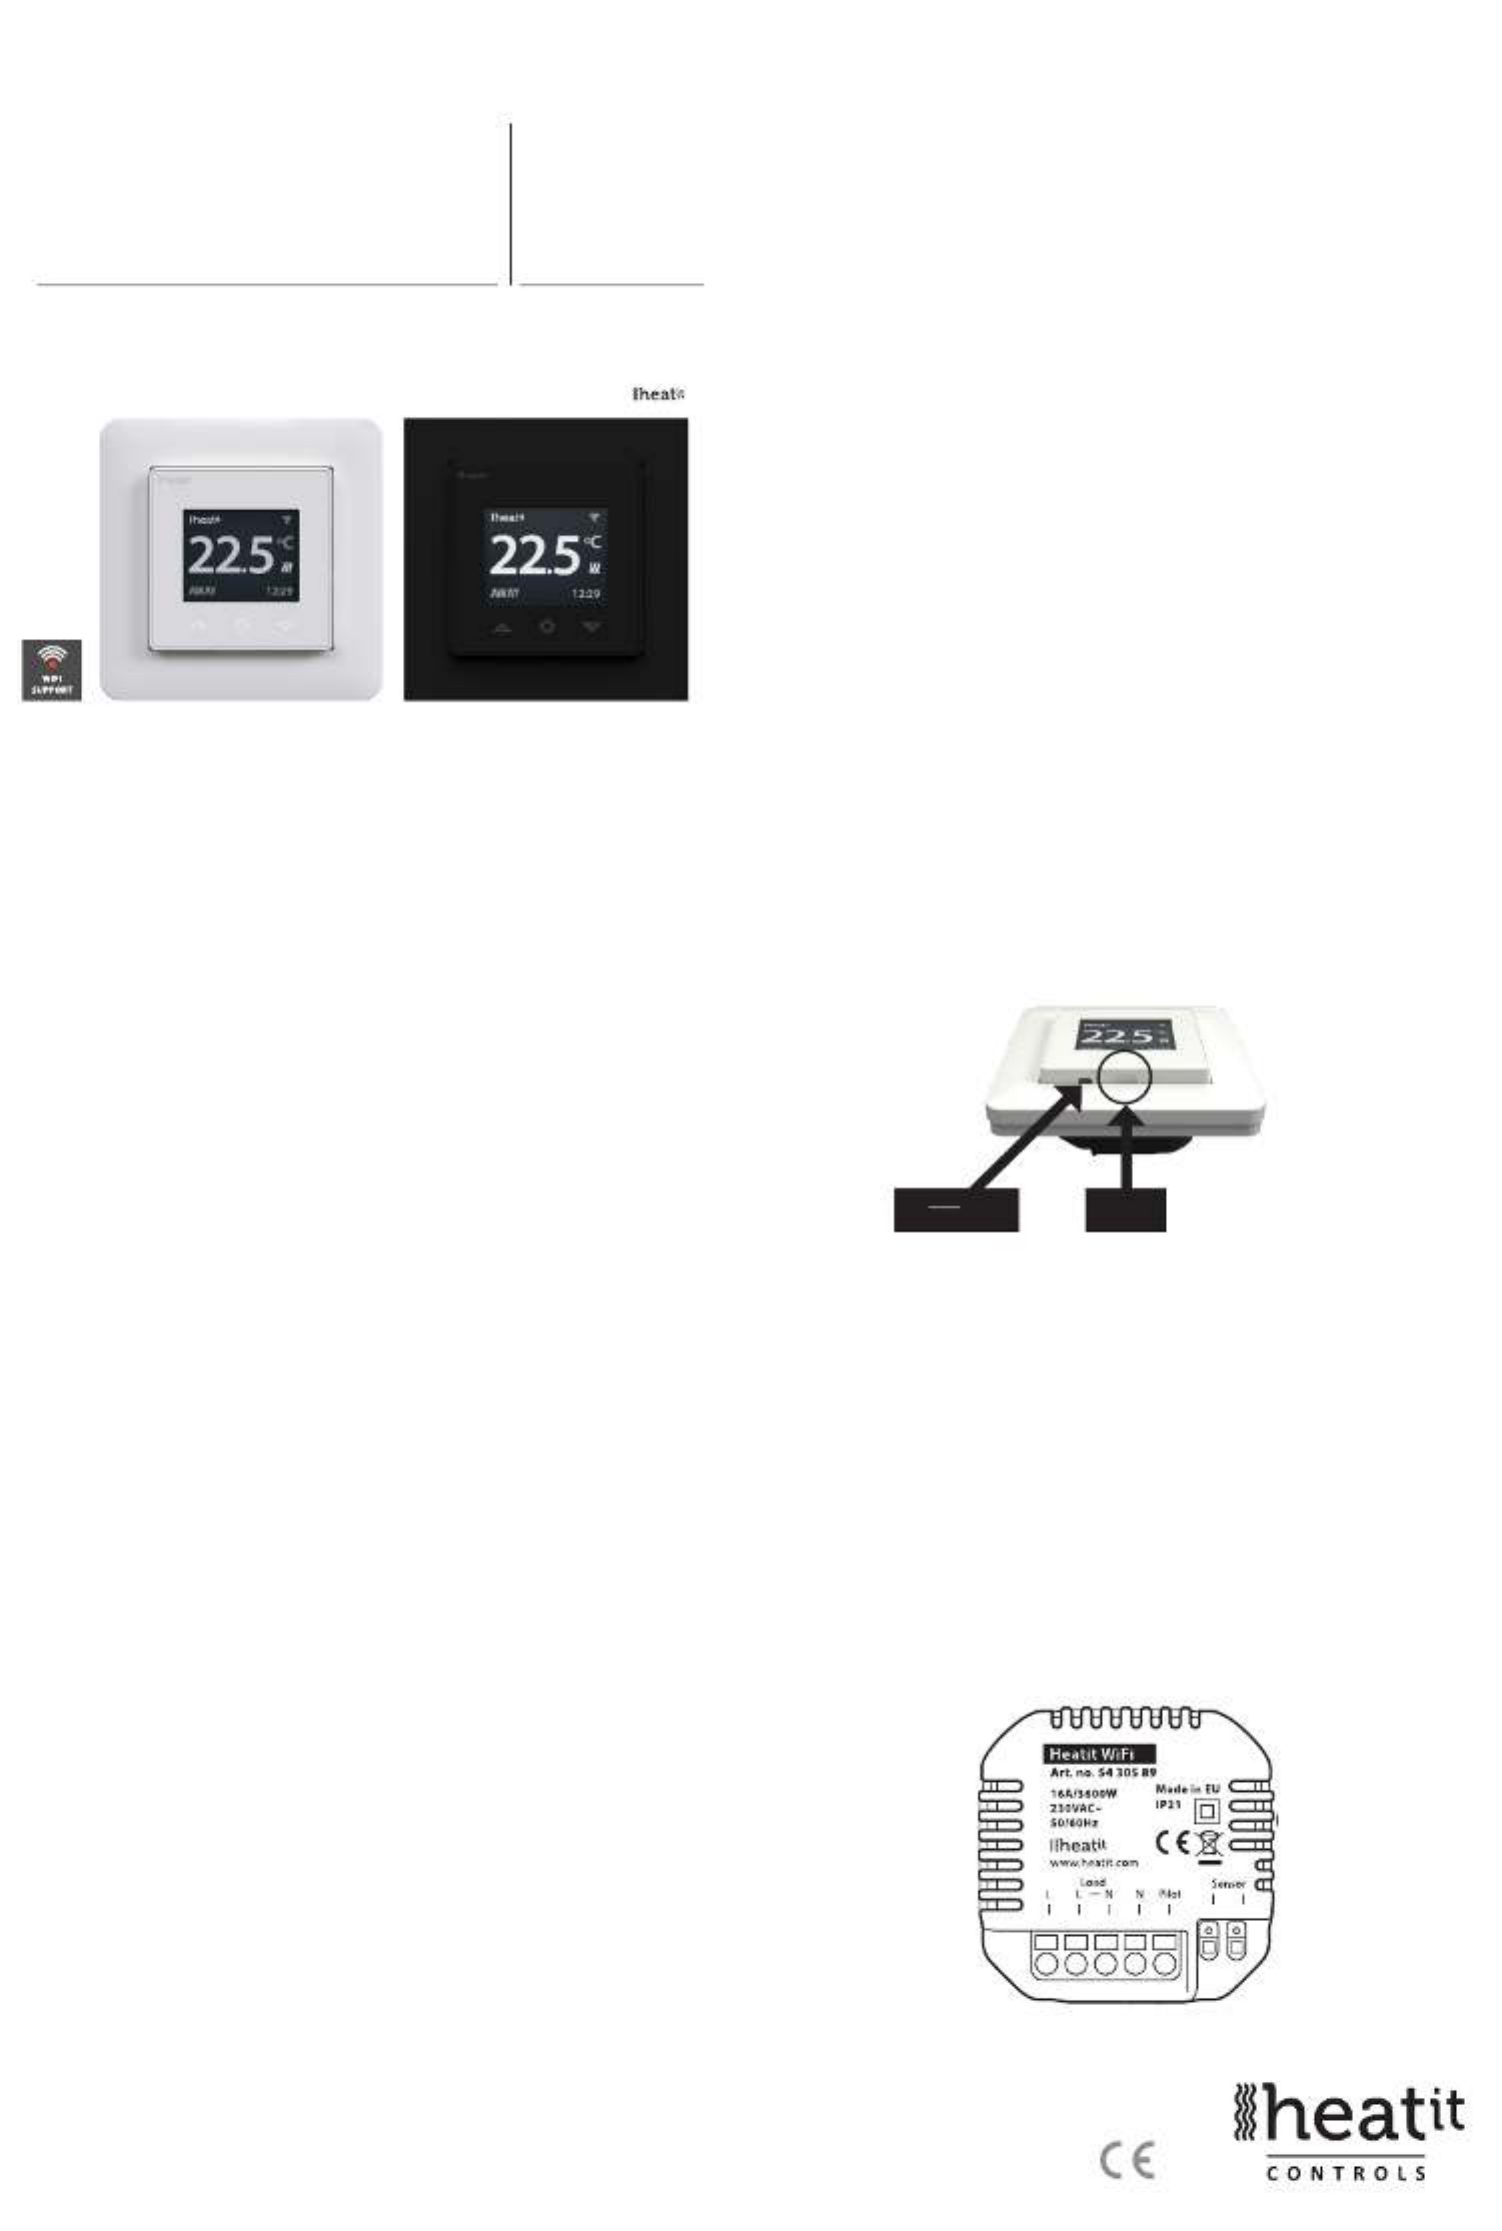
Release the front cover by pressing e.g. a screwdriver gently into the
ejector latch centered at the bottom of the thermostat front.
Now connect the wires to the thermostat terminals:
L Power connection (Live)
LOAD (N) Heating Cable connection (Neutral)
LOAD (L) Heating Cable connection (Live)
N Power connection (Neutral)
PILOT Pilot Wire (if applicable)
SENSOR Floor temp sensor, NTC type
Wires must be stripped 9-10mm. Wires can be released by pressing
the connector’s release switch. Floor sensor must be placed into a
TABLE OF CONTENTS
1. Introduction
2. Installation
3. Startup
4. Symbols
4.1 Operation mode
4.2 Heating/Cooling active
4.3 Note
5. Controls
6. Standby and main screen
7. Menu items
8. Operation mode
9. Weekly schedule
10. Heatit WiFi zones
11. Advanced settings
12. WiFi settings
13. Phone applications
14. Product info
HEATIT WIFI
Installers manual
Ver 2022-C
01.10.2021
DO INSERT NOT
ANYTHING HERE!
EJECTOR
LATCH
54 305 89 54 305 88

controlled by three touch sensitive buttons:
• Left (Up)
• Center (Confirm)
• Right (Down)
Each button has its own background light. When the background light is lit on
a button, the button is available for use.
Tip: Holding the left button for 2 seconds at any time will make a quick return
to the main screen.
Tip: While browsing the thermostat menu, pause at any menu item for a
moment, and a help text will be shown. This help text gives useful information
and guides the user through the functions related to that menu item. The help
text delay can be adjusted under “Settings” in the main menu.
6. STANDBY AND MAIN SCREEN
If the thermostat is not touched for a while, it will automatically go to standby
screen. While in standby, touching any of the buttons will display the main
screen below:
1. WiFi indicator
2. Measured temperature
3. Heating switched on/off
4. Operation mode
5. Time
In the main screen, pressing the center button will access the main
menu. Pressing the left or right button will change the set temperature.
7. MENU ITEMS
The main menu has the following items:
Operation Mode See point 8: ”Operation Mode”
Schedule See point 9: ”Weekly schedule”
Settings Adjust the settings
WiFi Adjust WiFi settings
Energy consumption Show energy consumption
Child Lock Activate lock
Info Thermostat information
Shut down Switch thermostat on/off
Tip: “Energy Consumption” shows consumption statistics over different
time periods. Press center button to reset statistics.
Tip: Select “Child Lock” and press center button three times to activate/
deactivate the lock.
°C
HOME 10:40
1
2 3
4 5
protective tube when used in concrete. Make sure there is no water
in the tube. Next, position the thermostat and fasten it onto the wall
mounting box using 2-4 screws. Open the frame retaining spring,
position the frame and close the spring. Then attach the front part,
making sure the connector between the front and bottom parts are
correctly placed. Press the front part until it snaps in place. The front part
may later be removed by pressing the ejector latch.
3. STARTUP
After connecting the power to the thermostat for the first time or after
performing a factory reset, the startup wizard will prompt the following
questions:
Language Set language
Set timezone Timezone compared to GMT
Daylight saving Daylight saving in use Y/N
Date & time Set current date & time
Thermostat use Heating or Cooling
Heating system Floor (Slow), Floor (Fast), Other (Fast)
Floor type Concrete or wooden
Floor Temp limit 5°C - 40°C (concrete) or 5°C - 27°C (wood)
Choice of sensor Room/Floor
Gradual Heating ON or OFF - used with new concrete floors
to limit temperature rise time. Only in floor
sensor mode.
Note: Wooden floors require a floor sensor to be connected, in order to
set the floor temperature limit to 27°C.
4. SYMBOLS
4.1 Operation mode
4.2 Heating/Cooling Active
4.3 Note
5. CONTROLS
Wooden floor has reached the maximum temperature of
27°C, thus heating is being limited.
Heating enabled Cooling
Cooling enabled
Home
Power regulation
Week schedule
Away
Anti-frost
°C
GRADUAL 10:40
Gradual heating
Gradual heating will raise the temperature slowly over the
course of 20 days. This is mainly user for new installations.
The thermostat is
8. OPERATION MODE
The thermostat has three main modes: Home, Away and Weekly schedule. The
additional modes are Anti-frost and Power regulation.
Home
Preset temperature while you are at home. The temperature
setting may be changed and automatically saved.
Away
Preset (reduced) temperature while you are away. The
temperature setting may be changed and automatically
saved. An external pilot signal will also change operation
mode between Home and Away.
Weekly schedule
The thermostat follows the settings in the Schedule
menu. Programming may also be done through the phone
app.
Anti-frost
This mode lowers the setpoint to 7 degrees. This may be
used e.g. in a summer cottage during winter time to prevent
frost damage.
Power regulation
Engineering mode which operates without feedback from
sensors. Relay conduction time is selected e.g.
20% relay is ON 20% and 80% OFF during the cycle
time. Cycle repeats automatically.
9. WEEKLY SCHEDULE
Create customized daily schedules to minimize energy consumption
and maximize comfort. The user can define up to five setpoints per
day. A setpoint gives a target set time and a target set temperature
for the thermostat to regulate automatically. You may view your daily
heating schedule in this menu. Setpoints may be added and removed
according to your preferences.
Tip: Create a daily schedule for a weekday according to your
preferences. Then use the copy/paste function to duplicate the given
day’s schedule to other weekdays.
10. HEATIT WIFI ZONES
All thermostats are added to zones. Zones can control multiple
thermostats at a time.
If there is only one thermostat in a zone, the zone settings will adhere
to changes made locally on the thermostat. If there are multiple
thermostats in a zone, the changes made locally on one thermostat
will make that thermostat enter custom settings mode. When in
custom settings mode the thermostat will not receive updates from
the zone. You can still control the thermostats individually in the app.
To make the thermostat adhere to the zone settings again, you will
have to set it back to zone settings in the app.
11. ADVANCED SETTINGS
WARNING: Advanced Settings is recommended only for expert
users. Consult your supplier or use with extreme caution!
Incorrect settings may damage your oor or heating system!
Advanced settings menu has the following items:
Heating setup Change heating or cooling
NTC sensor Change NTC type
Hysteresis Change temperature variation (not in
slow floor mode)
Calibration Fine tune temperature measuring
Temperature limits Set limits for room and floor
temperature
Pilot wire Change pilot wire setting
Adaptivity See description below!
Factory reset Perform full factory reset
Restart device Perform reboot
Adaptivity: The thermostat will automatically start/stop heating
proactively to reach the set temperature at the set time. If adaptivity
is switched off, the thermostat will start/stop heating at the set time
instead of operating proactively to reach the set temperature at the
set time.
12. WIFI SETTINGS
When the thermostat is not connected to the cloud, “Connect to
cloud” can be started from WiFi settings menu. The connection is
made using the phone application “Add themostat”. The thermostat
will show two 3 digit PIN codes that must be copied to the phone
application. The password for the selected WiFi network will be given
in the phone application. When the ”Add Thermostat” operation is
finalized, the thermostat will reboot.
After the thermostat is connected to the cloud, the WiFi settings
menu will offer the option to turn WiFi OFF/ON. Existing WiFi settings
will be used when turning WiFi back to ON.
To change the WiFi network or password please use the ”Connect to
cloud” menu along with the ”Reconfigure WiFi” menu in the phone
app.
To transfer the installation to the customer, go to
Profile> View profile>Change email address.
Customer cannot have registered a user already. Customer logs in
with own email and password set during account creation.
13. PHONE APPLICATIONS
App Store Play Store
CONNECT TO CLOUD
Cancel
006
569
Heatit WIFI
Produktspezifikationen
| Marke: | Heatit |
| Kategorie: | Thermostat |
| Modell: | WiFi |
Brauchst du Hilfe?
Wenn Sie Hilfe mit Heatit WiFi benötigen, stellen Sie unten eine Frage und andere Benutzer werden Ihnen antworten
Bedienungsanleitung Thermostat Heatit

24 September 2024
24 September 2024
5 September 2024
5 September 2024
5 September 2024
5 September 2024
22 Juli 2024
13 Januar 2024
18 November 2023
20 Juni 2023
Bedienungsanleitung Thermostat
- Thermostat Basetech
- Thermostat Hama
- Thermostat Nedis
- Thermostat SilverCrest
- Thermostat Panasonic
- Thermostat Brennenstuhl
- Thermostat Cotech
- Thermostat Profile
- Thermostat Bosch
- Thermostat AEG
- Thermostat Siemens
- Thermostat ATAG
- Thermostat Taurus
- Thermostat Velleman
- Thermostat Devolo
- Thermostat Schwaiger
- Thermostat Alecto
- Thermostat Conrad
- Thermostat EMOS
- Thermostat Gira
- Thermostat HomeMatic
- Thermostat Renkforce
- Thermostat Technoline
- Thermostat TFA
- Thermostat Schneider
- Thermostat Corberó
- Thermostat GE
- Thermostat King
- Thermostat Avidsen
- Thermostat Elro
- Thermostat Gigaset
- Thermostat Tesla
- Thermostat Max
- Thermostat Perel
- Thermostat Nexa
- Thermostat Vasco
- Thermostat Fenix
- Thermostat Westfalia
- Thermostat Vaillant
- Thermostat Honeywell
- Thermostat Remko
- Thermostat Junkers
- Thermostat RADEMACHER
- Thermostat AVM
- Thermostat ELV
- Thermostat TP-Link
- Thermostat Zehnder
- Thermostat Lux
- Thermostat De Dietrich
- Thermostat Netatmo
- Thermostat Theben
- Thermostat Tado
- Thermostat Remeha
- Thermostat Saunier Duval
- Thermostat Stiebel Eltron
- Thermostat Truma
- Thermostat Viessmann
- Thermostat Xavax
- Thermostat Hager
- Thermostat Dimplex
- Thermostat Buderus
- Thermostat Noma
- Thermostat JUNG
- Thermostat Boneco
- Thermostat Hunter
- Thermostat Baxi
- Thermostat Wolf
- Thermostat Nest
- Thermostat Magnum
- Thermostat HQ
- Thermostat Itho Daalderop
- Thermostat Carrier
- Thermostat Tylö
- Thermostat Busch-Jaeger
- Thermostat SPC
- Thermostat Gree
- Thermostat Sygonix
- Thermostat Orbis
- Thermostat Econo-heat
- Thermostat EQ-3
- Thermostat RWE
- Thermostat Eberle
- Thermostat BTicino
- Thermostat Bulex
- Thermostat Danfoss
- Thermostat Delta Dore
- Thermostat Fantini Cosmi
- Thermostat Grässlin
- Thermostat Heimeier
- Thermostat IMIT
- Thermostat Klafs
- Thermostat Oventrop
- Thermostat Salus
- Thermostat Seitron
- Thermostat EVE
- Thermostat Ariston Thermo
- Thermostat Elektrobock
- Thermostat Intertechno
- Thermostat Mikoterm
- Thermostat Ferroli
- Thermostat Carel
- Thermostat Daikin
- Thermostat Vemer
- Thermostat EnerGenie
- Thermostat Oregon Scientific
- Thermostat Finder
- Thermostat Homematic IP
- Thermostat Levoit
- Thermostat EQ3
- Thermostat Google
- Thermostat Somfy
- Thermostat Berker
- Thermostat Elgato
- Thermostat Elco
- Thermostat Devi
- Thermostat Drayton
- Thermostat Drayton Erie
- Thermostat Easy Timer
- Thermostat EasyTemp
- Thermostat Eliwell
- Thermostat Emerson
- Thermostat Emmeti
- Thermostat Enda
- Thermostat Eneco
- Thermostat Eqiva
- Thermostat Essent
- Thermostat Etherma
- Thermostat Eurotronic
- Thermostat Extraflame
- Thermostat Frico
- Thermostat Go Green
- Thermostat Helios (Amfra)
- Thermostat Hornbach
- Thermostat Hugo Muller
- Thermostat ICY
- Thermostat IR-V
- Thermostat Itho
- Thermostat Johnson Control
- Thermostat Landis Gyr
- Thermostat Levica
- Thermostat Lowes
- Thermostat Muller
- Thermostat Nefit
- Thermostat Niko
- Thermostat Nobo
- Thermostat OJ ELECTRONICS
- Thermostat Otio
- Thermostat Plieger
- Thermostat Plugwise
- Thermostat Radson
- Thermostat THERMAFLEX
- Thermostat Thermy
- Thermostat ACV
- Thermostat Hive
- Thermostat ThermoSmart
- Thermostat UPM
- Thermostat VDH
- Thermostat Wachendorff
- Thermostat Watts
- Thermostat Webasto
- Thermostat Weishaupt
- Thermostat Worcester-Bosch
- Thermostat Yokis
- Thermostat Z-Wave
- Thermostat Vimar
- Thermostat TrickleStar
- Thermostat Horstmann
- Thermostat Computherm
- Thermostat POER
- Thermostat H-Tronic
- Thermostat PECO
- Thermostat Chacon
- Thermostat Emko
- Thermostat Fibaro
- Thermostat Heatmiser
- Thermostat Crestron
- Thermostat ORNO
- Thermostat Optima
- Thermostat HomePilot
- Thermostat Krone
- Thermostat ChiliTec
- Thermostat Arnold Rak
- Thermostat Ouellet
- Thermostat Jumo
- Thermostat Wallair
- Thermostat Maico
- Thermostat Ecobee
- Thermostat Tellur
- Thermostat STI
- Thermostat Cepra
- Thermostat Tru Components
- Thermostat Qubino
- Thermostat Gewiss
- Thermostat Warmup
- Thermostat Sinustec
- Thermostat Rose LM
- Thermostat Agpo Ferroli
- Thermostat Amfra
- Thermostat Aube
- Thermostat AWB
- Thermostat Wattio
- Thermostat Brink
- Thermostat 2Heat
- Thermostat Bryant
- Thermostat Veria
- Thermostat Innogy
- Thermostat ELKO
- Thermostat MundoControl
- Thermostat Bearware
- Thermostat GENERAL Life
- Thermostat Oreg
Neueste Bedienungsanleitung für -Kategorien-

22 Dezember 2023
30 November 2024

16 Oktober 2024
7 Oktober 2024

5 Oktober 2024
5 Oktober 2024
5 Oktober 2024
5 Oktober 2024
4 Oktober 2024
3 Oktober 2024