Vicks Professional V940 Bedienungsanleitung
Vicks
Thermometer
Professional V940
Lesen Sie kostenlos die 📖 deutsche Bedienungsanleitung für Vicks Professional V940 (102 Seiten) in der Kategorie Thermometer. Dieser Bedienungsanleitung war für 26 Personen hilfreich und wurde von 2 Benutzern mit durchschnittlich 4.5 Sternen bewertet
Seite 1/102

INSTRUCTION MANUAL
PROFESSIONAL
THERMOMETER
Model V940
Questions or comments?
Call toll free at: 1-800-477-0457
consumerrelations@kaz.com
www.kaz.com
V940 OM.qxd 12/28/05 11:17 AM Page 1

QUICK START GUIDE
FIRST TIME USE:
Pull plastic strip from Battery Compartment. Discard.
Remove protective 98.6°F label from the LCD display. Discard.
2
6Press or replace
probe into holder Turns unit Off.
5Beep indicates
reading complete
4Race track indicates
thermometer in
measuring process.
3Place probe tip in location to take measurement ensuring
good contact. (see
Instructions For Use
for more detail)
Oral Underarm Rectal
2Press the Mode ( ) Button to change
measurement location. Unit is pre-set to
take an Oral temperature.
1Press or
pull out probe. Wait for display to indicate OK.
V940 OM.qxd 12/28/05 11:17 AM Page 2

TABLE OF CONTENTS
Quick Start Guide
2
Helpful Guidelines
4
Cautions
4
Introduction
5
Your Thermometer
6
Battery Replacement
7
Directions For Use
8
9
10
10
11
11
12
Operation Instructions
• Oral Method
• Axillary (underarm) Method
• Rectal Method
Changing Scale Between (°F) and (°C)
Memory Mode
Operation if Poor Contact
Display Messages
13
Care and Cleaning
14
Product Specifications
15
Lifetime Guarantee
16
3
V940 OM.qxd 12/28/05 11:17 AM Page 3

CAUTIONS
1. Temperature may only be taken by 3 methods: oral, underarm and rectal.
2. For hygienic purposes, Vicks recommends applying a probe cover for each
use. (Probe covers sold separately)
3. Do not use this thermometer near combustible agents.
4. Never use an abrasive cleanser.
5. DO NOT SUBMERGE IN WATER.
6. Store in a cool, dry place at room temperature that is not in direct sunlight.
HELPFUL GUIDELINES
Some helpful guidelines for best results when using the Vicks
Professional Thermometer:
Practice until you receive consistent readings
Call your doctor when your child has diarrhea, vomiting or changes in
appetite, lethargy (sluggishness) or is unusually sleepy.
It is important to know each individual’s “Normal” temperature when they are
well. This is the only way to accurately diagnose a fever. Take multiple
readings when healthy to determine “Normal” temperature. A child’s normal
temperature can be as high as 99.9°F.
4
V940 OM.qxd 12/28/05 11:17 AM Page 4

INTRODUCTION
Thank you for purchasing the Vicks Professional Thermometer. This thermometer
enables accurate temperature measurement in about 7 seconds in the oral,
rectal, or underarm modes when ambient temperature is between 50°F and
89.6°F (10°C and 32°C).
The Vicks Professional Thermometer is hospital tested and meets the American
Society for Testing and Materials (ASTM) accuracy requirement specified in
ASTM standard E1112 when used under normal operating conditions.
The Vicks Professional Thermometer is intended for intermittent measurements
of human body temperature in the home.
Please read this instruction manual completely before using your new
thermometer. If you have questions about the meaning of a specific temperature,
please talk with your physician.
5
V940 OM.qxd 12/28/05 11:17 AM Page 5

YOUR THERMOMETER
6
The Vicks Professional Thermometer includes the following components:
Vicks Professional Thermometer (Model V940)
2 AAA replaceable batteries (installed)
Instruction Manual
Removable probe cover holder + 5 disposable covers.
Probe
LCD Display Power
Button
Memory
Button
Mode
Button
Probe Tip
Removable Probe
Cover Storage Clip
(backside) Battery Cover
(bottom)
Cord Retainer
Probe
Holder
To fill the probe cover holder, slide covers into the slot on the back.
It is normal for the covers to stick out above the device.
V940 OM.qxd 12/28/05 11:17 AM Page 6

The Vicks Professional Thermometer is supplied with two AAA batteries. Replace
with new AAA batteries when the low battery symbol ( ) appears on the
display. Open the battery cover by sliding it to the right, revealing the battery
compartment. Replace the new batteries ensuring proper alignment as marked
inside the battery compartment. Replace the battery cover by placing the cover
back in place and sliding to the left.
BATTERY REPLACEMENT
Battery Cover
Batteries (– +/ )
7
V940 OM.qxd 12/28/05 11:17 AM Page 7

Vicks recommends that for 15 minutes prior to use, avoid eating or
drinking any liquids, exercising, taking showers or baths, or smoking.
Remain still and quiet during measurement.
Accuracy of reading depends on the proper placement of the thermometer.
Use a new probe cover before each use.
Thermometer is to be turned off before attempting to
repeat process.There should be one minute intervals
between taking temperature.
The thermometer will automatically shut off in one minute
after use.
Operation Instructions:
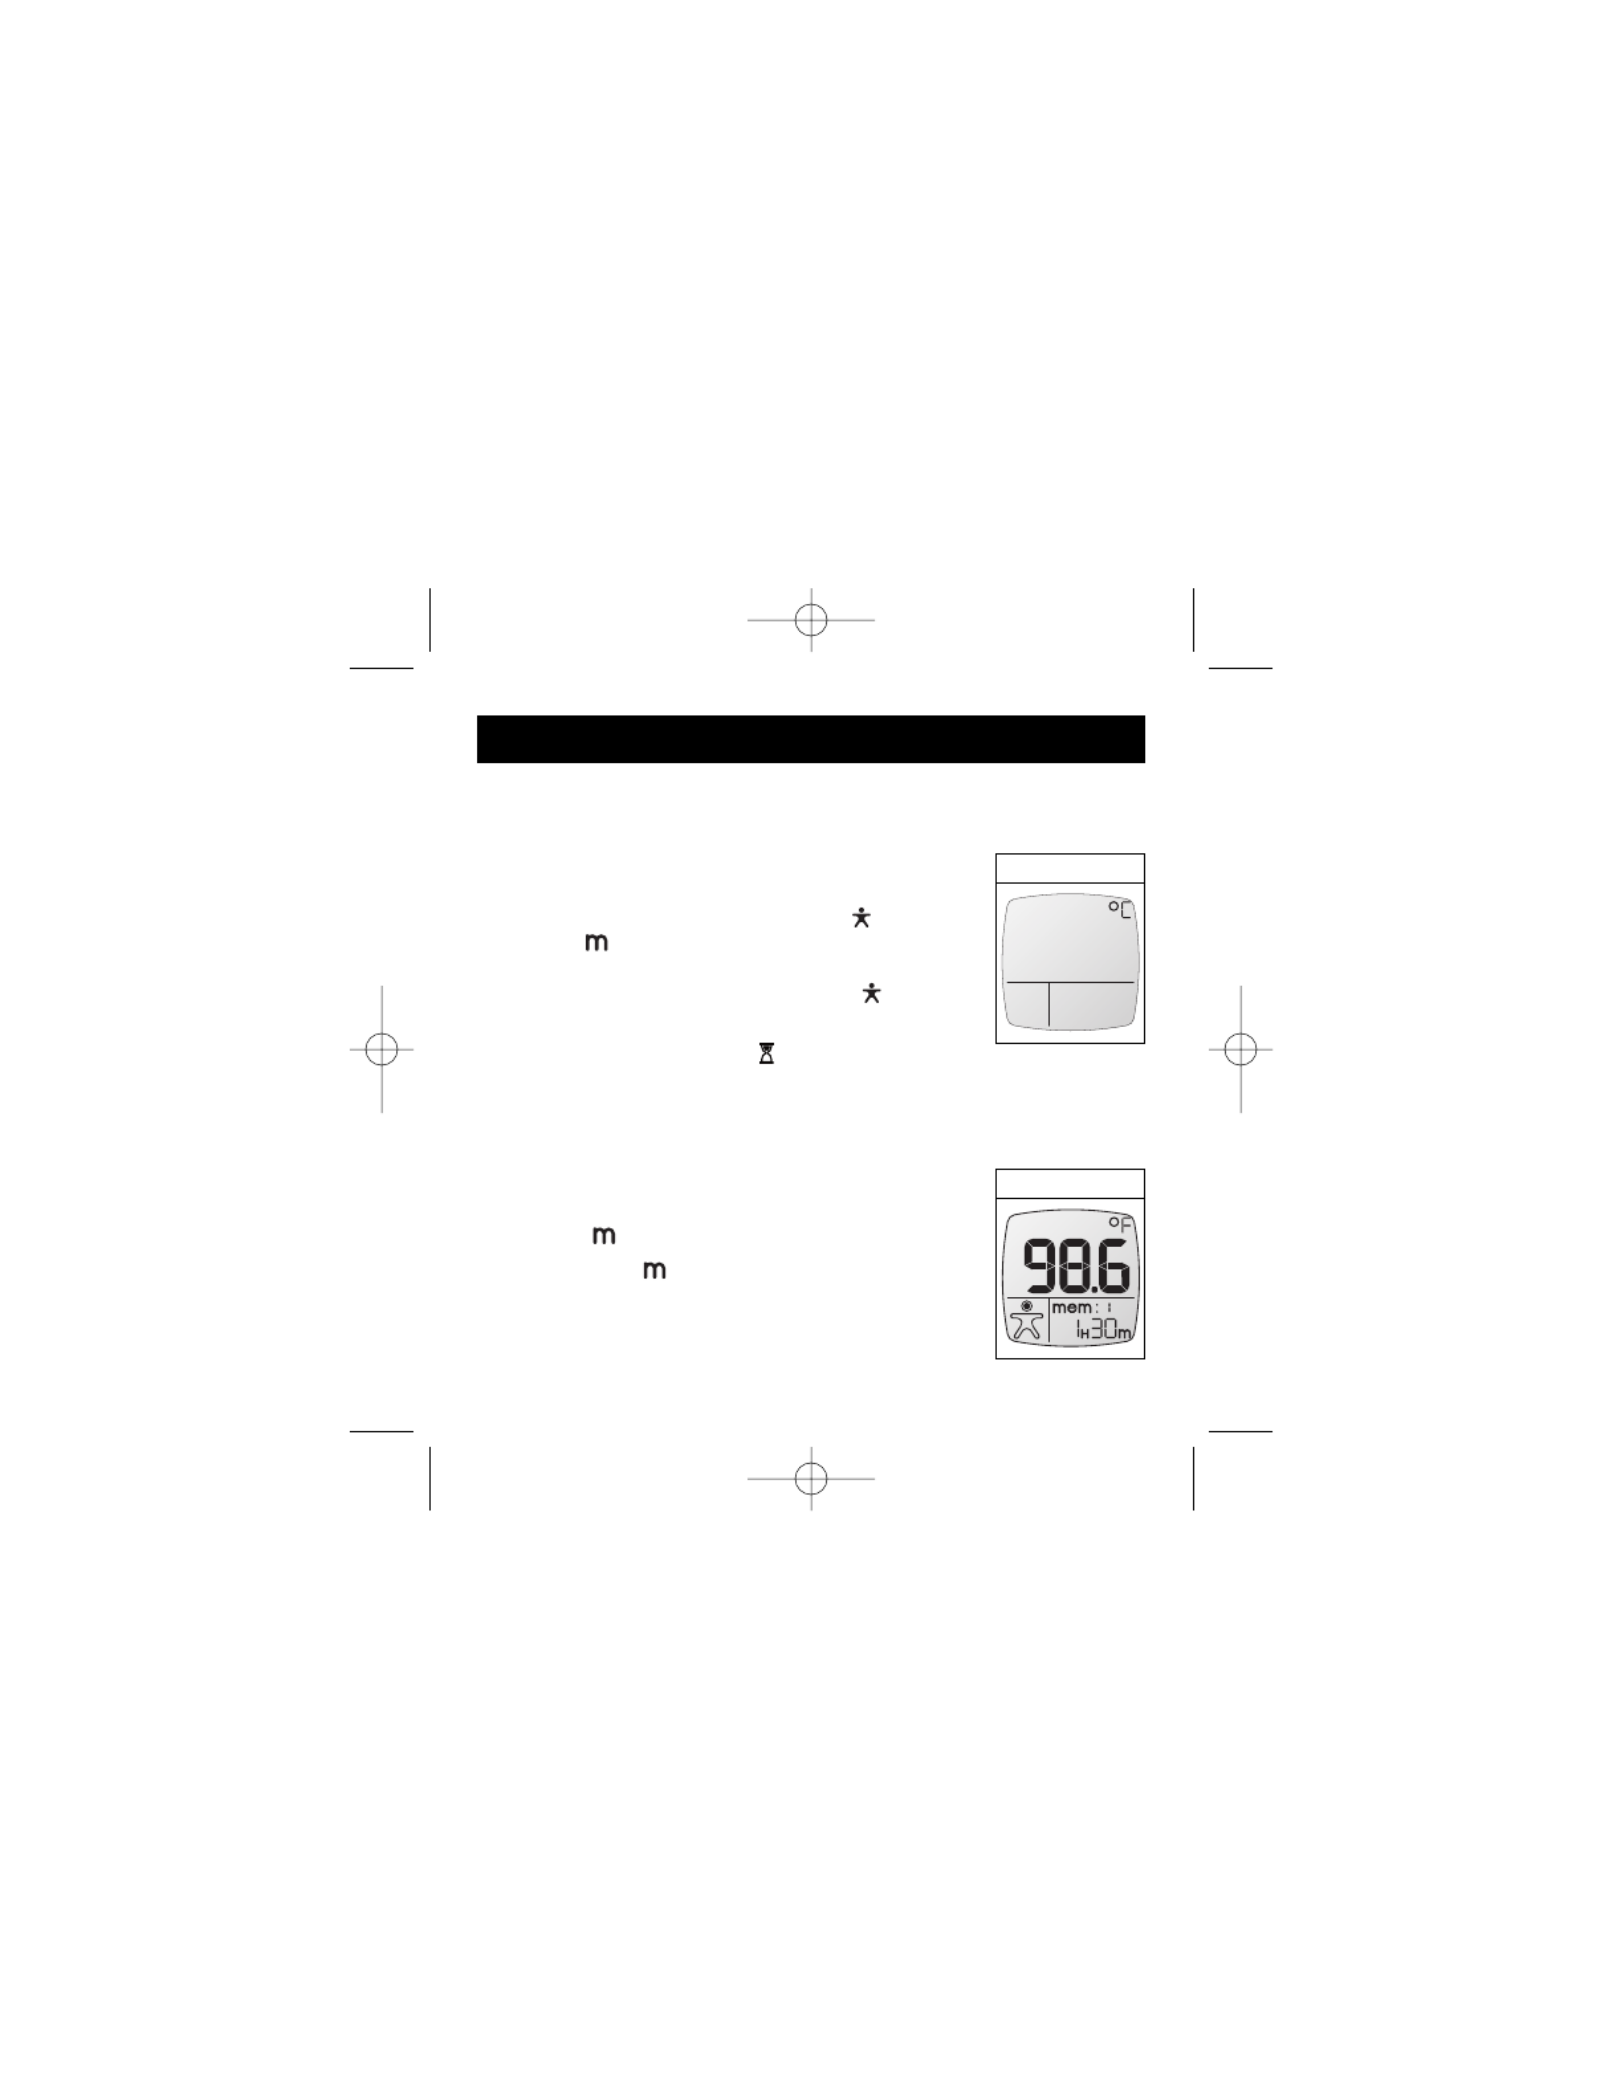
1. Either pull out the probe from its holder or press the Power
( ) button until you hear one beep. All symbols and
number segments will be displayed and the backlight will
come on (Fig. 1).
2. Place a new probe cover on the probe (recommended).
3. The result of the previous reading will be displayed for 2
seconds (Fig. 2) along with the backlight. The “hourglass”
symbol ( ) indicates that the thermometer is preparing
for use (2-3 seconds).
DIRECTIONS FOR USE
Fig. 1
Fig. 2
8
V940 OM.qxd 12/28/05 11:17 AM Page 8

DIRECTIONS FOR USE (cont’d)
4. Do not attempt to take temperature until the “OK” symbol
( ) and backlight disappear and two beeps are heard
(Fig. 3). This indicates that the thermometer is ready for
use.
5. To change the selected measurement method, simply
push the Mode ( ) button. The measurement method will
be indicated on the display as follows:
Oral Method:
Place the probe tip under the tongue deep in the
sublingual pocket (Fig. 4).
Gently press the probe downward with the tongue and
close mouth.
Oral Underarm Rectal
Fig. 4
Fig. 3
9
V940 OM.qxd 12/28/05 11:17 AM Page 9

Axillary (underarm) Method:
Wipe the underarm with a towel. Place the probe tip under
the arm so the tip is touching the skin and close the arm
overtop the thermometer (Fig. 5). Be sure no clothing
interferes with the contact.
Gently hold arm close to body to assure proper placement and accurate
function.
Rectal Method:
It is recommended to use a probe cover lubricated with water soluble jelly.
Gently slide the sensor tip of the thermometer no more than 1/2” (1.2 cm)
into the rectum. DO NOT USE IF ANY RESISTANCE IS NOTED.
6. A running circle on the display screen will appear indicating that
measurement is in progress (Fig. 6).
7. Temperature will be displayed after a long
beep is heard (approximately 6 seconds).
The backlight will come on after 2
seconds and remain on for 7 seconds.
8. Turn the unit off either by pressing the Power ( ) button or by replacing the
probe in the probe holder. In either case, be sure to clean the probe tip
before you put it in the probe holder.
DIRECTIONS FOR USE (cont’d)
Fig. 5
10
Fig. 6
V940 OM.qxd 12/28/05 11:17 AM Page 10
Changing Scale Between (°F) and (°C):
The Thermometer can display temperature in either Fahrenheit or Centigrade. To
change the scale, follow the instructions below:
1. Start with the thermometer turned off.
2. Simultaneously, press and hold the Mode ( ) and
Memory ( ) buttons for approximately 2 seconds.
Release buttons after the beep. The display will first show
the previously used scale. Press the Mode ( ) button to
switch to the alternate scale (Fig. 7).
3. When the “hourglass” symbol ( ) disappears, the
thermometer is ready to measure by the selected measurement scale.
NOTE: If thermometer is turned off before a measurement is taken after the
scale change, the scale will revert to the one last used.
Memory Mode:
When the unit is off, you can enter Memory Mode by pressing
the Memory ( ) button.
Press the Memory ( ) button again to recall up to 10 past
measurements (Fig. 8). The readout will indicate the
temperature, elapsed time since the reading and measuring
location.
DIRECTIONS FOR USE (cont’d)
Fig. 7
Fig. 8
11
V940 OM.qxd 12/28/05 11:17 AM Page 11

Memory Mode Continued:
The elapsed time will record for up 99 hours and 59 minutes. If there are
measurements in the history that are past this time, the time area of the screen
will have dashes (---).
If there is no action after 1 minute, the thermometer will automatically shut off.
Operation if Poor Contact:
If during measurement, there is irregular activity resulting
in poor contact with the measuring site,or if ambient
temperature is > 89.6°F, the unit will enter monitor mode.
The device will reflect this with a flashing site icon (Fig. 9).
In that case, please follow the instruction below.
1. Following the thermometer premeasurement preparation if
you see a temperature value on the display, instead of a
running circle, the thermometer is operating in the monitoring mode.
2. The “body site” icon ( ) and the “°F” or “°C” indicator will begin to blink
(Fig. 8) and a short beep will be heard every 10 seconds to indicate that the
measurement is in progress.
3. When a long beep is heard, the process is complete and the temperature will
be displayed in “°F” or “°C”.
NOTE: A measurement by the monitoring mode typically takes 30 seconds.
DIRECTIONS FOR USE (cont’d)
Fig. 9
12
V940 OM.qxd 12/28/05 11:17 AM Page 12

DISPLAY MESSAGES
The thermometer has been designed to display feedback messages to ensure
proper usage and accurate measurement. In the event of a malfunction or
incorrect measurement, the following messages will be displayed:
Cause
If the measured temperature is below
89.6°F (32.0°C) the display will indicate
“LO” (Fig. 10).
Cause
If the detected temperature is above
109.2°F (42.9°C) the display will indicate
"HI" (Fig. 11).
Cause
If there is a malfunction with the thermometer, the display
will show "Err" (Fig. 12). The unit will automatically power off
in 1 minute or you can turn the unit off by pushing the Power
( ) button. If Err message continues, please contact
Consumer Relations at 1-800-477-0457.
Fig. 10 Fig. 11
Fig. 12
13
V940 OM.qxd 12/28/05 11:17 AM Page 13

CARE AND CLEANING
Keep the thermometer clean and protected
Use a soft, dry cloth to clean the body of the thermometer.
Never clean the thermometer with an abrasive cleanser, thinner, benzene or
submerge the thermometer in water or other liquids.
Do not expose the thermometer to extreme temperature, humidity, direct
sunlight or shock. Store in a clean, dry place at room temperature.
NOTE: Do not submerge the thermometer in water or in other liquids...the
thermometer is water resistant but not waterproof.
Vicks recommends the use of probe covers for hygienic control.
Protect probe sensor after use by cleaning and placing it in the holder prior to
storing.
Use an alcohol swab or cotton swab moistened with 70% isopropyl alcohol to
clean the probe tip.
14
V940 OM.qxd 12/28/05 11:17 AM Page 14

PRODUCT SPECIFICATIONS
Read times average 7 seconds for all measuring sites based on human
clinical test results.
Power supply: 1.5V AAA size battery (Alkaline) x2.
10 memories with elapsed time in hours and minutes since the last reading.
°F/°C switchable
Mode selection from oral to underarm and rectal.
Can be powered on by pulling out the Probe from the Probe Holder or
pressing the Power key.
Auto power off in one minute of no use.
Low battery indication.
Self circuit detection.
LED backlight.
15
V940 OM.qxd 12/28/05 11:17 AM Page 15
Produktspezifikationen
| Marke: | Vicks |
| Kategorie: | Thermometer |
| Modell: | Professional V940 |
Brauchst du Hilfe?
Wenn Sie Hilfe mit Vicks Professional V940 benötigen, stellen Sie unten eine Frage und andere Benutzer werden Ihnen antworten
Bedienungsanleitung Thermometer Vicks

10 September 2024
7 August 2024
8 Juli 2024
8 Juli 2024
8 Juli 2024
8 Juli 2024
8 Juli 2024
30 März 2024
21 August 2023
Bedienungsanleitung Thermometer
- Thermometer Clatronic
- Thermometer Emerio
- Thermometer Tristar
- Thermometer Hama
- Thermometer Nedis
- Thermometer Philips
- Thermometer SilverCrest
- Thermometer Clas Ohlson
- Thermometer Cotech
- Thermometer Quigg
- Thermometer Voltcraft
- Thermometer Beper
- Thermometer Laserliner
- Thermometer AEG
- Thermometer Arendo
- Thermometer Kitchenware
- Thermometer Melissa
- Thermometer Tefal
- Thermometer Velleman
- Thermometer ADE
- Thermometer Alecto
- Thermometer Auriol
- Thermometer Beurer
- Thermometer Bresser
- Thermometer Cresta
- Thermometer Denver
- Thermometer EMOS
- Thermometer Eurochron
- Thermometer Irox
- Thermometer König
- Thermometer MarQuant
- Thermometer Medisana
- Thermometer Prologue
- Thermometer Techno Line
- Thermometer Technoline
- Thermometer Telefunken
- Thermometer TFA
- Thermometer Thomson
- Thermometer Trotec
- Thermometer Braun
- Thermometer Cuisinart
- Thermometer Inventum
- Thermometer Pyle
- Thermometer Bartscher
- Thermometer Respekta
- Thermometer Topcom
- Thermometer FlinQ
- Thermometer Motorola
- Thermometer Abus
- Thermometer Elro
- Thermometer Olympia
- Thermometer Livoo
- Thermometer Stanley
- Thermometer Perel
- Thermometer Geratherm
- Thermometer Kruidvat
- Thermometer Chicco
- Thermometer ProfiCare
- Thermometer Homedics
- Thermometer Lanaform
- Thermometer Citizen
- Thermometer Aponorm
- Thermometer Boso
- Thermometer Ecomed
- Thermometer Elta
- Thermometer Fysic
- Thermometer Laica
- Thermometer Levita
- Thermometer Microlife
- Thermometer Omron
- Thermometer Rossmax
- Thermometer Sanitas
- Thermometer Terraillon
- Thermometer Veroval
- Thermometer Sencor
- Thermometer Amprobe
- Thermometer Leifheit
- Thermometer Beaba
- Thermometer Dittmann
- Thermometer Domotherm
- Thermometer Hartig And Helling
- Thermometer IHealth
- Thermometer Miniland
- Thermometer Reer
- Thermometer Scala
- Thermometer Thermoval
- Thermometer Waeco
- Thermometer BabyOno
- Thermometer Luvion
- Thermometer Westfalia
- Thermometer Honeywell
- Thermometer Fora
- Thermometer Globaltronics
- Thermometer Summer
- Thermometer Hartmann
- Thermometer Weller
- Thermometer Silverline
- Thermometer Kerbl
- Thermometer Medel
- Thermometer Easypix
- Thermometer Zeiss
- Thermometer BeSafe
- Thermometer Safety 1st
- Thermometer Inkbird
- Thermometer Kyoritsu
- Thermometer Milwaukee
- Thermometer Testo
- Thermometer Omega
- Thermometer Esperanza
- Thermometer Innoliving
- Thermometer TrueLife
- Thermometer Salter
- Thermometer SereneLife
- Thermometer Gima
- Thermometer Testboy
- Thermometer Extech
- Thermometer Weber
- Thermometer Fluke
- Thermometer FLIR
- Thermometer Orbegozo
- Thermometer Vemer
- Thermometer La Crosse Technology
- Thermometer Oregon Scientific
- Thermometer Duronic
- Thermometer EasyLife
- Thermometer Eks
- Thermometer Elem6
- Thermometer Emga
- Thermometer Global Tronics
- Thermometer Guide
- Thermometer Joy-it
- Thermometer Jumper
- Thermometer Knikker
- Thermometer Kuchenprofi
- Thermometer La Crosse
- Thermometer MostEssential
- Thermometer Okoia
- Thermometer Pacom
- Thermometer Pasha
- Thermometer PCE Instruments
- Thermometer Premiumful
- Thermometer Radiant
- Thermometer Salva Tec
- Thermometer Save Demp
- Thermometer Sensitec
- Thermometer Silvergear
- Thermometer Taylor
- Thermometer TQC
- Thermometer Turbotech
- Thermometer Turbotronic
- Thermometer Uebe
- Thermometer Uni-T
- Thermometer VDH
- Thermometer WBTT
- Thermometer Welby
- Thermometer Welch Allyn
- Thermometer Mabis
- Thermometer TFA Dostmann
- Thermometer Owon
- Thermometer PeakTech
- Thermometer ZKTeco
- Thermometer Comark
- Thermometer Speco Technologies
- Thermometer AcuRite
- Thermometer InfiRay
- Thermometer Beha-Amprobe
- Thermometer Chauvin Arnoux
- Thermometer Arya
- Thermometer General
- Thermometer Pancontrol
- Thermometer Alter
- Thermometer Ebro
- Thermometer Etekcity
- Thermometer Greisinger
- Thermometer Mobi
- Thermometer Grado
- Thermometer Klein Tools
- Thermometer Delta Ohm
- Thermometer TensCare
- Thermometer A&D
- Thermometer ClimeMET
- Thermometer AvaTemp
- Thermometer AnD
- Thermometer ATN
- Thermometer Bioland
- Thermometer Blue Circle Medical
- Thermometer CDN
- Thermometer Telesystem
- Thermometer Bintoi
- Thermometer Innovo
- Thermometer Yummly
- Thermometer Aspen
- Thermometer Bearware
Neueste Bedienungsanleitung für -Kategorien-

3 Dezember 2024
1 Dezember 2024
16 Oktober 2024
16 Oktober 2024
15 Oktober 2024
13 Oktober 2024

11 Oktober 2024
9 Oktober 2024
9 Oktober 2024
7 Oktober 2024