TP-Link Festa FS308GP Bedienungsanleitung
Lesen Sie kostenlos die 📖 deutsche Bedienungsanleitung für TP-Link Festa FS308GP (4 Seiten) in der Kategorie Schalten. Dieser Bedienungsanleitung war für 26 Personen hilfreich und wurde von 2 Benutzern mit durchschnittlich 4.5 Sternen bewertet
Seite 1/4

Festa Smart Switch
LED Explanation
LED Explanation
PWR On/O: Power on/o
SYS
On (Green): Running at 1000 Mbps
On (Yellow): Running at 10/100 Mbps
Blinking: Transmitting/receiving data
O: No connected device
PoE Status
(For Port 1-4 of Festa FS308GP
/Port 1-8 of Festa FS310GP)
On: Providing PoE power
Blinking: Current-overload/Short-circuit/Connected to a
non-standard PD/Power exceeded the user-dened value
O: Not providing PoE Power
PoE Max
(For Festa FS308GP/
Festa FS310GP)
On: Remaining power supply ≤ 7 W
Blinking: Remaining power supply keeps ≤ 7 W for more than
2 minuites
O: Remaining power supply keeps > 7 W
Blinking: System running normally
On/O: System running abnormally
Speed
SFP1/SFP2
(For Festa FS310GP only)
Green/Yellow On: Running at 1000/100 Mbps
Blinking: Transmitting/receiving data
O: No connected device
For simplicity, we will take Festa FS310GP for example throughout the Guide. For simplicity, we will take Festa FS308G for example throughout the Guide.
Note:
1. The PoE ports can also connect to non-PoE devices, but only transmit data.
2. The PoE ports shall not be used to charge lithium batteries or devices supplied
by lithium batteries.
3. Maximum PoE power is 30 W for each PoE port, and total PoE budget is 62 W
(for Festa FS308GP) / 61 W (for Festa FS310GP) respectively.
4. PoE budget calculations are based on laboratory testing. Actual PoE power
budget is not guaranteed and will vary as a result of client limitations and
environmental factors.
Note:
1. Port 8 is a PD (Powered Device) port. When powered through port 8, the
switch can only be powered by power supplies that comply with the 802.3af/at
standard and Power Source Class 2 (PS2) or Limited Power Source (LPS)
defined in the standard of IEC 62368-1.
2. The DC power input takes precedence over the PD port. If the DC input fails,
the PoE input on the PD port willl supply power instead.
Connection for Non-PoE Switch
Connection for PoE Switch
DC Power dapterA
AC Power Cord
PoE+ Ports (1-8)
SFP Slots
Router
LAN Port WAN Port
Internet
IP Camera AP IP Phone
Powered Device (PD)
PC
PC
Router
LAN Port WAN Port
Internet
©2024 TP-Link
7106510914 REV1.0.0

Switch
Router
Festa Cloud
Clients
APAP AP AP
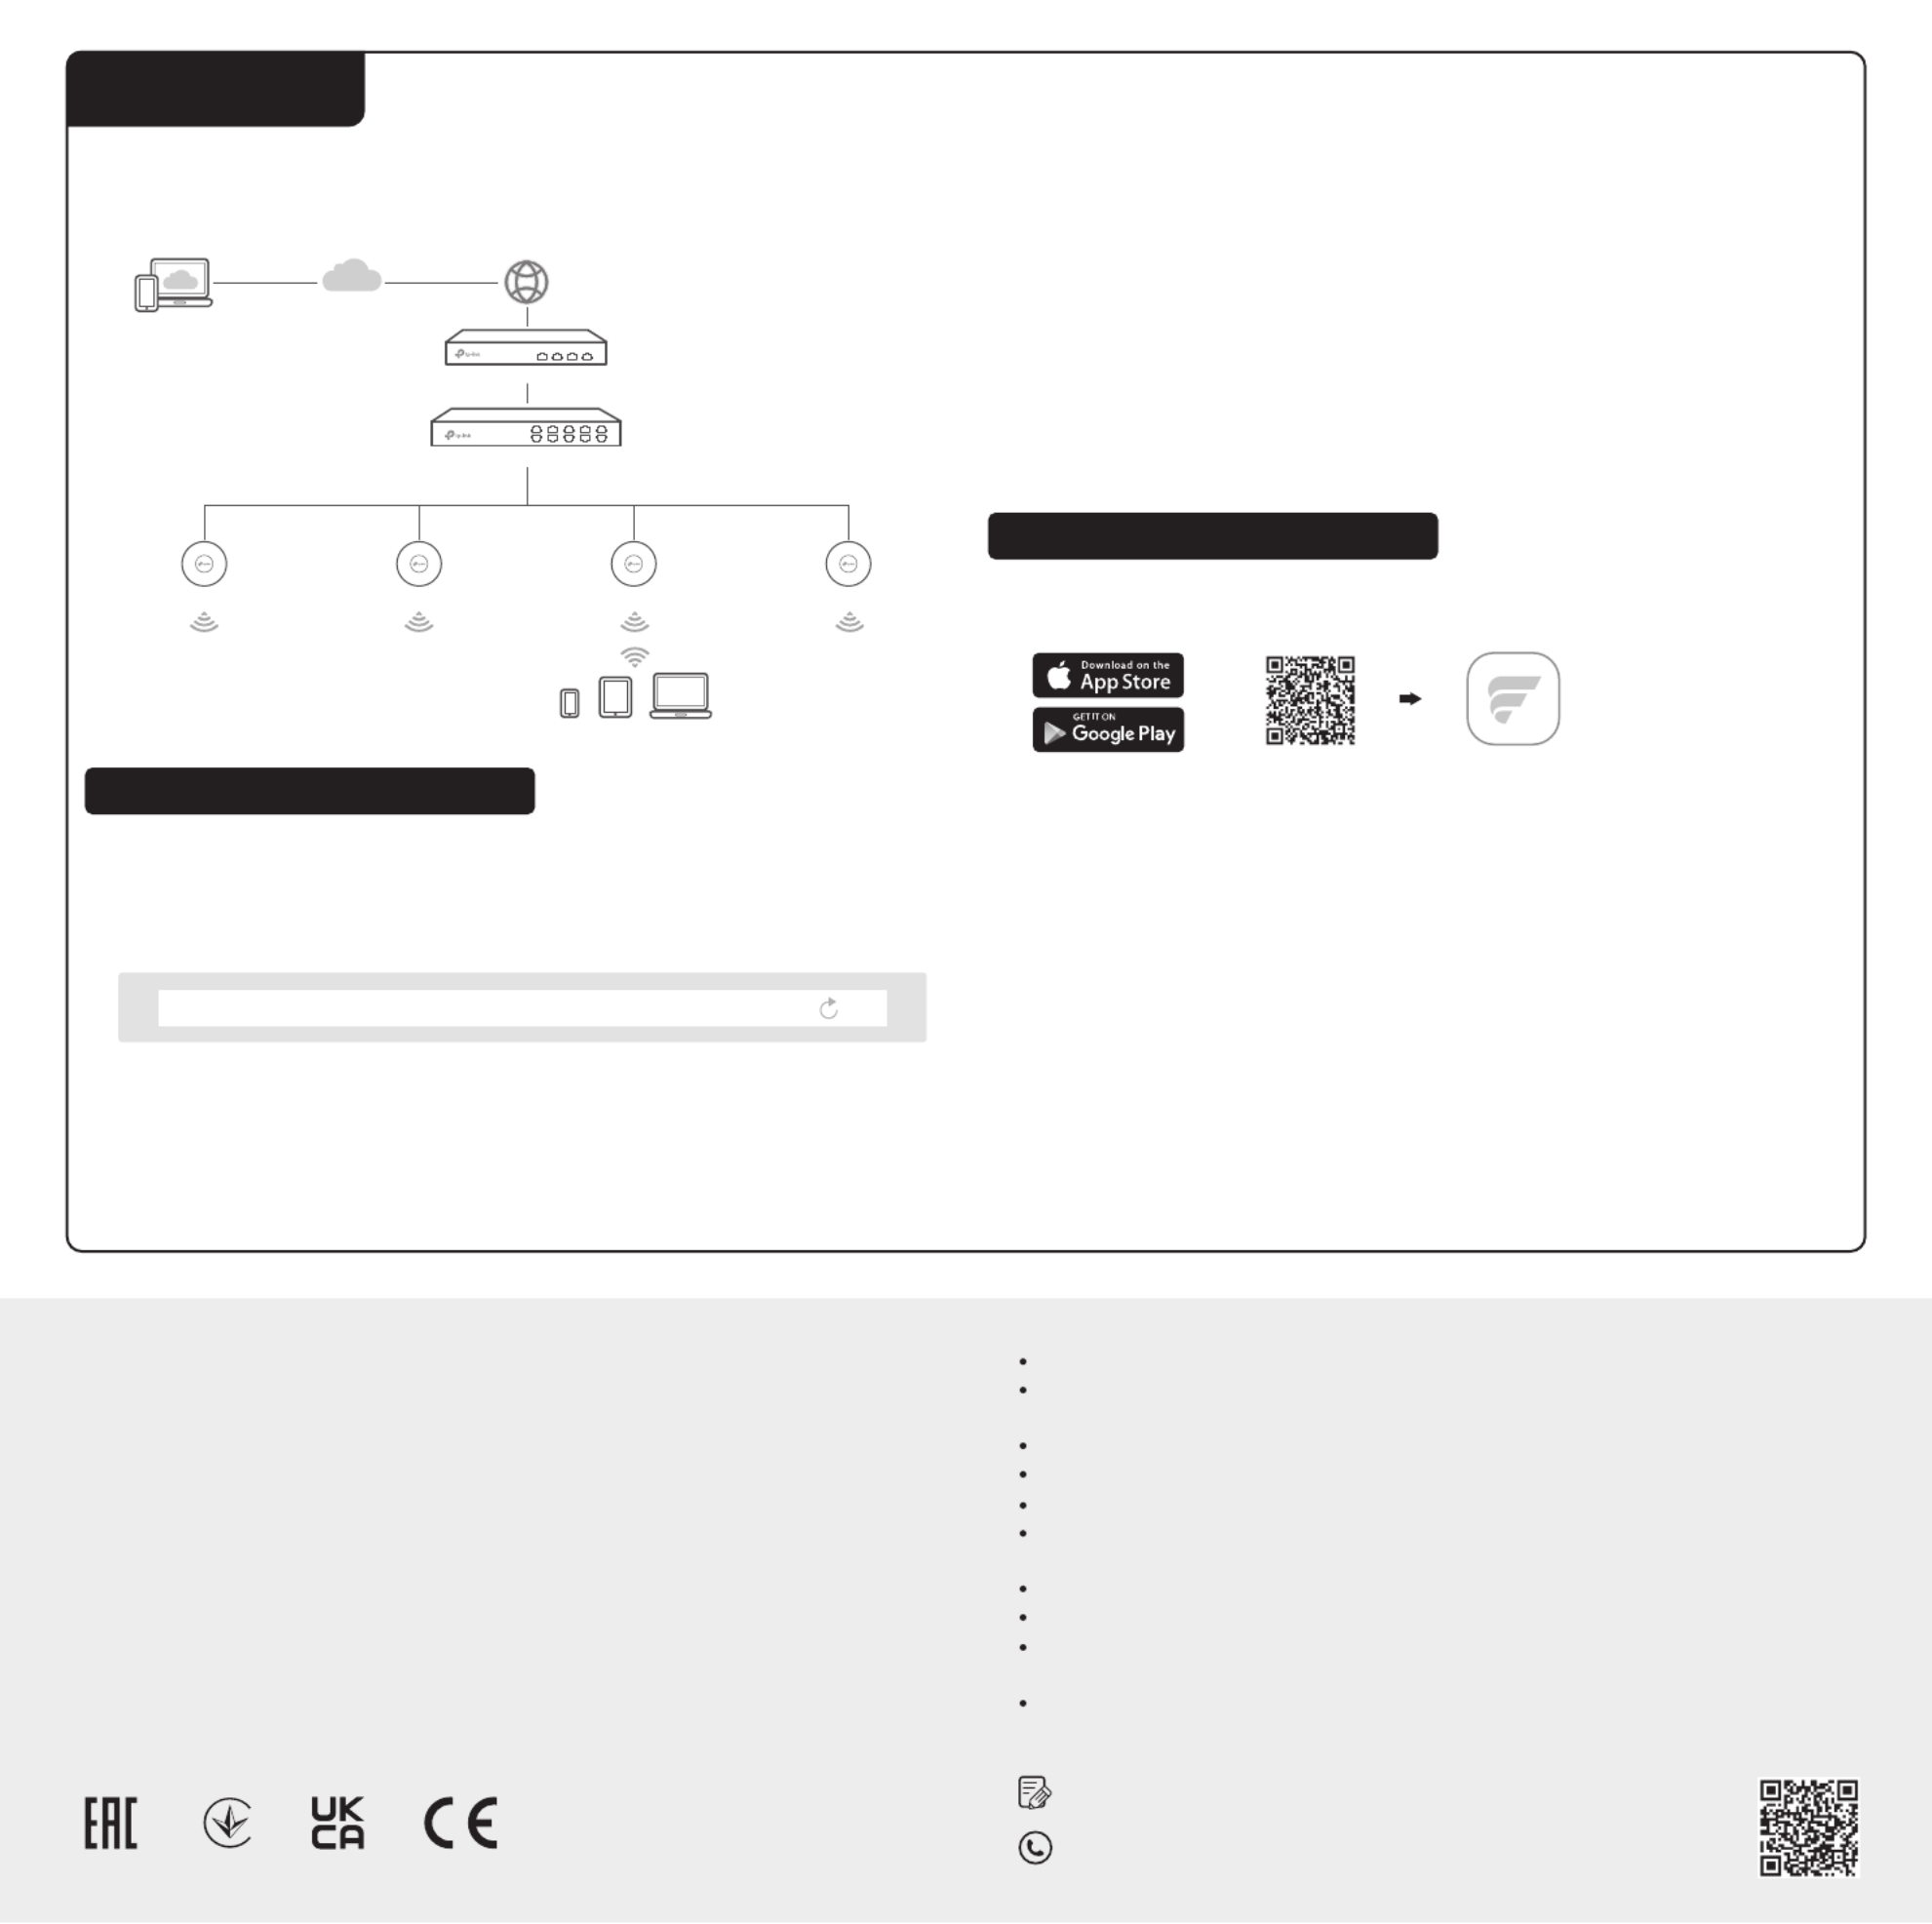
https://festa.tplinkcloud.com
1. Make sure that your devices can access the internet.
2. Launch a web browser and enter https://festa.tplinkcloud.com in the address
bar. Log in with your TP-Link ID.
3. + Add ControllerClick , then you will see you have successfully registered for a
Cloud-Based Controller and the controller has been added to the controller list.
Configuration
Some models featured in this guide may be unavailable in your country or region. For local
sales information, visit https://www.tp-link.com.
Safety Information
EU declaration of conformity
For technical support, the User Guide and other information, please visit
https://www.tp-link.com/support, or simply scan the QR code.
To ask questions, find answers, and communicate with TP-Link users or
engineers, please visit https://community.tp-link.com to join TP-Link Community.
UK declaration of conformity
TP-Link hereby declares that the device is in compliance with the essential requirements
and other relevant provisions of the Electromagnetic Compatibility Regulations 2016 and
Electrical Equipment (Safety) Regulations 2016.
The original UK declaration of conformity may be found at
https://www.tp-link.com/support/ukca/
TP-Link hereby declares that the device is in compliance with the essential requirements
and other relevant provisions of directives 2014/30/EU, 2014/35/EU, 2011/65/EU and
(EU)2015/863.
The original EU declaration of conformity may be found at
https://www.tp-link.com/en/support/ce/
Keep the device away from water, fire, humidity or hot environments.
Do not attempt to disassemble, repair, or modify the device. If you need service, please
contact us.
Do not use damaged charger or USB cable to charge the device.
Do not use any other chargers than those recommended.
Adapter shall be installed near the equipment and shall be easily accessible.
Plug the product into the wall outlets with earthing connection through the power supply
cord.
The working temperature for the device shall be within 0-40 ℃.
Place the device with its bottom surface downward.
The plug on the power supply cord is used as the disconnect device, the socket-outlet
shall be easily accessible. (Not for Festa FS308G)
The socket-outlet shall be installed near the equipment and shall be easily accessible. (Not
for Festa FS308G)
Option 1: Via a Web Browser
You can easily configure and manage Festa Smart Switches via the Festa
Cloud-Based Controller.
4. Set Up Now Config New SetupClick , click and follow the step-by-step
instructions to complete the configuration wizard of the controller.
5. On the controller’s management page, go to Devices + Add Devices, and click
and follow the step-by-step instructions to adopt your devices.
Now you can configure and manage your devices on the controller.
Note:
• Before you start, be sure to power up and connect your devices according to
the topology figure.
• A DHCP server (typically a router with DHCP function enabled) is required to
assign IP addresses to the devices and clients in your local network.
Option 2: Via Festa App
1. Download and install the Festa App from App Store or Google Play.
2. Launch the Festa App and log in with your TP-Link ID.
3. Tap + on the upper right corner, then you will see you have successfully
registered for a Cloud-Based Controller and the controller has been added to
the controller list.
4. Tap , tap Confirm Let’s Get Started and follow the step-by-step instructions to
complete the configuration wizard of the controller.
5. On the controller’s management page, go to Devices +, and click on the upper
right corner, and follow the step-by-step instructions to adopt your devices.
Now you can configure and manage your devices via the Festa App.
For detailed configurations, refer to the User Guide of the controller. The guide can be found on the download center of our official website: https://www.tp-link.com/support/download/.
Scan for Festa App Festa App
or
Produktspezifikationen
| Marke: | TP-Link |
| Kategorie: | Schalten |
| Modell: | Festa FS308GP |
Brauchst du Hilfe?
Wenn Sie Hilfe mit TP-Link Festa FS308GP benötigen, stellen Sie unten eine Frage und andere Benutzer werden Ihnen antworten
Bedienungsanleitung Schalten TP-Link

4 Oktober 2024
11 September 2024
11 September 2024
5 September 2024
4 September 2024
3 September 2024
3 September 2024
3 September 2024
3 September 2024
31 August 2024
Bedienungsanleitung Schalten
- Schalten Asus
- Schalten Belkin
- Schalten Hama
- Schalten HP
- Schalten LogiLink
- Schalten Manhattan
- Schalten Nedis
- Schalten Philips
- Schalten SilverCrest
- Schalten Panasonic
- Schalten Brennenstuhl
- Schalten Clas Ohlson
- Schalten Cotech
- Schalten Profile
- Schalten ZyXEL
- Schalten Bosch
- Schalten Yamaha
- Schalten Powerfix
- Schalten CSL
- Schalten Eminent
- Schalten Linksys
- Schalten Netgear
- Schalten König
- Schalten PCE
- Schalten Renkforce
- Schalten Trotec
- Schalten Schneider
- Schalten Rex
- Schalten Kaiser
- Schalten Vivanco
- Schalten Abus
- Schalten Elro
- Schalten Smartwares
- Schalten Tesla
- Schalten Perel
- Schalten Nexa
- Schalten Tork
- Schalten GEV
- Schalten Goobay
- Schalten Lindy
- Schalten Tripp Lite
- Schalten Ansmann
- Schalten Mercusys
- Schalten Marmitek
- Schalten Honeywell
- Schalten TRENDnet
- Schalten Kathrein
- Schalten Flamingo
- Schalten Alcatel
- Schalten Tiptel
- Schalten Black Box
- Schalten Alpine
- Schalten Techly
- Schalten Ebode
- Schalten Theben
- Schalten Vacmaster
- Schalten GAO
- Schalten Hager
- Schalten Behringer
- Schalten Omnitronic
- Schalten Monoprice
- Schalten Ecler
- Schalten Monacor
- Schalten Huawei
- Schalten JUNG
- Schalten Victron Energy
- Schalten Ei Electronics
- Schalten Edimax
- Schalten Totolink
- Schalten D-Link
- Schalten Sylvania
- Schalten Audiovox
- Schalten B-Tech
- Schalten QNAP
- Schalten SPC
- Schalten Speaka
- Schalten Digitus
- Schalten Sygonix
- Schalten DataVideo
- Schalten Lancom
- Schalten LevelOne
- Schalten Merten
- Schalten APC
- Schalten Eberle
- Schalten Cisco
- Schalten Delta Dore
- Schalten Grässlin
- Schalten Tenda
- Schalten CyberPower
- Schalten Boss
- Schalten IFM
- Schalten Intertechno
- Schalten Elation
- Schalten Ubiquiti Networks
- Schalten Kramer
- Schalten Aeon Labs
- Schalten Intellinet
- Schalten Eaton
- Schalten AV:link
- Schalten Hikvision
- Schalten Vemer
- Schalten PreSonus
- Schalten Planet
- Schalten EnGenius
- Schalten Finder
- Schalten Mikrotik
- Schalten Shimano
- Schalten Homematic IP
- Schalten Berker
- Schalten Dormakaba
- Schalten Emerson
- Schalten Generac
- Schalten Intermatic
- Schalten KlikaanKlikuit
- Schalten Mercury
- Schalten Paladin
- Schalten Provision ISR
- Schalten Robbe
- Schalten SEC24
- Schalten Steren
- Schalten Suevia
- Schalten AMX
- Schalten Triax
- Schalten WHALE
- Schalten Vimar
- Schalten Cudy
- Schalten Siig
- Schalten Electro Harmonix
- Schalten RGBlink
- Schalten Iogear
- Schalten StarTech.com
- Schalten Smart-AVI
- Schalten Dahua Technology
- Schalten PAC
- Schalten Gefen
- Schalten Avocent
- Schalten Legrand
- Schalten Atlantis Land
- Schalten CYP
- Schalten H-Tronic
- Schalten ATen
- Schalten Axing
- Schalten KanexPro
- Schalten SmartAVI
- Schalten Advantech
- Schalten Kraus & Naimer
- Schalten Chacon
- Schalten Juniper
- Schalten Fibaro
- Schalten Phoenix Contact
- Schalten Audac
- Schalten OSD Audio
- Schalten Wentronic
- Schalten SunBriteTV
- Schalten BZBGear
- Schalten Crestron
- Schalten Kemo
- Schalten ORNO
- Schalten Extron
- Schalten Atlona
- Schalten Equip
- Schalten Heitronic
- Schalten Hamlet
- Schalten STI
- Schalten Matrox
- Schalten Blustream
- Schalten Vivolink
- Schalten Mach Power
- Schalten Ernitec
- Schalten Cambium Networks
- Schalten ConnectPro
- Schalten Micro Connect
- Schalten Intelix
- Schalten ICasa
- Schalten Maclean Energy
- Schalten Cooking Performance Group
- Schalten Flic
- Schalten Liberty
- Schalten Noark
- Schalten 2USB
- Schalten KVM-TEC
- Schalten Setti+
- Schalten PureLink
Neueste Bedienungsanleitung für -Kategorien-

15 Oktober 2024
12 Oktober 2024
11 Oktober 2024
8 Oktober 2024
8 Oktober 2024
5 Oktober 2024
4 Oktober 2024
4 Oktober 2024
3 Oktober 2024
2 Oktober 2024