Mercury WF-E3 Bedienungsanleitung
Lesen Sie kostenlos die 📖 deutsche Bedienungsanleitung für Mercury WF-E3 (5 Seiten) in der Kategorie Schalter. Dieser Bedienungsanleitung war für 64 Personen hilfreich und wurde von 2 Benutzern mit durchschnittlich 4.5 Sternen bewertet
Seite 1/5
www.avsl.com 155UK User Manual 350.
3-Gang WiFi Smart Power Strip
with USB and Surge Protection
Order ref: 350.155UK
User Manual
Take smart control of your home devices with this easy to setup Mercury WiFi power strip. 3 smart sockets that can be
separately managed and 3 always-on USB ports with surge protection to shields sensitive electronics and appliances from
sudden power surges and spikes. Turn your devices on and off, check their status, create schedules and set timers from
anywhere using your smart phone or tablet and the installed Tuya application. Also use your voice to control any
connected device by pairing with Alexa, Google Assistant or Samsung Smart Things.
Specification:
Max. l oad
13A
USB output current
Single 5V 2.4A Max; Total 5V 4.5A Max
Connections
3x UK Mains, 2x USB Type-A, 1x USB Type-C
Wireless connection
2.4GHz
Cable length
1.5m
Power supply
230 240- V~/50Hz
Dimensions:
290 x 60 x 30mm
Weight:
615g
Features:
• 3 Smart sockets that can be individually controlled by smart phone application or Alexa, Google Home or Samsung
Smart Things
• 3 Always-on USB ports including a single 2.4A Type-C and 2x 1.0A USB Type-A
• Surge protection function with LED indicator that protects your devices from sudden spikes and power surges
• Timer function that schedules the smart sockets to automatically power connected devices on and off as needed
• Individual socket LED indicators
• Separate manual power button to turn all switches on or off
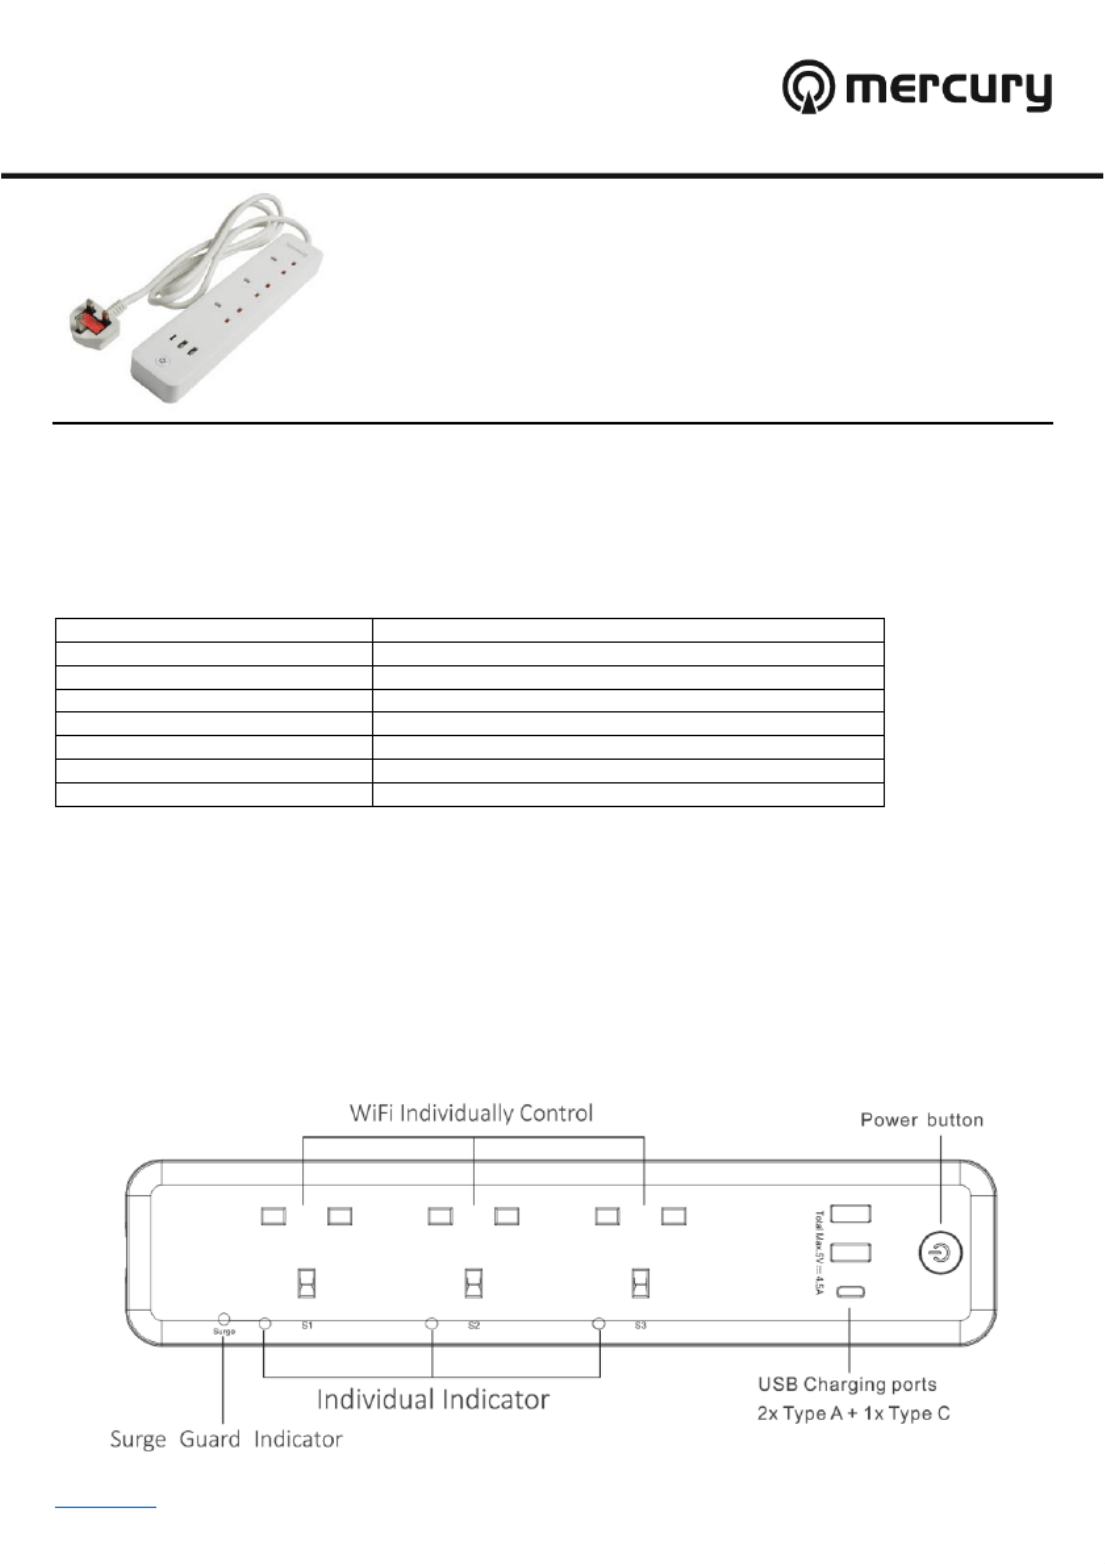
Product diagram:

www.avsl.com UK User Ma al 350.155 nu
Installation:
1. To take contro of your Mercury powe strip you first need to stall the free TuyaSmart application from your l r in
relevant smartphone service provider (i.e Apple App Store, Google Play Store etc). Once this is installed you will
need to follow the onscreen instructions to setup an account.
2. Plug in your Mercury power strip, enable Bluetooth on your smart device and with the TuyaSmart application
running press the power button on the unit for around 5 seconds until the LED indicator blinks rapidly.
3. Sometimes the app will auto-detect the power strip, if this is the case select Go to add and proceed to point 4 “ ”
( ). If you need to manually add the power strip, click on the blue cross in the top right-hand corner of the Fig.1
screen and select Power Strip (Wi-Fi) from the menu ( )“Fig.2
4. Confirm the -Fi your smart device is connected to and enter the ssword then click next. this power strip Wi pa Note:
is only compatible with 2.4Ghz signals and wont work on 5G networks.
5. Once the app has successfully loaded the settings for the power strip you can end the name by clicking on the am
pencil next to the heading at the top. You can also allocate the device to a default room by selecting from the
choices on the screen.
6. Once you have made you selections select done to complete the setup ( ) r F 3ig.
Controlling using the application:
1. Once setup is complete you will enter the main control screen for the power strip. From here its possible to control
all 3 sockets independently along with all 3 together ( ).Fig.4
2. Press on the large switch to control sockets 1- independently, after selection the switch surround on the screen es 3
will be illuminated you will ar the switch click on and off a the blue LED on the unit will illuminate., he nd
3. You may also press the smaller Master switch at the top to turn on and off all 3 sockets simultaneously.
4. On the right of each socket is a small pencil symbol which when selected enables the socket names to be
amended.
5. The small clock symbol that sits underneath each socket name, enables entry to the timer functions for the
switches. There are 4 different timer functions in this section namely Countdown, Schedule, Circulate and
Random. Each one of these functions provides different options for each individual socket as indicated in the
sections below.
6. There is also a Relay St us setting at the top which can be set to either on or off. This setting determines the at
status of the power strip after a loss of power or power surge causing shutdown. The default setting is which off
means after any loss of power to the unit it will remain switched off even after power has been restored and will
need resetting accordingly.
Fig.1
Fig.2
Fig.3

www.avsl.com 155UK User Manual 350.
7. Countdown: The sockets can be set to turn on or off after a scheduled length of countdown time. This time will
begin immediately after setting and enabling the function (Fig.5).
8. Schedule: The sockets can be set to turn on or off on any individual day or block days. These set times can be of
switched on and off individually when needed using the slide switch icon next to each time schedule ( ).Fig.6
Fig.4
Fig.5
Fig.6
Produktspezifikationen
| Marke: | Mercury |
| Kategorie: | Schalter |
| Modell: | WF-E3 |
Brauchst du Hilfe?
Wenn Sie Hilfe mit Mercury WF-E3 benötigen, stellen Sie unten eine Frage und andere Benutzer werden Ihnen antworten
Bedienungsanleitung Schalter Mercury

22 Februar 2024
24 Januar 2024
20 Dezember 2023
19 Dezember 2023
Bedienungsanleitung Schalter
- Schalter Asus
- Schalter Basetech
- Schalter Belkin
- Schalter Hama
- Schalter HP
- Schalter Manhattan
- Schalter Nedis
- Schalter SilverCrest
- Schalter Brennenstuhl
- Schalter Cotech
- Schalter Profile
- Schalter Quigg
- Schalter ZyXEL
- Schalter Bosch
- Schalter Buffalo
- Schalter TechniSat
- Schalter Yamaha
- Schalter Velleman
- Schalter Powerfix
- Schalter Linksys
- Schalter Netgear
- Schalter Schwaiger
- Schalter Alecto
- Schalter EMOS
- Schalter Gira
- Schalter Renkforce
- Schalter Trotec
- Schalter Schneider
- Schalter Worx
- Schalter Pyle
- Schalter Kaiser
- Schalter Jabra
- Schalter One For All
- Schalter Sennheiser
- Schalter Abus
- Schalter Elro
- Schalter Perel
- Schalter Wago
- Schalter Nexa
- Schalter Tork
- Schalter GEV
- Schalter Goobay
- Schalter Lindy
- Schalter Tripp Lite
- Schalter Ansmann
- Schalter Marmitek
- Schalter Honeywell
- Schalter TRENDnet
- Schalter Globaltronics
- Schalter TP-Link
- Schalter Kathrein
- Schalter Flamingo
- Schalter Black Box
- Schalter Techly
- Schalter Theben
- Schalter GAO
- Schalter Kopp
- Schalter Hager
- Schalter Monoprice
- Schalter Monacor
- Schalter Toolcraft
- Schalter Chamberlain
- Schalter Huawei
- Schalter JUNG
- Schalter Ei Electronics
- Schalter Edimax
- Schalter Totolink
- Schalter D-Link
- Schalter QNAP
- Schalter Digitus
- Schalter DataVideo
- Schalter Lancom
- Schalter LevelOne
- Schalter APC
- Schalter Grandstream
- Schalter Grässlin
- Schalter EVE
- Schalter Comet
- Schalter Elektrobock
- Schalter Tenda
- Schalter CyberPower
- Schalter IFM
- Schalter Intertechno
- Schalter Ubiquiti Networks
- Schalter Unify
- Schalter Kramer
- Schalter Intellinet
- Schalter AV:link
- Schalter Hikvision
- Schalter Vemer
- Schalter Planet
- Schalter EnGenius
- Schalter Finder
- Schalter Mikrotik
- Schalter Shimano
- Schalter Homematic IP
- Schalter Heidemann
- Schalter Berker
- Schalter Emerson
- Schalter Intermatic
- Schalter Inverto
- Schalter Merlin Gerin
- Schalter Paladin
- Schalter Suevia
- Schalter AMX
- Schalter Triax
- Schalter Ubiquiti
- Schalter UPM
- Schalter Adder
- Schalter Vimar
- Schalter Siig
- Schalter Iogear
- Schalter StarTech.com
- Schalter Smart-AVI
- Schalter Shelly
- Schalter Dahua Technology
- Schalter PAC
- Schalter Gefen
- Schalter Avocent
- Schalter Russound
- Schalter Legrand
- Schalter Eltako
- Schalter CYP
- Schalter H-Tronic
- Schalter ATen
- Schalter Noble
- Schalter SmartAVI
- Schalter Rule
- Schalter Kraus & Naimer
- Schalter Chacon
- Schalter Phoenix Contact
- Schalter OSD Audio
- Schalter BZBGear
- Schalter Crestron
- Schalter ORNO
- Schalter Atlona
- Schalter Krone
- Schalter Lightware
- Schalter Roline
- Schalter Wallair
- Schalter Adviti
- Schalter MFA
- Schalter Matrox
- Schalter Blustream
- Schalter Vivolink
- Schalter IB Connect
- Schalter Ernitec
- Schalter Raritan
- Schalter Seuthe
- Schalter Gigahertz Solutions
- Schalter ConnectPro
- Schalter SEADA
- Schalter IPGARD
- Schalter Doepke
- Schalter Micro Connect
- Schalter Epiphan
- Schalter Baco
- Schalter Pizzato Elettrica
- Schalter Upvel
Neueste Bedienungsanleitung für -Kategorien-
3 Dezember 2024
2 Dezember 2024
2 Dezember 2024
2 Dezember 2024
2 Dezember 2024
2 Dezember 2024
2 Dezember 2024
2 Dezember 2024
2 Dezember 2024
2 Dezember 2024