La Crosse Technology WS-7091 Bedienungsanleitung
La Crosse Technology
Wetterstation
WS-7091
Lesen Sie kostenlos die 📖 deutsche Bedienungsanleitung für La Crosse Technology WS-7091 (6 Seiten) in der Kategorie Wetterstation. Dieser Bedienungsanleitung war für 33 Personen hilfreich und wurde von 2 Benutzern mit durchschnittlich 4.5 Sternen bewertet
Seite 1/6
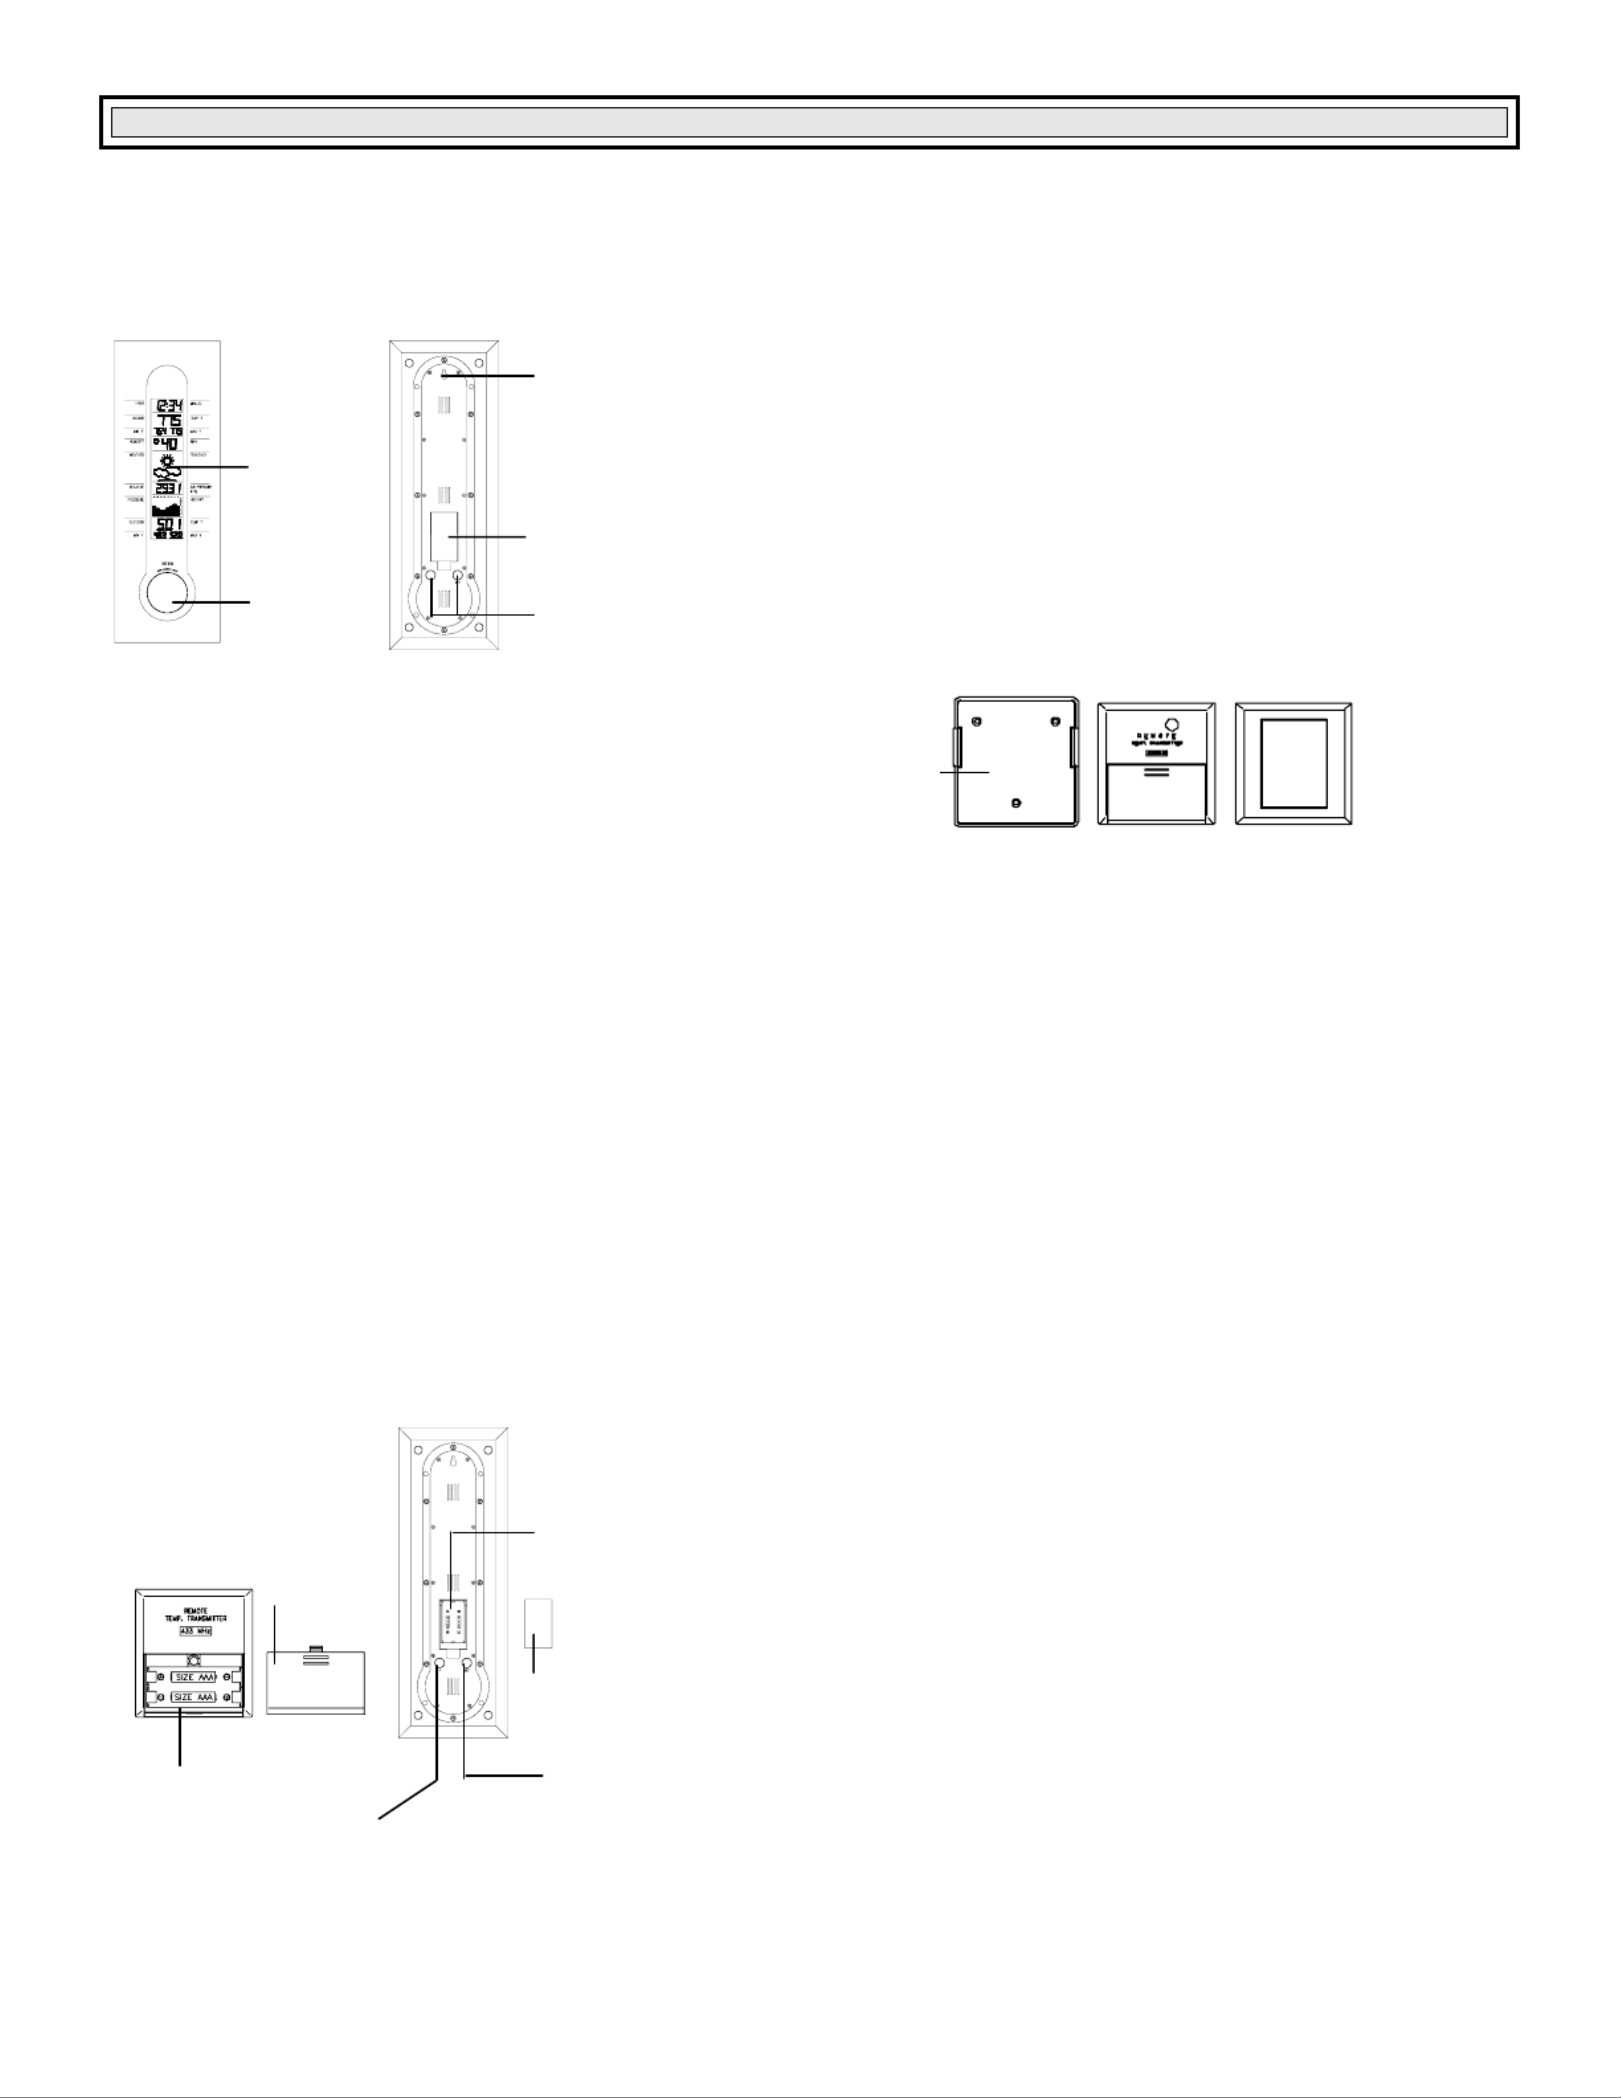
Hanging Hole
Battery
compartment
LCD
Display
Wireless Weather Station
Instruction Manual
Congratulations on purchasing this state-of-the-art Weather Station as an example of fine design and quality piece of engineering. The operation of this product is simple and
straightforward. By reading this instruction manual, users will receive a better understanding of the Weather Station together with the optimum benefit of all its features.
The Weather Station
The Temperature Transmitter
Features of the Weather Station
• 4 digits LCD time display
• Current indoor temperature display in degree Fahrenheit
• Simultaneous minimum and maximum indoor temperature recordings
• Current relative humidity display with “☺ “ Smilling or “ “ Sad face for comfort level
reading.
• 3 weather icons for weather forecasting
• Weather tendency indicator
• Relative air pressure inHg with adjustable reading ranges
• Air pressure history for the past 72 hours (electronic barometer with barometric pressure and trend)
• Current outdoor temperature display in degree Fahrenheit
• Simultaneous minimum and maximum outdoor temperature recordings.
• LCD contrast changeable to 8 different tones
• Low battery indicator
• Wall mounting
Features of the Temperature Transmitter:
• Remotely transmits outdoor temperature at 433MHz to the Weather Station
• With wall mounting holder
Getting Started
Please follow these steps to ensure that your new Weather Station and Temperature Transmitterwork correctly together:
Remove all pieces from the packaging and place onto a table in front of you.
Check that you have complete:
1. Weather Station
2. 433MHz temperature transmitter
3. Sealed pack with 3 screws and double-sided tape for wall mounting the transmitter
Setting up
1. Slide open the battery cover of the transmiter as indicated above.
2. Checking the correct polarization, insert the 2 x AAA, IEC LR3, 1.5V batteries into the battery compartment.
3. Replace the cover while ensuring the batteries do not spring free from the contacts as this may cause transmission start up problems.
4. Within 2 minutes of step 3, checking the correct polarization, insert 2 x AA, IEC LR6, 1.5V battery into the battery
Function keys
RESET
key
Holder
Battery compartment SET Key
+ key
Battery
compartment
Battery
cover
Battery
cover

compartment.
5. Replace the front cover while ensuring that the batteries do not spring free from the contacts as this may cause transmission start up problems (should this happen see
Resetting below)
6. Your Weather Station is now operational.
Note: For securing the product into place, please see “Positioning the Temperature Transmitter“ and “Positioning the Weather Station“ below.
When setting up, always remember to insert the batteries into the transmitter first as this will start the 433MHz transmission signal for the Weather Station to pick when it is
actived (always ensure batteries being used are new and of correct sizes).
Setting up
Going into Setting up, the display will run through the following sequence modes:
• LCD contrast
• Time setting unit (hour followed by minutes)
• Relative air pressure setting
• Weather sensitivity setting
LCD contrast setting
There are 8 different LCD contrast tones to suit the hanging level of the Weather Sation (default at Level 5). Simply hang the Weather station in the desired place and adjust
the contrast level so that the LCD digits are sharp and clear from that particular level.
1. Flip open the front cover of the Weather Station from the slot at the base of the unit and then press and hold the “SET“ key until the “LCD5“ start flashing.
2. Press the “+“ key to select and go through each of the 8 different contrast tones
3. Once the desired contrast tone is selected, press the “SET“ key once to move to the time setting mode.
Time setting mode
The hour digits will now start flashing.
1. Using the “+“ key, sety the required time in hours. Each press will increase the digits by one.
2. Once the hours are selected, press the “SET“ key to move into the minutes mode.
3. Press the “+“ key to set the required time in minutes. Each press will increase the digits by one.
4. When the time has been set, press the “SET“ key. The LCD will now enter the Relative Air pressure inHg setting mode.
Relative air pressure (inHg) setting
Following from the manual setting mode, the Relative air pressure inHg on the LCD will start flashing. The air pressure inHg range can be set between 28.60 to 30.45 inHg as
follow:
1. Press the “+“ key to change the Relative air pressure setting. Each press or holding the key down will increase the digits by 0.01inHg.
2. When the desired Relative air pressure is set, press the “SET“ key. The LCD will now enter the Weather sensitivity setting mode.
Note:
The inHg feature is beneficial for user living at various altitudes who want for example, to set readings base at sea level and not from their current surrounding area.
Weather sensitivity setting
Following from the Relative air pressure setting, the Weather sensitivity setting will start flashing in the Relative air pressure inHg section. The Weather sensitivity can be set
between the range of
2-4 hPa as follows:
1. Press the “+“ key to select the hPa. Each press or holding the key down will increase the digit by one hPa.
2. When the desired hPa is selected, press the “SET“ key to return to the normal mode.
3. Now hang the Weather Station into place.
Your Weather Station is now fully set. Please read “Positioning the temperature transmitter“ and “Weather Station“ below.
Note: The hPa setting feature can be used in area where there may be constant changes in air pressure which do not necessarily reflect the changes in the weather. In such
areas for example, the hPa might be set to every 3hPa (millibars) meaning that there will be no change of weather icons if the air pressure does not drop or increase by at
least 3hPa. For areas where the weather is stagnant, the hPa can be set lower.
Hour setting
(flashing)
Minutes setting
(flashing)
Relative air pressure
(flashing)
1.
After inserting the batteries, all the segments on the LCD will light up briefly before displaying the time and all the other modes.
Note:
Please check that the outdoor temperature is received on the LCD. Should the signal not be received, then see Checking for 433MHz reception below.
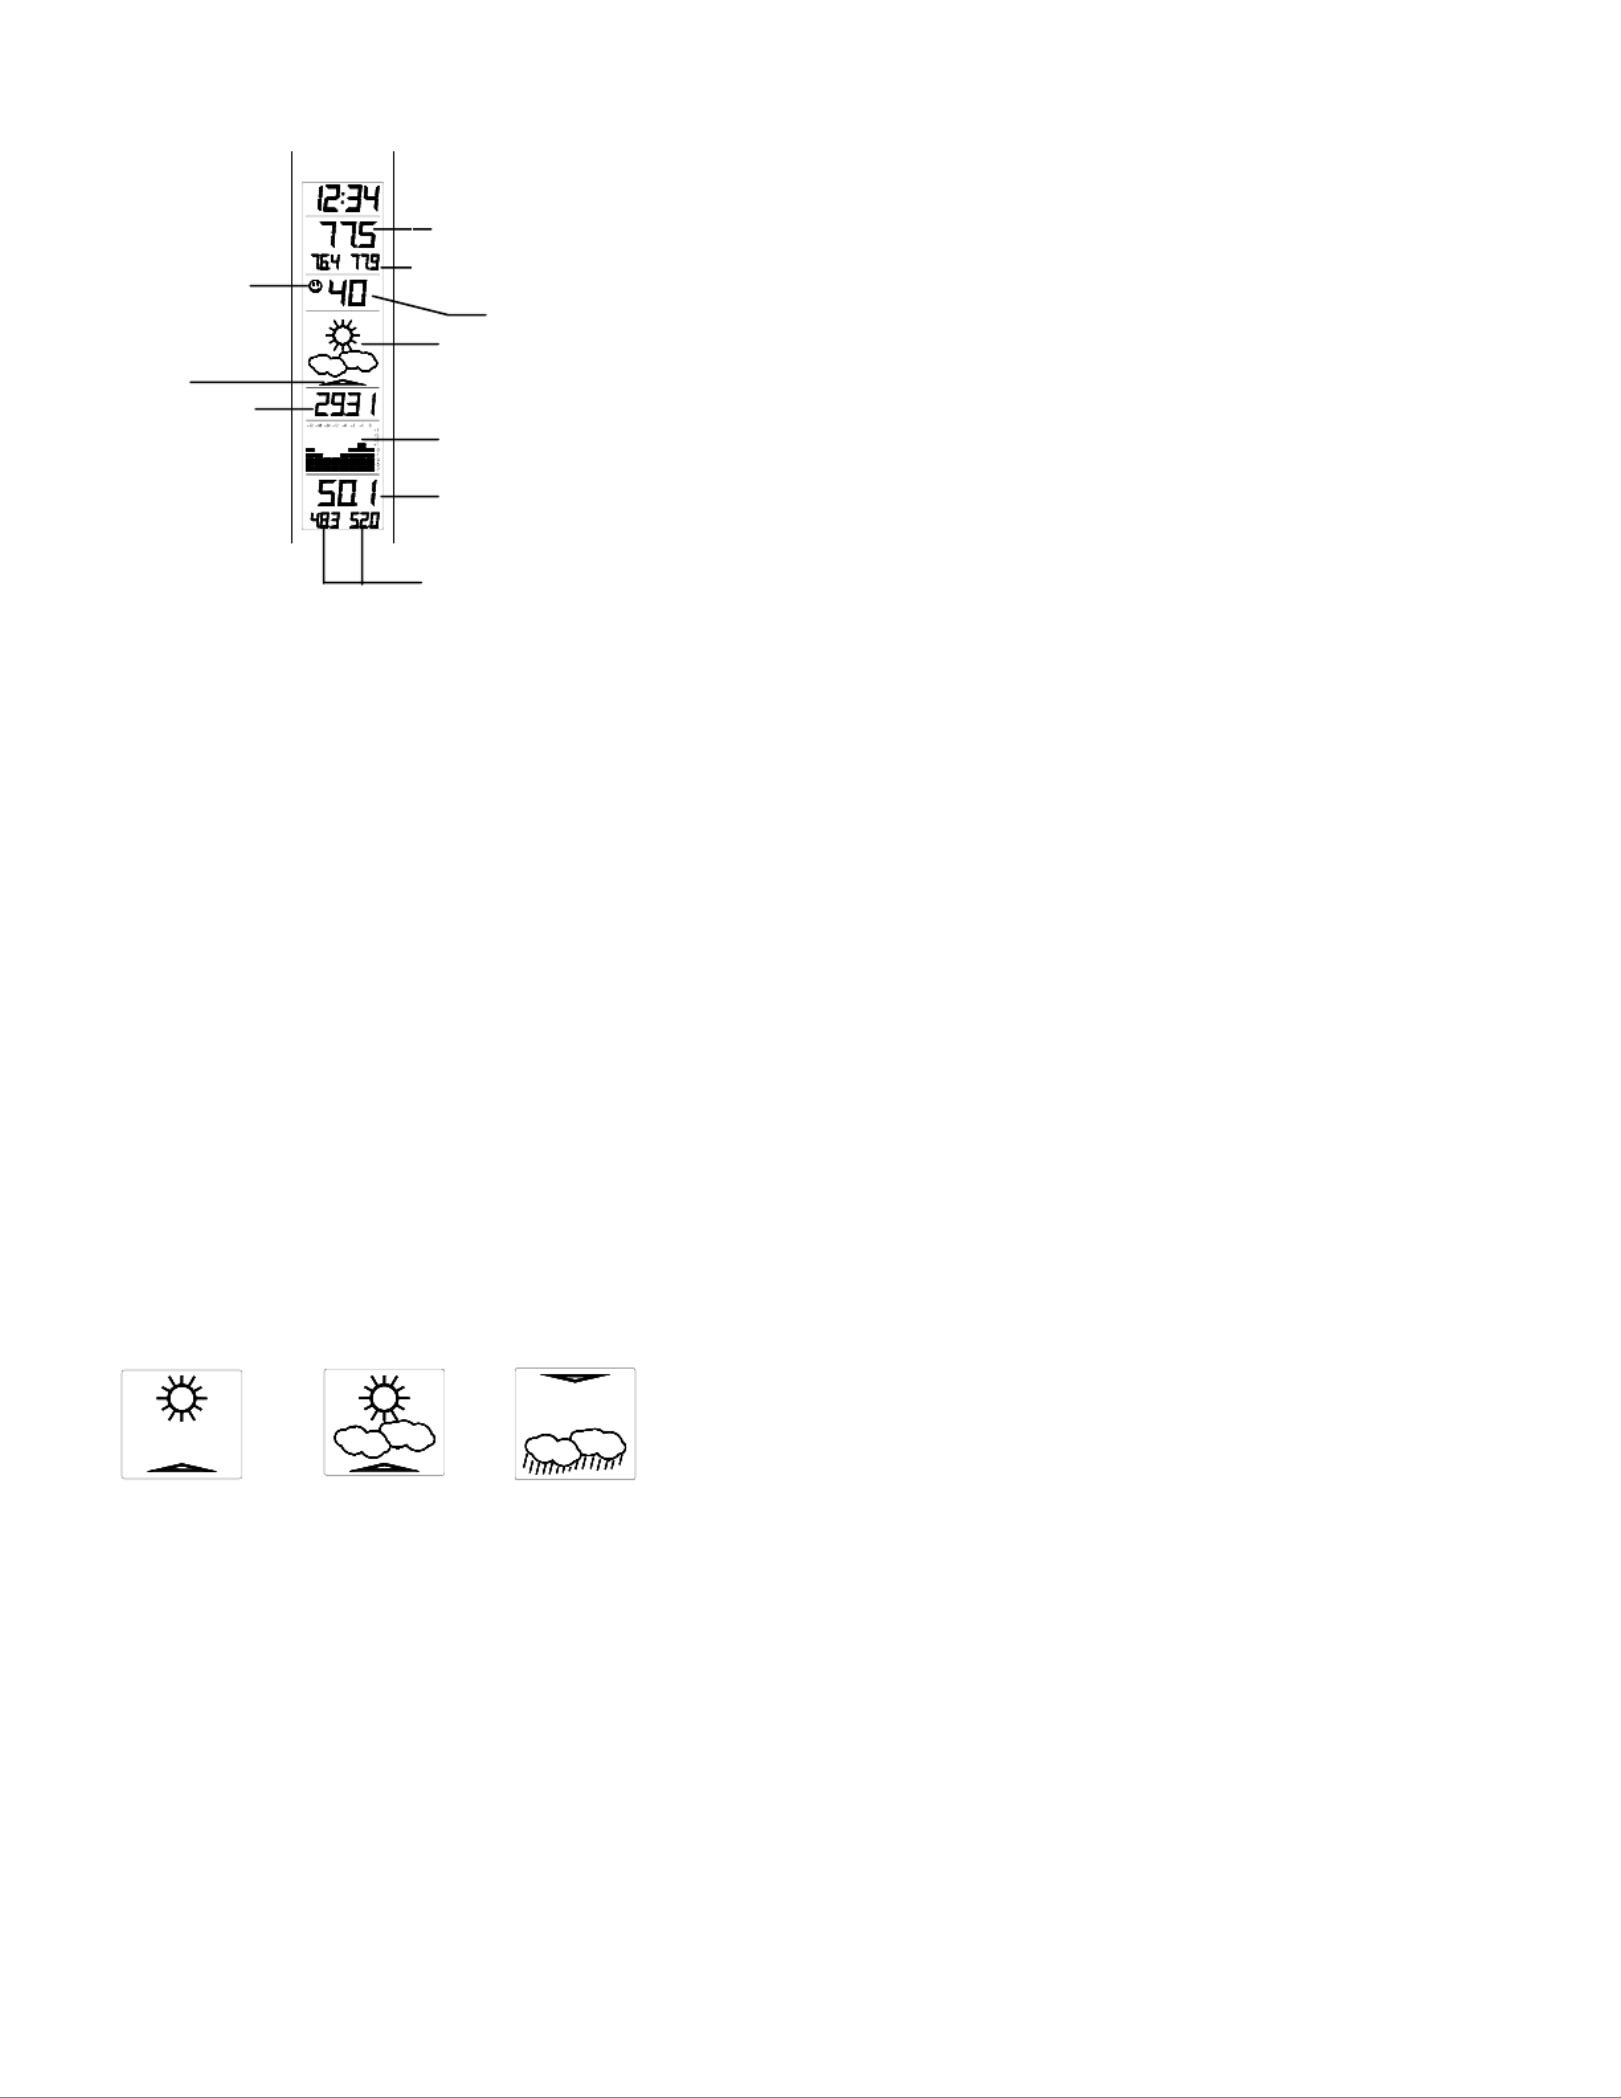
Indoor temperature reading:
The indoor temperature is displayed underneath the time and will automatically appear after few seconds when the batteries are inserted.
Minimum and maximum indoor temperature recordings:
Underneath the current indoor temperature readings are the minimum and maximum indoor temperature recordings. This feature is useful for displaying the recorded
temperatures of the room where the Weather Station has been placed. When a new temperature low or high is reached, it will be automatically updated and displayed.
Relative humidity reading with comfort level reading (face icons)
The relative humidity with comfort level reading is displayed underneath the indoor temperature. With this feature, users can determine how comfortable the reletive humidity
is within their current surroundings. Again, as with the indoor temperature, the relative humidity reading will automatically be taken once the batteries are inserted.
Working together with relative humidity, the Weather Station will register a comfort level reading by representation of a “☺
☺
☺
☺☺““Smilling“ face or “
““Sad“ face. The temperature
range between +68ºF to +78.7ºF and relative humidity range between 45% to 65% will register the “Smilling“ face. The “Sad“ face will appear should either the temperature
or humidity readings be outside these set level and the “Sad“ face represents un uncomfortable one.
When the “
““Sad“ face appears with the word “DRY“ or “WET“, it means that the relative humidity reading is outside its comfort range. However, “DRY“ or “WET“will not
appear if only the temperature reading is outside its comfort level range. The “
““Sad“ face and “DRY“ will appear of the relative humidity level is below 45% or “WET“ will
appear if the level is above 65%.
Weather tendency icons
There are 3 weather icons on the fourth line of LCD which can be displayed in any one of the following combinations:
For every sudden or significant change in the air pressure, the weather icons will update accordingly to represent the change in weather. If the icons do not change, then it
means either the air pressure has not changed or the change has been too slow for the Weather station to register. However, if the icon displayed is a sun or raining cloud,
there will be no change of icon if the weather gets any better (with sunny icon) or worse (with rainy icon) since the icons are already at their extremes.
The icons displayed forecasts the weather in terms of getting better or worse and not necessarily sunny or rainy as each icon indicates. For example, if the current weather is
cloudy and the rainy icon is displayed, it does not mean that the product is faulty because it is not raining. It simply means that the air pressure has dropped and the weather
is expected to get worse but not necessarily rainy.
Note:
After setting up, readings for weather forecasts should be disregarded for the next 12-24 hours. This will allow sufficient time for the Weather Station to collect air pressure
data at a constant altitude and therefore result in an more accurate forecast.
Common to weather forecasting, absolute accuracy cannot be guaranteed. The weather forecasting feature is estimated to have an accuracy level of about 75% due to the
varying areas the Weather Station has been designed for use in. In areas that experience sudden changes in weather (for example from sunny to rain), the Weather Station
will be more accurate compared to use in areas where the weather is stagnant most of the time (for example mostly sunny).
If the Weather Station is moved to another location significantly higher or lower than its initial standing point (for example from the ground floor to the upper floors of a house),
remove the batteries from both the Weather Station and transmitter and re-insert them after about 30 seconds. By doing this, the Weather Station will not mistake the new
Temperature in degree Fahrenheit
Minimum and maximum indoor
temperature reading
Smilling / Sad face
icons for comfort
reading
Relative humidity
Weather icons
Relative air
pressure inHp
Weather tendency
indicator
Air pressure history
Outdoor temperature
in degree Fahrenheit
Minimum and maximum
outdoor temperature reading
Cloudy with sunny
intervals
Sunny Rainy
Produktspezifikationen
| Marke: | La Crosse Technology |
| Kategorie: | Wetterstation |
| Modell: | WS-7091 |
Brauchst du Hilfe?
Wenn Sie Hilfe mit La Crosse Technology WS-7091 benötigen, stellen Sie unten eine Frage und andere Benutzer werden Ihnen antworten
Bedienungsanleitung Wetterstation La Crosse Technology

8 Oktober 2024
30 September 2024
29 September 2024
23 September 2024
22 September 2024
13 September 2024
12 September 2024
12 September 2024
11 September 2024
11 September 2024
Bedienungsanleitung Wetterstation
- Wetterstation Clatronic
- Wetterstation Hama
- Wetterstation Lexibook
- Wetterstation Nedis
- Wetterstation Tchibo
- Wetterstation Clas Ohlson
- Wetterstation Cotech
- Wetterstation Profile
- Wetterstation Adler
- Wetterstation Camry
- Wetterstation Velleman
- Wetterstation ADE
- Wetterstation Alecto
- Wetterstation Auriol
- Wetterstation Beurer
- Wetterstation Bresser
- Wetterstation Cresta
- Wetterstation Day
- Wetterstation Denver
- Wetterstation Dexford
- Wetterstation Durabase
- Wetterstation ECG
- Wetterstation EMOS
- Wetterstation Eurochron
- Wetterstation Gira
- Wetterstation HomeMatic
- Wetterstation Irox
- Wetterstation Jacob Jensen
- Wetterstation Kemot
- Wetterstation König
- Wetterstation MarQuant
- Wetterstation Mebus
- Wetterstation Medisana
- Wetterstation Mesko
- Wetterstation National Geographic
- Wetterstation Prologue
- Wetterstation Renkforce
- Wetterstation Sempre
- Wetterstation Techno Line
- Wetterstation Technoline
- Wetterstation Telefunken
- Wetterstation TFA
- Wetterstation ThinkGizmos
- Wetterstation Thomson
- Wetterstation Trevi
- Wetterstation Ventus
- Wetterstation Weinberger
- Wetterstation Ytora
- Wetterstation Trotec
- Wetterstation Blaupunkt
- Wetterstation Braun
- Wetterstation Rocktrail
- Wetterstation Daewoo
- Wetterstation Pyle
- Wetterstation Muse
- Wetterstation Avidsen
- Wetterstation Elro
- Wetterstation GoGEN
- Wetterstation Hyundai
- Wetterstation Orion
- Wetterstation Livoo
- Wetterstation Perel
- Wetterstation Soehnle
- Wetterstation Balance
- Wetterstation Fysic
- Wetterstation Sencor
- Wetterstation Krontaler
- Wetterstation Honeywell
- Wetterstation MINOX
- Wetterstation Lowrance
- Wetterstation Globaltronics
- Wetterstation ELV
- Wetterstation Guardo
- Wetterstation Unitec
- Wetterstation Netatmo
- Wetterstation Ascot
- Wetterstation Theben
- Wetterstation Brandson
- Wetterstation Tanita
- Wetterstation JUNG
- Wetterstation Johnson
- Wetterstation OBH Nordica
- Wetterstation Optex
- Wetterstation Davis
- Wetterstation Levenhuk
- Wetterstation Vitek
- Wetterstation Prestigio
- Wetterstation EQ-3
- Wetterstation EVE
- Wetterstation Extech
- Wetterstation Daikin
- Wetterstation Fluke
- Wetterstation Oregon Scientific
- Wetterstation Homematic IP
- Wetterstation EQ3
- Wetterstation Elgato
- Wetterstation Digi-tech
- Wetterstation DMV Electronics
- Wetterstation Ea2 LABS
- Wetterstation EMOS SELECT
- Wetterstation Garni
- Wetterstation Hesdo
- Wetterstation Inovalley
- Wetterstation IT
- Wetterstation Kaindle
- Wetterstation La Crosse
- Wetterstation Meade
- Wetterstation Nasa
- Wetterstation Nor-tec
- Wetterstation Otio
- Wetterstation Paget Trading
- Wetterstation PCE Instruments
- Wetterstation Saphir
- Wetterstation Saxon
- Wetterstation Taylor
- Wetterstation Thierry Mugler
- Wetterstation UPM
- Wetterstation Uzoli
- Wetterstation Waldbeck
- Wetterstation Xeecom ApS
- Wetterstation TFA Dostmann
- Wetterstation Vimar
- Wetterstation PeakTech
- Wetterstation AcuRite
- Wetterstation Ease Electronicz
- Wetterstation Chauvin Arnoux
- Wetterstation YONO
- Wetterstation Brigmton
- Wetterstation Chacon
- Wetterstation Baldr
- Wetterstation Garin
- Wetterstation ChiliTec
- Wetterstation Global Water
- Wetterstation Greisinger
- Wetterstation Marathon
- Wetterstation Majestic
- Wetterstation Gewiss
- Wetterstation ClimeMET
- Wetterstation Buienradar
- Wetterstation Balance Meteo
- Wetterstation Rebel
- Wetterstation JDC
- Wetterstation Greenure
- Wetterstation Browin
- Wetterstation Setti+
- Wetterstation Bearware
Neueste Bedienungsanleitung für -Kategorien-

15 Oktober 2024
5 Oktober 2024
3 Oktober 2024
2 Oktober 2024
29 September 2024
24 September 2024
24 September 2024
22 September 2024
22 September 2024
21 September 2024