ZyXEL WAX510D Bedienungsanleitung
ZyXEL
Zugangspunkt
WAX510D
Lesen Sie kostenlos die 📖 deutsche Bedienungsanleitung für ZyXEL WAX510D (6 Seiten) in der Kategorie Zugangspunkt. Dieser Bedienungsanleitung war für 34 Personen hilfreich und wurde von 2 Benutzern mit durchschnittlich 4.5 Sternen bewertet
Seite 1/6

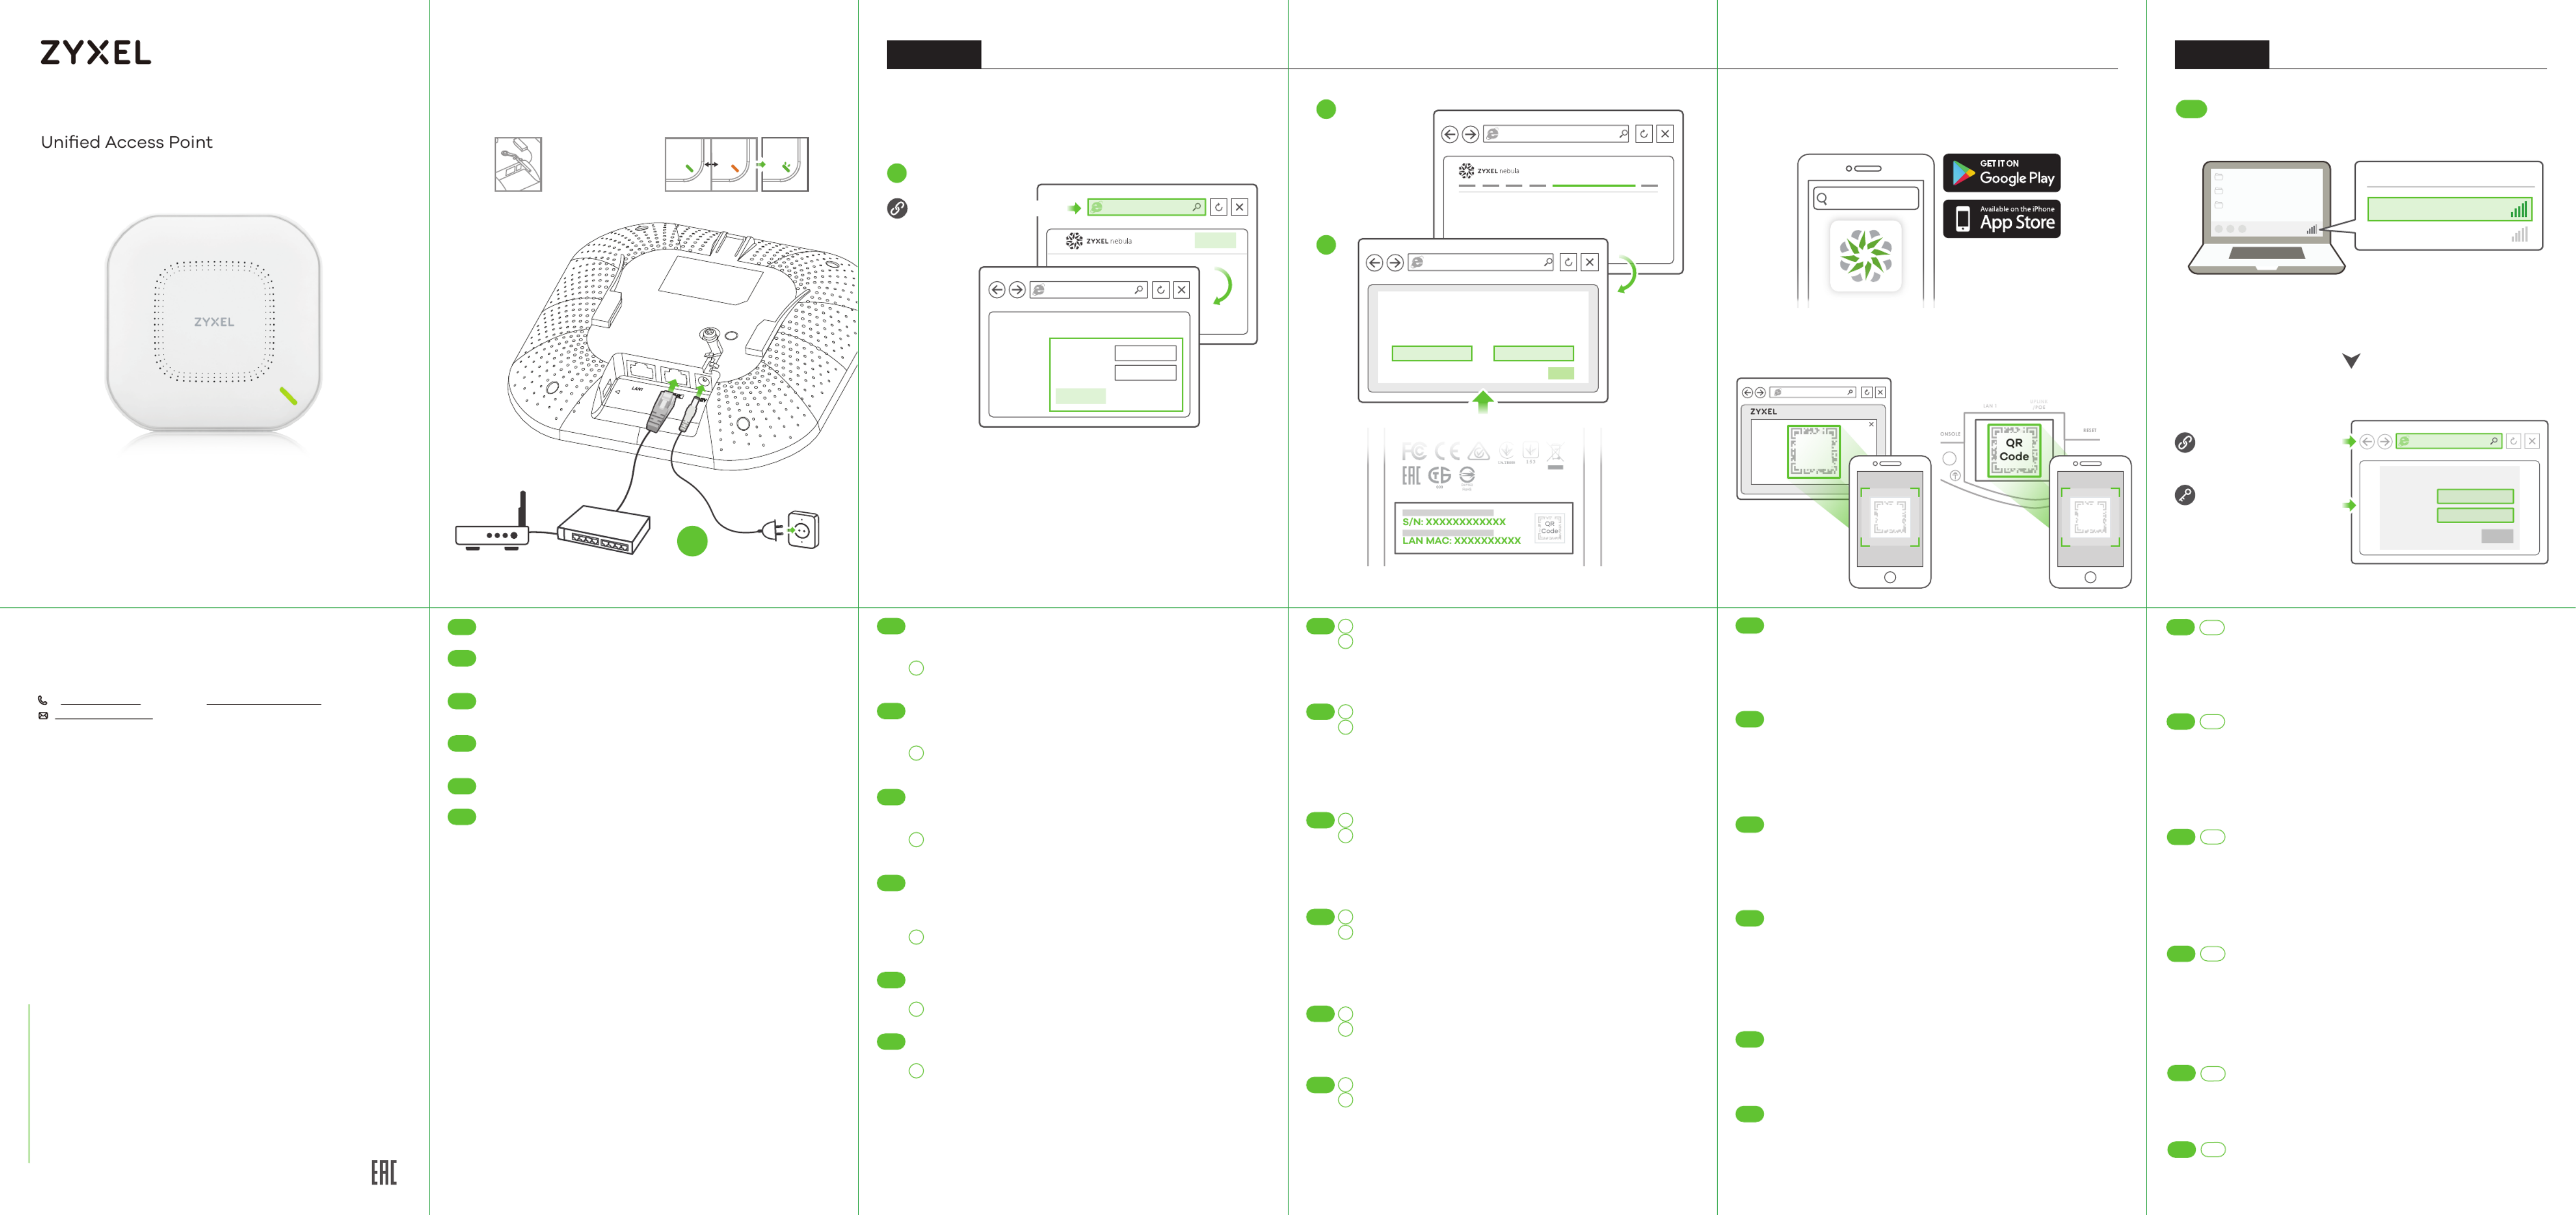
Follow the steps below to manage the WAX510D through the Zyxel
cloud-based network management system.
Note: Make sure the connected router has Internet access.
Go to the Zyxel Nebula Control Center (NCC) website
(https://nebula.zyxel.com Get Started). Click to sign up for a myZyxel
account and log in.
Führen Sie die folgenden Schritte aus, um den WAX510D über das
Cloud-basierte Netzwerkmanagementsystem von Zyxel zu verwalten.
Hinweis: Stellen Sie sicher, dass der angeschlossene Router über einen
Internetzugang verfügt.
Gehen Sie auf die NCC-Website (Zyxel Nebula Control Center)
(https://nebula.zyxel.com). Klicken Sie auf , um sich für Erste Schritte
ein myZyxel Konto registrieren und sich anzumelden.
Siga los siguientes pasos para administrar el WAX510Da través del
sistema de administración de redes basado en la nube de Zyxel.
Nota: Asegúrese de que el router conectado tenga acceso a Internet.
Vaya a la página web Nebula Control Center (NCC) de Zyxel
(https://nebula.zyxel.com Comenzar). Haga clic en para registrarse en
una cuenta myZyxel e iniciar sesión.
Suivez les étapes ci-dessous pour gérer le WAX510D via le système de
gestion de réseau cloud de Zyxel.
Remarque : Assurez-vous que le routeur connecté dispose d'un accès à
Internet.
Allez sur le site Zyxel Nebula Control Center (NCC)
(https://nebula.zyxel.com Démarrer). Cliquer sur pour ouvrir un
compte myZyxel et vous connecter.
Seguire la procedura seguente per gestire il WAX510D attraverso il
sistema di gestione della rete basato su cloud Zyxel.
Nota: Assicurarsi che il router connesso disponga di un accesso a
Internet."
Andare al sito web Zyxel Nebula Centro di controllo (NCC):
( ). Clicca su per creare un account https://nebula.zyxel.com Inizio
myZyxel ed entrare.
Cloud ManagementOption A
Login
https://nebula.zyxel.com
Sign In
Email
Password
Submit
https://nebula.zyxel.com
If you create a new site we can help you
configure it.
ORGANIZATION
https://nebula.zyxel.com
Register by MAC address and
serial number
MAC address Serial Number
OK
EN
ES
FR
DE
EN
ES
FR
DE
Download and open the Zyxel Nebula Mobile app. Log in with your
myZyxel account.
Create an organization and site or select an existing site. Scan the
WAX510D's QR code to add it to the site. (You can find the QR code in its
web configurator or on a label on the device or its box.)
Note: The WAX510D will go into cloud management mode automatically
and restart after it is registered to a site.
Laden Sie die Zyxel Nebula Mobil-App herunter und öffnen Sie sie. Melden
Sie sich mit Ihrem myZyxel-Konto an.
Erstellen Sie eine Organisation und einen Standort oder wählen Sie einen
bestehenden Standort. Scannen Sie den QR-Code des WAX510D, um ihn
zum Standort hinzuzufügen. (Der QR-Code befindet sich im
Web-Konfigurator oder auf einem Etikett auf dem Gerät oder seinem
Gehäuse.)
Hinweis: Der WAX510D wechselt automatisch in den Cloud
Verwaltungsmodus und startet neu, nachdem er auf einer Seite registriert
wurde.
Descargue y abra la aplicación movil Zyxel Nebula. Inicie sesión con su
cuenta de myZyxel.
Cree una organización y un sitio o seleccione un sitio existente. Lea el
código QR del WAX510D para añadirlo al sitio. (Puede encontrar el código
QR en su configurador web o en una etiqueta en el dispositivo o en su
caja.)
Nota: El WAX510D entrará en modo administración de nube
automáticamente y se reiniciará tras registrarse en un sitio.
Téléchargez et ouvrez l'application Zyxel Nebula Mobile. Connectez-vous
avec votre compte myZyxel.
Créez une organisation et un site ou sélectionnez un site existant.
Scannez le code QR du WAX510D pour l'ajouter au site. (Le code QR se
trouve dans son configurateur Web ou sur une étiquette apposée sur
l'appareil ou son boîtier.)
Remarque : Le WAX510D passera automatiquement en mode de gestion
du cloud et redémarrera après avoir été enregistré sur un site.
Scaricare e aprire la app. Accedere con il proprio Zyxel Nebula Mobile
account myZyxel.
Creare un'organizzazione e un sito o selezionare un sito esistente.
Passate allo scanner il codice QR di WAX510D per aggiungerlo al sito.
(Trovi il codice QR sul suo configuratore web o su un'etichetta sul
dispositivo o sulla sua confezione.)
Nota: Il WAX510D passerà automaticamente alla modalità di gestione
cloud e si riavvia dopo la registrazione in un sito.
1
1
1
1
1
Create an organization and a site (network) in the NCC.
Enter the WAX510D's LAN MAC address and serial number (S/N) (see
the label on the device) in the NCC configuration screen.
Note: The WAX510D will go into cloud management mode
automatically and restart after it is registered to a site. See the NCC
User's Guide for more information about configuring the WAX510D
through the NCC.
Erstellen Sie eine Organisation und einen Standort (Netzwerk) im
NCC.
Geben Sie die LAN MAC-Adresse und die Seriennummer (S/N) des
WAX510D (siehe Etikett auf dem Gerät) im
NCC-Konfigurationsbildschirm ein.
Hinweis: Der WAX510D wechselt automatisch in den Cloud
Verwaltungsmodus und startet neu, nachdem er auf einer Seite
registriert wurde. Weitere Informationen zur Konfiguration des
WAX510D über das NCC finden Sie im NCC-Benutzerhandbuch.
Cree una organización y un sitio (red) en el NCC.
Introduzca la dirección MAC de la LAN del WAX510D y el número de
serie (S/N) (ver la etiqueta del dispositivo) en la pantalla de
configuración del NCC.
Nota: El WAX510D entrará en modo administración de nube
automáticamente y se reiniciará tras registrarse en un sitio. Consulte
la Guía del usuario NCC para más información sobre la configuración
del WAX510D a través de NCC.
Créez une organisation et un site (réseau) dans le NCC.
Entrez l'adresse MAC LAN et le numéro de série (S/N) (voir l'étiquette
sur l'appareil) du WAX510D dans l'écran de configuration du NCC.
Remarque : Le WAX510D passera automatiquement en mode de
gestion du cloud et redémarrera après avoir été enregistré sur un site.
Reportez-vous au guide de l'utilisateur du NCC pour plus
d'informations sur la configuration du WAX510D via le NCC.
Create un’organizzazione e un sito (rete) nella NCC.
Immettere l' indirizzo MAC LAN e il numero di serie (S/N) del WAX510D
(vedere l' etichetta sul dispositivo) nella schermata di configurazione
NCC.
Nota: Il WAX510D passerà automaticamente alla modalità di gestione
cloud e si riavvia dopo la registrazione in un sito. Per ulteriori
informazioni sulla configurazione di WAX510D tramite NCC,
consultare la Guida dell'utente del NCC.
EN
ES
FR
DE
2
3
2
3
2
3
2
3
2
3
Option 1: Use MAC address serial number and to add
a device in the NCC
Option 2: Use Zyxel Nebula Mobile app to add a
device in the NCC
Where to find QR code:
Label on the deviceWeb Configurator
WAX510D
QR
Code
QR
Code
QR
Code
Nebula Mobile
or
1
2
3
Copyright © 2020 Zyxel Communications Corp. All Rights Reserved.
EU Importer
Zyxel Communications A/S
Gladsaxevej 378, 2. th. 2860 Søborg, Denmark
https://www.zyxel.com/dk/da/
US Importer
Zyxel Communications, Inc
1130 North Miller Street Anaheim, CA 92806-2001
https://www.zyxel.com/us/en/
See the User's Guide at www.zyxel.com for more information,
including customer support and safety warnings.
Quick Start Guide
ENGLISH | DEUTSCH | ESPAÑOL | FRANÇAIS
ITALIANO
WAX510D
802.11ax (WiFi 6) Dual-Radio
Unified Access Point
Support Information
Hardware Installation
Router PoE Switch
Wait until the LED
blinks green
Option B Standalone Management
Zyxel-xxxx
Wireless Network Connection
XXXX
http://1.1.1.1 (First time
configuration only)
User Name: admin
Login Password: 1234
(default)
1234
Login
User Name
Password
admin
WAX510D
http://1.1.1.1
1-a WiFi connection
From a WiFi enabled computer, search for the WAX510D's default WiFi
network name ( where xxxx is the last four characters of the Zyxel-xxxx,
MAC address) and connect to it.
Open your web browser and enter "http://1.1.1.1" for initial configuration.
Enter the default user name ( ) and password ( ). Click .admin 1234 Login
Note: If the WAX510D cannot connect to the Internet, use the
DHCP-assigned IP address of the WAX510D to access its web configurator.
Check the connected router or DHCP server for the IP address of the
WAX510D.
Suchen Sie mit einem WLAN-fähigen Computer nach dem
WLAN-Standardnamen des WAX510D ( , wobei xxxx die letzten Zyxel-xxxx
vier Zeichen der MAC-Adresse sind), und stellen Sie die Verbindung zu
diesem her.
Öffnen Sie Ihren Webbrowser, und geben Sie für die Erstkonfiguration
"http://1.1.1.1" ein. Geben Sie den Standardbenutzernamen ( ) und das admin
Kennwort ( ) ein. Klicken Sie auf .1234 Login
Hinweis: Wenn der WAX510D keine Verbindung zum Internet herstellen
kann, verwenden Sie die DHCP-zugewiesene IP-Adresse des WAX510D, um
auf dessen Web-Konfigurator zuzugreifen. Überprüfen Sie den
angeschlossenen Router oder DHCP-Server für die IP-Adresse des
WAX510D.
En un ordenador con WiFi activado, busque la conexión WiFi
predeterminada del WAX510D nombre de la red ( , donde xxxx Zyxel-xxxx
son los últimos cuatro caracteres de la dirección MAC) realice la
conexión.
Abra el navegador y escriba "http://1.1.1.1" para la configuración inicial.
Escriba el nombre de usuario predeterminado ( ) y la contraseña admin
( ). Haga clic en (Iniciar sesión).1234 Login
Nota: Si el WAX510D no puede conectarse a Internet, use la dirección IP
asignada por DHCP del WAX510D para acceder a su configurador web.
Compruebe el router o servidor DHCP conectado para ver la dirección IP
del WAX510D.
À partir d'un ordinateur connecté par WiFi, recherchez le nom de r éseau
WiFi par défaut du WAX510D ( , où xxxx représentent les quatre Zyxel-xxxx
derniers caractères de l'adresse MAC) et connectez-vous à celui-ci.
Ouvrez votre navigateur Web et saisissez « http://1.1.1.1 » pour la
configuration initiale. Saisissez le nom d'utilisateur par défaut ( ) et admin
le mot de passe ( ). Cliquez sur .1234 Connexion
Remarque : Si le WAX510D ne peut pas se connecter à Internet, utilisez
l'adresse IP attribuée par DHCP du WAX510D pour accéder à son
configurateur Web. Vérifiez l'adresse IP du WAX510D sur le routeur ou le
serveur DHCP connecté.
Da un computer abilitato WiFi, cercare il WiFi di default del WAX510D nome della
rete ( , dove xxxx rappresenta gli ultimi quattro caratteri dell'indirizzo Zyxel-xxxx
MAC) e connettersi ad essa.
Aprire il browser web e digitare "http://1.1.1.1" per la configurazione
iniziale.Inserisci il nome predefinito utente ( ) e la password ( ). Clicca admin 1234
su (accedi).Login
Nota: Se il WAX510D non riesce a connettersi a internet, usa l'indirizzo IP del
WAX510D assegnato dal DHCP per accedere alla configurazione web. Controlla
il router connesso o il server DHCP per verificare l'indirizzo IP del WAX510D.
1-a
1-a
1-a
1-a
1-a
EN
ES
FR
DE
EN
ES
FR
DE
Connect the port to a router with Internet access. If you are not UPLINK
using PoE, connect the WAX510D power socket to an appropriate power
source.
Verbinden Sie den Port mit einem Router mit Internetzugang. UPLINK
Wenn Sie PoE nicht verwenden, schließen Sie den Netzadapter an eine
geeignete Stromquelle an.
Conecte el puerto a un router con acceso a Internet. Si no está UPLINK
utilizando PoE, conecte la toma de corriente a una fuente de
alimentación adecuada.
Connectez le port à un routeur ayant accès à Internet. Si vous UPLINK
n'utilisez pas PoE, branchez la prise de courant à une source
d'alimentation appropriée.
Connetti la porta a un router con accesso a internet.Se non si UPLINK
utilizza PoE, collegare la presa di corrente a una fonte di alimentazione
appropriata.
IT
Power Outlet
Ground first for
additional protection
IT
IT
IT
IT
North America
+ 1 800 255 4101
support@zyxel.com
EU
https://support.zyxel.eu
OR

Grounding
http://192.168.1.2
User Name: admin
Login Password: 1234
(default)
1234
Login
User Name
Password
admin
WAX510D
http://192.168.1.2
1-b Wired connection
1-b
3
2
2
3
2
3
2
3
2
3
EN
ES
FR
2
3
DE
The wizard appears automatically. Use the wizard to set up your WAX510D.
Note: It takes 1 to 2 minutes to apply your wizard changes. The power LED will
blink red and green alternatively. The power and WiFi LEDs then turn steady
green when the system is ready. Check the screen and note down the Dashboard
WAX510D's IP address in case you need to access it's web configurator again.
Note : The 1.1.1.1 is for initial setup only. It is not usable after the WAX510D is
configured.
Use the WAX510D's new wireless settings (SSID and key) to re-connect to the
WAX510D's WiFi network for Internet access if you change them in the wizard.
Der Assistent erscheint automatisch. Richten Sie den WAX510D mit dem
Assistenten ein. Es dauert 1 bis 2 Minuten, bis der Assistent die Hinweis:
Änderungen übernimmt. Die POWER LED blinkt nun abwechselnd rot und grün.
Wenn das System bereit ist, leuchten die LED-Anzeigen POWER und WiFi (WLAN)
grün. Rufen Sie das -Fenster auf, und notieren Sie sich die IP-Adresse Dashboard
des WAX510D, falls Sie nochmals auf den Web-Konfigurator zugreifen müssen.
Hinweis : 1.1.1.1 kann nur bei der Erstkonfiguration verwendet werden, nicht jedoch,
wenn der WAX510D schon einmal konfiguriert wurde.
Nachdem Sie die WLAN-Einstellungen desWAX510D (SSID und dazugehöriger
Schlüssel) im Assistenten geändert haben, können Sie mit diesen die Verbindung
zum WLAN-Netzwerk des WAX510D und damit zum Internet herstellen.
El asistente aparecerá automáticamente. Utilice el asistente para configurar su
WAX510D. el asistente tarda entre 1 y 2 minutos en aplicar los cambios. El Nota:
LED de alimentación parpadeará en rojo y verde alternativamente. Los LEDs de
alimentación y WiFi se mantendrán en verde fijo cuando el sistema esté listo.
Compruebe la pantalla (Panel) y anote la dirección IP del WAX510D Dashboard
por si necesita acceder de nuevo al configurador web.
Nota : 1.1.1.1 es sólo para la configuración inicial. No se puede usar después de que
el WAX510D haya sido configurado.
Utilice la nueva configuración inalámbrica delWAX510D (SSID y clave) para
volver a conectarse a la red WiFi del WAX510D para acceder a Internet si la p2-ha
cambiado en el asistente.
L'assistant apparaît automatiquement. Utilisez l'assistant pour configurer votre
WAX510D. 1 à 2 minutes sont nécessaires pour appliquer les Remarque :
modifications de l'assistant. Le voyant d'alimentation clignote en rouge et vert
alternativement. Les voyants d'alimentation et WiFi s'allument en vert continu
quand le système est prêt. Consultez l'écran du et notez Tableau de bord
l'adresse IP du WAX510D au cas où vous auriez besoin d'accéder de nouveau à
son configurateur Web.
Remarque : L'adresse 1.1.1.1 est uniquement destinée à la configuration initiale.
Elle n'est pas utilisable une fois que le WAX510D est configuré.
Utilisez les nouveaux paramètres sans fil du WAX510D (SSID et clé) pour
reconnecter le réseau WiFi du WAX510D pour l'accès à Internet si vous les
modifiez dans l'assistant.
La procedura guidata viene visualizzata automaticamente.Utilizzare la
procedura guidata per configurare il WAX510D. Ci vogliono 1 o 2 minuti per Nota:
applicare le modifiche della procedura guidata.Il LED di alimentazione
lampeggia in rosso e verde alternativamente.I LED di alimentazione e WiFi
diventano poi verde fisso quando il sistema è pronto.Controlla lo schermo del
cruscotto e annota l’indirizzo IP del WAX510D per potere accedere in caso di
necessità al configuratore web.
Nota : 1.1.1.1 è solo per la configurazione iniziale.Non è utilizzabile dopo che il
WAX510D sia stato configurato.
Utilizzare le nuove impostazioni wireless del WAX510D (SSID e chiave) per
ri-connettere alla rete WiFi del WAX510D per l'accesso a Internet se li cambiate
nella procedura guidata.
DASHBOARD
Interface Status Summary
XXX X.X.X.X / X.X.X.X
Name IP Addr/Netmask
Wizard setting
WAX510D
Prev Next Cancel
SSID:
PSK
Secret:
XXXXXX
XXXXXX
SSID
SSID (WiFi Network Name):
PSK (WiFi Password):
Note 1
WAX510D
Current IP Address:
Note 2
Wall mounting: Drill two holes for the screw anchors (A), 62.4 mm
apart. Insert the screw anchors into the wall.
Ceiling mounting: Drill two holes for the screw anchors (A), 62.4 mm
or 70.1 mm apart. Insert the screw anchors into the ceiling.
Wandmontage: Bohren Sie die zwei Löcher für die Schraubdübel (A)
in einem Abstand von 62,4 mm. Bringen Sie die Schraubdübel an der
Wand an.
Deckenmontage: Bohren Sie die zwei Löcher für die Schraubdübel
(A) in einem Abstand von 62,4 mm oder 70,1 mm. Bringen Sie die
Schraubdübel an der Decke an.
Montaje en pared: Taladre dos agujeros para los anclajes de tornillo
(A), con 62,4 mm de separación. Inserte los anclajes de tornillo en la
pared.
Montaje en el techo: Taladre dos agujeros para los anclajes de
tornillo (A), con 62,4 mm o 70,1 mm de separación. Inserte los
anclajes de tornillo en el techo.
Montage mural : Percer deux trous à 62,4 mm l'un de l'autre pour les
chevilles (A). Insérer les chevilles dans le mur.
Montage au plafond : Percer deux trous pour les chevilles (A), à 62,4
mm ou 70,1 mm l'une de l'autre. Insérer les chevilles dans le plafond.
Montaggio a parete: Fai due buchi per i sostegni a vite (A), spaziati
di 62,4 mm. Inserisci nel muro i sostegni a vite.
Montaggio a soffitto: Fai due buchi per i sostegni a vite (A), spaziati
di 62,4 mm o di 70,1 mm. Inserisci nel soffitto i sostegni a vite.
Install two mounting screws through the holes on the bracket ( ) into B
the plugs/anchors to secure the bracket to the wall/ceiling. Make sure
the screws are snugly and securely fastened to the wall/ceiling.
After the bracket is attached to the wall/ceiling, slide the WAX510D
onto the bracket until it clicks into the place.
Bringen Sie zwei Montageschrauben durch die Öffnungen der
Halterung ( ) in die Dübel an, um die Halterung an der Wand/Decke zu B
befestigen. Stellen Sie sicher, dass die Schrauben fest in der
Wand/Decke befestigt sind.
Nachdem die Halterung an der Wand/Decke befestigt ist, schieben Sie
den WAX510D auf die Halterung, bis er einrastet.
Instale los dos tornillos de montaje a través de los agujeros del
soporte ( ) en los tacos o anclajes para fijar el soporte a la pared o B
techo. Asegúrese de que los tornillos estén perfectamente apretados y
seguros en la pared o techo.
Una vez que el soporte esté unido a la pared / techo, deslice el
WAX510D sobre el soporte hasta que encaje en su lugar.
Installez deux vis de fixation à travers les trous sur le support ( ) dans B
les chevilles/ancrages pour fixer le support au mur/plafond. Vérifiez
que les vis sont correctement fixées au mur/plafond et de façon
sécurisée.
Une fois le support fixé au mur/plafond, faire glisser le WAX510D sur le
support jusqu'à ce qu'il s'enclenche.
Inserire due viti per l'installazione attraverso i fori della staffa ( ) nei B
tasselli/ancoraggi per fissare la staffa alla parete/soffitto. Assicurarsi
che le viti siano saldamente e sicuramente fissate alla parete/soffitto.
Una volta che la staffa è attaccata al muro o al soffitto, fai scorrere il
WAX510D sulla staffa finché non va a posto con un click.
62.4mm
A
A
62.4 or 70.1 mm
EN
ES
FR
DE
Wall / Ceiling Mounting
1-a
1-b
1-a
1-b
1-a
1-b
1-a
1-b
1-a
1-b
2
3
2
3
2
3
2
3
EN
ES
FR
2
3
DE
1-a 1-b
2
3
x2
Unit: mm
25.40
9.00
x2
Unit: mm
20.50
6.50
x2
Unit: mm
25.00
11.80
T-bar Ceiling Mounting
LOCK
OPEN
B
1
2
3
Attach two clips to the ceiling grids as shown.
Install two screws to secure the bracket to the clips.
Slide the WAX510D onto the bracket until it clicks into the place.
Note: Clips (ACCESSORY-ZZ0105F) are sold separately.
Befestigen Sie zwei Clips wie abgebildet an den Deckenrastern.
Befestigen Sie die Halterung mit zwei Schrauben an den Clips.
Schieben Sie den WAX510D auf die Halterung, bis er einrastet.
Hinweis: Clips (ZUBEHÖR-ZZ0105F) sind separat erhältlich.
Fije dos clips a las rejillas del techo como se muestra.
Instale dos tornillos para asegurar el soporte a los clips.
Deslice el WAX510D en el soporte hasta que encaje en su lugar.
Nota: Los clips (ACCESSORY-ZZ0105F) se venden por separado.
Fixer deux clips aux grilles de plafond comme indiqué.
Installer deux vis pour fixer le support aux clips.
Faire glisser le WAX510D sur le support jusqu'à ce qu'il s'enclenche.
Remarque : Les clips (ACCESSORY-ZZ0105F) sont vendus séparément.
Inserisci le due clip nelle barre del soffitto, come in figura.
Usa due viti per attaccare la staffa alle clip.
Fai scorrere il WAX510D sulla staffa finché non va a posto con un click.
Nota: Le clip (ACCESSORY-ZZ0105F) vengono vendute a parte.
1
2
3
1
2
3
1
2
3
1
2
3
1
2
3
EN
ES
FR
DE
Remove the M4 ground screw from the WAX510D’s rear panel as shown.
Secure a green/yellow ground cable (18 AWG or smaller) to the WAX510D’s
rear panel using the M4 ground screw.
Attach the other end of the ground cable to a wall or the ground. Follow
your country’s regulations and safety instructions to electrically ground the
device properly. Qualified service personnel must confirm that the
building’s protective earthing terminal is valid.
Entfernen Sie die M4 Erdungsschraube von der Rückwand des WAX510D wie
abgebildet. Befestigen Sie ein grün/gelbes Erdungskabel (18 AWG oder
kleiner) mit der M4 Erdungsschraube an der Rückwand des WAX510D.
Befestigen Sie das andere Ende des Kabels an der
Bringen Sie das andere Ende des Erdungskabels an einer Wand oder am
Boden an. Befolgen Sie die nationalen Vorschriften und Sicherheitshinweise,
um das Gerät richtig elektrisch zu erden. Qualifiziertes Servicepersonal
muss bestätigen, dass die Schutzerdungsklemme des Gebäudes funktions-
fähig ist.
Retire el tornillo de tierra M4 del panel posterior del WAX510D como se
muestra. Fije un cable de tierra verde/amarillo (18 AWG o más pequeño) al
panel posterior del WAX510D con el tornillo de conexión a tierra M4.
Fije el otro extremo del cable de tierra a una pared o en el suelo. Siga las
regulaciones e instrucciones de seguridad del país para realizar la
conexión a tierra del dispositivo. Un técnico cualificado debe confirmar que
el terminal protector de conexión a tierra del edificio es válido.
Retirez la vis de masse M4 du panneau arrière du WAX510D comme indiqué.
Fixez un câble de masse vert/jaune (18 AWG ou plus petit) au panneau
arrière du WAX510D à l'aide de la vis de mise à la terre M4.
Branchez l'autre extrémité du câble de mise à la terre à un mur ou au sol.
Suivez les règlements de votre pays et les consignes de sécurité pour
mettre l'appareil correctement électriquement à la terre. La validité de la
borne de mise à la terre de protection du bâtiment doit être confirmée par
un personnel qualifié.
Rimuovere la vite di terra M4 dal pannello posteriore del WAX510D come
mostrato. Fissare un cavo di terra verde/giallo (18 AWG o inferiore) al
pannello posteriore del WAX510D utilizzando la vite di terra M4.
Collegare l'altra estremità del cavo di messa a terra alla parete o alla terra.
Applicare le norme del proprio paese e le istruzioni di sicurezza per mettere
a terra elettricamente il dispositivo nel modo corretto. Il personale di
servizio qualificato deve assicurarsi che i morsetti di terra protettivi
dell'edificio siano corretto.
1
2
1
2
1
2
1
2
EN
ES
FR
1
2
DE
LOCK
OPEN
B
1-b
1-b
1-b
1-b
EN
ES
FR
DE
Use an Ethernet cable to connect your computer to the port UPLINK
of the WAX510D through a PoE injector or PoE switch.
Use its DHCP-assigned IP or default static IP address
"http://192.168.1.2" to access the web configurator. Make sure your
computer IP address is in the same subnet as the WAX510D's.
Verwenden Sie ein Ethernet-Kabel, um Ihren Computer über einen
PoE-Injektor oder einen PoE-Switch mit dem Port des UPLINK
WAX510D zu verbinden.
Verwenden Sie die vom DHCP-Server zugewiesene IP-Adresse oder
die statische Standard-IP-Adresse "http://192.168.1.2", um auf den
Web-Konfigurator zuzugreifen. Die IP-Adresse des Computers muss
sich im selben Subnetz befinden wie die des WAX510D.
Use un cable Ethernet para conectar su computadora al puerto
UPLINK de la WAX510D a través de un inyector PoE o un interruptor
PoE.
Utilice su IP DHCP asignada o una dirección IP estática
"http://192.168.1.2" para acceder al configurador web. Compruebe que
la dirección IP del ordenador esté en la misma subred que el
WAX510D.
Utilisez un câble Ethernet pour connecter votre ordinateur au port
UPLINK du WAX510D via un injecteur PoE ou un commutateur PoE.
Utilisez son IP DHCP attribuée ou l'adresse IP statique par défaut
"http://192.168.1.2" pour accéder au configurateur Web. Vérifiez que
l'adresse IP de votre ordinateur se trouve dans le même sous-réseau
que le WAX510D.
Utilizzare un cavo Ethernet per collegare il computer alla porta
UPLINK del WAX510D tramite un iniettore PoE o un interruttore PoE.
Usare l’IP DHCP assegnato o l’indirizzo IP statico predefinito
"http://192.168.1.2" per accedere al configuratore web. Assicurati che
l’indirizzo IP del computer si trovi nella stessa sottorete del WAX510D.
PoE injector
or
PoE switch
IT
IT
IT
IT
IT
IT
Följ nedanstående steg för att hantera WAX510D genom Zyxels
molnbaserade nätverkshanteringssystem.
Obs : Se till att den anslutna routern har internetåtkomst.
Gå till webbplatsen för Zyxel Nebula Control Center (NCC)
( ). Klicka på för att registrera dig https://nebula.zyxel.com Kom igång
för ett myZyxel-konto och logga in.
FUrmați pașii de mai jos pentru a gestiona dispozitivul WAX510D prin sistemul
de gestionare a rețelei bazat pe cloud Zyxel.
Notă : Asigurați-vă că ruterul conectat are acces la internet.
Accesați site-ul web Zyxel Nebula Control Center (NCC - Centrul de control
Zyxel Nebula) ( ). Faceți clic pe https://nebula.zyxel.com Get Started
( ) pentru a vă înregistra pentru un cont myZyxel și conectați-vă.Începeți
Следвайте стъпките по за да управлявате чрез базираната на облак система -долу,
за управление на мрежата на Zyxel.
Забележка : Уверете че свързаният има интернет достъп се, рутер .
Посетете уеб сайта Zyxel Nebula Control Center (NCC) на
(https://nebula.zyxel.com .) Щракнете върху Начало, за да създадете акаунт в
myZyxel и да влезете.
Для управления через систему сетевого управления на основе WAX510D
Zyxel Cloud выполните следующие действия.
Примечание : Убедитесь, что подключенный маршрутизатор имеет доступ
в интернет.
Перейдите на сайт Zyxel Nebula Control Center (NCC)
( ). Нажмите , чтобы https://nebula.zyxel.com Начать работу
зарегистрировать аккаунт myZyxel и войти в систему.
按照下方的步骤操作,通过 基于云的网络管理系统管理 。 Zyxel WAX510D
注意:确保连接的路由器已接入互联网。
请访问 的 控制中心 网站 Zyxel Nebula (NCC) (https://nebula.zyxel.com)。
单击开始以注册 帐户并登录。myZyxel
請依照下列步驟,經由 雲端網路管理系統管理 。 Zyxel WAX510D
註:確認連接的路由器可存取網際網路。
請前往 控制中心 網站 Zyxel Nebula (NCC) (https://nebula.zyxel.com)。按
一下開始註冊 帳戶,並登入帳戶。myZyxel
Skapa en organisation och en site (nätverk) i NCC.
Ange :s LAN MAC-adress och serienummer (S/N) (se etiketten WAX510D
på enheten) i NCC-konfigurationsskärmen.
Obs : öppnar molnhanteringsläget automatiskt och startar WAX510D
om efter den är registrerad på en sida. Se NCC bruksanvisningen för
mer information om konfiguration av via NCC.WAX510D
Creați o organizație și un site (rețea) în NCC.
Introduceți adresa a rețelei a dispozitivului WAX510D și MAC LAN
numărul de serie (vedeți eticheta de pe dispozitiv) în ecranul de (S/N)
configurare NCC.
Notă : Dispozitivul WAX510D va intra automat în modul de gestionare
cloud și va reporni după ce este înregistrat pe un site. Consultați Ghidul
utilizatorului pentru mai multe informații privind configurarea NCC
dispozitivului WAX510D prin NCC.
Създайте организация и мрежа в сайт ( ) NCC.
Въведете LAN MAC (S/N) ( адреса и серийния номер на WAX510D вижте
етикета ) NCC.на устройството в екрана за конфигурация на
Забележка автоматично влезе в режим на управление на: WAX510D ще
облака и рестартира след регистрира към даден Вижте ще се , като се сайт.
ръководството за потребителя на за повече информация относно NCC
конфигурирането на чрез WAX510D NCC.
Создайте организацию и (сетевой) узел в центре NCC.
В окне конфигурации введите адрес и серийный NCC LAN MAC
номер устройства WAX510D (указанные на этикетке устройства).(S/N)
Примечание : После регистрации устройства WAX510D на сайте оно
автоматически переключится в режим облачного управления и
перезапустится. Дополнительные сведения о настройке WAX510D
через центр приведены в руководстве пользователя .NCC NCC
在 中创建组织和站点(网络)。 NCC
在 配置屏幕中,输入 的 地址和序列号 (见设 NCC WAX510D LAN MAC (S/N)
备上的标签)。
注意:WAX510D 将自动进入云管理模式,并在注册到站点后重启。有关通过
NCC NCC配置 的更多信息,请参见 WAX510D 用户指南。
在 建立組織及網站 (網路)。NCC
在 設定畫面中輸入 的 位址和序號 ( )(請參閱裝NCC WAX510D LAN MAC S/N
置上的標籤)。
註:WAX510D 會自動進入雲端管理模式,並在註冊到網站後重新啟動。有關透
過 設定 的更多資訊,請參閱 使用手冊。NCC WAX510D NCC
SE
BG
RO
简中
繁中
SE
BG
RO
简中
繁中
Ladda ned och öppna appen . Logga in med ditt Zyxel Nebula Mobile
myZyxel-konto.
Skapa en organisation och site eller välj en redan befintlig site. Skanna
WAX510D:s QR-kod för att lägga till den till siten. (Du hittar QR-koden i
dess webbkonfigurator eller på en etikett på enheten eller dess box.)
Obs : WAX510D öppnar molnhanteringsläget automatiskt och startar om
efter den är registrerad på en sida.
Descărcați și deschideți aplicația mobilă Zyxel Nebula. Conectați-vă la
contul myZyxel.
Creați o organizație și un site sau selectați un site existent. Scanați codul
QR al dispozitivului WAX510D pentru a-l adăuga la site. Puteți găsi codul (
QR în configuratorul web sau pe o etichetă de pe dispozitiv sau de pe
cutia acestuia.)
Notă :Dispozitivul WAX510D va intra automat în modul de gestionare
cloud și va reporni după ce este înregistrat pe un site.
Изтеглете и отворете мобилното приложение Влезте със своя Zyxel Nebula.
акаунт в myZyxel.
Създайте организация и или изберете съществуващ Сканирайте сайт сайт. QR
кода кода WAX510D, на за да го Можете добавите към сайта. ( QR да намерите в
този конфигуратор или на на устройството или уеб етикета кутията му.)
Забележка автоматично влезе в режим на управление на облака: WAX510D ще
и рестартира след регистрира към даден ще се , като се сайт.
Загрузите и запустите приложение Войдите в свой . Zyxel Nebula Mobile
аккаунт на myZyxel.
Создайте организацию и сетевой сайт или выберите существующий
сайт. Отсканируйте -код , чтобы добавить его к сайту.QR WAX510D
(QR-код указан в веб-конфигураторе, а также на этикетке на упаковке
или на корпусе устройства.)
Примечание : После регистрации устройства на сайте оно WAX510D
автоматически переключится в режим облачного управления и
перезапустится.
下载并打开 应用。使用您的 帐户登录。 Zyxel Nebula Mobile myZyxel
创建组织和站点或选择现有站点。扫描 的二维码,将它添加到站点中。WAX510D
(您可以在 web 配置程序中找到这个二维码;也可在设备或其包装盒上的标签上找
到。)
注意:WAX510D 将自动进入云管理模式,并在注册到站点后重启。
下載並打開 應用程式。使用您的 帳號登入。建立 Zyxel Nebula Mobile myZyxel
組織及網站,或選取現有的網站。掃描 的 碼,以將其新增到網站。WAX510D QR
(您可以在其網頁設定介面、裝置上的標籤或包裝盒上找到 QR 碼。)
註:WAX510D 會自動進入雲端管理模式,並在註冊到網站後重新啟動。
SE
BG
RU
RO
简中
繁中
2
3
2
3
RU 2
3
2
3
2
3
2
3
1
1
1
RU
1
1
1
Cloud ManagementOption A
Login
https://nebula.zyxel.com
Sign In
Email
Password
Submit
https://nebula.zyxel.com
If you create a new site we can help you
configure it.
ORGANIZATION
https://nebula.zyxel.com
Register by MAC address and
serial number
MAC address Serial Number
OK
Option 1: Use MAC address serial number and to add
a device in the NCC
Where to find QR code:
Label on the deviceWeb Configurator
WAX510D
QR
Code
QR
Code
QR
Code
or
1
2
3
Copyright © 2020 Zyxel Communications Corp. All Rights Reserved.
EU Importer
Zyxel Communications A/S
Gladsaxevej 378, 2. th. 2860 Søborg, Denmark
US Importer
Zyxel Communications, Inc
1130 North Miller Street Anaheim, CA 92806-2001
See the User's Guide at www.zyxel.com for more information,
including customer support and safety warnings.
Support Information
Quick Start Guide
SVENSKA | ROMÂNĂ | БЪЛГАРСКИ | РУССКИЙ |
简体中文 繁體中文|
Hardware Installation
Från en WiFi-aktiverad dator söker du efter WAX510D:s standard-WiFi
nätverksnamn ( , där xxxx är de fyra sista tecknen i MAC-adressen) Zyxel-xxxx
och ansluter till den.
Öppna webbläsaren och skriv in "http://1.1.1.1" för den initiala konfigurationen.
Ange standardanvändarnamn ( ) och-lösenord ( ). Klicka på .admin 1234 Logga in
Obs : Om WAX510D inte kan ansluta till internet, använd WAX510D:s
DHCP-tilldelade IP-adress för att öppna dess webbkonfigurator. Kontrollera
den anslutna routern eller DHCP-servern för WAX510D:s IP-adress.
De pe un computer cu WiFi activat, căutați numele rețelei WiFi implicite a
dispozitivului WAX510D ( , unde xxxx reprezintă ultimele patru Zyxel-xxxx
caractere ale adresei MAC) și conectați-vă la aceasta.
Deschideți browserul web și introduceți „http://1.1.1.1” pentru configurația inițială.
Introduceți numele de utilizator implicit ( ) și parola ( ). Faceți clic pe admin 1234
Login.
Notă : Dacă WAX510D nu se poate conecta la internet, utilizați adresa IP a
WAX510D alocată de DHCP pentru a accesa configuratorul web al acestuia.
Verificați routerul sau serverul DHCP conectat pentru a afla adresa IP a
WAX510D.
От компютър с разрешена връзка потърсете името на мрежата по WiFi WiFi
подразбиране на WAX510D (Zyxel-xxxx, xxxx където са последните четири
знака от адреса и се свържете към нея MAC ) .
Отворете уеб браузъра и въведете за първоначална конфигурация "http://1.1.1.1" .
Въведете потребителското име по подразбиране и паролата (admin) (1234).
Натиснете Вход Login ( ).
Забележка : Ако WAX510D , не може да се свърже с Интернет използвайте
приписания от адрес на DHCP IP WAX510D . за достъп до уеб конфигуратора му
Проверете свързания маршрутизатор или сървър за адреса на DHCP IP
WAX510D.
На компьютере с активированным WiFi найдите название сети по WiFi
умолчанию WAX510D xxxx(Формат: , где Zyxel-xxxx — последние четыре
символа -адреса) и подсоединитесь к этой сети.MAC
Откройте веб-браузер и введите в начальных конфигурациях. "http://1.1.1.1"
Введите базовые имя пользователя и пароль Нажмите ( )admin ( ). 1234 Login
( ).Вход
Примечание : WAX510D , Если устройству не удается подключиться к интернету
подключитесь к веб конфигуратору устройства с использованием адреса - IP- WAX510D,
присвоенного сервером Проверьте адрес в настройках DHCP- . IP- WAX510D
подключенного роутера или сервера DHCP- .
使用有 功能的电脑搜索 默认 网络 ( , 是WiFi WAX510D WiFi Zyxel-xxxx xxxx MAC
地址的最后四个字符),并进行连接。
打开 web 浏览器,在地址栏中输入 进行初始配置。输入默认用户名 “http://1.1.1.1”
( ) ( ) admin 和密码 1234 ,单击 Login 进行登录。
注:如果 无法连接到互联网,请使用 的 指定的 地址来访WAX510D WAX510D DHCP IP
问其 配置程序。请检查连接的路由器或 服务器以获取 地址。Web DHCP WAX510D 的 IP
從可使用 的電腦搜尋 的預設 網路名稱 ,其中 WiFi WAX510D WiFi (Zyxel-xxxx xxxx 為
MAC 位址的最後四個字元)並連線。
開啟您的網頁瀏覽器並輸入「 」以進行初始設定。輸入預設使用者名稱http://1.1.1.1
( ) ( ) ( )admin 及預設密碼 1234 。按一下 Login 登入 。
註:如果 無法連接到網際網路,請使用 WAX510D WAX510D 的 DHCP 指派的 IP 位址來
存取網頁設定介面。請檢查連接的路由器或 DHCP 伺服器以取得 WAX510D 的 IP 位址。
1-a
1-a
1-a
1-a
1-a
SE
BG
1-a
RU
简中
繁中
RO
Option B Standalone Management
Zyxel-xxxx
Wireless Network Connection
XXXX
http://1.1.1.1 (First time
configuration only)
User Name: admin
Login Password: 1234
(default)
1234
Login
User Name
Password
admin
WAX510D
http://1.1.1.1
1-a WiFi connection
SE
BG
简中
繁中
RO
Anslut -porten till en router med internetanslutning. Om du inte UPLINK
använder PoE, anslut eluttaget till en lämplig strömkälla.
Conectați portul la un router cu acces la internet. Dacă nu UPLINK
utilizați PoE, conectați mufa de alimentare la o sursă de alimentare
adecvată.
Свържете порта за към маршрутизатор с достъп Интернет не UPLINK до . Ако
използвате свържете захранващото гнездо към източник на PoE, подходящ
захранване.
Подключите порт к роутеру с доступом в интернет.UPLINK Если питание PoE
не используется, подсоедините гнездо питания к надлежащему
источнику питания.
将 端口连接到能够访问互联网的路由器。 如果您不使用 UPLINK PoE,请将电源插
座连接至适当的电源。
將 埠連接到能存取網際網路的路由器。 未使用 時,請將電源插槽連接 UPLINK PoE
至適當的電源。
RU
802.11ax (WiFi 6) Dual-Radio Option 2: Use Zyxel Nebula Mobile app to add a
device in the NCC
Nebula Mobile
Wait until the LED
blinks green
https://www.zyxel.com/dk/da/
https://www.zyxel.com/us/en/
Router PoE Switch Power Outlet
Taiwan
+ 886 2 2739 9889
retail@zyxel.com.tw
EU, Russia
https://support.zyxel.eu
OR
WAX510D Ground first for
additional protection
Produktspezifikationen
| Marke: | ZyXEL |
| Kategorie: | Zugangspunkt |
| Modell: | WAX510D |
| Breite: | 180 mm |
| Tiefe: | 180 mm |
| Gewicht: | 453 g |
| Produktfarbe: | Weiß |
| Höhe: | 39 mm |
| Platzierung: | Ceiling, Wall |
| AC Eingangsspannung: | 12 V |
| Antennentyp: | Intern |
| Betriebstemperatur: | 0 - 50 °C |
| Relative Luftfeuchtigkeit in Betrieb: | 10 - 90 % |
| Verpackungsbreite: | 229 mm |
| Verpackungstiefe: | 215 mm |
| Verpackungshöhe: | 64 mm |
| Paketgewicht: | 770 g |
| Netzstandard: | IEEE 802.11a, IEEE 802.11ac, IEEE 802.11ax, IEEE 802.11b, IEEE 802.11g, IEEE 802.11n |
| Unterstützte Sicherheitsalgorithmen: | WPA, WPA-Enterprise, WPA-PSK |
| Zertifizierung: | FCC Part 15B\nEN 301 489-1\nEN 301 489-17\nEN55022\nEN55024\nEN61000-3-2/-3\nEN60601-1-2\nBSMI CNS13438 |
| Stromverbrauch (Standardbetrieb): | 17 W |
| Power over Ethernet (PoE): | Ja |
| Warentarifnummer (HS): | 85176990 |
| Maximale Datenübertragungsrate: | 1775 Mbit/s |
| 2,4 GHz: | Ja |
| Antenne Zunahmeniveau (max): | 6 dBi |
| Anzahl der Antennen: | 2 |
| Temperaturbereich bei Lagerung: | -30 - 70 °C |
| Luftfeuchtigkeit bei Lagerung: | 10 - 95 % |
| Web-basiertes Management: | Ja |
| VLAN-Unterstützung: | Ja |
| Eingangsstrom: | 1.5 A |
| 5 GHz: | Ja |
| WLAN-Multimedia (WMM)/(WME): | Ja |
| Maximale Datenübertragungsrate (5 GHz): | 1200 Mbit/s |
| MIMO: | Ja |
| MIMO-Typ: | Multi User MIMO |
| Maximale Datenübertragungsrate (2,4 GHz): | 575 Mbit/s |
Brauchst du Hilfe?
Wenn Sie Hilfe mit ZyXEL WAX510D benötigen, stellen Sie unten eine Frage und andere Benutzer werden Ihnen antworten
Bedienungsanleitung Zugangspunkt ZyXEL

21 Juli 2024
21 Juli 2024
20 Juli 2024
19 Juli 2024
19 Juli 2024
2 April 2024
23 März 2024
6 November 2023
26 September 2023
13 Mai 2023
Bedienungsanleitung Zugangspunkt
- Zugangspunkt Asus
- Zugangspunkt HP
- Zugangspunkt Macally
- Zugangspunkt Bosch
- Zugangspunkt Buffalo
- Zugangspunkt Allnet
- Zugangspunkt Devolo
- Zugangspunkt Eminent
- Zugangspunkt Linksys
- Zugangspunkt Netgear
- Zugangspunkt Renkforce
- Zugangspunkt Fortinet
- Zugangspunkt Netis
- Zugangspunkt Aruba
- Zugangspunkt Lindy
- Zugangspunkt Dell
- Zugangspunkt Mercusys
- Zugangspunkt Honeywell
- Zugangspunkt TRENDnet
- Zugangspunkt AVM
- Zugangspunkt Zebra
- Zugangspunkt TP-Link
- Zugangspunkt Black Box
- Zugangspunkt Techly
- Zugangspunkt Hercules
- Zugangspunkt Huawei
- Zugangspunkt Edimax
- Zugangspunkt DrayTek
- Zugangspunkt Totolink
- Zugangspunkt D-Link
- Zugangspunkt Digitus
- Zugangspunkt DataVideo
- Zugangspunkt Lancom
- Zugangspunkt LevelOne
- Zugangspunkt Cisco
- Zugangspunkt Grandstream
- Zugangspunkt Tenda
- Zugangspunkt Ubiquiti Networks
- Zugangspunkt Intellinet
- Zugangspunkt Bintec-elmeg
- Zugangspunkt Planet
- Zugangspunkt EnGenius
- Zugangspunkt Mikrotik
- Zugangspunkt Moog
- Zugangspunkt Homematic IP
- Zugangspunkt EQ3
- Zugangspunkt Comtrend
- Zugangspunkt INCA
- Zugangspunkt Media-tech
- Zugangspunkt Mercku
- Zugangspunkt Mojo
- Zugangspunkt Sitecom
- Zugangspunkt SMC
- Zugangspunkt Steren
- Zugangspunkt AMX
- Zugangspunkt Vimar
- Zugangspunkt Cudy
- Zugangspunkt Moxa
- Zugangspunkt StarTech.com
- Zugangspunkt AirLive
- Zugangspunkt Kingston
- Zugangspunkt LigoWave
- Zugangspunkt Dahua Technology
- Zugangspunkt Speco Technologies
- Zugangspunkt Atlantis Land
- Zugangspunkt Cradlepoint
- Zugangspunkt SilverNet
- Zugangspunkt Advantech
- Zugangspunkt Juniper
- Zugangspunkt Insteon
- Zugangspunkt Crestron
- Zugangspunkt 3Com
- Zugangspunkt WatchGuard
- Zugangspunkt Aerohive
- Zugangspunkt V7
- Zugangspunkt Syscom
- Zugangspunkt Silex
- Zugangspunkt NUVO
- Zugangspunkt Mach Power
- Zugangspunkt IP-COM
- Zugangspunkt ICC
- Zugangspunkt Amer
- Zugangspunkt Allied Telesis
- Zugangspunkt Hawking Technologies
- Zugangspunkt Cambium Networks
- Zugangspunkt Brocade
- Zugangspunkt Extreme Networks
- Zugangspunkt Bountiful
- Zugangspunkt Meru
- Zugangspunkt Amped Wireless
- Zugangspunkt Ruckus Wireless
- Zugangspunkt Premiertek
- Zugangspunkt FlyingVoice
- Zugangspunkt Luxul
Neueste Bedienungsanleitung für -Kategorien-

2 Dezember 2024
13 Oktober 2024

11 Oktober 2024
8 Oktober 2024
4 Oktober 2024
4 Oktober 2024
1 Oktober 2024

1 Oktober 2024

29 September 2024
28 September 2024