Venom Hurricane Bedienungsanleitung
Lesen Sie kostenlos die 📖 deutsche Bedienungsanleitung für Venom Hurricane (2 Seiten) in der Kategorie Regler. Dieser Bedienungsanleitung war für 16 Personen hilfreich und wurde von 2 Benutzern mit durchschnittlich 4.5 Sternen bewertet
Seite 1/2
English
Hurricane Steering Wheel
Model number: VS2728
User Guide
The officially licensed Hurricane Steering Wheel is designed especially for PS4™ and
PS3™ to give you the extra edge to beat even your toughest opponents. Built-in
motors transmit vibrations from the racetrack straight into your steering wheel and
give you a feel for the action (if the game you play supports vibration functions),
whilst the ergonomic design provides fatigue-free comfort over long gaming
sessions.
We hope you enjoy your Hurricane Steering Wheel!
Note:
When playing your Hurricane Steering Wheel it may be necessary to change
the button configuration to suit your personal preference. The default button
configuration may also differ between games. Your PS4™ recognises the Hurricane
Steering Wheel as a DualShock®4 controller, not a steering wheel. Therefore to change
the button configuration go into settings on your game, select DualShock®4 Wireless
controller, not Steering Wheel and select Button Configuration.
Features and Specifications
• Vibration feedback effects for realistic racing experiences
• Rubber coated steering wheel for a perfect grip
• Gear shifter
• Suction cups for perfect stability
• Sensitivity settings to adjust settings to your personal driving style
• 270 degree rotation
• Auto-centering function
• 2-axis Directional Pad
• Includes foot pedals
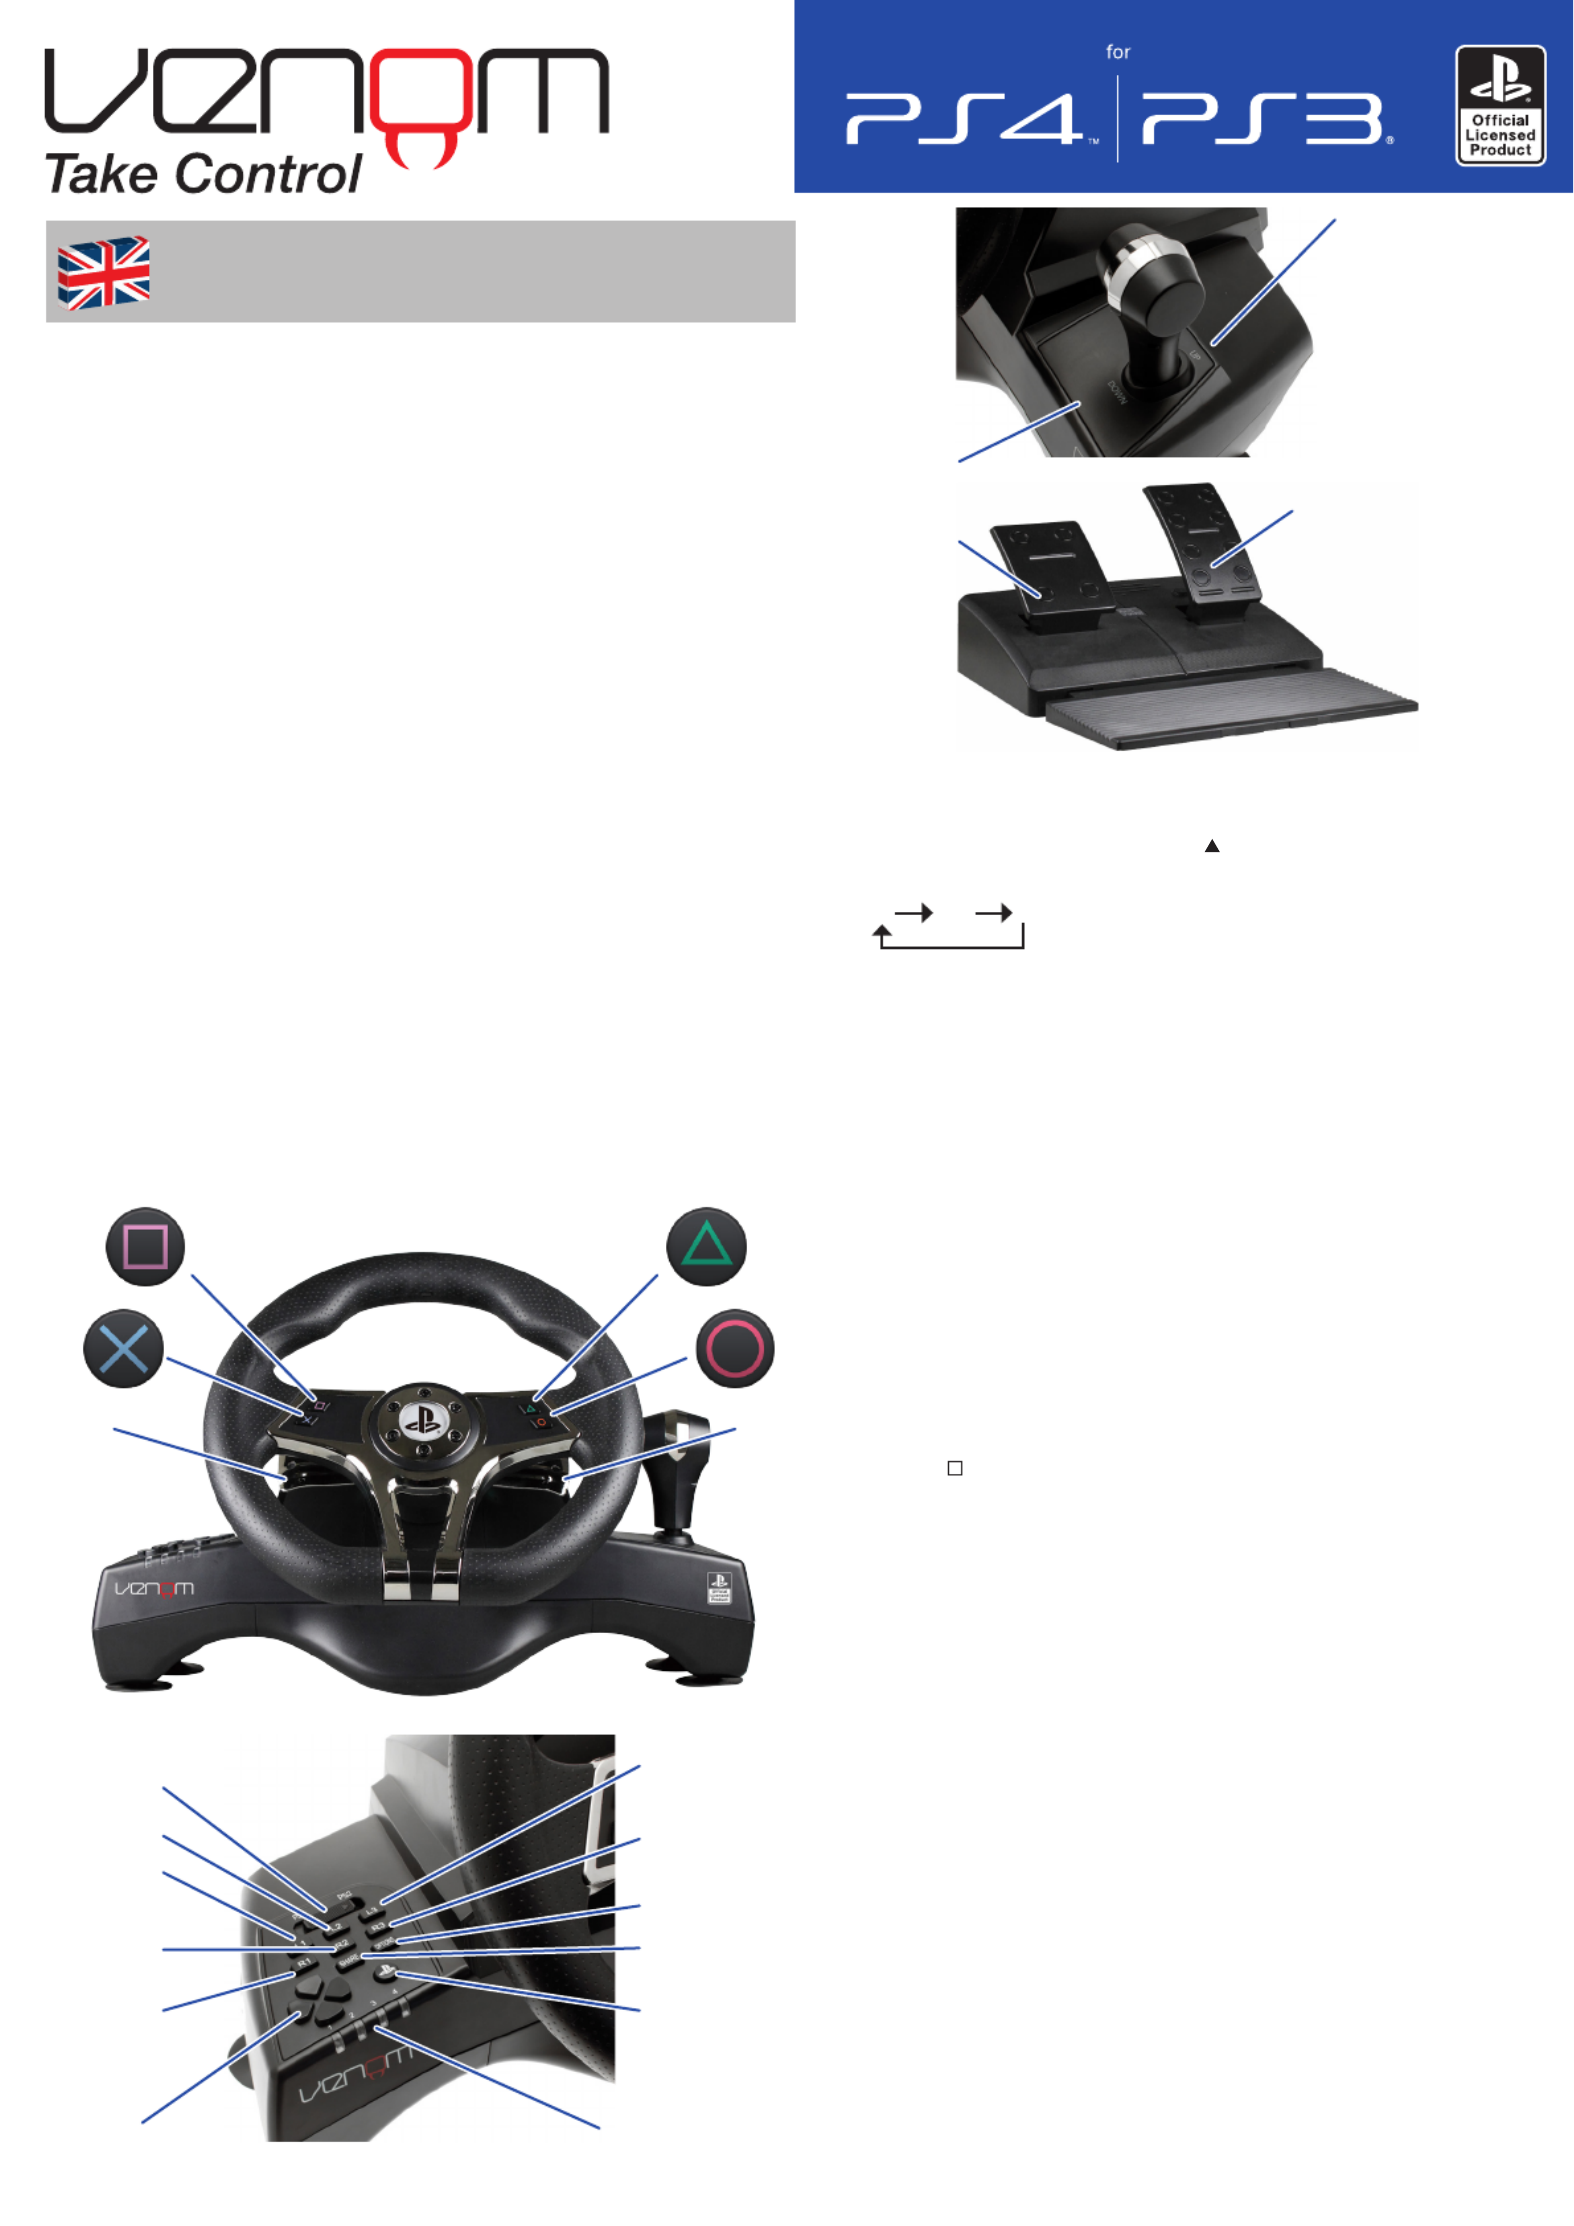
Button Layout
Wheel Sensitivity:
Please select a wheel sensitivity that suits your racing style.
You may choose between Low (default), Mid, and High.
Press and hold the “L-WING”, “R-WING” and “ ” buttons simultaneously to change
the sensitivity settings, please hold until the RED LED light (above the Venom Logo)
flashes.
LO MID HI
Connection and Installation with PlayStation®3:
a: Connect the pedals to the wheel.
b: Turn the switch to PS3™ and plug the wheel cable into the USB port of your PS3™
System. Switch on your PS3™.
c: Channel LEDs will be ON when the wheel is connected.
d: Once your PS3™ is connected you may start the game or change the settings of
your game or system.
Operating Methods
• Channel LED’s start flashing when the wheel is connected. Press the “PS“ button
to select a channel. The LED of the operating channel will be on when a channel is
selected.
• Press the “PS” button to enter the XMB™
menu interface when playing PS3™ games.
Press the “PS” button again to quit. Press the PS button twice quickly to enter each
main settings menu.
• 4 LED’s represent the operating channels: LED 1 to 4 represent channels 1 to 4
respectively. LED1+LED4 represent channel 5. LED2+LED4 represent channel 6,
LED3+LED4 represent channel 7.
For PS3TM games, the foot pedals can be assigned to:
• L-Pedal: button or L2 button
• R-Pedal: X button or R2 button
• Press the SHARE and OPTIONS buttons together for one second to change the
controls layout.
NOTE: Each time you unplug the wheel cable from the system or restart the system,
you need to press the “PS” button to select a channel for standard operation.
Connection and Installation with PlayStation®4:
a: Turn the switch to PS4™ and connect the pedals to the wheel.
b. Plug the wheel cable into the USB port of your PS4™ console. Switch on your PS4™.
c: Press the “PS” button to select a channel. Channel LED1 is ON.
d: Once your PS4™ is connected you may start the game or change the settings of
your game or system.
Operating Methods
• Connect the pedals to the wheel.
• Press the “PS” button to enter the PS4™ system menu when playing PS4™ games.
• Press the “PS” button twice quickly to switch between applications in use.
• Hold down the “PS” button to close an application, log out or turn off the PS4™
system.
Button Configuration
When using your Hurricane Steering Wheel it may be necessary to change the button
configuration to suit your personal preference. The default button configuration may
also differ between games. Your PS4™ recognises the Hurricane Steering Wheel as a
DualShock®4 controller, not a steering wheel. Therefore to change the button configura-
tion go into settings on your game, select DualShock®4 Wireless controller, not Steering
Wheel and select Button Configuration.
Firmware Update
Gear Up
Gear Down
Brake
Accelerator/Gas
L-Wing R-Wing
PS4/PS3 Switch L3 Button
R3 Button
Options Button
Share Button
PS Button
Channel LED’s
L2 Button
L1 Button
R2 Button
R1 Button
Directional buttons
Up/down/left/right

• Download Firmware and an update program from:
http://ps4wheel.asian-games.com.tw
• Install the update program (HJC32F1200_ISP_V14_Setup.exe)
• Run HJC32F1200_ISP_V14
• Connect the steering wheel to the PC USB port
• Press “Load File” and select “firmware” (update.bin)
• Press “Run” to update.
• When it shows “ISP OK” this means that the firmware update is complete.
Mode Change
• Choose between two modes : Gamepad mode (default) and Gaming Wheel mode
• Press “L-WING” ”R-WING” and “O” keys for one second at the same time. LED1 will
then turn off. Press the “PS” button to switch to “Gaming Wheel” mode, LED2 will
then turn ON.
Please note: ‘Need for Speed Rivals’ only supports Gamepad mode. ‘Drive Club’
supports both “Gamepad” & “Gaming Wheel” mode (for best results use Gaming
Wheel mode).
PS4™ is a registered trademark or trademark of Sony®.
Care and Maintenance
Your device is a product of superior design and craftsmanship and should be treated
with care. The suggestions below will help you to protect your warranty coverage:
• Keep your device out of the reach of small children.
• Keep the device dry. Precipitation, humidity and all types of liquid or moisture
can contain minerals that will corrode electronic circuits. If your device does get
wet, allow it to dry completely.
• Do not use or store the device in dusty, dirty areas, as moving parts and
electronic components of your device can be damaged.
• Do not use or store the device in hot areas. High temperatures can shorten the
life of electronic devices, damage batteries and warp or melt certain plastics.
• Do not use or store the device in cold areas. When the device returns to
its normal temperature, moisture can form inside the device and damage
electronic circuit boards.
• Do not drop, knock or shake the device. Rough handling can break internal
circuit boards and fine mechanics.
• Do not use harsh chemicals, cleaning solvents or strong detergents to clean the
device. All of the previous suggestions apply equally to your device, battery,
charger or any enhancements.
• The crossed out wheelie bin symbol on the product means that under the
WEEE regulations, all consumer and household electrical and electronic
products should not be mixed with general household waste as it may contain
environmentally hazardous substances. For environmentally responsible
recovery, recycling and treatment of the product, contact your local authority
for details of your nearest designated collection point where it will be accepted
free of charge.
Warranty:
This product is guaranteed by Venom Ltd for a period of 2 years from the date
of purchase. During this period if there is a defect due to faulty materials or
workmanship, the retailer from whom you purchased it will replace it with the same
or a similar model on production of your purchase receipt or proof of purchase. This
guarantee does not cover defects arising from accidental damage, misuse or wear
and tear, and is available only to the original purchaser of the product. This does not
affect your statutory rights.
Helpline Information:
The helpline is a one-to-one live service.
Hours: 9.00am - 5.00pm Monday to Thursday
9.00am – 4.30pm Friday
Tel: +44 (0) 1763 284181
Email: customerservice@venomuk.com
Website: www.venomuk.com
To ensure that your call is handled quickly and efficiently please check that you
have the model number VS2728 and any other relevant information regarding your
product at the time of your call.
EU & Turkey Only
Manufactured by Asian Games Corporation.
Venom Ltd. Solution House, Sandon Road, Therfield, Hertfordshire SG8 9RE.
Venom is a trademark of Venom Ltd.
www.venomuk.com
For use exclusively with PlayStation®4 and PlayStation®3 in PAL markets.
“ “, “PlayStation“, “ “ and “ “ are registered trademarks of Sony Computer Enter-
tainment Inc. Also “ “ is a trademark of the same company. All rights reserved.
Produktspezifikationen
| Marke: | Venom |
| Kategorie: | Regler |
| Modell: | Hurricane |
Brauchst du Hilfe?
Wenn Sie Hilfe mit Venom Hurricane benötigen, stellen Sie unten eine Frage und andere Benutzer werden Ihnen antworten
Bedienungsanleitung Regler Venom

9 August 2024
Bedienungsanleitung Regler
- Regler Samsung
- Regler Asus
- Regler Belkin
- Regler Gembird
- Regler Genius
- Regler Hama
- Regler HP
- Regler HyperX
- Regler Logitech
- Regler Microsoft
- Regler Nacon
- Regler Nedis
- Regler Niceboy
- Regler Saitek
- Regler Sony
- Regler SteelSeries
- Regler Sweex
- Regler T'nB
- Regler Targus
- Regler Trust
- Regler Bosch
- Regler Canon
- Regler Velleman
- Regler Hori
- Regler König
- Regler Thomson
- Regler Kenwood
- Regler Schneider
- Regler Pyle
- Regler Mitsubishi
- Regler Bose
- Regler Denon
- Regler Pioneer
- Regler JBL
- Regler One For All
- Regler Vivanco
- Regler BeamZ
- Regler Akai
- Regler Tascam
- Regler Zoom
- Regler Perel
- Regler Aruba
- Regler Lindy
- Regler Thrustmaster
- Regler TOA
- Regler MSI
- Regler Tripp Lite
- Regler Marshall
- Regler Razer
- Regler Honeywell
- Regler Marshall Electronics
- Regler SBS
- Regler DJI
- Regler Parrot
- Regler Reely
- Regler Zebra
- Regler Broan
- Regler Adj
- Regler Supermicro
- Regler Genesis
- Regler Thermaltake
- Regler Behringer
- Regler Mackie
- Regler Numark
- Regler Eurolite
- Regler Monoprice
- Regler Monacor
- Regler Huawei
- Regler JUNG
- Regler Hunter
- Regler Esperanza
- Regler Lumens
- Regler Korg
- Regler DataVideo
- Regler Manfrotto
- Regler Tracer
- Regler Cisco
- Regler Boss
- Regler Synology
- Regler Saramonic
- Regler Kramer
- Regler Irritrol
- Regler Jumbo
- Regler Vaddio
- Regler RCA
- Regler Datalogic
- Regler HQ Power
- Regler Nintendo
- Regler Kicker
- Regler Speed-Link
- Regler DBX
- Regler Draper
- Regler Hikvision
- Regler Radial Engineering
- Regler Rain Bird
- Regler Sven
- Regler PreSonus
- Regler ART
- Regler Senal
- Regler PDP
- Regler IK Multimedia
- Regler Krom
- Regler ASTRO Gaming
- Regler Gamesir
- Regler Fusion
- Regler GeoVision
- Regler Gossen Metrawatt
- Regler Icon
- Regler IHome
- Regler Media-tech
- Regler Naxa
- Regler PCE Instruments
- Regler Robitronic
- Regler Schaudt
- Regler SecurityMan
- Regler Steca
- Regler AMX
- Regler Universal Remote Control
- Regler Vizio
- Regler Siig
- Regler Intel
- Regler Zephyr
- Regler RGBlink
- Regler StarTech.com
- Regler Konix
- Regler Monster
- Regler Niles
- Regler Gefen
- Regler Polsen
- Regler Inovonics
- Regler Atlantis Land
- Regler Atlas Sound
- Regler Magnus
- Regler LSI
- Regler ATen
- Regler Morningstar
- Regler KanexPro
- Regler Lab Gruppen
- Regler SPL
- Regler SmartAVI
- Regler Natec
- Regler EtiamPro
- Regler Chauvet
- Regler Premier Mounts
- Regler Juniper
- Regler Phoenix Contact
- Regler Music Hall
- Regler Audac
- Regler OSD Audio
- Regler BZBGear
- Regler DreamGEAR
- Regler Crestron
- Regler GOgroove
- Regler PowerA
- Regler Atlona
- Regler LYYT
- Regler Elite Screens
- Regler Bigben Interactive
- Regler Rolls
- Regler Sonifex
- Regler Leviton
- Regler Apricorn
- Regler 8BitDo
- Regler Alfatron
- Regler Highpoint
- Regler Steelplay
- Regler AViPAS
- Regler Auray
- Regler Vakoss
- Regler Areca
- Regler Savio
- Regler Heritage Audio
- Regler Tru Components
- Regler Ltech
- Regler CTA Digital
- Regler Canyon
- Regler MuxLab
- Regler Kanlux
- Regler EXSYS
- Regler Amer
- Regler ALC
- Regler LumenRadio
- Regler Moza
- Regler Axor
- Regler Valcom
- Regler AirTurn
- Regler Dangerous Music
- Regler Clarity
- Regler Softube
- Regler RiotPWR
- Regler IPEGA
- Regler Dadson
- Regler Blizzard Lighting
- Regler Heath Zenith
- Regler Re.corder
- Regler Mitzu
- Regler CoolerMaster
- Regler Dragonshock
- Regler MOGA
- Regler HuddleCamHD
- Regler PTZ Optics
- Regler Balam Rush
Neueste Bedienungsanleitung für -Kategorien-
16 Oktober 2024
16 Oktober 2024
5 Oktober 2024
4 Oktober 2024

3 Oktober 2024
1 Oktober 2024
Hori Force Feedback Truck Control System Bedienungsanleitung
1 Oktober 2024
30 September 2024
27 September 2024