StarTech.com PEX1P2 Bedienungsanleitung
StarTech.com
Drucker
PEX1P2
Lesen Sie kostenlos die 📖 deutsche Bedienungsanleitung für StarTech.com PEX1P2 (2 Seiten) in der Kategorie Drucker. Dieser Bedienungsanleitung war für 25 Personen hilfreich und wurde von 2 Benutzern mit durchschnittlich 4.5 Sternen bewertet
Seite 1/2
Quick-Start Guide
To view manuals, FAQs, videos, drivers, downloads, technical drawings, and more, visit www.startech.com/support.
Manual Revision: September 11, 2020
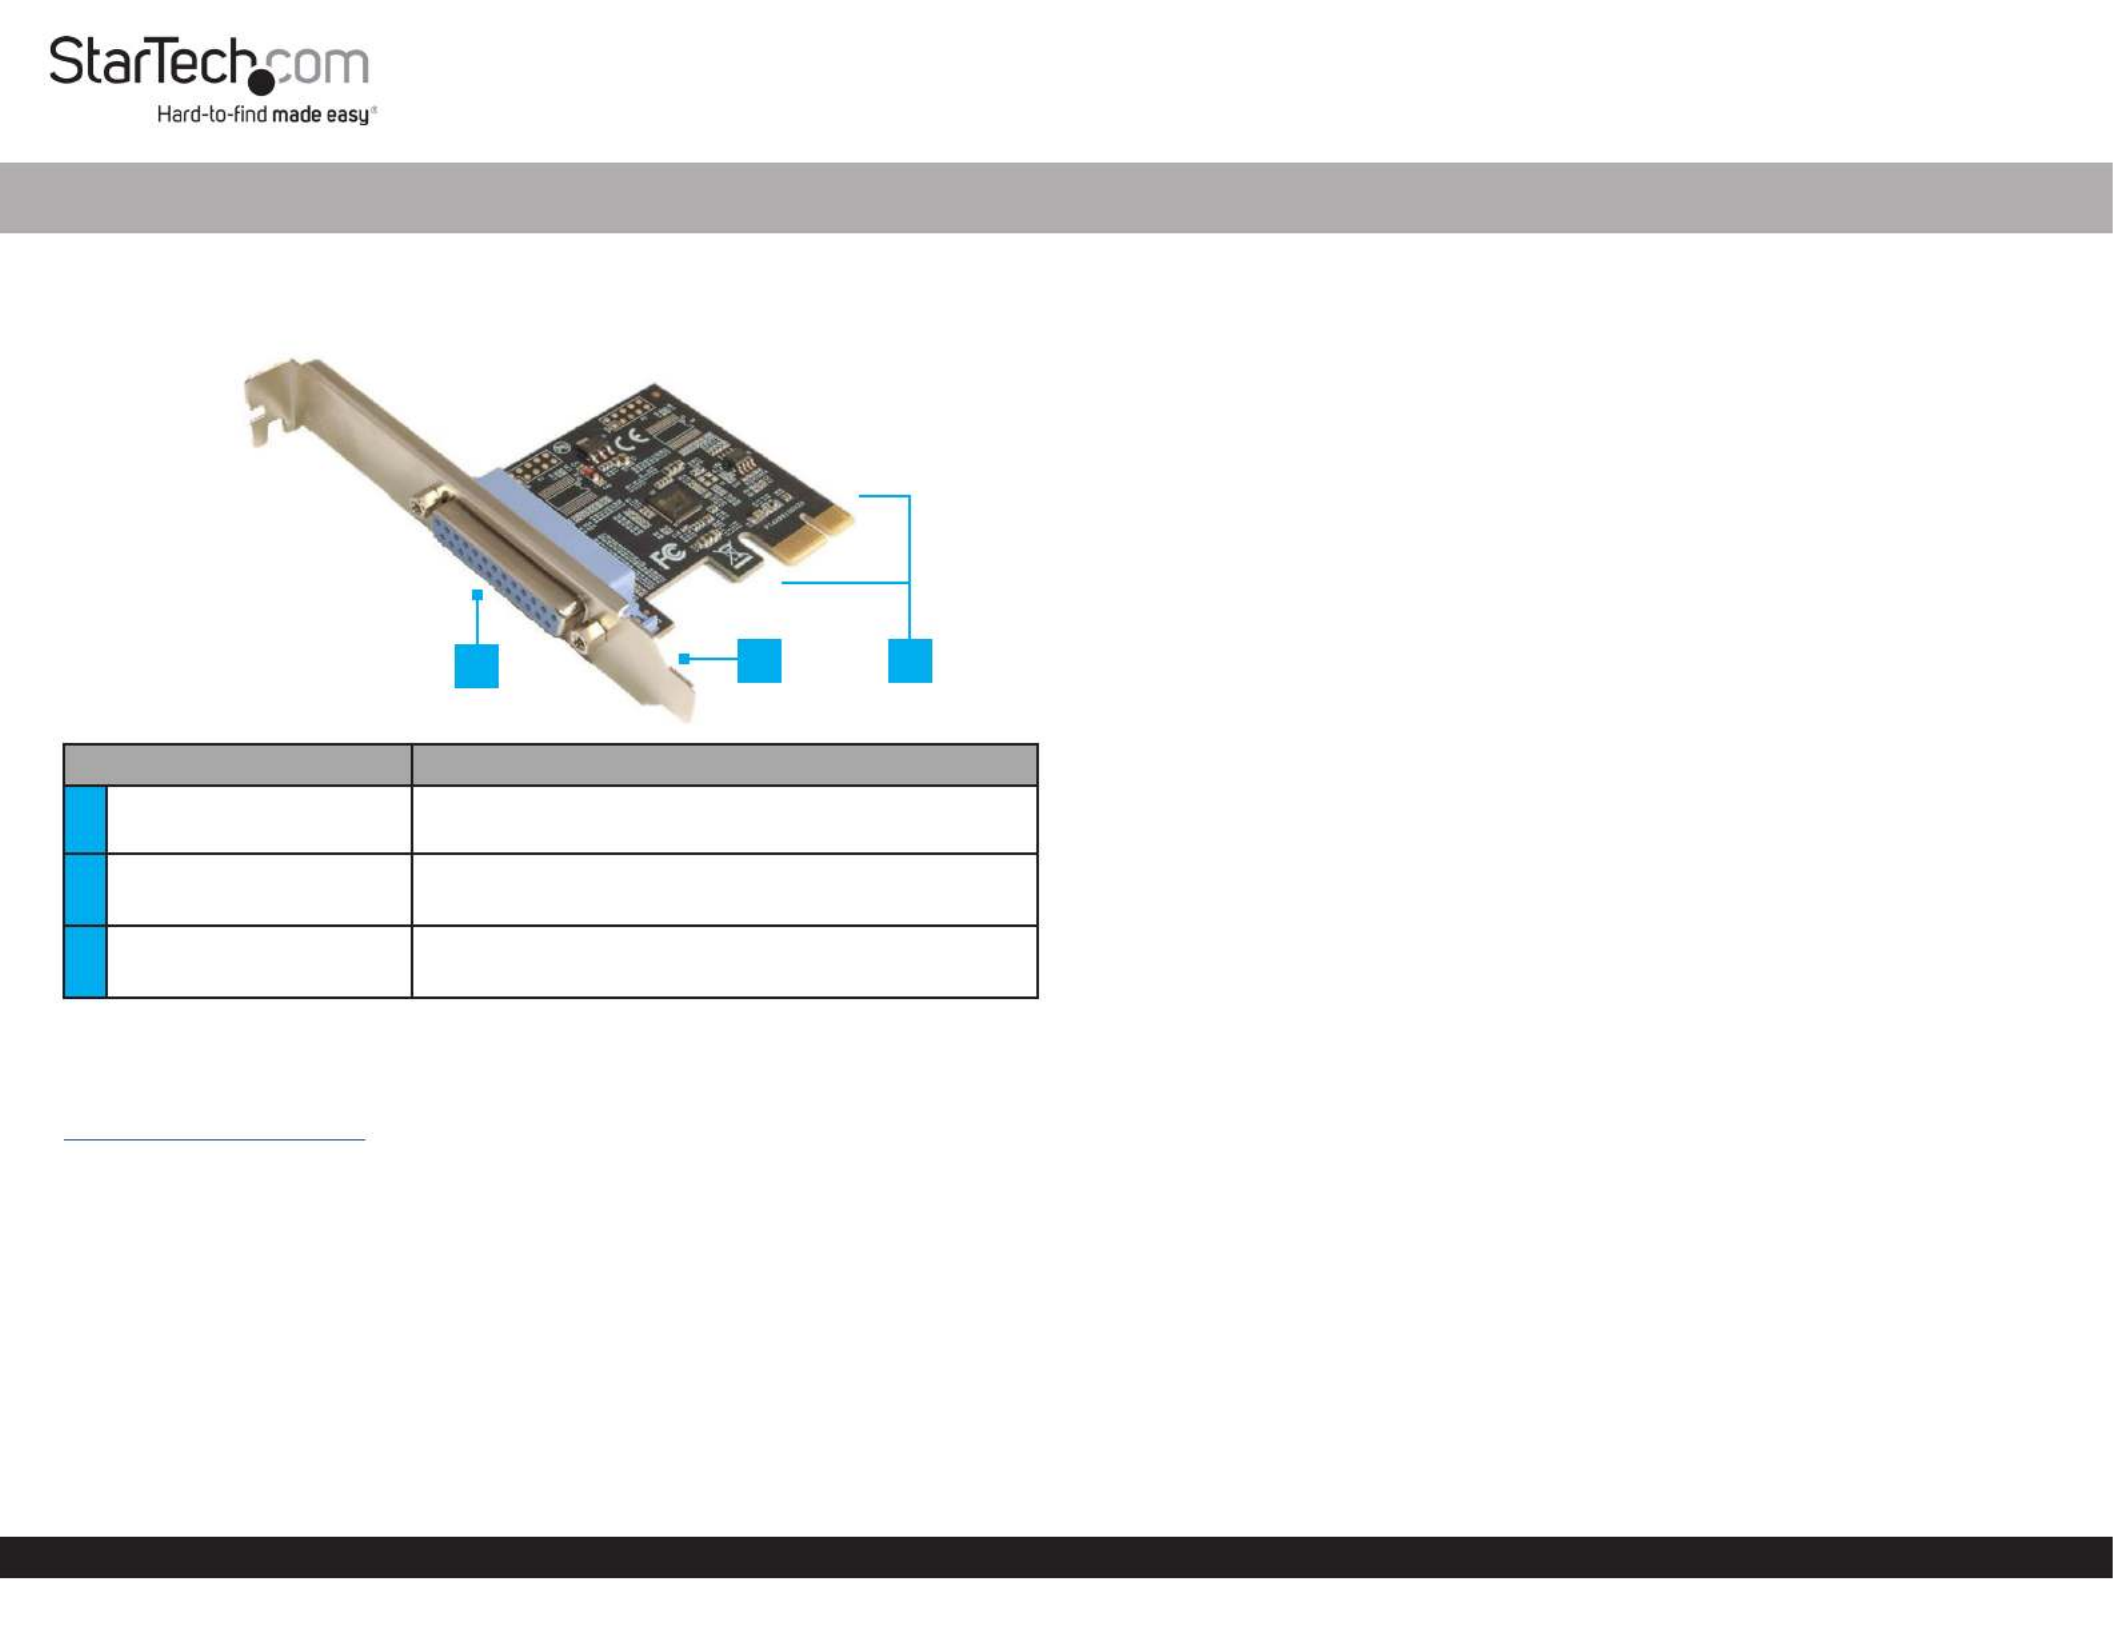
Product Diagram (PEX1P2)
Front Angle View
Port Function
1Parallel Port • Female DB-25 Parallel Port
2Bracket • Congurable for and Full Prole Low Height
installations
3PCIe p1-x1 Connector • Connect the to the Parallel Adapter Card PCI
Express Slot Computer in the
Requirements
For the latest requirements, please visit:
www.startech.com/PEX1P2.
• Computer with an available PCI Express slot (x1)
Tools
• Small Phillips Head Screwdriver
Hardware Installation
Warning: Parallel Adapter Cards can be damaged by static electricity. Make sure
that the is properly grounded before they open the or touch Installer Computer Case
the . The should wear an when Parallel Adapter Card Installer Anti-Static Strap
installing any computer component. If an is not available, discharge Anti-Static Strap
any built-up static electricity by touching a large for several Grounded Metal Surface
seconds. Only handle the by its edges and do not touch the Parallel Adapter Card
gold connectors.
1 Port PCI Express Dual Prole Parallel Adapter Card - SPP/EPP/ECP®
Installing the Low Prole Bracket
By default the is attached to the . Full Prole Bracket Parallel Adapter Card
Depending on the system conguration it may be necessary to remove the Full Prole
Bracket Low Prole Bracket and replace it with the (included).
1. Using a , remove the two securing Small Phillips Head Screwdriver Bracket Screws
the to the .Full Prole Bracket Parallel Adapter Card
2. Align the on the with the on the Screw Holes Parallel Adapter Card Screw Holes
Low Prole Bracket Parallel Adapter Card. Making sure the is sitting on-top of the
Screw Holes Low Prole Bracket on the .
3. Insert the through the and into the Bracket Screws Parallel Adapter Card Screw
Holes Low Prole Bracket on the .
4. Using the , tighten the being Small Phillips Head Screwdriver Bracket Screws,
careful not to over-tighten.
Installing the Parallel Adapter Card
1. Turn o the and any that are connected Computer Peripheral Devices
(e.g. printers, external hard drives, etc.).
2. Unplug the from the rear of the and disconnect any Power Cable Computer
Peripheral Devices that are connected.
3. Remove the from the . Cover Computer Case
Note: Consult the documentation that came with the for details about Computer
how to do this safely.
4. Locate an open (x1) and remove the corresponding PCI Express Slot Metal Cover
Plate Computer Case Metal Cover Plate from the rear of the . In most instances, the
is attached to the rear of the with a single . Save this Computer Case Screw Screw
for the next step.
5. Gently insert the into the open and fasten Parallel Adapter Card PCI Express Slot
the to the rear of the using the from step 4. Bracket Computer Case Screw
6. Place the back onto the . Cover Computer Case
7. Reconnect the to the rear of the .Power Cable Computer
8. Reconnect all of the that were disconnected in step 2.Peripheral Devices
9. Connect a to the on theSPP/EPP/ECP Peripheral Device Parallel Port Parallel
Adapter Card.
3
12

FCC Compliance Statement
This equipment has been tested and found to comply with the limits for a Class B digital device, pursuant to part 15 of the FCC
Rules. These limits are designed to provide reasonable protection against harmful interference in a residential installation.
This equipment generates, uses and can radiate radio frequency energy and, if not installed and used in accordance with the
instructions, may cause harmful interference to radio communications. However, there is no guarantee that interference will not
occur in a particular installation. If this equipment does cause harmful interference to radio or television reception, which can be
determined by turning the equipment o and on, the user is encouraged to try to correct the interference by one or more of the
following measures:
• Connect the equipment into an outlet on a circuit dierent from that to which the receiver is connected.
• Consult the dealer or an experienced radio/TV technician for help
This device complies with part 15 of the FCC Rules. Operation is subject to the following two conditions:
(1) This device may not cause harmful interference, and (2) this device must accept any interference received, including
interference that may cause undesired operation. Changes or modications not expressly approved by StarTech.com could void
the user’s authority to operate the equipment.
Industry Canada Statement
This Class B digital apparatus complies with Canadian ICES-003.
Cet appareil numérique de la classe [B] est conforme à la norme NMB-003 du Canada.
CAN ICES-3 (B)/NMB-3(B)
This device complies with Industry Canada licence-exempt RSS standard(s). Operation is subject to the following two conditions:
(1) This device may not cause interference, and (2) This device must accept any interference, including interference that may
cause undesired operation of the device.
Le présent appareil est conforme aux CNR d’Industrie Canada applicables aux appareils radio exempts de licence. L’exploitation
est autorisée aux deux conditions suivantes:
(1) l’appareil ne doit pas produire de brouillage, et (2) l’utilisateur de l’appareil doit accepter tout brouillage radioélectrique subi,
même si le brouillage est susceptible d’en compromettre le fonctionnement.
Use of Trademarks, Registered Trademarks, and other Protected Names and Symbols
This manual may make reference to trademarks, registered trademarks, and other protected names and/or symbols of third-
party companies not related in any way to StarTech.com. Where they occur these references are for illustrative purposes only
and do not represent an endorsement of a product or service by StarTech.com, or an endorsement of the product(s) to which
this manual applies by the third-party company in question. StarTech.com hereby acknowledges that all trademarks, registered
trademarks, service marks, and other protected names and/or symbols contained in this manual and related documents are the
property of their respective holders.
PHILLIPS® is a registered trademark of Phillips Screw Company in the United States or other countries.
Warranty Information
This product is backed by a two-year warranty.
For further information on product warranty terms and conditions, please refer to .
www.startech.com/warranty
Limitation of Liability
In no event shall the liability of StarTech.com Ltd. and StarTech.com USA LLP (or their ocers, directors, employees or agents)
for any damages (whether direct or indirect, special, punitive, incidental, consequential, or otherwise), loss of prots, loss of
business, or any pecuniary loss, arising out of or related to the use of the product exceed the actual price paid for the product.
Some states do not allow the exclusion or limitation of incidental or consequential damages. If such laws apply, the limitations
or exclusions contained in this statement may not apply to you.
Safety Measures
• If product has an exposed circuit board, do not touch the product under power.
Mesures de sécurité
• Si l’un des circuits imprimés du produit est visible, ne pas touchez le produit lorsqu’il est sous tension.
安全対策
• 製品に露出した状態の回路基盤が含まれる場合、電源が入っている状態で製品に触らないでください。
Misure di sicurezza
• Se il prodotto ha un circuito stampato visibile, non toccare il prodotto quando è acceso.
Säkerhetsåtgärder
• Rör aldrig vid enheter med oskyddade kretskort när strömmen är påslagen.
FR: fr.startech.com
DE: de.startech.com
ES: es.startech.com
NL: nl.startech.com
IT: it.startech.com
JP: jp.startech.com
StarTech.com Ltd.
45 Artisans Cres
London, Ontario
N5V 5E9
Canada
StarTech.com Ltd.
Unit B, Pinnacle 15
Gowerton Rd,
Brackmills
Northampton
NN4 7BW
United Kingdom
StarTech.com LLP
4490 South Hamilton
Road
Groveport, Ohio
43125
U.S.A.
Software Installation
Driver Installation
You can download the latest from the StarTech.com website: Drivers
www.startech.com/PEX1P2.
Navigate to the tab to locate the . Follow the instructions Drivers/Downloads Drivers
included with the . Driver Files
Produktspezifikationen
| Marke: | StarTech.com |
| Kategorie: | Drucker |
| Modell: | PEX1P2 |
| Breite: | 110 mm |
| Tiefe: | 210 mm |
| Gewicht: | 42 g |
| Produktfarbe: | Black, Steel |
| Höhe: | 120 mm |
| Material: | Stahl |
| Verpackungsbreite: | 143 mm |
| Verpackungstiefe: | 170 mm |
| Verpackungshöhe: | 30 mm |
| Paketgewicht: | 133 g |
| Warentarifnummer (HS): | 84733020 |
| Betriebsanleitung: | Ja |
| Eingebaut: | Ja |
| Anzahl Produkte pro Versandkarton: | 80 Stück(e) |
| Länge des Versandkartons: | 400 mm |
| Breite des Versandkartons: | 610 mm |
| Höhe des Versandkartons: | 330 mm |
| Mittlere Betriebsdauer zwischen Ausfällen (MTBF): | 26297 h |
| Treiber enthalten: | Ja |
| Nachhaltigkeitszertifikate: | CE, RoHS |
| Unterstützte Linux-Betriebssysteme: | Ja |
| Montageblöcke enthalten: | Ja |
| Hostschnittstelle: | PCIe |
| Datenübertragungsrate: | 2.5 Mbit/s |
| Unterstützte Server-Betriebssysteme: | Windows Server 2003, Windows Server 2008 R2, Windows Server 2012, Windows Server 2012 R2, Windows Server 2016, Windows Server 2019 |
| Anzahl Parallelanschlüsse: | 1 |
| Chipsatz: | PLX/Oxford - OXPCIe952 |
| Ausgangsschnittstelle: | Parallel |
| Erweiterungskarte Standard: | PCIe 1.0a |
Brauchst du Hilfe?
Wenn Sie Hilfe mit StarTech.com PEX1P2 benötigen, stellen Sie unten eine Frage und andere Benutzer werden Ihnen antworten
Bedienungsanleitung Drucker StarTech.com

6 September 2024
20 August 2024
Bedienungsanleitung Drucker
- Drucker Samsung
- Drucker Approx
- Drucker HP
- Drucker Sony
- Drucker Panasonic
- Drucker LG
- Drucker Roland
- Drucker Canon
- Drucker Velleman
- Drucker CSL
- Drucker Renkforce
- Drucker Thomson
- Drucker Sharp
- Drucker Mitsubishi
- Drucker Nilox
- Drucker Polaroid
- Drucker Xiaomi
- Drucker Olympia
- Drucker Seiko
- Drucker Toshiba
- Drucker Olympus
- Drucker Citizen
- Drucker Olivetti
- Drucker Epson
- Drucker Dell
- Drucker Lenovo
- Drucker MSI
- Drucker Honeywell
- Drucker OKI
- Drucker Brother
- Drucker Sagem
- Drucker Fujifilm
- Drucker Ricoh
- Drucker Datamax-O'neil
- Drucker Dymo
- Drucker Intermec
- Drucker Primera
- Drucker TSC
- Drucker Zebra
- Drucker Triumph-Adler
- Drucker Kodak
- Drucker Konica-Minolta
- Drucker Minolta
- Drucker TOMY
- Drucker Festo
- Drucker Frama
- Drucker NEC
- Drucker Ultimaker
- Drucker Fujitsu
- Drucker Huawei
- Drucker Testo
- Drucker Kogan
- Drucker Royal Sovereign
- Drucker D-Link
- Drucker Kyocera
- Drucker Lexmark
- Drucker Star
- Drucker Xerox
- Drucker Digitus
- Drucker Bixolon
- Drucker Epson 7620
- Drucker Fichero
- Drucker GG Image
- Drucker Ibm
- Drucker Oce
- Drucker Paxar
- Drucker Toshiba TEC
- Drucker ZKTeco
- Drucker Bematech
- Drucker Pantum
- Drucker HiTi
- Drucker Panduit
- Drucker Posiflex
- Drucker Vupoint Solutions
- Drucker Brady
- Drucker Star Micronics
- Drucker Metapace
- Drucker DNP
- Drucker Godex
- Drucker Phoenix Contact
- Drucker Elite Screens
- Drucker Equip
- Drucker Argox
- Drucker Dascom
- Drucker EC Line
- Drucker Orient Technologies
- Drucker Evolis
- Drucker Fargo
- Drucker Microboards
- Drucker Builder
- Drucker DTRONIC
- Drucker Colop
- Drucker Raspberry Pi
- Drucker IDP
- Drucker Tally Dascom
- Drucker Custom
- Drucker Nisca
Neueste Bedienungsanleitung für -Kategorien-
25 November 2024
24 November 2024
24 November 2024
24 November 2024

16 Oktober 2024

15 Oktober 2024

15 Oktober 2024

15 Oktober 2024

14 Oktober 2024

14 Oktober 2024