Snom D713 Bedienungsanleitung
Snom
Bürotelefon
D713
Lesen Sie kostenlos die 📖 deutsche Bedienungsanleitung für Snom D713 (121 Seiten) in der Kategorie Bürotelefon. Dieser Bedienungsanleitung war für 30 Personen hilfreich und wurde von 2 Benutzern mit durchschnittlich 4.5 Sternen bewertet
Seite 1/121
IP Phone D713
User Manual

2
TABLE OF CONTENTS
Copyright, Trademarks, GPL, Legal Disclaimers 7 ...........................................................
Important information 8 ......................................................................................................
Safety instructions .................................................................................................................8
SELV (Safety Extra Low Voltage) compliance ..............................................................8
Standards conformance ........................................................................................................9
Important additional information for the USA ..................................................................9
Important additional information Industry Canada .........................................................10
Technical specications ........................................................................................................11
Disposal of the device ..........................................................................................................11
Cleaning ..................................................................................................................................11
Setting up the phone 12 ......................................................................................................
Delivery Content ....................................................................................................................12
Attaching footstand and handset .................................................................................12
Wall mounting ................................................................................................................13
Rotating the tab of the cradle 13 ......................................................................................
Connecting the phone 14 ...................................................................................................
Connecting a headset ............................................................................................................15
Initializing and registering the phone ...............................................................................15
Prerequisites ...................................................................................................................15
Initialization ......................................................................................................................16
What to do if initialization and registration are unsuccessful ................................18
Correcting the clock ........................................................................................................19
Getting to know your phone 20 ..........................................................................................
At a glance .............................................................................................................................20
LED indicators .......................................................................................................................22
Call indicator ....................................................................................................................22
SmartLabel key LED .......................................................................................................22
MWI key LED .....................................................................................................................22
Mute key ............................................................................................................................22
Speakerphone key .........................................................................................................22
Headset key ......................................................................................................................22
Hard keys ...............................................................................................................................23
Context-sensitive, programmable function keys ......................................................23
Navigation, conrmation, and cancel keys .................................................................23
Preprogrammed, variably programmable function keys ........................................23
SmartLabel keys (freely programmable function keys) with LEDs ......................24

3
Alphanumeric Keypad ....................................................................................................25
Input modes and navigation ....................................................................................25
Entering numerals, letters, special characters, and symbols ..........................25
Display layout ........................................................................................................................27
In idle mode ......................................................................................................................27
When the phone is active ...............................................................................................29
SmartLabels .....................................................................................................................29
Settings ...................................................................................................................................30
User mode/administrator mode ..................................................................................30
Phone settings .................................................................................................................32
Settings available in user mode .............................................................................32
Settings available in administrator mode .............................................................33
Display settings ...............................................................................................................34
Adjusting the backlight .............................................................................................34
The phone's web interface .............................................................................................36
Opening the web interface .......................................................................................37
How the web interface works .................................................................................38
Web settings overriding manual phone settings .................................................38
Directories 39 ......................................................................................................................
Directory .................................................................................................................................39
Denitions, explanations ...............................................................................................39
Directory entries ........................................................................................................39
Contact Types .............................................................................................................40
Outgoing identity ........................................................................................................40
Group ............................................................................................................................40
Ringtones ..........................................................................................................................40
Adding/Editing Entries on the Phone ..........................................................................41
Adding new entry manually .....................................................................................41
Adding new entry from call list ...............................................................................41
Adding current caller ................................................................................................42
Sorting entries ...........................................................................................................42
Editing existing entry ................................................................................................42
Deleting an entry .......................................................................................................43
Adding/editing entries on the web interface .............................................................44
Adding new entry .......................................................................................................44
Editing an entry ..........................................................................................................45
Deleting entry on web interface ..............................................................................47
Dialing from phone directory ........................................................................................47
Deleting whole directory ...............................................................................................47
Importing a directory ......................................................................................................47

4
Exporting the directory ..................................................................................................48
External directories .............................................................................................................48
LDAP ..................................................................................................................................48
Contacts ............................................................................................................................48
Using the phone 50 .............................................................................................................
Making calls ...........................................................................................................................50
Selecting identity for current outgoing call ...............................................................50
Using dierent audio devices .......................................................................................50
Handset ........................................................................................................................50
Headset ........................................................................................................................50
Speakerphone ............................................................................................................50
Handset headset and casing speaker ...............................................................50or
Using dierent dialing methods ...................................................................................51
Auto dial .......................................................................................................................51
Redialing ......................................................................................................................51
Calling number from call history (missed, received, dialed calls) ...................51
Calling number from phone directory ...................................................................51
Calling number from external directory ...............................................................51
Speed dialing ..............................................................................................................52
Calling emergency numbers ...................................................................................52
Call completion ..........................................................................................................52
QuickLookUp (number guessing / auto completion) ..........................................53
Accepting calls ......................................................................................................................54
Using dierent audio devices .....................................................................................54
Automatically accepting calls .......................................................................................54
Call pick-up from another extension ...........................................................................54
Call waiting .......................................................................................................................55
Active calls .............................................................................................................................57
Hold ....................................................................................................................................57
One call on hold ..........................................................................................................57
Holding multiple calls ...............................................................................................57
Conference .......................................................................................................................58
Initiating a conference ..............................................................................................58
Conference screen navigation ................................................................................58
Transferring calls ............................................................................................................59
Attended transfer ......................................................................................................59
Blind transfer .............................................................................................................60
Terminating calls ..................................................................................................................62
Missed Calls ...........................................................................................................................62
Call lists ..................................................................................................................................62

5
Locking and unlocking the keyboard ................................................................................64
Rejecting or redirecting incoming calls ...........................................................................65
Manually ............................................................................................................................65
Automatically ...................................................................................................................65
Rejecting anonymous calls ...........................................................................................66
Call forwarding .....................................................................................................................67
Settings on the phone and turning on call forwarding ............................................67
Turning o call forwarding ............................................................................................68
Turning forwarding of all calls on/o with a function key ......................................68
Conguring the function keys ....................................................................................... 70
Function keys on Snom phones .........................................................................................70
Function key page of phone's web interface 72 ..............................................................
Programming the function keys 73 ..................................................................................
Function key settings on the phone .............................................................................73
Function key settings on the web interface ...............................................................75
Selected examples for function key programming ........................................................76
Example 1, extension monitoring and call pick-up ...................................................77
Example 2, speed dialing ...............................................................................................78
Example 3, changing setting of context-sensitive key .............................................79
Display options for SmartLabel keys 80 ..........................................................................
Settings on the phone ....................................................................................................80
Display mode settings ..............................................................................................80
Timer setting for returning display mode to default ..........................................82
Settings on the web interface .......................................................................................82
Customizing the phone settings 84 ...................................................................................
Identities/accounts ...............................................................................................................84
Conguring and editing identity/account ...................................................................84
Assigning ringtones ........................................................................................................86
Date and time formats .........................................................................................................87
Date ....................................................................................................................................87
Time ...................................................................................................................................88
Time zone ...............................................................................................................................88
Language settings of phone and web interface .............................................................89
Phone language ...............................................................................................................89
Web interface language .................................................................................................90
Dial tones ...............................................................................................................................90
Emergency numbers ............................................................................................................90
Call forwarding .....................................................................................................................91
Call completion .....................................................................................................................92

6
Call waiting ............................................................................................................................93
Hiding my caller ID ...............................................................................................................95
Rejecting anonymous calls .................................................................................................95
QuickLookUp (number guessing / auto completion) .....................................................96
Speed dial ..............................................................................................................................97
Setting a PIN to unlock the keyboard ................................................................................98
Software update 99 .............................................................................................................
Manual update .......................................................................................................................99
Auto provisioning ............................................................................................................... 100
Snom Secure Redirection and Provisioning Service (SRAPS) .................................... 100
Troubleshooting 101 ...........................................................................................................
Reboot .................................................................................................................................. 101
Hard reboot ......................................................................................................................... 101
Reset to factory values ..................................................................................................... 101
TFTP Update ....................................................................................................................... 101
Manual initialization .......................................................................................................... 102
Contacting Snom Support ................................................................................................ 102
Traces .................................................................................................................................. 103
Appendix 1 - Display Symbols and Icons 104 ...................................................................
Symbols found in the function key line ......................................................................... 104
Symbols found in the info bar/status line .................................................................... 106
SmartLabel function symbols ......................................................................................... 107
Display indications ............................................................................................................ 109
Appendix 2 - Status Messages 110 .....................................................................................
Appendix 3 - Wall Mounting 111 ..........................................................................................
Appendix 4 - Programmable Functions 112 .....................................................................
Freely programmable functions ..................................................................................... 112
Key Events ........................................................................................................................... 116
Appendix 5 - GNU General Public License 118 ...................................................................

7
D713 User Manual Copyright, Trademarks, GPL, Disclaimers
Copyright, Trademarks, GPL, Legal Disclaimers
© 2022 Snom Technology GmbH
All Rights Reserved.
Snom, the names of Snom products, and Snom logos are trademarks owned by Snom Technology
GmbH. All other product names and names of enterprises are the property of their respective
owners.
Product specications are subject to change without notice.
Snom Technology GmbH reserves the right to revise and change this document at any time, without
being obliged to announce such revisions or changes beforehand or after the fact.
Texts, images, and illustrations and their arrangement in this document are subject to the protection
of copyrights and other legal rights worldwide. Their use, reproduction, and transmittal to third
parties without express written permission may result in legal proceedings in the criminal courts as
well as civil courts.
When this document is made available on Snom’s web page, Snom Technology GmbH gives its
permission to download and print copies of its content for the intended purpose of using it as a
manual. No parts of this document may be altered, modied or used for commercial purposes without
the express written consent of Snom Technology GmbH.
Although due care has been taken in the compilation and presentation of the information in this
document, the data upon which it is based may have changed in the meantime. Snom therefore
disclaims all warranties and liability for the accurateness, completeness, and currentness of the
information published, except in the case of intention or gross negligence on the part of Snom or
where liability arises due to binding legal provisions.
Our rmware includes some source code that may be used and modied by anyone and everyone
under the GNU Public License (GPL) (see "Appendix 5 - GNU General Public License" on page 118),
provided they, in turn, make it available to everyone else with the same licensing agreement. Please
go to https://www.snom.com/footer/source-code-gpl-open-source/ for the original GPL license and
the source code of components licensed under GPL and used in Snom products.

8
D713 User Manual Safety, Disposal, Cleaning of Product
Important information
Please read the instructions on safety and disposal and on how to set up and use the device before
using it and also give them to other users to read or inform those users of their contents. Save this
manual and do not give the device to third parties without it.
Safety instructions
Follow the instructions in this manual and other applicable documentation of the device. The
nameplate is located at the bottom or rear of the product.
• Warning: Changes or modications to this unit not expressly approved by the party responsible
for compliance could void the user's authority to operate the equipment.
• Warning: The product included (ITE) in this manual is to be connected only to PoE networks
without routing to the outside plant.
• The socket outlet for the power adaptor must be near the equipment and easily accessible.
• Mount the device only at heights not exceeding 2m.
• If the phone is not supplied with power via an Ethernet cable, use only a power adapter expressly
recommended by Snom Technology. Other power supplies may damage or destroy the phone,
aect its behavior, or induce noise.
• Avoid placing the cables where people may trip over them or where they may be exposed to
mechanical pressure as this may damage them.
• This device is for indoor use only! NOT FOR OUTDOOR USE!
• Do not install the device in rooms with high humidity (for example, in bathrooms, laundry rooms,
or damp basements). Do not immerse the device in water and do not spill or pour liquids of any
kind onto or into the device.
• Do not install the device in surroundings at risk for explosions (paint shops, for example). Do not
use the device if ou smell gas or other potentially explosive fumes.
• Do not use the device during thunderstorms. Lightning striking the power grid may cause electric
shocks.
• Warning: The handset contains a magnet, and its earpiece may attract small dangerous objects
such as needles or pins. Please ensure before each use that no such objects are present.
SELV (Safety Extra Low Voltage) compliance
Safety status of input/output connections comply with SELV requirements.
Warning: To avoid electric shock, do not connect safety extra-low voltage (SELV)
circuits to telephone-network voltage (TNV) circuits. LAN ports contain SELV circuits,
and PSTN ports contain TNV circuits. Some LAN and PSTN ports both use RJ-45
(8P8C) connectors. Use caution when connecting cables.

9
D713 User Manual Safety, Disposal, Cleaning of Product
Standards conformance
This device complies with the essential health, safety, and environmental requirements of all
relevant European directives and UK legislation.
You can download the declaration of conformity at
www.snom.com/conformity.
Unauthorized opening, changing, or modifying the device will cause the warranty to lapse and may
also result in the loss of CE conformity. In case of malfunction contact authorized service personnel,
your seller, or Snom.
This product meets the applicable Innovation, Science and Economic Development Canada technical
specications. This phone is FCC Class A veried and meets US health, safety, and environmental
standards.
Unauthorized opening, changing, or modifying the device will cause the warranty to lapse and may
result in the loss of CE and ISED conformity and the FCC verication. In case of malfunction contact
authorized service personnel, your seller, or Snom.
Important additional information for the USA
FCC part 15
This device complies with Part 15 of the FCC rules. Operation is subject to the following two
conditions:
(1) This device may not cause harmful interference, and (2) this device must accept any interference
received, including interference that may cause undesired operation.
This equipment has been tested and found to comply with the limits for a Class A digital device,
pursuant to Part 15 of the FCC Rules. These limits are designed to provide reasonable protection
against harmful interference when the equipment is operated in a commercial environment. This
equipment generates, uses, and can radiate radio frequency energy and, if not installed and used in
accordance with the instruction manual, may cause harmful interference to radio communications.
Operation of this equipment in a residential area is likely to cause harmful interference in which case
the user will be required to correct the interference at the user’s expense.
WARNING: Changes or modications to this equipment not expressly approved by the party
responsible for compliance could void the user’s authority to operate the equipment.
Consumer information
a. This equipment complies with Part 68 of the FCC rules and the requirements adopted by the
ACTA. On the bottom of this equipment is a label that contains, among other information, a product
identier in the format US:AAAEQ##TXXXX. If requested, this number must be provided to the
telephone company.
b. An applicable certication jacks Universal Service Order Codes (USOC) for the equipment is
provided (i.e., RJ45C) in the packaging with each piece of approved terminal equipment.
c. A plug and jack used to connect this equipment to the premises wiring and telephone network
must comply with the applicable FCC Part 68 rules and requirements adopted by the ACTA. A
compliant LAN cable (RJ45) and modular plug is provided with this product. An RJ45 jack should
normally be used for connecting to the SIP equipment through the LAN cable. See installation
instructions for details.

10
D713 User Manual Safety, Disposal, Cleaning of Product
d. If this equipment causes harm to the telephone network, the telephone company will notify you
in advance that temporary discontinuance of service may be required. But if advance notice isn‘t
practical, the telephone company will notify the customer as soon as possible. Also, you will be
advised of your right to le a complaint with the FCC if you believe it is necessary.
e. The telephone company may make changes in its facilities, equipment, operations or procedures
that could aect the operation of the equipment. If this happens the telephone company
will provide advance notice in order for you to make necessary modications to maintain
uninterrupted service.
f. Should you experience trouble with this equipment, please contact
Snom Technology GmbH
1 (339) 227-6160 (select option 2)
for repair or warranty information. If the equipment is causing harm to the telephone network, the
telephone company may request that you disconnect the equipment until the problem is resolved.
g. Please follow instructions for repairing if any (e.g. battery replacement section); otherwise do not
alternate or repair any parts of device except specied.
h. Connection to party line service is subject to state taris. Contact the state public utility
commission, public service commission or corporation commission for information.
NOTICE: If your home has specially wired alarm equipment connected to the telephone line, ensure
the installation of this D713 does not disable your alarm equipment. If you have questions about what
will disable alarm equipment, consult your telephone company or a qualied installer.
This equipment is hearing aid compatible.
NOTICE: According to telephone company reports, AC electrical surges, typically resulting from
lightning strikes, are very destructive to telephone equipment connected to AC power sources. To
minimize damage from these types of surges, a surge arrestor is recommended.
Important additional information Industry Canada
This Class A digital apparatus complies with Canadian requirements: CAN ICES-3 (A)/NMB-3(A).
This product meets the applicable Innovation, Science and Econonmic Development Canada technical
specications.
Cet appareil numérique de la classe A est conforme à la norme NMB-003(A) du Canada.
Le présent produit est conforme aux spécications techniques applicables d‘Innovation, Sciences et
Développement Économique Canada.

11
D713 User Manual Safety, Disposal, Cleaning of Product
Technical specications
• Safety: IEC 62368-1
• Connectors:
◦2 x RJ45 (Ethernet): 1 x LAN, 1 x PC
◦2 x 4P4C (handset, optional headset)
◦1 x RJ12
• Ethernet: 2 x IEEE 802.3 / 1 Gigabit Ethernet switch
• Power over Ethernet (PoE): IEEE 802.3af, Class 2. If PoE is not available, use one of the
separately available power adapter (not included in delivery):
◦Mass Power, model NBS12E050200UV, Snom PN 00004570
◦Rongweixin, model R122-0502000ID, Snom PN 00004571
Disposal of the device
This device is subject to European Directive 2012/19/EU and may not be disposed
of with general household garbage. If you do not know where you may dispose
of the device at the end of its lifespan, contact your municipality, your local waste
management provider, or your seller.
In countries outside the European Union disposal should be done in line with local regulations. Please
contact local authorities for further information.
Cleaning
To clean the device, use an anti-static cloth. Please avoid cleaning liquids as they might damage the
surface or internal electronics of the device.

12
D713 User Manual Setting up the Phone
Setting up the phone
Delivery Content
GNU
General Public License
Quick
Installation
Guide
D713
- Base phone unit
- Footstand
- Handset
- Handset cord
-Ethernet cable
- Quick Installation Guide, GNU General Public Licence
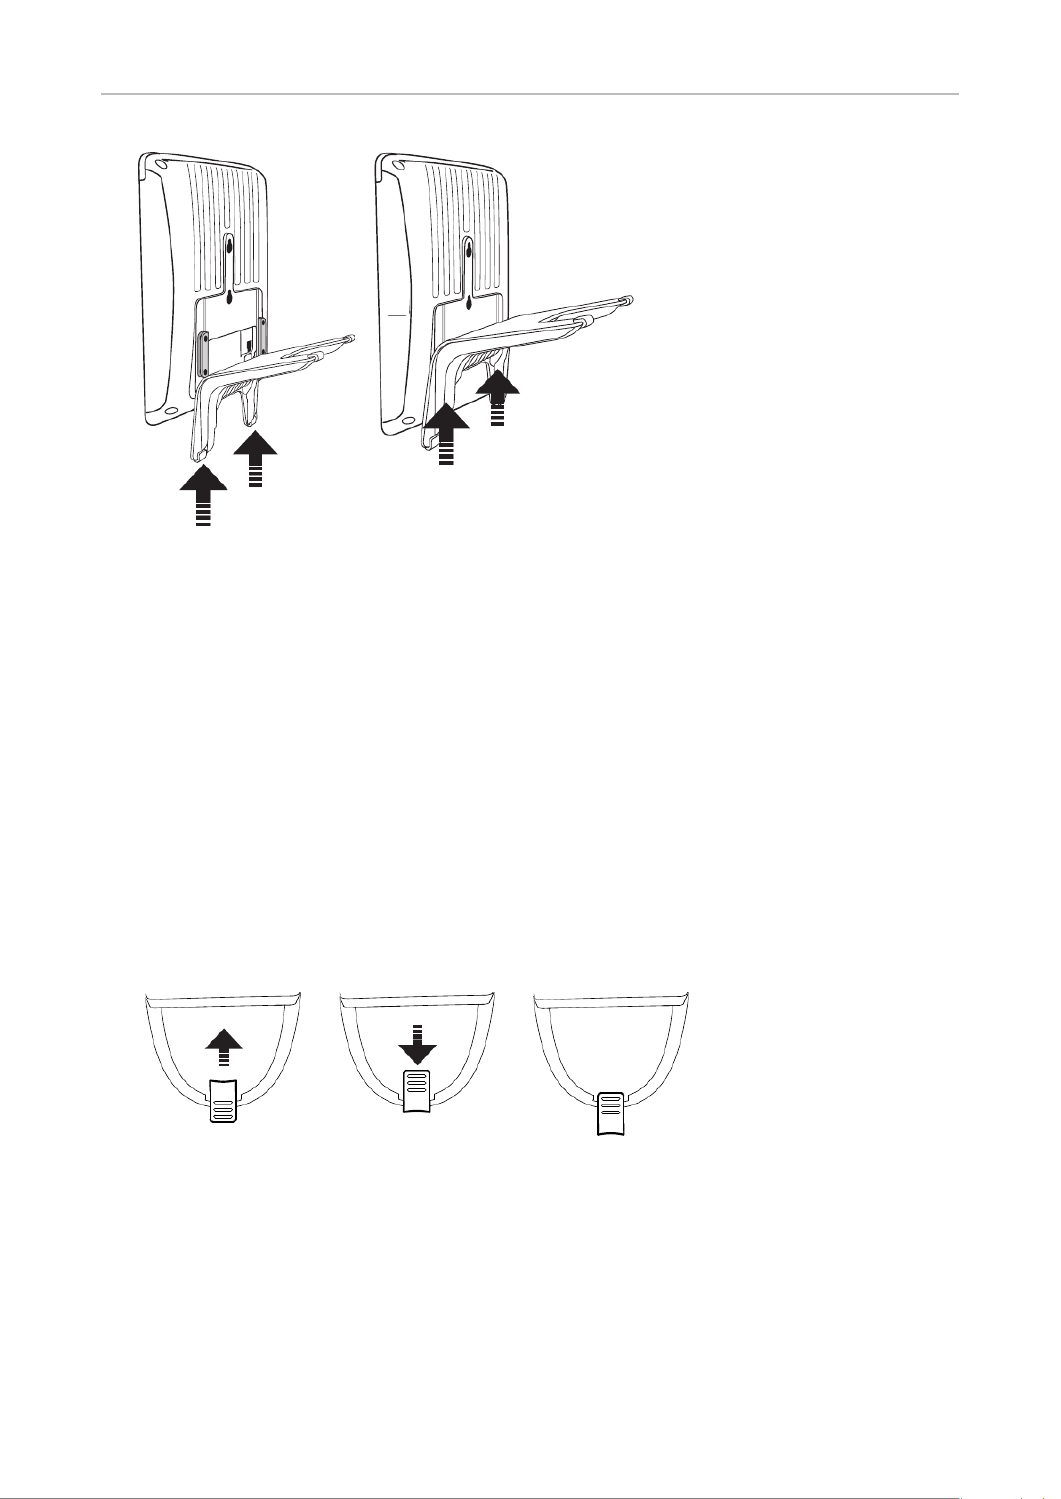
Attaching footstand and handset
The footstand can be attached at two dierent angles: 46° and 28°.
Note: Before attaching the footstand to the phone, plug the long end of the handset cord
into the connector labelled " " on the back of the phone and place the cord in the cable
guide.
1. Place the top of the grooves on the footstand below the slideguides on the back of the phone.
2. Push the footstand upwards onto the slideguides until they lock in place.
13
D713 User Manual Setting up the Phone
3. Plug the short end of the handset cord into the connector on the handset.
4. Place the phone on an even, horizontal surface.
Wall mounting
See "Appendix 3 - Wall Mounting" auf Seite 111 .
Rotating the tab of the cradle
The phone is delivered with the tab level with the inner edge of the cradle. If you are going to mount
the phone on a wall, we recommend that you rotate the tab 180°. After rotation, the tip of the tab will
protrude slightly above the edge of the "cradle". The small rectangular hole in the receiver casing ts
perfectly over the now protruding tip, holding the receiver safely in place in the upright position on
the wall.
Fig./Abb. 1 Fig./Abb. 2 Fig./Abb. 3
1. Slide the plastic tab from the cradle (Fig. 1)
2. Rotate the tab 180°.
3. Slide the tab back into the cradle (Fig. 2). The top of the tab now protrudes slightly above the
inner edge of the cradle (Fig. 3), so that it will hold the handset more securely.

14
D713 User Manual Setting up the Phone
Connecting the phone
EHS
(2, 3)
(2, 3)
(1, 2)
(2, 3)
(1) If PoE not available
(2) Not included in delivery
(3) Optional
The phone can be operated with Power over Ethernet (PoE) provided via the network cable or, if PoE
is not avaible in your network, with the separately available 5V DC power adapter (see "Technical
specications" on page 11).
1. Plug the long uncurled end of the 4P4C handset cord into the connector labeled , and connect
the short one to the handset.
2. Plug the Ethernet (network) cable into the RJ45 connector labeled and plug the other end into NET
the network side to establish a data link.

15
D713 User Manual Setting up the Phone
3. If PoE is not available, insert the plug of the power supply into the connector labeled 5V DC and
hook up the plug to the wall outlet.
4. The other RJ45 connector, labeled , is for daisy-chaining further Ethernet devices without the PC
need for a second Ethernet connection line.
Connecting a headset
You can use wired as well as wireless headsets with the phone.
• Wired headsets
If you want to use a wired headset, connect it to the RJ audio jack labeled .
Note: If both a wired and a wireless headset are connected to the phone, incoming calls
will go to the wireless headset.
• Wireless headsets
◦ Connecting the base station of your headset via the Snom EHS Adapter.
- .Connect the Snom EHS to the connector labeled EHS
- For more information on how to connect the Snom EHS Advanced and the headset, please
refer to the of the Snom EHS Advanced that came with the device Quick Installation Guide
and to the manual of your wireless headset.
◦Connecting the headset to the phone via a Bluetooth-compatible adapter.
Insert the adapter into the USB port of the phone. See also the Quick Start Guides of the Snom
USB BT and the Snom HS BT or the manual of the third-party headset.
Attention: The default settings for USB headsets are VID=0a12:PID=100d:HOOK=38/1 for
8.7.2.11 and higher.
- If your phone is running an earlier rmware version, enter these parameters manually on
the phone's web interface at > > > text eld of "Audio parameters". Click Advanced Audio
the question mark
?
?
?
??
to look up the parameters.
- If you are using a dierent headset, whatever the rmware version, enter the parameters
of the headset manually on the phone's web interface at > > > text eld of Advanced Audio
"Audio parameters". Click the question mark
?
?
?
?
? to nd out which parameters you need to
use for your respective headset.
Initializing and registering the phone
Prerequisites
To be able to use VoIP, you or your company must have:
• A broadband internet connection.

16
D713 User Manual Setting up the Phone
• Access to the internet via a router. This could be a separate device available in various versions
from many dierent manufacturers or in the form of a router on a server or a PC.
• Account information provided by your network administrator or a VoIP account with a VoIP service
provider who supports the VoIP SIP standard. The phone supports up to 6 VoIP accounts with one
or more VoIP providers.
The registration information received from your Internet service provider or your network
administrator may dier and may contain required and optional data. The required data normally
includes:
• Account (usually the phone number). On Snom phones, an account is called an "identity".
• Registrar
• Password
User name, authentication name, and outbound proxy may also be required. These are settings that
can only be congured on the web interface of the phone after it has been successfully registered. If
your provider or your network provides a mailbox account, that setting is also congured on the web
interface. For more information, see "Identities/accounts" on page 84.
Initialization
Snom phones are plug-and-play. Once the phone is connected to your network, it will begin to
initialize.
Note: Normally the initialization is completely automatic, using DHCP. If the phone
cannot discover a DHCP server in the subnet, you will be asked: Are you using DHCP?
If your network does not support DHCP, press and enter the IP address, netmask, IP
gateway, and DNS server manually. Ask your Internet service provider or your network
administrator for them.
Watch the display and, when asked to, make selections with on the navigation key / and
save with .
1. You will be prompted in English to select a language (Fig. 1). Use to select another /
language, if applicable, and press to save the highlighted language.
2. Next, you will be prompted in the language of your choice to select a time zone (Fig. 2). This
aects the time shown on your display.
Fig. 1 Fig. 2 Fig. 3

17
D713 User Manual Setting up the Phone
◦ Press , respectively, on the navigation key to move up or down the list one item at a or
time; press the function key underneath , respectively, to jump to the beginning of the or
next or the previous time zone.
◦ Press the function key underneath to show only those time zones where the selected
phone language is spoken. If you have selected English, all time zones are shown (Fig. 2).
◦ Press the function key underneath to show all time zones and all countries or cities within
the individual time zones, if there are any.
◦ Press to save the selected time zone, indicated by the white bar (Fig. 3).
3. Next, you will be prompted to select the tone scheme of a country. This aects the dial tone you
hear when you pick up the receiver. Dierent countries use dierent dial tones.
◦ Press to move up or down the list one item at a time. or
◦ Press to jump to the bottom country on the screen; when the last country is selected,
pressing results in jumping to the last country on the next screen.
◦ Press to jump to the rst country on the screen; when the rst country is selected, press
to jump to the rst country on the preceding screen.
◦ Press to save the selected country's tone scheme.
4. The display shows the "Welcome" screen. Press any key to log on.
5. . Enter the account number and save with

18
D713 User Manual Setting up the Phone
Note: See "Entering numerals, letters, special characters, and symbols" on page 25
on how to enter numbers and letters.
6. Enter the registrar and save with
7. If required, enter the password received from your Internet service provider or administrator and
press .
After successful registration you will see the identity symbol and the registered account (identity)
in the identity line underneath the date/time bar:
Note: If you see the account on the display preceded by and the phone or
is not working, the server may be down, either for servicing or due to a malfunction.
The registration and initialization should be completed as soon as the server is up
and running again. You may want to check with your administrator or your provider if
nothing happens within a reasonable amount of time.
om.co
om.co
What to do if initialization and registration are unsuccessful
Your network or your VoIP provider may require more login data than requested by the Snom phone
during the initialization and registration process. This data is entered on the web interface of the
phone. Contact your network system administrator or your VoIP provider for more information.
1. When you have received all necessary data, open the phone’s web interface. See "Opening the
web interface" on page 37 for more information.
2. Open Conguration Identity 1 and enter any additional login information you have received from
your provider. See "Identities/accounts" on page 84 for more information.
Infobar with date& time
Identity

19
D713 User Manual Setting up the Phone
Note: A number of IP telephony service providers and a number of SIP PBXs require
settings that are dierent from Snom’s standard factory settings. Snom’s web page
lists numerous providers and PBXs that have been tested for interoperability with
our phones and specic settings that may be required. Do not change the standard
conguration unless you know what you are doing. Expert help may be required.
Correcting the clock
The phone receives the time and date from your NTP time server. If the time and/or date on the
display are incorrect, you may need to set the correct time zone. This setting is available in admin
mode only.
• Changing the settings on the phone and on the web interface: See "Time zone" on page 88.
If the time is still incorrect, there may be a problem with the time server. Contact your network
administrator or your IP provider.
Default formats:
• Time. 24-hour clock, e.g. 17:35. Changing to AM and PM formats: See "Time" on page 88.
• Date. US date format MM/DD/YEAR, eg. 11/23/2010. Changing to European format
DD.MM.YEAR, e.g. 23.11.2010: See "Date" on page 87.

20
D713 User Manual Getting to Know Your Phone
Getting to know your phone
At a glance
The factory settings at a glance:
Handset
speaker
Handset
microphone
Casing microphone
Context-sensitive, programmable function symbols and function keys F1 F4 –
Press the function key underneath the display
symbol to activate the function, open the list
etc. depicted by the symbol above the key.
Standard functions available on idle screen. Default settings and
icons depend on rmware installed on phone.
Internal phone directory
Call lists (missed, received, dialled calls)
/ Forwarding all calls (turning CFwd on/o )
Status information (call forwarding active, passwords not
set, missed calls, etc.) or, if no status info,
to show phone's IP address and URL to Snom's Wiki
MWI key with LED
Call LED
• Blinking fast: Incoming call
• Steady light: Busy or missed call
• Blinking slowly: Call on hold
4 SmartLabel keys
P1–P4
Press P4 for 2 seconds to
show full SmartLabels
Function keys F1–F4
Outgoing
identity:
F1 F2 F3 F4
Alphanumeric
keypad
Casing
speaker
Handset
rest tab
Display -
idle screen

21
D713 User Manual Getting to Know Your Phone
MWI key with LED
◦ LED is lit when message is waiting on mailbox (if mailbox supplied on PBX)
◦ Press key to listen to message(s)
Turn DND (do not disturb) on and o . Callers hear the busy signal.
Directory
Settings menu
Transfer
Hold
Dedicated, customizable function keys
Adjusting the volume
◦ of the ringer when the phone is idle or ringing
◦ of the handset/casing loudspeaker when in a call
Mute/unmute microphone
Toggling between handsfree and handset mode. Press to dial number and accept calls on speakerphone.
Headset mode on/o
Audio control keys
Star key
• In editing mode:
◦ Press for one second to change input mode (numerals > lower case > upper case)
◦ Press brie y to type *
• On idle screen: Press for 3 seconds to lock/unlock the keypad
Default setting: Line
• Fast-blinking LED: Incoming call. Press key or to accept
• Steadily lit LED: In call
• Slow-blinking LED: Call on hold
SmartLabel keys with LED P1 P4–
Navigation keys
• Con rming, saving actions & input,
and returning to previous screen
• Accepting calls on speakerphone and
in headset mode
• From idle screen: Dialed calls
(redial)
• Canceling actions & input, and retur-
ning to previous screen
• Terminating calls on speakerphone
and in headset & handset modes
/ From idle screen: Select
outgoing identity
/ In other contexts (settings,
lists): Navigate up/down
From idle screen:
Received calls
In other contexts:
Navigate/space left
From idle screen :
Missed calls
In other contexts:
Navigate/space right

22
D713 User Manual Getting to Know Your Phone
LED indicators
Call indicator
The bright-red LED situated at the top of the display indicates incoming, ongoing, held, and missed
calls. It will be:
• Blinking rapidly when a call is coming in
• Glowing steadily when dialing, when in a call, and when you have missed a call. To turn the LED
o after a missed call, press the left arrow on the navigation key to open the Missed calls menu
and simultaneously turn o the LED.
• Blinking slowly when you have put a call on hold
SmartLabel key LED
Depending on the function mapped onto the key, the red or green LEDs on the key will be activated
when the key event occurs. The factory setting is red LED and "line". The LEDs of a line key will:
• blink rapidly when a call is ringing on the line;
• glow steadily when there is an ongoing call on the line;
• blink slowly when a call is on hold on the line;
• be o when the line is free.
When other functions are mapped onto the keys, the LEDs may glow or blink. For example: When
the "extension" function has been mapped onto a key and monitoring of extensions is enabled on both
phones, the LED will
• blink rapidly when a call is ringing on the extension;
• glow steadily when the extension is busy;
• be o when the extension is not busy.
MWI key LED
The symbol on the lights up red when there is a new message on the mailbox.
Mute key
The symbol on the key lights up red when and as long as the microphone is muted.
Speakerphone key
The symbol on the key lights up green when and as long as speakerphone mode is on.
Headset key
The symbol on the key lights up green when and as long as headset mode is on.
23
D713 User Manual Getting to Know Your Phone
Hard keys
Context-sensitive, programmable function keys
These function keys can be programmed on the Function Keys page of the phone's web interface with
a number of key events; these functions will then be available when the phone is in idle mode. For
more information, see "Conguring the function keys" on page 70. For the factory default settings,
see "At a glance" on page 20.
You cannot change the functions that are available when the phone is active, e.g., when you are in a
call, when the phone is ringing, etc. Depending on the activity, dierent functions will be available.
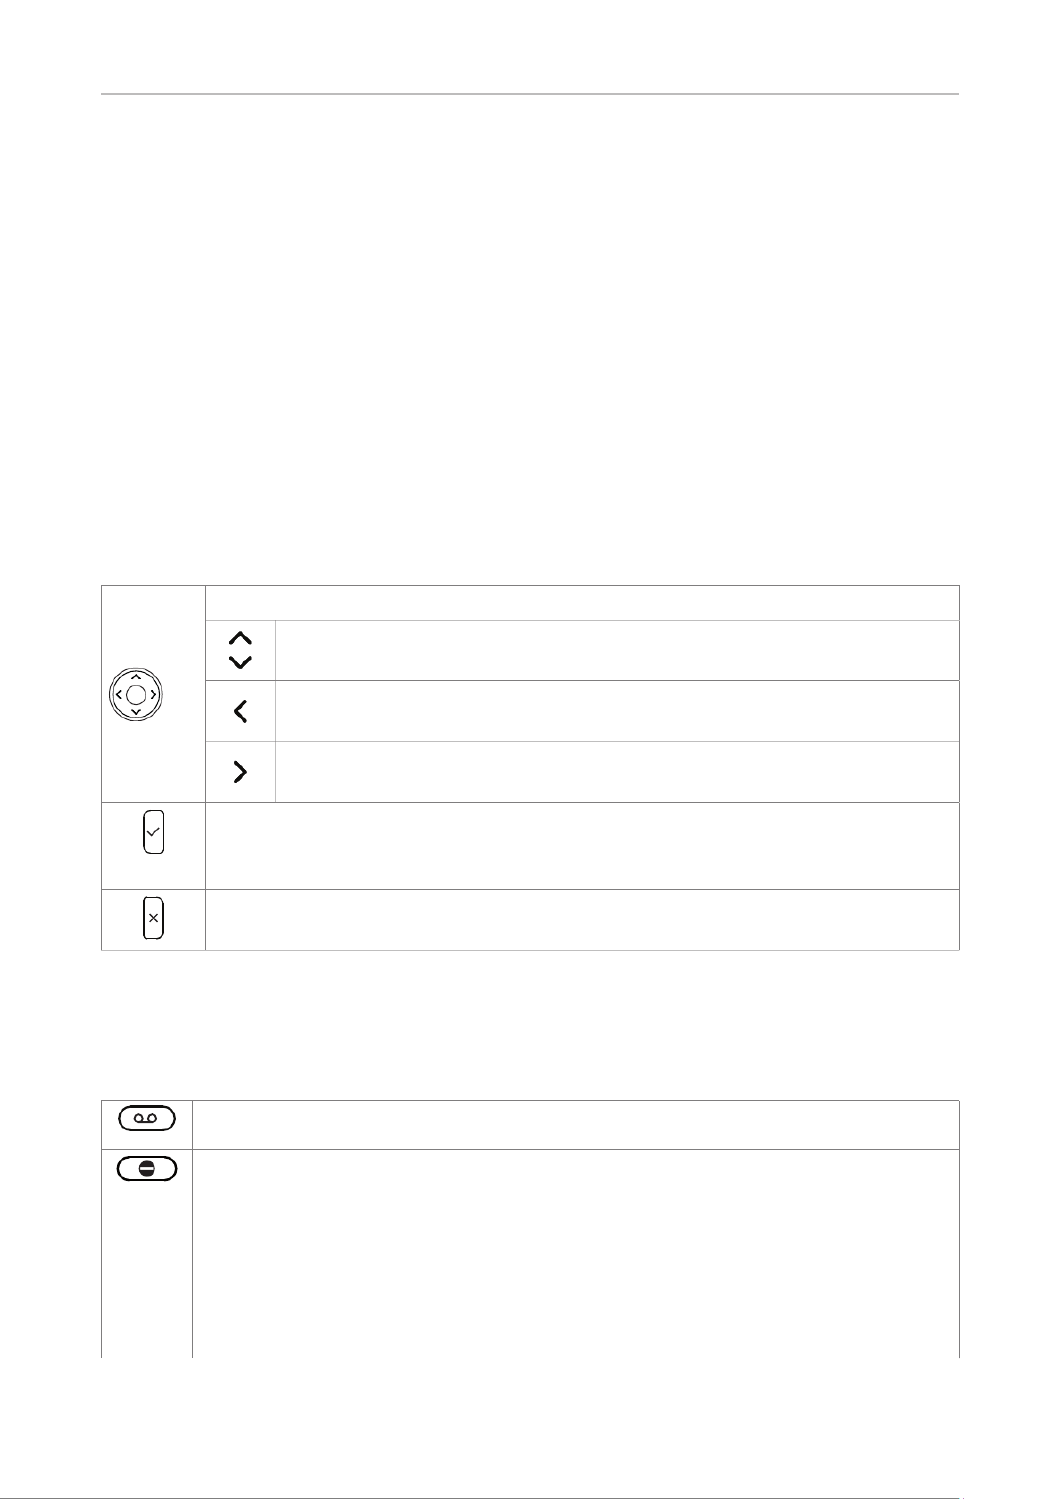
Navigation, conrmation, and cancel keys
can be programmed with the key events available in their drop-down menus. See "Conguring the
function keys" on page 70 for further information. Factory settings:
Navigation key
• On idle screen: Press to select identity for outgoing calls
• In other contexts: Moving up and down lists one item/button at a time
• In text elds, press to move the cursor to the left one character at a time.
• On idle screen, press to open list of missed calls.
• In text elds, press to move the cursor to the right one character at a time.
• On idle screen, press to open the list of received calls
• Press to accept calls on speakerphone and in headset mode.
• Press to conrm actions/settings and return to preceding screen.
• On idle screen: Redial.
• Press to terminate calls on speakerphone and in headset and handset modes.
• Press to cancel actions and return to preceding screen.
Preprogrammed, variably programmable function keys
The factory setting is printed on the respective key. Other functionalities can be programmed onto
them. See "Conguring the function keys" on page 70 for more information.
Message key. The LED on the key is lit when a new message is waiting on the mailbox.
Press the key to retrieve messages.
In "do not disturb" (DND) mode incoming calls do not ring; callers hear the busy signal.
If there is an active setting for call forwarding on busy, incoming calls will be forwarded
to the number specied in the setting (see "Call forwarding" on page 67). Exception:
Calls from phone numbers on your directory's VIP list (see "Contact Types" on page
40) will ring on your phone.
Press the key to turn the function on and o for all identities registered on the phone
(Fig. 1). If you want to turn on DND for one or more, but not all of the identities (Fig. 2 and
3), use the identity settings on the phone's web user interface.

24
D713 User Manual Getting to Know Your Phone
Settings: On the phone's web interface, select the identity. Click the Features tab, then
the on radio button for DND Apply, and .
When DND is on, you'll see the DND symbol in front of the respective identity; if the
identity is the outgoing identity, the symbol also appears in the info bar (Fig. 1 and 3).
Fig.1 - DND active Fig. 2 - DND active for Fig. 3 - DND active for current
a congured identity outgoing identity
Phone directory. See "Directories" on page 39 for further information.
Settings menu. See "Settings" on page 30 for further information.
Transfer. See "Transferring calls" on page 59 for further information.
Audio Control Keys
Press the right or left edge of the key to adjust the volume of the ringer when
• the phone is idle or ringing,
• of microphone/loudspeaker when in call
• Toggling between handsfree and handset mode
• Dialing numbers on speakerphone
• Accepting calls on speakersphone
Toggling between headset and handset modes. Please note: Handset mode overrides
headset mode. When the handset is picked up, the headset symbol in the status line will
be replaced by the handset symbol, indicating that you can now use only the handset for
the call. The phone will return to headset mode when the handset is placed in the cradle,
and the headset symbol will reappear in the status line.
Muting and unmuting the microphone when in a call. When the
microphone is muted, the mute symbol is displayed in the info bar.
SmartLabel keys (freely programmable function keys) with LEDs
These 4 freely programmable function keys on the right side of the display can be programmed
and labeled on the phone and on the Function Keys page of the phone's web interface. For
information on how to map functions onto these keys, see "Conguring the function keys" on page
70. The factory default setting is line.

25
D713 User Manual Getting to Know Your Phone
Alphanumeric Keypad
Input modes and navigation
Input mode
numerals
when dialing
Activity
Delete character
to the left of the
cursor
Contact Pool: Directory,
LDAP, call lists
Redial
Move cursor
to the left
to the right
Current audio mode:
Handset
Headset
Speakerphone
Fig. 1
Current input mode:
123: Numerals
abc: Lower case
ABC: Upper case letters
Next input mode:
: Numerals
: Lower case letters
: Upper case letters
Delete character to
the left of the cursor
Current input mode
Status info
Next input mode
Changing input mode
Fig. 2
Press any key on the alphanumeric keypad or pick up the handset to open the "Enter Number" screen.
When dialing a number (Fig. 1), the input mode is always numerals. When editing directory entries
(Fig. 2) and identities, the current input mode is indicated in the line underneath the cursor. Press the
left function key underneath the display to switch to the next input mode.
Text underneath cursor
= current input mode
Press function key to
switch to next input mode Next input mode
123 abc
abc ABC
ABC 123
Entering numerals, letters, special characters, and symbols
When entering letters and special characters, pause briey after each character until the cursor has
moved forward so that you won't overwrite the last character you entered. Pausing is not necessary
when entering numerals.
Numerals. In numeral mode, press the respective number key to type the number printed on the key.

26
D713 User Manual Getting to Know Your Phone
Letters. When in input modes lower and upper case letters, press the alphanumeric key with the
respective letter one, two, three, or four times quickly to type the rst, second, third, or fourth letter
printed on the key. Pause briey after each letter.
Example: In lower case letter mode, press the "2" key once to type an "a", twice to type
a "b", and three times to type a "c".
Letters with accents and umlauts. When in input modes lower and upper case letters, press the
alphanumeric key with the basic form of the respective letter as many times as necessary. Pause
briey after each letter. Available letters with accents and umlauts depend on the phone's language
setting.
Example: If the phone language is German, press key "2" four times to type "ä".
Entering special characters and symbols. In input modes lower and upper case letters, press keys
"0" and "1" one or more times quickly. Pause briey after each character or symbol.
• Period. Press "1" once.
• Space (" "). Press "0" once.˽
• Underscore ("_"). Press "0" twice.
• Special characters listed in the following table. Press "1" as many times as indicated:
1x . 2x 3x @ 4x 5x 6x+ 1 : ,
7x ? 8x ! 9x - 10x _ 11x 12x 13x/ \ (
14x ) 15x ; 16x & 17x 18x * 19x #%
20x 21x 22x > 23x 24x 25x< = $ [ ]
27
D713 User Manual Getting to Know Your Phone
Display layout
Input mode
numerals
when dialing
Activity
Delete character
to the left of the
cursor
Contact Pool: Directory,
LDAP, call lists
Redial
Move cursor
to the left
to the right
Current audio mode:
Handset
Headset
Speakerphone
Fig. 1
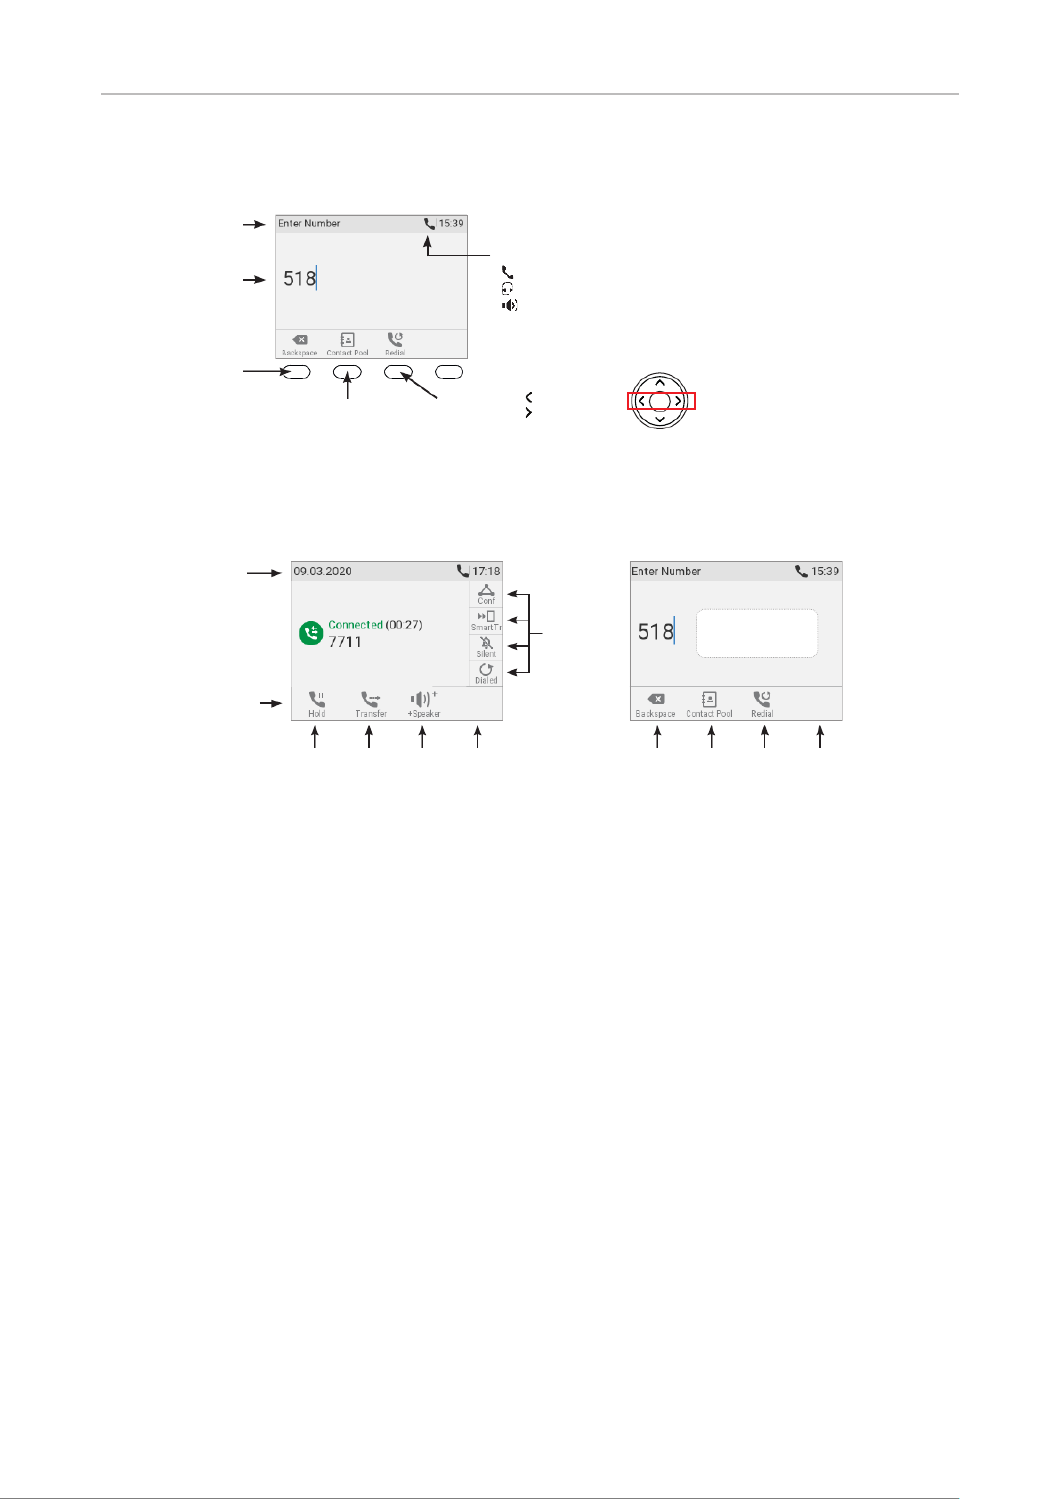
Info/status bar
Function key line
Showing SmartLabels Not showing SmartLabelsWhen active
Context-sensitive function key symbols Context-sensitive function key symbols
Context
information
Smart
labels
Fig. 2
In idle mode
In idle mode, the display presents the following information:
Info bar/status line
• When there are no status messages or if they have been deleted until the next reboot: Date and
time.
• When there are status messages: Any of numerous messages concerning the current status
of the phone might be displayed in this bar, for example the availability of a rmware update, a
reboot being required, etc. If there is more than one current status message at any one time, the
one with the highest priority will be shown. Some of the status messages you may see in idle
mode are:
◦ The text "Missed:" and the total number of missed calls since the last time you turned o the
misssed call indication (the text in the info bar as well as the call LED). The missed calls will
remain in your missed call list, however.
◦ The texts "Forward All:", "Forward when busy:", or "Forward after timeout:" and the phone
number calls will be forwarded to.
◦ The warnings "HTTP Password not set" and "Admin Password not set". They can be turned o
by setting the passwords.

28
D713 User Manual Getting to Know Your Phone
Deleting or temporarily suppressing status messages:
◦ Messages will be deleted automatically when the underlying cause is removed, i.e., call
forwarding is turned o, HTTP password is set, etc.
◦ Temporarily suppressing messages: Press , if the button is available, or >
Information Status info > to open the "Status info" screen. Use to select an item from
the list. Press to view details of the selected item, if available; press to delete the
selected item.
◦ Messages classied as important cannot be deleted. Examples:
"HTTP Password not set", "Admin Password not set".
Context area: Congured identities.
Outgoing identity
The current outgoing identity is indicated by a green ring around a green circle on a
white bar with a thin blue line on the left side. When you call someone, this is your
identity for the call.
Active identity
• An active identity that is not the current outgoing identity is indicated by a
green circle.
• It can be called.
• It can be selected as the outgoing identity for making calls by pressing /
on the navigation key.
A blue circle with a revolving white ring indicates that the identity is trying to
register.
A gray circle with a white "x" indicates that the identity is not properly registered.
Check your connections and whether the server is down.
Note: Identities can be deactivated without removing the registration settings by
changing their status to "inactive" on the phone's web interface. Inactive identities are
not displayed on the idle screen. They cannot be called or selected as the outgoing
identity. To deactivate the identity, open the phone's web interface and select the
Conguration Identity (1-6).
1. Change the "Identity active" setting to o.
2. Click .Re-Register
3. . Click Save
For information on conguring new identities or modifying existing ones, see "Identities/accounts" on
page 84. The default setting for the freely programmable function keys controlling the information
shown on the SmartLabels is "line". For more information on the labels, see "SmartLabel keys (freely
programmable function keys) with LEDs" auf Seite 24; for information on mapping other functions
onto the keys, see "Conguring the function keys" on page 70.
Produktspezifikationen
| Marke: | Snom |
| Kategorie: | Bürotelefon |
| Modell: | D713 |
Brauchst du Hilfe?
Wenn Sie Hilfe mit Snom D713 benötigen, stellen Sie unten eine Frage und andere Benutzer werden Ihnen antworten
Bedienungsanleitung Bürotelefon Snom

25 August 2024
23 August 2024
23 August 2024
16 August 2024
15 August 2024
14 August 2024
13 August 2024
11 August 2024
10 August 2024
9 August 2024
Bedienungsanleitung Bürotelefon
- Bürotelefon Samsung
- Bürotelefon Philips
- Bürotelefon Panasonic
- Bürotelefon LG
- Bürotelefon Siemens
- Bürotelefon Yealink
- Bürotelefon Telekom
- Bürotelefon Fortinet
- Bürotelefon Topcom
- Bürotelefon AKG
- Bürotelefon Bang And Olufsen
- Bürotelefon Beyerdynamic
- Bürotelefon Geemarc
- Bürotelefon Shure
- Bürotelefon Gigaset
- Bürotelefon Fysic
- Bürotelefon Plantronics
- Bürotelefon TOA
- Bürotelefon Aastra
- Bürotelefon AGFEO
- Bürotelefon Alcatel
- Bürotelefon Belgacom
- Bürotelefon Profoon
- Bürotelefon Swissvoice
- Bürotelefon Tiptel
- Bürotelefon Mitel
- Bürotelefon Ranex
- Bürotelefon Alcatel-Lucent
- Bürotelefon Avaya
- Bürotelefon Konftel
- Bürotelefon Polycom
- Bürotelefon Uniden
- Bürotelefon Ascom
- Bürotelefon Ericsson
- Bürotelefon Cisco
- Bürotelefon Grandstream
- Bürotelefon Unify
- Bürotelefon Vaddio
- Bürotelefon Bogen
- Bürotelefon EnGenius
- Bürotelefon Teltonika
- Bürotelefon DSS
- Bürotelefon Futiro
- Bürotelefon Gigaset Pro
- Bürotelefon Innovaphone
- Bürotelefon KPN
- Bürotelefon Nortel
- Bürotelefon Philips-NEC
- Bürotelefon AT-T
- Bürotelefon Audiocodes
- Bürotelefon Crestron
- Bürotelefon Argus
- Bürotelefon Aastra-Ericsson
- Bürotelefon Aspi
- Bürotelefon Ooma
Neueste Bedienungsanleitung für -Kategorien-
16 Oktober 2024
19 September 2024

18 September 2024
11 September 2024
11 September 2024
10 September 2024
9 September 2024
9 September 2024
9 September 2024
8 September 2024