Optoma X316ST Bedienungsanleitung
Optoma
Videostrahl
X316ST
Lesen Sie kostenlos die 📖 deutsche Bedienungsanleitung für Optoma X316ST (74 Seiten) in der Kategorie Videostrahl. Dieser Bedienungsanleitung war für 14 Personen hilfreich und wurde von 2 Benutzern mit durchschnittlich 4.5 Sternen bewertet
Seite 1/74

1English
Table of Contents ............................1
Usage Notice ...................................2
Safety Information ...............................2
Precautions .........................................3
Eye Safety Warnings ..........................5
Product Features ................................5
Introduction ......................................6
Package Overview ..............................6
Product Overview ...............................7
Main Unit .............................................. 7
Control Panel ....................................... 8
Input/Output Connections .................... 9
Remote Control .................................. 10
Installation ..................................... 11
Connecting the Projector ..................11
Connect to Computer/Notebook ........ 11
Connect to Video Sources ................. 12
Powering the Projector On / Off ........13
Powering On the Projector ................. 13
Powering off the projector .................. 14
Warning Indicator ............................... 14
Adjusting the Projected Image ..........15
Adjusting the Projector’s Height ........15
Adjusting the Projector’s Zoom /
Focus ................................................. 16
Adjusting Projection Image Size ........ 17
User Controls ................................20
Control Panel & Remote Control ......20
Control Panel .....................................20
Remote Control .................................. 21
On-screen Display Menus ................28
How to operate .................................. 28
Menu Tree .......................................... 29
IMAGE ...............................................31
IMAGE | Advanced ............................ 33
IMAGE | Advanced | Signal (RGB) ... 35
DISPLAY ............................................36
DISPLAY | 3D ................................... 39
SETUP ............................................... 40
SETUP | Security ............................... 42
SETUP | Audio Settings ..................... 44
SETUP | LAN Settings ....................... 45
SETUP | Advanced ............................ 47
OPTIONS ........................................... 48
OPTIONS | Remote Settings ............. 50
OPTIONS | Advanced ........................ 51
OPTIONS | Lamp Settings ................. 52
OPTIONS | Optional Filter Settings ... 53
Appendices ....................................54
Troubleshooting ................................54
Replacing the Lamp ..........................60
Installing and Cleaning the Filter ......62
Compatibility Modes .........................63
Computer/Video/HDMI/Mac
Compatibility ...................................... 63
3D Input Video Compatibility ............. 64
RS232 Commands and Protocol
Function List .....................................65
RS232 Pin Assignments .................... 65
RS232 Protocol Function List ............ 66
Ceiling Mount Installation ..................70
Optoma Global Ofces .....................71
Regulation & Safety Notices .............73
Table of Contents
2
English
Usage Notice
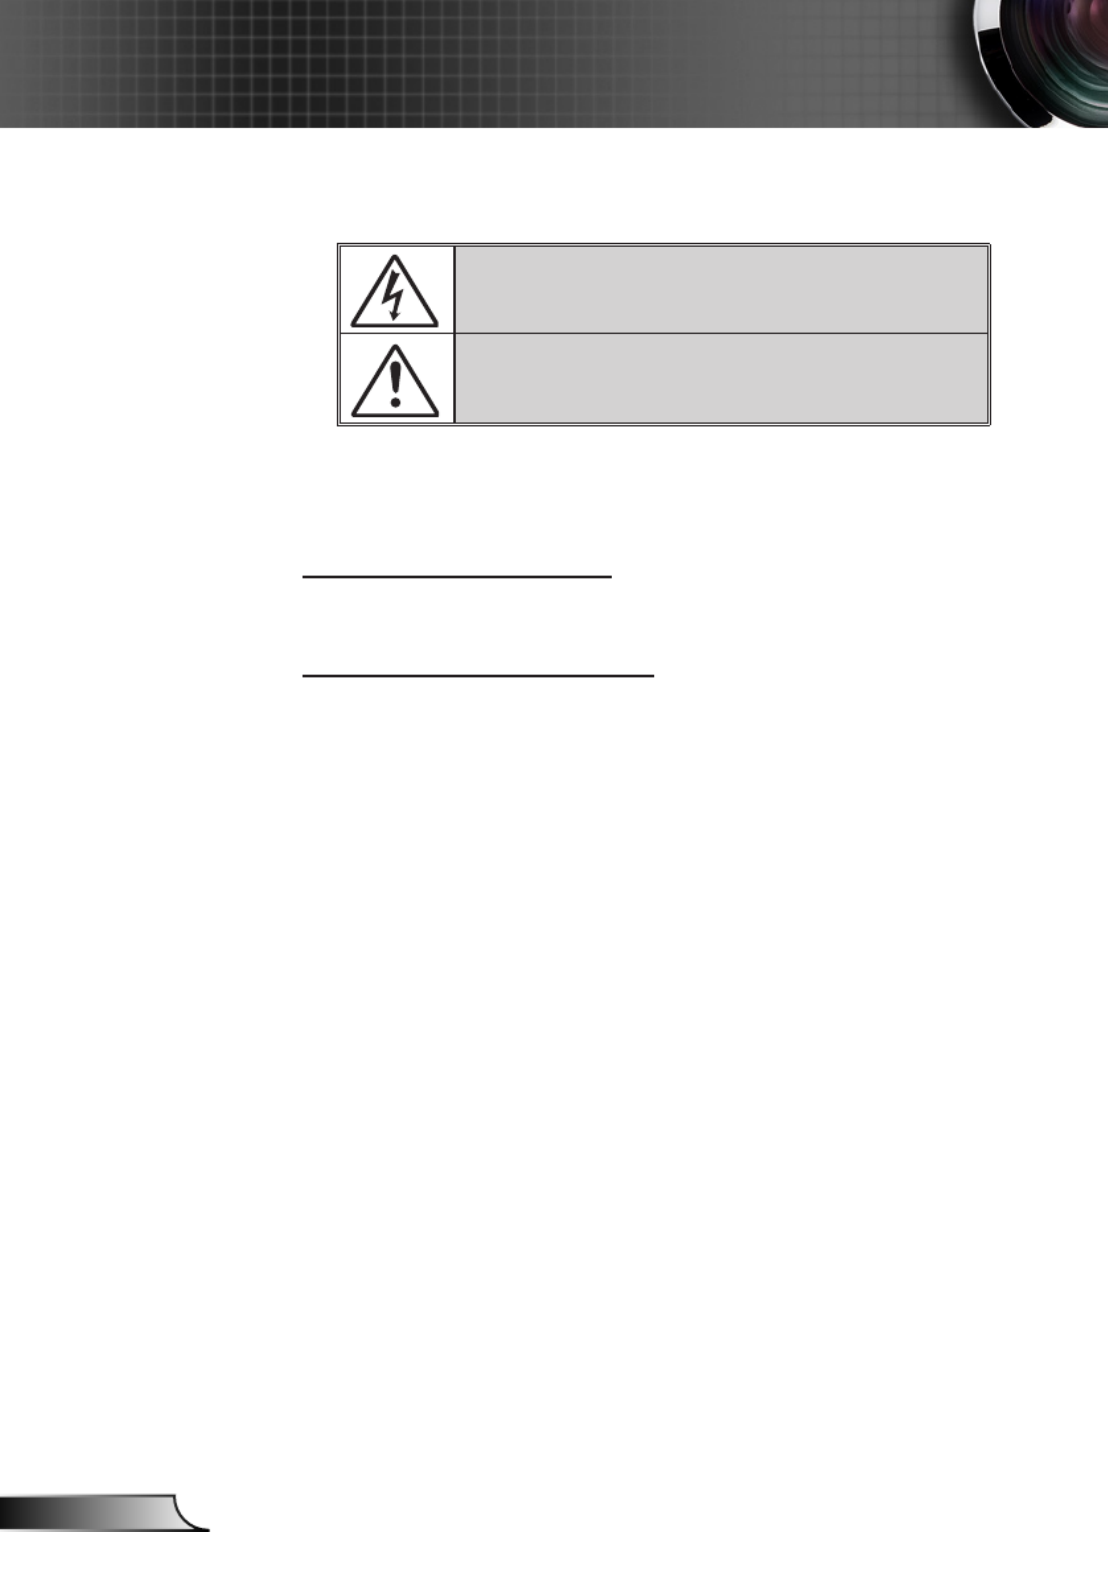
Safety Information
The lightning ash with arrow head within an equilateral triangle is
intended to alert the user to the presence of uninsulated “dangerous
voltage” within the product’s enclosure that may be of sufcient
magnitude to constitute a risk of electric shock to persons.
The exclamation point within an equilateral triangle is intended to alert
the user to the presence of important operating and maintenance
(servicing) instructions in the literature accompanying the appliance.
WARNING: TO REDUCE THE RISK OF FIRE OR ELECTRIC SHOCK, DO NOT
EXPOSE THIS APPLIANCE TO RAIN OR MOISTURE. DANGEROUS HIGH
VOLTAGES ARE PRESENT INSIDE THE ENCLOSURE. DO NOT OPEN THE
CABINET. REFER SERVICING TO QUALIFIED PERSONNEL ONLY.
Class B emissions limits
This Class B digital apparatus meets all requirements of the Canadian
Interference-Causing Equipment Regulations.
Important Safety Instruction
1. Do not block any ventilation openings. To ensure reliable operation of
the projector and to protect from over heating, it is recommended to
install the projector in a location that does not block ventilation. As an
example, do not place the projector on a crowded coffee table, sofa,
bed, etc. Do not put the projector in an enclosure such as a book case
or a cabinet that restricts air ow.
2. Do not use the projector near water or moisture. To reduce the risk
of re and/or electric shock, do not expose the projector to rain or
moisture.
3. Do not install near heat sources such as radiators, heaters, stoves or
any other apparatus such as ampliers that emits heat.
4. Clean only with dry cloth.
5. Only use attachments/accessories specied by the manufacturer.
6. Do not use the unit if it has been physically damaged or abused.
Physical damage/abuse would be (but not limited to):
Unit has been dropped.
Power supply cord or plug has been damaged.
Liquid has been spilled on to the projector.
Projector has been exposed to rain or moisture.
Something has fallen in the projector or something is loose inside.
Do not attempt to service the unit yourself. Opening or removing covers
may expose you to dangerous voltages or other hazards. Please call
Optoma before you send the unit for repair.
7. Do not let objects or liquids enter the projector. They may touch
dangerous voltage points and short out parts that could result in re or
electric shock.
8. See projector enclosure for safety related markings.
9. The unit should only be repaired by appropriate service personnel.
3English
Usage Notice
Precautions
Please follow all warnings, precautions and
maintenance as recommended in this user’s
guide.
▀■ Warning- Do not look into the projector’s lens when the lamp is
on. The bright light may hurt and damage your eyes.
▀■ Warning- To reduce the risk of re or electric shock, do not
expose this projector to rain or moisture.
▀■ Warning- Please do not open or disassemble the projector as
this may cause electric shock.
▀■ Warning- When replacing the lamp, please allow the unit to
cool down. Follow instructions as described on pages
60-61.
▀■ Warning- This projector will detect the life of the lamp itself.
Please be sure to change the lamp when it shows
warning messages.
▀■ Warning- Reset the “Lamp Reset” function from the on-screen
display “OPTIONS | Lamp Settings” menu after
replacing the lamp module (refer to page 52).
▀■ Warning- When switching the projector off, please ensure
the cooling cycle has been completed before
disconnecting power. Allow 90 seconds for the
projector to cool down.
▀■ Warning- Not all projectors come with a lens cap. For your
safety, if the projector is equipped with a lens cap
please ensure to remove it before you turn on the
projector.
▀■ Warning- When the lamp is approaching the end of its lifetime,
the message “Lamp Warning: Lamp life exceeded.”
will show on the screen. Please contact your local
reseller or service center to change the lamp as soon
as possible.
When the lamp
reaches the end
of its life, the pro-
jector will not turn
back on until the
lamp module has
been replaced.
To replace the
lamp, follow the
procedures listed
under “Replacing
the Lamp” section
on pages 60-61.

4
English
Usage Notice
Do:
Turn off and unplug the power plug from the AC outlet before
cleaning the product.
Use a soft dry cloth with mild detergent to clean the display
housing.
Disconnect the power plug from AC outlet if the product is
not being used for a long period of time.
Avoid using in areas susceptible to excessive dust and
dirt.
Do not:
Block the slots and openings on the unit provided for
ventilation.
Use abrasive cleaners, waxes or solvents to clean the unit.
Use under the following conditions:
Use in extremely hot, cold or humid environments.
Ensure that the ambient room temperature is within
5 - 40°C.
Relative Humidity is 5 - 40°C, 80% (Max.),
non-condensing.
Use near any appliance generating a strong magnetic eld.
Use in direct sunlight.

5English
Usage Notice
Eye Safety Warnings
▀■ Avoid staring/facing directly into the projector beam at all
times. Keep your back to the beam as much as possible.
▀■ When projector is used in a classroom, adequately supervise
students when they are asked to point out something on the
screen.
▀■ In order to minimize the lamp power, use room blinds to
reduce ambient light levels.
Product Features
▀■ XGA (1024x768) / WXGA (1280X800) Native resolution
▀■ HD compatible – 720p and 1080p supported
▀■ BrilliantColorTM Technology
▀■ Kensington Lock
▀■ RS232 control
▀■ Rapid shutdown
▀■ Full 3D (See page 64)
▀■ -The Product Features shall be congured by the manu
facturer as per practical conditions.
Product features may
vary depending on
model.

6
English
Introduction
Documentation :
User’s Manual
Warranty Card
Quick Start Card
WEEE Card
(for EMEA only)
Due to different
applications in
each Country,
some regions
may have
different
accessories.
Power Cord
IR Remote Control
Package Overview
Unpack and inspect the box contents to ensure
all parts listed below are in the box. If something
is missing, please contact your nearest customer
service center.
Battery
Projector VGA Cable (*)
Carrying case (*)
(*) Selected ac-
cessories may not
be included in the
package - varies by
regional offerings
and model specs.
L
R
Freeze
Power
Switch
Enter
Page -
Keystone
Volume
Menu
123
456
7 8
0
9
HDMI
User1
Source
Resync
User2 User3
VGA
Video
3D
Page+Laser

7English
Introduction
Product Overview
Main Unit
Focus Ring1.
Zoom Lever2.
IR Receiver3.
Control Panel4.
Input / Output Connec-5.
tions
Kensington6. TM Lock Port
Ventilation (inlet)7.
Speaker8.
Tilt-Adjustment Feet9.
Ventilation (outlet)10.
Focus Ring1.
IR Receiver2.
Control Panel3.
Input / Output Connec-4.
tions
Kensington5. TM Lock Port
Ventilation (inlet)6.
Speaker7.
Tilt-Adjustment Feet8.
Ventilation (outlet)9.
The interface
is subject to
model’s speci-
cations.
Do not block
projector in/out
air vents.
1
7
10
5
21
3
9
8
4
6
1
6
9
4
1
2
8
7
3
5
Standard Short Throw

8
English
Introduction
6
1 2
78
11
Source1.
Keystone Correction2.
Enter3.
Re-Sync4.
Help5.
Four Directional Select Keys6.
Temp LED7.
Power8.
On/Standby LED 9.
Lamp LED 10.
Menu11.
Control Panel
5
10
3 4
9
9English
Introduction
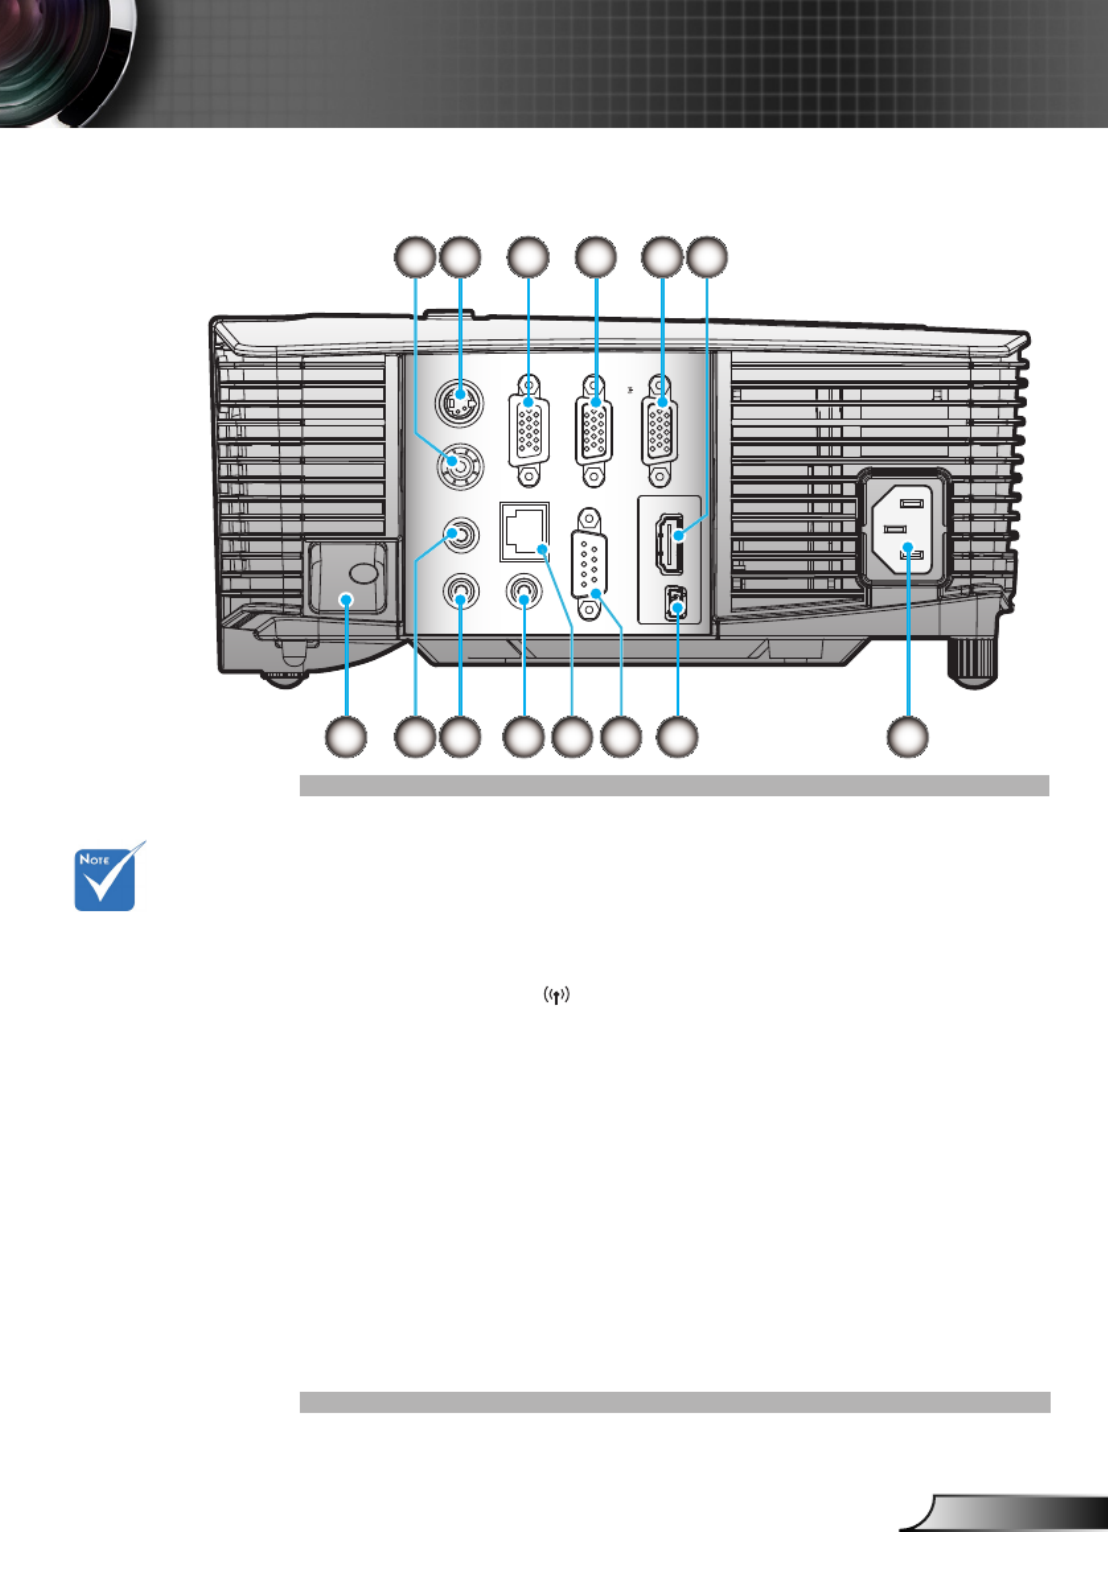
Input/Output Connections
Composite Video Input Connector1.
S-Video Input Connector2.
VGA-Out Connector (Monitor Loop-through Output)3.
VGA2-IN/YPbPr Connector 4.
(PC Analog Signal/Component Video Input/HDTV/YPbPr)
VGA1-IN/YPbPr/5. Connector
(PC Analog Signal/Component Video Input/HDTV/YPbPr/
Wireless function via VGA Dongle)
HDMI Connector6.
Security Lock Slot7.
Audio2 Input 8. Connector (3.5mm mini jack)
Audio Output Connector (3.5mm mini jack)9.
Audio1 Input Connector (3.5mm mini jack)10.
RS-232 Connector (9-pin)11.
USB service and remote mouse12.
Power 13.
RJ45 14.
Monitor loop
through only sup-
port in VGA -IN/2
YPbPr.
(*) The interface
is subject to
model’s specica-
tions.
VGA dongle is a
optional accesso-
ry. Please contact
Optoma service
for details.
HDMIUSB
RS-232C
AUDIO1-IN
AUDIO2-IN VIDEO
VGA-OUT
VGA2-IN/YPbPr
S-VIDEO
AUDIO-OUT
VGA1-IN/YPbPr/
RJ-45
7 9 10 12 138
2 3 4 51 6
1114

10
English
Introduction
Remote Control
The interface is
subject to model’s
specications.
Power On/Off1.
Freeze2.
Display Blank & Audio 3.
Mute
USB Mouse Left Click4.
Enter5.
Left Selection Key6.
Laser Pointer Trigger7.
Page Down8.
Keystone +/-9.
Aspect10.
HDMI11.
User Dene Keys12.
Source13.
Brightness Mode14.
Mouse function on/off 15.
switch
Mute16.
USB mouse Right click17.
Up Selection Key18.
Right Selection Key19.
Down Selection Key20.
Page Up21.
Volume +/-22.
3D23.
Video24.
VGA25.
Re-Sync26.
L
R
Freeze
Power
Switch
Enter
Page
-
Keystone
Volume
Menu
1 2 3
4 5 6
7 8
0
9
HDMI
User1
Source
Resync
User2 User3
VGA
Video
3D
Page+
Laser
1
2
3
4
5
6
7
8
9
10
11
12
13
14
26
25
24
23
22
21
20
19
18
17
15
16

11 English
Installation
HDM IUSB
RS-232C
AUDIO1-IN
AUDIO2-IN VIDEO
VGA-OUT
VGA2-IN/YPbPr
S-VIDEO
AUDIO-OUT
VGA1-IN/YPbPr/
mol ex
MOLEX
2 3 4
5
7
8
6
1
RJ-45
Connect to Computer/Notebook
Connecting the Projector
Due to the
difference in
applications for
each country,
some regions may
have different
accessories.
(*) Optional
accessory
The interface is
subject to model’s
specications .
1......................................................................................*Audio Output Cable
2.............................................................................................*VGA Out Cable
3.....................................................................................................VGA Cable
4..................................................................................................*HDMI Cable
5....................................................................................................Power Cord
6....................................................................................................*USB Cable
7................................................................................................*RS232 Cable
8.........................................................................................*Audio Input Cable
Audio Output
Monitor Output

12
English
Installation
HDMIUSB
RS-232C
AUDIO1-IN
AUDIO2-IN VIDEO
VGA-OUT
VGA2-IN/YPbPr
S-VIDEOAUDIO-OUT
VGA1-IN/YPbPr/
76
2
3
59
8
4
1
RJ-45
Connect to Video Sources
1................................................................................*Composite Video Cable
2.............................................................................................. *S-Video Cable
3..................................................................................................*HDMI Cable
4....................................................................................................Power Cord
5......................................................................................*Audio Output Cable
6.........................................................................................*Audio Input Cable
7...........................................................................................*VGA/RCA Cable
8................................................*15-Pin to 3 RCA Component/HDTV Adaptor
9.............................................................................*3 RCA Component Cable
S-Video Output
Composite Video Output
Due to the
difference in
applications for
each country,
some regions may
have different
accessories.
(*) Optional
accessory
The interface is
subject to model’s
specications .
DVD Player, Set-top Box,
HDTV receiver
Audio Output
DVD Player, Set-top Box,
HDTV receiver

13 English
Installation
Powering the Projector On / Off
Turn on the
projector rst and
then select the
signal sources.
Powering On the Projector
1. Securely connect the power cord and signal cable. When
connected, the POWER LED will turn red.
2. Turn on the lamp by pressing “ ” button either on the top of
the projector or on the remote. The POWER LED will now
turn blue.
The startup screen will display in approximately 10 seconds.
The rst time you use the projector, you will be asked to
select the preferred language and power saving mode.
3. Turn on and connect the source that you want to display
on the screen (computer, notebook, video player, etc). The
projector will detect the source automatically. If not, push
menu button and go to “OPTIONS”.
Make sure that the “Source Lock” has been set to “Off”.
If you connect multiple sources at the same time, press the
“SOURCE” button on the control panel or direct source keys
on the remote control to switch between inputs.
When Power mode
(Standby) is set to
Eco (<0.5W), the
VGA output and
Audio pass-through
will be deactivated
when the projector
is in standby.
1
Power

14
English
Installation
Contact the
nearest service
center if the
projector displays
these symptoms.
See pages
71-72 for more
information.
Powering off the projector
1. Press the “ ” button on the remote control or on the
control panel to turn off the projector.
The following message will be displayed on the screen.
Press the “ ” button again to conrm otherwise the
message will disappear after 15 seconds. The projector will
shut down when the “ ” button is pressed for the second
time.
2. The fans will continue to operate for 10 seconds and the
POWER LED will ash blue. During this period, the projec-
tor cannot be turned back on and the projector should not
be unplugged.
Once the cooling cycle is complete, the POWER LED will
turn to solid red (standby mode). At this point, the projector
can be turned back on by pushing the “ ” button.
3. Disconnect the power cord from the electrical outlet and the
projector.
4. Do not turn on the projector immediately following a power
off procedure.
Warning Indicator
When the warning indicators (see below) come on, the
projector will automatically shutdown:
“LAMP” LED indicator is lit red and if “On/Standby” indica-
tor ashes red.
“TEMP” LED indicator is lit red and if “On/Standby”
indicator ashes red. This indicates the projector has
overheated. Under normal conditions, the projector can be
switched back on.
“TEMP” LED indicator ashes red and if “On/Standby”
indicator ashes red.
Unplug the power cord from the projector, wait for 30 seconds
and try again. If the warning indicator light up again, please
contact your nearest service center for assistance.

16
English
Installation
Adjusting the Projector’s Zoom / Focus
You may turn the zoom ring to zoom in or out. To focus the im-
age, rotate the focus ring until the image is clear.
XGA series: The projector will focus at distances from 3.28
to 39.4 feet (1.0 to 12.0 meters).
WXGA series: The projector will focus at distances from 3.28
to 32.8 feet (1.0 to 10.0 meters).
XGA with 0.6 TR: The projector will focus at distances from
2.5 to 12 feet (0.76 to 3.66 meters).
WXGA with 0.5 TR: The projector will focus at distances
from 1.64 to 11 feet (0.5 to 3.35 meters).
Focus Ring
Zoom Lever

18
English
Installation
This table is for user’s reference only.
XGA
Diagonal length
(inch) size of
4:3 Screen
Screen Size W x H Projection Distance (D)
Offset (Hd)
(m) (m)(inch) (feet)
Width Height Width Height tele tele (inch)wide wide (m)
30.00 0.61 0.46 24.00 18.00 1.19 1.31 3.90 4.30 0.07 2.70
40.00 0.81 0.61 32.00 24.00 1.58 1.75 5.18 5.74 0.09 3.60
60.00 1.22 0.91 48.00 36.00 2.38 2.62 7.81 8.60 0.14 5.40
70.00 1.42 1.07 56.00 42.00 2.77 3.06 9.09 10.04 0.16 6.30
80.00 1.63 1.22 64.00 48.00 3.17 3.50 10.40 11.48 0.18 7.20
90.00 1.83 1.37 72.00 54.00 3.57 3.93 11.71 12.89 0.21 8.10
100.00 2.03 1.52 80.00 60.00 3.96 4.37 12.99 14.34 0.23 9.00
120.00 2.44 1.83 96.00 72.00 4.75 5.24 15.58 17.19 0.27 10.80
150.00 3.05 2.29 120.00 90.00 5.94 6.55 19.49 21.49 0.34 13.50
180.00 3.66 2.74 144.00 108.00 7.13 7.86 23.39 25.79 0.41 16.20
250.00 5.08 3.81 200.00 150.00 9.91 10.92 32.51 35.83 0.57 22.50
300.00 6.10 4.57 240.00 180.00 11.89 13.11 39.01 43.01 0.69 27.00
WXGA
Diagonal length
(inch) size of
16:10 Screen
Screen Size W x H Projection Distance (D)
Offset (Hd)
(m) (m)(inch) (feet)
Width Height Width Height tele tele (inch)wide wide (m)
30.00 0.65 0.40 25.44 15.90 1.00 1.10 3.28 3.61 0.05 1.97
40.00 0.86 0.54 33.92 21.20 1.34 1.46 4.40 4.79 0.07 2.63
60.00 1.29 0.81 50.88 31.80 2.00 2.20 6.56 7.22 0.10 3.94
70.00 1.51 0.94 59.36 37.10 2.34 2.56 7.68 8.40 0.12 4.60
80.00 1.72 1.08 67.84 42.40 2.67 2.93 8.76 9.61 0.13 5.26
90.00 1.94 1.21 76.32 47.70 3.00 3.30 9.84 10.83 0.15 5.91
100.00 2.15 1.35 84.80 53.00 3.34 3.66 10.96 12.01 0.17 6.57
120.00 2.58 1.62 101.76 63.60 4.01 4.39 13.16 14.40 0.20 7.89
150.00 3.23 2.02 127.20 79.50 5.01 5.49 16.44 18.01 0.25 9.86
180.00 3.88 2.42 152.64 95.40 6.01 6.59 19.72 21.62 0.30 11.83
250.00 5.38 3.37 212.00 132.50 8.35 9.15 27.40 30.02 0.42 16.43
300.00 6.46 4.04 254.40 159.00 10.02 10.98 32.87 36.02 0.50 19.72
Standard

19 English
Installation
This table is for user’s reference only.
XGA
Diagonal length
(inch) size of
4:3 Screen
Screen Size W x H Projection Distance (D)
Offset (Hd)
(m) (m)(inch) (feet)
Width Height Width Height tele tele (inch)wide wide (m)
32.00 0.65 0.49 25.59 19.29 0.40 0.40 1.31 1.31 0.07 2.89
40.00 0.81 0.61 32.00 24.00 0.50 0.50 1.64 1.64 0.09 3.60
60.00 1.22 0.91 48.00 36.00 0.75 0.75 2.46 2.46 0.14 5.40
70.00 1.42 1.07 56.00 42.00 0.88 0.88 2.89 2.89 0.16 6.30
80.00 1.63 1.22 64.00 48.00 1.00 1.00 3.28 3.28 0.18 7.20
90.00 1.83 1.37 72.00 54.00 1.13 1.13 3.71 3.71 0.21 8.10
100.00 2.03 1.52 80.00 60.00 1.25 1.25 4.10 4.10 0.23 9.00
120.00 2.44 1.83 96.00 72.00 1.50 1.50 4.92 4.92 0.27 10.80
150.00 3.05 2.29 120.00 90.00 1.88 1.88 6.17 6.17 0.34 13.50
180.00 3.66 2.74 144.00 108.00 2.26 2.26 7.41 7.41 0.41 16.20
250.00 5.08 3.81 200.00 150.00 3.13 3.13 10.27 10.27 0.57 22.50
300.00 6.10 4.57 240.00 180.00 3.76 3.76 12.34 12.34 0.69 27.00
WXGA
Diagonal length
(inch) size of
16:10 Screen
Screen Size W x H Projection Distance (D)
Offset (Hd)
(m) (m)(inch) (feet)
Width Height Width Height tele tele (inch)wide wide (m)
44.30 0.95 0.60 37.40 23.62 0.50 0.50 1.64 1.64 0.07 2.93
50.00 1.08 0.67 42.52 26.38 0.56 0.56 1.84 1.84 0.08 3.27
60.00 1.29 0.81 50.79 31.80 0.68 0.68 2.23 2.23 0.10 3.94
70.00 1.51 0.94 59.36 37.10 0.79 0.79 2.59 2.59 0.12 4.60
80.00 1.72 1.08 67.84 42.40 0.90 0.90 2.95 2.95 0.13 5.26
90.00 1.94 1.21 76.32 47.70 1.02 1.02 3.35 3.35 0.15 5.91
100.00 2.15 1.35 84.80 53.00 1.13 1.13 3.71 3.71 0.17 6.57
120.00 2.58 1.62 101.76 63.60 1.35 1.35 4.43 4.43 0.20 7.89
150.00 3.23 2.02 127.20 79.50 1.69 1.69 5.54 5.54 0.25 9.86
180.00 3.88 2.42 152.64 95.40 2.03 2.03 6.66 6.66 0.30 11.83
250.00 5.38 3.37 212.00 132.50 2.82 2.82 9.25 9.25 0.42 16.43
300.00 6.46 4.04 254.40 159.00 3.39 3.39 11.12 11.12 0.50 19.72
Short Throw

20
English
User Controls
Control Panel
Using the Control Panel
POWER Refer to the “Power On/Off the Projector” section on
pages 13-14.
RE-SYNC Automatically synchronize the projector to the input
source.
ENTER Conrm your item selection.
SOURCE Press “SOURCE” to select an input signal.
Menu Press “Menu” to launch the on-screen display
(OSD) menu. To exit OSD, Press “Menu” again.
Help Help Menu (only available when OSD menu is not
shown).
Four Directional Select
Keys
Use - to select items or make adjust
ments to your selection.
Keystone / Use to adjust image distortion caused by
tilting the projector. (±40 degrees)
Lamp LED Indicate the projector’s lamp status.
Temp LED Indicate the projector’s temperature status.
ON/STANDBY
LED Indicate the projector’s status.
Control Panel & Remote Control

21 English
User Controls
The interface
is subject to
model’s speci-
cations.
Using the Remote Control
Power Refer to the “Power On/Off the Projector”
section on pages 13-14.
Switch USB mouse switch.
Display blank
& Audio mute
Momentarily turns off/on the audio and
video.
Freeze Temporarily freeze the video.
Mute Momentarily turns off/on the audio.
L/R Emulate USB mouse Left/Right click.
Four Direc-
tional Selec-
tion Keys
Use to select items or make adjustments
to your selection. Up/Down/Left/Right key
for emulation of USB mouse via USB when
“Switch” button is clicked.
Enter Conrm your item selection.USB emulation
when “Switch” button is clicked.
Laser Laser pointer trigger, press to emit laser
(For Laser version).
Page +/- Page Up/Down for emulation of USB key-
board via USB when OSD off.
Keystone +/- Adjust image distortion caused by tilting the
projector.
Volume +/- Adjust to increase / decrease the volume.
Aspect Use this function to choose your desired
aspect ratio.
Menu
Press “Menu” to launch the on-screen
display (OSD) menu. To exit OSD, press
“Menu” again.
3D Press the “3D” to turn the 3D OSD menu
on/off.
Remote Control
L
R
Freeze
Power
Switch
Enter
Page
-
Keystone Volume
Menu
1 2 3
4 5 6
7 8
0
9
HDMI
User1
Source
Resync
User2 User3
VGA
Video
3D
Page+Laser

22
English
User Controls
Using the Remote Control
HDMI Press “HDMI” to choose HDMI source.
VGA Press “VGA” to choose VGA sources.
Video Press “Video” to choose Composite Video
and S-video source.
User dened keys
(1/2/3) Keys can be dened in projector OSD.
Source Press “Source” to select an input signal.
Brightness
Mode
Change the brightness mode: Bright->Eco-
>Dynamic->Eco+. (refer to page 52)
Re-Sync Automatically synchronizes the projector to
the input source.

23 English
User Controls
key
position
key
legend
Key
MTX
repeat
format
NEC_CODE
custom code Data
Byte 1 Byte 2 Byte 3 Byte 4
K27 1 Power F1 32 CD 81 7E
K25 2 Switch F1 32 CD 3E C1
K28 3 Display blank&Audio mute F1 32 CD 8A 75
K31 4 Freeze F1 32 CD 8B 74
K26 5 Mute F1 32 CD 92 6D
K29 6 L F1 32 CD CB 34
K30 7 R F1 32 CD CC 33
K33 8 UP F2 32 CD C6 39
K21 9 LEFT F2 32 CD C8 37
K23 10 Enter F1 32 CD C5/CA 3A/35
K19 11 Right F2 32 CD C9 36
K32 12 Down F2 32 CD C7 38
K22 13 Page- F2 32 CD C2 3D
K20 14 Laser -- -- -- -- --
K24 15 Page+ F2 32 CD C1 3E
K10 16 keystone- F2 32 CD 84 7B
K9 17 keystone+ F2 32 CD 85 7A
K8 18 Volume- F2 32 CD 8F 70
K7 19 Volume+ F2 32 CD 8C 73
K16 20 Format/1 F1 32 CD 98 67
K14 21 Menu/2 F1 32 CD 88 77
K13 22 3D/3 F1 32 CD 93 6C
K4 23 HDMI/4 F1 32 CD 86 79
K5 24 VGA/5 F1 32 CD D0 2F
K6 25 Video/6 F1 32 CD D1 2E
K3 26 User1/7 F1 32 CD D2 2D
K2 27 User2/8 F1 32 CD D3 2C
K1 28 User3/9 F1 32 CD D4 2B
K15 29 Soure F1 32 CD C3 3C
K17 30 Brightness/0 F1 32 CD 96 69
K18 31 Resync F1 32 CD C4 3B

24
English
User Controls
Installing Batteries
Replace only with the same or equivalent type recommend-
ed by the manufacturer.
CAUTION
Improper use of batteries can result in chemical leakage or
explosion. Be sure to follow the instructions below.
Do not mix batteries of different types. Different types of •
batteries have different characteristics.
Do not mix old and new batteries. Mixing old and new •
batteries can shorten the life of new batteries or cause
chemical leakage in old batteries.
Remove batteries as soon as they are worn out. Chemi-•
cals that leak from batteries that come in contact with skin
can cause a rash. If you nd any chemical leakage, wipe
thoroughly with a cloth.
The batteries supplied with this product may have a •
shorter life expectancy due to storage conditions.
Remove batteries from the remote if the remote is not to •
be used for extended period of time.
Obey local laws during disposal of the battery.•

25 English
User Controls
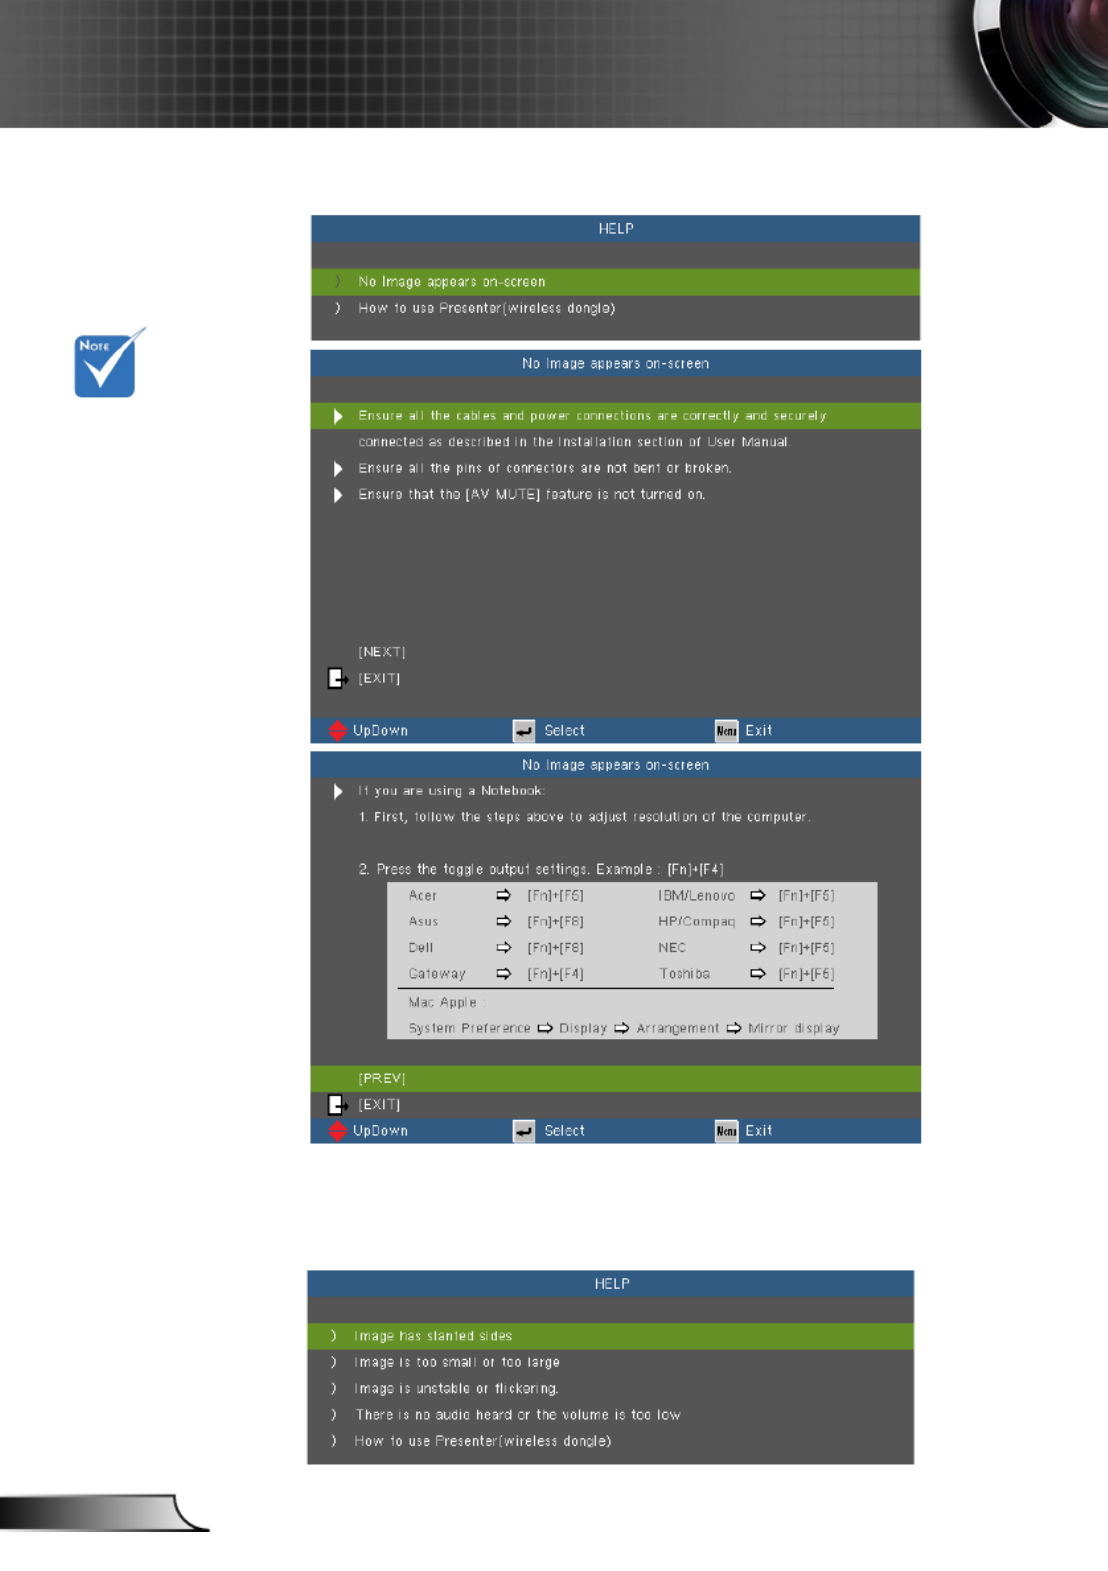
Using the HELP button
The HELP function ensures easy setup and operation.
Press the “?” button on the control panel to open the Help
Menu.
26
English
User Controls
Please refer to the
“Troubleshooting”
section on pages
54-59 for more
details.
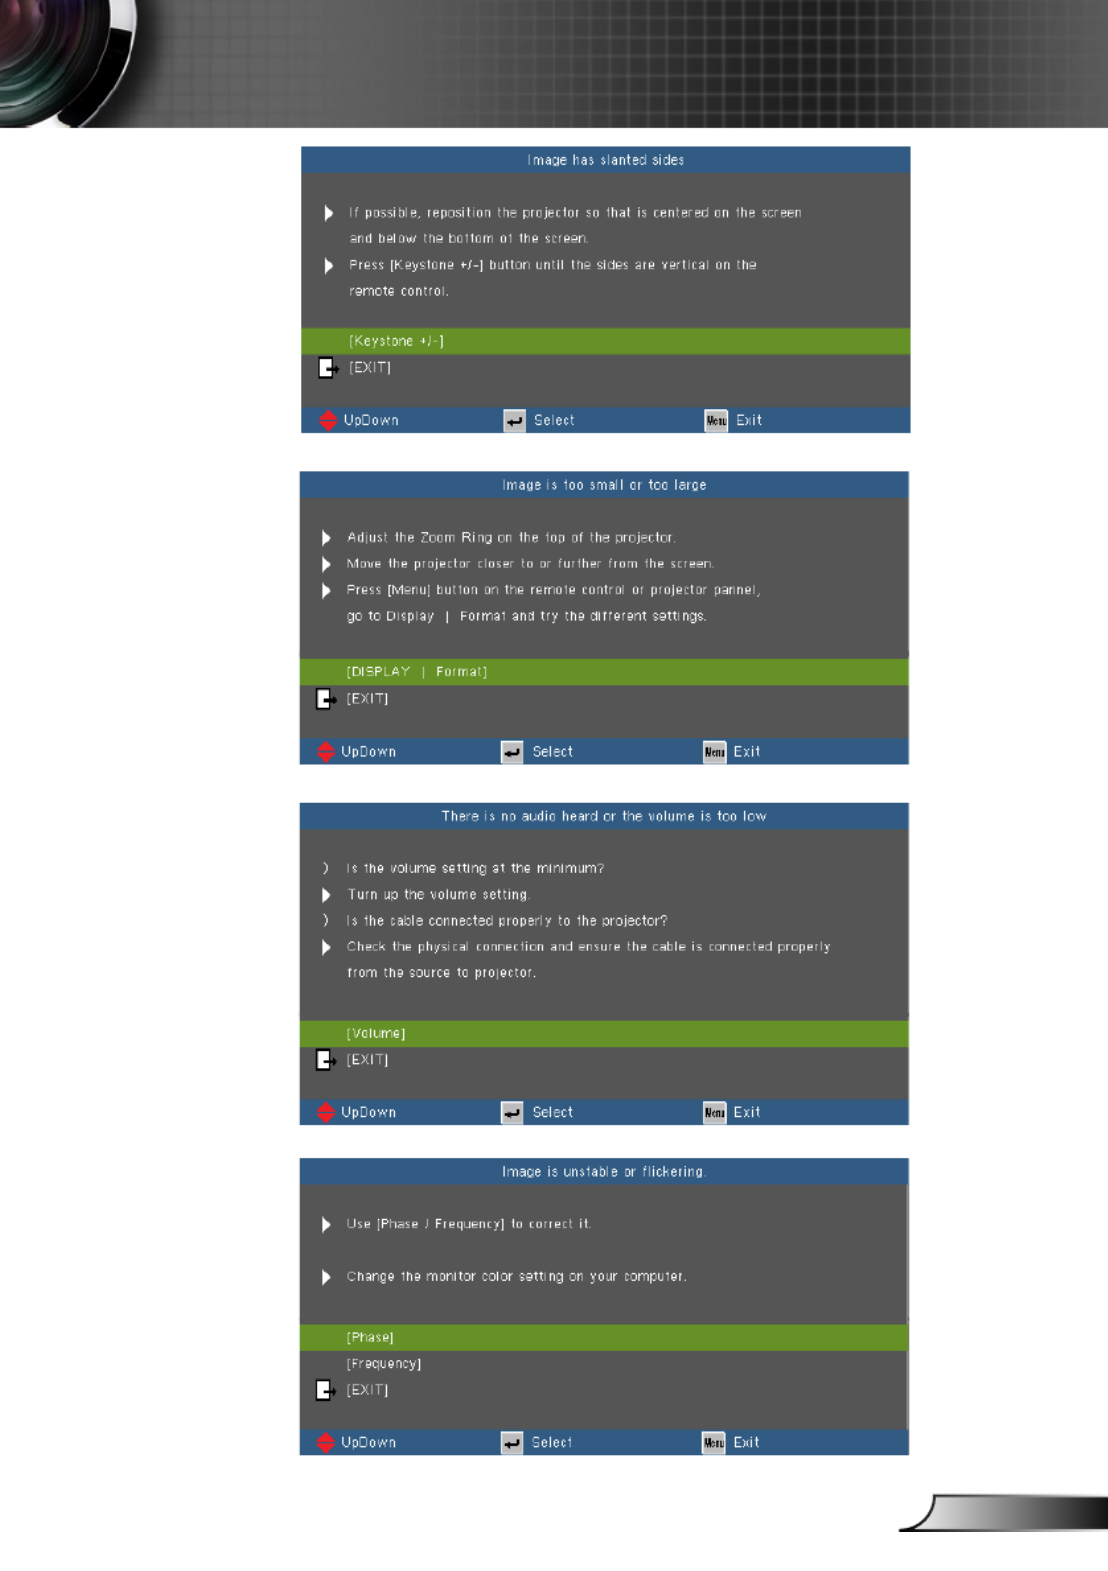
Help menu button functions only when no input source
is detected.
If input source is detected and help button is pressed, the
following pages will appear to help diagnose any problems.
27 English
User Controls

28
English
User Controls
The Projector has multilingual On-screen Display menus that
allow you to make image adjustments and change a variety of
settings.
How to operate
1. To open the OSD menu, press “Menu” on the Remote Control or
Projector Keypad.
2 When OSD is displayed, use keys to select any item in the
main menu. While making a selection on a particular page, press
or “Enter” key to enter sub menu.
3. Use keys to select the desired item and adjust the settings
using key.
4. Select the next item to be adjusted in the sub menu and adjust as
described above.
5. Press “Enter” to conrm, and the screen will return to the main
menu.
6. To exit, press “Menu” again. The OSD menu will close and the
projector will automatically save the new settings.
On-screen Display Menus
Main Menu
Sub Menu
Settings

29 English
User Controls
Main Menu Sub Menu
Display Mode Presentation / Bright / Movie / sRGB /
Blackboard / User / 3D
Brightness -50~50
Contrast -50~50
Sharpness 1~15
#1 Color -50~50
#1 Tint -50~50
Advanced Gamma Film / Video / Graphics / Standard
BrilliantColor™ 1~10
Color Temp. Warm / Medium / Cold
Color settings Red / Green / Blue /
Cyan / Magenta /
Yellow
Hue / Saturation / Gain [-50~50]
White Red / Green / Blue
Reset
Exit
Color Space AUTO / RGB / YUV (Input source is not
HDMI
)
AUTO / RGB (0-255) / RGB (16-235) /
YUV (Input source is HDMI)
#2 Signal Automatic On / Off
Phase (VGA)
Frequency (VGA)
H. Position (VGA)
V. Position (VGA)
Exit
Exit
Reset
Format #3 4:3 / 16:9 / Native / AUTO
#4 4:3 / 16:9 or 16:10 / LBX / Native / AUTO
Edge Mask 0~10
Zoom -5~25 (80%~200%)
Image Shift H -100~100
V -100~100
V Keystone -40~40
3D 3D Mode Off / DLP-Link
3D->2D 3D / L / R
#5 3D Format AUTO / SBS / Top and Bottom / Frame
Sequential
#5 3D Sync. Invert On / Off
Language English / Deutsch / Français / Italiano /
Español / Português / Svenska /
Nederlands / Norsk/Dansk / Polski /
Suomi / / / Magyar /Ɋɭɫɫɤɢɣ İȜȜȘȞȚțȐ
eština / /ý ̶γέΎϓ / ϲΑέϋ 腎
誎襦肫 /
䬨య襦肫 螔膩蓳 䞲ῃ㠊 / / / / ࡷࡎ࡙
Türkçe / ViӋt / Bahasa Indonesia / Româ
nå
Projection
Menu Location
#4 Screen Type 16:10 / 16:9 (WXGA)
#6 Security Security On / Off
Security Timer Month / Day / Hour
Change Password
Exit
Settings
IMAGE
DISPLAY
SETUP
Menu Tree

30
English
User Controls
Main Menu Sub Menu Settings
Projector ID 0~99
Audio Settings Internal Speaker On / Off
Mute On / Off
Volume 0~10
Audio Input Default / AUDIO1 / AUDIO2
Audio Input 2 function Mic / Audio Input2
LAN Settings Network Status Connect/Disconnect(Read-Only)
DHCP On/Off [Default Off]
IP Address Default [192.168.0.100]
Subnet mask Default [255.255.255.0]
Gateway Default [192.168.0.254]
DNS Default [192.168.0.51]
Apply Yes / No
MAC Address Read-Only
Exit
Advanced Logo Default / Neutral
Closed Captioning Off / CC1 / CC2
Exit
Input Source VGA / Video / Video / S-Video / HDMI
Source Lock On / Off
High Altitude On / Off
Information Hide On / Off
Keypad Lock On / Off
Test Pattern None / Grid / White Pattern
#6 IR Function On / Off / Top / Front
Background Color Black / Red / Blue / Green / White
Remote Settings User 1 VGA2/S-Video/LAN/Brightness/Contrast/Sleep Timer
User 2 VGA2/S-Video/LAN/Brightness/Contrast/Sleep Timer
User 3 VGA2/S-Video/LAN/Brightness/Contrast/Sleep Timer
Advanced Direct Power On On / Off
Auto Power Off (min) 0~180
Quick Resume On / Off
0~990
Active / Eco.
Lamp Settings Lamp Hours
Lamp Reminder On / Off
Brightness Mode Bright / Eco. / Dynamic / Eco+
Lamp Reset Yes / No
Exit
Optional Filter Settings Yes / No
Filter Usage Hours 0~9999
Filter Reminder Off / 300hr / 500hr / 800hr / 1000hr
Filter Reset Yes / No
Exit
Reset Yes / No
OPTIONS
SETUP
Optional Filter Installed
Power Mode (Standby)
Sleep Timer (min)
Please note that the on-screen display (OSD) menus vary according to the
signal type selected and the projector model you are using.
(#1) “Color” and “Tint” are only supported in Video mode.
(#2) “Signal” is only supported in Analog VGA (RGB) signal.
(#3) For XGA model only.
(#4) For WXGA model only. 16:9 or 16:10 depend on “Screen Type” setting.
(#5) “3D Sync Invert” is only available when 3D is enabled and this mode
3D is for DLP link glass only.
(#6) The function depends on model’s specications.

31 English
User Controls
IMAGE
Display Mode
There are many factory presets optimized for various types of
images.
Presentation: Good color and brightness from PC input.
Bright: Maximum brightness from PC input.
Movie: For home theater.
sRGB: Standardised accurate color.
Blackboard: This mode should be selected to achieve optimum
color settings when projecting onto a blackboard (green).
User: User’s settings.
3D: Recommend setting for 3D mode enabled. Any further ad-
justments by the user in 3D will be saved in this mode for further
use.
Brightness
Adjust the brightness of the image.
Press the to darken image.
Press the to lighten the image.
Contrast
The contrast controls the degree of difference between the lightest
and darkest parts of the picture.
Press the to decrease the contrast.
Press the to increase the contrast.

32
English
User Controls
Sharpness
Adjust the sharpness of the image.
Press the to decrease the sharpness.
Press the to increase the sharpness.
Color
Adjust a video image from black and white to fully saturated color.
Press the to decrease the amount of saturation in the image.
Press the to increase the amount of saturation in the image.
Tint
Adjust the color balance of red and green.
Press the to increase the amount of green in the image.
Press the to increase the amount of red in the image.
“Color” and “Tint”
functions are only
supported under
Video mode.
Produktspezifikationen
| Marke: | Optoma |
| Kategorie: | Videostrahl |
| Modell: | X316ST |
| Marktpositionierung: | Short throw |
| Eingebaute Lautsprecher: | Ja |
| Breite: | 314.6 mm |
| Tiefe: | 223.6 mm |
| Gewicht: | 2760 g |
| Mitgelieferte Kabel: | VGA |
| Produkttyp: | Short-Throw-Projektor |
| Produktfarbe: | Weiß |
| Höhe: | 101.7 mm |
| Energiequelle: | AC |
| Platzierung: | Desktop |
| RMS-Leistung: | 10 W |
| Anzahl eingebauter Lautsprecher: | 1 |
| AC Eingangsspannung: | 100 - 240 V |
| AC Eingangsfrequenz: | 50 - 60 Hz |
| Kopfhörerausgänge: | 1 |
| Anzahl USB 2.0 Anschlüsse: | 1 |
| On-Screen-Display (OSD): | Ja |
| Menüsprachen: | ARA,CZE,DAN,DEU,DUT,ENG,ESP,FIN,FRE,GRE,HUN,NOR,POL,POR,RUM,RUS,SWE,TUR |
| Betriebstemperatur: | 5 - 40 °C |
| Fernbedienung enthalten: | Ja |
| Eingebauter Ethernet-Anschluss: | Nein |
| Schnellstartübersicht: | Ja |
| Stromverbrauch (Standardbetrieb): | 294 W |
| Anzahl Ethernet-LAN-Anschlüsse (RJ-45): | 1 |
| Betriebsanleitung: | Ja |
| Natives Seitenverhältnis: | 4:3 |
| Kontrastverhältnis: | 20000:1 |
| Anzahl HDMI-Anschlüsse: | 1 |
| Stromverbrauch (Standby): | 0.5 W |
| LED-Anzeigen: | Ja |
| Geräuschpegel: | - dB |
| Analoges Signalformatsystem: | NTSC,NTSC 3.58,NTSC 4.43,NTSC J,NTSC M,PAL,PAL 4.43,PAL B,PAL D,PAL G,PAL H,PAL I,PAL M,PAL N,SECAM,SECAM 4.25/4.4,SECAM B,SECAM D,SECAM G,SECAM K,SECAM K1,SECAM L |
| RS-232 port: | 1 |
| Composite Video-Eingang: | 1 |
| Unterstützte Video-Modi: | 1080i,1080p,480i,480p,576i,576p,720p |
| Unterstützte Grafik-Auflösungen: | 1024 x 768 (XGA),1280 x 1024 (SXGA),1600 x 1200 (UXGA),640 x 480 (VGA),800 x 600 (SVGA) |
| 3D: | Ja |
| DVI Anschluss: | Nein |
| Mikrofon-Eingang: | Ja |
| Full-HD: | Nein |
| Kabelsperre-Slot: | Ja |
| Slot-Typ Kabelsperre: | Kensington |
| Akkus/Batterien enthalten: | Ja |
| Integrierter Kartenleser: | Nein |
| Projektorhelligkeit: | 3400 ANSI Lumen |
| Projektionstechnologie: | DLP |
| native Auflösung des Projektors: | XGA (1024x768) |
| Matrix Größe: | 0.55 Zoll |
| Anzahl der Farben: | 1,073 Milliarden Farben |
| Trapezkorrektur, vertikal: | -40 - 40 ° |
| Projektionsflächenkapazität: | 59.8 - 106.1 Zoll |
| Projektionsabstand: | 0.75 - 1.33 m |
| Anzahl VGA (D-Sub) Anschlüsse: | 3 |
| Serielle Schnittstelle: | RS-232 |
| HDMI-Version: | 1.4a |
| Nachhaltigkeitszertifikate: | RoHS |
| Anzahl Lampe(n): | 1 Lampen |
| Fernbedienungstyp: | IR |
| Passwortschutz: | Ja |
| Lebensdauer der Lichtquelle: | 4000 h |
| Lampenleistung: | 210 W |
| Typ der Lichtquelle: | Lampe |
| Brennweitenbereich: | - mm |
| Anzahl S-Video-Eingänge: | 1 |
| Höhe bei Betrieb: | 0 - 3000 m |
| Unterstützte Seitenverhältnisse: | 4:3,16:9 |
| Vertikaler Scanbereich: | 24 - 85 Hz |
| Horizontaler Scanbereich: | 15.3 - 91.1 kHz |
| Stromeingang: | Ja |
| Geräuschpegel (Energiesparmodus): | 29 dB |
| CardBus PCMCIA Slot-Typ: | Nein |
| Einheitlichkeit: | 80 % |
| Offset: | 115 % |
| Projektionsverhältnis: | 0.617:1 |
| Optical disc player Typ: | Nicht enthalten |
| Unterstütze 3D-Formate: | Frame packing,Side by side,Top and bottom |
| Verbrauch (Energiesparmodus): | 194 W |
| Matrix typ: | DMD |
Brauchst du Hilfe?
Wenn Sie Hilfe mit Optoma X316ST benötigen, stellen Sie unten eine Frage und andere Benutzer werden Ihnen antworten
Bedienungsanleitung Videostrahl Optoma

18 Juni 2024
28 Mai 2024
28 Mai 2024
26 Mai 2024
20 Mai 2024
14 Mai 2024
13 Mai 2024
12 Mai 2024
10 Mai 2024
4 Mai 2024
Bedienungsanleitung Videostrahl
- Videostrahl Samsung
- Videostrahl Da-Lite
- Videostrahl 3M
- Videostrahl Acer
- Videostrahl Anker
- Videostrahl Asus
- Videostrahl Sanyo
- Videostrahl BenQ
- Videostrahl HP
- Videostrahl Philips
- Videostrahl Sony
- Videostrahl Panasonic
- Videostrahl LG
- Videostrahl Klarstein
- Videostrahl Canon
- Videostrahl Yamaha
- Videostrahl Technaxx
- Videostrahl Blaupunkt
- Videostrahl Sharp
- Videostrahl Pyle
- Videostrahl Mitsubishi
- Videostrahl Hisense
- Videostrahl Salora
- Videostrahl Polaroid
- Videostrahl JVC
- Videostrahl Krüger And Matz
- Videostrahl Xiaomi
- Videostrahl Stairville
- Videostrahl Smartwares
- Videostrahl Hitachi
- Videostrahl Toshiba
- Videostrahl Livoo
- Videostrahl Steinel
- Videostrahl Prixton
- Videostrahl Casio
- Videostrahl Epson
- Videostrahl ViewSonic
- Videostrahl Dell
- Videostrahl Lenovo
- Videostrahl OKI
- Videostrahl Ricoh
- Videostrahl Smart
- Videostrahl Kodak
- Videostrahl Adj
- Videostrahl Eurolite
- Videostrahl Barco
- Videostrahl Bauer
- Videostrahl Eiki
- Videostrahl InFocus
- Videostrahl Nebula
- Videostrahl NEC
- Videostrahl Overmax
- Videostrahl Marantz
- Videostrahl Celexon
- Videostrahl Elmo
- Videostrahl D-Link
- Videostrahl Smart Tech
- Videostrahl ION
- Videostrahl Speaka
- Videostrahl Reflecta
- Videostrahl Derksen
- Videostrahl EasyMaxx
- Videostrahl Cameo
- Videostrahl Yaber
- Videostrahl Vivitek
- Videostrahl Emtec
- Videostrahl GPX
- Videostrahl La Vague
- Videostrahl Maxell
- Videostrahl Naxa
- Videostrahl Fun Generation
- Videostrahl Planar
- Videostrahl Celly
- Videostrahl Futurelight
- Videostrahl Tzumi
- Videostrahl Christie
- Videostrahl EKO
- Videostrahl Microtek
- Videostrahl Elite Screens
- Videostrahl ASK Proxima
- Videostrahl Vankyo
- Videostrahl AAXA Technologies
- Videostrahl Mimio
- Videostrahl DTS
Neueste Bedienungsanleitung für -Kategorien-

13 August 2024

9 August 2024
9 August 2024

25 Juni 2024
25 Juni 2024
25 Juni 2024
25 Juni 2024
25 Juni 2024
25 Juni 2024
25 Juni 2024