Optoma ProScene ZH606 Bedienungsanleitung
Optoma
Videostrahl
ProScene ZH606
Lesen Sie kostenlos die 📖 deutsche Bedienungsanleitung für Optoma ProScene ZH606 (67 Seiten) in der Kategorie Videostrahl. Dieser Bedienungsanleitung war für 32 Personen hilfreich und wurde von 2 Benutzern mit durchschnittlich 4.5 Sternen bewertet
Seite 1/67
User manual
DLP® Projector

English
2
TABLE OF CONTENTS
SAFETY ...............................................................................................
4
Important Safety Instruction....................................................................................................... 4
Cleaning the Lens...................................................................................................................... 5
Laser Radiation Safety Information 6
...........................................................................................
Disclaimer 6
..................................................................................................................................
Trademark Recognition 6
.............................................................................................................
FCC 7
...........................................................................................................................................
Declaration of Conformity for EU countries 7
...............................................................................
WEEE 7
........................................................................................................................................
INTRODUCTION 8
..................................................................................
Package Overview..................................................................................................................... 8
Standard accessories 8
................................................................................................................
Optional accessories 8
.................................................................................................................
Product Overview 9
......................................................................................................................
Connections.............................................................................................................................. 10
Keypad .....................................................................................................................................
11
Remote control 12
.........................................................................................................................
SETUP AND INSTALLATION .............................................................
13
Installing the projector 13
..............................................................................................................
Connecting sources to the projector 15
.........................................................................................
Adjusting the projector image 17
...................................................................................................
Remote setup 18
...........................................................................................................................
USING THE PROJECTOR 20
..................................................................
Powering on / off the projector.................................................................................................. 20
Selecting an input source 21
.........................................................................................................
Menu navigation and features 22
..................................................................................................
OSD Menu tree......................................................................................................................... 23
Display image settings menu.................................................................................................... 32
Display 3D menu 35
......................................................................................................................
Display aspect ratio menu 36
........................................................................................................
Display edge mask menu 39
.........................................................................................................
Display zoom menu 39
..................................................................................................................
Display image shift menu 39
.........................................................................................................
Display geometric correction menu 39
..........................................................................................
Audio mute menu 40
.....................................................................................................................
Audio volume menu 40
..................................................................................................................
Audio audio input menu 40
............................................................................................................
Audio audio / mic input function menu...................................................................................... 40
Setup projection menu.............................................................................................................. 41
Setup screen type menu........................................................................................................... 41

English 3
Setup power settings menu 41
......................................................................................................
Setup security menu 42
.................................................................................................................
Setup HDMI link settings menu 42
................................................................................................
Setup test pattern menu 42
...........................................................................................................
Setup remote settings menu..................................................................................................... 43
Setup projector ID menu........................................................................................................... 43
Setup 12V trigger menu............................................................................................................ 43
Setup HDBaseT control menu 43
..................................................................................................
Setup options menu.................................................................................................................. 44
Setup reset OSD menu 45
............................................................................................................
Network LAN menu 45
..................................................................................................................
Network control menu............................................................................................................... 46
Setup network control settings menu 47 .......................................................................................
Info menu.................................................................................................................................. 52
MAINTENANCE 53
..................................................................................
Installing and cleaning the dust lter ........................................................................................
53
ADDITIONAL INFORMATION 54 ............................................................
Compatible resolutions 54
.............................................................................................................
Image size and projection distance 57
..........................................................................................
Projector dimensions and ceiling mount installation 59
.................................................................
IR remote codes 60
.......................................................................................................................
Troubleshooting 62
........................................................................................................................
Warning indicators 64
....................................................................................................................
Specications ...........................................................................................................................
65
Optoma global ofces ...............................................................................................................
66

English 5
Do not use the unit if it has been physically damaged or abused. Physical damage/abuse would be
(but not limited to):
± Unit has been dropped.
± Power supply cord or plug has been damaged.
± Liquid has been spilled on to the projector.
± Projector has been exposed to rain or moisture.
± Something has fallen in the projector or something is loose inside.
Do not place the projector on an unstable surface. The projector may fall over resulting in injury or the
projector may become damaged.
Do not block the light coming out of the projector lens when in operation. The light will heat the object
and may melt, cause burns or start a re.
Please do not open or disassemble the projector as this may cause electric shock.
Do not attempt to service the unit yourself. Opening or removing covers may expose you to dangerous
voltages or other hazards. Please call Optoma before you send the unit for repair.
See projector enclosure for safety related markings.
The unit should only be repaired by authorized service personnel.
Only use attachments/accessories specied by the manufacturer.
Do not look into straight into the projector lens during operation. The bright light may harm your eyes.
This projector will detect the life of the light source itself.
When switching the projector off, please ensure the cooling cycle has been completed before
disconnecting power. Allow 90 seconds for the projector to cool down.
Turn off and unplug the power plug from the AC outlet before cleaning the product.
Use a soft dry cloth with mild detergent to clean the display housing. Do not use abrasive cleaners,
waxes or solvents to clean the unit.
Disconnect the power plug from AC outlet if the product is not being used for a long period of time.
Do not setup the projector in places where it might be subjected to vibration or shock.
Do not touch the lens with bare hands.
Remove battery/batteries from remote control before storage. If the battery/batteries are left in the
remote for long periods, they may leak.
Do not use or store the projector in places where smoke from oil or cigarettes may be present, as it
can adversely affect the quality of the projector performance.
Please follow the correct projector orientation installation as non standard installation may affect the
projector performance.
Use a power strip and or surge protector. As power outages and brown-outs can KILL devices.
Cleaning the Lens
Before cleaning the lens, be sure to turn off the projector and unplug the power cord to allow it to
completely cool down.
Use a compressed air tank to remove the dust.
Use a special cloth for cleaning lens and gently wipe the lens. Do not touch the lens with your ngers.
Do not use alkaline/acid detergents or volatile solvents such as alcohol for cleaning lens. If the lens is
damaged due to the cleaning process, it is not covered by the warranty.
Warning: Do not use a spray containing ammable gases to remove dust or dirt from the lens. This
may cause a re due to excessive heat inside the projector.
Warning: Do not clean the lens if the projector is warming up as this may cause the lens’ surface lm
to peel off.

English
6
Warning: Do not wipe or tap the lens with a hard object.
Laser Radiation Safety Information
This product is classied as CLASS 1 LASER PRODUCT - RISK GROUP 2 of IEC60825-1 : 2014 and
also complies with 21 CFR 1040.10 and 1040.11 as a Risk Group 2, LIP (Laser Illuminated Projector)
as dened in IEC 62471:5:Ed. 1.0. For more information see Laser Notice No. 57, dated May 8, 2019.
IEC 60825-1:2014 CLASS 1 LASER PRODUCT RISK GROUP 2
Complies with 21 CFR 1040.10 and 1040.11 except for conformance as a Risk Group 2
LIP as defined in IEC 62471-5:Ed. 1.0. For more information see Laser Notice No. 57,
dated May 8, 2019.
IEC 60825-1:2014 PRODUIT LASER DE CLASSE 1 GROUPE DE RISQUE 2
Conforme aux normes 21 CFR 1040.10 et 1040.11, à l'exception de la conformité en
tant que PIL du groupe de risque 2 définie dans la CEI 62471-5: Ed. 1,0. Pour plus
d'informations, voir l'avis au laser n ° 57 du 8 mai 2019.
IEC 60825-1:2014 1 RG2㊱◶ݿӝ ধ䲟ㅿ㓝
䲚Ҽ ѣᇐѿⲺ ধ䲟ㅿ㓝ԛཌ 㾷ㅜਾ ૂIEC 62471-5:Ed.1.0 RG2 LIP , 21 CFR 1040.10
1040.11 2019 5 8 57 .θᴪཐީؗᚥθ䈭৸䰻 ᒪ ᴾ ᰛⲺㅢ ਭ◶ݿޢ
IEC 60825-1:2014 1 RG2五◶ݿ⭘ ধ䳠ㅿ㍐
䲚Ҽ ѣᇐ㗟Ⲻ ধ䳠ㅿ㍐ԛཌ 㾷ㅜਾ ૂIEC 62471-5:Ed.1.0 RG2 LIP , 21 CFR 1040.10
1040.11 2019 5 8 57 .θᴪཐ䰒䋽䁀θ䄁৹䯧 ᒪ ᴾ ᰛⲺㅢ 㲕◶ݿޢ
Failure to comply with the following could result in death or serious injury.
This projector has built-in Class 4 laser module. Disassembly or modication is very dangerous and
should never be attempted.
Any operation or adjustment not specically instructed by the user’s guide creates the risk of
hazardous laser radiation exposure.
Do not open or disassemble the projector as htis may cause damage by the exposure of laser
radiation.
Do not stare into beam when the projector is on. The bright light may result in permanent eye damage.
When turning on the projector, make sure no one within projection range is looking at the lens.
Without following the control, adjustment or operation procedure may cause damage by the exposure
of laser radiation.
Adequate instructions for assembly, operation, and maintenance, including clear warnings concerning
precautions to avoid possible exposure to laser.
Copyright
This publication, including all photographs, illustrations and software, is protected under international copyright
laws, with all rights reserved. Neither this manual, nor any of the material contained herein, may be reproduced
without written consent of the author.
© Copyright 2019
Disclaimer
The information in this document is subject to change without notice. The manufacturer makes no representations
or warranties with respect to the contents hereof and specically disclaims any implied warranties of
merchantability or tness for any particular purpose. The manufacturer reserves the right to revise this publication
and to make changes from time to time in the content hereof without obligation of the manufacturer to notify any
person of such revision or changes.
Trademark Recognition
Kensington is a U.S. registered trademark of ACCO Brand Corporation with issued registrations and pending
applications in other countries throughout the world.
HDMI, the HDMI Logo, and High-Denition Multimedia Interface are trademarks or registered trademarks of HDMI
Licensing LLC in the United States and other countries.
DLP®, DLP Link and the DLP logo are registered trademarks of Texas Instruments and BrilliantColor TM is a
trademark of Texas Instruments.

English 7
MHL, Mobile High-Denition Link and the MHL Logo are trademarks or registered trademarks of MHL Licensing,
LLC.
All other product names used in this manual are the properties of their respective owners and are Acknowledged.
FCC
This device has been tested and found to comply with the limits for a Class B digital device pursuant to Part 15
of the FCC rules. These limits are designed to provide reasonable protection against harmful interference in a
residential installation. This device generates, uses and can radiate radio frequency energy and, if not installed and
used in accordance with the instructions, may cause harmful interference to radio communications.
However, there is no guarantee that interference will not occur in a particular installation. If this device does cause
harmful interference to radio or television reception, which can be determined by turning the device off and on is
encouraged to try to correct the interference by one or more of the following measures:
Reorient or relocate the receiving antenna.
Increase the separation between the device and receiver.
Connect the device into an outlet on a circuit different from that to which the receiver is connected.
Consult the dealer or an experienced radio/television technician for help.
Notice: Shielded cables
All connections to other computing devices must be made using shielded cables to maintain compliance with FCC
regulations.
Caution
Changes or modications not expressly approved by the manufacturer could void the user's authority, which is
granted by the Federal Communications Commission, to operate this projector.
Operation Conditions
This device complies with Part 15 of the FCC Rules. Operation is subject to the following two conditions:
1. This device may not cause harmful interference and
2. This device must accept any interference received, including interference that may cause undesired operation.
Notice: Canadian users
This Class B digital apparatus complies with Canadian ICES-003.
Remarque à l'intention des utilisateurs canadiens
Cet appareil numerique de la classe B est conforme a la norme NMB-003 du Canada.
Declaration of Conformity for EU countries
EMC Directive 2014/30/EU (including amendments)
Low Voltage Directive 2014/35/EU
RED 2014/53/EU (if product has RF function)
WEEE
Disposal instructions
Do not throw this electronic device into the trash when discarding. To minimize pollution and ensure
utmost protection of the global environment, please recycle it.

English
8
INTRODUCTION
Package Overview
Carefully unpack and verify that you have the items listed below under standard accessories. Some of the items
under optional accessories may not be available depending on the model, specication and your region of
purchase. Please check with your place of purchase. Some accessories may vary from region to region.
The warranty card is only supplied in some specic regions. Please consult your dealer for detailed information.
Standard accessories
Optional accessories
Note:
Optional accessories vary depending on model, specication and region.
Projector Remote control Power lead Documentation
Warranty Card*
Basic User Manual
Paper UM
F3
On
Geometric
Mode
Correction PIP/PBP
Off
F1 F2
AV Mut e
ENTER
Source
Volume D Zoom
Info.
VGA
1
S-Video
2
HDM I1
3
HDM I2
HDM I3
Format Freeze Remote
ID All
HDB aseT
4
Video
5
DVI
6
BNC
7
YPbPr
8
DisplayPort
9
3D
0
Re-Sync
Menu
F3
Note:
.The remote control is shipped with the battery
* For European warranty Information, please visit www.optoma.com.
Lens cap CD user manual Carry bag VGA cable

English 9
INTRODUCTION
Product Overview
10
11
37
8
1213
8
89
21 4 5 6
Note:
.Do not block projector intake and exhaust vents
When operating the projector in an enclosed space, allow at least 30 cm clearance around the intake
and exhaust vents.
No Item No Item
1. IR Receivers 8. Tilt-Adjustment Feet
2. Keypad 9. Kensington™ Lock Port
3. Lens Shift Dial 10. Input / Output
4. Ventilation (inlet) Power Socket11.
5. Zoom Lever 12. Security Bar
6. Focus Ring 13. Lens
7. Ventilation (outlet)
English 11
INTRODUCTION
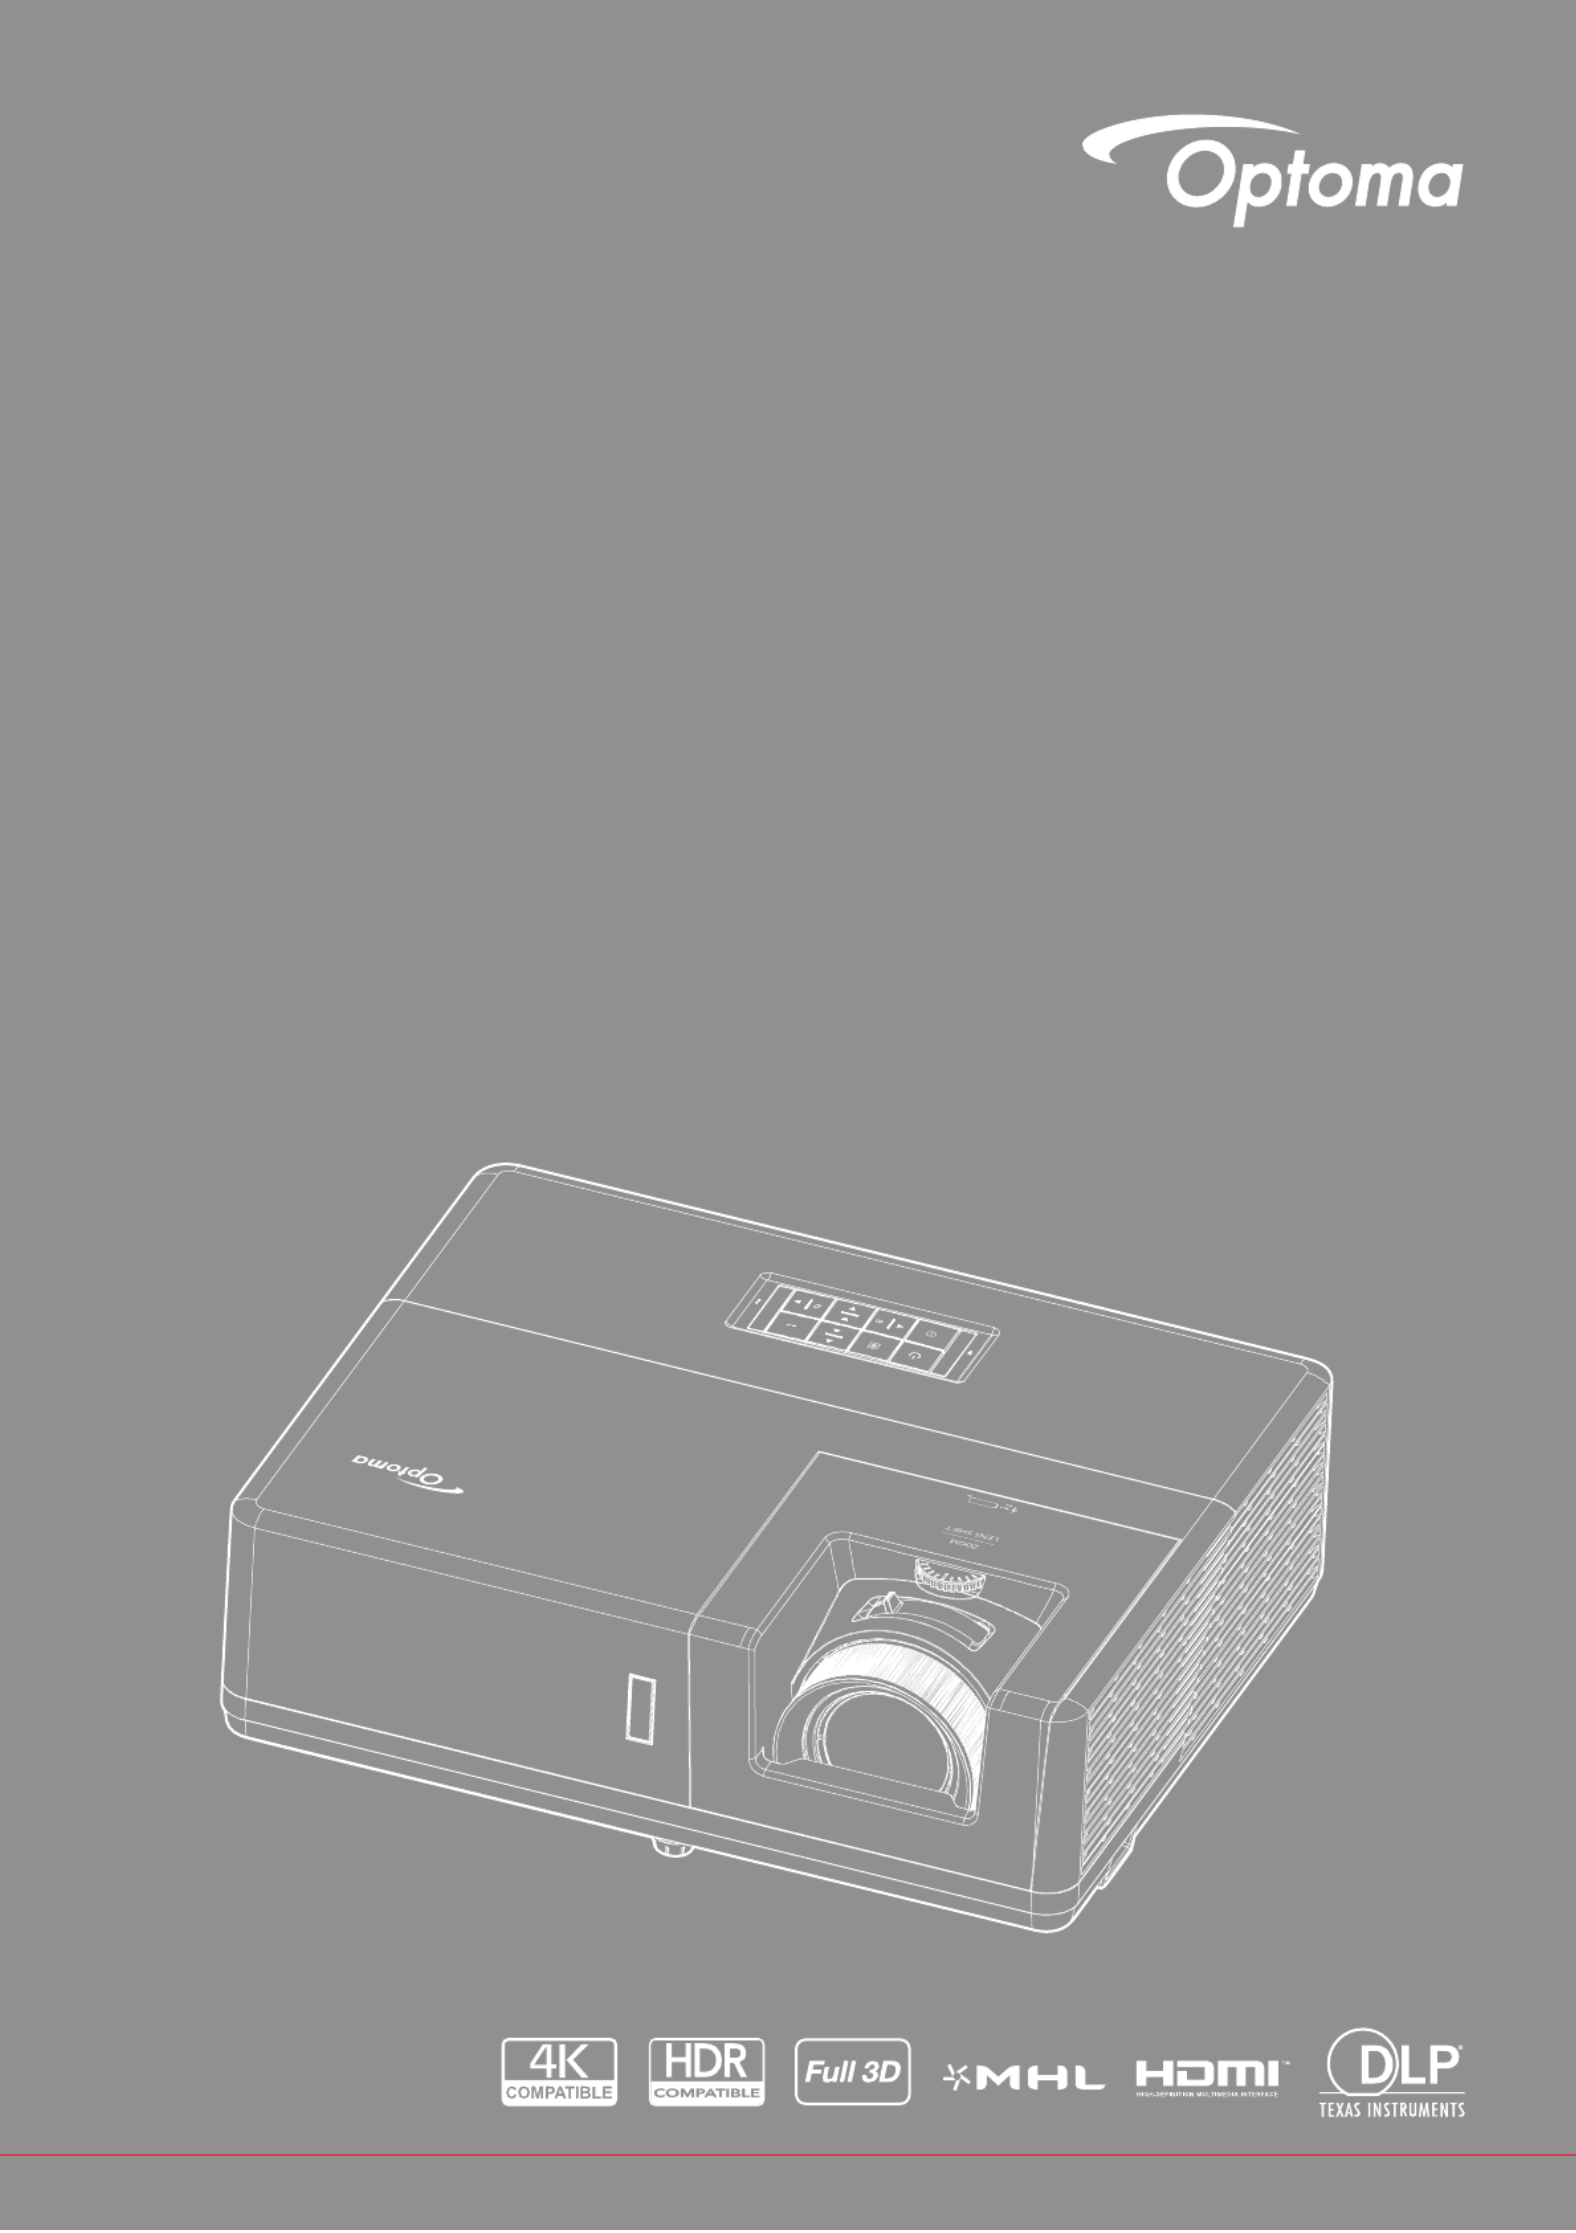
Keypad
10
21 3 5 6
9 78
4
No Item No Item
1. Lamp LED 6. Temp LED
2. Power and Power LED 7. Re-Sync
3. Menu 8. Four Directional Select Keys
4. Keystone Correction 9. Source
5. Enter 10. Information

English12
INTRODUCTION
Remote control
F3
On
Geometric
Mode
Correction PIP/PBP
Off
F1 F2
AV Mute
ENTER
Source
Volume D Zoom
Info.
VGA
1
S-Video
2
HDMI1
3
HDMI2
HDMI3
Format Freeze Remote
ID All
HDBaseT
4
Video
5
DVI
6
BNC
7
YPbPr
8
DisplayPort
9
3D
0
Re-Sync
Menu
F3
10
1
2
3
4
5
6
8
7
9
11
34
33
32
31
12
13
15
14
16
19
2017 2118
27
26
29
30
28
25
24
23
22
No Item No Item
1. Power on 18. YPbPr (not supported)
2. Geometric Correction 19. Numeric keypad (0-9)
3. Function button (F1) (Assignable) 20. Display port (not supported)
4. Mode 21. 3D
5. Four directional select keys 22. DVI (not supported)
6. Information 23. HDMI3 (not supported)
7. Function button (F3) (Assignable) 24. HDMI1
8. Source 25. HDMI2
9. Menu 26. Remote ID / Remote all
10. Volume - / + 27. Digital Zoom - / +
11. Freeze 28. Re-sync
12. Format (Aspect Ratio) 29. Laser
13. VGA 30. Enter
14. S-Video 31. AV Mute
15. HDBase-T 32. Function button (F2) (Assignable)
16. Video 33. PIP/PBP (not supported)
17. BNC (not supported) 34. Power off
Note: Some keys may have no function for models that do not support these features.
English 13
SETUP AND INSTALLATION
Installing the projector
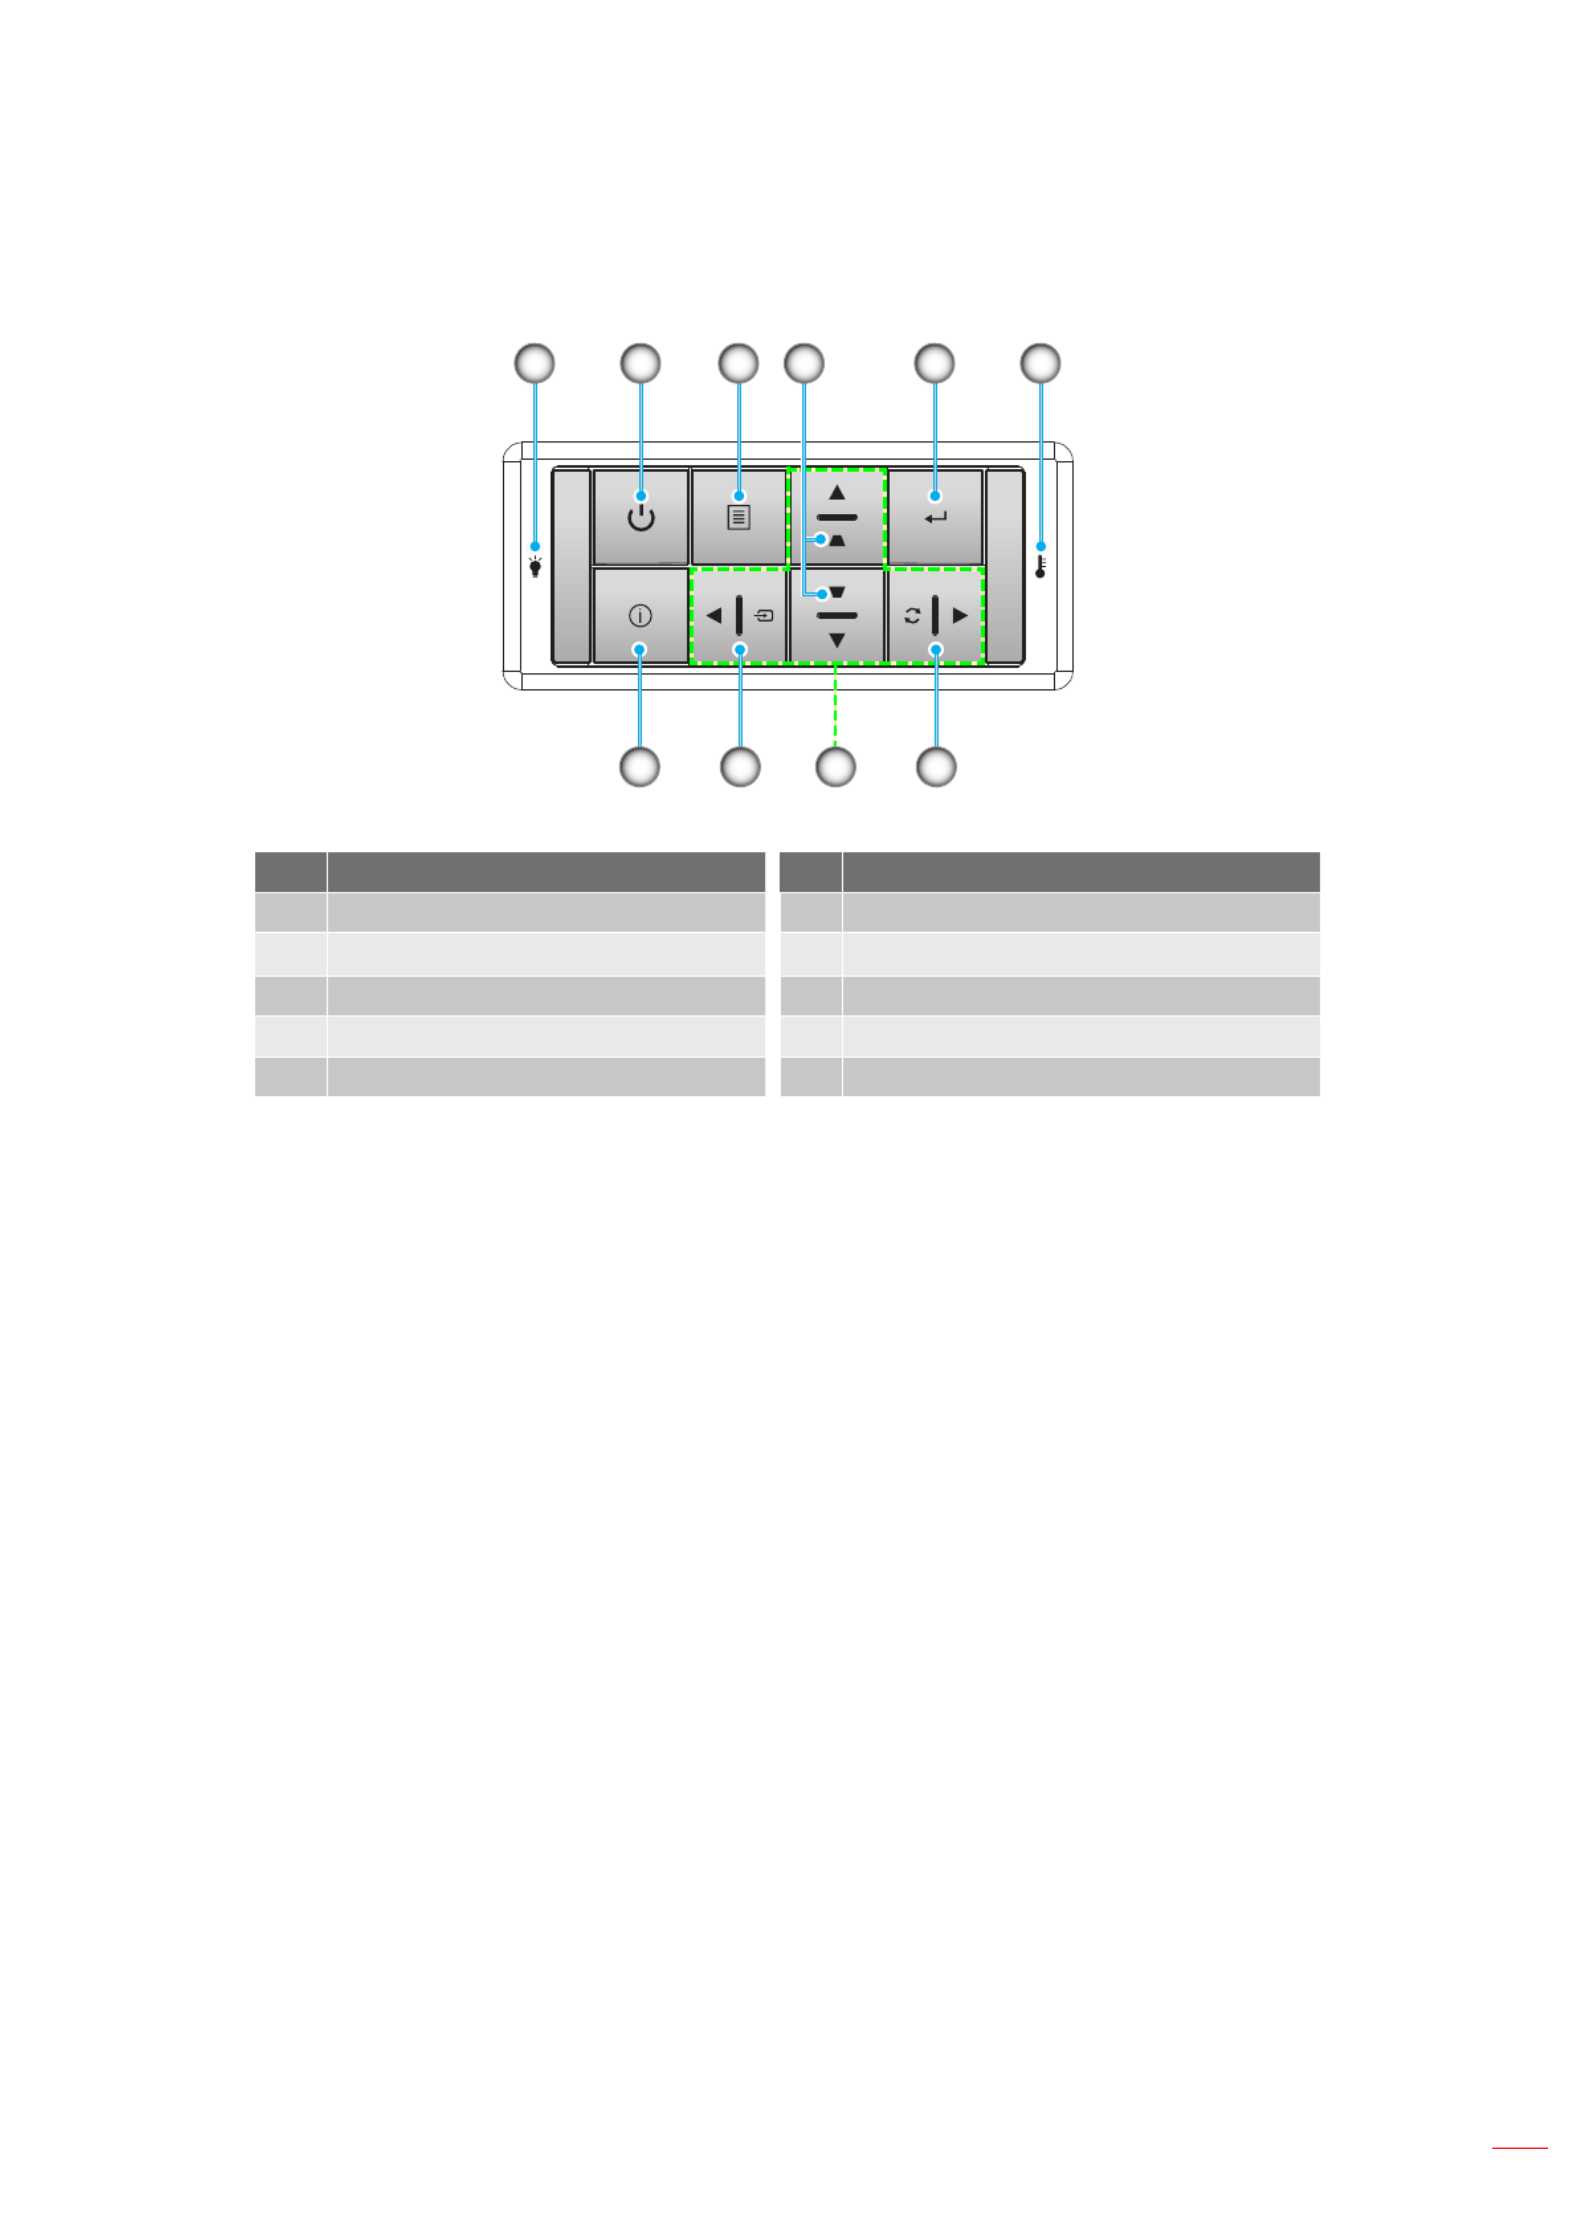
Your projector is designed to be installed in one of four possible positions.
Your room layout or personal preference will dictate which installation location you select. Take into consideration
the size and position of your screen, the location of a suitable power outlet, as well as the location and distance
between the projector and the rest of your equipment.
Table mount front Ceiling mount front
Table mount rear Ceiling mount rear
Projector should be placed at on a surface and 90 degrees / perpendicular to the screen.
How to determine projector location for a given screen size, please refer to distance table on pages
57-58.
How to determine screen size for a given distance, please refer to distance table on pages .57-58
Note: The further away the projector is placed from the screen the projected image size increases and vertical
offset also increases proportionally.

English14
SETUP AND INSTALLATION
Projector installation notice
360 degree free orientation operation.
Note: The brightness will vary when the projector is installed within the range highlighted.
The fan will default to “High altitude mode” when the projector is installed within the range highlighted.
45°
45°
45° 45°
225°~315°
Allow at least 30 cm clearance around the exhaust vent.
Minimum 100mm
(3.94 inches)
Minimum 300mm
(11.81 inches)
Minimum 300mm
(11.81 inches)
Minimum 100mm
(3.94 inches)
Ensure that the intake vents do not recycle hot air from the exhaust vent.
When operating the projector in an enclosed space, ensure that the surrounding air temperature within
the enclosure does not exceed operation temperature while the projector is running, and the air intake
and exhaust vents are unobstructed.
All enclosures should pass a certied thermal evaluation to ensure that the projector does not recycle
exhaust air, as this may cause the device to shutdown even if the enclosure temperature is with the
acceptable operation temperature range.

English 15
SETUP AND INSTALLATION
Connecting sources to the projector
Type 1 WUXGA
1
2
3
4
56
8
9
10
12
13
1415
16
18
7
17
11
English 17
SETUP AND INSTALLATION
Adjusting the projector image
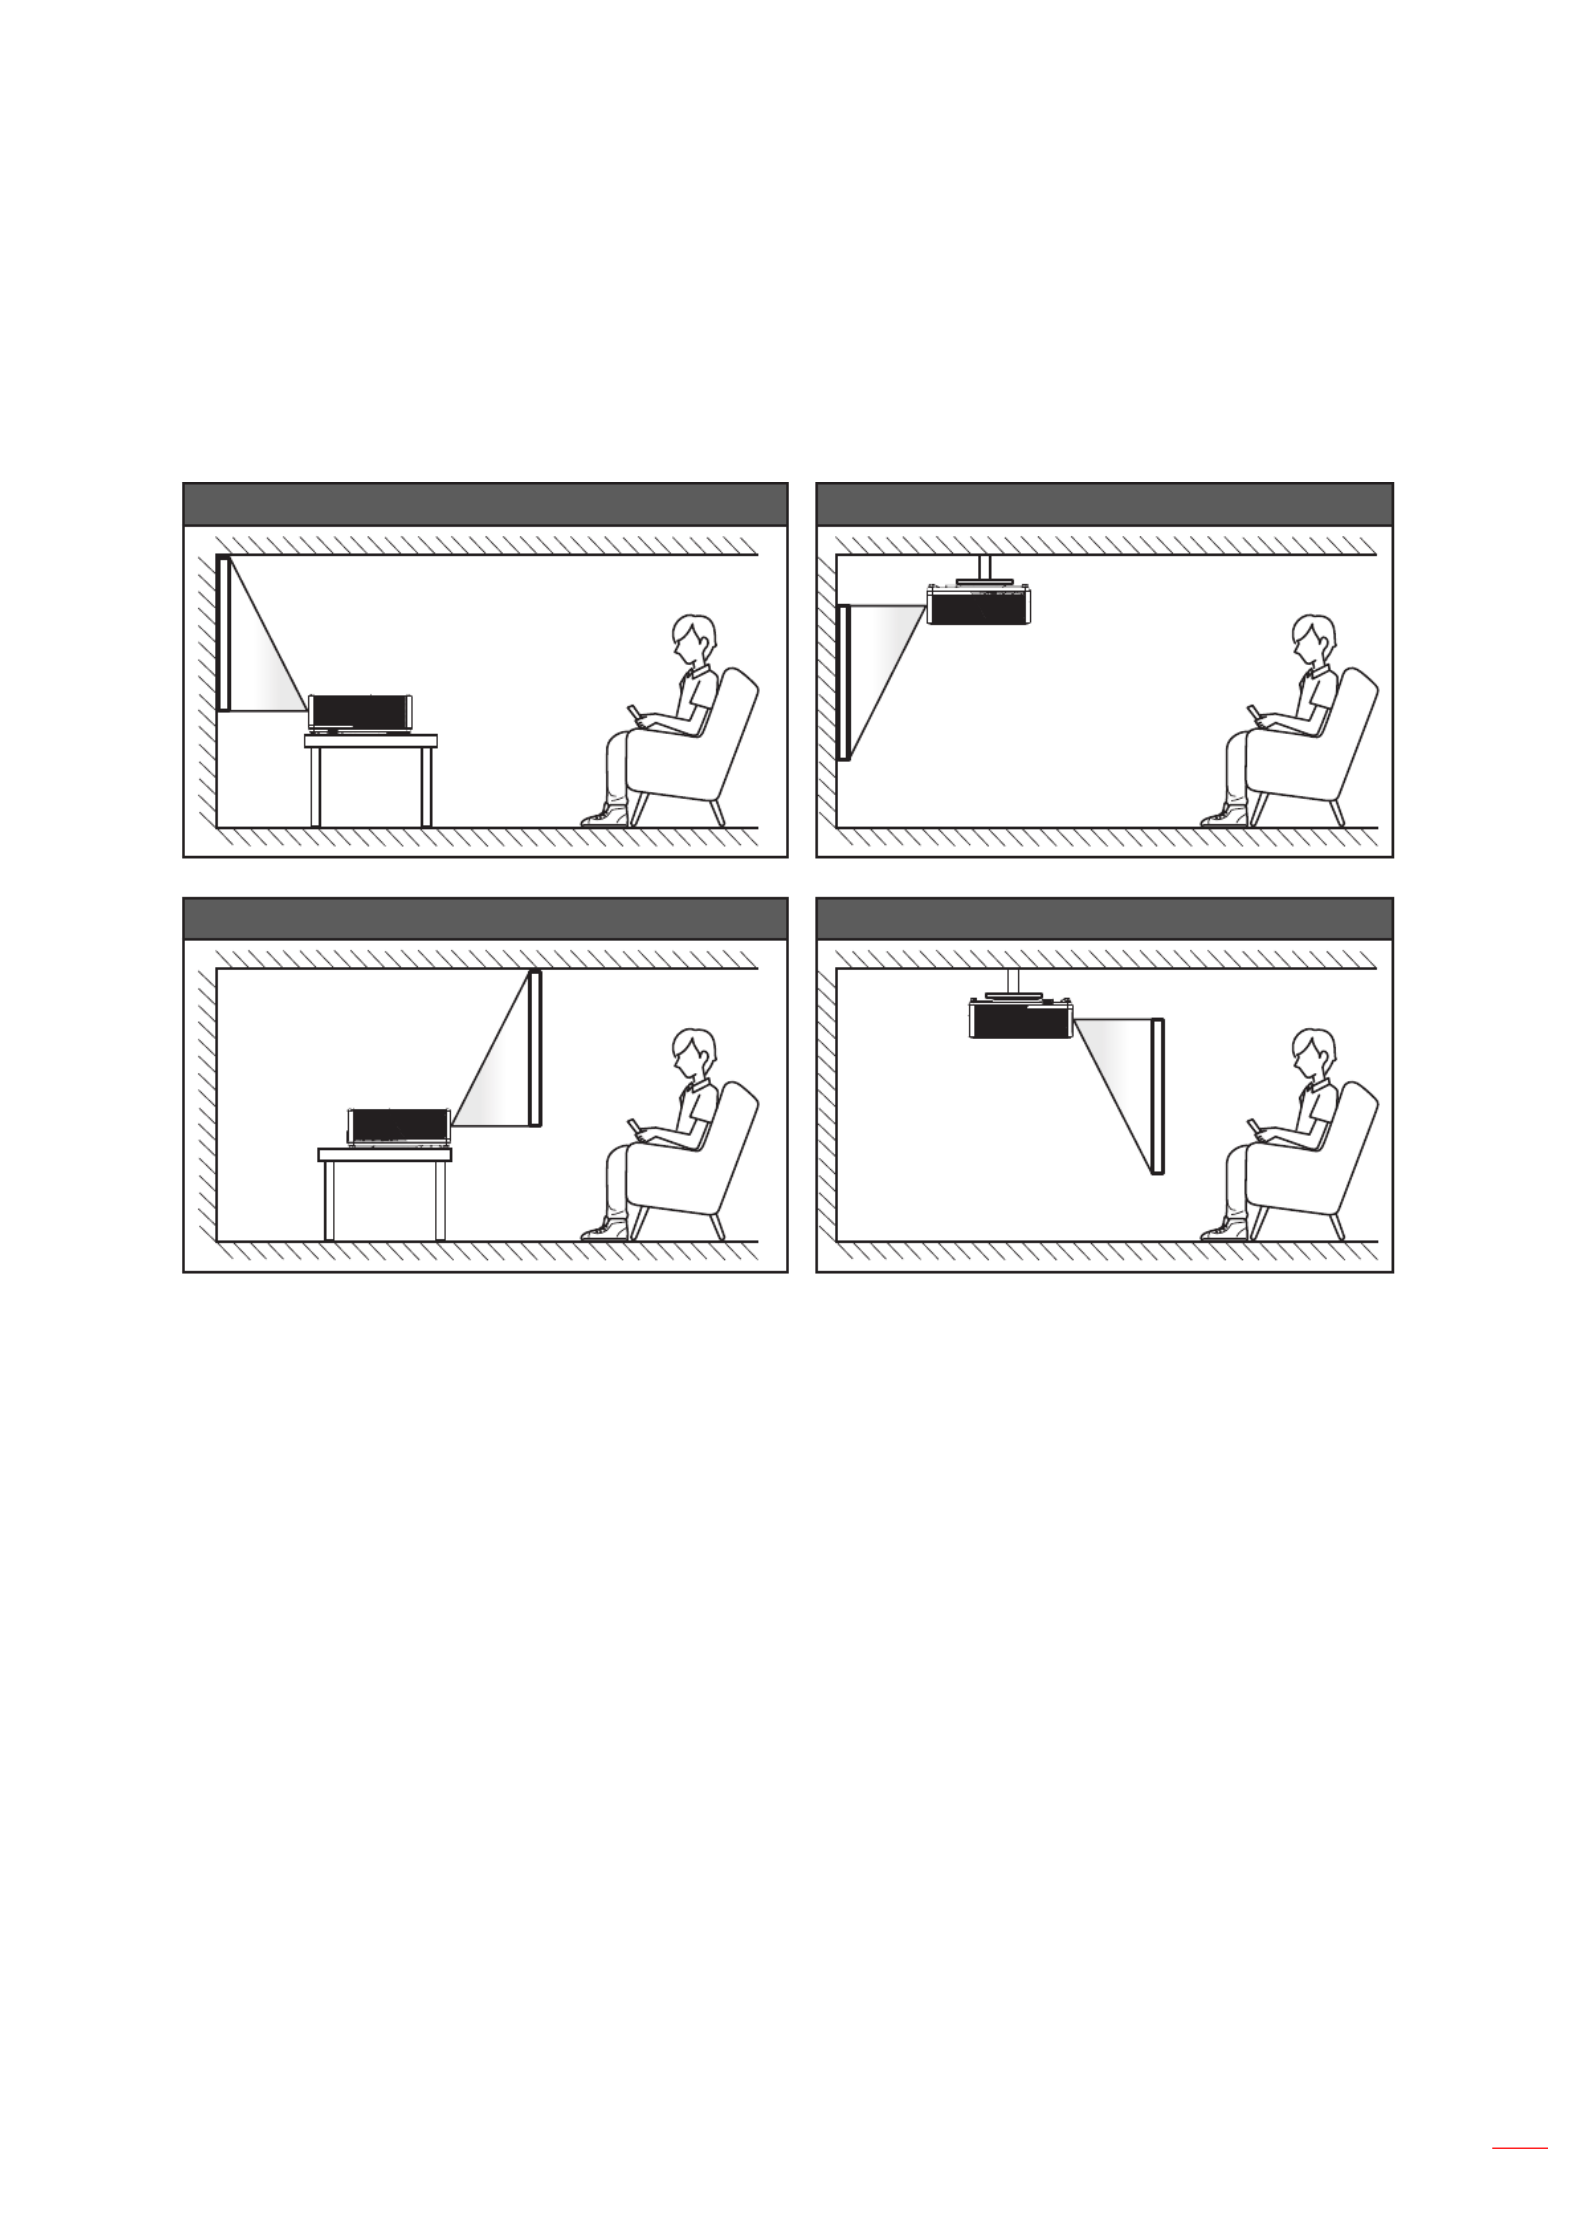
Image height
The projector is equipped with elevator feet for adjusting the image height.
1. Locate the adjustable foot you wish to adjust on the underside of the projector.
2. Rotate the adjustable foot clockwise or counterclockwise to raise or lower the projector.
Tilt-Adjustment Feet
Tilt-Adjustment Ring
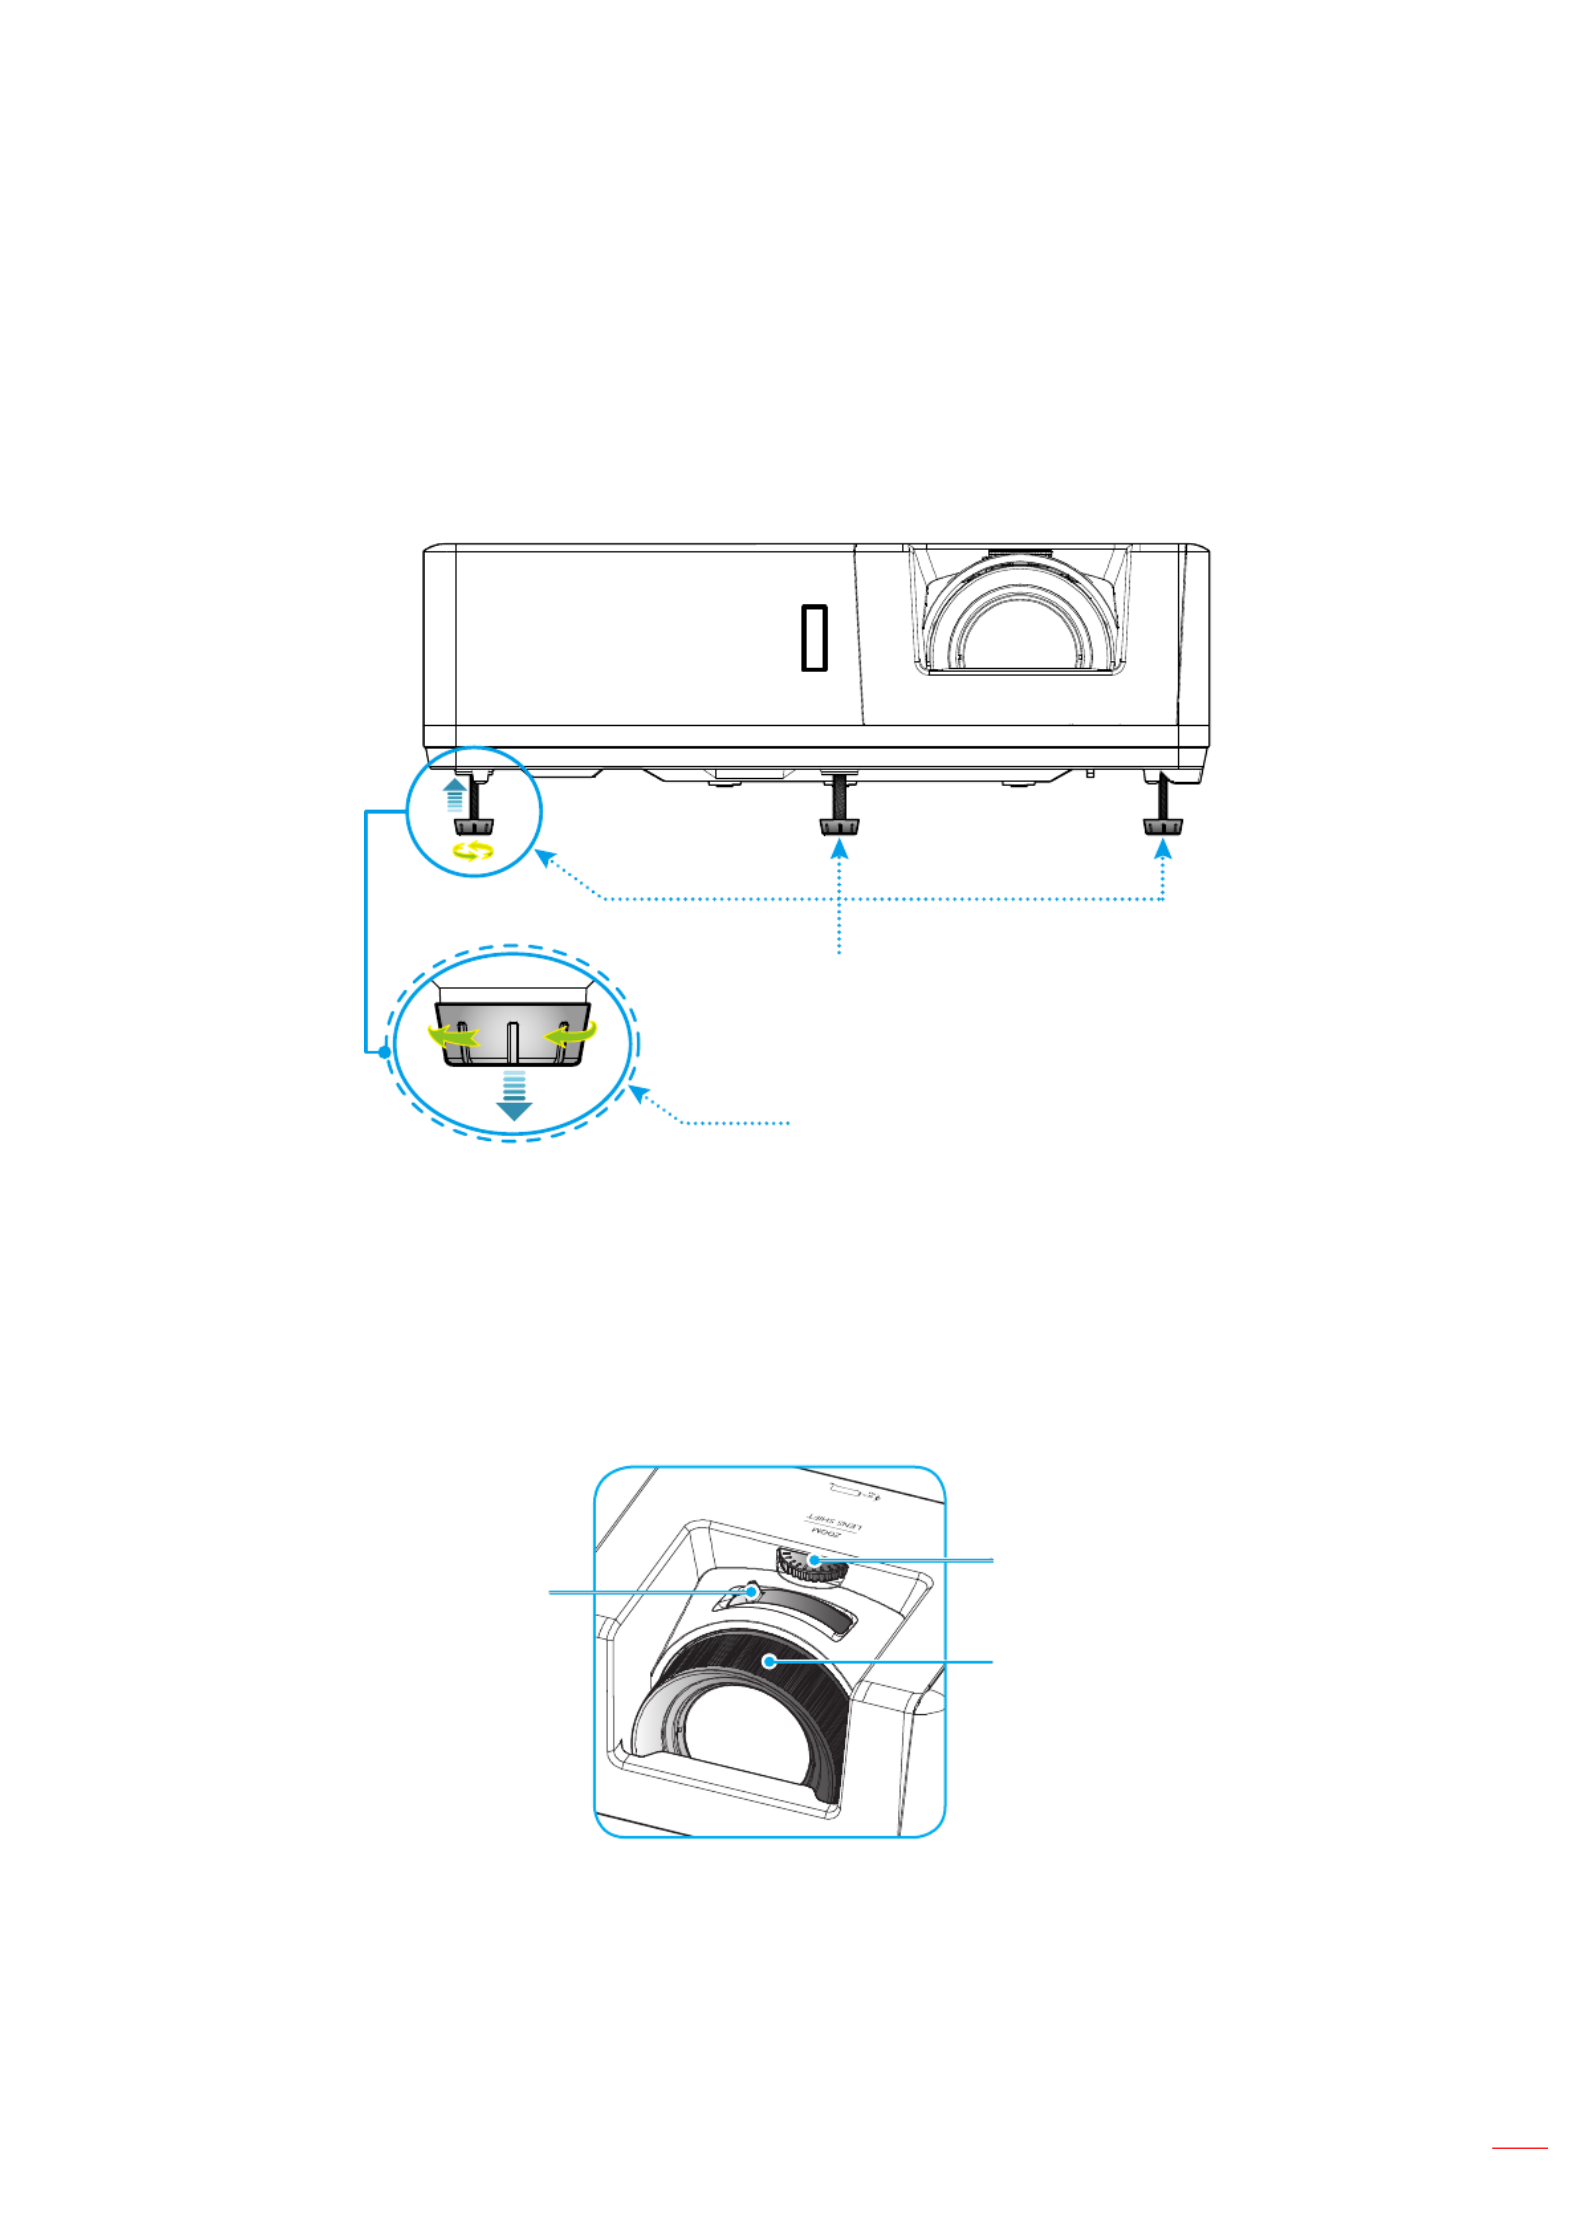
Lens shift, focus, and zoom
To adjust the image position, turn the lens shift dial clockwise or counterclockwise to adjust the
position of the projected image vertically.
To adjust the focus, turn the focus ring clockwise or counterclockwise until the image is sharp and
legible.
To adjust the image size, turn the zoom lever clockwise or counterclockwise to increase or decrease
the projected image size.
Lens Shift Dial
Zoom Lever
Focus Ring

English18
SETUP AND INSTALLATION
Remote setup
Installing / replacing the batteries
Two AAA size batteries are supplied for the remote control.
1. Remove the battery cover on the back of the remote control.
2. Insert AAA batteries in the battery compartment as illustrated.
3. Replace back cover on remote control.
Note: Replace only with the same or equivalent type batteries.
CAUTION
Improper use of batteries can result in chemical leakage or explosion. Be sure to follow the instructions below.
Do not mix batteries of different types. Different types of batteries have different characteristics.
Do not mix old and new batteries. Mixing old and new batteries can shorten the life of new batteries or
cause chemical leakage in old batteries.
Remove batteries as soon as the are depleted. Chemicals that leak from batteries that come in contact
with skin can cause a rash. If you nd any chemical leakage, wipe thoroughly with a cloth.
The batteries supplied with this product may have a shorter life expectancy due to storage conditions.
If you will not be using the remote control for an extended period of time, remove the batteries.
When you dispose of the batteries, you must obey the law in the relative area or country.

English 19
SETUP AND INSTALLATION
Effective range
Infra-Red (IR) remote control sensor is located on the top and front sides of the projector. Ensure to hold the
remote control at an angle within 30 degrees perpendicular to the projector’s IR remote control sensor to function
correctly. The distance between the remote control and the sensor should not be longer than 6 meters (19.7 feet)
when holding in an angle ±15° and not longer than 8 meters (26.2 feet) when aiming the sensor at 0°.
Make sure that there are no obstacles between the remote control and the IR sensor on the projector
that might obstruct the infra-red beam.
Make sure the IR transmitter of the remote control is not being shined by sunlight or uorescent lamps
directly.
Please keep the remote controller away from uorescent lamps for over 2 m or the remote controller
might become malfunction.
If the remote control is close to Inverter-Type uorescent lamps, it might become ineffective from time
to time.
If the remote control and the projector are within a very short distance, the remote control might
become ineffective.
When you aim at the screen, the effective distance is less than 5 m from the remote control to the
screen and reecting the IR beams back to the projector. However, the effective range might change
according to screens.
F3
On
Geometric
Mode
Correction PIP/PBP
Off
F1 F2
AV Mute
ENTER
Source
Volume D Zoom
Info.
VGA
1
S-Video
2
HDMI 1
3
HDMI 2
HDMI 3
Format Freeze Remote
ID All
HDBaseT
4
Video
5
DVI
6
BNC
7
YPbPr
8
DisplayPort
9
3D
0
Re-Sync
Menu
F3
F3
On
Geometric
Mode
Correction PIP/PBP
Off
F1 F2
AV Mute
ENTER
Source
Volume D Zoom
Info.
VGA
1
S-Video
2
HDMI 1
3
HDMI 2
HDMI 3
FormatFreeze Remote
ID All
HDBaseT
4
Video
5
DVI
6
BNC
7
YPbPr
8
DisplayPort
9
3D
0
Re-Sync
Menu
F3
Approx. ±15°
Approx. ±15°

English
20
USING THE PROJECTOR
Powering on / off the projector
On
Geometric
Correction PIP/PBP
Off
F1 F2
or
Lens cap
Powering on
1. Remove the lens cap.
2. Securely connect the power lead and signal/source cable. When connected, the Power LED will turn
red.
3. Turn on the projector by pressing the button on the projector keypad or remote control.
4. A start up screen will display in approximately 10 seconds and the Power LED will be ashing blue or
ashing green.
Note: The rst time the projector is turned on, you will be prompted to select the preferred language, projection
orientation, and other settings.
Powering off
1. Turn off the projector by pressing the button on the projector keypad or the button on the remote
control.
2. The following message will be displayed:
Power Off
Press power key again.
3. Press the or button again to conrm, otherwise the message will disappear after 15 seconds.
When you press the or button for the second time, the projector will shut down.
4. When the Power turns solid red, this indicates the projector has entered standby mode. If you wish
to turn the projector back on, you must wait until the cooling cycle has nished and the projector has
entered standby mode. When the projector is in standby mode, simply press the button again to
turn on the projector.
5. Disconnect the power lead from the electrical outlet and the projector.
Note:
It is not recommended that the projector is turned on immediately, right after a power off procedure.

English 21
USING THE PROJECTOR
Selecting an input source
Turn on the connected source that you want to display on the screen, such as computer, notebook, video player,
etc. The projector will automatically detect the source. If multiple sources are connected, press the button on the
projector keypad or the button on the remote control to select the desired input.Source
F3
Source
Volume D Zoom
Info.
Re-Sync
Menu
F3
or
Lens cap

English22
USING THE PROJECTOR
Menu navigation and features
The projector has multilingual on-screen display menus that allow you to make image adjustments and change a
variety of settings. The projector will automatically detect the source.
1. To open the OSD menu, press the button on the projector keypad or the button on the remote Menu
control.
2. When OSD is displayed, use keys to select any item in the main menu. While making a selection pq
on a particular page, press the button on the projector keypad or the button on the remote Enter
control to enter sub menu.
3. Use keys to select the desired item in the sub menu and then press the or button to tu Enter
view further settings. Adjust the settings by using keys.tu
4. Select the next item to be adjusted in the sub menu and adjust as described above.
5. Press press the or button to conrm, and the screen will return to the main menu.Enter
6. To exit, press the button again. The OSD menu will close and the projector will or Menu
automatically save the new settings.
Sub Menu
Main Menu
Settings
Navigation guide
Display
Image Settings
3D
Aspect Ratio
Edge Mask
Zoom
Image Shift
Geometric Correction
Select Exit Enter
English 23
USING THE PROJECTOR
OSD Menu tree
Main
Menu Sub Menu Sub Menu 2 Sub Menu 3 Sub Menu 4 Values
Display Image Settings
Display Mode
Presentation
Bright
HDR
Cinema
Game
sRGB
DICOM SIM.
User
3D
Wall Color
Off [Default]
Blackboard
Light Yellow
Light Green
Light Blue
Pink
Gray
Dynamic Range
HDR Off
Auto [Default]
HDR Picture
Mode
Bright
Standard [Default]
Film
Detail
Brightness -50 ~ 50
Contrast -50 ~ 50
Sharpness 1 ~ 15
Color -50 ~ 50
Tint -50 ~ 50
Gamma
Film
Video
Graphics
Standard(2.2)
1.8
2.0
2.4
2.6
Color Settings BrilliantColor TM 1 ~ 10

English24
USING THE PROJECTOR
Main
Menu Sub Menu Sub Menu 2 Sub Menu 3 Sub Menu 4 Values
Display Image Settings
Color Settings
Color
Temperature
Warm
Standard
Cool
Cold
Color Matching
Color
Red [Default]
Green
Blue
Cyan
Yellow
Magenta
White(*)
Hue / R(*) -50 ~ 50 [Default: 0]
Saturation / G(*) -50 ~ 50 [Default: 0]
Gain / B(*) -50 ~ 50 [Default: 0]
Reset Cancel [Default]
Yes
Exit
RGB Gain/Bias
Red Gain -50 ~ 50
Green Gain -50 ~ 50
Blue Gain -50 ~ 50
Red Bias -50 ~ 50
Green Bias -50 ~ 50
Blue Bias -50 ~ 50
Reset Cancel [Default]
Yes
Exit
Color Space [Not
HDMI Input]
Auto [Default]
RGB
YUV
Color Space
[HDMI Input]
Auto [Default]
RGB(0~255)
RGB(16~235)
YUV
White Level 0 ~ 31
Black Level -5 ~ 5
IRE 0
7.5
Signal
Automatic Off
On [Default]
Frequency -10 ~ 10 (depends on signal)
[Default: 0]
Phase 0~31 (depends on signal)
[Default: 0]
English 25
USING THE PROJECTOR
Main
Menu Sub Menu Sub Menu 2 Sub Menu 3 Sub Menu 4 Values
Display
Image Settings
Signal
H. Position -5 ~ 5 (depends on signal)
[Default: 0]
V. Position -5 ~ 5 (depends on signal)
[Default: 0]
Brightness Mode
DynamicBlack
Power
(Power = 100%/ 95%/ 90%/ 85%/
80%/ 75%/ 70%/ 65%/ 60%/ 55%/
50%)
Reset
3D
3D Mode Off
On [Default]
3D Tech DLP-Link [Default]
3D Sync
3D 2D
3D [Default]
L
R
3D Format
Auto [Default]
SBS
Top and Bottom
Frame Sequential
3D Sync Invert On
Off [Default]
Reset Cancel
Yes
Aspect Ratio
4:3
16:9
16:10
Note: For WUXGA model only.
LBX
Native
Auto
Edge Mask 0 ~ 10 [Default: 0]
Zoom -5 ~ 25 [Default: 0]
Image Shift
H -100 ~ 100 [Default: 0]
V -100 ~ 100 [Default: 0]
Geometric
Correction
Four Corners
H Keystone -30 ~ 30 [Default: 0]
V Keystone -30 ~ 30 [Default: 0]
Auto Keystone Off
On [Default]
Reset
Audio Mute Off [Default]
On
Volume 0 ~ 10 [Default: 5]

English26
USING THE PROJECTOR
Main
Menu Sub Menu Sub Menu 2 Sub Menu 3 Sub Menu 4 Values
Audio
Audio Input
HDMI1/MHL
Audio 1
Audio 2
Default [Default]
HDMI2
Audio 1
Audio 2
Default [Default]
HDBaseT
[Only for
HDBaseT model]
Audio 1
Audio 2
Default [Default]
VGA
[Only for
non-HDBaseT
model]
Audio 1
Audio 2
VGA 1
[Only for
HDBaseT model]
Audio 1
Audio 2
VGA 2
[Only for
HDBaseT model]
Audio 1
Audio 2
S-Video
[Only for
HDBaseT model]
Audio 1
Audio 2
Video Audio 1
Audio 2
Audio / Mic
Input Function
Audio Input [Default]
Mic
Setup
Projection
Front [Default]
Rear
Ceiling-top
Rear-top
Screen Type
[Only for
WUXGA model]
16:9
16:10 [Default]
Power Settings
Direct Power On Off [Default]
On
Signal Power On Off [Default]
On
Auto Power Off
(min.)
0 ~ 180 (5 min increments)
[Default: 20]
Sleep Timer
(min.)
0 ~ 990 (30 min increments)
[Default: 0]
Always On No [Default]
Yes
Power Mode
(Standby)
Active
Eco [Default]
USB Power
(Standby)
Off [Default]
On
English28
USING THE PROJECTOR
Main
Menu Sub Menu Sub Menu 2 Sub Menu 3 Sub Menu 4 Values
Setup
Remote
Settings
[depends on
remote]
F3
Test Pattern
Brightness
Contrast
Sleep Timer
Color Matching
Color Temp
Gamma
Projection
MHL
Projector ID 00 ~ 99
12V Trigger On
Off
HDBaseT
Control
Ethernet On
Off [Default]
RS232 On
Off [Default]
HDBaseT Mode Auto
HDBaseT [Default]
Options Language
English [Default]
Deutsch
Français
Italiano
Español
Português
Polski
Nederlands
Svenska
Norsk/Dansk
Suomi
ελληνικά
繁體中文
簡体中文
日本語
한국어
Русский
Magyar
Čeština
ไทย
Türkçe
Tiếng Việt
Bahasa Indonesia
Română
Slovenčina

English 29
USING THE PROJECTOR
Main
Menu Sub Menu Sub Menu 2 Sub Menu 3 Sub Menu 4 Values
Setup Options
Closed
Captioning
CC1
CC2
Off [Default]
Menu Settings
Menu Location
Top left
Top right
Center [Default]
Bottom left
Bottom right
Menu Timer
Off
5sec
10sec [Default]
Auto Source Off [Default]
On
Input Source
HDMI1/MHL
HDMI2
HDBaseT
VGA
VGA 1
VGA 2
S-Video
Video
Input Name
HDMI1/MHL Default [Default]
Custom
HDMI2 Default [Default]
Custom
HDBaseT
[Only for
HDBaseT model]
Default [Default]
Custom
VGA
[Only for
non-HDBaseT
model]
Default [Default]
Custom
VGA 1
[Only for
HDBaseT model]
Default [Default]
Custom
VGA 2
[Only for
HDBaseT model]
Default [Default]
Custom
S-Video
[Only for
HDBaseT model]
Default [Default]
Custom
Video Default [Default]
Custom
High Altitude Off [Default]
On
Display Mode
Lock
Off [Default]
On

English 31
USING THE PROJECTOR
Main
Menu Sub Menu Sub Menu 2 Sub Menu 3 Sub Menu 4 Values
Info
Regulatory
Serial Number
Source
Resolution 00x00
Refresh Rate 0.00Hz
Display Mode
Remote Code 00 ~ 99
Remote
Code(Active) 00 ~ 99
Power Mode
(Standby)
Light Source
Hours 0 hr
Network Status
IP Address
Projector ID 00 ~ 99
Brightness
Mode
FW Version
System
LAN
MCU

English32
USING THE PROJECTOR
Display menu
Display image settings menu
Display Mode
There are many factory presets optimized for various types of images.
: This mode is suitable for showing in front of public in connection to the PC.Presentation
: Maximum brightness from PC input.Bright
: Decodes and displays High Dynamic Range (HDR) content for the deepest blacks, brightest HDR
whites, and vivid cinematic color using REC.2020 color gamut. This mode will be automatically
enabled if HDR is set to ON (and HDR Content is sent to projector – 4K UHD Blu-ray, 1080p/4K UHD
HDR Games, 4K UHD Streaming Video). While HDR mode is active, other display modes (Cinema,
Reference, etc.) cannot be selected as HDR delivers color that is highly accurate, exceeding the color
performance of the other display modes.
: Provides the best colors for watching movies.Cinema
: Select this mode to increase the brightness and response time level for enjoying video games.Game
: Standardized accurate color.sRGB
: This mode can project a monochrome medical image such as an X ray radiography, DICOM SIM.
MRI, etc.
: Memorize user’s settings.User
: To experience the 3D effect, you need to have 3D glasses, make sure your PC/portable device 3D
has a 120 Hz signal output quad buffered graphics card and have a 3D Player installed.
Wall Color
Use this function to obtain an optimized screen image according to the wall color. Select between off, blackboard,
light yellow, light green, light blue, pink, and gray.
Dynamic Range
Congure the High Dynamic Range (HDR) setting and its effect when displaying video from 4K Blu-ray players and
streaming devices.
Note:
HDMI2 and VGA do not support Dynamic Range.
HDR
: Turn off HDR Processing. When set to Off, the projector will NOT decode HDR content.Off
: Auto detect HDR signal.Auto
HDR Picture Mode
: Choose this mode for brighter more saturated colors.Bright
: Choose this mode for natural looking colors with a balance of warm and cool tones.Standard
: Choose this mode for improved detail and image sharpness.Film
: The signal comes from OETF conversion to achieve the best color matching.Details
Brightness
Adjust the brightness of the image.
Contrast
The contrast controls the degree of difference between the lightest and darkest parts of the picture.
Sharpness
Adjust the sharpness of the image.

English 33
USING THE PROJECTOR
Color
Adjust a video image from black and white to fully saturated color.
Tint
Adjust the color balance of red and green.
Gamma
Set up gamma curve type. After the initial setup and ne tuning is completed, utilize the Gamma Adjustment steps
to optimize your image output.
: For home theater.Film
: For video or TV source.Video
: For PC / Photo source.Graphics
: For standardized setting.Standard(2.2)
: For specic PC / Photo source.1.8 / 2.0 / 2.4 / 2.6
Note:
These options are only available if the 3D mode function is disabled, the setting is not set Wall Color
to , and the setting is not set to .Blackboard Display Mode DICOM SIM. or HDR
If the setting is set to , user can only select for setting.Display Mode HDR HDR Gamma
In 3D mode, user can only select for setting.3D Gamma
If the setting is set to , user can only select for setting.Wall Color Blackboard Blackboard Gamma
If the setting is set to , user can only select for Display Mode DICOM SIM. DICOM SIM. Gamma
setting.
Color Settings
Congure the color settings.
BrilliantColorTM: This adjustable item utilizes a new color-processing algorithm and enhancements to
enable higher brightness while providing true, more vibrant colors in picture.
Color Temperature: Select a color temperature from Warm, Standard, Cool, or Cold.
: Select the following options:Color Matching
± Color: Adjust the red, green, black, cyan, yellow, magenta, and white level of the image.
± Hue / R(red)*: Adjust the color balance of red and green.
Note: *If the setting is set to , you can adjust the red color setting.Color White
± Saturation / G(green)*: Adjust a video image from black and white to fully saturated color.
Note: *If the setting is set to , you can adjust the green color setting.Color White
± Gain / B(blue)*: Adjust the image brightness.
Note: *If the setting is set to , you can adjust the blue color setting.Color White
± Reset: Return the factory default settings for color matching.
± Exit: Exit the “Color Matching” menu.
This settings allows to congure the brightness (gain) and contrast (bias) of an RGB Gain/Bias:
image.
± Reset: Return the factory default settings for RGB gain/bias.
± Exit: Exit the “RGB Gain/Bias” menu.
: Select an appropriate color matrix type from the following: Color Space (non-HDMI input only)
AUTO, RGB, or YUV.

English34
USING THE PROJECTOR
: select an appropriate color matrix type from the following: Auto, Color Space (HDMI input only)
RGB(0-255), RGB(16-235), and YUV.
Allow user to adjust White Level when inputting Video signals.White Level:
Note:
White level can only be adjusted for Video/S-Video input sources.
Allow user to adjust Black Level when inputting Video signals.Black Level:
Note:
Black level can only be adjusted for Video/S-Video input sources.
Allow user to adjust IRE value when inputting Video signals.IRE:
Note:
IRE is only available with NTSC video format.
IRE can only be adjusted for Video/S-Video input sources.
Signal
Adjust the signal options.
: Congure automatically the signal (the frequency and phase items are grayed out). If Automatic
automatic is disabled, the frequency and phase items will appear for tuning and saving the settings.
: Change the display data frequency to match the frequency of your computer’s graphic Frequency
card. Use this function only if the image appears to icker vertically.
: Synchronize the signal timing of the display with the graphic card. If the image appears to be Phase
unstable or ickers, use this function to correct it.
: Adjust the horizontal positioning of the image.H. Position
V. Position: Adjust the vertical positioning of the image.
Note: This menu is only available if the input source is RGB/Component.
Brightness Mode
Adjust the brightness mode settings.
: Use to automatically adjust the picture brightness in order to give optimum contrast DynamicBlack
performance.
: Choose the power percentage for brightness mode.Power
Reset
Return the factory default settings for color settings.

English 35
USING THE PROJECTOR
Display 3D menu
Note:
.This projector is a 3D ready projector with DLP-Link 3D solution
Please make sure your 3D glasses are use for DLP-Link 3D before enjoy your video.
This projector supports frame sequential (page-ip) 3D via HDMI1/HDMI2/VGA ports.
To enable 3D mode, the input frame rate should be set to 60Hz only, lower or higher frame rate is not
supported.
To reach the best performance, resolution 1920x1080 is recommended, please be noted that 4K
(3840x2160) resolution is not supported in 3D mode.
3D Mode
Use this option to enable or disable the 3D function.
: Select “Off” to turn off 3D mode. Off
: Select “On” to turn on 3D mode.On
Note: If the 2D and 3D sources enter PJ at the same time, if the ghosting image appears in the 2D source, make
sure to manually turn off the 3D function.
3D Tech
Set the 3D tech. parameter to “DLP-Link” or “3D Sync”.
3D → 2D
Use this option to specify how the 3D content should appear on the screen.
Display 3D signal.3D:
Display the left frame of 3D content.L (Left):
Display the right frame of 3D content.R (Right):
3D Format
Use this option to select the appropriate 3D format content.
: When a 3D identication signal is detected, the 3D format is selected automatically.Auto
: Display 3D signal in “Side-by-Side” format.SBS
Top and Bottom: Display 3D signal in “Top and Bottom” format.
: Display 3D signal in “Frame Sequential” format.Frame Sequential
3D Sync Invert
Use this option to enable/disable the 3D sync invert function.
Reset
Return the factory default settings for 3D settings.
English36
USING THE PROJECTOR
Display aspect ratio menu
Aspect Ratio
Select the aspect ratio of the displayed image between the following options:
: This format is for 4:3 input sources.4:3
: This format is for 16:9 input sources, like HDTV and DVD enhanced for Wide screen TV.16:9
(for WUXGA model only): This format is for 16:10 input sources, like widescreen laptops.16:10
: This format is for non-16x9, letterbox source and if you use external 16x9 lens to display 2.35:1 LBX
aspect ratio in full resolution.
: This format displays the original image without any scaling.Native
: Automatically selects the appropriate display format.Auto
Note:
Detailed informations about LBX mode:
±Some Letter-Box Format DVDs are not enhanced for 16x9 TVs. In this situation, the image
will not look right when displaying image in 16:9 mode. In this situation, please try to use the
4:3 mode to view the DVD. If the content is not 4:3, there will be black bars around the image
in 16:9 display. For this type of content, you can use LBX mode to ll the image on the 16:9
display.
±If you use an external anamorphic lens, this LBX mode also allows you to watch a 2.35:1
content (include Anamorphic DVD and HDTV lm source) that supports anamorphic wide is
enhanced for 16x9 Display in a wide 2.35:1 image. In this case, there are no black bars. Light
source power and vertical resolution are fully utilized.
1080p scaling table:
16:9 screen 480i/p 576i/p 1080i/p 720p PC
4x3 Scale to 1440x1080.
16x9 Scale to 1920x1080.
LBX Scale to 1920x1440, then get the central 1920x1080 image to display.
Native mode - 1:1 mapping centered.
- No scaling will be made; the image is displayed with the resolution based on input source.
Auto - If auto format is selected, the screen type will automatically become16:9 (1920x1080).
- If source is 4:3, the screen type will be scaled to 1440 x1080.
- If source is 16:9, the screen type will be scaled to 1920x1080.
- If source is 16:10, the screen type will be scaled to 1920x1200 and cut 1920x1080 area to
display.
English 37
USING THE PROJECTOR
1080p auto mapping rule:
Auto Input resolution Auto/Scale
H-resolution V-resolution 1920 1080
4:3
640 480 1440 1080
800 600 1440 1080
1024 768 1440 1080
1280 1024 1440 1080
1400 1050 1440 1080
1600 1200 1440 1080
Wide Laptop
1280 720 1920 1080
1280 768 1800 1080
1280 800 1728 1080
SDTV 720 576 1350 1080
720 480 1620 1080
HDTV 1280 720 1920 1080
1920 1080 1920 1080
WUXGA scaling table for 1920 x 1200 DMD (screen type 16:10):
Note:
Supported screen type 16:10 (1920 x 1200), 16:9 (1920x1080).
When screen type is 16:9, the16x10 format becomes unavailable.
When screen type is 16:10, the 16x9 format becomes unavailable.
If you select auto option then the display mode will be also automatically changed.
16 : 10 screen 480i/p 576i/p 1080i/p 720p PC
4x3 Scale to 1600x1200.
16x10 Scale to 1920x1200.
LBX Scale to 1920x1440, then get the central 1920x1200 image to display.
Native mode - 1:1 mapping centered.
- No scaling will be made; the image is displayed with the resolution based on input source.
Auto - If this format is selected, the screen type will automatically become 16:10 (1920x1200).
- If source is 4:3, the screen type will be scaled to 1600x1200.
- If source is 16:9, the screen type will be scaled to 1920x1080.
- If source is 16:10, the screen type will be scaled to 1920x1200.

English 39
USING THE PROJECTOR
WUXGA auto mapping rule (screen type 16:9):
Auto Input resolution Auto/Scale
H-resolution V-resolution 1920 1080
4:3
640 480 1440 1080
800 600 1440 1080
1024 768 1440 1080
1280 1024 1440 1080
1400 1050 1440 1080
1600 1200 1440 1080
Wide Laptop
1280 720 1920 1080
1280 768 1800 1080
1280 800 1728 1080
SDTV 720 576 1350 1080
720 480 1620 1080
HDTV 1280 720 1920 1080
1920 1080 1920 1080
Display edge mask menu
Edge Mask
Use this function to remove the video encoding noise on the edge of video source.
Display zoom menu
Zoom
Use to reduce or magnify an image on the projection screen.
Display image shift menu
Image Shift
Adjust the projected image position horizontally (H) or vertically (V).
Display geometric correction menu
Four Corners
Allow the image to be squeezed to t an area dened by moving each of the four corners’ x and y position.
H Keystone
Adjust image distortion horizontally and make a squarer image. Horizontal keystone is used to correct a keystoned
image shape in which the left and right borders of the image are unequal in length. This is intended for use with
horizontally on-axis applications.
V Keystone
Adjust image distortion vertically and make a squarer image. Vertical keystone is used to correct a keystoned
image shape in which the top and bottom are slanted to one of the sides. This is intended when for use with
vertically on-axis applications.
Produktspezifikationen
| Marke: | Optoma |
| Kategorie: | Videostrahl |
| Modell: | ProScene ZH606 |
Brauchst du Hilfe?
Wenn Sie Hilfe mit Optoma ProScene ZH606 benötigen, stellen Sie unten eine Frage und andere Benutzer werden Ihnen antworten
Bedienungsanleitung Videostrahl Optoma

18 Juni 2024
28 Mai 2024
28 Mai 2024
26 Mai 2024
20 Mai 2024
14 Mai 2024
13 Mai 2024
12 Mai 2024
10 Mai 2024
4 Mai 2024
Bedienungsanleitung Videostrahl
- Videostrahl Samsung
- Videostrahl Da-Lite
- Videostrahl 3M
- Videostrahl Acer
- Videostrahl Anker
- Videostrahl Asus
- Videostrahl Sanyo
- Videostrahl BenQ
- Videostrahl HP
- Videostrahl Philips
- Videostrahl Sony
- Videostrahl Panasonic
- Videostrahl LG
- Videostrahl Klarstein
- Videostrahl Canon
- Videostrahl Yamaha
- Videostrahl Technaxx
- Videostrahl Blaupunkt
- Videostrahl Sharp
- Videostrahl Pyle
- Videostrahl Mitsubishi
- Videostrahl Hisense
- Videostrahl Salora
- Videostrahl Polaroid
- Videostrahl JVC
- Videostrahl Krüger And Matz
- Videostrahl Xiaomi
- Videostrahl Stairville
- Videostrahl Smartwares
- Videostrahl Hitachi
- Videostrahl Toshiba
- Videostrahl Livoo
- Videostrahl Steinel
- Videostrahl Prixton
- Videostrahl Casio
- Videostrahl Epson
- Videostrahl ViewSonic
- Videostrahl Dell
- Videostrahl Lenovo
- Videostrahl OKI
- Videostrahl Ricoh
- Videostrahl Smart
- Videostrahl Kodak
- Videostrahl Adj
- Videostrahl Eurolite
- Videostrahl Barco
- Videostrahl Bauer
- Videostrahl Eiki
- Videostrahl InFocus
- Videostrahl Nebula
- Videostrahl NEC
- Videostrahl Overmax
- Videostrahl Marantz
- Videostrahl Celexon
- Videostrahl Elmo
- Videostrahl D-Link
- Videostrahl Smart Tech
- Videostrahl ION
- Videostrahl Speaka
- Videostrahl Reflecta
- Videostrahl Derksen
- Videostrahl EasyMaxx
- Videostrahl Cameo
- Videostrahl Yaber
- Videostrahl Vivitek
- Videostrahl Emtec
- Videostrahl GPX
- Videostrahl La Vague
- Videostrahl Maxell
- Videostrahl Naxa
- Videostrahl Fun Generation
- Videostrahl Planar
- Videostrahl Celly
- Videostrahl Futurelight
- Videostrahl Tzumi
- Videostrahl Christie
- Videostrahl EKO
- Videostrahl Microtek
- Videostrahl Elite Screens
- Videostrahl ASK Proxima
- Videostrahl Vankyo
- Videostrahl AAXA Technologies
- Videostrahl Mimio
- Videostrahl DTS
Neueste Bedienungsanleitung für -Kategorien-

13 August 2024

9 August 2024
9 August 2024

25 Juni 2024
25 Juni 2024
25 Juni 2024
25 Juni 2024
25 Juni 2024
25 Juni 2024
25 Juni 2024