Mousetrapper Advance 2.0 Bedienungsanleitung
Mousetrapper
Maus
Advance 2.0
Lesen Sie kostenlos die 📖 deutsche Bedienungsanleitung für Mousetrapper Advance 2.0 (12 Seiten) in der Kategorie Maus. Dieser Bedienungsanleitung war für 18 Personen hilfreich und wurde von 2 Benutzern mit durchschnittlich 4.5 Sternen bewertet
Seite 1/12

ENGLISH | SVENSKA | DANSK | NORSK | SUOMI | DEUTSCH | FRANÇAIS | NEDERLANDS
Getting started with Mousetrapper Advance 2.0
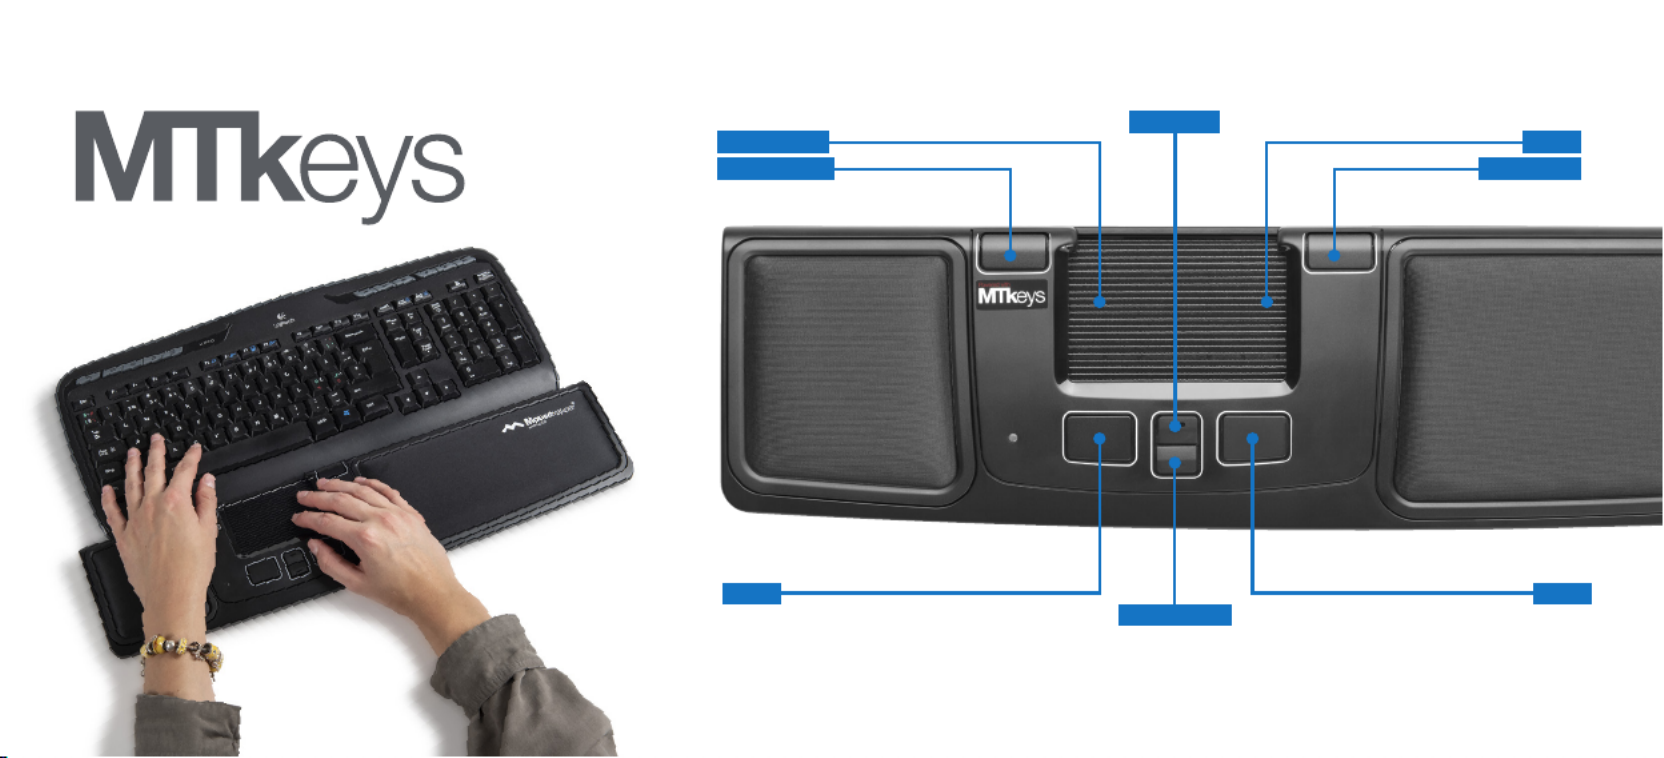
Double Click
Scroll up
Right Click
Scroll
Scroll down
PasteCopy
Click/Select
21

Installation
Connect the supplied cable to the socket on the left
side of your Mousetrapper, and connect the other end
to a USB port on the computer. Once installed, your
Mousetrapper and its buttons will operate as shown
in gure 2.
Changing from Mac to PC configuration
The product is congured for PC on delivery. To
congure it for Mac, simultaneously depress the lower
right button and the lower left button (Copy and Paste)
for 3–4 seconds. The LED will ash red to conrm the
conguration. Repeat the procedure to change back to
PC conguration.
Connecting Mousetrapper1
Positioning
Position your Mousetrapper between you and your
keyboard. The space bar on the keyboard should
be directly in front of the control pad, as shown in
gure 1. If you have a low keyboard, unfold the
keyboard support from underneath your Mousetrapper
and place the keyboard on top of it.
Scrolling
To scroll using the control pad, place your nger on the
right edge of the control pad. There is no need to press
on the control pad, simply slide your nger up or down
the edge, depending on which way you want to scroll.
Replacement of pads
The pads can be replaced when they are worn out. To
remove a pad, insert a at tool between the frame and
the Mousetrapper and gently prise the frame/pad out
of the Mousetrapper. You can order new pads via your
dealer or directly from Mousetrapper.
Basic tips2
MTKeys
To customise the button functions, go to
mousetrapper.com/mtkeys and download the software.
Then follow the instructions. If you have Windows 10,
you can download MTKeys from Microsoft Store.
When you have downloaded MTKeys, an image of the
product will appear that matches the image underneath
your Mousetrapper. Position the cursor over the button
you want to customise. Click on it by lightly pressing
the control pad once. You will see a pull-down menu
that lets you assign whichever action you want to
that button. You can choose between functions such
as adding an extra left-click, creating shortcuts and
inserting text by pasting it in.
Customising3
English
Produktspezifikationen
| Marke: | Mousetrapper |
| Kategorie: | Maus |
| Modell: | Advance 2.0 |
Brauchst du Hilfe?
Wenn Sie Hilfe mit Mousetrapper Advance 2.0 benötigen, stellen Sie unten eine Frage und andere Benutzer werden Ihnen antworten
Bedienungsanleitung Maus Mousetrapper

9 August 2024
Bedienungsanleitung Maus
- Maus 3M
- Maus A4Tech
- Maus Acer
- Maus Anker
- Maus Approx
- Maus Asus
- Maus BeeWi
- Maus BenQ
- Maus Connect IT
- Maus Corsair
- Maus Cougar
- Maus Exibel
- Maus Gembird
- Maus Genius
- Maus Gigabyte
- Maus Gyration
- Maus Hama
- Maus HP
- Maus HyperX
- Maus KeepOut
- Maus Kensington
- Maus Lexibook
- Maus LogiLink
- Maus Logitech
- Maus Mad Catz
- Maus Manhattan
- Maus Maxxter
- Maus Medion
- Maus Microsoft
- Maus Nacon
- Maus Nedis
- Maus NGS
- Maus Niceboy
- Maus Philips
- Maus Rapoo
- Maus Roccat
- Maus Saitek
- Maus Sandberg
- Maus Seal Shield
- Maus Sharkoon
- Maus SilverCrest
- Maus Speedlink
- Maus SteelSeries
- Maus Sweex
- Maus T'nB
- Maus Targus
- Maus Trust
- Maus Typhoon
- Maus Verbatim
- Maus Watson
- Maus Zalman
- Maus LG
- Maus Buffalo
- Maus CSL
- Maus Eminent
- Maus ISY
- Maus Denver
- Maus König
- Maus MarQuant
- Maus Renkforce
- Maus Vivanco
- Maus Xiaomi
- Maus Livoo
- Maus Cherry
- Maus Icy Box
- Maus Dell
- Maus LC-Power
- Maus Lenovo
- Maus MSI
- Maus Acme
- Maus Razer
- Maus Logik
- Maus Adj
- Maus Genesis
- Maus Cooler Master
- Maus NZXT
- Maus SilverStone
- Maus Thermaltake
- Maus Bakker Elkhuizen
- Maus Ednet
- Maus KeySonic
- Maus Penclic
- Maus Kogan
- Maus Energy Sistem
- Maus Conceptronic
- Maus EVOLVEO
- Maus I-Tec
- Maus SPC
- Maus Digitus
- Maus Mediacom
- Maus Tracer
- Maus BlueBuilt
- Maus Defender
- Maus Wortmann AG
- Maus Speed-Link
- Maus Ducky
- Maus Sven
- Maus Vorago
- Maus X9 Performance
- Maus Krom
- Maus Gamesir
- Maus INCA
- Maus IRIS
- Maus Media-tech
- Maus Sanwa
- Maus Steren
- Maus BakkerElkhuizen
- Maus Alienware
- Maus Man & Machine
- Maus Siig
- Maus Best Buy
- Maus Ozone
- Maus Iogear
- Maus Konix
- Maus Mitsai
- Maus Kunft
- Maus ModeCom
- Maus NPLAY
- Maus XPG
- Maus Natec
- Maus Posturite
- Maus Adesso
- Maus ThunderX3
- Maus V7
- Maus GMB Gaming
- Maus Equip
- Maus Raidsonic
- Maus Satechi
- Maus NOX
- Maus Xcellon
- Maus Fractal Design
- Maus Hamlet
- Maus UGo
- Maus Mars Gaming
- Maus Vakoss
- Maus Perixx
- Maus Savio
- Maus Vultech
- Maus Contour Design
- Maus ENDORFY
- Maus TEKLIO
- Maus Canyon
- Maus Keychron
- Maus R-Go Tools
- Maus Evoluent
- Maus Humanscale
- Maus G-Cube
- Maus White Shark
- Maus IOPLEE
- Maus Swiftpoint
- Maus 3Dconnexion
- Maus Xtrfy
- Maus Micro Innovations
- Maus Goldtouch
- Maus Silver Eagle
- Maus Sygonix Connect
- Maus Kondator
- Maus Spartan Gear
- Maus Raspberry Pi
- Maus Urban Factory
- Maus CoolerMaster
- Maus Bluestork
- Maus Balam Rush
Neueste Bedienungsanleitung für -Kategorien-
15 Oktober 2024

15 Oktober 2024
14 Oktober 2024
12 Oktober 2024
11 Oktober 2024

9 Oktober 2024
7 Oktober 2024
7 Oktober 2024

7 Oktober 2024
6 Oktober 2024