Lindy 42340 Bedienungsanleitung

Lindy Schalten 42340

Lesen Sie kostenlos die 📖 deutsche Bedienungsanleitung fĂŒr Lindy 42340 (3 Seiten) in der Kategorie Schalten. Dieser Bedienungsanleitung war fĂŒr 3 Personen hilfreich und wurde von 2 Benutzern mit durchschnittlich 4.5 Sternen bewertet

Seite 1/3
KVM Switch Compact USB 2.0 Audio
Installation Guide English
Installationsanleitung Deutsch
Manuel Utilisateur Français
Manuale d’uso Italiano
© LINDY – 2nd EDITION (September 2013)
No.
4234
0
–
HDMI
No. 42341 – DVI-D
No. 42342 – VGA
No. 42343 – DisplayPort
www.LINDY.com
For Home and Oce Use
Tested to Comply with
FCC Standards
Specication E n g l i s h
‱ USB 2.0 compliant, supports USB 2.0 hubs and device sharing
‱ Port switching via button, software and keyboard hotkey switching
‱ 2 System Cables connected to the switch
No. 42340 – Interfaces: HDMI, USB 2.0, Audio out & Microphone
HDMI up to 1920x1080, HDCP & 3D compliant, with HDMI Audio
No. 42341 – Interfaces: DVI, USB 2.0, Audio out & Microphone
DVI-D Single Link: up to 1920x1200, HDCP compliant – not for connec-
tion to HDMI ports of graphic cards or PC/notebook, HDMI and Deep
Colour are not supported!
No. 42342 – Interfaces: VGA, USB 2.0, Audio out & Microphone
No. 42343 – Interfaces: DisplayPort, USB 2.0, Audio out & Microphone
Installation E n g l i s h
1. Install the software (CD) on a PC “Software Installation for Windows”.
To install on Mac OS, copy the file (*.pkg format) to the local hard
disk and install it from there.
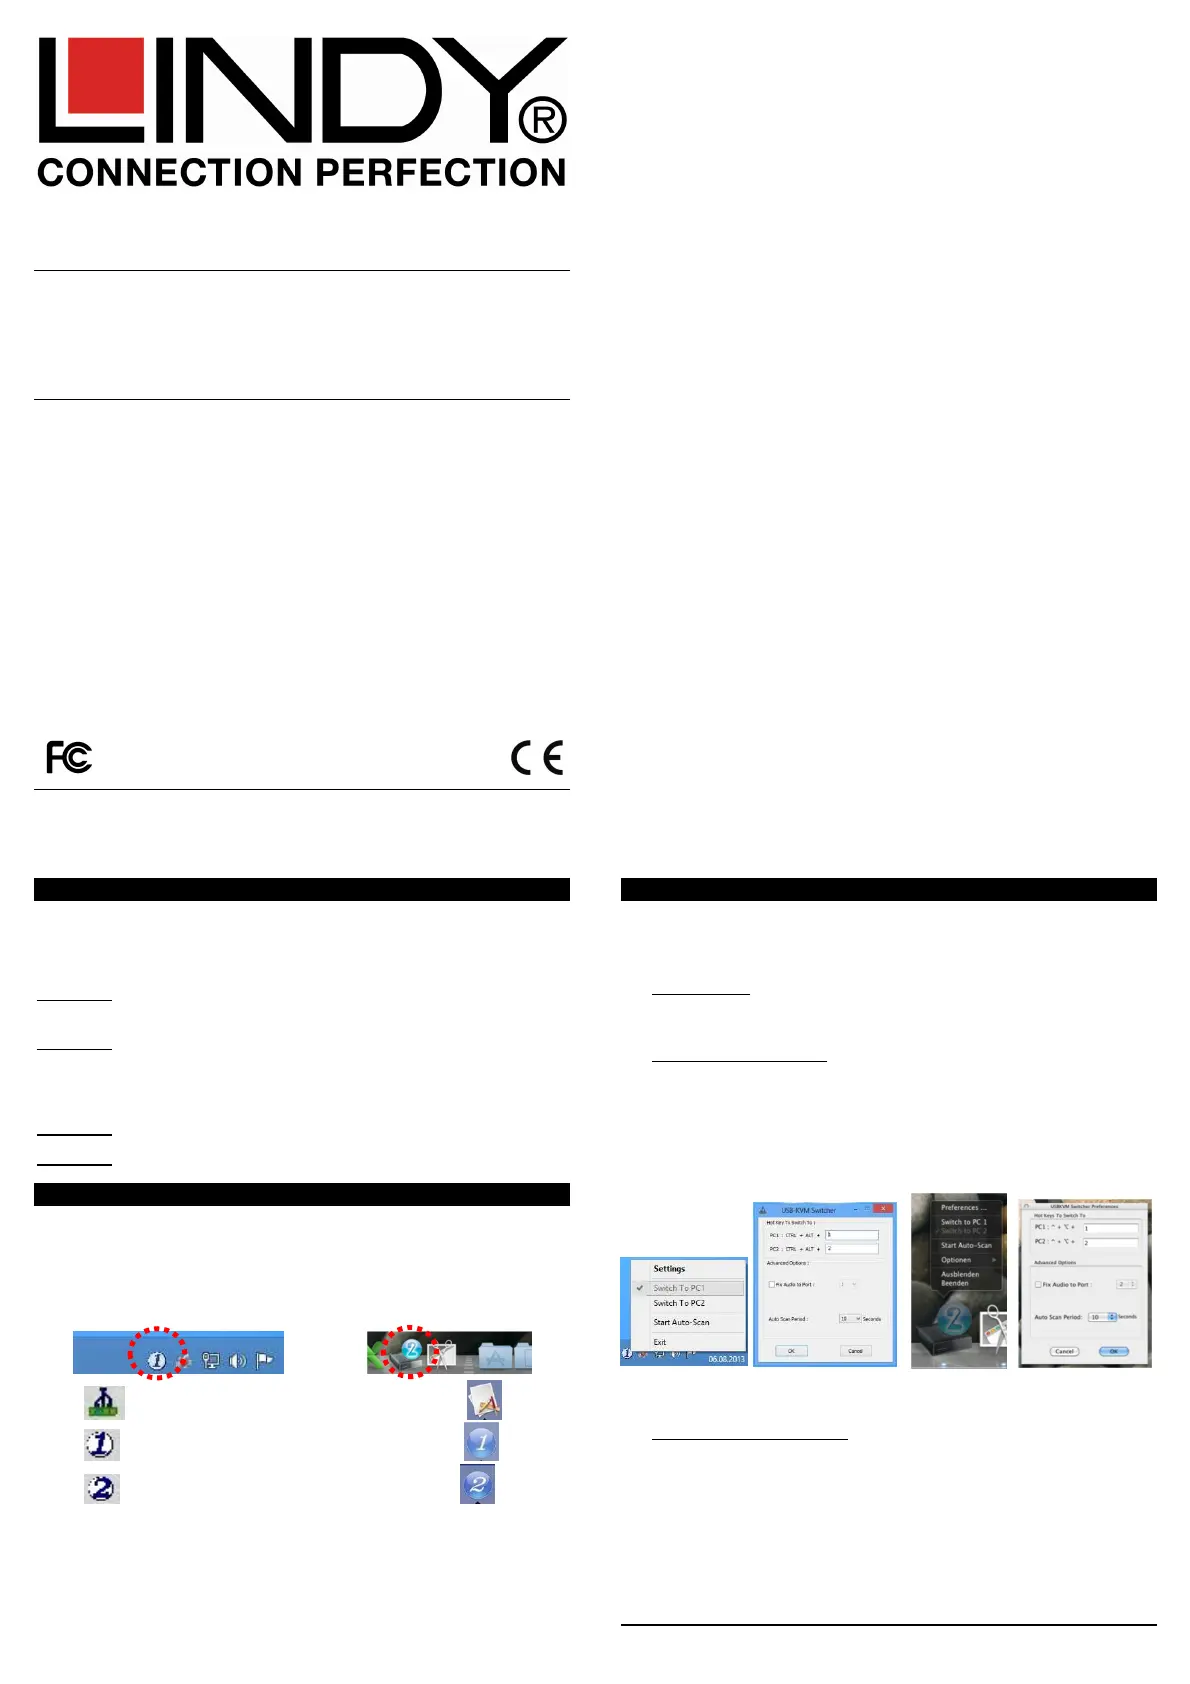
2. This will install the software on your computer and create some new
icons in the Windows taskbar or in the Mac Dock. They will look like
one of the icons shown below.
3.
No live connection or KVM switch detected
Port 1computer is displayed and selected
Port 2 computer is displayed and selected
4. Connect your keyboard, mouse, monitor and audio devices to the
KVM switch.
5. If required, you may use a USB hub to connect more than 2 USB
devices, to do this please use a self powered USB hub.
6. Connect the system cables directly to your computers. Extension or
adapter cables may NOT be supported at high video resolutions.
Operation & Port Switching E n g l i s h
There are three methods to toggle between the computers. After switching
please allow the computer a few seconds to load all USB drivers before
you can use the system.
1. Switch Button
The Switch Button is a wired remote control. Press the button to toggle
between the two computers.
2. KVM Switching Software (Windows & Mac OS)
For KVM Switching Software please refer to installation section.
Right clicking the icon opens the port switching menu.
Double clicking the icon opens the conguration menu. Using this
menu you may bind the audio ports to one computer and you may en-
able the beeper.
Windows OS Mac OS
Switching Menu Conguration Menu Switching Menu Conguration Menu
3. Keyboard Hotkey Switching (Windows & Mac OS)
Each keystroke hotkey sequence must be pressed within two seconds.
It is not possible to switch to a port with no active computer attached.
For Windows, the following key sequence for switching is preset:
“Scroll Lock + Scroll Lock”. Additional hotkeys like "CTRL ALT + *" can
be congured via the Conguration menu as described above.
For Mac, please dene the hotkeys via the Conguration menu as de-
scribed above.
Spezikationen D e u t s c h
‱ USB 2.0 kompatibel, unterstĂŒtzt USB 2.0 Hubs und Device Sharing
‱ Port Umschalten via Taste, Software und Tastatur-Hotkey
‱ 2 Systemkabel fest am Switch
No. 42340 – Interfaces: HDMI Full HD 1080p, USB 2.0, Audio, Mikrofon
HDMI bis 1920x1080, HDCP und 3D kompatibel, mit HDMI Audio
No. 42341 – Interfaces: DVI, USB 2.0(2x), Audio, Mikrofon.
DVI-D Single Link, unterstĂŒtzt Auösungen bis 1920x1200 und HDCP –
NICHT zum Anschluss an HDMI Ports von Grakkarten und
PC/Notebooks, unterstĂŒtzt HDMI und Deep Colour NICHT.
No. 42342 – Interfaces: VGA, USB 2.0, Audio, Mikrofon
No. 42343 – Interfaces: DisplayPort, USB 2.0, Audio, Mikrofon
Installation D e u t s c h
1. Starten Sie auf einem Windows PC von der mitgelieferten CD das
Programm “Software Installation for Windows”.
2. Um die Mac Version zu installieren, kopieren Sie die Datei im *.pkg
Format auf die Festplatte und installieren Sie sie von dort.
3. Dies Installiert die Umschaltsoftware auf Ihrem Rechner und erzeugt
ein neues Icon in der Taskleiste bzw. im Mac Dock.
Keine Verbindung zum KVM Switch erkannt
Computer an Port 1 wird angezeigt und ist aktiv
Computer an Port 2 wird angezeigt und ist aktiv
4. Verbinden Sie Tastatur, Maus, Monitor und AudiogerÀte mit dem KVM
Switch.
5. Verwenden Sie einen USB Hub um weitere Devices anzuschließen.
Der USB Hub sollte ĂŒber ein eigenes Netzteil verfĂŒgen!
6. Verbinden Sie die KVM-Kabel direkt mit dem Computer. Verwenden
Sie bei hohen Auösungen keine VerlĂ€ngerungen oder Adapterkabel!
Bedienung und Port-Umschaltung D e u t s c h
Es gibt drei Methoden um zwischen den Computern umzuschalten. Nach
dem Umschalten mĂŒssen auf dem Rechner zuerst die USB Treiber akti-
viert werden. Bitte warten Sie einige Sekunden auf den Abschluss der
Installation bevor Sie das System verwenden.
1. Umschaltknopf
Der Umschaltknopf ist eine kabelgebundene Fernbedienung. Mit ei-
nem einfachen BetÀtigen des Knopfes, schaltet der Switch um.
2. KVM Umschalt-Software (Windows & Mac Betriebssysteme)
Die KVM Umschalt-Software muss wie oben beschrieben installiert
werden.
Rechtsklick auf das Umschalticon Ă¶î€net das UmschaltmenĂŒ.
Doppelklick auf das Icon Ă¶î€net das KongurationsmenĂŒ. Hier können
Sie weitere Tastaturhotkeys denieren, die Audioports fest an einen
Rechner binden, und den Beeper ein- und ausschalten.
Windows OS Mac OS
UmschaltmenĂŒ KongurationsmenĂŒ UmschaltmenĂŒ KongurationsmenĂŒ
3.
Tastatur Hotkey Umschaltung (Windows & Mac OS)
Jede Tastenkombination muss in weniger als 2 Sekunden abge-
schlossen werden. Es ist nicht möglich auf einen Port ohne ange-
schlossenen aktiven Rechner zu schalten.
FĂŒr Windows verwenden Sie die Tastenkombination “Rollen + Rollen”.
Weitere Hotkeys, z.B. „CTRL ALT + *“ können ĂŒber das Kongurati-
onsmenĂŒ umdeniert werden.
Mac User denieren ihre Hotkeys ĂŒber das KongurationsmenĂŒ, s.o.
SpĂ©cications F r a n çai s
‱ USB 2.0, supporte des hubs USB 2.0 et le partage d’appareils USB
‱ Commutation par bouton sur le switch, par logiciel et par sĂ©quence
clavier hotkey
‱
2 cĂąbles combo xĂ©s au KVM
No. 42340 – Interfaces: HDMI Full HD 1080p, USB 2.0, audio, micro.
HDMI jusqu‘au 1920x1080, compatible HDCP et 3D, audio sur HDMI.
No. 42341 – Interfaces: DVI, USB 2.0, audio, micro.
DVI-D Single Link: rĂ©solutions jusqu’au 1920x1200, compatible HDCP –
NE PAS connecté aux ports HDMI de carte graphique sur PC/Notebook,
HDMI et Deep Colour NON pris en charge !
No. 42342 – Interfaces: VGA, USB 2.0, audio, micro
No. 42343 – Interfaces: DisplayPort, USB 2.0, audio, micro
Installation Fr a n ç ai s
1. Installez le logiciel PC “Software Installation for Windows”.
Pour l’installer sous Mac OS, copiez le chier (format *.pkg) vers le
disque dur local et installez-le depuis ce disque.
2. Cela installera le logiciel sur votre ordinateur et créera des nouveaux
icĂŽnes dans la barre des tĂąches Windows ou dans la barre Mac Dock.
Ils ressembleront Ă  cela:
Aucune connexion détectée au switch KVM
Le port 1 est achĂ© et sĂ©lectionnĂ©
Le port 1 est afchĂ© et sĂ©lectionnĂ©
3. Connectez le clavier, la souris, l’écran et les appareils audio au switch
KVM.
4. Si nécessaire, vous pouvez utiliser un hub USB pour connecter plus
que 2 pĂ©riphĂ©riques USB. VĂ©riez que le hub utilisĂ© possĂšde une
alimentation externe
5. Connectez les cĂąbles combo directement Ă  vos ordinateurs.
N’employez pas d’adaptateurs ou rallonges si vous utilisez de hautes
résolutions !
Utilisation & commutation Français
Il y a 3 méthodes de commutations. AprÚs la commutation, laissez
quelques secondes à tous les pilotes USB de se charger avant d’utiliser le
systĂšme.
1. Bouton du switch
Ce bouton est une tĂ©lĂ©commande laire. Pressez le bouton pour
commuter entre les 2 ordinateurs.
2. Logiciel KVM Switching (Windows & Mac OS)
Merci de lire le paragraphe précédent.
Clic droit sur l’icîne ouvre le menu de commutation.
Double clic sur l’icîne ouvre le menu de conguration. En utilisant ce
menu, vous pouvez lier les ports audio Ă  un port et vous pouvez acti-
ver le bip sonore.
Windows OS Mac OS
Menu du switch Menu de conguration Menu du switch Menu de conguration
3. SĂ©quence hotkey clavier (Windows & Mac OS)
Chaque sĂ©quence hotkey doit ĂȘtre pressĂ©e en moins de 2 secondes.
Il n’est pas possible de commuter sur un port non actif (pas
d’ordinateur allumĂ© ou connectĂ©).
Pour Windows, la sĂ©quence clĂ© de commutation est: “Scroll Lock +
Scroll Lock”. Ces sĂ©quence clĂ©s peuvent ĂȘtre changĂ©es en: "CTRL
ALT + *" via le menu de conguration dĂ©crit ci-dessus.
Pour Mac, merci de dĂ©î‹”nir les hotkeys via le menu de conguration
décrit ci-dessus.
Speciche I t a l i a n o
‱
USB 2.0 compatibile, supporta hub USB 2.0 e device sharing
‱
Commutazione tramite tasto, software e hotkey tastiera
‱
2 cavi system connessi allo switch
No. 42340 – Interfacce: HDMI Full HD 1080p, USB 2.0, Audio, Microfono .
Supporta risoluzioni HDMI no a 1920x1080, HDCP 3D con Audio
No. 42341 – Interfacce: DVI, USB 2.0, Audio, Microfono.
DVI-D Single Link: risoluzioni no 1920x1200, supporto HDCP – da
NON utilizzare con porte HDMI di PC/notebook, HDMI e Deep Colour
NON supportati!
No. 42342 – Interfacce: VGA, USB 2.0, Audio, Microfono
No. 42343 – Interfacce: DisplayPort, USB 2.0, Audio, Microfono
Installazione I t a l i a n o
1. Installate il software su un PC “Software Installation for Windows”.
Per installarlo su Mac OS, copiate il le (formato *.pkg) sull’hard disk
ed avviate l’installazione.
2. Dopo l’installazione del software compariranno delle nuove icone nella
taskbar di Windows o nella Mac Dock, come mostrato nelle immagini
qui sotto:
Nessuna connessione attiva o switch connesso
Computer sulla porta 1 attivo
Computer sulla porta 2 attivo
3. Collegate tastiera, mouse, monitor e dispositivi audio al KVM switch.
4. Se necessario utilizzate un hub USB alimentato per collegare piĂč di 2
dispositivi USB.
5. Collegate i cavi system direttamente ai computer: prolunghe ed adatta-
tori potrebbero NON essere utilizzabili ad alte risoluzioni.
Utilizzo & Commutazione I t a l i a n o
Potete commutare tra i computer collegati in tre modi dierenti.
Dopo aver inviato il comando di commutazione attendete qualche secondo
per permettere al sistema di caricare i driver USB.
1. Tasto sullo Switch
Il tasto remoto per la commutazione consiste in un dispositivo remoto
da connettere tramite cavo, premetelo per commutare da un computer
all’altro.
2. Software (Windows & Mac OS)
Per la commutazione via Software consultate il paragrafo Installazione.
Cliccate col tasto destro del mouse sull’icona per aprire il menu di
commutazione; fate doppio click sull’icona per aprire il menu di
congurazione. Utilizzate questo menu per assegnare le porte audio
ad un computer e per abilitare il segnale acustico.
Windows Mac OS
Menu di commutaz. Menu di conguraz. Menu di commutaz. Menu di conguraz.
3. Hotkey tastiera (Windows & Mac OS)
Ogni sequenza hotkey deve essere digitata entro due secondi. Non Ăš
possibile commutare su una porta senza un computer attivo collegato.
Di seguito trovate la hotkey per commutare su Windows: “Bloc Scorr +
Bloc Scorr”. Potete congurare altre hotkey come "CTRL ALT + *" dal
menu di congurazione come descritto qui sopra.
Su Mac impostate le hotkey dal menu di congurazione come descritto
qui sopra.
Certications
FCC Certications
This device complies with Part 15 of the FCC Rules. Operation is subject to the following two
conditions: (1) this device may not cause harmful interference, and (2) this device must accept any
interference received; including interference that may cause undesired operation.
CE Statement
This equipment complies with the requirements relating to Electromagnetic Compatibility Standards
EN55022/EN55024 and the further standards cited therein.
It must be used with shielded cables only.
It has been manufactured under the scope of RoHS compliance.
CE KonformitÀt
Dieses Produkt entspricht den einschlĂ€gigen CE Richtlinien der EU fĂŒr IT-Equipment und darf nur
zusammen mit abgeschirmten Kabeln verwendet werden.
Diese GerĂ€te wurden unter BerĂŒcksichtigung der RoHS Vorgaben hergestellt.
Die formelle KonformitĂ€tserklĂ€rung können wir Ihnen auf Anforderung zur VerfĂŒgung stellen
LINDY Herstellergarantie
(Nur fĂŒr Deutschland)
LINDY gewĂ€hrt Endkunden fĂŒr dieses Produkt zusĂ€tzlich und ĂŒber die gesetzliche Regelung in
Deutschland hinaus eine zweijÀhrige Herstellergarantie ab Kaufdatum. Die detaillierten Bedingun-
gen dieser Garantie nden Sie auf der LINDY Website aufgelistet bei den AGBs.
Recycling Information
WEEE (Waste of Electrical and Electronic Equipment),
Recycling of Electronic Products
In 2006 the European Union introduced regulations (WEEE) for the collection and recycling of all
waste electrical and electronic equipment. The Wheelie bin symbol shown indicates that this
product must not be disposed of with household waste. Instead the product must be recycled in a
manner that is environmentally friendly. For more information on how to dispose of this product,
please contact your local recycling centre or your household waste disposal service. Each individual
EU member state has implemented the WEEE regulations into national law in slightly dierent
ways. Please follow your national law when you want to dispose of any electrical or electronic
products.
Germany / Deutschland
Die EuropĂ€ische Union hat mit der W EEE Direktive umfassende Regelungen fĂŒr die Verschrottung
und das Recycling von Elektro- und Elektronikprodukten geschaen. Das ElektroG – Elektro- und
ElektronikgerÀtegesetz verbietet das Entsorgen von entsprechenden, auch alten, Elektro- und
ElektronikgerĂ€ten ĂŒber die HausmĂŒlltonne! Diese GerĂ€te mĂŒssen den lokalen Sammelsystemen
bzw. örtlichen Sammelstellen zugefĂŒhrt werden! Dort werden sie kostenlos entgegen genommen.
Die Kosten fĂŒr den weiteren Recyclingprozess ĂŒbernehmen die GerĂ€tehersteller.
France
En 2006, l'union Européenne a introduit la nouvelle réglementation (DEEE) pour le recyclage de
tout Ă©quipement Ă©lectrique et Ă©lectronique.
Chaque Etat membre de l' Union Européenne a mis en application la nouvelle réglementation
DEEE de maniĂšres lĂ©gĂšrement diî€Ă©rentes. Veuillez suivre le dĂ©cret d'application correspondant Ă 
l'élimination des déchets électriques ou électroniques de votre pays.
Italy
Nel 2006 l'unione europea ha introdotto regolamentazioni (WEEE) per la raccolta e il riciclo di
apparecchi elettrici ed elettronici. Non Ăš piĂč consentito semplicemente gettare queste apparecchia-
ture, devono essere riciclate. Ogni stato membro dell' EU ha tramutato le direttive WEEE in leggi
statali in varie misure. Fare riferimento alle leggi del proprio Stato quando si dispone di un apparec-
chio elettrico o elettronico.
Per ulteriori dettagli fare riferimento alla direttiva WEEE sul riciclaggio del proprio Stato.
No. 42340, 42341, 42342, 42343
www.lindy.com
For Home and Oce Use
Tested to Comply with
FCC Standards


Produktspezifikationen

Marke: Lindy
Kategorie: Schalten
Modell: 42340

Brauchst du Hilfe?

Wenn Sie Hilfe mit Lindy 42340 benötigen, stellen Sie unten eine Frage und andere Benutzer werden Ihnen antworten


Bedienungsanleitung Schalten Lindy

Bedienungsanleitung Schalten

Neueste Bedienungsanleitung fĂŒr -Kategorien-