Lightware DVI-OPT-RX220-ST-PRO Bedienungsanleitung
Lightware
Audio-/Video-Extender
DVI-OPT-RX220-ST-PRO
Lesen Sie kostenlos die 📖 deutsche Bedienungsanleitung für Lightware DVI-OPT-RX220-ST-PRO (1 Seiten) in der Kategorie Audio-/Video-Extender. Dieser Bedienungsanleitung war für 44 Personen hilfreich und wurde von 2 Benutzern mit durchschnittlich 4.5 Sternen bewertet
Seite 1/1
Quick Start Guide
DVI-OPT-TX220-Pro
DVI-OPT-RX220-Pro
DVI-OPT-TX220-ST-Pro
DVI-OPT-RX220-ST-Pro
Further information
Contact us
Lightware Visual Engineering LLC.
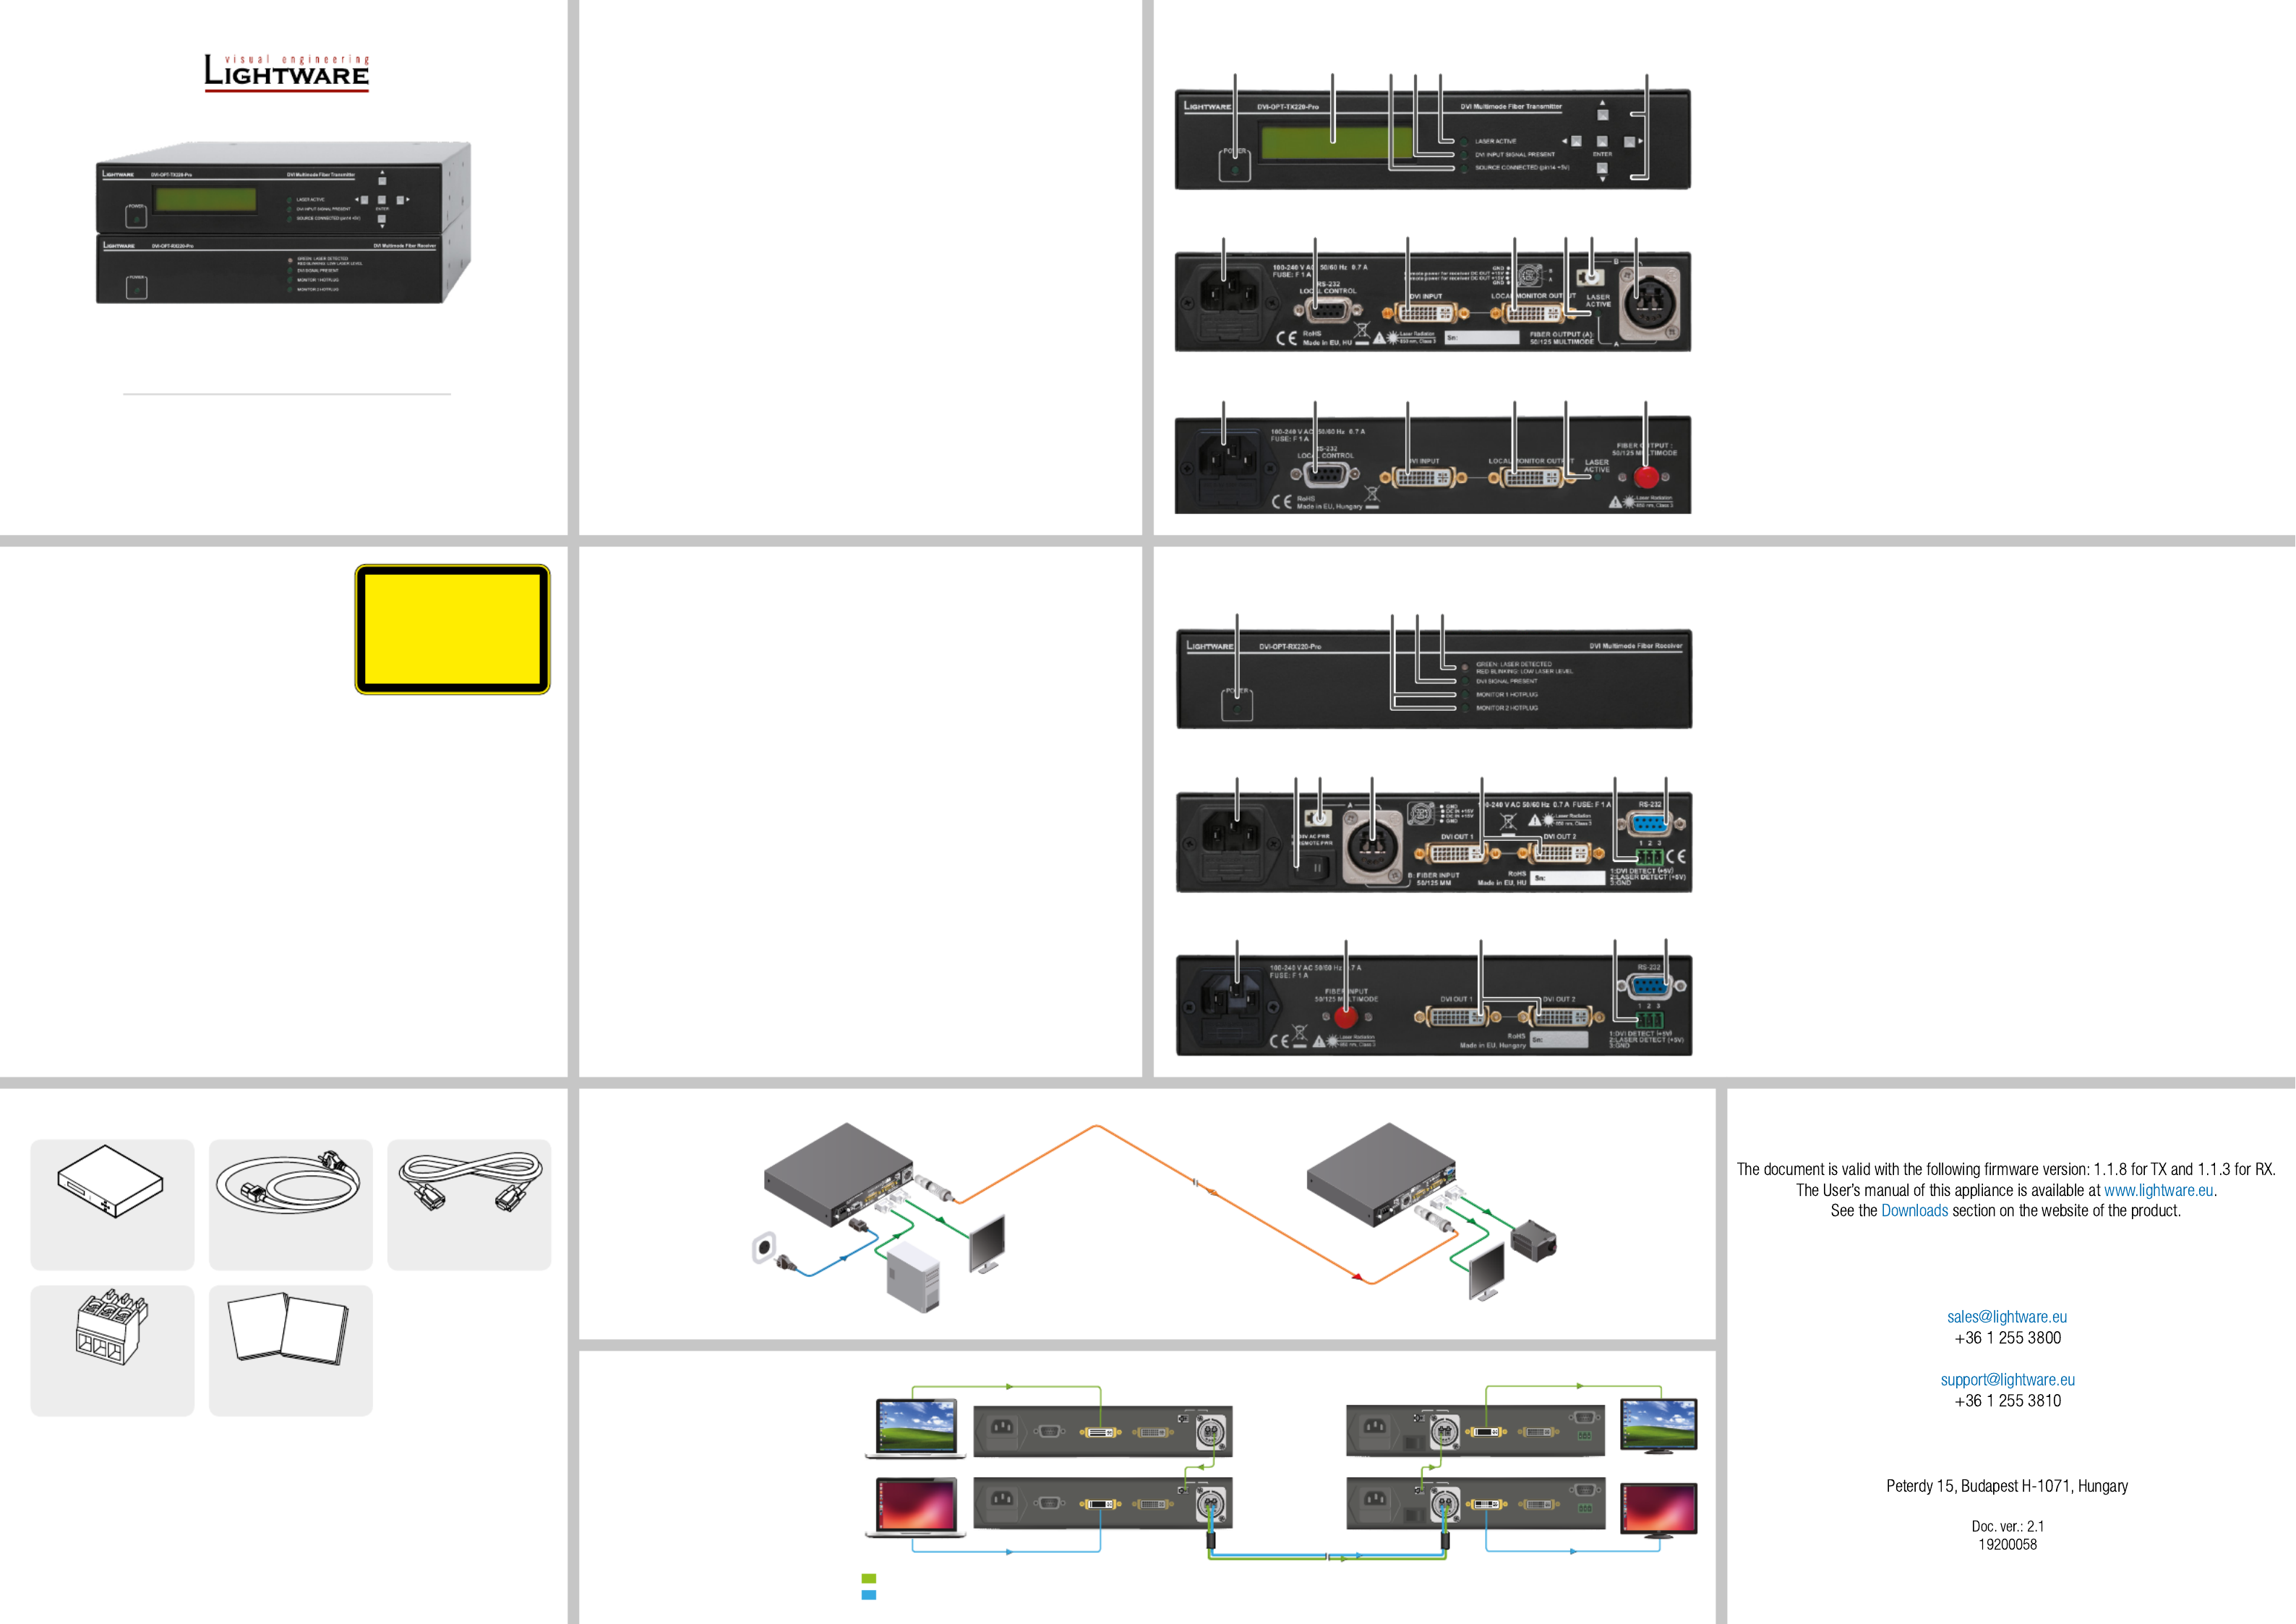
1
Power LED Lights green when the unit is powered on.
2
Menu display Displays status information and menu operation.
3
Source LED Indicates if a powered-on DVI source is connected to
the unit (detects +5V signal on Pin 14 of the input DVI
connector).
4
Signal LED Indicates when a valid DVI signal is detected on the DVI
INPUT connector.
5
Laser LED Indicates when the laser driver is enabled.
6
Menu navigation Up, down, left, right and enter buttons.
7
AC connector Standard IEC power connector.
8
Serial port D-SUB connector for RS-232 communication.
9
DVI input Connect a sinlge link DVI device.
q
Monitor output A local display device can be connected to monitor the
outgoing signal.
w
Laser LED Green: the laser driver is enabled.
e
Break-out
connector
The break-out LC connector is internally connected to
output B of the Neutrik connector.
r
Fiber output In the case of Neutrik connectors: Channel A carries
the signal from this unit’s optical transmitter, channel B
carries any optical signal from the break-out LC connector.
Important Safety Instructions
Please read and keep the information in the attached
safety instructions supplied with the product before
start using the device.
The extenders are Class 3R laser products.
Introduction
Lightware’s DVI-OPT-TX220-Pro is a Single Link DVI optical transmitter and DVI-OPT-
RX220-Pro is a Single Link DVI optical receiver. They use a single multimode ber to
extend DVI signals.
DVI-OPT-TX220-Pro and DVI-OPT-RX220-Pro are assembled with Neutrik NO2-4FDW
type LC duplex ber connector, DVI-OPT-TX220-ST-Pro and DVI-OPT-RX220-ST-Pro are
assembled with ST ber optical connector.
The extenders conform to DVI 1.0 specication, and handle signals between 25-165MHz
pixel clock frequency: from 640x480@60Hz to 1920x1200@60Hz or 2048x1080@60Hz
resolutions. The extenders have an RS-232 serial port for remote control applications and
rmware upgrade. The transmitter has a front panel for local control operations.
Box Contents
DVI-OPT-220
transmitter or receiver IEC Power cable RS-232 straight
serial cable
Phoenix 3-pole connector
(only for receivers)
Installation (Receiver)
1. Connect the DVI display device(s) to the DVI OUTPUT connector(s).
2. Connect a compatible Lightware ber transmitter unit to the FIBER INPUT.
3. Power on the transmitter and the DVI source (e.g. a computer).
4. To power the unit connect the standard IEC power cable. Now the unit is ready to be
used.
5. Power on the connected display devices. They will display the picture from the DVI
source (e.g. a computer).
Installation (Transmitter)
1. Connect the DVI source (e.g. a computer) to the DVI INPUT connector.
2. Connect a compatible Lightware ber receiver unit to the FIBER OUTPUT port.
3. Optionally connect a display device to the LOCAL MONITOR OUTPUT connector.
4. Connect the IEC power cable to the transmitter.
5. Select the EDID to emulate depending on the desired display resolution.
6. Power on the DVI source (e.g. a computer). It will read the EDID from the transmitter,
thereafter it will output the video signal according to the set resolution.
7. Power on the ber receiver and the connected display devices. They will display the
picture from the DVI source (e.g. a computer).
Checking the Emulated EDID
1. Use the left and right buttons on the front panel to select the Emulated EDID menu.
2. In the lower line, three messages toggle automatically showing the preferred
resolution, the name of the display and a three letter abbreviation assigned to the
manufacturer.
Selecting an EDID
1. Use the left and right buttons on the front panel to select the Switch EDID menu.
2. Use the up and down buttons to select the desired memory slot. Hold down the
buttons to scroll faster.
3. Press ENTER to emulate the selected EDID.
4. The EDID change is conrmed with a following message: „EDID switched!”
Learning an EDID
1. Use the left and right buttons on the front panel to select the Learn EDID menu.
2. Use the up and down buttons to select a memory slot (it will be overwritten). Hold
down the buttons to scroll faster.
3. Press ENTER to learn EDID to the selected memory slot from the last attached
monitor on the LOCAL MONITOR OUTPUT.
4. The EDID learning is conrmed with a following message: „EDID learned!”
Typical Standalone Application
Safety and warranty info,
Quick Start Guide
Transmitters - Front and Rear Views
Receivers - Front and Rear Views
Legend
Legend
1
Power LED Lights green when the unit is powered on.
2
Monitor LEDs Each LED indicates if a display device is connected to the
corresponding DVI output.
3
Signal LED Indicates valid DVI clock signal reception.
4
Laser LED Green: the laser is properly detected on the optical input.
Red blinking: low laser level, or no incoming signal.
5
AC connector Standard IEC power connector.
6
Power
selector
In position “I” the receiver unit is powered by its own built-
in power supply. In position “II” the receiver unit is powered
through special hybrid ber cable, type ’Neutrik 2M-4S75’.
7
Break-out
connector
The break-out LC connector is internally connected to output
A of the Neutrik connector.
8
Fiber input In the case of Neutrik connector: Channel B carries the
signal to this unit’s optical receiver, and channel A carries
any optical signal to the break-out LC connector.
9
DVI outputs Two display devices can be connected. The resolution and
pixel clock frequency are the same on both DVI connectors.
q
Alarm
outputs
DVI signal detection and laser detection signals with ground
reference are available on a three-pole Phoenix connector.
w
Serial port The device is controllable by Lightware Device Controller
software via RS-232 connection.
Double Linked Application
INVISIBLE LASER RADIATION
AVOID DIRECT EYE EXPOSURE
CLASS 3R LASER PRODUCT
Radiated wavelengths:
778 nm, 800 nm, 825 nm, 850 nm
Output power <= 1mW
Classified by EN 60825-1:2008
1 2 4
5 7
3
6 8 9 {q
5 8 9 {q w
w
1 5432 6
7 98 q r
7 98 q r
w e
w
Safety and
Warranty
Info
Quick
Start
Guide
Neutrik OpticalCON Duo connector
has two ber channels. Lightware
ber extenders use only one ber for
signal transmission and the other ber
is available through the break-out
connector.
In this case, one Neutrik OpticalCON
Duo cable is enough to transmit two
different A/V signal from one transmitter
pair to another receiver pair.
RS-2 32
LOCA L C ONT ROL
RoH S
Made in EU, H U
DVI cabIe
DVI cabIe
DVI cabIe
DVI cabIe
Power cable
DVI-OPT-TX220-Pro
DVI-OPT-RX220-Pro
Neutrik
opticalCON DUO
hybrid up to 2500m
Remote power
PC or Mac
DVI Monitor
DVI Monitor
Projector
DVI-OPT-TX220-Pro
DVI-OPT-TX220-Pro
DVI-OPT-RX220-Pro
DVI-OPT-RX220-Pro
Source 1.
Source 2.
Sink 1.
Sink 2.
1 4
B A
1 4
B A
DVI cable
Neutrik opticalCON DUO
up to 2500m
LC-LC fiber
optical cable LC-LC fiber
optical cable
B
1 4
B A
A
1 4
B A
A
DVI cable DVI cable
DVI cable
B
Audio/Video signal 1.
Audio/Video signal 2.
Produktspezifikationen
| Marke: | Lightware |
| Kategorie: | Audio-/Video-Extender |
| Modell: | DVI-OPT-RX220-ST-PRO |
| Upgradefähige Firmware: | Ja |
| WLAN: | Nein |
| Bluetooth: | Nein |
| Breite: | 221 mm |
| Tiefe: | 181 mm |
| Gewicht: | 1340 g |
| Übertragungstechnik: | Kabelgebunden |
| Höhe: | 42.2 mm |
| Material: | Metall |
| AC Eingangsspannung: | 100 - 240 V |
| AC Eingangsfrequenz: | 50 - 60 Hz |
| Zertifizierung: | CE |
| Stromverbrauch (Standardbetrieb): | 4 W |
| Typ: | AV-Receiver |
| LED-Anzeigen: | Ja |
| HDCP: | Nein |
| Unterstützte Grafik-Auflösungen: | 640 x 480 (VGA), 1920 x 1200 (WUXGA) |
| Rack-Einbau: | Ja |
| Serielle Schnittstelle: | RS-232 |
| Maximale Auflösung: | 1920 x 1200 Pixel |
| Nachhaltigkeitszertifikate: | RoHS |
| Eingangsstrom: | 0.7 A |
| Maximal mögliche Übertragungsstrecke: | 2500 m |
| Anzahl serielle Anschlüsse: | 1 |
| Bandbreite: | 1.65 Gbit/s |
| Optischer Kabelverbinder: | ST |
| DVI-Ausgangsanschlüsse: | 2 |
| Kabel mode struktur: | Multi-Modus |
| Erweiterte Display-Identifikationsdaten (EDID): | Ja |
| Schutz vor elektrostatischer Entladung (ESD): | Ja |
| HDCP-Durchschleifung: | Nein |
| Unterstützte faseroptische Wellenlängen: | 850 nm |
| OMA-Empfindlichkeit des Empfängers: | 14.25 dbm |
| Keine Videokompression: | Ja |
| Budget für optische Verluste: | 8 dB |
| Frontsteuerung (RX): | Ja |
Brauchst du Hilfe?
Wenn Sie Hilfe mit Lightware DVI-OPT-RX220-ST-PRO benötigen, stellen Sie unten eine Frage und andere Benutzer werden Ihnen antworten
Bedienungsanleitung Audio-/Video-Extender Lightware

27 Mai 2024
25 Mai 2024
23 März 2024
24 Februar 2024
19 Februar 2024
2 Februar 2024
14 Dezember 2023
26 November 2023
26 November 2023
26 November 2023
Bedienungsanleitung Audio-/Video-Extender
- Audio-/Video-Extender LogiLink
- Audio-/Video-Extender Manhattan
- Audio-/Video-Extender Nedis
- Audio-/Video-Extender Eminent
- Audio-/Video-Extender Schwaiger
- Audio-/Video-Extender König
- Audio-/Video-Extender Pyle
- Audio-/Video-Extender Telestar
- Audio-/Video-Extender One For All
- Audio-/Video-Extender Lindy
- Audio-/Video-Extender Tripp Lite
- Audio-/Video-Extender Marmitek
- Audio-/Video-Extender Black Box
- Audio-/Video-Extender Techly
- Audio-/Video-Extender Vision
- Audio-/Video-Extender Kindermann
- Audio-/Video-Extender Monoprice
- Audio-/Video-Extender Monacor
- Audio-/Video-Extender InLine
- Audio-/Video-Extender AG Neovo
- Audio-/Video-Extender Polycom
- Audio-/Video-Extender Edimax
- Audio-/Video-Extender Speaka
- Audio-/Video-Extender Digitus
- Audio-/Video-Extender DataVideo
- Audio-/Video-Extender LevelOne
- Audio-/Video-Extender MIPRO
- Audio-/Video-Extender Kramer
- Audio-/Video-Extender Intellinet
- Audio-/Video-Extender Bogen
- Audio-/Video-Extender AJA
- Audio-/Video-Extender Planet
- Audio-/Video-Extender Steren
- Audio-/Video-Extender Adder
- Audio-/Video-Extender Epcom
- Audio-/Video-Extender Siig
- Audio-/Video-Extender TV One
- Audio-/Video-Extender Rose
- Audio-/Video-Extender Iogear
- Audio-/Video-Extender StarTech.com
- Audio-/Video-Extender Smart-AVI
- Audio-/Video-Extender Aitech
- Audio-/Video-Extender Gefen
- Audio-/Video-Extender CYP
- Audio-/Video-Extender ASSMANN Electronic
- Audio-/Video-Extender ATen
- Audio-/Video-Extender KanexPro
- Audio-/Video-Extender SmartAVI
- Audio-/Video-Extender Crestron
- Audio-/Video-Extender Accell
- Audio-/Video-Extender I3-Technologies
- Audio-/Video-Extender Atlona
- Audio-/Video-Extender WyreStorm
- Audio-/Video-Extender Enson
- Audio-/Video-Extender Hall Research
- Audio-/Video-Extender Matrox
- Audio-/Video-Extender Blustream
- Audio-/Video-Extender Vivolink
- Audio-/Video-Extender Rose Electronics
- Audio-/Video-Extender MuxLab
- Audio-/Video-Extender C2G
- Audio-/Video-Extender TechLogix Networx
- Audio-/Video-Extender SEADA
Neueste Bedienungsanleitung für -Kategorien-
4 Dezember 2024
29 November 2024
29 November 2024
29 November 2024
26 November 2024
26 November 2024
26 November 2024
26 November 2024
26 November 2024
26 November 2024