Lexibook Touchman TM233 Bedienungsanleitung
Lexibook
Smartphone
Touchman TM233
Lesen Sie kostenlos die 📖 deutsche Bedienungsanleitung für Lexibook Touchman TM233 (86 Seiten) in der Kategorie Smartphone. Dieser Bedienungsanleitung war für 23 Personen hilfreich und wurde von 2 Benutzern mit durchschnittlich 4.5 Sternen bewertet
Seite 1/86

TM 230


FRANÇAIS
ENGLISH
ESPAÑOL
DEUTSCH
ITALIANO
PORTUGUÊS
NEDERLANDS
POLSKI
F 1 - F 9
GB 1 - GB 9
E 1 - E 4
D 1 - D 4
IT 1 - IT 4
P 1 - P 4
NL 1- NL 4
PO 1 - PO 4


2. Retirez la pile usagée et remplacez-la par une pile neuve en respectant la
polarité comme indiqué dans l'appareil.
3. L'écran affiche alors . RESET? Appuyez sur n'importe quelle autre
touche qu'ENTER pour ne pas réinitialiser l’assistant personnel et conserver
vos données enregistrées.
IMPORTANT ! vous devez effectuer le changement de pile en moins d'une
minute pour ne pas perdre vos données.
1. Clavier
1.1 Touches de fonctions
: boutons recherche pour afficher l’écran suivant ou précédent.
: Touches de flèches pour déplacer le curseur.
: Confirmation d’une saisie ou du choix d’une option.
: Marche / Arrêt.
: pour passer du clavier alphabétique au clavier numérique à l’écran.
: Fonctions Heure locale, Heure mondiale et Alarme.
: Contacts
: Fonctions Agenda, Actions et Mémos.
: Jeux.
:
Calculatrice, Conversion monnaies, Conversion Euro (taux fixes) et Conversion unités.
: Synchronisation PC avec le logiciel SyncMan
®
de Lexibook
®
.
LEXIBOOK
®
Assistant Personnel TouchMan
®
230 Series
TM 231 / TM 232 / TM233
Félicitations ! Vous venez d’acheter l’assistant personnel TM230 Series de
Lexibook
®
à écran large tactile.
Le logiciel SyncMan
®
de Lexibook
®
vous permet de synchroniser vos
données avec votre PC. Ce logiciel est à télécharger gratuitement sur notre site
my.lexibook.com (voir chapitres 20 et 21).
L’accès libre au bureau virtuel sur https://my.lexibook.com vous permettra
également de consulter et mettre à jour vos données personnelles sur Internet.
Totalement synchronisable grâce au logiciel SyncMan
®
, votre bureau
virtuel sur le site https://my.lexibook.com est le de votre complément idéal
assistant personnel TM230.
Avant de démarrer, veuillez retirer la languette de protection des piles située
sous la trappe au dos de l'appareil. Puis réinitialisez l’appareil :
1. Insérez une pointe fine dans le trou . RESET
2. s’affiche à l’écran. RESET ?
3. Appuyez sur pour valider. L’écran affiche le temps de RESET !
l’initialisation (cela peut prendre plusieurs secondes).
4. Puis l’écran revient automatique à l’affichage de l’heure locale.
N.B. : la réinitialisation supprime toutes les informations stockées dans la
machine et le code secret si l'appareil a déjà été utilisé.
Mise en marche et arrêt
Appuyez sur la touche pour mettre en marche ou arrêter votre assistant
personnel.
L’assistant personnel s’éteint automatiquement après 3 minutes sans utilisation.
Remplacement de la pile
1. Eteignez votre appareil et retirez la trappe du compartiment de la pile située
au dos de l'appareil.
F 1

3. Appuyez sur et utilisez les fl ches et pour faire d filer les è é
langues et s lectionner la langue voulue.é
4. Confirmez votre choix en touchant .
R glage du format de la dateé
1. Appuyez sur une fois pour afficher l heure locale (signe devant la ville).’
2. Appuyez sur pour afficher le clavier num rique l cran. Puis Appuyez é à ’é
sur . LMENU ’ ’option sLANGUE affiche.
3. Utilisez les fl ches et pour faire d filer les options du menu et è é
s lectionnez éFORMAT DATE. Appuyez sur pour confirmer.
4. Utilisez les fl ches et pour afficher les diff rents formats : è é
, et .AAAA/MM/JJ MM/JJ/AAAA JJ/MM/AAAA
5. Confirmez votre choix en touchant .
3. Heure
3.1 Heure locale
1. Appuyez sur . L’ é è êabbr viation de la ville sur la premi re ligne doit tre
pr c d e du signe .é é é
2. Appuyez sur (clavier alphab tique) et utilisez les touches et EDIT é
pour faire d filer les villes pr -enregistr es jusqu trouver celle é é é ’à
correspondant votre zone horaire locale. Ex : PAR pour Paris.à
3. Si vous le souhaitez, tapez le nom de votre ville (max. 6 lettres) quand vous
avez trouv votre zone horaire. Ex : LYON.é
4. Appuyez sur la fl che pour passer sur la 2nde ligne et modifier la date. è
Le clavier passe automatique en num rique .« é »
5. Tapez la date du jour puis tapez l heure. Si vous tes en format 12 heures, ’ ê
Appuyez sur AM/PM pour indiquez le matin (A) ou l apr s-midi (P).’ è
6. Appuyez sur pour confirmer
Liste des zones horaires
PAR = Paris ; = Londres ; = Les A ores ; = Rio de Janeiro ; LON AZO çRIO
CCS NYC = Caracas ; = New York ; = Chicago ; = Denvers ; CHI DEN
LAX ANC HNL MID = Los Angeles ; = Anchorage ; = Honolulu; = Iles Midway;
TNG = Tonga ; = Wellington ; = Noum a ; = Sydney : WLD NOU éSYD
ADL TYO = Ad la de ; é ï = Tokyo ; = Hong Kong ; = Bangkok ; HKG BKK
RGN = Yangon ; = Dhaka ; = New Delhi ; = Karachi ; DAC DEL KHI
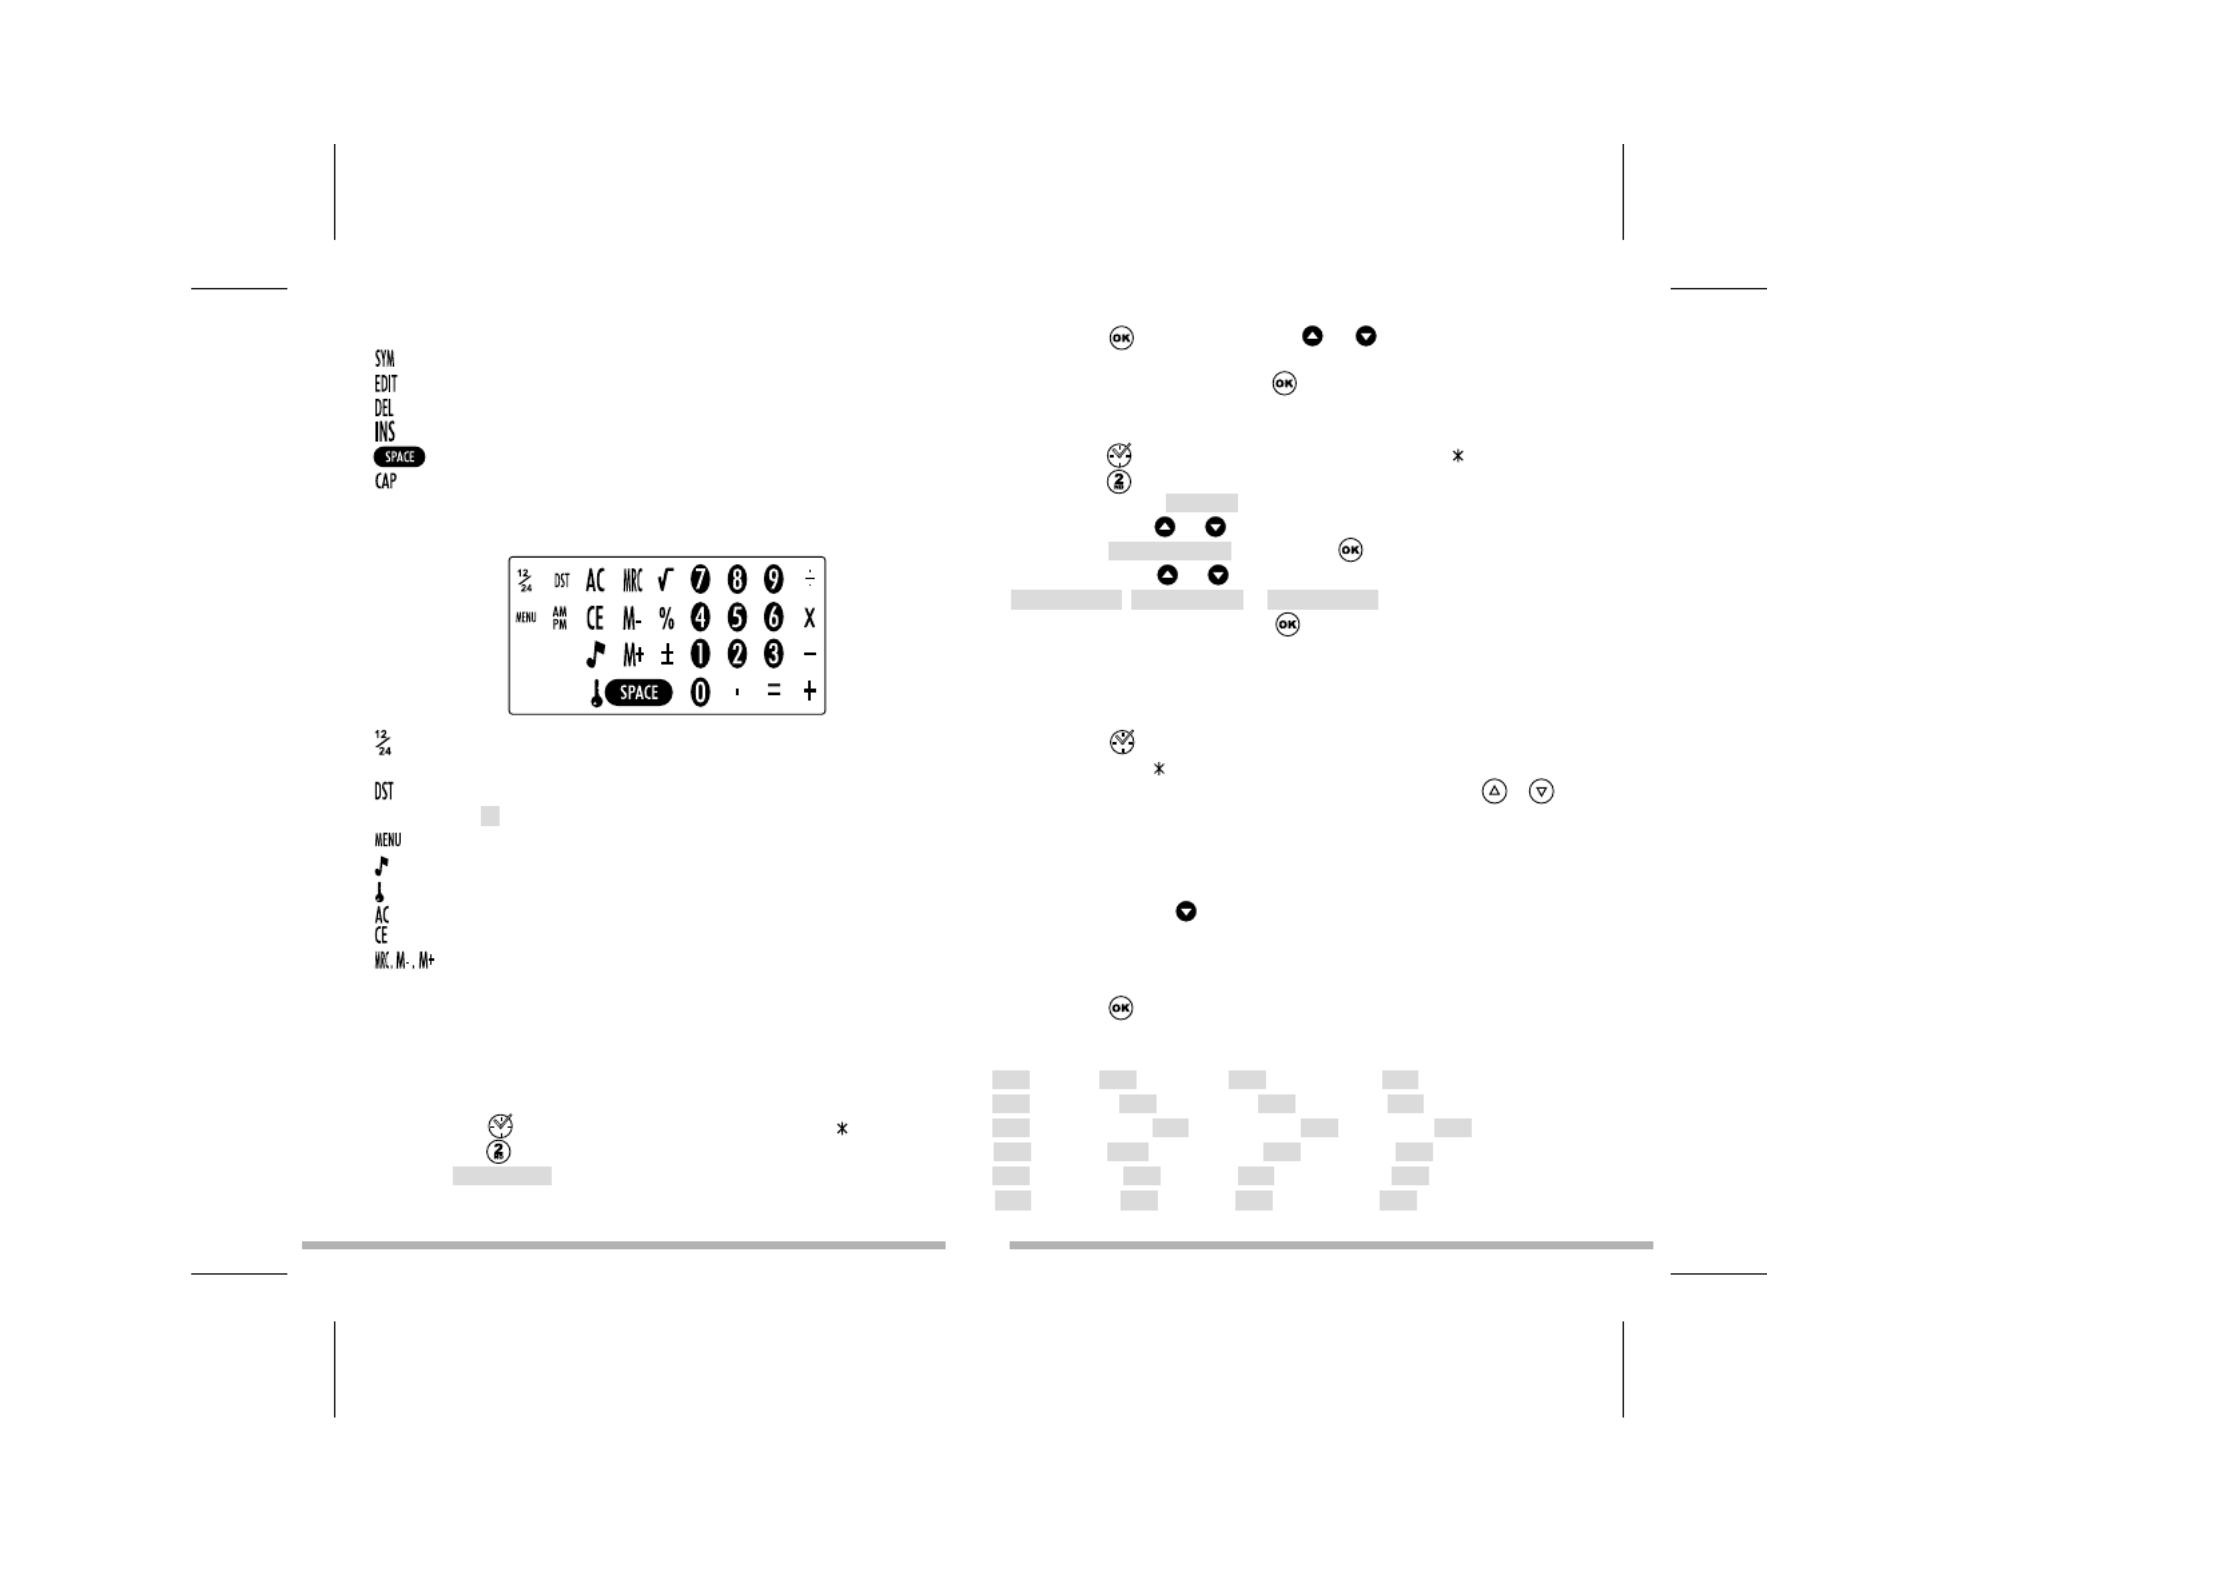
1.2 Clavier alphab tiqueé
: symboles, ponctuations et caract res sp ciaux (voir tableau en annexe).è é
: Modifier l enregistrement affich .’ é
: Supprimer l enregistrement affich .’ é
: Ins rer un espace l endroit du curseur.é à ’
: Espace
: Lettres majuscules
2.2 Clavier num riqueé
: Passer du format 12 heures (AM/PM) au format 24 heures
(format par d faut).é
: Passer de l heure d Hiver l heure d Et directement. En heure d Et le ’ ’ à ’ ’ é ’ é
symbole # s affiche devant le jour.’
: Acc s aux fonctions du menu : Langue, Format Date, M moire, PC Synchro.è é
: Activer ou d sactiver les touches sonores.é
: Activer le mot de passe
: Remise z ro de la calculatriceà é
: Touche ESC pour annuler une fonction. Efface la saisie en mode calculatrice.
: Touches M moire de la calculatriceé
2. R glages é
Langue d affichage’
Cet appareil offre un affichage disponible en 7 langues : English, Fran ais, ç
Deutsch, Espa ol, Italiano, Portugu s et Nederlands. ñ ê
1. Appuyez sur une fois pour afficher l heure locale (signe devant la ville).’
2. Appuyez sur pour acc der au clavier num rique puis appuyez sur . é é MENU
L’ ’ ’option sLANGUAGE affiche (la langue par defaut est l anglais).
F 2


5. Tapez l adresse du site Internet du contact puis appuyez sur pour acc der ’ é
au champ TEL./ FAX. Le clavier num rique s affiche automatiquement.é ’
6. Tapez le premier num ro (sur la deuxi me ligne) et appuyez sur pour é è
taper le second num ro sur la derni re ligne si besoin (max. 36 caract res).é è è
7. Appuyez sur pour enregistrer le nouveau contact
5. Cr er un nouveau rendez-vousé
1. Appuyez sur une fois pour ouvrir le mode . AGENDA
2. Tapez directement l intitul du rendez-vous puis appuyez sur pour taper ’ é
la date. Le clavier num rique s affiche automatiquement.é ’
3. Tapez la date puis l heure du rendez-vous. ’
4. Appuyez sur pour valider.
6. Cr er une action faire é « à »
1. Appuyez sur deux fois pour ouvrir le mode A FAIRE.
2. Tapez directement la description de l action puis appuyez sur pour ’
indiquer le niveau de priorit , de 1 (le plus haut) 9 (le plus bas).é à
3. Tapez le num ro voulu et appuyez sur pour taper la date. Le devant la éP
date indique que l action est faire .’ « à »
4. Tapez la date d ch ance et l heure et Appuyez sur pour confirmer.’é é ’
Marquer une action effectuée
1. Affichez l action concern e et Appuyez sur pour la modifier.’ é EDIT
2. Appuyez sur pour afficher . PRIORITE
3. Appuyez sur pour faire dispara tre le devant la date.îP
4. Appuyez sur pour confirmer.
7. Cr er un m moé é
1. Appuyez sur trois fois pour ouvrir le mode .MEMO
2. Tapez directement la description du m mo sur la premi re ligne (max. 36 é è
caract res).è
3. Appuyez sur pour aller sur les secondes et troisi me lignes pour saisir è
des chiffres si n cessaire.é
4. Appuyez sur pour confirmer.
KBL DXB THR MOW = Kaboul ; = Dubai ; = T h ran ; é é = Moscou ;
CAI = Le Caire.
3.2 Heure mondiale
1. Appuyez sur deux fois. Le signe dispara t devant la ville.î
2. Utilisez les touches et pour faire d filer les villes du monde entier. é
L’ éheure et la date seront automatiquement ajust es.
3.3 R glage de l alarmeé ’
Votre appareil dispose de trois types d'alarmes:
- alarme quotidienne heure fixe (r veil) : ((( )))à é •
- alarme toutes les heures (Carillon) : ((( )))
- alarme des rendez-vous (Rappel) : ((( / )))
1. Appuyez sur trois fois. L’ éalarme est affich e.
2. Pour modifier l heure de l alarme, Appuyez sur (clavier alphab tique). ’ ’ EDIT é
Le clavier num rique est automatiquement affich .é é
3. Tapez l heure voulue.’
4. Appuyez sur plusieurs fois pour faire d filer les modes d alarme é ’
souhait s : Carillon, R veil ou Rappel des rendez-vous. Au fur et mesure é é à
qu ils sont activ s ou d sactiv s, les ic nes des alarmes s affichent ou ’ é é é ô ’
disparaissent l cran. Vous pouvez activer un, deux ou trois modes en à ’é
m me temps. ê
5. Appuyez sur pour confirmer.
4. Cr er un nouveau contact é
Il y a 2 r pertoires t l phoniques, PERSONNEL et AFFAIRES. é é é
1. Appuyez sur une fois pour ouvrir le r pertoire . Appuyez éPERSONNEL
sur deux fois pour ouvrir le r pertoire éAFFAIRES.
2. Une fois le r pertoire voulu ouvert, tapez directement le nom du contact puis é
appuyez sur pour acc der au champ . éADRESSE
3. Tapez l adresse (max. 36 caract res) et appuyez sur pour acc der au ’ è é
champ .E-MAIL
4. Tapez l adresse e-mail puis appuyez sur pour acc der au champ .’ é URL
F 3


9. Rechercher un enregistrement
Les contacts sont class s par ordre alphab tique sur le nom.é é
Les rendez-vous sont class s par ordre chronologique.é
• é Par recherche s quentielle
Ouvrez le dossier concern , CONTACTS PERSONNELS, é
CONTACTS AFFAIRES, AGENDA, A FAIRE ou MEMO.
Appuyez sur les fl ches et pour rechercher l enregistrement voulu.è ’
Si aucune donn e n est trouv e, l cran affiche .é ’ é ’é NON TROUVE !
• Par recherche directe
Ouvrez le dossier concern , CONTACTS PERSONNELS, é
CONTACTS AFFAIRES, AGENDA, A FAIRE ou MEMO.
Tapez les premi res lettres du nom, du rendez-vous, de l action ou du m mo è ’ é
et Appuyez sur les fl ches ou pour afficher directement les è
enregistrements correspondants.
Si aucune donn e n est trouv e, l cran affiche . é ’ é ’é NON TROUVE !
10. Voir un enregistrement
Une fois l enregistrement affich , appuyez sur et pour faire d filer l cran ’ é é ’é
vers la gauche ou la droite.
Pour les contacts, appuyez sur pour afficher les diff rents champs de é
donn es : Nom, Adresse, E-mail, URL. é
11. Modifier un enregistrement
1. Une fois l enregistrement affich , Appuyez sur (clavier alphab tique) et ’ é EDIT é
utilisez les fl ches et pour placer le curseur l endroit voulu. è à ’
2. Ins rez un caract re en appuyant sur ou supprimer un caract re en é è INS è
appuyant sur . DEL
3. Appuyez sur pour passer aux autres champs de saisie pour les modifier
de la m me mani re ou simplement les remplir.è è
4. Une fois la correction termin e, Appuyez sur pour valider.é
8. Instructions pour la saisie des caract resè
Lettres majuscules
Appuyez sur CAP. (clavier alphab tique) pour activer ou d sactiver la saisie en é é
majuscules.
Chiffres
Appuyez sur pour passer du clavier alphab tique au clavier num rique et é é
inversement en cours de saisie.
Symboles
Appuyez sur (clavier alphab tique) pour taper le premier symbole de la SYM é
liste. Appuyez sur plusieurs fois pour faire d filer tous les symboles SYM é
disponibles jusqu trouver celui qui convient.’à
Lettres accentu es é
Appuyez sur (clavier alphab tique) puis aussit t sur la lettre concern e SYM é ô é
pour obtenir sa premi re forme accentu e. Appuyez sur plusieurs fois la m me è é ê
lettre pour faire d filer toutes ses formes accentu es. é é
Ex : Appuyez sur puis imm diatement pour afficher la lettre (en SYM éEé
minuscule) ou (en majuscule). É
Voir la liste des lettres accentu es en annexe.é
Annuler une saisie sans sauvegarder
En cours de saisie, Appuyez sur pour afficher le clavier num rique et é
Appuyez sur . CE
Corriger la frappe
Utilisez les fl ches et pour d placer le curseur sur le caract re corriger è é è à
et tapez le caract re voulu. è
Ins rer un caract reé è
Placez le curseur l endroit voulu et appuyez sur (clavier alphab tique) à ’ INS é
pour ins rer un espace. Tapez le caract re voulu.é è
Effacer un caract reè
Placez le curseur sur le caract re è à effacer et appuyez sur (clavier alphab tique).DEL é
F 4


6. L’écran affiche . Tapez encore le nouveau mot de passe et CONFIRMEZ !
appuyez sur .
Acc der aux fonctions prot g esé é é
La premi re fois que vous appuierez sur les touches ou pour consulter è
ou saisir vos donn es, l cran affichera é ’é MOT DE PASSE. Tapez alors votre
code et Appuyez sur pour confirmer.
14. Calculatrice
Appuyez sur pour utiliser la calculatrice.
15. Conversion mon taire (hors monnaies Euroland)é
D terminer le taux de conversioné
1. Appuyez sur deux fois. La premi re conversion s affiche . è ’ EURO USD
Il y a 5 conversions mon taires.é
2. Utilisez les fl ches et pour les faire d filer et s lectionner la è é é
conversion voulue.
3. Appuyez sur (clavier alphab tique). EDIT é
4. Le curseur clignote sur le premier caract re de la premi re monnaie. Si vous è è
souhaitez la modifier, tapez la monnaie voulue (max. 4 caract res) puis è
appuyez sur pour aller modifier de m me la seconde monnaie si ê
n cessaire. Appuyez sur pour confirmer.é
5. Si vous ne souhaitez pas modifier les monnaies, appuyez directement sur
apr s avoir appuy sur .è é EDIT
6. Z ro clignote en bas de l cran. Tapez le taux de conversion (ex : pour é ’é
EURO USD 1,089, tapez si 1 Euro = 1,089 Dollars).
7. Appuyez sur pour valider.
Appuyez tout moment sur pour annuler votre saisie sans enregistrer.àCE
Convertir un montant
1. S lectionnez la conversion voulue. Ex : éEURO USD
2. Tapez le montant convertir.à
Si c est un montant en Euros appuyez sur pour afficher le r’ ésultat en Dollars .
Si c est un montant en Dollars appuyez sur pour afficher le r’ ésultat en Euros.
12. Supprimer un enregistrement
1. Une fois l enregistrement affich , Appuyez sur (clavier alphab tique).’ é DEL é
2. L' cran affiche éEFFACER?. Appuyez sur pour confirmer ou n importe ’
quelle autre touche pour annuler la suppression.
13. Code secret
Vous pouvez prot ger par un mot de passe vos donn es confidentielles dans é é
CONTACTS, AGENDA, A FAIRE et MEMO. Le mot de passe ne peut exc der 6 é
caract res.è
ATTENTION ! Si vous perdez votre code secret vous ne pourrez plus acc der é à
vos donn es et vous serez contraints r initialiser votre assistant personnel pour é é
pouvoir nouveau l utiliser. Cette op ration vous fera perdre toutes vos donn es à ’ é é
pr c demment enregistr es.é é é
Enregistrer un mot de passe
1. Appuyez sur une fois pour afficher l heure locale (signe devant la ville).’
2. Appuyez sur pour acc der au clavier num rique et appuyez alors sur . é é
MOT DE PASSE est affich .é
3. Tapez votre mot de passe (maximum 6 caract res) et appuyez sur . è
4. Appuyez sur pour acc der au clavier alphab tique si vous voulez taper é é
des lettres.
5. L’écran affiche .CONFIRMEZ !
6. Tapez nouveau votre mot de passe pour confirmer et appuyez sur . Le à
code secret est activ et le symbole est affich l cran.é é à ’é
Modifier le mot de passe
1. Appuyez sur une fois pour afficher l heure locale (signe devant la ville).’
2. Appuyez sur (clavier num rique). éMOT DE PASSE s affiche l cran. ’ à ’é
3. Tapez votre mot de passe actuel et appuyez sur . L’écran affiche
MODIFIER ?.
4. Appuyez sur . L’écran affiche le mot de passe actuel et le curseur clignote
sur le premier caract re.è
5. Ins rez un caract re en appuyant sur ou supprimer un caract re en é è INS è
appuyant sur (max. 6 caract res). Appuyez sur pour valider.DEL è
F 5


19. V rification de la m moireé é
1. Appuyez sur une fois pour afficher l heure locale (signe devant la ville).’
2. Appuyez sur pour acc der au clavier num rique. Appuyez alors sur é é
. LMENU ’ ’option sLANGUE ? affiche.
3. Utilisez les fl ches et pour afficher l option et Appuyez è ’ MEMOIRE
sur pour confirmer.
4. L’é é ’ à ’écran affiche la m moire libre en nombre d octets puis revient l cran de
l heure locale.’
20. Synchronisation PC
Pr parer la synchronisationé
Avant d utiliser la synchronisation, assurez-vous que le logiciel SyncMan’
®
de Lexibook est install sur votre ordinateur PC. é
1. Connectez le c ble fourni avec l assistant personnel au Port Com de votre PC â ’
et ins rez le jack du c ble dans la prise PC de l assistant personnel (sur le é â ’
c t gauche).ô é
2. Lancez le logiciel SyncMan
®
sur votre PC et v rifiez que la é
synchronisation est bien configur e pour les assistants TM230 Series en é
cliquant sur , puis l onglet .Outils Options ’Votre Unit de pocheé
3. Configurez le Port Com de votre PC dans SyncMan
®
en cliquant sur
, puis l onglet . Assurez-vous galement Outils Options ’Synchronisation é
que l option est coch e.’Connexion automatique é
Lancer la synchronisation
1. Apr s avoir ouvert SyncManè
®
sur votre PC et connect votre assistant é
personnel au PC, appuyez sur une fois pour afficher l heure locale ’
(signe devant la ville).
2. Appuyez sur pour lancer la synchronisation. Vous pouvez galement é
appuyez sur et s lectionner l option MENU é ’ PC SYNCH.
3. L’écran affiche pendand la synchronisation.CONNEXION …
Si vous avez entr un mot de passe, vous devrez le saisir ce moment pour é à
pouvoir effectuer la synchronisation.
16. Conversion Euro (taux fixes)
Les taux fixes de l Euro ne sont pas modifiables.’
Convertir un montant
1. Appuyez sur trois fois. La premi re conversion s affiche è ’ EURO ATS
avec le taux fixe pr -enregistr . Il y a onze conversions Euro. é é 13.7603
2. Utilisez sur les fl ches et pour s lectionner la conversion Euro voulue. è é
Ex : EURO FRF
3. Tapez le montant le montant convertir.à
Si c est un montant en Euros Appuyez sur pour afficher le r sultat en Francs.’ é
Si c est un montant en Francs Appuyez sur pour afficher le r sultat en Euros. ’ é
17. Conversion unit s de mesureé
Convertir un nombre
1. Appuyez sur quatre fois. La premi re conversion s affiche è ’ inch cm
avec son taux . Il y a 8 conversions m triques pr -enregistr es.2.54 é é é
2. Appuyez sur les fl ches et pour s lectionner la conversion voulue. è é
Ex : mile km
3. Tapez le nombre convertir.à
Si c est un nombre en miles Appuyez sur pour afficher le r’ ésultat en kilom tres.è
Si c est un montant en kilom tres Appuyez sur pour afficher le r’ è ésultat en miles.
Liste des conversions m triquesé
inch cm yard m (inches et centim tres) ; è (yards et m tres) ; è
mile km C F ft m (miles et kilom tres) ; è (Celcius et Fahrenheit) ;
(feet et m tres) ; (ounces et grammes) ; (pounds et èoz g lb kg
kilogrammes) ; (us gallons et litres) ; (uk gal l US gal l UK
gallons et litres)
18. R -initialisationé
Cette proc dure vous permet de supprimer toutes vos donn es et votre code secret.é é
1. Ins rez une pointe fine dans le trou situ au dos de l'appareil et éRESET é
appuyez doucement. L' cran affiche éR init ?é
2. Appuyez sur pour confirmer ou sur toute autre touche pour abandonner.
F 6


22. JEUX
777
1. Appuyez une fois sur . L’é é ècran affiche au d777 but de la premi re ligne
et la fin, soit le montant minimum de la mise. Sur la seconde ligne $ 10 à
appara t le cr dit de d marrage soit .î é é 490
2. Modifier le montant de la mise en appuyant sur les fl ches ou et è
appuyez sur pour lancer le jeu.
3. Si vous obtenez vous gagnez 5 fois votre mise. Si vous obtenez 777
vous gagnez 3 fois votre mise. Si vous obtenez vous gagnez 2 fois
votre rmise.
4. Si obtenez n importe quelle autre combinaison vous perdez votre mise. Votre ’
cr dit est r duit d autant.é é ’
5. Le montant maximum du cr dit est 9990. Si vous perdez tout, cr dit = 0, le é é
jeu est termin .é
Loto flash
1. Appuyez deux fois sur . Une premi re s rie de six num ros de loto è é é
(compris entre 1 et 50) tir s au hasard est affich e.é é
2. Pour obtenir d autres s ries de six num ros tir s au sort, appuyez sur .’ é é é
3. Appuyez sur autant de fois que vous le souhaitez pour obtenir de
nouveaux num ros.é
23. PRECAUTIONS D UTILISATION’
1. Eviter les temp ratures extr mes, l exposition directe au soleil, l eau, é ê ’ ’
l humidit et la poussi re.’ é è
2. Ne pas laisser tomber l appareil. Vous pourriez l endommager.’ ’
3. Ne pas utiliser de d tergents, de produits nettoyants ou de solvants pour é
nettoyer la machine. Essuyez la machine avec un chiffon doux, propre et sec.
4. Ne pas tenir l appareil proche d un puissant champ magn tique ’ ’ é
(ex : haut-parleurs), ou d une source d lectricit statique.’ ’é é
5. Ne pas essayer de d monter l appareil. Toute tentative annulerait la garantie é ’
sur le produit.
6. Nous vous recommandons vivement de conserver une trace crite de vos é
donn es importantes. Par principe, tout syst me m moire lectronique peut é è à é é
perdre ses donn es dans certaines circonstances. Nous ne pouvons donc é
21. Logiciel SYNCMAN
®
de Lexibook
T l chargement du SyncMané é
®
1. Connectez-vous sur le site et enregistrez-vous http://my.lexibook.com
comme nouveau membre.
2. Vous recevrez rapidement un e-mail pour activer votre compte. Cliquez sur
le lien d activation dans le message.’
3. Connectez-vous nouveau sur le site htpp://my.lexibook.com et ouvrez à
votre compte. Sur la page d accueil de votre bureau virtuel, vous trouverez ’
un lien pour t l charger gratuitement le logiciel SyncMané é
®
de Lexibook
®
.
4. Suivez les instructions l cran et saisissez le num ro de s rie (S/N) de à ’é é é
votre assistant personnel indiqu au dos de l appareil pour valider le é ’
t l chargement. é é
N.B. : Si vous ne disposez pas d une connexion Internet pour t l charger le ’ é é
logiciel SyncMan
®
, nous vous invitons remplir le bon de commande à
ci-joint pour recevoir un CD-ROM. Il vous sera juste demand une é
participation aux frais d envoi.’
Installation du SyncMan
®
1. Fermer tous les programmes Windows.
2. Double-cliquez sur l application que vous avez t l charg e.’SyncMan.exe é é é
3. Suivez les instructions l cran pour proc der l installation.à ’é é à ’
Syst me requis sur votre PCè
Votre PC doit disposer des l ments suivants pour vous permettre d installer et é é ’
d utiliser le logiciel SyncMan’
®
correctement :
• Windows
®
95, 98, Millennium, 2000 & XP ou Windows NT
®
4.0 .
• Microsoft
®
Internet Explorer 5.0 ou version sup rieure.é
• 32MB RAM (pour afficher Microsoft Internet Explorer).
• ’ 10MB d espace disponible sur votre disque dur pour SyncMan.
• é Ecran couleur VGA ou sup rieur.
• Un Port Com disponible.
F 7

F 8
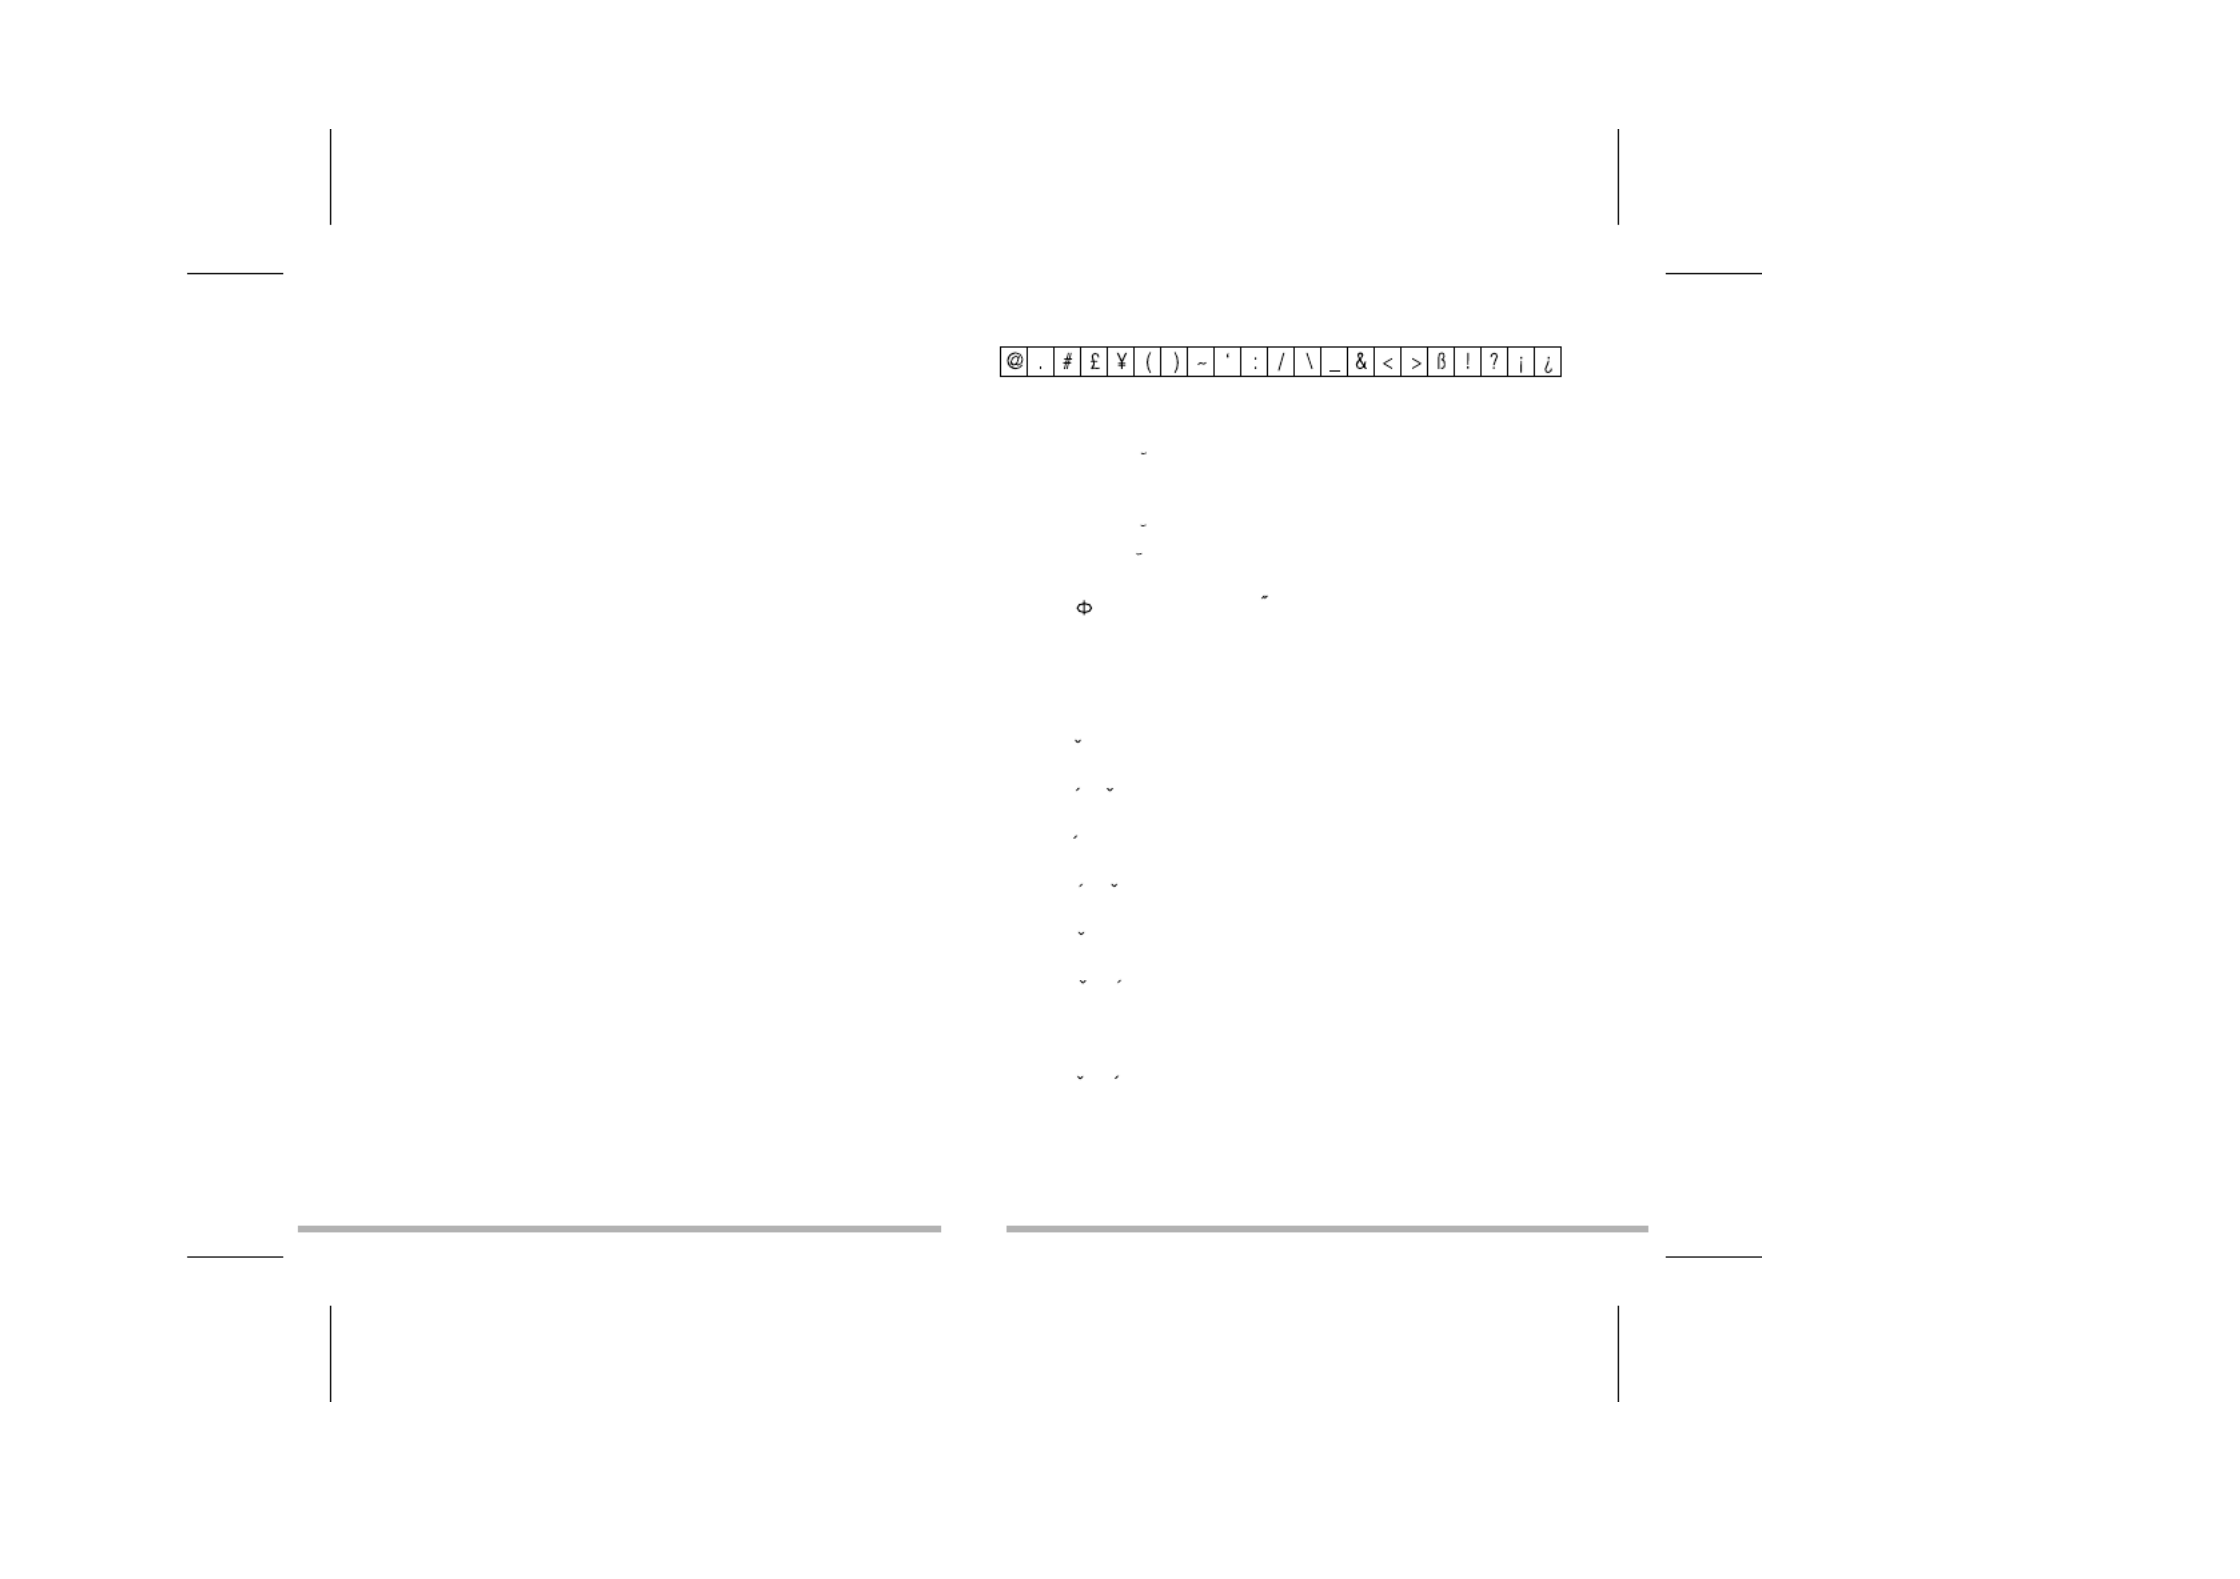
Annexe 1 Tableau des symboles et caract res sp ciaux– è é
Appendix 2 Accented letters–
A : A ➔Á➔À➔Ä➔ ➔Â➔Ã➔Å
a : a ➔á➔à➔ä➔ ➔â➔ã➔å➔
E : E ➔É➔È➔Ë➔ ➔Ê
e : e ➔é➔è➔ë➔ ➔ê
O o or : O ➔ ➔Ó➔Ò➔Ö➔Ô➔ ➔Õ➔
I i or : ➔Í➔Ì➔Ï➔Î
U u or : ➔Ú➔Ù➔Ü➔Û
R r or : R➔
Z z or : Z Z➔ ➔
Y y or : Y➔
S s or : S S➔ ➔
D d or : D➔
N n or : N N ➔➔➔Ñ
G g or : Ç
C c or : C C➔ ➔
accepter aucune responsabilit pour la perte des donn es qu elle ait t é é ’ é é
caus e par une mauvaise utilisation, une r paration, une erreur, le é é
changement de piles, l usage de piles apr s leur date limite d utilisation ou ’ è ’
tout autre circonstance.
Nous ne pouvons accepter aucune responsabilit directe ou indirecte pour des é
pertes financi res ou r clamations de tiers, qui pourraient r sulter de l usage è é é ’
de ce produit et de ses fonctions, comme le vol de num ro de cartes de cr dit, é é
la perte ou la modification des donn es.é
Attention ! Si l appareil re oit une d charge lectro-statique, fa tes ’ ç é é î
un Reset en enlevant et remettant les piles.
24. GARANTIE
Ce produit est couvert par notre garantie de deux ans.
Pour toute mise en uvre de la garantie ou de service apr s vente, vous devez œ è
vous adresser votre revendeur muni de votre preuve d'achat. Notre garantie à
couvre les vices de mat riel ou de montage imputables au constructeur é à
l'exclusion de toute d t rioration provenant du non-respect de la notice é é
d'utilisation ou de toute intervention intempestive sur l'article (telle que
d montage, exposition la chaleur ou l'humidit ).é à à é…
Tel. Assistance technique : 0821 23 3000 (0,78 F TTC/mn)
FAX : +33 (0) 1 73 23 23 04
E-mail : Lexibook@worldnet.fr
Site Internet : http://www.lexibook.com
25. CARACTERISTIQUES TECHNIQUES
Alimentation : 1 x CR2032
Dimensions : 105,5 x 76,3 x 11,5 mm
Poids : 70g (avec les piles)
Garantie : 1 an
Capacit M moire : TM231 = 32Koé é
TM232 = 64 Ko
TM233 = 128 Ko
La m moire est en partie utilis e par le programme é é
lui-m me.ê


F 9
Annexe 3 - Taux fixes de conversion Euro
Code Monnaie Nom Monnaies Pays Taux Euro
FRF Franc français France 1 Euro = 6.55957 FRF
DEM Mark allemand Allemagne 1 Euro = 1.95583 DEM
IEP Livre irlandaise Irlande 1 Euro = 0.787564 IEP
ESP Peseta Espagne 1 Euro = 166.386 ESP
ITL Lire Italie 1 Euro = 1936.27 ITL
ATS Shilling Austriche 1 Euro = 13.7603 ATS
BEF Franc belge Belgique 1 Euro = 40.3399 BEF
FIM Mark finlandais Finlande 1 Euro = 5.94573 FIM
LUF Franc luxembourgeois Luxembourg 1 Euro = 40.3399 LUF
NLG Florin Pays-Bas 1 Euro = 2.20371 NLG
PTE Escudos Portugal 1 Euro = 200.482 PTE

LEXIBOOK
®
TouchMan
®
230 Series Personal Assistants
TM 231 / TM 232 / TM233
Congratulations on the purchase of your the Lexibook
®
TM230 series PDA.
This new PDA generation include many useful features designed to ease the
organisation of your daily schedule and personal information.
With Internet access you can connect to Lexibook’s exclusive Internet services
site at which provides both useful and interesting https//my.lexibook.com
information which can be downloaded to your personal computer and then
synchronised* with your TM230.
*Some information may not always be able to be synchronised with your TM230.
Before you start using the TouchMan
®
230 Series, you must remove carefully
the static label protecting the LCD display and pull out the plastic battery tab at
the rear of the unit. After you have done this reset the unit :
1. Insert a blunt pin, such as an opened paper clip, into the hole (at the RESET
rear of the unit) and press gently. will displayed on the screen. RESET ?
2. Press to confirm. Display shows during the reset period RESET !
(just a few seconds).
3. Then the display shows local time screen.
Note : Doing a reset will delete all information stored in the unit as well as the
secret code if unit has been used previously.
Switching the unit on and off.
Press key to switch the unit on or off.
TouchMan
®
TM230 PDA will power-off automatically after 3 minutes if unused.
Battery replacement
1. Switch off your unit and pull open battery cover at the rear of the unit.
2. Replace used battery with a new, high quality CR2032 cell with (+) polarity
facing up.
3. Display shows ENTER to NOT reset the RESET?. Press any key except
unit and keep your information stored in memory.
IMPORTANT ! Be sure to complete battery replacement within 1 minute in
order to keep your stored information safe.
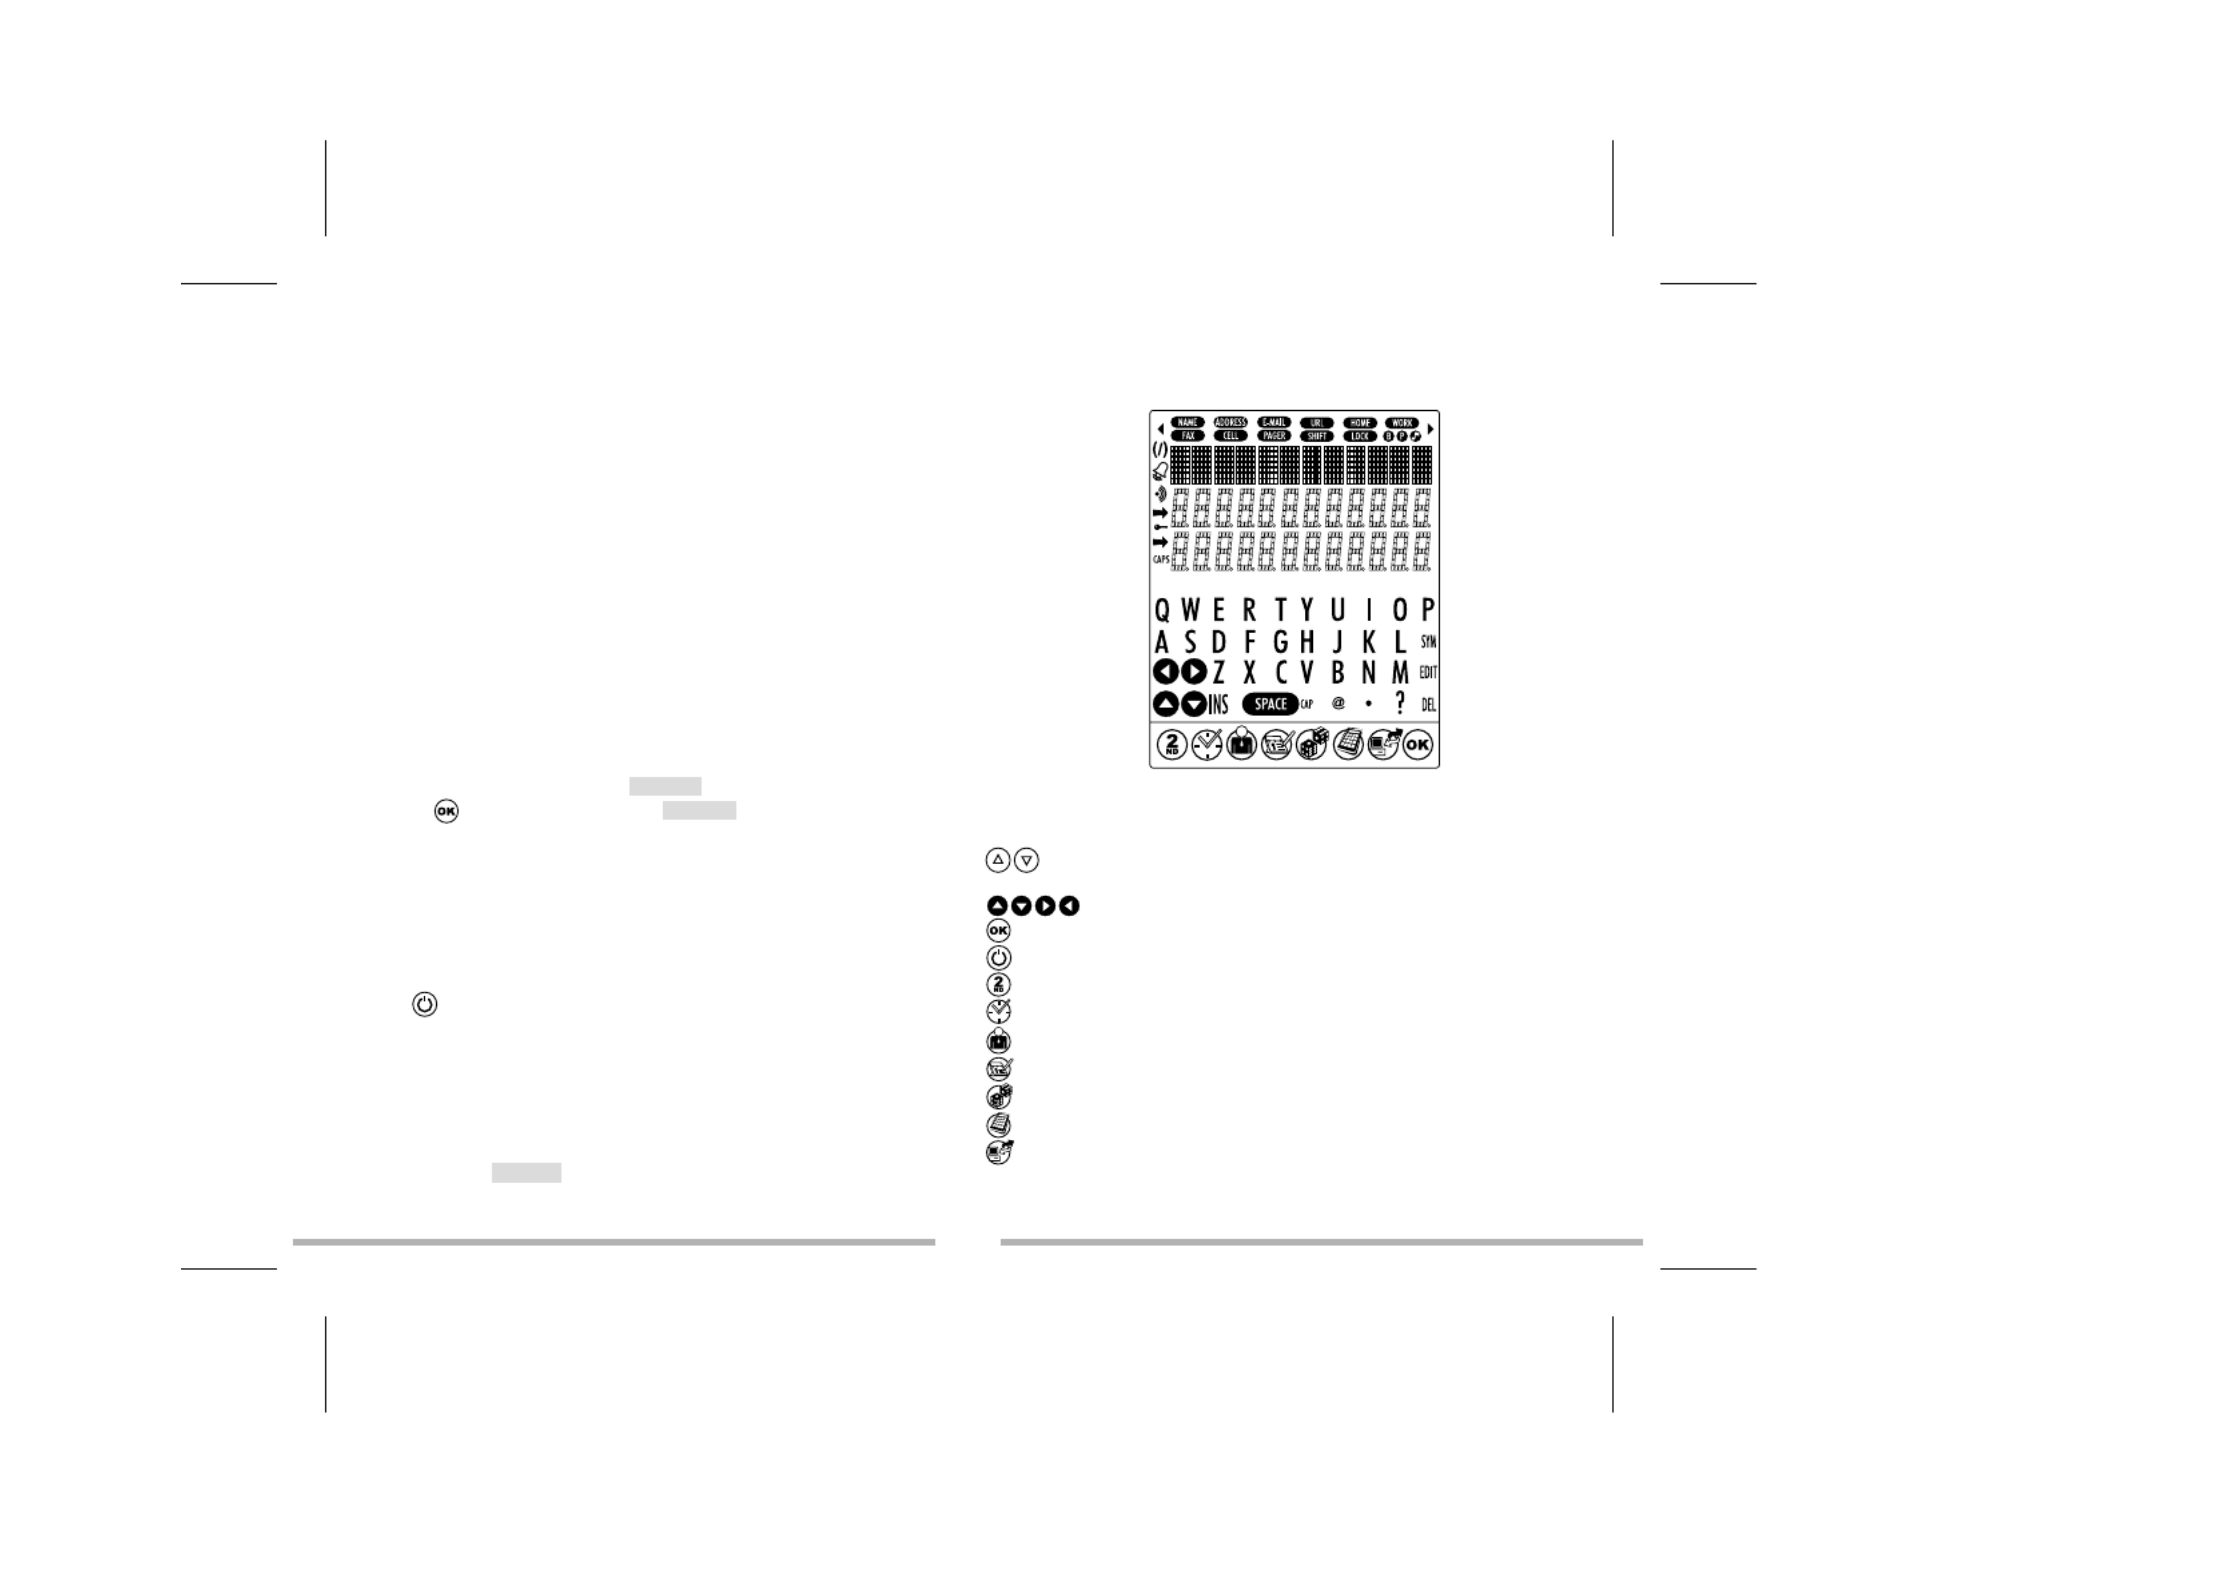
1. Keypad
1.1 Function keys
: Searching buttons to move cursor to next screen or next option or
record.
: Moving buttons to move cursor to next line or character.
: Confirm an entry or a selection.
: On/Off
: Toggle key to toggle from alphabetical keypad to numerical keypad.
: Home time, World time and Alarm.
: Contacts
: Scheduler, ToDo and Memos.
: Games
: Calculator, Currency and Euro (fixed rates) conversions, unit conversion.
: PC synchronisation with Lexibook SyncMan
®
software.
GB 1


1.2 Alphabetical keypad
: Symbols and special characters (refer to appendix for table list).
: Edit record.
: Delete record.
: Insert space.
: Tap a space
: Capital letters
2.2 Numerical keypad
: Toggle from 12-hour format (AM/PM) to 24-hour format (default setting).
: Enable Daylight Saving Time. When Summer time is on, # is displayed
before the day.
: Open Menu function list : Language, Date Format, Memory check,
PC Sync.
: Enable or disable key tone.
: Enable secret mode.
: Clear All in Calculator mode.
: ESC key to cancel operation. Clear entry key in Calculator mode.
: Memory keys in Calculator mode.
2. User settings
Display language
7 languages are available : English, Fran ais (French), Deutsch (German), ç
Español (Spanish), Italiano (Italian), Português (Portuguese) and
Nederlands (Dutch).
1. Press once to display home time ( symbol is shown).
2. Press key to display numerical keypad then press MENU. LANGUAGE ?
option is displayed.
3. Press and use and keys to scroll through language list and
select desired one.
4. Press to confirm.
Date format
1. Press once to display home time ( symbol is shown).
2. Press key to display numerical keypad then press MENU. LANGUAGE ?
option is displayed.
3. Use and to scroll through menu option list and select DATE FORMAT.
Press to confirm.
4. Use and to display available date formats : YYYY/MM/DD,
MM/DD/YYYY DD/MM/YYYY and .
5. Press to confirm.
3. Time
3.1 Home time
1. Press once. City name abbreviation is shown on first line with symbol
first.
2. Press and use and to scroll through city list and select EDIT
matching time zone.
3. If you wish, you can Tap directly your city name (max. 6 letters) when
matching time zone is displayed. Ex : LEEDS.
4. Press to move cursor to 2nd line and edit date. Numerical keypad is
automatically displayed.
5. Tap current day date then Tap current time. If you are in 12-hour format,
press AM/PM to toggle from AM (A) to PM (P) time.
6. Press to confirm.
Available Time zones
PAR LON RIO = Paris ; = London ; AZO = Azores Islands ; = Rio de Janeiro ;
CCS DEN = Caracas ; NYC = New York ; CHI = Chicago ; = Denver ;
LAX = Los Angeles ; ANC = Anchorage ; HNL = Honolulu ;
MID WLD NOU = Midway Islands ; TNG = Tonga ; = Wellington ; = Noumea ;
SYD ADL HKG = Sydney : = Adela de ; ïTYO = Tokyo ; = Hong Kong ;
GB 2

6. Tap in first number (on second line) then press key to Tap in second
number on third line (max. 36 characters).
7. Press to save record.
5. New scheduler record
1. Press once to open mode. SCHEDULE
2. Tap the meeting description then press key to enter date. Numercial
keypad is displayed.
3. Tap meeting s date and time. ’
4. Press to save record.
6. New ToDo record
1. Press twice to open mode.TO-DO
2. Tap task description then press key to set up priority level, between 1
(highest) to 9 (lowest).
3. Tap desired level number then press key to enter due date.
4. Tap due date and time. (pending) is shown before the due date.P
5. Press to save record.
Mark completed task
1. Display desired ToDo record then press EDIT.
2. Press to display PRIORITY.
3. Press to remove letter before due date.P
4. Press to save record.
7. New memo record
1. Press three times to open mode.MEMO
2. Tap in memo description on first line (max. 36 characters).
3. Press to go to second and third lines to enter numbers, if desired.
4. Press to save record.
GB 3
BKK RGN DAC = Bangkok ; = Yangon ; = Dhaka ; DEL = New Delhi ;
KHI DXB THR MOW = Karachi ; KBL = Kabul ; = Dubai ; = Tehran ; = Moscow;
CAI = Cairo.
3.2 World time
1. Press twice. symbol is no longer displayed on first line.
2. Use and keys to scroll through available time zones. Hours and Dates
will be automatically set up accordingly.
3.3 Alarm setting
Your unit offers three alarm modes :
- Daily alarm : (((•)))
- Hourly chime : ((( )))
- Scheduler alarm (event reminder) : ((( / )))
1. Press three times. Alarm is displayed.
2. To change alarm time, press EDIT.
3. Tap desired time.
4. Press key several time to enable desired alarm modes: hourly chime,
alarm clock or event reminder. When an alarm mode is enabled the
corresponding LCD icon is shown on the display. You can enable one,
two or all three alarm modes.
5. Press to confirm.
4. New contact record
There are two contact directories, PERSONAL and BUSINESS.
1. Press once to open directory. Press twice to open PERSONAL
BUSINESS directory.
2. Once directory is opened, tap directly the contact name and then press to
go to data field. ADDRESS
3. Tap contact address (max. 36 characters) then press key to go to E-MAIL
data field.
4. Tap contact e-mail address then press key to go to data field.URL
5. Tap contact URL then press to move to data field. Numercial TEL./FAX
keypad is displayed.


15. Currency conversion
Set up currency conversion
1. Press twice. First currency conversion is displayed : EURO USD.
There are 5 currency conversions.
2. Use or keys to scroll through currency conversion list and select
desired one.
3. Press (alphabetical keypad). EDIT
4. Cursor is flashing on first character of source currency. Change source
currency name if needed (max. 4 characters) then press to go and change
target currency name if needed. Press to confirm.
5. If you don t need to change currency names, press straight after ’
pressing EDIT.
6. Zero is flashing on third line. Tap currency rate (e.g.: for EURO USD,
Tap if 1 Euro = 1.089 US$). 1.089
7. Press to confirm.
Press at anytime to cancel setting. CE
Perform a conversion
1. Select desired currency conversion. E.g.: EURO USD
2. Tap amount to convert.
If it is a Euro amount, press to view US$ result.
If it is a US$ amount, press to view Euro result.
16. Euro Conversion (fixed rates)
Fixed Euro rates are not editable.
Perform a conversion
1. Press three times. First Euro conversion is displayed with EURO ATS
its Euro rate . There are 11 Euro conversions. 13.7603
2. Use or arrows to select desired Euro conversion. Ex : EURO FRF
3. Tap amount to convert.
If it is a Euro amount, press to view FRF result.
If it is a FRF amount, press to view Euro result.
13. Secret mode
You can set up a password to protect your Contact, Scheduler, ToDo and Memo
records. Password cannot exceed 6 characters.
WARNNG ! If you forget your password you will not be able to view your data
or enter new records and you will be forced to reset the unit. Resetting the unit
will lose all your data !
Set up a password
1. Press once to display home time ( symbol is displayed on first line).
2. Press to display numerical keypad and there press . PASSWORD ?
is displayed.
3. Tap your password (maximum 6 characters) and press .
Press to display alphabetical keypad if you wish to Tap letters.
4. Display shows RECONFIRM !.
5. Tap again your password and press to confirm. Secret mode is now
enabled and secret icon is on screen.
Edit password
1. Press once to display home time ( symbol is displayed on first line).
2. Press (numerical keypad). is displayed. PASSWORD ?
3. Tap your current password and press . Display shows EDIT ?.
4. Press . Display shows current password and cursor is flashing on first
character.
5. Insert character by pressing or delete character by pressing INS DEL
(max. 6 characters). Press to confirm.
6. Display shows . Tap again new password and press .RECONFIRM !
Open modes when password is enabled
First time you press or keys to view or enter data, display will show
PASSWORD?. Tap your password and press to confirm.
14. Calculator
Press to enter Calculator mode.
GB 5


pack. The SyncMan installation menu will start automatically. Follow the
screen prompts to install the software.
1. Connect the cable, included with your unit, to a free PC Com Port then insert
cable jack into the unit s socket (on top left side).. ’
2. Start SyncMan
®
software on your PC and check whether synchronisation
mode is set up for TM230 Series Personal Assistants by clicking on Tools,
Options then Your Device tab.
3. Set up PC Com Port in SyncMan
®
by clicking on then Tools Options,
Synchronisation tab automatic connection. Make sure also that is
ticked off.
Perform synchronisation
1. Once SyncMan
®
has been started and your unit connected to your PC,
press once to display home ( symbol on first line).
2. Press to start Synchronisation. Alternatively you can press then MENU
select option and press . PC SYNCH.
3. Display shows During synchronisation. LINKING …
If you have set up a password, you will be required to enter it at this time to
perform synchronisation.
21. Lexibook SYNCMAN
®
software
SyncMan
®
UPGRADE downloading
1. Go to https://my.lexibook.com web site and register as new member.
2. You will get by return an activation e-mail to make your account active. Click
on the activation link included in this e-mail.
3. Then go back to https://my.lexibook.com and enter your user name and
password, this will take you to your account home page, you will find a link
to download Lexibook SyncMan
®
upgrade software free.
Required PC configuration
Your PC must have following configuration to run Lexibook SyncMan
®
software properly :
• Windows
®
95, 98, Millennium, 2000 & XP or Windows NT
®
4.0 .
• Microsoft
®
Internet Explorer version 5.0 or above.
• 32MB RAM (for Internet Explorer).
17. Unit conversion
Perform a conversion
1. Press four times. First unit conversion is displayed with its inch cm
conversion rate . There are 8 pre-stored unit conversions.2.54
2. Press or arrows to select desired conversion. Ex : mile km
3. Tap amount to convert.
If it is a mile amount, press to view km result.
If it is a km amount, press to view mile result.
Available unit conversions:
inch cm yard m (inches and centimeters) ; (yards and meters) ;
mile km (miles and kilometers) ; C F (Celsius and Fahrenheit) ;
ft m oz g lb kg (feet and meters) ; (ounces and grams) ; (pounds
and kilograms) ; (US gallons and litres) ; (UK gal l US gal l UK
gallons and liters)
18. Reset
This operation will delete all your data and your password.
1. Insert a blunt pin, such as an opened paper clip, in RESET hole at the rear of
the unit and press gently Display shows RESET?
2. Press to confirm or any other key to escape.
19. Memory check
1. Press once to view home time ( symbol on first line).
2. Press to display numerical keypad and there press MENU. LANGUAGE ?
option is displayed.
3. Use or arrows to select and press to confirm.MEMORY CHECK
4. Display shows how many free bytes are left then returns to home time.
20. PC Synchronisation
Before synchronising
Prior to performing your first synchronisation, make sure that Lexibook
®
SyncMan
®
software is installed on your PC. Insert the CD included in your
GB 6

• 10MB free space on your hard drive.
• SVGA colour screen
• One free Com Port.
22. GAMES
777
1. Press once. Display shows and on first line. $10 is minimum 777 $10
wager. On second line there is default total money, 490.
2. Set desired wager by pressing either or and press to start game.
3. If you get a result you win fivefold the wager. If you get a result 777
you win threefold the wager. If you get a result you win twofold the
wager.
4. Il you get any other result, you lost your wager.
5. Maximum money amount you can win is 9990. If you reach 0, game is over.
Lottery
1. Press twice. A first series of six lottery numbers (from 1 to 49), picked up
at random, is displayed.
2. To view another series of six numbers, press .
3. To view other series, keep pressing .
24. CARE AND SAFETY
1. Avoid extremes in temperature, exposure to direct sunlight, water, humidity
and dust.
2. Don't drop the Organiser as this may damage it.
3. Do not use detergent, liquid cleaners or solvents to clean unit. Wipe unit with
clean, soft dry cloth.
4. Keep unit away from strong magnetic fields (e.g. loudspeakers), and any
source static electricity.
5. Don't attempt to dismantle unit. There are no user serviceable parts inside
and any attempt to do so will render the warranty void.
6. We strongly recommend that your keep a written record of all important data.
In almost any electronic memory system, data can be lost under certain
circumstances. We therefore accept no liability for loss of data whether this is
caused by incorrect use, repairs, error, changing batteries, using batteries
GB 7
after they have expired or other circumstances. Keep regular backup s of ’
your PC Data.
7. We do not accept any direct or indirect liability for financial losses or claims
from third parties, which result from using this product and all its functions,
such as stolen credit card numbers, loss or modification of data.
DO NOT dispose of old batteries by throwing into a fire.They may
explode and cause serious injury. ALWAYS dispose of batteries
carefully.
DO NOT leave batteries in unit for extended periods of non use as
they may leak and cause irrevocable damage to your unit. This will
invalidate your warranty.
Note:
a) Non-rechargeable batteries are not to be recharged.
b) Different types of batteries or new and used batteries are not to be mixed.
c) Only batteries to the same or equivalent type as recommended are to be used.
d) Batteries are to be inserted with the correct polarity.
e) Exhausted batteries are to be removed from the product.
f) The supply terminals are not to be short-circuited.
If in doubt consult your local stockist or ring the help line for further information.
Warning: If this product receives an electrostatic shock it may cease to function.
To re-start the unit open the battery door (if applicable to this device) and replace
it to do a reset, or alternatively remove batteries and put them back in.
24. WARRANTY
This product is covered by our comprehensive 2-year warranty. In the case of
any fault please return the unit to your original place of purchase for replacement
or repair. A copy of your sales receipt must be included as proof of purchase.
This warranty does not cover faults occurring through misuse, damage or abuse.
This does not affect your statutory rights.


GB 8
If you wish to register your product for our extended 3-year warranty programme
please enclose a cheque for the total sum of £15.00 along with your full name
and address details. You will be registered and a warranty certificate will be
forwarded to you.*
Return/Warranty extension address: Lexibook UK Limited
PO Box 66
Bordon
Hampshire GU35 0ZN
England
For assistance, please contact our Freephone Help Line 0808 100 3015.
Web site : www.lexibook.co.uk
* Damage to LCD display not included.
25. TECHNICAL SPECIFICATIONS
Battery : 1 x CR2032
Dimensions : 105,5 x 76,3 x 11,5 mm
Weight : 70g
Warranty : 1 year
Memory size : TM231 = 32KB
TM232 = 64 KB
TM233 = 128 KB
Specifications are subject to change without notice.
Appendix 1 Symbol table list–
Appendix 2 Accented letters–
A : A ➔Á➔À➔Ä➔ ➔Â➔Ã➔Å
a : a ➔á➔à➔ä➔ ➔â➔ã➔å➔
E : E ➔É➔È➔Ë➔ ➔Ê
e : e ➔é➔è➔ë➔ ➔ê
O o or : O ➔ ➔Ó➔Ò➔Ö➔Ô➔ ➔Õ➔
I i or : ➔Í➔Ì➔Ï➔Î
U u or : ➔Ú➔Ù➔Ü➔Û
R r or : R➔
Z z or : Z Z➔ ➔
Y y or : Y➔
S s or : S S➔ ➔
D d or : D➔
N n or : N N ➔➔➔Ñ
G g or : Ç
C c or : C C➔ ➔
GB 9
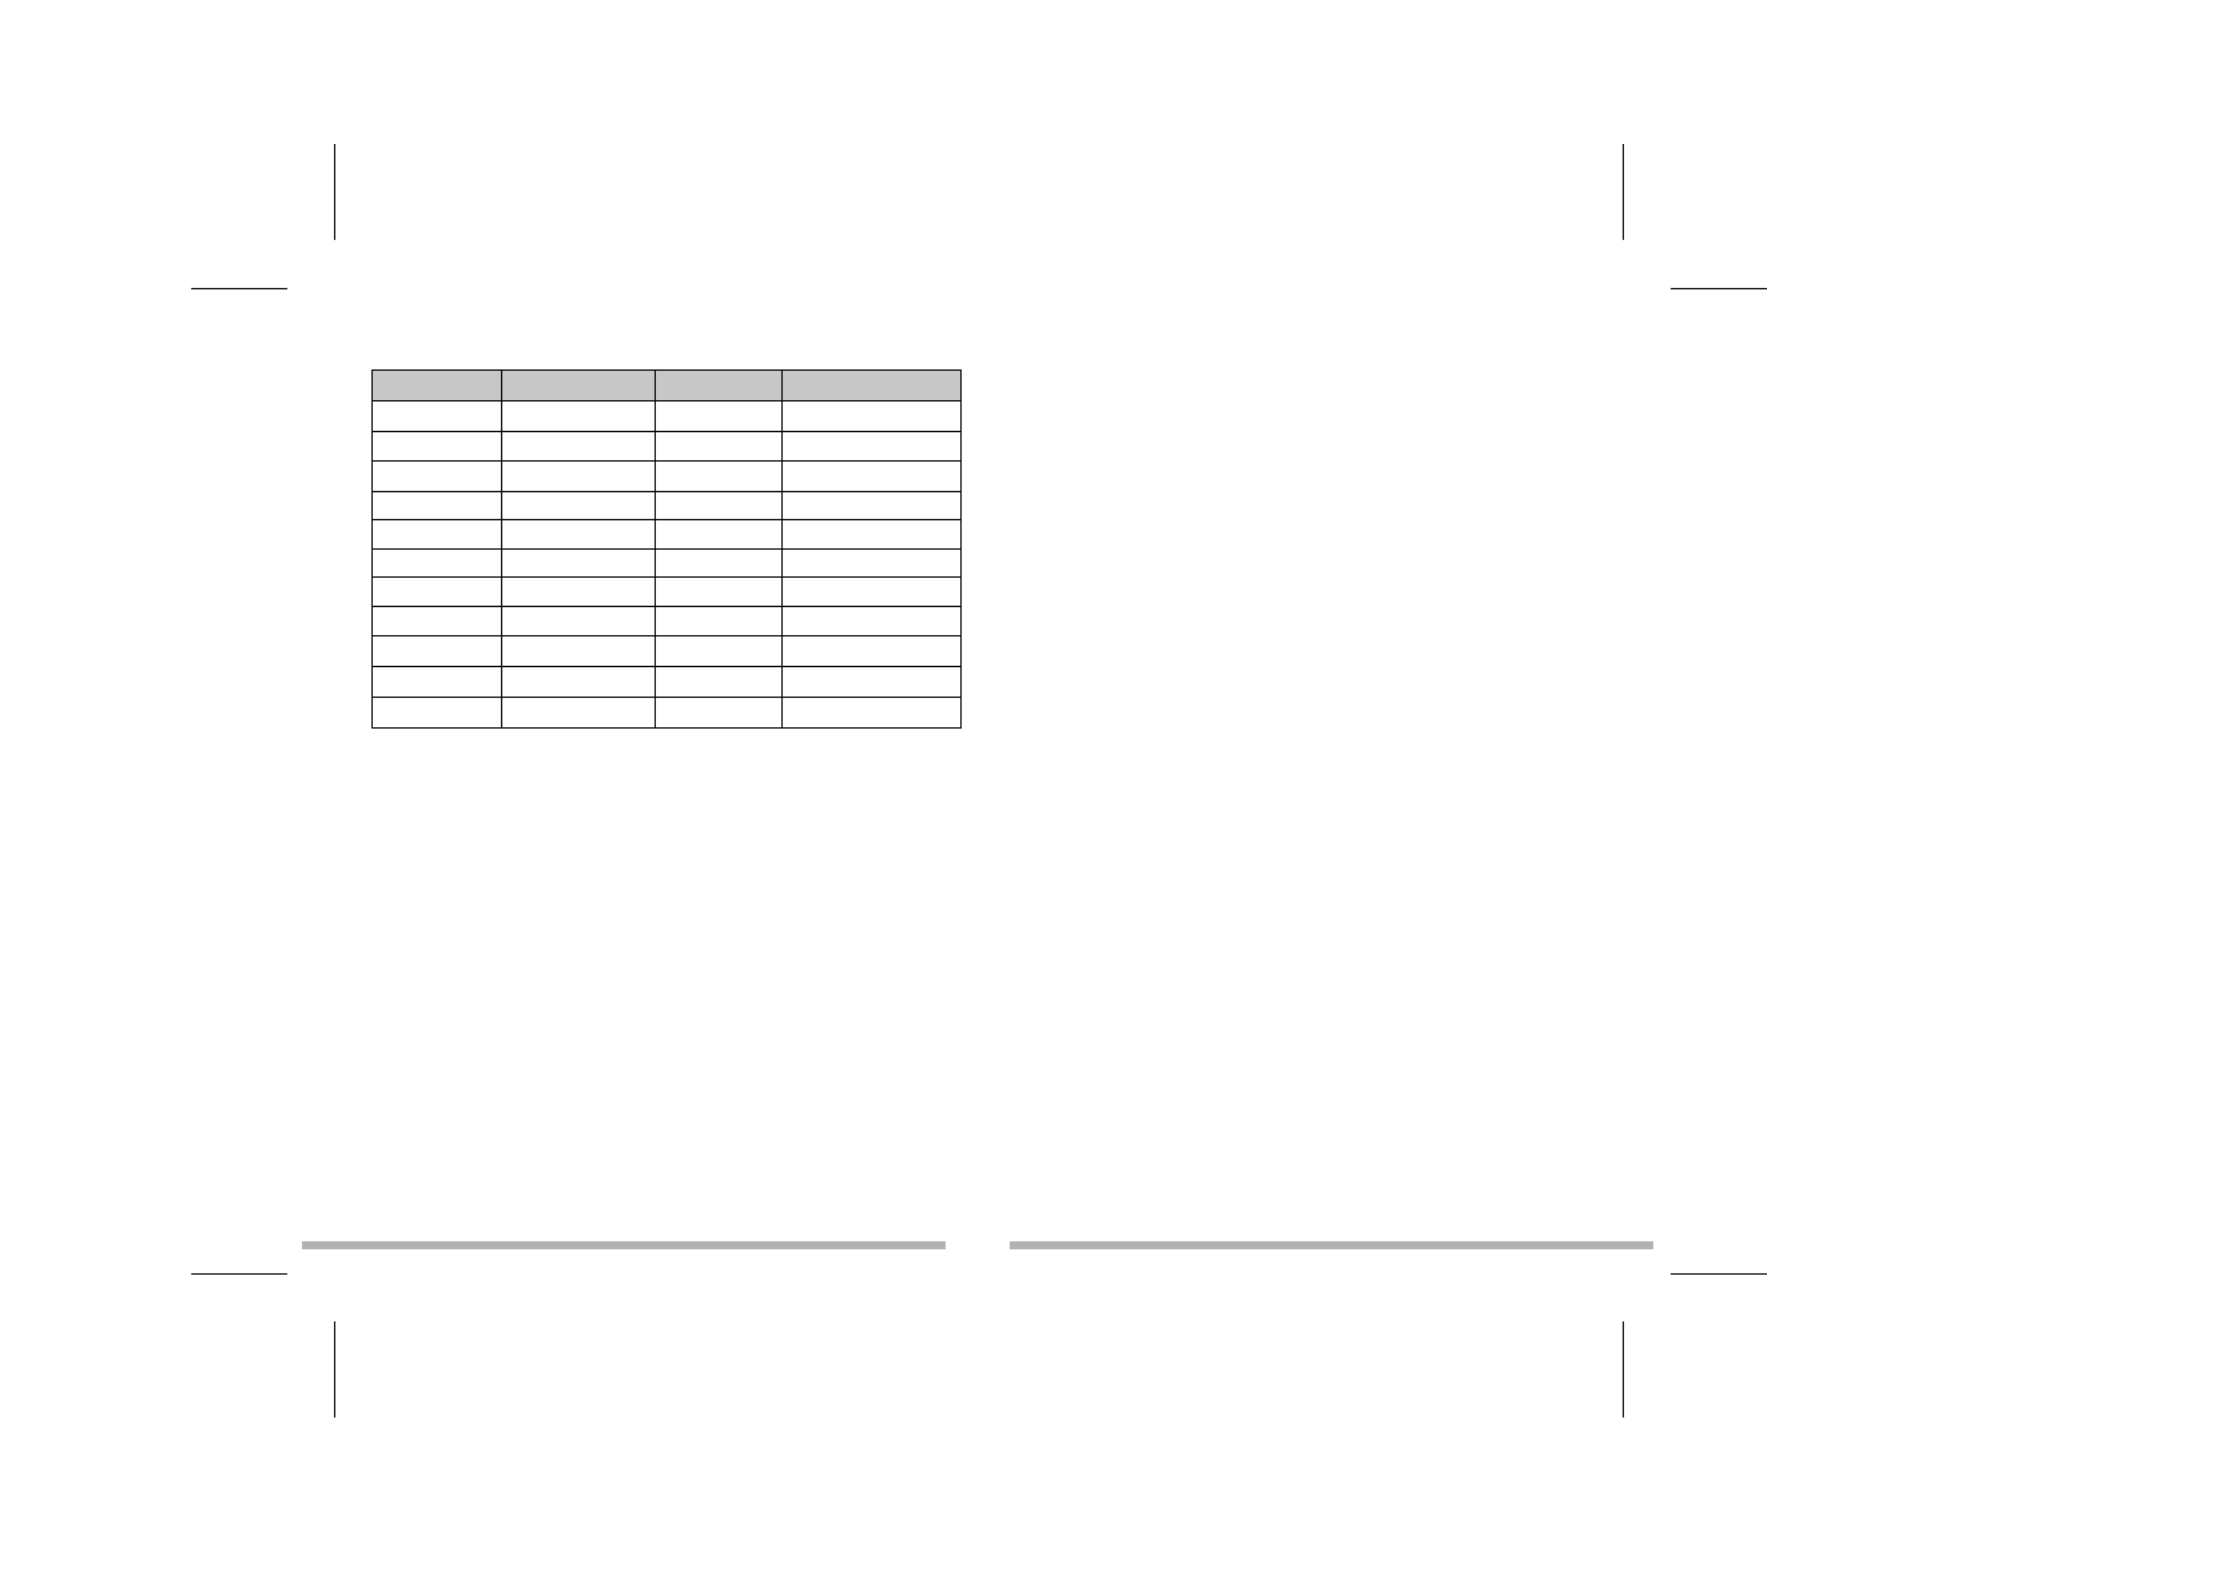
Appendix 3 Euro fixed rates–
Country Code Currency Name Country Euro Rate
FRF French franc France 1 Euro = 6.55957 FRF
DEM German mark Germany 1 Euro = 1.95583 DEM
IEP Irish punt Ireland (Eire) 1 Euro = 0.787564 IEP
ESP Peseta Spain 1 Euro = 166.386 ESP
ITL Lire Italy 1 Euro = 1936.27 ITL
ATS Shilling Austria 1 Euro = 13.7603 ATS
BEF Belgium franc Belgium 1 Euro = 40.3399 BEF
FIM Finland mark Finland 1 Euro = 5.94573 FIM
LUF Luxembourg franc Luxembourg 1 Euro = 40.3399 LUF
NLG Florin Pays-Bas 1 Euro = 2.20371 NLG
PTE Escudos Portugal 1 Euro = 200.482 PTE

Produktspezifikationen
| Marke: | Lexibook |
| Kategorie: | Smartphone |
| Modell: | Touchman TM233 |
Brauchst du Hilfe?
Wenn Sie Hilfe mit Lexibook Touchman TM233 benötigen, stellen Sie unten eine Frage und andere Benutzer werden Ihnen antworten
Bedienungsanleitung Smartphone Lexibook

20 August 2024
19 August 2024
18 August 2024
18 August 2024
20 Februar 2024
5 Juni 2023
21 Mai 2023
Bedienungsanleitung Smartphone
- Smartphone Samsung
- Smartphone Infiniton
- Smartphone Acer
- Smartphone Apple
- Smartphone Asus
- Smartphone Sanyo
- Smartphone BenQ
- Smartphone Gigabyte
- Smartphone HP
- Smartphone Manta
- Smartphone Medion
- Smartphone Microsoft
- Smartphone Nedis
- Smartphone NGS
- Smartphone Philips
- Smartphone SilverCrest
- Smartphone Sony
- Smartphone Panasonic
- Smartphone LG
- Smartphone AEG
- Smartphone Siemens
- Smartphone OK
- Smartphone CSL
- Smartphone Alecto
- Smartphone Denver
- Smartphone Bush
- Smartphone Telefunken
- Smartphone Thomson
- Smartphone Trevi
- Smartphone Blaupunkt
- Smartphone Sharp
- Smartphone Mitsubishi
- Smartphone Haier
- Smartphone Hisense
- Smartphone Nordmende
- Smartphone Vestel
- Smartphone Aiwa
- Smartphone ARCHOS
- Smartphone Mpman
- Smartphone Geemarc
- Smartphone Polaroid
- Smartphone TrekStor
- Smartphone Krüger And Matz
- Smartphone Motorola
- Smartphone Nokia
- Smartphone Umidigi
- Smartphone Xiaomi
- Smartphone Olympia
- Smartphone Switel
- Smartphone Fero
- Smartphone Hannspree
- Smartphone Hyundai
- Smartphone ITT
- Smartphone Gigaset
- Smartphone TCL
- Smartphone Tesla
- Smartphone Toshiba
- Smartphone Allview
- Smartphone Cubot
- Smartphone GOCLEVER
- Smartphone Mio
- Smartphone Fysic
- Smartphone Sencor
- Smartphone Sony Ericsson
- Smartphone Estar
- Smartphone Dell
- Smartphone Lenovo
- Smartphone Razer
- Smartphone Honeywell
- Smartphone Lava
- Smartphone Sagem
- Smartphone TELME
- Smartphone Intermec
- Smartphone TP-Link
- Smartphone Honor
- Smartphone Midland
- Smartphone Alcatel
- Smartphone Amplicomms
- Smartphone Audioline
- Smartphone Binatone
- Smartphone Brondi
- Smartphone Doro
- Smartphone Emporia
- Smartphone Profoon
- Smartphone Swissvoice
- Smartphone Tiptel
- Smartphone Kodak
- Smartphone Hammer
- Smartphone Facom
- Smartphone Easypix
- Smartphone IGet
- Smartphone Wiko
- Smartphone XD
- Smartphone InFocus
- Smartphone NEC
- Smartphone Overmax
- Smartphone Huawei
- Smartphone Aplic
- Smartphone Alcatel-Lucent
- Smartphone Vivax
- Smartphone Intex
- Smartphone Albrecht
- Smartphone Kogan
- Smartphone Energy Sistem
- Smartphone Kurio
- Smartphone Plum
- Smartphone RugGear
- Smartphone Ulefone
- Smartphone NGM
- Smartphone T-Mobile
- Smartphone Kyocera
- Smartphone EVOLVEO
- Smartphone Amazon
- Smartphone Mustang
- Smartphone Vodafone
- Smartphone Yota
- Smartphone SPC
- Smartphone HTC
- Smartphone Billow
- Smartphone Prestigio
- Smartphone Aligator
- Smartphone AT Telecom
- Smartphone Auro
- Smartphone Avus
- Smartphone Beafon
- Smartphone BlackBerry
- Smartphone Bq
- Smartphone Crosscall
- Smartphone Cyrus
- Smartphone Echo
- Smartphone Fairphone
- Smartphone General Mobile
- Smartphone Kazam
- Smartphone Konrow
- Smartphone Mediacom
- Smartphone Meizu
- Smartphone Mobistel
- Smartphone MTT
- Smartphone Nubia
- Smartphone Phicomm
- Smartphone Sonim
- Smartphone Wileyfox
- Smartphone Yezz
- Smartphone ZTE
- Smartphone Swisstone
- Smartphone RCA
- Smartphone OnePlus
- Smartphone Pantech
- Smartphone Oppo
- Smartphone Vivo
- Smartphone CAT
- Smartphone Aspera
- Smartphone TAG Heuer
- Smartphone AT&T
- Smartphone Realme
- Smartphone Infinix
- Smartphone Google
- Smartphone Alba
- Smartphone Danew
- Smartphone Doogee
- Smartphone Ecom
- Smartphone Energizer
- Smartphone Garmin-Asus
- Smartphone Gionee
- Smartphone GreatCall
- Smartphone Handheld
- Smartphone HomTom
- Smartphone Itel
- Smartphone Klipad
- Smartphone KPN
- Smartphone Leagoo
- Smartphone Leotec
- Smartphone Logicom
- Smartphone Lumigon
- Smartphone Maxcom
- Smartphone Maxx
- Smartphone Media-tech
- Smartphone Micromax
- Smartphone Neffos
- Smartphone NTech
- Smartphone NUU Mobile
- Smartphone O2
- Smartphone Oukitel
- Smartphone PENTAGRAM
- Smartphone Senifone
- Smartphone Spice
- Smartphone STK
- Smartphone Storex
- Smartphone Sunny
- Smartphone Sunstech
- Smartphone Tecdesk
- Smartphone Telstra
- Smartphone UMi
- Smartphone UTStarcom
- Smartphone Wolder
- Smartphone Wolfgang
- Smartphone Xtreamer
- Smartphone Zipy
- Smartphone Best Buy
- Smartphone Benefon
- Smartphone Primux
- Smartphone Keneksi
- Smartphone M3 Mobile
- Smartphone Coolpad
- Smartphone TIM
- Smartphone MyPhone
- Smartphone Freeman
- Smartphone Nevir
- Smartphone BLU
- Smartphone CRUX
- Smartphone Amplicom
- Smartphone NGM-Mobile
- Smartphone JCB
- Smartphone THL
- Smartphone Brigmton
- Smartphone Lark
- Smartphone Posh Mobile
- Smartphone ToughGear
- Smartphone ORA
- Smartphone GSmart
- Smartphone Tremay
- Smartphone Bea-fon
- Smartphone ITTM
- Smartphone Pharos
- Smartphone Karbonn
- Smartphone Tecno
- Smartphone Piranha
- Smartphone Growing
- Smartphone Majestic
- Smartphone Unnecto
- Smartphone Verykool
- Smartphone Bluebird
- Smartphone Nothing
- Smartphone Saiet
- Smartphone Syco
- Smartphone AQISTON
- Smartphone Androidtech
- Smartphone Casper
- Smartphone BGH
- Smartphone Olitech
- Smartphone Mobiola
- Smartphone LeEco
- Smartphone Jitterbug
- Smartphone Custom
- Smartphone POCO
- Smartphone HMD
- Smartphone Opis
Neueste Bedienungsanleitung für -Kategorien-

15 Oktober 2024
14 Oktober 2024

12 Oktober 2024
10 Oktober 2024

9 Oktober 2024

9 Oktober 2024

9 Oktober 2024
8 Oktober 2024
8 Oktober 2024

7 Oktober 2024