KJB Security Products PV-500NP Bedienungsanleitung
KJB Security Products
Überwachungskamera
PV-500NP
Lesen Sie kostenlos die 📖 deutsche Bedienungsanleitung für KJB Security Products PV-500NP (1 Seiten) in der Kategorie Überwachungskamera. Dieser Bedienungsanleitung war für 16 Personen hilfreich und wurde von 2 Benutzern mit durchschnittlich 4.5 Sternen bewertet
Seite 1/1
1 3 2 4
6 7 5
LawMate, innovation never stops
®
V1.0
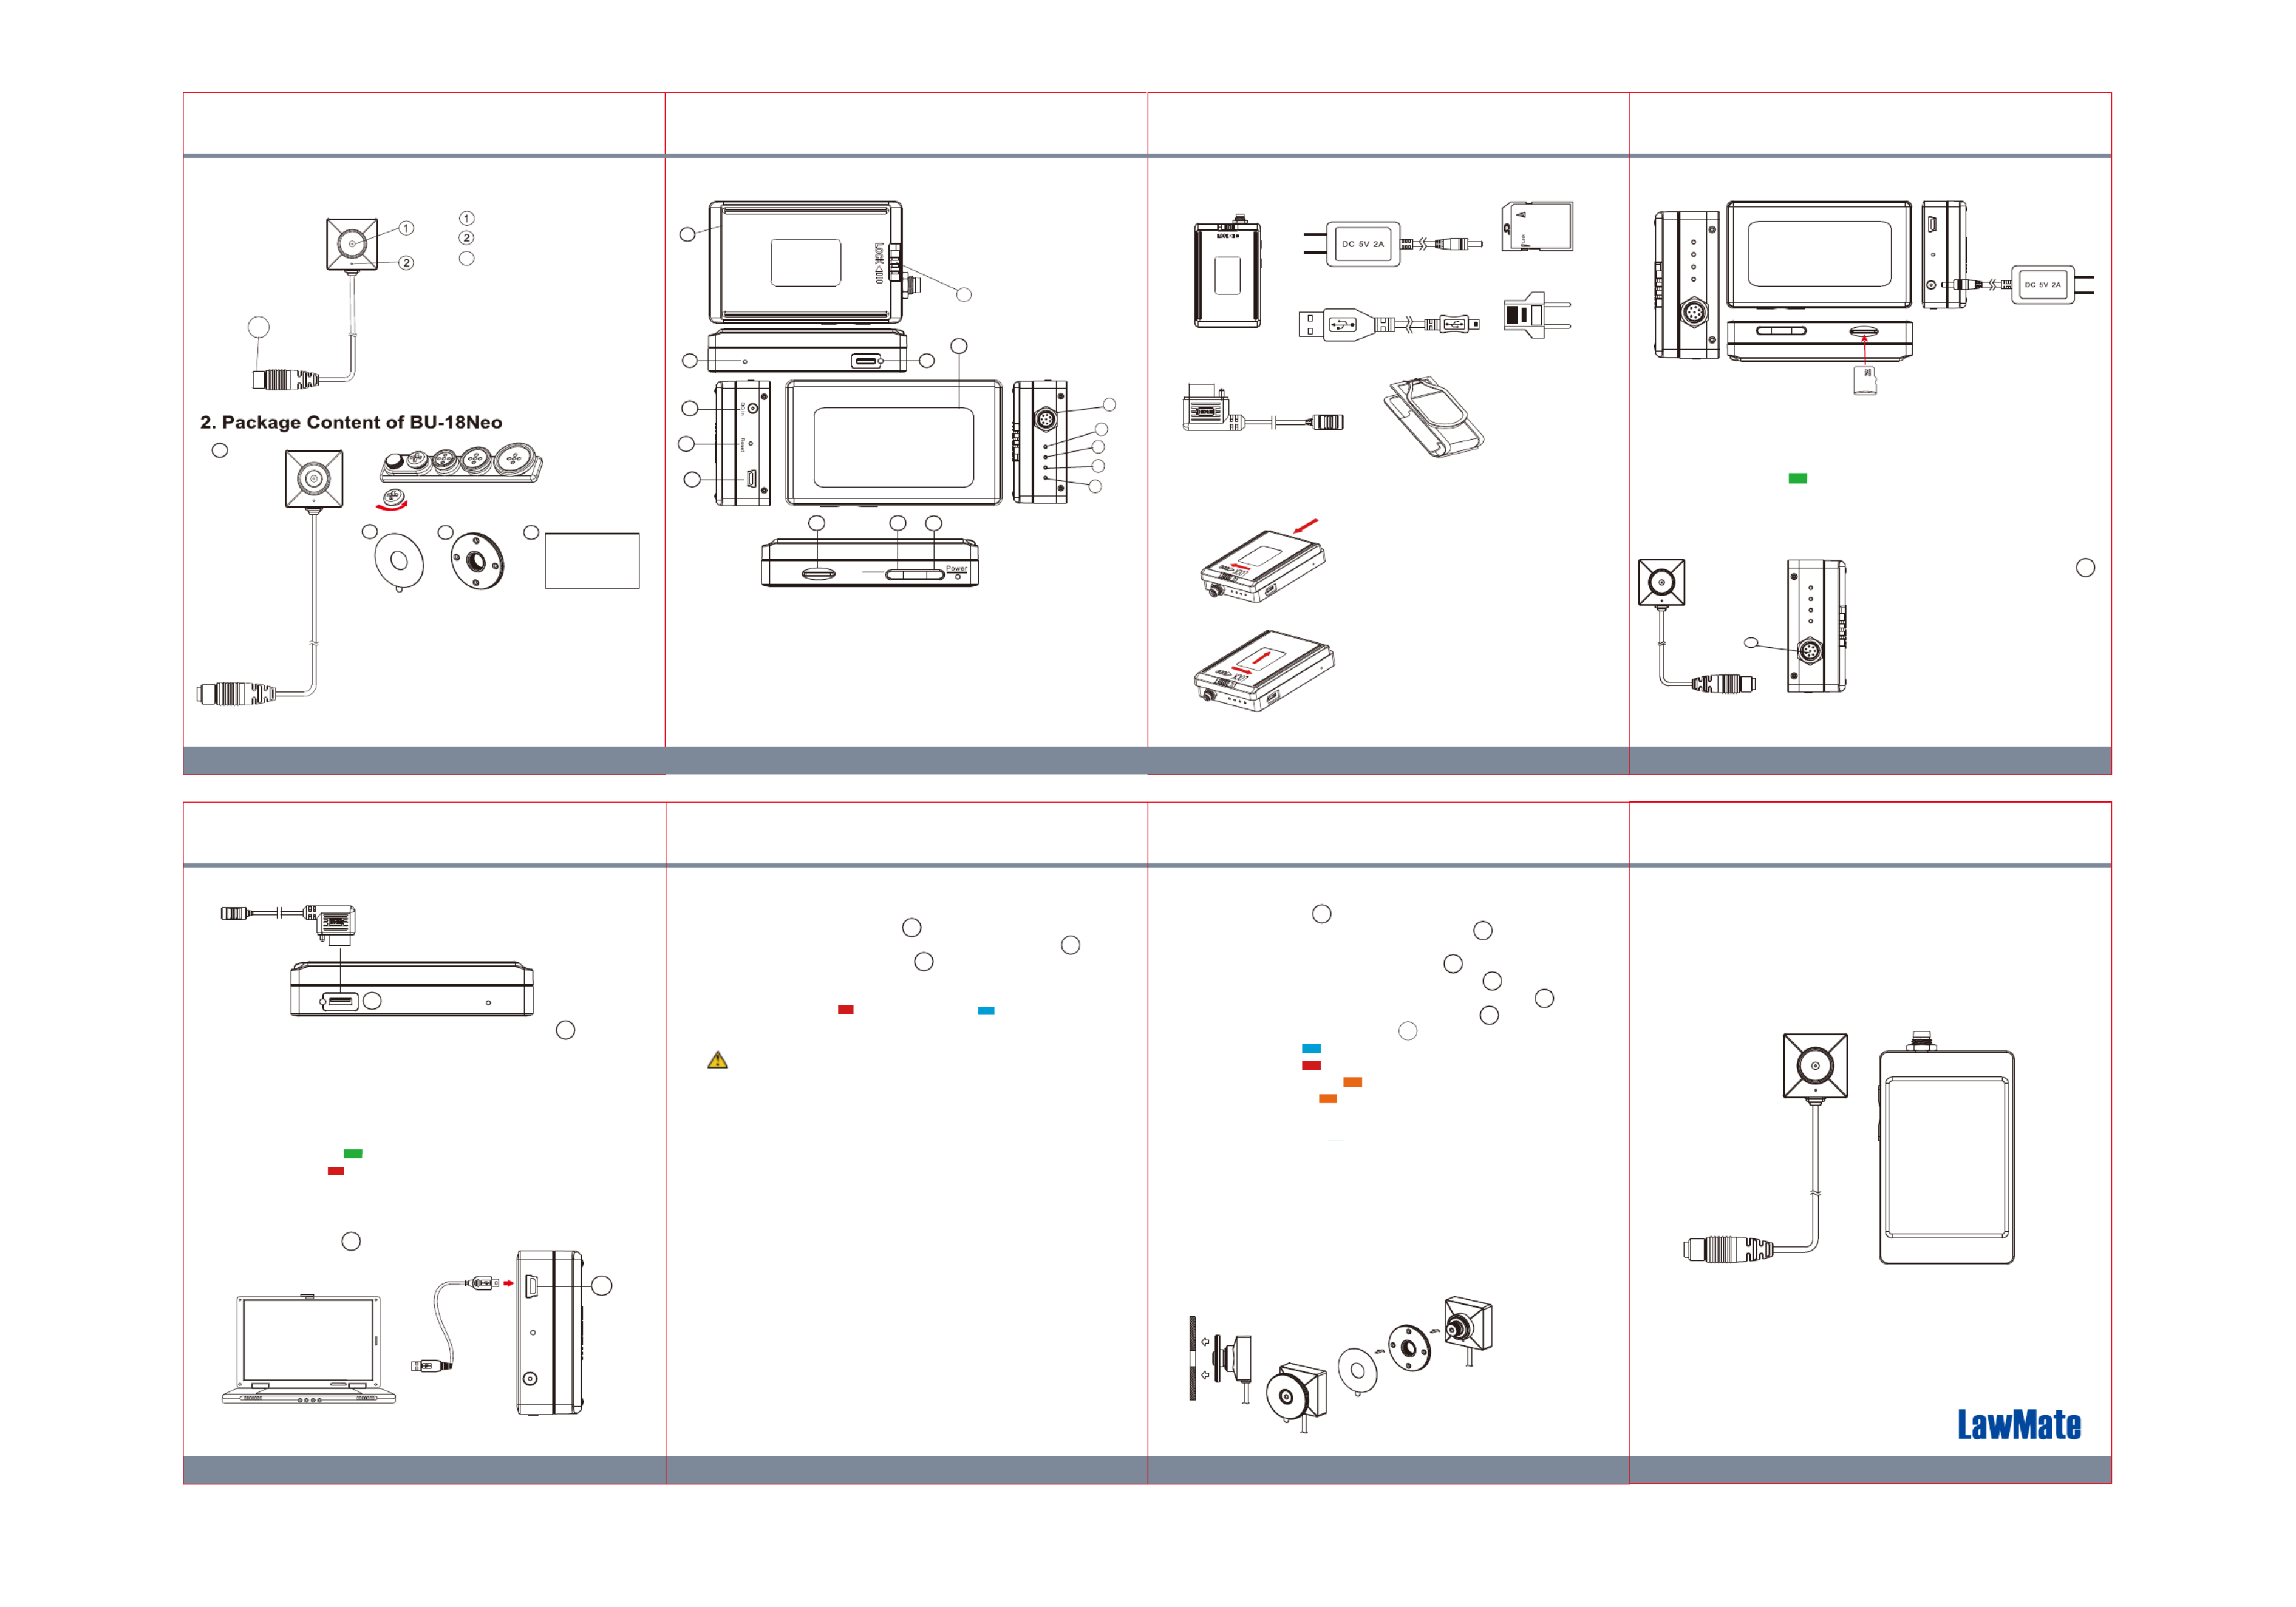
PV-500NP Bundle
BU-18Neo + PV-500Neo Pro Package
1. BU-18Neo Names and Parts
a. BU-18Neo 2MP Camera
b. Button & Screw Kit
c. 3M Double Coated Tape
d. DIY Lens Cover Button
e. User’s Manual
3. PV-500Neo Pro Names and Parts 4. Package Content of PV-500Neo Pro
5. Install and Remove Battery
To ve remo the ba ery gen ly unloctt , t k
by wi ching s t LOCK tcswi h to the right side
and push battery in red arrow pointed
direction.
To install the battery, attach the battery to
the DVR, gently push the battery in red
arrow pointed direction. tLa ly don’st , t forge
to slide LOCK swith o t the o s left t en ure it is
locked properly.
4GB
6. Battery Charging
1. Connect the charger plug to the DC In Jack .
2. Plug the power cord of the charger to an AC wall outlet.
The charging starts automatically. The device can record
while charging.
● Solid green LED - the device is charging.
● Green LED goes off - the deviced is fully charged.
7. Connecting camera to DVR
8
To connect the camera, plug the
camera’s connector end into ,
insert fully in to the socket and
screw firmly in to place
※ Only to connect the camera
to DVR when system is turned off.
※ Both camera and memory card
need to be inserted to DVR
to turn the system on.
Battery Pack
DC 5V 2A Charger
Memory Card
USB Cable
Controller Cable
European Adapter
Head
Pouch
1.
1. From the desktop right-click to open Notepad, create a text
file named settime.txt
2. On the first line of the file, enter date and time information as
year.month.day hours.minutes.seconds
For example, suppose the time is October 16, 2015 15:00.
2015.10.16 15:00:00Then enter
※
There should be a space left between day and hours,
and the time format should be of 24-hour clock.
3. Save the file to the root directory of the memory card.
4.
Insert the memory card into the slot, and power on the device.
The date and time setting is now completed.
※
W te hen the da and time ing is omple ed sett c t . T he setti . tme tx
file should not be visible when you connect the device to
the computer again.
11. Date and time setting (for Windows system)
Knowing that all video files are stored in the memory card,
you can process the following steps to download videos.
1. Use a memory card reader to transfer files from the card to
the computer.
2. Or, connect the device to the computer with memory card
inserted. Turn on the device and it will work as a flash drive.
13. Download videos and photos from DVR
10. Format the memory card
3
9. Connect the DVR to the computer
14
14. Put on DIY lens cover button
Stick the tape on the button and screw it on the camera.
8. Connect the wired controller to the DVR
User's Manual
a
cde
8
12
2.
● Solid green LED on Controller - the controller is connected.
● Solid red LED on Controller - the device is recording.
1. Plug in the Controller Cable into the Control port .
2. Turn on the Controller, the device starts recording instantly.
When turned off, the recording stops and device powered off.
3. To turn on the device, slide the controller toggle downward
and hold for 3 seconds.
4. To turn off the device, slide the controller toggle downward
again and hold for 3 seconds.
3
With the DVR powered off, plug the USB Cable
into the USB port on DVR and the
other end to the computer.
14
1. The camera must be connectd to the DVR first.
2.
Insert the memory card into as the icon shown on the device.
3. With device powered off, press and hold Rec button .
4. And then press Power button for 3 seconds until you
see the blinking red LED.
5. Lastly, release both buttons at the same time.
● Blinking Red LED + Solid Blue LED - the memory
card is being formatted.
● All lights go off - the formatting is completed.
10
11
9
Cau iont : To se make the memor cardy recognizable plea, be
sure orma he memor ard be ore t fo t t y c f us i . ing t for t fhe irst time
P se te t c , lea no that formatting on compu er is no ret ommended
f i s t o c ze or t t migh re ul int t f f the ailure or he compu er t re ogni
t .he card
12. Operation
1. Power on: Press for 3 seconds.
2. Recording: With device powered on, press to start or
stop recording.
3. Wi-Fi: With device powered on, press to turn on/off Wi-Fi.
4. Power off: With no ongoing recording, press for 3 seconds.
5. Reset: When the device functions abnormally, press .
6. Restore default Wi-Fi password: long press for 4 seconds.
7. Restore default setting : press for 10 seconds.
● Solid blue LED - power on
● Solid red LED - recording on
● Blinking orange LED - device searching for Wi-Fi connection
● Solid orange LED - device is connected to Wi-Fi
※
The device powers off itself when memory card is full.
9
10
9
9
15
13
15
2
1
1.Battery Pack
2.Battery Lock Switch
3.Controller Port
4. Charge - Green LED
5. Rec - Red LED
6. Wi-Fi - Orange LED
7. Power - Blue LED
8. Camera In Port
9. Power / Wi-Fi on &
off Button
10. Rec on/stop Button
11. Memory Card Slot
12. DC 5V in Jack
13. Reset Key
14. USB Port
15. Default Key
16. Touch Screen
16
Rec
Stop
9
1011
Camera Lens
Microphone
Locking Connector
3
3
315
12
13
14
8
7
6
5
4
Produktspezifikationen
| Marke: | KJB Security Products |
| Kategorie: | Überwachungskamera |
| Modell: | PV-500NP |
Brauchst du Hilfe?
Wenn Sie Hilfe mit KJB Security Products PV-500NP benötigen, stellen Sie unten eine Frage und andere Benutzer werden Ihnen antworten
Bedienungsanleitung Überwachungskamera KJB Security Products

5 September 2024
4 September 2024
26 August 2024
Bedienungsanleitung Überwachungskamera
- Überwachungskamera Samsung
- Überwachungskamera Approx
- Überwachungskamera Belkin
- Überwachungskamera Sanyo
- Überwachungskamera Exibel
- Überwachungskamera Gembird
- Überwachungskamera Genius
- Überwachungskamera Hama
- Überwachungskamera LogiLink
- Überwachungskamera Logitech
- Überwachungskamera Manhattan
- Überwachungskamera Nedis
- Überwachungskamera Niceboy
- Überwachungskamera Philips
- Überwachungskamera Sony
- Überwachungskamera Trust
- Überwachungskamera Panasonic
- Überwachungskamera Clas Ohlson
- Überwachungskamera Profile
- Überwachungskamera ZyXEL
- Überwachungskamera Bosch
- Überwachungskamera Laserliner
- Überwachungskamera Buffalo
- Überwachungskamera Canon
- Überwachungskamera Velleman
- Überwachungskamera Powerfix
- Überwachungskamera Eminent
- Überwachungskamera Linksys
- Überwachungskamera Maginon
- Überwachungskamera Netgear
- Überwachungskamera Technaxx
- Überwachungskamera Alecto
- Überwachungskamera Denver
- Überwachungskamera EMOS
- Überwachungskamera Gira
- Überwachungskamera König
- Überwachungskamera MarQuant
- Überwachungskamera Renkforce
- Überwachungskamera Thomson
- Überwachungskamera Trevi
- Überwachungskamera Blaupunkt
- Überwachungskamera Schneider
- Überwachungskamera Trebs
- Überwachungskamera Pyle
- Überwachungskamera Topcom
- Überwachungskamera Pioneer
- Überwachungskamera JVC
- Überwachungskamera Motorola
- Überwachungskamera Xiaomi
- Überwachungskamera Abus
- Überwachungskamera Avidsen
- Überwachungskamera Elro
- Überwachungskamera EZVIZ
- Überwachungskamera Imou
- Überwachungskamera INSTAR
- Überwachungskamera Megasat
- Überwachungskamera Olympia
- Überwachungskamera Smartwares
- Überwachungskamera Switel
- Überwachungskamera Yale
- Überwachungskamera Ferguson
- Überwachungskamera Orion
- Überwachungskamera Gigaset
- Überwachungskamera Strong
- Überwachungskamera Toshiba
- Überwachungskamera Garmin
- Überwachungskamera Perel
- Überwachungskamera Netis
- Überwachungskamera Lindy
- Überwachungskamera Fenton
- Überwachungskamera Waeco
- Überwachungskamera Acme
- Überwachungskamera Burg Wächter
- Überwachungskamera Marmitek
- Überwachungskamera Marshall
- Überwachungskamera Honeywell
- Überwachungskamera B/R/K
- Überwachungskamera Marshall Electronics
- Überwachungskamera TRENDnet
- Überwachungskamera Targa
- Überwachungskamera First Alert
- Überwachungskamera AVerMedia
- Überwachungskamera Zebra
- Überwachungskamera TP-Link
- Überwachungskamera Flamingo
- Überwachungskamera Kodak
- Überwachungskamera Rollei
- Überwachungskamera IGet
- Überwachungskamera Adj
- Überwachungskamera Netatmo
- Überwachungskamera Duramaxx
- Überwachungskamera Ebode
- Überwachungskamera Xavax
- Überwachungskamera InFocus
- Überwachungskamera Overmax
- Überwachungskamera Monoprice
- Überwachungskamera Monacor
- Überwachungskamera JUNG
- Überwachungskamera Ednet
- Überwachungskamera AG Neovo
- Überwachungskamera Nest
- Überwachungskamera Edimax
- Überwachungskamera V-TAC
- Überwachungskamera Aritech
- Überwachungskamera Uniden
- Überwachungskamera Kogan
- Überwachungskamera Genie
- Überwachungskamera M-e
- Überwachungskamera Elmo
- Überwachungskamera Lumens
- Überwachungskamera Jablocom
- Überwachungskamera Conceptronic
- Überwachungskamera D-Link
- Überwachungskamera Eufy
- Überwachungskamera Stabo
- Überwachungskamera Friedland
- Überwachungskamera EVOLVEO
- Überwachungskamera SPC
- Überwachungskamera August
- Überwachungskamera Ring
- Überwachungskamera Digitus
- Überwachungskamera SereneLife
- Überwachungskamera Swann
- Überwachungskamera Vitek
- Überwachungskamera DataVideo
- Überwachungskamera LevelOne
- Überwachungskamera Aida
- Überwachungskamera APC
- Überwachungskamera Beafon
- Überwachungskamera Chuango
- Überwachungskamera Cisco
- Überwachungskamera Grandstream
- Überwachungskamera Delta Dore
- Überwachungskamera EVE
- Überwachungskamera Defender
- Überwachungskamera Tenda
- Überwachungskamera Swisstone
- Überwachungskamera Foscam
- Überwachungskamera Ubiquiti Networks
- Überwachungskamera Kramer
- Überwachungskamera Vaddio
- Überwachungskamera Intellinet
- Überwachungskamera Reolink
- Überwachungskamera Swan
- Überwachungskamera Hikvision
- Überwachungskamera FLIR
- Überwachungskamera Furrion
- Überwachungskamera Arlo
- Überwachungskamera Nexxt
- Überwachungskamera Planet
- Überwachungskamera EnGenius
- Überwachungskamera Dörr
- Überwachungskamera Lorex
- Überwachungskamera Ikan
- Überwachungskamera Comtrend
- Überwachungskamera Somfy
- Überwachungskamera Dahua
- Überwachungskamera Dedicated Micros
- Überwachungskamera DIO
- Überwachungskamera EasyN
- Überwachungskamera Escam
- Überwachungskamera EverFocus
- Überwachungskamera Ganz
- Überwachungskamera GeoVision
- Überwachungskamera Hombli
- Überwachungskamera Home Protector
- Überwachungskamera Iiquu
- Überwachungskamera Indexa
- Überwachungskamera Interlogix
- Überwachungskamera KlikaanKlikuit
- Überwachungskamera Kompernass
- Überwachungskamera Mr Safe
- Überwachungskamera Naxa
- Überwachungskamera Nordval
- Überwachungskamera Notifier
- Überwachungskamera Oplink
- Überwachungskamera Provision ISR
- Überwachungskamera Quantum
- Überwachungskamera Raymarine
- Überwachungskamera Revo
- Überwachungskamera SAB
- Überwachungskamera Satel
- Überwachungskamera SecurityMan
- Überwachungskamera Sinji
- Überwachungskamera SMC
- Überwachungskamera Sonic Alert
- Überwachungskamera Sricam
- Überwachungskamera Steren
- Überwachungskamera Storage Options
- Überwachungskamera Tenvis
- Überwachungskamera Hive
- Überwachungskamera Ubiquiti
- Überwachungskamera Vivotek
- Überwachungskamera Woonveilig
- Überwachungskamera Y-cam
- Überwachungskamera ACTi
- Überwachungskamera AVer
- Überwachungskamera Epcom
- Überwachungskamera ZKTeco
- Überwachungskamera AirLive
- Überwachungskamera Mobotix
- Überwachungskamera Dahua Technology
- Überwachungskamera Speco Technologies
- Überwachungskamera 3xLOGIC
- Überwachungskamera Atlantis Land
- Überwachungskamera CRUX
- Überwachungskamera Pentatech
- Überwachungskamera Summer Infant
- Überwachungskamera Illustra
- Überwachungskamera Surveon
- Überwachungskamera Avigilon
- Überwachungskamera Brilliant
- Überwachungskamera Hanwha
- Überwachungskamera Lanberg
- Überwachungskamera Verint
- Überwachungskamera Axis
- Überwachungskamera EtiamPro
- Überwachungskamera MEE Audio
- Überwachungskamera Advantech
- Überwachungskamera Chacon
- Überwachungskamera Alula
- Überwachungskamera EKO
- Überwachungskamera IOIO
- Überwachungskamera BZBGear
- Überwachungskamera Adesso
- Überwachungskamera Brickcom
- Überwachungskamera Insteon
- Überwachungskamera Aigis
- Überwachungskamera Pelco
- Überwachungskamera ORNO
- Überwachungskamera Atlona
- Überwachungskamera Linear PRO Access
- Überwachungskamera Laxihub
- Überwachungskamera Valueline
- Überwachungskamera Aqara
- Überwachungskamera Tecno
- Überwachungskamera Lutec
- Überwachungskamera Brinno
- Überwachungskamera Night Owl
- Überwachungskamera WyreStorm
- Überwachungskamera Exacq
- Überwachungskamera Equip
- Überwachungskamera AVMATRIX
- Überwachungskamera UniView
- Überwachungskamera Alfatron
- Überwachungskamera Syscom
- Überwachungskamera BLOW
- Überwachungskamera Videotec
- Überwachungskamera DSC
- Überwachungskamera AViPAS
- Überwachungskamera Milestone Systems
- Überwachungskamera Inkovideo
- Überwachungskamera Hamlet
- Überwachungskamera Mobi
- Überwachungskamera Infortrend
- Überwachungskamera VideoComm
- Überwachungskamera Kguard
- Überwachungskamera Boyo
- Überwachungskamera HiLook
- Überwachungskamera Mach Power
- Überwachungskamera Canyon
- Überwachungskamera Digital Watchdog
- Überwachungskamera Ernitec
- Überwachungskamera Ikegami
- Überwachungskamera Gewiss
- Überwachungskamera Weldex
- Überwachungskamera Costar
- Überwachungskamera Sentry360
- Überwachungskamera ALC
- Überwachungskamera Spyclops
- Überwachungskamera Compro
- Überwachungskamera IDIS
- Überwachungskamera I3International
- Überwachungskamera B & S Technology
- Überwachungskamera Qian
- Überwachungskamera Accsoon
- Überwachungskamera Control4
- Überwachungskamera Petcube
- Überwachungskamera Apeman
- Überwachungskamera ATN
- Überwachungskamera IC Intracom
- Überwachungskamera POSline
- Überwachungskamera Watec
- Überwachungskamera ETiger
- Überwachungskamera Videcon
- Überwachungskamera BirdDog
- Überwachungskamera Topica
- Überwachungskamera Rostra
- Überwachungskamera Caddx
- Überwachungskamera Whistler
- Überwachungskamera ClearView
- Überwachungskamera Beseye
- Überwachungskamera IMILAB
- Überwachungskamera CNB Technology
- Überwachungskamera Tapo
- Überwachungskamera Securetech
- Überwachungskamera NetMedia
- Überwachungskamera Nivian
- Überwachungskamera Guardzilla
- Überwachungskamera Blink
- Überwachungskamera Zavio
- Überwachungskamera Campark
- Überwachungskamera IPX
- Überwachungskamera Annke
- Überwachungskamera AVTech
- Überwachungskamera Vimtag
- Überwachungskamera Security Labs
- Überwachungskamera Seneca
- Überwachungskamera Vosker
- Überwachungskamera Owltron
- Überwachungskamera Enabot
- Überwachungskamera Luis Energy
- Überwachungskamera Sir Gawain
- Überwachungskamera VisorTech
- Überwachungskamera Milesight
- Überwachungskamera GVI Security
- Überwachungskamera Conbrov
- Überwachungskamera HuddleCamHD
- Überwachungskamera Setti+
- Überwachungskamera BIRDFY
- Überwachungskamera I-PRO
- Überwachungskamera DVDO
- Überwachungskamera TCP
Neueste Bedienungsanleitung für -Kategorien-
15 Oktober 2024

15 Oktober 2024
14 Oktober 2024
14 Oktober 2024

13 Oktober 2024
13 Oktober 2024
13 Oktober 2024
11 Oktober 2024
11 Oktober 2024
11 Oktober 2024