Bretford Core36MS Bedienungsanleitung
Bretford
Ladegerät für Mobilgerät
Core36MS
Lesen Sie kostenlos die 📖 deutsche Bedienungsanleitung für Bretford Core36MS (3 Seiten) in der Kategorie Ladegerät für Mobilgerät. Dieser Bedienungsanleitung war für 19 Personen hilfreich und wurde von 2 Benutzern mit durchschnittlich 4.5 Sternen bewertet
Seite 1/3
1
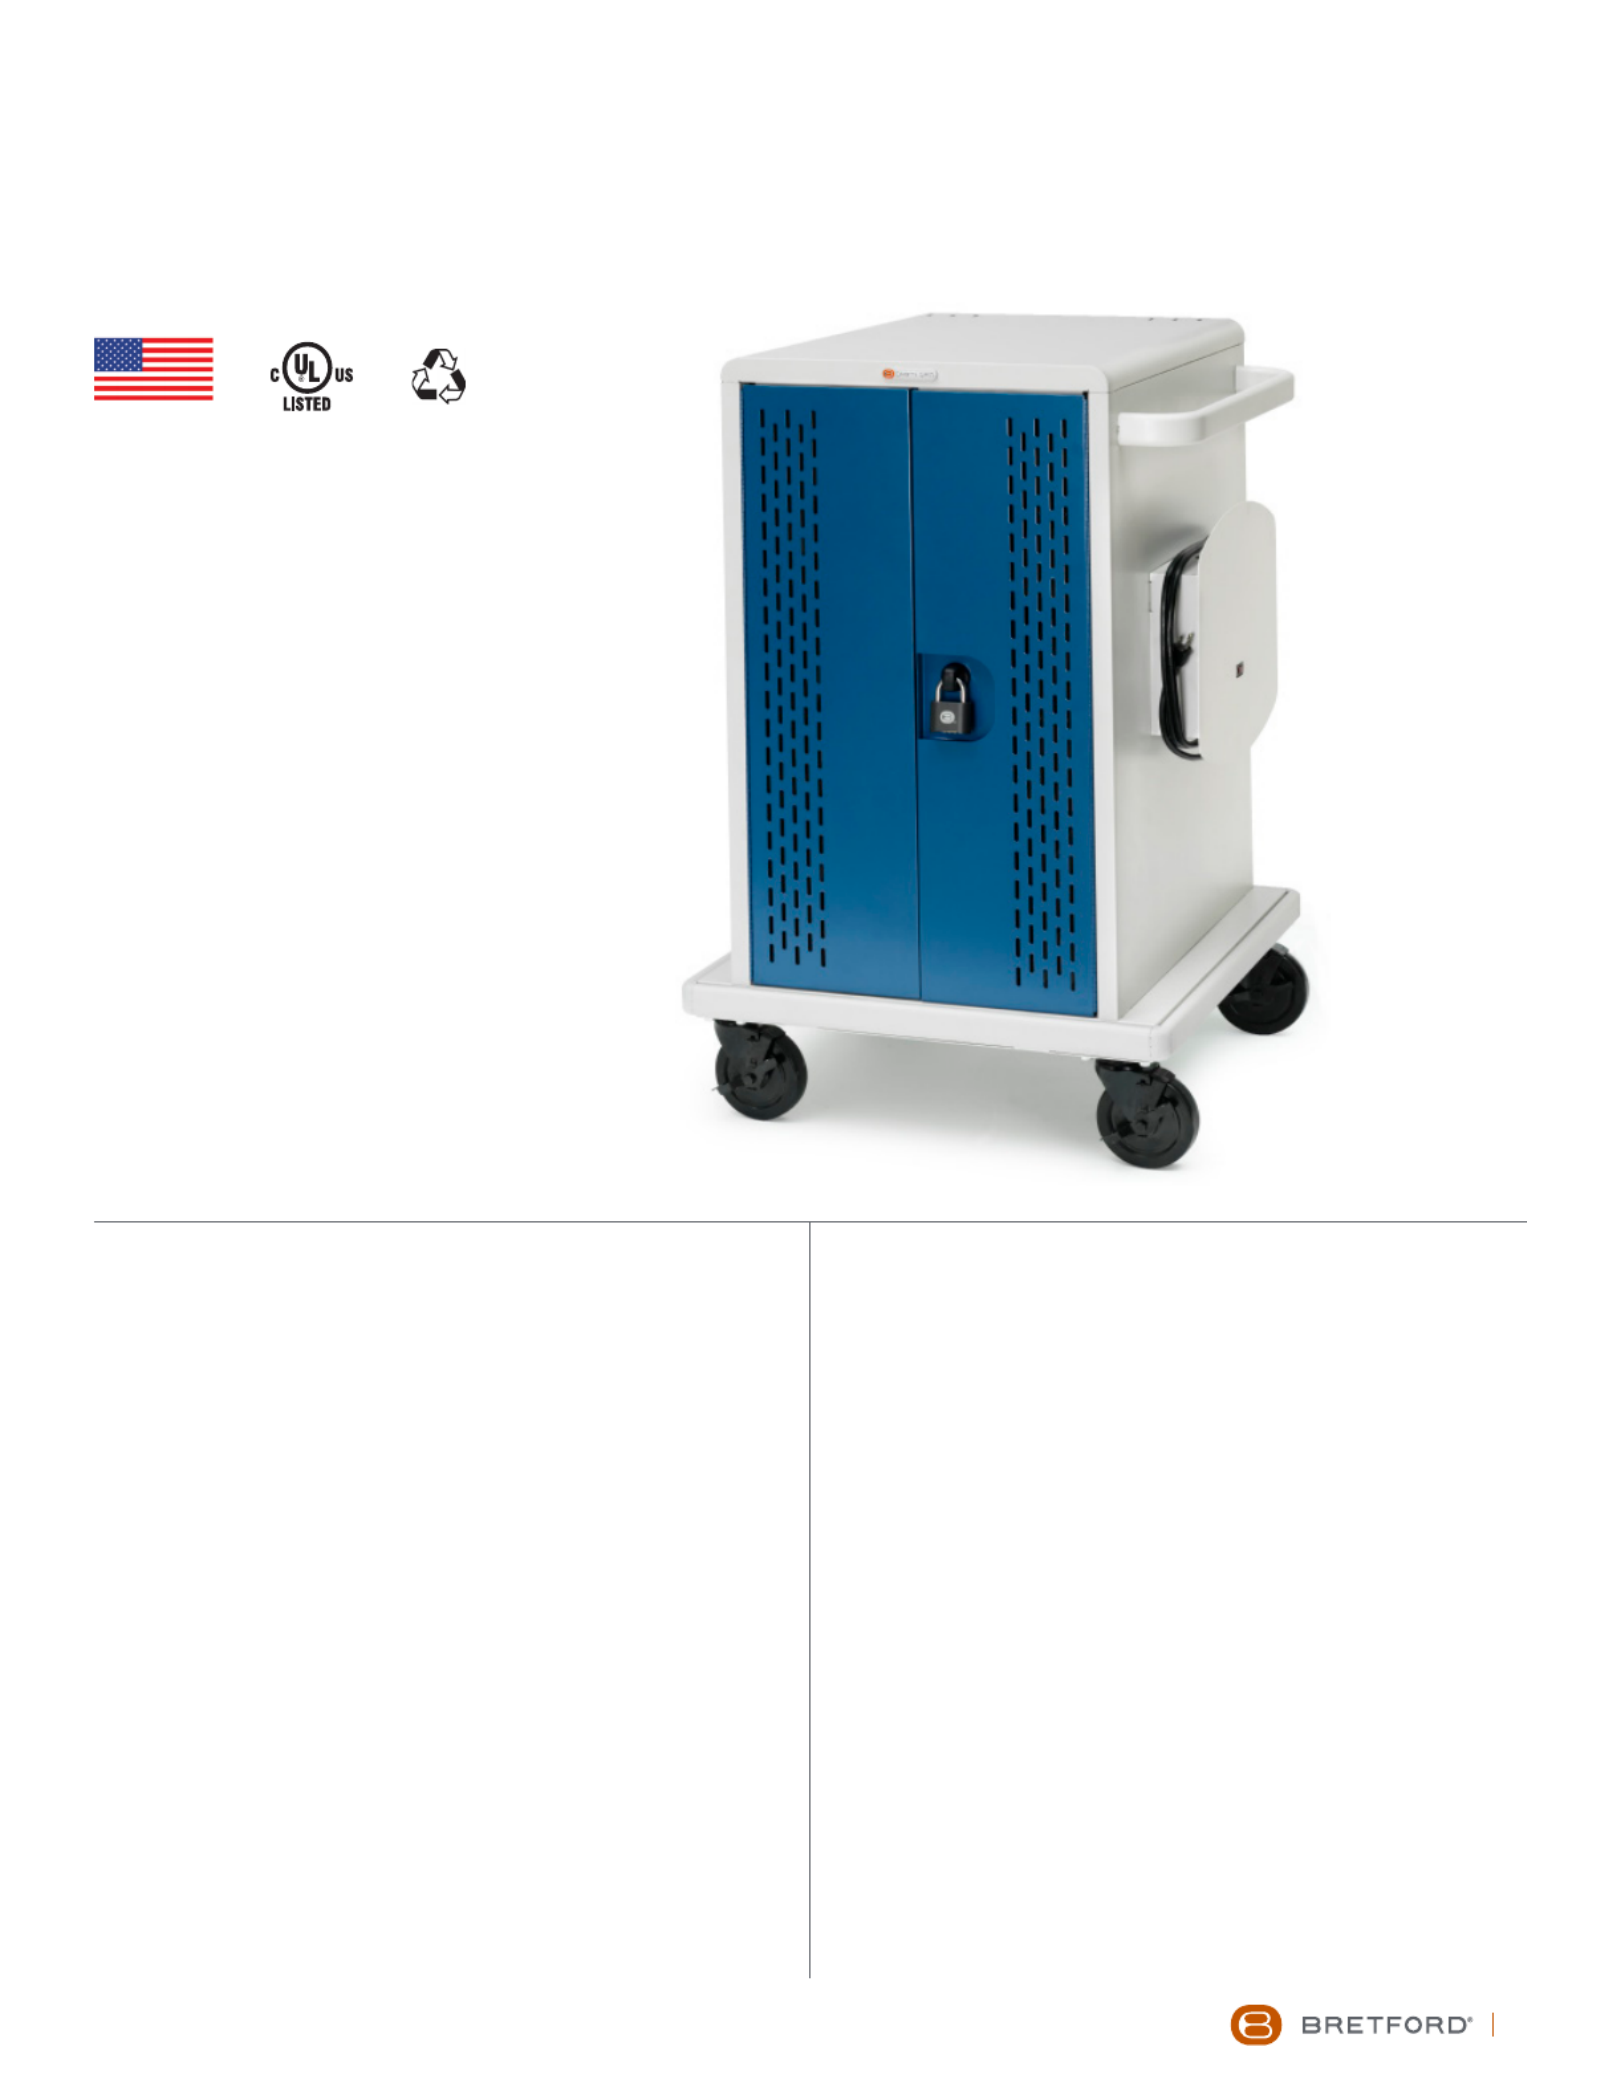
USER GUIDE
CORE™ 36M CART
CORE36MS-CTTZ • CORE36MSBP-CTTZ
TECHNICAL SPECIFICATIONS
CAPACITY
36 Devices
COMPATIBILITY
Designed for various sized Chromebooks, yet versatile enough
to support most tablets, laptops/hybrids and ultrabooks. Uses
device manufacturer supplied AC power cord.
UNIT DIMENSIONS
25.25”W x 26.5”D x 41.3875”H
SLOT DIMENSIONS
1.25”W x 14.75”D x 9.875”H
WEIGHT WITHOUT DEVICES
142 lbs.
WARRANTY
For product specic warranty information, please visit
bretford.com/warranty
TIMER
Digital
SHIPPING
Ships fully assembled
IMPORTANT USER NOTES
• Product is for indoor use only.
• User can plug in 36 devices at one time.
• Turn power switch o before plugging in devices.
• Turn power switch o before unplugging the cart.
• Do not plug the cart in if the switch or power
cord has been damaged.
• Do not plug the power cord into another extension cord
or re-locatable power tap.
• Be sure to turn power switch o and unplug cart before
moving to a dierent location.
• Ensure casters are locked before opening cart doors.
• Be sure to lock up cart in a secure environment after
every use.
• Do not share the lock combination code with any
unauthorized persons.
MADE IN THE USA
2
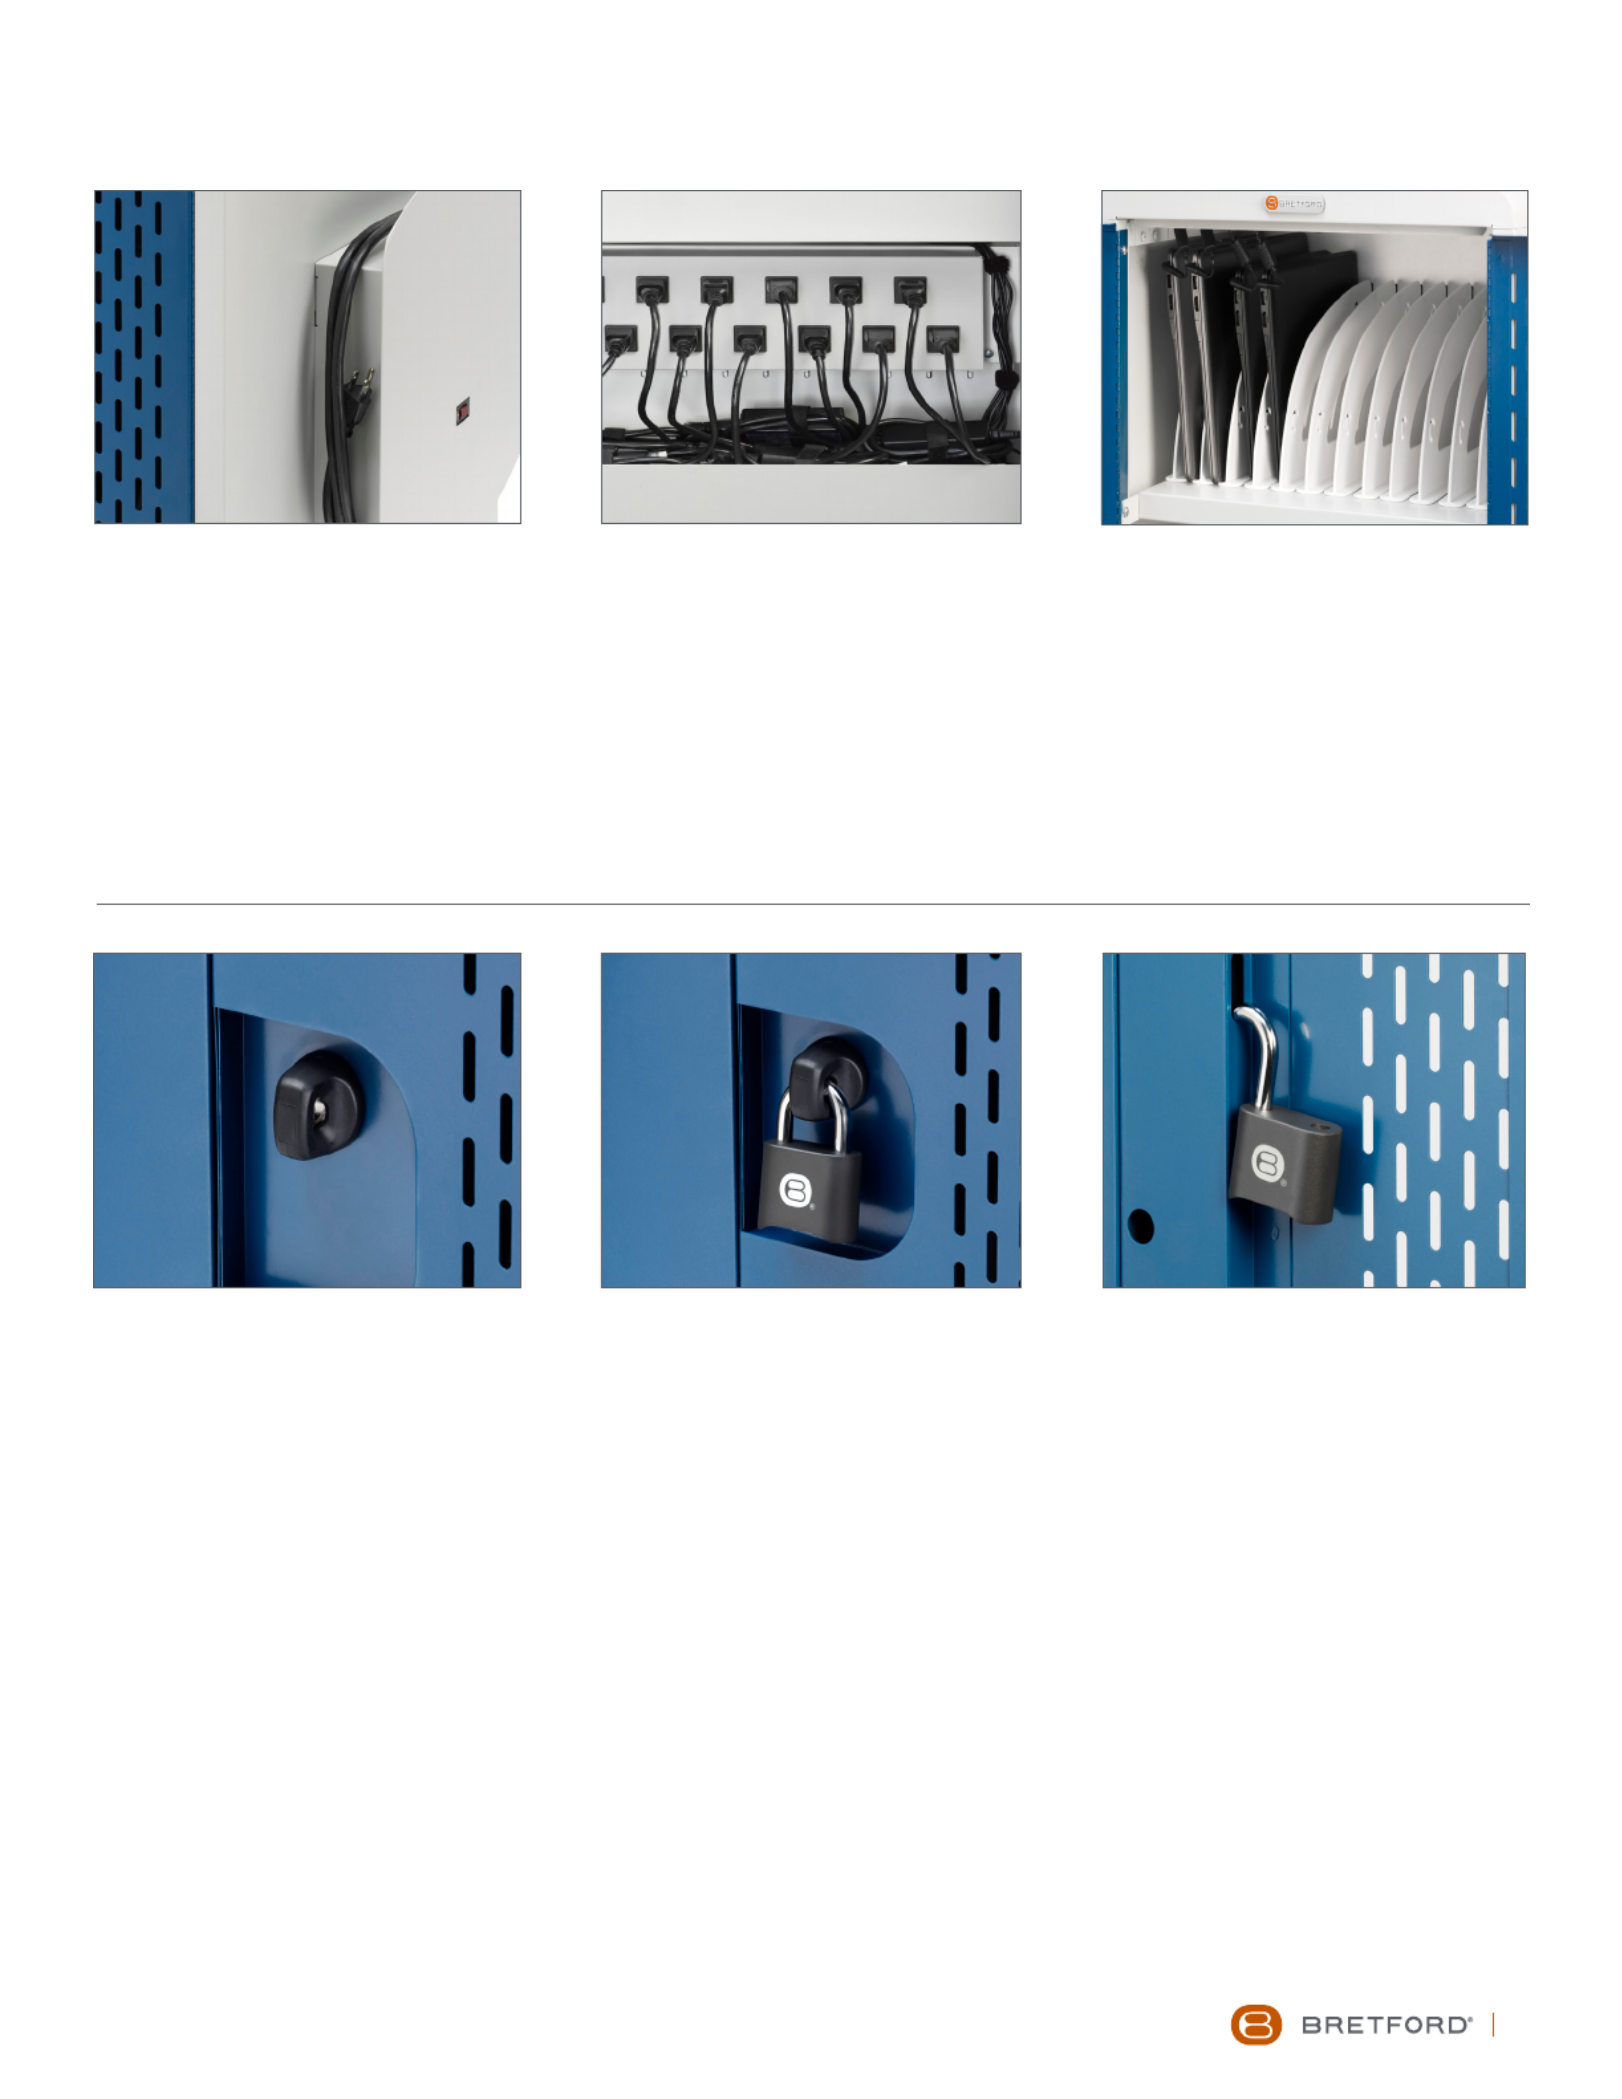
GENERAL USE
POWER SWITCH
Located on the right hand side of the cabinet.
AC OUTLET ACCESS – ADAPTER STORAGE
Bins provide convenient adapter storage. Plug adapters into AC outlets as needed. Use VELCRO® straps to secure power adapters.
DEVICE STORAGE
Polypropylene dividers store devices vertically and oer optimal spacing for device compatibility.
AC Outlet Access – Adapter Storage Device StorageCord Winder and Power Switch
USER GUIDE | CORE 36M CART ™
Using the Handle Inserting The Shackle / Lock Programming Interior Door Lock Holder
TORQUE RESISTANT HANDLE & LOCK INSTRUCTIONS
USING THE HANDLE
The torque resistant handle/lock serves as a handle to open and close the cabinet when the shackle is not inserted.
INSERTING THE SHACKLE
Hold the lock shackle on a slight angle when inserting into the shackle opening and push rmly. Once the shackle is inserted the cam is
no longer engaged and the torque resistant handle/lock will spin which deters access to devices by lowering the risk of the cam breaking.
LOCK PROGRAMMING
To program the user programmable combination padlock included:
1. Open the padlock using combination “0000.”
2. Insert the programming key and turn 90 degrees.
3. Set the combination you would like to use.
4. Remove the programming key.
3
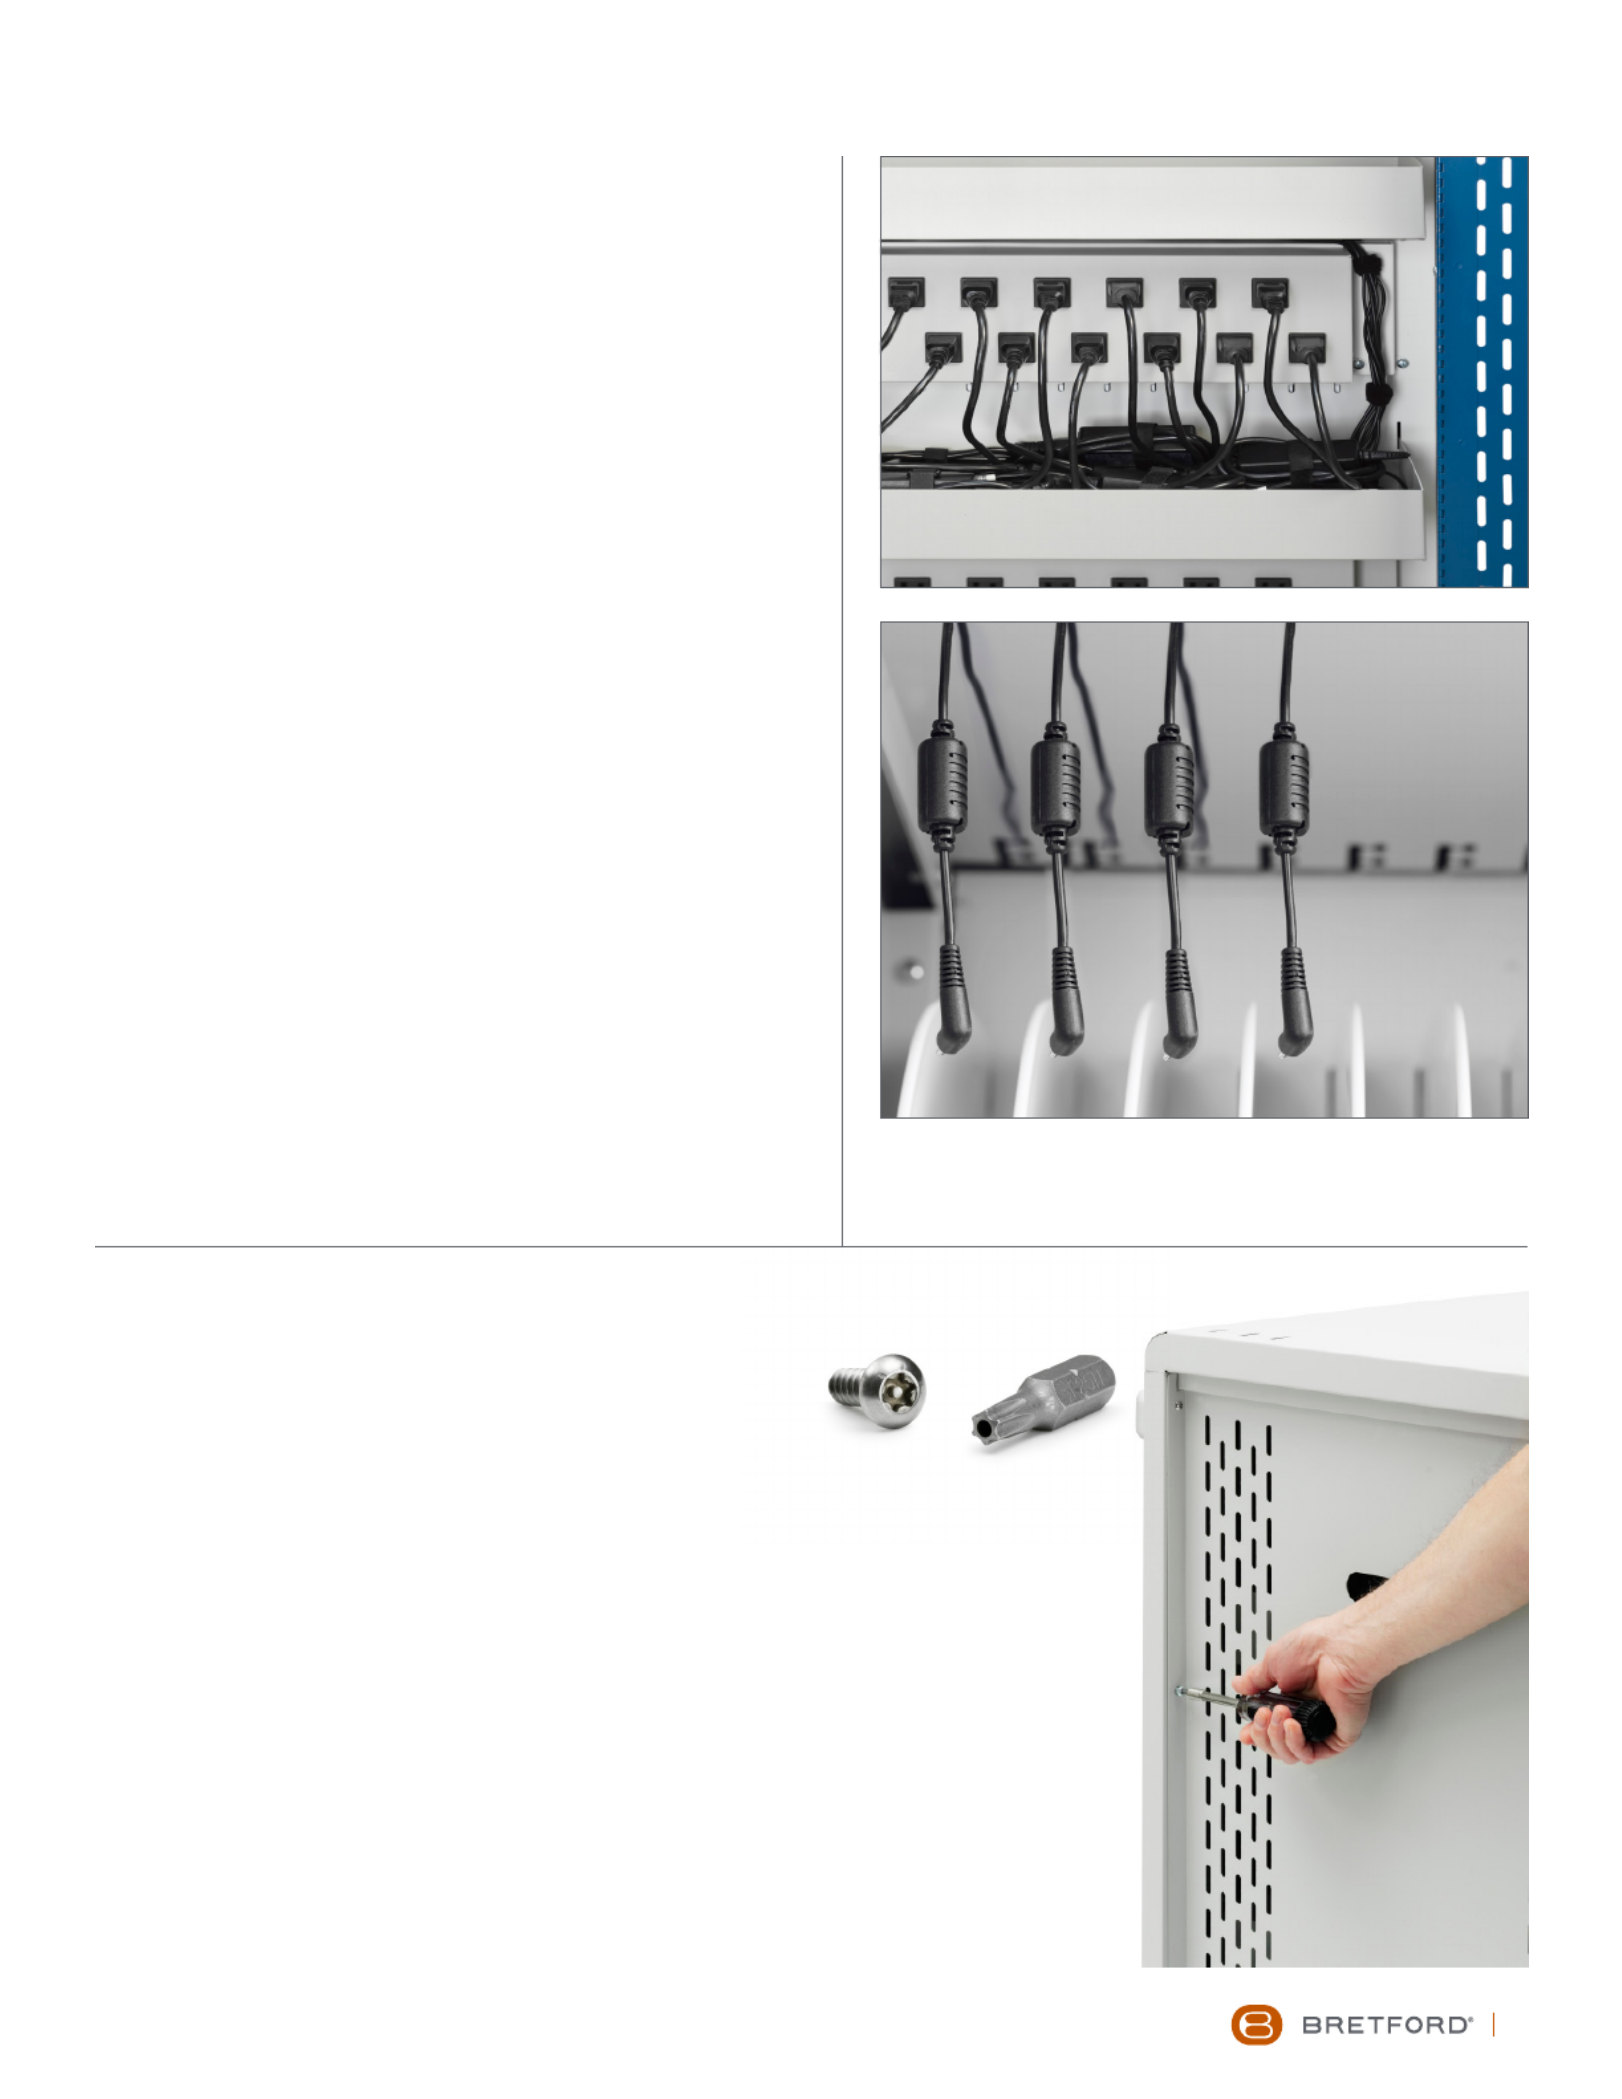
DEVICE STORAGE & CABLE MANAGEMENT
1. Starting in the rear of the cart, insert a power adapter in the
storage bin for the associated device storage shelf (top, middle
or bottom).
2. Measure the amount of cable necessary to reach from the
power adapter located in the bin to the front of the cart, (around
the AC outlet box, through the divider panel and through the
cable management hooks). Leave sucient slack for the power
connector to connect to the device.
3. Wrap remaining cable to the power adapter using one of
the VELCRO® straps that came with the cart.
4. Plug the AC cord into one of the outlets nearest to where
the brick is located in the bin.
5. Repeat the above process for the 36 device’s power
adapters and cables.
6. Insert a device into each of the 36 device slots.
7. Plug the power connector into each of the 36 devices.
8. Place cart near a wall outlet and plug cart in.
9. Turn on the power switch (on the cord-winder side of the cart).
10. Once the timer is turned on, it begins rotating power to the
dierent power strips every three (3) minutes. This allows for
ecient charging of the devices in the cart from one 15
amp wall circuit.
11. Only one group of the total devices in the cart will be
charging at a time–rotating every three minutes.
12. Supplied numbered stickers can be applied to shelves in
front of dividers, for slot numbering, if desired.
Part #031-10065 • V5 05.2015
USER GUIDE | CORE 36M CART ™
Bretford, B design, and Core are trademarks or registered marks of Bretford Manufacturing,
Inc. Patents Pending. ©2015 Bretford Manufacturing, Inc. All rights reserved. All other
referenced product names and logos are trademarks of their respective owners.
REMOVING REAR ACCESS PANEL
(CORE36MSBP-CTTZ)
Using the included T2511 Torx bit, remove the four screws
securing the rear adapter access panel. Use the handle
cutout to remove the panel. Inside, plug adapters into AC
outlets as needed, and secure with velcro straps. Reattach
rear adapter access panel using T2511 Torx bit and included
security screws.
Tools required: Multi-Bit screwdriver, T2511 Torx bit (included)
1. Insert the T2511 Torx bit into your Multi-Bit screwdriver.
2. Remove the four security screws from the back adapter
access panel.
3. Remove the rear adapter access panel.
4. Install your power adapters as needed.
5. Replace the rear adapter access panel.
6. Replace the four security screws, securing the rear
adapter access panel, using the included TORX 2511 bit.
Produktspezifikationen
| Marke: | Bretford |
| Kategorie: | Ladegerät für Mobilgerät |
| Modell: | Core36MS |
Brauchst du Hilfe?
Wenn Sie Hilfe mit Bretford Core36MS benötigen, stellen Sie unten eine Frage und andere Benutzer werden Ihnen antworten
Bedienungsanleitung Ladegerät für Mobilgerät Bretford

30 August 2024
30 August 2024
30 August 2024
30 August 2024
30 August 2024
30 August 2024
30 August 2024
30 August 2024
30 August 2024
30 August 2024
Bedienungsanleitung Ladegerät für Mobilgerät
- Ladegerät für Mobilgerät Tristar
- Ladegerät für Mobilgerät Anker
- Ladegerät für Mobilgerät Approx
- Ladegerät für Mobilgerät Belkin
- Ladegerät für Mobilgerät Corsair
- Ladegerät für Mobilgerät Gembird
- Ladegerät für Mobilgerät Hama
- Ladegerät für Mobilgerät Kensington
- Ladegerät für Mobilgerät LogiLink
- Ladegerät für Mobilgerät Manhattan
- Ladegerät für Mobilgerät Manta
- Ladegerät für Mobilgerät Nedis
- Ladegerät für Mobilgerät Philips
- Ladegerät für Mobilgerät SilverCrest
- Ladegerät für Mobilgerät Sony
- Ladegerät für Mobilgerät Trust
- Ladegerät für Mobilgerät Clas Ohlson
- Ladegerät für Mobilgerät Voltcraft
- Ladegerät für Mobilgerät Makita
- Ladegerät für Mobilgerät Bosch
- Ladegerät für Mobilgerät IKEA
- Ladegerät für Mobilgerät Denver
- Ladegerät für Mobilgerät EMOS
- Ladegerät für Mobilgerät Blaupunkt
- Ladegerät für Mobilgerät Nomad
- Ladegerät für Mobilgerät Aukey
- Ladegerät für Mobilgerät Festool
- Ladegerät für Mobilgerät Vestel
- Ladegerät für Mobilgerät Krüger And Matz
- Ladegerät für Mobilgerät Nokia
- Ladegerät für Mobilgerät Akai
- Ladegerät für Mobilgerät GoGEN
- Ladegerät für Mobilgerät Orava
- Ladegerät für Mobilgerät Tesla
- Ladegerät für Mobilgerät Kress
- Ladegerät für Mobilgerät Varta
- Ladegerät für Mobilgerät Ewent
- Ladegerät für Mobilgerät Lindy
- Ladegerät für Mobilgerät Tripp Lite
- Ladegerät für Mobilgerät GP
- Ladegerät für Mobilgerät Westfalia
- Ladegerät für Mobilgerät Black Box
- Ladegerät für Mobilgerät Pro User
- Ladegerät für Mobilgerät MiPow
- Ladegerät für Mobilgerät Mophie
- Ladegerät für Mobilgerät Urban Revolt
- Ladegerät für Mobilgerät Veripart
- Ladegerät für Mobilgerät Xtorm
- Ladegerät für Mobilgerät Weego
- Ladegerät für Mobilgerät Champion
- Ladegerät für Mobilgerät Cooler Master
- Ladegerät für Mobilgerät SilverStone
- Ladegerät für Mobilgerät Monoprice
- Ladegerät für Mobilgerät Toolcraft
- Ladegerät für Mobilgerät Ednet
- Ladegerät für Mobilgerät Gardena
- Ladegerät für Mobilgerät Kogan
- Ladegerät für Mobilgerät Lumens
- Ladegerät für Mobilgerät Conceptronic
- Ladegerät für Mobilgerät Audiovox
- Ladegerät für Mobilgerät HQ
- Ladegerät für Mobilgerät Be Quiet!
- Ladegerät für Mobilgerät Digitus
- Ladegerät für Mobilgerät Mr Handsfree
- Ladegerät für Mobilgerät BlueBuilt
- Ladegerät für Mobilgerät Fresh 'n Rebel
- Ladegerät für Mobilgerät Ubiquiti Networks
- Ladegerät für Mobilgerät RCA
- Ladegerät für Mobilgerät Datalogic
- Ladegerät für Mobilgerät Speed-Link
- Ladegerät für Mobilgerät Cellular Line
- Ladegerät für Mobilgerät Energizer
- Ladegerät für Mobilgerät Naxa
- Ladegerät für Mobilgerät Sitecom
- Ladegerät für Mobilgerät Steren
- Ladegerät für Mobilgerät AMX
- Ladegerät für Mobilgerät WAGAN
- Ladegerät für Mobilgerät Siig
- Ladegerät für Mobilgerät Bauhn
- Ladegerät für Mobilgerät IOttie
- Ladegerät für Mobilgerät Zens
- Ladegerät für Mobilgerät Palmer
- Ladegerät für Mobilgerät Cygnett
- Ladegerät für Mobilgerät Duracell
- Ladegerät für Mobilgerät Brigmton
- Ladegerät für Mobilgerät Natec
- Ladegerät für Mobilgerät Malmbergs
- Ladegerät für Mobilgerät DreamGEAR
- Ladegerät für Mobilgerät Akyga
- Ladegerät für Mobilgerät Chéroy
- Ladegerät für Mobilgerät Goal Zero
- Ladegerät für Mobilgerät V7
- Ladegerät für Mobilgerät Equip
- Ladegerät für Mobilgerät Satechi
- Ladegerät für Mobilgerät Vakoss
- Ladegerät für Mobilgerät Götze & Jensen
- Ladegerät für Mobilgerät Seasonic
- Ladegerät für Mobilgerät Anthro
- Ladegerät für Mobilgerät SilentiumPC
- Ladegerät für Mobilgerät Goodram
- Ladegerät für Mobilgerät Genki
- Ladegerät für Mobilgerät Wonky Monkey
- Ladegerät für Mobilgerät Anywhere Cart
- Ladegerät für Mobilgerät CoolerMaster
- Ladegerät für Mobilgerät Xline
- Ladegerät für Mobilgerät Justsmart.tech
Neueste Bedienungsanleitung für -Kategorien-
15 Oktober 2024
15 Oktober 2024
15 Oktober 2024
15 Oktober 2024
15 Oktober 2024
14 Oktober 2024
12 Oktober 2024
10 Oktober 2024
8 Oktober 2024
4 Oktober 2024