Atlona AT-DISP-CTRL Bedienungsanleitung
Lesen Sie kostenlos die 📖 deutsche Bedienungsanleitung für Atlona AT-DISP-CTRL (12 Seiten) in der Kategorie Regler. Dieser Bedienungsanleitung war für 25 Personen hilfreich und wurde von 2 Benutzern mit durchschnittlich 4.5 Sternen bewertet
Seite 1/12
1
Installation Guide
AT-DISP-CTRL
HDMI Display Controller
AT-DISP-CTRL
The Atlona AT-DISP-CTRL is a compact display controller, designed for small meeting spaces
and huddle rooms. The DISP-CTRL detects connection of a source device with an active signal,
and then automatically sends a control command to turn on a display. Similarly, when the device
is disconnected, the DISP-CTRL delivers a command to turn o the display. The DISP-CTRL
can be congured to deliver pre-stored or user-programmed display control commands through
TCP/IP, RS-232, IR, or CEC. Additionally, this controller includes EDID and HDCP management
features, and can be powered locally or through standard Power over Ethernet (PoE). The DISP-
CTRL is HDCP 2.2 compliant and supports 4K/UHD video @ 60 Hz with 4:4:4 chroma sampling,
as well as HDMI data rates up to 18 Gbps.
IMPORTANT: Visit http://www.atlona.com/product/AT-DISP-CTRL for the latest rmware
updates and documentation.
Package Contents
1 x AT-DISP-CTRL
2 x Mounting brackets
4 x Mounting screws
1 x 5 V DC power supply
1 x Installation Guide

2
Installation Guide
AT-DISP-CTRL
AT-DISP-CTRL
LAN
RX
PoE
TXTX
RESET
IP MODE
RS-232 IR OUT DC 5V
FW
HDMI INHDMI OUT SOURCE
POWER
AT-DISP-CTRL
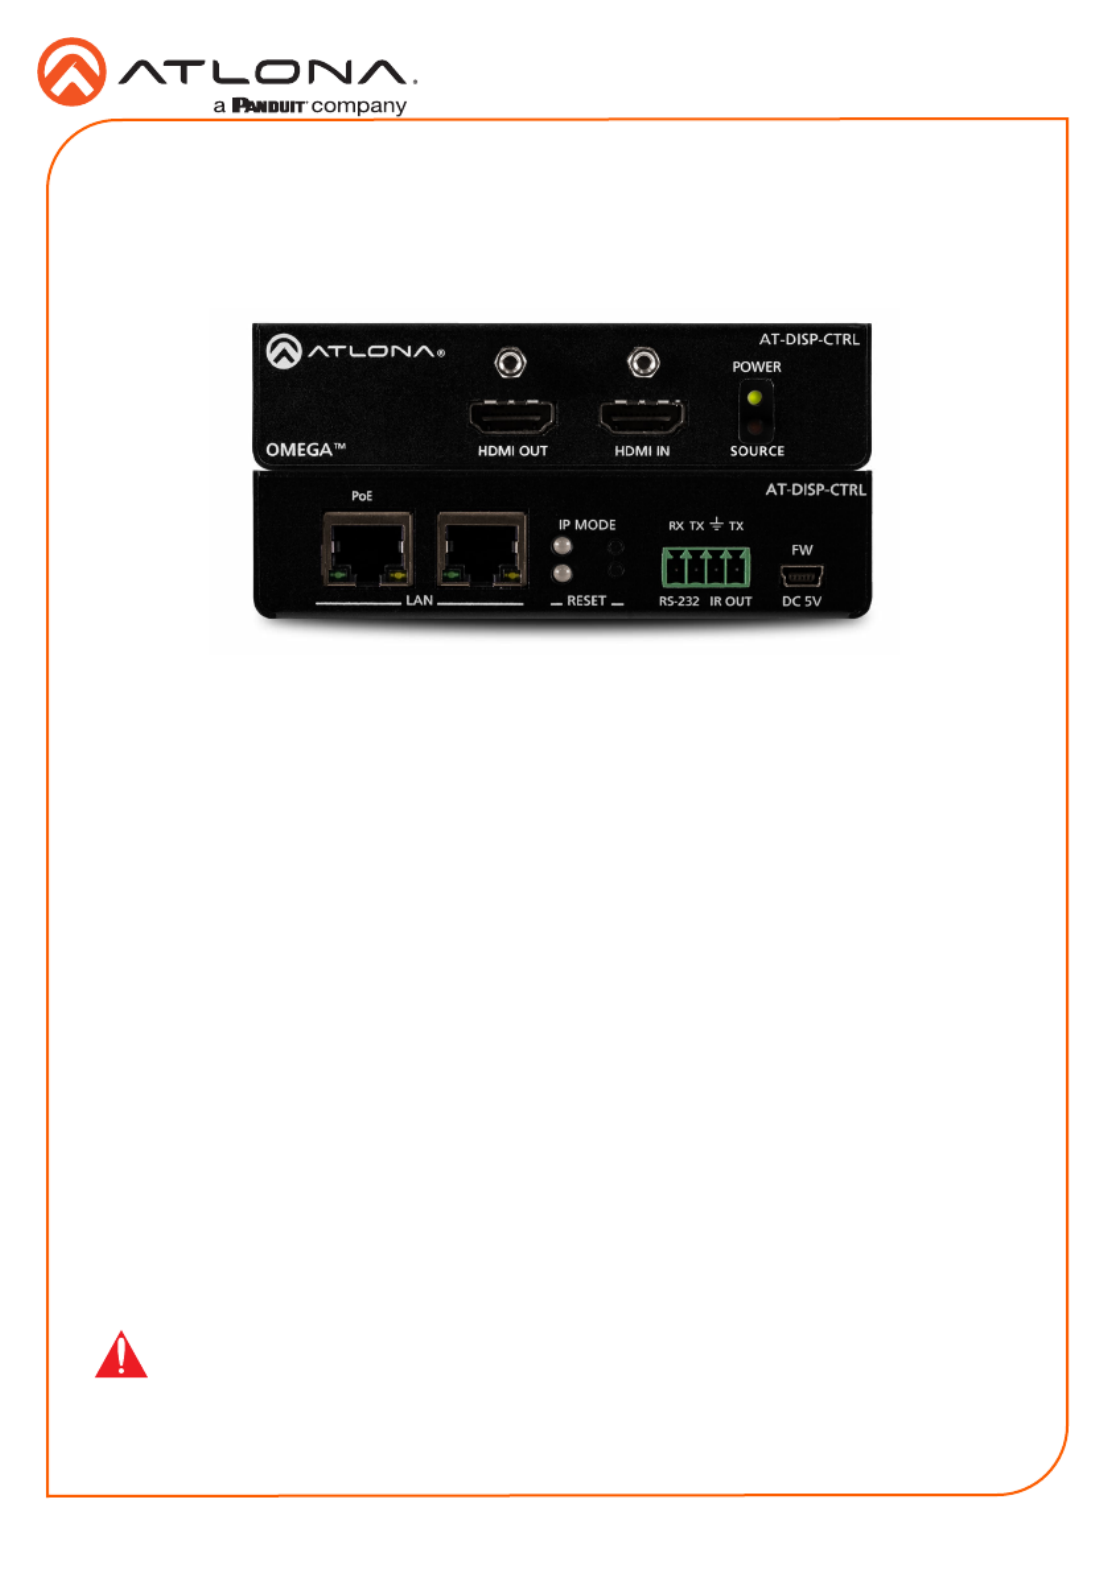
Panel Descriptions
1 HDMI OUT
Connect an HDMI cable from this port to
the display.
2 HDMI IN
Connect an HDMI cable from this port to
the source device.
3 POWER
This LED indicator glows solid green when
the unit is powered.
4 SOURCE
This LED indicator glows solid amber
when a source is connected to the HDMI
IN port.
5 PoE LAN
Connect an Ethernet cable from a PoE-
capable network switch to the PoE LAN
port. If a PoE switch is not available,
connect a USB to mini-USB cable from
a computer to the port to power the FW
unit.
6 LAN
Connect an Ethernet cable from the LAN
port to the display device, if control will be
IP-based.
7 IP MODE
Press and release this button to set the IP
mode or display the current IP address.
Refer to IP Conguration (page 6) for
more information.
8 RESET
Press and release this button to reset the
unit to factory-default settings. Refer to
Resetting to Factory-Defaults (page 7)
for more information.
9 RS-232 / IR OUT
Connect a serial cable from the RS-232
port, using the included 4-pin captive
screw connector, to the display device.
Connect an IR emitter from the IR OUT
port, using the included 4-pin captive
screw connector, and place the emitter
next to the display.
10 FW
If not using PoE to power the unit, then
connect a USB to mini-USB cable
between a computer and this port. The
same USB to mini-USB cable can also
used to update the rmware. Refer to the
User Manual for more information.
Rear
Front
1
7
8
95 6 10
2 3
4
3
Installation Guide
AT-DISP-CTRL
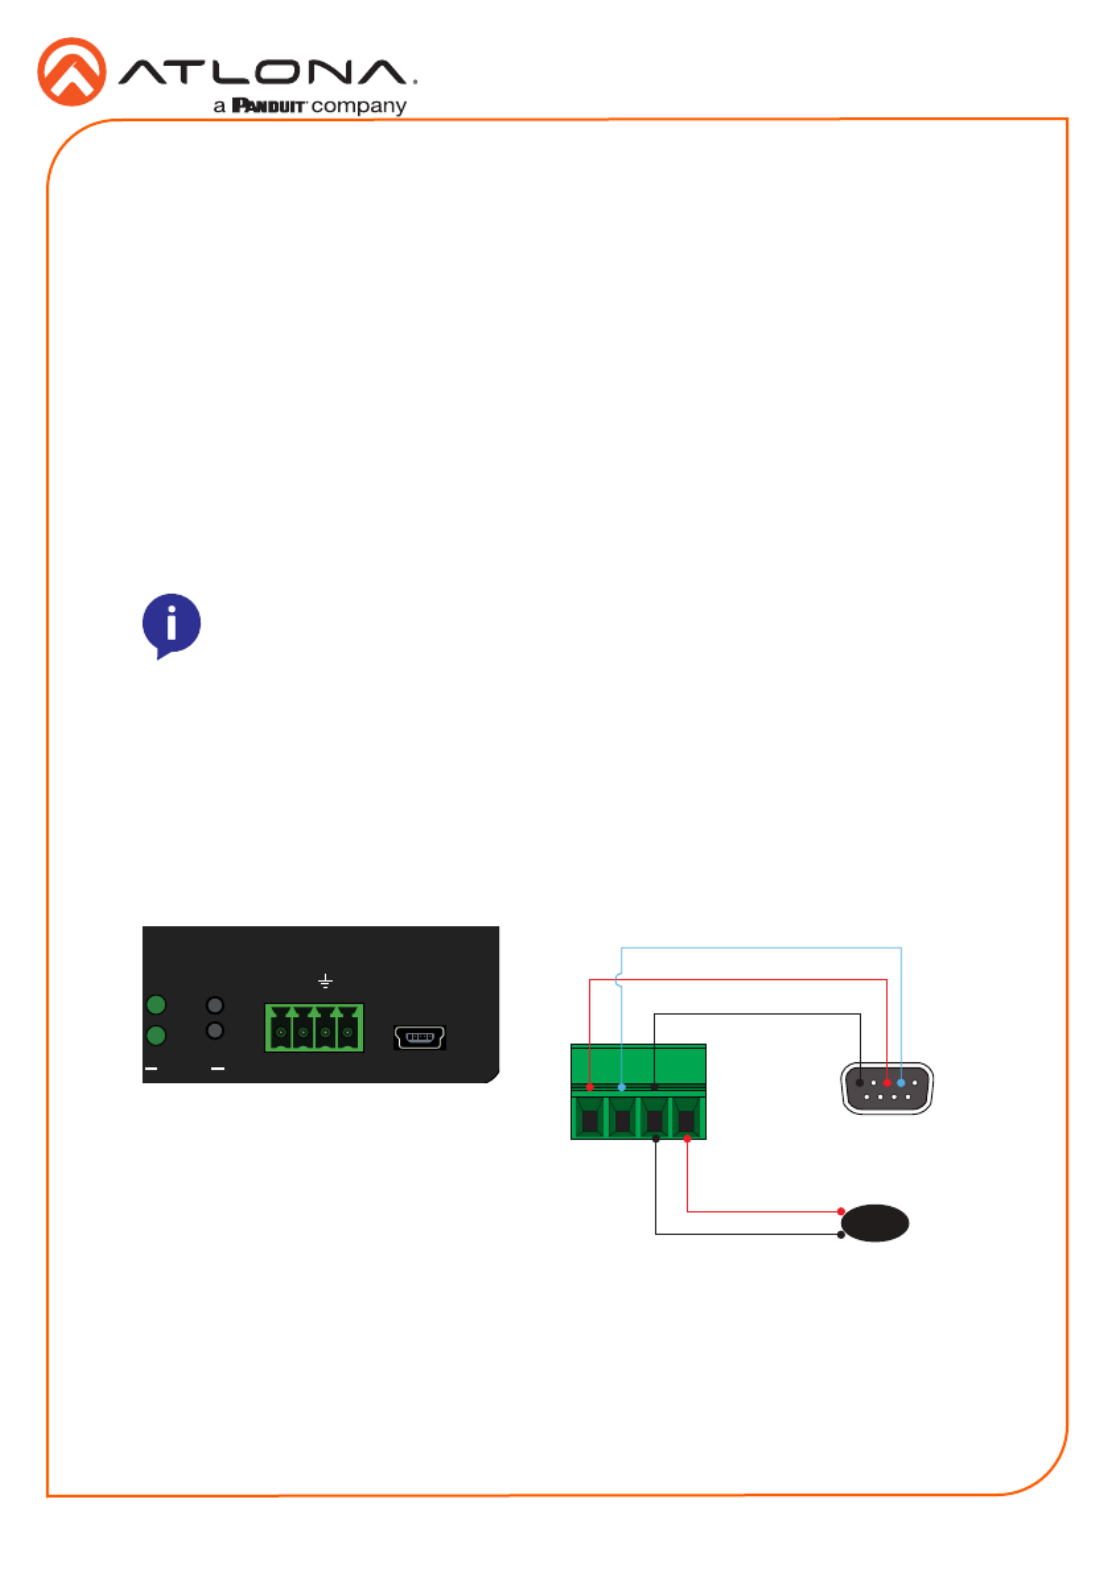
The AT-DISP-CTRL provides both an and port, which can be used to send turn-on/RS-232 IR
turn-o commands to the display, when a source is connected to the AT-DISP-CTRL. Command
conguration is handled through the web GUI. Refer to the User Manual for more information.
It is not necessary to connect both RS-232 and IR emitters to control the display. Either option
can be used, depending upon the environment and the system setup.
NOTE: Typical DB9 connectors use pin 2 for TX, pin 3 for RX, and pin 5 for
ground. On some devices functions of pins 2 and 3 are reversed.
RS-232 / IR Connector
RS-232
IR
1. Use wire strippers to remove a portion of the cable jacket.
2. Remove at least 3/16” (5 mm) from the insulation of the RX, TX, and GND wires.
3. Insert the TX, RX, and GND wires from the DE-9 connector, into the correct terminal using
the included 4-pin captive screw connector.
1. Use wire strippers to remove a portion of the cable jacket.
2. Remove at least 3/16” (5 mm) from the insulation of the GND and Signal (S) wires.
3. Insert the GND and Signal (S) wires from the IR emitter into the correct terminal using the
included 4-pin captive screw connector.
AT-DISP-CTRL
RX TXTX
RESET
IP MODE
RS-232 IR OUT DC 5V
FW GND
DE-9 (RS-232) port
IR Emitter
RX
TX
S
GND
Produktspezifikationen
| Marke: | Atlona |
| Kategorie: | Regler |
| Modell: | AT-DISP-CTRL |
Brauchst du Hilfe?
Wenn Sie Hilfe mit Atlona AT-DISP-CTRL benötigen, stellen Sie unten eine Frage und andere Benutzer werden Ihnen antworten
Bedienungsanleitung Regler Atlona

22 August 2024
Bedienungsanleitung Regler
- Regler Samsung
- Regler Asus
- Regler Belkin
- Regler Gembird
- Regler Genius
- Regler Hama
- Regler HP
- Regler HyperX
- Regler Logitech
- Regler Microsoft
- Regler Nacon
- Regler Nedis
- Regler Niceboy
- Regler Saitek
- Regler Sony
- Regler SteelSeries
- Regler Sweex
- Regler T'nB
- Regler Targus
- Regler Trust
- Regler Bosch
- Regler Canon
- Regler Velleman
- Regler Hori
- Regler König
- Regler Thomson
- Regler Kenwood
- Regler Schneider
- Regler Pyle
- Regler Mitsubishi
- Regler Bose
- Regler Denon
- Regler Pioneer
- Regler JBL
- Regler One For All
- Regler Vivanco
- Regler BeamZ
- Regler Akai
- Regler Tascam
- Regler Zoom
- Regler Perel
- Regler Aruba
- Regler Lindy
- Regler Thrustmaster
- Regler TOA
- Regler MSI
- Regler Tripp Lite
- Regler Marshall
- Regler Razer
- Regler Honeywell
- Regler Marshall Electronics
- Regler SBS
- Regler DJI
- Regler Parrot
- Regler Reely
- Regler Zebra
- Regler Broan
- Regler Adj
- Regler Supermicro
- Regler Genesis
- Regler Thermaltake
- Regler Behringer
- Regler Mackie
- Regler Numark
- Regler Eurolite
- Regler Monoprice
- Regler Monacor
- Regler Huawei
- Regler JUNG
- Regler Hunter
- Regler Esperanza
- Regler Lumens
- Regler Korg
- Regler DataVideo
- Regler Manfrotto
- Regler Tracer
- Regler Cisco
- Regler Boss
- Regler Synology
- Regler Saramonic
- Regler Kramer
- Regler Irritrol
- Regler Jumbo
- Regler Vaddio
- Regler RCA
- Regler Datalogic
- Regler HQ Power
- Regler Nintendo
- Regler Kicker
- Regler Speed-Link
- Regler DBX
- Regler Draper
- Regler Hikvision
- Regler Radial Engineering
- Regler Rain Bird
- Regler Sven
- Regler PreSonus
- Regler ART
- Regler Senal
- Regler PDP
- Regler IK Multimedia
- Regler Krom
- Regler ASTRO Gaming
- Regler Gamesir
- Regler Fusion
- Regler GeoVision
- Regler Gossen Metrawatt
- Regler Icon
- Regler IHome
- Regler Media-tech
- Regler Naxa
- Regler PCE Instruments
- Regler Robitronic
- Regler Schaudt
- Regler SecurityMan
- Regler Steca
- Regler AMX
- Regler Universal Remote Control
- Regler Vizio
- Regler Siig
- Regler Intel
- Regler Zephyr
- Regler RGBlink
- Regler StarTech.com
- Regler Konix
- Regler Monster
- Regler Niles
- Regler Gefen
- Regler Polsen
- Regler Inovonics
- Regler Atlantis Land
- Regler Atlas Sound
- Regler Magnus
- Regler LSI
- Regler ATen
- Regler Morningstar
- Regler KanexPro
- Regler Lab Gruppen
- Regler SPL
- Regler SmartAVI
- Regler Natec
- Regler EtiamPro
- Regler Chauvet
- Regler Premier Mounts
- Regler Juniper
- Regler Phoenix Contact
- Regler Music Hall
- Regler Audac
- Regler OSD Audio
- Regler BZBGear
- Regler DreamGEAR
- Regler Crestron
- Regler GOgroove
- Regler PowerA
- Regler LYYT
- Regler Elite Screens
- Regler Bigben Interactive
- Regler Rolls
- Regler Sonifex
- Regler Leviton
- Regler Apricorn
- Regler 8BitDo
- Regler Alfatron
- Regler Highpoint
- Regler Steelplay
- Regler AViPAS
- Regler Auray
- Regler Vakoss
- Regler Areca
- Regler Savio
- Regler Heritage Audio
- Regler Tru Components
- Regler Ltech
- Regler CTA Digital
- Regler Canyon
- Regler MuxLab
- Regler Kanlux
- Regler EXSYS
- Regler Venom
- Regler Amer
- Regler ALC
- Regler LumenRadio
- Regler Moza
- Regler Axor
- Regler Valcom
- Regler AirTurn
- Regler Dangerous Music
- Regler Clarity
- Regler Softube
- Regler RiotPWR
- Regler IPEGA
- Regler Dadson
- Regler Blizzard Lighting
- Regler Heath Zenith
- Regler Re.corder
- Regler Mitzu
- Regler CoolerMaster
- Regler Dragonshock
- Regler MOGA
- Regler HuddleCamHD
- Regler PTZ Optics
- Regler Balam Rush
Neueste Bedienungsanleitung für -Kategorien-
16 Oktober 2024
16 Oktober 2024
5 Oktober 2024
4 Oktober 2024

3 Oktober 2024
1 Oktober 2024
Hori Force Feedback Truck Control System Bedienungsanleitung
1 Oktober 2024
30 September 2024
27 September 2024