Vivitar DVR 943 HDv2 Bedienungsanleitung
Lesen Sie kostenlos die 📖 deutsche Bedienungsanleitung für Vivitar DVR 943 HDv2 (65 Seiten) in der Kategorie Camcorder. Dieser Bedienungsanleitung war für 24 Personen hilfreich und wurde von 2 Benutzern mit durchschnittlich 4.5 Sternen bewertet
Seite 1/65

DVR HDv2 943
Digital Video Recorder
User Manual
© 2009-2011 Sakar Inter ti al, Inc. All ri ts reserved. na on gh
Windows a the Win ws l o are registered tr marks of Microsoft Corporation. nd do og ade
All other tra marks are t pr erty of their res ctive comp ies. de he op pe an

2
Contents
Introduction ................................................................................................................................ 3
What‟s Included ......................................................................................................................... 3
Parts of the Camera ................................................................................................................... 4
Initial Camera Setup .................................................................................................................. 5
Main Camera Modes ................................................................................................................. 8
Camera Technical Specications ............................................................................................... 9
Computer System Requirements WINDOWS OS –................................................................. 10
Computer System Requirements MAC OS –........................................................................... 10
Using Your Digital Camcorder .................................................................................................. 11
Changing Camera Mode .......................................................................................................... 11
Navigating the Menus .............................................................................................................. 12
Video Capture Mode ................................................................................................................ 13
Video Playback Mode .............................................................................................................. 28
Photo Capture Mode ................................................................................................................ 32
Photo Playback Mode .............................................................................................................. 50
Connecting the Digital Video Camera to a TV or HDTV ........................................................... 56
Installing the Software .............................................................................................................. 58
Connecting the Camera to the Computer ................................................................................ 59
Getting Photos and Videos from your Camera to Your Computer ............................................ 60
Get started! .............................................................................................................................. 61
Transferring Images Manually . ................................................................................................ 62
Camera Maintenance .............................................................................................................. 63
Sakar Warranty Card ............................................................................................................... 64
Technical Support .................................................................................................................... 65
Troubleshooting ....................................................................................................................... 65

3
Introduction
Thank you for purchasing this digital video recorder. Everything you need to take quality digital
photos and videos is included with your camera.
Vivitar makes capturing those special moments as easy as possible.
Please read this manual carefully rst in order to get the most out of your digital camera.
Note:
A Class 4 SD card or higher is required.
Most SD cards have a symbol with a “C” and a number within. Make sure the number
inside is a 4 or higher, .
Your digital video recorder supports a Class 4 SD Memory Card - up to 32GB.
In order to use your digital video recorder normally, it is strongly recommended to insert
the SD Memory card before use.
Class 4 SD Memory cards are not included and need to be purchased separately.
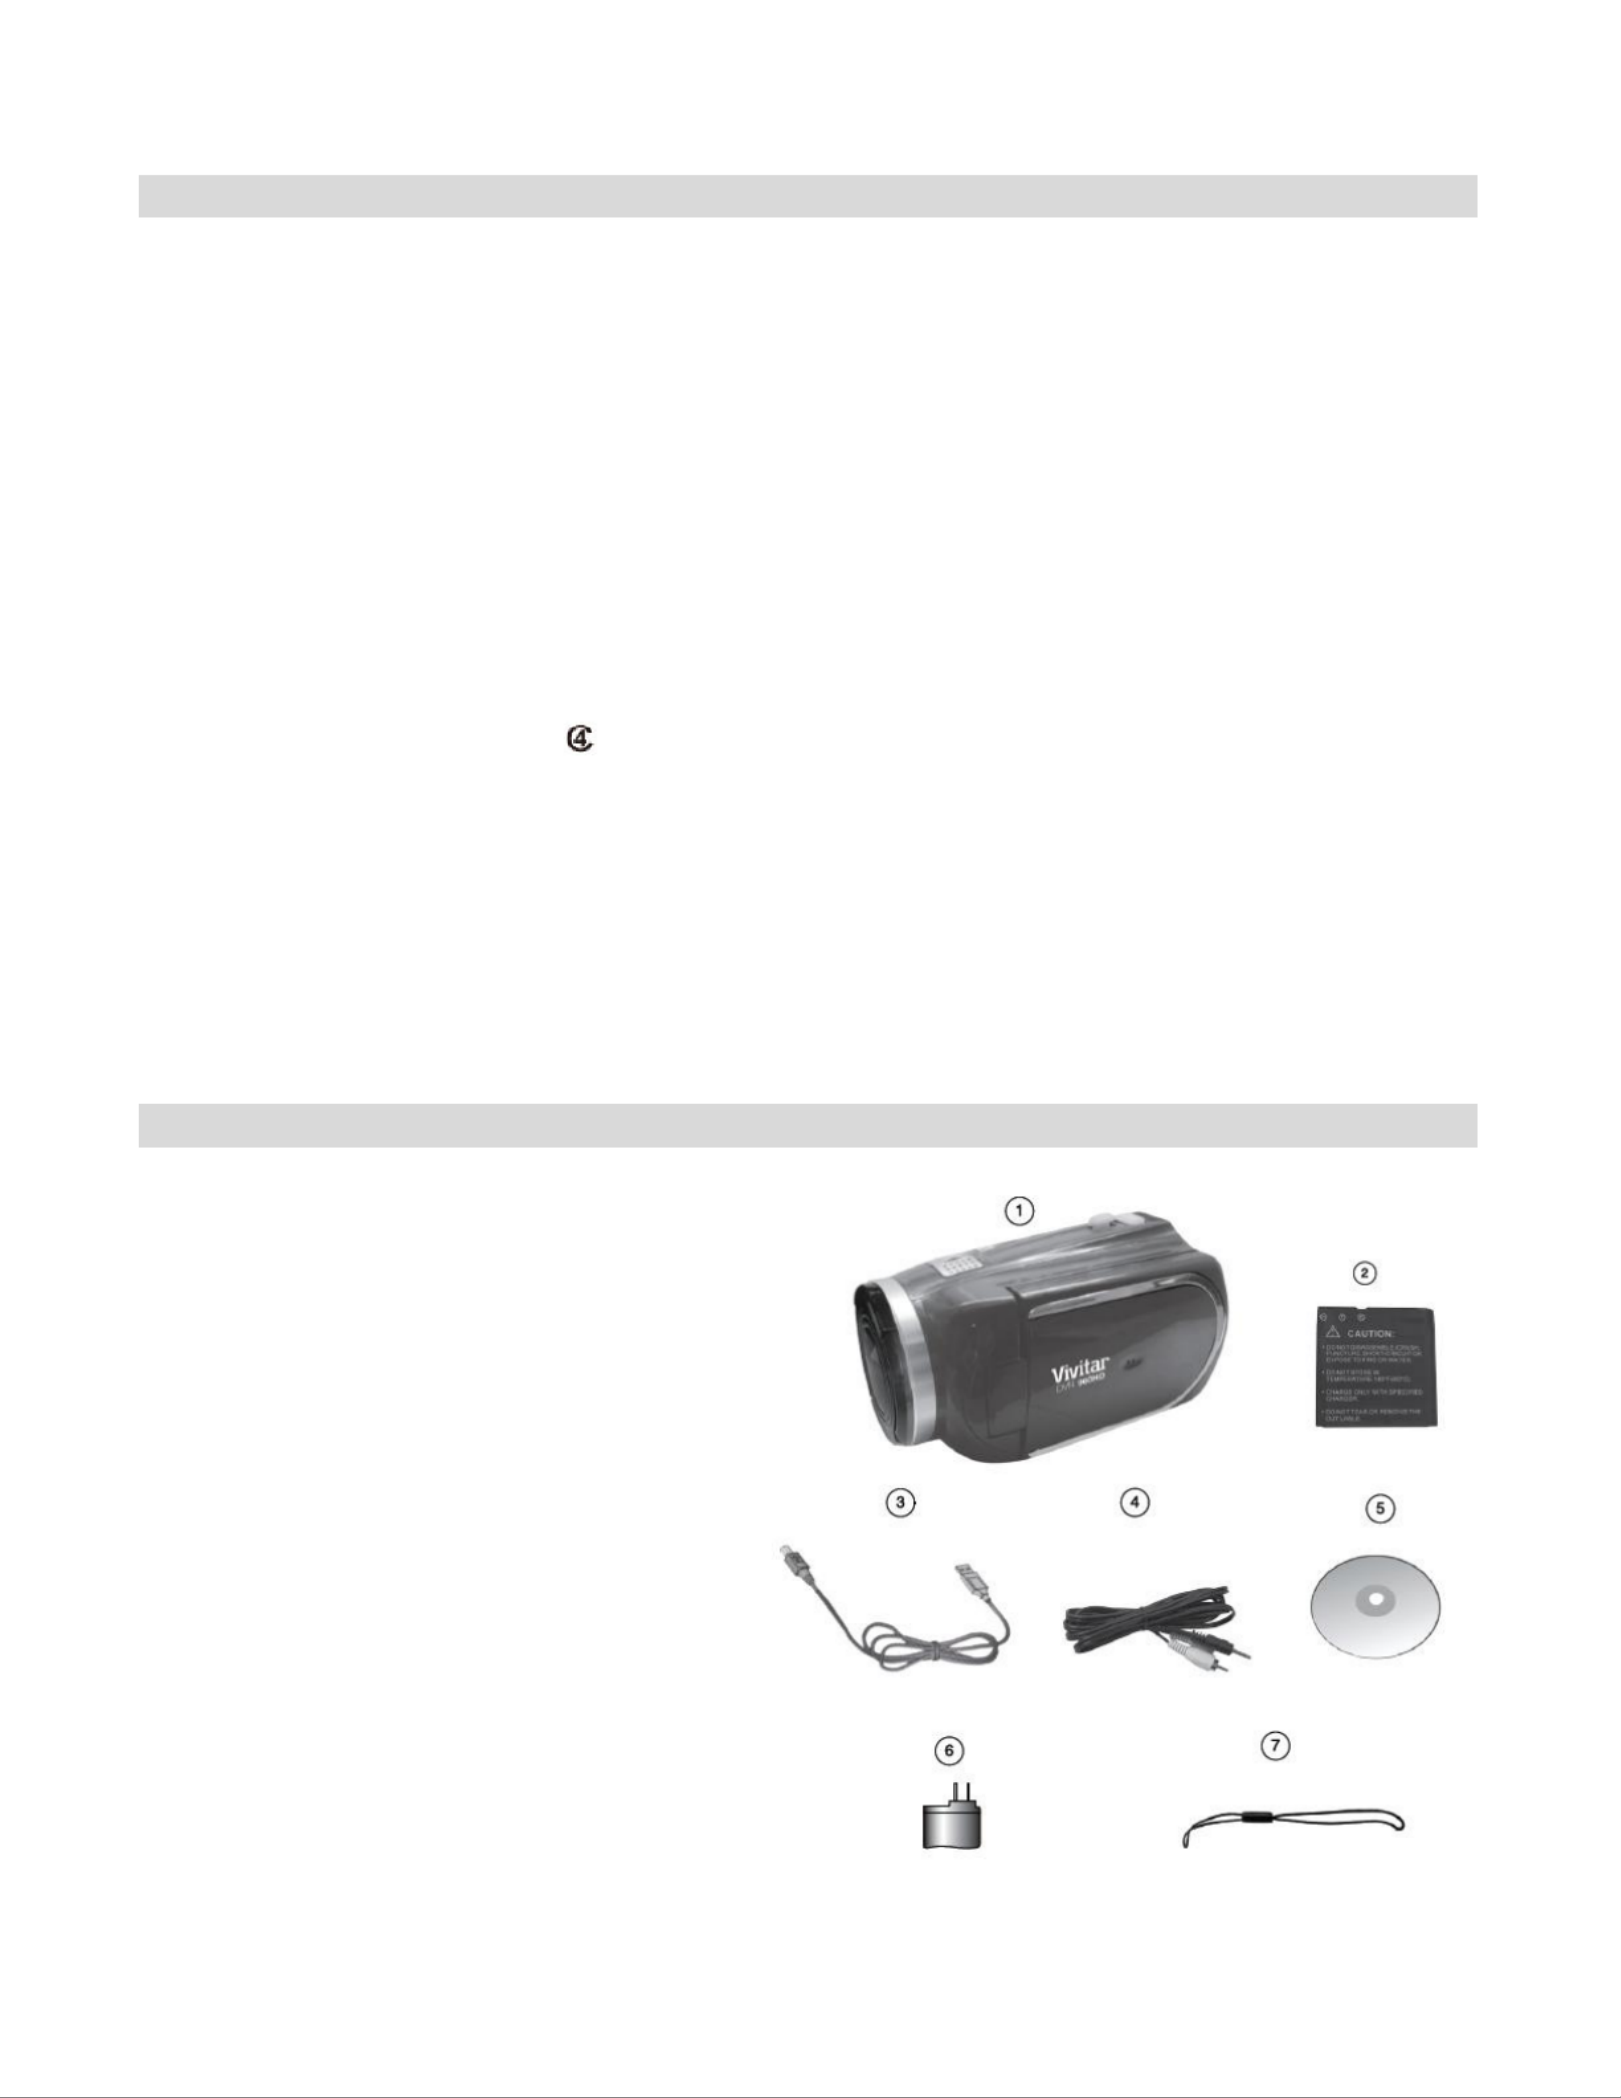
What’s Included
1. Digital Camcorder
2. Lithium Battery
3. USB cable
4. TV Cable
5. Vivitar Experience Image Manager
software Installation CD
6. Lens Cover Strap
7. Hand Strap (not shown)
Note: SD Memory Card not included.

5
Initial Camera Setup
Installing the Battery
Installing Memory Card the
Charge before using your camera for the first
time.
To Charge the Lithium Battery:
1. Power O the camcorder.
2. Make sure the battery is inserted correctly.
3. Connect the camcorder with the USB cable
to the computer or supplied AC Adapter
(which you then plug into an electrical outlet).
4. Allow the battery to charge for at least 4
hours before using the first time.
5. The charge light will turn o when the
battery is fully charged.
Turning On the Camera
Using the Camera
Important: You must
use a Class 4 SD card
or higher SD card
only.
Insert SD Memory
card (up to 32GB)
before use.

7
camera setup. A message will appear: “Continue with Camera Setup?” Select “Yes” to
continue or “ ” to exit the setup.No
Note: If you select “Cancel” and decide to leave the camera setup, the camera will be set
to its default settings. These settings can be adjusted at any time manually using
the menus in the camera.
Setting the Date and Time
The next step in the initial camera setup is to set the date and time on the camera.
Set the Date and Time as Desired and press the OK button to conrm the selection and move to the
next part of the camera setup.
Setting the ViviLink Default Option
Once the Language h been set, you will be asked to as “Confirm ViviLink Photo and Video Social
Network site” to set the default ViviLink destination for photos and videos taken with your camera.
The ViviLink technology allows you to quickly and easily upload your camera‟s photos and videos to
the social networks of your choice with the accompanying software application.
1. First you will asked to choose the default ViviLink social network for Photos. be
2. Highlight the desired default social network and press the OK button to conrm the selection.
3. Next you will be asked to choose the default ViviLink social network for Videos.
4. Highlight the desired default social network and press the button to conrm the selection. OK
5. After the ViviLink Video option is conrmed the camera is now ready to use.

8
Main Camera Modes
Your camera has dierent modes for the various camera functions.
You can switch modes by pressing the button on your camera after the camera has been MODE
powered ON.
Video Capture Mode
Use this mode to capture videos with your digital camera.
This is the default mode when the camera is powered ON.
To take a video, aim your camera as desired and press the button to start the Video Shutter
record. A red record indicator will appear on the LCD screen while record is in progress. To
stop the record, press the button again. The video will be automatically saved Video Shutter
to your camera‟s memory card.
To access the various menus for the Video Capture mode, press the button while in MENU
the Video Capture mode.
Photo Capture Mode
Use this mode to capture pictures with your camera.
After turning on your camera, press the button once to open the Photo Capture mode. MODE
To take a picture, aim your camera as desired and press the Photo Shutter button.
The picture will be automatically saved to your camera‟s memory card.
To access the various menus for the Photo Capture mode, press the button while in MENU
the Photo Capture mode.
Playback Mode (Photos & Videos)
Use this mode to view and manage the photos and videos on your camera.
After turning on your camera, press the button twice to open the Playback mode for MODE
photos and videos. You can scroll through the photos and videos that you‟ve previously taken
to view, edit or delete them as desired.
To access the various menus for the Playback mode for photos and videos, press the MENU
button while in the Playback mode.

10
Computer System Requirements WINDOWS OS –
To be able to download photos and videos to your PC, you will need the following minimum
conguration:
Microsoft® Windows XP with Service Pack 3, Windows Vista with Service Pack 1 or Windows 7
Pentium® 4 processor (or above)
512 MB of RAM, with 250 MB of free hard disk space
-bit Color monitor, 1024 X 768 recommended screen resolution 16
-ROM Drive CD
QuickTime® 6 or higher
Microsoft® Internet Explorer 7 or higher
Windows Media Player 10 or higher
DirectX 9 or higher
Internet connection required
Computer System Requirements MAC OS –
Intel processor running Mac OS X v10.5.x or later
256 MB RAM, MB free hard disk space 250
Display: 1024 x 768 or higher-resolution monitor
QuickTime® 6 or higher
Internet connection required

11
Using Your Digital Camcorder
Make sure the batteries have been inserted properly into your digital camera.
If your camera comes with a rechargeable lithium battery, make sure it is fully charged before
the first use.
Make sure a proper SD card has been inserted correctly into your camera.
Powering the camera ON
Press the Power button to turn your camera ON.
The camera will be in Video Capture mode to start.
Note: Once you flip open the LCD screen your camera automatically turns o– n.
Powering the camera OFF
While the camera is on, you can press the Power button again at any point to turn your camera
OFF. You will see a “Goodbye” splash screen and then the camera will power off completely.
Note: Your digital camera also has an Auto Power Off feature that will automatically turn off
your camera after a specific period of time that your camera is on and left idle. The
Auto Power Off settings can be set from the Auto Power Off settings menu.
Also, once you close the LCD screen, your camera automatically turns off.
Changing Camera Mode
Your camera has three main modes:
1. Video Capture Mode - Use this mode to capture videos with your camera.
2. Photo Capture Mode - Use this mode to capture photos with your camera.
3. Playback Mode (for photos and videos) - Use this mode to view the photos and videos
you have already taken with your camera.

13
Video Capture Mode
The Video Capture Mode allows you to capture videos with your digital video camera. When the
digital video camera is first powered ON, the camera will be in Video Capture Mode.
Taking a Video
1. While in Video Capture Mode, use the LCD display to direct the digital video camera at the
scene you would like to capture.
2. Press the T/Zoom In and W/Zoom Out buttons (on the top section of the digital
video camera) to better set the camera display if desired.
Note: The actual shape of these buttons may vary per camera model.
3. Press the Video Shutter button to START the video capture.
4. You will see a red blinking icon at the top of the LCD indicating that the record is in progress.
The elapsed video record time is shown as you record at the top right corner on the LCD screen.
5. To STOP the video record, press the button again. Video Shutter
6. The video will automatically be saved to the SD Memory card.
Note: Once you have finished recording, the total time you have left for recording additional video
is shown the top right corner on the LCD screen at .
Video Capture Mode Quick Function Buttons
Your digital video camera has Quick Function buttons controlled by the OK joystick button.
Button
Function
Right
Delete
Opens the Delete menu to the „Delete This Video?‟ option
Left
No Function in Video Mode
EV + Up
Light Exposure (-3.0EV ~ +3.0EV)
Increases the Light Exposure +
EV- Down
Light Exposure (-3.0EV ~ +3.0EV)
Reduces the Light Exposure -
OK
LED Light
Turns the LED Flash On / Off

14
ViviLink Button:
The ViviLink button (located on the inside wall of your digital video camera) allows you to easily and
quickly define which social network your captured video will be uploaded to when using the
software application.
1. While in Video Capture mode, press the button. ViviLink
2. The ViviLink for Videos Menu opens.
3. Press the joystick button or to highlight the desired menu option. UP DOWN
4. Press the button on the joystick to select and save the highlighted menu option. OK
5. selected option icon will appear on the selected item and you will return to the previous A
mode.
6. An icon reflecting your selection will display on the LCD screen.
7. Once you have selected the ViviLink destination site, the selection applies only to the current
video you are capturing.
Remember: The ViviLink feature is deactivated by default, therefore select the ViviLink
destination before capturing a video. A ViviLink destination will only be assigned to a photo or
video if you manually set it from the ViviLink menu.
Changing the ViviLink destination site will also make the selected site the new default ViviLink
option. A new default can be selected at any time using this menu.
After you have captured a video and would like to add the ViviLink (or change the ViviLink if it
already has one) you can do so by viewing the captured video(s) in the Video Playback Mode
and pressing the button to access the ViviLink for Videos Menu. MENU
Hide/Show the LCD Icons
The display of the icons on the LCD screen can be hidden or visible as desired.
1. Hold the button for 2 seconds to hide the display of the icons on the screen. MODE
2. Press the button again to redisplay the icons on the screen. MODE

15
Video Capture Mode Menus
The following are the menus that appear in your digital video camera‟s Video Capture Mode:

16
Scene Menu
The Scene Menu allows you to choose scene settings that allow your camera to adapt properly to
your current environment.
1. Press the button to open the menus for the current mode. MENU
2. Press the joystick button or to scroll and select the Scene menu. LEFT RIGHT
3. Press the joystick button or to highlight the desired menu option. UP DOWN
4. Press the button on the joystick to select and confirm the highlighted menu option. OK
5. selected option icon will appear on the selected item. A
6. Press the joystick button or to select the next menu item. LEFT RIGHT
7. Press the button to exit the menu and return to your previous mode. MODE
8. An icon reflecting your selection will display on the LCD screen.
9. Remember that this setting will be saved by your digital video camera until you manually change
the setting or restore the camera‟s default factory settings.
Image Size Menu
The Image Size menu allows you to choose the desired size of the images taken by your digital
video camera. Keep in mind that images with a higher resolution will also take up more of your
camera memory. ‟s
1. Press the button to open the menus for the current mode. MENU
2. Press the joystick button or to scroll and select the Image Size menu. LEFT RIGHT
3. Press the joystick button or to highlight the desired menu option UP DOWN .
4. Press the button on the joystick to select and confirm the highlighted menu option. OK
5. selected option icon will appear on the selected item. A
6. Press the joystick button or to select the next menu item. LEFT RIGHT
7. Press the button to exit the menu and return to your previous mode. MODE
8. An icon reflecting your selection will display on the LCD screen.

17
9. Remember that this setting will be saved by your digital video camera until you manually change
the setting or restore the camera‟s default factory settings.
Quality Menu
The Quality menu allows you to select the desired quality level of the images taken by your camera.
Keep in mind that images with a higher image quality level will also take up more memory on your
camera.
1. Press the button to open the menus for the current mode. MENU
2. Press the joystick button or to scroll and select the Quality menu. LEFT RIGHT
3. Press the joystick button or UP DOWN to highlight the desired menu option.
4. Press the button on the joystick to select and confirm the highlighted menu option. OK
5. selected option icon will appear on the selected item. A
6. Press the joystick button or to select the next menu item. LEFT RIGHT
7. Press the button to exit the menu and return to your previous mode. MODE
8. An icon reflecting your selection will display on the LCD screen.
9. Remember that this setting will be saved by your digital video camera until you manually change
the setting or restore the camera‟s default factory settings.
Anti-Shake Menu
The Anti-Shake feature reduces image corruption that can be caused by movement of the camera
while capturing the image.
Note: The Anti-Shake menu may not be available in some versions of this camera.
1. Press the button to open the menus for the current mode. MENU
2. Press the joystick button or to scroll and select the Anti-Shake menu. LEFT RIGHT
3. Press the joystick button or UP DOWN to highlight the desired menu option.
4. Press the button on the joystick to select and confirm the highlighted menu option. OK

18
5. selected option icon will appear on the selected item. A
6. Press the joystick button or to select the next menu item. LEFT RIGHT
7. Press the button to exit the menu and return to your previous mode. MODE
8. An icon reflecting your selection will display on the LCD screen.
9. Remember that this setting will be saved by your digital video camera until you manually change
the setting or restore the camera‟s default factory settings.
White Balance Menu
The White Balance feature allows your camera to adjust the coloring of the captured images
depending on the type of light source in the current environment.
Properly adjusting the White Balance setting to match your current environment will allow the
camera to properly balance the colors in the images that are taken with your camera.
1. Press the button to open the menus for the current mode. MENU
2. Press the joystick button or to scroll and select the White Balance menu. LEFT RIGHT
3. Press the joystick button or UP DOWN to highlight the desired menu option.
4. Press the button on the joystick to select and confirm the highlighted menu option. OK
5. selected option icon will appear on the selected item. A
6. Press the joystick button or to select the next menu item. LEFT RIGHT
7. Press the button to exit the menu and return to your previous mode. MODE
8. An icon reflecting your selection will display on the LCD screen.
9. Remember that this setting will be saved by your digital video camera until you manually change
the setting or restore the camera‟s default factory settings.
Color Eect Menu
You can choose to add a color effect to the images taken with your camera.
1. Press the button to open the menus for the current mode. MENU

20
When the environment has more light than is needed, reduce the exposure setting (by using the
negative - count) to reduce the amount of light allowed into the lens by your camera.
If the environment has less light (darker) than is needed, increase the exposure setting (by using
the positive + count) to increase the amount of light allowed into the lens by your camera.
1. Press the button to open the menus for the current mode. MENU
2. Press the joystick button or to scroll and select the Light Exposure menu. LEFT RIGHT
3. Press the joystick button or to highlight the desired menu option. UP DOWN
4. Press the button on the joystick to select and conrm the highlighted menu option. OK
5. selected option icon will appear on the selected item. A
6. Press the joystick button or to select the next menu item. LEFT RIGHT
7. Press the button to exit the menu and return to your previous mode. MODE
8. An icon reecting your selection will display on the LCD screen.
9. Remember that this setting will be saved by your digital video camera until you manually change
the setting or restore the camera‟s default factory settings.
ISO Menu
The ISO menu allows you to set the level of sensitivity that your camera has to light in the
surrounding environment. When the ISO level is increased, the image sensor in your camera will be
more sensitive to light and allow you to capture images in lower-light situations. The higher
sensitivity to light however, may reduce the quality of the images that are taken.
When the ISO is reduced, the image sensor in your camera will be less sensitive to light and will
optimize the image quality in environments with bright lighting.
1. Press the button to open the menus for the current mode. MENU
2. Press the joystick button or to scroll and select the ISO menu. LEFT RIGHT

22
7. Press the button to exit the menu and return to your previous mode. MODE
8. An icon reflecting your selection will display on the LCD screen.
9. Remember that this setting will be saved by your digital video camera until you manually change
the setting or restore the camera‟s default factory settings.
Language Menu
You can select your digital video camera language setting by selecting the desired language from ‟s
the Language menu.
1. Press the button to open the menus for the current mode. MENU
2. Press the joystick button or to scroll and select the Language menu. LEFT RIGHT
3. Press the joystick button or to highlight the desired menu option UP DOWN .
4. Press the butto on the joystick to select and confirm the highlighted menu option. OK n
5. selected option icon will appear on the selected item. A
6. Press the joystick button or to select the next menu item. LEFT RIGHT
7. Press the button to exit the menu and return to your previous mode. MODE
8. Remember that this setting will be saved by your digital video camera until you manually change
the setting or restore the camera‟s default factory settings.
Date/Time Menu
When you capture an image with your camera, the image will include a time stamp with the date
and time that the image was taken.
The Date/Time menu allows you to set your camera‟s date and time as desired. You can also
disable the timestamp for future images that will be taken with your camera.
On The timestamp will appear on photos taken. –
O The date stamp will not appear on photos taken. –

26
4. Press the joystick button or to hiUP DOWN ghlight the desired menu option: „Yes‟ or „Cancel‟.
5. To Format the Memory Card: „Yes‟
If you would like to proceed with the format, select „Yes‟ and press the button on theOK
joystick to conrm .
The memory card will be completely formatted.
A message will appear conrming that your memory card rmat has completed. fo
Y will automatically exit the menu and return to the previous mode. ou
6. To Exit Format the Memory Card: „Cancel‟
If you would like to exit the format without formatting the memory card, select „Cancel‟ and press
the button on the joystick. OK
7. Press the button at any time to exit the menu and return to your previous mode. MODE
Firmware Settings (Restore Factory Settings) Menu
Use this menu to view the Firmware version on your digital video camera or to reset your camera
settings to the Factory Default Settings.
1. Press the button to open the menus for the current mode. MENU
2. Press the joystick button or to scroll and select the Restore Factory Settings LEFT RIGHT
menu.
3. To reset the digital video camera‟s settings to the Factory Default Settings, press button OK on
the joystick Restore Factory Setting to select „ ‟.
4. Press the joystick button or to hiUP DOWN ghlight the desired menu option: „Yes‟ or „No‟.
If you would like to proceed with the reset, select „Yes‟ and press the OK button on the
joystick to conrm.
The settings will be reset and a message will appear indicating that the settings have been
reset.
You will automatically exit the menu and return to the previous mode with the digital video
camera settings set to the Factory Default Settings.
Produktspezifikationen
Marke: | Vivitar |
Kategorie: | Camcorder |
Modell: | DVR 943 HDv2 |
Brauchst du Hilfe?
Wenn Sie Hilfe mit Vivitar DVR 943 HDv2 benötigen, stellen Sie unten eine Frage und andere Benutzer werden Ihnen antworten
Bedienungsanleitung Camcorder Vivitar

28 August 2024

28 August 2024

28 August 2024

28 August 2024

28 August 2024

28 August 2024

27 August 2024

22 Mai 2024

5 Mai 2024

11 April 2024
Bedienungsanleitung Camcorder
- Camcorder Samsung
- Camcorder 3M
- Camcorder Sanyo
- Camcorder BenQ
- Camcorder Gembird
- Camcorder Genius
- Camcorder Hama
- Camcorder HP
- Camcorder Lexibook
- Camcorder Macally
- Camcorder Medion
- Camcorder Nedis
- Camcorder Philips
- Camcorder SilverCrest
- Camcorder Sony
- Camcorder T'nB
- Camcorder Trust
- Camcorder Panasonic
- Camcorder OK
- Camcorder Canon
- Camcorder Linksys
- Camcorder Maginon
- Camcorder Bresser
- Camcorder Denver
- Camcorder Intenso
- Camcorder König
- Camcorder National Geographic
- Camcorder Renkforce
- Camcorder Trevi
- Camcorder Braun
- Camcorder Kenwood
- Camcorder Sharp
- Camcorder Pyle
- Camcorder Salora
- Camcorder Aiptek
- Camcorder Coby
- Camcorder Lenco
- Camcorder Mpman
- Camcorder Nilox
- Camcorder Polaroid
- Camcorder Jay-Tech
- Camcorder JVC
- Camcorder Xiaomi
- Camcorder Hitachi
- Camcorder Hyundai
- Camcorder Toshiba
- Camcorder Olympus
- Camcorder Zoom
- Camcorder Garmin
- Camcorder GOCLEVER
- Camcorder Lamax
- Camcorder Prixton
- Camcorder Mio
- Camcorder Sencor
- Camcorder ViewSonic
- Camcorder Marshall
- Camcorder Nikkei
- Camcorder Samson
- Camcorder SBS
- Camcorder Fujifilm
- Camcorder MINOX
- Camcorder Nikon
- Camcorder Ricoh
- Camcorder DJI
- Camcorder Dragon Touch
- Camcorder EnVivo
- Camcorder Midland
- Camcorder Vtech
- Camcorder Kodak
- Camcorder Agfa
- Camcorder Easypix
- Camcorder Konica-Minolta
- Camcorder Leica
- Camcorder Minolta
- Camcorder Praktica
- Camcorder Rollei
- Camcorder SeaLife
- Camcorder Traveler
- Camcorder IGet
- Camcorder Contax
- Camcorder Mamiya
- Camcorder Voigtländer
- Camcorder Yashica
- Camcorder Bauer
- Camcorder Overmax
- Camcorder Airis
- Camcorder Akaso
- Camcorder Uniden
- Camcorder Kitvision
- Camcorder Kogan
- Camcorder Elmo
- Camcorder Energy Sistem
- Camcorder Jobo
- Camcorder Soundmaster
- Camcorder Bolex
- Camcorder Magellan
- Camcorder TomTom
- Camcorder Kyocera
- Camcorder Cobra
- Camcorder AEE
- Camcorder CamOne
- Camcorder Contour
- Camcorder EVOLVEO
- Camcorder GoPro
- Camcorder Quintezz
- Camcorder ION
- Camcorder DNT
- Camcorder Insignia
- Camcorder Swann
- Camcorder DataVideo
- Camcorder Aida
- Camcorder Prestigio
- Camcorder Mediacom
- Camcorder Tracer
- Camcorder Cisco
- Camcorder RCA
- Camcorder ARRI
- Camcorder Transcend
- Camcorder Oregon Scientific
- Camcorder Blackmagic Design
- Camcorder Insta360
- Camcorder Zorki
- Camcorder DOD
- Camcorder Drift
- Camcorder Ematic
- Camcorder FHD 1080P
- Camcorder Flip
- Camcorder ISAW
- Camcorder Leotec
- Camcorder MMTC
- Camcorder Mobius
- Camcorder Naxa
- Camcorder Replay
- Camcorder Sakar
- Camcorder SJCAM
- Camcorder Spypoint
- Camcorder Storex
- Camcorder TacTic
- Camcorder Veho
- Camcorder YI
- Camcorder Zagg
- Camcorder Best Buy
- Camcorder AgfaPhoto
- Camcorder Vupoint Solutions
- Camcorder Kaiser Baas
- Camcorder Microtek
- Camcorder Runcam
- Camcorder Activeon
- Camcorder BlackVue
- Camcorder Braun Phototechnik
- Camcorder Hamlet
- Camcorder RSC
- Camcorder Kobian
- Camcorder Hamilton Buhl
- Camcorder Contour Design
- Camcorder Curve
- Camcorder Beaulieu
- Camcorder Qoltec
- Camcorder Stealth Cam
- Camcorder DXG
- Camcorder ATN
- Camcorder Whistler
- Camcorder Aqua-Vu
Neueste Bedienungsanleitung für -Kategorien-

25 November 2024

25 November 2024

12 Oktober 2024

12 Oktober 2024

8 Oktober 2024

7 Oktober 2024

3 Oktober 2024

28 September 2024

24 September 2024

23 September 2024