Uniden EXI 8560 Bedienungsanleitung
Lesen Sie kostenlos die 📖 deutsche Bedienungsanleitung für Uniden EXI 8560 (13 Seiten) in der Kategorie Telefon. Dieser Bedienungsanleitung war für 34 Personen hilfreich und wurde von 2 Benutzern mit durchschnittlich 4.5 Sternen bewertet
Seite 1/13

At Uniden, we'll take care of you!
Thank you for purchasing a Uniden product.
If you have any questions or problems,
please do not return this product to the place of purchase.
Having Trouble?
Our customer care specialists are here to help you! Visit our website at
www.uniden.com or call our Customer Hotline at 1-800-297-1023
during regular business hours.*
Need a Part?
To order headsets, replacement batteries or other accessories, visit our
website at www.uniden.com 1-800-554-3988 or call during regular
business hours.*
Help for our Special
Needs Customers
Uniden provides a customer service hotline for accessibility questions. If
you have disability and need customer service assistance or if you have any
questions about how Uniden's products can accommodate persons with
disabilities, please call the accessibility voice/TTY line:
1-800-874-9314 (voice or TTY).
Accessibility information can be found on our website, www.uniden.com,
under the "Accessibility" link. If your call is received outside of our business
hours, leave us a message and we will call you back.
* Central Standard Time. Detailed customer service hours are available at www.uniden.com.
©2007 Uniden America Corporation, Fort Worth, Texas.
Printed in China UCZZ01064BZ(0)
UNIDEN
CORDLESS
TELEPHONES
EXI8560 Series

1) Installing the Phone
1-1. Choosing the Best Location
To get the best performance out of your new phone, put it in the best location:
Near an AC outlet
and a telephone
wall jack.
• Microwave ovens
• Refrigerators
• Fluorescent
lighting
• Dust
• Excessive
moisture
• Other cordless
telephones
In a
centrally-located
open area.
PLACE YOUR BASE
• TVs
• Other electronics
• Direct sunlight
• Extreme temperatures
• Personal computers
• Wireless LAN
equipment
• Dust
• Excessive
moisture
• Areas with
a lot of
background
noise
• Shock
• Vibration
• Shock
• Vibration
TRY TO AVOID
Notes: For maximum range
Keep both the base and handset antennas free of obstruction.
When the handset is not in use, place the handset in an upright position.
Metal and reinforced concrete may aect cordless telephone performance.
•
•
•
1-2. Plug in the Battery
Use only the Uniden BT-905 rechargeable battery pack supplied with your phone.
1Locate the battery pack,
battery cover and the handset. 2Line up the red and black wires
on the battery pack connector
with the sticker in the handset's
battery compartment.
3Place the cover over the
battery compartment and
slide it up into place.
Push the battery connector in firmly.
(You should hear it click into place.)
Red
Black
1-3. Plug in the Base
Don’t put any power cord where people might trip over it or step on it. If a power cord becomes
chafed or worn out, it can create a re or electrical hazard.
Note: For optimum battery life, charge your handset completely before you connect the telephone
cord. The rst time you charge a new battery, allow 15 to 20 hours.
4Connect the AC adapter to the jack.DC IN 9V
Route the cord through the molded wiring channel.
6
5
Connect the AC adapter
to a standard 120V
AC wall outlet.
DO NOT use an AC outlet
controlled by a wall switch.
To AC outlet
AC adapter
(supplied)
To DC IN 9V
4Connect the AC adapter to the jack.DC IN 9V
Route the cord through the molded wiring channel.
6
5
Connect the AC adapter
to a standard 120V
AC wall outlet.
DO NOT use an AC outlet
controlled by a wall switch.
To AC outlet
AC adapter
(supplied)
To DC IN 9V
7Place the handset in the base.
What if the charge LED doesn't
light up?
• Check AC adapter connection.
• Make sure you are not using
an outlet that's controlled by
a wall switch.
Make sure that
the LED /in use
illuminates.
7Place the handset in the base.
What if the charge LED doesn't
light up?
• Check AC adapter connection.
• Make sure you are not using
an outlet that's controlled by
a wall switch.
Make sure that
the LED /in use
illuminates.
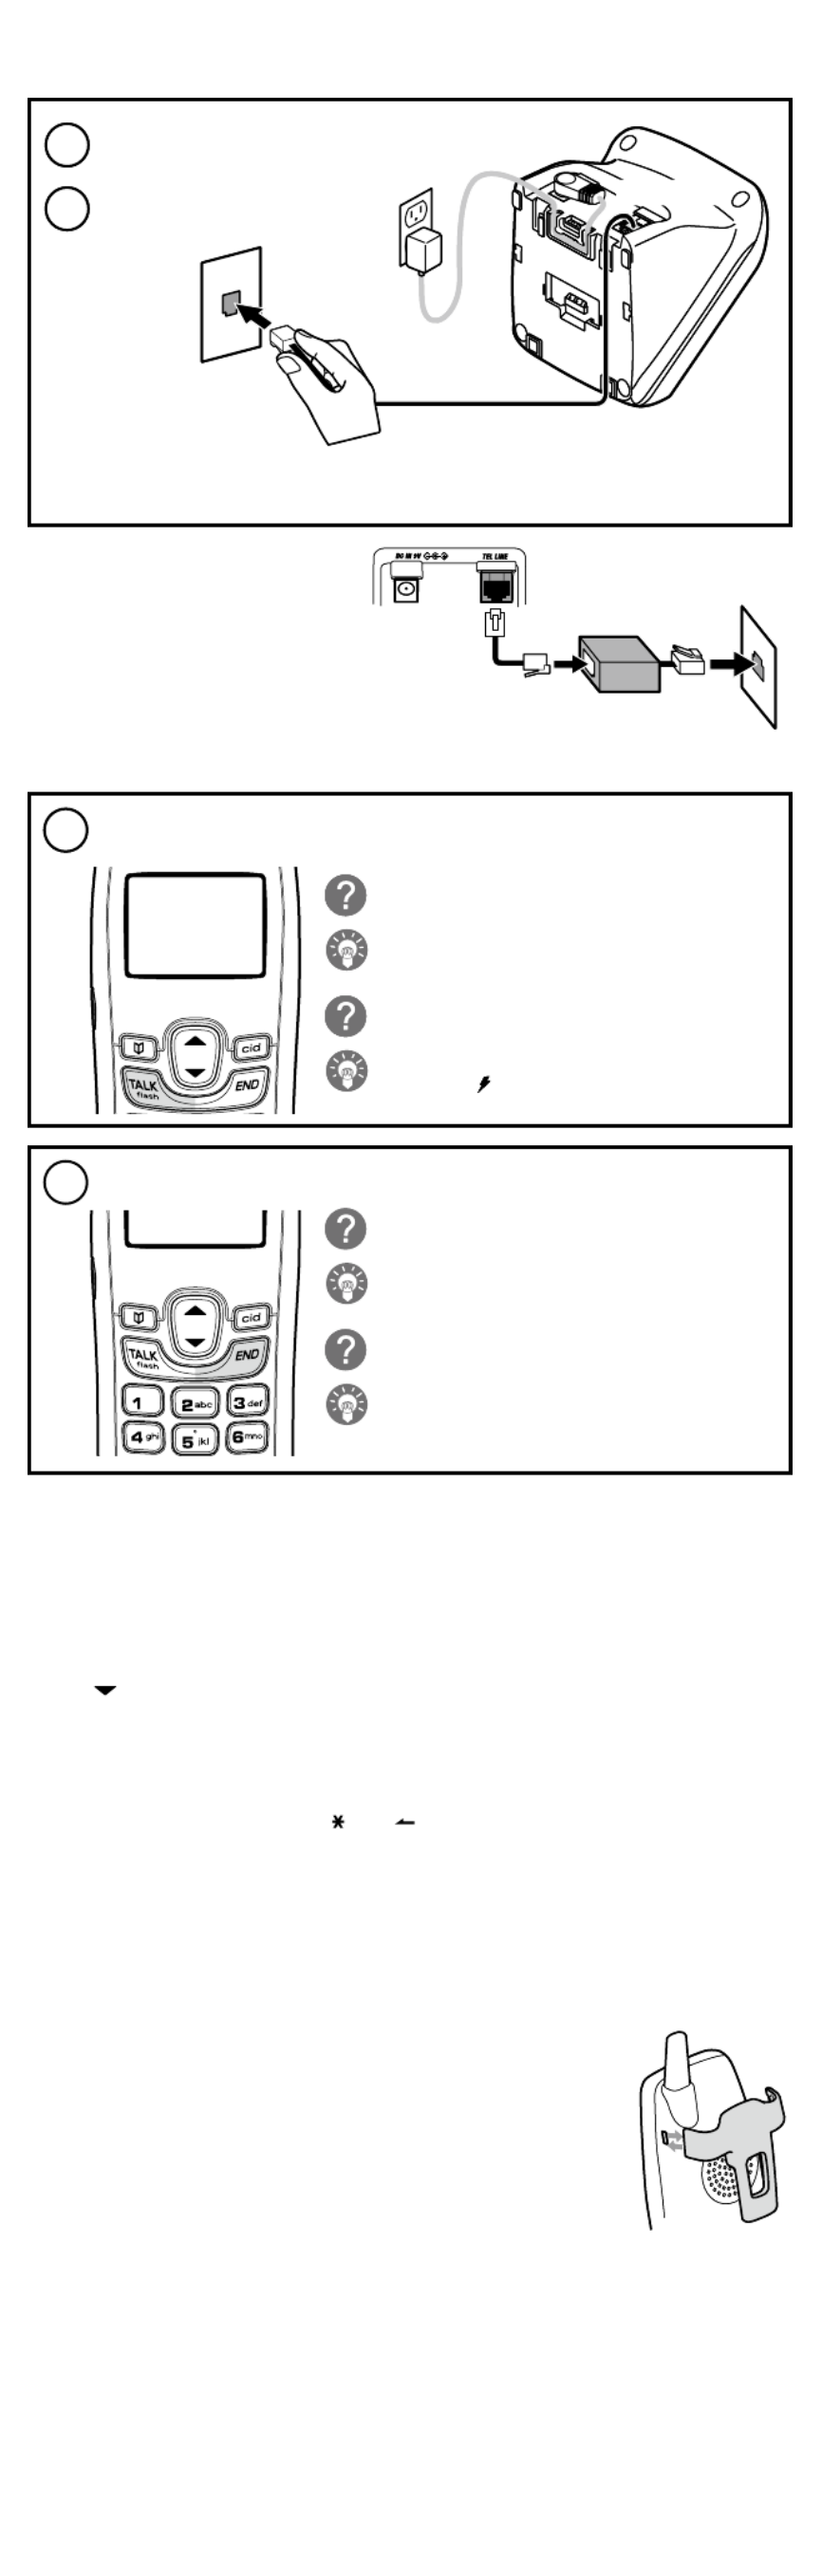
1-4. Connect the Telephone Cord
If you receive high-speed internet service
through your telephone line (referred to as
DSL), you should install a DSL lter between
the telephone base and the wall jack. Standard
telephones often can’t operate correctly without
a DSL lter.
Test the connection
11 Make a quick test call, and then press to hang up.[END]
What if the call doesn't go through?
Try changing the dial mode (see below).
What if there is a lot of static?
Check the sources of interference described in section
1-1 on Choosing the best location: is the base near
any of those?
Changing from tone to pulse dialing (DIAL)
Your phone can communicate with the telephone network in two dierent ways: tone dialing or pulse dialing.
These days, most phone networks use a method called tone dialing, so your phone comes programmed for tone
dialing.
If your phone company uses pulse dialing, you need to change your phone’s dial settings. If you don't get a dial
tone or can't connect to the telephone network, follow the steps below to modify your phone’s settings:
With the phone in standby, press and hold . [cid/menu]
Press to move the pointer to DIAL.[ ]
Press to set the phone to pulse dialing.[select/channel]
Press [END] put the handset back in the base and . The handset communicates the new setting to the
base.
Note: If you use pulse dialing and you need to send DTMF tones during a call (if you're using an automated
response system, for example), press to temporarily switch to tone dialing. When the call [ /tone/ ]
ends, the phone automatically returns to pulse dialing mode.
Now your phone is ready to use!
1-5. Attach the Belt Clip
To attach the belt clip
Insert the tabs on the side of the belt clip into the holes on either side of the handset.
Press the belt clip down until it clicks into place. (Tug on the clip to make sure it’s
secure.)
To remove the belt clip
Gently pull the tabs out of the holes, then slide the belt clip o of the handset.
1)
2)
3)
4)
8Connect the telephone cord to the
TEL LINE jack on the rear of the base.
9Connect the telephone cord
to a telephone wall jack.
To telephone
wall jack
Telephone cord (supplied)
Note: If the telephone cord does not fit into your telephone wall jack, contact your
local phone provider for assistance.
To TEL LINE
Telephone
wall jack
Telephone cord
DSL filter
Telephone
wall jack
Telephone cord
DSL filter
10 Pick up the handset from the base and press [TALK/flash].
You should hear a dial tone, and the display should show TALK.
What if I can't hear a dial tone?
Check the telephone cord connection on the base.
What if the display doesn't show TALK?
Put the handset back in the base for at least five seconds.
Make sure the LED flashes. /in use
Talk 0:01
Produktspezifikationen
| Marke: | Uniden |
| Kategorie: | Telefon |
| Modell: | EXI 8560 |
Brauchst du Hilfe?
Wenn Sie Hilfe mit Uniden EXI 8560 benötigen, stellen Sie unten eine Frage und andere Benutzer werden Ihnen antworten
Bedienungsanleitung Telefon Uniden

13 Oktober 2024
11 Oktober 2024
2 Oktober 2024
28 September 2024
21 September 2024
20 September 2024
20 September 2024
18 September 2024
14 September 2024
14 September 2024
Bedienungsanleitung Telefon
- Telefon Samsung
- Telefon Infiniton
- Telefon Tristar
- Telefon Acer
- Telefon Anker
- Telefon Apple
- Telefon Asus
- Telefon BeeWi
- Telefon Hama
- Telefon Lexibook
- Telefon Logitech
- Telefon Medion
- Telefon Microsoft
- Telefon Philips
- Telefon SilverCrest
- Telefon Sony
- Telefon Sweex
- Telefon Tevion
- Telefon Trust
- Telefon Panasonic
- Telefon LG
- Telefon Roland
- Telefon ZyXEL
- Telefon Flex
- Telefon AEG
- Telefon Siemens
- Telefon Essentiel B
- Telefon Yamaha
- Telefon Yealink
- Telefon CSL
- Telefon Linksys
- Telefon XD Enjoy
- Telefon Netgear
- Telefon Denver
- Telefon Jacob Jensen
- Telefon MarQuant
- Telefon Renkforce
- Telefon Telefunken
- Telefon Thomson
- Telefon Trevi
- Telefon Blaupunkt
- Telefon Grundig
- Telefon Pyle
- Telefon GE
- Telefon Nordmende
- Telefon Fortinet
- Telefon Topcom
- Telefon ARCHOS
- Telefon Bang And Olufsen
- Telefon Pioneer
- Telefon Geemarc
- Telefon Jabra
- Telefon JBL
- Telefon Krüger And Matz
- Telefon Motorola
- Telefon Nokia
- Telefon PEAQ
- Telefon Sennheiser
- Telefon Xiaomi
- Telefon Olympia
- Telefon Switel
- Telefon Edenwood
- Telefon Hitachi
- Telefon ITT
- Telefon MT Logic
- Telefon Gigaset
- Telefon Toshiba
- Telefon Allview
- Telefon Cubot
- Telefon Fysic
- Telefon Lifetec
- Telefon Sencor
- Telefon Lindy
- Telefon Plantronics
- Telefon VXi
- Telefon Fenton
- Telefon Lenovo
- Telefon Marmitek
- Telefon Marshall
- Telefon Scosche
- Telefon TRENDnet
- Telefon Sagem
- Telefon AVM
- Telefon Parrot
- Telefon AVerMedia
- Telefon Zebra
- Telefon EnVivo
- Telefon Honor
- Telefon Aastra
- Telefon AGFEO
- Telefon Alcatel
- Telefon Amplicomms
- Telefon Audioline
- Telefon Auerswald
- Telefon Belgacom
- Telefon Binatone
- Telefon Brondi
- Telefon DeTeWe
- Telefon Doro
- Telefon Emporia
- Telefon Hagenuk
- Telefon Profoon
- Telefon Swatch
- Telefon Swissvoice
- Telefon Tiptel
- Telefon Vtech
- Telefon Logik
- Telefon Wiko
- Telefon Mackie
- Telefon Mitel
- Telefon NEC
- Telefon Overmax
- Telefon Airis
- Telefon Huawei
- Telefon Oricom
- Telefon Ranex
- Telefon Alcatel-Lucent
- Telefon Avaya
- Telefon Konftel
- Telefon Polycom
- Telefon Snom
- Telefon Wantec
- Telefon DrayTek
- Telefon Ascom
- Telefon Fanvil
- Telefon GPO
- Telefon Humantechnik
- Telefon Sagemcom
- Telefon RugGear
- Telefon D-Link
- Telefon T-Mobile
- Telefon Sylvania
- Telefon Kyocera
- Telefon EVOLVEO
- Telefon SPC
- Telefon Crosley
- Telefon Xblitz
- Telefon JPL
- Telefon HTC
- Telefon Prestigio
- Telefon Viking
- Telefon Auro
- Telefon BlackBerry
- Telefon Ericsson
- Telefon ZTE
- Telefon Cisco
- Telefon Grandstream
- Telefon Swisstone
- Telefon Unify
- Telefon OpenVox
- Telefon RCA
- Telefon OnePlus
- Telefon Bintec-elmeg
- Telefon Bogen
- Telefon Oppo
- Telefon Patton
- Telefon CAT
- Telefon Planet
- Telefon AT&T
- Telefon Realme
- Telefon Oregon Scientific
- Telefon EnGenius
- Telefon Mikrotik
- Telefon Davolink
- Telefon Gigaset Pro
- Telefon Innovaphone
- Telefon KPN
- Telefon Logicom
- Telefon Maxcom
- Telefon Oukitel
- Telefon Premier
- Telefon Proximus
- Telefon Sitecom
- Telefon SMC
- Telefon Spectralink
- Telefon Steren
- Telefon Sunstech
- Telefon Tecdesk
- Telefon Telstra
- Telefon Vimar
- Telefon British Telecom
- Telefon MXL
- Telefon AirLive
- Telefon Mitsai
- Telefon MyPhone
- Telefon BLU
- Telefon Audiocodes
- Telefon Legrand
- Telefon BT
- Telefon Amplicom
- Telefon Opel Mobile
- Telefon Digium
- Telefon Gamdias
- Telefon Chacon
- Telefon Clear Sounds
- Telefon On-Q
- Telefon Crestron
- Telefon 3Com
- Telefon Lewitt
- Telefon Teledex
- Telefon Tecno
- Telefon Sedna
- Telefon ALLO
- Telefon Hamlet
- Telefon Akuvox
- Telefon CyberData Systems
- Telefon CTA Digital
- Telefon Canyon
- Telefon Primare
- Telefon Dopod
- Telefon Neat
- Telefon Syco
- Telefon Tador
- Telefon 4family
- Telefon ArtDio
- Telefon Valcom
- Telefon Edge-Core
- Telefon Clarity
- Telefon Vogtec
- Telefon Olitech
- Telefon Cortelco
- Telefon Algo
- Telefon Future Call
- Telefon Dnake
- Telefon Liam&Daan
- Telefon FlyingVoice
Neueste Bedienungsanleitung für -Kategorien-

1 Dezember 2024
1 Dezember 2024

30 November 2024

15 Oktober 2024
15 Oktober 2024
14 Oktober 2024
9 Oktober 2024
7 Oktober 2024
7 Oktober 2024

6 Oktober 2024