Tascam DR-40 Bedienungsanleitung
Tascam
Sprachrekorder
DR-40
Lesen Sie kostenlos die 📖 deutsche Bedienungsanleitung für Tascam DR-40 (148 Seiten) in der Kategorie Sprachrekorder. Dieser Bedienungsanleitung war für 28 Personen hilfreich und wurde von 2 Benutzern mit durchschnittlich 4.5 Sternen bewertet
Seite 1/148

D01242000B
DR-40
Linear PCM Recorder
ENGLISH
FRANÇAIS
ESPAÑOL
DEUTSCH
ITALIANO
RUSSIAN
OWNER'S MANUAL
MODE D’EMPLOI
MANUAL DEL USUARIO
BEDIENUNGSANLEITUNG
MANUALE DI ISTRUZIONI
РУКОВОДСТВО ПОЛЬЗОВАТЕЛЯ

2 TASCAM DR-40
• TASCAM is a trademark of TEAC CORPORATION, registered
in the U.S. and other countries.
• SDXC Logo is a trademark of SD-3C, LLC.
• Supply of this product does not convey a license nor imply
any right to distribute MPEG Layer-3 compliant content
created with this product in revenue-generating broadcast
systems (terrestrial, satellite, cable and/or other distribution
channels), streaming applications (via Internet, intranets
and/or other networks), other content distribution systems
(pay-audio or audio-on-demand applications and the like)
or on physical media (compact discs, digital versatile discs,
semiconductor chips, hard drives, memory cards and the
like). An independent license for such use is required. For
details, please visit http://mp3licensing.com.
• MPEG Layer-3 audio coding technology licensed from
Fraunhofer IIS and Thomson Licensing.
• Microsoft, Windows and Windows Vista are either registered
trademarks or trademarks of Microsoft Corporation in the
United States and/or other countries.
• Mac, Mac OS and Mac OS X are trademarks of Apple Inc.
• Other company names, product names and logos in this
document are the trademarks or registered trademarks of
their respective owners.
TEAC CORPORATION
https://tascam.jp/jp/
Phone: +81-42-356-9143
1-47 Ochiai, Tama-shi, Tokyo 206-8530 Japan
TEAC AMERICA, INC. http://tascam.com/
Phone: +1-323-726-0303
1834 Gage Road, Montebello, California 90640 USA
TEAC MEXICO, S.A. de C.V.
http://teacmexico.net/
Phone: +52-55-5010-6000
Río Churubusco 364, Colonia Del Carmen, Delegación
Coyoacán, CP 04100, México DF, México
TEAC UK LIMITED
http://tascam.eu/
Phone: +44-8451-302511
2 Huxley Road, Surrey Research Park, Guildford, GU2 7RE,
United Kingdom
TEAC EUROPE GmbH
http://tascam.eu/
Phone: +49-611-71580
Bahnstrasse 12, 65205 Wiesbaden-Erbenheim, Germany
TEAC SALES & TRADING(SHENZHEN) CO., LTD
Phone: +86-755-88311561~2
Room 817, Block A, Hailrun Complex, 6021 Shennan Blvd.,
Futian District, Shenzhen 518040, China

TASCAM DR-40 3
Owner’s Manual
IMPORTANT SAFETY PRECAUTIONS
INFORMATION TO THE USER
This equipment has been tested and found to comply with the limits for a Class
B digital device, pursuant to Part 15 of the FCC Rules. These limits are designed
to provide reasonable protection against harmful interference in a residential
installation. This equipment generates, uses, and can radiate radio frequency
energy and, if not installed and used in accordance with the instruction manual,
may cause harmful interference to radio communications. However, there is
no guarantee that interference will not occur in a particular installation. If this
equipment does cause harmful interference to radio or television reception,
which can be determined by turning the equipment off and on, the user is
encouraged to try to correct the interference by one or more of the following
measures.
a) Reorient or relocate the receiving antenna.
b) Increase the separation between the equipment and receiver.
c) Connect the equipment into an outlet on a circuit different from that to
which the receiver is connected.
d) Consult the dealer or an experienced radio/TV technician for help.
CAUTION
Changes or modifications to this equipment not expressly approved by TEAC
CORPORATION for compliance could void the user’s authority to operate this
equipment.
For U.S.A.
For Canada
THIS CLASS B DIGITAL APPARATUS COMPLIES WITH CANADIAN ICES-003.
CET APPAREIL NUMERIQUE DE LA CLASSE B EST CONFORME A LA NORME
NMB-003 DU CANADA.
Declaration of Conformity
Responsible party : TEAC AMERICA, INC.
Address : 1834 Gage Road, Montebello, California,
U.S.A.
Telephone number : 1-323-726-0303
This device complies with Part 15 of the FCC Rules. Operation is subject to the
following two conditions: (1) this device may not cause harmful interference,
and (2) this device must accept any interference received, including inter-
ference that may cause undesired operation.
This product complies with the European Directives
request and the other Commission Regulations.
IMPORTANT SAFETY INSTRUCTIONS
1 Read these instructions.
2 Keep these instructions.
3 Heed all warnings.
4 Follow all instructions.
5 Do not use this apparatus near water.
6 Clean only with dry cloth.
7 Do not block any ventilation openings. Install in accordance with the
manufacturer’s instructions.
8 Do not install near any heat sources such as radiators, heat registers, stoves,
or other apparatus (including amplifiers) that produce heat.
9 Do not defeat the safety purpose of the polarized or grounding-type plug. A
polarized plug has two blades with one wider than the other. A grounding
type plug has two blades and a third grounding prong. The wide blade or
the third prong are provided for your safety. If the provided plug does not
fit into your outlet, consult an electrician for replacement of the obsolete
outlet.

TASCAM DR-40 5
• Do not disassemble a battery. The acid inside the battery could harm skin or
clothing.
8For European Customers
Disposal of electrical and electronic equipment
(a) All electrical and electronic equipment should be disposed of separately
from the municipal waste stream via designated collection facilities
appointed by the government or the local authorities.
(b) By disposing of the electrical and electronic equipment correctly, you will
help save valuable resources and prevent any potential negative effects on
human health and the environment.
(c) Improper disposal of waste equipment can have serious effects on the
environment and human health as a result of the presence of hazardous
substances in electrical and electronic equipment.
(d) The crossed out wheeled dust bin symbol indicates that
electrical and electronic equipment must be collected and
disposed of separately from household waste.
(e) The return and collection systems are available to the end users.
For more detailed information about disposal of old electrical
and electronic equipment, please contact your city office, waste
disposal service or the shop where you purchased the equipment.
Disposal of batteries and/or accumulators
(a) Waste batteries and/or accumulators should be disposed of separately from
the municipal waste stream via designated collection facilities appointed by
the government or the local authorities.
(b) By disposing of waste batteries and/or accumulators correctly, you will
help save valuable resources and prevent any potential negative effects on
human health and the environment.
(c) Improper disposal of waste batteries and/or accumulators can have serious
effects on the environment and human health as a result of the presence of
hazardous substances in batteries and/or accumulators.
(d) The crossed out wheeled dust bin symbol indicates that
batteries and/or accumulators must be collected and disposed
of separately from household waste.
If the battery or accumulator contains more than the specified
values of lead (Pb), mercury (Hg), and/or cadmium (Cd) defined
in the Battery Directive (2006/66/EC), then the chemical symbols for lead
(Pb), mercury (Hg) and/or cadmium (Cd) will be indicated beneath the
crossed out wheeled dust bin symbol.
(e) The return and collection systems are available to the end users. For more
detailed information about disposal of waste batteries and/or accumulators,
please contact your city office, waste disposal service or the shop where you
purchased them.
Pb, Hg, Cd
Any data, including, but not limited to information, described herein are
intended only as illustrations of such data and/or information and not as the
specifications for such data and/or information. TEAC Corporation disclaims
any warranty that any use of such data and/or information shall be free from
infringement of any third party’s intellectual property rights or other propri-
etary rights, and further, assumes no liability of whatsoever nature in the event
of any such infringement, or arising from or connected with or related to the
use of such data and/or information.
This product is designed to help you record and reproduce sound works to
which you own the copyright, or where you have obtained permission from
the copyright holder or the rightful licensor. Unless you own the copyright, or
have obtained the appropriate permission from the copyright holder or the
rightful licensor, your unauthorized recording, reproduction or distribution
thereof may result in severe criminal penalties under copyright laws and inter-
national copyright treaties. If you are uncertain about your rights, contact your
legal advisor. Under no circumstances will TEAC Corporation be responsible for
the consequences of any illegal copying performed using the recorder.

6 TASCAM DR-40
Contents
Introduction..............................................................................................................................7
Included items .........................................................................................................................7
Note about the Reference Manual ..................................................................................7
Precautions for placement and use ................................................................................7
Beware of condensation ......................................................................................................7
Cleaning the unit ....................................................................................................................7
Using the TEAC Global Site .................................................................................................7
User registration .....................................................................................................................7
Names of Parts .........................................................................................................................8
Top .....................................................................................................................................................................8
Front .................................................................................................................................................................8
Left side ..........................................................................................................................................................8
Right side panel ........................................................................................................................................8
Bottom ............................................................................................................................................................9
Home Screen ............................................................................................................................9
Preparation ............................................................................................................................ 10
Powering the unit .................................................................................................................................10
Turning the unit on ..............................................................................................................................10
Selecting a language..........................................................................................................................10
Setting the built-in clock ................................................................................................................. 11
Turning the unit off ............................................................................................................................. 11
Connecting monitoring equipment ........................................................................................ 11
Attaching the tilt foot ....................................................................................................................... 11
Basic operation procedures .............................................................................................11
Menu structure.......................................................................................................................................12
Recording ............................................................................................................................... 12
Recording Screen .................................................................................................................................12
Note about recording standby .................................................................................................... 13
Recording menu structure .............................................................................................................13
Manually adjusting the input level............................................................................................14
Using the Level Control Function .............................................................................................. 14
Recording ...................................................................................................................................................14
Setting the low-cut filter .................................................................................................................. 14
Playback .................................................................................................................................. 15
Playback Control screen ................................................................................................................... 15
Playback menu structure .................................................................................................................15
Playing back recordings ...................................................................................................................15
Adjusting the playback volume .................................................................................................. 15
Selecting files for playback (skipping) ....................................................................................15
Quick Operations ................................................................................................................. 16
QUICK button overview ...................................................................................................................16
Connecting with a Computer ......................................................................................... 16
Connecting with a computer using USB ...............................................................................16
Exchanging files with a computer .............................................................................................16
Disconnecting from a computer ................................................................................................16
Other settings and information ..................................................................................... 16
Turning the built-in speaker off ................................................................................................... 16
System Settings .....................................................................................................................................16
Quick reference for using various functions............................................................. 17
Messages ................................................................................................................................. 21
Troubleshooting ..................................................................................................................22
Specifications ........................................................................................................................ 23
Ratings..........................................................................................................................................................23
Inputs and outputs ..............................................................................................................................23
Control input/output ratings ........................................................................................................23
Audio performance .............................................................................................................................23
Recording times.....................................................................................................................................23
Requirements for connected computers .............................................................................23
General ........................................................................................................................................................24

TASCAM DR-40 7
Introduction
Thank you very much for purchasing the TASCAM
DR-40.
Before using this unit, read this owner's manual
carefully so that you will be able to use it correctly
and enjoy working with it for many years. After you
have finished reading this manual, please keep it in a
safe place for future reference.
Included items
This product includes the following items.
Take care when opening the package to avoid
damaging the items. Keep the packing materials for
transportation in the future.
Please contact the store where you purchased this
unit if any of these items are missing or have been
damaged during transportation.
• Main unit .................................................................................. 1×
• SD card (in the unit) .......................................................... 1×
• AA alkaline batteries ......................................................... 3×
• USB cable ................................................................................. 1×
• Tilt foot ...................................................................................... 1×
• Owner’s Manual (this manual)
including warranty ............................................................ 1×
Note about the Reference
Manual
This Owner’s Manual explains the main functions
of this unit. Please see the Reference Manual for
information about all the unit’s functions.
You can also download this Owner’s Manual and the
Reference Manual from the TEAC Global Site
(http://teac-global.com/).
prevent this, or if this occurs, let the unit sit for one
or two hours at the new room temperature before
using it.
Cleaning the unit
Use a dry soft cloth to wipe the unit clean. Do not
wipe with chemical cleaning cloths, thinner, alcohol
or other chemical agents. Doing so could damage
the surface or cause discoloration.
Using the TEAC Global Site
You can download this Owner’s Manual and the
Reference Manual necessary for this unit from the
TEAC Global Site (http://teac-global.com/).
1. Open the TEAC Global Site (http://teac-global.
com/).
2. In the TASCAM Downloads section, click the
desired language to open the Downloads
website page for that language.
NOTE
If the desired language does not appear, click
Other Languages.
3. Click the product name in the “Search by Model
Name” section to open the Downloads page for
that product.
4. Select and download the Owner’s Manual and
the Reference Manual that are needed.
User registration
Customers in the USA, please visit the TASCAM
website (http://tascam.com/) to register as a user
online.
Precautions for placement
and use
• The operating temperature range of this unit is
0–40°C (32–104°F).
• Do not install this unit in the following types of
locations. Doing so could degrade the sound
quality and/or cause malfunctions.
Places with significant vibrations
Near windows or other places exposed to
direct sunlight
Near heaters or other extremely hot places
Extremely cold places
Places with bad ventilation or high humidity
Very dusty locations
Places exposed directly to rain or other water
• Do not place this unit on top of a power amplifier
or other device that generates heat.
• If this unit is placed near a power amplifier or
other device with a large transformer, it could
cause a hum. If this occurs, increase the distance
between this unit and the other device.
• This unit could cause color irregularities on a TV
screen or noise from a radio if used nearby. If this
occurs, use this unit farther away.
• This unit might produce noise if a mobile phone
or other wireless device is used nearby to make
calls or send or receive signals. If this occurs,
increase the distance between this unit and those
devices or turn them off.
Beware of condensation
Condensation could occur if the unit is moved from
a cold place to a warm place, it is used immediately
after a cold room has been heated or it is otherwise
exposed to a sudden temperature change. To

8 TASCAM DR-40
Names of Parts
Top
1 Built-in stereo microphone
This is a directional stereo electret condenser
microphone.
2 DUAL indicator
This lights orange when recording in dual
recording mode.
3 4CH indicator
This lights orange when recording in 4-channel
recording mode.
4 OVER DUB indicator
This lights orange when recording in
overdubbing mode.
5 3/4 [SOLO] button
6 1/2 [SOLO] button
7 (HOME) [ ] button 8
8 + button
9 MENU button
0 . button
q PB CONT button
w button −
e Display
r PEAK indicator
t REC MODE button
y RECORD [ ] button/REC indicator 0
When stopped, press this button to put the unit
into recording standby. The indicator will REC
start to blink.
u PLAY [ ] button 7
i QUICK button
o / button
p ENTER/MARK button
a MIXER button
Front
s EXT MIC/LINE IN L/R jacks (XLR/TRS)
d REMOTE jack ( 2.5mm TRS) φ
Left side
f /LINE OUT jack
g EXT IN switch
h HOLD switch
j INPUT LEVEL (+/ ) buttons −
Right side panel
k USB port
l SD card slot

TASCAM DR-40 9
Bottom
; Built-in mono speaker
z Tripod or tilt foot mounting threads
(1/4-inch)
x Battery compartment cover
c Strap attachment
v Battery compartment
Home Screen
This is the screen that is usually shown when the unit
is stopped.
1 Playback area
This shows the current playback file area.
ALL: All files in the MUSIC folder
FOLDER: All files in the selected folder
P.LIST: All files added to the playlist
2 Loop/repeat playback status
: Single playback
: Single file repeat playback
: All file repeat playback
: Loop playback
3 Current playback file number/total number
of files
This shows the current file number and total
number of files in the current playback area.
4 Elapsed time
This shows the elapsed time (hours: minutes:
seconds) of the current file.
5 Speaker output
Icon shown: speaker output on
Icon not shown: speaker output off
6 Power supply status
A battery icon appears when power is supplied
by batteries. When batteries are being used,
a battery icon shows the amount of power
remaining in bars ( , , ).
The batteries are almost dead and the power
will soon turn off (standby) if the icon with
no bars appears.
When using a TASCAM PS-P520E AC adapter
(sold separately) or USB bus power,
appears.
7 Recorder operation status
This icon shows the recorder operation status.
Indicator Meaning
8Stopped
9Paused
7Playing back
,Searching forward
mSearching backward
/Skipping forward
.Skipping backward
8 Level meters
These show the levels of the input and playback
signals.
When overdubbing and in mix mode, the levels
of the mixed input and playback sounds are
shown.
10 TASCAM DR-40
9 Track status
These icons change according to the recording
mode.
Indicator
examples Meaning
Playing a file recorded in MONO
or STEREO mode
Playing a file recorded in DUAL
MONO or DUAL ST mode or
monitoring in these modes
Playing a file recorded in 4CH
mode or monitoring in this mode
/ In OVERDUB SEPARATE mode
/ In OVERDUB MIX mode
0 Loop playback IN (starting) and OUT
(ending) points
The set IN (starting) and OUT (ending) points of
the loop are shown.
The icon appears at the playback position
on the bar when the IN point is set.
The icon appears at the playback position
on the bar when the ending point is set.
q Remaining time
This shows the elapsed time (hours: minutes:
seconds) of the current file.
w Playback speed setting status
One of the following icons appears according
to the playback speed setting.
Icon Playback speed
×1.0
× ×1.1 – 1.5
× ×0.5 – 0.9
When playback speed not control-
lable
e Effect on/off status
This icon shows whether the effect is on or off.
: Built-in effect off
: Built-in effect on
r Peak value in decibels (dB)
The maximum level that occurs in a fixed period
of time is displayed digitally.
t File name
This shows the name of the file playing back.
When ID3 tag information is available for an
MP3 file being played, it is given priority for
display.
This shows the project name when there are
multiple files recorded in 4-channel recording
mode, dual recording mode or overdubbing
separate mode.
y Playback position
The current playback position is shown by a bar.
Preparation
Powering the unit
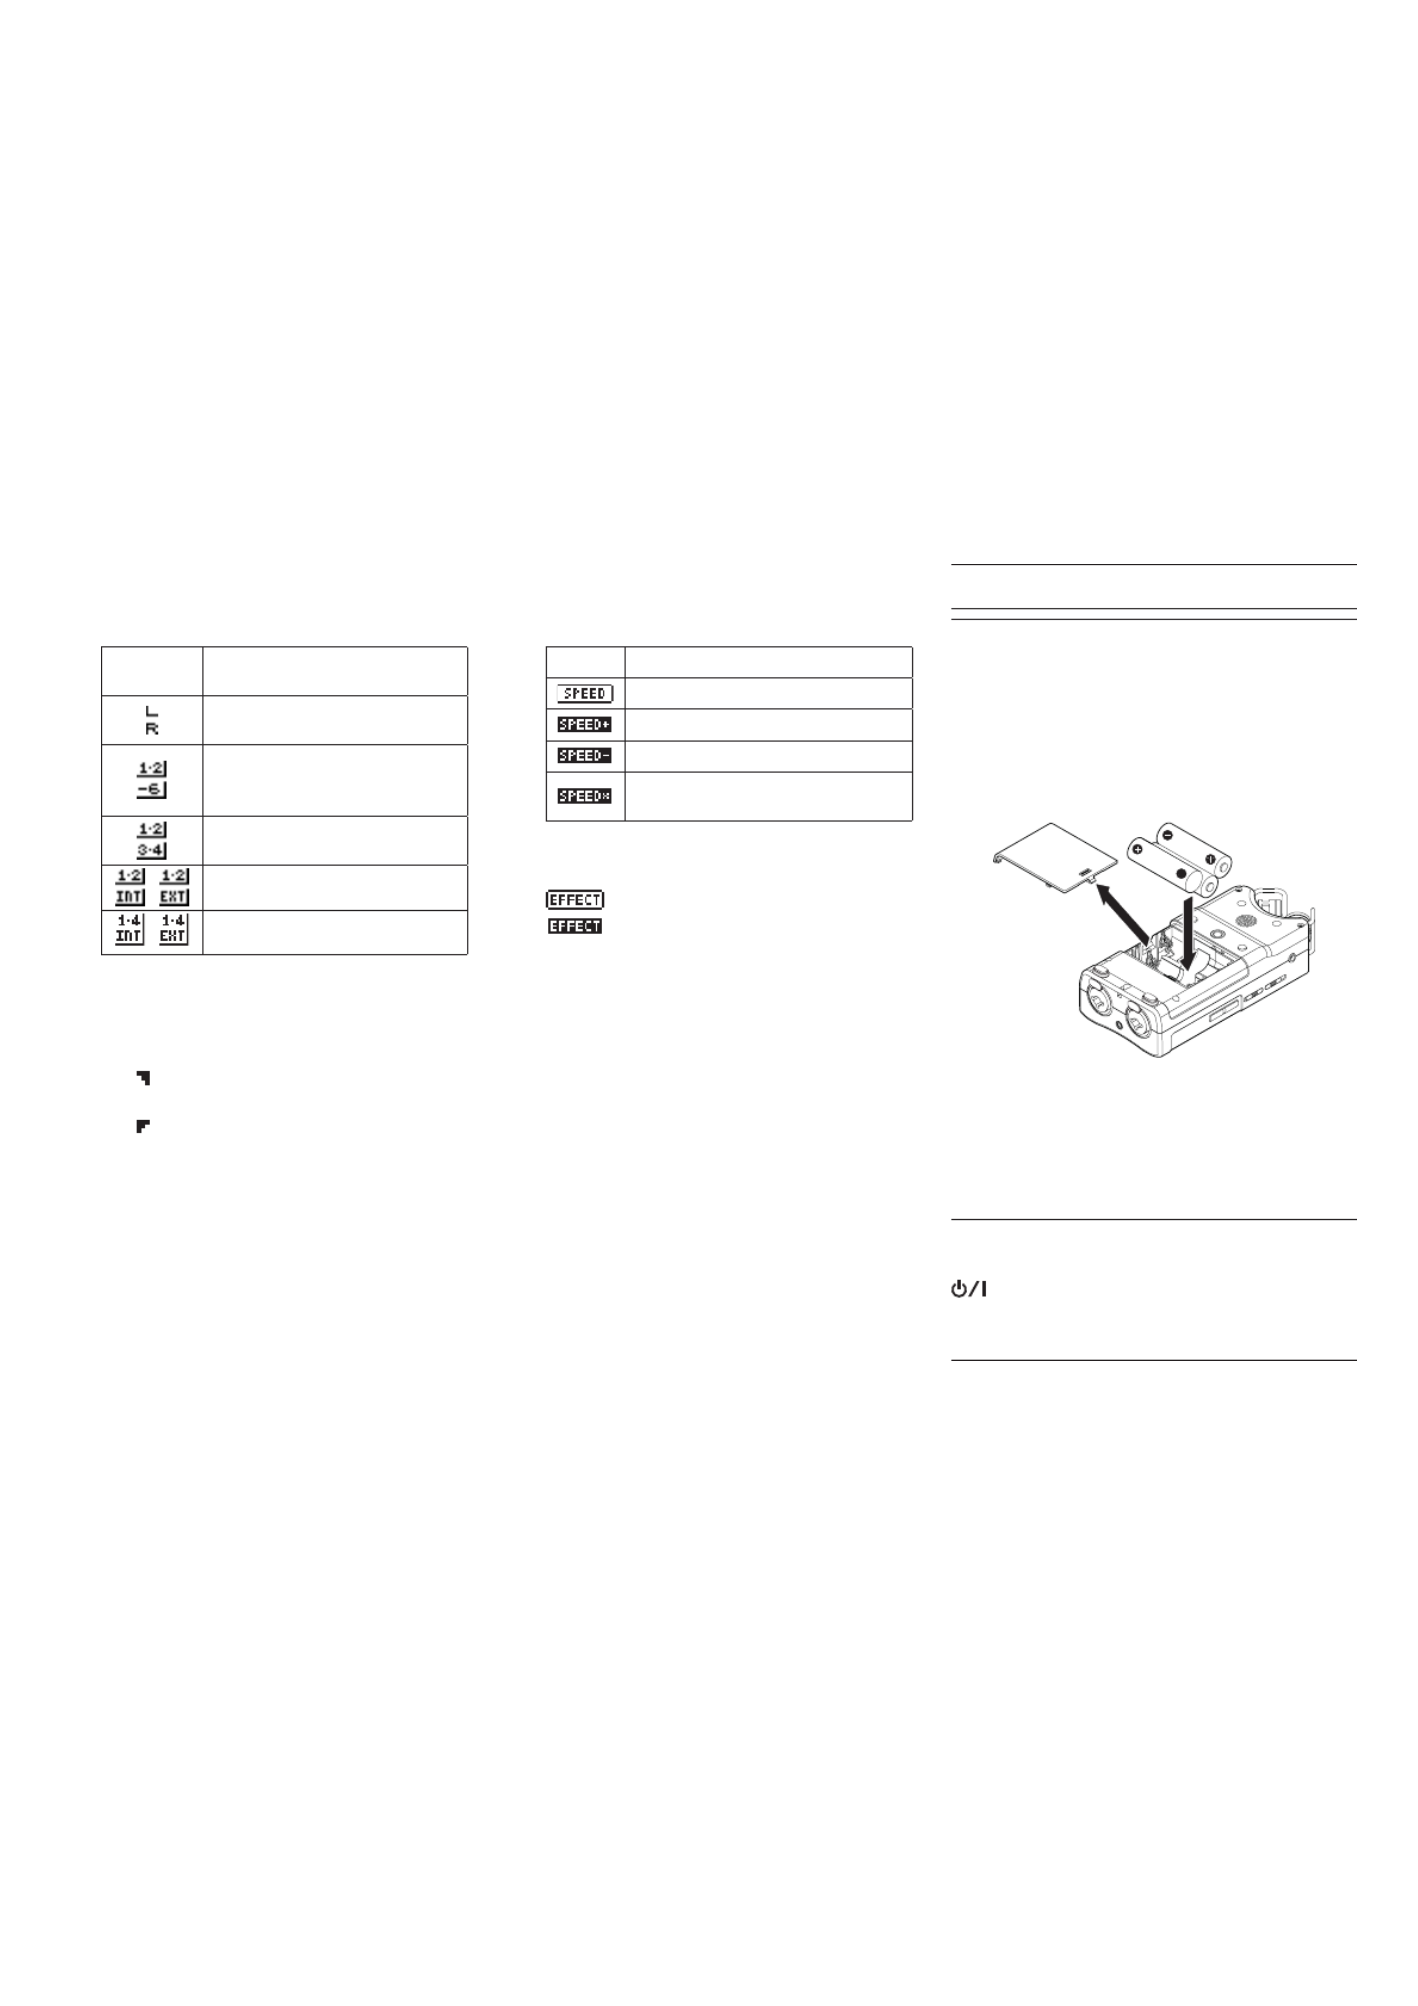
8Using AA batteries
1. Remove the battery compartment cover from
the back of the unit.
2. Install 3 AA batteries with their and ¥ ^
marks as shown in the battery compartment.
3. Close the battery compartment cover.
• Use the item of the menu BATTERY TYPE SYSTEM
to set the type of battery in order to accurately
show the amount of power remaining and allow
the unit to accurately determine whether enough
power is available for proper operation. (By
default, this is set to for alkaline batteries.)ALKAL
Turning the unit on
When the unit is off (in standby), press and hold the
button until the (HOME) [ ]8 TASCAM DR-40
start-up screen is shown on the display.
The Home Screen appears after the unit starts up.
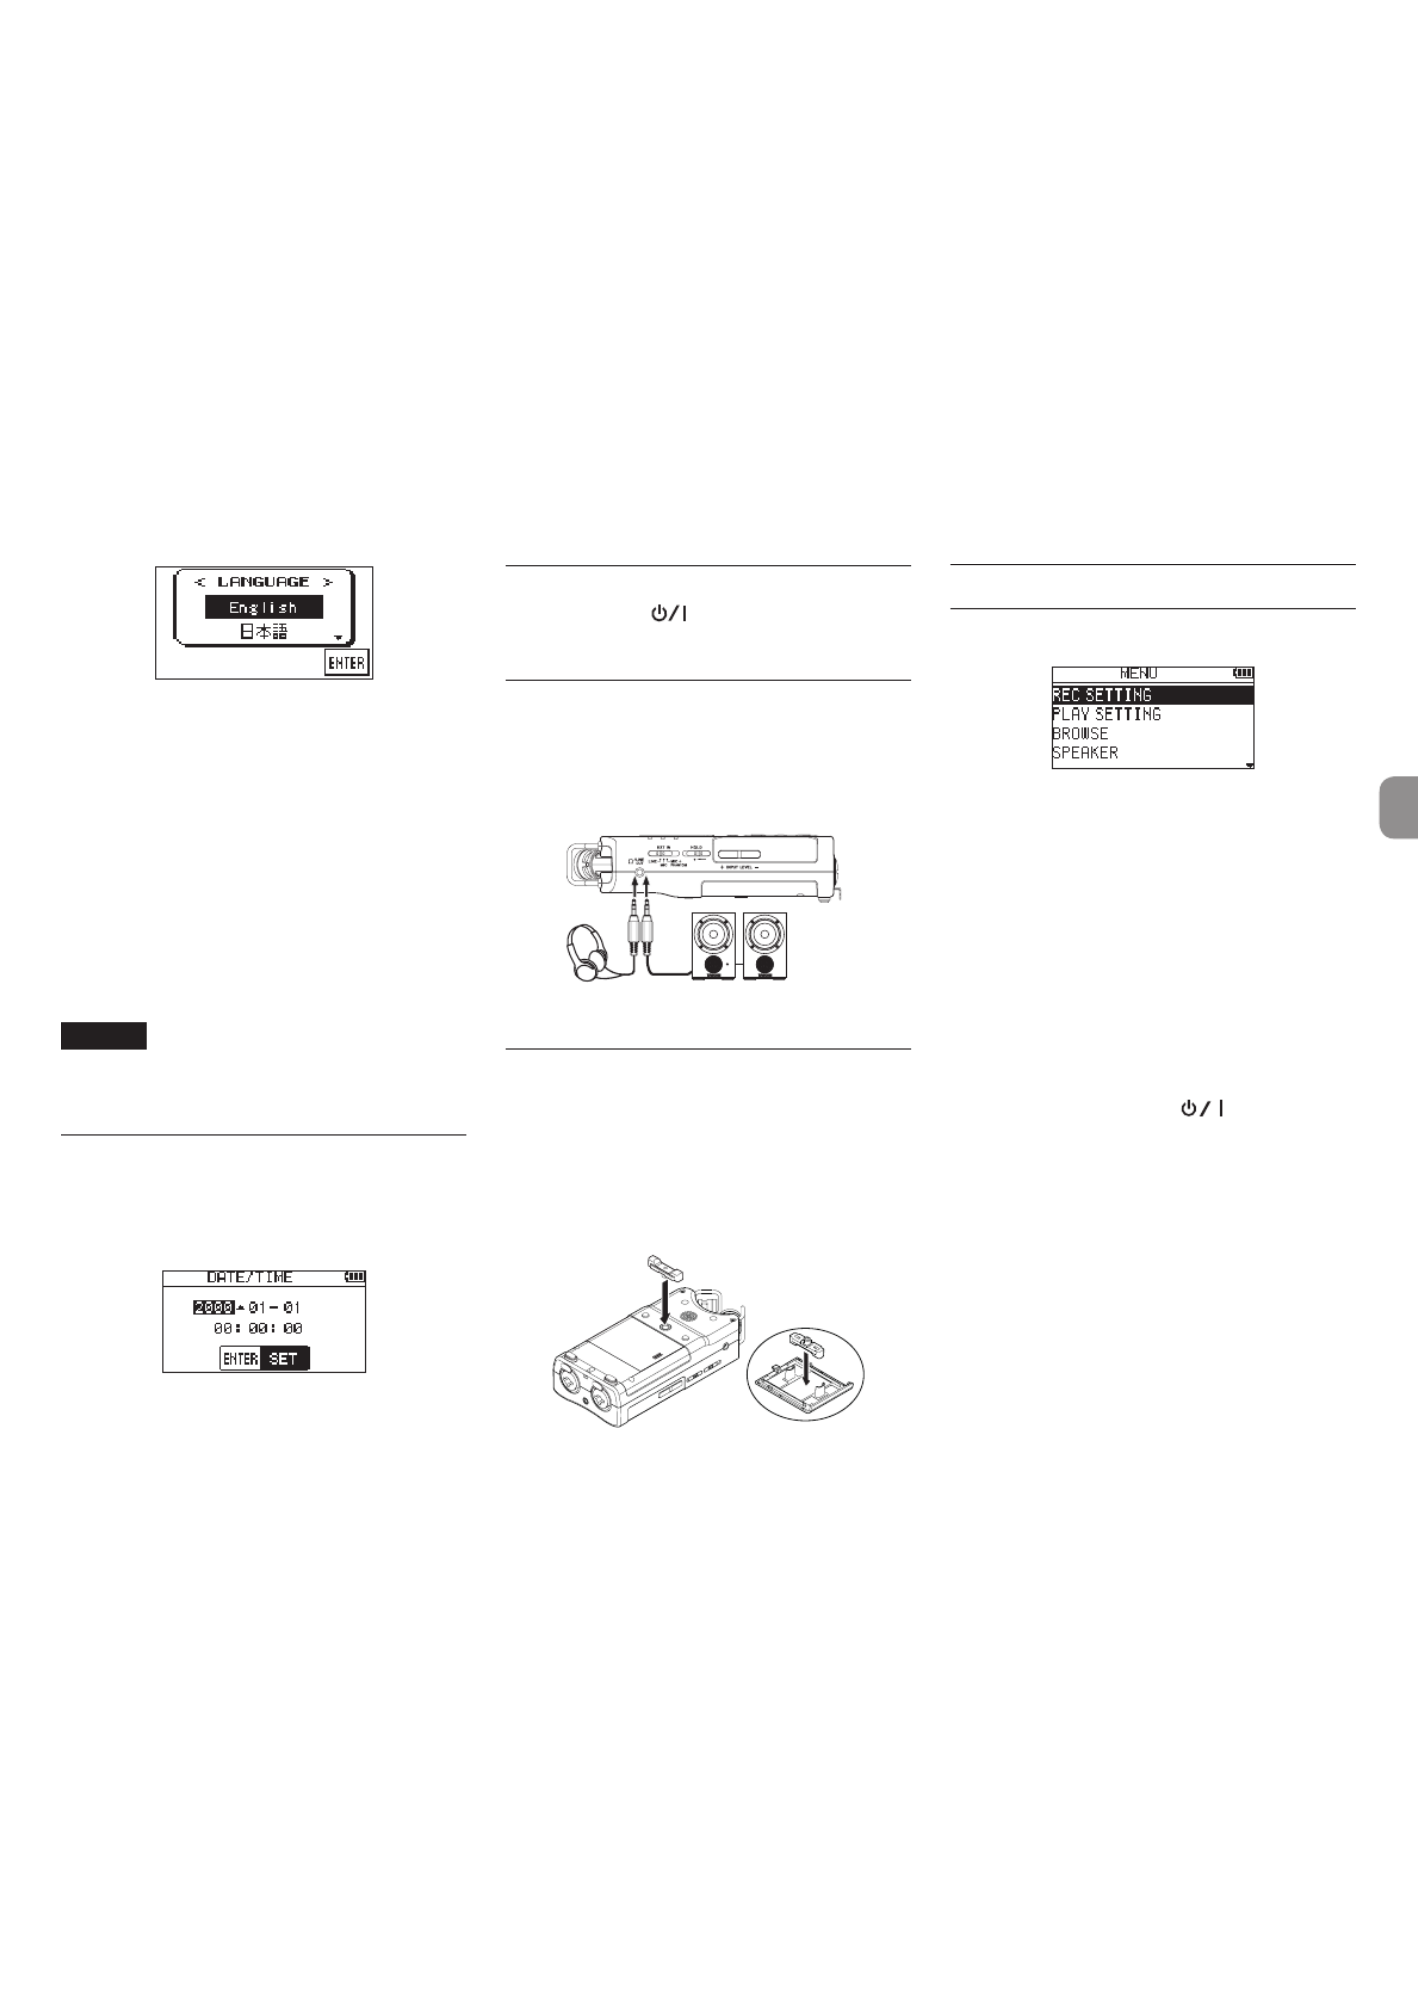
Selecting a language
The first time you turn a new unit on after purchase,
the following setting must be made.
A screen appears to set the language shown on the display.
TASCAM DR-40 11
Press the + or − button to move the cursor and select
(highlight with light letters on a black background)
the language to be shown on the display.
English : use English
日本語
: use Japanese
Français : use French
Español : use Spanish
Deutsch : use German
Italiano : use Italian
Русский
: use Russian
中文 : use Chinese
After selection, press the button to confirm it.ENTER/MARK
NOTE
You can change this setting with the SYSTEM
screen item. (See “Quick reference for LANGUAGE
using various functions” on page 17.)
Setting the built-in clock
When the unit is turned on for the first time (or when
the built-in clock is reset after being left unused without
batteries), the screen appears before the DATE/TIME
start-up screen to allow the date and time to be set.
Use the and . // +/ buttons to set the date and −
time, and press the button to confirm.ENTER/MARK
Turning the unit off
Press and hold the button until (HOME) [ ]8
LINEAR PCM RECORDER appears on the display. The
unit turns off after it completes its shutdown process.
Connecting monitoring equipment
To listen with headphones, connect them to the
PHONES jack.
To listen with an external monitoring system
(powered monitor speakers or an amplifier and
speakers), connect it to the jack.LINE OUT
Headphones Powerd monitor speakers
or amplifer and speakers
Attaching the tilt foot
When recording with the built-in mic, you can attach the
included tilt foot to the tripod mounting threads to prevent
the mic from being too low when placing the unit with the
bottom side (battery compartment cover side) down.
When not using the tilt foot, you can put it between
the two protrusions on the inside of the battery
compartment cover for storage and transportation.
Basic operation procedures
1. Press the button to open the MENU MENU
Screen.
2. Use the and buttons to select (highlight) + –
menu items, and press the ENTER/MARK
button to open setting screens.
3. Use the and buttons to select the setting + –
item, and press the button.ENTER/MARK
4. Use the or button to move / ENTER/MARK
the cursor to the right and highlight the setting
value.
5. Use the and buttons to change the setting.+ –
6. Press the button to move the cursor left .
if you want to set a different item in the same
menu.
7. Repeat step 3 to 6 as necessary to set other items.
8. When finished, press the [ ] (HOME) 8
button to return to the Home Screen.

12 TASCAM DR-40
Menu structure
MENU
REC SETTING Make recording settings
PLAY SETTING Make playback settings
BROWSE Work with files and
folders on the SD card
SPEAKER Turn the built-in
speaker on/off
OTHERS Open the OTHERS
submenu
INFORMATION
View information
TUNER Use the tuner
EFFECT Make effect settings
FILE NAME Make file name settings
DATE/TIME Set the date and time
REMOTE Footswitch and wired
remote control settings
SYSTEM Make system settings
Recording
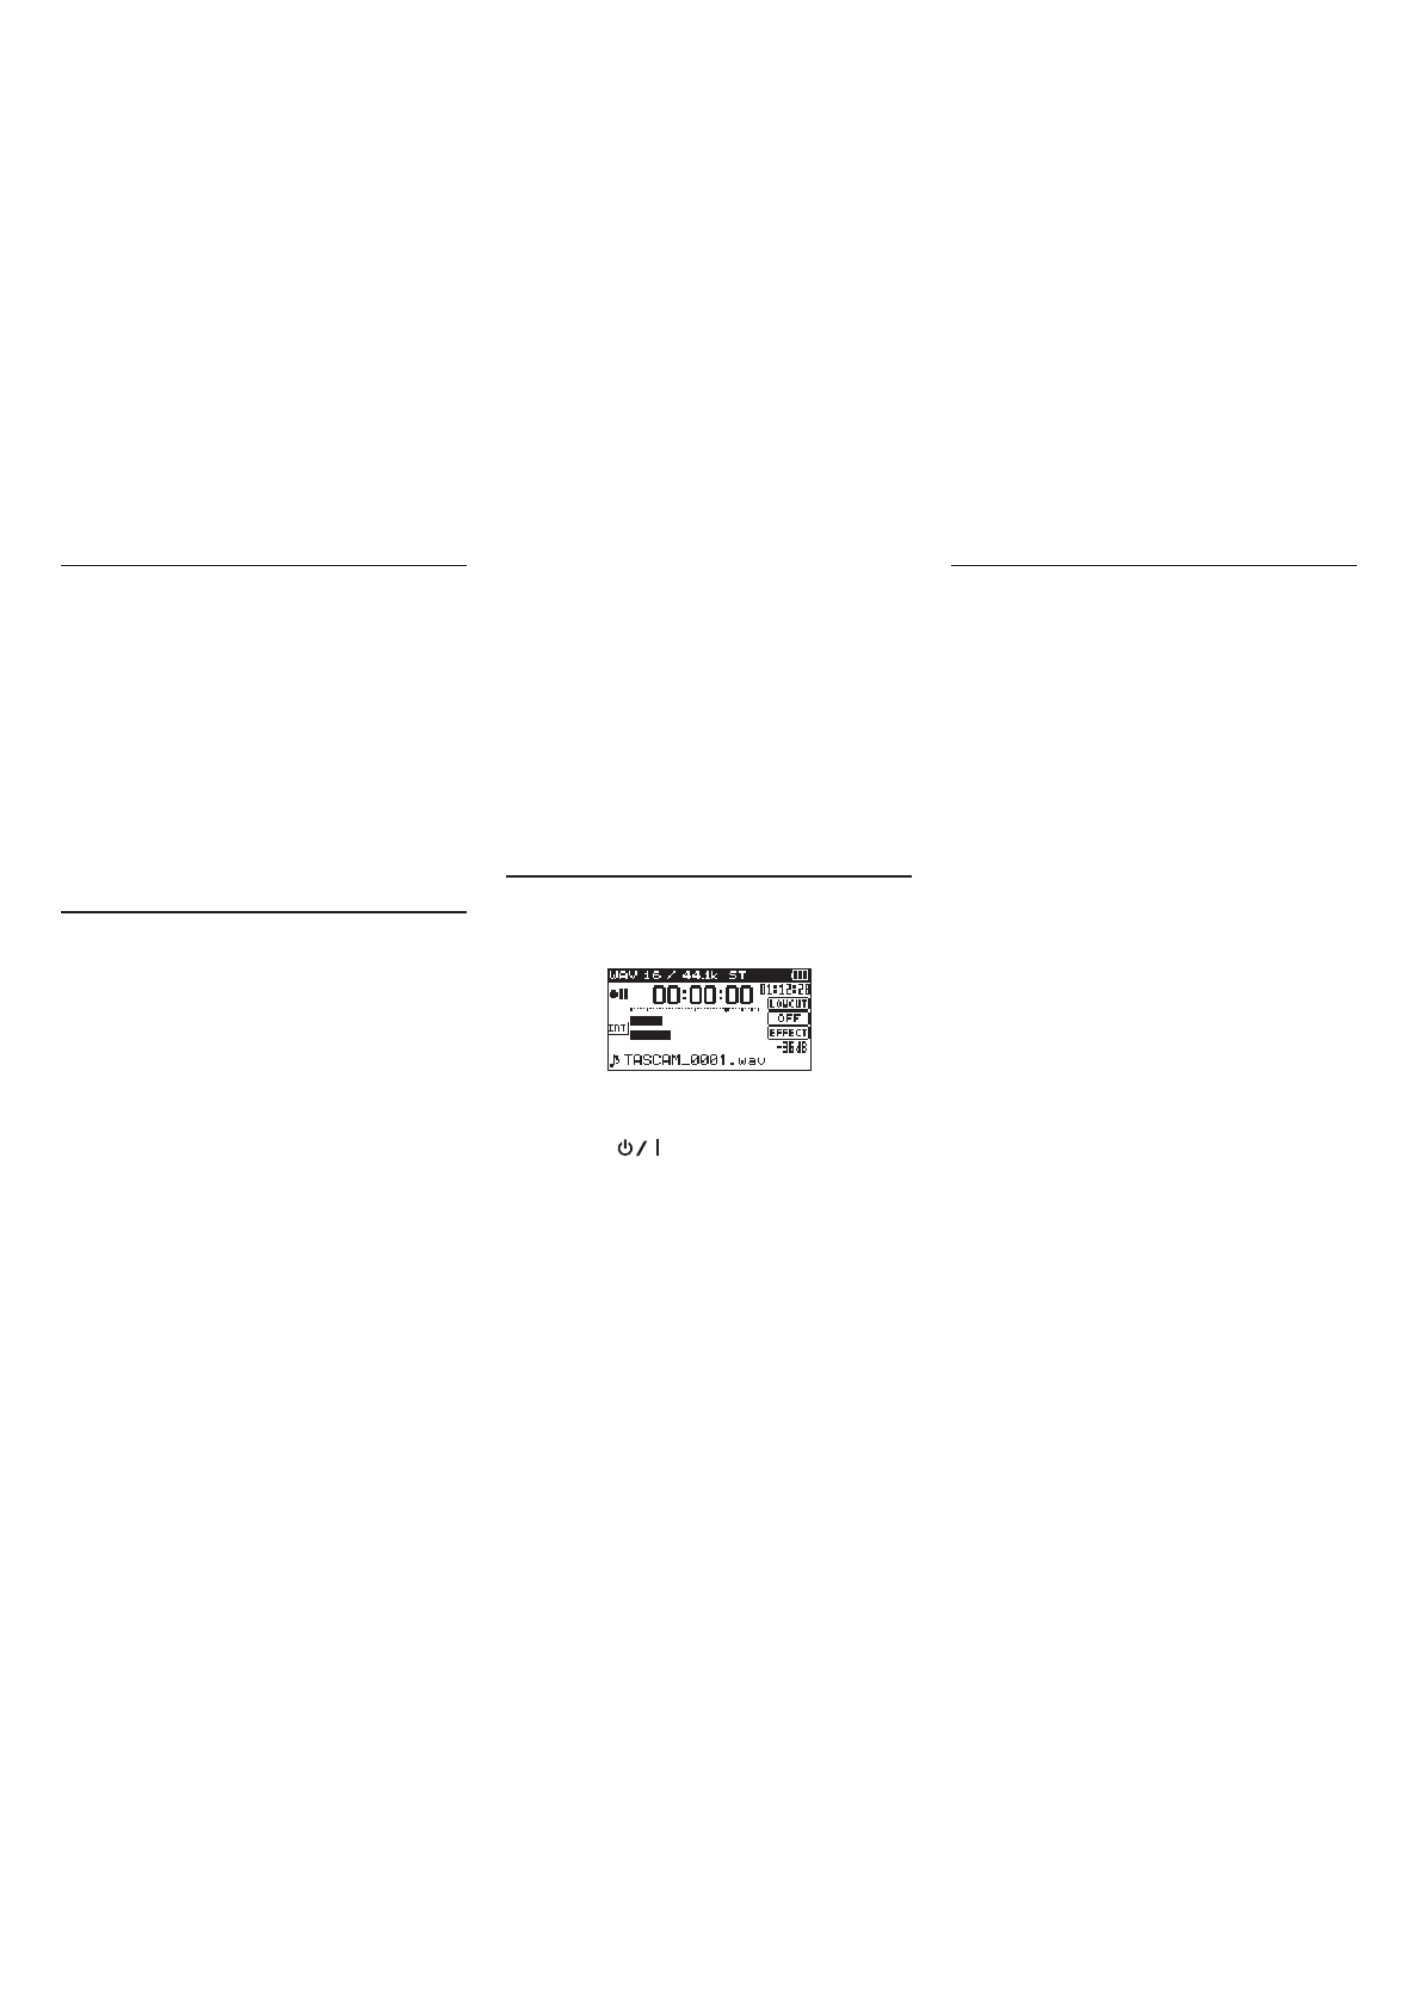
Recording Screen
y
1 Recording format
This shows the file recording format.
WAV 16 WAV 24 BWF 16 BWF 24 MP3 320k, , , , ,
MP3 256k MP3 192k MP3 128k MP3 96k, , , ,
MP3 64k MP3 32k,
2 Pre or Auto recording function status
appears when the prerecording function is
ON and the unit is in recording standby.
appears when the auto recording function
is ON and the unit is recording.
3 Recording sampling frequency
This shows the file recording sampling
frequency.
44.1k 48k 96k, ,
4 Number of recording channels
This shows the number of recording channels
in the file.
ST MONO,
5 Elapsed recording time
The elapsed recording time of the file appears
as hours: minutes: seconds.
6 Built-in stereo microphone left-right
setting
If the left-right setting of the built-in stereo
microphone is not correct for the current mic
angle, the current left-right setting will be
shown.
Icon Mic angle MIC setting
Closed (X-Y) L-R
Open (A-B) R-L
7 Recorder operation status
This icon shows the recorder operation status.
Indicator Meaning
09 Recording standby or recording
paused
0Recording
8 Input source
This icon shows the input source.
Indicator
examples Meaning
Built-in mic set as input source
EXT MIC/LINE IN jack set as input
source
Input source set to DUAL ( to -6
-12) in dual recording mode
Channels 1-2 are a playback file in
OVERDUB SEPARATE mode
Mix of playback file and built-in
mic set as input source in
OVERDUB MIX mode
Mix of playback file and EXT MIC/
LINE IN set as input source in
OVERDUB MIX mode
TASCAM DR-40 13
9 Level meters
These show the input signal levels. When
recording in OVERDUB MIX mode, these show
the levels of the mixed input and playback
sounds. The mark at the 12dB position on b −
the scale is a guide for input level adjustment.
0 File name
The file name that will automatically be given
to recorded files is shown.
This shows the project name when there are
multiple files recorded in 4-channel recording
mode, dual recording mode or overdubbing
separate mode.
q Remaining recording time
This shows the remaining recording time until
the set maximum file size is reached (in hours:
minutes: seconds). If the remaining recording
time on the SD card is less, however, the
remaining recording time on the card is shown.
w Low cut filter on/off status
This shows whether the low cut filter is on or
off. This icon is shown as light letters on a dark
background if the low-cut filter is set to , 40Hz
80Hz 120Hz or .
: Low cut filter off
: Low cut filter on
e Level control function status
: Level control off
: Peak reduction on
: Automatic level control on
: Limiter on
r Effect on/off status
: Built-in effect off
: Built-in effect on
t Peak value in decibels (dB)
This shows the peak input level value digitally.
y Auto tone function status
This icon shows whether the auto tone function
is on.
Blank : Auto tone off
: Auto tone on
Note about recording standby
This unit has a recording standby function like that of
a professional recorder. In recording standby mode,
you can adjust the input level, for example, and then
start recording quickly.
When in recording standby, the indicator blinks REC
and the recording screen appears.
Recording menu structure
REC SETTING
FORMAT Set the file format
BWF: / 16bit 24bit
WAV: / 16bit 24bit
MP3: – bps32 320k
SAMPLE Set the sampling frequency
44.1k 48k 96k / / (Hz)
(96kHz for WAV only)
TRACK INCSet the automatic track incre-
mentation time
OFF 5min 10min 15min 30min, , , , ,
60min
LOW CUT Set the low-cut filter
OFF 40Hz 80Hz 120Hz, , ,
PRE REC Set the pre-recording function
ON OFF,
AUTO REC Set the auto-recording function
MODE OFF NEW FILE MARK : , ,
LEVEL :
-6dB -12dB -24dB -48dB , , ,
AUTO TONE
Set the auto tone function
OFF HEAD HEAD+TAIL, ,
TONE SECSSet the length of the auto tone
0.5SEC. 1SEC. 2SEC. 3SEC. , , ,
TONE VOL Set the volume of the auto tone
-12dB -18dB -24dB -30dB , , , ,
-36dB
14 TASCAM DR-40
Manually adjusting the input level
1. Press the [ ] button to enter RECORD 0
recording standby.
2. Use the and buttons to INPUT LEVEL + −
adjust the input level. Meters that show the
input level settings appear at the bottom of the
display.
If the input is too high, the indicator on the PEAK
right above the display lights just before recorded
sound would distort.
The level meters have a b mark as a guide at 12dB. −
Set the recording level so that level changes occur
near this mark without causing the indicator PEAK
to light red.
Using the Level Control Function
You can set the level control function for recording
with a microphone input.
1. Press the [ ] button to enter RECORD 0
recording standby.
2. Press the button to open the quick QUICK
menu.
3. Select (highlight) and press the LEVEL CTRL
ENTER/MARK button to open the settings
screen.
4. Select one of the following functions, and press
the button to enable it and ENTER/MARK
return to the recording screen.
8 PEAK REDUCTION
This function reduces the input volume automati-
cally to a suitable level when input signals are too
loud. The recording level can be raised manually
when desired. This function is useful when recording
music that has volume changes that affect the sound
negatively. After making this setting, the set level is
retained even if it is turned off.
8 AUTO LEVEL
Using this function, the recording level is automati-
cally increased when the input sound is too quiet or
decreased when it is too loud. This function is useful
for recording meetings, for example. In this mode,
the recording level cannot be changed manually.
8 LIMITER
This function prevents distortion when signals that
are too loud are input suddenly. This is useful when
you do not want to change the recording level.
In this mode, the recording level can be changed
manually even when recording.
Recording
1. Press the [ ] button to enter RECORD 0
recording standby.
2. Press the [ ] button again to start RECORD 0
recording.
3. Press the ( ) [ ] button to finish HOME 8
recording.
When recording starts, the indicator lights REC
continuously, and the display shows the elapsed
recording time and the remaining recording time.
Pausing recording
You can pause recording and then continue
recording in the same file.
1. When recording, press the RECORD [ ] 0
button to pause.
2. Press the [ ] button again to resume RECORD 0
recording.
Setting the low-cut filter
Use the low-cut filter if you want to cut noise and
other sounds at low frequencies. This function
can be used to reduce air-conditioning noise and
unpleasant wind noise, for example.
1. Select menu item and MENU wREC SETTING
press the button.ENTER/MARK
2. Set the item on the LOW CUT REC SETTING
screen.
Options: , , , OFF 40Hz 80Hz 120Hz
The higher the number (frequency) is, the wider
the band of low frequencies that will be cut.

TASCAM DR-40 15
Playback
Playback Control screen
During playback or when stopped, press the PB
CONT button to open the Playback Control screen.
Recording is not possible when this screen is open.
Use the and buttons to skip to IN/OUT . /
points and the file beginning/end. You cannot skip
to the previous or next file.
1 Loop playback status
The icon appears when loop playback is
enabled.
2 Playback speed
This shows the playback speed as a multiple
of the normal speed. appears on the left VSA
when variable speed audition, which allows
tempo to be changed without changing pitch,
is enabled.
3 Usable buttons
This shows the functions of the buttons
available when the Playback Control screen is
open.
MENU: Turn loop playback ON or OFF.
ENTER: Create or delete an IN or OUT point.
4 Loop playback IN (starting) and OUT
(ending) points
The set IN (starting) and OUT (ending) points of
the loop are shown.
The icon appears at the playback position
on the bar when the IN point is set.
The icon appears on the playback position
bar when the ending point is set.
5 Playback position display
The current playback position is shown by a bar.
Playback menu structure
PLAY SETTING
AREA Set the playback area
ALL FILES FOLDER, ,
PLAYLIST
REPEAT Set the repeat mode
CONTINUOUS SINGLE, ,
1 REPEAT ALL REPEAT,
PLAYEQ Set the playback equalizer
OFF TREBLE+ - MIDDLE+ -, / , / ,
BASS+ -/
JUMPBACK Set jump-back playback
OFF 1SEC. 10SEC., – ,
20SEC. 30SEC. ,
Playing back recordings
When the Home Screen is open and playback is
stopped, press the button to start playback.7
8Pausing
When the Home Screen is open and a track is playing
back, press the [ ] button to pause (HOME) 8
playback at the current position.
8Stopping
Press the [ ] button when paused to (HOME) 8
return to the beginning of the playback file and stop.
8Searching backward and forward
When the Home Screen is open, press and hold the
. / or button to search backward or forward.
Adjusting the playback volume
When the Home Screen is open, use the and +−
buttons to adjust the volume.
Selecting files for playback
(skipping)
When the Home Screen is open, use the . and
/ buttons to select the file that you want to play.
Press the button when located at the .
beginning of a file to skip to the beginning of the
previous file.
When the Home Screen is open during playback,
press the button to skip to the next file./

TASCAM DR-40 17
Quick reference for using various functions
• Button names are shown like this: .MENU
• Instructions are abbreviated. For example, on the Home Screen, press the button, select the menu, and then select the item becomes: MENU REC SETTING PRE REC
Home Screen .wMENU wREC SETTING wPRE REC
Not all steps are given for complex operations. For detailed operation procedures, see the Reference Manual.
Category Desired action Function name Procedures, buttons used and explanation
Basic
functions
Return to the Home Screen HOME
Return to the Home Screen if you become unsure about how to proceed.
Record in stereo Home Screen wRECORD RECORD w
Recording will start using the current settings.
Play a recording Home Screen wPLAY
Play the file shown (selected).
Adjust the playback volume Home Screen w+/−
Adjust the volume of headphones, speakers, etc.
Select a file for playback Home Screen w . //
If there a many files, using the browse function might be more convenient.
Recording
Change the file format Home Screen wMENU wREC SETTING wFORMAT
Set the file format used for recordings, including whether they are uncompressed (WAV) or
compressed (MP3).
Set the low-cut filter Low cut filter Home Screen wMENU wREC SETTING wLOW CUT
This function removes noise and other sounds at low frequencies. Set the cutoff frequency.
Adjust the input level manually Home Screen wRECORD INPUT LEVEL +/ w−
Watch the meters and set the recording level so that they do not peak.
Adjust the input level automati-
cally
Peak reduction Home Screen wRECORD QUICK w wLEVEL CTRL wPEAK REDUCTION
This function automatically lowers the level when the recording level would overload.
Adjust the input level automati-
cally
Auto level Home Screen wRECORD QUICK w wLEVEL CTRL wAUTO LEVEL
This function automatically adjusts the level in response to the loudness of the input signal.
Adjust the input level automati-
cally
Limiter Home Screen wRECORD QUICK w wLEVEL CTRL wLIMITER
This function compresses only loud sounds to prevent overloads and does not change the recording
level.

TASCAM DR-40 19
Category Desired action Function name Procedures, buttons used and explanation
Other
playback
features
Use the playback equalizer Playback equalizer Home Screen wMENU wPLAY SETTING wPLAYEQ
This function allows you to increase or decrease the levels of the high or low frequencies during
playback to improve the sound quality.
Go back a few seconds during
playback and play a part again
Jump-back
playback
During playback wPLAY
When used during playback, this function allows you to go back and play the preceding few seconds
again.
Change the jump-back playback
settings
Jump-back
playback
Home Screen wMENU wPLAY SETTING wJUMPBACK
You can set how far to go back when using the jump-back playback function.
Even out the volume during
playback
Level alignment Home Screen wQUICK wLEVEL ALIGN
This function makes recordings sound more even by adjusting the playback volume.
Select the playback area Home Screen wMENU wPLAY SETTING wAREA
You can select a folder or playlist as the play area from which files can be chosen.
Other
features
Tune an instrument Chromatic tuner Home Screen wMENU wOTHERS wTUNER
You can use this unit to help tune a guitar or other instrument.
Add reverb to the recorded signal
during playback
Reverb effect Home Screen wMENU wOTHERS wEFFECT
You can use the reverb effect when listening to a recording without affecting the recorded file.
Adjust the volume of a four-track
recording
Home Screen wMIXER
You can adjust the volume of each track independently. You can also use the mix down function to
combine them into a stereo file.
Merge four-track recordings into
a stereo file
Mixdown function Home Screen wQUICK wMIXDOWN
You can use the MIXER to adjust volume levels when creating a stereo file.
Change RC-3F footswitch assign-
ments
Home Screen wMENU wOTHERS wREMOTE
You can change the footswitch assignments according to the application.
Use an RC-10 remote control to
operate the unit
Home Screen wMENU wOTHERS wREMOTE
Set the unit so that you can use a wired remote control.
Record a slate tone Auto tone Home Screen wMENU wREC SETTING wAUTO TONE
The unit can automatically add a tone when beginning and ending recordings.
File
opera-
tions
Check file information Home Screen wMENU wBROWSE w+/−wQUICK wINFO
Use this function to check recording dates and file sizes, for example.
Add a file to the playlist Home Screen wMENU wBROWSE w+/−wQUICK wADD LIST
You can make a playlist that includes specific files.
Delete a file Home Screen wMENU wBROWSE w+/−wQUICK wFILE DEL
You can delete files that you do not need.
Delete a file Home Screen wQUICK wDELETE
You can delete files that you do not need.

20 TASCAM DR-40
Category Desired action Function name Procedures, buttons used and explanation
File
opera-
tions
Delete all files in a folder at the
same time
Home Screen wMENU wBROWSE w+/−wQUICK wALL DEL
You can delete all the files in a folder at the same time.
Divide a file Divide Home Screen wQUICK wDIVIDE
Use this function to divide one file into two files.
Divide a file at a mark Automatic division Home Screen wQUICK wAUTO DIVIDE
Use this function to divide files automatically at marks. This can be used to separate songs.
Unit
settings
Set the language shown Home Screen wMENU wOTHERS wSYSTEM wLANGUAGE
Use this to set the language shown on the display.
Set the date and time Home Screen wMENU wOTHERS wDATE/TIME
Use this function to set the internal clock, which is used for the recording dates written to files, for
example.
Turn the speaker off Home Screen wMENU wSPEAKER wOFF
Use this to stop sound output from the speaker on the back of the unit.
Check unit and card information Home Screen wMENU wOTHERS wINFORMATION
Use this function to check the unit firmware version and the remaining space on the card, for
example.
Change the power saving
function setting
Automatic power
saving
Home Screen wMENU wOTHERS wSYSTEM wAUTO PWR SAVE
This function automatically turns the unit off when it is not used for some time.
Change the backlight setting Home Screen wMENU wOTHERS wSYSTEM wBACKLIGHT
Use this to change the display backlight setting.
Adjust the display contrast Home Screen wMENU wOTHERS wSYSTEM wCONTRAST
Use this to set the contrast of the characters on the display.
Set the battery type Home Screen wMENU wOTHERS wSYSTEM wBATTERY TYPE
Select the type of battery being used. This setting affects the accuracy of the remaining battery
display.
Restore the unit to its default
settings
Initialize Home Screen wMENU wOTHERS wSYSTEM wINITIALIZE
Use this function to restore all settings to their factory defaults.
Quickly format an SD card Quick format Home Screen wMENU wOTHERS wSYSTEM wQUICK FORMAT
Use this function to format cards. You should usually use the quick format function to format a card.
Completely format an SD card Erase format Home Screen wMENU wOTHERS wSYSTEM wERASE FORMAT
Use this only when you want to completely erase the data on a card.
Set the file name format Home Screen wMENU wOTHERS wFILE NAME
You can change the characters used in automatically-assigned file names.

TASCAM DR-40 21
Message Meaning and response
No PB File There is no file that can be played back. The file might be
damaged.
No MUSIC File There is no playback file, so DIVIDE cannot be executed.
Format Error
Format CARD
The card is not formatted properly or the card is broken.
This message also appears if the card was formatted using
a computer connected by USB or if an unformatted card is
inserted in the unit.
Always use the DR-40 to format cards to be used with it.
Change the card or press the button while this ENTER/MARK
message is being shown to format the card.
Formatting will erase all the data on the card.
File Not Found
Make Sys File
The system file is missing. This unit requires a system file for
operation. When this message appears, press the ENTER/
MARK button to automatically create a system file.
Invalid SysFile
Make Sys File
The system file required to operate this unit is invalid. When
this message appears, press the button to ENTER/MARK
automatically create a new system file.
Invalid Card
Change Card Something might be wrong with the card. Change the card.
Write Timeout Writing to the card timed out. Backup files on the card to a
computer, and format the card.
Card Full The card has no remaining space. Erase unnecessary files or
move them to a computer to make open space.
Can't Divide The selected division point is not suitable.
(It is too close to the beginning or end of the track.)
Current File
MP3 MP3 files cannot be divided.
Max File Size
The file is larger than the designated size, or the recording time
has exceeded 24 hours when the total number of folders and
files was already at the limit (5000).
File Full The total number of folders and files exceeds 5000. Erase
unnecessary folders and files or move them to a computer.
Card Error The card could not be recognized properly. Change the card.
If any other error occurs, turn the unit off and restart it.
Messages
The following is a list of the pop-up messages.
These might appear on the DR-40 under certain conditions. Refer to this list if
one of these pop-up messages appears and you want to check the meaning or
determine a proper response.
Message Meaning and response
File Name ERR
The DIVIDE function would cause the file name to exceed 200
characters. The DIVIDE function adds “a” or “b” to the end of the
file name. Before choosing the DIVIDE function, connect the unit
to a computer and edit the file name to less than 200 characters.
Battery Empty The batteries are almost out of power. Replace the batteries.
No Card No card is in the unit, so recording is not possible.
File Not Found
A file added to the playlist cannot be found or a file could be
damaged. Please check that file.
Non-Supported
The audio file is not a supported format. Please see “11 –
Connecting with a Computer” in the Reference Manual for file
formats that this unit can use.
File Protected
The file is read only and cannot be erased.
I/O Too Short The IN and OUT points are too close together. Set them with at
least 1 second between them.
Dup File Name
The DIVIDE function would cause the file name to be the same
as that of an existing file in the same folder. The DIVIDE function
adds “a” or “b” to the end of the file name. Before choosing the
DIVIDE function, connect the unit to a computer and edit the
file name.
File Not Found
PLAYLIST
A file in the Playlist cannot be found. Please confirm that the
file is still in the Music folder.
No PLAYLIST
No files have been added to the Playlist.
Add a file to the Playlist or change the play mode to something
besides .PLAYLIST
PLAYLIST FULL The playlist is full. You cannot add more than 99 tracks to the
Playlist.
MBR ERROR
Init CARD
The card is not formatted properly or the formatting is broken.
Change the card or press the button while this ENTER/MARK
message is being shown to format the card. Formatting will
erase all the data on the card.
TASCAM DR-40 23
Specifications
Ratings
8Recording media
SD card (64 MB 2 GB)−
SDHC card (4 GB 32 GB)−
SDXC card (48 GB - 256 GB)
8Recording/playback formats
BWF: 44.1/48/96kHz, 16/24 bit
WAV: 44.1/48/96kHz, 16/24 bit
MP3: 44.1/48 kHz, 32/64/96/128/192/256/320 kbps
8Number of channels
4 channels (stereo 2)×
Inputs and outputs
8EXT MIC/LINE IN jacks
Connectors:
XLR-3-31 (1: GND, 2: HOT, 3: COLD) (support phantom power)
6.3mm (1/4") standard TRS jacks (Tip: HOT, Ring: COLD, Sleeve: GND)
8/LINE OUT jack
Connector: 1/8" (3.5mm stereo mini jack)
8Built-in speaker
0.3W (mono)
Control input/output ratings
8USB port
Connector: Mini-B type
Format:
USB 2.0 HIGH SPEED mass storage class
8REMOTE jack
Connector: 2.5mm TRS jack
Audio performance
8Frequency response
20-20 kHz +1/ 3 dB (EXT IN to LINE OUT, 44.1kHz sampling frequency, JEITA*)−
20-22 kHz +1/ 3 dB (EXT IN to LINE OUT, 48kHz sampling frequency, JEITA*)−
20-40 kHz +1/ 3 dB (EXT IN to LINE OUT, 96kHz sampling frequency, JEITA*)−
8Distortion
0.05% or less (EXT IN to LINE OUT, 44.1/48/96kHz sampling frequency, JEITA*)
8S/N ratio
92 dB or higher
(EXT IN to LINE OUT, 44.1/48/96kHz sampling frequency, JEITA*)
*based on JEITA CP-2150
Recording times
File format (recording setting) Capacity
4 GB
WAV 16-bit (STEREO) 44.1kHz 6:44:00
WAV 24-bit (STEREO) 96kHz 2:04:00
MP3 (STEREO/MONO) 320kbps 44.1kHz, 48kHz 29:48:00
• The recording times shown above are estimates. They might differ depending
on the SD/SDHC/SDXC card in use.
• The recording times shown above are not continuous recording times, but
rather they are the total possible recording times for the SD/SDHC/SDXC card.
Requirements for connected computers
Check the TEAC Global Site (http://teac-global.com/) for the latest information
about supported operating systems.
8Supported operating systems
Windows XP, Windows Vista, Windows 7, Windows 8 (including 8.1)
Mac OS X 10.2 or newer

24 TASCAM DR-40
General
8Power
3 AA batteries (alkaline or NiMH)
USB bus power from a computer
Specialized AC adapter (TASCAM/PS-P520E, sold separately)
8Power consumption
1.7 W (maximum)
8Current consumption
0.34 A (maximum)
8Battery operation time (continuous operation)
• Using alkaline batteries (EVOLTA)
Format Operation time Note
Recording 2-channel WAV,
44.1kHz, 16-bit
About 20.5 hours Recording with built-in
stereo mic
About 2 hours When using phantom
power
Playback 2-channel WAV,
44.1kHz, 16-bit About 21.5 hours Using headphones
Recording: JEITA recording time Playback: JEITA music playback time
• Using NiMH batteries (eneloop)
Format Operation time Note
Recording 2-channel WAV,
44.1kHz, 16-bit
About 17 hours Recording with built-in
stereo mic
About 3 hours When using phantom
power
Playback 2-channel WAV,
44.1kHz, 16-bit About 17.5 hours Using headphones
Recording: JEITA recording time Playback: JEITA music playback time
NOTE
The battery operation times (during continuous operation) could vary
depending on the media being used.
8Dimensions
70 155 35 mm (Width height depth, mic open)× × × ×
90 155 35 mm (Width height depth, mic closed)× × × ×
8Weight
285 g / 213 g (including batteries / not including batteries)
8Operating temperature range
0°C–40°C (32°F–104°F)
• Illustrations in this manual might differ in part from the actual product.
• Specifications and external appearance might be changed without notification
to improve the product.
• Detailed specifications are provided in the Reference Manual.

TASCAM DR-40 25
Mode d'emploi
PRÉCAUTIONS DE SÉCURITÉ IMPORTANTES
Pour le Canada
THIS CLASS B DIGITAL APPARATUS COMPLIES WITH CANADIAN ICES-003.
CET APPAREIL NUMÉRIQUE DE LA CLASSE B EST CONFORME À LA NORME
NMB-003 DU CANADA.
Ce produit est conforme aux directives européennes
et aux autres réglementations de la Commission
européenne.
INSTRUCTIONS DE SÉCURITÉ IMPORTANTES
1 Lisez ces instructions.
2 Conservez ces instructions.
3 Tenez compte de tous les avertissements.
4 Suivez toutes les instructions.
5 N'utilisez pas cet appareil avec de l'eau à proximité.
6 Ne nettoyez l'appareil qu'avec un chiffon sec.
7 Ne bloquez aucune ouverture de ventilation. Installez-le conformément aux
instructions du fabricant.
8 Ne l'installez pas près de sources de chaleur telles que des radiateurs,
bouches de chauffage, poêles ou autres appareils (y compris des
amplificateurs) dégageant de la chaleur.
9 Ne neutralisez pas la fonction de sécurité de la fiche polarisée ou de terre.
Une fiche polarisée a deux broches, l'une plus large que l'autre. Une fiche de
terre a deux broches identiques et une troisième broche pour la mise à la
terre. La broche plus large ou la troisième broche servent à votre sécurité. Si
la fiche fournie n'entre pas dans votre prise, consultez un électricien pour le
remplacement de la prise obsolète.
10 Évitez de marcher sur le cordon d'alimentation et de le pincer, en particulier
au niveau des fiches, des prises secteur, et du point de sortie de l'appareil.
11 N'utilisez que des fixations/accessoires spécifiés par le fabricant.
12 Utilisez-le uniquement avec des chariots, socles,
trépieds, supports ou tables spécifiés par le fabricant
ou vendus avec l'appareil. Si un chariot est utilisé,
faites attention à ne pas être blessé par un
renversement lors du déplacement de l'ensemble
chariot/appareil.
13 Débranchez cet appareil en cas d'orage ou de non utilisation prolongée.
14 Confiez toute réparation à des techniciens de maintenance qualifiés. Une
réparation est nécessaire si l'appareil a été endommagé d'une quelconque
façon, par exemple si le cordon ou la fiche d'alimentation est endommagé,
si du liquide a été renversé sur l'appareil ou si des objets sont tombés
dedans, si l'appareil a été exposé à la pluie ou à l'humidité, s'il ne fonctionne
pas normalement, ou s'il est tombé.

28 TASCAM DR-40
Sommaire
Introduction...........................................................................................................................29
Éléments fournis ..................................................................................................................29
Note à propos du manuel de référence ...................................................................... 29
Précautions concernant l'emplacement et l'emploi.............................................. 29
Attention à la condensation ............................................................................................29
Nettoyage de l'unité ........................................................................................................... 29
Utilisation du site mondial TEAC ...................................................................................29
Nomenclature des parties ................................................................................................ 30
Face supérieure ......................................................................................................................................30
Face avant ..................................................................................................................................................30
Face latérale gauche ...........................................................................................................................30
Face latérale droite ...............................................................................................................................30
Face inférieure .........................................................................................................................................31
Écran d'accueil ...................................................................................................................... 31
Préparation ............................................................................................................................32
Alimentation de l'unité .....................................................................................................................32
Mise sous tension de l'unité ...........................................................................................................32
Selecting a language..........................................................................................................................33
Réglage de l'horloge intégrée......................................................................................................33
Mise hors tension de l'unité ...........................................................................................................33
Branchement d'un équipement d'écoute de contrôle................................................33
Fixation du pied d’inclinaison ......................................................................................................33
Procédures d'édition de base .........................................................................................33
Structure du menu...............................................................................................................................34
Enregistrement .....................................................................................................................34
Écran d'enregistrement ....................................................................................................................34
Note sur l'armement d'enregistrement ..................................................................................35
Structure du menu d’enregistrement .....................................................................................35
Réglage manuel du niveau d'entrée ........................................................................................36
Emploi de la fonction de contrôle de niveau .....................................................................36
Enregistrement .......................................................................................................................................36
Réglage du filtre coupe-bas (LOW CUT) ................................................................................36
Lecture ..................................................................................................................................... 36
Écran de contrôle de lecture .........................................................................................................36
Structure du menu de lecture ...........................................................................................
Lecture des enregistrements ............................................................................................
Réglage du volume de lecture .........................................................................................
Sélection des fichiers à lire (saut) ...................................................................................
Opérations rapides .............................................................................................................38
Présentation de la touche QUICK ...................................................................................
Branchement à un ordinateur ........................................................................................38
Branchement à un ordinateur par USB ............................................................................
Échange de fichiers avec un ordinateur ..........................................................................
Déconnexion d'un ordinateur ..........................................................................................
Autres réglages et informations .................................................................................... 38
Désactivation du haut-parleur intégré .............................................................................
Réglages du système .......................................................................................................
Référence rapide pour l'emploi des diverses fonctions ....................................... 39
Messages .................................................................................................................................43
Guide de dépannage .........................................................................................................44
Caractéristiques techniques ...........................................................................................46
Données ...........................................................................................................................
Entrées et sorties ..............................................................................................................
Performances audio .........................................................................................................
Durées d'enregistrement ..................................................................................................
Configurations informatiques requises pour les ordinateurs connectés ........47
Générales .........................................................................................................................

30 TASCAM DR-40
Nomenclature des parties
Face supérieure
1 Microphone stéréo intégré
C'est un microphone stéréo directionnel à
condensateur électret.
2 Voyant DUAL
S'allume en orange lors de l'enregistrement en
mode double.
3 Voyant 4CH
S'allume en orange lors de l'enregistrement en
mode 4 canaux.
4 Voyant OVER DUB
S'allume en orange lors de l'enregistrement en
mode de superposition.
5 Touche 3/4 [SOLO]
6 Touche 1/2 [SOLO]
7 Touche (HOME) [ ] 8
8 Touche +
9 Touche MENU
0 Touche .
q Touche PB CONT
w Touche −
e Écran
r Voyant de crête PEAK
t Touche REC MODE
y Touche RECORD [ ]/voyant REC 0
À l'arrêt, pressez cette touche pour armer l'unité
en vue de l'enregistrement. Le voyant REC
commencera à clignoter.
u Touche PLAY [ ] 7
i Touche QUICK
o Touche /
p Touche ENTER/MARK
a Touche MIXER
Face avant
s Prises EXT MIC/LINE IN (XLR/jack 3 points
TRS)
d Prise REMOTE (mini-jack 3 points (TRS) de
2,5mm de diamètre)
Face latérale gauche
f Prise /LINE OUT
g Sélecteur EXT IN
h Commutateur HOLD
j Touches INPUT LEVEL (+/–)
Face latérale droite
k Port USB
l Fente pour carte SD

TASCAM DR-40 35
La source d'entrée en mode
OVERDUB MIX (superposition
mixée) est un mixage du fichier lu
et du micro intégré
La source d'entrée en mode
OVERDUB MIX (superposition
mixée) est un mixage du fichier lu
et de la prise .EXT MIC/LINE IN
9 Indicateurs de niveau
Ils affichent le niveau du signal entrant. Lors
d'un enregistrement en mode OVERDUB MIX, ils
affichent le niveau du mixage des sons d'entrée
et de lecture. Le symbole en position -12dB b
de la graduation est un guide pour le réglage
du niveau d'entrée.
0 Nom du fichier
Le nom de fichier automatiquement donné aux
fichiers enregistrés est affiché.
Affiche le nom du projet quand il y a plusieurs
fichiers enregistrés en mode d'enregistrement
4 canaux, en mode double enregistrement ou
en mode de superposition séparée (Overdub
Separate).
q Temps d'enregistrement restant
Affiche le temps d'enregistrement restant
jusqu'à l'atteinte de la taille de fichier maximale
réglée (en heures : minutes : secondes). S'il reste
moins de temps d'enregistrement sur la carte
SD, c'est celui-ci qui est affiché à la place.
w Statut de filtre coupe-bas
Indique si le filtre coupe-bas est en ou hors
service Cette icône est affichée en clair sur fond
sombre si le filtre coupe-bas est réglé à , 40Hz
80Hz 120Hz ou .
: filtre coupe-bas désactivé
: filtre coupe-bas activé
e Statut de fonction de contrôle de niveau
: contrôle de niveau désactivé
: réduction de crête activée
: contrôle automatique de niveau
activé
: limiteur activé
r Statut ON/OFF d'effet
: effet intégré hors service
: effet intégré en service
t Valeur crête en décibels (dB)
Affiche numériquement la valeur du niveau
crête d'entrée.
y Statut de fonction de tonalité automatique
Cette icône indique si la fonction de tonalité
automatique est activée.
Vide : tonalité automatique désactivée
: tonalité automatique activée
Note sur l'armement
d'enregistrement
Cette unité a une fonction d'armement
d'enregistrement comme celle d'un enregistreur
professionnel. En mode d'armement
d'enregistrement, vous pouvez régler par exemple
le niveau d'entrée puis lancer rapidement
l'enregistrement.
En armement d'enregistrement, l'indicateur REC
clignote et l'écran d'enregistrement s'affiche.
Structure du menu d’enregistrement
REGL.ENREGIST. (Réglages d’enregistrement)
FORMAT Format du fichier
BWF : 16bit / 24bit
WAV : 16bit / 24bit
MP3 : 32 - 320kbps
FRQ.ECHA.
Fréquence d'échantillonnage
44,1k / 48k / 96k (Hz)
(96 kHz pour fichier WAV
uniquement)
CREA.FICH Périodicité de changement
automatique de piste
NON 5min 10min 15min , , , ,
30min 60min,
COUPE-BAS Filtre coupe-bas
NON, 40Hz 80Hz 120Hz, ,
PRE-ENRG. Fonction de pré-enregistrement
OUI NON,
ENR.AUTO. Fonction d'enregistrement
automatique
MODE : NON NV.FICH. , ,
MARQUEUR
NIV.DEBUT : -6dB ,
-12dB -24dB -48dB, ,
TON.AUTO.
Fonction de tonalité automatique
NON DEBUT DEBUT+FIN, ,
TPS TONA. Durée de tonalité automatique
0,5s 1s 2s 3s,,,
NIV.TONA. Volume de tonalité automatique
-12dB -18dB -24dB ,,,
-30dB -36dB,

TASCAM DR-40 37
1 Statut de lecture en boucle
L'icône apparaît quand la lecture en boucle
est activée.
2 Vitesse de lecture
Affiche la vitesse de lecture sous forme d'un
multiple de la vitesse normale. (Variable VSA
Speech Audition) apparaît sur la gauche lorsque
l'écoute à vitesse variable, qui permet de
changer le tempo sans changer la hauteur, est
activée.
3 Touches utilisables
Affiche les fonctions des touches lorsque l'écran
de contrôle de lecture est ouvert.
MENU: active/désactive la lecture en boucle.
ENTER: crée ou supprime un point IN ou OUT.
4 Points IN (début) et OUT (fin) de boucle de
lecture
Les points IN (début) et OUT (fin) qui ont été
définis pour la boucle sont affichés.
L'icône apparaît sur l'affichage de position
de lecture quand le point de début est défini.
L'icône apparaît sur l'affichage de position
de lecture quand le point de fin est défini.
5 Affichage de la position de lecture
La position de lecture actuelle est indiquée par
une barre.
Structure du menu de lecture
REGLAG.LECTURE (Réglages de lecture)
ZONE Zone de lecture
TOUS FICH. ,
DOSSIER PLAYLIST,
REPETER Mode de répétition
CONTINU UNIQUE , ,
REPETER 1 TT ,
REPETER
EQ LECT. Égaliseur de lecture
NON , , AIGUS ±
MEDIUMS ± ,
BASSES ±
RECUL Saut en arrière de lecture
NON 1s - 10s 20s , , , ,
30s
Lecture des enregistrements
Quand l'écran d'accueil est ouvert et la lecture
arrêtée, pressez la touche pour lancer la lecture.7
8Mise en pause
Avec l'écran d'accueil ouvert et une piste en lecture,
pressez la touche [ ] pour mettre en (HOME) 8
pause la lecture sur la position actuelle.
8Arrêt
Pressez la touche [ ] depuis le mode (HOME) 8
de pause pour revenir au début du fichier lu et
s'arrêter.
8Recherche arrière et avant
Avec l'écran d'accueil ouvert, pressez et maintenez
la touche ou pour une recherche vers . /
l'arrière ou l'avant.
Réglage du volume de lecture
Quand l'écran d'accueil est ouvert, utilisez les
touches et pour régler le volume.+−
Sélection des fichiers à lire (saut)
Quand l'écran d'accueil est ouvert, sélectionnez le
fichier que vous voulez lire avec les touches et.
/.
Pressez la touche quand vous vous trouvez au .
début d'un fichier pour sauter au début du fichier
précédent.
Quand l'écran d'accueil est ouvert durant la lecture,
pressez la touche pour sauter au fichier suivant./

44 TASCAM DR-40
Guide de dépannage
Si vous avez des problèmes de fonctionnement avec cette unité, veuillez essayer ce qui
suit avant de solliciter une réparation. Si ces mesures ne résolvent pas le problème, veuillez
contacter le magasin auprès duquel vous avez acheté l’unité ou l’assistance clientèle TEAC.
8L’unité ne s’allume pas.
• Vérifiez que les piles ne sont pas épuisées.
• Vérifiez que les piles sont installées selon une orientation ¥/^ correcte.
• Vérifiez que l’adaptateur secteur (PS-P520E TASCAM, vendu séparément) est
bien branché à la fois à la prise secteur et à l’unité.
• Si vous utilisez l’alimentation par le bus USB, vérifiez que le câble USB est
correctement connecté.
• Si vous utilisez l’alimentation par le bus USB, vérifiez que la connexion ne se
fait pas au travers d’un concentrateur (Hub) USB.
• Vérifiez que le commutateur HOLD n’est pas poussé dans la direction de la flèche.
8L’unité s’éteint automatiquement.
• La fonction d’économie automatique d’énergie est-elle activée ? (Voir
« Réglage de la fonction d’économie automatique d’énergie » dans « 12 −
Réglages et informations » dans le manuel de référence.)
8L’unité ne fonctionne pas.
• Vérifiez que le commutateur HOLD n’est pas poussé dans la direction de la flèche.
• L’unité est-elle connectée à un ordinateur par un câble USB ? (« USB
connecté» apparaît-il à l’écran ?)
8La carte SD n’est pas reconnue.
• Vérifiez que la carte SD est complètement insérée.
8La lecture n’est pas possible.
• Si vous essayez de lire un fichier WAV, vérifiez que sa fréquence
d’échantillonnage est prise en charge par cette unité.
• Si vous essayez de lire un fichier MP3, vérifiez que son débit binaire est pris en
charge par cette unité.
Message Signification et réponse
Fichier actuel
MP3 Les fichiers MP3 ne peuvent pas être divisés.
Taille fich.max.
Le fichier est plus grand que l’espace choisi ou la durée
d’enregistrement dépasse 24 heures alors que le nombre
limite (5000) de dossiers et fichiers a déjà été atteint.
Fichier plein Le nombre total de dossiers et fichiers dépasse 5000.
Effacez les dossiers et fichiers inutiles ou transférez-les sur
un ordinateur.
Error tarjeta La carte ne peut pas être correctement reconnue. Changez
la carte
.
Si une de ces erreurs survient, éteignez l'unité et rallumez-la.

48 TASCAM DR-40
8 Plage de température de fonctionnement
0 °C–40 °C
• Les illustrations de ce mode d'emploi peuvent partiellement différer du
produit réel.
• Caractéristiques et aspect externe peuvent être changés sans préavis en vue
d'améliorer le produit.
• Des caractéristiques détaillées sont fournies dans le manuel de référence.
Produktspezifikationen
| Marke: | Tascam |
| Kategorie: | Sprachrekorder |
| Modell: | DR-40 |
Brauchst du Hilfe?
Wenn Sie Hilfe mit Tascam DR-40 benötigen, stellen Sie unten eine Frage und andere Benutzer werden Ihnen antworten
Bedienungsanleitung Sprachrekorder Tascam

9 August 2024
3 August 2024
24 Juli 2024
24 Juli 2024
23 Juli 2024
17 Juli 2024
13 Juli 2024
Bedienungsanleitung Sprachrekorder
- Sprachrekorder Sanyo
- Sprachrekorder Nedis
- Sprachrekorder Philips
- Sprachrekorder Sony
- Sprachrekorder Panasonic
- Sprachrekorder Roland
- Sprachrekorder Yamaha
- Sprachrekorder König
- Sprachrekorder MarQuant
- Sprachrekorder Trevi
- Sprachrekorder Grundig
- Sprachrekorder Salora
- Sprachrekorder Aiwa
- Sprachrekorder Mpman
- Sprachrekorder Motorola
- Sprachrekorder Abus
- Sprachrekorder Olympia
- Sprachrekorder Toshiba
- Sprachrekorder Olympus
- Sprachrekorder Zoom
- Sprachrekorder Samson
- Sprachrekorder AVerMedia
- Sprachrekorder Humax
- Sprachrekorder Audioline
- Sprachrekorder Profoon
- Sprachrekorder Sangean
- Sprachrekorder GPO
- Sprachrekorder D-Link
- Sprachrekorder Audiovox
- Sprachrekorder Reloop
- Sprachrekorder DNT
- Sprachrekorder Swann
- Sprachrekorder DataVideo
- Sprachrekorder Boss
- Sprachrekorder Saramonic
- Sprachrekorder RCA
- Sprachrekorder Hikvision
- Sprachrekorder Planet
- Sprachrekorder Oregon Scientific
- Sprachrekorder EverFocus
- Sprachrekorder GeoVision
- Sprachrekorder Griffin
- Sprachrekorder LifeGood
- Sprachrekorder Livescribe
- Sprachrekorder M-Audio
- Sprachrekorder Provision ISR
- Sprachrekorder Epcom
- Sprachrekorder AirLive
- Sprachrekorder Dahua Technology
- Sprachrekorder Sound Devices
- Sprachrekorder Speco Technologies
- Sprachrekorder Gefen
- Sprachrekorder Neo
- Sprachrekorder Lectrosonics
- Sprachrekorder Hanwha
- Sprachrekorder Axis
- Sprachrekorder Atomos
- Sprachrekorder Syscom
- Sprachrekorder Majestic
- Sprachrekorder Kguard
- Sprachrekorder HiLook
- Sprachrekorder Mach Power
- Sprachrekorder Qian
- Sprachrekorder Pixel Maker
- Sprachrekorder AVTech
- Sprachrekorder Jammin Pro
Neueste Bedienungsanleitung für -Kategorien-

12 Oktober 2024
11 Oktober 2024
10 Oktober 2024
7 Oktober 2024

7 Oktober 2024
3 Oktober 2024
30 September 2024
28 September 2024
22 September 2024

21 September 2024