Standard Horizon BU-1 Bluetooth Adapter Unit Bedienungsanleitung
Standard Horizon
Marine
BU-1 Bluetooth Adapter Unit
Lesen Sie kostenlos die 📖 deutsche Bedienungsanleitung für Standard Horizon BU-1 Bluetooth Adapter Unit (2 Seiten) in der Kategorie Marine. Dieser Bedienungsanleitung war für 13 Personen hilfreich und wurde von 2 Benutzern mit durchschnittlich 4.5 Sternen bewertet
Seite 1/2
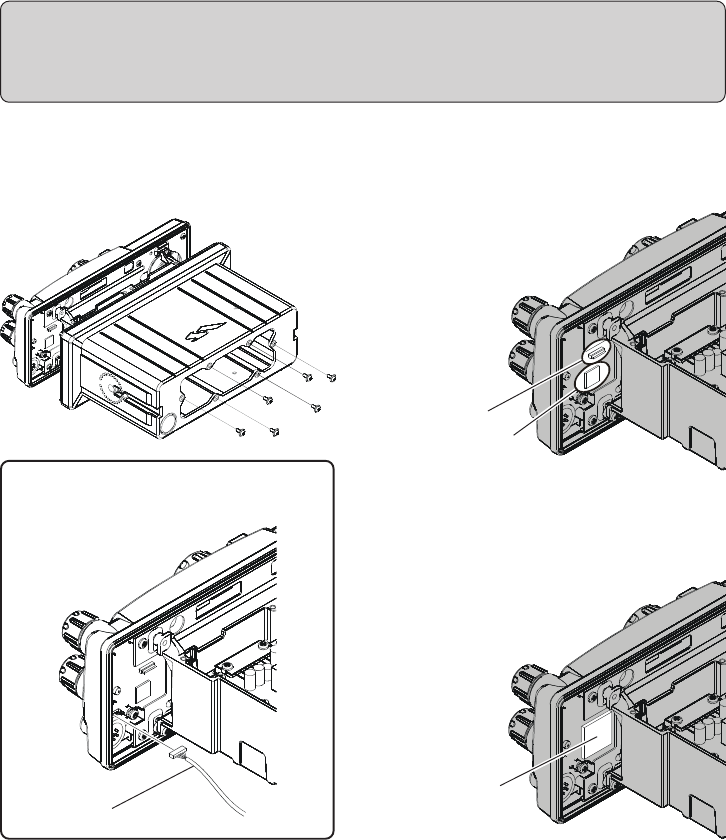
Installation
1. Remove the six screws and the washer se-
curing the Front Panel and then carefully
separate the Front Panel from the Rear case.
Connector
BU-1 Bluetooth® Adapter Unit
Please be sure to follow these safety precautions.
Turn the transceiver power off, and disconnect all cables from the transceiver.
Touch a metal place to discharge any static electricity from your body.
Double-side tape
If you use the GX5500S, disconnect the
wire from the Printed Circuit Board in the
Front Panel.
2. Locate the connector for the BU-1.
Peel the covering of the double-side tape on
the Printed Circuit Board.
3. Carefully align the connector on the BU-1
with the connector on the Printed Circuit
Board, and gently press the BU-1 into place.
4. Replace the Rear Case, using the screws and
washer removed in the first step.
Note: If you used the GX5500S, Attach the
Wire to the connector on the Printed
Circuit Board in the Front Panel.
Be certain the Rubber packing on the Rear
case is correctly installed, and the rear
case adheres and seals properly.
5. Installation is now complete.
BU-1
Wire

Installation of the optional BU-1 Bluetooth® Adapter Unit will enable, the GX5000S/GX5500S to
send/receive voice messages with the optional BH-1 Bluetooth® Headset via wireless links.
Pairing
When using the Bluetooth® Headset for the
first time, the Bluetooth® Headset and the
GX5000S/GX5500S must be paired.
Bring the Bluetooth® Headset and the
GX5000S/GX5500S close together when
doing Pairing.
1. Press and hold the [CALL(MENU)] key un-
til “Setup MenuSetup Menu
Setup MenuSetup Menu
Setup Menu” appears.
2. Turn the CHANNEL selector knob to select
“BluetoothBluetooth
BluetoothBluetooth
Bluetooth” menu, then press the [ENT] key.
You may change the PIN code, if desired,
before continuing with step 3.
a. Turn the CHANNEL selector knob to
select “Pin CodePin Code
Pin CodePin Code
Pin Code”.
b. Press the [ENT] key (The current PIN
code appears).
c. Using the GX5500S
To enter a PIN code from the keypad,
just press the numbered digits on the
keypad in the proper sequence.
Using the GX5000S
i) Rotate the CHANNEL selector
knob to set the first digit of the PIN
code.
ii) Press the [ENT] key to save the
first digit of the PIN code and move
on to the next place.
iii)Repeat the previous steps to com-
plete the PIN code.
d. If you make a mistake, press the [ENT]
key to move the incorrect number, then
re-enter the correct number.
e. Press and holed the [ENT] key to save
the new setting and exit to the
“BluetoothBluetooth
BluetoothBluetooth
Bluetooth” menu.
3. Turn the CHANNEL selector knob to select
“PairingPairing
PairingPairing
Pairing”, then press the [ENT] key.
4. Make sure that the BH-1 is off.
5. Press the [ENT] key.
6. Press and hold the POWER switch on the
BH-1 for five seconds, until the BH-1’s LED
indicator blinks red/blue alternately.
7. When the BH-1 is correctly recognized (Re-
quires a 20 to 30 seconds) by the transceiver,
the BH-1’s LED indicator will blink blue,
and “Pairing Succeeded” notation will ap-
pear on the display of the transceiver.
8. To exit this menu and return to radio opera-
tion mode press the [16/9] key.
VOX feature
1. Press and hold the [CALL(MENU)] key un-
til “Setup MenuSetup Menu
Setup MenuSetup Menu
Setup Menu” appears.
2. Turn the CHANNEL selector knob to select
“BluetoothBluetooth
BluetoothBluetooth
Bluetooth” menu, then press the [ENT] key.
3. Turn the CHANNEL selector knob to select
“Vox FunctionVox Function
Vox FunctionVox Function
Vox Function”, then press the [ENT] key.
4. Turn the CHANNEL selector knob to se-
lect the desired VOX function:
OFF: Disable the VOX feature.
HIGH: Activate the VOX feature (VOX
gain: High).
LOW: Activate the VOX feature (VOX
gain: Low).
5. Press the [ENT] key to save the new set-
ting and exit to the “BluetoothBluetooth
BluetoothBluetooth
Bluetooth” menu.
6. To exit this menu and return to radio opera-
tion mode press the [16/9] key.
Battery saver
Enable/Disable the battery saver of the optional
BH-1 Bluetooth® Headset.
1. Press and hold the [CALL(MENU)] key un-
til “Setup MenuSetup Menu
Setup MenuSetup Menu
Setup Menu” appears.
2. Turn the CHANNEL selector knob to select
“BluetoothBluetooth
BluetoothBluetooth
Bluetooth” menu, then press the [ENT] key.
3. Turn the CHANNEL selector knob to select
“Save FunctionSave Function
Save FunctionSave Function
Save Function”, then press the [ENT] key.
4. Turn the CHANNEL selector knob to se-
lect “ON” or “OFF”.
5. Press the [ENT] key to save the new set-
ting and exit to the “BluetoothBluetooth
BluetoothBluetooth
Bluetooth” menu.
6. To exit this menu and return to radio opera-
tion mode press the [16/9] key.
VERTEX STANDARD CO., LTD.
4-8-8 Nakameguro, Meguro-Ku, Tokyo 153-8644, Japan
VERTEX STANDARD
US Headquarters
10900 Walker Street, Cypress, CA 90630, U.S.A.
EAF43U100
Produktspezifikationen
| Marke: | Standard Horizon |
| Kategorie: | Marine |
| Modell: | BU-1 Bluetooth Adapter Unit |
Brauchst du Hilfe?
Wenn Sie Hilfe mit Standard Horizon BU-1 Bluetooth Adapter Unit benötigen, stellen Sie unten eine Frage und andere Benutzer werden Ihnen antworten
Bedienungsanleitung Marine Standard Horizon

26 August 2024
26 August 2024
26 August 2024
26 August 2024
26 August 2024
26 August 2024
26 August 2024
26 August 2024
26 August 2024
Bedienungsanleitung Marine
- Marine Humminbird
- Marine Kenwood
- Marine Garmin
- Marine Silva
- Marine Furuno
- Marine Lowrance
- Marine Simrad
- Marine Icom
- Marine President
- Marine Rockford Fosgate
- Marine Klarfit
- Marine IVT
- Marine Navionics
- Marine Dickinson Marine
- Marine Digital Yacht
- Marine Eagle
- Marine Easy
- Marine Echotec
- Marine Efoy
- Marine Fastnet
- Marine Fusion
- Marine Geonav
- Marine Interphase
- Marine Katadyn
- Marine KVH
- Marine Lofrans
- Marine Lorenz
- Marine Nasa
- Marine Navico
- Marine Nordwest-funk
- Marine Plastimo
- Marine Polmar
- Marine Raymarine
- Marine Raytheon
- Marine Sailtron
- Marine SEAFARER
- Marine WEST SYSTEM
- Marine AdvanSea
- Marine Alphatron
- Marine BandG
Neueste Bedienungsanleitung für -Kategorien-
5 Oktober 2024
24 September 2024
22 September 2024
21 September 2024
18 September 2024
27 August 2024
27 August 2024
27 August 2024
27 August 2024
26 August 2024