Sharp XEA-506 Bedienungsanleitung
Lesen Sie kostenlos die 📖 deutsche Bedienungsanleitung für Sharp XEA-506 (132 Seiten) in der Kategorie Kasten. Dieser Bedienungsanleitung war für 15 Personen hilfreich und wurde von 2 Benutzern mit durchschnittlich 4.5 Sternen bewertet
Seite 1/132

ELECTRONIC CASH REGISTER
CAJA REGISTRADORA ELECTRONICA
INSTRUCTION MANUAL MANUAL DE INSTRUCCIONES
XE-A506
MODEL
MODELO

FCC Regulations state that any unauthorized changes or modifications to
this equipment not expressly approved by the manufacturer could void
the user’s authority to operate this equipment.
Note: This equipment has been tested and found to comply with the
limits for a Class A digital device, pursuant to Part 15 of the FCC Rules.
These limits are designed to provide reasonable protection against
harmful interference when the equipment is operated in a commercial
environment.
This equipment generates, uses, and can radiate radio frequency energy
and, if not installed and used in accordance with the instruction manual,
may cause harmful interference to radio communications. Operation of
this equipment in a residential area is likely to cause harmful interference
in which case the user will be required to correct the interference at his
own expense.
WARNING
CAUTION
The AC power socket-outlet should be installed near the equipment
and should be easily accessible.
Please record below the model number and serial number for easy
reference in case of loss or theft. These numbers are located on the
right side of the unit. Space is provided for further pertinent data.
Model Number
Serial Number
Date of Purchase
Place of Purchase
FOR YOUR RECORDS

1
EnglishEnglish
INTRODUCTION
Thank you very much for your purchase of the SHARP Electronic Cash Register, Model XE-A506.
Please read this manual carefully before operating your machine in order to gain full understanding of
functions and features.
Please keep this manual for future reference. It will help you if you encounter any operational problems.
• Be sure to initialize the cash register before you start operating the cash register. Otherwise, distorted
memory contents and malfunction of the cash register will occur. For this procedure, please refer to page 8.
IMPORTANT
• On the printer, a paper cutter is mounted. Be careful not to cut yourself on the paper cutter.
• Install your register and the barcode scanner in a location that is not subject to direct radiation,
unusual temperature changes, high humidity or exposed to water sources.
Installation in such locations could cause damage to the cabinets and the electronic components.
• Never operate the register and the barcode scanner with wet hands.
The water could seep into the interior of the register and the barcode scanner and cause component failure.
• When cleaning your register or barcode scanner, use a dry, soft cloth. Never use solvents, such as
benzine and/or thinner.
The use of such chemicals will lead to discoloration or deterioration of the cabinets.
• The register plugs into any standard wall outlet (120V AC ±10%).
Other electrical devices on the same electrical circuit could cause the register to malfunction.
• If the register or the barcode scanner malfunctions, call 1-800-BE-SHARP for service - do not try to
repair the register or the barcode scanner yourself.
• For complete electrical disconnection, disconnect the main plug.
PRECAUTION
This Electronic Cash Register has a built-in memory protection circuit which is operated by rechargeable
batteries.
As you know, all batteries will, in time, dissipate their charge even if not used. Therefore to insure an
adequate initial charge in the protection circuit, and to prevent any possible loss of memory upon installation, it
is recommended that each unit be allowed to recharge for a period of 24 to 48 hours prior to use.
In order to charge the batteries, the machine must be plugged in and the mode switch must be in a position
other than “OFF”. This recharging precaution can prevent unnecessary initial service calls.
SD logo is a trademark of the SD Card Association.
CAUTI ON!
Customer Service Hotline
1-800-BE-SHARP
For Easy Set-up, see
“GETTING STARTED” (page 8).
The Spanish version (summary of English version) is after the English version.
La versión española (el resumen de la versión inglesa) sigue a la versión inglesa.

4
PARTS AND THEIR FUNCTIONS
Register front view Register rear view
Use only the USB cable supplied with the XE-A506 for the connection with a PC. Never use other
cables.
Barcode scanner
The barcode scanner is supplied with the cash register. You can use the barcode scanner by connecting it to
the scanner port mounted on the cash register.
Before connecting the barcode scanner, make sure to unplug the AC power cord of the cash
register.
A button located at the rear side is invalid.
External View
1
SCANNER
Scanner portSD card slot
USB port
(Refer to page 71.)
Operator display
Receipt paper
Journal window
Drawer lock
Drawer
Printer cover
Customer display
(Pop-up type)
Mode switch
AC power cord
Keyboard
Scanning window
Indicator
Lights when a barcode is scanned.
How to scan a barcode:
Place the scanning window close to the barcode you wish to scan. When the barcode is scanned, the
indicator will light and beep.
6
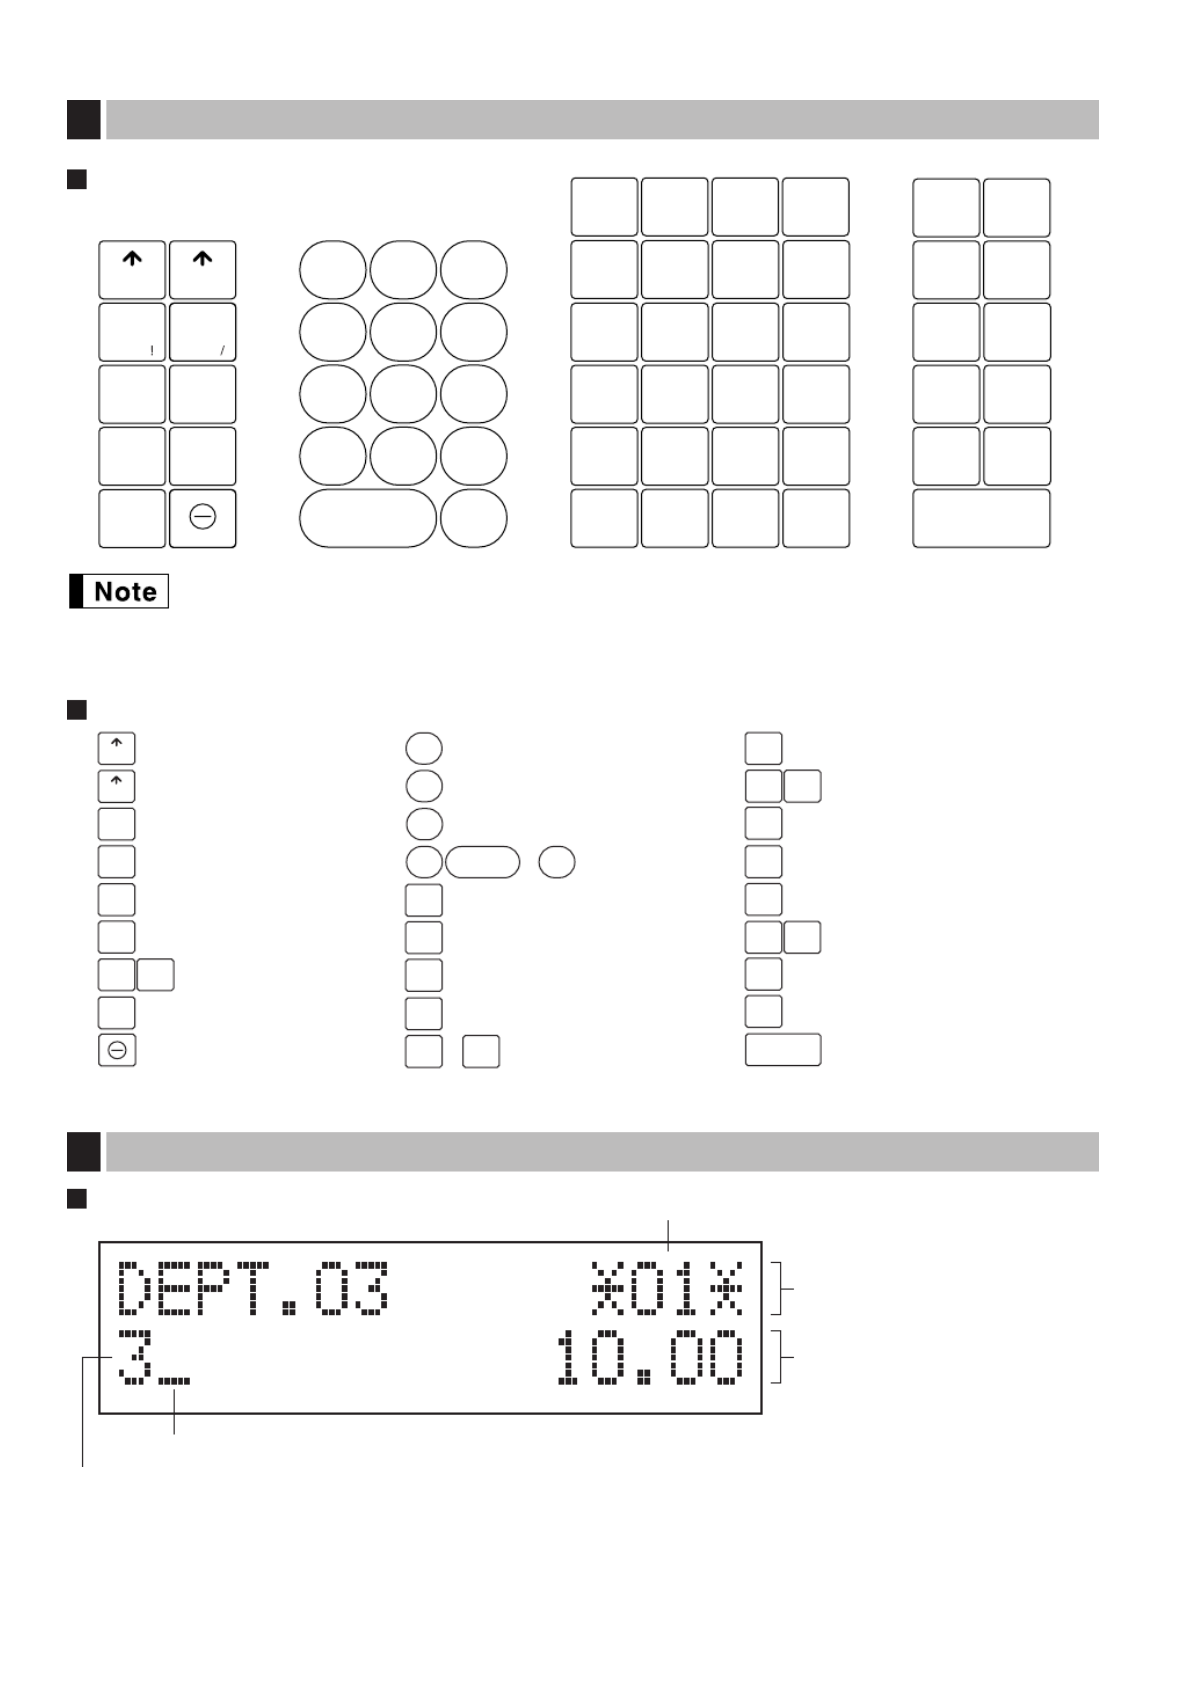
Operator display
• Clerk code or Mode name
The mode you are in is displayed. When a clerk is assigned, the clerk code is displayed in the REG or
OP X/Z mode. For example, “ ” is displayed when clerk 01 is assigned.?01?
Displays
5
Function message display area
Clerk code or mode name
Numeric entry display area
Receipt OFF indicator
Repeat / Sentinel mark / Power save mark
Keyboard layout
• To distinguish from other keys, 0~9, :, @, Pand lare represented as not square-
shaped keys but round-shaped keys in this manual.
• The small characters on the bottom or lower right in each key indicates functions or characters
which can be used for character entries for text programming. For details, refer to page 44.
Key names
Keyboard
4
123
456
789
CL
•
000
DEPT
SHIFT
%1
VOID
RFND
–
%2
NUMBER
SHIFT
SPACE
DC
ESC
BS
RCPT
/PO
@/
FOR
PLU
/UPC DEPT
#
B
24
4
C
23
3
D
22
2
E
21
1
G
29
9
H
28
8
I
27
7
J
26
6
L
34
14
M
33
13
N
32
12
O
31
11
Q
39
19
A
25
5F
30
10 K
35
15 P
40
20
R
38
18
S
37
17
T
36
16
AUTO
INQ
TAX2
SHIFT
TAX1
SHIFT
MDSE
SBTL
#/TM
SBTL
CHK CH
2
Y
X
V
U
TAX CH
1
ZW
CA/AT/NS
CLK#
/CONV
RA
/AMT
RECEIPT OURNALJ
ESC
RCPT
/PO
CA/AT/NS
Receipt paper feed key
Journal paper feed key
Received-on account
/Amount key
Receipt print/Paid-out key
Void key
Tax key
Escape key
Multiplication key
Decimal point key
Clear key
Department code entry key
PLU/UPC key
Department shift key
Clerk code entry
/Conversion key
Department keys
~Total/Amount tender
/No sale key
~Numeric keys
900 0
VOID
@/
FOR
CL
•
TAX
RFND
Refund key
%1 %2 Percent 1 and 2 keys
Discount key
PLU
/UPC
DEPT
#
DEPT
SHIFT
TAX1
SHIFT
Merchandise subtotal key
MDSE
SBTL
Non-add code/Time display
/Subtotal key
#/TM
SBTL
Inquiry key
INQ
Check key
CHK
Automatic sequence key
AUTO
CH1 CH2
21
1
40
20
TAX2
SHIFT Tax 1 and 2 shift keys
RECEIPT
JOURNAL
Charge 1 and 2 keys
RA
/AMT
CLK#
/CONV

9
Precaution: The paper cutter is mounted on the printer (receipt side). Take caution when
installing paper rolls.
The register can print receipts and journals. For the printer, you must install the paper rolls (receipt and journal
paper rolls) provided with the register.
Install the paper rolls according to the procedure shown below with the power cord connected and the mode
switch set to the PGM position:
How to cut a paper roll and set it in the paper roll cradle:
When setting a new paper roll in the paper roll cradle, be sure to cut the paper end behind the
taped (or pasted) point in advance.
1. Cut off approximately one revolution of each paper roll. Make sure each paper end is cut as illustrated
above.
2. Set a paper roll in the paper roll cradle of the receipt side as illustrated above.
Correct Incorrect
To the printer
Incorrect
To the printer
Correct
Installing paper rolls
5
Preparing the cash register
To make the cash register ready for operation, remove the
retainer and set the print head release lever in print position.
1. Push the printer cover forward and detach it.
2. Remove the white retainer at the position shown at the right. Please
keep this retainer for future use when transferring the cash register.
3. Move the print head release lever to the printing position as
illustrated at the right.
4
Retainer
Print head
release lever
(printing position)
The cash register has a built-in memory protection circuit which is operated by rechargeable
batteries. Since the rechargeable batteries have been discharged, please charge the batteries for
one or two days before using the cash register for the first time. To charge the batteries, set the
mode switch to a position other than “OFF” with the power cord plugged into the AC outlet.
Unless the batteries have been charged, all of the programmed data and sales data are not saved.
If you press a key by mistake, an error message such as “HEAD UP” or “PAPER EMPTY” may be
displayed. Press the lkey to clear message after installing paper rolls.

11
Now you are ready for sales registration.
Starting sales entries
8
• Text programming for clerk name, department items, PLU/sub-department and UPC/EAN items, logo
messages printed on the top or bottom of receipts, function texts and foreign currency symbol
• Bottle return department
• Split pricing entry
This is not factory preset. You must enable this function.
• Foreign currency conversion rate
You must set a conversion rate to use the conversion key.
• Preset unit price for departments, PLU/UPC/EANs
• Preset amount for -
• Preset rates for % &
You do not have to program these preset prices/amount/rates since they can be entered at
registration.
• Amount entry digit limit for PO amount, RA amount, Manual tax amount
The factory setting makes the maximum amount you can enter. You can program to limit the amount.
• Sentinel - High amount lockout (HALO) for cash in drawer (CID)
• Department group
You can classify departments into a maximum of 9 groups (0 to 9 groups: 0: non-group is assigned).
Sales in each group can later be printed on an individual group total report and full group total report.
• Commission
If you program commission rate (up to two) and classify departments (For PLU/sub-department/
UPC/EANs, their commission rates are tracked by their associated departments.) into commission
groups (0 to 2 groups: 0: non-commission), commission sales and amount in each commission group
can later be printed on an individual and full clerk report.
• Key sequence for AUTO key
• Online time out setting
• Specification of clerk to be trained
Department programming:
The cash register is pre-programmed for departments as follows:
Department: Allow open price entry in normal department (group: 0, commission group: 0), taxable status-
taxable 1 for department 1 to 10, and non taxable for department 11 to 99
When you use department 11 or above, and/or you apply taxable status other than taxable 1 for department 1 to
10, you must change department settings. Please refer to the department programming section for
programming details.

12
OVERVIEW OF FLOW OF DAILY SALES ENTRIES
Things to do before starting sales entries:
• Make sure the power cord is securely connected to the AC outlet.
• Turn the mode switch to OP X/Z position and check if date and time are correctly set.
• Replace the till, if removed for safety.
• Check if there is enough paper on each roll.
• Select receipt ON/OFF function.
• Make any necessary programming for the day in PGM mode.
For details, refer to BASIC SALES ENTRY, page 13. For the till and paper roll, refer to OPERATOR
MAINTENANCE, page 74 and for programming, refer to programming sections.
Things you can do for sales entries:
• Item entries
• Item repeat entries
• Item multiplication entries
• Single item cash sale (SICS), if programmed.
• Split pricing entries, if programmed.
• Displaying subtotals
• Cash/Check/Charge sale
• Cash tendering in a foreign currency, if the currency conversion rate is programmed.
• Manual tax entry
• Discount or premium using % & and -key
• Refund entry
• No sale
• Paid-out entries
• Received on account entries
• Printing non-add code number
• Making corrections
• Checking sales reports
For details of sales entry method, refer to BASIC SALES ENTRY (page 13) and OPTIONAL FEATURES
(page 24) sections and for details of correcting sales entries, refer to CORRECTION (page 29) section. For
details of reading sales information, refer to READING (X) AND RESETTING (Z) OF SALES TOTAL (page 62)
section.
Things to do after close of business:
• Print sales reports, and clear sales data for the day.
• Account money - comparing it with the amount of cash in drawer versus the amount printed on the general
report.
• Remove the till for safety.
• Turn the mode switch to OFF position.
For details of reading sales information, refer to READING (X) AND RESETTING (Z) OF SALES TOTAL (page
62) section. For details of removing the till and maintenance details, refer to OPERATOR MAINTENANCE
(page 74) section.
FOR THE OPERATOR
Produktspezifikationen
| Marke: | Sharp |
| Kategorie: | Kasten |
| Modell: | XEA-506 |
Brauchst du Hilfe?
Wenn Sie Hilfe mit Sharp XEA-506 benötigen, stellen Sie unten eine Frage und andere Benutzer werden Ihnen antworten
Bedienungsanleitung Kasten Sharp

15 September 2024
14 August 2024
11 August 2024
3 August 2024
2 August 2024
1 August 2024
28 Juli 2024
27 Juli 2024
26 Juli 2024
23 Juli 2024
Bedienungsanleitung Kasten
- Kasten Samsung
- Kasten Approx
- Kasten HP
- Kasten Miele
- Kasten IKEA
- Kasten Olympia
- Kasten Toshiba
- Kasten Livarno
- Kasten MADE
- Kasten Casio
- Kasten Olivetti
- Kasten ELO
- Kasten IZettle
- Kasten VeriFone
- Kasten Intermec
- Kasten Zebra
- Kasten Royal Sovereign
- Kasten SAM4s
- Kasten Uniwell
- Kasten Vectron
- Kasten Bematech
- Kasten Posiflex
- Kasten Newland
- Kasten ATen
- Kasten Advantech
- Kasten BDI
- Kasten Crestron
- Kasten Equip
- Kasten Barska
- Kasten EC Line
- Kasten Cambro
- Kasten Aopen
- Kasten Colormetrics
- Kasten Qian
- Kasten MyPOS
- Kasten Acropaq
- Kasten J2 Retail Systems
- Kasten Flytech
- Kasten Custom
Neueste Bedienungsanleitung für -Kategorien-

9 September 2024
6 September 2024
6 September 2024
6 September 2024
6 September 2024
6 September 2024
6 September 2024
6 September 2024
6 September 2024
6 September 2024