Sharkoon X-Tatic Air Bedienungsanleitung
Lies die bedienungsanleitung für Sharkoon X-Tatic Air (2 Seiten) kostenlos online; sie gehört zur Kategorie Headset. Dieses Handbuch wurde von 33 Personen als hilfreich bewertet und erhielt im Schnitt 4.5 Sterne aus 5 Bewertungen. Hast du eine Frage zu Sharkoon X-Tatic Air oder möchtest du andere Nutzer dieses Produkts befragen? Stelle eine Frage
Seite 1/2
E
F
G
H
I
J
E
F
G
H
E
F
G
H
I
Microphone
Microphone OnMicrophone Mute
Power On
AUDIO IN FROM RCA1
CHARGE AA
CHARGE AAA
POWER
AUDIO IN FROM RCA2
CHARGE AA
CHARGE AAA
POWER
SIGNAL
POWER
LED on Headset
LED on Transmitter
Pairing Mode
AUDIO IN FROM RCA1
CHARGE AA
CHARGE AAA
POWER
LED on Headset
LED on Transmitter
SIGNAL
POWER
AUDIO IN FROM RCA2
CHARGE AA
CHARGE AAA
POWER
Standby Mode
AUDIO IN FROM RCA1
CHARGE AA
CHARGE AAA
POWER
AUDIO IN FROM RCA2
CHARGE AA
CHARGE AAA
POWER
LED on Headset
LED on Transmitter
SIGNAL
POWER
Charging Batteries
AA batteries charging
CHARGE AA
CHARGE AAA
POWER
AA batteries fully charged
CHARGE AA
CHARGE AAA
POWER
AAA batteries charging
CHARGE AA
CHARGE AAA
POWER
AAA batteries fully charged
CHARGE AA
CHARGE AAA
POWER
LED on Transmitter
ABC
BEEP
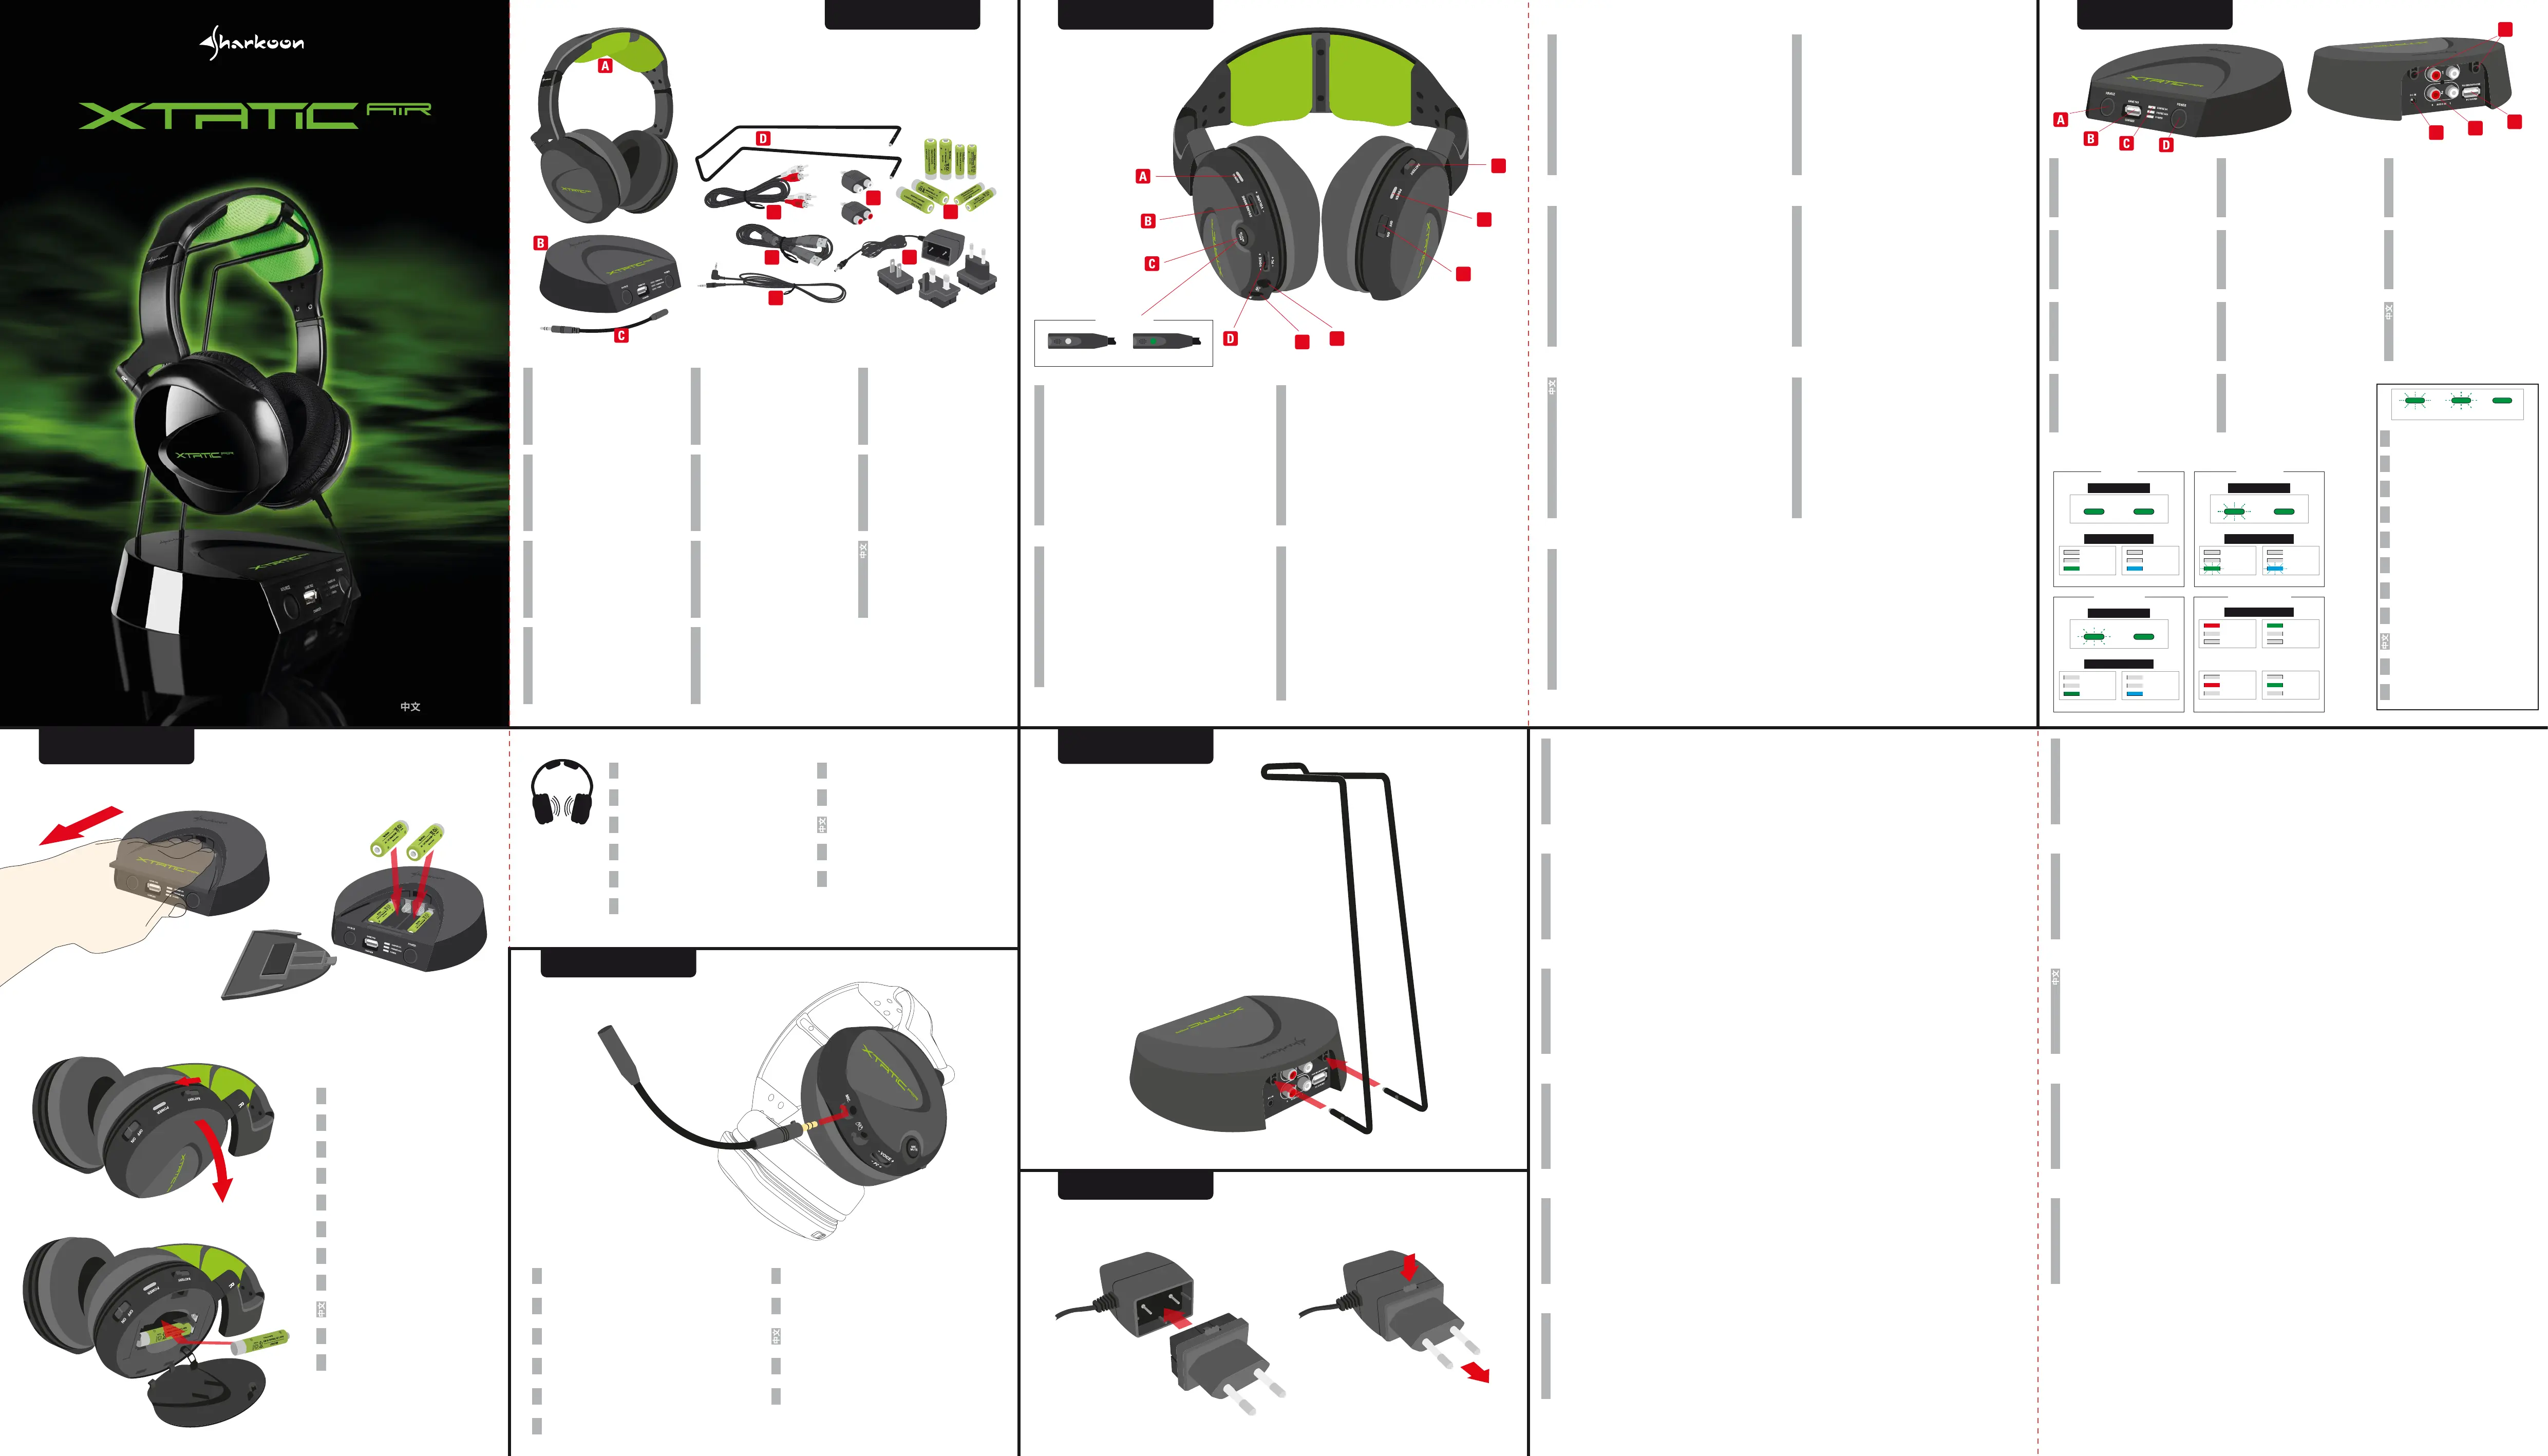
A – Signal LED: Constantly on, when connected with the transmitter station and
receiving audio input from the transmitter station. Rapid flashing, while the headset is
pairing with the transmitter station. Off, when headset is switched off. Flashing slowly
after three minutes, when there is no incoming audio input from the transmitter station.
B – Sound mode/Volume -/+ controller: Press to change the equalizer mode
(the equalizer function is only supported when the microphone is not active). When
connected over RCA (e.g. to a console) this controller adjusts the headset volume;
when connected over USB (e.g. to a PC system) the increase/decrease volume function
is deactivated.
C – Mic mute button: Press to deactivate/activate the microphone, the
microphone LED will indicate the current status.
D – Voice/PC -/+ controller: When connected over RCA (e.g. to a console) this
controller adjusts the volume of the chat partner’s voice; when connected over USB
(e.g. to a PC system) this controller adjusts the PC system’s volume.
E – Connector for detachable microphone
F – Connector for Xbox
®
360 chat cable
G – On/off switch: powers the headset on/off
H – Power LED: Constantly on, while the headset is powered on, during pairing and
in stand-by mode. Off, when the headset is switched off.
I – Opening lever for battery compartment
A – X-Tatic AIR Headset
B – Transmitter station
C – Detachable microphone
D – Headset mount
E – 1x RCA cable (male/male)
F – 2x RCA adapters (2x female/1x male)
G – 1x USB cable (type A male/type A male)
H – 1x 2.5 mm chat cable for Xbox
®
I – 4x NiMH AA rechargeable batteries and
4x NiMH AAA rechargeable batteries
J – Power adapter (110 V~230 V) incl.
travel adapters (EU, US and UK)
ENGLISH
A – Signal-LED: Immer an, wenn das Headset mit der Transmitter-Station verbunden ist
und gleichzeitig Audio-Input von ihr empfängt. Schnell blinkend, während des
Pairing-Prozesses zwischen Headset und Transmitter-Station. Aus, wenn das Headset
abgeschaltet ist. Langsam blinkend nach drei Minuten, wenn kein Audio-Input von der
Transmitter-Station eingeht.
B – „Sound mode/Volume -/+”-Regler: Drücken, um den Equalizer-Modus zu
wechseln (die Equalizer-Funktion wird nur unterstützt, wenn das Mikrofon nicht aktiviert ist).
Wenn über Cinch angeschlossen (z.B. an eine Konsole), stellt dieser Regler die Headset-
Lautstärke ein; wenn über USB angeschlossen (z.B. an einen PC), ist dieser Lautstärkeregler
deaktiviert.
C – „Mic mute“-Schalter: Drücken zum Deaktivieren/Aktivieren des Mikrofons, die
Mikrofon-LED zeigt den aktuellen Status an.
D – “Voice/PC -/+”-Regler: Wenn über Cinch angeschlossen (z.B. an eine Konsole),
stellt dieser Regler die Sprachlautstärke des Chat-Partners ein; wenn über USB angeschlos-
sen (z.B. an einen PC), stellt dieser Regler die PC-Systemlautstärke ein.
E – Anschluss für abnehmbares Mikrofon
F – Anschluss für Xbox
®
360-Chatkabel
G – „On/off“-Schalter: schaltet das Headset an/aus
H – Strom-LED: Immer an, während das Headset angeschaltet ist, während des
Pairing-Prozesses und im Standby-Modus. Aus, wenn das Headset ausgeschaltet ist.
I – Öffnungs-Mechanismus für das Batteriefach
DEUTSCH
A – LED de signal : Allumée en continu lorsque le casque est apparié avec la station
de transmission et reçoit un signal audio de cette station. Clignote rapidement lorsque le
casque est connecté à la station de transmission. Éteinte lorsque le casque est hors
tension. Clignote lentement après trois minutes lorsqu’il n'y a pas de signal audio provenant
de la station de transmission.
B – Contrôle du mode sonore/du volume -/+ : Appuyez pour changer de mode
d’égaliseur (la fonction égaliseur n’est prise en charge que lorsque le microphone n’est pas
activé).Lors d’une connexion via RCA (par ex. à une console), ce contrôle ajuste le volume
du casque ; lors d’une connexion via USB (par ex. à un PC), la fonction
d’augmentation/réduction du volume est désactivée.
C – Bouton pour couper le microphone : Appuyez pour désactiver/activer le
microphone. La LED du microphone indique l'état actuel.
D – Contrôle -/+ voix/PC : Lors d’une connexion via RCA (par ex. à une console), ce
contrôle ajuste le volume de la voix lors de la conversation avec le partenaire ; lors d’une
connexion via USB (par ex. à un PC), ce contrôle ajuste le volume du PC.
E – Connecteur pour microphone détachable
F – Connecteur pour câble de chat Xbox
®
360
G – Commutateur Marche/Arrêt : permet de mettre le casque sous/hors tension
H – LED d’alimentation : Allumée en continu lorsque le casque est sous tension,
durant l’appariement et en mode veille. Éteinte lorsque le casque est hors tension.
I – Capot d’ouverture du compartiment des piles
FRANÇAIS
A – LED de señal: Constantemente encendido cuando se conecta con la estación de
transmisión y se recibe entrada de audio desde dicha estación. Parpadea rápidamente
cuando los auriculares se están asociando con la estación de trasmisión.
Apagado cuando los auriculares no reciben alimentación. Parpadea lentamente después de
tres minutos cuando no se recibe entrada de audio desde la estación de trasmisión.
B – Modo de sonido/Controlador de volumen -/+: Presiónelo para cambiar el
modo de ecualizador (la función de ecualizador solamente se admite cuando el micrófono
no está activo).Cuando se conecta a través de RCA (como, por ejemplo, a una consola) este
controlador ajusta el volumen de los auriculares; cuando se conecta a través de USB (por
ejemplo a su PC) la función de aumento y disminución del volumen se desactiva.
C – Botón de desactivación de micrófono: Presiónelo para desactivar o activar
el micrófono. El LED indicará el estado actual.
D – Controlador de voz/PC -/+: Cuando se conecta a través de RCA (como, por
ejemplo, a una consola) este controlador ajusta el volumen de voz del contertulio; cuando se
conecta a través de USB (por ejemplo, a su PC) este controlador ajusta el volumen de su PC.
E – Conector para micrófono desmontable
F – Conector para cable de voz para Xbox
®
360
G – Conmutador de encendido y apagado: permite encender y apagar los
auriculares
H – LED de alimentación: Constantemente encendido cuando los auriculares
reciben alimentación, durante la asociación y en el modo de espera.
Apagado cuando los auriculares no reciben alimentación.
I – Palanca de apertura del compartimento de las pilas
ESPAÑOL
A – LED de sinal: Sempre aceso, quando ligado à estação de transmissão e a receber
áudio da mesma. A piscar rapidamente, quando os auscultadores estão a emparelhar com
a estação de transmissão. Desligado, quando os auscultadores estão desligados. A piscar
lentamente após três minutos, quando não existe entrada de sinal de áudio da estação de
transmissão.
B – Botão de modo de som/Volume -/+: Prima para mudar o modo do
equalizador (a função do equalizador é suportada apenas quando o microfone não está
activado).Quando é usado um cabo RCA (por exemplo, para ligar a uma consola de jogos)
este botão permite ajustar o volume de som dos auscultadores; quando é usado um cabo
USB (por exemplo, para ligar a um PC) a função de controlo do volume está desactivada.
C – Botão de corte de som no microfone: Prima para desactivar/activar o
microfone, o LED do microfone mostra o estado actual.
D – Botão Voz/PC -/+: Quando é usado um cabo RCA (por exemplo, para ligar a uma
consola de jogos) este botão permite ajustar o volume da conversação; quando é usado
um cabo USB (por exemplo, para ligar a um PC) este botão permite ajustar o volume de
som do PC.
E – Conector para microfone amovível
F – Conector para cabo de conversação para a Xbox
®
360
G – Botão ligado/desligado: Liga/Desliga os auscultadores
H – LED de alimentação: Sempre aceso, enquanto os auscultadores estão ligados,
durante o emparelhamento e no modo de suspensão. Desligado, quando os auscultadores
estão desligados.
I – Patilha para abertura do compartimento das pilhas
PORTUGÛES
A – LED segnale: Sempre acceso, quando le cuffie sono accoppiate con il
trasmettitore e ricevono ingresso audio dal trasmettitore. Lampeggia rapidamente quando
le cuffie sono collegate al trasmettitore. Spento, quando le cuffie sono spente.
Lampeggia lentamente dopo tre minuti, quando non c'è alcun ingresso audio in arrivo dal
trasmettitore.
B – Modalità audio/Controllo Volume -/+: Premere per cambiare la modalità
equalizzatore (la funzione equalizzatore è supportata solo quando il microfono non è
attivo). Quando è collegato tramite cavo RCA (ad esempio ad una console), il controller
regola il volume delle cuffie, quando è collegato tramite cavo USB (ad esempio ad un PC)
la funzione di aumento/diminuzione volume è disattivata.
C – Tasto esclusione microfono: Premere per disattivare/attivare il microfono,
il LED microfono indicherà lo stato attuale.
D – Controllo -/+ Voce/PC: Quando è collegato tramite cavo RCA (ad esempio ad
una console), questo controller regola il volume della voce del partner di chat; quando è
collegato tramite cavo USB (ad esempio ad un PC) questo controller regola il volume del
sistema PC.
E – Connettore per microfono staccabile
F – Connettore per cavo chat Xbox
®
360
G – Interruttore d’accensione/spegnimento: permette di accendere/spegnere le
cuffie
H – LED alimentazione: Sempre acceso quando le cuffie sono accese, durante
l’accoppiamento ed in modalità di Standby. Spento, quando le cuffie sono spente.
I – Leva di apertura scomparto batterie
ITALIANO
A – Signaal- LED: Brandt doorlopend bij verbinding met het zendstation en wanneer
een audiosignaal wordt ontvangen van het zendstation. Knippert snel wanneer de headset
gekoppeld is met het zendstation. Uit wanneer de headset is uitgeschakeld. Knippert
langzaam na drie minuten wanneer er geen audiosignaal wordt ontvangen van het
zendstation.
B – Geluidsmodus/volume -/+ beheer: Druk om de equalizermodus te wijzigen
(de equalizerfunctie wordt alleen ondersteund wanneer de microfoon niet is
ingeschakeld.Bij aansluiting via tulp (bijvoorbeeld op een console) past deze controller het
headsetvolume aan; bij aansluiting via USB (bijvoorbeeld op een pc-systeem) is de functie
voor het verhogen/verlagen van het volume uitgeschakeld.
C – Microfoondempingsknop: Druk om de microfoon in/uit te schakelen, de
microfoon-LED geeft de huidige status aan.
D – Spraak/pc -/+ beheer: Bij aansluiting via tulp (bijvoorbeeld op een console) past
deze controller het volume van de stem van de gesprekspartner aan; bij aansluiting via
USB (bijvoorbeeld op een pc-systeem) past deze controller het systeemvolume van het
pc-systeem aan.
E – Aansluiting voor afneembare microfoon
F – Aansluiting voor Xbox
®
360 chatkabel
G – Aan/uit-schakelaar: schakelt de headset aan/uit
H – Stroom-LED: Brandt doorlopend wanneer de headset is ingeschakeld, tijdens het
paren en in de standbymodus. Uit, wanneer de headset is uitgeschakeld.
I – Openingshefboom voor batterijvak
NEDERLANDS
A – Dioda sygnału: Świeci stale po połączeniu ze stacją nadajnika i przy odbiorze
sygnałów audio ze stacja nadajnika. Szybkie miganie podczas nawiązywania
połączenia słuchawek ze stacją nadajnika. Zgaszona po wyłączeniu słuchawek. Wolne
miganie po trzech minutach, przy braku sygnałów audio ze stacji nadajnika.
B – Trybu dźwięku/Regulator głośności -/+: Naciśnij, aby zmienić tryb
korektora (funkcja korektora jest obsługiwana wyłącznie wtedy, gdy nie jest aktywny
mikrofon.Po podłączeniu przez RCA (np. z konsolą) ten regulator reguluje głośność
słuchawek; po podłączeniu przez USB (np. z systemem PC), funkcja
zwiększania/zmniejszania głośności jest wyłączana.
C – Przycisk wyciszenia mikrofonu: Naciśnij, aby wyłączyć/uaktywnić
mikrofon, dioda LED mikrofonu LED wskaże aktualny stan.
D – Regulator -/+ Głos/PC: Po podłączeniu przez RCA (np. z konsolą) ten regulator
reguluje głośność głosu rozmówcy w sesji chat; po podłączeniu przez USB (np. z
systemem PC) ten regulator reguluje głośność systemu PC.
E – Złącze odłączanego mikrofonu
F – Złącze kabla chat dla Xbox
®
360Strona prawa
G – Przełącznik Włączenie/wyłączenie:
włączenie/wyłączenie zasilania słuchawek
H – Dioda zasilania: Świeci stale podczas uruchamiania słuchawek, podczas
parowania i w trybie oczekiwania. Zgaszona po wyłączeniu słuchawek.
I – Otwieranie dźwigni wnęki baterii
POLSKI
A – 訊號LED燈: 恆亮-當訊號配對成功或是訊號正常接收中快速閃爍- 當耳機及傳輸座
訊號配對中不亮- 當耳機被關閉時.三分鐘後緩慢閃爍-當無聲音從訊號傳輸座送出
B – 音場模式/音量控制 -/+ : 按壓此鍵改變音場模式 (特殊音場模式只有在麥克風未啟
用下生效)當透過RCA連接時(如: 遊戲機),這個旋鈕可以控制耳機音量大小;當透過USB
連接時(如:PC), 這個旋鈕無作用
C – 麥克風靜音按鈕: 按壓可以開啟/關閉 麥克風靜音功能,LED指示燈可以顯示狀態
D – 語音/PC控制 -/+ : 當透過RCA連接時(如: 遊戲機),這個旋鈕可以控制接收對方語音
音量大小當透過USB連接時(如:PC),這個旋鈕可以控制電腦輸出的音量
E – 快拆式麥克風接頭
F – Xbox
®
360 語音連接線接頭
G – 電源開關: 控制耳機的開啟/關閉
H – 電源指示燈: 恆亮- 耳機開啟或配對中,待機中.不亮-耳機關閉.
I – 電池槽蓋開啟鍵
A – LEDランプ:点灯:接続完了状態および無線通信中に常時点灯します。高速点
滅:トランスミッターステーションとペアリング作業の最中に高速点滅します。
消灯:ヘッドセットの電源がオフになると、消灯します。トランスミッターステ
ーションと無線通信していない3分後にゆくっり点滅し始めます。
B – サウンドモード/音量 - / +コントローラ:ボタンを押してイコライザモードの
切り替えをします。(イコライザ機能は、マイクがオフのときのみ有効です。)
RCA接続(例えば、ゲーム機との接続) の場合、このコントローラ でヘッドセット
の音量を調整します。USB接続(例えば、PCとの接続)の場合、音量調整機能が無
効になります。
C – マイクミュートボタン: ボタンを押してマイクミュートをオン/オフにします。
マイクのLED表示は、現行のステータスを示します。
D – ボイスチャット音量/ PC音量 - / +コントローラ:RCA接続(例えば、ゲーム機と
の接続) の場合、このコントローラでボイスチャット相手の音量を調整します。
USB接続(例えば、PCとの接続)の場合、音このコントローラ でPC音量を調整しま
す。
E – 着脱式マイクの接続口。
F – XBox
®
チャットケーブルの接続口。
G – オン/オフ スイッチ:ヘッドセットの電源スイッチ。
H – 電源LEDランプ:常時点灯:電源オン、ペアリングモード、スタンバイモードの
とき、点灯します。消灯:ヘッドセットの電源がオフになると、消灯します。
I – バッテリーコンパートメントの蓋を開くレバー。
日本語
A – 동작상태 LED: 송신기에연결되어있고송신기에서오디오입력을받을때계속
점등됩니다.헤드셋을송신기와페어링하는동안빠르게점등됩니다.
헤드셋전원이꺼져있을때는점등되지않습니다.송신기에서신호를받지
못하거나신호가끊어지면 3분후천천히점등됩니다.
B – 사운드모드/볼륨 -/+ 컨트롤러: 이퀄라이져모드를변환할수
있습니다.(이퀄라이즈기능은오직마이크로폰이활성화되어있지않을시사용이
가능합니다.) RCA방식(콘솔게임)으로연결하였을시볼륨컨트롤이가능하며USB
방식 (PC system)으로연결하였을시는비활성화됩니다.
C – 마이크뮤트기능: Press to deactivate/activate the microphone, the microphone LED
will indicate the current status.마이크로폰활성화/비활성화버튼을누르면 LED가
현재의마이크상태를나타냅니다.
D – 보이스/PC -/+ 컨트롤러: When connected over RCA (e.g. to a console) this controller
adjusts the volume of the chat partner’s voice; when connected over USB (e.g. to a PC
system) this controller adjusts the PC system’s volume. RCA방식(콘솔게임)으로연결
하였을시상대방의보이스음향을조절가능하며
USB 방식 (PC system)으로 연결 하였을 때에는 메인 볼륨 조절이 가능합니다.
E – 마이크 연결 단자
F – Xbox
®
360 마이크 케이블 연결 단자
G – On/off 스위치: 헤드셋 전원on/off
H – 파워 LED:헤드셋의전원이켜져있거나페어링또는스텐바이모드일때점등
됩니다.헤드셋전원이꺼지면꺼집니다.
I – 배터리 덮개
한국어
ENGLISH
A – X-Tatic AIR Headset
B – Transmitter-Station
C – Abnehmbares Mikrofon
D – Headset-Ständer
E – 1x Cinch-Kabel (Stecker/Stecker)
F – 2x Cinch-Adapter (2x Buchse/1x Stecker)
G – 1x USB-Kabel (Typ A Stecker/Typ A Stecker)
H – 1x 2,5-mm-Chatkabel für Xbox
®
I – 4x NiMH-AA-Akkus und 4x NiMH-AAA-Akkus
J – Stromadapter (110 V~230 V) inkl. Reiseadapter
(EU, USA und UK)
DEUTSCH
A – Casque X-Tatic AIR
B – Station de transmission
C – Microphone détachable
D – Support du casque
E – 1x câble RCA (mâle/mâle)
F – 2x adaptateurs RCA (2 x femelle/1 x mâle)
G – 1x câble USB (type A mâle/type A mâle)
H – 1x câble de chat 2,5 mm pour XBox
®
I – 4x piles rechargeables NiMH de type AA et 4x
piles rechargeables NiMH de type AAA
J – Adaptateur secteur (110 V~230 V) incluant des
adaptateurs de voyage (UE, USA et RU)
FRANÇAIS
A – Auriculares X-Tatic AIR
B – Estación de transmisión
C – Micrófono desmontable
D – Soporte para auriculares
E – 1 cable RCA (macho/macho)
F – 2 adaptadores RCA (2 hembras/1 macho)
G – 1 cable USB (macho tipo A/macho tipo A)
H – 1 cable para voz de 2,5 mm para XBox
®
I – 4 pilas recargables NiMH de tipo AA y 4 pilas
recargables NiMH de tipo AAA
J – Adaptadores para viaje (UE, EE. UU. y RU) incluidos
en el adaptador de alimentación (110 V~230 V)
ESPAÑOL
A – Auscultadores X-Tatic AIR
B – ZEstação de transmissão
C – Microfone amovível
D – Suporte para os auscultadores
E – 1 cabo RCA (macho/macho)
F – 2 adaptadores RCA (2 fêmea/1 macho)
G – 1 cabo USB (macho tipo A/macho tipo A)
H – 1 cabo para conversação de 2,5 mm para a XBox
®
I – 4 pilhas recarregáveis AA NiMH e 4 pilhas
recarregáveis AAA NiMH
J – Transformador (110 V~230 V) incluindo adaptadores
de viagem (UE, E.U.A. e Reino Unido)
PORTUGÛES
A – Cuffie X-Tatic AIR
B – Trasmettitore
C – Microfono staccabile
D – Supporto cuffie
E – 1x cavo RCA (maschio/maschio)
F – 2x adattatori RCA (2x femmina/1x maschio)
G – 1x cavo USB (tipo A maschio/tipo A maschio)
H – 1x cavo chat 2,5 mm per XBox
®
I – 4x batterie ricaricabili NiMH AA e 4x batterie
ricaricabili NiMH AAA
J – Adattatore di corrente (110 V~230 V) inclusi
adattatori da viaggio (UE, USA e Regno Unito)
ITALIANO
A – X-Tatic AIR headset
B – Zendstation
C – Afneembare microfoon
D – Headsetbevestiging
E – 1x tulpkabel (man/man)
F – 2x tulpkabels (2x vrouw/1x man)
G – 1x USB-kabel (type A man/type A man)
H – 1x 2,5 mm chatkabel voor XBox
®
I – 4x NiMH AA oplaadbare batterijen en 4x NiMH AAA
oplaadbare batterijen
J – Netstroomadapter (110 V~230 V) incl. reisadapters
(EU, VS en VK)
NEDERLANDS
A – Słuchawki X-Tatic AIR
B – Stacja nadajnika
C – Odłączany mikrofon
D – Wspornik słuchawek
E – 1x kabel RCA (męski/męski)
F – 2x adaptery RCA (2x żeński/1x męski)
G – 1x kabel USB (typ A męski/typ A męski)
H – 1x 2,5 mm kabel chat dla XBox
®
I – 4x ładowalne baterie NiMH AA i 4x ładowalne
baterie NiMH AAA
J – Adapter zasilania (110 V~230 V) zawiera
adaptery podróżne (UE, USA i Wielka Brytania)
POLSKI
A – X-Tatic AIR 耳機
B – 訊號傳輸座
C – 快拆式麥克風
D – 耳機掛架
E – 1x RCA 線材 (公/公)
F – 2x RCA 轉接頭 (2x 母/1x 公)
G – 1x USB 線 (type A 公/type A 公)
H – 1x 2.5 mm 訊號連接線( XBox
®
專用)
I – 4x 鎳氫 AA 充電電池 和 4x 鎳氫 AAA充電電池
J – 電源變壓器 (110 V~230 V) 含萬用旅行接
頭一組 (歐規, 美規, 英規)
A – X-Tatic AIR ヘッドセット
B – トランスミッターステーション
C – 着脱可能なマイク
D – Headset mount
E – 1x RCA ケーブル (オス/オス)
F – 2x RCA アダプタ (2x メス/1x オス)
G – 1x USB ケーブル (Aのオスコネクタ
/Aのオスコネクタ )
H – 1x XBox
®
用2.5 mm チャットケーブル
I – 4x AA充電式ニッケル水素電池および 4x AAA
充電式ニッケル水素電池
J – ACアダプタ (110 V~230 V)、トラベルアダプ
タ(EU、US、UK)も付属
日本語
A – X-Tatic AIR 헤드셋
B – 음향 송신기
C – 마이크로폰
D – 헤드셋 마운트
E – 1x RCA케이블(male/male)
F – 2x RCA 아답터 (2x female/1x male)
G – 1x USB 케이블 (type A male/type A male)
H – 1x 2.5 mm XBox
®
용채팅케이블
I – 4x NiMH AA 충전 배터리와 4x NiMH AAA
충전배터리
한국어
A – Audio source selector button
B – Charger port for PS3™ gamepads
C – LED indications: see below!
D – Power button: press once to switch on, press again
to switch off.
E – DC In for included power adapter
F – RCA audio input connectors
G – USB microphone connector (PS3™ and PC)
H – Openings for headset mount: see below!
A – Keuzeknop voor audiobron
B – Oplaadpoort voor PS3™-gamepads
C – LED-indicaties: zie onder!
D – Aan/uit-knop
E – Gelijkstroomaansluiting voor meegeleverde
netstroomadapter
F – Tulpingangen voor audio
G – USB-microfoonaansluiting (PS3™ en PC)
H – Openingen voor headsetbevestiging: zie onder!
A – オーディオソース選択ボタン
B – PS3™ゲームパッド用USBチャージャーボード
C – LED表示: 下記をご参照ください!
D – 電源ボタン
E – DC in
F – RCAオーディオ入力コネクタ
G – USBマイクコネクタ (PS3™およびPC用)
H – ヘッドセットスタンドの取付穴:下記をご参照
ください!
A – Wahlschalter für Audio-Quelle
B – Ladebuchse für PS3™-Gamepads
C – LED-Anzeigen: siehe unten!
D – Power-Schalter: einmal drücken zum Anschalten,
erneut drücken zum Ausschalten.
E – DC-In-Anschluss für beigelegten Stromadapter
F – Cinch-Audioanschlüsse
G – USB-Mikrofon-Anschluss (PS3™ und PC)
H – Öffnungen für Headset-Ständer: siehe unten!
A – Botão para selecção da fonte de áudio
B – Porta de carregamento para comandos de jogos da PS3™
C – Indicações LED: ver abaixo!
D – Botão de alimentação
E – Entrada DC para o transformador fornecido
F – Conectores RCA para entrada de áudio
G – Conector USB para microfone (PS3™ e PC)
H – Aberturas para o suporte dos auscultadores:
ver abaixo!
A – Przycisk wyboru źródła audio
B – Port ładowarki dla gamepadów PS3™
C – Wskazania LED: patrz poniżej!
D – Przycisk zasilania
E – Wejście prądu stałego dla dostarczonego adaptera
zasilania
F – Złącza wejścia audio RCA
G – Złącze mikrofonu USB (PS3™ i PC)
H – Gniazda wspornika słuchawek: patrz poniżej!
A – 오디오 소스 선택 버튼
B – PS3™ 게임패드 충전단자
C – LED 동작 상태: 아래 참조!
D – 파워 버튼E – 파워 아답터 연결 단자
F – RCA 오디오 연결 단자
G – USB 마이크로폰 커넥터(PS3™ 와 PC)
H – 해드셋 거치대 연결부: 아래 참조!
A – Bouton de sélection de la source audio
B – Port de recharge pour gamepads PS3™
C – Voyants LED : voir ci-dessous !
D – Bouton Marche/Arrêt
E – Entrée CC pour l’adaptateur secteur inclus
F – Connecteurs d’entrée audio RCA
G – Connecteur pour microphone USB (PS3™ et PC)
H – Ouvertures pour le support du casque : voir
ci-dessous !
A – Tasto di selezione origine audio
B – Porta di caricamento USB per gamepad PS3™
C – Indicazioni LED: vedi sotto!
D – Tasto d’alimentazione
E – DC IN per adattatore di corrente incluso
F – Connettori ingresso audio RCA
G – Connettore microfono USB (PS3™ e PC)
H – Aperture per supporto cuffie: vedi sotto!
A – RCA輸入埠切換鈕
B – PS3™遊戲手把充電埠
C – LED 指示燈: 參閱後續說明!
D – 電源鈕
E – 變壓器插孔
F – RCA 訊號輸入孔
G – USB 麥克風訊號輸出接頭 (PS3™ 和 PC使用)
H – 耳機掛架插孔: 參閱後續說明!
A – LED flashing fast (~ once/second)
B – LED flashing slowly (~ once/5 seconds)
C – LED constantly on
A – LED schnell blinkend (~einmal/Sekunde)
B – LED langsam blinkend (~einmal/5 Sekunden)
C – LED immer an
A – La LED clignote rapidement (environ 1 fois par seconde)
B – La LED clignote lentement (environ 1 fois toutes les 5 sec.)
C – La LED est allumée en continu
A – El LED parpadea rápidamente (aprox. 1 vez por segundo)
B – El LED parpadea lentamente (aprox. 1 vez cada 5 segundos)
C – LED constantemente encendido
A – LED a piscar rapidamente (1 vez por segundo)
B – LED a piscar lentamente (1 vez em intervalos de 5 segundos)
C – LED sempre aceso
A – LED lampeggiante veloce (circa 1 volta al secondo)
B – LED lampeggiante lento (circa 1 volta ogni 5 secondi)
C – LED sempre acceso
A – LED knippert snel (ongeveer eenmaal per seconde)
B – LED knippert langzaam (ongeveer eenmaal per 5 seconden)
C – LED brandt doorlopend
A – Szybkie miganie diody (około 1 raz na sekundę)
B – Wolne miganie diody (około 1 raz na 5 sekund)
C – Stałe światło diody
A – LED 閃爍快速 (約1秒1次)
B – LED 閃爍慢速 (約5秒1次)
C – LED 恆亮
A – LED 高速点滅 (約1秒に1回)
B – LED ゆくっり点滅 (約5秒に1回)
C – LED 点灯
A – LED 빠르게 점등(약1 초에 한번씩)
B – LED 느리게 점등(약 5초에 한번씩)
C – LED 계속 점등
1. Insert the microphone’s 3.5 mm stereo plug into the headset’s microphone
connector according to the connector shape.
2. Turn the microphone counterclockwise to lock it.
1. Steek de 3,5 mm stereostekker van de microfoon in de microfoonaansluiting van
de headset volgens de stekkervorm.
2. Draai de microfoon tegen de klok in om deze te vergrendelen.
1. Setzen Sie den 3,5-mm-Klinkenstecker des Mikrofons in den Mikrofonanschluss
des Headsets ein. Achten Sie dabei auf die Formgebung der Anschlüsse.
2. Drehen Sie das Mikrofon entgegen dem Uhrzeigersinn, um es zu fixieren.
1. Włącz wtyczkę 3,5 mm mikrofonu stereo do złącza mikrofonu słuchawek, zgodnie
z odpowiednim kształtem złącza.
2. Obróć mikrofon przeciwnie do wskazówek zegara w celu zablokowania.
1. Insérez la fiche stéréo 3,5 mm du microphone dans le connecteur de microphone
du casque dont la forme correspond.
2. Tournez le microphone dans le sens inverse des aiguilles d’une montre pour le
verrouiller en position.
1. 把麥克風接頭依照形狀插入到耳機的麥克風插座中
2. 將麥克風逆時針方向旋轉直到卡緊
1. Inserte el enchufe estéreo de 3,5 mm del micrófono en el conector para
micrófono de los auriculares conforme a la forma del conector.
2. Gire el micrófono en sentido contrario a las agujas del reloj para bloquearlo.
1. コネクタの形状に従い、ヘッドセットのマイクコネクタにマイクの
3.5mmステレオプラグを挿入します。
2. マイクを反時計回りに回してロックします。
1. Ligue a ficha estéreo de 3,5 mm do microfone ao conector do microfone
existente nos auscultadores, tendo em atenção a forma do conector.
2. Rode o microfone no sentido contrário ao dos ponteiros do relógio para o fixar.
1. 마이크로폰의 3.5 mm 스트레오 플러그를 헤드셋의 마이크 입력 단자에
구멍을 맞추어 연결 합니다.
2. 삽입 후 반 시계 방향으로 돌려서 고정 합니다.
1. Inserire il connettore stereo 3,5 mm del microfono nel connettore microfono delle
cuffie in base alla forma del connettore.
2. Girare il microfono in senso antiorario per bloccarlo.
Note:
Only use SHARKOON rechargeable NiMH batteries with
shortened sleeve for charging.
Hinweis:
Verwenden Sie zum Laden ausschließlich SHARKOON
NiMH-Akkus mit verkürzter Manschette („shortened sleeve“).
Remarque :
Utilisez uniquement des piles rechargeables SHARKOON NiMH
avec cosse raccourcie pour la recharge.
Nota:
Utilice solamente pilas NiMH recargables SHARKOON con funda
acortada para carga.
Nota:
Para efeitos de carregamento use apenas pilhas NiMH
recarregáveis da SHARKOON com a capa curta.
Nota:
Usare solo batterie NiMH ricaricabili SHARKOON a rivestimento
ridotto per la ricarica.
Opmerking:
Gebruik alleen SHARKOON oplaadbare NiMH-batterijen met
korte huls voor opladen.
Uwaga:
Do ładowania należy używać wyłącznie ładowalnych baterii
NiMH SHARKOON ze skróconą osłoną.
注意:
只可以使用 SHARKOON 充電鎳氫電池(為特殊設計,外皮有
一截未包覆) .
注:
必ずSHARKOON社の専用充電式ニッケル水素電池
(shortened sleeve)をお使いください。
주의사항:
반드시 SHARKOON 사의재충전NiMH batteries만사용하셔야
하며전용충전기를사용하시길바랍니다.
A warning signal (with an interval of ten seconds) indicates battery
low power. The batteries must be replaced within three minutes.
Ein Warnsignal (mit zehnsekündigem Intervall) zeigt leere Akkus an.
Die Akkus müssen dann innerhalb von drei Minuten gewechselt
werden.
Un signal d’avertissement (avec un intervalle de 10 secondes entre 2
bips) avertira du niveau faible des piles. Les piles doivent être
remplacées dans un délai de trois minutes.
Un tono de advertencia (en un intervalo de 10 segundos) indicará que
las pilas tienen poca carga. Es necesario cambiar las pilas antes de
que transcurran tres minutos.
Um aviso sonoro (com intervalos de 10 segundos) assinala que a
carga das pilhas está fraca. Estas têm de ser substituídas no espaço
de 3 minutos.
Un segnale acustico (ad intervalli di 10 secondi) avviserà lo stato di
batteria scarica. Le batterie devono essere sostituite entro tre minuti.
Een waarschuwingssignaal (met 10secinterval) geeft lege batterijen
aan. Batterijen moeten binnen drie minuten worden vervangen.
Sygnał ostrzeżenia (z 10sek. odstępem czasu) wskazujący słabe
naładowanie baterii. Baterie należy wymienić w ciągu trzech minut.
電池低電量的警告信號(10秒間隔的燈號閃爍).電池必須在3分鐘內
更換
10秒間隔でローバッテリ警告音が鳴ります。3分以内にバッテ
リを交換する必要があります。
배터리용량이부족할때 10초간격으로경고음이울립니다.
배터리를 3분내에교체하여야합니다.
Pairing:
1. The headset and the transmitter station will automatically connect to each other, after they have been switched on (Pairing).
2. To force a reconnect between headset and transmitter station, get close to the transmitter station, then press and hold the equalizer button for several seconds.
3. When the transmitter station is switched off, the headset will try to reconnect to the transmitter station until the transmitter station is switched on again or the headset is switched off.
Auto mute/sleep and wake-up function:
Auto mute: when leaving the transmission range of the transmitter station, the headset will automatically mute. It will come back to operation, when re-entering the transmission range. The same
effect will take place, when there is no incoming audio input from the transmitter station.
Auto sleep: After three minutes without incoming audio input from the transmitter station or after three minutes out of the transmission range, the headset will switch to sleep mode to save
battery power. To wake up the headset, press the microphone mute button.
ENGLISH
Pairing-Prozess:
1. Das Headset und die Transmitter-Station verbinden sich automatisch miteinander, nachdem beide angeschaltet wurden (Pairing-Prozess).
2. Um eine erneute Verbindung zwischen Headset und Transmitter-Station zu erzwingen, nähern Sie sich mit dem Headset der Station, dann drücken und halten Sie den Equalizer-Knopf für einige
Sekunden.
3. Wenn die Transmitter-Station abgeschaltet ist, wird das Headset solange Verbindungsversuche unternehmen, bis die Transmitter-Station angeschaltet oder das Headset abgeschaltet wird.
Auto-Mute/Sleep und Wake-Up-Funktion:
Auto-Mute: Wenn Sie den Sendebereich der Transmitter-Station verlassen, wird das Headset automatisch stumm schalten (Mute). Es kehrt zum Normalbetrieb zurück, wenn Sie in den
Sendebereich der Transmitter-Station zurückkehren. Dasselbe passiert, wenn kein Audio-Input von der Transmitter-Station eingeht.
Auto-Sleep: Nach drei Minuten ohne eingehenden Audio-Input von der Transmitter-Station oder nach drei Minuten außerhalb des Sendebereichs schaltet das Headset automatisch in den
Schlafmodus, um den Akkuverbrauch zu senken. Um das Headset aufzuwecken, drücken Sie einfach den Mute-Knopf.
DEUTSCH
Appariement :
1. Le casque et la station de transmission se connectent automatiquement l’un à l’autre après avoir été mis sous tension (appariement).
2. Pour forcer une reconnexion entre le casque et la station de transmission, approchez-vous de cette dernière puis maintenez le bouton d’égaliseur appuyé pendant plusieurs secondes.
3. Lorsque la station de transmission est hors tension, le casque tente de s’y reconnecter jusqu’à ce que la station de transmission soit à nouveau mise sous tension ou que le casque soit mis
hors tension.
Fonctions muet et sommeil automatiques :
Fonction muet automatique : lorsque vous quittez la zone de transmission de la station de transmission, le casque se met automatiquement en mode muet. Il se remet en fonctionnement lors du
retour dans la zone de transmission.
Fonction sommeil automatique : Après un délai de 3 minutes sans signal audio en provenance de la station de transmission ou 3 minutes hors de la zone de transmission, le casque passe en
mode sommeil afin d’économiser les piles. Pour réactiver le casque, appuyez sur le bouton permettant de couper le microphone.
FRANÇAIS
Asociación:
1. Los auriculares y la estación de transmisión se conectarán automáticamente entre sí cuando se enciendan (asociación).
2. Para forzar la reconexión entre los auriculares y la estación de transmisión, acérquese a ésta y, a continuación, presione sin soltar el botón del ecualizador durante varios segundos.
3. Cuando la estación de transmisión se apague, los auriculares intentarán conectarse a la misma hasta que esta se vuelva a encender o los auriculares se apaguen.
Funciones de desactivación del sonido y de suspensión automáticas:
Desactivación del sonido automática: si sale del alcance de transmisión de la estación de transmisión, los auriculares desactivarán el sonido automáticamente. El sonido se recuperará cuando
vuelva a entrar en el alcance de transmisión.
Suspensión automática: Si transcurren tres minutos sin que haya señal de entrada de audio desde la estación de transmisión o estando fuera del alcance de transmisión, los auriculares
cambiarán al modo de suspensión para ahorrar energía de las pilas. Para reactivar los auriculares, presione el botón de desactivación de sonido del micrófono.
ESPAÑOL
Emparelhamento:
1. Os auscultadores e a estação de transmissão ligam automaticamente um ao outro depois de ligados (Emparelhamento).
2. Para forçar uma nova ligação entre os auscultadores e a estação de transmissão, aproxime-se da estação de transmissão e mantenha o botão do equalizador premido durante vários
segundos.
3. Quando a estação de transmissão for desligada, os auscultadores tentarão ligar novamente à estação de transmissão até esta seja novamente ligada ou os auscultadores sejam desligados.
Corte de som automático e função de suspensão:
Corte de som automático: quando a estação de transmissão sair do alcance, o som nos auscultadores será automaticamente cortado. Quando a estação de transmissão ficar novamente dentro
de alcance, o som será reposto.
Suspensão automática: Após três minutos sem entrada de áudio da estação de transmissão ou após três minutos fora de alcance, os auscultadores entram no modo de suspensão para
poupança das pilhas. Para reactivar os auscultadores, prima o botão de corte de som no microfone.
PORTUGÛES
Accoppiamento:
1. Le cuffie ed il trasmettitore si collegheranno automaticamente a vicenda, dopo che sono stati accesi (accoppiati).
2. Per forzare una nuova connessione tra le cuffie ed il trasmettitore, avvicinarsi al trasmettitore, quindi tenere premuto il tasto equalizzatore per diversi secondi.
3. Quando il trasmettitore è spento, le cuffie tenteranno di riconnettersi al trasmettitore finché non sarà riacceso oppure finché le cuffie non saranno spente.
Esclusione automatica e funzione disattivazione:
Esclusione automatica: quando si esce dal campo di trasmissione del trasmettitore, le cuffie saranno escluse automaticamente. Torneranno a funzionare quando si rientra nel campo di
trasmissione.
Disattivazione automatica: Dopo tre minuti senza segnale d’ingresso audio dal trasmettitore, oppure dopo tre minuti fuori del campo di trasmissione, le cuffie passano alla modalità di disattivazio-
ne per risparmiare la carica delle batterie. Premere il tasto di esclusione microfono per riattivare le cuffie.
ITALIANO
Paren:
1. De headset en het zendstation zullen zich automatisch met elkaar verbinden, nadat ze zijn ingeschakeld (paren).
2. Om opnieuw verbinding te maken tussen headset en zendstation houdt u de headset dichtbij het zendstation en houdt u de equalizerknop enkele seconden ingedrukt.
3. Wanneer het zendstation is uitgeschakeld, probeert de headset opnieuw verbinding te maken met het zendstation, tot het zendstation weer wordt ingeschakeld of de headset wordt uitgescha
keld.
Automatisch dempen en slaapfunctie:
Automatisch dempen: bij het verlaten van het zendbereik van het zendstation wordt de headset automatisch gedempt. Deze wordt weer ingeschakeld wanneer deze zich weer in het zendbereik
bevindt.
Automatische slaapstand: Na drie minuten zonder inkomend audiosignaal van het zendstation, of na drie minuten buiten het zendbereik, schakelt de headset automatisch naar de slaapmodus
om de batterij te sparen. Om de headset weer uit de slaapstand te halen drukt u op de microfoondempingsknop.
NEDERLANDS
Parowanie:
1. Po włączeniu (Parowanie), słuchawki i stacja nadajnika zostaną ze sobą połączone automatycznie.
2. Aby wymusić ponowne połączenie pomiędzy słuchawkami i stacją nadajnika, przysuń się bliżej do stacji nadajnika, a następnie naciśnij i przytrzymaj przez kilka sekund przycisk korektora.
3. Po wyłączeniu stacji nadajnika nastąpi ponowna próba połączenia słuchawek ze stacją nadajnika, aż do ponownego włączenia stacji nadajnika lub wyłączenia słuchawek.
Automatyczne wyciszenie i funkcja uśpienia:
Automatyczne wyciszenie: po przekroczeniu zasięgu transmisji stacji nadajnika słuchawki zostaną wyłączone automatycznie. Działanie zostanie przywrócone po ponownym znalezieniu się w
zasięgu transmisji.
Automatyczne uśpienie: Po trzech minutach bez sygnału audio ze stacji nadajnika lub po trzech minutach poza zasięgiem transmisji słuchawki zostaną przełączone w tryb uśpienia w celu
oszczędzania energii baterii. Aby wybudzić słuchawki, naciśnij przycisk wyciszenia mikrofonu.
POLSKI
配對:
1. 耳機和傳輸座電源都開啟後將會開始自動配對(配對中).
2. 如果需要強制重新配對, 請靠近傳輸座, 然後按壓不放耳機上的音場按鍵幾秒鐘
3. 當傳輸座電源關閉時,耳機會一直嘗試重新配對直到傳輸座電源再次被開啟或是耳機電源被關閉.
自動靜音與睡眠模式:
自動靜音: 當耳機離開了傳輸座的訊號可及範圍,耳機將會自動靜音.當重新進入訊號範圍會自動重新運作.
自動進入睡眠模式: 無任何音訊從傳輸座傳入或是離開訊號範圍3分鐘後,耳機會自動進入睡眠模式以節省電力消耗.請按下麥克風靜音鈕來喚醒耳機.
ペアリング:
1. ヘッドセットとトランスミッターの電源を入れると、自動的に相互接続してペアリングし始めます。
2. 強制再接続の場合、ヘッドセットとトランスミッターを極力近づけ、イコライザボタンを数秒間押しておこなってください。
3. トランスミッターがオフされる場合、ヘッドセットは、トランスミッターがオンされるか、またはヘッドセットがオフされるまで、トランスミッターに再接続を試行し
ようとします。
オートミュートとスリープ機能 :
オートミュート: 通信範囲外に移動する場合、ヘッドセットが自動的にミュートされます。通信範囲内に戻ると、動作可能になります。
オートスリープ: 無信号入力時まはた通信可能範囲外に移動する場合、約3分後に、自動的にスリープモードに入り、バッテリ電源の節約をします。マイクのミュートボタ
ンを押すと、スリープモードが解除されます。
페어링:
1. 헤드셋과 송신기는 전원을 켠 후 자동으로 연결 됩니다..
2. 헤드셋과 송신기를 재 연결 하고자 하시면 송신기 가까운 곳에서 이퀄라이즈 동작 버튼을 몇 초 동안 누르시면 연결 됩니다.
3. 송신기의 전원이 꺼질 경우 헤드셋은 전원이 꺼지기 전까지 자동으로 연결을 시도 합니다.
자동음소거와슬립모드:
자동음소거: 송신기의송신거리에서벗어나게되면자동으로자동음소거가되며송신거리안으로다시들어오면음소거가해제됩니다.
슬립모드: 3분동안송신기로부터오디오신호가없거나송신기의송신거리범위에서 3분간벗어나면배터리절약을위하여자동으로슬립모드로변환됩니다.
다시사용하고싶을실때는마이크음소거버튼을누르십시오
PACKAGE CONTENTS
CONNECTING THE MICROPHONE
CHANGING THE TRAVEL ADAPTER
INSTALLING/REPLACING THE
(RECHARGEABLE) BATTERIES
ATTACHING THE HEADSET MOUNT
TO THE TRANSMITTER STATION
HEADSETTRANSMITTER
ENGLISH
DEUTSCH
FRANÇAIS
ESPAÑOL
PORTUGÛES
ITALIANO
NEDERLANDS
POLSKI
日本語
한국어
日本語
한국어
ENDEFRESPTIT
NLPL
日本語
한국어
ENDEFRESPTIT
ENDEFRESPTIT
NLPL日本語
한국어
NLPL日本語
한국어
A – Botón de selección de fuente de audio
B – Puerto de carga USB para mandos de PS3™
C – Indicaciones LED: consulte la información que se
muestra a continuación.
D – Botón de alimentación
E – Entrada de CC para el adaptador de alimentación incluido
F – Conectores de entrada de audio RCA
G – Conector de micrófono USB (PS3™ y PC)
H – Orificios para el soporte para los auriculares:
consulte la información que se muestra a continuación.
ENDEFRESPTITNLPL日本語
한국어
ENGLISH | DEUTSCH | FRANÇAIS | ESPAÑOL | PORTUGÛES | ITALIANO | NEDERLANDS | POLSKI | | 日本語|한국어
MANUAL
Produktspezifikationen
| Marke: | Sharkoon |
| Kategorie: | Headset |
| Modell: | X-Tatic Air |
| USB Anschluss: | Ja |
| Gewicht: | 617 g |
| Mitgelieferte Kabel: | AC, AUX, RCA, USB |
| Ladegerät: | Ja |
| Produkttyp: | Kopfhörer |
| Empfohlene Nutzung: | Gaming |
| Headset-Typ: | Binaural |
| Tragestil: | Kopfband |
| Übertragungstechnik: | Kabellos |
| Position Kopfhörerlautsprecher: | Ohrumschließend |
| Kopfhörerfrequenz: | 35 - 40000 Hz |
| Impedanz: | 32 Ohm |
| Akku-/Batterietechnologie: | Nickel-Cadmium (NiCd) |
| Betriebsanleitung: | Ja |
| 2,5-mm-Anschluss: | Ja |
| Kopfhörer-Empfindlichkeit: | 120 dB |
| Treibereinheit: | 40 mm |
| Mikrofon-Frequenz: | 100 - 5000 Hz |
| Mikrofon-Empfindlichkeit: | -42 dB |
| Mikrofon-Eingangsimpedanz: | 2200 Ohm |
| Anzahl unterstützter Akkus/Batterien: | 2 |
| Energiebedarf: | 5V DC, 0.5A |
| Gerätebreite (inkl. Fuß): | 142 mm |
| Gerätetiefe (inkl. Fuß): | 160 mm |
| Gerätehöhe (inkl. Fuß): | 248 mm |
| Frequenzband: | 2.4 GHz |
| Anzahl enthaltener Produkte: | 1 Stück(e) |
| Maximale Eingangsleistung: | 0.1 W |
| Batteriegewicht: | 23 g |
| Abmessungen (BxTxH): | 101 x 185 x 197 mm |
| Akku: | Ja |
| Ausgangsleistung: | 0.03 W |
| Kompatibilität: | e.g. Xbox, Xbox 360, PS3 and Wii |
| Kompatible Akku-/Batteriegrößen: | AA |
| Empfängerdimensionen (B x T x H): | 142 x 160 x 44 mm |
| Empfängergewicht: | 270 g |
| XLR-Stecker: | Ja |
Brauchst du Hilfe?
Wenn Sie Hilfe mit Sharkoon X-Tatic Air benötigen, stellen Sie unten eine Frage und andere Benutzer werden Ihnen antworten
Bedienungsanleitung Headset Sharkoon

3 August 2025
3 August 2025
23 Juli 2025
22 Juli 2025
3 September 2024
20 August 2024
20 August 2024
20 August 2024
19 August 2024
18 August 2024
Bedienungsanleitung Headset
Neueste Bedienungsanleitung für -Kategorien-
31 März 2026
31 März 2026
31 März 2026
27 März 2026
26 März 2026
26 März 2026
26 März 2026
25 März 2026
24 März 2026
24 März 2026