Samsung le40b530 Bedienungsanleitung
Samsung
LCD-Plasma-Fernseher
le40b530
Lesen Sie kostenlos die 📖 deutsche Bedienungsanleitung für Samsung le40b530 (336 Seiten) in der Kategorie LCD-Plasma-Fernseher. Dieser Bedienungsanleitung war für 13 Personen hilfreich und wurde von 2 Benutzern mit durchschnittlich 4.5 Sternen bewertet
Seite 1/336

BN68-02362A-02
Contact SAMSUNG WORLDWIDE
If you have any questions or comments relating to Samsung products, please contact the SAMSUNG customer care centre.
Country Customer Care Centre Web Site
AUSTRIA 0810 - SAMSUNG (7267864, € 0.07/min) www.samsung.com/at
BELGIUM 02 201 2418 www.samsung.com/be
www.samsung.com/be_fr
CZECH REPUBLIC
800 - SAMSUNG (800-726786) www.samsung.com/cz
Distributor pro Českou republiku:
Samsung Zrt., česká organizační složka, Oasis Florenc, Sokolovská394/17, 180 00, Praha 8
DENMARK 8 - SAMSUNG (7267864) www.samsung.com/dk
EIRE 0818 717 100 www.samsung.com/ie
FINLAND 30 - 6227 515 www.samsung.com/
FRANCE 01 4863 0000 www.samsung.com/fr
GERMANY 01805 - SAMSUNG (7267864, € 0.14/Min) www.samsung.de
HUNGARY 06 - 80 - SAMSUNG (7267864) www.samsung.com/hu
ITALIA 800 - SAMSUNG (7267864) www.samsung.com/it
LUXEMBURG 02 261 03 710 www.samsung.com/lu
NETHERLANDS 0900-SAMSUNG (0900-7267864) (€ 0,10/Min) www.samsung.com/nl
NORWAY 3 - SAMSUNG (7267864) www.samsung.com/no
POLAND 0 801 1SAMSUNG(172678)
022 - 607 - 93 - 33 www.samsung.com/pl
PORTUGAL 808 20 - SAMSUNG (7267864) www.samsung.com/pt
SLOVAKIA 0800 - SAMSUNG (7267864) www.samsung.com/sk
SPAIN 902 - 1 - SAMSUNG (902 172 678) www.samsung.com/es
SWEDEN 0771 726 7864 (SAMSUNG) www.samsung.com/se
SWITZERLAND 0848 - SAMSUNG (7267864, CHF 0.08/min) www.samsung.com/ch
U.K 0845 SAMSUNG (7267864) www.samsung.com/uk
TURKEY 444 77 11 www.samsung.com/tr
BELARUS 810-800-500-55-500 -
ESTONIA 800-7267 www.samsung.com/ee
LATVIA 8000-7267 www.samsung.com/lv
LITHUANIA 8-800-77777 www.samsung.com/lt
MOLDOVA 00-800-500-55-500 -
KAZAHSTAN 8-10-800-500-55-500 www.samsung.com/kz_ru
KYRGYZSTAN 00-800-500-55-500 -
RUSSIA 8-800-555-55-55 www.samsung.ru
TADJIKISTAN 8-10-800-500-55-500 -
UKRAINE 8-800-502-0000 www.samsung.com/ua
www.samsung.com/ua_ru
UZBEKISTAN 8-10-800-500-55-500 www.samsung.com/kz_ru
LCD TV
user manual
imagine the possibilities
Thank you for purchasing this Samsung product.
To receive more complete service, please register
your product at
www.samsung.com/register
Model Serial No.
BN68-02362A-01L09-Cover.indd 1 2009-10-07 ¿ÀÈÄ 4:04:58

Figures and illustrations in this User Manual are provided for reference only and may differ from actual product appearance.
Product design and specifications may be changed without notice.
Digital TV Notice
1. Functionalities related to Digital TV(DVB) are only available in countries/areas where DVB-T (MPEG2 and MPEG4 AVC) digital
terrestrial signals are broadcasted or where you are able to access to a compatible DVB-C(MPEG2 and MPEG4 AAC) cable-
TV service. Please check with your local dealer the possibility to receive DVB-T or DVB-C signal.
2. DVB-T is the DVB European consortium standard for the broadcast transmission of digital terrestrial television and DVB-
C is that for the broadcast transmission of digital TV over cable. However, some differentiated features like EPG (Electric
Programme Guide), VOD (Video on Demand) and so on, are not included in this specification. So, they cannot be workable at
this moment.
3. Although this TV set meets the latest DVB-T and DVB-C standards, as of [August, 2008], the compatibility with future DVB-T
digital terrestrial and DVB-C digital cable broadcasts cannot be guaranteed.
4. Depending on the countries/areas where this TV set is used some cable-TV providers may charge an additional fee for such a
service and you may be required to agree to terms and conditions of their business.
5. Some Digital TV functions might be unavailable in some countries or regions and DVB-C might not work correctly with some
cable service providers.
6. For more information, please contact your local Samsung customer care centre.
Precautions When Displaying a Still Image
A still image may cause permanent damage to the TV screen
Do not display a still image and partially still on the LCD panel for more than 2 hours as it can cause screen image retention.
This image retention is also known as “screen burn”. To avoid such image retention, reduce the degree of brightness and
contrast of the screen when displaying a still image.
Watching the LCD TV in 4:3 format for a long period of time may leave traces of borders displayed on the
left, right and centre of the screen caused by the difference of light emission on the screen. Playing a DVD or
a game console may cause a similar effect to the screen. Damages caused by the above effect are not
covered by the Warranty.
Displaying still images from Video games and PC for longer than a certain period of time may produce partial after-images. To
prevent this effect, reduce the ‘brightness’ and ‘contrast’ when displaying still images.
© 2009 Samsung Electronics Co., Ltd. All rights reserved.
❑
❑
●
●
●
[LB5P_W.Euro]BN68-02362A-01L09.i1 1 2009-09-10 ¿ÀÈÄ 3:43:09

English - 1
License
TruSurround HD, SRS and symbol are trademarks of SRS Labs, Inc. TruSurround HD technology is
incorporated under license from SRS Labs, Inc.
Manufactured under license from Dolby Laboratories. Dolby and the double-D symbol are trademarks of
Dolby Laboratories.
Symbol
N O T
Note One-Touch Button TOOLS Button Press
❑
❑
GENERAL INFORMATION
Viewing the Control Panel ....................................................2
Accessories ..........................................................................2
Viewing the Connection Panel ..............................................3
Remote Control ....................................................................5
Installing Batteries in the Remote Control ............................5
OPERATION
Viewing the menus ...............................................................6
Placing Your Television in Standby Mode .............................7
Plug & Play Feature..............................................................7
Viewing the Display ..............................................................8
CHANNEL CONTROL
Conguring the Channel Menu .............................................8
Managing Channels ...........................................................11
PICTURE CONTROL
Conguring the Picture Menu .............................................13
Using Your TV as a Computer (PC) Display .......................15
Setting up the TV with your PC ..........................................16
SOUND CONTROL
Conguring the Sound Menu ..............................................17
Selecting the Sound Mode .................................................18
■
■
■
■
■
■
■
■
■
■
■
■
■
■
■
■
SETUP
Conguring the Setup Menu ...............................................19
INPUT / SUPPORT
Conguring the Input Menu ................................................22
Conguring the Support Menu............................................22
ANYNET+
Connecting Anynet+ Devices .............................................24
Setting Up Anynet+ .............................................................25
Switching between Anynet+ Devices ..................................25
Recording ...........................................................................26
Listening through a Receiver (Home Theatre) ...................26
Troubleshooting for Anynet+ ...............................................27
RECOMMENDATIONS FOR USE
Teletext Feature ..................................................................28
Installing the Stand .............................................................29
Installing the Wall Mount Kit ...............................................29
Using the Anti-Theft Kensington Lock ................................30
Securing the Installation Space ..........................................30
Securing the TV to the Wall ................................................31
Troubleshooting ..................................................................32
Specications .....................................................................35
■
■
■
■
■
■
■
■
■
■
■
■
■
■
■
■
■
CONTENTS
English
[LB5P_W.Euro]BN68-02362A-01L09.i1 1 2009-09-10 ¿ÀÈÄ 3:43:10

English - 3
Viewing the Connection Panel
The product colour and shape may vary depending on the model.
Whenever you connect an external device to your TV, make sure that power on the unit is turned off.
When connecting an external device, match the colour of the connection terminal to the cable.
1
DIGITAL AUDIO OUT (OPTICAL)
Connects to a Digital Audio component such as a Home theatre receiver.
When the HDMI IN jacks are connected, the DIGITAL AUDIO OUT (OPTICAL) jack on the TV outputs 2 channel audio
only. If you want to hear 5.1 channel audio, connect the Optical jack on the DVD / Blu-ray player or Cable / Satellite Box
directly to an Amplier or Home Theatre, not the TV.
2
PC
Connect to the video output jack on your PC.
3
ANT IN
Connects to an antenna or cable TV system.
4
PC / DVI AUDIO IN
Connect to the audio output jack on your PC.
DVI audio outputs for external devices.
5
AUDIO OUT [R-AUDIO-L]
Connect RCA audio cables to AUDIO OUT [R-AUDIO-L] on the rear of your set and the other ends to corresponding
audio in connectors on the Amplier or DVD Home Theatre.
6
KENSINGTON LOCK (depending on the model)
The Kensington Lock (optional) is a device used to physically x the system when used in a public place. If you want to
use a locking device, contact the dealer where you purchased the TV.
The location of the Kensington Lock may be different depending on its model.
7
HDMI IN 1(DVI), 2, 3
Connects to the HDMI jack of a device with an HDMI output.
No sound connection is needed for an HDMI to HDMI connection.
Use the HDMI IN 1(DVI) jack for DVI connection to an external device. Use a DVI to HDMI cable or DVI-HDMI adapter
(DVI to HDMI) for video connection and the PC / DVI AUDIO IN jacks for audio.
You can also use the ports to connect to a PC.
What is HDMI?
‘High Denition Multimedia interface’ allows the transmission of high denition digital video data and multiple channels of
digital audio.
The HDMI / DVI terminal supports DVI connection to an extended device with the appropriate cable (not supplied).
The difference between HDMI and DVI is that the HDMI device is smaller in size, has the HDCP (High Bandwidth Digital
Copy Protection) coding feature installed, and supports multi - channel digital audio.
¦
N
N
N
–
N
–
–
–
–
–
–
N
–
N
N
N
N
1 2 43 5
0 9 8 7 6
7
@
!
[TV Side Panel]
[TV Rear Panel]
Power Input
[LB5P_W.Euro]BN68-02362A-01L09.i3 3 2009-09-10 ¿ÀÈÄ 3:43:11

English - 4
The TV may not output sound and pictures may be displayed with abnormal colour when DVD / Blu-ray player / Cable Boxes
/ Satellite receivers supporting HDMI versions older than 1.3 are connected. When connecting an older HDMI cable and
there is no sound, connect the HDMI cable to the HDMI IN 1(DVI) jack and the audio cables to the PC / DVI AUDIO IN jacks
on the back of the TV. If this happens, contact the company that provided the DVD / Blu-ray player / Cable Box / Satellite
receiver to conrm the HDMI version, then request a rmware update. HDMI cables that are not 1.3 may cause annoying
icker or no screen display.
8
COMPONENT IN
Connect component video cables (optional) to component connector (PR, PB, Y) on the rear of your set and the other ends
to corresponding component video out connectors on the DTV or DVD.
If you wish to connect both the Set-Top Box and DTV (or DVD), you should connect the Set-Top Box to the DTV (or DVD)
and connect the DTV (or DVD) to component connector (PR, PB, Y) on your set.
The PR, PB and Y connectors on your component devices (DTV or DVD) are sometimes labelled Y, B-Y and R-Y or Y, Cb
and Cr.
Connect RCA audio cables (optional) to [R-AUDIO-L] on the rear of your set and the other ends to corresponding audio
out connectors on the DTV or DVD.
9
EXT (RGB)
Connector Input Output
Video Audio (L / R) RGB Video + Audio (L / R)
EXT O O O Only TV or DTV output is available.
Inputs or outputs for external devices, such as VCR, DVD, video game device or video disc players.
0
SERVICE
Connector for software upgrades.
!
AV IN [VIDEO] / [R-AUDIO-L]
Connect RCA cable to an appropriate external A/V device such as VCR, DVD or Camcorder.
Connect RCA audio cables to [R-AUDIO-L] on your set and the other ends to corresponding audio out connectors on the
A/V device.
@
COMMON INTERFACE Slot
When not inserting ‘CI CARD’ in some channels, ‘Scrambled Signal’ is displayed on the screen.
The pairing information containing a telephone number, CI CARD ID, Host ID and other information will be displayed in
about 2~3 minutes. If an error message is displayed, please contact your service provider.
When the channel information configuration has finished, the message ‘Updating Completed’ is displayed, indicating that
the channel list is now updated.
You must obtain a CI CARD from a local cable service provider. Remove the CI CARD by carefully pulling it out with your
hands since dropping the CI CARD may cause damage to it.
Insert the CI-Card in the direction marked on it.
The place of the COMMON INTERFACE Slot may be different depending on its model.
CAM is not supported in some countries and regions, check with your authorized dealer.
N
–
–
–
–
–
–
–
–
N
N
N
N
N
[LB5P_W.Euro]BN68-02362A-01L09.i4 4 2009-09-10 ¿ÀÈÄ 3:43:11

English - 5
Remote Control
You can use the remote control up to a distance of about 23 feet from the TV.
The performance of the remote control may be affected by bright light.
The product colour and shape may vary depending on the model.
1
POWER : Television Standby
button.
2
NUMERIC BUTTONS : Press to
change the channel.
3
FAV.CH : Used to display
Favourites Channel Lists on the
screen.
4
Y
: Press to increase or
decrease the volume.
5
SOURCE : Press to display and
select the available video sources.
6
INFO : Press to display information
on the TV screen.
7
TOOLS : Use to quickly select
frequently used functions.
8
CH LIST : Displays the Channel List
on screen.
9
COLOURS BUTTONS : Use these
buttons in the Channel list menus
etc.
!
DUAL : Sound effect selection
@
Use these buttons in the Anynet+
modes. (
∏
: This remote can
be used to control recording on
Samsung recorders with the
Anynet+ feature)
#
TV : Selects the TV mode directly.
$
PRE-CH : Enables you to return
to the previous channel you were
watching.
%
MUTE
M
: Press to temporarily cut
off the sound.
^
P
<
/P
>
: Press to change
channels.
&
MENU : Displays the main on-screen
menu
*
GUIDE : Electronic Programme Guide
(EPG) display
(
RETURN : Returns to the previous menu
)
UP▲/DOWN▼/LEFT◄/RIGHT►
/ ENTER
E
: Use to select on-screen
menu items and change menu values.
a
EXIT : Press to exit the menu.
b
P.SIZE : Picture size selection
c
SRS : SRS TS HD selection.
d
SUBT. : Digital subtitle display
e
AD : Audio Description selection.
Teletext Functions
5
0
: Teletext mode selection (LIST /
FLOF)
6
5
: Teletext reveal
7
4
: Teletext size selection
8
8
: Teletext store
9
Fastext topic selection
0
/
: Alternately select Teletext,
Double, or Mix.
#
:
: Exit from the Teletext display
$
1
: Teletext sub page
^
2
: Teletext next page
3
: Teletext previous page
&
6
: Teletext index
(
9
: Teletext hold
a
7
: Teletext cancel
Installing Batteries in the Remote Control
1. Lift the cover at the back of the remote control upward as shown in the gure.
2. Install two AAA size batteries.
Make sure to match the ‘+’ and ‘–’ ends of the batteries with the diagram inside the
compartment.
3. Replace the cover.
Remove the batteries and store them in a cool, dry place if you won’t be using the
remote control for a long time.
If the remote control doesn’t work, check the following:
Is the TV power on?
Are the plus and minus ends of the batteries reversed?
Are the batteries drained?
Is there a power outage or is the power cord unplugged?
Is there a special uorescent light or neon sign nearby?
¦
N
N
N
¦
N
N
N●
●
●
●
●
[LB5P_W.Euro]BN68-02362A-01L09.i5 5 2009-09-10 ¿ÀÈÄ 3:43:11

English - 7
Placing Your Television in Standby Mode
Your set can be placed in standby mode in order to reduce the power consumption. The standby mode can be useful when you
wish to interrupt viewing temporarily (during a meal, for example).
1. Press the POWER
P
button on the remote control.
The screen is turned off and a standby indicator appears on your set.
2. To switch your set back on, simply press the POWER
P
button again.
Do not leave your set in standby mode for long periods of time (when you are away on holiday, for example). It is best to
unplug the set from the mains and aerial.
Plug & Play Feature
When the TV is initially powered on, basic settings proceed automatically and subsequently.
1. Press the POWER button on the remote control. The message You can set the menu
language. is displayed.
2. Select the appropriate language by pressing the ▲ or ▼ button. Press the ENTER
E
button to conrm your choice.
3. Press the ◄ or ► button to select Store Demo or Home Use, then the ENTER
E
button.
We recommend setting the TV to Home Use mode for the best picture in your home environment.
Store Demo mode is only intended for use in retail environments.
If the unit is accidentally set to Store Demo mode and you want to return to Home Use (Standard): Press the Volume
button on the TV. When the volume OSD is displayed, press and hold the MENU button on the TV for 5 seconds.
4. Press the ENTER
E
button. Select the appropriate country by pressing the ▲ or ▼ button. Press the ENTER
E
button to
conrm your choice.
5. Press the ▲ or ▼ button to select Air or Cable, then press the ENTER
E
button.
Air: Air antenna signal.
Cable: Cable antenna signal.
6. Press the ▲ or ▼ button to select the channel source to memorize. Press the ENTER
E
button to select Start.
Digital & Analogue: Digital and Analogue channels.
Digital: Digital channels.
Analogue: Analogue channels.
When setting the antenna source to Cable, a step appears allowing you to set a value for the digital channel search. For
more information, refer to Channel→AutoStore.
The channel search will start and end automatically.
Press the ENTER
E
button at any time to interrupt the memorization process.
After all the available channels are stored, the message Set the Clock Mode. is displayed.
7. Press the ENTER
E
button. Press the ▲ or ▼ button to select Auto, then Press the ENTER
E
button.
If you select Manual, Set current date and time is displayed.
If you have received a digital signal, the time will be set automatically. If not, select Manual to set the clock. (refer to page
19)
8. The connection method to provide the best quality HD is offered. After conrming the method, press the ENTER
E
button.
9. The message Enjoy your TV! is displayed. When you have nished, press the ENTER
E
button.
If you want to reset this feature...
1. Press the MENU button to display the menu. Press the ▲ or ▼ button to select Setup, then press the ENTER
E
button.
2. Press the ENTER
E
button again to select Plug & Play.
3. Enter your 4 digit PIN number. The default PIN number of a new TV set is ‘0-0-0-0’.
If you want to change PIN number, use the Change PIN function. (refer to page 21)
The Plug & Play feature is only available in the TV mode.
¦
N
N
¦
N
N
N
N
N
N
N
N
N
N
N
N
N
Plug & Play
You can set the menu language.
Menu Language : English ►
E
Enter
[LB5P_W.Euro]BN68-02362A-01L09.i7 7 2009-09-10 ¿ÀÈÄ 3:43:12

English - 8
Viewing the Display
The display identifies the current channel and the status of certain audio-video settings.
Press the INFO button to viewing the information.
Press the INFO button on the remote control. The TV will display the channel, the type of
sound, and the status of certain picture and sound settings.
▲, ▼: You can view other channel’s information. If you want to move to the currently
selected channel, press ENTER
E
button.
◄, ►: You can view the desired program’s information at the current channel.
Press the INFO button once more or wait approximately 10 seconds and the display
disappears automatically.
CHANNEL CONTROL
ConguringtheChannelMenu
Country
The PIN number input screen appears. Enter your 4 digit PIN number.
Analogue Channel
You can change the country for analogue channels.
Digital Channel
You can change the country for digital channels.
Auto Store
You can scan for the frequency ranges available to you (and availability depends on your country). Automatically allocated
programme numbers may not correspond to actual or desired programme numbers.
If a channel is locked using the Child Lock function, the PIN input window appears.
Air / Cable
Antenna source to memorize
Digital & Analogue: Digital and Analogue channels.
Digital: Digital channels.
Analogue: Analogue channels.
When selecting Cable→‘Digital&Analogue’or‘Cable→Digital’
Provide a value to scan for cable channels.
SearchMode→Full/Network/Quick
Quick
Network ID: Displays the network identication code.
Frequency: Displays the frequency for the channel. (Differs in each country)
Modulation: Displays available modulation values.
Symbol Rate: Displays available symbol rates.
–
–
–
–
Scans for all channels with active broadcast stations and stores them in the TV’s memory.
If you want to stop Auto Store, press the
ENTER
E
button.
The Stop Auto Store? message will be displayed.
Select Yes by pressing the ◄ or ► button, then press the
ENTER
E
button.
¦
O
●
●
N
¦
❑
N
❑
N
●
●
●
●
N
N
N
Country ►
Auto Store
Manual Store
Cable Search Option
Now & Next Guide
Full Guide
Default Guide : Full Guide
Channel
DTV Air
15
abc1
18:00 ~ 6:00
18:11 Thu 6 Jan
Life On Venus Avenue
Unclassified
No Detaild Information
'
INFO
[LB5P_W.Euro]BN68-02362A-01L09.i8 8 2009-09-10 ¿ÀÈÄ 3:43:12

English - 9
Manual Store
Scans for a channel manually and stores it in the TV’s memory.
If a channel is locked using the Child Lock function, the PIN input window appears.
Digital Channel
Manual store for digital channels.
Digital Channel is only available in DTV mode.
Channel: Set the Channel number using the ▲, ▼ or number (0~9) buttons.
Frequency: Set the frequency using the number buttons.
Bandwidth: Set the bandwidth using the ▲, ▼ or number (0~9) buttons.
When it has nished, channels are updated in the channel list.
Analogue Channel
Manual store for analogue channel.
Programme (Programme number to be assigned to a channel): Sets the programme number using the ▲, ▼ or number (0~9)
buttons.
ColourSystem→Auto/PAL/SECAM/NTSC4.43: Sets the colour system value using the ▲ or ▼ button.
SoundSystem→BG/DK/I/L: Sets the sound system value using the ▲ or ▼ button.
Channel (When you know the number of the channel to be stored): Press the ▲ or ▼ button to select C (Air channel) or S
(Cable channel). Press the ► button, then press the ▲, ▼ or number (0~9) buttons to select the required number.
You can also select the channel number directly by pressing the number (0~9) buttons.
If there is abnormal sound or no sound, reselect the sound standard required.
Search (When you do not know the channel numbers): Press the ▲ or ▼ button to start the search. The tuner scans the
frequency range until the rst channel or the channel that you selected is received on the screen.
Store (When you store the channel and associated programme number): Set to OK by pressing the
ENTER
E
button.
Channel mode
P (Programme mode): When completing tuning, the broadcasting stations in your area have been assigned to position
numbers from P00 to P99. You can select a channel by entering the position number in this mode.
C (Air channel mode): You can select a channel by entering the assigned number to each air broadcasting station in this
mode.
S (Cable channel mode): You can select a channel by entering the assigned number for each cable channel in this mode.
Cable Search Option (depending on the country)
Sets additional search options such as the frequency and symbol rate for cable network searches.
Frequency (Start ~ Stop): Displays the frequency for the channel.
Modulation: Displays available modulation values.
Symbol Rate: Displays available symbol rates.
Now & Next Guide / Full Guide
The EPG (Electronic Programme Guide) information is provided by the broadcasters. Programme entries may appear blank or out
of date as a result of the information broadcast on a given channel. The display will dynamically update as soon as new information
becomes available.
For detailed procedures on using Now & Next Guide and Full Guide, refer to the descriptions on page 10.
You can also display the guide menu simply by pressing the GUIDE button. (To configure the Default Guide, refer to the
descriptions.)
Now & Next Guide
For the six channels indicated in the left-hand column, displays the Current programme and the Next programme information.
Full Guide
Displays the programme information as time ordered One hour segments. Two hours of programme information is displayed which
may be scrolled forwards or backwards in time.
❑
N
N
N
●
●
●
N
●
●
●
●
N
N
●
●
N–
–
–
❑
●
●
●
❑
N
O
[LB5P_W.Euro]BN68-02362A-01L09.i9 9 2009-09-10 ¿ÀÈÄ 3:43:12

English - 10
DefaultGuide→Now&NextGuide/FullGuide
You can decide whether to display either the Now & Next Guide or the Full Guide when the GUIDE button on the remote control
is pressed.
Channel List
For detailed procedures on using the Channel List, refer to the ‘Managing Channels’ instructions.
You can select these options by simply pressing the CH LIST button on the remote control.
Channel Mode
When press the P
>
/
<
button, Channels will be switched within the selected channel list.
Added Ch.
Channels will be switched within the memorized channel list.
Favourite Ch.
Channels will be switched within the favourite channel list.
Fine Tune
If the reception is clear, you do not have to ne tune the channel, as this is done automatically during the search and store
operation. If the signal is weak or distorted, you may have to ne tune the channel manually.
Fine tuned channels that have been saved are marked with an asterisk ‘*’ on the right-hand side of the channel number in the
channel banner.
To reset the ne-tuning, select Reset by pressing the ▲ or ▼ button and then press the ENTER
E
button.
Only Analogue TV channels can be ne tuned.
Using the Now & Next Guide / Full Guide
To... Then...
Watch a programme in the EPG list Select a programme by pressing the ▲, ▼, ◄, ► button.
Exit the guide Press the blue button
If the next programme is selected, it is scheduled with the clock icon displayed. If the ENTER
E
button is pressed again, press the
◄, ► button to select Cancel Schedules, the scheduling is cancelled with the clock icon gone.
View programme information Select a programme of your choice by pressing the ▲, ▼, ◄, ► button.
Then press the INFO button when the programme of your choice is
highlighted.
The programme title is on the upper part of the screen centre.
Please click on INFO button for detailed information. Channel Number, Running Time, Status Bar, Parental Level, Video Quality
Information (HD / SD), Sound Modes, Subtitle or Teletext, languages of Subtitle or Teletext and brief summary of the highlighted
programme are included on the detailed information. “...” will be appeared if the summary is long.
Toggle between the Now & Next Guide and Full
Guide Press the red button repeatedly.
In Full Guide
Scrolls backwards quickly (24 hours).
Scrolls forwards quickly (24 hours).
Press the green button repeatedly.
Press the yellow button repeatedly.
❑
❑
O
❑
❑
N
N
N
Now & Next Guide
DTV Cable 900 f tn 2:10 Tue 1 Jun
Freshmen On Campus
2:00 - 2:30
No Detailed Information
Now Next
Mint Extra
Loaded
Fresh 40 with Dynamite MC
The Distillery
Smash Hits! Sunday
1 f tn
2 ITV Play
3 Kerrang!
4 Kiss
5 oneword
6 Smash Hits!
▼
Street Hypn..
Kisstory
No Information
No Information
No Information
Watch
INFO
Information ■Full Guide ■ Exit
Full Guide
DTV Cable 900 f tn 2:10 Tue 1 Jun
Freshmen On Campus
2:00 - 2:30
No Detailed Information
Today 2:00 - 3:00 3:00 - 4:00
Mint Extra
Loaded
Fresh 40 with Dynamite MC
The Distillery
Smash Hits! Sunday
1 f tn
2 ITV Play
3 Kerrang!
4 Kiss
5 oneword
6 Smash Hits!
▼
No Information
Freshmen O..
Watch
INFO
Information ■Now/Next ■ +24 Hours ■ Exit
[LB5P_W.Euro]BN68-02362A-01L09.i10 10 2009-09-10 ¿ÀÈÄ 3:43:12

English - 11
Managing Channels
Using this menu, you can Add / Delete or set Favourite channels and use the programme guide
for digital broadcasts.
All Channels
Shows all currently available channels.
Added Channels
Shows all added channels.
Favourites
Shows all favourite channels.
To select the Favourites channels you have set up, press the FAV.CH button on the remote control.
Programmed
Shows all current reserved programmes.
Select a channel in the All Channels, Added Channels or Favourites screen by pressing the ▲ / ▼ buttons, and pressing
the ENTER
E
button. Then you can watch the selected channel.
Using the Colour buttons with the Channel List
Red (Channel Type): Toggle between your TV, Radio, Data / Other and All.
Green (Zoom): Enlarges or shrinks a channel number.
Yellow (Select): Selects multiple channel lists. You can perform the add / delete, add to Favourites / delete from
Favourites, or lock / unlock function for multiple channels at the same time. Select the required channels and press the
yellow button to set all the selected channels at the same time. The
c
mark appears to the left of the selected channels.
TOOLS (Tools): Displays the Delete (or Add), Add to Favourite (or Delete from Favourite), Lock (or Unlock), Timer
Viewing, Edit Channel Name, Sort, Edit Channel Number, Select All (or Deselect All), Auto Store menu. (The
Options menus may differ depending on the situation.)
Channel Status Display Icons
A
: An analogue channel.
c
: A channel selected by pressing the yellow button.
*
: A channel set as a Favourite.
(
: A programme currently being broadcast.
\
: A locked channel.
)
: A reserved programme
Channel List Option Menu (in All Channels / Added Channels / Favourites)
Press the TOOLS button to use the option menu.
Option menu items may differ depending on the channel status.
Add / Delete
You can delete or add a channel to display the channels you want.
All deleted channels will be shown on All Channels menu.
A gray-coloured channel indicates the channel has been deleted.
The Add menu only appears for deleted channels.
You can also delete a channel from the Added Channels or Favourite menu in the same
manner.
Add to Favourite / Delete from Favourite
You can set channels you watch frequently as favourites.
Press the TOOLS button to display the Tools menu. You can also set the add to (or delete from) Favourite by selecting Tools
→AddtoFavourite(or Delete from Favourite).
The ‘
*
’ symbol will be displayed and the channel will be set as a favourite.
All favourite channels will be shown on Favourite menu.
¦
O
N
N–
–
–
–
N●
●
●
●
●
●
N
N
N
N
N
N
T
N
N
824 UKTV Gold
825 UKTV style
A
1 C --
A
2 C --
A
3 ♥ C --
A
4 C --
A
5 C --
A
6 C --
A
7 C --
Added Channels
All ■ Channel Type ■ Zoom ■ Select T Tools
824 UKTV Gold
825 UKTV style
A
1 C --
A
2 C --
A
3 ♥ C --
A
4 C --
A
5 C --
A
6 C --
A
7 C --
Added Channels
All ■ Channel Type ■ Zoom ■ Select T Tools
Delete
Add to Favourite
Lock
Timer Viewing
Edit Channel Name
Sort
▼
[LB5P_W.Euro]BN68-02362A-01L09.i11 11 2009-09-10 ¿ÀÈÄ 3:43:13

English - 12
Lock / Unlock
You can lock a channel so that the channel cannot be selected and viewed. This function is available only when the Child Lock is
set to On. (see page 21)
The PIN number input screen appears. Enter your 4 digit PIN number.
The default PIN number of a new TV set is ‘0-0-0-0’. You can change the PIN, by selecting Change PIN from the menu.
The ‘
\
’ symbol will be displayed and the channel will be locked.
Timer Viewing
If you reserve a programme you want to watch, the channel is automatically switched to the reserved channel in the Channel List;
even when you are watching another channel. To reserve a programme, set the current time rst. (See page 19)
Only memorized channels can be reserved.
You can set the channel, day, month, year, hour and minute directly by pressing the number buttons on the remote control.
Reserving a programme will be shown in the Programmed menu.
Digital Programme Guide and Viewing Reservation
When a digital channel is selected, and you press the ► button, the Programme Guide for the channel appears. You can
reserve a programme according to the procedures described above.
Edit Channel Name (analogue channels only)
Channels can labelled so that their call letters appear whenever the channel is selected.
The names of digital broadcasting channels are automatically assigned and cannot be labelled.
Edit Channel Number (digital channels only)
You can also edit the channel number by pressing the number buttons on the remote control.
Sort (analogue channels only)
This operation allows you to change the programme numbers of the stored channels. This operation may be necessary after using
the auto store.
Select All / Deselect All
Select All: You can select all the channels in the channel list.
Deselect All: You can deselect all the selected channels.
You can only select Deselect All when there is a selected channel.
Auto Store
For further details on setting up options, refer to page 8.
If a channel is locked using the Child Lock function, the PIN input window appears.
Channel List Option Menu (in Programmed )
You can view, modify or delete a reservation.
Press the TOOLS button to use the option menu.
Change Info
Select to change a viewing reservation.
Cancel Schedules
Select to cancel a viewing reservation.
Information
Select to view a viewing reservation. (You can also change the reservation information.)
Select All
Select all reserved programmes.
N
N
N
N
N
N
N
N
●
●
N
N
N
N
1 / 1 / 2009
13:59 5 TV1 Quincy, M.E
18:59 2 TV3 The Equalizer
20:59 2 TV3 McMillan & Wife
Programmed
All ■ Zoom ■ Select T Tools E Information
Change Info
Cancel Schedules
Information
Select All
[LB5P_W.Euro]BN68-02362A-01L09.i12 12 2009-09-10 ¿ÀÈÄ 3:43:13

English - 14
White Balance
You can adjust the colour temperature for more natural picture colours.
R-Offset / G-Offset / B-Offset / R-Gain / G-Gain / B-Gain: You can adjust the Colour ‘temperature’ in the light areas by
changing the values of R, G, B. Recommended for advanced users only.
Reset: The previously adjusted white balance will be reset to the factory defaults.
Flesh Tone
You can emphasize the pink ‘esh tone’ in the picture.
Changing the adjustment value will refresh the adjusted screen.
EdgeEnhancement→Off/On
You can emphasize object boundaries in the picture.
Picture Options
In PC mode, you can only make changes to the Colour Tone and Size from among the items in Picture Options.
ColourTone→Cool/Normal/Warm1/Warm2
You can select the most comfortable colour tone to your eyes.
Settings can be adjusted and stored for each external device you have connected to an input of the TV.
Warm1 or Warm2 is only activated when the picture mode is Movie.
Size
You can select the picture size which best corresponds to your viewing requirements.
Press the TOOLS button to display the Tools menu. You can also set the size by selecting Tools→PictureSize.
You can select these options by simply pressing the P.SIZE button on the remote control.
Auto Wide: Automatically adjusts the picture size to the 16:9 aspect ratio.
16:9: Adjusts the picture size to 16:9 appropriate for DVDs or wide broadcasting.
Wide Zoom: Magnify the size of the picture more than 4:3.
Zoom: Magnies the 16:9 wide picture (in the vertical direction) to t the screen size.
4:3: This is the default setting for a video movie or normal broadcasting.
Screen Fit: Use the function to see the full image without any cut-off when HDMI (720p / 1080i / 1080p) or Component (1080i
/ 1080p) signals are input.
Depending on the input source, the picture size options may vary.
The items available may differ depending on the selected mode.
In PC Mode, only 16:9 and 4:3 mode can be adjusted.
Settings can be adjusted and stored for each external device you have connected to an input of the TV.
Temporary image retention may occur when viewing a static image on the set for more than two hours.
Wide Zoom: Press the ► button to Select Position, then press the ENTER
E
button. Press the ▲ or ▼ button to move the
picture up / down. Then press the ENTER
E
button.
Zoom: Press the ► button to Select Position, then press the ENTER
E
button. Press the ▲ or ▼ button to move the picture
up and down. Then press the ENTER
E
button. Press the ► button to Select Size, then press the ENTER
E
button. Press
the ▲ or ▼ button to magnify or reduce the picture size in the vertical direction. Then press the ENTER
E
button.
After selecting Screen Fit in HDMI (1080i / 1080p) or Component (1080i / 1080p) mode: Select Position by pressing the ◄ or ►
button. Use the ▲, ▼, ◄ or ► button to move the picture.
Reset: Press the ◄ or ► button to select Reset, then press the ENTER
E
button. You can initialize the setting.
If you use the Screen Fit function with HDMI 720p input, 1 line will be cut at the top, bottom, left and right as in the Overscan
function.
ScreenMode→16:9/WideZoom/Zoom/4:3
When setting the picture size to Auto Wide in a 16:9 wide TV, you can determine the picture size you want to see the 4:3 WSS
(Wide Screen Service) image or nothing. Each individual European country requires different picture size so this function is
intended for users to select it.
16:9: Sets the picture to 16:9 wide mode.
Wide Zoom: Magnify the size of the picture more than 4:3.
Zoom: Magnify the size of the picture vertically on screen.
4:3: Sets the picture to 4:3 normal mode.
This function is available in Auto Wide mode.
This function is not available in PC, Component or HDMI mode.
●
●
N
❑
N
N
N
T
O
●
●
●
●
●
●
N
N
N
N
N
N
N
N
N
●
●
●
●
N
N
[LB5P_W.Euro]BN68-02362A-01L09.i14 14 2009-09-10 ¿ÀÈÄ 3:43:13

English - 15
DigitalNR→Off/Low/Medium/High/Auto
If the broadcast signal received by your TV is weak, you can activate the Digital Noise Reduction feature to help reduce any static
and ghosting that may appear on the screen.
When the signal is weak, select one of the other options until the best picture is displayed.
HDMIBlackLevel→Normal/Low
You can directly select the black level on the screen to adjust the screen depth.
This function is active only when the external input connects to HDMI (RGB signals).
FilmMode→Off/Auto
The TV can be set to automatically sense and process lm signals from all sources and adjust the picture for optimum quality.
Film Mode is supported in TV, AV, COMPONENT(480i / 1080i) and HDMI(480i / 1080i).
PictureReset→ResetPictureMode/Cancel
Resets all picture settings to the default values.
Select a picture mode to be reset. The reset is performed for each picture mode.
Reset Picture Mode: Current picture values return to default settings.
N
N
N
❑
N
●
Using Your TV as a Computer (PC) Display
Setting Up Your PC Software (Based on Windows XP)
The Windows display-settings for a typical computer are shown below. The actual screens on your PC will probably be different,
depending upon your particular version of Windows and your particular video card. However, even if your actual screens look
different, the same basic set-up information will apply in almost all cases. (If not, contact your computer manufacturer or Samsung
Dealer.)
1. First, click on ‘Control Panel’ on the Windows start menu.
2. When the control panel window appears, click on ‘Appearance and Themes’ and a display dialog-box will appear.
3. When the control panel window appears, click on ‘Display’ and a display dialogbox will appear.
4. Navigate to the ‘Settings’ tab on the display dialog-box.
The correct size setting (resolution): Optimum-1920 X 1080 pixels
If a vertical-frequency option exists on your display settings dialog box, the correct value is ‘60’ or ‘60 Hz’. Otherwise, just click
‘OK’ and exit the dialog box.
¦
[LB5P_W.Euro]BN68-02362A-01L09.i15 15 2009-09-10 ¿ÀÈÄ 3:43:13
English - 16
Display Modes
Both screen position and size will vary depending on the type of PC monitor and its resolution. The resolutions in the table are
recommended.
D-Sub and HDMI/DVI Input
Mode Resolution Horizontal Frequency
(KHz)
Vertical Frequency
(Hz)
Pixel Clock Frequency
(MHz)
Sync Polarity
(H / V)
IBM 640 x 350 31.469 70.086 25.175 +/-
720 x 400 31.469 70.087 28.322 -/+
MAC 640 x 480 35.000 66.667 30.240 -/-
832 x 624 49.726 74.551 57.284 -/-
1152 x 870 68.681 75.062 100.000 -/-
VESA CVT 720 x 576 35.910 59.950 32.750 -/+
1152 x 864 53.783 59.959 81.750 -/+
1280 x 720 44.772 59.855 74.500 -/+
1280 x 960 75.231 74.857 130.000 -/+
1280 x 720 56.456 74.777 95.750 -/+
VESA DMT 640 x 480 31.469 59.940 25.175 -/-
640 x 480 37.861 72.809 31.500 -/-
640 x 480 37.500 75.000 31.500 -/-
800 x 600 37.879 60.317 40.000 +/+
800 x 600 48.077 72.188 50.000 +/+
800 x 600 46.875 75.000 49.500 +/+
1024 x 768 48.363 60.004 65.000 -/-
1024 x 768 56.476 70.069 75.000 -/-
1024 x 768 60.023 75.029 78.750 +/+
1152 x 864 67.500 75.000 108.000 +/+
1280 x 1024 63.981 60.020 108.000 +/+
1280 x 1024 79.976 75.025 135.000 +/+
1280 x 800 49.702 59.810 83.500 -/+
1280 x 800 62.795 74.934 106.500 -/+
1280 x 960 60.000 60.000 108.000 +/+
1360 x 768 47.712 60.015 85.500 +/+
1440 x 900 55.935 59.887 106.500 -/+
1440 x 900 70.635 74.984 136.750 -/+
1680 x 1050 65.290 59.954 146.250 -/+
VESA GTF 1280 x 720 52.500 70.000 89.040 -/+
1280 x 1024 74.620 70.000 128.943 -/-
VESA DMT /
DTV CEA 1920 x 1080p 67.500 60.000 148.500 +/+
When using an HDMI / DVI cable connection, you must use the HDMI IN 1(DVI) jack.
The interlace mode is not supported.
The set might operate abnormally if a non-standard video format is selected.
Separate and Composite modes are supported. SOG is not supported.
Too long or low quality VGA cable can cause picture noise at high resolution modes (1920x1080 or 1600x1200).
Setting up the TV with your PC
Preset: Press the SOURCE button to select PC mode.
Auto Adjustment
Auto Adjustment allows the PC screen of set to self-adjust to the incoming PC video signal.
The values of ne, coarse and position are adjusted automatically.
This function does not work in DVI-HDMI mode.
Press the TOOLS button to display the Tools menu. You can also set the Auto Adjustment
by selecting Tools→AutoAdjustment.
Screen
Coarse / Fine
The purpose of picture quality adjustment is to remove or reduce picture noise. If the noise is not removed by Fine-tuning alone,
then adjust the frequency as best as possible (Coarse) and Fine-tune again. After the noise has been reduced, readjust the picture
so that it is aligned on the centre of screen.
PC Position
Adjust the PC’s screen positioning if it does not t the TV screen. Press the ▲ or ▼ button to adjusting the Vertical-Position. Press
the ◄ or ► button to adjust the Horizontal-Position.
Image Reset
You can replace all image settings with the factory default values.
N
N
N
N
N
¦
N
❑
N
T
❑
Brightness : : 45
Sharpness : 50
AutoAdjustment ►
Screen
Advanced Settings
Picture Options
Picture Reset
Picture
[LB5P_W.Euro]BN68-02362A-01L09.i16 16 2009-09-10 ¿ÀÈÄ 3:43:14

English - 17
SOUND CONTROL
ConguringtheSoundMenu
Mode→Standard/Music/Movie/ClearVoice/Custom
You can select a sound mode to suit your personal preferences.
Press the TOOLS button to display the Tools menu. You can also congure the sound
mode by selecting Tools → Sound Mode.
Standard
Selects the normal sound mode.
Music
Emphasizes music over voices.
Movie
Provides the best sound for movies.
Clear Voice
Emphasizes voice over other sounds.
Custom
Recalls your customized sound settings.
Equalizer
The sound settings can be adjusted to suit your personal preferences.
Mode
You can select a sound mode to suit your personal preferences.
Balance
Controls the balance between the right and left speakers.
100Hz / 300Hz / 1KHz / 3KHz / 10KHz (Bandwidth Adjustment)
To adjust the level of different bandwidth frequencies
Reset
Resets the equalizer settings to the default values.
SRSTruSurroundHD→Off/On
SRS TruSurround HD is a patented SRS technology that solves the problem of playing 5.1 multichannel content over two
speakers. TruSurround delivers a compelling, virtual surround sound experience through any two-speaker playback system,
including internal television speakers. It is fully compatible with all multichannel formats.
Press the SRS button on the remote control to select Off or On.
Audio Language (digital channels only)
You can change the default value for audio languages. Displays the language information for the incoming stream.
You can only select the language among the actual languages being broadcast.
While viewing a digital channel, this function can be selected.
AudioFormat→MPEG/DolbyDigital (digital channels only)
When sound is emitted from both the main speaker and the audio receiver, a sound echo may occur due to the decoding speed
difference between the main speaker and the audio receiver. In this case, use the TV Speaker function.
The Audio Format appears according to the broadcasting signal.
While viewing a digital channel, this function can be selected.
Audio Description (digital channels only)
This is an auxiliary audio function that provides an additional audio track for visually challenged persons. This function handles the
Audio Stream for the AD (Audio Description), when it is sent along with the Main audio from the broadcaster. Users can turn the
Audio Description On or Off and control the volume.
Press the AD button on the remote control to select Off or On.
¦
❑
T
❑
❑
O
❑
N
N
❑
N
N
❑
O
Mode :Custom ►
Equalizer
SRS TruSurround HD : Off
Audio Language : - - -
Audio Format : - - -
Audio Description
Auto Volume : Off
Sound
[LB5P_W.Euro]BN68-02362A-01L09.i17 17 2009-09-10 ¿ÀÈÄ 3:43:14
English - 18
AudioDescription→Off/On
Turn the audio description function on or off.
Volume
You can adjust the audio description volume.
Volume is active when Audio Description is set to On.
AutoVolume→Off/On
Each broadcasting station has its own signal conditions, and so it is not easy to adjust the volume every time the channel is
changed. This feature lets you automatically adjust the volume of the desired channel by lowering the sound output when the
modulation signal is high or by raising the sound output when the modulation signal is low.
SpeakerSelect→ExternalSpeaker/TVSpeaker
If you want to hear the sound through separate speakers, cancel the internal amplier.
The volume and MUTE buttons do not operate when the Speaker Select is set to External Speaker.
If you select External Speaker in the Speaker Select menu, the sound settings will be limited.
SoundReset→ResetAll/ResetSoundMode/Cancel
You can restore the Sound settings to the factory defaults.
Selecting the Sound Mode
You can set the sound mode by pressing the DUAL button. When you press it, the current sound mode is displayed on the screen.
Audio Type Dual 1 / 2 Default
A2 Stereo
Mono MONO Automatic change
Stereo STEREO↔MONO
Dual DUAL1↔DUAL2 DUAL 1
NICAM
Stereo
Mono MONO Automatic change
Stereo MONO↔STEREO
Dual MONO↔DUAL1
DUAL 2 DUAL 1
If the stereo signal is weak and an automatic switching occurs, then switch to the mono.
This function is only activated in stereo sound signal. It is deactivated in mono sound signal.
This function is only available in TV mode.
N
❑
❑
N
N
❑
¦
N
N
N
[LB5P_W.Euro]BN68-02362A-01L09.i18 18 2009-09-10 ¿ÀÈÄ 3:43:14

English - 19
SETUP
ConguringtheSetupMenu
Menu Language
You can set the menu language.
Time
Clock
Setting the clock is necessary in order to use the various timer features of the TV.
The current time will appear every time you press the INFO button.
If you disconnect the power cord, you have to set the clock again.
Clock Mode
You can set up the current time manually or automatically.
Auto: Set the current time automatically using the time from the digital broadcast.
Manual: Set the current time to a manually specied time.
Depending on the broadcast station and signal, the auto time may not be set correctly. If this occurs, set the time
manually.
The Antenna or cable must be connected in order to set the time automatically.
Clock Set
You can set the current time manually.
Set up this item when you have set Clock Mode to Manual.
You can set the day, month, year, hour and minute directly by pressing the number buttons on the remote control.
SleepTimer→Off/30min/60min/90min/120min/150min/180min
The sleep timer automatically shuts off the TV after a preset time (30, 60, 90, 120, 150 and 180 minutes).
The TV automatically switches to standby mode when the timer reaches 0.
To cancel the Sleep Timer function, select Off.
Press the TOOLS button to display the Tools menu. You can also set the sleep timer by selecting Tools→SleepTimer.
Timer 1 / Timer 2 / Timer 3
Three different on / off timer settings can be made. You must set the clock rst.
On Time: Set the hour, minute, and activate / inactivate. (To activate the timer with the setting you’ve chosen, set to Activate.)
Off Time: Set the hour, minute, and activate / inactivate. (To activate the timer with the setting you’ve chosen, set to Activate.)
Volume: Select the desired turn on volume level.
Antenna: Select Air or Cable.
Channel: Select the desired channel.
Repeat: Select Once, Everyday, Mon~Fri, Mon~Sat, Sat~Sun or Manual.
When Manual is selected, press the ► button to select the desired day of the week. Press the ENTER
E
button over the
desired day and the
c
mark will appear.
You can set the hour, minute and channel by pressing the number buttons on the remote control.
Auto Power Off
When you set the timer On, the television will eventually turn off, if no controls are operated for 3 hours after the TV was
turned on by the timer. This function is only available in timer On mode and prevents overheating, which may occur if a TV is
on for too long time.
¦
❑
❑
N
N
●
–
–
N
N
●
N
N
N
N
T
●
●
●
●
●
●
N
N
N
Plug & Play
MenuLanguage :English ►
Time
Broadcast
Security
General
Setup
[LB5P_W.Euro]BN68-02362A-01L09.i19 19 2009-09-10 ¿ÀÈÄ 3:43:14

English - 20
Broadcast
Subtitle
You can activate and deactivate the subtitles. Use this menu to set the Subtitle Mode. Normal under the menu is the basic subtitle
and Hard of hearing is the subtitle for a hearing-impaired person.
Subtitle→Off/On : Switches subtitles on or off.
Mode→Normal/Hardofhearing: Sets the subtitle mode.
Subtitle Language: Set the subtitle language.
If the programme you are watching does not support the Hard of hearing function, Normal automatically activates even
though Hard of hearing mode is selected.
English is the default in cases where the selected language is unavailable in the broadcast.
You can select these options simply by pressing the SUBT. button on the remote control.
DigitalText→Disable/Enable (UK only)
If the programme is broadcast with digital text, this feature is enabled.
MHEG (Multimedia and Hypermedia Information Coding Experts Group)
An International standard for data encoding systems used in multimedia and hypermedia. This is at a higher level than the
MPEG system which includes data-linking hypermedia such as still images, character service, animation, graphic and video
les as well as multimedia data. MHEG is user runtime interaction technology and is being applied to various elds including
VOD (Video-On-Demand), ITV (Interactive TV), EC (Electronic Commerce), tele-education, tele-conferencing, digital libraries
and network games.
Teletext Language
You can set the Teletext language by selecting the language type.
English is the default in cases where the selected language is unavailable in the broadcast.
Preference
Primary Audio Language / Secondary Audio Language / Primary Subtitle Language / Secondary Subtitle Language /
Primary Teletext Language / Secondary Teletext Language
Using this feature, users can select one of the languages. The language selected here is the default when the user selects a
channel.
If you change the language setting, the Subtitle Language, Audio Language, and the Teletext Language of the Language
menu are automatically changed to the selected language.
The Subtitle Language, Audio Language, and the Teletext Language of the Language menu show a list of languages
supported by the current channel and the selection is highlighted. If you change this language setting, the new selection is
only valid for the current channel. The changed setting does not change the setting of the Primary Subtitle Language, Primary
Audio Language, or the Primary Teletext Language of the Preference menu.
Common Interface
CI Menu
This enables the user to select from the CAM-provided menu. Select the CI Menu based on the menu PC Card.
Application Info.
This contains information on CAM inserted in the CI slot and displays it.
The Application Info inserting is about the ‘CI CARD’. You can install the CAM anytime whether the TV is ON or OFF.
1. Purchase the CI CAM module by visiting your nearest dealer or by phone.
2. Insert the ‘CI CARD’ into the CAM in the direction of the arrow until it ts.
3. Insert the CAM with the ‘CI CARD’ installed into the common interface slot.
(Insert the CAM in the direction of the arrow, right up to the end so that it is parallel with the slot.)
4. Check if you can see a picture on a scrambled signal channel.
CAM is not supported in some countries and regions, check with your authorized dealer.
❑
●
●
●
N
N
N
N
N
●
●
●
N
N
[LB5P_W.Euro]BN68-02362A-01L09.i20 20 2009-09-10 ¿ÀÈÄ 3:43:14

English - 21
Security
Before the setup screen appears, the PIN number input screen appears. Enter your 4 digit PIN number.
The default PIN number of a new TV set is ‘0-0-0-0’. You can change the PIN by selecting Change PIN from the menu.
ChildLock→Off/On
This feature allows you to prevent unauthorized users, such as children, from watching unsuitable programme by muting out video
and audio.
You can lock some channels in Channel List. (refer to page 12)
Child Lock is available only in TV mode.
Parental Lock
This feature allows you to prevent unauthorized users, such as children, from watching unsuitable programme by a 4-digit PIN
(Personal Identication Number) code that is dened by the user.
The Parental Lock item differs depending on the country.
When the Parental Lock is set, the ‘
\
’ symbol is displayed.
Allow All: Press to unlock all TV ratings.
Block All: Press to lock all TV ratings.
Change PIN
You can change your personal ID number that is required to set up the TV.
If you forget the PIN code, press the remote control buttons in the following sequence, which resets the PIN to ‘0-0-0-0’:
POWER(Off) → MUTE → 8 → 2 → 4 → POWER(On).
General
GameMode→Off/On
When connecting to a game console such as PlayStation™ or Xbox™, you can enjoy a more realistic gaming experience by
selecting the game menu.
To disconnect the game console and connect another external device, cancel game mode in the setup menu.
If you display the TV menu in Game Mode, the screen shakes slightly.
Game Mode is not available in regular TV and PC mode.
If Game Mode is On:
Picture mode is automatically changed to Standard and users cannot change the mode.
Sound mode is automatically changed to Custom and users cannot change the mode. Adjust the sound using the
equalizer.
The Reset Sound function is activated. Selecting the Reset function after setting the equalizer resets the equalizer settings to
the factory defaults.
EnergySaving→Off/Low/Medium/High/PictureOff/Auto
This feature adjusts the brightness of the TV in order to reduce power consumption. When watching TV at night, set the Energy
Saving mode option to High to reduce eye fatigue as well as power consumption.
If you select Picture Off, the screen is turned off and you can only hear the sound. Press any button to get out of Picture Off.
In the Tools menu, Picture Off function is not supported.
Press the TOOLS button to display the Tools menu. You can also set the Energy Saving option by selecting Tools → Energy
Saving.
Melody→Off/Low/Medium/High
A melody sound can be set to come on when the TV is powered On or Off.
The Melody does not play
When no sound is output from the TV because the MUTE button has been pressed.
When no sound is output from the TV because the (–) Volume button has been pressed.
When the TV is turned off by Sleep Timer function.
❑
N
N
N
N
N
N
N
N
❑
N
N
N
N–
–
N
N
T
N–
–
–
[LB5P_W.Euro]BN68-02362A-01L09.i21 21 2009-09-10 ¿ÀÈÄ 3:43:14

English - 22
INPUT / SUPPORT
ConguringtheInputMenu
Source List
Use to select TV or other external input sources such as DVD / Blu-ray players / Satellite
receivers (Set-Top Box) connected to the TV. Use to select the input source of your choice.
Press the SOURCE button on the remote control to view an external signal source. TV
mode can be selected by pressing the TV button.
TV / Ext. / AV / Component / PC / HDMI1/DVI / HDMI2 / HDMI3.
You can choose only those external devices that are connected to the TV. In the Source
List, connected inputs will be highlighted and sorted to the top. Inputs that are not
connected will be sorted to the bottom.
Ext. and PC Always stays activated.
Using the Colour buttons on the remote with the Source list
Red (Refresh): Refreshes the connecting external devices.
TOOLS (Tools): Displays the Edit Name and Information menus.
Edit Name
Name the device connected to the input jacks to make your input source selection easier.
VCR / DVD / Cable STB / Satellite STB / PVR STB / AV Receiver / Game / Camcorder / PC / DVI / DVI PC / TV / IPTV / Blu-ray
/ HD DVD / DMA
When a PC with a resolution of 1920 x 1080 @ 60Hz is connected to the HDMI IN 1(DVI) port, you should set the HDMI1
mode to DVI PC in the Edit Name of the Input mode.
When connecting an HDMI/DVI cable to the HDMI IN 1(DVI) port, you should set the HDMI1/DVI mode to DVI or DVI PC in
the Edit Name of the Input mode. In this case, a separate sound connection is required.
ConguringtheSupportMenu
Self Diagnosis
Picture Test
If you think you have a picture problem, perform the picture test. Check the colour pattern on
the screen to see if the problem still exists.
Yes: If the test pattern does not appear or there is noise in the test pattern, select Yes.
There may be a problem with the TV. Contact Samsung’s call centre for assistance.
No: If the test pattern is properly displayed, select No. There may be a problem with your
external equipment. Please check your connections. If the problem still persists, refer to
the external device’s user manual.
Sound Test
If you think you have a sound problem, please perform the sound test. You can check the sound by playing a built-in melody sound
through the TV. ‘Does the problem still exist with this sound test?’ appears on the screen.
If you hear no sound from the TV’s speakers, before performing the sound test, make sure Speaker Select is set to TV speaker
in the Sound menu.
The melody will be heard during the test even if Speaker Select is set to External Speaker or the sound is muted by pressing
the MUTE button.
Yes: If during the sound test you can hear sound only from one speaker or not at all, select Yes. There may be a problem with
the TV. Contact Samsung’s call centre for assistance.
No: If you can hear sound from the speakers, select No. There may be a problem with your external equipment. Please check
your connections. If the problem still persists, refer to the external device’s user manual.
Signal Information (digital channels only)
Unlike analogue channels, which can vary in reception quality from ‘snowy’ to clear, digital (HDTV) channels have either perfect
reception quality or you will not receive them at all. So, unlike analogue channels, you cannot ne tune a digital channel. You can,
however, adjust your antenna to improve the reception of available digital channels.
If the signal strength meter indicates that the signal is weak, physically adjust your antenna to increase the signal strength.
Continue to adjust the antenna until you nd the best position with the strongest signal.
¦
❑
O
N
N
N–
–
❑
N
N
¦
❑
●
●
N
N
●
●
N
Source List
Edit Name
Input
SelfDiagnosis ►
Software Upgrade
HD Connection Guide
Contact Samsung
Support
[LB5P_W.Euro]BN68-02362A-01L09.i22 22 2009-09-10 ¿ÀÈÄ 3:43:14

English - 23
Software Upgrade
To keep your product up-to-date with new Digital Television features then software upgrades
are periodically broadcast as part of the normal Television signal. It will automatically detect
these signals and display the software upgrade banner. You are given the option to install the
upgrade.
BY USB
Insert a USB drive containing the rmware upgrade into TV. Please be careful to not
disconnect the power or remove the USB drive while upgrades are being applied. The TV will
turn off and turn on automatically after completing the rmware upgrade. Please check the rmware version after the update is
completed. When software is upgraded, video and audio settings you have made will return to their default (factory) settings.
We recommend you write down your settings so that you can easily reset them after the upgrade.
BY Channel
Upgrades the software using the broadcasting signal.
If the function is selected during the software transmission period, this function searches for available software and downloads
the software.
The time required to download the software is determined by the signal status.
Standby Mode Upgrade
To continue software upgrade with master power on, Select On by pressing the ▲ or ▼ button. 45 minutes after entering standby
mode, a manual upgrade is automatically conducted. Since the power of the unit is turned on internally, the screen may be on
slightly for the LCD product. This phenomenon may continue for more than 1 hour until the software upgrade is completed.
Alternative Software
To display the software version information.
HD Connection Guide
This menu presents the connection method that provides the optimal quality for the HD TV.
Refer to this information when connecting external devices to the TV.
Contact Samsung
View this information when your TV does not work properly or when you want to upgrade the software.
You can view the information regarding the call centre, product and software le download method.
❑
N
N
❑
❑
TV Rear Panel
USB Drive
[LB5P_W.Euro]BN68-02362A-01L09.i23 23 2009-09-10 ¿ÀÈÄ 3:43:15

English - 24
ANYNET+
Connecting Anynet+ Devices
Anynet+ is a function that enables you to control all connected Samsung devices that support Anynet+ with your Samsung TV’s
remote.
The Anynet+ system can be used only with Samsung devices that have the Anynet+ feature. To be sure your Samsung device has
this feature, check if there is an Anynet+ logo on it.
To connect to a TV
1. Connect the HDMI IN (1(DVI), 2 or 3) jack on the TV and the HDMI OUT jack of the corresponding Anynet+ device using an
HDMI cable.
To connect to Home Theatre
1. Connect the HDMI IN (1(DVI), 2 or 3) jack on the TV and the HDMI OUT jack of the corresponding Anynet+ device using an
HDMI cable.
2. Connect the HDMI IN jack of the home theatre and the HDMI OUT jack of the corresponding Anynet+ device using an HDMI
cable.
Connect the Optical cable between the DIGITAL AUDIO OUT (OPTICAL) jack on your TV and the Digital Audio Input on the
Home Theatre.
When following the connection above, the Optical jack only outputs 2 channel audio. You will only hear sound from the Home
Theatre’s Front Left and Right speakers and the subwoofer. If you want to hear 5.1 channel audio, connect the DIGITAL
AUDIO OUT (OPTICAL) jack on the DVD / Blu-ray player or Cable/Satellite Box (ie Anynet Device 1 or 2) directly to the
Ampli er or Home Theatre, not the TV.
Connect only one Home Theatre.
You can connect an Anynet+ device using the HDMI 1.3 cable. Some HDMI cables may not support Anynet+ functions.
Anynet+ works when the AV device supporting Anynet+ is in the Standby or On status.
Anynet+ supports up to 12 AV devices in total. Note that you can connect up to 3 devices of the same type.
¦
N
N
N
N
N
N
TV
Optical Cable
Home Theatre
HDMI 1.3 Cable
Anynet+ Device 1
HDMI 1.3 Cable
Anynet+ Device 2 Anynet+ Device 3
HDMI 1.3 Cable
HDMI 1.3
Cable
TV Anynet+ Device 1
HDMI 1.3 Cable
Anynet+ Device 2 Anynet+ Device 3
HDMI 1.3 Cable
HDMI 1.3 Cable
[LB5P_W.Euro]BN68-02362A-01L09.i24 24 2009-09-10 ¿ÀÈÄ 3:43:15

English - 25
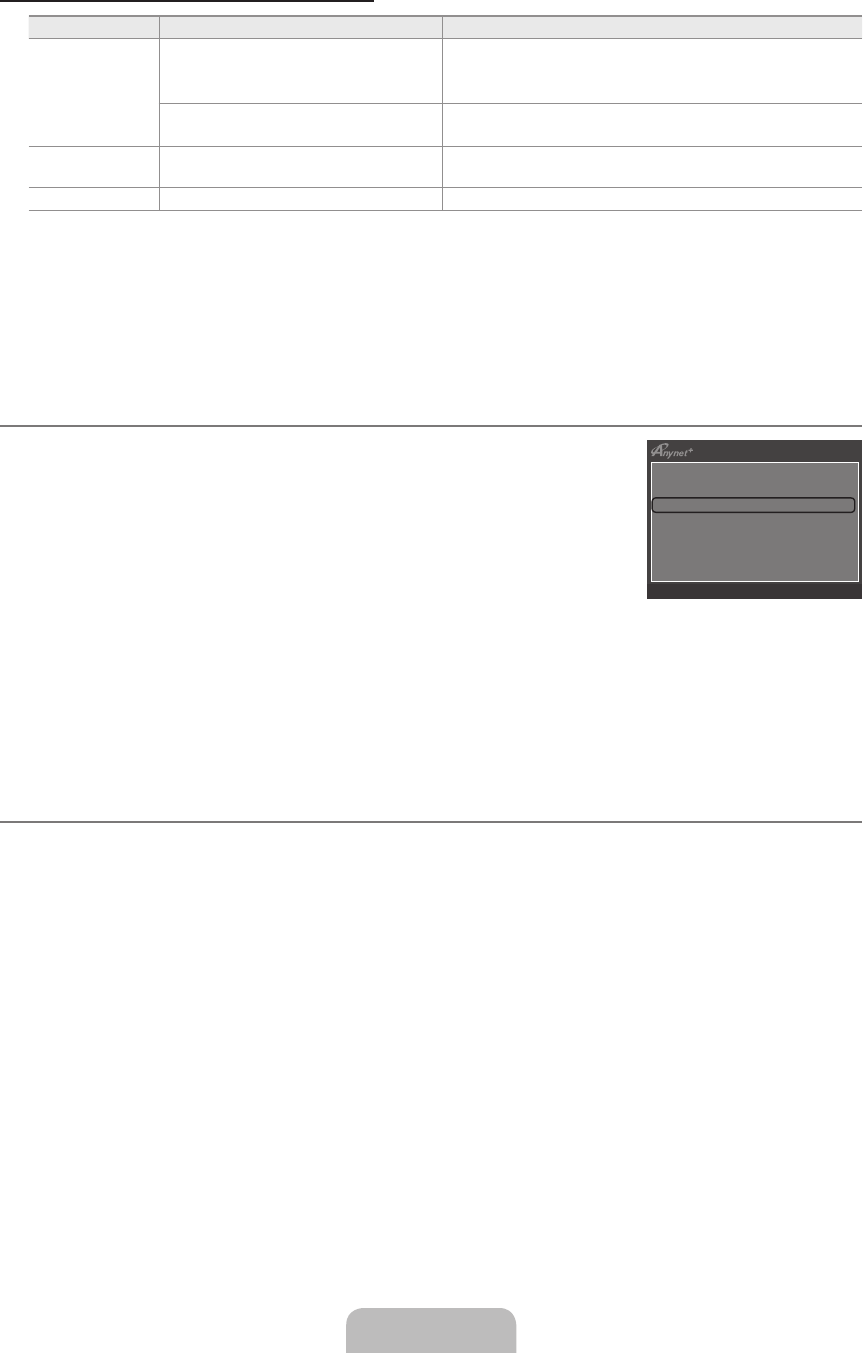
Setting Up Anynet+
Press the TOOLS button to display the Tools menu. You can also display Anynet+ menu
by selecting Tools→Anynet+(HDMI-CEC).
Setup
Anynet+(HDMI-CEC)→Off / On
To use the Anynet+ Function, Anynet+ (HDMI-CEC) must be set to On.
When the Anynet+ (HDMI-CEC) function is disabled, all the Anynet+ related operations
are deactivated.
AutoTurnOff→No/Yes
Setting an Anynet+ Device to turn Off Automatically when the TV is Turned Off
The active source on the TV remote must be set to TV to use the Anynet+ function.
If you set Auto Turn Off to Yes, connected external devices are also turned off when the
TV is turned off. If an external device is still recording, it may or may not turn off.
Switching between Anynet+ Devices
1. Press the TOOLS button. Press the ENTER
E
button to select Anynet+ (HDMI-CEC).
2. Press the ▲ or ▼ button to select Device List, then press the ENTER
E
button
Anynet+ devices connected to the TV are listed. If you cannot nd a device you want,
press the red button to scan for devices.
Only when you set Anynet+ (HDMI-CEC) to On in the Setup menu, the Device List
menu appears.
3. Press the ▲ or ▼ button to select a particular device and press the ENTER
E
button. It
is switched to the selected device.
Switching to the selected devices may take up to 2 minutes. You cannot cancel the
operation during the switching operation.
The time required to scan for devices is determined by the number of connected devices.
When the device scan is complete, the number of devices found are not displayed.
Although the TV automatically searches the device list when the TV is turned on via the power button, devices connected to
the TV when the TV is on or under some conditions are not automatically displayed in the device list. Press the red button to
search for the connected device.
If you have selected external input mode by pressing the SOURCE button, you cannot use the Anynet+ function. Make sure to
switch to an Anynet+ device by using the Device List.
Anynet+ Menu
The Anynet+ menu changes depending on the type and status of the Anynet+ devices connected to the TV.
Anynet+ Menu Description
View TV Anynet+ mode changes to TV broadcast mode.
Device List Shows the Anynet+ device list.
(device_name) MENU Shows the connected device menus. E.g. If a DVD recorder is connected, the disc menu of the
DVD recorder will appear.
(device_name) Operation Shows the play menu of the connected device. E.g. If a DVD recorder is connected, the play
menu of the DVD recorder will appear.
Record: (*recorder) Starts recording immediately using the recorder. (This is only available for devices that support the
recording function.)
Stop Recording: (*recorder) Stops recording.
Receiver Sound is played through the receiver.
If more than one recording device is connected, they are displayed as (*recorder) and if only one recording device is
connected, it will be represented as (*device_name).
¦
T
❑
N
N
N
¦
N
N
N
N
N
N
N
N
View TV
Device List
Record : DVDR
DVDR MENU
DVDR Operation
Receiver : On
Setup
U
Move
E
Enter
R
Return
Device List
Setup
U
Move
E
Enter
R
Return
Setup
Anynet+ (HDMI-CEC) : On
Auto Turn Off : Yes
U
Move
E
Enter
R
Return
Anynet+(HDMI-CEC) ►
Application
[LB5P_W.Euro]BN68-02362A-01L09.i25 25 2009-09-10 ¿ÀÈÄ 3:43:16
English - 26
TV Remote Control Buttons Available in Anynet+ Mode
Device Type Operating Status Available Buttons
Anynet+ Device
After switching to the device, when the
menu of the corresponding device is
displayed on the screen.
Numeric buttons
▲/▼/◄/►/ENTER
E
buttons
Colour buttons / EXIT button
After switching to the device, while playing
a le
π
(Backward search) /
µ
(Forward search) /
∫
(Stop) /
∂
(Play) /
∑
(Pause)
Device with built-
in Tuner
After switching to the device, when you
are watching a TV programme P
>
/ P
<
button
Audio Device When Receiver is activated Volume / MUTE button
The Anynet+ function only works when the active source on the TV remote control is set to TV.
The
∏
button works only while in the recordable state.
You cannot control Anynet+ devices using the buttons on the TV. You can control Anynet+ devices only using the TV remote
control.
The TV remote control may not work under certain conditions. If this occurs, reselect the Anynet+ device.
The Anynet+ functions do not operate with other manufacturers’ products.
The
π
,
µ
operations may differ depending on the device.
Recording
You can make a recording of a TV programme using a Samsung recorder.
1. Press the TOOLS button. Press the ENTER
E
button to select Anynet+ (HDMI-CEC).
2. Press the ▲ or ▼ button to select Record: (device_name), then press the ENTER
E
button. Recording begins.
When there is more than one recording device
When multiple recording devices are connected, the recording devices are listed.
Press the ▲ or ▼ button to select a recording device and press the ENTER
E
button. Recording begins.
When the recording device is not displayed
Select Device List and press the red button to search devices.
3. Press the EXIT button to exit.
You can record the source streams by selecting Record: (device_name).
Pressing the
∫
button will record whatever you are currently watching. If you are watching video from another device, the
video from the device is recorded.
Before recording, check whether the antenna jack is properly connected to the recording device. To properly connect an
antenna to a recording device, refer to the recording device’s users manual.
Listening through a Receiver (Home Theatre)
You can listen to sound through a receiver instead of the TV speaker.
1. Press the TOOLS button. Press the ENTER
E
button to select Anynet+ (HDMI-CEC).
2. Press the ▲ or ▼ button to select Receiver. Press the ◄ or ► button to select On or Off.
3. Press the EXIT button to exit.
If your receiver supports audio only, it may not appear in the device list.
The receiver will work when you have properly connected the optical in jack of the receiver to the
DIGITAL AUDIO OUT (OPTICAL) jack of the TV.
When the Home Theatre receiver is set to On, you can hear sound output from the TV’s Optical jack. When the TV is
displaying a DTV(air) signal, the TV will send out 5.1 channel sound to the Home theatre receiver. When the source is a digital
component such as a DVD and is connected to the TV via HDMI, only 2 channel sound will be heard from the Home Theatre
receiver.
If there is a power interruption to the TV when the Receiver is set to On (by disconnecting the power cord or a power failure),
the Speaker Select may be set to External Speaker when you turn the TV on again. (see page 18)
N
N
N
N
N
N
¦
N
N
N
N
N
¦
N
N
N
N
View TV
Device List
Record : DVDR
DVDR MENU
DVDR Operation
Receiver : On
Setup
U
Move
E
Enter
R
Return
[LB5P_W.Euro]BN68-02362A-01L09.i26 26 2009-09-10 ¿ÀÈÄ 3:43:16

English - 27
Troubleshooting for Anynet+
Problem Possible Solution
Anynet+ does not work. Check if the device is an Anynet+ device. The Anynet+ system supports Anynet+ devices only.
Connect only one receiver (home theatre).
Check if the Anynet+ device power cord is properly connected.
Check the Anynet+ device’s Video/Audio/HDMI 1.3 cable connections.
Check whether Anynet+ (HDMI-CEC) is set to On in the Anynet+ setup menu.
Check whether the TV remote control is in TV mode.
Check whether it is Anynet+ exclusive remote control.
Anynet+ doesn’t work in certain situations. (Searching channels, Operating Plug & Play, etc.)
When connecting or removing the HDMI 1.3 cable, please make sure to search devices again
or turn your TV off and on again.
Check if the Anynet+ Function of Anynet+ device is set on.
●
●
●
●
●
●
●
●
●
●
I want to start Anynet+.Check if the Anynet+ device is properly connected to the TV and check if the Anynet+ (HDMI-
CEC) is set to On in the Anynet+ Setup menu.
Press the TV button on the TV remote control to switch to TV. Then press the TOOLS button
to show the Anynet+ menu and select a menu you want.
●
●
I want to exit Anynet+. Select View TV in the Anynet+ menu.
Press the SOURCE button on the TV remote control and select a device other than Anynet+
devices.
Press P
>
/
<
, PRE-CH and FAV.CH to change the TV mode. (Note that the channel button
operates only when a tuner-embedded Anynet+ device is not connected.)
●
●
●
The message Connecting to
Anynet+ device... appears
on the screen.
You cannot use the remote control when you are conguring Anynet+ or switching to a view
mode.
Use the remote control when the Anynet+ setting or switching to view mode is complete.
●
●
The Anynet+ device does
not play.
You cannot use the play function when Plug & Play is in progress.
●
The connected device is not
displayed. Check whether or not the device supports Anynet+ functions.
Check whether or not the HDMI 1.3 cable is properly connected.
Check whether Anynet+ (HDMI-CEC) is set to On in the Anynet+ setup menu.
Search Anynet+ devices again.
You can connect an Anynet+ device using the HDMI 1.3 cable only. Some HDMI cables may
not support Anynet+ functions.
If it is terminated by an abnormal situation such as disconnecting the HDMI cable or power
cord or a power failure, please repeat the device scan.
●
●
●
●
●
●
The TV programme cannot
be recorded. Check whether the antenna jack on the recording device is properly connected.
●
The TV sound is not output
through the receiver. Connect the optical cable between TV and the receiver.
●
¦
[LB5P_W.Euro]BN68-02362A-01L09.i27 27 2009-09-10 ¿ÀÈÄ 3:43:16

English - 28
RECOMMENDATIONS FOR USE
Teletext Feature
Most television stations provide written information services via Teletext. The index page of the Teletext service gives you
information on how to use the service. In addition, you can select various options to suit your requirements by using the remote
control buttons.
For Teletext information to be displayed correctly, channel reception must be stable. Otherwise, information may be missing or
some pages may not be displayed.
You can change Teletext pages by pressing the numeric buttons on the remote control.
1
0
(mode)
Press to select the Teletext mode
(LIST/FLOF). If you press it in the LIST
mode, it switches into the List save
mode. In the List save mode, you can
save Teletext page into list using the
8
(store) button.
2
5
(reveal)
Used to display the hidden text (answers
to quiz games, for example). To display
normal screen, press it again.
3
4
(size)
Press to display the double-size letters
in the upper half of the screen. For
lower half of the screen, press it again.
To display normal screen, press it once
again.
4
8
(store)
Used to store the Teletext pages.
5
Colour buttons (red/green/yellow/
blue)
If the FASTEXT system is used by a
broadcasting company, the different
topics covered on a Teletext page are
colour-coded and can be selected by
pressing the coloured buttons. Press
one of them corresponding to the
required. The page is displayed with
other coloured information that can be
selected in the same way. To display
the previous or next page, press the
corresponding coloured button.
6
/
(Teletext on/mix)
Press to activate Teletext mode after
selecting the channel providing the
Teletext service. Press it twice to overlap
the Teletext with the current broadcasting
screen.
7
:
(exit)
Exit from the Teletext display.
8
1
(sub-page)
Used to display the available sub-page.
9
2
(page up)
Used to display the next Teletext page.
0
3
(page down)
Used to display the previous Teletext
page.
!
6
(index)
Used to display the index (contents)
page at any time while you are viewing
Teletext.
@
9
(hold)
Used to hold the display on a given
page if the selected page is linked with
several secondary pages which follow on
automatically. To resume, press it again.
#
7
(cancel)
Used to display the broadcast when
searching for a page.
The Teletext pages are organized according to six categories:
Part Contents
ASelected page number.
BBroadcasting channel identity.
CCurrent page number or search indications.
DDate and time.
EText.
FStatus information.
FASTEXT information.
¦
N
N
1
2
3
4
5
6
8
9
0
@
#
!
7
[LB5P_W.Euro]BN68-02362A-01L09.i28 28 2009-09-10 ¿ÀÈÄ 3:43:16

English - 29
Teletext information is often divided between several pages displayed in sequence, which can be accessed by:
Entering the page number
Selecting a title in a list
Selecting a coloured heading (FASTEXT system)
Teletext level supported by the TV is version 2.5 which is capable of displaying additional graphics or text.
Depending upon the transmission, blank side panels can occur when displaying Teletext.
In these cases, additional graphics or text is not transmitted.
Older TV’s which do not support version 2.5 are not capable of displaying any additional graphics or text, regardless of the
Teletext transmission.
Press the TV button to exit from the Teletext display.
Teletext 16:9, picture is 16:9
Installing the Stand
Preset: Place the Guide Stand and Cover Neck onto the stand and fasten it using the
screws. Applicable to 32inch models only.
1. Attach your LCD TV to the stand.
Two or more people should carry the TV.
Make sure to distinguish between the front and back of the stand when assembling
them.
To make sure the TV is installed on the stand at a proper level, do not apply excess
downward pressure to the upper left of right sides of the TV.
2. Fasten two screws at position
1
and then fasten two screw at position
2
.
Stand the product up and fasten the screws. If you fasten the screws with the LCD TV
placed down, it may lean to one side.
Installing the Wall Mount Kit
Wall mount items (sold separately) allow you to mount the TV on the wall.
For detailed information on installing the wall mount, see the instructions provided with the
Wall Mount items. Contact a technician for assistance when installing the wall mounted
bracket.
Samsung Electronics is not responsible for any damage to the product or injury to yourself or
others if you elect to install the TV on your own.
Do not install your Wall Mount Kit while your TV is turned on. It may result in personal
injury due to electric shock.
N–
–
–
N
N
N
N
O
N
¦
N
N
N
N
N
¦
Back
Front
[LB5P_W.Euro]BN68-02362A-01L09.i29 29 2009-09-10 ¿ÀÈÄ 3:43:17

English - 30
Using the Anti-Theft Kensington Lock
The Kensington Lock is a device used to physically x the system when using it in a public
place. The appearance and locking method may differ from the illustration depending on the
manufacturer. Refer to the manual provided with the Kensington Lock for proper use. The
locking device has to be purchased separately. The location of the Kensington Lock may be
different depending on its model.
1. Insert the locking device into the Kensington slot on the LCD TV (
1
) and turn it in the
locking direction (
2
).
2. Connect the Kensington Lock cable (
3
).
3. Fix the Kensington Lock to a desk or a heavy stationary object.
3
1
2
Securing the Installation Space
Keep the required distances between the product and other objects (e.g. walls) to ensure proper ventilation.
Failing to do so may result in fire or a problem with the product due to an increase in the internal temperature of the product.
Install the product so the required distances shown in the figure are kept.
When using a stand or wall-mount, use parts provided by Samsung Electronics only.
If you use parts provided by another manufacturer, it may result in a problem with the product or an injury due to the
product falling.
If you use parts provided by another manufacturer, it may result in a problem with the product or fire due to an increase in
the internal temperature of the product due to poor ventilation.
The appearance may differ depending on the product.
When installing the product with a stand When installing the product with a wall-mount
10 cm
10 cm
10 cm
10 cm
10 cm
10 cm
10 cm
¦
¦
N
N
<Optional>
[LB5P_W.Euro]BN68-02362A-01L09.i30 30 2009-09-10 ¿ÀÈÄ 3:43:18
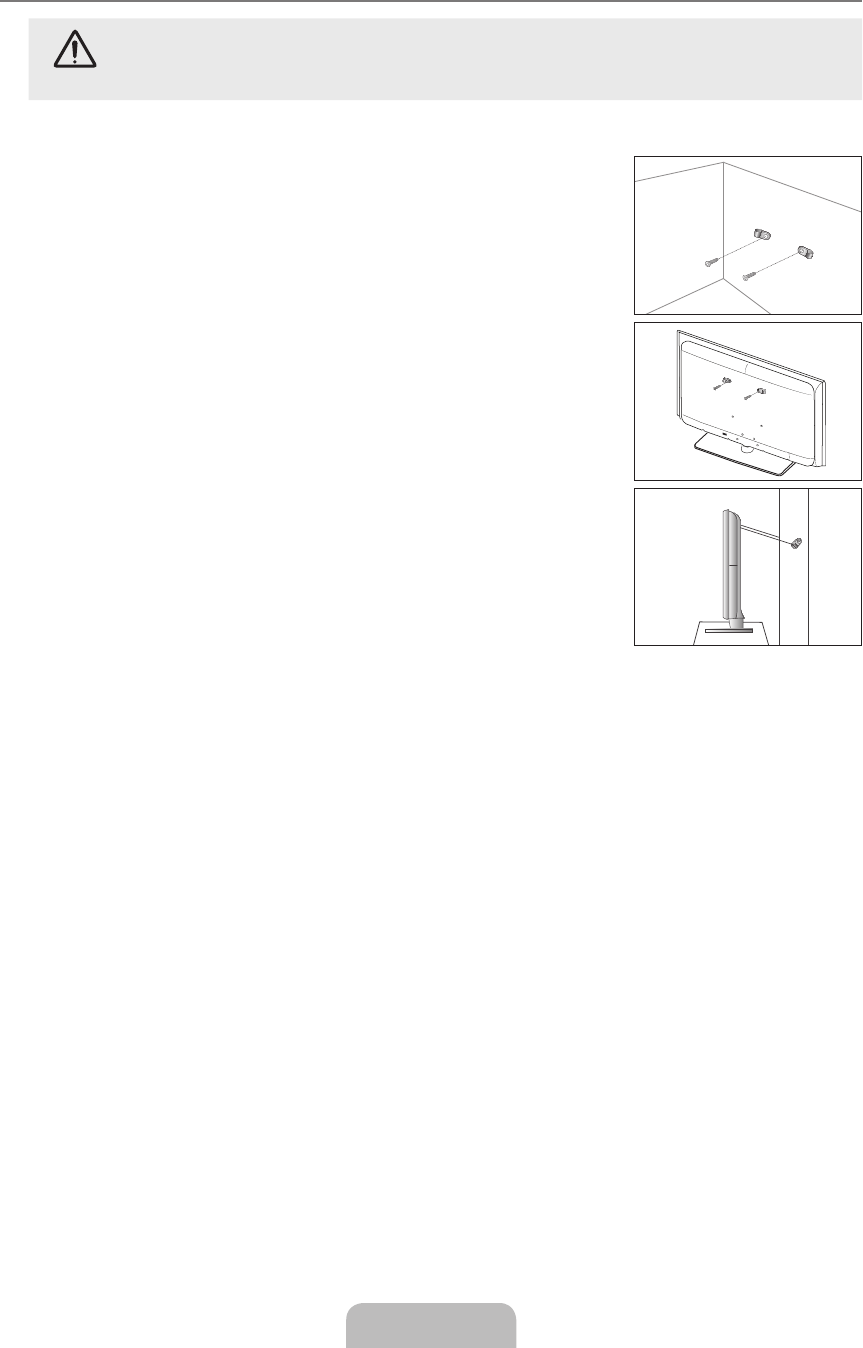
English - 31
Securing the TV to the Wall
Caution: Pulling, pushing, or climbing on the TV may cause the TV to fall. In particular, ensure your children do
not hang over or destabilize the TV; doing so may cause the TV to tip over, causing serious injuries or death.
Follow all safety precautions provided on the included Safety Flyer. For added stability, install the anti-fall device
for safety purposes, as follows.
To avoid the TV from falling:
1. Put the screws into the clamps and rmly fasten them onto the wall. Conrm that the
screws have been rmly installed onto the wall.
You may need additional material such as an anchor depending on the type of wall.
Since the necessary clamps, screws, and string are not supplied, please purchase
these additionally.
2. Remove the screws from the centre back of the TV, put the screws into the clamps, and
then fasten the screws onto the TV again.
Screws may not be supplied with the product. In this case, please purchase the
screws of the following specications.
Screw Specications
For a 17 ~ 29 Inch LCD TV: M4 X L15 / For a 32 ~ 40 Inch LCD TV: M6 X L15
3. Connect the clamps xed onto the TV and the clamps xed onto the wall with a strong
string and then tie the string tightly.
Install the TV near to the wall so that it does not fall backwards.
It is safe to connect the string so that the clamps xed on the wall are equal to or
lower than the clamps xed on the TV.
Untie the string before moving the TV.
4. Verify all connections are properly secured. Periodically check connections for any
sign of fatigue for failure. If you have any doubt about the security of your connections,
contact a professional installer.
¦
N
N
N
N
–
N
N
N
Wall
Wall
[LB5P_W.Euro]BN68-02362A-01L09.i31 31 2009-09-10 ¿ÀÈÄ 3:43:18
English - 32
Troubleshooting
If you have any questions of TV, rst refer to this list. If none of these troubleshooting tips apply, please visit ‘www.samsung.com’
site, then click on Support or contact Call Centre on list of last page.
Issue Solution
Picture Quality
First of all, please perform the Picture Test to conrm that your TV is properly displaying
test image.
Go to MENU - Support - Self Diagnosis - Picture Test
If the test image is properly displayed, the poor picture may caused by the source or signal.
●
TV image does not look as good
as it did in the store. If you have an analogue Cable/Set top box, upgrade to an Box. Use HDMI or
Component cables to deliver HD picture quality.
Cable/Satellite subscriber : Try HD(High Definition) stations from channel line up.
Antenna connection: Try HD stations after performing Auto programme.
Many HD channels are upscaled from SD(Standard Definition) contents.
Adjust Cable/Set top box video output resolution to 1080i or 720p.
Confirm that you are watching the TV at the minimum distance recomended based on
the size and definition of the signal you are displaying.
●
●
●
N
●
●
Picture is distorted : macroblock,
small block, dots, pixelization
Compression of video contents may cause picture distortion especially on fast moving
pictures such as sports and action movies.
Low signal level or bad quality can cause picture distortion. This is not a TV issue.
●
●
Wrong or missing colour with
Component connection. Make sure the Component cables are connected to the correct jacks. Incorrect or loose
connections may cause colour problems or the screen will be blank.
●
Poor colour or brightness. Adjust Picture options in the TV menu. (Picture mode, Colour, Brightness,
Sharpness)
Adjust Energy Saving option in Setup menu.
Try picture reset to view the default picture setting. (Go to MENU - Picture -
Picture Reset)
●
●
●
Dotted line on the edge of screen. If picture size is set to Screen Fit, change to 16:9.
Change cable/set top box resolution.
●
●
Picture is black and white with AV
(Composite) input only. Connect video cable(Yellow) to Green jack of component input 1 of the TV.
●
Picture freezes or is distorted
when changing channels or
picture is delayed.
If connected with cable box, please try to reset cable box. (reconnect AC cord and wait
until cable box reboots. It may take up to 20 minutes.)
Set output resolution of cable box to 1080i or 720p.
●
●
Sound Quality
First of all, please perform the Sound Test to conrm that your TV audio is properly
operating.
Go to MENU - Support - Self Diagnosis - Sound Test
If the audio is OK, the sound problem may caused by the source or signal.
●
No sound or sound is too low at
maximum volume. Please check the volume of external device connected to your TV then, adjust the TV
volume accordingly.
●
Picture is good but no sound. Set the Speaker Select option to TV speaker in the sound menu.
Make sure audio cables from an external device are connected to correct audio input
jacks on the TV.
Check connected device’s audio output option. (ex: You may need to change your
cable box’ audio option to HDMI when you have HDMI connected to your TV.)
If you are using a DVI to HDMI cable, a separate audio cable is required.
Deactivate SRS function if you are setting the volume over 30 value.
Remove plug from headphone jack. (if available on your TV)
●
●
●
●
●
●
Noise from speaker. Check cable connections. Make sure a video cable is not connected to an audio input.
For Antenna/Cable connection, check signal strength. Low signal level may cause
sound distortion.
●
●
¦
[LB5P_W.Euro]BN68-02362A-01L09.i32 32 2009-09-10 ¿ÀÈÄ 3:43:18
English - 33
Issue Solution
No Picture, No Video
TV won’t turn on. Make sure the AC power cord is plugged in securely to the wall outlet and the TV.
Make sure the wall outlet is working.
Try pressing the POWER button on the TV to make sure the remote is working
properly. If the TV turns on, it may be caused by Remote Control. To fix the Remote
problem, refer to ‘Remote control does not work’ below.
●
●
●
TV turns off automatically. Check if the Sleep Timer is set to On in the Setup menu.
If connected the TV to your PC, check your PC power settings.
Make sure the AC power cord is plugged in securely to the wall outlet and the TV.
If there is no signal for about 10 ~ 15 minutes with Antenna/Cable connection, the TV
will turn off.
●
●
●
●
No picture/Video. Check cable connections.(remove and reconnect all cables of TV and external devices)
Set your external device’s (Cable/Set top Box, DVD, Blu-ray etc) video output to match
the connections to the TV input. For example, external device’s output: HDMI, TV’s
input: HDMI.
Make sure your connected device is powered on.
Make sure to select the TV’s correct source by pressing the SOURCE button on the TV
remote.
●
●
●
●
RF(Cable/Antenna) Connection
Cannot receive all channels. Make sure Antenna cable is connected securely.
Please try Plug & Play to add available channels to the channel list.
Go to MENU - Setup - Plug & Play and wait for all avaiable channels are stored.
Verify Antenna is positioned correctly.
●
●
●
Picture is distorted: macroblock,
small block, dots, pixelization
Compression of video contents may cause picture distortion especially on fast moving
pictures such as sports and action movies.
Low signal level can cause picture distortion. This is not a TV issue.
●
●
PC Connection
‘Not Supported Mode’ message. Set your PC’s output resolution and frequency so it matches the resolutions supported
by the TV.
●
PC is always shown on source list
even if not connected.
This is normal; PC is always shown on the source list even though a PC is not
connected.
●
Video is OK but there is no audio
with HDMI connection. Check the audio output setting on your PC.
●
[LB5P_W.Euro]BN68-02362A-01L09.i33 33 2009-09-10 ¿ÀÈÄ 3:43:18

English - 34
Issue Solution
Others
Picture is not shown in full screen. Black bars on each side will be shown on HD channels when displaying upscaled SD
(4:3) contents.
Black bars on Top & Bottom will be shown on movies that have aspect ratios different
from your TV.
Adjust picture size option on your external device or TV to full screen.
●
●
●
Remote control does not work. Replace the remote control batteries with correct polarity (+ -).
Clean the transmission window located on the top of the remote.
Try pointing the remote directly at the TV from 5~6 feet away.
●
●
●
Can not control TV power or
volume with Cable/Set top box
remote control.
Programme the Cable/Set top box remote control to operate the TV. Refer to Cable/Sat
user manual for SAMSUNG TV code.
●
‘Not Supported Mode’ message. Check the supported resolution of the TV and adjust the external device’s output
resolution accordingly. Refer to resolution settings in this manual.
●
Plastic smell from TV. This smell is normal and will dissipate over time.
●
TV Signal Information is
unavailable in the Self Diagnostic
Test menu.
This function is only available with digital channels with an Antenna (RF/Coax)
connection.
●
TV is tilted to right or left side. Remove the stand base from TV and reassemble.
●
Can not assemble stand base. Make sure TV is placed on flat surface. If can not remove screws from TV, please use
magnetized screw driver.
●
Channel menu is grey out.
(unavailable)
Channel menu is only available when TV source is selected.
●
Your settings are lost after 30
minutes or every time TV is
turned off.
If TV is in the Store Demo mode, it will reset audio and picture settings every 30
minutes. Please change from Store Demo mode to Home Use mode in the
Plug & Play procedure. Press the SOURCE button to select TV mode,
go to MENU → Setup → Plug & Play → ENTER
E
.
●
Intermittent loss of audio or video. Check cable connections and reconnect.
Can be caused by using overly rigid or thick cables. Make sure the cables are flexible
enough for long term use. If wall mounting, we recommend using cables with 90
degree connectors.
●
●
You may see small particles if you
look closely at the edge of the
bezel surrounding the TV screen.
This is part of the product’s design and is not a defect.
●
‘Scramble signal’ or ‘Weak Signal/
No Signal’ with CAM CARD(CI). Check that CAM has CI Card installed into the common interface slot.
Pull out CAM from the TV and insert into the slot again.
●
●
When turned off and 45 minutes
later, TV is turned on itself. It is normal, the TV operate OTA (Over The Air) function itself to upgrade firmware
downloaded during watching.
●
Recurrent picture/sound issue. Check and change signal/source.
●
This TFT LCD panel uses a panel consisting of sub pixels which require sophisticated technology to produce. However, there
may be few bright or dark pixels on the screen. These pixels will have no impact on the performance of the product.
N
[LB5P_W.Euro]BN68-02362A-01L09.i34 34 2009-09-10 ¿ÀÈÄ 3:43:19
English - 35
Specications
Model Name LE32B530, LE32B541 LE37B530
Screen Size
(Diagonal) 32 inch 37 inch
PC Resolution
(Optimum) 1920 x 1080 @ 60 Hz 1920 x 1080 @ 60 Hz
Sound
(Output) 10W x 2 10W x 2
Dimensions (WxDxH)
Body
With stand
801 X 77 X 518 mm
801 X 220 X 562 mm
918 X 77 X 597 mm
918 X 300 X 650 mm
Weight
With Stand 11.8 kg 14.0 kg
Environmental Considerations
Operating Temperature
Operating Humidity
Storage Temperature
Storage Humidity
10°C to 40°C (50°F to 104°F)
10% to 80%, non-condensing
-20°C to 45°C (-4°F to 113°F)
5% to 95%, non-condensing
Stand Swivel
Left / Right -20˚ ~ 20˚
Model Name LE40B530, LE40B541 LE46B530
Screen Size
(Diagonal) 40 inch 46 inch
PC Resolution
(Optimum) 1920 x 1080 @ 60 Hz 1920 x 1080 @ 60 Hz
Sound
(Output) 10W x 2 10W x 2
Dimensions (WxDxH)
Body
With stand
998 X 78 X 621 mm
998 X 260 X 686 mm
1127 X 78 X 712 mm
1127 X 260 X 766 mm
Weight
With Stand 16.7 kg 23.7 kg
Environmental Considerations
Operating Temperature
Operating Humidity
Storage Temperature
Storage Humidity
10°C to 40°C (50°F to 104°F)
10% to 80%, non-condensing
-20°C to 45°C (-4°F to 113°F)
5% to 95%, non-condensing
Stand Swivel
Left / Right -20˚ ~ 20˚
Design and specications are subject to change without prior notice.
This device is a Class B digital apparatus.
For the power supply and Power Consumption, refer to the label attached to the product.
¦
N
N
N
[LB5P_W.Euro]BN68-02362A-01L09.i35 35 2009-09-10 ¿ÀÈÄ 3:43:19

Les figures et illustrations contenues dans ce mode d’emploi sont fournies pour référence uniquement. Elles peuvent différer de
l’aspect réel du produit. La conception et les spécifications du produit sont susceptibles d’être modifiées sans préavis.
Notifications pour le téléviseur numérique
1. Les fonctions relatives au téléviseur numérique (DVB) ne sont disponibles que dans les pays ou régions où des signaux
terrestres numériques de type DVB-T (MPEG2 et MPEG4 AVC) sont diffusés ou dans lesquels vous avez accès à un service
de télévision par câble compatible DVB-C (MPEG2 et MPEG4 AAC). Consultez votre distributeur local pour connaître les
possibilités de réception des signaux DVB-T ou DVB-C.
2. DVB-T est la norme du consortium européen pour la diffusion de signaux terrestres de télévision numérique. La norme DVB-
C est quant à elle prévue pour la diffusion des signaux de télévision numérique par câble. Certaines fonctions particulières,
telles que le guide électronique des programmes (Electric Program Guide - EPG), la vidéo à la demande (Video on Demand
- VOD), etc., ne sont toutefois pas incluses dans cette spécification. Elles ne seront par conséquent pas traitées pour l'instant.
3. Bien que ce téléviseur soit conforme aux dernières normes DVB-T et DVB-C (août 2008), il n'est pas garanti qu'il soit
compatible avec les futures diffusions de signaux numériques terrestres DVB-T et par câble DVB-C.
4. En fonction du pays ou de la région où vous vous trouvez, certains opérateurs de télévision par câble peuvent facturer des
frais supplémentaires pour un tel service. Vous devrez aussi peut-être accepter les termes et conditions de ces sociétés.
5. Il se peut que certaines fonctions de TV numérique ne soient pas disponibles dans certains pays ou certaines régions et que
la réception des signaux DVB-C ne soit pas correcte avec tous les opérateurs.
6. Pour plus d'informations, contactez votre service client Samsung.
Précautionsàprendrelorsdel'afchaged'uneimagexe
Une image xe peut occasionner des dommages irrémédiables à l'écran du téléviseur.
N'afchez pas d'image xe ou partiellement xe sur l'écran LCD pendant plus de 2 heures car cela pourrait provoquer
une rémanence de l'image à l'écran. Cette rémanence de l'image est également appelée "brûlure de l'écran". Pour l'éviter,
réduisez la luminosité et le contraste de l'écran lorsque vous afchez une image xe.
L'afchage sur l'écran LCD du téléviseur d'images au format 4:3 pendant une période prolongée peut laisser
des traces de bordures à gauche, à droite et au centre de l'écran, dues à la différence d'émission de lumière
sur celui-ci. La lecture d'un DVD ou l'utilisation d'une console de jeu peut avoir un effet similaire sur l'écran.
Les dommages occasionnés par l'effet précité ne sont pas couverts par la garantie.
L'afchage d'images xes de jeux vidéo et d'ordinateurs pendant une période excessive peut produire des rémanences. Pour
éviter cela, réduisez la "luminosité" et le "contraste" lors de l'afchage d'images xes.
© 2009 Samsung Electronics Co., Ltd. Tous droits réservés.
❑
❑
●
●
●
[LB5P_W.Euro]BN68-02362A-01L09.i1 1 2009-09-10 ¿ÀÈÄ 3:43:19

Licence
TruSurround HD, SRS et le symbole sont des marques de SRS Labs, Inc. La technologie TruSurround
HD est incorporée sous licence de SRS Labs, Inc.
Fabriqué sous licence de Dolby Laboratories. Dolby et le symbole du double D sont des marques déposées
de Dolby Laboratories.
Symboles
N O T
Remarque Bouton tactile Bouton TOOLS Appuyez sur
❑
❑
INFORMATIONS GÉNÉRALES
Présentation du panneau de commande..............................2
Accessoires ..........................................................................2
Présentation du panneau de branchement ..........................3
Télécommande .....................................................................5
Insertion des piles dans la télécommande ...........................5
FONCTIONNEMENT
Afchage des menus ............................................................6
Mise en mode veille de votre téléviseur ...............................7
Fonction Plug & Play ............................................................7
Visualisation de l’afchage ...................................................8
CONTRÔLE DES CHAÎNES
Conguration du menu des chaînes .....................................8
Gestion des chaînes ..........................................................11
CONTRÔLE D'IMAGE
Conguration du menu Image ............................................13
Utilisation de votre téléviseur comme écran
d'ordinateur (PC) ................................................................15
Conguration du téléviseur avec le PC ..............................16
CONTRÔLE DU SON
Conguration du menu Sound ............................................17
Sélection du mode son .......................................................18
■
■
■
■
■
■
■
■
■
■
■
■
■
■
■
■
Conguration
Conguration du menu Conguration .................................19
Entrée / Assistance
Conguration du menu Input ..............................................22
Conguration du menu Support..........................................22
ANYNET+
Connexion de périphériques Anynet+ ................................24
Conguration d'Anynet+ .....................................................25
Commutation entre périphériques Anynet+ ........................25
Enregistrement ...................................................................26
Écoute via un récepteur (home cinéma).............................26
Dépannage d'Anynet+ ........................................................27
RECOMMANDATION D'UTILISATION
Fonction Télétexte ..............................................................28
Montage du socle ...............................................................29
Installation du kit de montage mural ...................................29
Utilisation du verrou antivol Kensington .............................30
Sécurisation de l'emplacement d'installation ......................30
Fixation du téléviseur au mur .............................................31
Dépannage .........................................................................32
Caractéristiques..................................................................35
■
■
■
■
■
■
■
■
■
■
■
■
■
■
■
■
■
CONTENU
Français
Français - 1
[LB5P_W.Euro]BN68-02362A-01L09.i1 1 2009-09-10 ¿ÀÈÄ 3:43:19

Présentation du panneau de branchement
La couleur et la forme du produit peuvent varier en fonction du modèle.
Lorsque vous branchez un périphérique externe sur votre téléviseur, assurez-vous que celui-ci est éteint.
Lorsque vous branchez un périphérique externe, faites correspondre les couleurs de la borne de connexion et du câble.
1
DIGITAL AUDIO OUT (OPTICAL)
Pour raccorder un composant audio numérique tel qu'un récepteur home cinéma.
Lorsque les prises HDMI IN sont connectées, la prise DIGITAL AUDIO OUT (OPTICAL) du téléviseur produit uniquement
un signal audio 2 voies. Pour écouter du son canal 5,1, branchez la prise optique du lecteur DVD / Blu-ray ou du
décodeur câble/Décodeur satellite directement sur un amplicateur ou sur un système home cinéma, et non sur le
téléviseur.
2
PC IN
Pour raccorder la che de sortie vidéo de votre PC.
3
ANT IN
Pour raccorder une antenne ou un système de câblodiffusion.
4
PC / DVI AUDIO IN
Pour raccorder la che de sortie audio de votre PC.
Sorties audio DVI pour périphériques externes.
5
AUDIO OUT [R-AUDIO-L]
Branchez les câbles audio RCA au connecteur AUDIO OUT [R-AUDIO-L] situé à l'arrière de votre poste et les autres
extrémités aux connecteurs d'entrée audio correspondants sur l'amplicateur ou le système Home Cinéma.
6
Verrou KENSINGTON (en fonction du modèle)
Le verrou Kensington (en option) est un dispositif permettant de xer physiquement le système en cas d'utilisation dans
un lieu public. Si vous désirez utiliser un dispositif de verrouillage, contactez le revendeur auquel vous avez acheté le
téléviseur.
L'emplacement du verrou Kensington peut varier en fonction du modèle.
7
HDMI IN 1(DVI), 2, 3
Pour raccorder la che HDMI d'un périphérique équipé d'une sortie HDMI.
Aucune connexion audio n'est nécessaire pour une connexion HDMI-HDMI.
Utilisez la prise HDMI IN 1(DVI) pour une connexion DVI à un périphérique externe. Utilisez un câble ou un adaptateur
DVI-HDMI pour la connexion vidéo et les prises PC / DVI AUDIO IN pour le son.
Vous pouvez également utiliser les ports pour connecter un PC.
Qu'est-ce que HDMI ?
La technologie HDMI (High Denition Multimedia interface) permet la transmission de données vidéo numériques haute
dénition et de plusieurs canaux de son numérique.
Le terminal HDMI / DVI prend en charge la connexion DVI vers un périphérique raccordé avec le câble adéquat (non
fourni).
La différence entre HDMI et DVI est que le périphérique HDMI est plus petit, dispose de la fonction de codage HDCP
(High Bandwidth Digital Copy Protection) et prend en charge le son numérique multicanal.
¦
N
N
N
–
N
–
–
–
–
–
–
N
–
N
N
N
N
1 2 43 5
0 9 8 7 6
7
@
!
[Panneau latéral du téléviseur]
[Panneau arrière du téléviseur]
Entrée de l'alimentation
Français - 3
[LB5P_W.Euro]BN68-02362A-01L09.i3 3 2009-09-10 ¿ÀÈÄ 3:43:20

Il se peut que le téléviseur n'émette aucun son et que les images s'afchent dans des couleurs anormales en cas
de connexion de lecteurs DVD / Blu-ray et décodeurs/récepteurs satellite compatibles avec des versions de HDMI
antérieures à HDMI 1.3. Si, lorsque vous branchez un câble HDMI de génération antérieure, aucun son n'est émis,
connectez le câble HDMI à la prise HDMI IN 1(DVI) et les câbles audio aux prises PC / DVI AUDIO IN situées à l'arrière
du téléviseur. Dans ce cas, contactez la société ayant fourni le lecteur DVD / Blu-ray ou le décodeur câble / récepteur
satellite an de vérier la version de HDMI, puis demandez une mise à jour du micrologiciel. Des câbles HDMI d'une
version autre que 1.3 peuvent provoquer un scintillement à l'écran ou une absence totale d'image.
8
COMPONENT IN
Branchez les câbles vidéo de composant (en option) aux connecteurs de composant (PR, PB, Y) à l'arrière du téléviseur
et les autres extrémités aux connecteurs de sortie vidéo de composant correspondants sur le récepteur DTV ou le lecteur
DVD.
Si vous souhaitez brancher à la fois le boîtier décodeur et le récepteur DTV (ou lecteur DVD), vous devez brancher
le boîtier décodeur au récepteur DTV (ou au lecteur DVD), puis le récepteur DTV (ou lecteur DVD) au connecteur de
composant (PR, PB, Y) du téléviseur.
Les connecteurs PR, PB et Y de vos composants (récepteur DTV ou lecteur DVD) sont parfois désignés par les lettres Y,
B-Y et R-Y ou Y, Cb et Cr.
Branchez les câbles audio RCA (en option) sur la prise [R-AUDIO-L] à l'arrière du téléviseur et leur autre extrémité sur
les prises de sortie audio correspondantes du récepteur DTV ou du lecteur DVD.
9
EXT (RGB)
Connecteur Entrée Sortie
Vidéo Audio (G / D) RVB Vidéo + Audio (G / D)
EXT O O O Seule la sortie TV ou DTV est disponible.
Entrées ou sorties pour périphériques externes tels que des magnétoscopes, des lecteurs DVD, des consoles de jeux
vidéo ou des lecteurs de vidéodisques.
0
SERVICE
Connecteur pour mises à niveau logicielles.
!
AV IN [VIDEO] / [R-AUDIO-L]
Branchez un câble RCA à un périphérique externe audio/vidéo approprié tel qu'un magnétoscope, un lecteur DVD ou un
caméscope.
Branchez les câbles audio RCA sur la prise [R-AUDIO-L] du téléviseur et leur autre extrémité sur les prises de sortie
audio correspondantes du périphérique audio/vidéo.
@
Emplacement COMMON INTERFACE
Si vous n'insérez pas la carte d'interface commune (CI CARD) dans certains canaux, le message "Scrambled Signal"
s'afche.
Les informations de pairage contenant un numéro de téléphone, l'ID de la CI CARD, l'ID de l'hôte et d'autres informations
s'afcheront dans 2 ou 3 minutes. Si un message d'erreur s'afche, contactez votre fournisseur de service.
Lorsque la conguration des informations sur les chaînes est terminée, le message "Updating Completed" s'afche,
indiquant que la liste des chaînes est à jour.
Vous devez vous procurer une CI CARD auprès d'un fournisseur local de câblodiffusion. Extrayez la CI CARD en la tirant
délicatement. Une chute pourrait l'endommager.
Insérez la CI-Card dans le sens indiqué sur celle-ci.
L'emplacement de la fente COMMON INTERFACE peut varier en fonction du modèle.
Il se peut que le module CAM ne soit pas pris en charge dans certains pays ou régions. Vériez auprès de votre
revendeur agréé.
N
–
–
–
–
–
–
–
–
–
–
–
N
N
N
N
Français - 4
[LB5P_W.Euro]BN68-02362A-01L09.i4 4 2009-09-10 ¿ÀÈÄ 3:43:20

Télécommande
Vous pouvez utiliser la télécommande jusqu'à une distance maximale d'environ 7 m du téléviseur.
Une lumière intense peut affecter le bon fonctionnement de la télécommande.
La couleur et la forme du produit peuvent varier en fonction du modèle.
1
POWER : Bouton de mise en veille
du téléviseur.
2
TOUCHESNUMÉRIQUES :
Permettent de changer de chaîne.
3
FAV.CH : Permet de basculer vers
vos chaînes préférées.
4
Y
: Permet d'augmenter ou
de baisser le volume.
5
SOURCE : Permet d'afcher et
de sélectionner les sources vidéo
disponibles.
6
INFO : Permet d'afcher des
informations sur l'écran du
téléviseur.
7
TOOLS : Permet de sélectionner
rapidement les fonctions
fréquemment utilisées.
8
CH LIST : Afche la liste des
chaînes.
9
BOUTONS DE COULEUR : Utilisez
ces boutons dans les menus de
Liste des chaînes, etc.
!
DUAL : Sélection d'effets sonores.
@
Utilisez ces boutons dans les
modes Anynet+. (
∏
: vous
pouvez utiliser cette télécommande
pour contrôler l'enregistrement sur
des enregistreurs Samsung offrant
la fonctionnalité Anynet+.
#
TV : Sélectionne directement le
mode TV.
$
PRE-CH : Vous permet de revenir
à la chaîne que vous regardiez
précédemment.
%
MUTE
M
: Vous permet de couper
le son temporairement.
^
P
<
/P
>
: Permet de changer de
chaîne.
&
MENU : Afche le menu principal à
l'écran.
*
GUIDE : Afchage du guide électronique
des programmes (EPG).
(
RETURN : Revient au menu précédent
)
HAUT▲/BAS▼/GAUCHE◄/
DROITE►/ENTER
E
: Permettent
de sélectionner des options de menu
à l'écran et de modier des valeurs de
menu.
a
EXIT : Permet de quitter le menu.
b
P.SIZE : Sélection du format d'image.
c
SRS : Sélection de SRS TS HD.
d
SUBT. : Afchage numérique des sous-
titres.
e
AD : Sélection de la description audio.
Fonctions télétexte.
5
0
: Sélection du mode Télétexte (LIST/
FLOF).
6
5
: Activation du télétexte.
7
4
: Sélection de la taille du télétexte.
8
8
: Mémorisation du télétexte.
9
Sélection des rubriques Fastext
0
/
: Sélection alternative de
Teletext, Double ou Mix.
#
:
: fermer l'afchage du télétexte.
$
1
: Page secondaire du télétexte.
^
2
: Page de télétexte suivante
3
: Page de télétexte précédente.
&
6
: Index du télétexte
(
9
: Pause du télétexte.
a
7
: Annulation du télétexte.
Insertion des piles dans la télécommande
1. Soulevez le couvercle au dos de la télécommande comme illustré dans la gure.
2. Placez-y deux piles AAA.
Assurez-vous que les pôles "+" et "–" des piles correspondent au schéma situé à
l'intérieur du compartiment.
3. Replacez le couvercle.
Retirez les piles et stockez-les dans un endroit frais et sec si vous n'utilisez pas la
télécommande pendant longtemps.
Si la télécommande ne fonctionne pas, vériez les points suivants :
Le téléviseur est-il sous tension ?
Les bornes + et - des piles ne sont-elles pas inversées ?
Les piles sont-elles déchargées ?
Le cordon d'alimentation est-il débranché ou y a-t-il une panne de courant ?
Une lampe uorescente ou néon est-elle allumée à proximité ?
¦
N
N
N
¦
N
N
N●
●
●
●
●
Français - 5
[LB5P_W.Euro]BN68-02362A-01L09.i5 5 2009-09-10 ¿ÀÈÄ 3:43:21
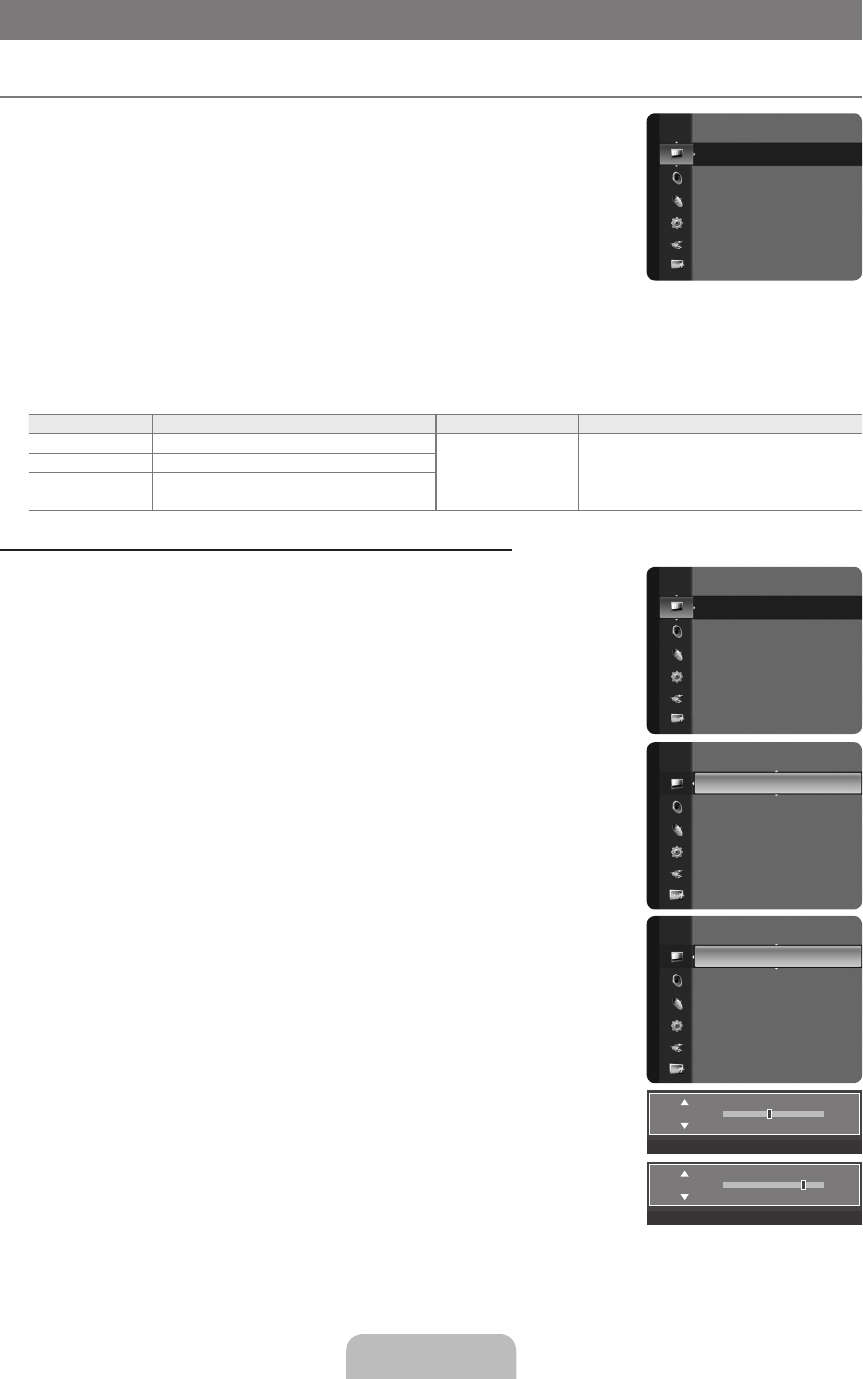
FONCTIONNEMENT
Afchagedesmenus
Avant d'utiliser le téléviseur, procédez comme suit pour apprendre à naviguer dans le menu
an de sélectionner et de régler les différentes fonctions.
1. Appuyez sur le bouton MENU.
Le menu principal s'afche à l'écran. Son côté gauche contient des icônes : Image, Son,
Canal, Conf., Entrée, Application, Assistance.
2. Appuyez sur le bouton ▲ ou ▼ pour sélectionner l'une des icônes.
Appuyez sur le bouton ◄ ou ► pour accéder au sous-menu de l'icône.
3. Appuyez sur le bouton ▲ ou ▼ pour déplacer des options dans le menu.
Appuyez sur le bouton ENTER
E
pour entrer des options dans le menu.
4. Appuyez sur le bouton ▲/▼/◄/► pour modier les options sélectionnées.
Appuyez sur le bouton RETURN pour revenir au menu précédent.
5. Appuyez sur le bouton EXIT pour quitter le menu.
Utilisation des boutons de télécommande
Bouton Opération Bouton Opération
MENU
m
Afcher le menu principal à l'écran.
▲/▼/◄/►/
ENTER
E
Déplacer le curseur pour sélectionner un
élément.
Choisir l'élément sélectionné.
Conrmer un paramétrage.
RUTURN
R
Revenir au menu précédent.
EXIT
e
Fermer le menu afché à l'écran.
Exemple:congurationdelaluminositédutéléviseurdanslemenuImage
Réglage de la luminosité sur 80
1. Appuyez sur le bouton MENU pour afcher le menu.
2. Appuyez sur le bouton ENTER
E
pour sélectionner Image.
3. Appuyez sur le bouton ▲ ou ▼ pour régler la Luminosité.
4. Appuyez sur le bouton ENTER
E
.
5. Appuyez sur le bouton ◄ ou ► jusqu'à ce que la luminosité soit réglée sur 80.
6. Appuyez sur le bouton ENTER
E
.
Appuyez sur le bouton EXIT pour quitter le menu.
¦
N
N
Français - 6
Mode :Standard ►
Rétroéclairage : 7
Contraste : 95
Luminosité : 45
Netteté : 50
Couleur : 50
Teinte (V / R) : V50 / R50
Image
Mode :Standard ►
Rétroéclairage : 7
Contraste : 95
Luminosité : 45
Netteté : 50
Couleur : 50
Teinte (V / R) : V50 / R50
Image
Rétroéclairage : 7
Contraste : 95
Luminosité :45 ►
Netteté : 50
Couleur : 50
Teinte (V / R) : V50 / R50
Paramètres avancés
Options d'image
Réinitialisation de l'image
Image
U
Déplacer
L
Régler
E
Entrer
R
Retour
45
Luminosité
U
Déplacer
L
Régler
E
Entrer
R
Retour
80
Luminosité
Mode :Standard ►
Rétroéclairage : 7
Contraste : 95
Luminosité : 45
Netteté : 50
Couleur : 50
Teinte (V / R) : V50 / R50
Image
[LB5P_W.Euro]BN68-02362A-01L09.i6 6 2009-09-10 ¿ÀÈÄ 3:43:21

Mise en mode veille de votre téléviseur
Vous pouvez mettre votre téléviseur en mode Veille afin de réduire la consommation électrique. Le mode veille peut être utile si
vous souhaitez éteindre votre téléviseur temporairement (pendant un repas par exemple).
1. Appuyez sur le bouton POWER
P
de la télécommande.
L'écran s'éteint et un voyant de veille apparaît sur votre téléviseur.
2. Pour rallumer le téléviseur, appuyez de nouveau sur le bouton POWER
P
.
Ne laissez pas le téléviseur en mode Veille pendant de longues périodes (lorsque vous êtes en vacances par exemple). Il est
conseillé de débrancher le téléviseur du secteur et de l'antenne.
Fonction Plug & Play
Lorsque vous allumez le téléviseur pour la première fois, des réglages de base s'effectuent l'un
après l'autre de manière automatique.
1. Appuyez sur le bouton POWER de la télécommande. Le message You can set the menu
language. s’afche.
2. Sélectionnez la langue appropriée en appuyant sur le bouton ▲ ou ▼. Appuyez sur le
bouton ENTER
E
pour conrmer votre choix.
3. Appuyez sur le bouton ◄ ou ► pour sélectionner Enr. démo ou Util. domicile, puis appuyez sur le bouton ENTER
E
.
Nous recommandons de régler le téléviseur sur le mode Util. domicile pour une meilleure qualité d'image dans votre
environnement personnel.
Enr. démo n'est prévu que pour un usage en magasin.
Si l'unité est accidentellement réglée sur le mode Enr. démo et que vous souhaitez revenir au mode Util. domicile
(Standard) : Appuyez sur le bouton Volume du téléviseur. Lorsque l'afchage écran du volume apparaît, appuyez
pendant 5 secondes sur le bouton MENU du téléviseur.
4. Appuyez sur le bouton ENTER
E
. Sélectionnez le pays approprié en appuyant sur le bouton ▲ ou ▼. Appuyez sur le bouton
ENTER
E
pour conrmer votre choix.
5. Appuyez sur le bouton ▲ ou ▼ pour sélectionner Hertzien ou Câble, puis appuyez sur le bouton ENTER
E
.
Hertzien: Hertzien signal d'antenne.
Câble: Câble signal d'antenne.
6. Appuyez sur le bouton ▲ ou ▼ pour sélectionner la source de chaîne à mémoriser. Appuyez sur le bouton ENTER
E
pour
sélectionner Démarrer.
Numérique et Analogique : Chaînes numériques et analogiques.
Numérique : Chaînes numériques.
Analogique : Chaînes analogiques.
Lors du réglage de la source d'antenne sur Câble, une fenêtre s'afche, qui vous permet de dénir une valeur pour la
recherche de chaîne numérique. Pour plus d'informations, reportez-vous à Canal→MémorisationAuto.
La recherche de chaînes démarre et se termine automatiquement.
Appuyez sur le bouton ENTER
E
à tout moment pour interrompre la mémorisation.
Une fois toutes les chaînes disponibles mémorisées, le message DénitlemodeHorloge s'afche.
7. Appuyez sur le bouton ENTER
E
. Appuyez sur le bouton ▲ ou ▼ pour sélectionner Auto., puis appuyez sur le bouton
ENTER
E
.
Si vous sélectionnez Manuel,Dénitladateetl'heure s'afche.
Si vous recevez un signal numérique, l'heure se règle automatiquement. Sinon, sélectionnez Manuel pour régler l'horloge
(voir page 19).
8. La méthode de connexion pour l'obtention de la meilleure qualité HD est proposée. Après avoir conrmé la méthode, appuyez
sur le bouton ENTER
E
.
9. Le message Profitez de votre téléviseur. s'affiche. Lorsque vous avez terminé, appuyez sur le bouton ENTER
E
.
Si vous souhaitez réinitialiser cette fonction...
1. Appuyez sur le bouton MENU pour afcher le menu. Appuyez sur le bouton ▲ ou ▼ pour sélectionner Conf., puis sur le
bouton ENTER
E
.
2. Appuyez de nouveau sur le bouton ENTER
E
pour sélectionner Plug & Play.
3. Entrez votre code PIN à quatre chiffres. Le code PIN par défaut d'un nouveau téléviseur est 0-0-0-0.
Si vous voulez modier le code PIN, utilisez la fonction ModierPIN. (voir page 21).
La fonction Plug & Play est uniquement disponible en mode TV.
¦
N
N
¦
N
N
N
N
N
N
N
N
N
N
N
N
N
Français - 7
Plug & Play
You can set the menu language.
Menu Language : English ►
E
Enter
[LB5P_W.Euro]BN68-02362A-01L09.i7 7 2009-09-10 ¿ÀÈÄ 3:43:21

Visualisationdel’afchage
L’affichage identifie la chaîne en cours et l’état de certains paramètres audio et vidéo.
Appuyez sur le bouton INFO pour afficher les informations.
Appuyez sur le bouton INFO de la télécommande. La télévision affiche la chaîne, le type
de son et l’état de certains paramètres de son et d’image.
▲, ▼: Vous pouvez afficher des informations relatives à une autre chaîne. Pour
accéder à la chaîne actuellement sélectionnée, appuyez sur le bouton ENTER
E
.
◄, ►: Vous pouvez afficher les informations relatives au programme souhaité de la
chaîne actuelle.
Appuyez de nouveau sur le bouton INFO ou attendez environ 10 secondes pour que
l’affichage disparaisse automatiquement.
CONTRÔLE DES CHAÎNES
Congurationdumenudeschaînes
Pays
L'écran de saisie du code PIN s'afche. Entrez votre code PIN à quatre chiffres.
Canal analogique
Permet de changer de pays pour les chaînes analogiques.
Canal numérique
Permet de changer de pays pour les chaînes numériques.
Mémorisation Auto
Vous pouvez chercher les plages de fréquence disponibles par balayage (leur disponibilité dépend de votre pays). Il est possible
que les numéros de programme attribués automatiquement ne correspondent pas aux numéros de programme souhaités ou réels.
Si une chaîne est verrouillée par la fonction Verrouillage Canal, la fenêtre de saisie du code PIN s'afche.
Hertzien / Câble
Source d'antenne à mémoriser
Numérique et Analogique : Chaînes numériques et analogiques.
Numérique : Chaînes numériques.
Analogique : Chaînes analogiques.
Lors de la sélection de ‘Câble→NumériqueetAnalogique’oude‘Câble→Numérique’
Fournissez une valeur à rechercher pour les chaînes câblées.
ModeRech.→Complet/Réseau/Rapide
Rapide
Network ID : afche le code d'identication du réseau.
Fréquence : afche la fréquence correspondant au canal (varie d'un pays à l'autre).
Modulation : afche les valeurs de modulation disponibles.
Taux de symbole : afche les débits de symboles disponibles.
–
–
–
–
Cherche toutes les chaînes avec des stations de diffusion actives et les enregistre dans la mémoire du téléviseur.
Pour arrêter la mémorisation automatique, appuyez sur le bouton
ENTER
E
.
Le message Arrêter le programme automatique ? s'afche.
Sélectionnez Oui en appuyant sur le bouton ◄ ou ►, puis appuyez sur le bouton
ENTER
E
.
¦
O
●
●
N
¦
❑
N
❑
N
●
●
●
●
N
N
N
Français - 8
Pays ►
Mémorisation Auto
Mémorisation Manuelle
Option de recherche du câble
Guide Now & Next
Guide Complet
Par défaut : Guide Complet
Canal
DTV Air
15
abc1
18:00 ~ 6:00
18:11 Thu 6 Jan
Life On Venus Avenue
Unclassified
No Detaild Information
' INFO
[LB5P_W.Euro]BN68-02362A-01L09.i8 8 2009-09-10 ¿ÀÈÄ 3:43:22

Mémorisation Manuelle
Permet de chercher manuellement une chaîne et de l'enregistrer dans la mémoire du téléviseur.
Si une chaîne est verrouillée par la fonction Verrouillage Canal, la fenêtre de saisie du code PIN s'afche.
Canal numérique
Enregistrement manuel de chaînes numériques.
Canal numérique est uniquement disponible en mode DTV.
Canal : Sélectionnez le numéro de chaîne à l'aide des boutons ▲, ▼ ou des chiffres (0~9).
Fréquence : Sélectionnez la fréquence à l'aide des chiffres.
Bande passante : Sélectionnez la bande passante à l'aide des boutons ▲, ▼ ou des chiffres (0~9).
Au terme de la recherche, les chaînes de la liste sont mises à jour.
Canal analogique
Enregistrement manuel de chaînes analogiques.
Programme (numéro de programme à attribuer à une chaîne) : Sélectionnez le numéro de chaîne à l'aide des boutons ▲, ▼
ou des touches numériques (0~9).
SystèmedeCouleur→Auto./PAL/SECAM/NTSC4.43 : Sélectionnez le système de couleurs à l'aide du bouton ▲ ou ▼.
SystèmeSonore→BG/DK/I/L: Sélectionnez le système audio à l'aide du bouton ▲ ou ▼.
Canal (si vous connaissez le numéro de la chaîne à mémoriser) : Appuyez sur le bouton ▲ ou ▼ pour sélectionner
C (chaîne hertzienne) ou S (chaîne câblée). Appuyez sur le bouton ►, puis sur le bouton ▲ ou ▼ ou un chiffre (0~9) pour
sélectionner le numéro de votre choix.
Vous pouvez également sélectionner le numéro de chaîne directement en appuyant sur les touches numériques (0~9).
Si aucun son ne sort ou si le son produit est anormal, sélectionnez de nouveau la norme son requise.
Recherche (lorsque vous ne connaissez pas les numéros de chaîne) : Appuyez sur le bouton ▲ ou ▼ pour lancer la
recherche. Le syntoniseur balaie la plage de fréquences jusqu'à ce que vous receviez la première chaîne ou la chaîne que
vous avez sélectionnée à l'écran.
Enr. (permet de mémoriser la chaîne et le numéro de programme correspondant) : Sélectionnez OK en appuyant sur le
bouton
ENTER
E
.
Mode des chaînes
P (Mode Programme) : à la n du réglage, des numéros de position compris entre P00 et P99 sont attribués aux stations
de radiodiffusion de votre région. Dans ce mode, vous pouvez sélectionner un chaîne en saisissant son numéro de
position.
C (Mode chaîne hertzienne) : dans ce mode, vous pouvez sélectionner une chaîne en saisissant le numéro attribué à
chacune des stations de télédiffusion.
S (Mode chaîne câblée) : dans ce mode, vous pouvez sélectionner une chaîne en saisissant le numéro attribué à
chacune des chaînes câblées.
Option de recherche du câble (en fonction du pays)
Définit des options supplémentaires telles que la fréquence et le débit de symboles pour les recherches sur réseau câblé.
Fréquence (Début ~ Fin) : afche la fréquence correspondant au canal.
Modulation : afche les valeurs de modulation disponibles.
Taux de symbole : afche les débits de symboles disponibles.
Guide Now & Next / Guide Complet
Les informations relatives au guide électronique des programmes (EPG) sont fournies par les diffuseurs. Des entrées de
programmes peuvent être vides ou ne pas être à jour en raison des informations diffusées sur un canal donné. L'afchage est
automatiquement actualisé dès que de nouvelles informations sont disponibles.
Pour obtenir plus de détails sur les procédures d'utilisation du Guide Now & Next et Guide Complet, reportez-vous aux
descriptions de la page 10.
Vous pouvez aussi afcher le guide en appuyant simplement sur le bouton GUIDE (pour congurer Par défaut, reportez-vous
aux descriptions).
Guide Now & Next
Pour les six canaux indiqués dans la colonne de gauche, les informations relatives au programme actuel et au programme suivant
sont afchées.
Guide Complet
Afche le programme heure par heure. Deux heures de programme sont afchées et vous pouvez faire déler le programme en
avançant ou en remontant dans le temps.
❑
N
N
N
●
●
●
N
●
●
●
●
N
N
●
●
N–
–
–
❑
●
●
●
❑
N
O
Français - 9
[LB5P_W.Euro]BN68-02362A-01L09.i9 9 2009-09-10 ¿ÀÈÄ 3:43:22

Français - 13
CONTRÔLE D'IMAGE
CongurationdumenuImage
Mode
Vous pouvez sélectionner le type d'image correspondant le mieux à vos besoins d'afchage.
Appuyez sur le bouton TOOLS pour afcher le menu Outils. Vous pouvez également
dénir le mode d'image en sélectionnant Outils→Mded'image.
Dynamique
Sélectionne l'image pour un afchage haute dénition dans une pièce lumineuse.
Standard
Sélectionne l'image pour un afchage optimal dans un environnement normal.
Cinéma
Sélectionne l'image pour le visionnage de lms dans une pièce sombre.
Rétroéclairage / Contraste / Luminosité / Netteté / Couleur / Teinte (V/R)
Votre téléviseur offre de plusieurs options de paramétrage qui permettent de contrôler la
qualité d'image.
Rétroéclairage : Règle la luminosité du rétroéclairage de l'écran LCD.
Contraste : Règle le niveau de contraste de l'image.
Luminosité : Règle le niveau de luminosité de l'image.
Netteté : Règle la dénition des bords de l'image.
Couleur : Règle la saturation de couleur de l'image.
Teinte (V/R) : Ajuste la teinte de couleur de l'image.
Sélectionnez un mode d'image à ajuster. Les valeurs ajustées sont enregistrées pour tous les modes d'image.
Lorsque vous modiez les paramètres Rétroéclairage, Contraste, Luminosité, Netteté, Couleur ou Teinte (V/R), l'afchage
à l'écran change en conséquence.
Dans les modes analogiques TV, Ext., AV du système PAL, vous ne pouvez pas utiliser la fonction Teinte (V/R).
En mode PC, vous ne pouvez modier que les options Rétroéclairage, Contraste et Luminosité.
Vous pouvez régler et Mémoriser des paramètres pour chaque périphérique externe connecté à une entrée du téléviseur.
Vous pouvez réduire sensiblement l'énergie consommée en cours d'utilisation en baissant le niveau de luminosité de l'image,
de façon à diminuer le coût de fonctionnement général.
Paramètres avancés
Les nouveaux téléviseurs Samsung permettent d'effectuer des réglages d'image encore plus précis que les modèles précédents.
Le réglage des paramètres détaillés de l'image est expliqué ci-dessous.
Paramètres avancés est disponible dans les modes Standard et Cinéma.
En mode PC, vous ne pouvez modier que les paramètres Gamma et Balance blancs parmi les options de menu
Paramètres avancés.
Nuancedenoir→Arrêt/Sombre/Plussombre/Leplussombre
Vous pouvez choisir le niveau de noir pour régler la profondeur de l'écran.
ContrasteDynam.→Arrêt/Bas/Moyen/Elevé
Vous pouvez régler le contraste de l'écran pour obtenir un résultat optimal.
Gamma
Vous pouvez régler l'intensité des couleurs primaires (rouge, vert, bleu).
Espace couleur
Espace couleur de Couleur est une matrice de couleurs composée de rouge, de vert et de bleu. Sélectionnez votre espace de
couleur préféré et appréciez la couleur la plus naturelle.
Natif : offre une nuance de couleur profonde et riche.
Auto. : règle automatiquement la nuance de couleur la plus naturelle sur la base des sources de programme.
¦
❑
T
❑
●
●
●
●
●
●
N
N
N
N
N
N
❑
N
N
●
●
Français - 13
Mode :Standard ►
Rétroéclairage : 7
Contraste : 95
Luminosité : 45
Netteté : 50
Couleur : 50
Teinte (V / R) : V50 / R50
Image
Couleur : 50
Teinte (V / R) : V50 / R50
Paramètresavancés ►
Options d'image
Réinitialisation de l'image
Image
[LB5P_W.Euro]BN68-02362A-01L09.i13 13 2009-09-10 ¿ÀÈÄ 3:43:23

Français - 18
Descriptionaudio→Arrêt/Marche
Active ou désactive la fonction de description audio.
Volume
Permet d'ajuster le volume de la description audio.
Volume est actif lorsque Description audio est déni sur Marche .
Volumeauto→Arrêt/Marche
Chaque station de télédiffusion possède ses propres conditions de signal. Il n'est donc pas facile de régler le volume chaque fois
que vous changez de chaîne. Cette fonction permet de régler automatiquement le volume du canal désiré en réduisant la sortie
son lorsque le signal de modulation est puissant ou en l'augmentant lorsque le signal est faible.
SélectionHaut-parleur→Ht-parlext/Haut-parleurTV
Pour entendre le son par l'intermédiaire d'enceintes séparées, désactivez l'amplicateur interne.
Les boutons de volume et MUTE ne fonctionnent pas lorsque la fonction Sélection Haut-parleur est réglée sur Ht-parl ext.
Si vous sélectionnez Ht-parl ext dans le menu Sélection Haut-parleur, les paramètres de son sont limités.
Réinitialisationduson→Réinitial.tout/Réinitial.modeson/Annuler
Vous pouvez rétablir les valeurs par défaut des paramètres audio.
Sélection du mode son
Vous pouvez congurer le mode sonore en appuyant sur le bouton DUAL. Lorsque vous appuyez sur ce bouton, le mode
sonore courant s’afche à l’écran.
Type d'audio Dual 1 / 2 Par défaut
Stéréo A2
Mono MONO Changement automatique
Stéréo STEREO↔MONO
Double DUAL1↔DUAL2 DUAL 1
NICAM
Stéréo
Mono MONO Changement automatique
Stéréo MONO↔STEREO
Double MONO↔DUAL1
DUAL 2 DUAL 1
Si le signal stéréo est faible et qu'une commutation automatique se produit, passez alors en Mono.
Cette fonction n'est activée qu'en son stéréo. Elle est désactivée en mode mono.
Cette fonction n'est disponible qu'en mode TV.
N
❑
❑
N
N
❑
¦
N
N
N
Français - 18
[LB5P_W.Euro]BN68-02362A-01L09.i18 18 2009-09-10 ¿ÀÈÄ 3:43:23
Français - 22
Entrée / Assistance
CongurationdumenuInput
Liste Source
Permet de sélectionner le téléviseur ou d'autres sources d'entrée externes telles que des
lecteurs DVD/Blu-ray ou des récepteurs satellite (boîtiers décodeurs) connectées au téléviseur.
Permet de sélectionner la source d'entrée de votre choix.
Appuyez sur le bouton SOURCE de la télécommande pour afficher une source de signal
externe. Une pression sur le bouton TV sélectionne le mode TV.
TV / Ext. / AV / Composant / PC / HDMI1 / DVI / HDMI2 / HDMI3
Vous ne pouvez sélectionner que des périphériques externes connectés au téléviseur.
Dans Liste Source, les entrées connectées s'afchent en surbrillance en début de liste.
Les entrées non connectées s'afchent en bas de liste.
Les options Ext. et PC sont toujours activées.
Utilisation des boutons de couleur de la télécommande dans la liste des sources
Rouge (Rafraîchir) : Actualise la liste des périphériques externes connectés.
TOOLS (Outils) : Afche les menus Modif. Nom et Information.
Modif. Nom
Nommez le périphérique connecté aux prises d'entrée pour faciliter la sélection de source d'entrée.
Magnétoscope / DVD / Décodeur Câble / Décodeur satellite / Décodeur PVR / Récepteur AV / Jeu / Caméscope / PC / DVI /
DVI PC / TV / IPTV/ Blu-ray / HD DVD / DMA
Si un PC d'une résolution de 1920 x 1080 à 60 Hz est connecté au port HDMI IN 1(DVI), vous devez régler le mode
HDMI1/DVI sur DVI PC dans le champ Modif. Nom du mode Entrée.
Si vous connectez un câble HDMI/DVI au port HDMI IN 1(DVI), vous devez régler le mode HDMI1/DVI sur DVI ou DVI PC
dans le champ Modif. Nom du mode Entrée. Dans ce cas, une connexion audio séparée est indispensable.
CongurationdumenuSupport
Diagnostic automatique
Test de l’image
Si vous pensez que l'image n'est pas optimale, exécutez le test d'image. Vériez la mire de
couleur à l'écran pour voir si le problème persiste.
Oui : si la mire de couleur n'apparaît pas où si elle est parasitée, sélectionnez Oui. Il se
peut que le téléviseur soit défaillant. Demandez de l'aide au centre d'appel de Samsung.
Non: si la mire de couleur s'afche correctement, sélectionnez Non. Il se peut que
l'équipement externe soit défaillant. Vériez les connexions. Si le problème persiste,
reportez-vous au mode d'emploi du périphérique externe.
Test du son
Si vous pensez que le son n'est pas optimal, exécutez le test du son. Vous pouvez contrôler le
son en diffusant une mélodie préenregistrée sur le téléviseur. Le message "Le problème persiste-t-il pour ce test du son?" s'afche
à l'écran.
Si les haut-parleurs du téléviseur restent muets, avant d'effectuer le test du son, vériez que l'option Sélection Haut-parleur
est réglée sur Haut-parleur TV dans le menu Sound.
La mélodie est diffusée pendant le test, même si l'option Sélection Haut-parleurt est réglée sur Ht-parl ext ou si le son a été
désactivé en appuyant sur le bouton MUTE.
Oui : si, pendant le test du son, vous n'entendez du son que d'un haut-parleur ou pas de son du tout, sélectionnez Oui. Il se
peut que le téléviseur soit défaillant. Demandez de l'aide au centre d'appel de Samsung.
Non : Si vous entendez du son des haut-parleurs, sélectionnez Non. Il se peut que l'équipement externe soit défaillant.
Vériez les connexions. Si le problème persiste, reportez-vous au mode d'emploi du périphérique externe.
Informations de signal (chaînes numériques uniquement)
À l'inverse des chaînes analogiques, dont la qualité de réception peut varier de "neigeuse" à claire, les chaînes numériques
(HDTV) présentent une qualité de réception parfaite ou bien vous ne les recevez pas. Contrairement aux chaînes analogiques,
vous ne pouvez donc pas syntoniser une chaîne numérique. Vous avez toutefois la possibilité de régler votre antenne pour
améliorer la réception des chaînes numériques disponibles.
Si l'indicateur d'intensité du signal indique que celui-ci est faible, réglez physiquement votre antenne an d'en augmenter
l'intensité. Continuez à régler l'antenne jusqu'à ce que trouver la position offrant le signal le plus puissant.
¦
❑
O
N
N
N–
–
❑
N
N
¦
❑
●
●
N
N
●
●
N
Diagnosticautomatique ►
Mise à niveau du logiciel
Guide de connexion HD
Contacter Samsung
Assistance
Liste Source
Modif. Nom
Entrée
[LB5P_W.Euro]BN68-02362A-01L09.i22 22 2009-09-10 ¿ÀÈÄ 3:43:24

Mise à niveau du logiciel
Pour garder le produit à jour avec les nouvelles fonctions de télévision numérique, des mises
à jour logicielles sont régulièrement diffusées via le signal de télévision normal. Le téléviseur
détecte automatiquement ces signaux et afche la bannière de mise à jour logicielle. Vous
avez le choix d'installer ou non la mise à jour.
USB
Insérez dans le téléviseur un lecteur USB contenant la mise à niveau du microprogramme.
Veillez à ne pas couper l'alimentation ni retirer le lecteur USB pendant l'application des
mises à niveau. Une fois la mise à niveau du micrologiciel terminée, le téléviseur se met
automatiquement hors puis sous tension. Vériez la version du micrologiciel une fois les mises
à jour terminées. Lorsque le logiciel est mis à niveau, les paramètres vidéo et audio dénis
reprennent leur valeur par défaut (usine).
Il est recommandé de noter les paramétrages an de pouvoir les rétablir facilement après la mise à niveau.
Canal
Mise à niveau du logiciel à l'aide du signal de diffusion.
Si elle est sélectionnée pendant la période de transmission du logiciel, cette fonction recherche le logiciel disponible et le
télécharge.
Le temps nécessaire au téléchargement du logiciel dépend de l'état du signal.
Mise à niveau en mode veille
Pour poursuivre la mise à jour du logiciel en gardant le téléviseur sous tension, sélectionnez ON en appuyant sur le bouton
▲ ou ▼. Une mise à jour manuelle a lieu automatiquement 45 minutes après que l'entrée en mode veille. Étant donné que la mise
sous tension s'effectue de façon interne, il se peut que l'écran LCD s'allume légèrement. Ce phénomène peut se produire pendant
plus d'une heure, jusqu'à ce que la mise à jour logiciel soit terminée.
Autre logiciel
Afche des informations sur la version du logiciel.
Guide de connexion HD
Ce menu indique la méthode de connexion offrant la qualité optimale pour le téléviseur haute dénition.
Consultez ces informations lors de la connexion de périphériques externes au téléviseur.
Contacter Samsung
Consultez ces informations si le téléviseur ne fonctionne pas correctement ou si vous voulez mettre à niveau le logiciel.
Vous pouvez consulter les informations concernant le centre d'appel, le produit et la méthode de téléchargement du logiciel.
❑
N
N
❑
❑
Français - 23
Panneau arrière du téléviseur
Lecteur USB
[LB5P_W.Euro]BN68-02362A-01L09.i23 23 2009-09-10 ¿ÀÈÄ 3:43:24

ANYNET+
Connexion de périphériques Anynet+
Anynet+ est une fonction qui vous permet de contrôler tous les appareils Samsung connectés compatibles Anynet+ avec votre
télécommande Samsung.
Le système Anynet+ s'utilise uniquement avec des périphériques Samsung disposant de la fonction Anynet+. Pour véri er que
votre périphérique Samsung dispose de cette fonction, assurez-vous qu'il porte le logo Anynet+.
Connexion à un téléviseur
1. À l'aide d'un câble HDMI, reliez la prise HDMI IN (1(DVI), 2 ou 3) du téléviseur à la prise HDMI OUT du périphérique Anynet+
correspondant.
Connexion à un système home cinéma
1. À l'aide d'un câble HDMI, reliez la prise HDMI IN (1(DVI), 2 ou 3) du téléviseur à la prise HDMI OUT du périphérique Anynet+
correspondant.
2. À l'aide d'un câble HDMI, reliez la prise HDMI IN du système home cinéma à la prise HDMI OUT du périphérique Anynet+
correspondant.
Connectez le câble optique entre la prise DIGITAL AUDIO OUT (OPTICAL) de votre téléviseur et l'entrée Digital Audio (audio
numérique) de votre système home cinéma.
Si vous suivez les instructions de connexion ci-avant, la prise optique produit uniquement un signal audio 2 voies. Vous
n'entendrez du son qu'au niveau des haut-parleurs avant gauche et droit et du caisson de basses de votre système home
cinéma. Pour écouter des chaînes audio 5.1, branchez la prise DIGITAL AUDIO OUT (OPTICAL) du lecteur DVD/Blu-ray ou
du décodeur câble/récepteur satellite (c.-à-d. périphérique Anynet 1 ou 2) directement sur l'ampli cateur ou sur un système
home cinéma, et non sur le téléviseur.
Ne connectez qu'un seul système home cinéma.
Vous pouvez connecter un périphérique Anynet+ à l'aide du câble HDMI 1.3. Certains câbles HDMI ne prennent pas en
charge les fonctions+
Anynet+ fonctionne si le périphérique compatible est en mode veille ou en marche.
Anynet+ prend en charge jusqu'à 12 périphériques AV. Vous pouvez connecter jusqu'à 3 périphériques du même type.
¦
N
N
N
N
N
N
TV
Câble optique
Home cinéma
Câble HDMI 1.3
Périphérique Anynet+ 1
Câble HDMI 1.3
Périphérique Anynet+ 2 Périphérique Anynet+ 3
Câble HDMI 1.3
Câble
HDMI 1.3
TV Périphérique Anynet+ 1
Câble HDMI 1.3
Périphérique Anynet+ 2 Périphérique Anynet+ 3
Câble HDMI 1.3
Câble HDMI 1.3
Français - 24
[LB5P_W.Euro]BN68-02362A-01L09.i24 24 2009-09-10 ¿ÀÈÄ 3:43:25
Boutons de la télécommande du téléviseur disponibles en mode Anynet+
Type de
périphérique
État de fonctionnement Boutons disponibles
Périphérique
Anynet+
Après basculement vers le périphérique,
lorsque son menu s'afche à l'écran.
Touches numériques
▲/▼/◄/►/ENTER
E
Boutons de couleur / Bouton EXIT
Après basculement vers le périphérique,
pendant la lecture d'un chier.
π
(recherche vers l'arrière) /
µ
(recherche vers l'avant) /
∫
(Arrêter) /
∂
(Lire) /
∑
(Pause)
Périphérique à
tuner intégré
Après basculement vers le périphérique,
lorsque vous regardez un programme
télévisé. Bouton P
>
/ P
<
Périphérique
audio Lorsque le récepteur est activé. Bouton Volume / MUTE
La fonction Anynet+ n'est utilisable que si la source active dénie sur la télécommande est TV.
Le bouton
∏
ne fonctionne que si le périphérique est dans un état où l'enregistrement est possible.
Il est impossible de commander des périphériques Anynet+ à l'aide des boutons situés sur le téléviseur. Vous ne pouvez
commander des périphériques Anynet+ qu'au moyen de la télécommande du téléviseur.
Il se peut que la télécommande du téléviseur ne fonctionne pas dans certaines conditions. Dans ce cas, sélectionnez de
nouveau le périphérique Anynet+
Les fonctions d'Anynet+ n'opèrent pas sur des produits d'autres fabricants.
Les opérations
π
,
µ
peuvent varier en fonction du périphérique.
Enregistrement
Vous pouvez enregistrer un programme télévisé à l’aide d’un enregistreur Samsung.
1. Appuyez sur le bouton TOOLS. Appuyez sur le bouton ENTER
E
pour sélectionner
Anynet+ (HDMI-CEC).
2. Appuyez sur le bouton ▲ ou ▼ pour sélectionner Enregistrer : (nom_périphérique), puis
appuyez sur le bouton ENTER
E
. L'enregistrement commence.
S'il y a plusieurs périphériques d'enregistrement
Si plusieurs enregistreurs sont connectés, leur liste s'afche.
Appuyez sur le bouton ▲ ou ▼ pour sélectionner un périphérique, puis appuyez sur
le bouton ENTER
E
. L'enregistrement commence.
Sil’enregistreurn’estpasafché
Sélectionnez Liste d'appareils, puis appuyez sur le bouton rouge pour rechercher des périphériques.
3. Appuyez sur le bouton EXIT pour quitter le menu.
Vous pouvez effectuer un enregistrement en sélectionnant Enregistrer : (nom_périphérique).
Appuyer sur le bouton
∫
permet d'enregistrer ce que vous regardez. Si vous regardez une vidéo provenant d'un autre
périphérique, elle est enregistrée.
Avant d'enregistrer, vériez la connexion de la che d'antenne au périphérique d'enregistrement. Pour connecter correctement
une antenne à un périphérique d'enregistrement, reportez-vous au mode d'emploir de ce dernier.
Écoute via un récepteur (home cinéma)
Vous pouvez écouter du son via un récepteur au lieu du haut-parleur du téléviseur.
1. Appuyez sur le bouton TOOLS. Appuyez sur le bouton ENTER
E
pour sélectionner Anynet+ (HDMI-CEC).
2. Appuyez sur le bouton ▲ ou ▼ pour sélectionner "Récepteur": Appuyez sur le bouton ◄ ou ► pour sélectionner Marche ou
Arrêt.
3. Appuyez sur le bouton EXIT pour quitter le menu.
Si votre récepteur ne prend en charge que l'audio, il se peut qu'il ne gure pas dans la liste des périphériques.
Le récepteur fonctionnera lorsque vous aurez correctement raccordé la che d'entrée optique du récepteur à la prise de sortie
numérique (optique) DIGITAL AUDIO OUT (OPTICAL) du téléviseur.
Lorsque le récepteur home cinéma est sous tension, vous pouvez entendre du son sortant de la prise optique du téléviseur.
Lorsque le téléviseur afche un signal DTV (air), il envoie un son canal 5.1 au récepteur du home cinéma. Lorsque la source
est un composant numérique (par exemple, un DVD) connecté au téléviseur TV via HDMI, le récepteur home cinéma n'émet
qu'un son 2 voies.
Si une coupure de courant se produit alors que l'option Récepteur est dénie sur Marche (câble d'alimentation débranché
ou panne de courant), il se peut que l'option Sélection Haut-parleur soit dénie sur Ht-parl ext lorsque vous rallumez le
téléviseur (Voir page 18).
N
N
N
N
N
N
¦
N
N
N
N
N
¦
N
N
N
N
Français - 26
Voir télévision
Liste d'appareils
Enregistrer : DVDR
DVDR MENU
DVDR Operation
Récepteur : Marche
Conguration
U
Déplacer
E
Entrer
R
Retour
[LB5P_W.Euro]BN68-02362A-01L09.i26 26 2009-09-10 ¿ÀÈÄ 3:43:26

RECOMMANDATION D'UTILISATION
Fonction Télétexte
La plupart des chaînes de télévision offrent des services d'informations écrites via le télétexte. La page d'index du télétexte
contient des instructions sur l'utilisation du service. Vous pouvez, en outre, sélectionner différentes options à l'aide des touches de
la télécommande.
Pour que les informations du télétexte s'afchent correctement, la réception des chaînes doit être stable. Autrement, des
informations pourraient manquer ou certaines pages ne pas s'afcher.
Vous pouvez changer de page de télétexte en appuyant sur les touches numériques de la télécommande.
1
0
(mode)
Permet de sélectionner le mode
Télétexte (LIST/FLOF). Si vous appuyez
sur cette touche en mode LISTE, vous
basculez en mode d'enregistrement
de liste. Dans ce mode, vous pouvez
enregistrer une page de télétexte dans
une liste à l'aide du bouton
8
(mémoriser).
2
5
(révéler)
Permet d'afcher le texte masqué
(par exemple, les réponses à un
questionnaire). Pour rétablir le mode
d'afchage normal, appuyez de
nouveaux dessus.
3
4
(taille)
Permet d'afcher la moitié supérieure
de l'écran en caractères deux fois plus
grands. Pour afcher la moitié inférieure
de l'écran, appuyez de nouveau sur
cette touche. Pour rétablir le mode
d'afchage normal, appuyez dessus une
fois de plus.
4
8
(mémoriser)
Permet d'enregistrer les pages de
télétexte.
5
Boutons de couleur (rouge/vert/jaune/
bleu)
Si une société de télédiffusion utilise
le système FASTEXT, les différentes
rubriques d'une page de télétexte
sont associées à un code couleur
qui permet de les sélectionner à
l'aide des touches de couleur de
la télécommande. Appuyez sur la
touche dont la couleur correspond
à celle de la rubrique souhaitée. La
page afche d'autres informations en
couleur que vous pouvez sélectionner
de la même manière. Pour afcher la
page précédente ou la page suivante,
appuyez sur la touche de couleur
correspondante.
6
/
(télétexte actif/mixte)
Permet d'activer le mode Télétexte après
avoir choisi la chaîne diffusant le service
télétexte. Appuyez deux fois sur cette
touche pour superposer le télétexte à
l'émission en cours de diffusion.
7
:
(quitter)
Quitte l'afchage du télétexte.
8
1
(page secondaire)
Permet d'afcher une page secondaire.
9
2
(page suivante)
Permet d'afcher la page de télétexte
suivante.
0
3
(page précédente)
Permet d'afcher la page de télétexte
précédente.
!
6
(index)
Permet d'afcher la page d'index du
télétexte (sommaire) à tout moment.
@
9
(verrouiller)
Permet de bloquer l'afchage sur une
page précise, si celle-ci est reliée à
plusieurs pages secondaires qui délent
automatiquement. Pour reprendre
l'afchage de celles-ci, appuyez de
nouveau sur cette touche.
#
7
(annuler)
Permet d'afcher le programme lors de la
recherche d'une page.
Les pages de télétexte sont organisées en six catégories :
Catégorie Contenu
ANuméro de la page sélectionnée.
BIdentité de la chaîne émettrice.
CNuméro de la page actuelle ou indications de recherche.
DDate et heure.
ETexte.
FInformations sur l'état.
Informations FASTEXT.
¦
N
N
Français - 28
1
2
3
4
5
6
8
9
0
@
#
!
7
[LB5P_W.Euro]BN68-02362A-01L09.i28 28 2009-09-10 ¿ÀÈÄ 3:43:26
Produktspezifikationen
| Marke: | Samsung |
| Kategorie: | LCD-Plasma-Fernseher |
| Modell: | le40b530 |
Brauchst du Hilfe?
Wenn Sie Hilfe mit Samsung le40b530 benötigen, stellen Sie unten eine Frage und andere Benutzer werden Ihnen antworten
Bedienungsanleitung LCD-Plasma-Fernseher Samsung

5 Juli 2024
5 Juli 2024
5 Juli 2024
4 Juli 2024
4 Juli 2024
3 Juli 2024
3 Juli 2024
3 Juli 2024
3 Juli 2024
Bedienungsanleitung LCD-Plasma-Fernseher
- LCD-Plasma-Fernseher Sanyo
- LCD-Plasma-Fernseher BenQ
- LCD-Plasma-Fernseher Medion
- LCD-Plasma-Fernseher Philips
- LCD-Plasma-Fernseher Sony
- LCD-Plasma-Fernseher Panasonic
- LCD-Plasma-Fernseher LG
- LCD-Plasma-Fernseher AEG
- LCD-Plasma-Fernseher Electrolux
- LCD-Plasma-Fernseher Thomson
- LCD-Plasma-Fernseher BEKO
- LCD-Plasma-Fernseher Grundig
- LCD-Plasma-Fernseher Sharp
- LCD-Plasma-Fernseher Daewoo
- LCD-Plasma-Fernseher Salora
- LCD-Plasma-Fernseher Vestel
- LCD-Plasma-Fernseher Pioneer
- LCD-Plasma-Fernseher JVC
- LCD-Plasma-Fernseher Akai
- LCD-Plasma-Fernseher Hannspree
- LCD-Plasma-Fernseher Hitachi
- LCD-Plasma-Fernseher Loewe
- LCD-Plasma-Fernseher Toshiba
- LCD-Plasma-Fernseher Ricatech
- LCD-Plasma-Fernseher ViewSonic
- LCD-Plasma-Fernseher Opera
- LCD-Plasma-Fernseher TechnoStar
- LCD-Plasma-Fernseher Humax
- LCD-Plasma-Fernseher Marantz
- LCD-Plasma-Fernseher Sansui
- LCD-Plasma-Fernseher AOC
- LCD-Plasma-Fernseher Iiyama
- LCD-Plasma-Fernseher Fujitsu-Siemens
- LCD-Plasma-Fernseher Magnum
- LCD-Plasma-Fernseher Scott
- LCD-Plasma-Fernseher Oppo
- LCD-Plasma-Fernseher D.BOSS
- LCD-Plasma-Fernseher Dantax
- LCD-Plasma-Fernseher Gericom
- LCD-Plasma-Fernseher Graetz
- LCD-Plasma-Fernseher Magnavox
- LCD-Plasma-Fernseher Qmedia
- LCD-Plasma-Fernseher Tatung
- LCD-Plasma-Fernseher Watsvision
- LCD-Plasma-Fernseher Yakumo
- LCD-Plasma-Fernseher Bang Olufsen
Neueste Bedienungsanleitung für -Kategorien-

5 Oktober 2024

5 Oktober 2024

5 Oktober 2024
23 September 2024

19 September 2024
18 September 2024

27 August 2024
27 August 2024
26 August 2024
25 August 2024