Samsung Galaxy M33 Bedienungsanleitung
Lesen Sie kostenlos die 📖 deutsche Bedienungsanleitung für Samsung Galaxy M33 (133 Seiten) in der Kategorie Telefon. Dieser Bedienungsanleitung war für 26 Personen hilfreich und wurde von 2 Benutzern mit durchschnittlich 4.5 Sternen bewertet
Seite 1/133

www.samsung.com/hk
USER MANUAL
English (HK). 03/2022. Rev.1.0
SM-M336B/DS

2
Table of Contents
Getting started
4 Device layout and functions
7 Charging the battery
10 SIM or USIM card (nano-SIM card)
11 Memory card (microSD card)
14 Turning the device on and off
15 Initial setup
15 Samsung account
16 Transferring data from your previous
device (Smart Switch)
18 Understanding the screen
26 Notification panel
28 Screen capture and screen record
29 Entering text
Apps and features
32 Installing or uninstalling apps
33 Phone
36 Contacts
38 Messages
39 Internet
40 Camera
53 Gallery
57 AR Zone
63 Bixby Vision
64 Multi window
67 Samsung Pay
69 Samsung Health
70 Samsung Notes
71 Samsung Members
71 Samsung Kids
72 Samsung Global Goals
72 Galaxy Shop
72 Galaxy Wearable
73 Calendar
73 Reminder
74 Radio
75 Voice Recorder
76 My Files
76 Clock
76 Calculator
77 Game Launcher
78 Game Booster
79 SmartThings
80 Sharing content
81 Music Share
82 Smart View
83 Link to Windows
84 Google apps

Table of Contents
3
111 Advanced features
112 Motions and gestures
113 Video call effects
113 Dual Messenger
114 Digital Wellbeing and parental
controls
115 Battery and device care
115 Optimising your device
115 Battery
116 Storage
116 Memory
116 Device protection
116 Software update
116 Diagnostics
117 Apps
117 General management
118 Accessibility
119 Software update
119 Remote support
120 About phone
Usage notices
121 Precautions for using the device
123 Notes on package contents and
accessories
124 Device overheating situations and
solutions
Appendix
127 Troubleshooting
Settings
85 Introduction
85 Samsung account
85 Connections
87 Wi-Fi
88 Bluetooth
89 NFC and contactless payments
91 Data saver
91 Mobile data only apps
91 Mobile Hotspot
92 More connection settings
93 Sounds and vibration
94 Sound quality and effects
94 Separate app sound
95 Notifications
95 Display
96 Motion smoothness
96 Wallpaper and style
96 Themes
97 Home screen
97 Lock screen
98 Smart Lock
98 Biometrics and security
99 Face recognition
101 Fingerprint recognition
103 Samsung Pass
105 Secure Folder
108 Privacy
108 Location
109 Safety and emergency
109 Accounts and backup
110 Samsung Cloud
110 Google
Getting started
10
SIM or USIM card (nano-SIM card)
Insert the SIM or USIM card provided by the mobile telephone service provider.
You can insert two SIM or USIM cards so you can have two phone numbers or service
providers for a single device. In some areas, data transfer speeds may be slower if two SIM
cards are inserted in the device than when one SIM card is inserted.
Some services that require a network connection may not be available depending on
the service provider.
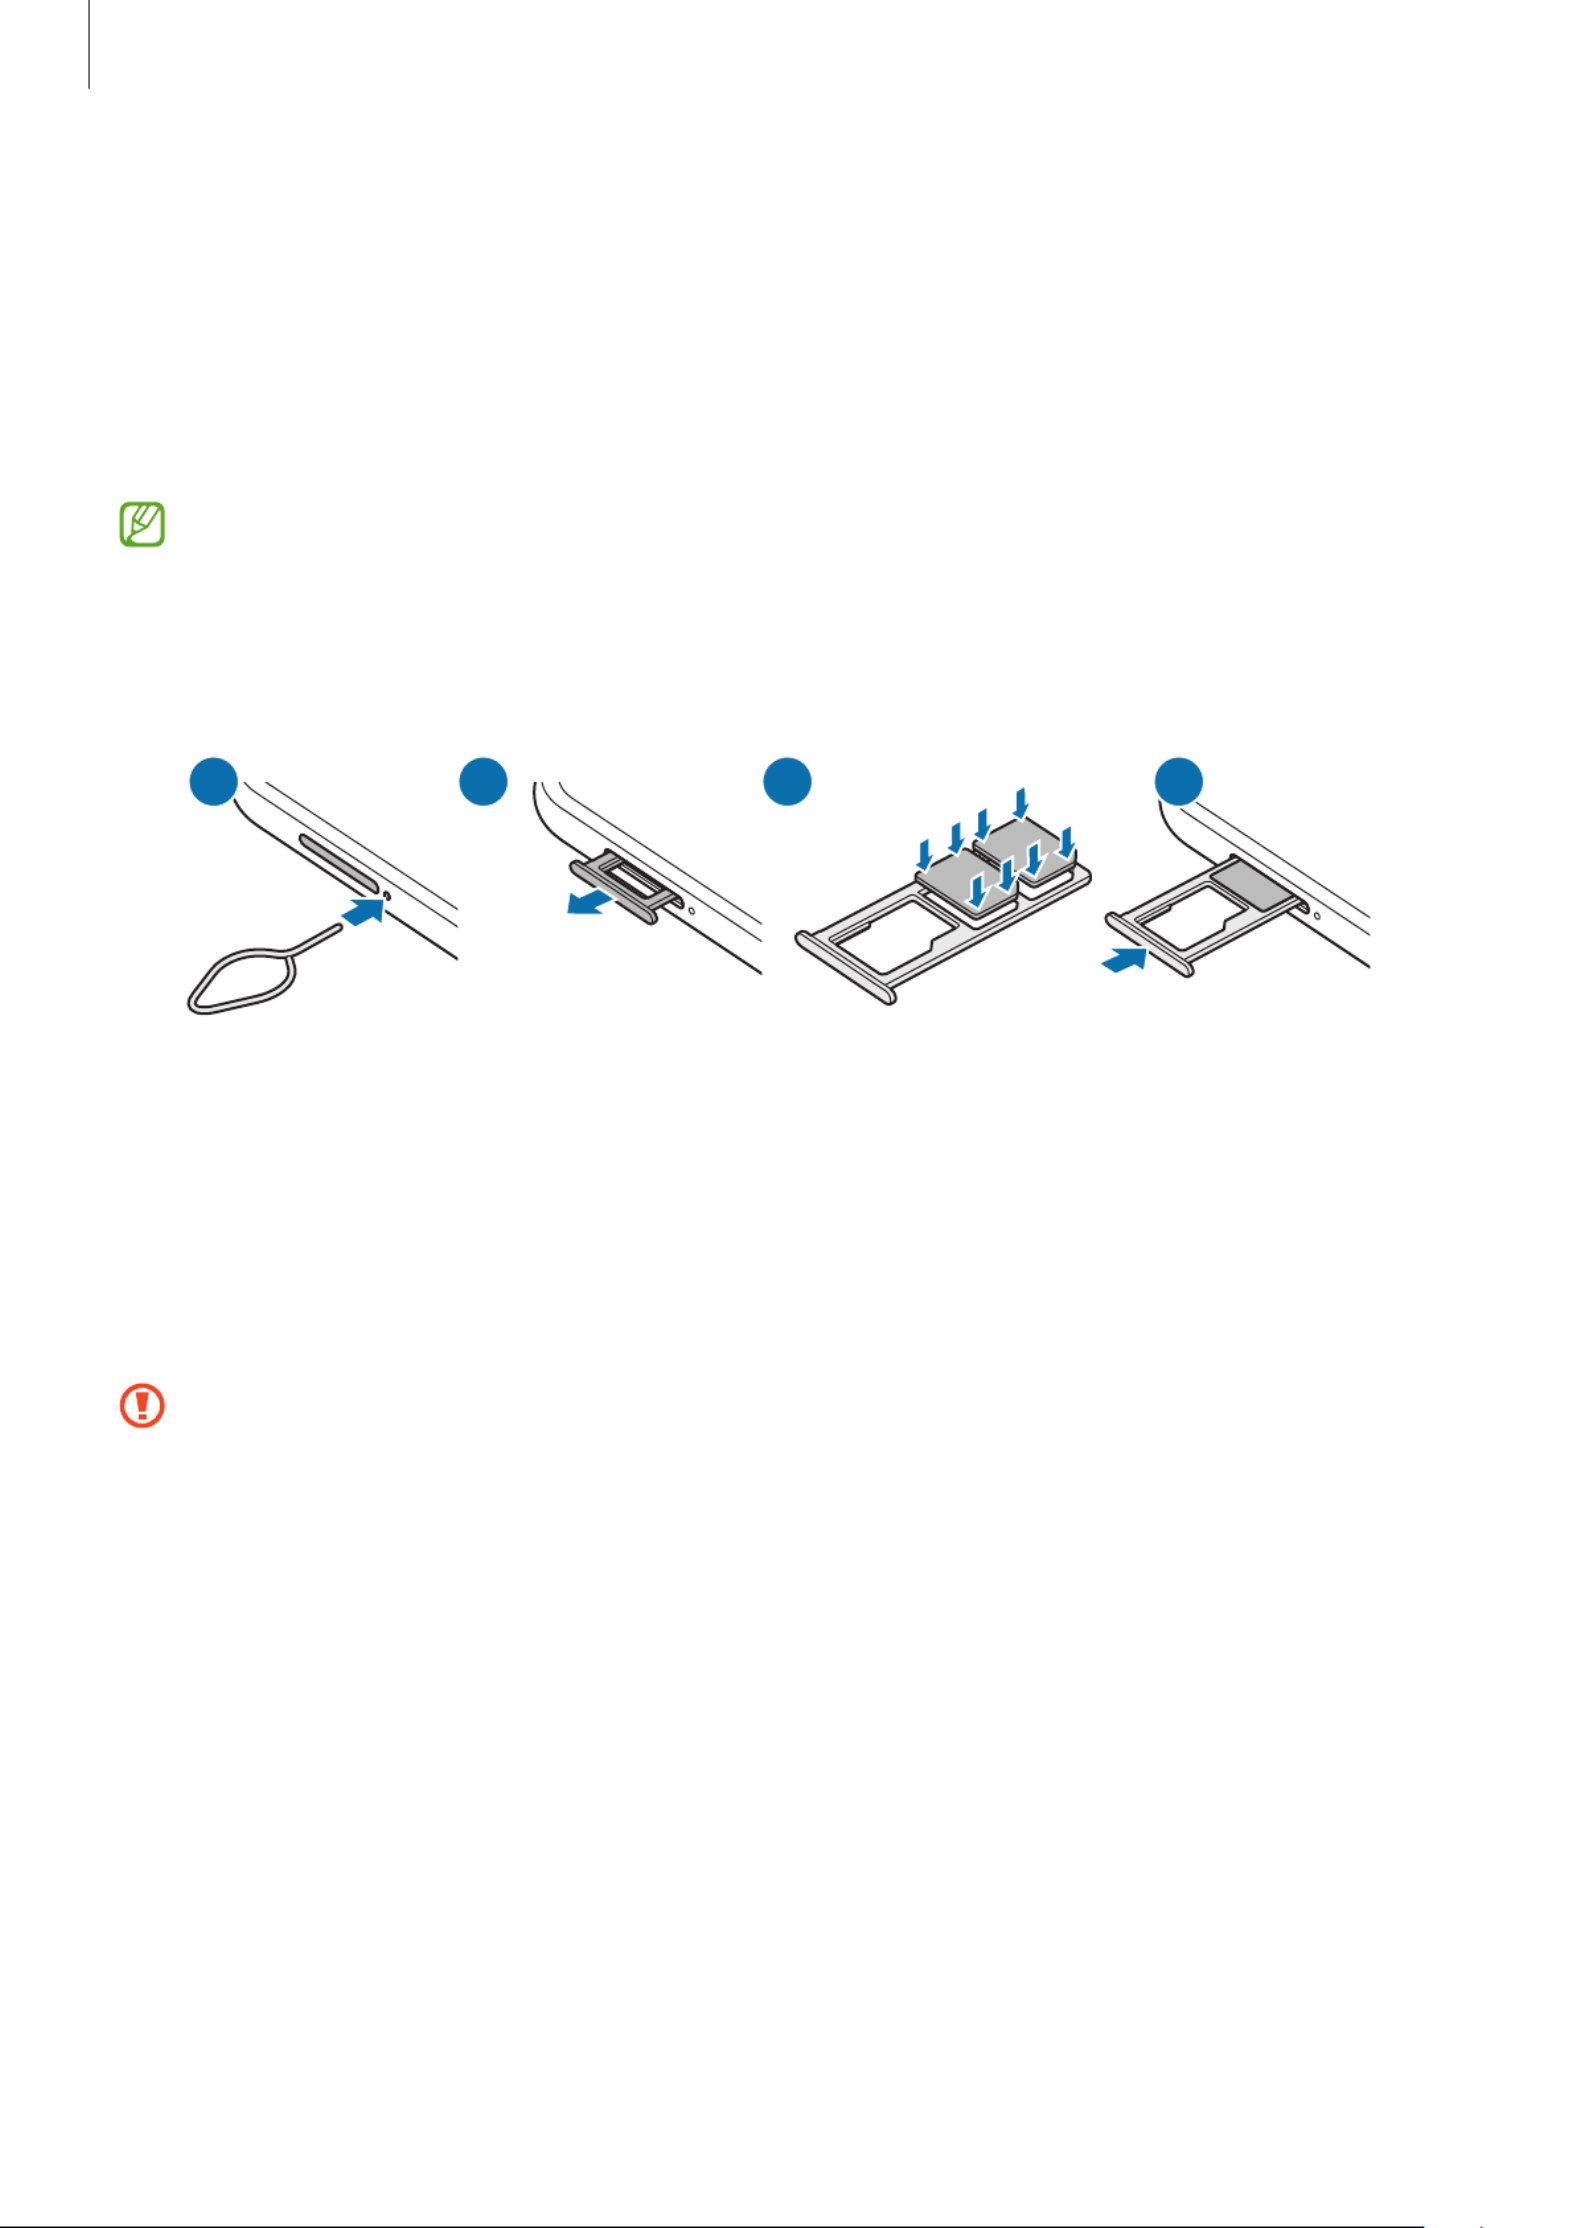
Installing the SIM or USIM card
21 3 4
1 Insert the ejection pin into the hole next to the tray to loosen the tray.
2 Pull out the tray gently from the tray slot.
3 Place the SIM or USIM card on the tray with the contacts facing downwards gold-coloured
and gently press the SIM or USIM card into the tray to secure it.
4 Insert the tray back into the tray slot.
•
Use only a nano-SIM card.
•
Use caution not to lose or let others use the SIM or USIM card. Samsung is not
responsible for any damages or inconveniences caused by lost or stolen cards.
•
Ensure that the ejection pin is perpendicular to the hole. Otherwise, the device may
be damaged.
•
If the card is not fixed firmly into the tray, the SIM card may leave or fall out of the
tray.
•
If you insert the tray into your device while the tray is wet, your device may be
damaged. Always make sure the tray is dry.
•
Fully insert the tray into the tray slot to prevent liquid from entering your device.

Getting started
11
SIM card manager
Launch the
Settings
app and tap
Connections
→
SIM card manager
.
•
SIM cards
: Activate the SIM card to use and customise the SIM card settings.
•
Preferred SIM card
: Select to use specific SIM cards for some features, such as voice calls,
when two cards are activated.
•
Auto data switching
: Set the device to use another SIM card for data services if the
preferred SIM card cannot connect to the network.
•
More SIM card settings
: Customise the call settings.
Memory card (microSD card)
Installing a memory card
Your device’s memory card capacity may vary from other models and some memory cards
may not be compatible with your device depending on the memory card manufacturer and
type. To view your device’s maximum memory card capacity, refer to the Samsung website.
21 3 4
1 Insert the ejection pin into the hole next to the tray to loosen the tray.
2 Pull out the tray gently from the tray slot.
3 Place a memory card on the tray with the contacts facing downwards and gold-coloured
gently press the memory card into the tray to secure it.

Getting started
12
4 Insert the tray back into the tray slot.
•
Some memory cards may not be fully compatible with the device. Using an
incompatible card may damage the device or the memory card, or corrupt the data
stored in it.
•
Use caution to insert the memory card right-side up.
•
Ensure that the ejection pin is perpendicular to the hole. Otherwise, the device may
be damaged.
•
When you remove the tray from the device, the mobile data connection will be
disabled.
•
If the card is not fixed firmly into the tray, the memory card may leave or fall out of
the tray.
•
If you insert the tray into your device while the tray is wet, your device may be
damaged. Always make sure the tray is dry.
•
Fully insert the tray into the tray slot to prevent liquid from entering your device.
•
The device supports the FAT and the exFAT file systems for memory cards. When
inserting a card formatted in a different file system, the device will ask to reformat
the card or will not recognise the card. To use the memory card, you must format it. If
your device cannot format or recognise the memory card, contact the memory card
manufacturer or a Samsung Service Centre.
•
Frequent writing and erasing of data shortens the lifespan of memory cards.
•
When inserting a memory card into the device, the memory card’s file directory
appears in the
My Files
→
SD card
folder.
Getting started
13
Removing the memory card
Before removing the memory card, first unmount it for safe removal.
1 Launch the
Settings
app and tap
Battery and device care
→
Storage
.
2 Swipe to the left to view the
SD card
page.
3 Tap
→
Unmount
.
Do not remove external storage, such as a memory card or USB storage, while the
device is transferring or accessing information, or right after transferring data. Doing
so can cause data to be corrupted or lost or cause damage to the external storage or
device. Samsung is not responsible for losses, including loss of data, resulting from the
misuse of external storage devices.
Formatting the memory card
A memory card formatted on a computer may not be compatible with the device. Format the
memory card on the device.
1 Launch the
Settings
app and tap
Battery and device care
→
Storage
.
2 Swipe to the left to view the
SD card
page.
3 Tap
→
Format
.
Before formatting the memory card, remember to make backup copies of all important
data stored in the memory card. The manufacturer’s warranty does not cover loss of
data resulting from user actions.
Getting started
14
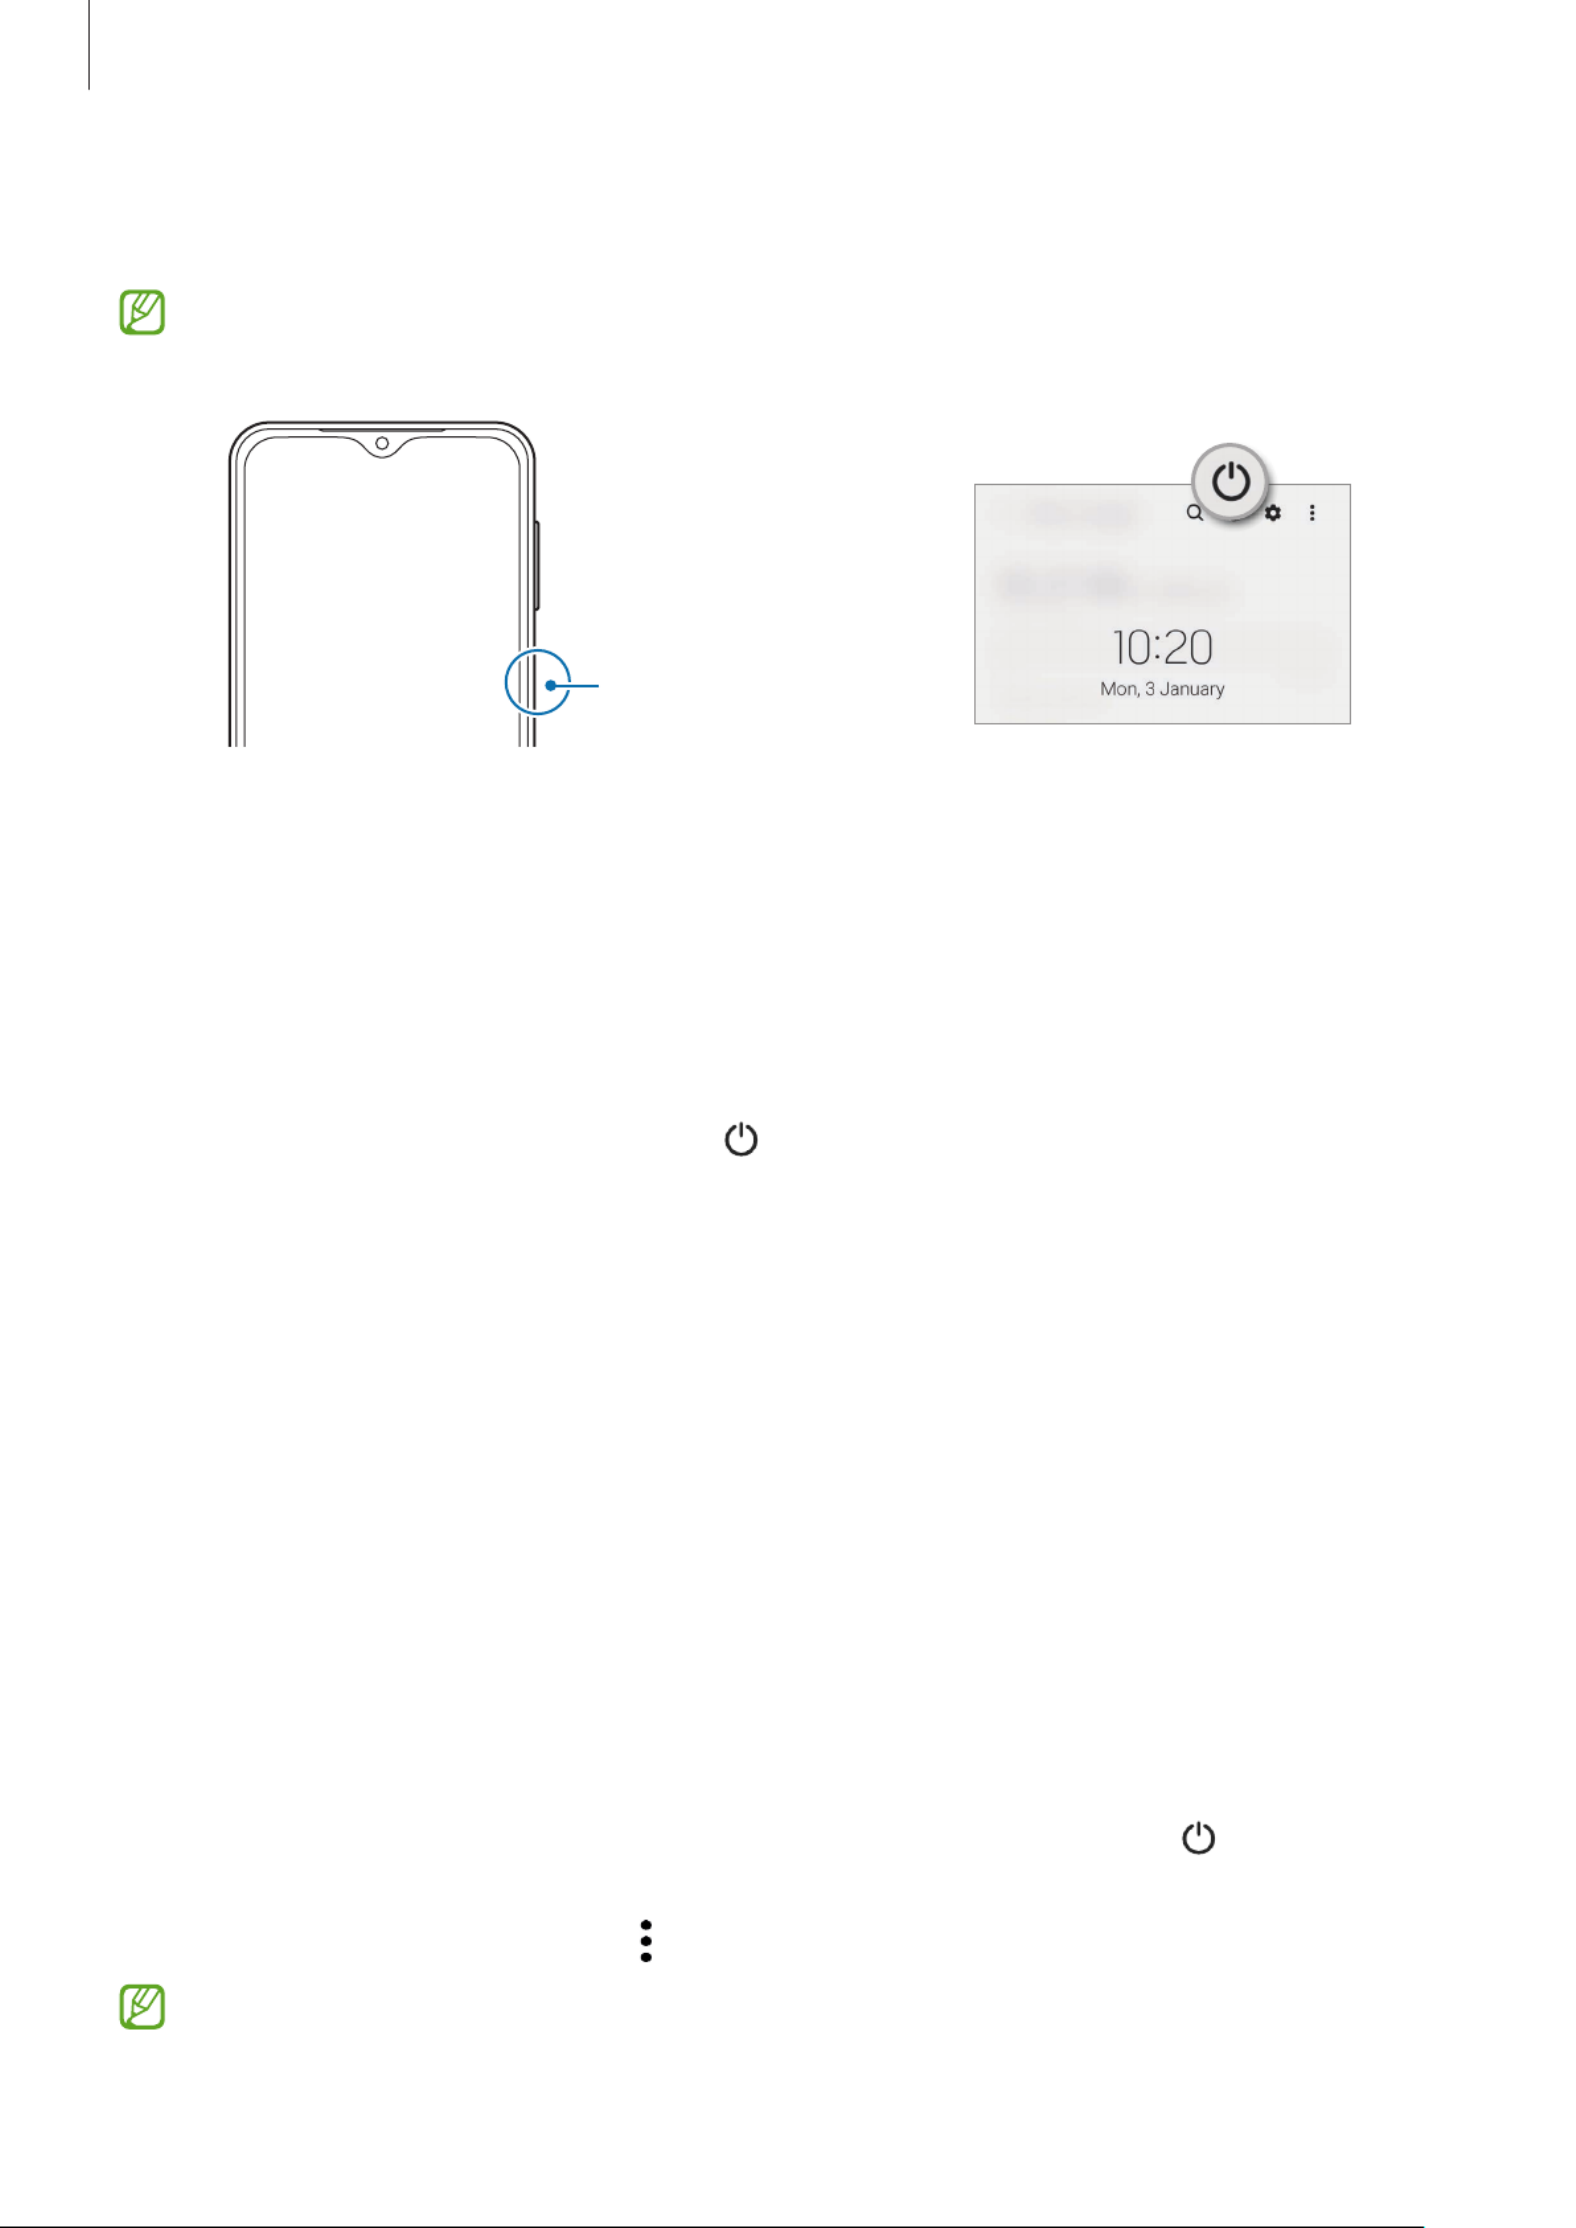
Turning the device on and off
Follow all posted warnings and directions from authorised personnel in areas where the
use of wireless devices is restricted, such as aeroplanes and hospitals.
Side key
Turning the device on
Press and hold the Side key for a few seconds to turn on the device.
Turning the device off
1 To turn off the device, press and hold the Side key. Alternatively, open the notification
panel, swipe downwards, and then tap .
2 Tap
Power off
.
To restart the device, tap
Restart
.
Forcing restart
If your device is frozen and unresponsive, press and hold the Side key and the Volume Down
key simultaneously for more than 7 seconds to restart it.
Emergency mode
You can switch the device to emergency mode to reduce battery consumption. Some apps
and functions will be restricted. In emergency mode, you can make an emergency call, send
your current location information to others, sound an emergency alarm, and more.
To activate emergency mode, press and hold the Side key, and then tap
Emergency mode
.
Alternatively, open the notification panel, swipe downwards, and then tap
→
Emergency
mode
.
To deactivate emergency mode, tap
→
Turn off Emergency mode
.
The usage time left shows the time remaining before the battery power runs out. Usage
time left may vary depending on your device settings and operating conditions.

Getting started
15
Initial setup
When you turn on your device for the first time or after performing a data reset, follow the
on-screen instructions to set up your device.
If you do not connect to a Wi-Fi network, you may not be able to set up some device
features during the initial setup.
Samsung account
Your Samsung account is an integrated account service that allows you to use a variety of
Samsung services provided by mobile devices, TVs, and the Samsung website.
To check the list of services that can be used with your Samsung account, visit
account.samsung.com.
1 Launch the
Settings
app and tap
Samsung account
.
Alternatively, launch the
Settings
app and tap
Accounts and backup
→
Manage
accounts
→
Add account
→
Samsung account
.
2 If you already have a Samsung account, sign in to your Samsung account.
•
If you want to sign in using your Google account, tap
Sign in with Google
.
•
If you do not have a Samsung account, tap
Create account
.
Finding your ID and resetting your password
If you forget your Samsung account ID or password, tap
Find ID
or
Forgot password?
on the
Samsung account sign-in screen. You can find your ID or reset your password after you enter
the required information.
Signing out of your Samsung account
When you sign out of your Samsung account, your data, such as contacts or events, will also
be removed from your device.
1 Launch the
Settings
app and tap
Accounts and backup
→
Manage accounts
.
2 Tap
Samsung account
→
My profile
and tap
Sign out
at the bottom of the screen.
3 Tap
Sign out
, enter your Samsung account password, and then tap
OK
.

Getting started
16
Transferring data from your previous device
(Smart Switch)
You can use Smart Switch to transfer data from your previous device to your new device.
Launch the
Settings
app and tap
Accounts and backup
→
Bring data from old device
.
•
This feature may not be supported on some devices or computers.
•
Limitations apply. Visit www.samsung.com/hk/apps/smart-switch for details.
Samsung takes copyright seriously. Only transfer content that you own or have the
right to transfer.
Transferring data using a USB cable
You can connect your previous device to your device with the USB cable to easily and quickly
transfer data.
1 Connect your device and the previous device using your device’s USB cable.
A USB connector may be needed depending on the previous device.
2 When the app selection window appears, tap pop-up
Smart Switch
→
Receive data
.
3 In the previous device, tap
Allow
.
If you do not have the app, download it from
Galaxy Store
or
Play Store
.
Your device will recognise the previous device and a list of data you can transfer will
appear.
4 On your device, select an option you want, tap
Next
, and then follow the on-screen
instructions to transfer data.
Do not disconnect the USB cable from the device when you are transferring files. Doing
so may cause data loss or device damage.
Transferring data increases the battery power consumption of your device. Ensure that
your device is sufficiently charged before transferring data. If the battery power is low,
data transfer may be interrupted.
Transferring data wirelessly
Transfer data from your previous device to your device wirelessly via Wi-Fi Direct.
1 On the previous device, launch
Smart Switch
.
If you do not have the app, download it from
Galaxy Store
or
Play Store
.
2 On your device, launch the
Settings
app and tap
Accounts and backup
→
Bring data
from old device
.
Getting started
18
Understanding the screen
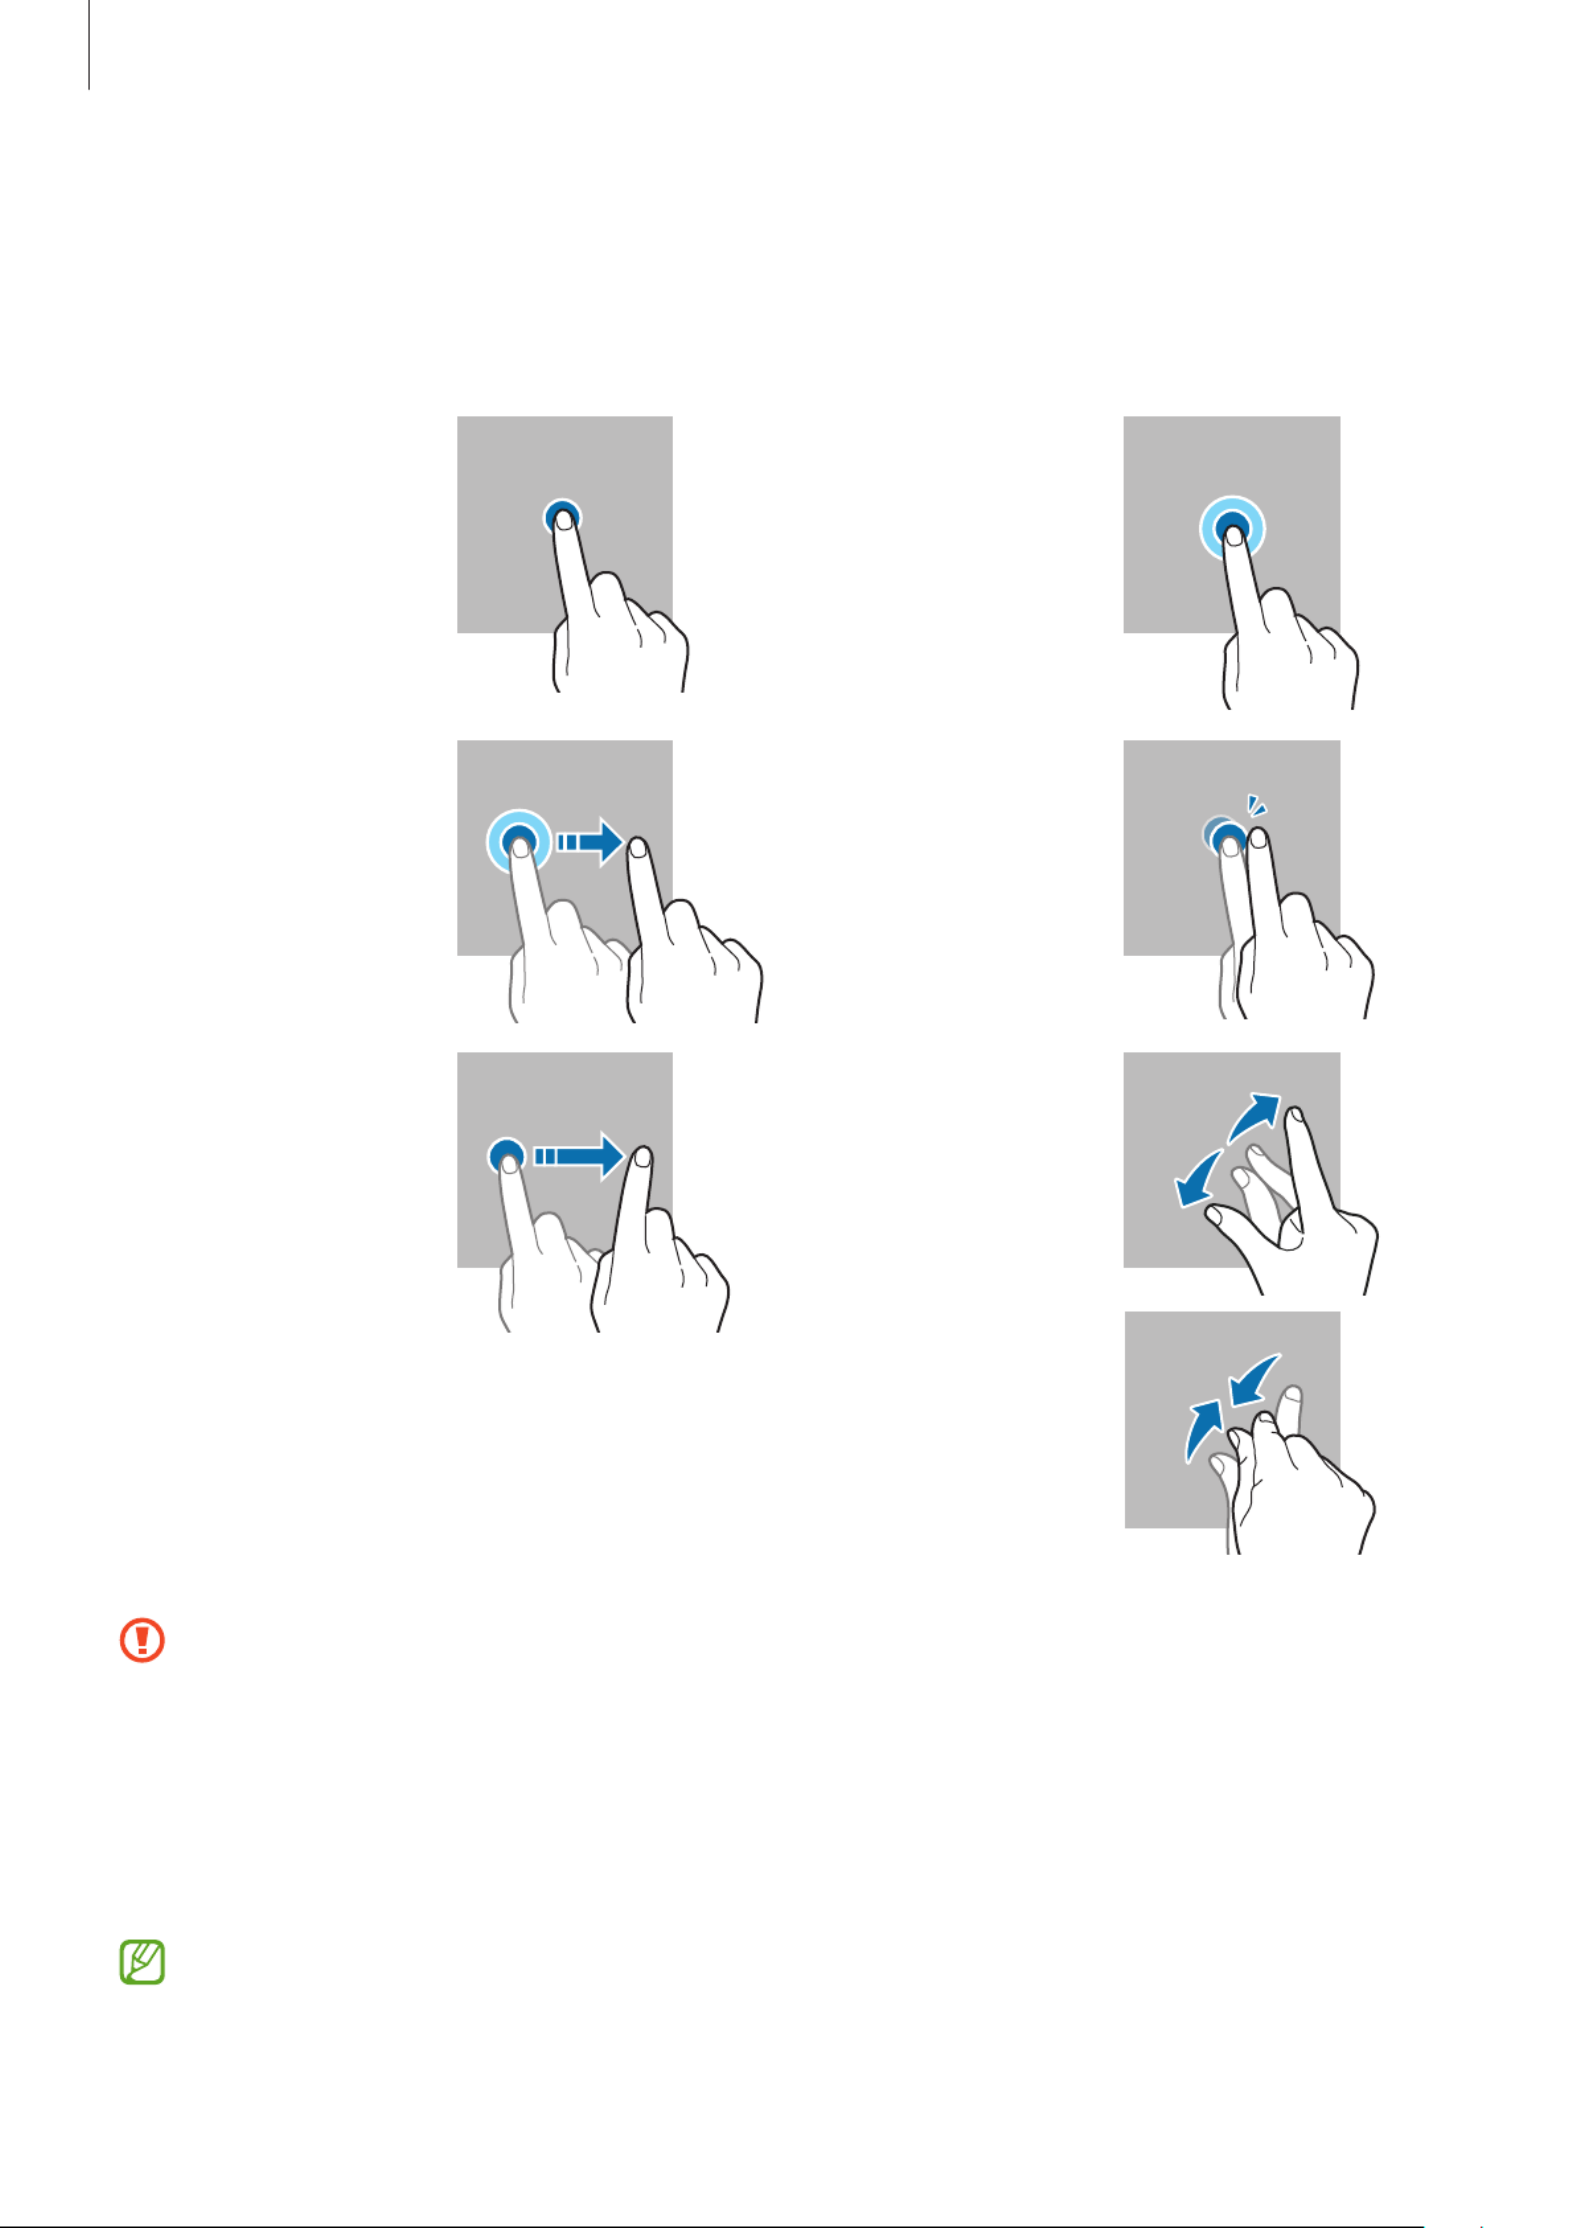
Controlling the touchscreen
Tapping
Tap the screen.
Tapping and
holding
Tap and hold
the screen for
approximately
2 seconds.
Dragging
Tap and hold an
item and drag
it to the target
position.
Double-tapping
Double-tap the
screen.
Swiping
Swipe upwards,
downwards, to
the left, or to the
right.
Spreading and
pinching
Spread two
fingers apart
or pinch on the
screen.
•
Do not allow the touchscreen to come into contact with other electrical devices.
Electrostatic discharges can cause the touchscreen to malfunction.
•
To avoid damaging the touchscreen, do not tap it with anything sharp or apply
excessive pressure to it with your fingertips.
•
It is recommended not to use fixed graphics on part or all of the touchscreen for
extended periods. Doing so may result in afterimages (screen ) or ghosting.burn-in
The device may not recognise touch inputs close to the edges of the screen, which are
outside of the touch input area.
Getting started
20
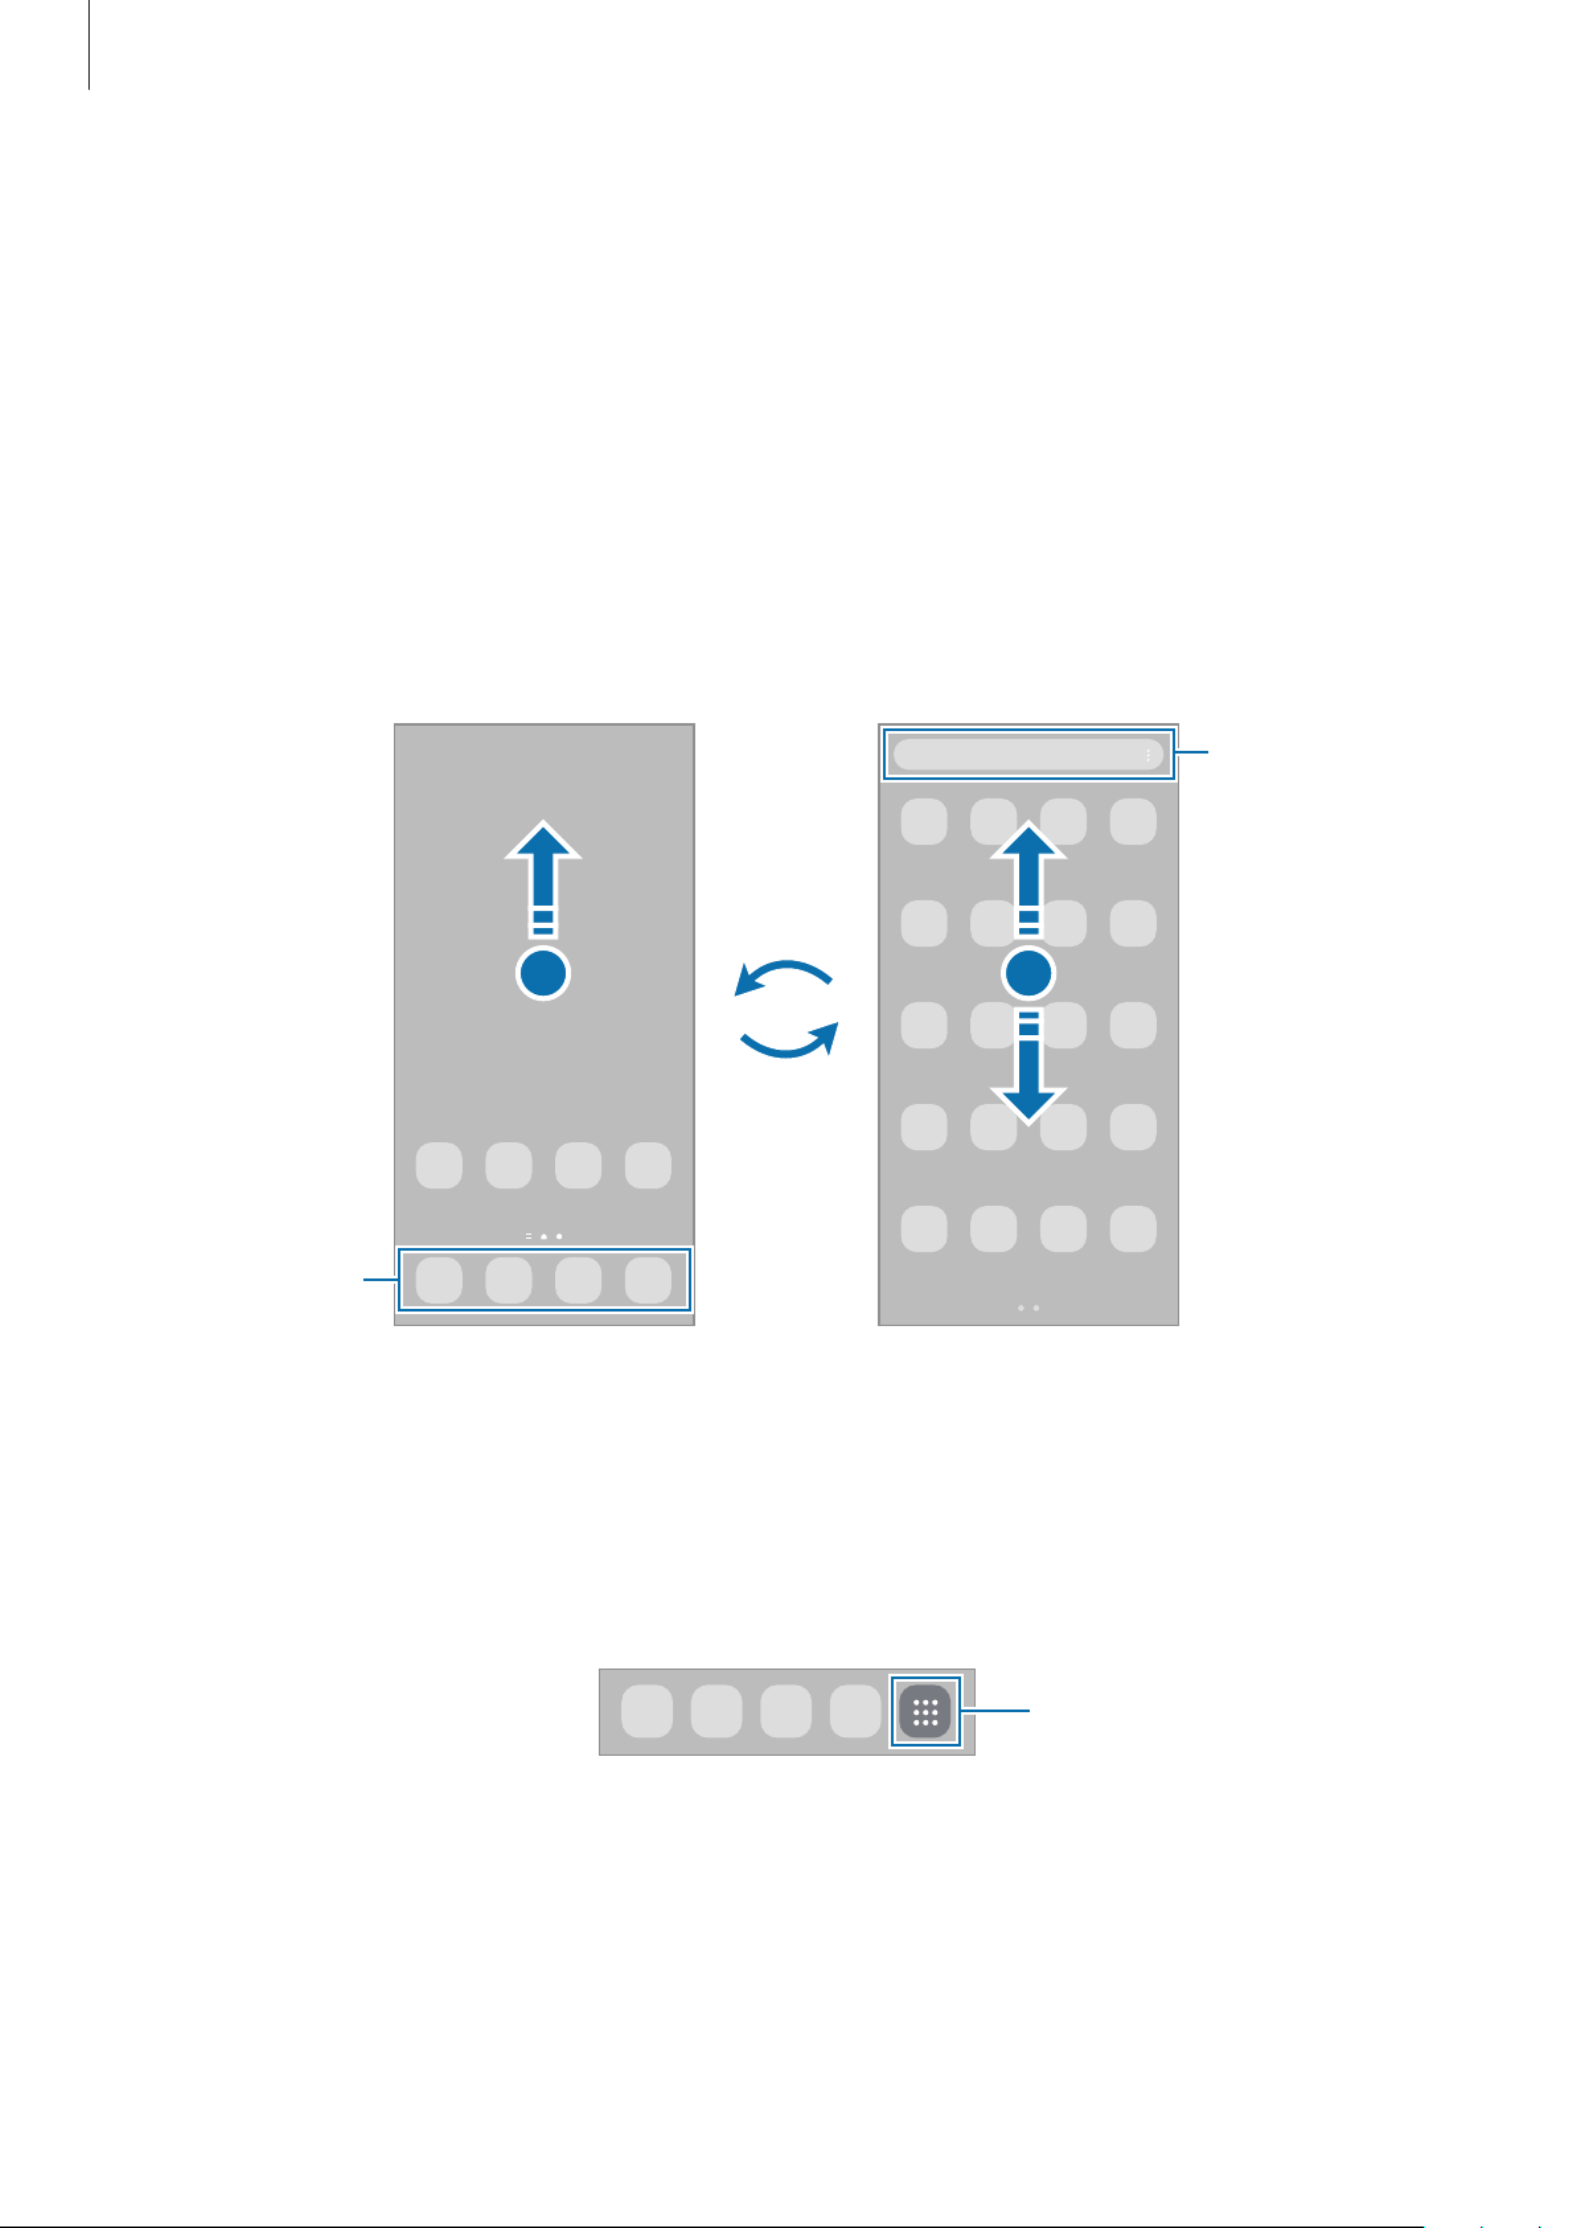
Home screen and Apps screen
The Home screen is the starting point for accessing all of the device’s features. It displays
widgets, shortcuts to apps, and more.
The Apps screen displays icons for all apps, including newly installed apps.
Switching between Home and Apps screens
On the Home screen, swipe upwards to open the Apps screen.
To return to the Home screen, swipe upwards or downwards on the Apps screen.
Alternatively, tap the Home button or the Back button.
Home screen Apps screen
Finder
Favourite apps
If you add the Apps button on the Home screen, you can open the Apps screen by tapping
the button. On the Home screen, tap and hold an empty area, tap
Settings
, and then tap the
Show Apps screen button on Home screen
switch to activate it. The Apps button will be
added at the bottom of the Home screen.
Apps button

Getting started
21
Editing the Home screen
On the Home screen, tap and hold an empty area, or pinch your fingers together to access
the editing options. You can set the wallpaper, add widgets, and more. You can also add,
delete, or rearrange Home screen panels.
•
Adding panels: Swipe to the left, and then tap .
•
Moving panels: Tap and hold a panel preview, and then drag it to a new location.
•
Deleting panels: Tap on the panel.
•
Wallpaper and style
: Change the wallpaper settings for the Home screen and the locked
screen.
•
Themes
: Change the device’s theme. Visual elements of interface, such as colours, icons,
and wallpapers, will change depending on the selected theme.
•
Widgets
: Widgets are small apps that launch specific app functions to provide
information and convenient access on your Home screen. Select a widget and tap
Add
.
The widget will be added on the Home screen.
•
Settings
: Configure settings for the Home screen, such as the screen layout.
Displaying all apps on the Home screen
Without using a separate Apps screen, you can set the device to display all apps on the Home
screen. On the Home screen, tap and hold an empty area, and then tap
Settings
→
Home
screen layout
→
Home screen only
→
Apply
.
You can now access all your apps by swiping to the left on the Home screen.
Getting started
22
Launching Finder
Search for content on the device quickly.
1 On the Apps screen, tap
Search
. Alternatively, open the notification panel, swipe
downwards, and then tap .
2 Enter a keyword.
Apps and content on your device will be searched.
If you tap on the keyboard, you can search for more content.
Moving items
Tap and hold an item, and then drag it to a new location. To move the item to another panel,
drag it to the side of the screen.
To add a shortcut to an app on the Home screen, tap and hold an item on the Apps screen,
and then tap
Add to Home
. A shortcut to the app will be added on the Home screen.
You can also move frequently used apps to the shortcuts area at the bottom of the Home
screen.
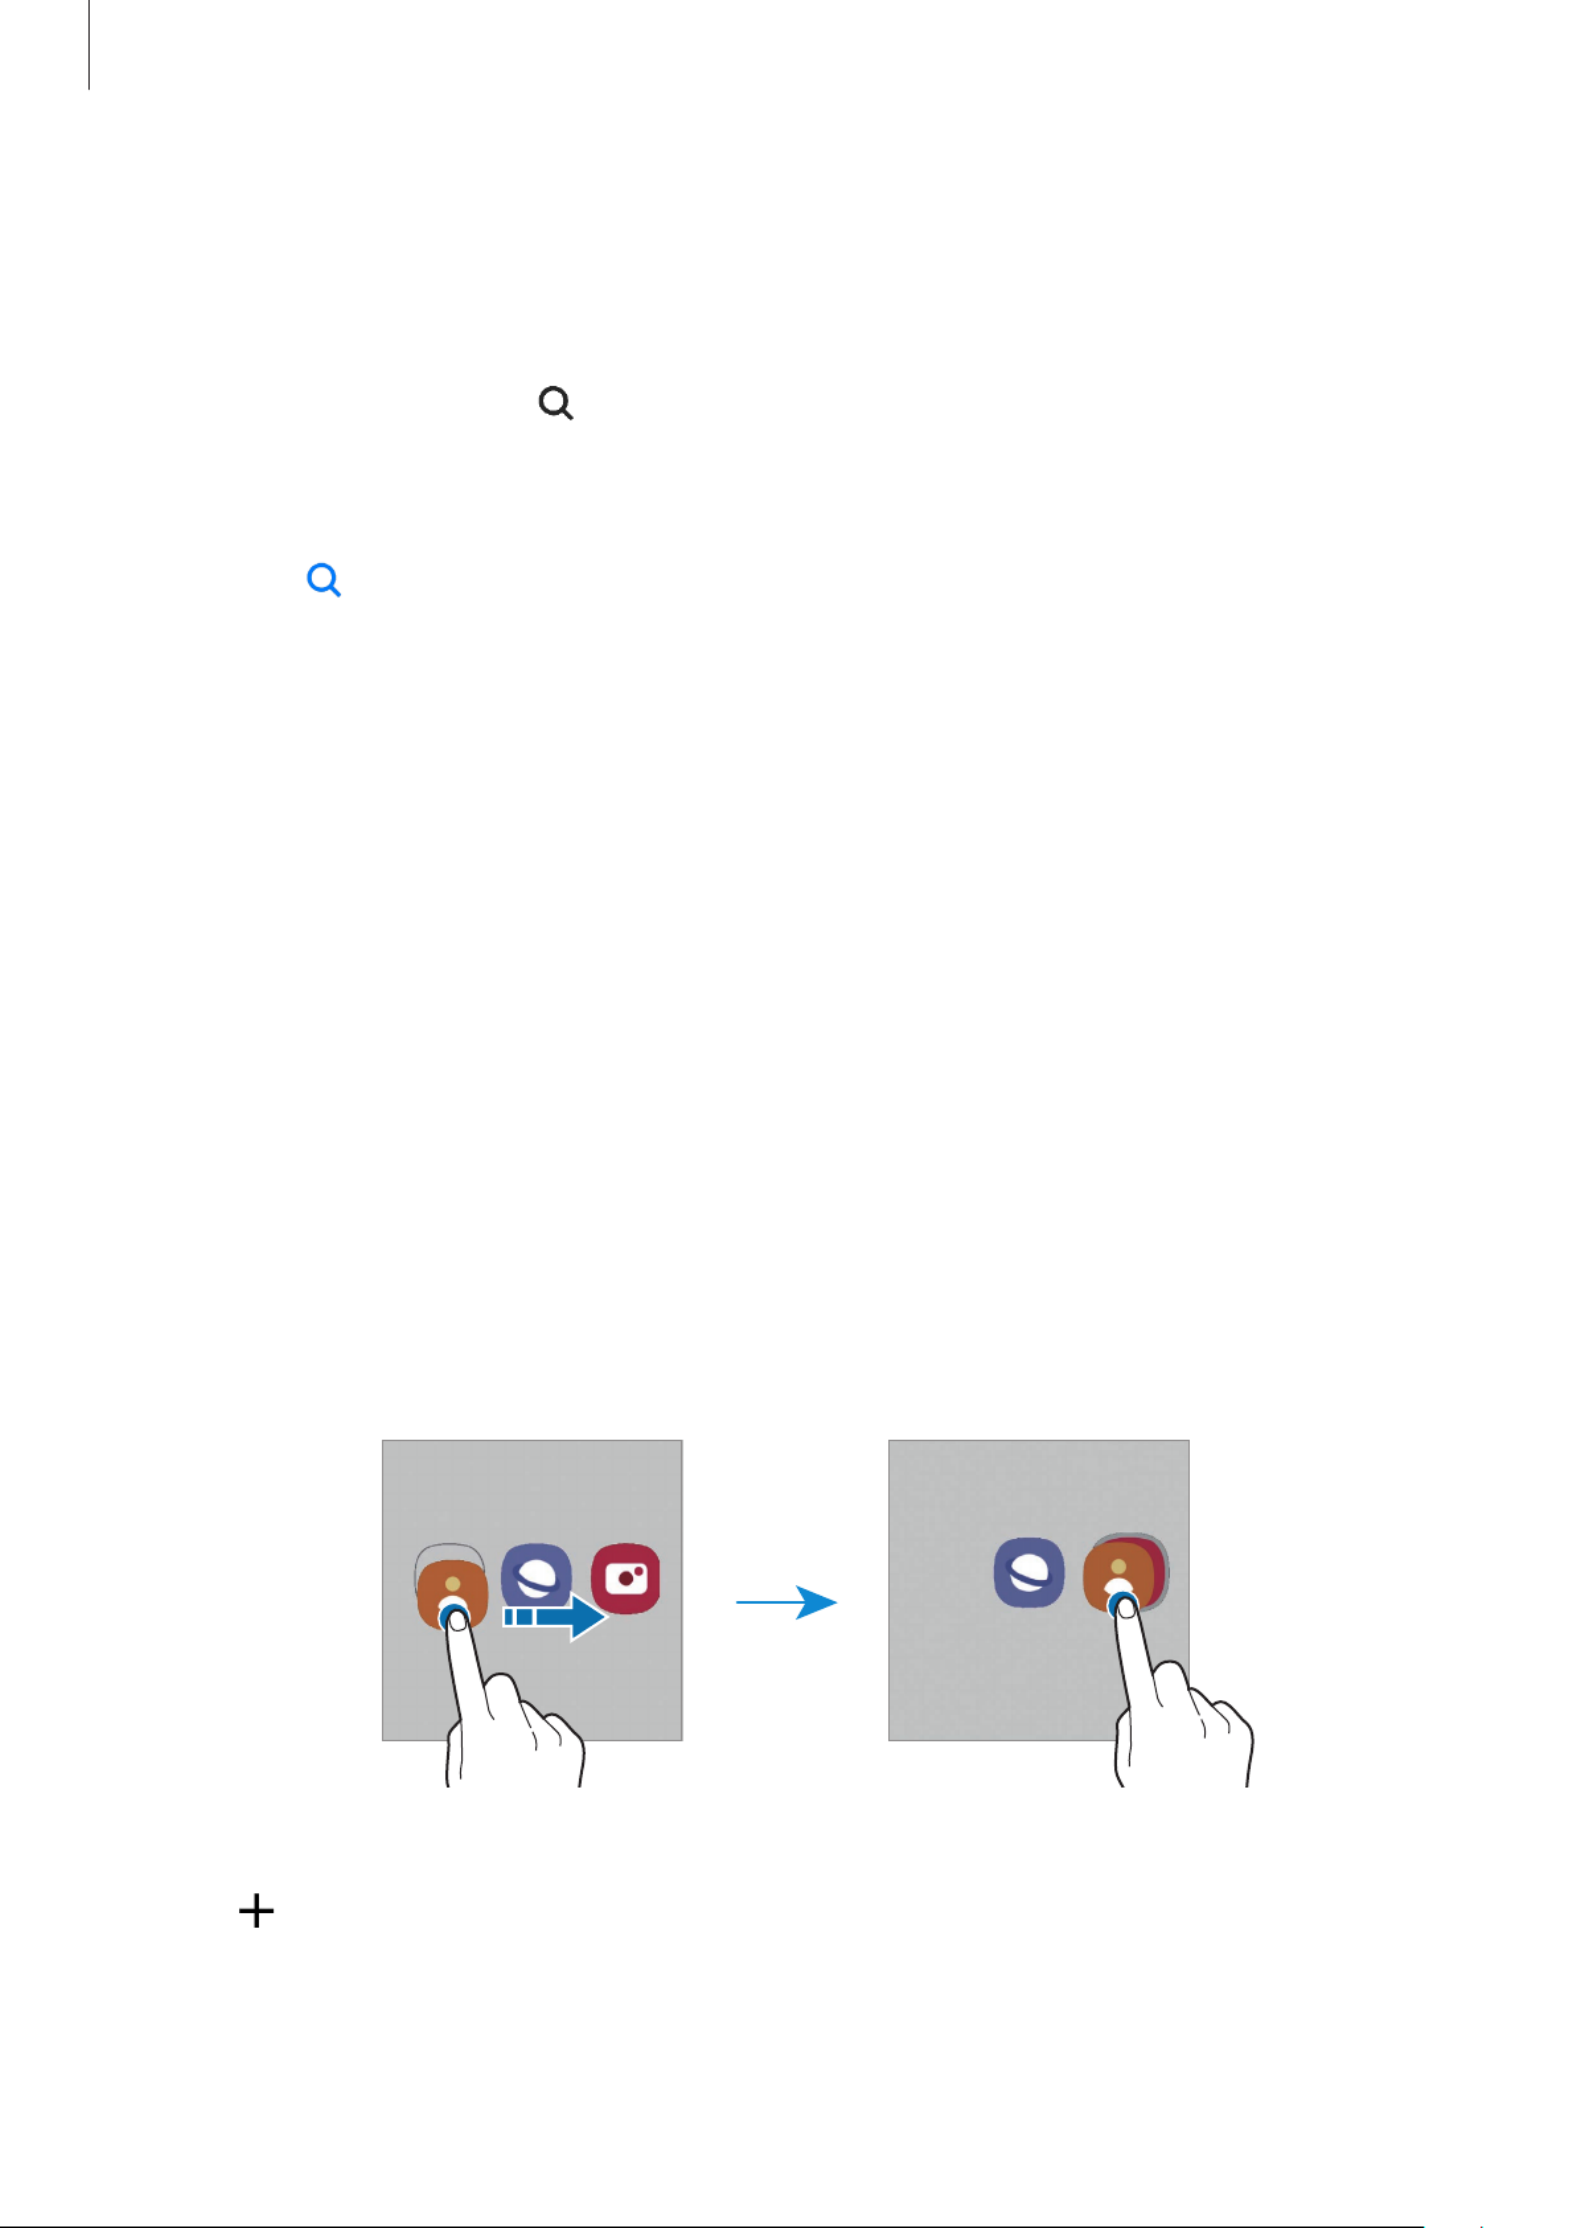
Creating folders
Create folders and gather similar apps to quickly access and launch apps.
On the Home screen or the Apps screen, tap and hold an app, and then drag it over another
app.
A new folder containing the selected apps will be created. Tap
Folder name
and enter a
folder name.
•
Adding more apps
Tap on the folder. Tick the apps to add and tap
Done
. You can also add an app by
dragging it to the folder.

Getting started
23
•
Moving apps from a folder
Tap and hold an app to drag it to a new location.
•
Deleting a folder
Tap and hold a folder, and then tap
Delete folder
. Only the folder will be deleted. The
folder’s apps will be relocated to the Apps screen.
Edge panel
You can quickly access your favourite apps and features from the Edge panels.
Drag the Edge panel handle towards the centre of the screen.
If the Edge panel handle is not visible, launch the
Settings
app, tap
Display
, and then tap the
Edge panels
switch to activate it.
Edge panel handle
Edge panel
Edge panel settings

Getting started
24
Lock screen
Pressing the Side key turns off the screen and locks it. Also, the screen turns off and
automatically locks if the device is not used for a specified period.
To unlock the screen, swipe in any direction when the screen turns on.
If the screen is off, press the Side key to turn on the screen. Alternatively, the double-tap
screen.
Changing the screen lock method
To change the screen lock method, launch the
Settings
app, tap
Lock screen
→
Screen lock
type
, and then select a method.
When you set a pattern, PIN, password, or your biometric data for the screen lock method,
you can protect your personal information by preventing others from accessing your device.
After setting the screen lock method, the device will require an unlock code whenever
unlocking it.
You can set your device to perform a factory data reset if you enter the unlock code
incorrectly several times in a row and reach the attempt limit. Launch the
Settings
app,
tap
Lock screen
→
Secure lock settings
, unlock the screen using the preset screen lock
method, and then tap the
Auto factory reset
switch to activate it.
Getting started
25
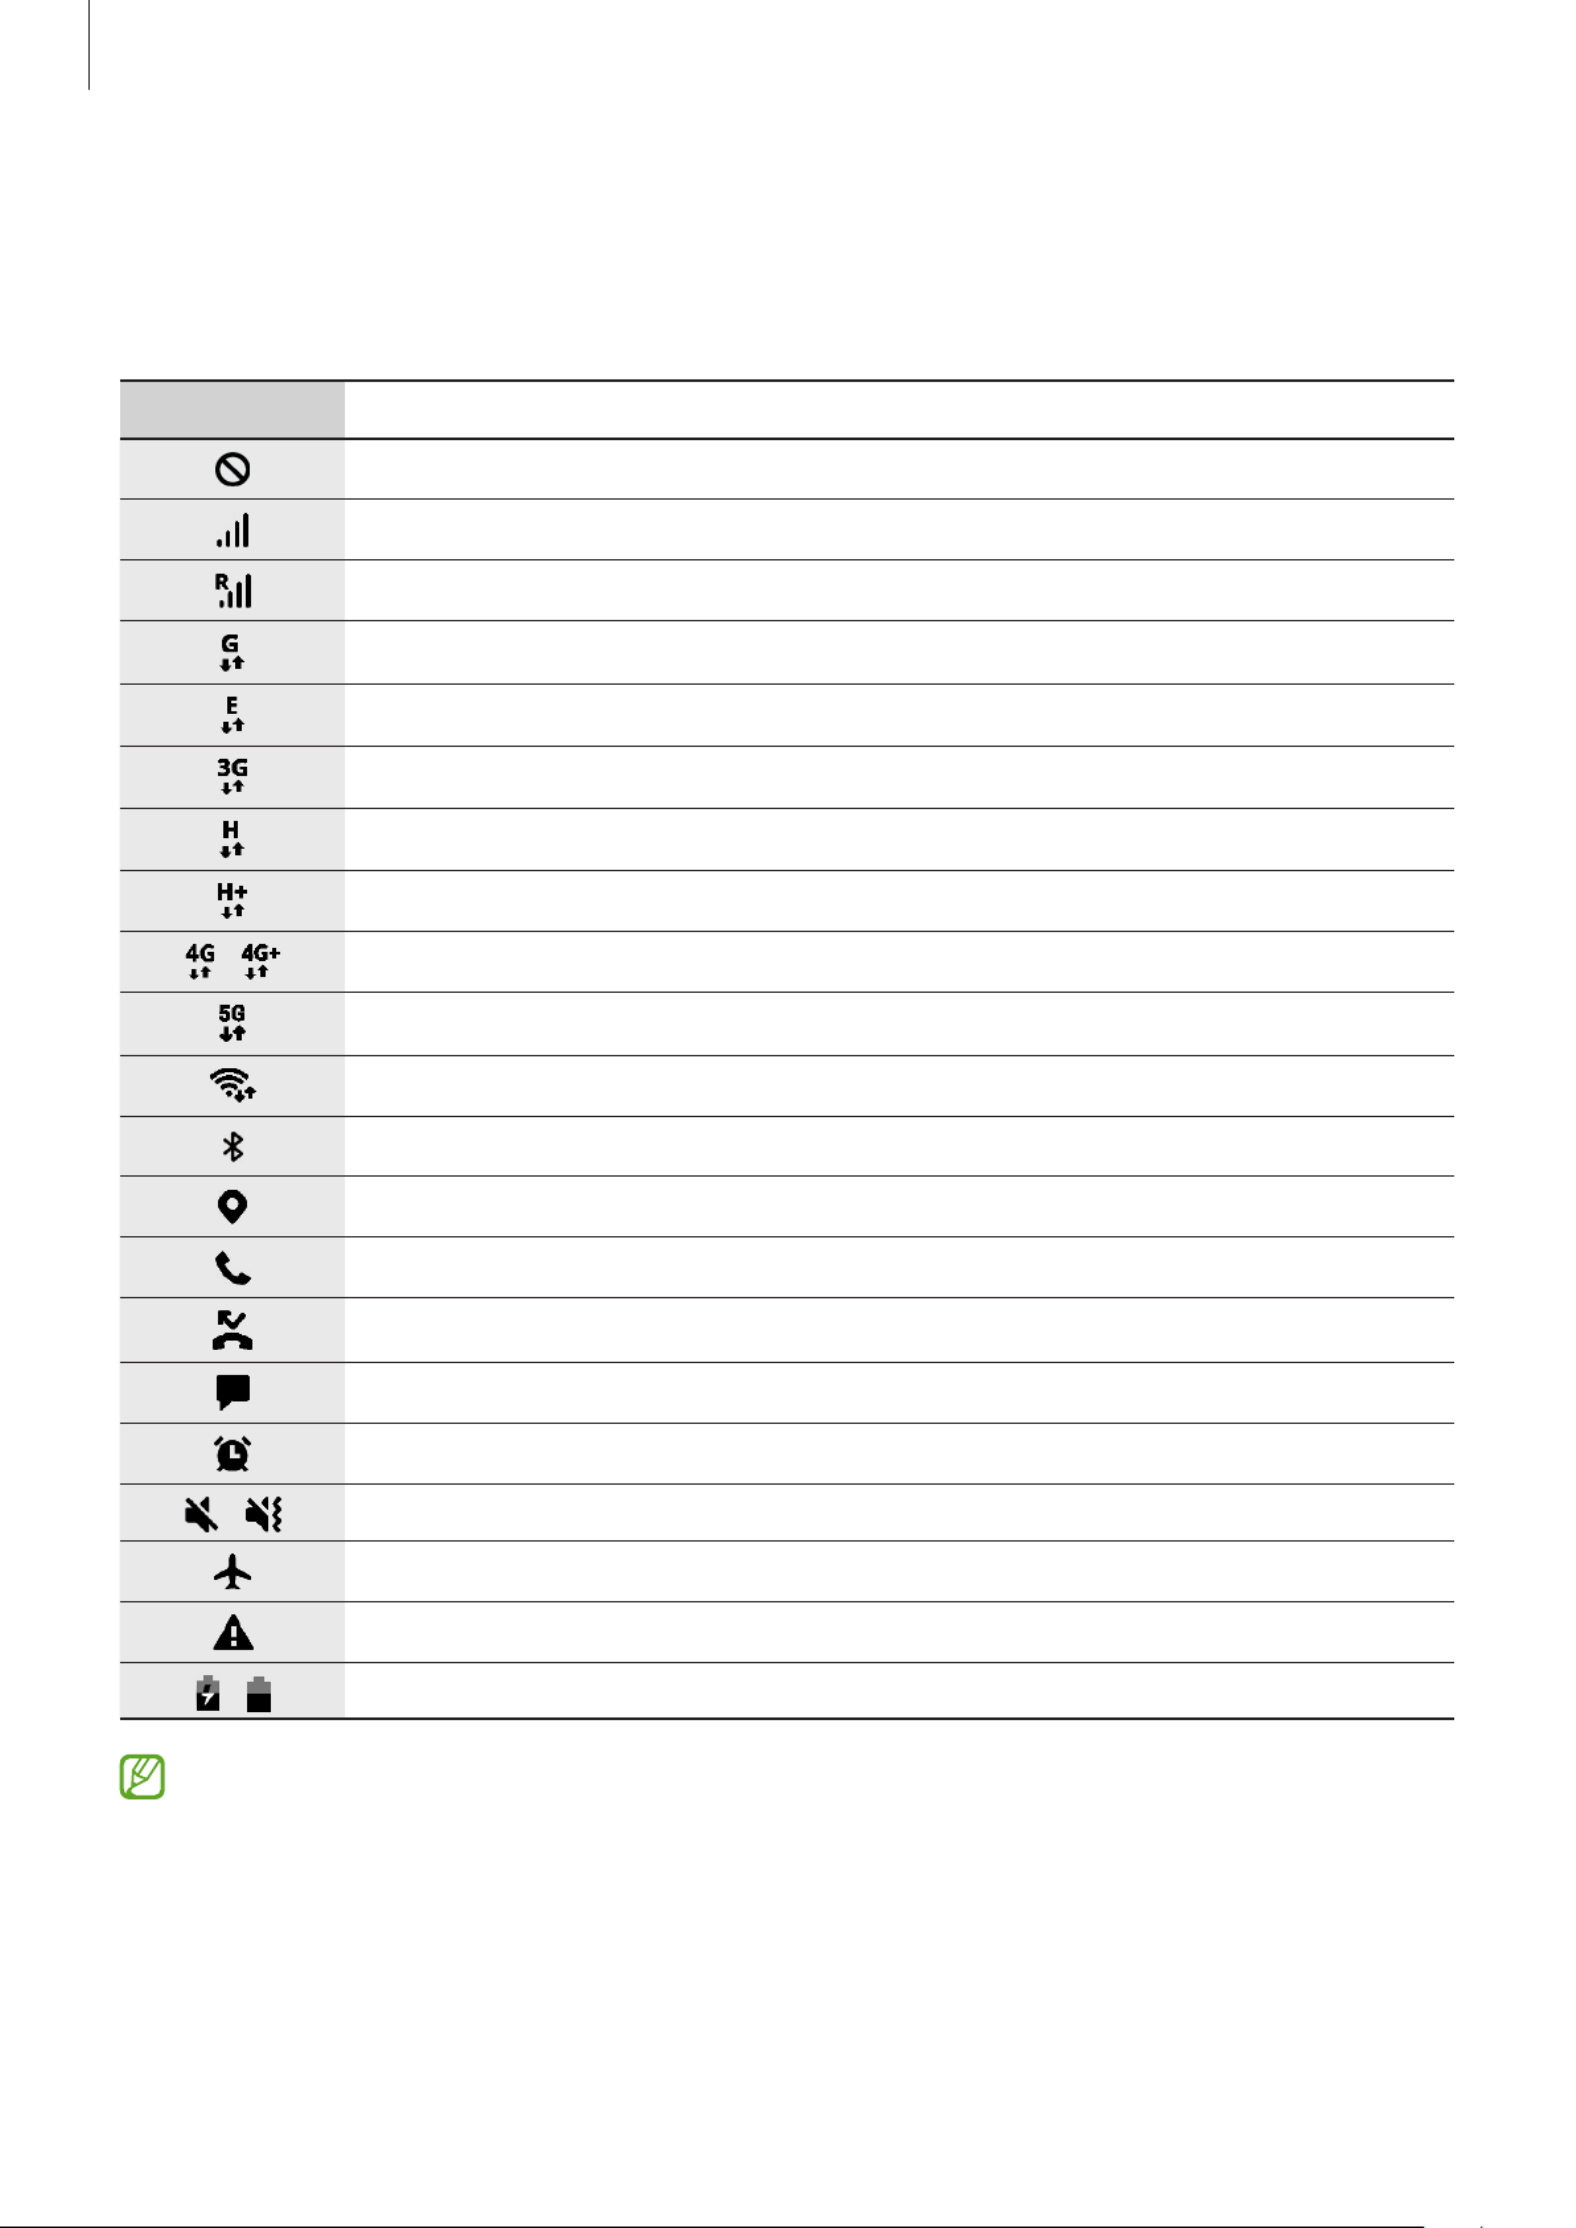
Indicator icons
Indicator icons appear on the status bar at the top of the screen. The icons listed in the table
below are most common.
Icon Meaning
No signal
Signal strength
Roaming (outside of normal service area)
GPRS network connected
EDGE network connected
UMTS network connected
HSDPA network connected
HSPA+ network connected
/ LTE network connected
5G 5G network connected / Device is in network that includes the network
Wi-Fi connected
Bluetooth feature activated
Location services being used
Call in progress
Missed call
New text or multimedia message
Alarm activated
/ Mute mode / Vibration mode
Flight mode activated
Error occurred or caution required
/ Battery charging / Battery power level
•
The status bar may not appear at the top of the screen in some apps. To display the
status bar, drag down from the top of the screen.
•
Some indicator icons appear only when you open the notification panel.
•
The indicator icons may appear differently depending on the service provider or
model.

Getting started
26
Notification panel
When you receive new notifications, indicator icons appear on the status bar. To see more
information about the icons, open the notification panel and view the details.
To open the notification panel, drag the status bar downwards. To close the notification panel,
swipe upwards on the screen.
You can use the following functions on the notification panel.
View the notification details and
perform various actions.
Control connected nearby devices
and SmartThings devices and
scenes.
Clear all notifications.
Launch Settings.
Access the notification settings.
Quick setting buttons
Control media on your device and
connected nearby devices.
Using quick setting buttons
Tap quick setting buttons to activate certain features. Swipe downwards on the notification
panel to view more buttons. To add more buttons, tap .
Adjust the brightness of the
display.
Quick setting buttons

Getting started
27
To change feature settings, tap the text under each button. To view more detailed settings,
tap and hold a button.
To rearrange buttons, tap
→
Edit buttons
, tap and hold a button, and then drag it to
another location.
Controlling media playback
Take control of music or video playback easily using the Media feature.
1 Open the notification panel and tap
Media output
.
2 Tap the icons on the controller to control the playback.
Controlling nearby devices
Launch quickly and take control of nearby connected devices and frequently used
SmartThings devices and scenes on the notification panel.
1 Open the notification panel and tap
Device control
.
Nearby connected devices and SmartThings devices and scenes will appear.
2 Select a nearby device or a SmartThings device to control it, or select a scene to launch it.

Getting started
28
Screen capture and screen record
Screen capture
Capture a screenshot while using the device.
Press the Side key and the Volume Down key simultaneously. You can view the captured
screenshots in
Gallery
.
It is not possible to capture a screenshot while using some apps and features.
After capturing a screenshot, use the following options on the toolbar at the bottom of the
screen:
•
: Capture the current content and the hidden content on an elongated page, such as a
webpage. When you tap , the screen will automatically scroll down and more content
will be captured.
•
: Write or draw on the screenshot or crop a portion from the screenshot. You can view
the cropped area in
Gallery
.
•
: Add tags to the screenshot. To search for screenshots by tag, tap
Search
at the top of
the Apps screen and tap
Screenshots
→
. You can view the tags list and easily search
for the screenshot you want.
•
: Share the screenshot with others.
If the options are not visible on the captured screen, launch the
Settings
app, tap
Advanced features
→
Screenshots and screen recorder
, and then tap the
Screenshot
toolbar
switch to activate it.

Getting started
29
Screen record
Record the screen while using your device.
1 Open the notification panel, swipe downwards, and then tap (
Screen recorder
) to
activate it.
2 Select a sound setting and tap
Start recording
.
After a countdown, recording will start.
•
To write or draw on the screen, tap .
•
To record the screen with a video overlay of yourself, tap .
3 When you are finished recording the video, tap .
You can view the video in
Gallery
.
To change the screen recorder settings, launch the
Settings
app and tap
Advanced
features
→
Screenshots and screen recorder
.
Entering text
Keyboard layout
A keyboard appears automatically when you enter text.
Break to the next line.
Enter numbers.
Delete a preceding character.
Enter symbols.
Change the input language.
Additional keyboard functions
Enter a space.
View more keyboard functions.
Text entry is not supported in some languages. To enter text, you must change the
input language to one of the supported languages.
Changing the input language
Tap the input language key to switch between the input languages. Tap
→
Languages
and types
→
Manage input languages
and select the languages to use.

Getting started
31
•
: Attach animated GIFs.
•
/ / : Enter stickers.
•
: Open the text editing panel.
Some features may not be available depending on the service provider or model.
Copying and pasting
1 Tap and hold over text.
2 Drag or to select the desired text, or tap
Select all
to select all text.
3 Tap
Copy
or
Cut
.
The selected text is copied to the clipboard.
4 Tap and hold where the text is to be inserted and tap
Paste
.
To paste text that you have previously copied, tap
Clipboard
and select the text.
32
Apps and features
Installing or uninstalling apps
Galaxy Store
Purchase and download apps. You can download apps that are specialised for Samsung
Galaxy devices.
Launch the
Galaxy Store
app. Browse apps by category or tap to search for a keyword.
•
This app may not be available depending on the service provider or model.
•
To change the auto update settings, tap
Menu
→
→
Auto update apps
, and then
select an option.
Play Store
Purchase and download apps.
Launch the
Play Store
app. Browse apps by category or search for apps by keyword.
To change the auto update settings, tap your account icon, tap
Settings
→
Network
preferences
→
Auto-update apps
, and then select an option.
Managing apps
Uninstalling or disabling apps
Tap and hold an app and select an option.
•
Uninstall
: Uninstall downloaded apps.
•
Disable
: Disable selected default apps that cannot be uninstalled from the device.
Some apps may not support this feature.
Enabling apps
Launch the
Settings
app, tap
Apps
→
→
Disabled
→
OK
, select an app, and then tap
Enable
.
Apps and features
33
Setting app permissions
For some apps to operate properly, they may need permission to access or use information
on your device.
To view your app permission settings, launch the
Settings
app and tap
Apps
. Select an app
and tap
Permissions
. You can view the app’s permissions list and change its permissions.
To view or change app permission settings by permission category, launch the
Settings
app
and tap
Apps
→
→
Permission manager
. Select an item and select an app.
If you do not grant permissions to apps, the basic features of the apps may not function
properly.
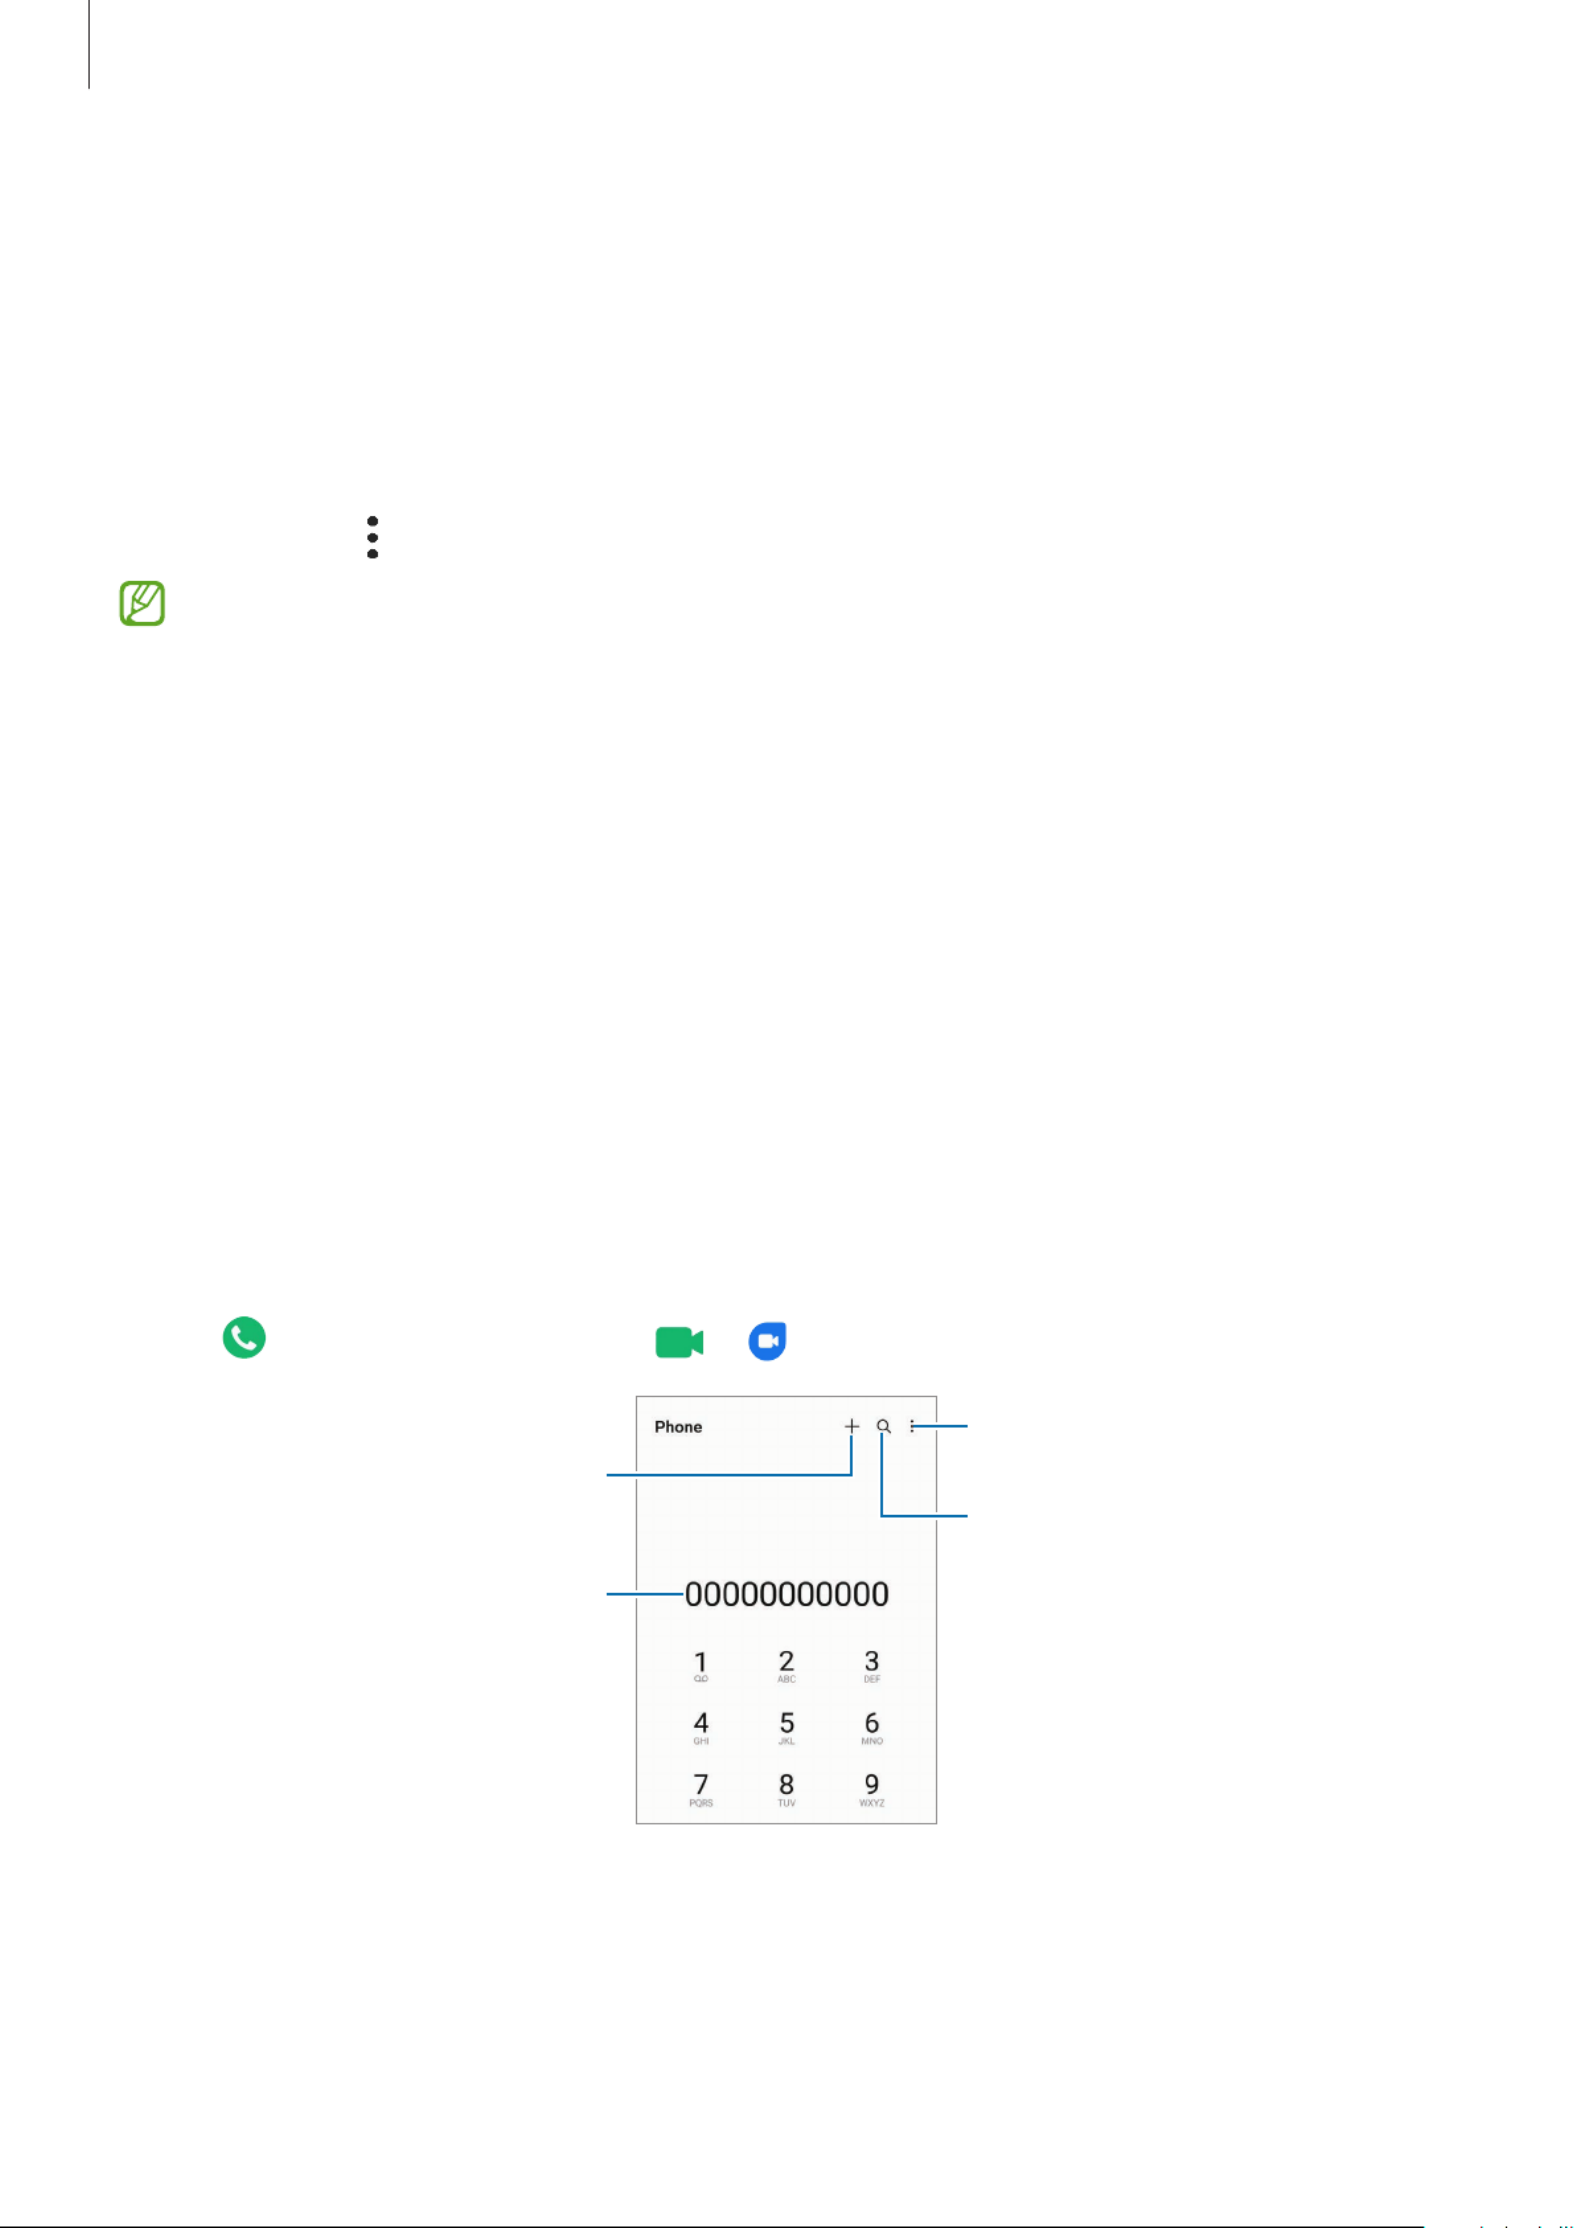
Phone
Introduction
Make or answer voice and video calls.
Making calls
1 Launch the
Phone
app and tap
Keypad
.
2 Enter a phone number.
3 Tap to make a voice call, or tap or to make a video call.
Preview the phone number.
More options
Search for a contact.
Add the number to the contacts
list.

Apps and features
34
Making calls from call logs or contacts list
Launch the
Phone
app, tap
Recents
or
Contacts
, and then swipe to the right on a contact or
a phone number to make a call.
If this feature is deactivated, tap
→
Settings
→
Other call settings
, and then tap the
Swipe
to call or text
switch to activate it.
Using speed dial
To set a number to speed dial, launch the
Phone
app, tap
Keypad
or
Contacts
→
→
Speed
dial numbers
, select a speed dial number, and then add a phone number.
To make a call, tap and hold a speed dial number on the keypad. For speed dial numbers 10
and up, tap the first digit(s) of the number, and then tap and hold the last digit.
For example, if you set the number as a speed dial number, tap , tap 123 1 2, and then tap and
hold 3.
Making an international call
1 Launch the
Phone
app and tap
Keypad
.
2 Tap and hold until the sign appears.0 +
3 Enter the country code, area code, and phone number, and then tap .
Receiving calls
Answering a call
When a call comes in, drag outside the large circle.
Rejecting a call
When a call comes in, drag outside the large circle.
To send a message when rejecting an incoming call, drag the
Send message
bar upwards
and select a message to send.
To create various rejection messages, launch the
Phone
app, tap
→
Settings
→
Quick
decline messages
, enter a message, and then tap .

Apps and features
35
Blocking phone numbers
Block calls from specific numbers added to your block list.
1 Launch the
Phone
app and tap
→
Settings
→
Block numbers
.
2 Tap
Recents
or
Contacts
, select contacts or phone numbers, and then tap
Done
.
To manually enter a number, tap
Add phone number
, enter a phone number, and then
tap .
When blocked numbers try to contact you, you will not receive notifications. The calls will be
logged in the call log.
You can also block incoming calls from people that do not show their caller ID. Tap the
Block unknown/private numbers
switch to activate the feature.
Options during calls
•
Add call
: Dial a second call. The first call will be put on hold. When you end the second
call, the first call will be resumed.
•
Hold call
: Hold a call.
•
Bluetooth
: Switch to a Bluetooth headset if it is connected to the device.
•
Speaker
: Activate or deactivate the speakerphone. When using the speakerphone, keep
the device away from your ears.
•
Mute
: Turn off the microphone so that the other party cannot hear you.
•
Keypad
/
Hide
: Open or close the keypad.
•
: End the current call.
•
Camera
: During a video call, turn off the camera so that the other party cannot see you.
•
Switch
: During a video call, switch between the front and rear cameras.
Some features may not be available depending on the service provider or model.

Apps and features
36
Contacts
Introduction
Create new contacts or manage contacts on the device.
Adding contacts
Creating a new contact
1 Launch the
Contacts
app and tap .
2 Select a storage location.
3 Enter contact information and tap
Save
.
Importing contacts
Add contacts by importing them from other storages to your device.
1 Launch the
Contacts
app and tap
→
Manage contacts
→
Import or export contacts
→
Import
.
2 Follow the instructions to import contacts.on-screen
Syncing contacts with your web accounts
Sync your device contacts with online contacts saved in your web accounts, such as your
Samsung account.
1 Launch the
Settings
app, tap
Accounts and backup
→
Manage accounts
and select the
account to sync with.
2 Tap
Sync account
and tap the
Contacts
switch to activate it.
Produktspezifikationen
| Marke: | Samsung |
| Kategorie: | Telefon |
| Modell: | Galaxy M33 |
| Display-Typ: | TFT |
| Touchscreen: | Ja |
| Bildschirmdiagonale: | 6.6 Zoll |
| Anzahl der Farben des Displays: | 16 Millionen Farben |
| RAM-Kapazität: | 6 GB |
| Anzahl Prozessorkerne: | 8 |
| Beschleunigungsmesser: | Ja |
| Gyroskop: | Ja |
| Unterstützte Audioformate: | 3GA, AAC, AMR, AWB, FLAC, IMY, M4A, MIDI, MP3, MXMF, OGA, OGG, OTA, RTTTL, RTX, WAV, XMF |
| GPS: | Ja |
| BeiDou: | Ja |
| GLONASS: | Ja |
| Galileo: | Ja |
| USB Anschluss: | Ja |
| WLAN: | Ja |
| WLAN-Standards: | 802.11a, 802.11b, 802.11g, Wi-Fi 4 (802.11n), Wi-Fi 5 (802.11ac) |
| Bluetooth: | Ja |
| Bluetooth-Version: | 5.1 |
| Nahfeldkommunikation (NFC): | Ja |
| Kopfhörer-Anschluss: | 3,5 mm |
| Akku-/Batteriekapazität: | 5000 mAh |
| Breite: | 76.9 mm |
| Tiefe: | 8.4 mm |
| Gewicht: | 198 g |
| Produktfarbe: | Braun |
| Höhe: | 165.4 mm |
| Bildschirmform: | Flach |
| Unterstützte Video-Modi: | 2160i |
| Unterstützte Videoformate: | 3G2, 3GP, AVI, FLV, M4V, MKV, MP4, WEBM |
| USB-Stecker: | USB Typ-C |
| USB-Version: | 2.0 |
| Maximale Framerate: | 30 fps |
| Auflösung bei Capture Geschwindigkeit: | 3840x2160@30fps |
| Autofokus: | Ja |
| Digitaler Zoom: | 10 x |
| Austauschbare Batterie: | Nein |
| Formfaktor: | Balken |
| Prozessor-Taktfrequenz: | 2.4 GHz |
| Standort-Position: | Ja |
| Interne Speicherkapazität: | 128 GB |
| Kompatible Speicherkarten: | MicroSD (TransFlash) |
| Max. Speicherkartengröße: | 1024 GB |
| Plattform: | Android |
| Rückkamera-Typ: | Quad-Kamera |
| Auflösung Rückkamera (numerisch): | 50 MP |
| Auflösung zweite Rückkamera (numerisch): | 5 MP |
| Rückkamera Blendenzahl: | 1.8 |
| Zweite Rückkamera Blendenzahl: | 2.2 |
| Frontkamera-Typ: | Einzelne Kamera |
| Auflösung Frontkamera (numerisch): | 8 MP |
| Frontkamera Blendenzahl: | 2.2 |
| Rückkamera-Blitz: | Ja |
| Blitz-Typ: | LED |
| Video-Auflösung: | 3840 x 2160 Pixel |
| Sprechzeit (3G): | - h |
| Standby-Zeit (3G): | - h |
| Umgebungslichtsensor: | Ja |
| SIM-Kartensteckplätze: | Dual-SIM |
| Mobilfunknetzgenerierung: | 5G |
| SIM-Kartentyp: | NanoSIM |
| 3G-Standards: | UMTS |
| 4G-Standard: | LTE-TDD |
| Wi-Fi Direct: | Ja |
| unterstützte 3G-Bandbreiten: | 850,900,1900,2100 MHz |
| unterstützte 4G-Bandbreiten: | 700,800,850,900,1800,1900,2100,2300,2500,2600 MHz |
| Abonnement-Typ: | Kein Abonnement |
| Art des Touchscreens: | Kapazitiv |
| Name der Farbe: | Braun |
| Fingerabdruckscanner: | Ja |
| Dritte Rückfahrkamera-Auflösung (numerisch): | 2 MP |
| Videoaufnahme-Modi: | 2160p |
| Dritte Rückfahrkamera Blendenzahl: | 2.4 |
| Browsingzeit (WLAN): | 22 h |
| Kopf-SAR (EU): | 1.042 W/kg |
| Körper-SAR (EU): | 1.378 W/kg |
| Vierte Rückfahrkamera-Auflösung (numerisch): | 2 MP |
| Vierte Rückfahrkamera Blendenzahl: | 2.4 |
| Sprechzeit (4G): | 44 h |
| Browsingzeit (4G): | 21 h |
| Quasi-Zenit-Satelliten-System (QZSS): | Ja |
| Magnetsensor: | Ja |
| 5G-Bänder unterstützt: | 700,800,850,900,1800,2100,2300,2600,3500 MHz |
| Extremitäten SAR (EU): | 1.94 W/kg |
| Display-Auflösung: | 1080 x 2408 Pixel |
Brauchst du Hilfe?
Wenn Sie Hilfe mit Samsung Galaxy M33 benötigen, stellen Sie unten eine Frage und andere Benutzer werden Ihnen antworten
Bedienungsanleitung Telefon Samsung

21 Juli 2024
9 Juli 2024
4 Juni 2024
28 November 2023
4 November 2023
24 Juni 2023
28 Mai 2023
4 Mai 2023
4 Mai 2023
2 Mai 2023
Bedienungsanleitung Telefon
- Telefon Infiniton
- Telefon Tristar
- Telefon Acer
- Telefon Anker
- Telefon Apple
- Telefon Asus
- Telefon BeeWi
- Telefon Hama
- Telefon Lexibook
- Telefon Logitech
- Telefon Medion
- Telefon Microsoft
- Telefon Philips
- Telefon SilverCrest
- Telefon Sony
- Telefon Sweex
- Telefon Tevion
- Telefon Trust
- Telefon Panasonic
- Telefon LG
- Telefon Roland
- Telefon ZyXEL
- Telefon Flex
- Telefon AEG
- Telefon Siemens
- Telefon Essentiel B
- Telefon Yamaha
- Telefon Yealink
- Telefon CSL
- Telefon Linksys
- Telefon XD Enjoy
- Telefon Netgear
- Telefon Denver
- Telefon Jacob Jensen
- Telefon MarQuant
- Telefon Renkforce
- Telefon Telefunken
- Telefon Thomson
- Telefon Trevi
- Telefon Blaupunkt
- Telefon Grundig
- Telefon Pyle
- Telefon GE
- Telefon Nordmende
- Telefon Fortinet
- Telefon Topcom
- Telefon ARCHOS
- Telefon Bang And Olufsen
- Telefon Pioneer
- Telefon Geemarc
- Telefon Jabra
- Telefon JBL
- Telefon Krüger And Matz
- Telefon Motorola
- Telefon Nokia
- Telefon PEAQ
- Telefon Sennheiser
- Telefon Xiaomi
- Telefon Olympia
- Telefon Switel
- Telefon Edenwood
- Telefon Hitachi
- Telefon ITT
- Telefon MT Logic
- Telefon Gigaset
- Telefon Toshiba
- Telefon Allview
- Telefon Cubot
- Telefon Fysic
- Telefon Lifetec
- Telefon Sencor
- Telefon Lindy
- Telefon Plantronics
- Telefon VXi
- Telefon Fenton
- Telefon Lenovo
- Telefon Marmitek
- Telefon Marshall
- Telefon Scosche
- Telefon TRENDnet
- Telefon Sagem
- Telefon AVM
- Telefon Parrot
- Telefon AVerMedia
- Telefon Zebra
- Telefon EnVivo
- Telefon Honor
- Telefon Aastra
- Telefon AGFEO
- Telefon Alcatel
- Telefon Amplicomms
- Telefon Audioline
- Telefon Auerswald
- Telefon Belgacom
- Telefon Binatone
- Telefon Brondi
- Telefon DeTeWe
- Telefon Doro
- Telefon Emporia
- Telefon Hagenuk
- Telefon Profoon
- Telefon Swatch
- Telefon Swissvoice
- Telefon Tiptel
- Telefon Vtech
- Telefon Logik
- Telefon Wiko
- Telefon Mackie
- Telefon Mitel
- Telefon NEC
- Telefon Overmax
- Telefon Airis
- Telefon Huawei
- Telefon Oricom
- Telefon Ranex
- Telefon Alcatel-Lucent
- Telefon Avaya
- Telefon Konftel
- Telefon Polycom
- Telefon Snom
- Telefon Wantec
- Telefon Uniden
- Telefon DrayTek
- Telefon Ascom
- Telefon Fanvil
- Telefon GPO
- Telefon Humantechnik
- Telefon Sagemcom
- Telefon RugGear
- Telefon D-Link
- Telefon T-Mobile
- Telefon Sylvania
- Telefon Kyocera
- Telefon EVOLVEO
- Telefon SPC
- Telefon Crosley
- Telefon Xblitz
- Telefon JPL
- Telefon HTC
- Telefon Prestigio
- Telefon Viking
- Telefon Auro
- Telefon BlackBerry
- Telefon Ericsson
- Telefon ZTE
- Telefon Cisco
- Telefon Grandstream
- Telefon Swisstone
- Telefon Unify
- Telefon OpenVox
- Telefon RCA
- Telefon OnePlus
- Telefon Bintec-elmeg
- Telefon Bogen
- Telefon Oppo
- Telefon Patton
- Telefon CAT
- Telefon Planet
- Telefon AT&T
- Telefon Realme
- Telefon Oregon Scientific
- Telefon EnGenius
- Telefon Mikrotik
- Telefon Davolink
- Telefon Gigaset Pro
- Telefon Innovaphone
- Telefon KPN
- Telefon Logicom
- Telefon Maxcom
- Telefon Oukitel
- Telefon Premier
- Telefon Proximus
- Telefon Sitecom
- Telefon SMC
- Telefon Spectralink
- Telefon Steren
- Telefon Sunstech
- Telefon Tecdesk
- Telefon Telstra
- Telefon Vimar
- Telefon British Telecom
- Telefon MXL
- Telefon AirLive
- Telefon Mitsai
- Telefon MyPhone
- Telefon BLU
- Telefon Audiocodes
- Telefon Legrand
- Telefon BT
- Telefon Amplicom
- Telefon Opel Mobile
- Telefon Digium
- Telefon Gamdias
- Telefon Chacon
- Telefon Clear Sounds
- Telefon On-Q
- Telefon Crestron
- Telefon 3Com
- Telefon Lewitt
- Telefon Teledex
- Telefon Tecno
- Telefon Sedna
- Telefon ALLO
- Telefon Hamlet
- Telefon Akuvox
- Telefon CyberData Systems
- Telefon CTA Digital
- Telefon Canyon
- Telefon Primare
- Telefon Dopod
- Telefon Neat
- Telefon Syco
- Telefon Tador
- Telefon 4family
- Telefon ArtDio
- Telefon Valcom
- Telefon Edge-Core
- Telefon Clarity
- Telefon Vogtec
- Telefon Olitech
- Telefon Cortelco
- Telefon Algo
- Telefon Future Call
- Telefon Dnake
- Telefon Liam&Daan
- Telefon FlyingVoice
Neueste Bedienungsanleitung für -Kategorien-

1 Dezember 2024
1 Dezember 2024

30 November 2024

15 Oktober 2024

15 Oktober 2024
14 Oktober 2024
13 Oktober 2024
11 Oktober 2024
9 Oktober 2024
7 Oktober 2024