Salora DPF 7125 DIG Bedienungsanleitung
Salora
Digitaler Fotorahmen
DPF 7125 DIG
Lesen Sie kostenlos die 📖 deutsche Bedienungsanleitung für Salora DPF 7125 DIG (4 Seiten) in der Kategorie Digitaler Fotorahmen. Dieser Bedienungsanleitung war für 27 Personen hilfreich und wurde von 2 Benutzern mit durchschnittlich 4.5 Sternen bewertet
Seite 1/4

USER MANUAL
Digital Photo Frame
1) Please read the instruction manual carefully and follow all the requirements of safe operation to operate the device.
2) Do not use this unit near water. Do not place over the unit any container with liquid inside.
3) Do not install near any heat sources such as radiators, heat registers, stoves, or other apparatus (including
amplifiers) that produce heat.
4) Unplug this unit during lightning, storms or when not use for long.
5) About Cleaning: Unplug the system, use only wet cloth to clean. Do not use liquid detergent or aerosol.
6) Only use accessories specified by the manufacturer.
7) Refer all servicing to qualified service personnel, servicing is required when the unit has been damaged in any way,
such as power supply cord or plug is damaged, liquid has been spilled or objects have fallen into the unit, exposed
to moisture, does not operate normally. Don't try to repair the machine by yourself because of the danger of high
voltage and electric shock.
Warning: To reduce the risk of fire or electric shock, do not expose this apparatus to rain or moisture.
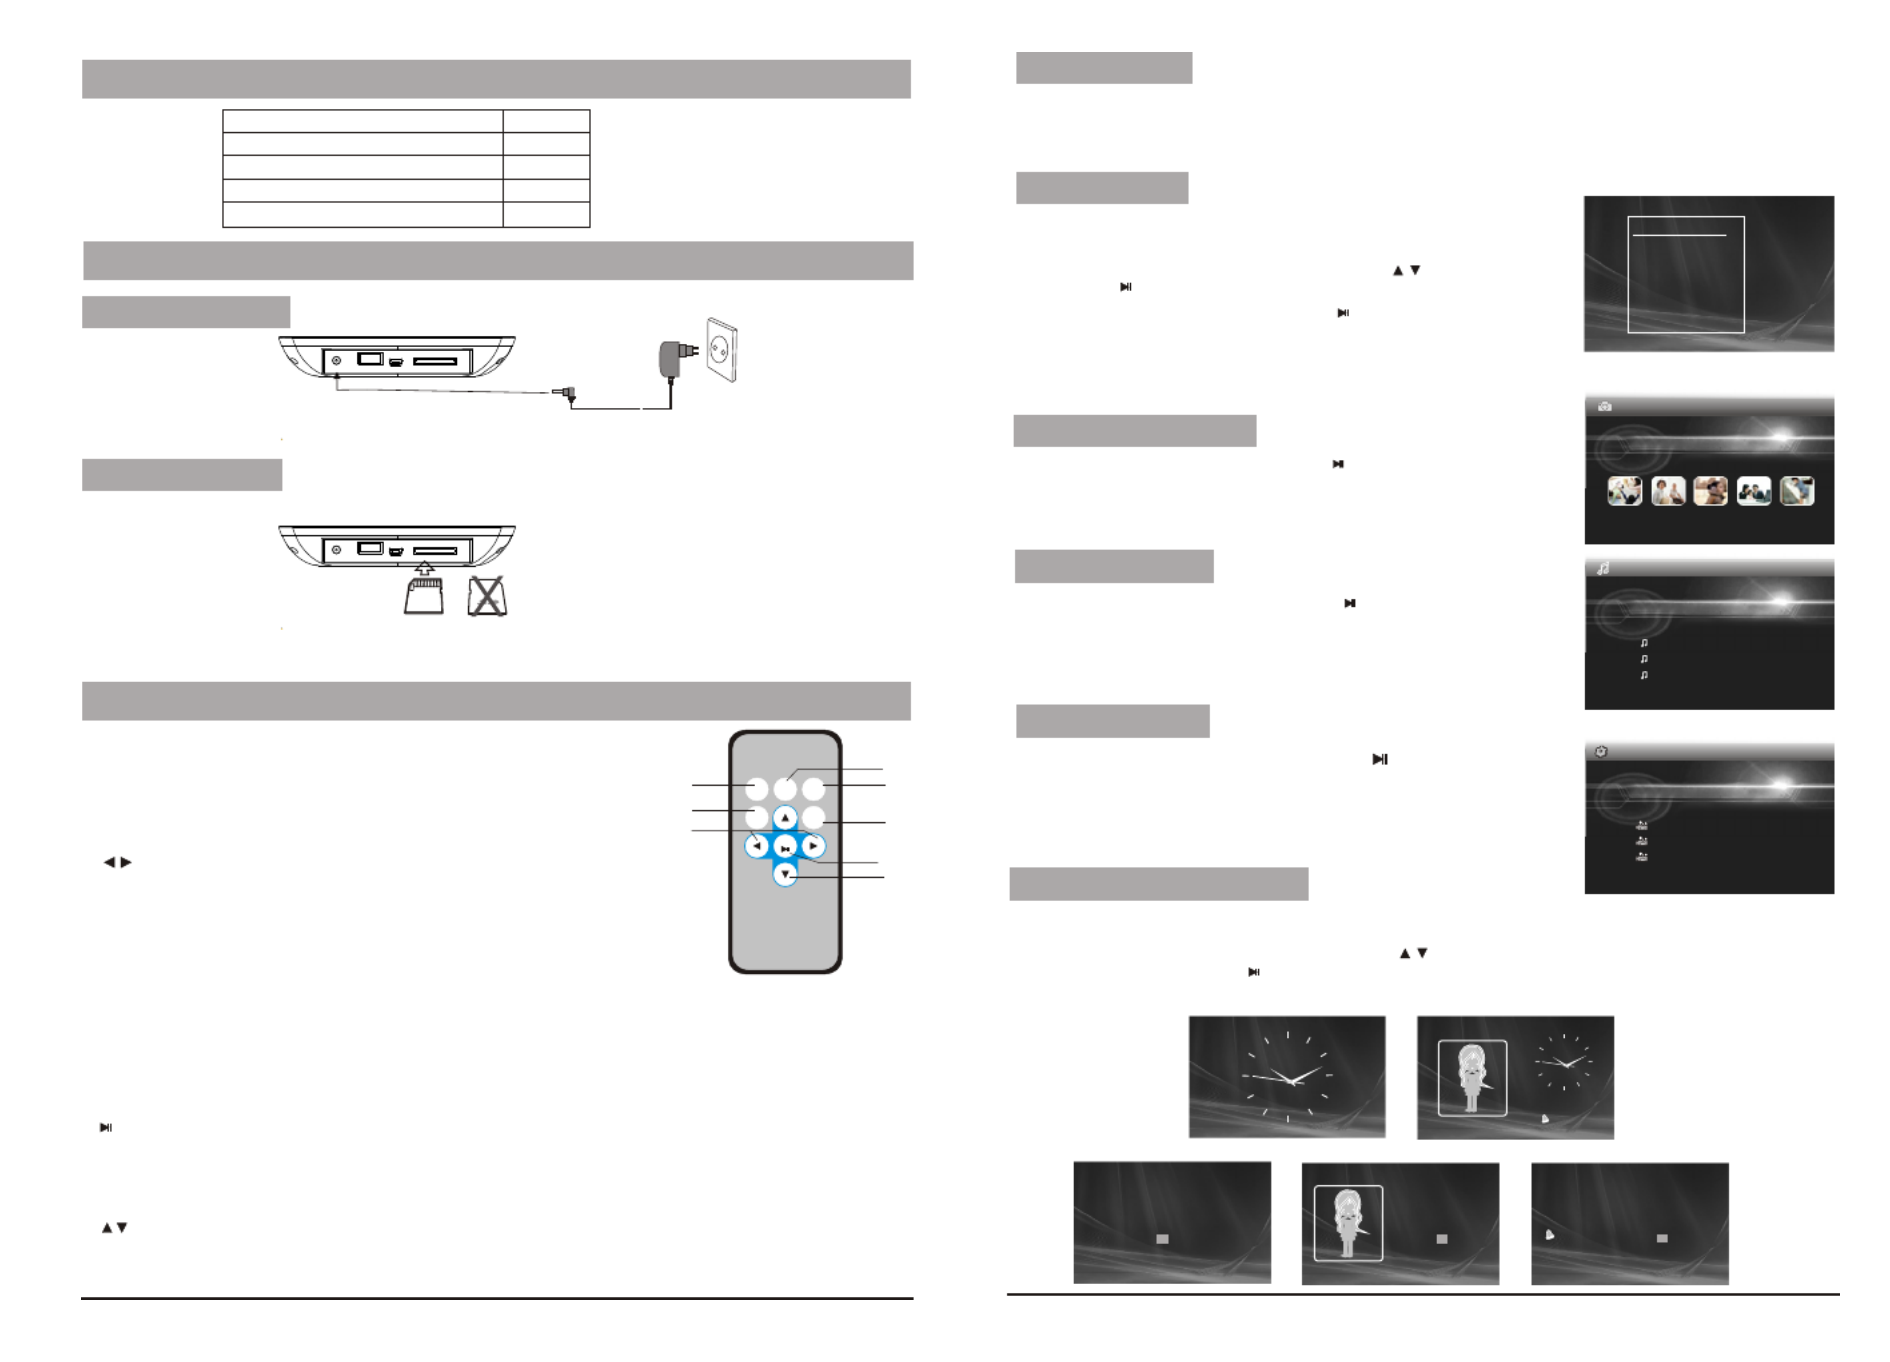
Support SD/MMC/MS card and USB device. Internal Nand flash.
Able to read MP3, JPEG, MPEG, AVI files(Bit rate under 2.5 Mb/s).
Main Features
Main Unit Controls
1. DC in 5V 2. SD card slot
3. Mini USB port 4. USB port
5. Power :turn on and turn off the unit
6. Menu: Press this button to return menu root from play mode, when it's time display mode,
press this key to return menu root; When playing video, press it to enter folder list;
7. : Use this button to move cursor up and down when at menu, setting menu, play list interface
When playing video or JPEG files, press it to play next/prev video file or JPEG file.
When the picture is enlarged, press it to move the picture up or down.
8. Enter : Press this button to enter the submenu step when at menu root and setting menu; when at play list,
press this button to play and pause; when displaying pictures, press this button for delete or
copy function. when at time set mode, press this button to switch from year, month, day, hour, minute,
a.m,p.m;
9. Mode: When automatic playing photo, press this button to switch automatic play mode(Photo single view,
Photo slide show, multi image view, calendar + picture, timer +picture); when at music or video
play mode, press this button to forward to volume adjusting, press it twice to go fast forward or
backward, press it third to return to play mode.
10. Base
CAUTION
RISK OF ELECTRIC SHOCK
DO NOT OPEN
Safety Precautions
Warning: To alert the user to dangerous
voltage inside the unit
1
1
2
3
4
5
6
7
7
8
9
10
2
Main unit
Instruction manual
Remote control with battery
AC/DC power adapter
1 PC
1 PC
1 PC
1 PC
Package
Plug one end of the supplied AC/DC power adaptor into the DC input jack of the machine, then plug the
other end into the AC power receptacle. Please refer to the illustration above.
System Connection
Power connection
Upon using an SD card, insert it to the corresponding slot flatly with the label side backward until you hear a click.
Using your SD card
Note: Please do not disconnect USB device or plug out SD/MMC/MS card while they are working with the unit.
Functional failure may occur in case of wrong operations.
Remote Control
3. Button
When playing video file, press this button to fast forward or back forward.
When viewing picture, press it to rotate the picture clockwise or counter-clockwise.
When zooming in the picture, press it to move the picture left or right.
4. MENU
Press this button to return menu root from play mode, when it's time display mode,
press this key to return menu root,When playing video, press it to enter folder list;
5. MODE
When automatic playing photo, press this button to switch automatic play mode(Photo single play, Photo slide
show, multi image view, calendar + picture, timer +picture); when at music or video play mode, press this button
to forward to volume adjusting, press it twice to go fast forward or backward, press it third to return to play mode.
1. REPEAT
When playing Music or video files, press "REPEAT" button
to repeat playback of track/All.
2. ZOOM
While play photo, press this key to zoom in or out.
REP EAT MO D E
RC- M4 6E
OK
ME NU
SE T UP Z OO M
1
2
3
8
4
5
6
7
7. /OK
To confirm when selecting an option on the menu.
During playback, press it to start to play; press it again to pause.
When at time set mode, press this button to switch from year, month, day, hour, minute, a.m,p.m;
when displaying pictures, press this button for delete or copy function.
8. button
When playing video or JPEG files, press it to play next/prev video file or JPEG file.
When the picture is enlarged, press it to move the picture up or down.
6. SETUP
Press this key to enter into setup menu.
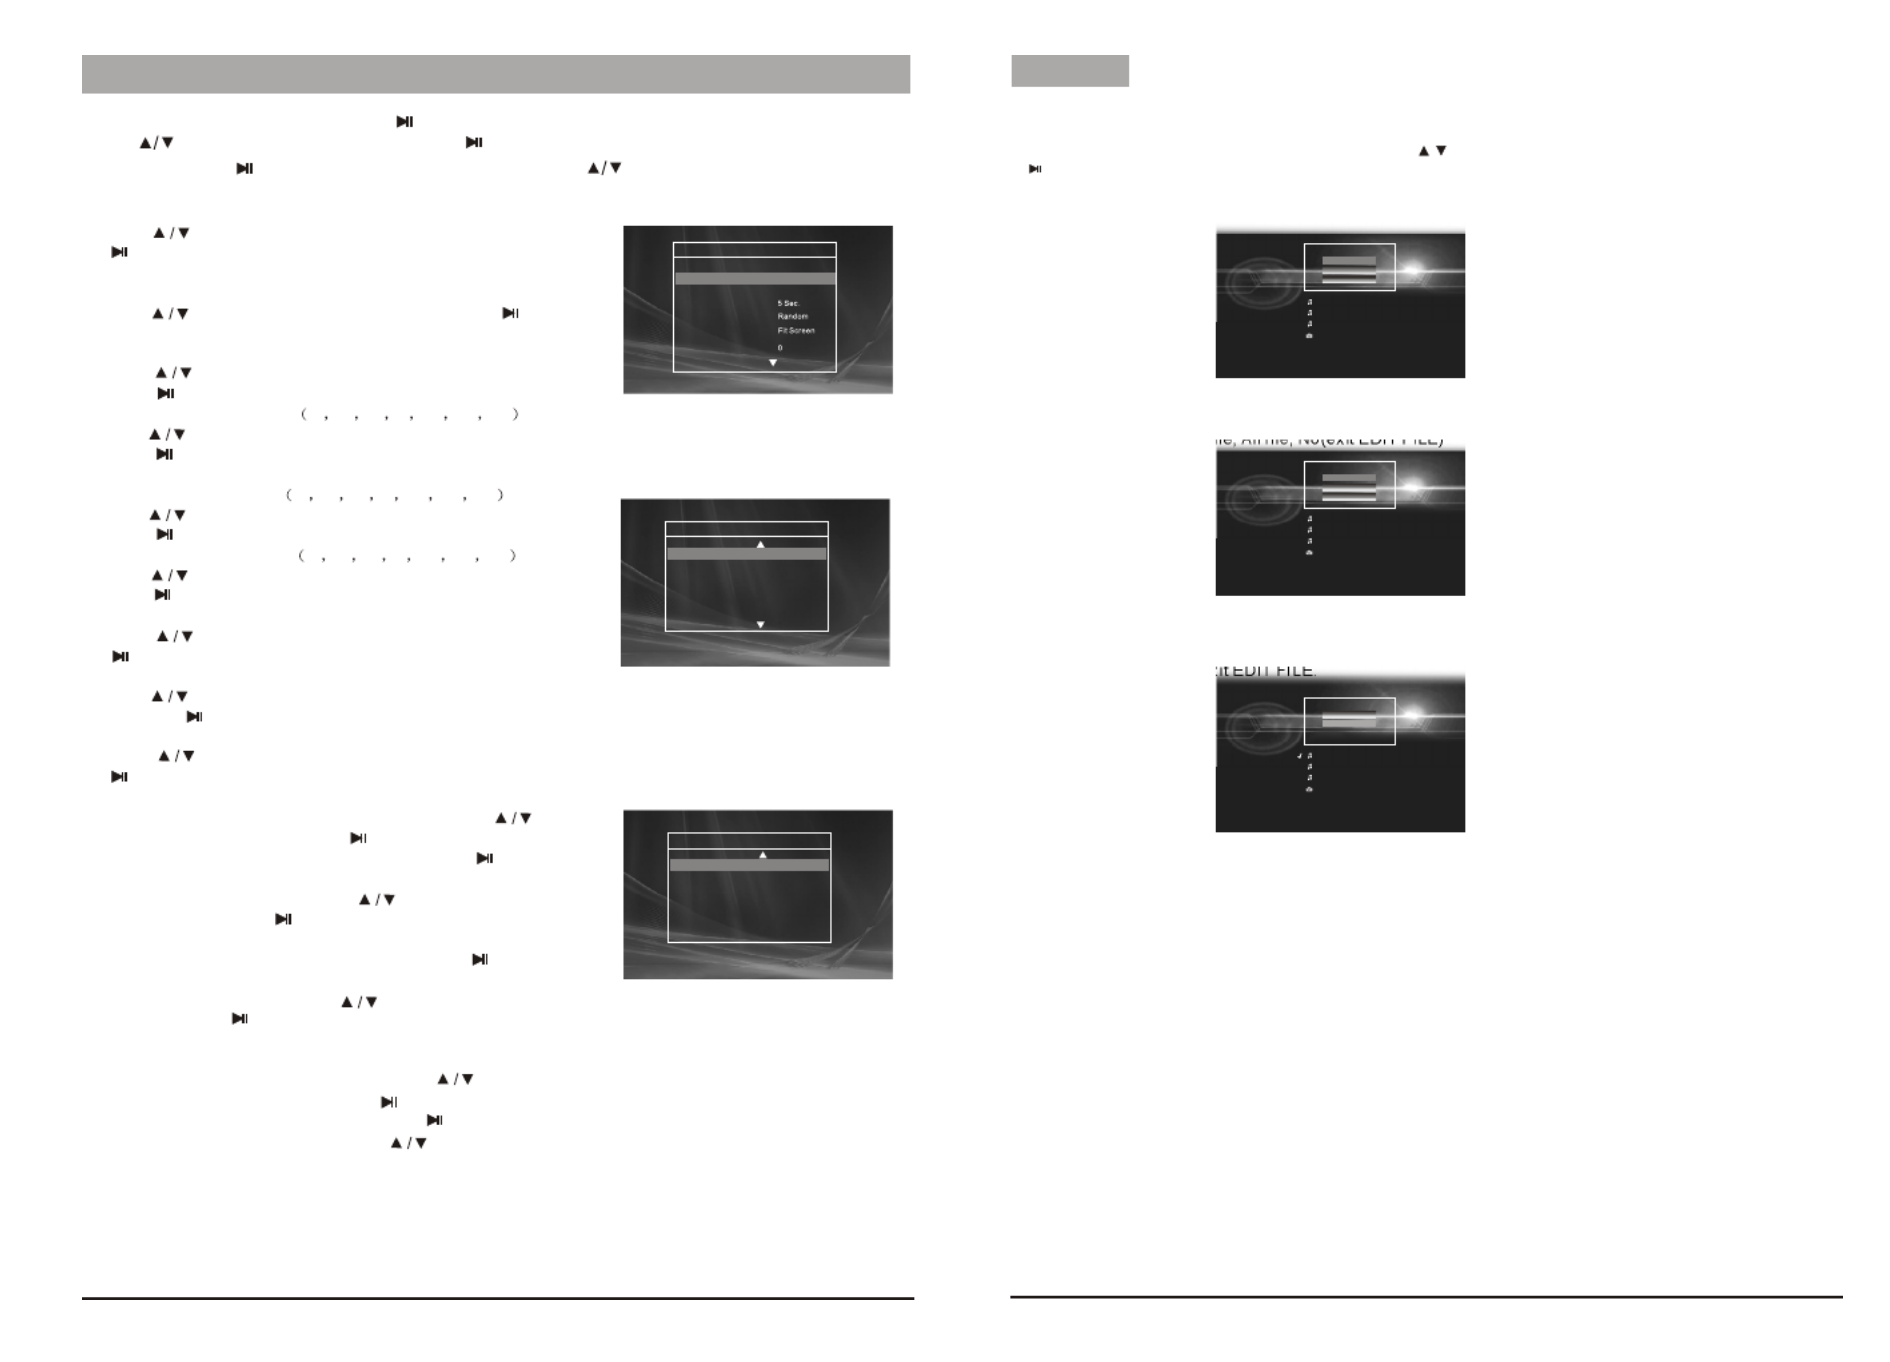
1. After connecting power to the unit, turn on the unit with the POWER button.
2. Insert USB device or SD/MMC/ MS card.
3.The unit will automatically play image when turn on.Then you can press MODE butten to select display
Mode circularly, as photo single play/photo slide show/multi image view/clock and photo view/calendar and photo view.
3. Press MENU butten to enter the main menu. Use “ “button to select the
option, press “ /OK” or “ENTER”button to confirm.
Auto Playing file
USB device will be read only. To select the media source, press
MENU button to access the Setup-Media.
MENU
EXIT
PHOTO
MUSIC
PHOTO MUSIC
MOVIE
CLOCK
SET UP
EDIT FILE
Custom playing
1. After connecting power to the unit, turn on the unit with the POWER button.
2. Insert USB device or SD/MMC/ MS card.
Notice: When selecting an option and press “ /OK”or “ENTER” button to play,
the unit will automatically check whether USB device or other card has
been connected to the unit. If both USB device and card are inserted,
Select “ Photo” option on main menu, press “ /OK” or “ENTER”button to play.
Under this mode, only JPEG file is available to play. The unit will automatically
play JPEG when entering this mode.
Playing JPEG file(photos)
Phot o
Select MOVIE option on main menu, press “ /OK” button
to enter the menu. Under this mode,only video file of DAT, MPG and AVI
is available to play.
“ ” or “ENTER”
Playing video file
MUSIC
XXXX
XXXX
XXXX
XXXXXXXX
MOVIE
XXXX
XXXX
XXXX
XXXXXXXX
Select “ MUSIC” option on main menu, press “ /OK ” or “ENTER”button to
enter the menu. Under this mode, only Music file(MP3 file) is available to play.
The unit will automatically list all music files when entering this mode .
Playing music files
Calendar and clock display
1. After connecting power to the unit, turn on the unit with the “POWER” button.
2. Press “MENU” butten to enter the main menu. Use “ ”button to select
the “CLOCK” option, Press“ /OK” or “ENTER”button to confirm. Use
“ MODE ” button to select the calendar and clock display mode.
10:30:28 A M
09:3 0
2009- 03-18 March
S M T W T F S
1234567
8 9 1 0 1 1 1 2 1 3 1 4
15 1 6 17 18 19 20 2 1
22 23 24 25 26 2 7 28
29 30 31
2009- 03-18 March
S M T W T F S
1234567
8 9 1 0 11 1 2 13 1 4
15 16 17 18 19 20 21
22 23 24 25 26 27 28
29 30 31
10:3 0:28AM
09:30
2009- 03- 18 March
S M T W T F S
1 2 3 4 5 6 7
8 9 1 0 11 1 2 1 3 14
15 16 17 18 19 20 21
22 23 24 25 26 27 28
29 30 31
3
USB cable 1 PC
4
System Setup
Select “SETUP” on main menu and press “ / OK” or “ENTER” button to enter setup menu. In setup menu, user can
press “ ” button to select below item, and press “ / OK” or “ENTER” button to confirm.
2.“Interval Time” of picture display (5Sec.,10Sec.,15Sec.,30Sec.,
1Min.,3Min.,Off).
Press “ ”to choose the item you desire, and press
“ / OK” or “ENTER” button to exit.
3.“Transition Effect” of picture display (No Effect, Rombus,
Rectspread, Blind Vertical,Blind Horizontal, Random).
Press “ ”to choose the item you desire, and press “ /
OK” or “ENTER” button to exit.
4.“Show Type” of screen (Full, Screen, Fit Screen).
Press “ ”to choose the item you desire, and
press “ / OK” or “ENTER” button to exit.
5.“TFT Brightness” of screen -3 -2 -1 0 +1 +2 +3 .
Press “ ”to choose the item you desire, and
press “ / OK” or “ENTER” button to exit.
6.“TFT Contrast” of screen -3 -2 -1 0 +1 +2 +3 .
Press “ ” to choose the item you desire, and
press “ /OK” or “ENTER” button to exit.
7.“TFT Saturation” of screen -3 -2 -1 0 +1 +2 +3 .
Press “ ” to choose the item you desire, and
press “ /OK” or “ENTER” button to exit.
8.“OSD Language” (English, French, German,Italian ).
Press “ ” to choose the item you desire, and press
“ /OK” or “ENTER” button to exit.
9.“Repeat Mode” of play music and video (All, One, Off).
Press “ ” to choose the item you desire,
and press “ /OK” or “ENTER” button to exit.
10.“Media” of auto-play (SD/MMC/MS,USB,Nand). After inserting USB or SD/MMC/MS card,
Press “ ” to choose the item you desire, and press
“ / OK” or “ENTER” button to exit.
11.“Time mode” Move the cursor to “Time mode”, press “ ”
to choose 24H or 12H and press “ / OK” or “ENTER” to exit.
12.“Set Time” Move the cursor to Set Time, and press “ / OK”
or “ENTER” to start the time setting, and change the setting
for Hour, Minute and Second, press“ ” to change the
number and then press “ / OK” or “ENTER” to exit. When clock
shown as 12-hour system, the user have to choose AM or PM.
13.“Set Date” Move the cursor to Set Date, and press“ / OK”
or “ENTER” to start the date setting, and change the setting
for Year, Month and Day, press “ ” to change the number
and then press “ / OK” or “ENTER” to exit.
14.“Alarm Setting” Move the cursor to Set Alarm, and press
“ OK” or “ENTER” to start the alarm setting, and change the
setting for Hour, Minute and On or Off, press “ ” to change
the number and On or Off, then press“ / OK” or“ENTER” to exit.
15.“Default” Move the cursor to “Default”, press“ / OK” or
“ENTER” to enter the item, and press “ ”to return to the
original factory setting.
SE T UP
Exit to MENU
Int e rv al Time
Transit io n Ef fect
Sho w Type
TFT Bright ness
Exit
SE T UP
T F T Cont rast
T F T Sat urat ion
OSD Lang ua g e
Repeat Mod e
Media
T ime mode
0
0
Eng lis h
All
SD
24 hours
SE T UP
Set Time
Set Dat e
Alarm Se t t ing
De f aul t
00:00:0 0
2009/04/01
00:00 Of f
Read
5
Fo rmat NF Yes
1. "Format" press “ / OK” or “ENTER” button to option. Press " " to format Nand flash.
EDIT FILE
When no device is connected, the unit will play the audio/video files stored in Nand Flash; When no
playable file in Nand Flash, the unit will go to Clock interface.
When no device is connected, it is used to delete the pictures, music and video files stored in Nand
Flash. It includes (exit EDIT FILE)
When device connected, it is used to copy the pictures, music and video files from device to Nand
Flash. It includes (exit EDIT FILE)
After choosing select delete or copy, choose the file you want to delete or copy, then press MENU,
select YES or NO, then exit EDIT FILE.
Press “MENU” butten to enter the main menu. Use “ ”button to select the “EDIT FILE” option, Press
“ /OK” or “ENTER”button to confirm.
Select file, All file, No
Select file, All file, No
De let e f ile
Se lec t f i le
Al l f ile
No
XXXXX.mp3
XX XXX XX .mp3
XXXXX.mp3
XXXXX.jpg
Cp oy f ile
Se lec t f i le
Al l f ile
No
XX XXX X. m p3
XX XXX X. m p3
XXXXX.mp3
XX XXX XX .jpg
Cp oy f ile
No
XX XXX X. m p3
XX XXX X. m p3
XXXXX.mp3
XX XXX XX .jpg
Yes
Produktspezifikationen
| Marke: | Salora |
| Kategorie: | Digitaler Fotorahmen |
| Modell: | DPF 7125 DIG |
Brauchst du Hilfe?
Wenn Sie Hilfe mit Salora DPF 7125 DIG benötigen, stellen Sie unten eine Frage und andere Benutzer werden Ihnen antworten
Bedienungsanleitung Digitaler Fotorahmen Salora

16 Oktober 2024
8 September 2024
31 Juli 2024
21 Juli 2024
11 Juli 2024
Bedienungsanleitung Digitaler Fotorahmen
- Digitaler Fotorahmen Hama
- Digitaler Fotorahmen Lexibook
- Digitaler Fotorahmen Philips
- Digitaler Fotorahmen Sony
- Digitaler Fotorahmen Sweex
- Digitaler Fotorahmen Clas Ohlson
- Digitaler Fotorahmen XD Enjoy
- Digitaler Fotorahmen Netgear
- Digitaler Fotorahmen Denver
- Digitaler Fotorahmen Intenso
- Digitaler Fotorahmen MarQuant
- Digitaler Fotorahmen Telefunken
- Digitaler Fotorahmen TFA
- Digitaler Fotorahmen Trevi
- Digitaler Fotorahmen Braun
- Digitaler Fotorahmen Coby
- Digitaler Fotorahmen DIFRNCE
- Digitaler Fotorahmen Lenco
- Digitaler Fotorahmen Motorola
- Digitaler Fotorahmen Akai
- Digitaler Fotorahmen Hannspree
- Digitaler Fotorahmen Ricatech
- Digitaler Fotorahmen Sencor
- Digitaler Fotorahmen ViewSonic
- Digitaler Fotorahmen Sagem
- Digitaler Fotorahmen Sigma
- Digitaler Fotorahmen Xoro
- Digitaler Fotorahmen Binatone
- Digitaler Fotorahmen Kodak
- Digitaler Fotorahmen Agfa
- Digitaler Fotorahmen Logik
- Digitaler Fotorahmen Kogan
- Digitaler Fotorahmen Energy Sistem
- Digitaler Fotorahmen Jobo
- Digitaler Fotorahmen Sylvania
- Digitaler Fotorahmen Transcend
- Digitaler Fotorahmen Dörr
- Digitaler Fotorahmen Maxell
- Digitaler Fotorahmen Naxa
- Digitaler Fotorahmen Qmedia
- Digitaler Fotorahmen Veho
- Digitaler Fotorahmen AgfaPhoto
- Digitaler Fotorahmen Aluratek
- Digitaler Fotorahmen Brigmton
- Digitaler Fotorahmen NIX
- Digitaler Fotorahmen Promate
- Digitaler Fotorahmen Braun Phototechnik
- Digitaler Fotorahmen Micca
- Digitaler Fotorahmen Vankyo
- Digitaler Fotorahmen Majestic
- Digitaler Fotorahmen Sungale
- Digitaler Fotorahmen Palsonic
- Digitaler Fotorahmen Digital Foci
Neueste Bedienungsanleitung für -Kategorien-
15 Oktober 2024
8 Oktober 2024
1 Oktober 2024
27 September 2024
19 September 2024
15 September 2024
9 September 2024
6 September 2024
5 September 2024
5 September 2024