Pantum P2509 Bedienungsanleitung
Lesen Sie kostenlos die 📖 deutsche Bedienungsanleitung für Pantum P2509 (95 Seiten) in der Kategorie Drucker. Dieser Bedienungsanleitung war für 19 Personen hilfreich und wurde von 2 Benutzern mit durchschnittlich 4.5 Sternen bewertet
Seite 1/95

User Guide
It is recommended to carefully read this Guide before using the printer
Pantum P2200/P2500 Series
Pantum P2600 Series
Monochrome Laser Printer

I
Preface
Welcome to the Pantum series products!
We heartily appreciate your using of Pantum series products!
To protect your vital interests, please carefully read the following statements.
Legal Notice
Trademark
Pantum and Pantum are registered trademarks of Zhuhai Pantum Electronics Co.,Ltd. logos
Microsoft®, Windows®, Windows Server® and Windows Vista® are trademarks registered by
Microsoft Corporation in the United States or other countries/regions.
Wi-Fi® and Wi-Fi Protected Setup™ are registered trademarks of the Wi-Fi Alliance.
The ownership to the names of the software in this User Guide belongs to their respective
owned companies in accordance with corresponding license agreement, and they are referred
for instructions onl .y
All other product and brand names herein may be the registered trademarks, trademarks or
service marks of their respective owners, and they are referred for instructions only.
Copyright
The copyright of this User Guide is owned by Zhuhai Pantum Electronics Co.,Ltd.
It is prohibited to copy, translate, modify and transmit this User Guide by any means or forms
without the prior written consent of Zhuhai Pantum Electronics Co.,Ltd.
Version: V1 .4
Disclaimer
For a better user experience, Zhuhai Pantum Electronics Co.,Ltd. reserves the right to make
changes to the User Guide. The information contained herein is subject to change without
notice.
Users are responsible for any damages arising from failing to follow this User Guide.
Meanwhile, except the express warranty made in the product maintenance manual or service
commitment, Zhuhai Pantum Electronics Co.,Ltd. does not make any express or implied
warranty or guarantee to this User Guide (including composing or words).
Using this product to copy, print, scan certain documents or images or make other forms
of operations may be prohibited by the local laws. If you are uncertain about the legality of
using this product for certain documents or images, you should consult your legal advisor in
advance.
Mopria®, the Mopria® Logo and the Mopeia® Alliance logo are registered trademarks
and service marks of Mopria Alliance, Inc. in the United States and other countries.
Unauthorized use is strictly prohibited.

II
Safety Precautions
Disconnect the power supply
The product should be placed close to or easily accessible to power sockets, so as to allow
easy disconnection of power supply!
Laser Safety
The laser radiation is harmful to the human body. Since laser components are completely
sealed in the printer, laser radiation will not leak. o avoid laser radiation, please do not T
randomly disassemble the printer!
The printer follows the provisions of Class 1 laser products under CFR standard. The printer
has a Class III B laser diode, which has no laser radiation leakage among laser components.
The laser components shall complies with the requirements of: U.S. Code of Federal Regulations, 21
CFR 1040, IEC 60825-1
The following label is attached to the laser components inside the printer:
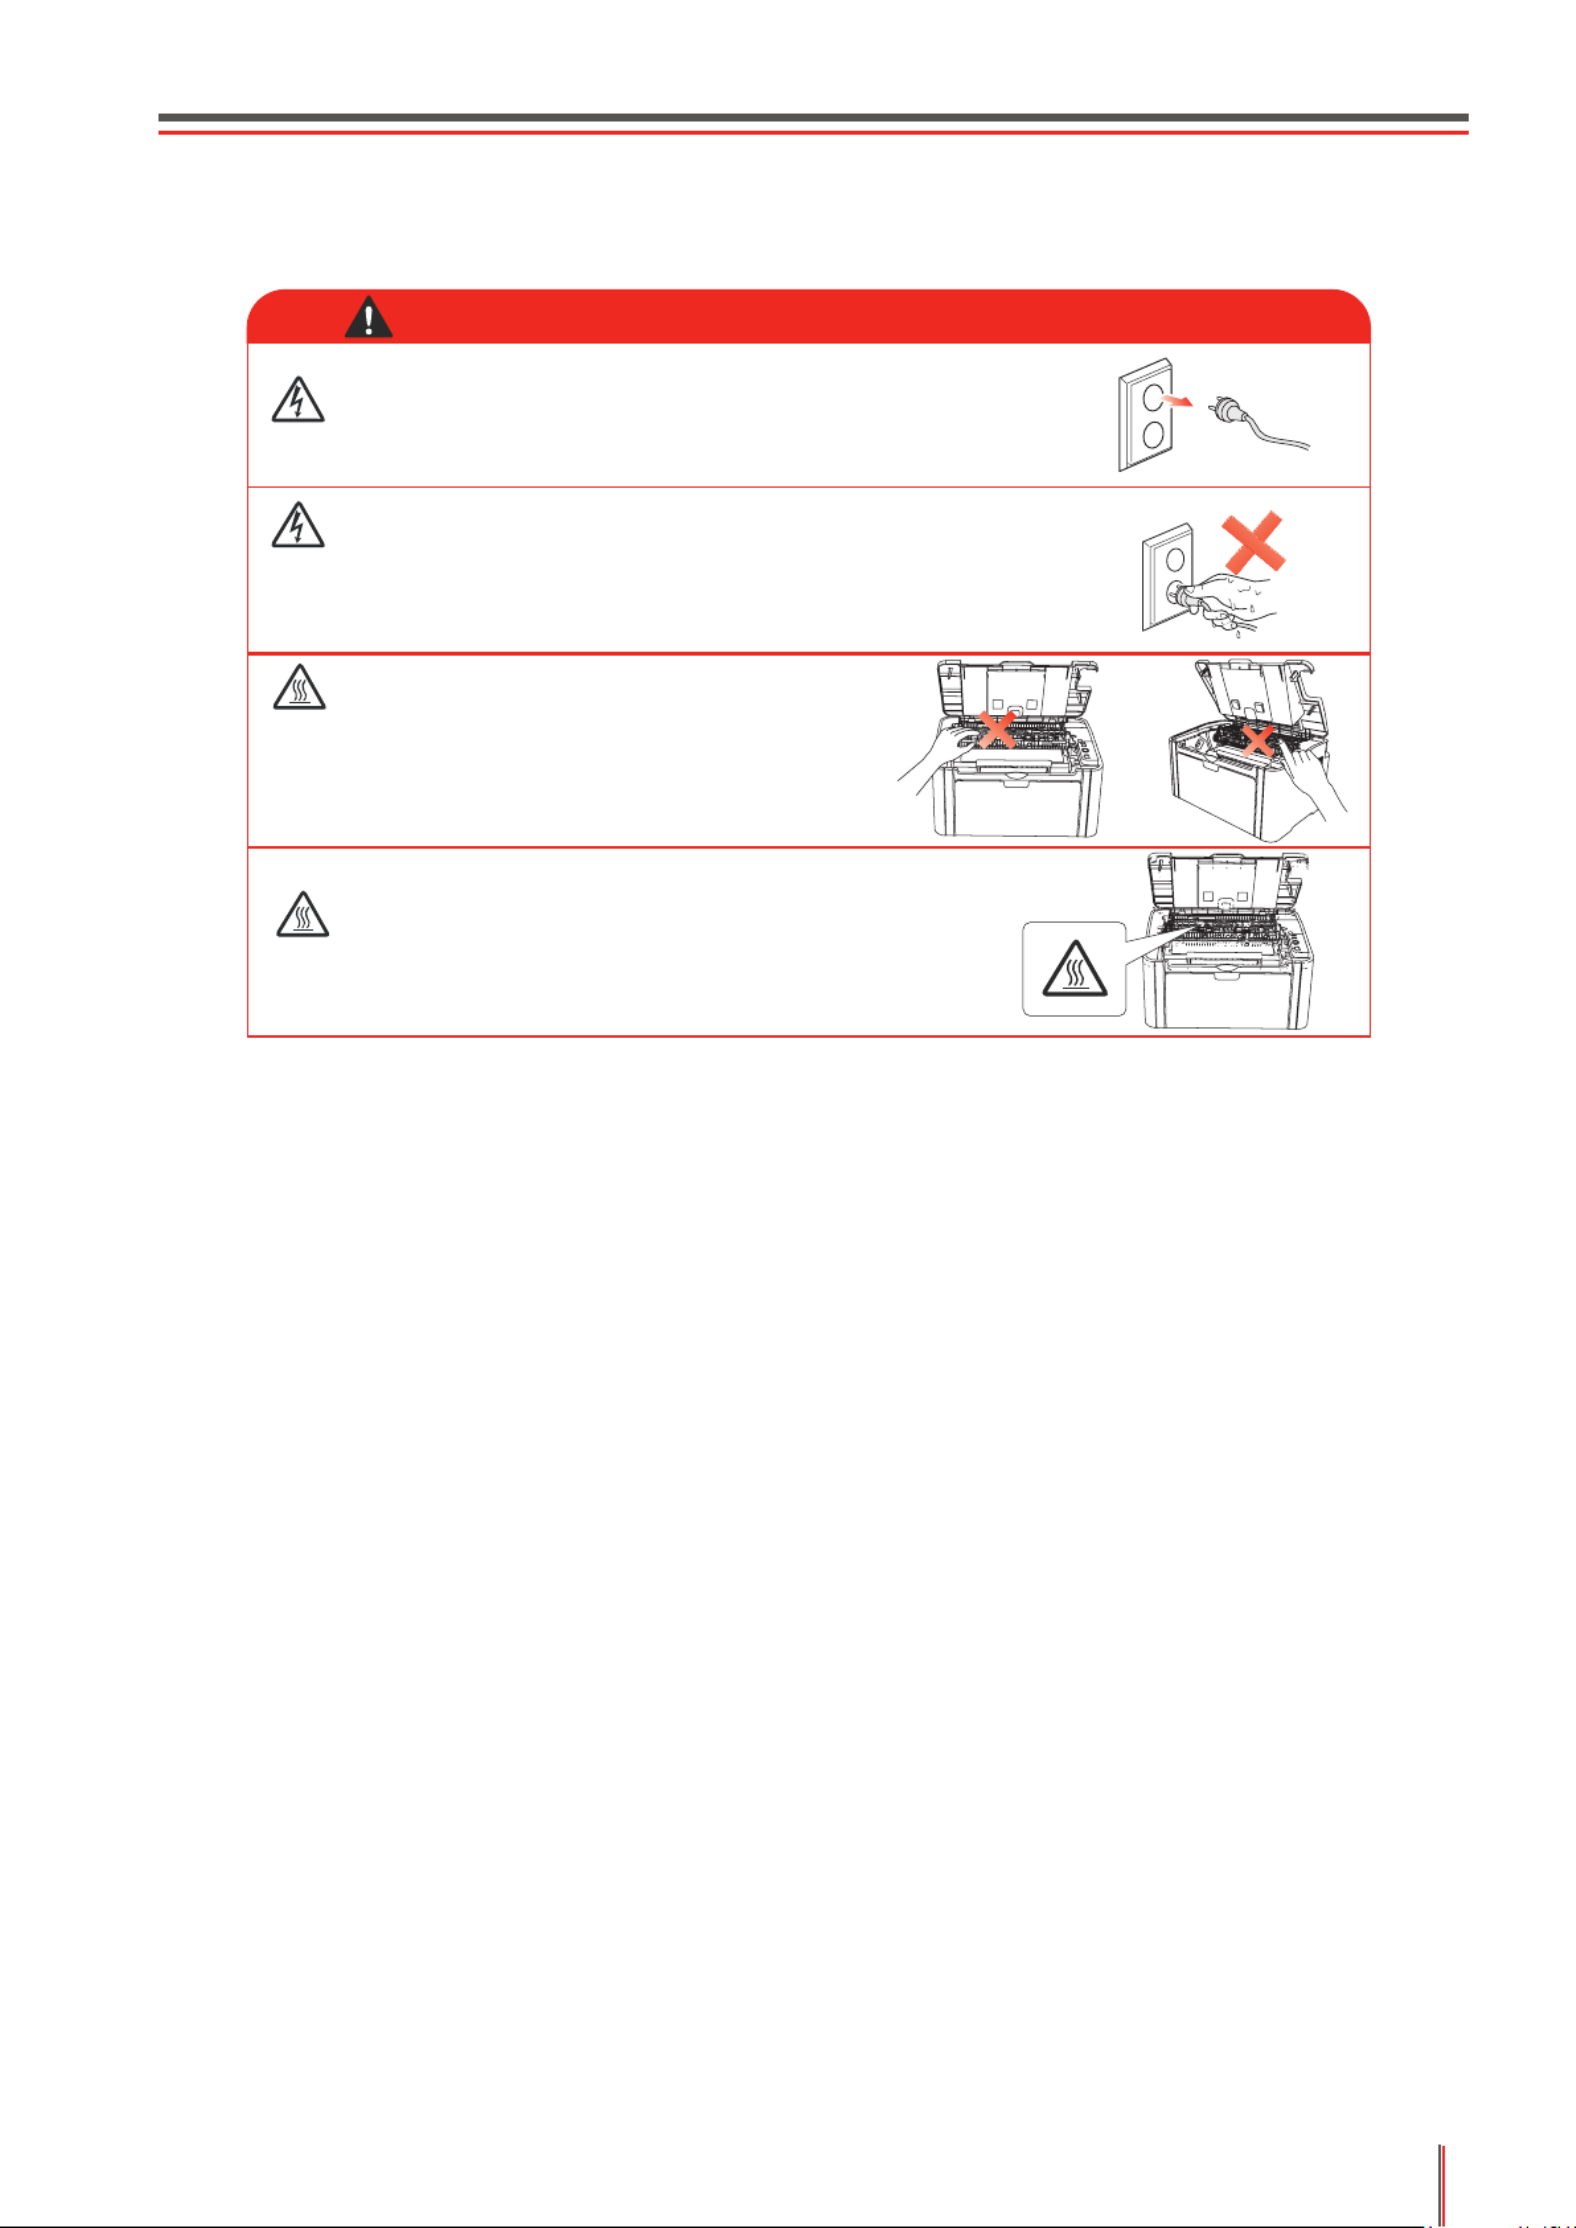
Safety Warning
Please note the following safety warnings before using the printer:
There is high-voltage electrode inside the printer. Before
cleaning the printer, make sure the power is turned off!
Plugging and unplugging the power cord plug with a
wet hand can result in an electric shock.
The fuser unit is attached with a high temperature
warning label. Please do not remove or damage
this label.
The fuser unit is hot when and after
printing. Touching the fuser unit (the
shaded area as shown) may cause burns!
Warning
III

IV
Precautions
Precautions before Using the Printer:
1. Read and understand all instructions;
2. Familiarize yourself with the basic principles associated with operating electrical appliances;
3. Comply with all warnings and instructions marked on the equipment or speci ed in the manual
supplied with the equipment;
4. If the operating instructions con ict with the safety information, please refer back to the safety
information, as you may have misu nderstood the operating instructions. If you cannot resolve the
con icts, please call the Customer Service Hotline or contact a service representative for help;
5. Before cleaning the equipment, remove the power cord from the AC power supply outlet. Do not
use liquid or aerosol cleaners;
6. Please make sure that the equipment is put on a stable desktop surface to avoid serious damage
caused by the f alling of the equipment;
7. Do not put the equipment near a radiator, an air conditioner, or a ventilation pipe;
8. Do not place any articles on top of the power cord. Do not put the equipment in a place where its
power cord will be stepped on by people;
9. Outlets and extension cords must not be overloaded. This may reduce performance and could
result in re or electric shock;
10. Do not allow pets t o chew on the AC power cord or the computer interface cable;
11. Do not allow sharp objects piercing equipment slot, so as to avoid contact with the high-
voltage device, which otherwise may result in re or electric shock. Take care not to spill
liquids onto the equipment;
12. Do not disassemble the equipment so as to avoid the risk of electric shock. Necessary repairs may
only be carried out by pr ofessional maintenance personnel. Opening or removing the cover could
result in an electric shock or other potential hazards. Incorrect disassembly and assembly could
also result in an electric shock during future use;
13. If any one of the following occurs, disconnect the equipment from the computer and pull out the
power cord from the AC wall socket and contact a quali ed member of the service personnel for
maintenance:
• Liquid has been spilled into the equipment.
• The equipment has been exposed to rain or water.
• The equipment falls, or the cover is damaged.
• Signi cant changes in the equipment s performance.’
14. Only adjust the control mentioned in the instructions. Incorrect adjustment of other controls may result
in damage and mean that professional maintenance personnel need to spen d more time xing it;
15. Do not use the equipment in a thunderstorm so as to avoid the risk of an electric shock. If possible,
pull out the AC power cord during a thunderstorm;
16. If you continuously print multiple pages, the surface of the tray will become very hot. Take care not
to touch this surface, and keep children away from this surface;
17. The signal wire of the device connected with the printer can not be connected to the outdoors;
18. Please ensure timely ventilation in case of a prolonged use or printing huge amounts of documents
in a poorly ventilated room;
19. In standby status, the product will automatically enter into the power saving (sleep) mode if it does
not receive any job order for a while (such as 1 minute); and it can realize zero power consumption
only if it has not been connected with any external input power supply;
20. As the Class 1 equipment, the product must be connected to the power supply outlet with
protective grounding line when using;
21.
This product should be placed according to the shipping marks on the product package box during delivery;
22. Thisproductisakindoflow-voltageequipment.Whenusingthisproductbelowthespecied
voltage range, please refer to the product precautions or call Pantum Aftersales Service Centre, if
the toner comes off the printed contents, or the equipment starts slowly;
23. This product is sold as a complete machine. The consumers can go to Pantum Aftersales Service
Centre to purchase parts they need. If the product sold is inconsistent with the package list, please
gotothespeciedAftersalesServiceCentretosolvetheproblem;
24. Install this product in a place with the temperature between1 °C to3 5°C,and the relative0 2.
humidity between 20% to 80%;
25. For security and other reasons the printer may switch to intermittent printing after a certain amount of
continuous printing.
26. This device complies with Industry Canada licence-exempt RSS standard(s). Operation is subject to
the following two conditions:

V
Regulatory Information
This symbol indicates that, at the end of your product’s life, it must not be discarded
as domestic waste. Instead, you should dispose of your used equipment at a
designated collection point for the recycling of waste electrical and electronic
equipment. Ref: EU Directive 2002/96/EC on Waste Electrical and Electronic
Equipment (WEEE). Please contact your distributor / supplier for further
information.
This product is suitable for indoor use only.
European Community (EC) directives conformity
This product complies with the protection requirements of EC directives 20 / /14 30
E and 20 / 5/E on the approximation and harmonization of the laws of the U 14 3 U
Member States relating to electromagnetic compatibility and safety of electrical
equipment designed for use within certain voltage limits.
The manufacturer of this product is: Zhuhai Pantum Electronics Co.,Ltd.,
No.3883,Zhuhai Avenue,Zhuhai,Guangdong,China
A declaration of conformity to the requirements of the Directives is available upon
request from the Authorized Representative.
This product satisfies the Class B limits of EN 550 2 and safety requirements of 3
EN 60950.
This printer is fully compliant with the ROHS Directive 2009/95/EC and the
requirements of the revised Directive 2011/65/EU for managing toxic and
hazardous substances.
(1) this device may not cause interference, and
(2) this device must accept any interference, including interference that may cause undesired
27. IC Radiation Exposure Statement:
This equipment complies with Canada and FCC radiation exposure limits set forth for uncontrolled
environments. This equipment should be installed and operated with a minimum distance of 20cm
between the radiator and your body.
This transmitter must not be co-located or operating in conjunction with any other antenna or
transmitter.
28. This equipment has been tested and found to comply with the limits for a Class B digital device,
pursuant to Part 15 of the FCC Rules. These limits are designed to provide reasonable protection
against harmful interference in a residential installation. This equipment generates, uses and can
radiate radio frequency energy and, if not installed and used in accordance with the instructions,
may cause harmful interference to radio communications. However, there is no guarantee that
interference will not occur in a particular installation.
If this equipment does cause harmful interference to radio or television reception, which can be
determined by turning the equipment off and on, the user is encouraged to try to correct the
interference by one or more of the following measures:
• Reorient or relocate the receiving antenna.
• Increase the separation between the equipment and receiver.
• Connect the equipment into an outlet on a circuit different from that to which the receiver is
connected.
• Consult the dealer or an experienced radio/TV technician for help.
29. Changes or modications not expressly approved by the party responsible for compliance could void
the user's authority to operate the equipment.
30. The power consumption of the product is 0.92W in networked standby if all wired network ports are
connected and all wireless network ports are activated;
31. Please keep this User Guide properly.

VI
Table of Contents
1. Before Using the Printer 1-2 ...............................................................................................................
1.1. Packing List ............................................................................................................................1-2
1.2. Components of the Printer ......................................................................................................1-3
1.3. Laser Toner Cartridge .............................................................................................................1-4
2. Paper and Print Media ...................................................................................................................2-2
2.1. Paper Specication .................................................................................................................2-2
2.2. Special Paper .........................................................................................................................2-3
2.3. Loading Paper ........................................................................................................................2-4
2.3.1. Loading into the Automatic Feeder Tray ..........................................................................2-4
2.3.2. Loading into the Manual Feeder Tray ..............................................................................2-5
2.4. Nonprinting Area .....................................................................................................................2-7
2.5. Guidelines for Paper Use ........................................................................................................2-7
3. Driver installation and uninstallation ...............................................................................................3-2
3.1. How to install Windows printer driver ......................................................................................3-2
3.1.1. One-click Installation .........................................................................................................3-2
3.1.2. Manual installation ..........................................................................................................3-16
3.1.3. Method of driver unistallation ..........................................................................................3-22
3.2. Mac system driver installation ...............................................................................................3-23
3.2.1. Driver installation ............................................................................................................3-23
3.3. Add printer to Mac system ....................................................................................................3-25
3.3.1. Add up the printer via USB .............................................................................................3-25
3.3.2. Add up the printer via wireline connection ......................................................................3-25
3.3.3. Add up the printer via wireless connection ......................................................................3-25
4. Wired Network Settings (For wired network printer models) ........................................................4-2
4.1. Set IP Address ........................................................................................................................4-2
4.2 Install the Printer to Network ....................................................................................................4-3
4.3 Setting Network Products ........................................................................................................4-4
4.3.1. View or Change Network Settings ...................................................................................4-4
4.3.2. Set or Change Web Server Login Password ...................................................................4-4
4.3.3. Restore to Factory Settings .............................................................................................4-4
5. Wireless network setup (applicable to Wi-Fi models) ....................................................................5-2
5.1. Basic structure mode ..............................................................................................................5-2
5.1.1. Wireless network setup tools ...........................................................................................5-2
5.1.2. Wi-Fi Protected Setup (WPS) setup .................................................................................5-7
5.1.3. How to disable the Wi-Fi network connected ...................................................................5-7
5.2. Wi-Fi Direct mode ...................................................................................................................5-8
5.2.1. Preliminary preparations ..................................................................................................5-8
5.2.2. Wi-Fi Direct connection ....................................................................................................5-8
5.2.3. How to disable the Wi-Fi Direct ........................................................................................5-8
5.3. Wireless network setup FAQs .................................................................................................5-8
6. Pantum Mobile Print ......................................................................................................................6-2
6.1. What's Pantum Mobile Print ....................................................................................................6-2
6.2. Download Pantum Mobile Print ..............................................................................................6-2
6.3. Supported Mobile Operating System ......................................................................................6-2
6.4. How to use mobile devices for the mobile printing ..................................................................6-2
6.4.1. For Android Devices ........................................................................................................6-2
7. Print ................................................................................................................................................7-2
7.1. Print Function ..........................................................................................................................7-2
7.2. Opening Help Document ........................................................................................................7-3
7.3. Manual Duplex ........................................................................................................................7-4
7.4. Cancel Print Job 7-7 .....................................................................................................................

VII
8. Control Panel .................................................................................................................................8-2
8.1. Control Panel Overview ..........................................................................................................8-2
8.1.1. Functions of Buttons on the Control Panel ......................................................................8-2
8.1.2. Function of LED Indicators on the Control Panel .............................................................8-3
9. Routine Maintenance .....................................................................................................................9-2
9.1.Cleaning the Printer .................................................................................................................9-2
9.2. Maintenance of Laser Toner Cartridge ...................................................................................9-4
9.2.1. Use and Maintenance of Laser Toner Cartridge ..............................................................9-4
9.2.2. Service Life of Laser Toner Cartridge ...............................................................................9-4
9.2.3. Replace Laser Toner Cartridge ........................................................................................9-5
10. Troubleshooting .........................................................................................................................10-2
10.1. Clearing Jammed Paper .....................................................................................................10-2
10.1.1. Paper Jam in the Feed Port .........................................................................................10-3
10.1.2. Paper Jam inside the Printer .......................................................................................10-3
10.2. Common Troubleshooting ...................................................................................................10-6
10.2.1. Common Trouble .........................................................................................................10-6
10.2.2. Image Defects ..............................................................................................................10-8
11. Product Specication .................................................................................................................11-2
11.1.P2200/P2500 Series Specication .......................................................................................11-2
11.1.1. Specication Overview .................................................................................................11-2
11.1.2. Printing Specication ...................................................................................................11-3
11.2. P2600 Series Specication .................................................................................................11-4
11.2.1. Specication Overview .................................................................................................11-4
11.2.2. Printing Specication ....................................................................................................11-5

1
Chapter
1-1
Before Using the Printer
1. Before Using the Printer ..................................................................................................................1-2
1.1. Packing List .............................................................................................................................. 21-
1.2. Components of the Printer ........................................................................................................ 31-
1.3. Laser Toner Cartridge ............................................................................................................... 41-

1-2
1. Before Using the Printer
1.1. Packing List
When you open the package, make sure that the following parts are included in the carton:
Quantity
Printer 1
Laser Toner Cartridge 1
USB Interface Cable 1
Power Cord 1
CD-ROM 1
Quick Setup Guide 1
Pantum Warranty 1
Note: • The Pantum Warranty may not be attached in some regions.
Name
P2200/P2500 Series P2600 Series
1-3
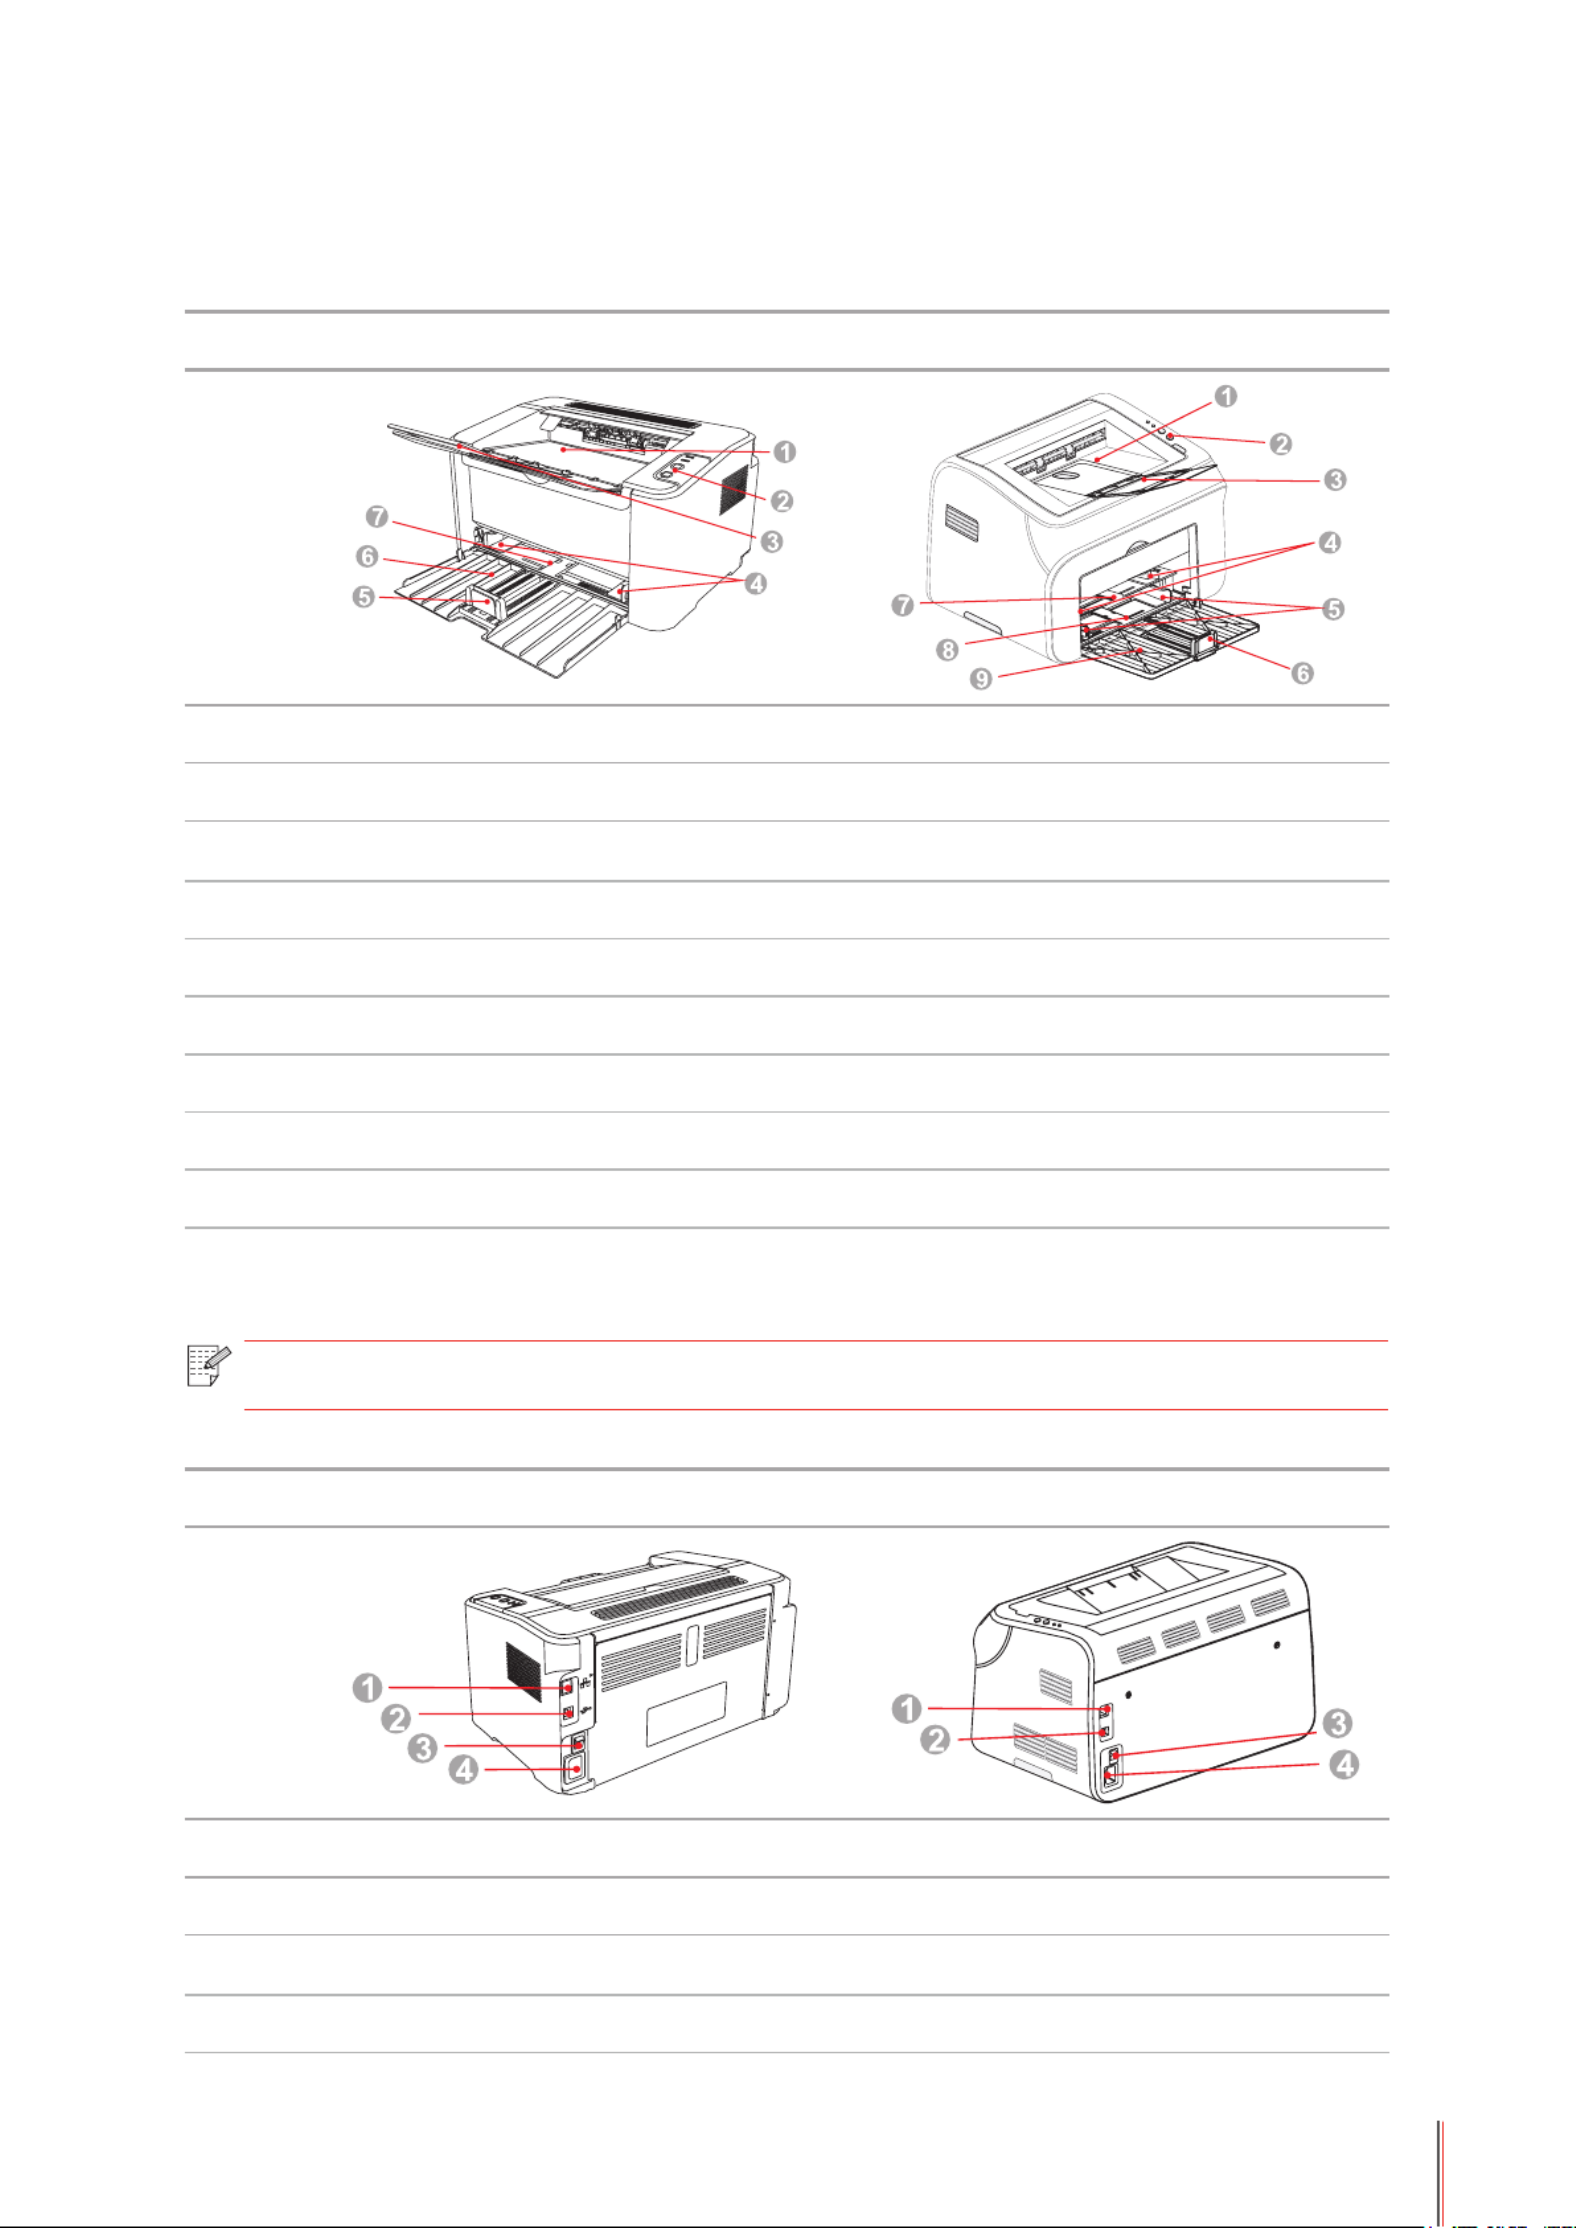
1.2. Components of the Printer
| Front View
Serial No. P2500 SeriesP2200/ P2 00 Series6
1 Output Bin Output Bin
2 Control Panel Control Panel
3 Output Tray Output Tray
4 Automatic Feed Guide Manual Feed Guide
5 Paper Stop Automatic Feed Guide
6 Feeder Tray Paper Stop
7 Automatic Feeder Tray Manual Feeder Tray
8 Automatic Feeder Tray
9 Feeder Tray
| Rear View
Serial No. P2500 Series P2 00 SeriesP2200/ 6
1 Network Interface Network Interface
2 USB Interface USB Interface
3 Power Switch Power Switch
4 Power Interface Power Interface
Note: • The rear view of the printer may vary dependi ng on the models and functions.

1-4
1.3. Laser Toner Cartridge
| Service Life of the Laser Toner Cartridge
Series Name P2500 Series P2 00 SeriesP2200/ 6
Diagram
Type Average Print Volume
Laser Toner
Cartridge
with
Standard
Capacity
About 1600 Pages
(The above data is based on ISO/
IEC 19752 standard)
About 1500 Pages
(The above data is based on
ISO/IEC 19752 standard)
Laser Toner
Cartridge
with High
Capacity
N/A About 2300 Pages
(The above data is based on
ISO/IEC 19752 standard)
Note: • The model is subject to increase without notice.
• Consumables capacity may vary depending on the types used.
• The Company does not recommend using consumables other than that of the
original Pantum consumables.
• Any damages caused by using non-Pantum original consumables are not covered
by the Warranty.

2-1
2
Chapter
Paper and Print Media
2. Paper and Print Media .....................................................................................................................2-2
2.1. Paper Specification ...................................................................................................................2-2
2.2. Special Paper ........................................................................................................................... 32-
2.3. Loading Paper .......................................................................................................................... 42-
2.3.1. Loading into the Automatic Feeder Tray ............................................................................ 42-
2.3.2. Loading into the Manual Feeder Tray ................................................................................2-5
2.4. Nonprinting Area ....................................................................................................................... 72-
2.5. Guidelines for Paper Use .......................................................................................................... 72-

2-2
2. Paper and Print Media
2.1. Paper Speci icationf
P2200/P2500
Series P2 006
Series
Automatic
Feeder Tray
Media Type Plain, thin, special paper (transparency,
cardstock, label, envelope, thick, etc.).
Media Size
A4, A5, JIS B5, IS0 B5, A6, Letter, Legal,
Executive, Folio, Ocio, Statement, Japanese
Postcard, Monarch Env, DL Env, C5 Env, C6,
Env, No.10 Env, ZL, Big 16K, Big 32K, 16K,
32K, B6, Yougata4, Postcard, Younaga3,
Nagagata3, Yougata2, custom, etc.
Media Weight
Maximum
Capacity of
the Tray
150 pages 80g/m²
P2 00 Series6 Manual
Feeder Tray
Media Type Plain, thin, special paper (transparency,
cardstock, label, envelope, thick, etc.).
Media Weight 60~163g/m²
Maximum
Capacity of
the Tray
1 page
Note: • It is recommended to use the standard paper for the printer .
• Extensive use of special paper may af fect the service life of the printer .
• The print media that does not meet the guidelines set out in this User Guide may
result in poor print quality , increased paper jam and excessive wear of the printer .
• Properties such as weight, composition, texture and humidity are important
factors affecting the printer performance and output quality.
• Please note the following matters when selecting the print media:
1. Desired print effect: The print media selected should meet the requirement
of the print tasks.
2. Surface smoothness: The smoothness of the print media may affect the
sharpness of the print outcome.
3. Some print media may meet all the use guidelines contained herein,
but they still can not bring satisfactory effect. This may be due to incorrect
operation, inappropriate temperature and humidity, or other factors beyond the
control of Pantum. Before purchasing large quantities of print media, make
sure that the print media meets the specifications specified in this User Guide.
4. Using print media that does not meet these specifications may cause
damage to the printer.
60~163g/m²

2-3
2.2. Special Paper
This printer supports using the special paper for printing. Special paper includes: label,
envelope, transparency, thick, cardstock, etc.
| Please observe the following standards:
Types of Print
Media Correct Practices Incorrect Practices
Label
Use labels with no exposed
lining paper only.
Labels shall be put at when
using.
Use labels of full sheet only.
There is no guarantee that all the
labels in the market can meet
corresponding requirements.
Use wrinkled, blistering or damaged labels.
Envelope Envelopes should be loaded
evenly.
Use wrinkled, nicked, stuck or damaged
envelopes.
Use envelopes with clips, snaps, indows, or W
coated linings.
Use envelopes with self-adhesive stickers
or other synthetic materials.
Transparency
Use only transparencies
approved for use in laser
printers.
Use transparent print media that is not
suitable for laser printers.
Thick,
Cardstock
Use only heavy paper that
is approved for use in laser
printers and meets the weight
specications of this printer.
Use paper whose weight exceeds the
recommended media specications of this
printer.
Note: • When using special paper or print media, be sure to select matched print type
and size in the print settings so as to get the best print effect.
• When using special media to print, it is recommended to load one piece of paper
at one time. For P2200 /P2500 series, load one piece of special paper into the
automatic feeder tray at one time. For P2 0 series, load one piece of special60
paper into the manual feeder tray at one time.

2-4
2.3. Loading Paper
2.3.1. Loading into the Automatic Feeder Tray
a) Open the feeder tray.
P2500 Series P2 00 Series6
b) Slide the automatic feed guides to match both sides of the paper.
P2500 Series P2 00 Series6
c) Raise the output tray to avoid the paper from slipping and falling.
P2500 Series P2 00 Series6
d) Load the paper into the automatic feeder tray with the print-side up.
P2200/P2500 Series P2 00 Series6

2-5
e) Adjust the paper stop to keep the paper in position. To ensure normal paper feeding,
adjust the bottom paper stop into the slot to keep it from slipping out, and then adjust the①
blue stop to match the paper size.②
P2200/P2500 Series P2 00 Series6
2.3.2. Loading into the Manual Feeder Tray
a) Open the feeder tray.
Note: • If the paper loaded into the automatic feeder tray at one time exceeds 150 pages,
paper will jam or cannot be fed in.
• When using the printed paper, please make the side to be printed (the blank side)
up.
• When printing on A5 paper, it is recommended that the paper is fed in landscape
orientation, which can extend the service life of the laser toner cartridge.
Note: • Only P2 0 series products support manual feeding.60
Note: • Before loading paper, please unfold the stacked paper to avoid a paper jam or feed
error,and then load the paper into the tray print-side up.

2-6
b) Slide the manual feed guides to match both sides of the paper.
c) Raise the output tray to avoid the paper from slipping and falling.
d) Put the print media like an envelope or transparency into the manual feeder tray with two
hands until the front end of the envelope or transparency contacts the correction roller.
e) After the printed page is output from the printer, load another paper according to the above
steps to continue printing.
Note: • When loading paper into the manual feeder tray, the printer will automatically
enable the manual feed mode.
• Load the paper into the manual feeder tray with the print-side up. When loading,
the top of the paper first enters into the manual feeder tray.
• Ensure that the paper, envelope or transparency is loaded straightly and in the
correct position of the manual feeder tray. Otherwise, it will result in a skewed
printout or a paper jam.
After printing, please immediately remove the paper , envelopes and
transparencies. Stacking paper or envelopes may cause a paper jam or
the paper curling.
Warning

2-7
2.4. Nonprinting Area
The shaded section indicates the nonprinting area.
Usage Paper Size Top and Bottom
Margins (A)
Left and Right
Margins (B)
Printing
A4 5 mm (0.197 inch) 5 mm (0.197 inch)
Letter 5 mm (0.197 inch) 5 mm (0.197 inch)
2.5. Guidelines for Paper Use
• Paper or manuscript with rough texture, concave and convex, oil stain and good smoothness
has poor printing performance.
• Please make sure that there is no dust, uff, etc. on the paper.
• Paper shall be put on a at surface and stored under a cool and dry environment.

3-1
3
Chapter
Driver installation
and uninstallation
3.Driver installation and uninstallation ............................................................................................. ..3-2
3.1.Driver installation based on Windows system ..........................................................................3-2
3.1.1.Installation via USB connection .........................................................................................3-2
3.1.2.One-key wireless network installation ..............................................................................3-16
3.1.3.Installation via wired network connection .........................................................................3-22
3.2.Driver installation based on Mac system ................................................................................3-23
3.2.1.Driver installation..............................................................................................................3-23
3.3.Add printer to Mac system ......................................................................................................3-25
3.3.1.Add in USB connection mode ..........................................................................................3-25
3.3.2.Addition in wired network connection mode .....................................................................3-25
3.3.3.Add in wireless network connection mode .......................................................................3-25

3. Driver installation and uninstallation
3.1. How to install Windows printer driver
Windows driver installation software provides two installing methods: one-click installation
and manual installation.We recommend one-click installation, which can help to install driver
automatically in a faster and more convenient way.If you have any difculty in using one-click
installation, please try manual installation.
3.1.1. One-click Installation
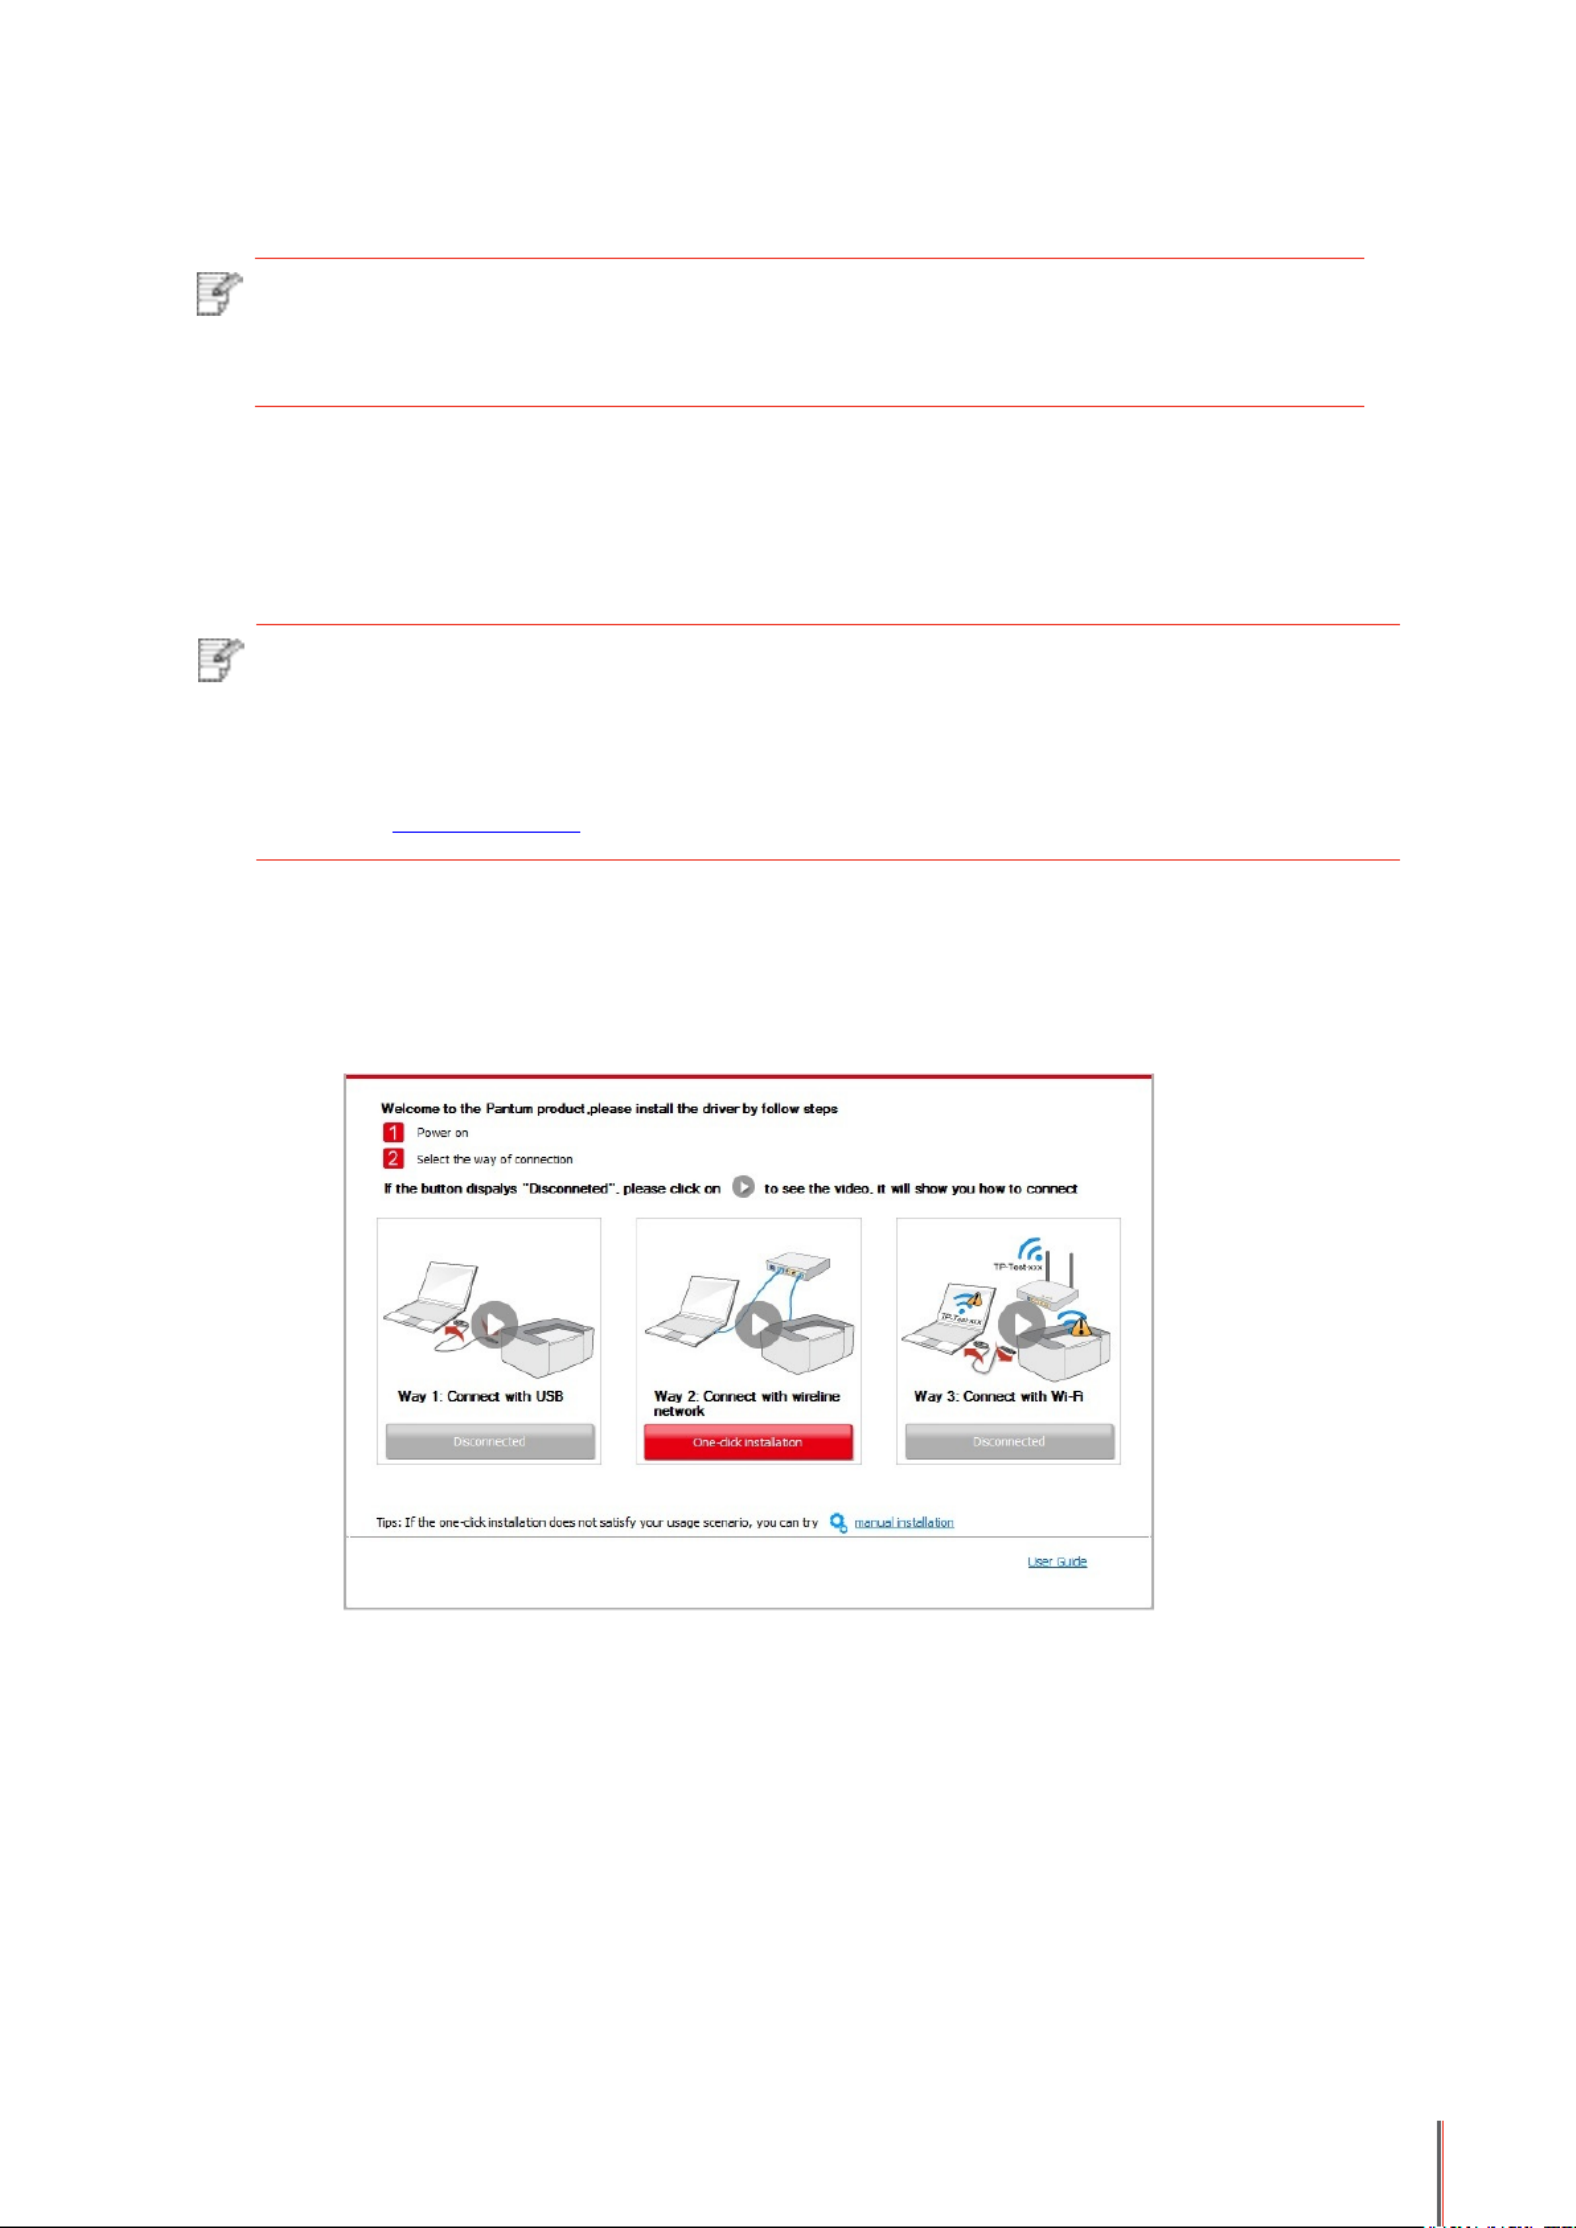
One-click installation provides three methods of installation: connect the printer via USB
cable, connect the printer via wired nectwork, and connect the printer via wireless
network. You can choose one of them according to your habit.
3.1.1.1. Method I: Connect the printer via USB cable
1. Connect the printer to computer via USB cable, power the printer and computer on.
2. Place the attached installation CD in the computer CD-ROM:
• Windows XP system: automatically run the installation procedure.
• Windows 7/Vista/Server 2008 system: Pop up “Autoplay” interface, click “Autorun.exe” to
run the installation procedure.
• Windows 8 system: When the “ DVD RW driver” window pops up from the right top corner of
computer desktop, click anywhere in the pop-up window, then click “Autorun.exe” to run the
installation procedure.
• Windows 10 system: When the “DVD RW driver” window pops up from the right top corner
of computer desktop, click anywhere in the window, then click “Autorun.exe” to run the
installation procedure.
Note: • Driver installation interface may differ because of different models and functions,
so the schematic diagram is only for your reference.
Note: • Some computers may be unable to auto play the CD beacase of system
configuration. Please double click "Computer" icon, find "DVD RW driver", then
double click "DVD RW driver" to run the installation procedure.
3. Click on the “I agree” button on the right buttom corner after reading the license agreement
and enter into driver installation interface.
4. Click on the “One-click installation” button in Method I and enter into the installation
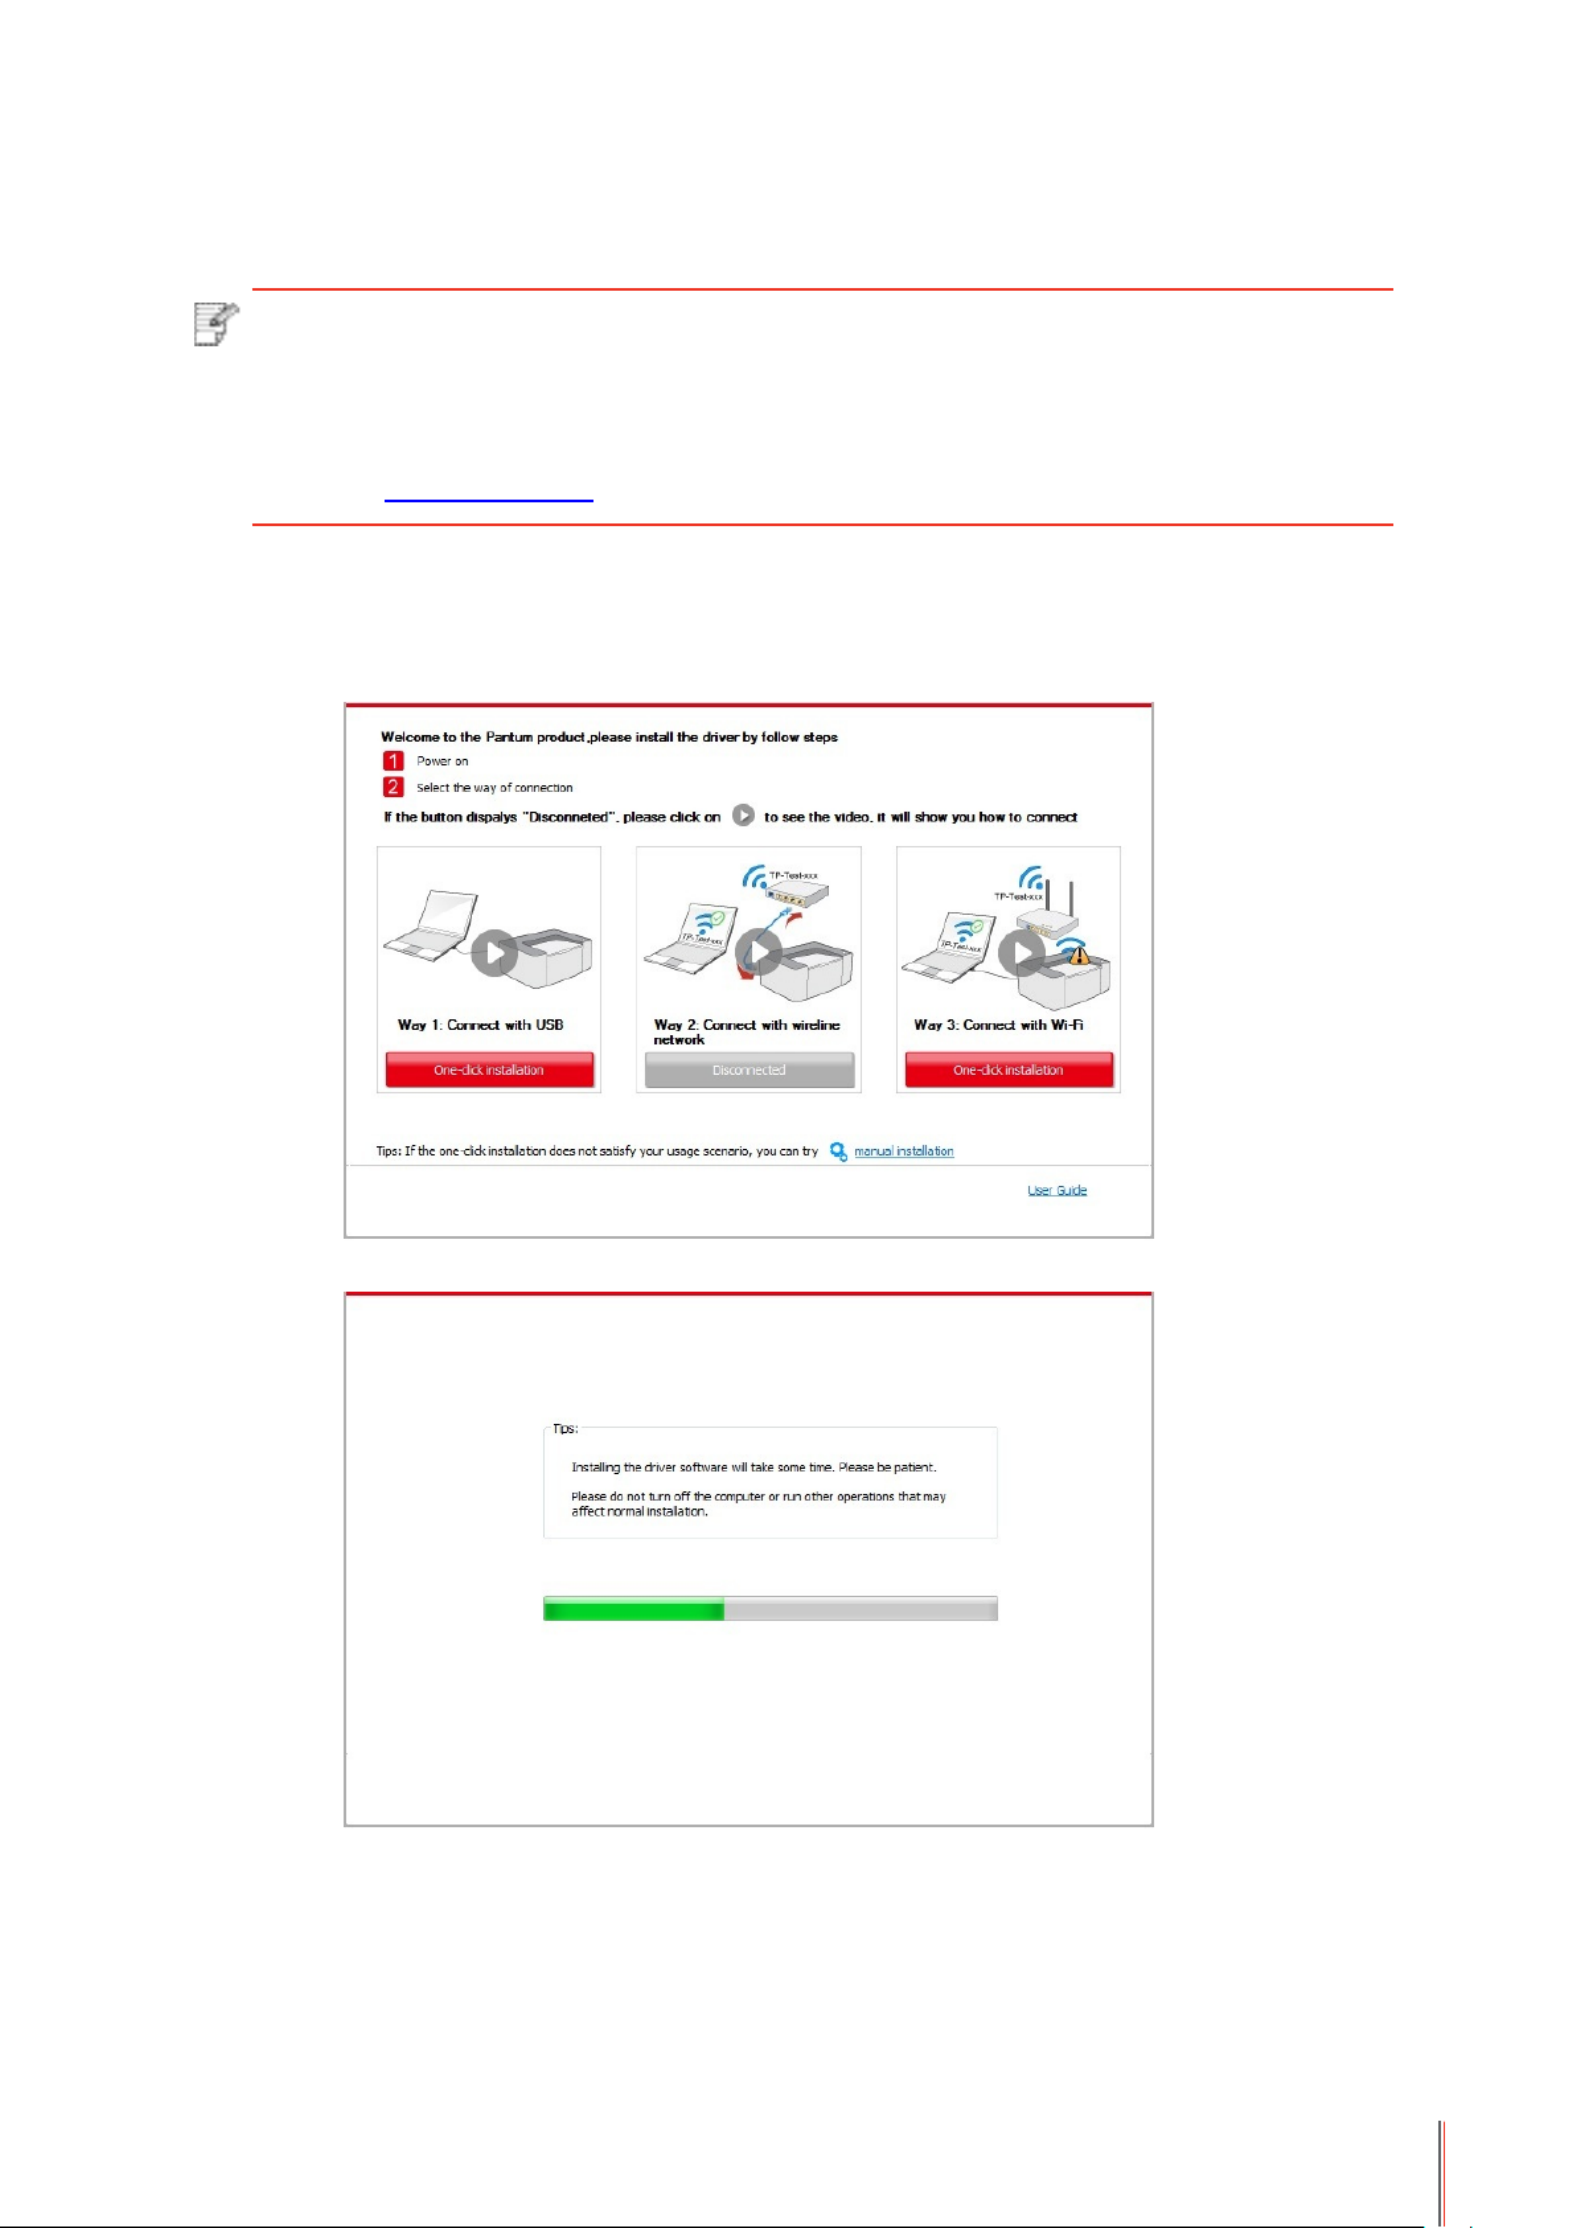
process. The process may need some time, and the duration is related to your computer
conguration, please wait patiently.
3- 2

5. After the installation, click “Print &Test Page” button. If your printer prints the test page
successfully, it means that you have installed the driver correctly.
3.1.1.2. Method II: Connect the printer via wired network
1. Turn the power of printer and computer on.
2. Connect the computer to wired network.
3. Connect network cable to the network interface of printer, to make sure the printer is
connected to computer network (please refer to for network setup).Chapter 4
4. Place the attached installation CD in the computer CD-ROM:
• Windows XP system: automatically run the installation procedure.
• Windows 7/Vista/Server 2008 system: Pop up “Autoplay” interface, click “Autorun.exe” to
run the installation procedure.
• Windows 8 system: When the “ DVD RW driver” window pops up from the right top corner
of computer desktop, click anywhere in the pop-up window, then click “Autorun.exe” to run
the installation procedure.
3-1
3- 3
• Windows 10 system: When the “DVD RW driver” window pops up from the right top corner
of computer desktop, click anywhere in the window, then click “Autorun.exe” to run the
installation procedure.
Note: • Some computers may be unable to auto play the CD beacase of system
configuration. Please double click "Computer" icon, find "DVD RW driver", then
double click "DVD RW driver" to run the installation procedure.
5. Click on the “I agree” button on the right buttom corner after reading the license agreement
and enter into driver installation interface.
6. Please click on the “One-click installation” button in Method II and install driver software.
Note :• You can put your mouse cursor in the “One-click installation” button to check the
popup information in order to confirm if the current printer is the one you need to
install through IP address before you click the button.
• You can check the printer IP address through “Network configuration page” (Please
see for how to print).Chapter .8 1.1.3
• Click on the “One-click installation” button to enter installation process if your software has
searched only one printer. The process may need some time, and the duration is related to
your computer conguration. Please wait patiently.
3-4

• If your software has searched several printers, click on the”One-click intallation” button, and
the printer list interface will pop up. Please select the printer that you need according to your
printer wired network IP address or host ID.
3- 5

Note:• If the printer you need is not shown in the list, please click “Refresh” button to
search again. If it is not found, please check if the printer and computer are in the
same network. (Please see for how to check).Chapter 5.3
• When the printer IP address changes under printer driver installed with host ID ,
you can also directly print without re-installing the driver. If you need to install the
printer driver with the host ID, please check the option “Install the printer in the list
with host ID”.
7. After the installation, click “Print &Test Page” button. If your printer prints the test page
successfully, it means that you have installed the driver correctly.
3.1.1.3. Method III: Connect the printer via wireless network
Please check if the printer is connected with wireless network when installing the printer
driver software. If disconnected, please install it with reference to . If Chapter 3.1.1.3.1
connected, please install it with reference to .Chapter 3.1.1.3.2
Note: • You can print "Network configuration page" to confirm printer network connection
status to see if printer is connected with network (Please see or Chapter 8.1.1.3
how to print).
3.1.1.3.1. The printer is not connected with wireless network
3.1.1.3.1.1. Congure wireless network via USB cable and install driver
Since some computers are not provided with wireless network function, this section is
divided into "Connect computer to router via Wi-Fi" and "Connect computer to router via
wired connection" to introduce installation process.
I. Connect computer to router via Wi-Fi
1. Computer is already connected to router via Wi-Fi.
2. Connect the printer to computer via USB cable, then power the printer on.
3. Place the attached installation CD in the computer CD-ROM:
• Windows XP system: automatically run the installation procedure.
• Windows 7/Vista/Server 2008 system: Pop up “Autoplay” interface, click “Autorun.exe” to
run the installation procedure.
• Windows 8 system: When the “ DVD RW driver” window pops up from the right top corner of
computer desktop, click anywhere in the pop-up window, then click “Autorun.exe” to run the
installation procedure.
• Windows 10 system: When the “DVD RW driver” window pops up from the right top corner
of computer desktop, click anywhere in the window, then click “Autorun.exe” to run the
installation procedure.
Note: • Some computers may be unable to auto play the CD beacase of system
configuration. Please double click "Computer" icon, find "DVD RW driver", then
double click "DVD RW driver" to run the installation procedure.
3-6
Note: • You can put your mouse cursor in the “One-click installation” button to check the
popup information in order to confirm if the current printer is the one you need to
install through IP address before you click the button.
• You can check the printer IP address through “Network configuration page” (Please
see for how to print). Chapter 8.1.1.3
4. Click on the “I agree” button on the right buttom corner after reading the license agreement
and enter into driver installation interface.
5. Click the “One-click installation” button in Method III to install driver software.
• Click “One-click installation” button if your software has searched only one printer, and enter
into installation process to complete automatic network conguration and driver installation.
3-7

• If your software has searched several printers, click “One-click intallation” button, and
the printer list interface will pop up. Please select “Congure printer with Wi-Fi via USB and
install” and select USB printer, click “Conrm” button and enter into installation process to
complete automatic network conguration and driver installation.
Note: • When the printer IP address changes under printer driver installed with host ID ,
you can also directly print without re-installing the driver. If you need to install the
printer driver with the host ID, please check the option "Install the printer in the list
with host ID".
6. After the installation, click “Print &Test Page” button. If your printer prints the test page
successfully, it means that you have installed the driver correctly.
3-8

II. Connect computer to router via network cable
1. Connect computer to router via network cable.
2. Connect the printer to computer via USB cable, then power the printer on.
3. Place the attached installation CD in the computer CD-ROM:
• Windows XP system: automatically run the installation procedure.
• Windows 7/Vista/Server 2008 system: Pop up “Autoplay” interface, click “Autorun.exe” to
run the installation procedure.
• Windows 8 system: When the “ DVD RW driver” window pops up from the right top corner of
computer desktop, click anywhere in the pop-up window, then click “Autorun.exe” to run the
installation procedure.
• Windows 10 system: When the “DVD RW driver” window pops up from the right top corner
of computer desktop, click anywhere in the window, then click “Autorun.exe” to run the
installation procedure.
Note:• You can put your mouse cursor in the “One-click installation” button to check the
popup information in order to confirm if the current printer is the one you need to
install through IP address before you click the button.
• You can check the printer IP address through “Network configuration page” (Please
see for how to print)Chapter 8.1.1.3 .
Note:• Some computers may be unable to auto play the CD beacase of system
configuration. Please double click "Computer" icon, find "DVD RW driver", then
double click "DVD RW driver" to run the installation procedure.
4. Click on the “I agree” button on the right buttom corner after reading the license agreement
and enter into driver installation interface.
5. Please click on the “One-click installation” button in Method III and install driver software.
3-9
Produktspezifikationen
| Marke: | Pantum |
| Kategorie: | Drucker |
| Modell: | P2509 |
Brauchst du Hilfe?
Wenn Sie Hilfe mit Pantum P2509 benötigen, stellen Sie unten eine Frage und andere Benutzer werden Ihnen antworten
Bedienungsanleitung Drucker Pantum

6 September 2024
6 September 2024
5 September 2024
28 August 2024
28 August 2024
19 August 2024
16 August 2024
10 August 2024
6 August 2024
6 August 2024
Bedienungsanleitung Drucker
- Drucker Samsung
- Drucker Approx
- Drucker HP
- Drucker Sony
- Drucker Panasonic
- Drucker LG
- Drucker Roland
- Drucker Canon
- Drucker Velleman
- Drucker CSL
- Drucker Renkforce
- Drucker Thomson
- Drucker Sharp
- Drucker Mitsubishi
- Drucker Nilox
- Drucker Polaroid
- Drucker Xiaomi
- Drucker Olympia
- Drucker Seiko
- Drucker Toshiba
- Drucker Olympus
- Drucker Citizen
- Drucker Olivetti
- Drucker Epson
- Drucker Dell
- Drucker Lenovo
- Drucker MSI
- Drucker Honeywell
- Drucker OKI
- Drucker Brother
- Drucker Sagem
- Drucker Fujifilm
- Drucker Ricoh
- Drucker Datamax-O'neil
- Drucker Dymo
- Drucker Intermec
- Drucker Primera
- Drucker TSC
- Drucker Zebra
- Drucker Triumph-Adler
- Drucker Kodak
- Drucker Konica-Minolta
- Drucker Minolta
- Drucker TOMY
- Drucker Festo
- Drucker Frama
- Drucker NEC
- Drucker Ultimaker
- Drucker Fujitsu
- Drucker Huawei
- Drucker Testo
- Drucker Kogan
- Drucker Royal Sovereign
- Drucker D-Link
- Drucker Kyocera
- Drucker Lexmark
- Drucker Star
- Drucker Xerox
- Drucker Digitus
- Drucker Bixolon
- Drucker Epson 7620
- Drucker Fichero
- Drucker GG Image
- Drucker Ibm
- Drucker Oce
- Drucker Paxar
- Drucker Toshiba TEC
- Drucker ZKTeco
- Drucker StarTech.com
- Drucker Bematech
- Drucker HiTi
- Drucker Panduit
- Drucker Posiflex
- Drucker Vupoint Solutions
- Drucker Brady
- Drucker Star Micronics
- Drucker Metapace
- Drucker DNP
- Drucker Godex
- Drucker Phoenix Contact
- Drucker Elite Screens
- Drucker Equip
- Drucker Argox
- Drucker Dascom
- Drucker EC Line
- Drucker Orient Technologies
- Drucker Evolis
- Drucker Fargo
- Drucker Microboards
- Drucker Builder
- Drucker DTRONIC
- Drucker Colop
- Drucker Raspberry Pi
- Drucker IDP
- Drucker Tally Dascom
- Drucker Custom
- Drucker Nisca
Neueste Bedienungsanleitung für -Kategorien-
25 November 2024
24 November 2024
24 November 2024
24 November 2024

16 Oktober 2024

15 Oktober 2024

15 Oktober 2024

15 Oktober 2024

14 Oktober 2024

14 Oktober 2024