PAC VS41 Bedienungsanleitung
Lesen Sie kostenlos die 📖 deutsche Bedienungsanleitung für PAC VS41 (8 Seiten) in der Kategorie Schalten. Dieser Bedienungsanleitung war für 14 Personen hilfreich und wurde von 2 Benutzern mit durchschnittlich 4.5 Sternen bewertet
Seite 1/8

© 2018 AAMP Global. All rights reserved. PAC is a Power Brand of AAMP Global.
PAC-audio.com
P ifi A C ti
Rev. 032018
Intelligent 4 Camera Switcher for Controlling
Front, Rear, and Blind Spot Cameras
VS41
The VS41 is an intelligent 4 camera switcher for controlling front, rear, and blind spot cameras. Manually connect
cameras and trigger wires (pulsed or constant inputs), or connect to a BCI-, RP4.2-, or RPA- module's expansion port
for full digital control, and fast easy connectivity. The VS41 also accepts analog + or - and constant / pulsed signals.
Introduction & Features
Important Notes
1. If you are using the VS41 with another PAC interface, such as a BCI-, RP4.2-, or RPA-, with an Expansion Port, simply
connect the 10-pin connector into the module. Do not manually wire the positive or negative trigger wires. The BCI-,
RP4.2-, or RPA- module will digitally control the VS41 switching operation when connected to the Expansion Port.
2. The VS41 video output will always default to the signal from Input 1 when none of the input triggers are activated. This
Input is ideal for connecting the rear (reverse) camera.
3. The VS41 inputs have priority in descending numerical order. For example: If you have Input 3 or 4 triggered, then you
trigger a lower number input (for example Input 2), Input 2 will take priority over the higher numbered Input.
4. The input triggers can accept either a pulsed or constant input, making them ideal for connecting to a turn signal as a
trigger.
5. The reverse trigger output will provide a 150 mA 12v (+) trigger while any of the input triggers are activated.
6. Upon deactivation of the last positive or negative trigger, the last video input source and the reverse trigger output will
remain active for an additional 3 seconds. (Not applicable when used with a BCI-, RP4.2-, or RPA- interface).
7. If there is poor video quality after installation of this module, please ensure quality connections on any RCA connections.
8. Positive Input triggers accept input voltages in the range of 2v to 12v.
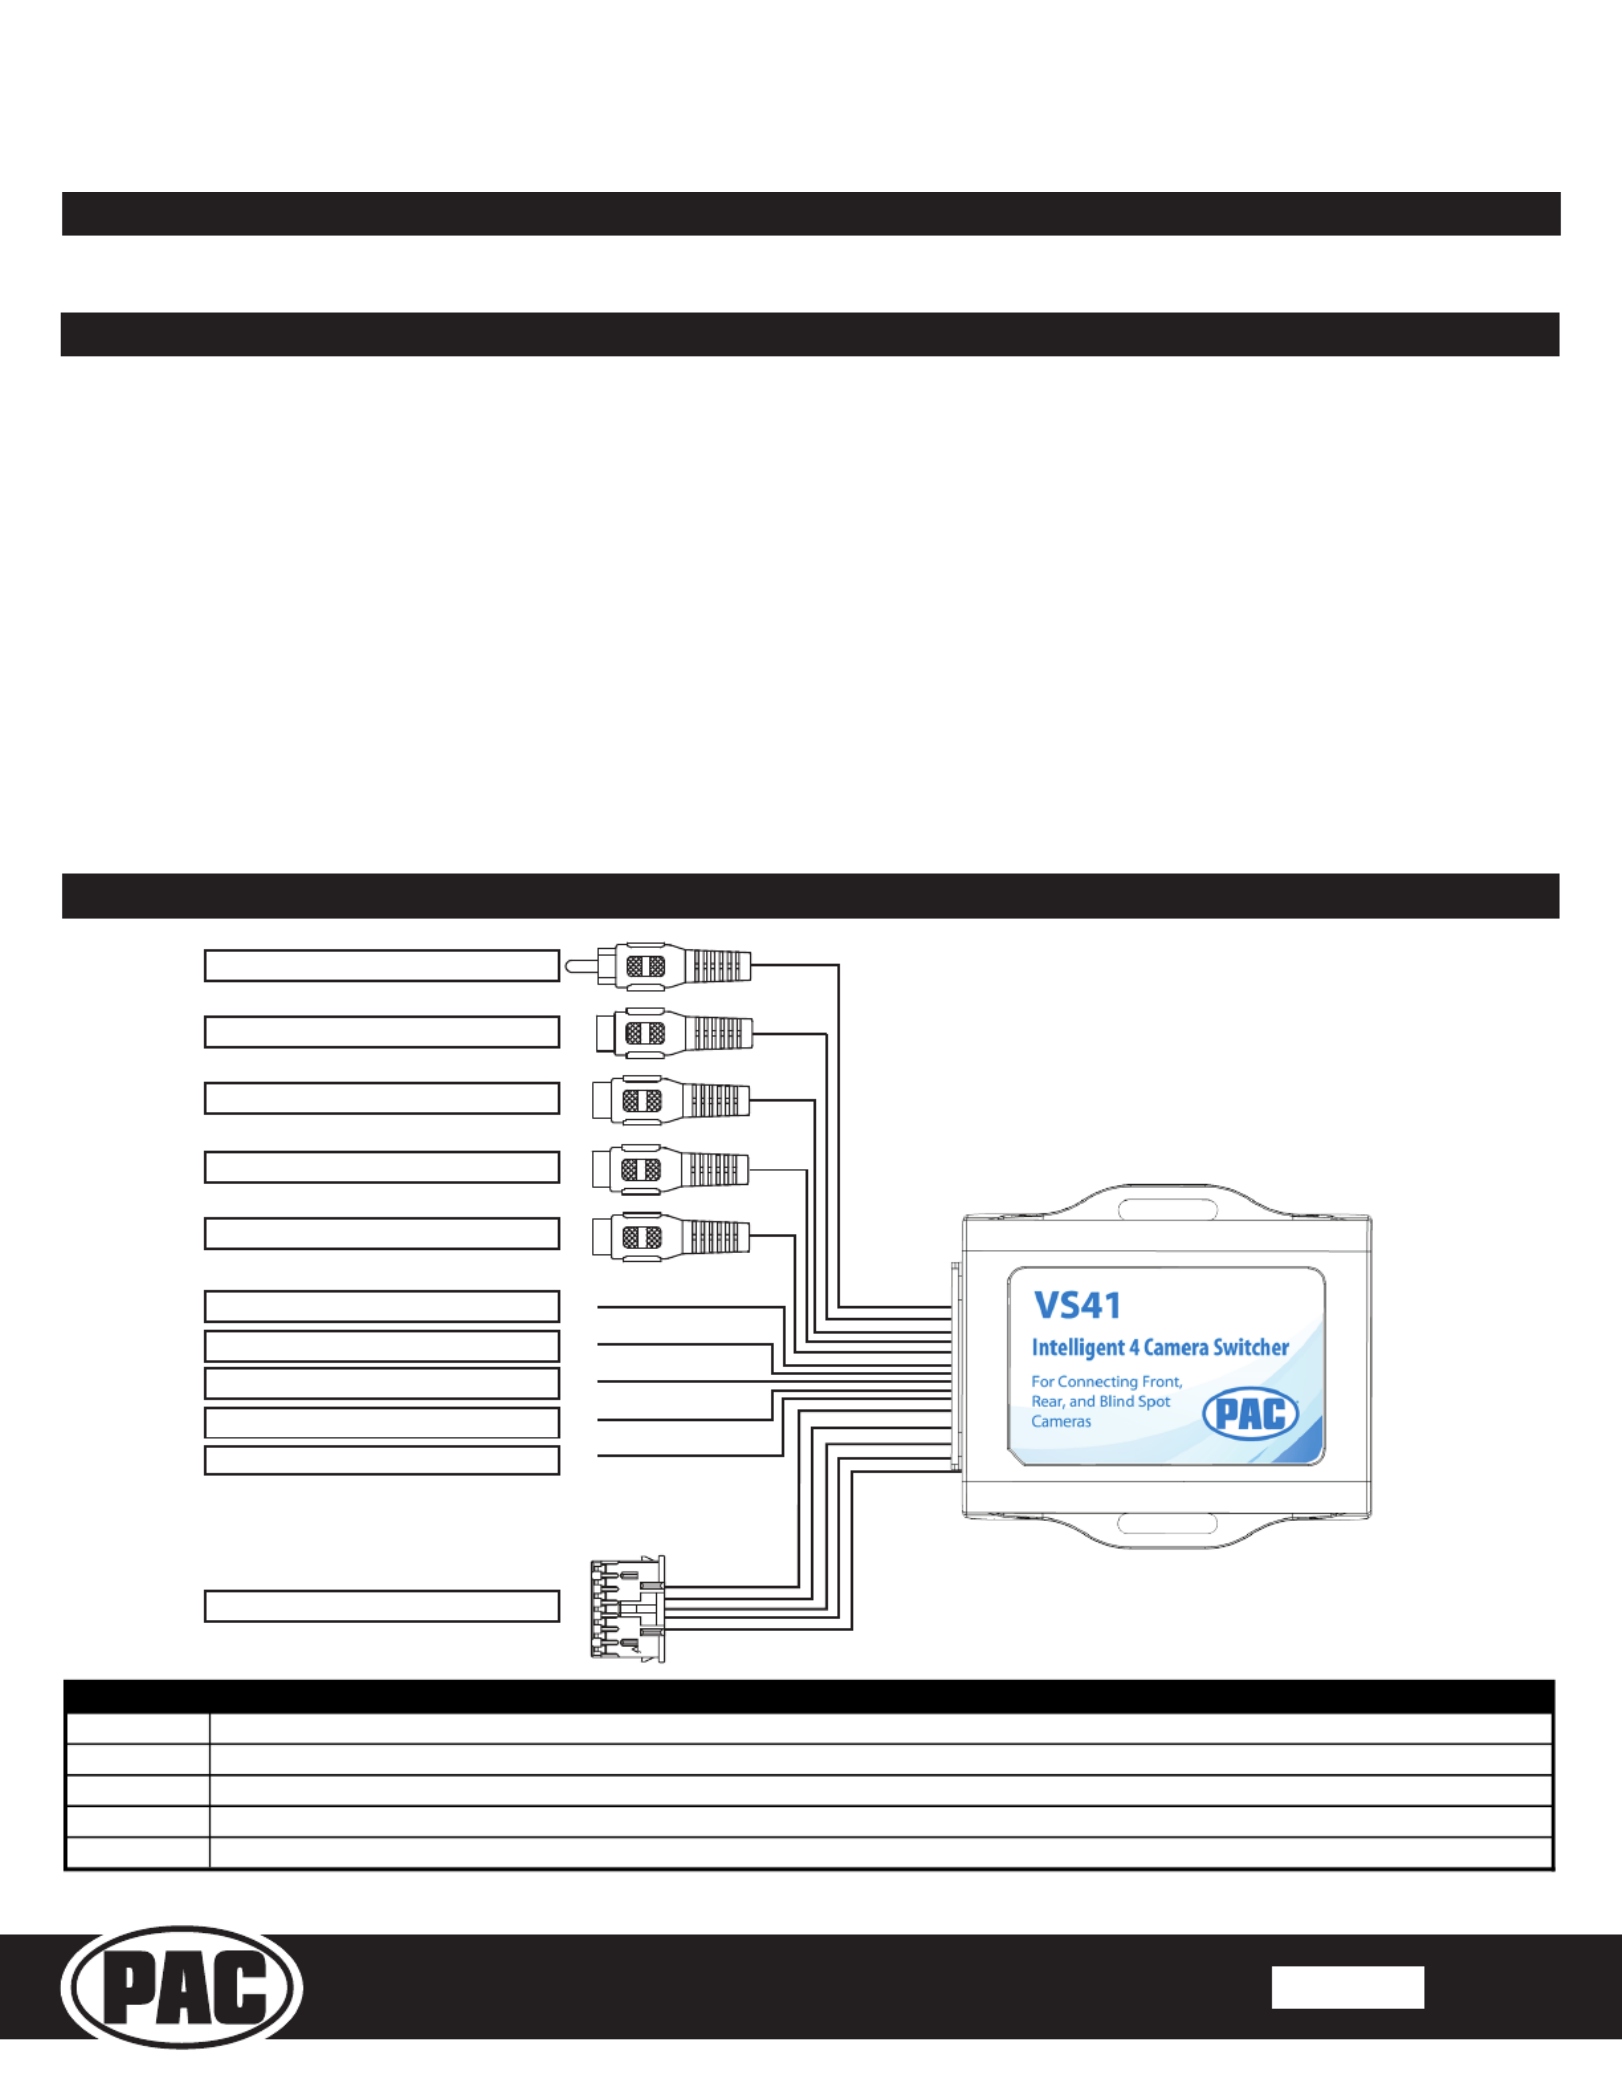
Video Output
Video 1 Input - Reverse Camera
Video 2 Input - Front Camera
Video 3 Input - Left Blind Spot
Video 4 Input - Right Blind Spot
Input 1 trigger (+)White
Input 1 trigger (-)White / Black
Accessory 12v (+)Yellow
Reverse trigger output (+)Purple / White
Ground (-)Black
Input 4 trigger (+)Purple
Input 4 trigger (-)Purple / Black
Input 3 trigger (+)Green
Input 3 trigger (-)Green / Black
Input 2 trigger (+)Gray
Input 2 trigger (-)Gray / Black
Expansion Port on BCI- , RP4.2-,
or RPA Module
10-Pin Plug
Wiring Connection Chart
© 2018 AAMP Global. All rights reserved. PAC is a Power Brand of AAMP Global.
PAC-audio.com
P ifi A C ti
Rev. 032818
Vehicle Specic Instructions for use with RadioPRO ADVANCED
In Select 2003-2006 Chevrolet / GMC Trucks and SUVs
VS41
The VS41 is an intelligent 4 camera switcher for controlling front, rear, and blind spot cameras. It is designed to be
used with PAC radio replacement interfaces.
Introduction & Features
Important Notes
1. These instructions are specically for adding reverse, blind spot, and front cameras (or any combination of the three) to an
aftermarket radio in the following vehicles:
• 2003-2006 GM Trucks / SUVs
2. You must locate and connect to the analog turn signal wires in the vehicle, as well as connect the reverse output trigger
from the GM1A to the VS41. Please wire the VS41’s analog input triggers 1, 3 and 4 according to the instructions below.
3. Analog input trigger 2 on the VS41 only needs to be connected if you want manual activation of the front camera via toggle
switch. Automatic activation of the front camera (Input 2) via Class II Data-Bus commands can be set using the RadioPRO
PC application. See page 2 for more details on the RadioPRO PC app.
4. The reverse trigger output will provide a 150 mA 12v (+) trigger while any of the input triggers are activated.
5. The VS41 video output will always default to the signal from Input 1 when none of the input triggers are activated. This
Input is ideal for connecting the rear (reverse) camera.
6. The VS41 inputs have priority in descending numerical order. For example: If you have Input 3 or 4 triggered, then you
trigger a lower number input (for example Input 2), Input 2 will take priority over the higher numbered Input.
7. If there is poor video quality after installation of this module, please ensure quality connections on all RCA connections.
Wiring Connection Chart
Video Output
Video 1 Input - Reverse Camera
Video 2 Input - Front Camera
Video 3 Input - Left Blind Spot
Video 4 Input - Right Blind Spot
Input 1 trigger (+)White
Reverse trigger output (+)Purple / White
Input 4 trigger (+)Purple
Input 3 trigger (+)Green
Input 2 trigger (-)Gray / Black
Expansion Port on GM1A
10-Pin Plug
Any wire present on the VS41 that is not
mentioned here WILL NOT be used in this
application.
VS41 Wire
Connection
White
Reverse Trigger Input (+) -
Connect to
the Purple / White reverse trigger output provided by the GM1A
Gray / Black
Front Camera Trigger (-) -
If you would like to manually force the front camera, hook this wire to a ground (-) trigger through a toggle switch.
Green
Left Blind Spot Trigger Input (+) - *
Dark green at turn signal switch on top of steering column. See diagrams next page.
Purple
Right Blind Spot Trigger Input (+) - *
Light green at turn signal switch on top of steering column. See diagrams next page.
Purple / White
Reverse Trigger Output (+) -
Connect this wire to the aftermarket radio's reverse trigger input.
*Please verify all signals with a multi-meter before connecting the VS41

© 2018 AAMP Global. All rights reserved. PAC is a Power Brand of AAMP Global.
PAC-audio.com
P ifi A C ti
Rev. 032818
Vehicle Specic Instructions for use with RadioPRO ADVANCED
In Select 2003-2006 Chevrolet / GMC Trucks and SUVs
VS41
Installation Steps
1. Connect the 10-pin expansion plug to the GM1A interface.
2. Wire up all the triggers and inputs as indicated in the chart on page 1.
3. See diagrams below for location of turn signal wires.
4. Once connected, verify all cameras are showing properly. The front camera behavior can be setup using the RadioPRO app.
Please see the next section for more details on the RadioPRO app.
Fig. A Fig. B
RadioPRO App
Use of the RadioPRO App allows you to do the following:
• Set the behavior of the front camera
Connect the GM1A interface to the PC and select the behavior of the front camera. Use the chart below to understand how
each mode works. The GM1A does not have to be connected to power or in the vehicle to access camera settings.
Mode
Description
Notes
Greater than 0MPH and less
than *xMPH
This will activate the camera
input whenever the vehicle is
going faster than 0 mph or less
than the designated number.
*Options are: 3 mph, 5mph, or 7
mph.
On when Shift into D until
6MPH or 30Sec
This will activate the camera
input whenever the vehicle is
placed into Drive. The camera
input will turn off once the
vehicles speed is faster than
6MPH, or after 30 seconds.
This mode should be used in
vehicles that have an automatic
transmission
On when Shift out of R until
6MPH or 30Sec
This will activate the camera
input whenever the vehicle is
shifted out of reverse. The
camera input will turn off once
the vehicles MPH is faster than
6MPH, or after 30 seconds.
This mode should only be used in
vehicles that have a manual
transmission.
Produktspezifikationen
| Marke: | PAC |
| Kategorie: | Schalten |
| Modell: | VS41 |
Brauchst du Hilfe?
Wenn Sie Hilfe mit PAC VS41 benötigen, stellen Sie unten eine Frage und andere Benutzer werden Ihnen antworten
Bedienungsanleitung Schalten PAC

11 August 2024
Bedienungsanleitung Schalten
- Schalten Asus
- Schalten Belkin
- Schalten Hama
- Schalten HP
- Schalten LogiLink
- Schalten Manhattan
- Schalten Nedis
- Schalten Philips
- Schalten SilverCrest
- Schalten Panasonic
- Schalten Brennenstuhl
- Schalten Clas Ohlson
- Schalten Cotech
- Schalten Profile
- Schalten ZyXEL
- Schalten Bosch
- Schalten Yamaha
- Schalten Powerfix
- Schalten CSL
- Schalten Eminent
- Schalten Linksys
- Schalten Netgear
- Schalten König
- Schalten PCE
- Schalten Renkforce
- Schalten Trotec
- Schalten Schneider
- Schalten Rex
- Schalten Kaiser
- Schalten Vivanco
- Schalten Abus
- Schalten Elro
- Schalten Smartwares
- Schalten Tesla
- Schalten Perel
- Schalten Nexa
- Schalten Tork
- Schalten GEV
- Schalten Goobay
- Schalten Lindy
- Schalten Tripp Lite
- Schalten Ansmann
- Schalten Mercusys
- Schalten Marmitek
- Schalten Honeywell
- Schalten TRENDnet
- Schalten TP-Link
- Schalten Kathrein
- Schalten Flamingo
- Schalten Alcatel
- Schalten Tiptel
- Schalten Black Box
- Schalten Alpine
- Schalten Techly
- Schalten Ebode
- Schalten Theben
- Schalten Vacmaster
- Schalten GAO
- Schalten Hager
- Schalten Behringer
- Schalten Omnitronic
- Schalten Monoprice
- Schalten Ecler
- Schalten Monacor
- Schalten Huawei
- Schalten JUNG
- Schalten Victron Energy
- Schalten Ei Electronics
- Schalten Edimax
- Schalten Totolink
- Schalten D-Link
- Schalten Sylvania
- Schalten Audiovox
- Schalten B-Tech
- Schalten QNAP
- Schalten SPC
- Schalten Speaka
- Schalten Digitus
- Schalten Sygonix
- Schalten DataVideo
- Schalten Lancom
- Schalten LevelOne
- Schalten Merten
- Schalten APC
- Schalten Eberle
- Schalten Cisco
- Schalten Delta Dore
- Schalten Grässlin
- Schalten Tenda
- Schalten CyberPower
- Schalten Boss
- Schalten IFM
- Schalten Intertechno
- Schalten Elation
- Schalten Ubiquiti Networks
- Schalten Kramer
- Schalten Aeon Labs
- Schalten Intellinet
- Schalten Eaton
- Schalten AV:link
- Schalten Hikvision
- Schalten Vemer
- Schalten PreSonus
- Schalten Planet
- Schalten EnGenius
- Schalten Finder
- Schalten Mikrotik
- Schalten Shimano
- Schalten Homematic IP
- Schalten Berker
- Schalten Dormakaba
- Schalten Emerson
- Schalten Generac
- Schalten Intermatic
- Schalten KlikaanKlikuit
- Schalten Mercury
- Schalten Paladin
- Schalten Provision ISR
- Schalten Robbe
- Schalten SEC24
- Schalten Steren
- Schalten Suevia
- Schalten AMX
- Schalten Triax
- Schalten WHALE
- Schalten Vimar
- Schalten Cudy
- Schalten Siig
- Schalten Electro Harmonix
- Schalten RGBlink
- Schalten Iogear
- Schalten StarTech.com
- Schalten Smart-AVI
- Schalten Dahua Technology
- Schalten Gefen
- Schalten Avocent
- Schalten Legrand
- Schalten Atlantis Land
- Schalten CYP
- Schalten H-Tronic
- Schalten ATen
- Schalten Axing
- Schalten KanexPro
- Schalten SmartAVI
- Schalten Advantech
- Schalten Kraus & Naimer
- Schalten Chacon
- Schalten Juniper
- Schalten Fibaro
- Schalten Phoenix Contact
- Schalten Audac
- Schalten OSD Audio
- Schalten Wentronic
- Schalten SunBriteTV
- Schalten BZBGear
- Schalten Crestron
- Schalten Kemo
- Schalten ORNO
- Schalten Extron
- Schalten Atlona
- Schalten Equip
- Schalten Heitronic
- Schalten Hamlet
- Schalten STI
- Schalten Matrox
- Schalten Blustream
- Schalten Vivolink
- Schalten Mach Power
- Schalten Ernitec
- Schalten Cambium Networks
- Schalten ConnectPro
- Schalten Micro Connect
- Schalten Intelix
- Schalten ICasa
- Schalten Maclean Energy
- Schalten Cooking Performance Group
- Schalten Flic
- Schalten Liberty
- Schalten Noark
- Schalten 2USB
- Schalten KVM-TEC
- Schalten Setti+
- Schalten PureLink
Neueste Bedienungsanleitung für -Kategorien-

15 Oktober 2024
12 Oktober 2024
11 Oktober 2024
8 Oktober 2024
8 Oktober 2024
5 Oktober 2024
4 Oktober 2024
4 Oktober 2024
4 Oktober 2024
3 Oktober 2024