Oyen Digital MiniPro RAID V4 Bedienungsanleitung
Oyen Digital
Festplatte
MiniPro RAID V4
Lesen Sie kostenlos die 📖 deutsche Bedienungsanleitung für Oyen Digital MiniPro RAID V4 (2 Seiten) in der Kategorie Festplatte. Dieser Bedienungsanleitung war für 23 Personen hilfreich und wurde von 2 Benutzern mit durchschnittlich 4.5 Sternen bewertet
Seite 1/2

Table of Contents
1 Specications
2 Detailed View
3 Power
4 Installing Drives (Enclosure Version)
5 Connections
6 System Setup
7 RAID Modes
8 Formatting
9 Sleep
10 RAID 1 Rebuild
11 Troubleshooting and FAQ
12 Warranty Information
MiniPro RAID V4
User Guide
(11) Troubleshooting and FAQ
(12) Warranty Information
This product includes a three (3) year repair/replacement
warranty provided by Oyen Digital. This warranty is non-
transferable and is limited to the original purchaser. Warranty
service may be requested at: oyendigital.com/support
(7) RAID Modes
RAID 0 (Striping) combines data evenly across
both drives simultaneously; dramatically increasing performance. RAID 0
will be viewed as one single storage unit. If one disk in the RAID System
fails, all data in installed disks will be lost.
RAID 1 (Mirroring) consists of two drives storing duplicate copies of the
same data. In this mode, the data is simultaneously written to both drives.
The speed of operation is slow in comparison to RAID 0; however if one
drive fails, no data is lost. Simply replace the failed drive. The total capacity
= one drive. For example, if installing 2 x 1TB drives, the total capacity will
be 1TB.
JBOD (Clear) is simply a collection of drives that are recognized as
separate drives by the OS. JBOD provides no performance increase or
redundancy. This is the default setting.
Big (Span) combines both hard drives into a single logical unit. Spanning
does not increase performance or safety. “Big” mode is considered a legacy
mode and may cause a decrease in drive performance. It is not
recommended for use in most applications.
(9) Sleep
The MiniPro RAID V4 does not have an auto-sleep timer. However, it will
follow the sleep settings of the computer. When your computer enters
sleep mode, the MiniPro will sleep and the HDDs will spin down.
(10) RAID 1 Rebuild
If one of the drives fail, the D1 or D2 LED will turn RED. A new drive can
be installed and will automatically rebuild with data (if congured for
RAID 1).
1. Power down the MiniPro and remove the failed drive indicated by the
red LED. (see section 4 for assembly instructions).
2. Install the new drive. Connect the MiniPro to a computer and power
it on.
3. The D1/D2 LED will blink about 3-4 times per second, which indicates
a rebuild in progress.
4. Leave the MiniPro connected to the computer until the rebuild
completes. The LEDs will be solid blue when the rebuild is nished.
Note: An SSD rebuild will take about 1 hour per Terabyte. An HDD
rebuild will take about 3 hours per Terabyte.
(8) Formatting
After setting a new RAID mode, you must format the volume.
Formatting can be performed using Disk Utility (Mac) or Disk
Management (Windows). Note: RAID 0/1 or Span will appear as a single
drive in the OS.
For instructions, visit: http://oyendigital.com/format
1) I set the RAID. How do I know the RAID was congured properly?
If using Windows, open Device Manager > Disk Drives. If using Mac, open
Disk Utility, then View > Show All Devices. The MiniPro will be shown
with the RAID mode in the title. E.g. MiniPro RAID V4 RAID 0.
2) Does a "Clear" procedure delete data from RAID 1 or JBOD drive(s)?
If a Clear procedure is performed on RAID 1 or JBOD drives, the existing
data on the drives will not be deleted. It wil delete data only if clearing
a RAID 0 or Big mode.
3) Can I remove a drive from the RAID and install it in another
enclosure for access to the les?
Yes, only if using RAID 1(Mirroring) or JBOD.
4) How many MiniPro RAID V4 can be connected in a chain?
A total of six devices may be connected in a chain.
5) Can a bus-powered drive be connected to the HUB ports?
Yes, up to 15W of bus power is available for drives connected to the HUB
ports. However, for maxumim power, we recommend using the external
power adapter when connecting bus-powered devices to the hub ports.
6) How long does a RAID 1 rebuild take?
It depends on several factors including the size of the drive and whether
it is an HDD or SSD. An SSD RAID will rebuild at a rate of about 1 hour per
Terabyte. For example, a 4TB SSD RAID will rebuild in about 4 hours. An
HDD RAID will rebuild at a rate of about 3 hours per Terabyte. For
example, a 4TB HDD RAID will rebuild in about 12 hours.
For other questions please contact tech support or visit the
section of our Web site (www.oyendigital.com/support).
Technical Support: support@oyendigital.com
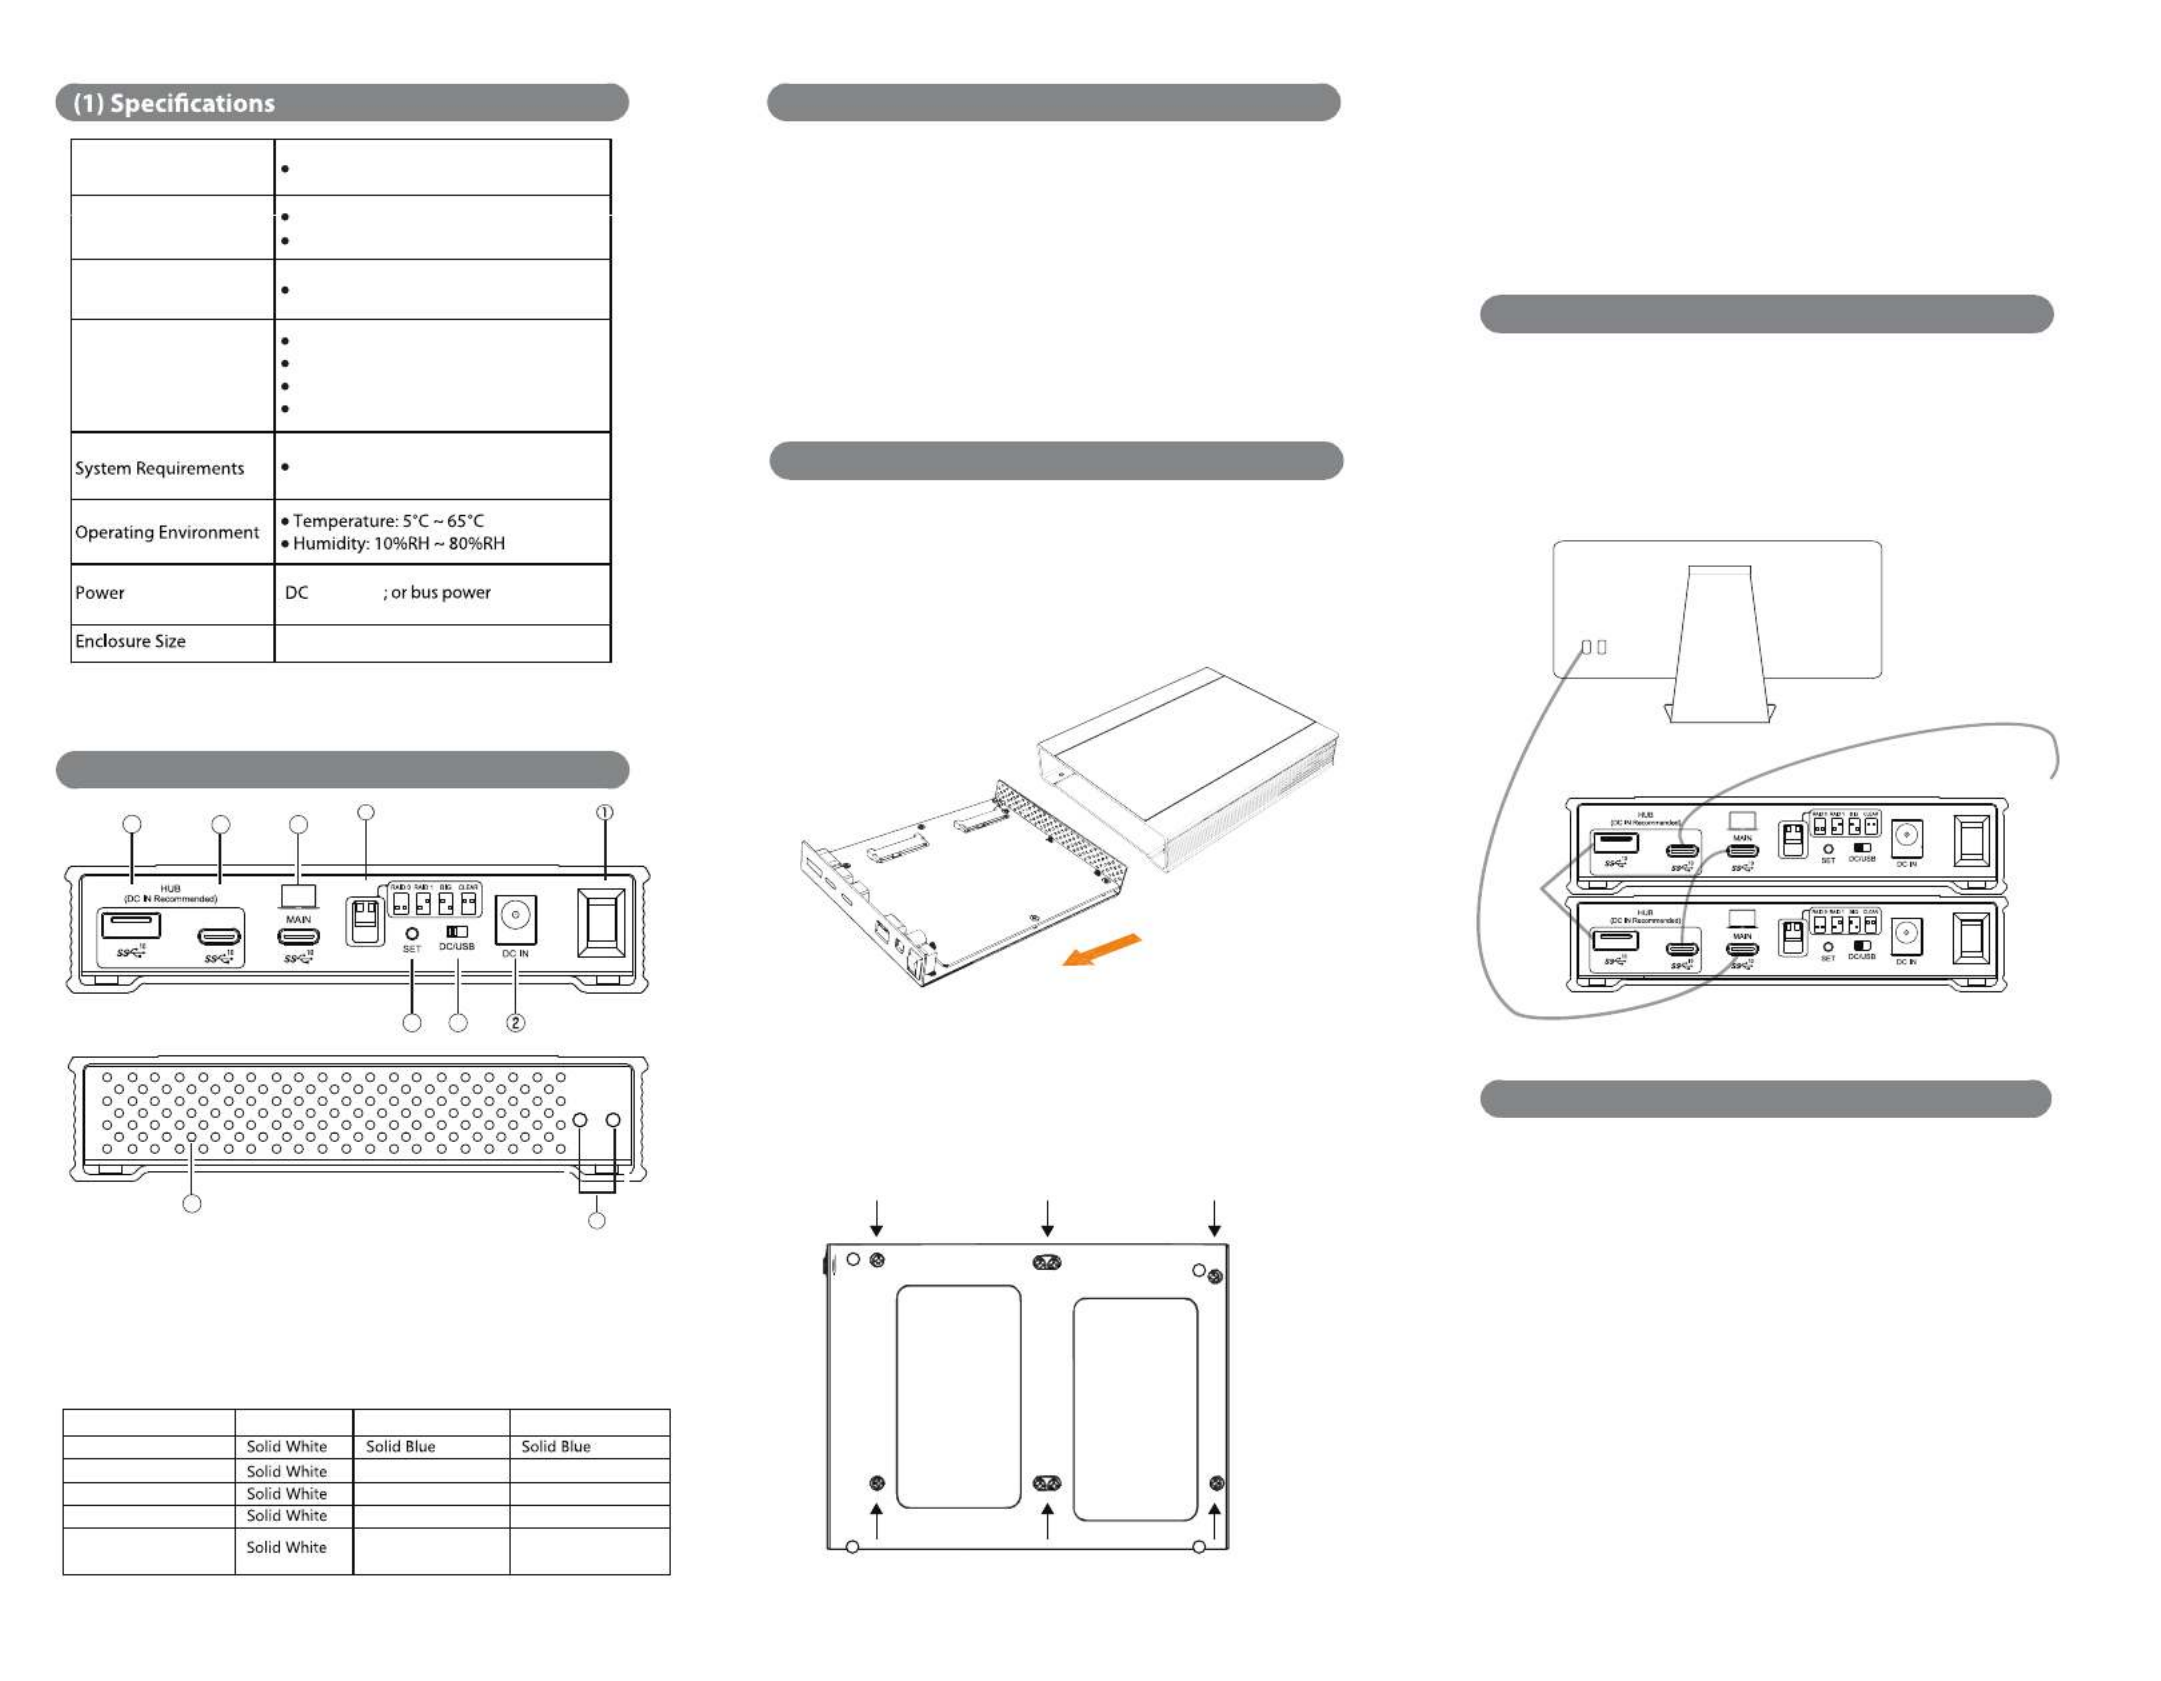
7.0 x 5.7 x 1.4 inches
+12V/3A
Windows, Mac, Linux
RAID Modes
2 x 2.5” SATA HDDs or SSDs
Internal Storage
Main Port
Hub Ports
RAID 0 Striping
RAID 1 Mirroring
JBOD Clear (independent drives)
BIG (non-RAID single volume)
USB Type-C (Up to 10Gbps)
USB Type-C (Up to 10Gbps)
USB Type-A (Up to 10Gbps)
LED indicators
* Note: D1 & D2 LEDs will be OFF when the MiniPro is not
connected to a computer.
Red
Fast rapid flickering
Red
Off
Blink 3-4 times
per second
Off
Blink 3-4 times
per second
State Power LED Drive 1 (D1) Drive 2 (D2)
Drive Error or missing
HDD Sleep
RAID 1 Rebuilding
Read/Write activity
Powered & ready
Fast rapid flickering
D1 D2
(3) Power
(2) Detailed View (without Bumper)
1. ON/OFF Switch
2. DC Input
3. Power Selector (bus-
power or external power)
4. Set Button
5. RAID Mode Switch
6. Main Port (to computer)
7. USB-C Hub Port
8. USB-A Hub Port
9. Drive 1&2 Status LEDs
10. Power LED
34
5
678
9
10
Bottom View
(4) Installing Drives (Enclosure Version)
D1
D2
(6) System Setup
1. Connect the USB-C cable to the port on the MiniPro. MAIN
2. Connect the other end of the cable to the host computer.
3. (Optional) Connect additional MiniPros or other USB devices to the
HUB ports as shown.
The illustration shows two MiniPro in a daisy-chain conguration.
(5) Connections
Additional
USB-C devices
(optional)
Additional
USB-A
devices
(optional)
The default mode is JBOD, which is two independent drives formatted
as exFAT for Windows and Mac.
If you desire
a mode other than JBOD,
perform a ‘Set RAID’:
Set RAID:
1. Set the switches on the MiniPro to the desired mode.
2. Connect the MiniPro to the host computer and turn on. Wait for the
D1 and D2 lights to turn blue.
3. Using the tip of the screwdriver, press the SET button for at least 5 seconds.
4. Release the SET button. The RAID is congured and ready for
formatting (section 8).
If changing or deleting a RAID mode, perform a “Clear” procedure.
Clear Procedure:
1. Set the switches on the MiniPro to Clear.
2. Connect the MiniPro to the host computer. Wait for the D1 and D2
lights to turn blue.
3. Using the tip of the screwdriver, press the SET button for at least 5 seconds.
4. Release the SET button. Any previous RAID mode is removed
and the drives are now set for JBOD mode.
f) Slide the bracket back into the enclosure and fasten using the 4
exterior screws removed in step b.
g) Insert the front of the MiniPro into the rubber bumper. Stretch the
corners of the bumper around the MiniPro.
Note: The red dot inside the rubber indicates the front bottom.
The MiniPro can be powered from the included DC adapter or bus power.
To choose the power source, slide the selector
switch to the desired
position. DC = External Power Adapter, = Bus PowerUSB
Note:
• USB-C or Thunderbolt host ports will generally provide sucient
power without the need for the external power adapter.
• If connecting bus-powered drives to the HUB ports of the V4, we
recommend connecting the external power adapter with the DC/USB
switch in the DC position. This ensures full power for all devices.
Follow the steps to install 2.5-inch SATA drives in the MiniPro RAID V4
enclosure.
a) Slowly stretch the rubber bumper over each corner of the MiniPro until
loose. Remove the bumper from the enclosure.
b) Remove the screws located at the bottom of the case and slide out
the circuit board bracket from the enclosure.
c) Install the drives in the D1 & D2 slots on the circuit board.
d) With your hand holding the drives into the bracket, ip it over to view
the screw holes.
e) Attach the drives to the bracket using the included screws.
FRONT
REAR
Produktspezifikationen
| Marke: | Oyen Digital |
| Kategorie: | Festplatte |
| Modell: | MiniPro RAID V4 |
Brauchst du Hilfe?
Wenn Sie Hilfe mit Oyen Digital MiniPro RAID V4 benötigen, stellen Sie unten eine Frage und andere Benutzer werden Ihnen antworten
Bedienungsanleitung Festplatte Oyen Digital

4 September 2024
3 September 2024
3 September 2024
3 Juni 2024
Bedienungsanleitung Festplatte
- Festplatte Samsung
- Festplatte HP
- Festplatte Medion
- Festplatte Sandberg
- Festplatte Sharkoon
- Festplatte Sony
- Festplatte Sweex
- Festplatte Verbatim
- Festplatte Intenso
- Festplatte Fantec
- Festplatte Pioneer
- Festplatte TrekStor
- Festplatte Toshiba
- Festplatte Dell
- Festplatte Western Digital
- Festplatte PNY
- Festplatte SilverStone
- Festplatte Seagate
- Festplatte Fujitsu
- Festplatte Freecom
- Festplatte Quark
- Festplatte Transcend
- Festplatte LaCie
- Festplatte AudioControl
- Festplatte StarTech.com
- Festplatte Kingston
- Festplatte HGST
- Festplatte OWC
- Festplatte Rocstor
- Festplatte Apricorn
- Festplatte G-Technology
- Festplatte CnMemory
- Festplatte Xcellon
- Festplatte Areca
- Festplatte Sabrent
- Festplatte BLACKJET
Neueste Bedienungsanleitung für -Kategorien-

10 Oktober 2024

2 Oktober 2024

17 September 2024

16 September 2024

15 September 2024
9 September 2024

6 September 2024
5 September 2024
4 September 2024
4 September 2024