OWC Aura Pro 6G Bedienungsanleitung
OWC
Solid-State-Laufwerke (SSD)
Aura Pro 6G
Lesen Sie kostenlos die 📖 deutsche Bedienungsanleitung für OWC Aura Pro 6G (16 Seiten) in der Kategorie Solid-State-Laufwerke (SSD). Dieser Bedienungsanleitung war für 14 Personen hilfreich und wurde von 2 Benutzern mit durchschnittlich 4.5 Sternen bewertet
Seite 1/16

1
Start with Internet Recovery
This guide provides the information required to format your OWC SSD, as well as options for installing the Mac operating system and
migrating your data. The process starts by booting into Internet Recovery, using one of the keyboard shortcuts listed below. Because the
shortcut used and the specific Mac determine the OS used by Recovery it is worthwhile to determine the latest compatible OS for your
Mac before choosing a method. We have included Apple’s official compatibility lists for the last several OS versions (see below).
Recovery Option 1: Cmd-Opt-R (Recommended)
Power on the Mac then immediately press and hold Cmd-
Opt-R until you see a screen similar to the one at right (in
some cases it may be grey). If you see a Wi-Fi menu, choose
your preferred network to continue; you may need to provide
network credentials.
This Recovery option ensures that later in the process, if you use
the ‘Reinstall macOS / OS X’ function (i.e. a clean OS install) the
latest compatible version will be used.
Exception: If has never been macOS Sierra 10.12.4 or later
installed on this Mac, Cmd-Opt-R installs the macOS that
originally shipped with your Mac, or the closest version still
available. To avoid this, update to 10.12.4+ before running Recovery.
Recovery Option 2: Cmd-R
Power on the Mac and immediately press and hold Cmd-R until you see a screen similar to the one shown earlier (in some cases it will
be a grey background with a globe). If you see a Wi-Fi menu, choose your preferred network to continue; you may need to provide
network credentials.
This option ensures that if you use the ‘Reinstall macOS / OS X’ function (i.e. a “clean install”) later in the process, the most recently installed
OS version will be used.
Exception: If you recently had your Mac logic board replaced during a repair, Recovery may install the latest compatible macOS.
Additional Notes:
• OS 10.11 and 10.13 included changes to Disk Utility that will determine which formatting instructions to use (see next page).
• If you want to verify the OS version that you booted into before choosing the formatting instructions, you can use the Terminal.
From the main menu at the top of the Recovery screen, choose Utilities > Terminal, then type the command sw_vers and press
Return. The OS version that you have booted into will be displayed. If it’s the version you expected based on the information
provided earlier, you can continue to the Formatting section below. If not, you can try again by choosing Apple Menu > Restart,
waiting till the screen turns black and then pressing and holding a different Recovery shortcut, to see if you get the result you want.
If you do not it is possible the version of the OS you are looking for is no longer available for your specific Mac.
Formatting, OS Installation, and Migration Guide
OWC Aura Pro 6G SSD (2012 MacBook Air)
• macOS 10.15 Catalina-compatible
• macOS 10.14 Mojave-compatible
• macOS 10.13 High Sierra-compatible
• macOS 10.12 Sierra-compatible
• Mac OS X 10.11 El Capitan-compatible
• Mac OS X 10.10 Yosemite-compatible
Important Notes
• This process requires a working internet connection on the host computer.
• This guide assumes that the was already followed and completed. SSD installation process
• If the SSD is installed on a laptop, make sure the power adapter is connected before you begin the steps below.

2
Formatting the SSD
Once you have booted into Recovery, use the Disk Utility to format the SSD. While the process of formatting your drive is simple in all
cases, the appearance and steps within Disk Utility can vary based on the OS version. We have set up examples for each version. Please
note: the drive labels or information in this document may differ from your drive, but the processes won’t change.
• If the Recovery method selected targets macOS 10.13-10.15, please continue with the steps below.
• If the Recovery method selected targets OS X 10.11 or macOS 10.12, please skip ahead to page 5.
• If the Recovery method selected targets OS X 10.7-10.10, please skip ahead to page 8.
Formatting Steps: 10.13-10.15
Step 1 – from the macOS Utilities window, select the Disk Utility option and click Continue.
Step 2 – to ensure that all internal devices and volumes are shown from the start, open the View menu widget near the top-left corner of
the Disk Utility window and choose ‘Show All Devices’.
Step 3 – in the sidebar area at left, select the
icon or label for the physical disk (item A at
right) Note: some SSDs may also include a
factory-formatted volume, listed beneath
the physical disk item; this factory volume
— or any others on the drive — will be
permanently erased.
Step 4 – click the ‘Erase’ button (item B at
right) to continue.
3
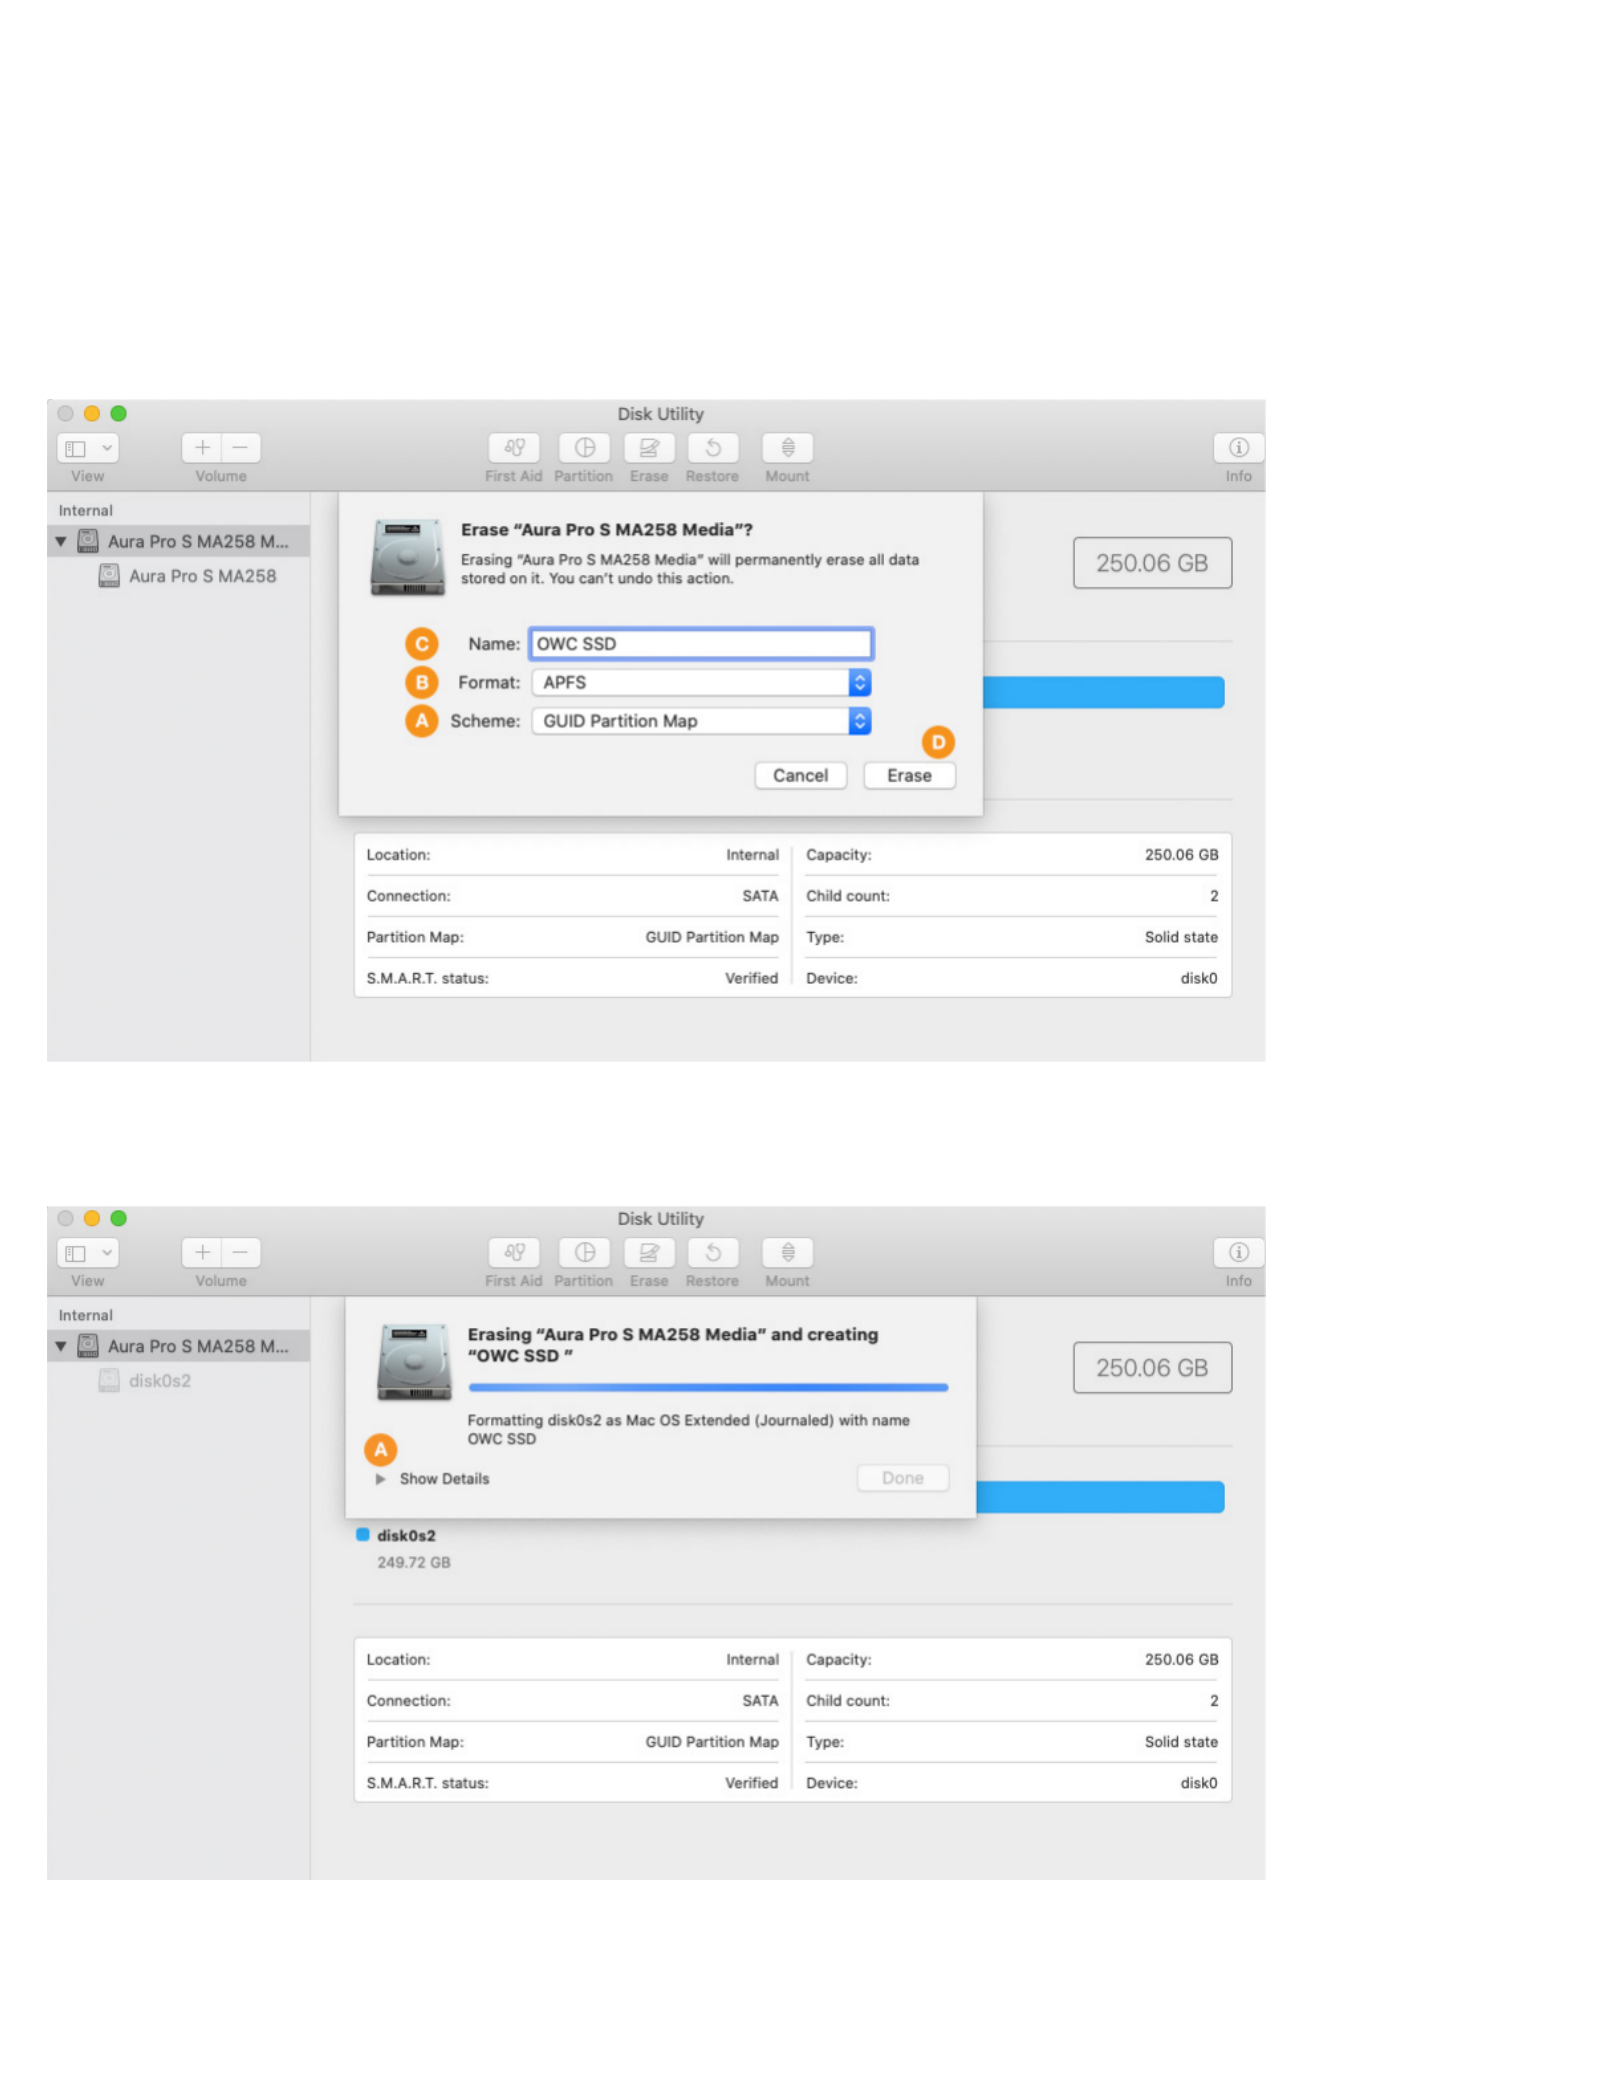
Step 5 – a sheet will open containing the settings needed to format the drive. From the ‘Scheme’ menu (item A below) set the value to
‘GUID Partition Map’ if it’s not already selected (required).
Step 6 – from the ‘Format’ menu (item B below) choose ‘APFS’. This is the recommended format for Mac SSDs in macOS 10.13 and later.
Step 7 – type a name for your new system volume in the field supplied (item C). the volume names shown in later sections will not Note:
match the one shown here because the examples are from different sources. However, whatever volume name you choose at this step,
will be applicable when choosing a destination for your system and/or data files during the migration process, as well.
Step 8 – click the ‘Erase’ button (item D) to format the drive. In many cases it will only take a few seconds.
During the format process, by default the screen will look similar to what you see below. Note that it is possible to see the details of the
formatting process by clicking the ‘Show Details’ widget (item A below), but it is not necessary to complete the process.
Produktspezifikationen
| Marke: | OWC |
| Kategorie: | Solid-State-Laufwerke (SSD) |
| Modell: | Aura Pro 6G |
Brauchst du Hilfe?
Wenn Sie Hilfe mit OWC Aura Pro 6G benötigen, stellen Sie unten eine Frage und andere Benutzer werden Ihnen antworten
Bedienungsanleitung Solid-State-Laufwerke (SSD) OWC

25 August 2024
25 August 2024
25 August 2024
25 August 2024
25 August 2024
Bedienungsanleitung Solid-State-Laufwerke (SSD)
- Solid-State-Laufwerke (SSD) Samsung
- Solid-State-Laufwerke (SSD) Corsair
- Solid-State-Laufwerke (SSD) Gigabyte
- Solid-State-Laufwerke (SSD) Sony
- Solid-State-Laufwerke (SSD) Verbatim
- Solid-State-Laufwerke (SSD) Buffalo
- Solid-State-Laufwerke (SSD) Fantec
- Solid-State-Laufwerke (SSD) TrekStor
- Solid-State-Laufwerke (SSD) Western Digital
- Solid-State-Laufwerke (SSD) ADATA
- Solid-State-Laufwerke (SSD) Seagate
- Solid-State-Laufwerke (SSD) SanDisk
- Solid-State-Laufwerke (SSD) Freecom
- Solid-State-Laufwerke (SSD) IStorage
- Solid-State-Laufwerke (SSD) Transcend
- Solid-State-Laufwerke (SSD) Emtec
- Solid-State-Laufwerke (SSD) LaCie
- Solid-State-Laufwerke (SSD) Zotac
- Solid-State-Laufwerke (SSD) Intel
- Solid-State-Laufwerke (SSD) Kingston
- Solid-State-Laufwerke (SSD) Aluratek
- Solid-State-Laufwerke (SSD) XPG
- Solid-State-Laufwerke (SSD) Advantech
- Solid-State-Laufwerke (SSD) Crucial
- Solid-State-Laufwerke (SSD) Patriot
- Solid-State-Laufwerke (SSD) DIGISTOR
- Solid-State-Laufwerke (SSD) G-Technology
- Solid-State-Laufwerke (SSD) Origin Storage
- Solid-State-Laufwerke (SSD) Silicon Power
- Solid-State-Laufwerke (SSD) ATP
- Solid-State-Laufwerke (SSD) Kingston Technology
- Solid-State-Laufwerke (SSD) Goodram
- Solid-State-Laufwerke (SSD) Kioxia
- Solid-State-Laufwerke (SSD) SK Hynix
Neueste Bedienungsanleitung für -Kategorien-
3 Oktober 2024
3 Oktober 2024
3 Oktober 2024
1 Oktober 2024
1 Oktober 2024
1 Oktober 2024
1 Oktober 2024
1 Oktober 2024
1 Oktober 2024
1 Oktober 2024