Oregon Scientific AD106 Bedienungsanleitung
Lesen Sie kostenlos die 📖 deutsche Bedienungsanleitung für Oregon Scientific AD106 (4 Seiten) in der Kategorie Wetterstation. Dieser Bedienungsanleitung war für 23 Personen hilfreich und wurde von 2 Benutzern mit durchschnittlich 4.5 Sternen bewertet
Seite 1/4

INTRODUCTION
Thank you for selecting Oregon ScientificTM SmartSync
software. This product allows you to download
information from your Pedometer to your PC.
Please keep this manual handy as you use your new
product. It contains practical step-by-step instructions,
as well as technical specifications and warnings you
should know.
IMPORTANT This software is not intended to substitute
professional measurement or industrial precision
devices. Values produced should be considered as
reasonable representations only.
OVERVIEW
USB CABLE AND CD-ROM
1. Connection jack to Pedometer
2. Connection jack to PC
MINIMUM REQUIREMENTS
• Windows 98SE or above
• Pentium 1 with 64MB RAM
• 50MB free memory
• USB port
SET-UP
To install the software:
1. Insert the CD into your PC.
2. The Installation Wizard will start automatically. If the
install does not start:
• Run Setup.exe directly from the CD-ROM.
3. The installation wizard will guide you through the
installation process.
Once installation is complete you can access the
software by clicking on the SmartSync icon on your
desktop or via the START menu.
When accessing the software for the first time you will
be asked to select the hour and day / month format.
Click to check the box next to your desired setting and
press OK.
TRANSFERRING DATA
Data can be transferred to a PC directly from the
pedometer or by using the base.
To connect the pedometer to a PC:
1. Insert the USB cable into your PC.
2. Unclip the cover of the USB port on the pedometer.
3. To connect directly to the pedometer: insert the
USB cable into the port on the pedometer.
4. To connect via the base: Insert the USB cable into
the base. Then, place the pedometer onto the base
so that the base USB connector is inserted into the
pedometer USB port.
NOTE The first time you connect to your PC the
pedometer will automatically synchronize to your PC’s
clock.
To transfer your data:
1. Connect the Pedometer to your PC.
2. The software should start automatically. If it doesn’t,
click on the SmartSync icon to start the software.
3. Click on the Communication tab and select Data
Transfer.
4. The progress bar will track the data transfer until it is
completed.
The connection status is shown in the bottom left hand
side of the SmartSync window.
NOTE If connection is interrupted, please remove the
USB cable from your PC and re-insert.
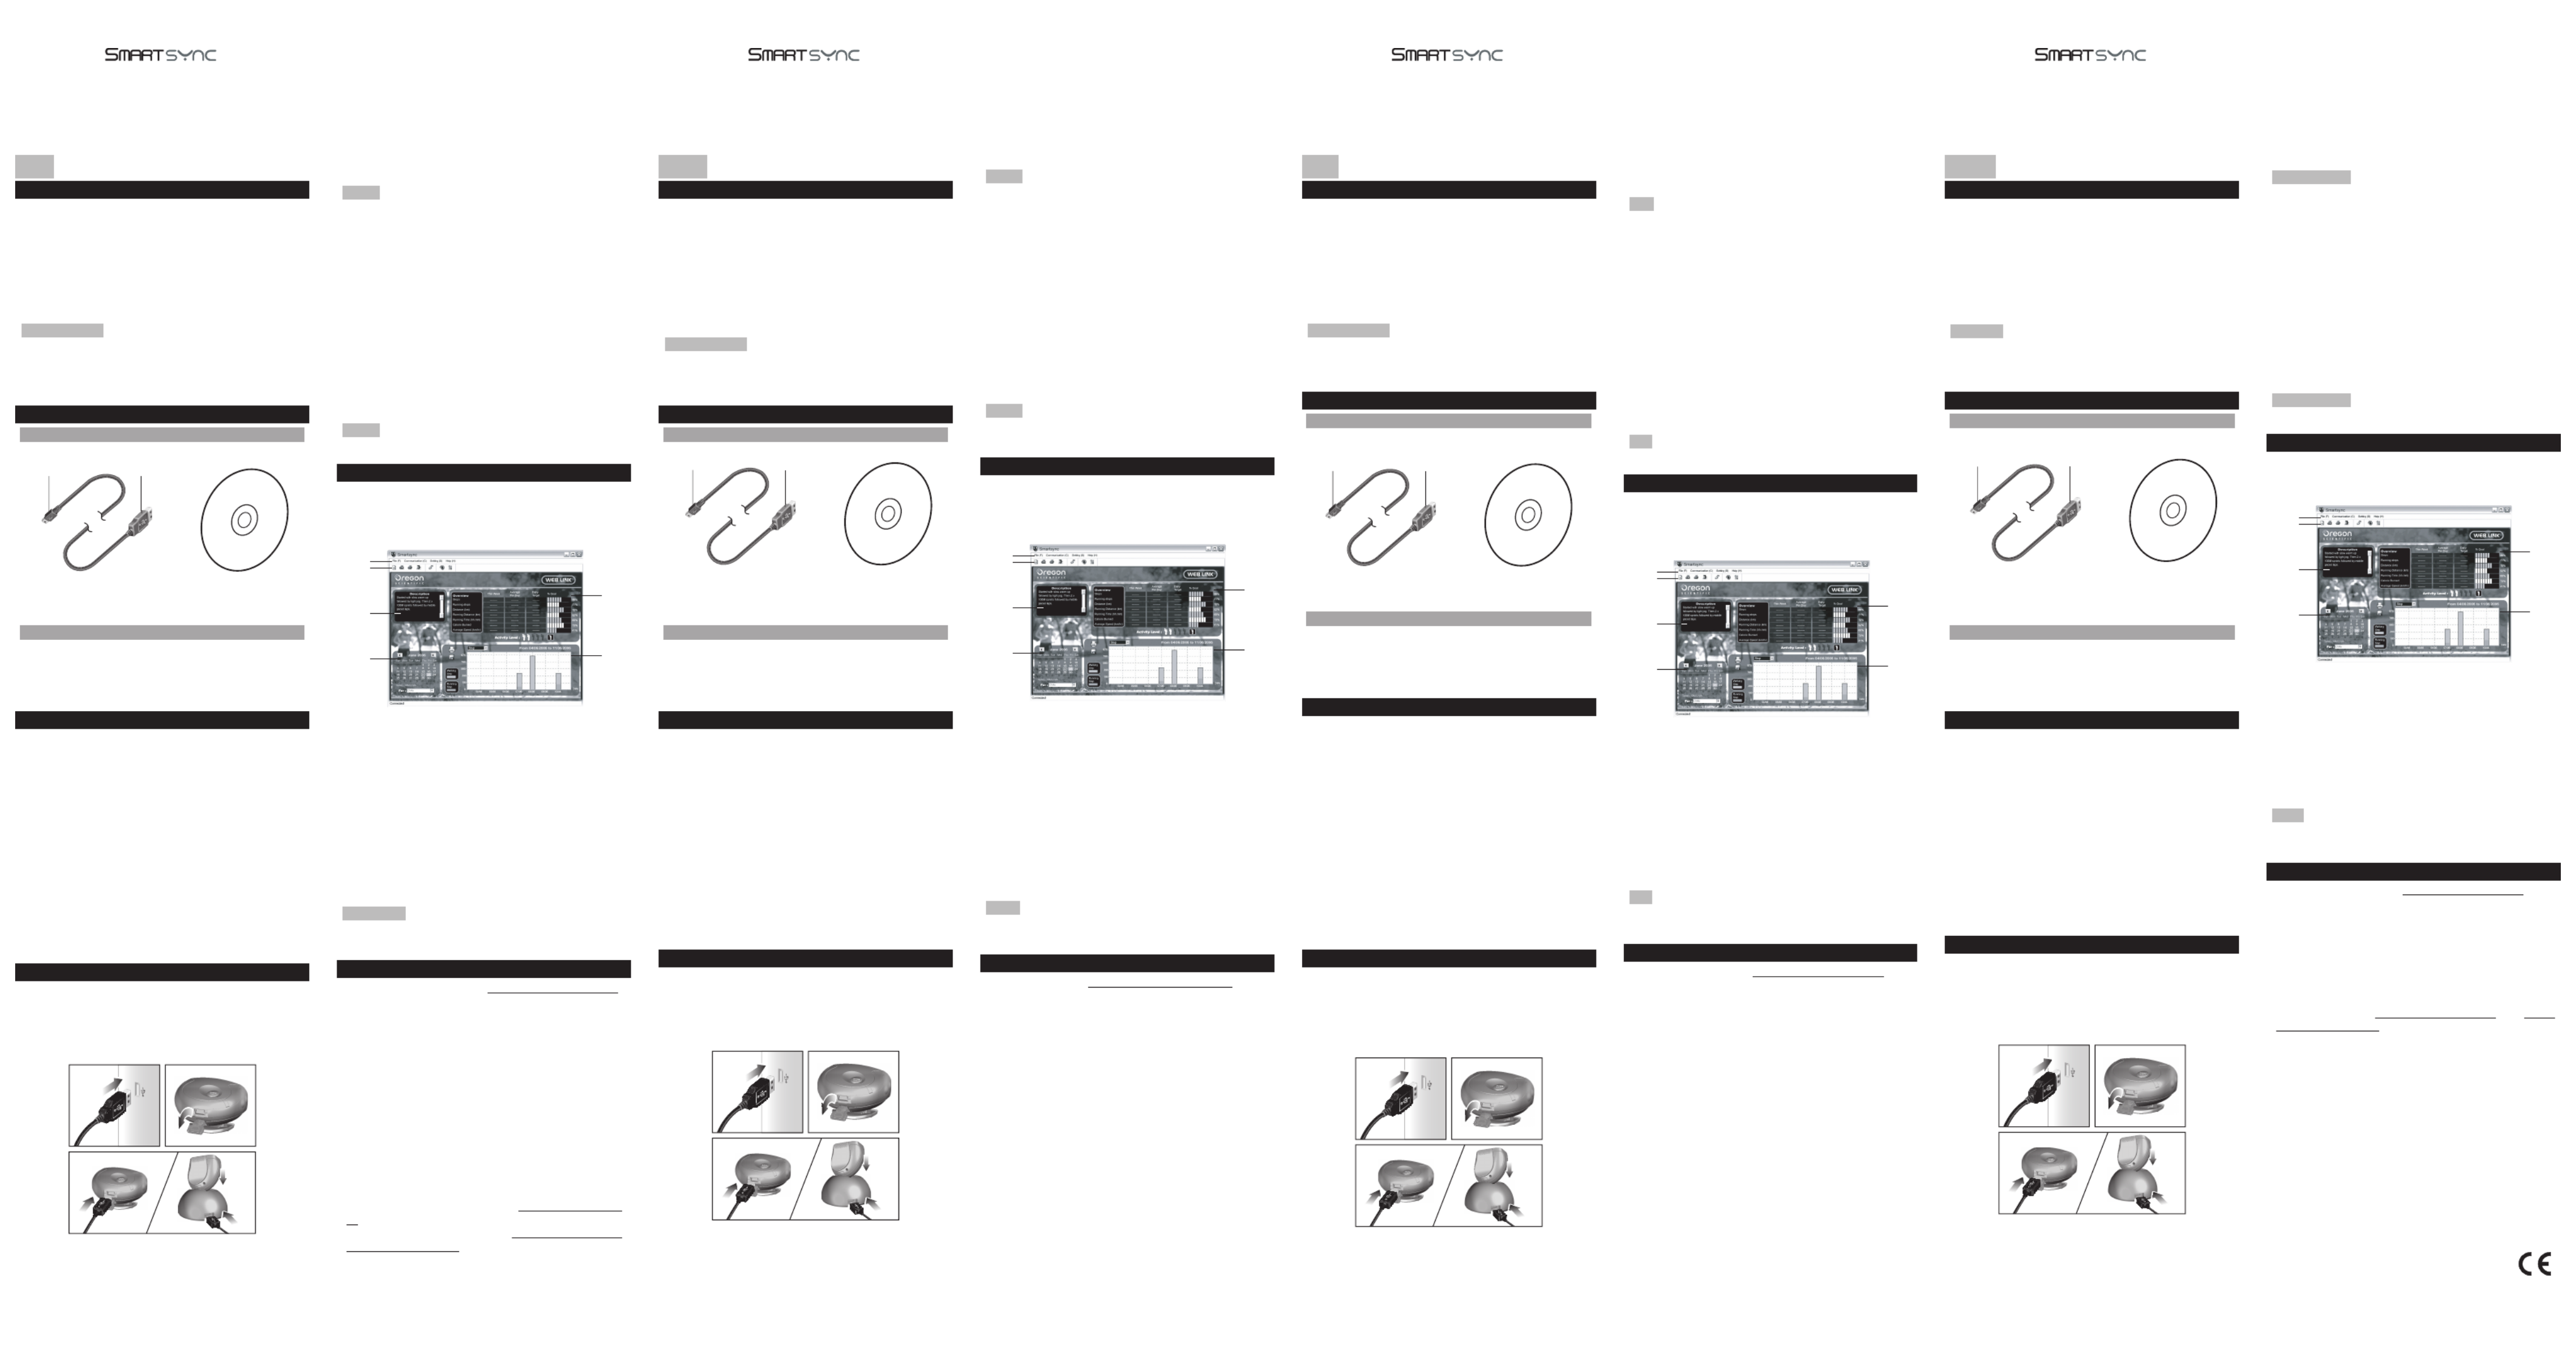
SOFTWARE OVERVIEW
SmartSync allows you to organise and display your
exercise data. You can track your personal progress
over time by regularly downloading and storing your
data.
1. Menu tabs (File, Communication, Setting and
Help): file management; access settings and help
file; transfer data; printing
2. shortcuts to commonly used Toolbar area:
commands
3. : edit and display data description Description area
4. : select data by date(s) Calendar area
5. : data overview information Overview area
6. : visual representation of data Graphics area
selected
TIP For more detailed description and information view
the Help file:
• Click on Contents on the Help menu.
ABOUT OREGON SCIENTIFIC
Visit our website (www.oregonscientific.com) to
learn more about Oregon Scientific products such as
digital cameras; MP3 players; children’s electronic
learning products and games; projection clocks; health
and fitness gear; weather stations; and digital and
conference phones. The website also includes contact
information for our Customer Care department in case
you need to reach us, as well as frequently asked
questions and customer downloads.
We hope you will find all the information you need on
our website, however if you’re in the US and would
like to contact the Oregon Scientific Customer Care
department directly, please visit:
www2.oregonscientific.com/service/default.asp
OR
Call 1-800-853-8883.
For international inquiries, please visit:
www2.oregonscientific.com/about/international.asp
PC Kit for use with PE830
Model: AD106
USER MANUAL
EN INTRODUZIONE
Grazie per aver scelto il software Oregon Scientific
TM
SmartSync. Questo prodotto consente di scaricare i
dati dal contapassi sul proprio computer.
Si consiglia di tenere questo manuale a portata di mano
durante l’utilizzo del prodotto. Il manuale contiene
pratiche istruzioni dettagliate, dati tecnici e avvertenze
che è necessario conoscere.
IMPORTANTE Questo software non sostituisce i
dispositivi professionali e industriali di misurazione
o di precisione. I valori rilevati e visualizzati dall’unità
devono essere considerati puramente indicativi.
PANORAMICA
CAVO USB E CD-ROM
1. Jack di collegamento al contapassi
2. Jack di collegamento al computer
REQUISITI MINIMI
• Windows 98SE o superiore
• Pentium 1 con 64MB di RAM
• 50MB di memoria libera
• Porta USB
IMPOSTAZIONE
Per installare il software:
1. Inserire il CD nel computer.
2. L’installazione guidata si avvia automaticamente.
Se l’installazione non si avvia:
Eseguire Setup.exe direttamente dal CD-ROM•.
3. La procedura guida l’utente attraverso il processo di
installazione.
Una volta completata l’installazione, è possibile
accedere al software facendo click sull’icona SmartSync
presente sul desktop o attraverso il menu START.
Quando si accede al software per la prima volta, verrà
chiesto di selezionare il formato dell’ora e del giorno
/ mese. Fare click per selezionare la casella accanto
all’impostazione desiderata e premere OK.
TRASFERIMENTO DEI DATI
I dati possono essere trasferiti al computer direttamente
dal contapassi o mediante la base.
Per collegare il contapassi al computer:
1. Inserire il cavo USB nel computer.
2. Sollevare il coperchio della porta USB sul
contapassi.
3. Per collegare il contapassi direttamente: inserire il
cavo USB nella porta del contapassi.
4. Per collegarlo mediante la base: inserire il cavo USB
nella base. Successivamente, porre il contapassi
sulla base in modo che il connettore USB della
stessa si inserisca nella porta USB del contapassi.
NOTA La prima volta che si collega al computer,
il contapassi si sincronizza automaticamente con
l’orologio del computer stesso.
Per trasferire i dati:
1. Collegare il contapassi al computer
2. Il software deve partire automaticamente. Se ciò
non avviene, fare click sull’icona SmartSync per
avviare il software.
3. Fare click sulla scheda Comunicazione e
selezionare .Trasferimento Dati
4. La barra di avanzamento segue il trasferimento dei
dati fino al suo completamento.
Lo stato del collegamento è indicato nella parte inferiore
sinistra della finestra di SmartSync.
NOTA Se il collegamento si interrompe, rimuovere il
cavo USB dal computer e reinserirlo.
PANORAMICA DEL SOFTWARE
SmartSync consente di organizzare e visualizzare
i dati relativi al proprio allenamento. Scaricando e
memorizzando regolarmente i dati, è possibile tenere
sotto controllo i propri progressi nel corso del tempo.
1. Opzioni del menù (File, Comunicazione,
Impostazione e Guida): gestione dei file, accesso
alle impostazioni, guida, trasferimento dati e
stampa
2. collegamenti ai Area barra degli strumenti:
comandi più utilizzati
3. modifica e visualizzazione della Area descrizione:
descrizione dei dati
4. selezione dei dati in base alla Area calendario:
data
5. informazioni sulla panoramica Area panoramica:
dei dati
6. rappresentazione visiva dei dati Area grafico:
selezionati
CONSIGLIO Per informazioni più dettagliate,
visualizzare il file della Guida:
• Fare click su Contenuto all’interno del menu Guida.
INFORMAZIONI SU OREGON SCIENTIFIC
Per avere maggiori informazioni sui nuovi prodotti
Oregon Scientific, come le fotocamere digitali, i lettori
MP3, i computer didattici per ragazzi, gli orologi con
proiezione dell’ora, le stazioni barometriche, gli orologi
da polso multifunzione, gli strumenti per la cura della
persona ed il fitness, ed altro ancora, visita il nostro sito
internet www.oregonscientific.it
Puoi trovare anche le informazioni necessarie per
contattare il nostro servizio clienti, le risposte ad alcune
domande più frequenti (FAQ) o i software da scaricare
gratuitamente.
Sul nostro sito internet potrai trovare tutte le informazioni
di cui hai bisogno, ma se desideri contattare direttamente
il nostro Servizio Consumatori puoi visitare il sito
www.oregonscientific.it oppure chiamare al numero
199112277. Per ricerche di tipo internazionale puoi
visitare invece il sito www.oregonscientific.com.
Kit per computer da usare con
il modello PE830
Modello: AD106
MANUALE PER L’UTENTE
IT
INTRODUCTION
Merci d’avoir choisi le logiciel Oregon ScientificTM
SmartSync. Ce produit vous permet de télécharger les
informations sur votre PC à partir de votre enregistreur
de podomètre.
Veuillez conserver ce manuel pour toutes références
ultérieures. Il contient toutes les instructions pratiques,
les caractéristiques techniques et les avertissements à
prendre en compte.
IMPORTANT Ce logiciel ne se substitue pas aux
appareils de mesures professionnelles et de précisions
industrielles. Les valeurs présentées ne sont que
raisonnablement représentatives.
VUE D’ENSEMBLE
CABLE USB ET CD-ROM
1. Prise de connexion podomètre
2. Prise de connexion au PC
CONFIGURATION MINIMALE
• Windows 98SE ou versions supérieures
• Processeur Pentium 1 avec 64 Mb de RAM
• 50 Mb d’espace disponible
• Port USB
INSTALLATION
Installation du logiciel :
1. Mettre le CD dans votre lecteur CD.
2. L’assistant d’installation apparaîtra automatiquement
Si le processus d’installation ne s’affiche pas :
Lancez Setup.exe directement depuis •
l’emplacement du CD-ROM.
3. L’assistant d’installation vous guidera tout au long
du processus.
Une fois l’installation achevée, vous pouvez accéder
au logiciel en cliquant sur l’icône SmartSync de votre
bureau ou par le menu DEMARRER.
Lorsque vous utilisez le logiciel pour la première fois, on
vous demandera de sélectionner le format de l’heure et
jour / du mois. Cliquez pour activer la case à côté du
réglage désiré et appuyez sur Ok.
TRANSFERT DE DONNEES
Vous pouvez transférer les données directement sur
votre PC depuis le podomètre ou en utilisant la base.
Pour connecter le podomètre à votre PC :
1. Insérez le câble USB dans à votre PC.
2. Ouvrez le couvercle du port USB de votre
podomètre.
3. Connexion directe au podomètre : insérez le câble
USB dans le port du podomètre.
4. Connexion par la base : insérez le câble USB dans
la base : Puis, posez le podomètre sur la base de
façon que son connecteur USB s’insère dans le port
USB du podomètre.
REMARQUE Lors de la première connexion à votre PC
le podomètre se synchronisera automatiquement avec
l’horloge de votre PC.
Pour transférer vos données :
1. Connecter le Podomètre à votre PC
2. Le logiciel devrait s’ouvrir automatiquement. Dans
le cas contraire, cliquez sur l’icône SmartSync pour
lancer le logiciel.
3. Cliquez sur l’onglet
Communication et sélectionnez
Transfert de données.
4. La barre de progression vous indiquera les progrès
du transfert de données jusqu’à ce qu’il soit
terminé.
Le statut de connexion est indiqué sur le côté inférieur
gauche de la fenêtre SmartSync.
REMARQUE Si la connexion s’interrompt, retirez le
câble USB de votre PC et réinsérez-le.
VUE D’ENSEMBLE DU LOGICIEL
SmartSync vous permet d’organiser et d’afficher les
données de vos exercices. Vous pouvez suivre vos
progrès en téléchargeant et en stockant régulièrement
vos données.
1. Onglets du Menu (Fichier, Communication,
Réglage et Aide) gestion de fichier ; accès aux
réglages et au fichier d’aide ; aux données de
transfert ; et à l’impression
2. Zone barre d’outils raccourcis vers les commandes
habituelles
3. Edite et affiche la transmission Zone description :
des données
4. sélectionne les données par Zone calendrier :
date(s)
5. données générales Zone vue d’ensemble :
6. représentation visuelle des Zone Graphiques :
données sélectionnées
ASTUCE Pour obtenir des descriptions et informations
détaillées, veuillez vous reporter au fichier d’Aide :
• Cliquez sur Contenu dans le menu Aide.
A PROPOS D’OREGON SCIENTIFIC
En consultant notre site internet (www.oregonscientific.
fr), vous pourrez obtenir des informations sur les
produits Oregon Scientific: photo numérique; lecteurs
MP3; produits et jeux électroniques éducatifs; réveils;
sport et bien-être; stations météo; téléphonie. Le site
indique également comment joindre notre service
après-vente.
Nous espérons que vous trouverez toutes les
informations dont vous avez besoin sur notre site,
néanmoins, si vous souhaitez contacter le service client
Oregon Scientific directement, allez sur le site www2.
oregonscientific.com/service/default.asp ou appelez
le 1-800-853-8883 aux US. Pour des demandes
internationales, rendez vous sur le site: www2.
oregonscientific.com/about/international.asp
Kit PC à utiliser avec
PE830
Modèle : AD106
MANUEL DE L’UTILISATEUR
FR EINLEITUNG
Wir danken Ihnen, dass Sie sich für die Software
SmartSync von Oregon ScientificTM entschieden haben.
Mit diesem Produkt können Sie Daten vom
Schrittz
ä
hler
auf Ihren PC herunterladen.
Halten Sie diese Anleitung bitte bereit, wenn Sie Ihr
neues Produkt verwenden. Sie enthält praktische
Schritt-für-Schritt-Anweisungen sowie technische
Daten und wichtige Warnhinweise.
WICHTIG Diese Software ist nicht dafür vorgesehen,
fachmännische Messungen oder industrielle
Präzisionsgeräte zu ersetzen. Die angezeigten Werte
sollten nur als representative Indikation betrachtet werden.
ÜBERSICHT
USB-KABEL UND CD-ROM
1. Verbindungsstecker zu Schrittz
ä
hler
2. Verbindungsstecker zu PC
MINDESTANFORDERUNGEN
• Windows 98SE oder höher
• Pentium 1 mit 64 MB RAM
• 50 MB freier Festplattenspeicher
• USB-Anschluss
EINRICHTUNG
So installieren Sie die Software:
1. Legen Sie die CD in Ihren PC.
2. Der Installationsassistent wird automatisch gestartet.
Falls die Installation nicht gestartet wird:
• Führen Sie Setup.exe direkt von Ihrer CD-ROM aus
3. Der Installationsassistent leitet Sie durch den
Installationsvorgang.
Wenn die Installation beendet ist, können Sie die
Software starten, indem Sie auf das SmartSync-Symbol
auf Ihrem Desktop klicken oder das Programm über
das START-Menü ausführen.
Wenn Sie die Software zum ersten Mal ausführen,
werden Sie vom Programm aufgefordert, das Zeit-
und Datumsformat auszuwählen. Markieren Sie das
Kästchen neben Ihrer gewünschten Einstellung und
klicken Sie auf OK.
DATEN ÜBERTRAGEN
Die Daten können direkt vom
Schrittz
ä
hler
oder über den
Sockel an den PC übertragen werden.
So schließen Sie den
Schrittz
ä
hler
an den PC an:
1. Stecken Sie das USB-Kabel in Ihren PC.
2. Lösen Sie die Abdeckung des USB-Anschlusses am
Schrittz
ä
hler.
3. So schließen Sie den Schrittz
ä
hler direkt an: Stecken Sie
das USB-Kabel in die Buchse des Schrittz
ä
hler.
4. So stellen Sie den Anschluss über den Sockel her: Stecken
Sie das USB-Kabel in den Sockel. Platzieren Sie den
Schrittz
ä
hler anschließend so auf dem Sockel, dass der USB-
Stecker des Sockels in die USB-Buchse des Schrittz
ä
hlers
gesteckt wird.
HINWEIS Wenn Sie den
Schrittz
ä
hler
das erste Mal mit
Ihrem PC verbinden, wird seine Uhrzeit automatisch mit
der Uhr Ihres PCs synchronisiert.
So übertragen Sie Ihre Daten:
1. Verbinden Sie den Schrittz
ä
hler mit Ihrem PC.
2. Die Software sollte automatisch gestartet werden. Klicken
Sie andernfalls auf das SmartSync-Symbol, um die Software
zu starten.
3. Klicken Sie auf die Registerkarte Kommunikation und
wählen Sie .Datenübertragung aus
4. Die Fortschrittleiste verfolgt die Datenübertragung, bis diese
beendet ist.
Der Verbindungsstatus wird in der unteren, linken Ecke
des SmartSync-Fensters angezeigt.
HINWEIS Wenn die Verbindung unterbrochen wird,
trennen Sie das USB-Kabel von Ihrem PC und stecken
Sie es erneut an.
SOFTWARE - ÜBERSICHT
Mit SmartSync können Sie Ihre Trainingsdaten
organisieren und darstellen. Sie können Ihren
persönlichen Fortschritt über die Zeit verfolgen,
indem Sie Ihre Daten regelmäßig herunterladen und
speichern.
1. Menü-Registerkarten (Datei, Kommunikation,
Einstellungen und Hilfe): Dateien verwalten;
Einstellungen und Hilfedatei aufrufen; Daten
übertragen; Drucken
2. Verknüpfungen für häufig Bereich Symbolleiste:
verwendete Befehle
3. Bereich “Beschreibung”: Beschreibung der Daten
bearbeiten und anzeigen
4. Daten nach Datum/Daten Bereich “Kalender”:
auswählen
5. Übersichtsinformationen der Bereich “Übersicht”:
Daten
6. Bildliche Darstellung der Bereich “Grafik”:
gewählten Daten
TIPP Detaillierte Beschreibungen und Informationen
finden Sie in der Hilfedatei:
• Klicken Sie auf Inhaltsverzeichnis im Menü Hilfe.
ÜBER OREGON SCIENTIFIC
Besuchen Sie unsere Website (www.oregonscientific.de) und
erfahren Sie mehr über unsere Oregon Scientific-Produkte
wie zum Beispiel Wetterstationen, Projektions-Funkuhren,
Produkte für Gesundheit und Fitness, Digitalkameras, MP3-
Player, DECT-Telefone und elektronische Lernprodukte für
Kinder. Auf der Website finden Sie auch Informationen, wie
Sie im Bedarfsfall unseren Kundendienst erreichen und Daten
herunterladen können.
Wir hoffen, dass Sie alle wichtigen Informationen auf unserer
Website finden. Für internationale Anfragen besuchen Sie
bitte unsere Website: www2.oregonscientific.com
PC-Set zur Verwendung mit PE830
Modell: AD106
BEDIENUNGSANLEITUNG
DE
12
CD
12
CD
12
CD
12
CD
1
2
3
46
5
1
2
3
46
5
1
2
3
46
5
1
2
3
46
5

INTRODUCCIÓN
Gracias por elegir el software SmartSync de Oregon
ScientificTM. Este producto descarga la información de
su
podómetro
a su PC.
Tenga este manual a mano cuando use el nuevo
producto. Contiene prácticas instrucciones explicadas
paso a paso, así como especificaciones técnicas y
advertencias que debe conocer.
IMPORTANTE Este software no está pensado para
sustituir las mediciones profesionales ni los dispositivos
de precisión industrial. Los valores procedentes de esta
unidad deben considerarse únicamente indicaciones
razonables.
RESUMEN
CABLE USB Y CD-ROM
1. Toma de conexión a podómetro
2. Toma de conexión a PC
REQUISITOS MÍNIMOS
• Windows 98SE o superior
• Pentium 1 con 64MB RAM
• 50MB de memoria libre
• Puerto USB
CONFIGURACIÓN
Para instalar el software:
1. Introduzca el CD en su ordenador.
2. El asistente de instalación se pondrá en marcha
automáticamente. Si la instalación no se inicia:
• Ejecute Setup.exe directamente del CD-ROM.
3. El asistente de instalación le guiará a lo largo del
proceso de instalación.
Una vez la instalación esté completada, podrá acceder
al software haciendo clic en el icono de SmartSync de
su escritorio mediante el menú de INICIO
Cuando utilice el software por primera vez, le pedirá
que elija el formato de hora y día / fecha. Haga clic para
marcar la casilla que hay al lado de su ajuste preferido
y pulse OK.
TRANSFERENCIA DE DATOS
Los datos se pueden transferir al PC directamente
desde el podómetro o mediante la base.
Cómo conectar el podómetro a un PC:
1. Introduzca el cable USB en su ordenador.
2. Retire la cubierta del puerto USB del podómetro.
3. Para conectar directamente al podómetro: introduzca
el cable USB en el puerto del podómetro.
4. Para conectar mediante la base: Introduzca el
cable USB en la base. A continuación coloque el
podómetro en la base de modo que el conector
USB de la base quede introducido en el puerto USB
del podómetro.
NOTA La primera vez que lo conecte a su PC, el
podómetro se sincronizará automáticamente con el
reloj de su PC.
Para transferir sus datos:
1. Conecte el Podómetro a su PC.
2. El software debería iniciarse automáticamente. Si
no lo hace, haga clic en el icono SmartSync para
ponerlo en marcha.
3. Haga clic en la pestaña de Comunicación y
seleccione .Transferencia de datos
4. La barra de progreso hará un seguimiento de la
transferencia hasta que finalice.
El estado de la conexión se muestra en la esquina
inferior izquierda de la ventana de SmartSync.
NOTA Si la conexión se interrumpe, sírvase retirar el
cable USB de su PC y reintroducirlo.
VISTA GENERAL DEL SOFTWARE
SmartSync le permite organizar y mostrar sus datos
de ejercicio. Puede hacer un seguimiento de su
progreso personal a lo largo del tiempo descargando y
almacenando datos regularmente.
1. Pestañas del menú (Archivo, Comunicación,
Ajustes y Ayuda): gestión de archivos; ajustes de
acceso y fichero de ayuda; transferencia de datos;
impresión
2. acceso directo a Área de barra de herramientas:
los comandos más utilizados
3. Área de descripción: edita y muestra la descripción
de datos
4. selecciona datos por fecha(s)Área de calendario:
5. información de Área general del producto:
resumen de datos
6. representación visual de los Área de gráficos:
datos seleccionados
CONSEJO Para obtener información y descripciones
más detalladas, consulte el archivo Ayuda:
• Haga clic en Índice en el menú Ayuda.
SOBRE OREGON SCIENTIFIC
Visite nuestra página web (www.oregonscientific.com)
para conocer más sobre los productos de Oregon
Scientific tales como: Reproductores MP3, juegos y
productos de aprendizaje electrónico para niños, relojes
de proyección, productos para la salud y el deporte,
estaciones meteorológicas y teléfonos digitales y de
conferencia. La página web también incluye información
de contacto de nuestro departamento de Atención al
Cliente, en caso de que necesite contactar con nosotros,
a la vez que Preguntas Frecuentes y Descargas de los
programas y controladores necesarios para nuestros
productos.
Esperamos que encuentre toda la información que
necesite en nuestra página web. En cualquier caso, si
necesita contactar con el departamento de Atención al
Cliente directamente, por favor visite www.oregonscientific.
es la sección “Contáctenos” o llame al 902 338 368. Los
residentes en EEUU pueden visitar www2.oregonscientific.
com/service/default.asp o llamar al 1-800-853-8883.
Kit PC para utilizarlo
con el PE830
Modelo: AD106
MANUAL DE USUARIO
ES
INTRODUÇÃO
Agradecemos por selecionar o software SmartSync
da Oregon Scientific™. Este produto permite a
transferência de informação de seu logger de
pedômetro seu PC.
Mantenha este manual à mão ao utilizar seu novo
produto. Ele contém práticas instruções passo-a-passo,
bem como especificações técnicas e avisos que devem
ser do seu conhecimento.
IMPORTANTE Este software não tem por intenção
substituir medidas profissionais nem aparelhos de
precisão industrial. Os valores gerados devem ser
considerados apenas como representações razoáveis.
VISÃO GERAL
CABO USB E CD-ROM
1. Conexão para o pedômetro
2. Conexão para o PC
REQUERIMENTOS MÍNIMOS
• Windows 98SE ou superior
• Pentium 1 com 64MB de RAM
• 50MB de memória disponível
• Entrada USB
MONTAGEM
Para instalar o software:
1. Coloque o CD no PC.
2. A instalação Wizard terá início automaticamente.
Caso a instalação não tenha início:
• Execute Setup.exe diretamente do CD-ROM.
3. A instalação Wizard irá guiá-lo através do
processo.
Ao concluir a instalação, é possível acessar o software
clicando no ícone SmartSync em seu desktop ou
através do menu START.
Ao acessar o software pela primeira vez, é necessário
selecionar o formato hora e dia / mês. Clique para
assinalar sua configuração preferida e pressione OK.
TRANSFERÊNCIA DE DADOS
Os dados podem ser transferidos para um PC
diretamente do pedômetro ou usando a base.
Para conectar o pedômetro a um PC:
1. Insira o cabo USB no PC.
2. Desprenda a tampa da porta USB no pedômetro.
3. Para conectar diretamente ao pedômetro: insira o
cabo USB na porta do pedômetro.
4. Para conectar através da base: Insira o cabo USB
na base. Em seguida, coloque o pedômetro na base
para que o conector USB da base seja inserido na
porta USB do pedômetro.
NOTA Ao conectá-lo pela primeira vez ao PC, o
pedômetro será automaticamente sincronizado ao
relógio do PC.
Para transferir seus dados:
1. Conecte o Pedômetro ao PC.
2. O software deve ser automaticamente iniciado. Se
não for, clique no ícone SmartSync para iniciar o
software.
3. Clique na guia Comunicação e selecione
Transferência de dados.
4. A barra de progresso acompanhará a transferência
de dados até que seja concluída.
O status de conexão é mostrado no lado inferior
esquerdo da janela do SmartSync.
NOTA Se a conexão for interrompida, remova o cabo
USB do PC e reinsira-o.
VISÃO GERAL DO SOFTWARE
O SmartSync permite organizar e exibir seus dados
de exercício. É possível acompanhar seu progresso
em determinado período, transferindo e armazenando
regularmente seus dados.
1. Barras do menu (File, Communication, Setting e
Help): gerência de arquivo; acesso a configuração e
arquivo ajuda; transferência de dados; impressão
2. atalho para Área da barra de ferramentas:
comandos mais usados
3. edite e exiba a descrição dos Área de descrição:
dados
4. selecione os dados por Área do calendário:
data(s)
5. informações da visão geral Área de visão geral:
dos dados
6. representação visual dos dados Área de gráficos:
selecionados
DICA Para mais descrição detalhada e informação,
verifique o arquivo Help:
• Clique em Contents no menu Help.
SOBRE A OREGON SCIENTIFIC
Visite nosso site (www.oregonscientific.com.br) para
aprender mais sobre nossos outros produtos, tais como
Câmeras Digitais; Produtos de Aprendizagem; Relógios
de Projeção; Equipamentos de Esporte e Saúde;
Estações Meteorológicas. O nosso site possui também
dados para contato com nosso SAC, assim como
perguntas e respostas mais recentes e downloads.
Esperamos que você encontre todas as informações
que necessitar, entretanto se você quiser entrar em
contato direto com nosso SAC, ligue para 55 11 2182-
8608.
Kit PC para Uso com PE830
Modelo: AD106
MANUAL DO USUÁRIO
POR
INTRODUCTIE
Dank u dat u heeft gekozen voor Oregon Scientific
TM
SmartSync software. Dit product stelt u in staat om
gegevens van uw pedometer op te slaan op uw PC.
Houd deze handleiding bij de hand terwijl u uw nieuwe
product gebruikt. Deze bevat praktische stap-voor-
stap instructies, evenals de technische specificaties en
belangrijke waarschuwingen.
BELANGRIJK Deze software is niet bedoeld om
professionele metingen of industriële instrumenten
te vervangen. De gemeten waarden moeten slechts
gezien worden als een indicatie.
OVERZICHT
USB KABEL EN CD-ROM
1. Aansluiting voor de pedometer
2. Aansluiting voor de PC
MINIMALE SYSTEEMEISEN
• Windows 98SE of hoger
• Pentium 1 met 64MB RAM
• 50MB hardeschijfruimte
• USB-aansluiting
SETUP
Om de software te installeren:
1. Plaats de CD-ROM in uw PC.
2. De Installatiewizard start automatisch. Als de
installatie niet start:
• Start Setup.exe direct van de CD-ROM.
3. De installatiewizard begeleidt u tijdens het
installatieproces.
Zodra de installatie voltooid is, kunt u de software
starten door op het SmartSync icoon op uw bureaublad
te klikken, of via het STARTmenu
Wanneer u de software voor de eerste keer opstart, zult
u gevraagd worden het uur en dag/maand formaat in
te stellen. Klik het vakje naast de gewenste optie aan
en druk op OK.
GEGEVENS OVERZETTEN
U kunt met behulp van de basis alle gegevens direct
van de pedometer op uw PC zetten.
De pedometer op een PC aansluiten:
1. Steek de USB-kabel in uw PC.
2. Open het klepje van de USB-aansluiting van de
pedometer.
3. Om direct verbinding te maken met de pedometer:
Steek de USB-kabel in de aansluiting van de
pedometer.
4. Om verbinding te maken via de basis: Steek de
USB-kabel in de basis. Plaats de pedometer in de
basis zodat de USB-plug in de USB-aansluiting van
de pedometer steekt.
NB De eerste keer dat u de pedometer op uw PC
aansluit, zal de pedometer zijn klok gelijk zetten met
die van de PC.
Uw gegevens overzetten:
1. Sluit de Pedometer aan op uw PC.
2. De software start automatisch. Indien dit niet het
geval is klikt u op het SmartSync icoon om de
software te starten.
3. Klik op de Communication tab en selecteer Data
Transfer.
4. De voortgangsbalk zal het overzetten van de
gegevens bijhouden tot deze voltooid is.
De verbindingsstatus wordt links onderin het SmartSync
scherm weergegeven.
NB Indien de verbinding onderbroken wordt, haalt u de
USB-kabel uit uw PC en steekt hem weer terug.
OVERZICHT SOFTWARE
Met SmartSync kunt u uw trainingsgegevens bijhouden
en weergeven. U kunt uw persoonlijke voortgang
bijhouden door de gegevens regelmatig over te zetten
en op te slaan.
1. Menu tabs (File, Communication, Setting en
Help): bestandsbeheer; toegangsinstellingen en
hulpbestanden; gegevensverzending; printen
2. snelkoppelingen voor veelgebruikte Werkbalk:
functies
3. aanpassen en weergeven van Beschrijvingsvak:
beschrijving
4. selecteren van gegevens op datum Kalendervak:
5. Overzichtsinformatie van gegevensOverzichtsvak:
6. Visuele weergave van geselecteerde Grafiekenvak:
gegevens
TIP Voor een meer gedetailleerde beschrijving en
informatie bekijkt u de Hulpbestanden:
• Klik op Contents en op het Help menu.
OVER OREGON SCIENTIFIC
Bezoek onze website (www.oregonscientific.com) om
meer te weten over uw nieuwe product en andere
Oregon Scientific producten zoals digitale fototoestellen,
gezondheids- en fitnessuitrusting en weerstations.
Op deze website vindt u tevens de informatie over
onze klantendienst, voor het geval u ons wenst te
contacteren.
PC kit voor gebruik met PE830
Model: AD106
HANDLEIDING
NL
INTRODUKTION
Tack för att du valt Oregon Scientific
TM SmartSync
mjukvara. Denna produkt tillåter dig att ladda ner
information från pedometern till din PC.
Ha denna manual tillhands när du använder din
nya produkt. Den innehåller en praktisk steg-för-
steg instruktion, samt teknisk specifikation och
varningsmeddelanden som du bör känna till.
VIKTIGT Denna mjukvara är inte avsedd att
ersätta professionella mätningar eller industriella
precisionsutrustningar. Värden som visas av denna
produkt bör endast ses som rimliga uppskattningar.
PRODUKTÖVERSIKT
USB-KABEL OCH CD-ROM
1. Anslutningskontakt till pedometern
2. Anslutningskontakt till PC
MINIMIKRAV
• Windows 98 eller senare
• Pentium 1 med 64MB RAM
• 50MB ledigt minne
• USB port
INSTÄLLNING
För att installera mjukvaran:
1. Sätt i CD: n i din PC.
2. Installationen startar automatiskt. Om installeringen
inte startar:
• Kör Setup.exe direkt från CD-ROM.
3.
Installationen guidar dig genom installationsprocessen.
När installationen är färdig kan du starta mjukvaran
genom att klicka på SmartSync ikonen på skrivbordet
eller via START menyn.
När du startar mjukvaran första gången blir du tillfrågad
att välja timme och dag / månad format. Klicka för att se
nästa inställning och tryck OK.
ÖVERFÖRING AV DATA
Data kan överföras till din PC direkt från pedometern
eller genom att använda huvudenheten.
Anslut pedometern till din PC:
1. Anslut USB-kabeln till din PC.
2. Öppna skyddet för USB-porten på pedometern.
3. För att ansluta direkt till pedometern sätter du i
USB-kabeln i pedometerns USB-port.
4. För att ansluta via huvudenheten ansluter du
USB-kabeln till huvudenheten och placerar sedan
pedometern på huvudenheten så att USB-kontakten
passar i pedometerns USB-port.
OBSERVERA Första gången du ansluter till din PC
kommer pedometern automatiskt att synkroniseras
med din PC-klocka.
Överför dina data:
1. Anslut pedometern till din PC.
2. Programvaran kommer att starta automatiskt. Om
den inte gör det klickar du på SmartSync-ikonen för
att starta programmet.
3. Klicka på fliken Communication och välj sedan
Data .Transfer
4. På skärmen visas överföringen tills den är klar.
Anslutningsstatus visas längst ner till vänster i
SmartSync-fönstret.
OBSERVERA Om anslutningen avbryts tar du bort
USB-kabeln från din dator och ansluter den igen.
MJUKVARA ÖVERSIKT
SmartSync låter dig organisera och visa alla dina
träningsdata. Du kan följa din personliga kurva
kontinuerligt genom att ladda ner och spara din data.
1. Menyflikar (File, Communication, Setting och
Help): filhanterare; komma åt inställningar och
hjälpfil; överföra data, utskrift
2. snabbkommando till ofta använda Verktygslist:
kommandon
3. editera och visa databeskrivningarBeskrivningsarea:
4. visar dina data i datumordning Kalenderarea:
5. datainformationsöverblickÖverblickarea:
6. grafisk prestentation över valda dataGrafisk area:
TIPS För mer detaljerad beskrivning och information
titta på Help filen:
• Klicka på Contents på Help menyn.
OM OREGON SCIENTIFIC
Besök vår hemsida (www.oregonscientific.se) för
att se mer av våra produkter såsom digitalkameror;
MP3 spelare; projektionsklockor; hälsoprodukter;
väderstationer; DECT- telefoner och konferenstelefoner.
Hemsidan innehåller också information för våra kunder
i de fall ni behöver ta kontakt med oss eller behöver
ladda ner information. Vi hoppas du hittar all information
du behöver på vår hemsida och om du vill komma i
kontakt med Oregon Scientific kundkontakt besöker du
vår lokala hemsida www.oregonscientific.se eller www.
oregonscientific.com för att finna telefonnummer till
respektive supportavdelning.
PC mjukvara för användning
med PE830
Modell: AD106
BRUKSANVISNING
SWE
12
CD
12
CD
12
CD
12
CD
© 2006 Oregon Scientific. All rights reserved.
086L004449-036
1
2
3
46
5
1
2
3
46
5
1
2
3
46
5
1
2
3
46
5
Produktspezifikationen
| Marke: | Oregon Scientific |
| Kategorie: | Wetterstation |
| Modell: | AD106 |
Brauchst du Hilfe?
Wenn Sie Hilfe mit Oregon Scientific AD106 benötigen, stellen Sie unten eine Frage und andere Benutzer werden Ihnen antworten
Bedienungsanleitung Wetterstation Oregon Scientific

2 September 2024
27 August 2024
27 August 2024
27 August 2024
27 August 2024
21 August 2024
21 August 2024
19 August 2024
19 August 2024
Bedienungsanleitung Wetterstation
- Wetterstation Clatronic
- Wetterstation Hama
- Wetterstation Lexibook
- Wetterstation Nedis
- Wetterstation Tchibo
- Wetterstation Clas Ohlson
- Wetterstation Cotech
- Wetterstation Profile
- Wetterstation Adler
- Wetterstation Camry
- Wetterstation Velleman
- Wetterstation ADE
- Wetterstation Alecto
- Wetterstation Auriol
- Wetterstation Beurer
- Wetterstation Bresser
- Wetterstation Cresta
- Wetterstation Day
- Wetterstation Denver
- Wetterstation Dexford
- Wetterstation Durabase
- Wetterstation ECG
- Wetterstation EMOS
- Wetterstation Eurochron
- Wetterstation Gira
- Wetterstation HomeMatic
- Wetterstation Irox
- Wetterstation Jacob Jensen
- Wetterstation Kemot
- Wetterstation König
- Wetterstation MarQuant
- Wetterstation Mebus
- Wetterstation Medisana
- Wetterstation Mesko
- Wetterstation National Geographic
- Wetterstation Prologue
- Wetterstation Renkforce
- Wetterstation Sempre
- Wetterstation Techno Line
- Wetterstation Technoline
- Wetterstation Telefunken
- Wetterstation TFA
- Wetterstation ThinkGizmos
- Wetterstation Thomson
- Wetterstation Trevi
- Wetterstation Ventus
- Wetterstation Weinberger
- Wetterstation Ytora
- Wetterstation Trotec
- Wetterstation Blaupunkt
- Wetterstation Braun
- Wetterstation Rocktrail
- Wetterstation Daewoo
- Wetterstation Pyle
- Wetterstation Muse
- Wetterstation Avidsen
- Wetterstation Elro
- Wetterstation GoGEN
- Wetterstation Hyundai
- Wetterstation Orion
- Wetterstation Livoo
- Wetterstation Perel
- Wetterstation Soehnle
- Wetterstation Balance
- Wetterstation Fysic
- Wetterstation Sencor
- Wetterstation Krontaler
- Wetterstation Honeywell
- Wetterstation MINOX
- Wetterstation Lowrance
- Wetterstation Globaltronics
- Wetterstation ELV
- Wetterstation Guardo
- Wetterstation Unitec
- Wetterstation Netatmo
- Wetterstation Ascot
- Wetterstation Theben
- Wetterstation Brandson
- Wetterstation Tanita
- Wetterstation JUNG
- Wetterstation Johnson
- Wetterstation OBH Nordica
- Wetterstation Optex
- Wetterstation Davis
- Wetterstation Levenhuk
- Wetterstation Vitek
- Wetterstation Prestigio
- Wetterstation EQ-3
- Wetterstation EVE
- Wetterstation Extech
- Wetterstation Daikin
- Wetterstation Fluke
- Wetterstation La Crosse Technology
- Wetterstation Homematic IP
- Wetterstation EQ3
- Wetterstation Elgato
- Wetterstation Digi-tech
- Wetterstation DMV Electronics
- Wetterstation Ea2 LABS
- Wetterstation EMOS SELECT
- Wetterstation Garni
- Wetterstation Hesdo
- Wetterstation Inovalley
- Wetterstation IT
- Wetterstation Kaindle
- Wetterstation La Crosse
- Wetterstation Meade
- Wetterstation Nasa
- Wetterstation Nor-tec
- Wetterstation Otio
- Wetterstation Paget Trading
- Wetterstation PCE Instruments
- Wetterstation Saphir
- Wetterstation Saxon
- Wetterstation Taylor
- Wetterstation Thierry Mugler
- Wetterstation UPM
- Wetterstation Uzoli
- Wetterstation Waldbeck
- Wetterstation Xeecom ApS
- Wetterstation TFA Dostmann
- Wetterstation Vimar
- Wetterstation PeakTech
- Wetterstation AcuRite
- Wetterstation Ease Electronicz
- Wetterstation Chauvin Arnoux
- Wetterstation YONO
- Wetterstation Brigmton
- Wetterstation Chacon
- Wetterstation Baldr
- Wetterstation Garin
- Wetterstation ChiliTec
- Wetterstation Global Water
- Wetterstation Greisinger
- Wetterstation Marathon
- Wetterstation Majestic
- Wetterstation Gewiss
- Wetterstation ClimeMET
- Wetterstation Buienradar
- Wetterstation Balance Meteo
- Wetterstation Rebel
- Wetterstation JDC
- Wetterstation Greenure
- Wetterstation Browin
- Wetterstation Setti+
- Wetterstation Bearware
Neueste Bedienungsanleitung für -Kategorien-

15 Oktober 2024
8 Oktober 2024
5 Oktober 2024
3 Oktober 2024
2 Oktober 2024
30 September 2024
29 September 2024
29 September 2024
24 September 2024
24 September 2024