Onkyo NS-6130 Bedienungsanleitung
Lesen Sie kostenlos die 📖 deutsche Bedienungsanleitung für Onkyo NS-6130 (204 Seiten) in der Kategorie Empfänger. Dieser Bedienungsanleitung war für 9 Personen hilfreich und wurde von 2 Benutzern mit durchschnittlich 4.5 Sternen bewertet
Seite 1/204


E
N
Before Start
What's in the box .................................................................... 2
Part Names
Front Panel ............................................................................. 3
Rear Panel .............................................................................. 4
Remote Controller .................................................................. 5
Display .................................................................................... 6
Install
Connections with an amplifier ................................................. 7
Connecting the power cord, etc. ............................................. 9
Initial Setup
Power On & Initial Setup ...................................................... 10
Playback
USB Storage Device/HDD .................................................... 12
Internet Radio ....................................................................... 14
Spotify ................................................................................... 15
AirPlay® ................................................................................ 16
Music Server ......................................................................... 17
Entering text ......................................................................... 19
Advanced Setup
Advanced Settings................................................................. 20
Firmware Update
Firmware Update .................................................................. 23
Others
Troubleshooting .................................................................... 25
General Specifications .......................................................... 27
License and Trademark Information ..................................... 28
> Before Start > Part Names > Install > Initial Setup > Playback
Advanced Setup | Firmware Update | Others
NETWORK AUDIO PLAYER
NS-6130
Instruction
Manual

2
> Before Start > Part Names > Install > Initial Setup > Playback
Advanced Setup | Firmware Update | Others
E
N
What's in the box
Before Start
0The power cord must be connected only after all other cable connections are completed.
0We will not accept responsibility for damage arising from the connection of equipment
manufactured by other companies.
0Functionality may be introduced by firmware updates and service providers may cease
services, meaning that some network services and content may become unavailable in
the future.
0Specifications and appearance are subject to change without prior notice.
Main unit (1)
Remote controller (RC-942E) (1), Batteries (AAA/R03) (2)
Analog audio cable (1)
RI cable (1)
Power cord (1)

> Before Start >Part Names > Install > Initial Setup > Playback
Advanced Setup | Firmware Update | Others
3
E
N
Front Panel
Part Names
1. ÍON/STANDBY button: Turns the unit on or to standby mode.
2. Remote control sensor
3. Display (P6)
4. Play button:
∫
: This button stops playback.
1
/; : Play or pause play.
5. MENU/ENTER dial (:/9)
When playing, turn left or right to select the folder or file, then press to confirm.
Press and hold to show the settings screen. While the menu is displayed, turn the dial to
select items and press to confirm the settings.
0Depending on the input, the operation may not start.
6. USB
port: Connect a USB storage device or HDD (hard disk drive) to play music files. You can
also supply power (maximum 5 V/0.5 A) to USB devices with a USB cable.
0When connecting a HDD that requires more than 5 V/0.5 A, connect to the USB port
(maximum 5 V/1 A) on the rear of the unit.
7. DISPLAY button: Switches the information on the display.
8. INPUT button: Switches the input to be played.
9. RETURN button: Returns to the previous screen.

4
> Before Start >Part Names > Install > Initial Setup > Playback
Advanced Setup | Firmware Update | Others
E
N
Rear Panel
1. AC INLET: Connect the supplied power cord.
2. Wireless antenna: Used for Wi-Fi connection. Adjust their angles according to the
connection status.
3. USB port: Connect a USB storage device or HDD (hard disk drive) to play music files. You
can also supply power (maximum 5 V/1 A) to USB devices with a USB cable.
4. AUDIO OUTPUT DIGITAL COAXIAL jack: Connect a pre-main amplifier with digital
coaxial cable.
5. ETHERNET jack: Connect to the network with an ethernet cable.
6. REMOTE CONTROL jack: Connect an Onkyo product with an RI jack using the
included RI cable to synchronized with this unit. (P8)
7. AUDIO OUTPUT ANALOG jacks: Connect a pre-main amplifier with the included analog
audio cable.
180°
90°
> Before Start >Part Names > Install > Initial Setup > Playback
Advanced Setup | Firmware Update | Others
5
E
N
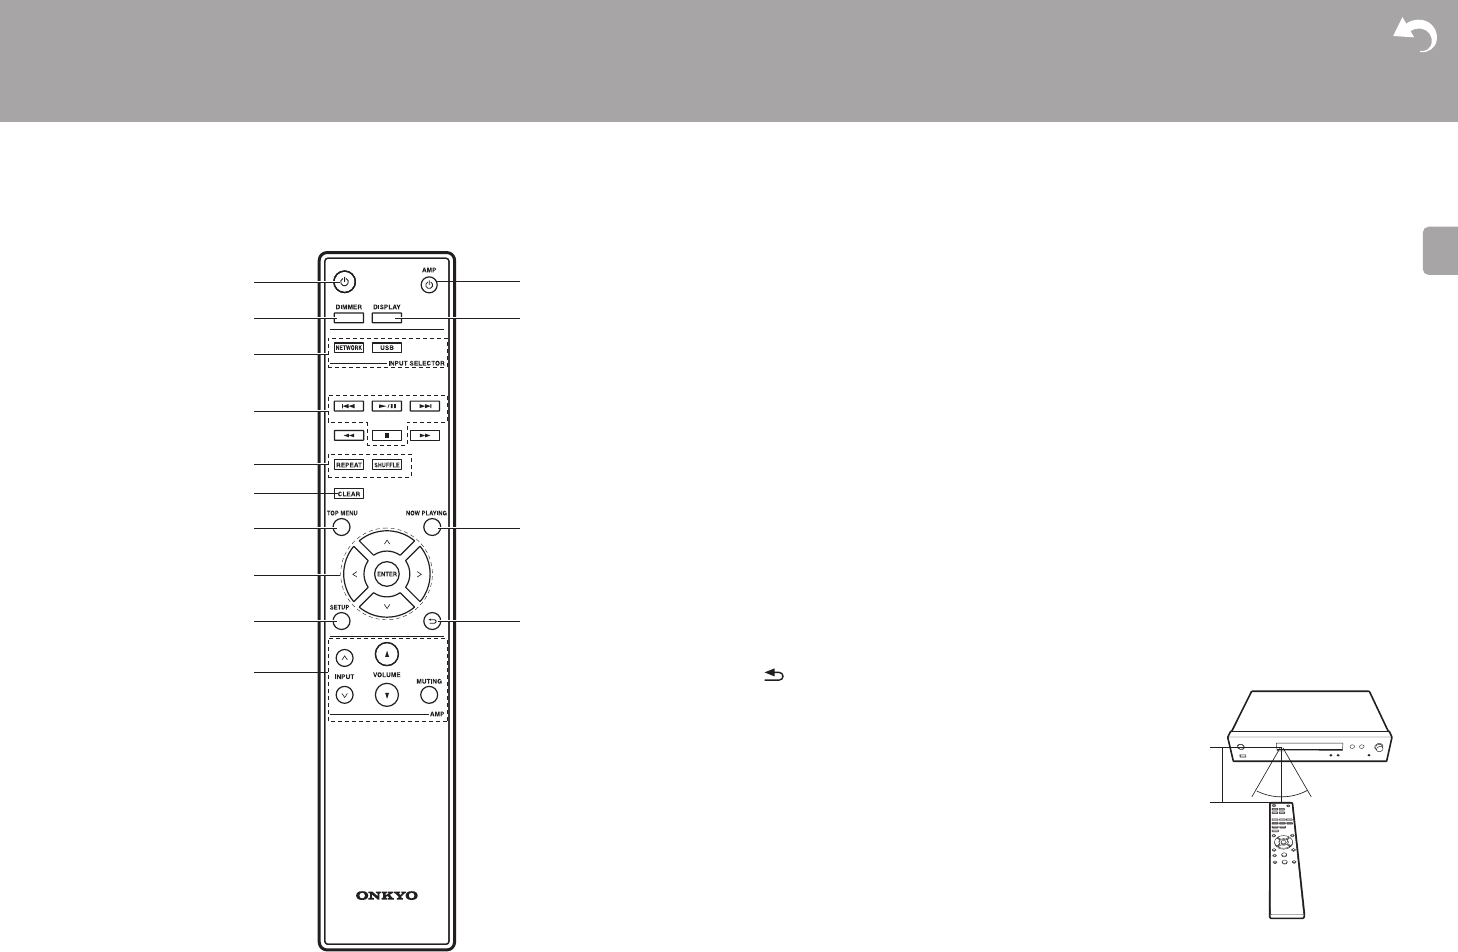
Remote Controller
1. Íbutton: Turns the unit on or into standby mode.
2. DIMMER button: Switch the display off or adjust the brightness of the display in two steps.
3. INPUT SELECTOR buttons: Switches the input to be played.
4. Play buttons:
:: Move to the track before the one being played.
/;: Play or pause play.
9: Move to the next track.
∫: Stop playback.
0Depending on the input, the operation may not start.
5. REPEAT button: Set repeat play.
SHUFFLE button: Set shuffle play.
6. CLEAR button: Used when entering text, etc
7. TOP MENU button: Move to the top menu of the selected input.
8. Cursors, ENTER button: Select the item with the cursors and press ENTER to confirm.
9. SETUP button: Displays the setup menu.
10.
Amplifier control buttons
Use to switch the input, adjust the volume, etc., of an Onkyo pre-main amplifier.
0Operation may not be possible with some amplifiers.
11.
ÍAMP button: Switch an Onkyo pre-main amplifier between on and standby.
0Operation may not be possible with some amplifiers.
12.
DISPLAY button: Switches the information on the display.
13.
NOW PLAYING button: When you have changed the display during play, for example, this
button returns the display to show information about the file being played.
14.
button: Returns the display to the previous state.
022 and 11 are not used.
30° 30°
Approx. 5 m

6
> Before Start >Part Names > Install > Initial Setup > Playback
Advanced Setup | Firmware Update | Others
E
N
Display
1. ASb: Lights when "Auto Standby" (P21) is set to "On".
2. DSD: Lights when the audio signal being input is DSD.
3. Lights when remote controller cursor operations are possible.
4. Displays the play status.
5. DIMMER indicator: Lights when you have pressed DIMMER to turn the display off.
6. Message display: Displays information about tracks and menus.
0Characters that cannot be displayed on this unit are replaced with asterisks ( *).
0The following icons are displayed.
: Folder
: Track title
: Playing
: Paused
: Artist
: Album
: 1-track repeat
: Repeat within a folder
: Shuffle
0When DIMMER is pressed to turn off the display, the unit may appear the same as if you
had unplugged the unit from the power outlet, but electricity is still being supplied to the
unit. To completely cut the unit off from the power supply, you need to unplug the power
plug (shutoff device) unit from the power outlet.
ASb DSD

7
E
N
> Before Start > Part Names >Install > Initial Setup > Playback
Advanced Setup | Firmware Update | Others
Connections with an amplifier
Install
a
a
1
2
You can play the audio from network features such as
internet radio through speaker systems connected to pre-
main amplifiers or AV receivers. Connect to suit the input
jacks on your amplifier.
Connecting with an analog audio cable
The signal is converted to analog in the D/A converter of
this unit and then output to the pre-main amplifier. Connect
the LINE IN jacks on a pre-main amplifier with the included
analog audio cable to the AUDIO OUTPUT ANALOG jack
on this unit.
Connecting with a digital coaxial cable
The signal is converted to analog in the D/A converter of
the pre-main amplifier. Connect the COAXIAL IN jacks on a
pre-main amplifier with a digital coaxial cable to the AUDIO
1
2
NS-6130
a
b
OR
Integrated amplifier, AV receiver, etc.
a Analog audio cable, b Digital coaxial cable

8
> Before Start > Part Names >Install > Initial Setup > Playback
Advanced Setup | Firmware Update | Others
E
N
OUTPUT DIGITAL COAXIAL jack on this unit.
Connecting with Onkyo RI Components
By connecting an Onkyo component with RI jack to the unit
by using an optional RI cable and an analog audio cable,
you can link the unit's power and input selection and enable
operation with this unit's remote controller. For details, refer
to the instruction manual of the component with the RI jack.
0Some components may not support all RI functions.
a
Amplifier
NS-6130
a RI cable

9
> Before Start > Part Names >Install > Initial Setup > Playback
Advanced Setup | Firmware Update | Others
E
N
Connecting the power cord, etc.
a
1 2
a
Power cord connection
This model includes a removable power cord.
The power cord must be connected only after all other
connections are completed. Make sure you first connect the
power cord to AC INLET terminal of the unit and then
connect to the outlet. Always disconnect the outlet side first
when disconnecting the power cord.
Ethernet cable connection
To connect to the network with an ethernet cable, use the
ETHERNET jack. When using Wi-Fi connection, make
settings in initial settings (P10). You can enjoy features
such as internet radio and AirPlay by connecting to the
network.
a Power cord

10
> Before Start > Part Names > Install > Initial Setup >Playback
Advanced Setup | Firmware Update | Others
E
N
Power On & Initial Setup
Initial Setu p
1 2
Network Setup
Starting up: When you press Í, "Now Initializing..." is
displayed on the display. After this, when "Now Initializing..."
goes out, you can start operating the unit.
Wi-Fi connection settings
When you first turn the power on, the Network Setup screen
is displayed automatically, allowing you to easily make Wi-Fi
connection settings.
To set, select the item with the cursors on the remote
controller and press ENTER to confirm.
0To return to the previous display, press .
0Turn MENU/ENTER on the main unit to the left and right
to select the item, then press the dial to confirm.
1. Press ENTER when "Network Setup" is displayed.
2. To make Wi-Fi settings, select "Wi-Fi". If you have
connected with an ethernet cable, select "Wired(Exit)"
with / on the remote controller and press ENTER.
3. If you selected "Wi-Fi", select the setting method with /
Network Setup
Wi-Fi
Wired ( Exit )

11
> Before Start > Part Names > Install > Initial Setup >Playback
Advanced Setup | Firmware Update | Others
E
N
on the remote controller and press ENTER.
0To redo the initial settings, press SETUP on the remote
controller, select "Wi-Fi" in "Network" - "Connection",
then select "Wi-Fi Setup".
∫iOS device
Set by sharing the iOS device's Wi-Fi settings with this unit.
1. Connect the iOS device by Wi-Fi.
2. Select this device in the "SET UP NEW AIRPLAY
SPEAKER..." item on the screen of the iOS device and
select "Next".
0This unit is displayed as "Onkyo NS-6130 XXXXXX".
3. After "Check Network" is displayed on this unit, when the
Wi-Fi settings are complete, the display changes. Select
"Done" on the screen of the iOS device.
∫Scan Networks
From the list of SSID for access points such as wireless
LAN routers, select the required SSID and make the
settings.
1. Select the SSID of the access point you want to connect
with / on the remote controller and press ENTER.
2. Select "Password" or "Push Button" with / on the
remote controller and press ENTER. If the access point
has an automatic connection button, by selecting "Push
Button" you can connect without entering a password.
3. If you select "Password", enter the password of the
access point. For details on how to enter text, refer to
"Entering text" (P19).
If you select "Push Button", then after pressing and
holding the automatic setting button on the access point
for the required amount of time, press ENTER on the
remote controller.
4. After "Check Network" is displayed, the information of the
display switches when the Wi-Fi settings are complete.
0If "Retry" appears on the display, press ENTER to retry
the settings.
∫Enter SSID of the access point
Set by entering the SSID of the access point you want to
connect.
1. Enter the SSID. For details on how to enter text, refer to
"Entering text" (P19).
2. Select the authentication method with / on the
remote controller and press ENTER.
0If you select "None", proceed to step 3. If you select
"WEP", "WPA", or "WPA2", enter the password and
confirm.
3. After "Check Network" is displayed, the information of the
display switches when the Wi-Fi settings are complete.
0If "Retry" appears on the display, press ENTER to retry
the settings.
iOS device
Scan Networks
Input SSID
My SSID
Password
Push Button
WPA2
WPA
WEP
None

12
> Before Start > Part Names > Install > Initial Setup >Playback
Advanced Setup | Firmware Update | Others
E
N
USB Storage Device/HDD
Playback
d
e
f
2
1
b
a
c
Basic operations
You can play music files by connecting a USB storage
device or HDD (hard disk drive) to the USB port on the front
or rear of the unit.
0The USB port on the front supports a maximum 5 V/0.5 A
power supply. If the HDD requires more than this,
connect to the USB port (maximum 5 V/1 A) on the rear
of the unit.
1. Turn the unit on.
2. Press USB to select "USB (F)" (USB port on the front
panel) or "USB (R)" (USB port on the rear panel).
3. Plug your USB storage device or HDD into the USB port
on the front or rear.
4. Press ENTER (e) after reading is complete.
5. Select the folder or music file with / (d) on the
remote controller and press ENTER (e) to confirm. To
return to the previous display, press (f).
6. Use play buttons (b) to stop play or choose tracks to play.
0The display of album name and artist name is supported
with MP3/WMA/Apple Lossless/FLAC/AAC/DSD (DSF
only) format music files.
0Characters that cannot be displayed by this unit appear
as "
¢
".
0The USB port of this unit conforms with the USB 2.0
standard. The transfer speed may be insufficient for
some content you play, which may cause some
interruption in sound.
Repeat play
1. Repeatedly press REPEAT (a) during play to display
or on the display.
: Repeat play of the selected individual track.
: Repeat play of all tracks within a folder.
To cancel repeat play, press REPEAT (a) several times
USB ( F )

13
> Before Start > Part Names > Install > Initial Setup >Playback
Advanced Setup | Firmware Update | Others
E
N
until the icons disappear.
Shuffle play
1. Press SHUFFLE (c) during play to display on the
display.
: Play tracks in a folder randomly.
To cancel shuffle play, press SHUFFLE (c) until the icon
disappears.
USB Storage / HDD Device Requirements
0Note that operation is not guaranteed with all USB
storage devices or HDD.
0This unit can use USB storage devices that comply with
the USB mass storage device class standard. (However,
there are still devices that cannot be played by this unit
even if they comply with the USB mass storage class
standard.)
0The unit is also compatible with USB storage devices
using the FAT16 or FAT32 file system formats. Other
formats such as exFAT, NTFS, and HFS cannot be
played by this unit.
0If the USB storage device has been partitioned, each
section will be treated as an independent device.
0Up to 20,000 tracks per folder can be displayed, and
folders may be nested up to 16 levels deep.
0USB hubs and USB storage devices with hub functions
are not supported. Do not connect these devices to the
unit.
0USB storage devices with security function are not
supported on this unit.
0If the USB storage device or HDD comes with an AC
adapter, we recommend that you use its AC adapter to
power it.
0Media inserted to the USB card reader may not be
available in this function. Furthermore, depending on the
USB storage device, proper reading of the contents may
not be possible.
0We accept no responsibility whatsoever for the loss or
damage to data stored on a USB storage device when
that device is used with this unit. We recommend that you
back up your important music files beforehand.
Supported Audio Formats
For server playback and playback from a USB storage
device, this unit supports the following music file formats.
Note that sound files that are protected by copyright cannot
be played on this unit.
MP3 (.mp3/.MP3):
0Supported formats: MPEG-1/MPEG-2 Audio Layer 3
0Supported sampling rates: 44.1 kHz, 48 kHz
0Supported bitrates: Between 8 kbps and 320 kbps and
VBR.
WMA (.wma/.WMA):
0Supported sampling rates: 44.1 kHz, 48 kHz
0Supported bitrates: Between 5 kbps and 320 kbps and
VBR.
0WMA Pro/Voice/WMA Lossless formats are not
supported
WAV (.wav/.WAV):
WAV files include uncompressed PCM digital audio.
0Supported sampling rates: 44.1 kHz, 48 kHz, 88.2 kHz,
96 kHz, 176.4 kHz, 192 kHz
0Quantization bit: 8 bit, 16 bit, 24 bit
AIFF (.aiff/.aif/.aifc/.afc/.AIFF/.AIF/.AIFC/.AFC):
AIFF files include uncompressed PCM digital audio.
0Supported sampling rates: 44.1 kHz, 48 kHz, 88.2 kHz,
96 kHz, 176.4 kHz, 192 kHz
0Quantization bit: 8 bit, 16 bit, 24 bit
AAC (.aac/.m4a/.mp4/.3gp/.3g2/.AAC/.M4A/.MP4/.3GP/
.3G2):
0Supported formats: MPEG-2/MPEG-4 Audio
0Supported sampling rates: 44.1 kHz, 48 kHz, 88.2 kHz,
96 kHz
0Supported bitrates: Between 8 kbps and 320 kbps and
VBR.
FLAC (.flac/.FLAC):
0Supported sampling rates: 44.1 kHz, 48 kHz, 88.2 kHz,
96 kHz, 176.4 kHz, 192 kHz
0Quantization bit: 8 bit, 16 bit, 24 bit
Apple Lossless (.m4a/.mp4/.M4A/.MP4):
0Supported sampling rates: 44.1 kHz, 48 kHz, 88.2 kHz,
96 kHz, 176.4 kHz, 192 kHz
0Quantization bit: 16 bit, 24 bit
DSD (.dsf/.dff/.DSF/.DFF):
0Supported formats: DSF/DSDIFF
0Supported sampling rates: 2.8 MHz, 5.6 MHz, 11.2 MHz

14
> Before Start > Part Names > Install > Initial Setup >Playback
Advanced Setup | Firmware Update | Others
E
N
Internet Radio
Basic operations
When this unit is connected to a network, you can listen to
TuneIn or other preregistered Internet radio services.
Depending on the internet radio service, the user may need
to register from their computer first.
1. Turn the unit on.
2. Press NETWORK.
3. Select "TuneIn Radio", etc., with / (a) of the remote
controller and press ENTER (b) to confirm.
0If "Connection Error." is displayed, check whether the
network is properly connected.
4. Select the station, etc., with / (a) on the remote
controller and press ENTER
(b)
. To return to the previous
display, press (c).
TuneIn
You can register a station you have played as a favorite.
1. Press ENTER (b) while playing TuneIn.
2. Select "Add to My Presets" with / (a) on the remote
controller and press ENTER
(b)
.
3. To play a favorite, select a registered station in "My
Presets", displayed first when "TuneIn Radio" selected
and press ENTER
(b)
. To delete favorites, press ENTER
(b) during play,
select "Remove from My Presets" and
press ENTER
(b)
.
a
b
c
1
Spotify
TuneIn Radio
Deezer
TIDAL

15
> Before Start > Part Names > Install > Initial Setup >Playback
Advanced Setup | Firmware Update | Others
E
N
Spotify
Spoti fy
Wi-Fi
Onkyo NS-6130 xxxxxx
b
a
c
d
e
1
4
3
2
Basic Operation
Spotify Connect play is possible by connecting this unit to
the same network as a smartphone or tablet. To enable
Spotify Connect, install the Spotify application on your
smartphone or tablet and create a Spotify premium account.
1. Connect the smartphone to the network that this unit is
connected to.
2. Click the Connect icon in the track play screen of the
Spotify app.
3. Select this unit.
0This unit is displayed as "Onkyo NS-6130 XXXXXX".
4. This unit turns on automatically and the input selector
changes to NET and streaming of Spotify starts.
0If "Option" - "PWR Setting" - "NET Stby" is set to "Off"
in the setup menu, manually turn the unit on and then
press NETWORK on the remote controller.
0Refer to the following for Spotify settings:
www.spotify.com/connect/
The Spotify software is subject to third party licenses
found here:
www.spotify.com/connect/third-party-licenses
The following remote controller operations are also
possible.
(a) This button plays the previous track.
(b) Pressed during play this button pauses playback.
Pressed while paused, and it restarts play.
(c) This button plays the next track.
(d) Start repeat play.
(e) Start shuffle play.

16
> Before Start > Part Names > Install > Initial Setup >Playback
Advanced Setup | Firmware Update | Others
E
N
AirPlay®
Wi-Fi
Onkyo NS-6130x
iPhone
1 3
2
4
Basic Operation
You can wirelessly enjoy the music files on an iPhone®,
iPod touch®, or iPad® connected to the same access point
as this unit. Update the OS version on your iOS device to
the latest version.
1. Turn the unit on.
2. Connect the iOS device to the same network as this unit.
3. Tap the AirPlay icon in the control center of the iOS
device and select this unit from the list of devices
displayed, and tap "Done".
0This unit is displayed as "Onkyo NS-6130 XXXXXX".
0If an "AirPlay PW" has been set on this unit, enter the
password you set.
4. Play the music files on the iOS device.
0In the setup menu displayed by pressing SETUP on the
remote controller, when "Option" - "PWR Setting" - "NET
Stby" is set to"On", when play of AirPlay starts, this unit
turns on automatically and play starts.
0Due to the characteristics of AirPlay wireless technology,
the sound produced on this unit may slightly be behind
the sound played on the AirPlay-enabled device.
0SHUFFLE or REPEAT on the remote controller does not
work. Operate from the iOS device.
You can also play the music files on a computer with iTunes
(Ver. 10.2.2 or later). Make sure this unit and the computer
are connected to the same network, click the AirPlay icon
in iTunes, select this unit from the list of devices
displayed, and start play of a music file.

17
> Before Start > Part Names > Install > Initial Setup >Playback
Advanced Setup | Firmware Update | Others
E
N
Music Server
It is possible to stream music files stored on PCs or NAS
devices connected to the same network as this unit. The
network servers this unit is compatible with are those PCs
with players installed that have the server functionality of
Windows Media® Player 11 or 12, or NAS that are
compatible with home network functionality. You may need
to make some settings in advance to use Windows Media®
Player 11 or 12. Note that only music files registered in the
library of Windows Media® Player can be played.
Configuring Windows Media® Player
∫Windows Media® Player 11
1. Turn on your PC and start Windows Media® Player 11.
2. In the "Library" menu, select "Media Sharing" to display a
dialog box.
3. Select the "Share my media" check box, and then click
"OK" to display the compatible devices.
4. Select this unit, and then click "Allow".
0When it is clicked, the corresponding icon is checked.
5. Click "OK" to close the dialog.
0Depending of the version of Windows Media® Player,
there may be differences in the names of items you can
select.
∫Windows Media® Player 12
1. Turn on your PC and start Windows Media® Player 12.
2. In the "Stream" menu, select "Turn on media streaming"
to display a dialog box.
0If media streaming is already turned on, select "More
streaming options..." in the "Stream" menu to list players
in the network, and then go to step 4.
3. Click "Turn on media streaming" to list players in the
network.
4. Select this unit in "Media streaming options" and check
that it is set to "Allow".
5. Click "OK" to close the dialog.
0Depending of the version of Windows Media® Player,
there may be differences in the names of items you can
select.
Playing
1. Turn the unit on.
2. Start the server (Windows Media® Player 11, Windows
Media® Player 12, or NAS device) containing the music
files to play.
3. Make sure that the PCs and/or NASs are properly
connected to the same network as this unit.
4.
Press NETWORK
.
5. Select "Music Server" with / (a) on the remote
controller and press ENTER (b).
6. Select the server and music file with / (a) on the
remote controller and press ENTER (b) to confirm. To
return to the previous display, press (c).
0If "Connection Error." is displayed, check whether the
network is properly connected.
0Depending on the server being used and the files played,
elapsed play time and remaining play time may not be
displayed.
0For music files on a server, there can be up to 20,000
tracks per folder, and folders may be nested up to 16
levels deep.
Controlling Remote Playback from a PC
You can use this unit to play music files stored on your PC
by operating the PC inside your home network. The unit
supports remote playback with Windows Media® Player 12.
1. Turn on your PC and start Windows Media® Player 12.
2. Open the "Stream" menu and check that "Allow remote
control of my Player..." is checked. Click "Turn on media
streaming" to list players in the network.
3. Select and right-click the music file to play with Windows
1
a
b
c
Music Server

18
> Before Start > Part Names > Install > Initial Setup >Playback
Advanced Setup | Firmware Update | Others
E
N
Media® Player 12. To remotely play a music file on
another server, open the target server from "Other
Libraries" and select the music file to play.
4. Select this unit in "Play to" to open the "Play to" window
of Windows Media® Player 12 and start playback on the
unit. If your PC is running on Windows® 8.1, click "Play
to", and then select this unit. If your PC is running on
Windows® 10, click "Cast to Device", and select this unit.
Operations during remote playback are possible from the
"Play to" window on the PC.
0Remote playback is not possible when using a network
service or playing music files on a USB storage device.
0Depending of the version of Windows, there may be
differences in the names of items you can select.
Supported Audio Formats
For server playback and playback from a USB storage
device, this unit supports the following music file formats.
0Note that playback via wireless LAN of sampling rates of
88.2 kHz or higher, and DSD are not supported.
0Remote play of FLAC, and DSD is also not supported.
0Variable bit-rate (VBR) files are supported. However,
playback times may not be displayed correctly.
0Remote playback does not support the gapless playback.
MP3 (.mp3/.MP3):
0Supported formats: MPEG-1/MPEG-2 Audio Layer-3
0Supported sampling rates: 44.1 kHz, 48 kHz
0Supported bitrates: Between 8 kbps and 320 kbps and
VBR.
WMA (.wma/.WMA):
0Supported sampling rates: 44.1 kHz, 48 kHz
0Supported bitrates: Between 8 kbps and 320 kbps and
VBR.
0WMA Pro/Voice/WMA Lossless formats are not
supported
WAV (.wav/.WAV):
WAV files include uncompressed PCM digital audio.
0Supported sampling rates: 44.1 kHz, 48 kHz, 88.2 kHz,
96 kHz, 176.4 kHz, 192 kHz
0Quantization bit: 8 bit, 16 bit, 24 bit
AIFF (.aiff/.aif/.aifc/.afc/.AIFF/.AIF/.AIFC/.AFC):
AIFF files include uncompressed PCM digital audio.
0Supported sampling rates: 44.1 kHz, 48 kHz, 88.2 kHz,
96 kHz, 176.4 kHz, 192 kHz
0Quantization bit: 8 bit, 16 bit, 24 bit
AAC (.aac/.m4a/.mp4/.3gp/.3g2/.AAC/.M4A/.MP4/.3GP/
.3G2):
0Supported formats: MPEG-2/MPEG-4 Audio
0Supported sampling rates: 44.1 kHz, 48 kHz, 88.2 kHz,
96 kHz
0Supported bitrates: Between 8 kbps and 320 kbps and
VBR.
FLAC (.flac/.FLAC):
0Supported sampling rates: 44.1 kHz, 48 kHz, 88.2 kHz,
96 kHz, 176.4 kHz, 192 kHz
0Quantization bit: 8 bit, 16 bit, 24 bit
LPCM (Linear PCM):
0Supported sampling rates: 44.1 kHz, 48 kHz
0Quantization bit: 16 bit
Apple Lossless (.m4a/.mp4/.M4A/.MP4):
0Supported sampling rates: 44.1 kHz, 48 kHz, 88.2 kHz,
96 kHz, 176.4 kHz, 192 kHz
0Quantization bit: 16 bit, 24 bit
DSD (.dsf/.dff/.DSF/.DFF):
0Supported formats: DSF/DSDIFF
0Supported sampling rates: 2.8 MHz, 5.6 MHz, 11.2 MHz

19
> Before Start > Part Names > Install > Initial Setup >Playback
Advanced Setup | Firmware Update | Others
E
N
Entering text
Text entry, for passwords, etc., uses the following
procedure.
1. Select the characters or symbols with / / / (b).
2. Press ENTER (d) to confirm the selected character.
Repeat this to enter text.
0Press REPEAT (c) to change the characters to be
enter, for example to switch between upper and lower
case.
0Press CLEAR (a) to delete all the input characters.
3. After completing input, select "OK" with /// (b)
and press ENTER
(d)
.
0Turn MENU/ENTER (e) on the main unit to the left and
right to select the item, then press the dial to confirm.
Characters that can be entered
Space: A single space the size of a character is entered.
A/a: Switches between characters displayed. (a A)
(left) / (right) : Select to move the cursor.
BS (backspace): Removes a character on the left of the
cursor. The cursor moves left.
OK: Confirms the entered content.
e
a
b
d
b
c
abcdefghij
A
/
a B
S
O
K
á
Á

20
> Before Start > Part Names > Install > Initial Setup > Playback
Advanced Setup | Firmware Update | Others
E
N
Advanced Settings
Advanced Setup
The unit allows you to configure advanced settings to provide you with an even better
experience.
1. Press SETUP on the remote controller.
2. Select the item with / on the remote controller and press ENTER to confirm.
3. Select the settings with / / / on the remote controller and press ENTER to confirm.
0To return to the previous screen, press .
4. To exit the settings, press SETUP.
Network
∫Connection
Select the type connection to the network.
1
Update
Factory Reset
System Info
Option
Network

> Before Start > Part Names > Install > Initial Setup > Playback
Advanced Setup | Firmware Update | Others
21
E
N
Select the item with / on the remote controller and press ENTER.
"Wi-Fi": To connect via wireless LAN
"Wired" (Default Value): To connect via wired LAN
Perform "Wi-Fi Setup" if you select "Wi-Fi".
∫Wi-Fi Setup
Make Wi-Fi connection settings. (P10)
This can be set only when "Wi-Fi" is selected in "Connection".
0You can make Wi-Fi connection settings using a web browser on a computer. For details,
refer to “Web Setup” (P22).
∫DHCP
Select the item with / on the remote controller and press ENTER .
"On" (Default Value): Auto configuration by DHCP
"Off": Manual configuration without DHCP
If selecting "Off", you must set "IP Address", "Subnet Mask", "Gateway", and "DNS"
manually.
∫IP Address
Displays/Sets the IP address.
∫Subnet Mask
Displays/Sets the subnet mask.
∫Gateway
Displays/Sets the gateway.
∫DNS
Displays/Sets the primary DNS server.
∫Proxy URL
Displays/Sets the proxy server URL.
∫Proxy Port
Displays/Sets the proxy server port number when you enter "Proxy URL".
∫Friendly Name
Change the device name for this unit which is shown on other devices connected to the
network to an easily recognized name. You can input up to 31 characters. For details on how
to enter text, refer to "Entering text" (P19).
∫AirPlay PW
You can set a password of up to 31 characters so that only registered users can use AirPlay.
For details on how to enter text, refer to "Entering text" (P19).
∫Network Check
You can check the network connection. The confirmation results are displayed when you
press ENTER.
Option
∫PWR Setting
∫Dig Filter
Select the item with / on the remote controller and press ENTER.
"SHARP" (Default Value): Sound with more structure and firmness
"SHORT": Sound that starts quick and seems to move forward
Auto Standby This setting places the unit on standby automatically after 20
minutes of inactivity without any audio input.
"On" (Default Value): The unit will automatically enter standby
mode.
"Off ": The unit will not automatically enter standby mode.
NET Stby
When this feature is turned "On", you can turn on the power of the
unit via the network using an application that can control this unit
.
Select the item with / on the remote controller and press
ENTER.
0Setting to "On" (Default Value) increases the power
consumption even when the unit is on standby.
0"NET Stby", which suppresses power consumption, may be
disabled when the network connection is lost.

22
> Before Start > Part Names > Install > Initial Setup > Playback
Advanced Setup | Firmware Update | Others
E
N
"SLOW": Soft and fluid sound
∫Digital Out
Make settings for digital audio output.
Select the item with / on the remote controller and press ENTER.
"On" (Default Value), "Off"
System Info
The MAC address of this unit and the current firmware version will be displayed.
Select "MAC address" or "Firmware" with / on the remote controller.
Factory Reset
Reset the settings of this unit to the status at the time of shipment. We recommend that you
take a note of the settings you have changed before going ahead with a factory reset.
To reset, select "Reset Start" with / on the remote controller and press ENTER. Press
ENTER again to start the rest. The unit will be placed on standby automatically when
initializing is completed.
Update
"Update" is not displayed if there are no firmware updates.
∫via Network
Press ENTER to select when you want to update the firmware via network.
∫via USB
Press ENTER to select when you want to update the firmware via USB.
Web Setup
You can make Wi-Fi connection settings using a web browser on a computer. Be sure your
computer is connected to the router wirelessly.
If this unit is connected to the router using ethernet cable, you can not do this setting.
1. Turn the unit on.
2. Press SETUP on the remote controller, select "Wi-Fi" in "Network" - "Connection", then
select "Wi-Fi Setup".
3. Press / to select "iOS device" and press ENTER.
4. In the list of wireless LAN connections on your computer, select SSID of this unit
(softap_0009B0xxxxxx).
0"xxxxxx" in SSID is the lower three bytes of the MAC address.
5. Open the web browser on your computer and access http://192.168.200.1.
6. The "Web Setup" menu is displayed. Make network settings for this unit.
0Depending on the equipment being used or connection environment, this function may
not work.
0Consult the appropriate operating instructions for information regarding operation of the
computer.
0Since this kind of connection is not encoded, a minor security risk may be involved.

23
> Before Start > Part Names > Install > Initial Setup > Playback
Advanced Setup | Firmware Update |Others
E
N
Firmware Update
Firmware Update
The updating function on this unit
This unit has functionality to update the firmware (the
system software) over a network or by the USB port. This
enables us to make improvements to a variety of operations
and to add features.
For details about the updated play features, see here.
How to update
There are two methods for updating the firmware: via
network and via USB. The update may take about 5
minutes to complete for either method: via network or via
USB. Furthermore, existing settings are guaranteed
regardless of the method used for update.
0For the latest information on updates, visit our company’s
website. There is no need to update the firmware on this
unit if there is no update available.
0When performed over the network, it may take even
more time depending on the connection status.
0During an update, do not
– Disconnect and reconnect any cable or USB storage
device, or perform any operation on the component
such as turn off its power
– Accessing this unit from a PC or smartphone using an
application
Disclaimer: The program and accompanying online
documentation are furnished to you for use at your own risk.
We will not be liable and you will have no remedy for
damages for any claim of any kind whatsoever concerning
your use of the program or the accompanying online
documentation, regardless of legal theory, and whether
arising in tort or contract.
In no event will we be liable to you or any third party for any
special, indirect, incidental, or consequential damages of
any kind, including, but not limited to, compensation,
reimbursement or damages on account of the loss of
present or prospective profits, loss of data, or for any other
reason whatsoever.
Updating the Firmware via Network
0Check that the unit is turned on, and the connection to
the Internet is secured.
0Turn off the controller component (PC etc.) connected to
the network.
0Stop any playing Internet radio, USB storage device, or
server content.
1. "Network" is displayed on the display when SETUP on
the remote controller is pressed.
2. Press / and ENTER to select "Update" - "via
Network" in order.
0"Update" is not displayed if there are no firmware
updates.
3. Press ENTER to start the firmware update.
0"Completed" is displayed when the update is
complete.
4. Press ÍON/STANDBY on the main unit to switch the unit
to standby. The process is completed and your firmware
is updated to the latest version.
If an error message is displayed: When an error occurs,
"*-** Error!" is displayed on the display of this unit. ("*"
represents an alphanumeric character.) Check the
following:
0*-01, *-10: Ethernet cable not found. Connect the
Ethernet cable properly.
0*-02, *-03, *-04, *-05, *-06, *-11, *-13, *-14, *-
16, *-17, *-18, *-20, *-21: Internet connection
error. Check the following:
–The router is turned on
–This unit and the router are connected via the network
Try to disconnect and then connect again the power to
the unit and router. This may solve the problem. If you
are still unable to connect to the Internet, the DNS server
or proxy server may be temporarily down. Check the
service status with your ISP provider.
0Others: Disconnect then reconnect the AC power cord,
then repeat from the beginning.
Network
Update

24
> Before Start > Part Names > Install > Initial Setup > Playback
Advanced Setup | Firmware Update |Others
E
N
Updating via USB
0Prepare a 128 MB or larger USB storage device. FAT16
or FAT32 file system format.
0Delete any data stored on the USB storage device.
0Turn off the controller component (PC etc.) connected to
the network.
0Stop any playing Internet radio, USB storage device, or
server content.
0Some USB storage devices may take long to load, may
not be loaded correctly, or may not be correctly fed
depending on the device or their content.
0We will not be liable whatsoever for any loss or damage
of data, or storage failure arising from the use of the USB
storage device with this unit. Thank you for your
understanding.
1. Connect the USB storage device to your PC.
2. Download the firmware file from our company’s website
to your PC and unzip.
Firmware files are named in the following way:
ONKNAP **** _************** _*** .zip
Unzip the file on your PC. The number of unzipped files
and folders varies depending on the model.
3. Copy all unzipped files and folders to the root folder of
the USB storage device.
0Make sure to copy the unzipped files.
4. Connect the USB storage device to the USB port of this
unit.
0If you connect a USB hard disk drive to the USB port of
the unit, we recommend that you use its AC adapter to
power it.
0If the USB storage device has been partitioned, each
section will be treated as an independent device.
5. "Network" is displayed on the display when SETUP on
the remote controller is pressed.
6. Press / and ENTER to select "Update" - "via USB" in
order.
0"Update" is not displayed if there are no firmware
updates.
7. Press ENTER to start the firmware update.
0"Completed" is displayed when the update is
complete.
8. Press ÍON/STANDBY on the main unit to switch the unit
to standby. The process is completed and your firmware
is updated to the latest version.
9. Remove the USB storage device from this unit.
If an error message is displayed: When an error occurs,
"*-** Error!" is displayed on the display of this unit.
Check the following:
0*-01, *-10: USB storage device not found. Check
whether the USB storage device or USB cable is
correctly inserted to the USB port of this unit.
Connect the USB storage device to an external power
source if it has its own power supply.
0*-05, *-13, *-20, *-21: The firmware file is not
present in the root folder of the USB storage device, or
the firmware file is for another model. Retry from the
download of the firmware file.
0Others: Disconnect then reconnect the AC power cord,
then repeat from the beginning.
Network
Update

25
> Before Start > Part Names > Install > Initial Setup > Playback
Advanced Setup | Firmware Update | Others
E
N
Troubleshooting
Others
Before starting the procedure
When operation is unstable, problems may be solved by
simply turning the power on or to standby or disconnecting/
connecting the power cord, rather than reviewing settings
and operations. Try the simple measures on both the unit
and the connected device. If the problem isn't fixed after
referring to "Troubleshooting", resetting the unit to the
status at the time of shipment may solve the problem. Note
that your settings will also be initialized when you reset, so
we recommend that you note down your settings before
doing the following.
Resetting the unit (this resets the unit settings to
the default)
1. Press SETUP on the remote controller, select "Factory
Reset" - "Reset Start" in the Setup screen and press
ENTER.
2. Press ENTER.
3. The unit switches to standby and the settings are reset.
Power
Cannot turn on the unit
0Unplug the power cord from the wall outlet, wait 5
seconds or more, then plug it in again.
The unit turns off unexpectedly
0The unit automatically switches to standby when the
"Option" - "PWR Setting" - "Auto Standby" setting in the
Setup menu functions.
The display doesn't light
0The display may go dim while the DIMMER is working,
and may also turn off. Press DIMMER button and change
the brightness level of the display.
Wi-Fi Connection
0Try plugging/unplugging the power supply of wireless
LAN router and the unit, check the wireless LAN router
power-on status, and try reboot of the wireless LAN
router.
Cannot connect to the access point
0Check that the setting of SSID and encryption (WEP,
etc.) is correct. Make sure the network settings of the unit
is properly set.
0Connection to an SSID that includes multi-byte
characters is not supported. Name the SSID of the
wireless LAN router using single-byte alphanumeric
characters only and try again.
0When the wireless LAN router setting is at stealth mode
(mode to hide the SSID key) or when ANY connection is
off, the SSID is not displayed. Change the setting and try
again.
Connected to an SSID different to the SSID selected
0Some access points allow you to set multiple SSIDs for
one unit. If you use the automatic setting button on such
a router, you may end up connecting with a different
SSID from the SSID you wanted to connect to. Use the
connection method requiring you to enter a password if
this happens.
Playback is interrupted and communication does not
work
0Shorten the distance from the access point or remove
obstacles to improve visibility, and try again. Place the
unit away from microwave ovens or other access points.
It is recommended to place the access point and the unit
in the same room.
0If there is a metallic object near the unit, wireless LAN
connection may not be possible as the metal can effect
on the radio wave.
0When other access point are used near the unit, several
issues such as interrupted playback and communication
may occur. You can avoid these issues by changing the
channel of the access point. For instructions on changing
channels, see the instruction manual provided with the
access point.
Cannot Play USB storage device / HDD
0Check whether the USB storage device or USB cable is
correctly inserted to the USB port of the unit.
0Disconnect the USB storage device from the unit, and
then try reconnecting.
0This unit may not recognize USB storage devices and
HDDs as proper devices sometimes. Try switching this
unit to standby and then turning it on again.
0Depending on the type of format, the playback may not
be performed normally. Check the type of the file formats
that is supported. (P13)
0Cautions regarding USB and HDD devices (P13)
Network function
0If you cannot select a network service, it will become
selectable when the network function is started.
0Try plugging/unplugging the power supply of this unit and
the router, and try rebooting the router.
Cannot access the Internet radio
0Certain network service or contents available through the
unit may not be accessible in case the service provider
terminates its service.
0Make sure that your modem and router are properly
connected, and make sure they are both turned on.
0Depending on ISP, setting the proxy server is necessary.
0Make sure that the used router and/or modem is
supported by your ISP.
Cannot access the network server
0This unit needs to be connected to the same router as
the network server.

26
> Before Start > Part Names > Install > Initial Setup > Playback
Advanced Setup | Firmware Update | Others
E
N
0This unit is compatible with Windows Media® Player 11 or
12 network servers or NAS that are compatible with
home network functionality. Furthermore, when using a
PC, only music files registered in the Windows Media
Player library can be played.
Playback stops while listening to music files on the
network server
0When the PC is serving as the network server, try quitting
any application software other than the server software
(Windows Media® Player 12, etc.).
0If the PC is downloading or copying large files, the
playback may be interrupted.
The album names and artist names for the Music Server
are not displayed
0Meta data, such as album names and artist names,
needs to be recognized on the server for distribution to
this unit, so this depends on the specifications of the NAS
or server you are using.
0The file formats supported depend on the NAS or server
software. For details, contact the manufacturer of NAS or
the server software.

27
> Before Start > Part Names > Install > Initial Setup > Playback
Advanced Setup | Firmware Update | Others
E
N
General Specifications
Audio Section
Rated RCA Output Level and Impedance
02 Vrms (RCA OUT 1 kHz, 0 dBfs)/470 h
Frequency response
04Hz - 70kHz (-3 dB)
THD+N
00.002 % (1 kHz 0 dBfs/RCA OUT/30 kHz LPF)
Dynamic range
0110 dB (24 bit)
Channel separation
0100 dB (1 kHz/RCA OUT)
Signal to Noise Ratio
0110 dB (A-weighting/RCA OUT)
Network Section
ETHERNET LAN
010BASE-T/100BASE-TX
Wireless LAN
0IEEE 802.11 a/b/g/n standard
05 GHz/2.4 GHz band
Output jacks
Analog audio output
02 (L/R)
Digital audio output
01 (COAXIAL)
Other jacks
USB
0Front: 1
version: USB2.0
Maximum supplied current: 0.5 A
0Rear: 1
version: USB2.0
Maximum supplied current: 1.0 A
RI: 2
General
Power Supply
0AC 220 - 240 V, 50/60 Hz
Power Consumption
022 W
00.2 W (In Standby)
02.5 W (In Standby, NET Stby : On)
Dimensions (W t H t D)
0435 mm t 100 mm t 318 mm
Weight
03.5 kg

28
> Before Start > Part Names > Install > Initial Setup > Playback
Advanced Setup | Firmware Update | Others
E
N
License and Trademark Information
The Wi-Fi CERTIFIED Logo is a certification mark of Wi-Fi Alliance®.
AirPlay, iPad, iPhone, and iPod touch are trademarks of Apple Inc., registered in
the U.S. and other countries.
iPad Air and iPad mini are trademarks of Apple Inc.
“Made for iPod”, “Made for iPhone” and “Made for iPad” mean that an electronic
accessory has been designed to connect specifically to iPod, iPhone, or iPad,
respectively, and has been certified by the developer to meet Apple
performance standards. Apple is not responsible for the operation of this device
or its compliance with safety and regulatory standards.
Please note that the use of this accessory with iPod, iPhone or iPad may affect
wireless performance.
AirPlay works with iPhone, iPad, and iPod touch with iOS 4.3.3 or later, Mac
with OS X Mountain Lion or later, and PC with iTunes 10.2.2 or later.
Google Cast and the Google Cast badge are trademarks of Google inc.
This Mark Certifies that this product is compliant with the BLACKFIRE
ALLIANCE Standard.
Please refer to WWW.BLACKFIREALLIANCE.COM for more information.
BLACKFIRETM is a Registered Trademark (No. 85,900,599) of BLACKFIRE
RESEARCH CORP. All rights reserved.
FireConnectTM is technology powered by BlackFire Research.
The product with this logo is conformed to Hi-Res Audio standard defined by
Japan Audio Society. This logo is used under license from Japan Audio Society.
“VLSC” and “VLSC (logo)” are trademarks of Onkyo Corporation.
This product is protected by certain intellectual property rights of Microsoft. Use
or distribution of such technology outside of this product is prohibited without a
license from Microsoft.
Windows and the Windows logo are trademarks of the Microsoft group of
companies.
DSD and the Direct Stream Digital logo are trademarks of Sony Corporation.
MPEG Layer-3 audio coding technology licensed from Fraunhofer IIS and
Thomson.
“All other trademarks are the property of their respective owners.”
“Toutes les autres marques commerciales sont la propriété de leurs détenteurs
respectifs.”
“El resto de marcas comerciales son propiedad de sus respectivos
propietarios”.
“Tutti gli altri marchi di fabbrica sono di proprietà dei rispettivi proprietari.”
“Alle anderen Warenzeichen sind das Eigentum ihrer jeweiligen Eigentümer.”
“Alle andere handelsmerken zijn eigendom van de desbetreffende
rechthebbenden.”
“Alla andra varumärken tillhör deras respektive ägare”.
BLACKFIRE

E
N
<U.S.A.>
18 Park Way, Upper Saddle River, N.J. 07458, U.S.A.
For Dealer, Service, Order and all other Business Inquiries:
Tel: 201-785-2600 Fax: 201-785-2650
http://www.us.onkyo.com/
<Germany>
Gutenbergstrasse 3, 82178 Puchheim, Germany
Tel: +49-8142-4401-0 Fax: +49-8142-4208-213
http://www.eu.onkyo.com/
<UK>
Anteros Building, Odyssey Business Park, West End Road, South Ruislip, Middlesex,
HA4 6QQ United Kingdom
Tel: +44 (0)871-200-1996 Fax: +44 (0)871-200-1995
<Hong Kong>
Unit 1033, 10/F, Star House, No 3, Salisbury Road, Tsim Sha Tsui Kowloon, Hong Kong.
Tel: +852-2429-3118 Fax: +852-2428-9039
http://www.hk.onkyo.com/
<PRC>
302, Building 1, 20 North Chaling Rd., Xuhui District, Shanghai, China 200032,
Tel: +86-21-52131366 Fax: +86-21-52130396
http://www.cn.onkyo.com/
<Asia, Oceania, Middle East, Africa>
Please contact an Onkyo distributor referring to Onkyo SUPPORT site.
http://www.intl.onkyo.com/support/
The above-mentioned information is subject to change without prior notice.
Visit the Onkyo web site for the latest update.
For Product Support Team Only:
1-800-229-1687
http://www.us.onkyo.com/
2-3-12 Yaesu, Chuo-ku, Tokyo 104-0028 JAPAN
http://www.onkyo.com/
Корпорация О энд Пи
2-3-12, Яэсу, Чуо-ку, г. Токио, 104-0028, ЯПОНИЯ
F1609-0
SN 29402680
* 2 9 4 0 2 6 8 0 *
(C) Copyright 2016 Onkyo & Pioneer Corporation Japan. All rights reserved.
http://www.onkyo.com/privacy/

2
> Avant de Démarrer > Nom des pièces > Installation > Initial Setup > Lecture
Configuration avancée |Mise à jour du micrologiciel | Autres
F
R
Ce que contient la boîte
Avant de Démarrer
0Le cordon d'alimentation devra être branché uniquement lorsque tous les autres
raccordements seront effectués.
0Nous n’acceptons en aucun cas la responsabilité des dommages résultant d'une
connexion à des équipements fabriqués par d'autres sociétés.
0Des fonctionnalités peuvent être mises en place par des mises à jour du micrologiciel et
des services de fournisseurs pourraient cesser, ce qui signifie que certains services
réseau ainsi que leurs contenus pourraient devenir inaccessibles dans le futur.
0Les spécifications et l'aspect peuvent changer sans préavis.
Appareil principal (1)
Télécommande (RC-942E) (1), Piles (AAA/R03) (2)
Câble audio analogique (1)
Câble RI (1)
Cordon d'alimentation (1)

> Avant de Démarrer > Nom des pièces > Installation > Initial Setup > Lecture
Configuration avancée |Mise à jour du micrologiciel | Autres
3
F
R
Panneau frontal
Nom des pièces
1. Touche ÍON/STANDBY : Permet la mise en marche ou en veille de l'appareil.
2. Capteur de la télécommande
3. Afficheur (P6)
4. Touche Lecture :
∫
: Cette touche permet d'arrêter la lecture.
1
/; : Lecture ou pause.
5. Molette MENU/ENTER (: /9)
Durant la lecture, tourner à gauche ou à droite pour sélectionner le dossier ou le fichier,
puis appuyer pour valider.
Appuyer quelques instants pour afficher l'écran des réglages. Pendant que le menu est
affiché, tourner la molette pour sélectionner les éléments et appuyer pour valider les
paramètres.
0Selon l’entrée, il se peut que la commande ne se lance pas.
6. Port USB : raccorder un périphérique de stockage USB ou un DD (disque dur) pour lire
des fichiers de musique. Vous pouvez également fournir l’alimentation (maximum 5 V/
0,5 A) aux périphériques USB avec un câble USB.
0Pour raccorder un DD qui nécessite plus de 5 V/0,5 A, le brancher sur le port USB
(maximum 5 V/1 A) à l’arrière de l’appareil.
7. Touche DISPLAY : Modifie l'information affichée.
8. Touche INPUT : Change l'entrée à lire.
9. Touche RETURN : Permet de retourner sur l’écran précédent.

4
> Avant de Démarrer > Nom des pièces > Installation > Initial Setup > Lecture
Configuration avancée |Mise à jour du micrologiciel | Autres
F
R
Panneau arrière
1. AC INLET: Permet de raccorder le cordon d'alimentation fourni.
2. Antenne sans fil : Utilisée pour la connexion Wi-Fi. Réglez leurs angles en fonction de
l’état de la connexion.
3. Port USB : Permet de raccorder un périphérique de stockage USB ou un DD (disque dur)
pour lire des fichiers musicaux. Il est également possible de fournir l’alimentation
(maximum 5 V/1 A) aux périphériques USB avec un câble USB.
4. Prise AUDIO OUTPUT DIGITAL COAXIAL : Permet de raccorder un amplificateur
principal à l'aide d'un câble coaxial numérique.
5. Prise ETHERNET : Permet de se connecter au réseau à l'aide d'un câble Ethernet.
6. Prise REMOTE CONTROL : Permet de raccorder un produit Onkyo muni d'une prise
RI en utilisant un câble RI fourni pour le synchroniser avec cet appareil. (P8)
7. Prises AUDIO OUTPUT ANALOG : Permet de raccorder un amplificateur principal à l'aide
du câble audio analogique fourni.
180°
90°

> Avant de Démarrer > Nom des pièces > Installation > Initial Setup > Lecture
Configuration avancée |Mise à jour du micrologiciel | Autres
5
F
R
Télécommande
1. Touche Í : Permet la mise en marche ou en veille de l'appareil.
2. Touche DIMMER : Permet de désactiver l'afficheur ou de régler sa luminosité sur deux
niveaux.
3. Boutons INPUT SELECTOR : Change l'entrée à lire.
4. Touches Lecture :
: : Permet de retourner à la piste précédant celle en cours de lecture.
/;: Lecture ou pause.
9: Passer à la piste suivante.
∫ : Arrêter la lecture.
0Selon l’entrée, il se peut que la commande ne se lance pas.
5. Touche REPEAT : Permet de sélectionner la répétition de lecture.
Touche SHUFFLE : Permet de sélectionner la lecture aléatoire.
6. Touche CLEAR : Utilisée lors de la saisie de texte, etc.
7. Touche TOP MENU : Permet d'accéder au menu principal de l'entrée sélectionnée.
8. Touches du curseur et ENTER: Sélectionner l’élément à l’aide des touches du curseur et
appuyer sur ENTER pour confirmer.
9. Touche SETUP : Affiche le menu de configuration.
10.
Touches de commande de l'amplificateur
Utilisées pour changer l'entrée, régler le volume, etc. d'un amplificateur principal Onkyo.
0Les commandes pourraient ne pas répondre avec certains amplificateurs.
11.
Touche
Í
AMP : Permet de mettre en marche ou en veille un amplificateur principal Onkyo.
0Les commandes pourraient ne pas répondre avec certains amplificateurs.
12.
Touche DISPLAY : Modifie l'information affichée.
13.
Touche NOW PLAYING : Si vous avez changé l'affichage durant la lecture, par exemple, cette
touche sert à afficher une nouvelle fois les informations du fichier en cours de lecture.
14.
Touche : Permet à l'affichage de retourner à son état précédent.
0Les touches 22 et 11 ne sont pas
utilisées.
30° 30°
Environ 5 m

6
> Avant de Démarrer > Nom des pièces > Installation > Initial Setup > Lecture
Configuration avancée |Mise à jour du micrologiciel | Autres
F
R
Afficheur
1. ASb : S'allume lorsque "Auto Standby" (P21) est réglé sur "On".
2. DSD : S'allume lorsque le signal audio entrant est DSD.
3. S'allume lorsque les actions avec les touches du curseur de la télécommande sont
possibles.
4. Affiche l'état de la lecture.
5. Témoin DIMMER : S'allume lorsque DIMMER a été pressé pour éteindre l'afficheur.
6. Affichage des messages : Affiche les informations des pistes et des menus.
0Les caractères qui ne peuvent pas s'afficher sur cet appareil sont remplacés par des
astérisques ( *).
0Les icônes suivantes sont affichées.
: Dossier
: Titre de la piste
: Lecture
: Pause
: Artiste
: Album
: 1 répétition de piste
: Répétition d'un dossier
: Lecture aléatoire
0Lorsque vous appuyez sur DIMMER pour désactiver l'affichage, l'appareil a le même
aspect que lorsque l'alimentation est débranchée, mais il est toujours alimenté en
électricité. Pour couper totalement l'alimentation électrique, vous devez débrancher la
fiche d'alimentation (dispositif d'arrêt) de la prise d'alimentation.
ASb DSD

8
> Avant de Démarrer > Nom des pièces > Installation > Initial Setup > Lecture
Configuration avancée |Mise à jour du micrologiciel | Autres
F
R
A de l'amplificateur principal. Raccordez les prises
COAXIAL IN de l'amplificateur principal à l'aide du câble
coaxial numérique à la prise AUDIO OUTPUT DIGITAL
COAXIAL de cet appareil.
Raccordement des Composants RI Onkyo
En raccordant un composant Onkyo muni d'une prise RI à
l'appareil à l'aide d'un câble RI en option et d'un câble audio
analogique, vous pouvez lier l'alimentation et la sélection de
l'entrée de l'appareil et activer les commandes avec la
télécommande de cet appareil. Pour plus de détails,
reportez-vous au mode d'emploi du composant muni de la
prise RI.
0Il est possible que certains composants ne prennent pas
en charge toutes les fonctions RI.
a
Amplificateur
NS-6130
a Câble RI

9
> Avant de Démarrer > Nom des pièces > Installation > Initial Setup > Lecture
Configuration avancée |Mise à jour du micrologiciel | Autres
F
R
Pour brancher cordon d'alimentation, etc.
a
1 2
a
Branchement du cordon d'alimentation
Ce modèle dispose d’un cordon d’alimentation amovible.
Le cordon d'alimentation doit être connecté uniquement
lorsque toutes les autres connexions sont effectuées.
Assurez-vous de brancher d'abord le cordon d'alimentation
à la prise AC INLET de l'appareil puis de le brancher à la
prise d'alimentation. Toujours débrancher de la prise en
premier lorsque vous retirez le cordon d'alimentation.
Branchement du câble Ethernet
Pour vous connecter au réseau à l’aide d’un câble Ethernet,
utilisez la fiche ETHERNET. Si vous utilisez une connexion
Wi-Fi, indiquez les paramètres lors de la configuration
initiale (P10). Vous pouvez profiter des fonctionnalités
comme la radio Internet et AirPlay en vous connectant au
réseau.
a Cordon d'alimentation

10
> Avant de Démarrer > Nom des pièces > Installation > Initial Setup >Lecture
Configuration avancée |Mise à jour du micrologiciel | Autres
F
R
Mise sous tension & Configuration initiale
Initial Setu p
1 2
Network Setup
Démarrage : Lorsque vous appuyez sur la touche Í, "Now
Initializing..." apparait sur l'afficheur. Après cela, une fois
"Now Initializing..." disparu, vous pouvez commencer à
utiliser l'appareil.
Paramètres de connexion Wi-Fi
Lors de la première mise sous tension, l'écran Network
Setup s'affiche automatiquement, et vous permet de définir
facilement les paramètres de connexion Wi-Fi.
Pour les définir, sélectionnez l'élément grâce aux touches
du curseur de la télécommande et appuyez sur ENTER pour
valider.
0Pour revenir sur l’affichage précédent, appuyez sur .
0Tournez MENU/ENTER sur l'appareil principal vers la
gauche et la droite pour sélectionner l'élément, puis
appuyez sur la molette pour valider.
1. Appuyez sur ENTER lorsque "Network Setup" s'affiche.
2. Pour définir les paramètres Wi-Fi, sélectionnez "Wi-Fi". Si
vous avez branché un câble Ethernet, sélectionnez
"Wired(Exit)" à l'aide des touches / de la
télécommande et appuyez sur ENTER.
Network Setup

11
> Avant de Démarrer > Nom des pièces > Installation > Initial Setup >Lecture
Configuration avancée |Mise à jour du micrologiciel | Autres
F
R
3. Si vous avez sélectionné "Wi-Fi", choisissez la méthode
de réglage à l'aide des touches / de la
télécommande et appuyez sur ENTER.
0Pour refaire la configuration initiale, appuyez sur la
touche SETUP de la télécommande, sélectionnez "Wi-Fi"
dans "Network" - "Connection" puis sélectionnez "Wi-Fi
Setup".
∫iOS device
Effectuez le réglage en partageant les paramètres Wi-Fi du
périphérique iOS avec cet appareil.
1. Connectez le dispositif iOS par Wi-Fi.
2. Sélectionnez cet appareil dans l'élément "SET UP NEW
AIRPLAY SPEAKER..." sur l'écran du périphérique iOS
et sélectionnez "Next".
0Cet appareil s'affiche sous le nom "Onkyo NS-6130
XXXXXX".
3. Une fois que "Check Network" s'affiche sur cet appareil,
lorsque les réglages Wi-Fi sont terminés, l'affichage
change. Sélectionnez "Done" sur l'écran du périphérique
iOS.
∫Scan Networks
Dans la liste des SSID pour les points d'accès tels que les
routeurs LAN sans fil, sélectionnez le SSID requis et
effectuez les réglages.
1. Sélectionnez le SSID du point d'accès à connecter à
l'aide des touches / de la télécommande et appuyez
sur ENTER.
2. Sélectionnez "Password" ou "Push Button" à l'aide des
touches / de la télécommande et appuyez sur
ENTER. Si le point d'accès est muni une touche de
connexion automatique, en sélectionnant "Push Button"
vous pouvez vous connecter sans saisir de mot de
passe.
3. Si vous sélectionnez "Password", saisissez le mot de
passe du point d'accès. Pour plus de détails sur la saisie
de texte, voir "Saisie du texte" (P19).
Si vous sélectionnez "Push Button", après avoir
maintenu la touche de configuration automatique du
point d'accès appuyée pendant la durée nécessaire,
appuyez sur la touche ENTER de la télécommande.
4. Une fois que "Check Network" s’est affiché, les
informations sur l’afficheur changent lorsque les réglages
Wi-Fi sont terminés.
0Si "Retry" apparait sur l’afficheur, appuyez sur ENTER
pour refaire les réglages.
∫Saisissez le SSID du point d'accès
Pour effectuer le réglage, saisissez le SSID du point
d'accès à connecter.
1. Saisissez le SSID. Pour plus de détails sur la saisie de
texte, voir "Saisie du texte" (P19).
2. Sélectionnez la méthode d'authentification à l'aide des
touches / de la télécommande et appuyez sur
ENTER.
0Si vous sélectionnez "None", passez à l'étape 3. Si
vous sélectionnez "WEP", "WPA" ou "WPA2",
saisissez le mot de passe puis validez.
3. Une fois que "Check Network" s’est affiché, les
informations sur l’afficheur changent lorsque les réglages
Wi-Fi sont terminés.
0Si "Retry" apparait sur l’afficheur, appuyez sur ENTER
pour refaire les réglages.
Wi-Fi
Wired ( Exit )
iOS device
Scan Networks
Input SSID
My SSID
Password
Push Button
WPA2
WPA
WEP
None

12
> Avant de Démarrer > Nom des pièces > Installation > Initial Setup >Lecture
Configuration avancée |Mise à jour du micrologiciel | Autres
F
R
Périphérique de stockage USB/DD
Lecture
d
e
f
2
1
b
a
c
Commandes de base
Vous pouvez lire des fichiers musicaux en connectant un
périphérique de stockage USB ou un DD (disque dur) au
port USB situé à l'avant ou à l'arrière de l'appareil.
0Le port USB à l’avant peut supporter une charge
maximale de 5 V/0,5 A. Si le DD nécessite une
alimentation plus importante, branchez-le sur le port
USB (maximum 5 V/1 A) situé à l’arrière de l’appareil.
1. Mettez en marche l'appareil.
2. Appuyez sur USB pour sélectionner "USB (F)" (port USB
du panneau frontal) ou "USB (R)" (port USB du panneau
arrière).
3. Branchez votre périphérique de stockage USB ou votre
DD au port USB situé à l'avant ou à l'arrière de l'appareil.
4. Appuyez sur ENTER (e) une fois que la lecture est
terminée.
5. Sélectionnez le dossier ou le fichier musical à l'aide des
touches / (d) de la télécommande et appuyez sur
ENTER (e) pour valider. Pour revenir sur l’affichage
précédent, appuyez sur (f).
6. Utilisez les touches de lecture (b) pour arrêter la lecture
ou choisir les pistes à lire.
0L'affichage du nom de l'album et du nom de l'artiste est
pris en charge avec les fichiers musicaux aux formats
MP3/WMA/Apple Lossless/FLAC/AAC/DSD (DSF
uniquement).
0Les caractères qui ne peuvent pas être affichés par cet
appareil sont remplacés par "
¢
".
0Le port USB de cet appareil est conforme à la norme
USB 2.0. La vitesse de transfert peut être insuffisante
pour certains des contenus que vous lisez, ce qui peut
causer des coupures du son.
Répétition de lecture
USB ( F )

13
> Avant de Démarrer > Nom des pièces > Installation > Initial Setup >Lecture
Configuration avancée |Mise à jour du micrologiciel | Autres
F
R
1. Appuyez plusieurs fois sur REPEAT (a) pendant la
lecture pour faire apparaitre ou sur l'afficheur.
: Permet de répéter la lecture de la piste
sélectionnée.
: Permet de répéter la lecture de toutes les pistes.
Pour annuler la répétition de lecture, appuyez plusieurs
fois sur REPEAT (a) jusqu'à ce que les icônes
disparaissent.
Lecture aléatoire
1. Appuyez sur SHUFFLE (c) pendant la lecture pour
afficher sur l'afficheur.
: Lit aléatoirement les pistes présentes dans un
dossier.
Pour annuler la lecture aléatoire, appuyez sur SHUFFLE
(c) jusqu'à ce que l'icône disparaisse.
Configuration requise du périphérique de
stockage USB/disque dur
0Notez que cette commande n'est pas garantie avec tous
les périphériques de stockage USB ou DD.
0Cet appareil peut utiliser les périphériques de stockage
USB conformes à la norme USB MSC. (Toutefois,
certains périphériques ne peuvent pas être lus par cet
appareil même s'ils sont conformes à la norme de
stockage de masse USB.)
0L'appareil est également compatible avec les
périphériques de stockage USB utilisant les formats de
système de fichier FAT16 ou FAT32. D'autres formats tels
qu'exFAT, NTFS et HFS ne peuvent pas être lus par cet
appareil.
0Si le périphérique de stockage USB a été partitionné,
chaque section sera considérée comme étant un
périphérique indépendant.
0Vous pouvez afficher jusqu'à 20.000 pistes par dossier,
et les dossiers peuvent être imbriqués jusqu'à 16 niveaux
de profondeur.
0Les concentrateurs USB et les périphériques de
stockage USB avec des fonctions de concentrateur ne
sont pas pris en charge. Ne branchez pas ces
périphériques à l’appareil.
0Les périphériques de stockage USB avec des fonctions
de sécurité ne sont pas pris en charge sur cet appareil.
0Si le périphérique de stockage USB ou le DD est fourni
avec un adaptateur secteur, nous vous recommandons
d'utiliser son adaptateur pour l'alimenter.
0Un média inséré dans le lecteur de carte USB peut ne
pas être disponible dans cette fonction. De plus, en
fonction du périphérique de stockage USB, une lecture
correcte du contenu peut être impossible.
0Nous déclinons toute responsabilité pour la perte ou
l'endommagement des données sauvegardées sur un
périphérique de stockage USB lorsque ce périphérique
est utilisé avec cet appareil. Nous vous recommandons
de sauvegarder à l'avance les fichiers musicaux
importants.
Formats audio pris en charge
Pour la lecture depuis un serveur et la lecture depuis un
périphérique de stockage USB, l’appareil prend en charge
les formats de fichiers musicaux suivants. Notez que les
fichiers audio qui sont protégés par droits d'auteur ne
peuvent pas être lus sur cet appareil.
MP3 (.mp3/.MP3):
0Formats pris en charge: MPEG-1/MPEG-2 Audio Layer 3
0Taux d’échantillonnage pris en charge: 44,1 kHz, 48 kHz
0Débits binaires pris en charge: Entre 8 kbps, 320 kbps et
VBR.
WMA (.wma/.WMA):
0Taux d’échantillonnage pris en charge: 44,1 kHz, 48 kHz
0Débits binaires pris en charge: Entre 5 kbps, 320 kbps et
VBR.
0Les formats WMA Pro/Voice/WMA Lossless ne sont pas
pris en charge
WAV (.wav/.WAV):
Les fichiers WAV comprennent des données audio
numériques PCM non compressées.
0Taux d’échantillonnage pris en charge : 44,1 kHz,
48 kHz, 88,2 kHz, 96 kHz, 176,4 kHz, 192 kHz
0Bits de quantification: 8 bits, 16 bits, 24 bits
AIFF (.aiff/.aif/.aifc/.afc/.AIFF/.AIF/.AIFC/.AFC):
Les fichiers AIFF comprennent des données audio
numériques PCM non compressées.
0Taux d’échantillonnage pris en charge : 44,1 kHz,
48 kHz, 88,2 kHz, 96 kHz, 176,4 kHz, 192 kHz
0Bits de quantification: 8 bits, 16 bits, 24 bits
AAC (.aac/.m4a/.mp4/.3gp/.3g2/.AAC/.M4A/.MP4/.3GP/
.3G2):
0Formats pris en charge: MPEG-2/MPEG-4 Audio
0Taux d’échantillonnage pris en charge : 44,1 kHz,
48 kHz, 88,2 kHz, 96 kHz
0Débits binaires pris en charge: Entre 8 kbps, 320 kbps et
VBR.
FLAC (.flac/.FLAC):
0Taux d’échantillonnage pris en charge : 44,1 kHz,
48 kHz, 88,2 kHz, 96 kHz, 176,4 kHz, 192 kHz
0Bits de quantification: 8 bits, 16 bits, 24 bits
Apple Lossless (.m4a/.mp4/.M4A/.MP4):
0Taux d’échantillonnage pris en charge : 44,1 kHz,
48 kHz, 88,2 kHz, 96 kHz, 176,4 kHz, 192 kHz
0Bits de quantification: 16 bits, 24 bits
DSD (.dsf/.dff/.DSF/.DFF):
0Formats pris en charge: DSF/DSDIFF
0Taux d’échantillonnage pris en charge: 2,8 MHz,
5,6MHz, 11,2MHz,
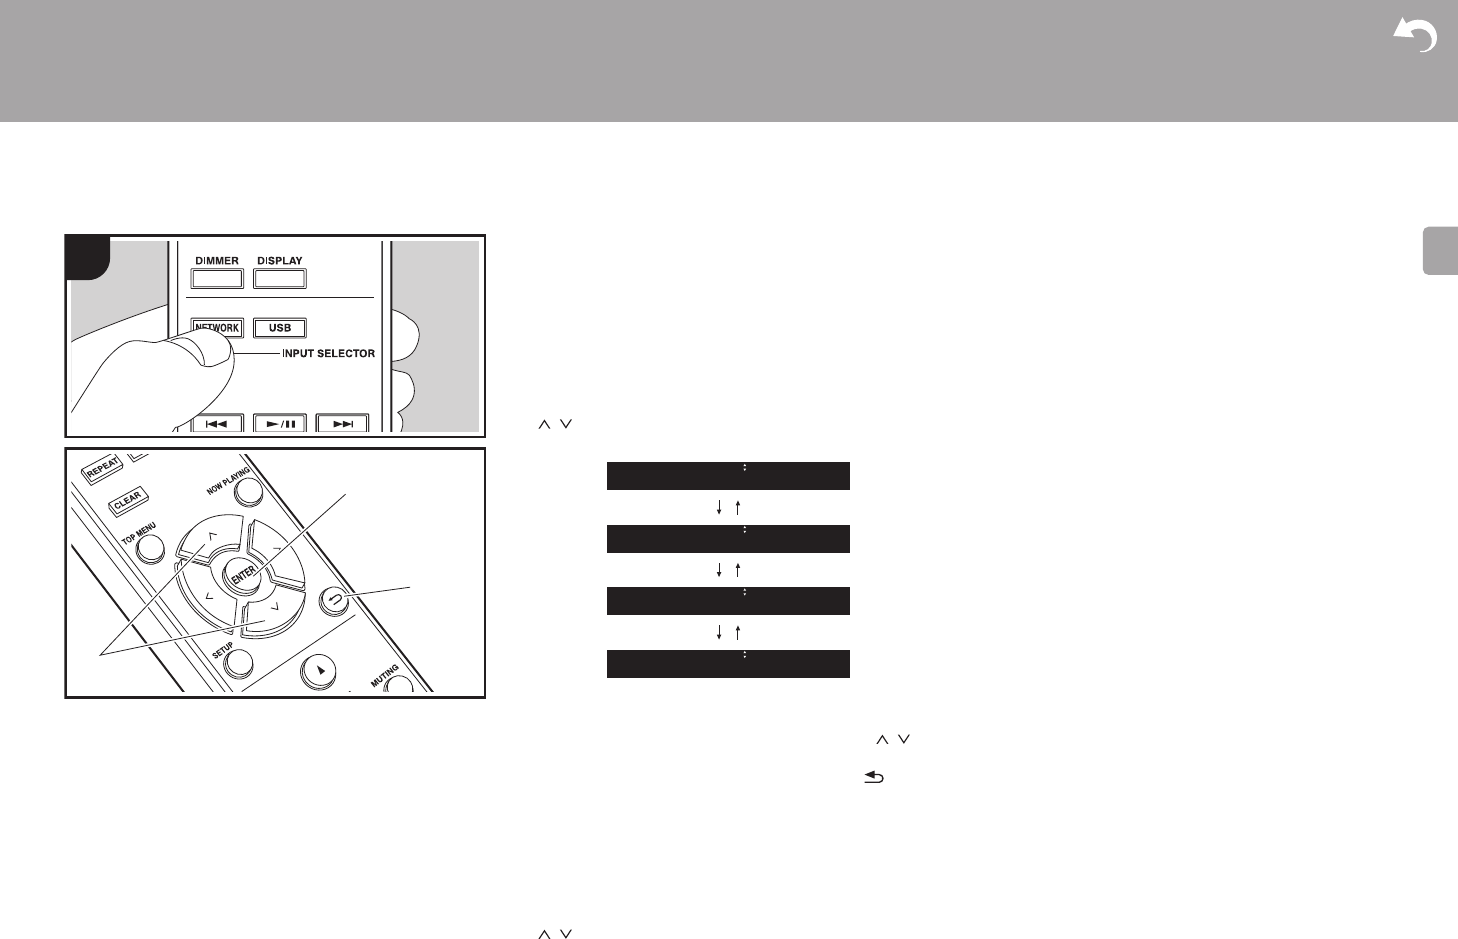
14
> Avant de Démarrer > Nom des pièces > Installation > Initial Setup >Lecture
Configuration avancée |Mise à jour du micrologiciel | Autres
F
R
Radio Internet
Commandes de base
Lorsque cet appareil est connecté au réseau, vous pouvez
écouter TuneIn ou d'autres services de radio Internet
préenregistrés.
Selon le service de radio Internet, il se peut que l’utilisateur
doive s’inscrire d’abord sur l’ordinateur.
1. Mettez en marche l'appareil.
2. Appuyez sur NETWORK.
3. Sélectionnez "TuneIn Radio", etc., à l’aide des touches
/ (a) de la télécommande et appuyez sur ENTER (b)
pour valider.
0Si "Connection Error." s’affiche, vérifiez si le réseau est
connecté correctement.
4. Sélectionnez la station etc., à l'aide des touches / (a)
de la télécommande et appuyez sur ENTER
(b)
. Pour
revenir sur l’affichage précédent, appuyez sur (c).
TuneIn
Vous permet d'enregistrer une station déjà lue dans les
favoris.
1. Appuyez sur ENTER (b) pendant la lecture TuneIn.
2. Sélectionnez "Add to My Presets" à l'aide des touches
/ (a) de la télécommande et appuyez sur ENTER
(b)
.
3. Pour lire un favori, sélectionnez une station mémorisée
dans "My Presets", affichez-la en premier lorsque
"TuneIn Radio" est sélectionné et appuyez sur ENTER
(b)
. Pour supprimer des favoris, appuyez sur ENTER
(b)
pendant la lecture,
sélectionnez "Remove from My
Presets" et appuyez sur ENTER
(b)
.
a
b
c
1
Spotify
TuneIn Radio
Deezer
TIDAL
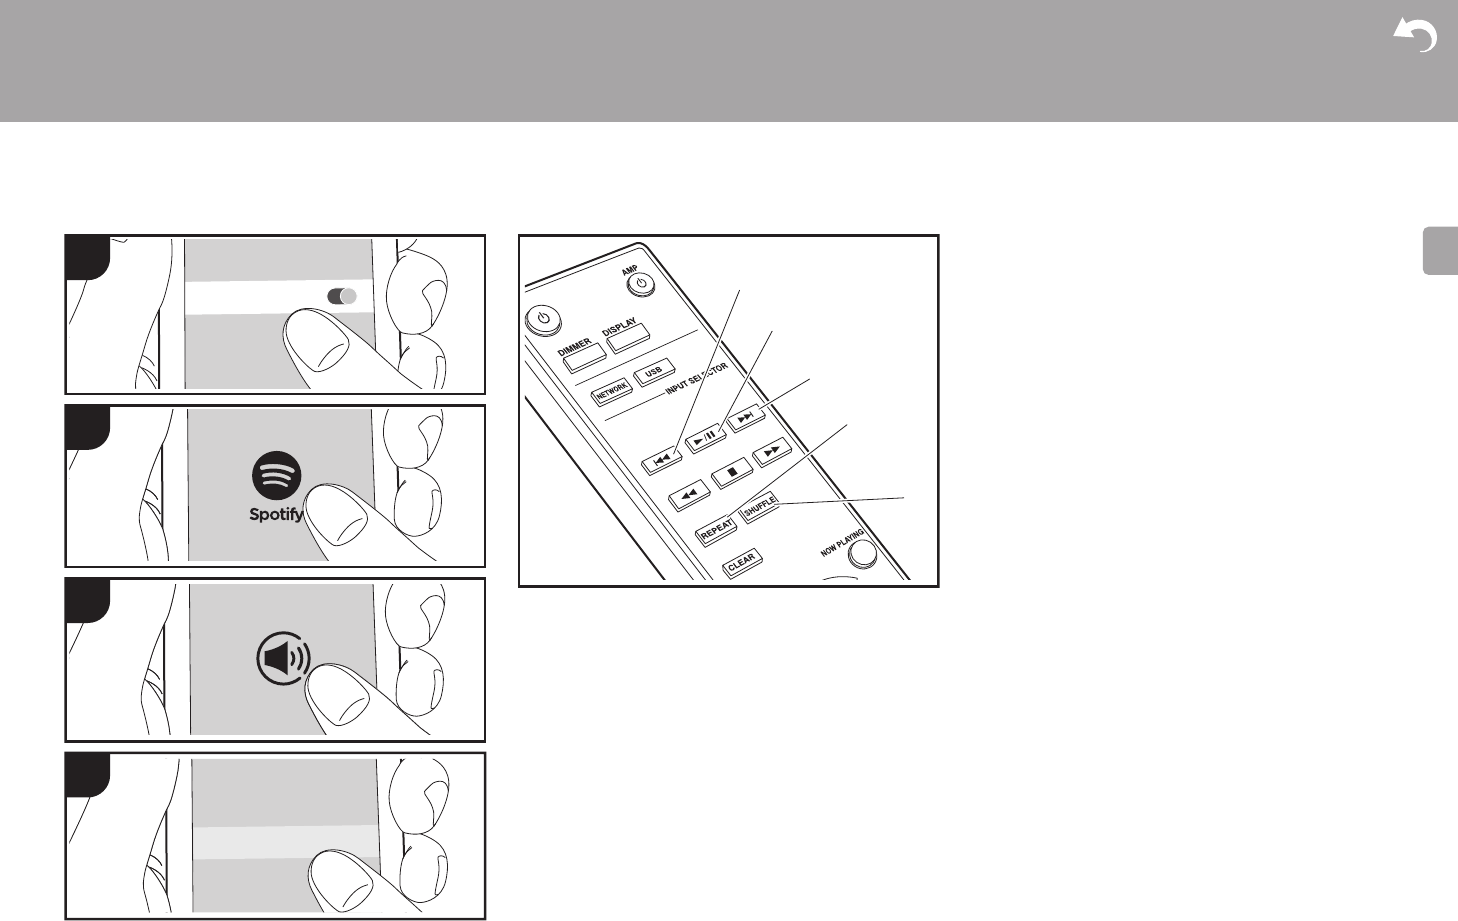
15
> Avant de Démarrer > Nom des pièces > Installation > Initial Setup >Lecture
Configuration avancée |Mise à jour du micrologiciel | Autres
F
R
Spotify
Wi-Fi
Onkyo NS-6130 xxxxxx
b
a
c
d
e
1
4
3
2
Fonctionnement de base
La lecture Spotify Connect est possible en connectant cet
appareil au même réseau qu’un smartphone ou une
tablette. Pour utiliser Spotify Connect, vous devez installer
l'appli Spotify sur votre smartphone ou votre tablette et
créer un compte Spotify Premium.
1. Connectez le smartphone au réseau auquel cet appareil
est connecté.
2. Cliquez sur l'icône Connect sur l'écran de lecture de la
piste de l'appli Spotify.
3. Sélectionnez cet appareil.
0Cet appareil s'affiche sous le nom "Onkyo NS-6130
XXXXXX".
4. Cet appareil s’allume automatiquement, le sélecteur
d’entrée passe automatiquement sur NET et la diffusion
en flux de Spotify démarre.
0Si "Option" - "PWR Setting" - "NET Stby" est réglé sur
"Off" dans le menu de configuration, mettez
manuellement en marche l’appareil et appuyez sur la
touche NETWORK de la télécommande.
0Consultez ce qui suit pour configurer Spotify :
www.spotify.com/connect/
Le logiciel Spotify est soumis à des licences de tiers que
vous trouverez ici :
www.spotify.com/connect/third-party-licenses
Les actions suivantes avec la télécommande sont
également possibles.
(a) Cette touche permet de lancer la lecture de la piste
précédente.
(b) Pressée durant la lecture, cette touche permet de mettre
en pause la lecture. Pressée durant la pause, elle
reprend la lecture.
(c) Cette touche permet de lancer la lecture de la piste
suivante.
(d) Permet de lancer la répétition de lecture.
(e) Permet de lancer la lecture aléatoire.

16
> Avant de Démarrer > Nom des pièces > Installation > Initial Setup >Lecture
Configuration avancée |Mise à jour du micrologiciel | Autres
F
R
AirPlay®
Wi-Fi
Onkyo NS-6130x
iPhone
1 3
2
4
Fonctionnement de base
Vous pouvez profiter à distance des fichiers musicaux
présents sur un iPhone®, iPod touch®, ou un iPad®
connecté au même point d'accès que cet appareil. Mettez à
jour la version OS de votre périphérique iOS.
1. Mettez en marche l'appareil.
2. Connectez le périphérique iOS au même réseau que
celui de cet appareil.
3. Touchez l'icône AirPlay présente dans le centre de
contrôle du dispositif iOS et sélectionnez cet appareil
dans la liste des dispositifs affichée, puis touchez
"Done".
0Cet appareil s'affiche sous le nom "Onkyo NS-6130
XXXXXX".
0Si un "AirPlay PW" a été défini sur cet appareil,
saisissez le mot de passe défini.
4. Lisez les fichiers musicaux sur le dispositif iOS.
0Dans le menu configuration affiché en appuyant sur la
touche SETUP de la télécommande, lorsque "Option" -
"PWR Setting" - "NET Stby" est sur "On", et que la
lecture d’AirPlay démarre, cet appareil se met
automatiquement en marche et la lecture démarre.
0À cause des caractéristiques de la technologie sans fil
AirPlay, le son produit par cet appareil peut être
légèrement en retard par rapport au son lu par le
périphérique compatible AirPlay.
0La touche SHUFFLE ou REPEAT de la télécommande
ne fonctionne pas. Utilisez le périphérique iOS.
Vous pouvez également lire les fichiers musicaux sur
l’ordinateur avec iTunes (Ver. 10.2.2 ou ultérieure). Vérifiez
que cet appareil et l’ordinateur sont connectés au même
réseau, cliquez sur l’icône AirPlay dans iTunes,
sélectionnez cet appareil dans la liste des périphériques
affichée et démarrez la lecture d’un fichier musical.
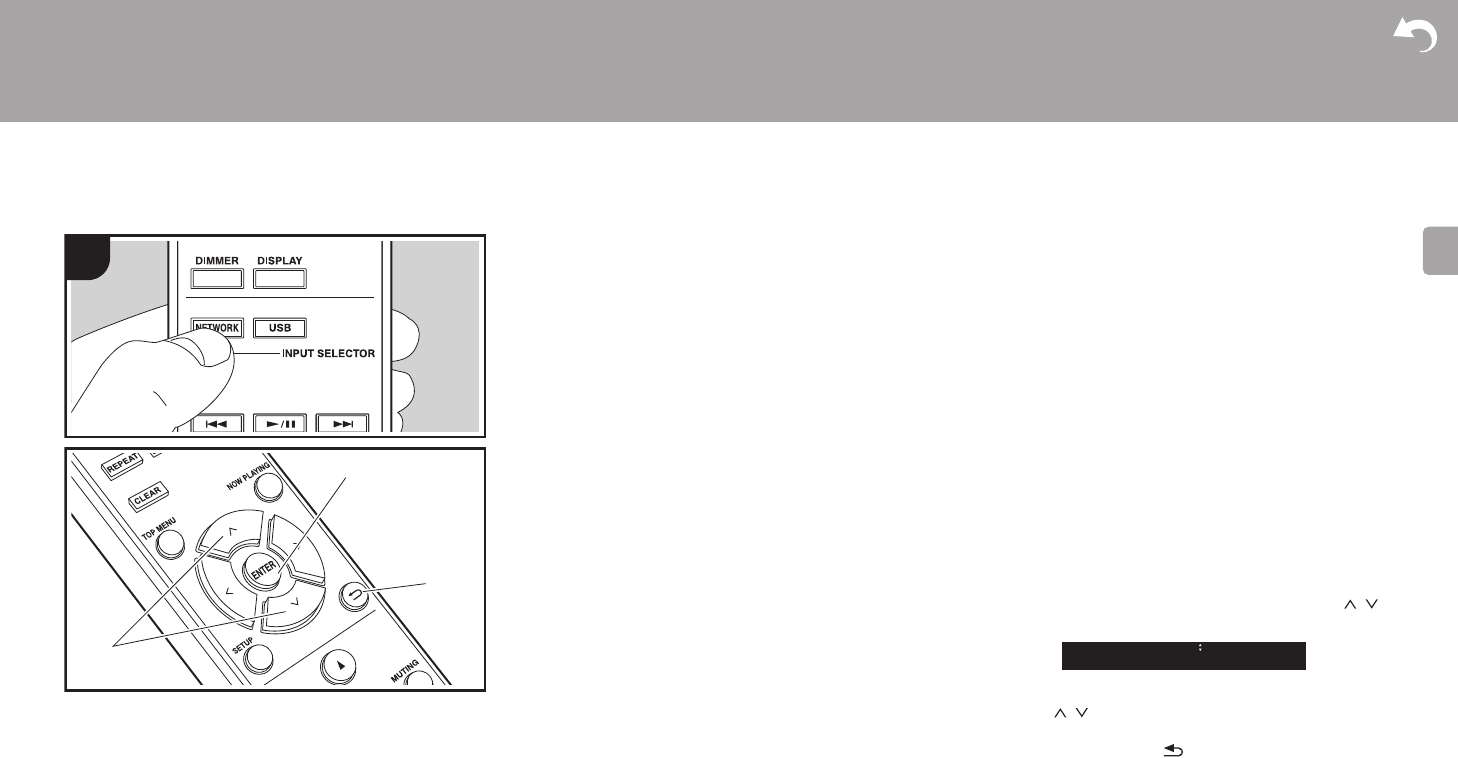
17
> Avant de Démarrer > Nom des pièces > Installation > Initial Setup >Lecture
Configuration avancée |Mise à jour du micrologiciel | Autres
F
R
Music Server
Il est possible de diffuser en flux des fichiers de musique
présents sur les ordinateurs ou dispositifs NAS connectés
au même réseau que cet appareil. Le serveur réseau de cet
appareil est compatible avec les ordinateurs ayant la
fonctionnalité serveur de Windows Media® Player 11 ou 12
installée, ou les NAS compatibles avec la fonctionnalité
réseau domestique. Vous devez effectuer certains réglages
au préalable pour utiliser Windows Media® Player 11 ou 12.
Notez que seuls les fichiers de musique enregistrés dans la
bibliothèque de Windows Media® Player peuvent être lus.
Configuration de Windows Media® Player
∫Windows Media® Player 11
1. Mettez en marche votre PC et lancez Windows Media®
Player 11.
2. Dans le menu "Library", sélectionnez "Media Sharing"
pour afficher une boîte de dialogue.
3. Sélectionnez la case à cocher "Share my media", puis
cliquez sur "OK" pour afficher les périphériques
compatibles.
4. Sélectionnez cet appareil, puis cliquez sur "Allow".
0Lorsque vous cliquez dessus, l'icône correspondante
est cochée.
5. Cliquez sur "OK" pour fermer la boîte de dialogue.
0En fonction de la version de Windows Media® Player, il
peut y avoir des différences de nom avec les éléments
que vous sélectionnez.
∫Windows Media® Player 12
1. Mettez en marche votre PC et lancez Windows Media®
Player 12.
2. Dans le menu "Stream", sélectionnez "Turn on media
streaming" pour afficher une boîte de dialogue.
0Si la diffusion multimédia en continu est déjà activée,
sélectionnez "More streaming options... " dans le menu
"Stream" pour afficher la liste de lecteurs réseau, puis
passez à l’étape 4.
3. Cliquez sur "Turn on media streaming" pour afficher une
liste de lecteurs dans le réseau.
4. Sélectionnez cet appareil dans "Media streaming
options" et vérifiez qu’il est réglé sur "Allow".
5. Cliquez sur "OK" pour fermer la boîte de dialogue.
0En fonction de la version de Windows Media® Player, il
peut y avoir des différences de nom avec les éléments
que vous sélectionnez.
Lire
1. Mettez en marche l'appareil.
2. Démarrez le serveur (Windows Media® Player 11,
Windows Media® Player 12, ou le périphérique NAS)
contenant les fichiers musicaux à lire.
3. Assurez-vous que les ordinateurs et/ou les NAS sont
correctement connectés au même réseau que cet
appareil.
4. Appuyez sur NETWORK.
5. Sélectionnez "Music Server" à l'aide des touches /
(a) de la télécommande et appuyez sur ENTER (b).
6. Sélectionnez le serveur et le fichier musical à l'aide des
touches / (a) de la télécommande et appuyez sur
ENTER (b) pour valider. Pour revenir sur l’affichage
précédent, appuyez sur (c).
0Si "Connection Error." s’affiche, vérifiez si le réseau est
connecté correctement.
0En fonction du serveur utilisé et des fichiers lus, le temps
de lecture écoulé et le temps restant peuvent ne pas
s'afficher.
0Pour les fichiers de musique sur un serveur, il peut y
avoir jusqu'à 20.000 pistes par dossier, et les dossiers
peuvent être imbriqués jusqu'à 16 niveaux de
profondeur.
1
a
b
c
Music Server
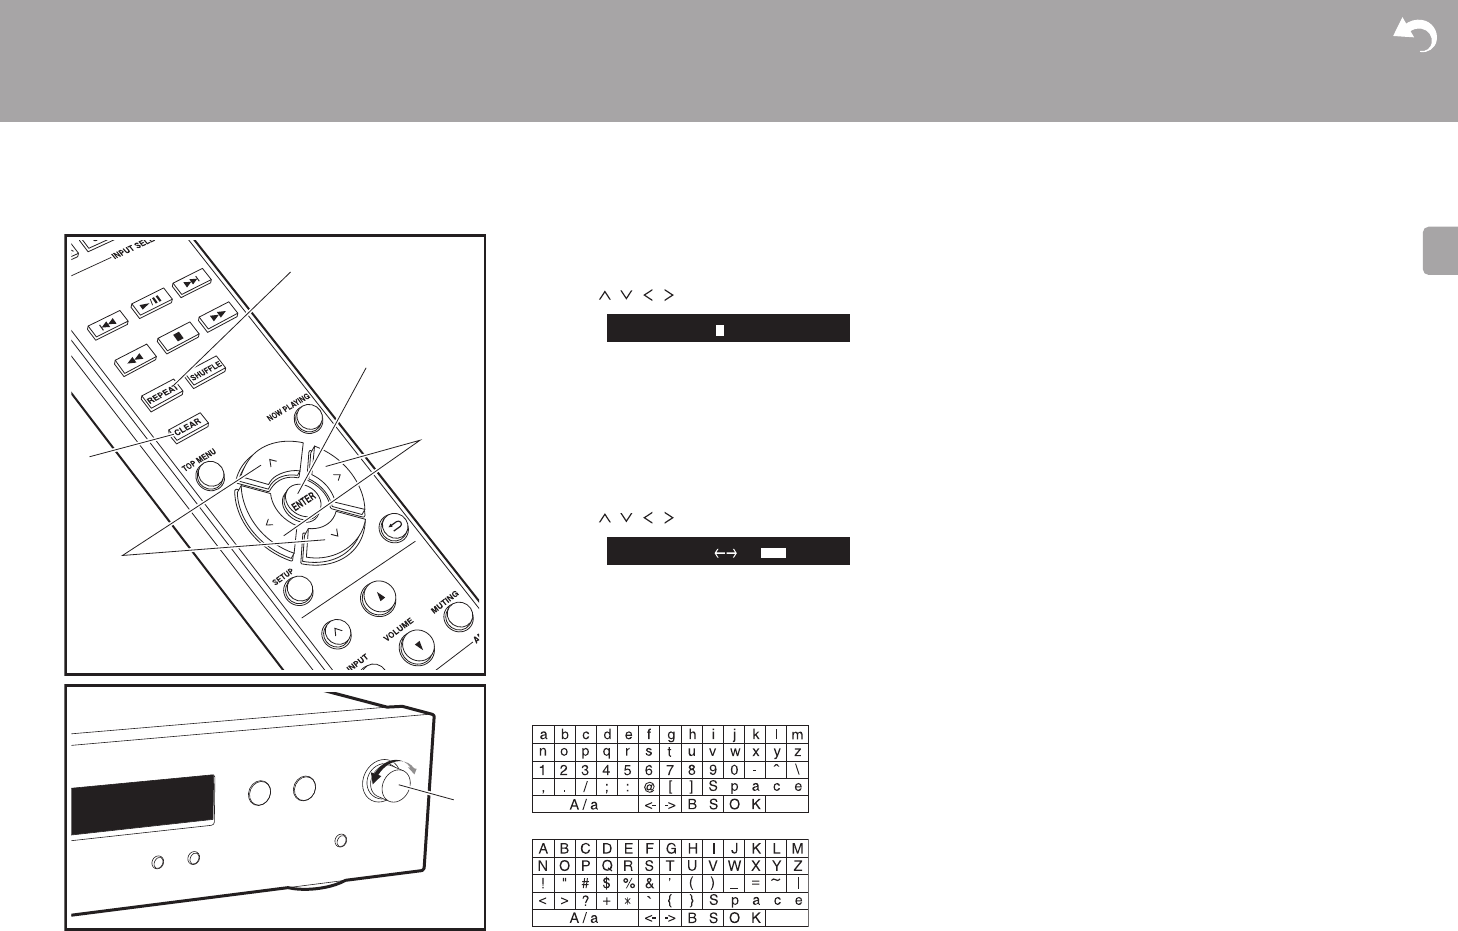
19
> Avant de Démarrer > Nom des pièces > Installation > Initial Setup >Lecture
Configuration avancée |Mise à jour du micrologiciel | Autres
F
R
Saisie du texte
La saisie de texte, pour les mots de passe, etc. s'effectue
de la manière suivante.
1. Sélectionnez les caractères ou les symboles à l'aide des
touches / / / (b).
2. Appuyez sur ENTER (d) pour valider le caractère
sélectionné. Répétez ceci pour saisir le texte.
0Appuyez sur REPEAT (c) pour changer les caractères
à saisir, par exemple pour basculer entre les
minuscules et les majuscules.
0Appuyez sur CLEAR (a) pour supprimer tous les
caractères saisis.
3. À la fin de la saisie, sélectionnez "OK" à l'aide des
touches / / / (b) et appuyez sur ENTER
(d)
.
0Tournez MENU/ENTER (e) sur l'appareil principal vers la
gauche et la droite pour sélectionner l'élément, puis
appuyez sur la molette pour valider.
Caractères pouvant être saisis
Espace : Permet de saisir une espace de la taille d'un
caractère.
A/a : Permet de modifier la casse des caractères affichés.
(a A)
(gauche) / (droite) : À sélectionner pour déplacer le
curseur.
BS (retour arrière) : Supprime un caractère à gauche du
curseur. Permet de déplacer le curseur vers la gauche.
OK : Permet de valider le contenu saisi.
e
a
b
d
b
c
abcdefghij
A
/
a B
S
O
K
á
Á
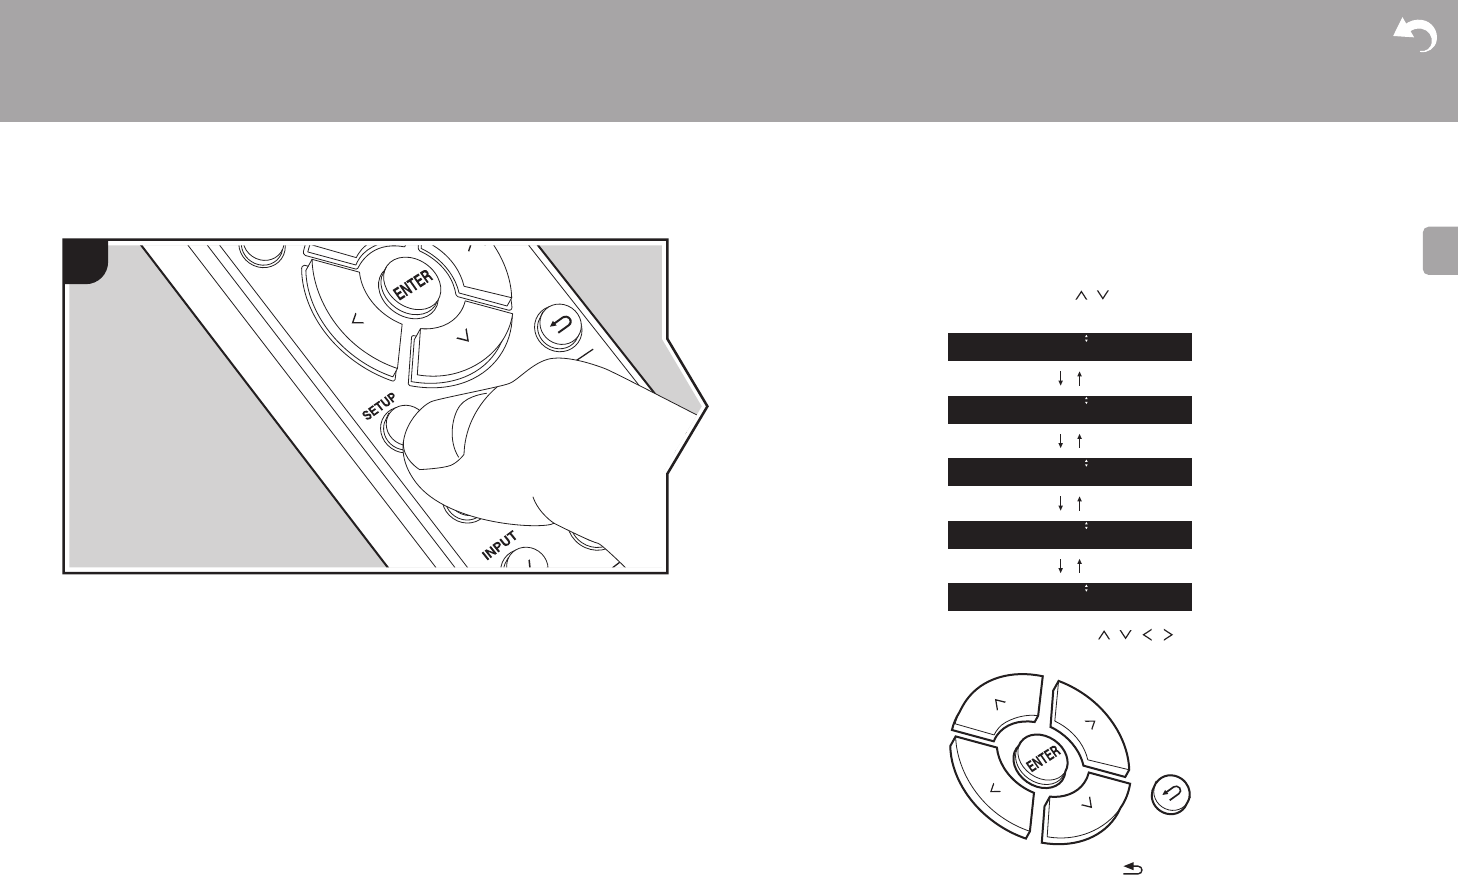
20
> Avant de Démarrer > Nom des pièces > Installation > Initial Setup > Lecture
Configuration avancée |Mise à jour du micrologiciel | Autres
F
R
Configuration avancée
Configuration avancée
L'appareil vous permet de configurer les paramètres avancés pour qu'ils vous fournissent
une expérience encore meilleure.
1. Appuyez sur SETUP sur la télécommande.
2. Sélectionnez l'élément à l'aide des touches / de la télécommande et appuyez sur
ENTER pour valider.
3. Sélectionnez les réglages à l'aide des touches / / / de la télécommande et
appuyez sur ENTER pour valider.
0Pour revenir sur l'écran précédent, appuyez sur .
4. Pour quitter les réglages, appuyez sur SETUP.
Network
∫Connection
1
Update
Factory Reset
System Info
Option
Network

> Avant de Démarrer > Nom des pièces > Installation > Initial Setup > Lecture
Configuration avancée |Mise à jour du micrologiciel | Autres
21
F
R
Sélectionnez le type de connexion au réseau.
Sélectionnez l'élément à l'aide des touches / de la télécommande et appuyez sur
ENTER.
"Wi-Fi" : pour une connexion LAN sans fil
"Wired" (Valeur par défaut) : Pour une connexion LAN filaire
Effectuez "Wi-Fi Setup" si vous sélectionnez "Wi-Fi".
∫Wi-Fi Setup
Effectuez les réglages de la connexion Wi-Fi. (P10)
Ce réglage peut être effectué uniquement lorsque "Wi-Fi" est sélectionné dans
"Connection".
0Vous pouvez effectuer le réglage des paramètres de connexion Wi-Fi à l’aide d’un
navigateur web sur un ordinateur. Pour plus de détails, voir "Web Setup" (P22).
∫DHCP
Sélectionnez l'élément à l'aide des touches / de la télécommande et appuyez sur
ENTER.
"On" (Valeur par défaut) : Configuration automatique via le protocole DHCP
"Off" : Configuration manuelle sans protocole DHCP
En sélectionnant "Off", vous devez régler manuellement "IP Address", "Subnet Mask",
"Gateway", et "DNS".
∫IP Address
Affiche/Définit l'adresse IP.
∫Subnet Mask
Affiche/Définit le masque de sous-réseau.
∫Gateway
Affiche/Définit la passerelle.
∫DNS
Affiche/Définit le serveur DNS primaire.
∫Proxy URL
Affiche/Définit l'URL du serveur proxy.
∫Proxy Port
Affiche/Définit le numéro de port du serveur proxy quand vous saisissez "Proxy URL".
∫Friendly Name
Changez le nom de périphérique de cet appareil qui apparait sur les autres périphériques
connectés au réseau pour un nom facilement reconnaissable. Vous pouvez saisir jusqu'à 31
caractères. Pour plus de détails sur la saisie de texte, voir "Saisie du texte" (P19).
∫AirPlay PW
Vous pouvez saisir un mot de passe pouvant avoir jusqu'à 31 caractères pour que seuls les
utilisateurs mémorisés puissent utiliser AirPlay. Pour plus de détails sur la saisie de texte,
voir "Saisie du texte" (P19).
∫Network Check
Vous pouvez vérifier la connexion réseau. Les résultats de la validation s'affichent lorsque
vous appuyez sur ENTER.
Option
∫PWR Setting
Auto Standby Ce réglage met automatiquement l’appareil en veille après 20
minutes d’inactivité sans aucune entrée audio.
"On" (Valeur par défaut) : L’appareil passera automatiquement
en mode veille.
"Off" : L’appareil ne passe pas automatiquement en mode veille.
NET Stby Lorsque cette fonctionnalité est mise sur "On", vous pouvez
mettre sous tension l'appareil via le réseau en utilisant une
application qui peut commander cet appareil.
Sélectionnez l'élément à l'aide des touches / de la
télécommande et appuyez sur ENTER.
0Le réglage sur "On" (Valeur par défaut) augmente la
consommation d'énergie même lorsque l'appareil est en mode
veille.
0"NET Stby", qui réprime la consommation d’énergie, peut se
désactiver lorsque la connexion réseau est perdue.

22
> Avant de Démarrer > Nom des pièces > Installation > Initial Setup > Lecture
Configuration avancée |Mise à jour du micrologiciel | Autres
F
R
∫Dig Filter
Sélectionnez l'élément à l'aide des touches / de la télécommande et appuyez sur
ENTER.
"SHARP" (Valeur par défaut): Son ayant davantage de structure et de fermeté
"SHORT" : Son qui démarre rapidement et donne l'impression d'un déplacement vers l'avant
"SLOW" : son doux et fluide
∫Digital Out
Effectuez les réglages pour la sortie audio numérique.
Sélectionnez l'élément à l'aide des touches / de la télécommande et appuyez sur
ENTER.
"On" (Valeur par défaut), "Off"
System Info
L'adresse MAC de cet appareil et la version actuelle du micrologiciel s'affichent.
Sélectionnez "MAC address" ou "Firmware" à l'aide des touches / de la télécommande.
Factory Reset
Réinitialisez les réglages de cet appareil pour le remettre dans l'état où il était au moment de
son achat. Nous vous conseillons de prendre note des réglages modifiés avant de procéder
à la réinitialisation aux réglages d'usine.
Pour réinitialiser, sélectionnez "Reset Start" à l'aide des touches / de la télécommande
et appuyez sur ENTER. Appuyez une nouvelle fois sur ENTER pour démarrer la
réinitialisation. L'appareil se met automatiquement en veille une fois l'initialisation terminée.
Update
"Update" ne s'affiche pas si aucune mise à jour du micrologiciel n'est disponible.
∫via Network
Appuyez sur ENTER pour sélectionner lorsque vous désirez mettre à jour le micrologiciel via
le réseau.
∫via USB
Appuyez sur ENTER pour sélectionner lorsque vous désirez mettre à jour le micrologiciel via
USB.
Web Setup
Vous pouvez effectuer le réglage des paramètres de connexion Wi-Fi à l’aide d’un
navigateur web sur un ordinateur. Veillez à ce que votre ordinateur soit connecté à distance
au routeur.
Si cet appareil est connecté au routeur à l’aide d’un câble Ethernet, vous ne pouvez pas
effectuer ce réglage.
1. Mettez en marche l'appareil.
2. Appuyez sur la touche SETUP de la télécommande, sélectionnez "Wi-Fi" dans "Network"
- "Connection", puis sélectionnez "Wi-Fi Setup".
3. Appuyez sur / pour sélectionner "iOS device" et appuyez sur ENTER.
4. Dans la liste des connexions LAN sans fil figurant sur votre ordinateur, sélectionnez le
SSID de cet appareil (softap_0009B0xxxxxx).
0"xxxxxx" dans le SSID correspond aux trois bits inférieurs de l’adresse MAC.
5. Ouvrez le navigateur web sur votre ordinateur et accédez à l’adresse http://
192.168.200.1.
6. Le menu "Web Setup" s’affiche. Effectuez les nombreux réglages de cet appareil.
0En fonction de l’équipement utilisé ou de l’environnement de connexion, cette fonction
peut ne pas fonctionner.
0Consultez les bonnes instructions d’exploitation pour obtenir des informations sur
l’utilisation de l’ordinateur.
0Étant donné que ce type de connexion n’est pas encodé, un risque de sécurité mineur
peut exister.

23
> Avant de Démarrer > Nom des pièces > Installation > Initial Setup > Lecture
Configuration avancée |Mise à jour du micrologiciel |Autres
F
R
Mise à jour du micrologiciel
Mise à jour du micrologiciel
La fonction de mise à jour de cet appareil
Cet appareil possède une fonctionnalité qui permet la mise
à jour du micrologiciel (logiciel du système) via le réseau ou
le port USB. Ceci nous permet de pouvoir effectuer des
améliorations d’une variété de commandes et d’ajouter des
fonctionnalités.
Pour avoir plus de détails sur les fonctionnalités de lecture
mises à jour, voir ici.
Comment mettre à jour
Il y a deux méthodes de mise à jour du micrologiciel : via
réseau et via USB. La mise à jour peut prendre environ 5
minutes pour s'effectuer avec l'une ou l'autre des méthodes
: Via réseau ou via USB. De plus, les paramètres actuels
sont garantis, quelle que soit la méthode utilisée pour la
mise à jour.
0Pour connaître les dernières informations sur les mises à
jour, visitez le site internet de notre société. Il n'est pas
nécessaire de mettre à jour le micrologiciel de cet
appareil s'il n'y a aucune mise à jour disponible.
0Si la mise à jour est effectuée en ligne, elle peut
nécessiter plus de temps en fonction de l'état de la
connexion.
0Lors d'une mise à jour, ne pas
– Débranchez et rebranchez un câble ou un
périphérique de stockage USB ou bien effectuez
n'importe quelle action sur le composant comme par
exemple l'éteindre.
– Accès à cet appareil à partir d'un ordinateur ou d'un
smartphone à l'aide d'une application
Avertissement : Le programme et la documentation en
ligne qui l'accompagne vous sont fournis pour une
utilisation à vos propres risques.
Nous ne serons pas tenu responsable et vous n'aurez
aucun recours en dommages et intérêts pour toute
réclamation de quelque nature que ce soit concernant votre
utilisation du programme ou la documentation en ligne qui
l'accompagne, quelle que soit la théorie juridique et si
délictuelle ou contractuelle.
En aucun cas, Nous ne sommes responsables envers vous
ou un tiers pour tous dommages spéciaux, indirects,
accessoires ou consécutifs de toute nature, y compris, mais
sans s'y limiter, à la compensation, le remboursement ou
des dommages et intérêts en raison de la perte de profits,
présents ou futurs, perte de données, ou pour toute autre
raison que ce soit.
Mise à jour du micrologiciel via le réseau
0Vérifiez que l'appareil est en marche et que la connexion
à Internet fonctionne.
0Éteignez le composant du contrôleur (PC, etc.) connecté
au réseau.
0Arrêtez la lecture de la webradio, un périphérique de
stockage USB, ou le contenu d'un serveur.
1. "Network" apparait sur l'afficheur lorsque vous appuyez
sur la touche SETUP de la télécommande.
2. Appuyez sur / et ENTER pour sélectionner "Update"
- "via Network" dans l'ordre indiqué.
0"Update" ne s'affiche pas si aucune mise à jour du
micrologiciel n'est disponible.
3. Appuyez sur ENTER pour démarrer la mise à jour du
micrologiciel.
0"Completed" s'affiche lorsque la mise à jour est
terminée.
4. Appuyez sur la touche ÍON/STANDBY de l'appareil
principal pour passer l'appareil en mode veille. Le
processus est terminé et votre micrologiciel est mis à jour
à la dernière version.
Si un message d'erreur s'affiche :Lorsqu'une erreur se
produit, " *-** Error!" apparait sur l'afficheur de cet
appareil. (" *" représente un caractère alphanumérique.)
Vérifiez les points suivants :
0*-01, *-10 : Câble Ethernet introuvable. Raccordez le
câble Ethernet correctement.
0*-02, *-03, *-04, *-05, *-06, *-11, *-13, *-14, *-
16, *-17, *-18, *-20, *-21 : Erreur de connexion
Internet. Vérifiez les points suivants :
– Le routeur est activé
Network
Update

24
> Avant de Démarrer > Nom des pièces > Installation > Initial Setup > Lecture
Configuration avancée |Mise à jour du micrologiciel |Autres
F
R
– Cet appareil et le routeur sont connectés via le réseau
Essayez de débrancher puis connectez de nouveau
l'alimentation de l’appareil et du routeur. Ceci permet de
résoudre le problème. Si vous ne parvenez toujours pas
à vous connecter à Internet, le serveur DNS ou le
serveur proxy peuvent être temporairement
indisponibles. Vérifiez l'état du service avec votre
fournisseur d'accès à internet.
0Autres : Débranchez puis rebranchez le cordon
d'alimentation secteur, puis répétez depuis le début.
Mise à jour via USB
0Préparez un périphérique de stockage USB de 128 Mo
ou plus. Format de système de fichiers FAT16 ou FAT32.
0Supprimez toutes les données enregistrées sur le
périphérique de stockage USB.
0Éteignez le composant du contrôleur (PC, etc.) connecté
au réseau.
0Arrêtez la lecture de la webradio, un périphérique de
stockage USB, ou le contenu d'un serveur.
0Certains périphériques de stockage USB peuvent
prendre du temps à charger, risquent de ne pas être
chargés correctement, ou peuvent ne pas être
correctement alimentés en fonction du périphérique ou
de son contenu.
0Nous ne pourrons être tenus responsables des pertes ou
de l’endommagement des données, ou des défaillances
de stockage causées par l'utilisation d'un périphérique de
stockage USB avec cet appareil. Nous vous remercions
de votre compréhension.
1. Connectez le périphérique de stockage USB à votre PC.
2. Téléchargez le fichier du micrologiciel sur votre
ordinateur depuis le site Web de notre société et
décompressez-le.
Les fichiers du micrologiciel sont nommés de la manière
suivante :
ONKNAP **** _************** _*** .zip
Décompressez le fichier sur votre PC. Le nombre de
fichiers et de dossiers décompressés varie en fonction
du modèle.
3. Copiez tous les fichiers et dossiers décompressés dans
le dossier racine du périphérique de stockage USB.
0Assurez-vous de copier les fichiers décompressés.
4. Branchez le périphérique de stockage USB au port USB
de cet appareil.
0Si vous connectez un disque dur USB au port USB de
l'appareil, nous vous recommandons d'utiliser son
adaptateur secteur pour l'alimenter.
0Si le périphérique de stockage USB a été partitionné,
chaque section sera considérée comme étant un
périphérique indépendant.
5. "Network" apparait sur l'afficheur lorsque vous appuyez
sur la touche SETUP de la télécommande.
6. Appuyez sur / et ENTER pour sélectionner "Update"
- "via USB" dans l'ordre indiqué.
0"Update" ne s'affiche pas si aucune mise à jour du
micrologiciel n'est disponible.
7. Appuyez sur ENTER pour démarrer la mise à jour du
micrologiciel.
0"Completed" s'affiche lorsque la mise à jour est
terminée.
8. Appuyez sur la touche ÍON/STANDBY de l'appareil
principal pour passer l'appareil en mode veille. Le
processus est terminé et votre micrologiciel est mis à jour
à la dernière version.
9. Retirez le périphérique de stockage USB de cet appareil.
Si un message d'erreur s'affiche : Lorsqu'une erreur se
produit, " *-** Error!" apparait sur l'afficheur de cet
appareil. Vérifiez les points suivants :
0*-01, *-10 : Périphérique de stockage USB
introuvable. Vérifiez si le périphérique de stockage USB
ou si le câble USB est correctement inséré dans le port
USB de cet appareil.
Branchez le périphérique de stockage USB à une source
d'alimentation externe s'il dispose de sa propre
alimentation.
0*-05, *-13, *-20, *-21 : Le fichier du micrologiciel
n'est pas présent dans le dossier racine du périphérique
de stockage USB, ou le fichier du micrologiciel est
destiné à un autre modèle. Essayez à nouveau à partir
du téléchargement du fichier du micrologiciel.
0Autres : Débranchez puis rebranchez le cordon
d'alimentation secteur, puis répétez depuis le début.
Network
Update

25
> Avant de Démarrer > Nom des pièces > Installation > Initial Setup > Lecture
Configuration avancée |Mise à jour du micrologiciel | Autres
F
R
Dépannage
Autres
Avant de démarrer la procédure
Lorsque le fonctionnement est instable, les problèmes
peuvent être résolus simplement en mettant l'appareil sous
tension ou en veille, ou en débranchant/rebranchant le
cordon d'alimentation, plutôt qu'en passant en revue les
réglages et les opérations. Essayez d'effectuer les mesures
les plus simples à la fois sur l'appareil et sur le périphérique
connecté. Si la consultation de "Dépannage" ne résout pas
le problème, réinitialiser l'appareil dans l'état dans lequel il
était au moment de l'achat peut le résoudre. Veuillez noter
que vos réglages seront également initialisés lorsque vous
réinitialiserez l'appareil ; nous vous recommandons par
conséquent de noter vos réglages avant de commencer la
procédure suivante.
Réinitialisation de l'appareil (ceci réinitialise les
paramètres de cet appareil sur leur valeur par
défaut)
1. Appuyez sur la touche SETUP de la télécommande,
sélectionnez "Factory Reset" - "Reset Start" sur l'écran
Setup et appuyez sur ENTER.
2. Appuyez sur ENTER.
3. L'appareil se met en veille et les réglages sont
réinitialisés.
Alimentation
Impossible d'allumer cet appareil
0Débranchez le cordon d'alimentation de la prise murale,
attendez 5 secondes ou plus, puis rebranchez-le une
nouvelle fois.
L'appareil s'éteint de manière inattendue
0L'appareil passe automatiquement en mode veille
lorsque le paramètre "Option" - "PWR Setting" - "Auto
Standby" dans les fonctions du menu Setup est actif.
L'afficheur ne s'allume pas
0L'afficheur peut s'assombrir pendant que le DIMMER
fonctionne, et il peut également s'éteindre. Appuyez sur
la touche DIMMER et modifiez le niveau de luminosité de
l'afficheur.
Connexion Wi-Fi
0Essayez de brancher/débrancher l'alimentation du
routeur LAN sans fil et de l’appareil, vérifiez l'état de mise
sous tension du routeur LAN sans fil et essayez de
redémarrer le routeur LAN sans fil.
Impossible de se connecter au point d'accès.
0Vérifiez si le réglage du SSID et le cryptage (WEP, etc.)
sont corrects. Assurez-vous que les paramètres réseau
de l’appareil soient correctement configurés.
0La connexion à un SSID qui comprend des caractères
multi-bytes n’est pas pris en charge. Nommez le SSID du
routeur LAN sans fil à l'aide de caractères
alphanumériques à un octet uniquement et essayez à
nouveau.
0Lorsque le routeur LAN sans fil est réglé en mode furtif
(mode pour masquer la clé SSID) ou lorsque
N'IMPORTE QUELLE connexion est désactivée, le SSID
ne s'affiche pas. Changez les paramètres et réessayez.
Connecté à un SSID différent du SSID sélectionné
0Certains point d'accès vous permettent de définir
plusieurs SSID pour un seul appareil. Si vous utilisez la
touche de réglage automatique sur ce genre de routeur,
vous pouvez finir par vous connecter à un SSID différent
du SSID que vous désiriez. Si cela arrive, utilisez la
méthode de connexion nécessitant la saisie d'un mot de
passe.
La lecture est interrompue et la communication ne
fonctionne pas
0Réduisez la distance avec le point d'accès ou retirez tout
obstacle pour améliorer la visibilité, et essayez de
nouveau. Placez l’appareil à l’écart des fours à micro-
ondes ou d’autres points d’accès.
Il est recommandé de placer le point d’accès et l’appareil
dans la même pièce.
0S’il y a un objet métallique à proximité de l’appareil, la
connexion LAN sans fil peut ne pas être possible du fait
que le métal peut avoir des effets sur les ondes radio.
0Lorsque d’autres point d'accès sont utilisés à proximité
de l’appareil, plusieurs problèmes tels que l’interruption
de la lecture et de la communication peuvent se produire.
Vous pouvez éviter ces problèmes en modifiant le canal
de votre point d'accès. Pour plus d’informations sur la
modification de canaux, reportez-vous au manuel
d’instructions fourni avec le point s'accès.
Impossible de lire un périphérique de
stockage USB/DD
0Vérifiez si le périphérique de stockage USB ou si le câble
USB est correctement inséré dans le port USB de
l'appareil.
0Débranchez le périphérique de stockage USB de
l’appareil, puis essayez de le rebrancher.
0Il peut arriver que cet appareil ne reconnaisse pas les
périphériques de stockage USB et les HDD comme
dispositifs adaptés. Essayez de mettre en veille cet
appareil, puis de le remettre en marche.
0Selon le type de format, la lecture peut ne pas s’effectuer
normalement. Vérifiez les formats de fichiers pris en
charge. (P13)
0Précautions concernant les périphériques USB et DD
(P13)
Fonction réseau
0Si vous ne pouvez pas sélectionner de service réseau, il

26
> Avant de Démarrer > Nom des pièces > Installation > Initial Setup > Lecture
Configuration avancée |Mise à jour du micrologiciel | Autres
F
R
deviendra sélectionnable lorsque la fonction réseau sera
lancée.
0Essayez de brancher/débrancher la prise électrique de
cet appareil et du routeur, et essayez de redémarrer le
routeur.
Impossible d'accéder à la webradio
0Certains services de réseau ou de contenus accessibles
à partir de l’appareil risquent de ne pas être accessibles
au cas où le fournisseur de services interrompt son
service.
0Assurez-vous que votre modem et routeur soient
correctement connectés, et assurez-vous qu’ils soient
tous les deux allumés.
0En fonction du FAI, le réglage du serveur proxy est
nécessaire.
0Assurez-vous que le routeur utilisé et/ou le modem est
bien pris en charge par votre FAI.
Impossible d'accéder au serveur de réseau
0Cet appareil doit être connecté au même routeur que le
serveur réseau.
0Cet appareil est compatible avec Windows Media®
Player 11 ou 12, les serveurs réseau ou les NAS
compatibles avec la fonctionnalité réseau domestique.
De plus, en utilisant un ordinateur, seuls les fichiers
musicaux mémorisés dans la bibliothèque de Windows
Media Player peuvent être lus.
La lecture s'arrête pendant que vous écoutez des
fichiers de musique sur le réseau du serveur
0Lorsque l'ordinateur est utilisé comme serveur réseau,
essayez de quitter tout programme autre que le logiciel
du serveur (Windows Media® Player 12, etc.).
0Si le PC télécharge ou copie des fichiers volumineux, il
se peut que la lecture soit interrompue.
Les noms des albums et des artistes de Music Server
ne sont pas affichés
0Les métadonnées, telles que les noms des albums et des
artistes, doivent être reconnues sur le serveur pour
pouvoir être distribuées vers cet appareil ; cela dépend
des spécifications du périphérique NAS ou du serveur
que vous utilisez.
0Les formats de fichiers pris en charge dépendent du
logiciel du serveur ou du NAS. Pour plus de détails,
contactez le fabricant du logiciel du serveur ou du NAS.

27
> Avant de Démarrer > Nom des pièces > Installation > Initial Setup > Lecture
Configuration avancée |Mise à jour du micrologiciel | Autres
F
R
Caractéristiques générales
Section audio
Niveau de sortie RCA nominale et impédance
02 Vrms (RCA OUT 1 kHz, 0 dBfs)/470 h
Réponse en fréquence
04Hz - 70kHz (-3 dB)
THD+N
00,002 % (1 kHz 0 dBfs/RCA OUT/30 kHz LPF)
Plage dynamique
0110 dB (24 bits)
Séparation canal
0100 dB (1 kHz/RCA OUT)
Rapport signalbruit
0110 dB (A-weighting/RCA OUT)
Partie réseau
Réseau LAN ETHERNET
010BASE-T/100BASE-TX
Réseau LAN sans fil
0Norme IEEE 802.11 a/b/g/n
0Bande 5 GHz/2,4 GHz
Prises de sortie
Sortie audio analogique
02 (L/R)
Sortie audio numérique
01 (COAXIAL)
Autres prises
USB
0Avant : 1
Version : USB 2.0
Courant fourni maximal : 0,5 A
0Arrière : 1
Version : USB 2.0
Courant fourni maximal : 1,0 A
RI : 2
Général
Alimentation
0CA 220 - 240 V, 50/60 Hz
Consommation d'énergie
022 W
00,2 W (en mode veille)
02,5 W (en mode veille, NET Stby : On)
Dimensions (L t H t P)
0435 mm t 100 mm t 318 mm
Poids
03,5 kg
28
> Avant de Démarrer > Nom des pièces > Installation > Initial Setup > Lecture
Configuration avancée |Mise à jour du micrologiciel | Autres
F
R
Licence et Marque commerciale
The Wi-Fi CERTIFIED Logo is a certification mark of Wi-Fi Alliance®.
AirPlay, iPad, iPhone, and iPod touch are trademarks of Apple Inc., registered in
the U.S. and other countries.
iPad Air and iPad mini are trademarks of Apple Inc.
“Made for iPod”, “Made for iPhone” and “Made for iPad” mean that an electronic
accessory has been designed to connect specifically to iPod, iPhone, or iPad,
respectively, and has been certified by the developer to meet Apple
performance standards. Apple is not responsible for the operation of this device
or its compliance with safety and regulatory standards.
Please note that the use of this accessory with iPod, iPhone or iPad may affect
wireless performance.
AirPlay works with iPhone, iPad, and iPod touch with iOS 4.3.3 or later, Mac
with OS X Mountain Lion or later, and PC with iTunes 10.2.2 or later.
Google Cast and the Google Cast badge are trademarks of Google inc.
This Mark Certifies that this product is compliant with the BLACKFIRE
ALLIANCE Standard.
Please refer to WWW.BLACKFIREALLIANCE.COM for more information.
BLACKFIRETM is a Registered Trademark (No. 85,900,599) of BLACKFIRE
RESEARCH CORP. All rights reserved.
FireConnectTM is technology powered by BlackFire Research.
The product with this logo is conformed to Hi-Res Audio standard defined by
Japan Audio Society. This logo is used under license from Japan Audio Society.
“VLSC” and “VLSC (logo)” are trademarks of Onkyo Corporation.
This product is protected by certain intellectual property rights of Microsoft. Use
or distribution of such technology outside of this product is prohibited without a
license from Microsoft.
Windows and the Windows logo are trademarks of the Microsoft group of
companies.
DSD and the Direct Stream Digital logo are trademarks of Sony Corporation.
MPEG Layer-3 audio coding technology licensed from Fraunhofer IIS and
Thomson.
“All other trademarks are the property of their respective owners.”
“Toutes les autres marques commerciales sont la propriété de leurs détenteurs
respectifs.”
“El resto de marcas comerciales son propiedad de sus respectivos
propietarios”.
“Tutti gli altri marchi di fabbrica sono di proprietà dei rispettivi proprietari.”
“Alle anderen Warenzeichen sind das Eigentum ihrer jeweiligen Eigentümer.”
“Alle andere handelsmerken zijn eigendom van de desbetreffende
rechthebbenden.”
“Alla andra varumärken tillhör deras respektive ägare”.
BLACKFIRE

F
R
<U.S.A.>
18 Park Way, Upper Saddle River, N.J. 07458, U.S.A.
For Dealer, Service, Order and all other Business Inquiries:
Tel: 201-785-2600 Fax: 201-785-2650
http://www.us.onkyo.com/
<Germany>
Gutenbergstrasse 3, 82178 Puchheim, Germany
Tel: +49-8142-4401-0 Fax: +49-8142-4208-213
http://www.eu.onkyo.com/
<UK>
Anteros Building, Odyssey Business Park, West End Road, South Ruislip, Middlesex,
HA4 6QQ United Kingdom
Tel: +44 (0)871-200-1996 Fax: +44 (0)871-200-1995
<Hong Kong>
Unit 1033, 10/F, Star House, No 3, Salisbury Road, Tsim Sha Tsui Kowloon, Hong Kong.
Tel: +852-2429-3118 Fax: +852-2428-9039
http://www.hk.onkyo.com/
<PRC>
302, Building 1, 20 North Chaling Rd., Xuhui District, Shanghai, China 200032,
Tel: +86-21-52131366 Fax: +86-21-52130396
http://www.cn.onkyo.com/
<Asia, Oceania, Middle East, Africa>
Please contact an Onkyo distributor referring to Onkyo SUPPORT site.
http://www.intl.onkyo.com/support/
The above-mentioned information is subject to change without prior notice.
Visit the Onkyo web site for the latest update.
For Product Support Team Only:
1-800-229-1687
http://www.us.onkyo.com/
2-3-12 Yaesu, Chuo-ku, Tokyo 104-0028 JAPAN
http://www.onkyo.com/
Корпорация О энд Пи
2-3-12, Яэсу, Чуо-ку, г. Токио, 104-0028, ЯПОНИЯ
F1609-0
SN 29402680
* 2 9 4 0 2 6 8 0 *
(C) Copyright 2016 Onkyo & Pioneer Corporation Japan. All rights reserved.
http://www.onkyo.com/privacy/
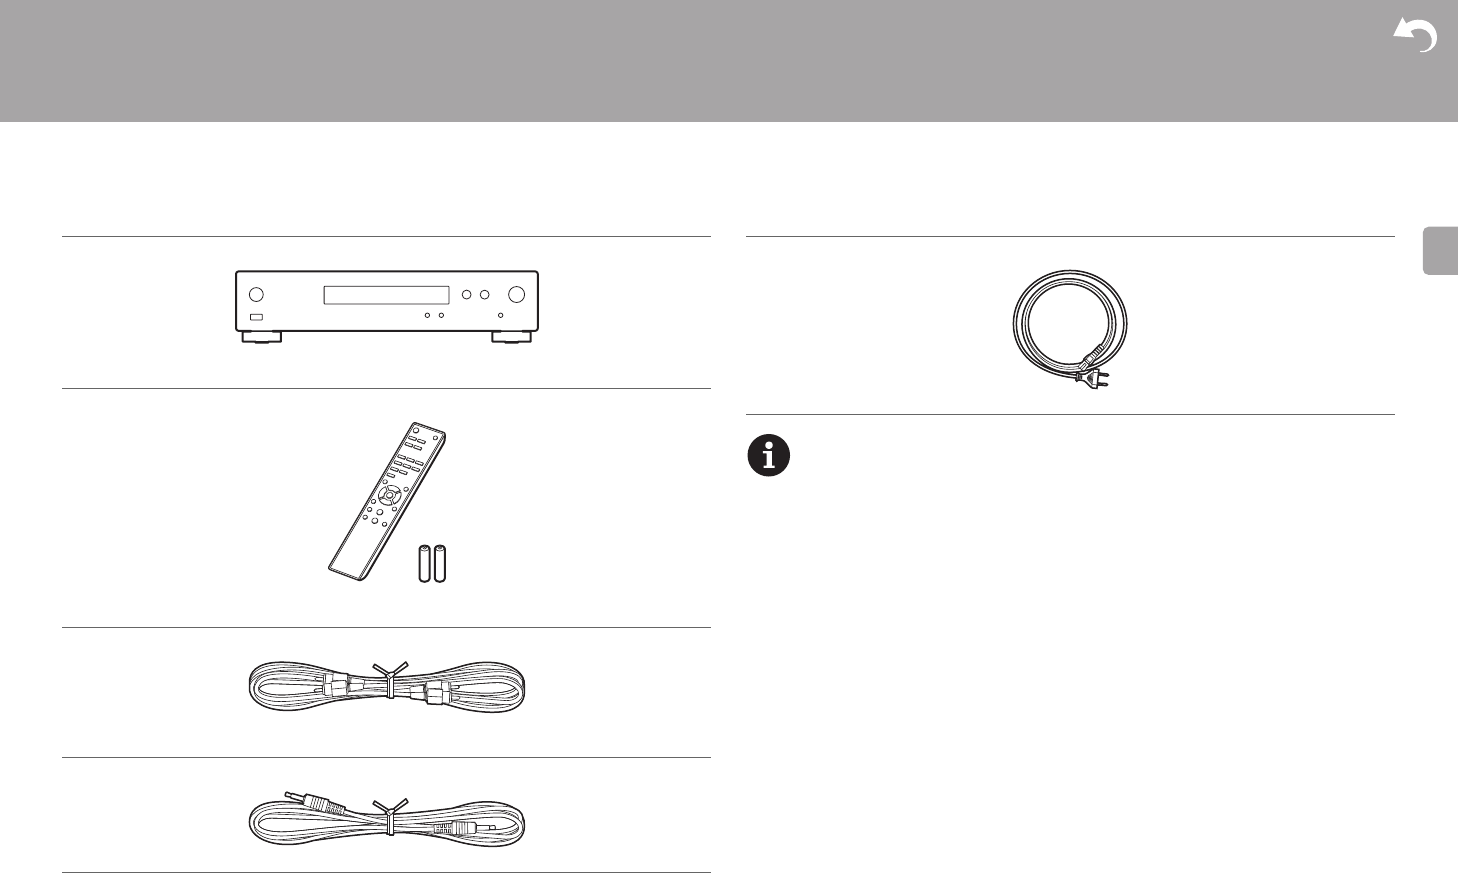
2
> Antes de empezar > Nombres de las piezas > Instalación > Initial Setup > Reproducción
Configuración avanzada |Actualización de Firmware | Otros
E
S
Qué se encuentra en la caja
Antes de empezar
0El cable de alimentación no debe conectarse hasta que no se hayan completado todas
las otras conexiones.
0No aceptamos ninguna responsabilidad por daño causado debido a la conexión de
equipos fabricados por otras compañías.
0Puede que se amplíen las funcionalidades mediante actualizaciones de firmware y que
los proveedores de servicios cesen su actividad, lo que significa que algunos servicios de
red y contenidos puede que no estén disponibles en el futuro.
0Las especificaciones y las características están sujetas a cambios sin previo aviso.
Unidad principal (1)
Mando a distancia (RC-942E) (1), Pilas (AAA/R03) (2)
Cable de audio analógico (1)
Cable RI (1)
Cable de alimentación (1)

> Antes de empezar > Nombres de las piezas > Instalación > Initial Setup > Reproducción
Configuración avanzada |Actualización de Firmware | Otros
3
E
S
Panel frontal
Nombres de las piez as
1. Botón ÍON/STANDBY: Enciende la unidad o la pone en modo de espera.
2. Sensor del mando a distancia
3. Pantalla (P6)
4. Botón de reproducción:
∫
: Este botón detiene la reproducción.
1
/; : Reproducir o pausar la reproducción.
5. Selector MENU/ENTER (:/9)
Durante la reproducción, gírelo a la izquierda o a la derecha para seleccionar la carpeta o
archivo y, a continuación, púlselo para confirmar la selección.
Manténgalo pulsado para ver la pantalla de ajustes. Mientras se muestra el menú, gire el
mando para seleccionar elementos y pulse para confirmar los ajustes.
0Dependiendo de la entrada, puede que la operación no se inicie.
6. Puerto USB: Conectar un dispositivo de almacenamiento USB o un HDD (disco duro)
para reproducir archivos de música. También puede suministrar alimentación (máximo
5 V/0,5 A) a dispositivos USB con un cable USB.
0Cuando conecte un HDD que requiera más de 5 V/0,5 A, conéctelo al puerto USB
(máximo 5 V/1 A) de la parte trasera de la unidad.
7. Botón DISPLAY: Cambia la información en la pantalla.
8. Botón INPUT: Cambia la entrada a reproducir.
9. Botón RETURN: Vuelve a la pantalla anterior.

4
> Antes de empezar > Nombres de las piezas > Instalación > Initial Setup > Reproducción
Configuración avanzada |Actualización de Firmware | Otros
E
S
Panel trasero
1. AC INLET: Conecte el cable de alimentación suministrado.
2. Antena inalámbrica: Se utiliza para la conexión Wi-Fi. Ajuste los ángulos de acuerdo con
el estado de la conexión.
3. Puerto USB: Conectar un dispositivo de almacenamiento USB o un HDD (disco duro)
para reproducir archivos de música. También puede suministrar alimentación (máximo
5 V/1 A) a dispositivos USB con un cable USB.
4. Conector AUDIO OUTPUT DIGITAL COAXIAL: Conecte un preamplificador principal con
un cable coaxial digital.
5. Conector ETHERNET: Conecte con la red a través de un cable ethernet.
6. Conector REMOTE CONTROL: Conecte un producto Onkyo con un conector RI
empleando el cable RI incluido para sincronizarlo con la unidad. (P8)
7. Conectores AUDIO OUTPUT ANALOG: Conecte un preamplificador principal con el
cable de audio analógico incluido.
180°
90°

> Antes de empezar > Nombres de las piezas > Instalación > Initial Setup > Reproducción
Configuración avanzada |Actualización de Firmware | Otros
5
E
S
Mando a distancia
1. Botón Í: Enciende la unidad o la configura en modo de espera.
2. Botón DIMMER: Apague la pantalla o ajuste su brillo en dos pasos.
3. Botones INPUT SELECTOR: Cambia la entrada a reproducir.
4. Botones de reproducción:
:: Pasar a la pista anterior a la que se está reproduciendo.
/;: Reproducir o pausar la reproducción.
9: Pasar a la siguiente pista.
∫: Detener la reproducción.
0Dependiendo de la entrada, puede que la operación no se inicie.
5. Botón REPEAT: Configure la reproducción repetida.
Botón SHUFFLE: Ajuste la reproducción aleatoria.
6. Botón CLEAR: Se utiliza para insertar texto, etc.
7. Botón TOP MENU: Desplácese al menú superior de la entrada seleccionada.
8. Cursores, botón ENTER: Seleccione el elemento con los cursores y pulse ENTER para confirmar.
9. Botón SETUP: Muestra el menú de configuración.
10.
Botones de control del amplificador
Utilícelos para cambiar la entrada, ajustar el volumen, etc., de un preamplificador
principal Onkyo.
0Puede que no funcione con algunos amplificadores.
11.
Botón
Í
AMP: Alterna el encendido y el modo de espera en un preamplificador principal Onkyo.
0Puede que no funcione con algunos amplificadores.
12.
Botón DISPLAY: Cambia la información en la pantalla.
13.
Botón NOW PLAYING: Si ha cambiado la pantalla durante la reproducción, por ejemplo,
este botón hace que la pantalla vuelva a mostrar información sobre el archivo que se está
reproduciendo.
14.
Botón : Regresa la pantalla al estado anterior.
022 y 11 no se utilizan.
30° 30°
Aprox. 5 m
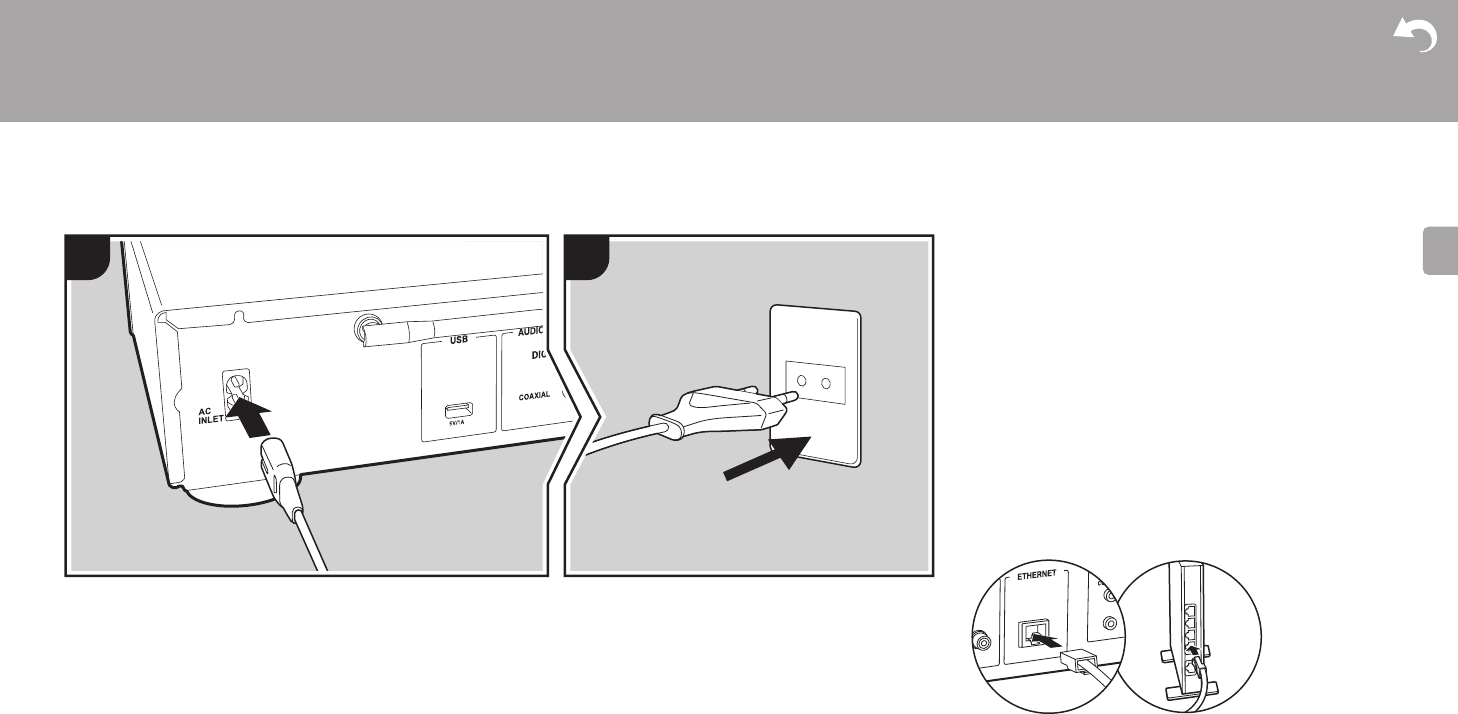
9
> Antes de empezar > Nombres de las piezas > Instalación > Initial Setup > Reproducción
Configuración avanzada |Actualización de Firmware | Otros
E
S
Conexión del cable de alimentación, etc.
a
1 2
a
Conexión del cable de alimentación
Este modelo incluye un cable de alimentación extraíble.
El cable de alimentación debe conectarse sólo después de
que todas las otras conexiones se hayan completado.
Conecte el cable de alimentación al terminal AC INLET de la
unidad en primer lugar y luego conéctelo a la toma.
Desconecte siempre el cable de alimentación del lado de la
toma de corriente primero cuando desconecte el cable de
alimentación.
Conexión del cable ethernet
Para conectarse a la red con un cable ethernet, utilice el
conector ETHERNET. Cuando utilice una conexión Wi-Fi,
realice ajustes en la configuración inicial (P10). Puede
disfrutar de funciones como la radio por internet y AirPlay
conectándose a la red.
a Cable de alimentación
Produktspezifikationen
| Marke: | Onkyo |
| Kategorie: | Empfänger |
| Modell: | NS-6130 |
Brauchst du Hilfe?
Wenn Sie Hilfe mit Onkyo NS-6130 benötigen, stellen Sie unten eine Frage und andere Benutzer werden Ihnen antworten
Bedienungsanleitung Empfänger Onkyo

3 Oktober 2024
8 September 2024
3 September 2024
30 August 2024
26 August 2024
16 August 2024
11 August 2024
8 August 2024
6 August 2024
1 August 2024
Bedienungsanleitung Empfänger
- Empfänger Asus
- Empfänger Belkin
- Empfänger Exibel
- Empfänger Hama
- Empfänger Audio-Technica
- Empfänger LogiLink
- Empfänger Logitech
- Empfänger Manhattan
- Empfänger Medion
- Empfänger Nedis
- Empfänger Philips
- Empfänger Sandberg
- Empfänger Sony
- Empfänger Zalman
- Empfänger Panasonic
- Empfänger Roland
- Empfänger MX Onda
- Empfänger Bosch
- Empfänger Vox
- Empfänger TechniSat
- Empfänger Yamaha
- Empfänger Velleman
- Empfänger Neumann
- Empfänger CSL
- Empfänger Devolo
- Empfänger Schwaiger
- Empfänger Alecto
- Empfänger Conrad
- Empfänger Denver
- Empfänger EMOS
- Empfänger Gira
- Empfänger König
- Empfänger MarQuant
- Empfänger Renkforce
- Empfänger Bush
- Empfänger Thomson
- Empfänger Trevi
- Empfänger Blaupunkt
- Empfänger Grundig
- Empfänger Kenwood
- Empfänger Sharp
- Empfänger Hilti
- Empfänger Pyle
- Empfänger Golden Age Project
- Empfänger Salora
- Empfänger Telestar
- Empfänger Aiwa
- Empfänger AKG
- Empfänger Auna
- Empfänger Bang And Olufsen
- Empfänger Bose
- Empfänger Bowers And Wilkins
- Empfänger Caliber
- Empfänger Maxview
- Empfänger Denon
- Empfänger Pioneer
- Empfänger Geemarc
- Empfänger Jabra
- Empfänger JBL
- Empfänger JVC
- Empfänger Klipsch
- Empfänger Krüger And Matz
- Empfänger Meliconi
- Empfänger Motorola
- Empfänger Nokia
- Empfänger Optoma
- Empfänger Sennheiser
- Empfänger Shure
- Empfänger Technics
- Empfänger Teufel
- Empfänger Vivanco
- Empfänger Hifonics
- Empfänger Megasat
- Empfänger Smartwares
- Empfänger Akai
- Empfänger Alden
- Empfänger Dual
- Empfänger Ferguson
- Empfänger GoGEN
- Empfänger Hyundai
- Empfänger Orava
- Empfänger Strong
- Empfänger Tesla
- Empfänger Imperial
- Empfänger Tascam
- Empfänger Zoom
- Empfänger Garmin
- Empfänger Nexa
- Empfänger Sencor
- Empfänger Goobay
- Empfänger Lindy
- Empfänger Astro
- Empfänger Plantronics
- Empfänger Fenton
- Empfänger TOA
- Empfänger Rotel
- Empfänger Musway
- Empfänger Tripp Lite
- Empfänger Audio Pro
- Empfänger Cabasse
- Empfänger Canton
- Empfänger Dali
- Empfänger Harman Kardon
- Empfänger Inateck
- Empfänger Magnat
- Empfänger Marmitek
- Empfänger Marshall
- Empfänger Naim
- Empfänger Power Dynamics
- Empfänger Samson
- Empfänger Scosche
- Empfänger Skytec
- Empfänger Tangent
- Empfänger Vonyx
- Empfänger Peavey
- Empfänger Marshall Electronics
- Empfänger Sagem
- Empfänger Simrad
- Empfänger AVM
- Empfänger Xoro
- Empfänger Karma
- Empfänger Atlas
- Empfänger Reely
- Empfänger Edision
- Empfänger GigaBlue
- Empfänger Humax
- Empfänger Kathrein
- Empfänger Metronic
- Empfänger Smart
- Empfänger Topfield
- Empfänger Xtrend
- Empfänger Zehnder
- Empfänger Icom
- Empfänger Brondi
- Empfänger Alpine
- Empfänger Rupert Neve Designs
- Empfänger NAD
- Empfänger Fender
- Empfänger Renegade
- Empfänger Ebode
- Empfänger LTC
- Empfänger Vincent
- Empfänger Vision
- Empfänger Hager
- Empfänger Behringer
- Empfänger Mackie
- Empfänger Omnitronic
- Empfänger Thomann
- Empfänger MB Quart
- Empfänger Marantz
- Empfänger Monoprice
- Empfänger Arcam
- Empfänger Cambridge
- Empfänger Crown
- Empfänger Dynacord
- Empfänger Ecler
- Empfänger Luxman
- Empfänger Monacor
- Empfänger Rockford Fosgate
- Empfänger TEAC
- Empfänger Thorens
- Empfänger Crunch
- Empfänger Chamberlain
- Empfänger JUNG
- Empfänger Aplic
- Empfänger InLine
- Empfänger Sangean
- Empfänger Classé
- Empfänger Optex
- Empfänger Revox
- Empfänger Sherwood
- Empfänger Jamo
- Empfänger AXTON
- Empfänger Clarion
- Empfänger Mac Audio
- Empfänger Kogan
- Empfänger Genie
- Empfänger Humantechnik
- Empfänger T-Mobile
- Empfänger Skytronic
- Empfänger Yaesu
- Empfänger Audizio
- Empfänger ESX
- Empfänger Reloop
- Empfänger HQ
- Empfänger Pinnacle
- Empfänger Block
- Empfänger Rega
- Empfänger SYNQ
- Empfänger Amazon
- Empfänger Insignia
- Empfänger August
- Empfänger Audison
- Empfänger DataVideo
- Empfänger RCF
- Empfänger Electro-Voice
- Empfänger Cyrus
- Empfänger Scansonic
- Empfänger Sogo
- Empfänger Cisco
- Empfänger Delta Dore
- Empfänger Salus
- Empfänger Sonos
- Empfänger Yorkville
- Empfänger MIPRO
- Empfänger Elektrobock
- Empfänger FiiO
- Empfänger Boss
- Empfänger IFM
- Empfänger Intertechno
- Empfänger American Audio
- Empfänger Anthem
- Empfänger Roksan
- Empfänger Engel Axil
- Empfänger Alto
- Empfänger Kopul
- Empfänger Chord
- Empfänger Saramonic
- Empfänger Kramer
- Empfänger Hertz
- Empfänger Pro-Ject
- Empfänger Aeon Labs
- Empfänger Vaddio
- Empfänger Galaxy Audio
- Empfänger HQ Power
- Empfänger Ibiza Sound
- Empfänger Kicker
- Empfänger Warm Audio
- Empfänger Polk
- Empfänger Line 6
- Empfänger Bogen
- Empfänger DBX
- Empfänger Radial Engineering
- Empfänger McIntosh
- Empfänger Sonance
- Empfänger Jensen
- Empfänger ELAC
- Empfänger Fostex
- Empfänger JL Audio
- Empfänger Pyle Pro
- Empfänger PreSonus
- Empfänger Qtx
- Empfänger Hartke
- Empfänger ART
- Empfänger Deaf Bonce
- Empfänger Fredenstein
- Empfänger LD Systems
- Empfänger RDL
- Empfänger Audiolab
- Empfänger Oculus VR
- Empfänger Summit Audio
- Empfänger Homematic IP
- Empfänger Black Lion Audio
- Empfänger Dreambox
- Empfänger Bluesound
- Empfänger Solid State Logic
- Empfänger RME
- Empfänger GlobalSat
- Empfänger Chandler
- Empfänger DAP
- Empfänger DAP Audio
- Empfänger Definitive Technology
- Empfänger Denson
- Empfänger Devialet
- Empfänger DIO
- Empfänger DLS
- Empfänger Focal
- Empfänger Focusrite
- Empfänger Formuler
- Empfänger Fusion
- Empfänger Graupner
- Empfänger Ground Zero
- Empfänger Helix
- Empfänger Hirschmann
- Empfänger Homecast
- Empfänger Infinity
- Empfänger Iriver
- Empfänger JB Systems
- Empfänger Koda
- Empfänger Lanzar
- Empfänger Legamaster
- Empfänger Medeli
- Empfänger Mercury
- Empfänger Monitor Audio
- Empfänger Mtx Audio
- Empfänger Mvision
- Empfänger Naxa
- Empfänger Octagon
- Empfänger Phoenix Gold
- Empfänger Raymarine
- Empfänger REL Acoustics
- Empfänger Selfsat
- Empfänger Soundstream
- Empfänger Stagg
- Empfänger Steren
- Empfänger Stinger
- Empfänger Sunstech
- Empfänger Terratec
- Empfänger ACV
- Empfänger AMX
- Empfänger Triax
- Empfänger Tronics
- Empfänger TV STAR
- Empfänger Universal Remote Control
- Empfänger Velodyne
- Empfänger Vivotek
- Empfänger Wharfedale
- Empfänger Winegard
- Empfänger Xsarius
- Empfänger Zgemma
- Empfänger Universal Audio
- Empfänger Phonic
- Empfänger Epcom
- Empfänger Adastra
- Empfänger Siig
- Empfänger Amiko
- Empfänger Cloud
- Empfänger Mooer
- Empfänger AudioControl
- Empfänger MXL
- Empfänger TV One
- Empfänger NAV-TV
- Empfänger StarTech.com
- Empfänger APart
- Empfänger Blackstar
- Empfänger HEOS
- Empfänger Smart-AVI
- Empfänger QSC
- Empfänger RetroSound
- Empfänger Dahua Technology
- Empfänger Proel
- Empfänger Niles
- Empfänger Panduit
- Empfänger Martin Logan
- Empfänger Metra
- Empfänger Kanto
- Empfänger PAC
- Empfänger Sound Devices
- Empfänger Speco Technologies
- Empfänger IFi Audio
- Empfänger Gefen
- Empfänger Polsen
- Empfänger Bugera
- Empfänger Russound
- Empfänger Vocopro
- Empfänger SRS
- Empfänger Comica
- Empfänger Astell&Kern
- Empfänger IMG Stage Line
- Empfänger Inovonics
- Empfänger Mosconi
- Empfänger Atlas Sound
- Empfänger FBT
- Empfänger DB Technologies
- Empfänger CYP
- Empfänger Amplicom
- Empfänger Micromega
- Empfänger Palmer
- Empfänger Jolida
- Empfänger Ampeg
- Empfänger Avalon
- Empfänger BOYA
- Empfänger Audient
- Empfänger Bang Olufsen
- Empfänger Lectrosonics
- Empfänger ATen
- Empfänger Eventide
- Empfänger Axing
- Empfänger Laney
- Empfänger Morel
- Empfänger SVS
- Empfänger KanexPro
- Empfänger Citronic
- Empfänger Crest Audio
- Empfänger Lab Gruppen
- Empfänger SPL
- Empfänger Parasound
- Empfänger Apantac
- Empfänger Brigmton
- Empfänger Axis
- Empfänger MEE Audio
- Empfänger Wet Sounds
- Empfänger Edisio
- Empfänger Pyramid
- Empfänger Stewart
- Empfänger Black Hydra
- Empfänger Linn
- Empfänger Roswell
- Empfänger Music Hall
- Empfänger Audac
- Empfänger OSD Audio
- Empfänger Match
- Empfänger Audioengine
- Empfänger Neets
- Empfänger EA
- Empfänger BZBGear
- Empfänger Crestron
- Empfänger PSSO
- Empfänger HiFi ROSE
- Empfänger Accell
- Empfänger Ibanez
- Empfänger Antelope Audio
- Empfänger Pharos
- Empfänger Kemo
- Empfänger Audix
- Empfänger Viscount
- Empfänger GOgroove
- Empfänger Avantree
- Empfänger PSB
- Empfänger Phoenix Audio
- Empfänger Extron
- Empfänger Atlona
- Empfänger Comtek
- Empfänger LYYT
- Empfänger JTS
- Empfänger Redline
- Empfänger Valueline
- Empfänger Grace Design
- Empfänger Ashdown Engineering
- Empfänger Ram Audio
- Empfänger Esoteric
- Empfänger Xantech
- Empfänger Wavtech
- Empfänger Krell
- Empfänger Artsound
- Empfänger Rolls
- Empfänger Sonifex
- Empfänger Advance Acoustic
- Empfänger Kali Audio
- Empfänger Leviton
- Empfänger Revel
- Empfänger WyreStorm
- Empfänger Wireless Solution
- Empfänger Manley
- Empfänger Klark Teknik
- Empfänger Lindell Audio
- Empfänger AVMATRIX
- Empfänger Alfatron
- Empfänger Acme United
- Empfänger Mark Levinson
- Empfänger CAD Audio
- Empfänger Dynavox
- Empfänger Key Digital
- Empfänger AER
- Empfänger Cerwin-Vega
- Empfänger Sound Ordnance
- Empfänger Majestic
- Empfänger Ocean Matrix
- Empfänger Markbass
- Empfänger AmpliVox
- Empfänger LEA
- Empfänger Memphis Audio
- Empfänger FiveO
- Empfänger Televes
- Empfänger Aquatic AV
- Empfänger DirecTV
- Empfänger Ashly
- Empfänger Fishman
- Empfänger AVPro Edge
- Empfänger Integra
- Empfänger Matrox
- Empfänger Blustream
- Empfänger CyberData Systems
- Empfänger Williams Sound
- Empfänger Sunfire
- Empfänger SoundTube
- Empfänger JETI
- Empfänger SureCall
- Empfänger Vivolink
- Empfänger WesAudio
- Empfänger ANKARO
- Empfänger NUVO
- Empfänger Audiofrog
- Empfänger Canyon
- Empfänger AMS Neve
- Empfänger Trace Elliot
- Empfänger The T.amp
- Empfänger Knoll
- Empfänger MuxLab
- Empfänger Hegel
- Empfänger Triangle
- Empfänger Whirlwind
- Empfänger Camille Bauer
- Empfänger Hughes & Kettner
- Empfänger Rocketfish
- Empfänger Dimavery
- Empfänger Palsonic
- Empfänger Musical Fidelity
- Empfänger Rexing
- Empfänger A-NeuVideo
- Empfänger Crest
- Empfänger Cranborne Audio
- Empfänger Seco-Larm
- Empfänger Primare
- Empfänger C2G
- Empfänger Fosi Audio
- Empfänger S.M.S.L
- Empfänger Aurel
- Empfänger Advance
- Empfänger AEA
- Empfänger Datapath
- Empfänger TechLogix Networx
- Empfänger PTN-electronics
- Empfänger CE Labs
- Empfänger Gold Note
- Empfänger Planet Audio
- Empfänger Lotronic
- Empfänger Audiotec Fischer
- Empfänger Sinus Live
- Empfänger Shinybow
- Empfänger Shanling
- Empfänger Fontastic
- Empfänger BC Acoustique
- Empfänger NuPrime
- Empfänger Taga Harmony
- Empfänger Creek
- Empfänger BMB
- Empfänger Valcom
- Empfänger Intelix
- Empfänger Madison
- Empfänger Topp Pro
- Empfänger Whistler
- Empfänger Powersoft
- Empfänger LinksPoint
- Empfänger Modelcraft
- Empfänger Simaudio
- Empfänger TIC
- Empfänger Mobile Crossing
- Empfänger FSR
- Empfänger Edwards Signaling
- Empfänger Lyngdorf
- Empfänger AudioSource
- Empfänger Leema
- Empfänger Quad
- Empfänger IOTAVX
- Empfänger Inter-M
- Empfänger Soundtrack
- Empfänger Canor
- Empfänger Unison Research
- Empfänger Clare Controls
- Empfänger Loxjie
- Empfänger Cayin
- Empfänger Technical Pro
- Empfänger VMV
- Empfänger Bellari
- Empfänger Comprehensive
- Empfänger PureLink
- Empfänger FoneStar
- Empfänger Glemm
Neueste Bedienungsanleitung für -Kategorien-
2 Dezember 2024
1 Dezember 2024
30 November 2024
30 November 2024
30 November 2024
30 November 2024
30 November 2024
30 November 2024
30 November 2024
29 November 2024