Nitecore CW20 Bedienungsanleitung
Nitecore Ventilator CW20
Lies die bedienungsanleitung für Nitecore CW20 (2 Seiten) kostenlos online; sie gehört zur Kategorie Ventilator. Dieses Handbuch wurde von 67 Personen als hilfreich bewertet und erhielt im Schnitt 5.0 Sterne aus 3 Bewertungen. Hast du eine Frage zu Nitecore CW20 oder möchtest du andere Nutzer dieses Produkts befragen? Stelle eine Frage
Seite 1/2
SYSMAX Innovations Co., Ltd.
TEL: +86-20-83862000
FAX: +86-20-83882723
E-mail: [email protected]
Web: www.nitecore.com
Address: Unit 6355, 5/F, No.1021 Gaopu Road, Tianhe District,
Guangzhou, 510653, Guangdong, China
(English)
(Deutsch)
Features Warnings⚠
Battery Safety⚠
Technical Specications
Product Overview
Using the Nozzle
Charging Function
The CW20 is equipped with an intelligent Li-ion battery
charging system. Please charge the product before the rst use.
Use the USB-C cable to connect an external power supply to
the charging port to begin the charging process.
•During the charging process, the blue power indicators will
gradually transition from ashing to a steady light to display
the battery level.
•Once the battery is fully charged, the product will automatically
stop charging and the blue power indicators will become steadily
turned on.
•The charging time in Standard Mode is approx. 7h (5V/1A).
The charging time in QC Mode is approx. 2h 30min (9V/2A).
•The CW20 is available during the charging process.
Note: The CW20 will be automatically unlocked when charged
in the Lockout Mode.
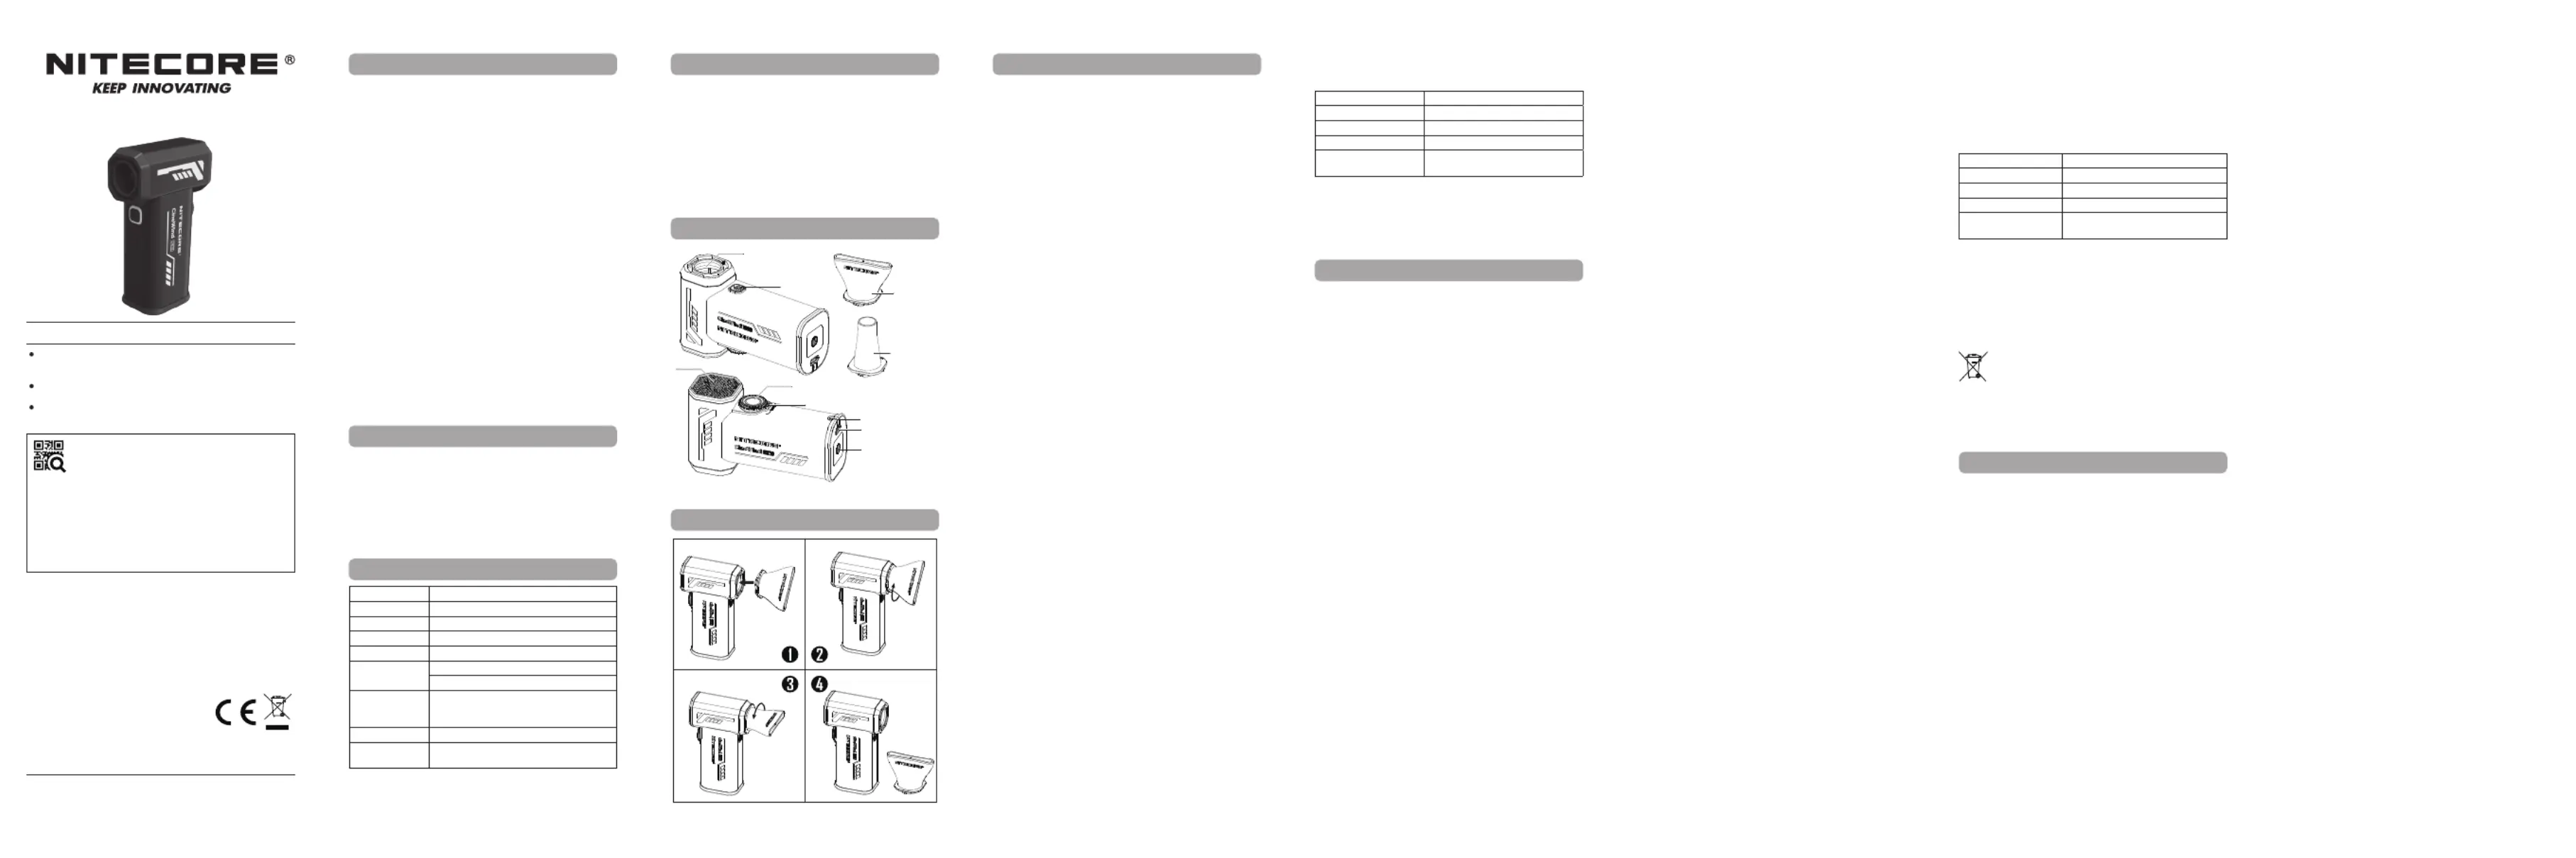
Using the Nozzle
Installing the Nozzle:
Align the nozzle and the air outlet in place (Figure 1). Rotate
the nozzle in the direction indicated by the arrow until it is tight
and secure (Figure 2).
Detaching the Nozzle:
Rotate the nozzle in the direction indicated by the arrow to
remove it (Figures 3 & 4).
Continuous Blowing Mode
•On: When the CW20 is o, double press the Power Button
to turn it on. The power indicators will be on to indicate the
remaining battery power.
•O: When the CW20 is on, short press the Power Button to
turn it o and the power indicators will go o.
Fast Blowing Mode
When the CW20 is o, press and hold the Power Button to turn
it on. Release to turn it o.
Wind Speed Adjustment
The CW20 features stepless wind speed control. Rotate the
Wind Speed Adjuster to select the desired wind speed.
•When the CW20 is on, rotate the Wind Speed Adjuster
clockwise to increase the wind speed until it reaches its
maximum.
•When the CW20 is on, rotate the Wind Speed Adjuster
counterclockwise to decrease the wind speed until it
reaches its minimum.
Lockout / Unlock
•Lockout: When the CW20 is o, short press and then
quickly long press the Power Button until 4 power indicators
light up one by one followed by rapid ashing to indicate
the lockout status. In the Lockout Mode, the CW20 is
unavailable. Pressing and holding the Power Button will turn
on the 4 power indicators; release to turn them o.
•Unlock: In the Lockout Mode, short press and then quickly
long press the Power Button until 4 power indicators go o
one by one. Release to turn on Continuous Blowing Mode to
indicate the unlock status.
Power Indication
When the power is o, short press the Power Button and the
power indicators will glow to indicate the remaining battery power.
⚠ Warnungen:
1. Dieses Produkt ist für den Gebrauch durch Erwachsene ab
18 Jahren bestimmt. Bitte bewahren Sie dieses Produkt
außerhalb der Reichweite von Kindern auf.
2. Verwenden Sie das Produkt nur für den vorgesehenen
Zweck. Jede andere Verwendung des Produkts kann zu
Risiken und Gefahren führen.
3. Umgebungstemperatur bei der Verwendung: -10 ~ 40°C;
Lagertemperatur: -20 ~ 60°C
4. Decken Sie den Lufteinlass und -auslass NICHT ab, wenn
Sie das Produkt verwenden.
5. Stecken Sie NICHT Ihre Hände oder Fremdkörper in den
Ventilator, um Unfälle oder Schäden am Produkt zu vermeiden.
6. Bitte halten Sie das Gerät sauber, um zu verhindern, dass
Insekten oder Fremdkörper in das Gerät eindringen und
möglicherweise Fehlfunktionen verursachen.
7. Lassen Sie KEINE Haare oder Stoe in der Nähe des Ge-
bläses, um Unfälle zu vermeiden.
8. Stellen Sie den Betrieb des Geräts sofort ein, wenn Sie An-
zeichen einer Fehlfunktion feststellen.
9. Stellen Sie das Gerät NICHT in der Nähe des Feuers auf, um
Unfälle und Schäden am Gerät zu vermeiden.
10. Bitte lagern Sie das Gerät an einem kühlen und trockenen Ort.
11. Bitte verwenden Sie das Produkt in einer normalen Weise,
um Unfälle im Falle eines Produktausfalls zu vermeiden.
12. Wenn das Produkt in einer geschlossenen Umgebung, wie
z. B. einem Rucksack oder einer Aufbewahrungstasche, auf-
bewahrt wird, oder wenn es über einen längeren Zeitraum
nicht benutzt wird, aktivieren Sie bitte den Sperr-Mode, um
eine versehentliche Aktivierung zu vermeiden.
13. Zerlegen, modizieren oder reparieren Sie das Produkt
NICHT, da dadurch die Produktgarantie erlischt. Vollständige
Informationen zur Garantie nden Sie im Abschnitt "Garan-
tiebedingungen" in dieser Bedienungsanleitung.
⚠ Batteriesicherheit
Die unsachgemäße Verwendung von Geräten mit eingebauten
Li-Ionen-Akkus kann zu schweren Akkuschäden oder
Sicherheitsrisiken wie Verbrennung oder Explosion führen.
Verwenden Sie das Gerät NICHT, wenn es beschädigt ist.
Zerlegen, durchstechen, zerschneiden, zerquetschen oder
verbrennen Sie das Gerät NICHT. Wenn Sie ein Leck oder einen
ungewöhnlichen Geruch feststellen, stellen Sie die Verwendung
des Geräts sofort ein. Entsorgen Sie das Gerät in Übereinstimmung
mit den geltenden örtlichen Gesetzen und Vorschriften.
1. This product is intended for use by adults aged 18 and over.
Please keep this product out of the reach of children.
2. Only use the product for its intended purposes. Using the
product in any other way could potentially lead to risks and
hazards.
3. Ambient Temperature of Usage: -10~40°C (14~104°F);
Temperature of Storage: -20~60°C (-4~140°F)
4. DO NOT cover the air inlet and outlet when using the product.
5. DO NOT put your hands or any foreign objects into the fan
to avoid accidents or damage to the product.
6. Please keep the product clean to prevent insects or foreign
objects from entering the product and potentially causing
malfunction.
7. DO NOT leave hair or fabric near the fan to avoid accidents.
8. Stop using the product immediately if any signs of malfunction
are observed.
9. DO NOT place the product near the re to avoid accidents
and damage to the product.
10. Please store the product in cool and dry places.
11. Please use the product in a standard manner to avoid
accidents in the event of product failure.
12. When the product is placed in an enclosed environment such
as a backpack or storage bag, or when it is left unused for
an extended period, please activate the Lockout Mode to
avoid accidental activation.
13. DO NOT disassemble, modify or repair the product as doing
so will render the product warranty invalid. Please refer to
the warranty section in the manual for complete warranty
information.
⚠ IMPORTANT
Thanks for purchasing NITECORE!
Please read this manual carefully before using the product
and follow the instructions.
This manual contains important safety information and
operating instructions. Please keep it for future reference.
In case of updates, please refer to the latest version
available on the ocial website.
CW20 User Manual
IMPORTANT NOTICE CONCERNING
WARRANTY SERVICE
Thank you for purchasing! Before using this product,
please nd your verication code on the package box, and go
to https://photo.nitecore.com/Server/validation (or scan the QR
code beside the verication code to visit on your mobile phone).
Type in your verication code and personal information as
required, and submit the page. After verication, NITECORE will
send you a warranty service email for a free warranty extension
of 6 months. This email and your registration email address are
essential to your possible warranty application.
•Wind speed adjuster for stepless control, with a max wind
speed of 150 km/h (93.2 mph)
•Unidirectional air intake to prevent secondary damage to the
object surface
•Power indicators to indicate the remaining battery power
•Built-in intelligent Li-ion battery charging system with a
USB-C charging port
•An expansion interface available at the bottom
•Constructed from aero grade aluminum alloy with HA III
military grade hard-anodized nish
Input5V1A / 9V2A⎓⎓
Rated Power100W (MAX)
Battery Capacity26.64Wh
Rotational Speed98,000 RPM (MAX)
Wind Speed15 km/h – 150 km/h (9.3 mph – 93.2 mph)
Runtime
150 km/h: approx. 20min
15 km/h: approx. 15h 30min
Dimensions
115.2mm x 38.2mm x 67.2mm /
4.54" x 1.50" x 2.65"
(Accessories Not Included)
Weight321g / 11.32 oz (Accessories Not Included)
Accessories
Flat Nozzle, Round Nozzle, Lanyard,
USB-C Charging Cable, Storage Case
Air Inlet
Wind Speed Adjuster
Lanyard Hole
USB-C Charging Cable
1/4" Screw Hole
Flat Nozzle
Round Nozzle
Power Indicators
Power Button
Air Outlet
Improper use of devices with built-in Li-ion batteries may result
in severe battery damage or safety hazards such as combustion
or explosion. DO NOT use the device if it is damaged. DO NOT
disassemble, puncture, cut, crush, or incinerate the device.
If any leakage or abnormal odor is noticed, stop using the
device immediately. Dispose of the device in accordance with
applicable local laws and regulations.
Note: The fan will experience reduced wind speed or become
unable to adjust the wind speed due to low power. In such
cases, please recharge the product as soon as possible.
Status of IndicatorsRemaining Power
4 Constant-on75%-100%
3 Constant-on50-75%
2 Constant-on25-50%
1 Constant-on
0%-25% (Please recharge the
product as soon as possible)
Expansion Interface
The CW20 is equipped with an expansion interface located at
the bottom, allowing for the installation of various photography
accessories.
(Francais)
Avertissement :
1. Ce produit est destiné à être utilisé par des adultes âgés de
18 ans et plus. Tenez-le hors de portée des enfants.
2. N'utilisez le produit qu'aux ns pour lesquelles il a été
conçu. Toute autre utilisation du produit peut entraîner des
risques et des dangers.
3. Température ambiante d'utilisation : -10~40°C (14~104°F) ;
Température de stockage : -20~60°C (-4~140°F)
4. NE PAS couvrir l'entrée et la sortie d'air lors de l'utilisation
du produit.
5. NE METTEZ PAS vos mains ou des objets étrangers dans le
ventilateur an d'éviter tout accident ou dommage au produit.
6. Veillez à ce que l'appareil reste propre an d'éviter que des
insectes ou des objets étrangers ne pénètrent dans l'appareil
et ne provoquent des dysfonctionnements.
7. Ne laissez pas de cheveux ou de tissus à proximité du
ventilateur pour éviter les accidents.
8. Cessez immédiatement d'utiliser le produit si vous observez
des signes de dysfonctionnement.
9. NE PAS placer le produit près du feu pour éviter les accidents
et les dommages au produit.
10. Conservez le produit dans un endroit frais et sec.
11. Veuillez utiliser le produit de manière standard an d'éviter
tout accident en cas de défaillance du produit.
12. Lorsque le produit est placé dans un environnement fermé tel
qu'un sac à dos ou un sac de transport, ou lorsqu'il n'est pas
utilisé pendant une période prolongée, veuillez activer le mode
de verrouillage an d'éviter toute activation accidentelle.
Ladefunktion
Das CW20 ist mit einem intelligenten Li-Ionen-Akku-Ladesystem
ausgestattet. Bitte laden Sie das Produkt vor dem ersten
Gebrauch auf. Verwenden Sie das USB-C-Kabel, um ein
externes Netzteil an den Ladeanschluss anzuschließen und den
Ladevorgang zu starten.
•Während des Ladevorgangs gehen die blauen LEDs allmählich
von Blinken zu Dauerlicht über, um den Ladestand anzuzeigen.
•Sobald der Akku vollständig aufgeladen ist, beendet das
Produkt automatisch den Ladevorgang und die blauen LEDs
leuchten dauerhaft.
•Die Ladezeit im Standardmodus beträgt ca. 7 Stunden (5V/1A).
Die Ladezeit im QC-Modus beträgt ca. 2h 30min (9V/2A).
•Das CW20 ist während des Ladevorgangs nutzbar.
Hinweis: Das CW20 wird automatisch entriegelt, wenn es im
Lockout-Mode geladen wird.
Verwendung der Düsen
Installation der Düse:
Richten Sie die Düse und den Luftauslass an ihrem Platz aus
(). Drehen Sie die Düse in Pfeilrichtung, bis sie fest und ❶
sicher sitzt ().❷
Abnehmen der Düse:
Drehen Sie die Düse in die durch den Pfeil angezeigte Richtung,
um sie zu entfernen ( und ).❸❹
Kontinuierlicher Blas-Mode
•Ein: Wenn das CW20 ausgeschaltet ist, schalten Sie es durch
doppeltes Drücken der EIN-/AUS-Taste ein. Die Stromanzeige
leuchtet, um die verbleibende Akkuleistung anzuzeigen.
•Aus: Wenn das CW20 eingeschaltet ist, drücken Sie kurz auf
die EIN-/AUS-Taste, um es auszuschalten, und die Betriebs-
anzeigen erlöschen.
Hochgeschwindigkeits-Blas-Mode
Wenn das CW20 ausgeschaltet ist, halten Sie die EIN-/AUS-
Taste gedrückt, um es einzuschalten. Lassen Sie sie los, um es
auszuschalten.
Einstellung der Luftgeschwindigkeit
Das CW20 verfügt über eine stufenlose
Luftgeschwindigkeitsregelung. Drehen Sie den
Luftgeschwindigkeitsregler, um die gewünschte
Luftgeschwindigkeit einzustellen.
•Wenn das CW20 eingeschaltet ist, drehen Sie den Luftge-
schwindigkeitsregler im Uhrzeigersinn, um die Luftge-
schwindigkeit zu erhöhen, bis sie ihren Höchstwert erreicht.
•Wenn das CW20 eingeschaltet ist, drehen Sie den Luftge-
schwindigkeitsregler gegen den Uhrzeigersinn, um die Wind-
geschwindigkeit zu verringern, bis sie ihr Minimum erreicht.
Sperr-Mode / Entsperren
•Sperren: Wenn das CW20 ausgeschaltet ist, drücken Sie
erst kurz und dann lange auf die EIN-/AUS-Taste, bis die
4 Betriebs-LEDs nacheinander aueuchten und anschlie-
ßend schnell blinken, um den Sperr-Mode anzuzeigen. Im
Sperr-Mode ist das CW20 nicht verfügbar. Wenn Sie die EIN-/
AUS-Taste gedrückt halten, leuchten die 4 Betriebs-LEDs auf.
Lassen Sie sie los, um sie auszuschalten.
•Entsperren: Drücken Sie im Sperr-Mode erst kurz und dann
lange auf die EIN-/AUS-Taste, bis die 4 Betriebs-LEDs nach-
einander erlöschen. Loslassen, um den kontinuierlichen Blas-
Mode einzuschalten, der den Entsperrungsstatus anzeigt.
Anzeige der verbleibenden Energie
Wenn das Gerät ausgeschaltet ist, drücken Sie kurz die
EIN-/AUS-Taste und die Betriebs-LEDs leuchten auf, um die
verbleibende Akkuleistung anzuzeigen.
Hinweis: Wenn das Gebläse nur eine geringere
Luftgeschwindigkeit hat oder die Luftgeschwindigkeit nicht mehr
eingestellt werden kann ist ggf. der Strom zu schwach. In solchen
Fällen laden Sie das Gerät bitte so schnell wie möglich auf.
Status der LEDsVerbleibende Energie
4 konstant an75% - 100%
3 konstant an50% - 75 %
2 konstant an25% - 50 %
1 konstant an
0% - 25% (Bitte laden Sie das Gerät
so schnell wie möglich auf)
Erweiterungsschnittstelle
Das CW20 ist mit einer Erweiterungsschnittstelle an der
Unterseite ausgestattet, die die Installation von verschiedenem
Fotozubehör ermöglicht.
Entsorgung von Elektro- und
Elektronikgeräten
Die durchgestrichene Mülltonne bedeutet, dass Sie
gesetzlich verpichtet sind, diese Geräte einer vom
unsortierten Siedlungsabfall getrennten Erfassung
zuzuführen. Die Entsorgung über die Restmülltonne oder die gelbe
Tonne ist untersagt. Enthalten die Produkte Batterien oder Akkus,
die nicht fest verbaut sind, müssen diese vor der Entsorgung
entnommen und getrennt als Batterie entsorgt werden.
13. NE PAS démonter, modier ou réparer le produit car cela
rendrait la garantie du produit invalide. Veuillez vous référer
à la section garantie du manuel pour des informations
complètes sur la garantie.
Sécurité de la batterie :
L'utilisation incorrecte d'appareils équipés de batteries Li-ion
intégrées peut endommager gravement la batterie ou entraîner
des risques de sécurité tels que la combustion ou l'explosion.
N'utilisez PAS l'appareil s'il est endommagé. NE PAS démonter,
percer, couper, écraser ou incinérer l'appareil. En cas de fuite ou
d'odeur anormale, cessez immédiatement d'utiliser l'appareil.
Mettez l'appareil au recyclage conformément aux lois et
réglementations locales en vigueur.
Fonction de charge :
Le CW20 est équipé d'un système intelligent de chargement
de la batterie Li-ion. Veuillez charger le produit avant la
première utilisation. Utilisez le câble USB-C pour connecter
une alimentation externe au port de charge an de
commencer le processus de charge.
•Pendant le processus de chargement, les indicateurs d'alimen-
tation bleus passent progressivement d'une lumière clignotante
à une lumière xe pour indiquer le niveau de la batterie.
•Une fois la batterie entièrement chargée, le produit s'arrête
automatiquement et les indicateurs d'alimentation bleus
s'allument en continu.
•Le temps de charge en mode standard est d'environ 7 heures
(5V/1A). Le temps de charge en mode QC est d'environ 2h
30min (9V/2A).
•Le CW20 est disponible pendant le processus de charge.
Remarque : le CW20 est automatiquement déverrouillé
lorsqu'il est chargé en mode verrouillage.
Utilisation de la buse :
Installation de la buse :
Alignez la buse et la sortie d'air en place (gure 1). Tournez la
buse dans le sens indiqué par la èche jusqu'à ce qu'elle soit
bien xée (gure 2).
Démontage de la buse :
Tourner la buse dans le sens indiqué par la èche pour la retirer
(gures 3 et 4).
Mode de soufflage continu :
•Marche : Lorsque le CW20 est éteint, appuyez deux fois
sur le bouton d'alimentation pour le mettre en marche. Les
voyants d'alimentation s'allument pour indiquer la charge
restante de la batterie.
•Arrêt : Lorsque le CW20 est allumé, appuyez brièvement
sur le bouton d'alimentation pour l'éteindre et les indicateurs
d'alimentation s'éteindront.
Mode de soufflage rapide :
Lorsque le CW20 est éteint, appuyez sur le bouton
d'alimentation et maintenez-le enfoncé pour l'allumer. Relâchez
le bouton pour l'éteindre.
Réglage de la vitesse de ventilation :
Le CW20 dispose d'un contrôle progressif de la vitesse de
ventilation. Tournez le bouton de réglage de la vitesse de
ventilation pour sélectionner la vitesse souhaitée.
CW14032024
Made in China
Thanks for purchasing NITECORE!
Please find us on facebook: nitecoreimage
Produktspezifikationen
| Marke: | Nitecore |
| Kategorie: | Ventilator |
| Modell: | CW20 |
Brauchst du Hilfe?
Wenn Sie Hilfe mit Nitecore CW20 benötigen, stellen Sie unten eine Frage und andere Benutzer werden Ihnen antworten
Bedienungsanleitung Ventilator Nitecore

3 September 2024
2 September 2024
26 August 2024
Bedienungsanleitung Ventilator
Neueste Bedienungsanleitung für -Kategorien-
3 April 2026
2 April 2026
2 April 2026
1 April 2026
31 März 2026
31 März 2026
31 März 2026
31 März 2026
30 März 2026
30 März 2026