NEC M300X Bedienungsanleitung
NEC
Projektoren
M300X
Lesen Sie kostenlos die 📖 deutsche Bedienungsanleitung für NEC M300X (155 Seiten) in der Kategorie Projektoren. Dieser Bedienungsanleitung war für 23 Personen hilfreich und wurde von 2 Benutzern mit durchschnittlich 4.5 Sternen bewertet
Seite 1/155
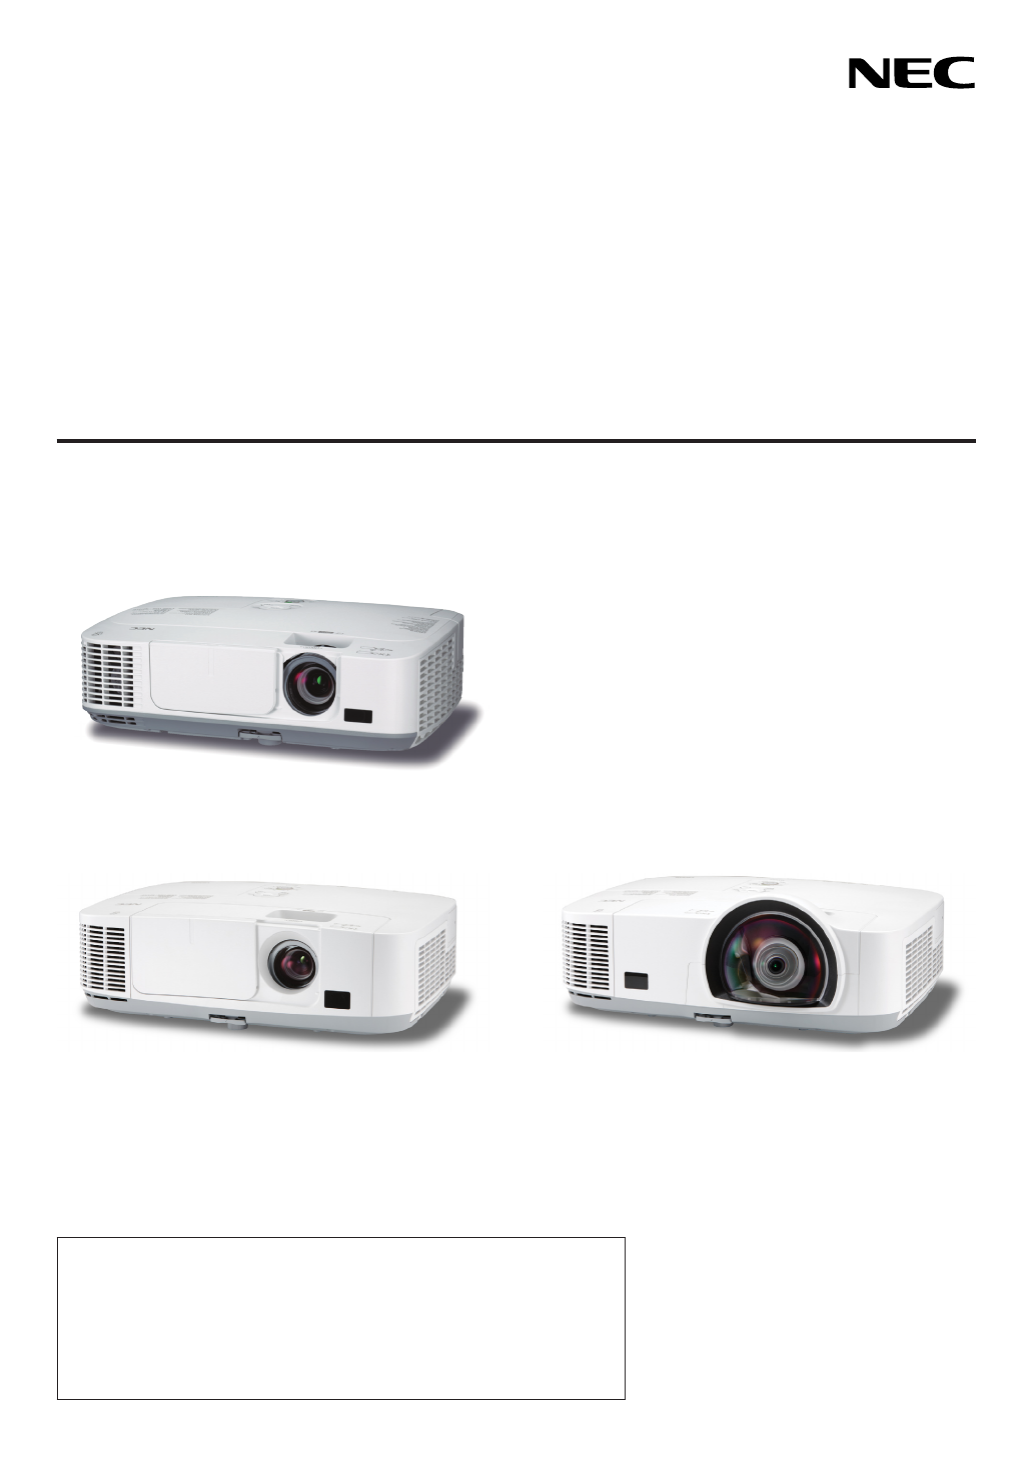
Portable Projector
M350X/M300X/M260X/M230X/M420X/
M420XV/M300W/M260W/M350XS/
M300XS/M260XS/M300WS/M260WS
User’s Manual
The M350X, M230X, M420X, M420XV, M350XS, M260XS, and
M260WS are not distributed in North America.
Model No.
NP-M350X, NP-M300X, NP-M260X, NP-M230X, NP-M420X, NP-
M420XV, NP-M300W, NP-M260W, NP-M350XS, NP-M300XS, NP-
M260XS, NP-M300WS, NP-M260WS
[M350X/M300X/M260X/M230X/M300W/M260W]
[M350XS/M300XS/M260XS/M300WS/M260WS][M420X/M420XV]

3rd edition, January 2011
• Macintosh,MacOSXandPowerBookaretrademarksofAppleInc.registeredintheU.S.andothercountries.
• Microsoft,Windows,WindowsVista, Internet Explorer, .NETFrameworkandPowerPointare eitheraregistered
trademarkortrademarkofMicrosoftCorporationintheUnitedStatesand/orothercountries.
• MicroSaverisaregisteredtrademarkofKensingtonComputerProductsGroup,adivisionofACCOBrands.
• VirtualRemoteToolusesWinI2C/DDClibrary,©NicomsoftLtd.
• HDMI,theHDMILogoandHigh-DenitionMultimediaInterfacearetrademarksorregisteredtrademarksofHDMI
LicensingLLC.
• TrademarkPJLinkisatrademarkappliedfortrademarkrightsinJapan,theUnitedStatesofAmericaandother
countries and areas.
• Wi-Fi®,Wi-FiAlliance®,andWi-FiProtectedAccess (WPA,WPA2)®are registered trademarks oftheWi-Fi Alli-
ance.
• Blu-rayisatrademarkofBlu-rayDiscAssociation
• Otherproductandcompanynamesmentionedinthisuser’smanualmaybethetrademarksorregisteredtrademarks
oftheirrespectiveholders.
• GPL/LGPLSoftwareLicenses
TheproductincludessoftwarelicensedunderGNUGeneralPublicLicense(GPL),GNULesserGeneralPublic
License(LGPL),andothers.
Formoreinformationoneachsoftware,see“readme.pdf”insidethe“aboutGPL&LGPL”folderonthesuppliedCD-
ROM.
NOTES
(1)Thecontentsofthisuser’smanualmaynotbereprintedinpartorwholewithoutpermission.
(2)Thecontentsofthisuser’smanualaresubjecttochangewithoutnotice.
(3)Greatcarehasbeentakeninthepreparationofthisuser’smanual;however,shouldyounoticeanyquestionable
points,errorsoromissions,pleasecontactus.
(4)Notwithstandingarticle(3),NECwillnotberesponsibleforanyclaimsonlossofprotorothermattersdeemed
toresultfromusingtheProjector.

i
Important Information
Safety Cautions
Precautions
PleasereadthismanualcarefullybeforeusingyourNECprojectorandkeepthemanualhandyforfuturereference.
CAUTION
Toturnoffmainpower,besuretoremovetheplugfrompoweroutlet.
Thepoweroutletsocketshouldbeinstalledasneartotheequipmentaspossible,andshouldbeeasily
accessible.
CAUTION
TOPREVENTSHOCK,DONOTOPENTHECABINET.
THEREAREHIGH-VOLTAGECOMPONENTSINSIDE.
REFERSERVICINGTOQUALIFIEDSERVICEPERSONNEL.
Thissymbolwarnstheuserthatuninsulatedvoltagewithintheunitmaybesufcienttocauseelectrical
shock.Therefore,itisdangeroustomakeanykindofcontactwithanypartinsideoftheunit.
Thissymbolalertstheuserthatimportantinformationconcerningtheoperationandmaintenanceofthis
unithasbeenprovided.
Theinformationshouldbereadcarefullytoavoidproblems.
WARNING: TOPREVENTFIREORSHOCK,DONOTEXPOSETHISUNITTORAINORMOISTURE.
DONOTUSETHISUNIT’SPLUGWITHANEXTENSIONCORDORINANOUTLETUNLESSALLTHEPRONGS
CANBEFULLYINSERTED.
DOC Compliance Notice (for Canada only)
This Class B digital apparatus meets all requirements of the Canadian Interference-Causing Equipment Regula-
tions.
Machine Noise Information Regulation - 3. GPSGV,
Thehighestsoundpressurelevelislessthan70dB(A)inaccordancewithENISO7779.
CAUTION
Avoiddisplayingstationaryimagesforaprolongedperiodoftime.
DoingsocanresultintheseimagesbeingtemporarilysustainedonthesurfaceoftheLCDpanel.
Ifthisshouldhappen,continuetouseyourprojector.Thestaticbackgroundfrompreviousimageswill
disappear.
Disposing of your used product
EU-widelegislationasimplementedineachMemberStaterequiresthatusedelectricalandelectronic
productscarryingthemark(left)mustbedisposedofseparatelyfromnormalhouseholdwaste.Thisin-
cludesprojectorsandtheirelectricalaccessoriesorlamps.Whenyoudisposeofsuchproducts,please
followtheguidanceofyourlocalauthorityand/orasktheshopwhereyoupurchasedtheproduct.
Aftercollectingtheusedproducts,theyarereusedandrecycledinaproperway.Thiseffortwillhelpus
reducethewastesaswellasthenegativeimpactsuchasmercurycontainedinalamptothehuman
healthandtheenvironmentattheminimumlevel.
ThemarkontheelectricalandelectronicproductsonlyappliestothecurrentEuropeanUnionMember
States.

ii
Important Information
WARNING TO CALIFORNIA RESIDENTS:
Handlingthecablessuppliedwiththisproductwillexposeyoutolead,achemicalknowntotheStateofCalifornia
tocausebirthdefectsorotherreproductiveharm.WASH HANDS AFTER HANDLING.
RF Interference (for USA only)
WARNING
TheFederalCommunicationsCommissiondoesnotallowanymodicationsorchangestotheunitEXCEPTthose
speciedbyNECDisplaySolutionsofAmerica,Inc.inthismanual.Failuretocomplywiththisgovernmentregu-
lationcouldvoidyourrighttooperatethisequipment.Thisequipmenthasbeentestedandfoundtocomplywith
thelimitsforaClassBdigitaldevice,pursuanttoPart15oftheFCCRules.Theselimitsaredesignedtoprovide
reasonableprotectionagainstharmfulinterferenceinaresidentialinstallation.Thisequipmentgenerates,uses,and
canradiateradiofrequencyenergyand,ifnotinstalledandusedinaccordancewiththeinstructions,maycause
harmfulinterferencetoradiocommunications.However,thereisnoguaranteethatinterferencewillnotoccurina
particularinstallation.
Ifthisequipmentdoescauseharmfulinterferencetoradioortelevisionreception,whichcanbedeterminedby
turningtheequipmentoffandon,theuserisencouragedtotrytocorrecttheinterferencebyoneormoreofthe
followingmeasures:
•Reorientorrelocatethereceivingantenna.
•Increasetheseparationbetweentheequipmentandreceiver.
•Connecttheequipmentintoanoutletonacircuitdifferentfromthattowhichthereceiverisconnected.
•Consultthedealeroranexperiencedradio/TVtechnicianforhelp.
ForUKonly:InUK,aBSapprovedpowercordwithmouldedplughasaBlack(veAmps)fuseinstalledforusewith
thisequipment.Ifapowercordisnotsuppliedwiththisequipmentpleasecontactyoursupplier.
Important Safeguards
Thesesafetyinstructionsaretoensurethelonglifeofyourprojectorandtopreventreandshock.Pleasereadthem
carefullyandheedallwarnings.
Installation
•Donotplacetheprojectorinthefollowingconditions:
- on an unstable cart, stand, or table.
-nearwater,baths,ordamprooms.
-indirectsunlight,nearheaters,orheatradiatingappliances.
-inadusty,smokyorsteamyenvironment.
-onasheetofpaperorcloth,rugsorcarpets.
•Ifyouwishtohavetheprojectorinstalledontheceiling:
-Donotattempttoinstalltheprojectoryourself.
-Theprojectormustbeinstalledbyqualiedtechniciansinordertoensureproperoperationandreducetherisk
ofbodilyinjury.
-Inaddition,theceilingmustbestrongenoughtosupporttheprojectorandtheinstallationmustbeinaccordance
withanylocalbuildingcodes.
-Pleaseconsultyourdealerformoreinformation.

iii
Important Information
Fire and Shock Precautions
• Ensurethatthereissufcientventilationandthatventsareunobstructedtopreventthebuild-upofheatinsideyour
projector.Allowatleast4inches(10cm)ofspacebetweenyourprojectorandawall.
• Donottrytotouchtheventilationoutletontheleftfront(whenseenfromthefront)asitcanbecomeheatedwhile
theprojectoristurnedonandimmediatelyaftertheprojectoristurnedoff.Partsoftheprojectormaybecometem-
porarilyheatediftheprojectoristurnedoffwiththePOWERbuttonoriftheACpowersupplyisdisconnectedduring
normalprojectoroperation.
Usecautionwhenpickinguptheprojector.
• Preventforeignobjectssuchaspaperclipsandbitsofpaperfromfallingintoyourprojector.Donotattempttoretrieve
anyobjectsthatmightfallintoyourprojector.Donotinsertanymetalobjectssuchasawireorscrewdriverintoyour
projector.Ifsomethingshouldfallintoyourprojector,disconnectitimmediatelyandhavetheobjectremovedbya
qualiedservicepersonnel.
• Donotplaceanyobjectsontopoftheprojector.
• Donottouchthepowerplugduringathunderstorm.Doingsocancauseelectricalshockorre.
• Theprojectorisdesignedtooperateonapowersupplyof100-240VAC50/60Hz.Ensurethatyourpowersupply
tsthisrequirementbeforeattemptingtouseyourprojector.
• Donotlookintothelenswhiletheprojectorison.Seriousdamagetoyoureyescouldresult.
WARNING
•Donotuseanyotherobjectthantheprojector’sslidinglenscovertocoverthelenswhiletheprojectorison.
Doingsocancausetheobjecttogetextremelyhot,andpossiblyresultinginareordamageduetotheheat
emittedfromthelightoutput.
•Donotcoverthelenswiththelenscaporequivalentwhiletheprojectorison.Doingsocanleadtomeltingof
thecapduetotheheatemittedfromthelightoutput.
•Donotplaceanyobjects,whichareeasilyaffectedbyheat,infrontoftheprojectorlens.Doingsocouldlead
totheobjectmeltingfromtheheatthatisemittedfromthelightoutput.
Place the projector in a horizontal position
Thetiltangleoftheprojectorshouldnotexceed10degrees,norshouldtheprojectorbeinstalledinanywayother
thanthedesktopandceilingmount,otherwiselamplifecoulddecreasedramatically.
10°

iv
Important Information
• Keepanyitems(magnifyingglassetc.)outofthelightpathoftheprojector.Thelightpathbeingprojectedfromthe
lensisextensive,thereforeanykindofabnormalobjectsthatcanredirectlightcomingoutofthelens,cancause
anunpredictableoutcomesuchasareorinjurytotheeyes.
• Donotplaceanyobjects,whichareeasilyaffectedbyheat,infrontofaprojectorexhaustvent.
Doingsocouldleadtotheobjectmeltingorgettingyourhandsburnedfromtheheatthatisemittedfromtheex-
haust.
• Handlethepowercordcarefully.Adamagedorfrayedpowercordcancauseelectricshockorre.
- Donotuseanypowercordotherthantheonesuppliedwiththeprojector.
- Donotbendortugthepowercordexcessively.
- Donotplacethepowercordundertheprojector,oranyheavyobject.
- Donotcoverthepowercordwithothersoftmaterialssuchasrugs.
- Donotheatthepowercord.
- Donothandlethepowerplugwithwethands.
• Turnofftheprojector,unplugthepowercordandhavetheprojectorservicedbyaqualiedservicepersonnelunder
thefollowingconditions:
- Whenthepowercordorplugisdamagedorfrayed.
- Ifliquidhasbeenspilledintotheprojector,orifithasbeenexposedtorainorwater.
- Iftheprojectordoesnotoperatenormallywhenyoufollowtheinstructionsdescribedinthisuser’smanual.
- Iftheprojectorhasbeendroppedorthecabinethasbeendamaged.
- Iftheprojectorexhibitsadistinctchangeinperformance,indicatinganeedforservice.
• Disconnectthepowercordandanyothercablesbeforecarryingtheprojector.
• Turnofftheprojectorandunplugthepowercordbeforecleaningthecabinetorreplacingthelamp.
• Turnofftheprojectorandunplugthepowercordiftheprojectorisnottobeusedforanextendedperiodoftime.
• WhenusingaLANcable(onlymodelswiththeRJ-45LANport):
Forsafety,donotconnecttotheconnectorforperipheraldevicewiringthatmighthaveexcessivevoltage.
CAUTION
• Donotusethetilt-footforpurposesotherthanoriginallyintended.Misusessuchasgrippingthetilt-footorhang-
ingonthewallcancausedamagetotheprojector.
• Donotsendtheprojectorinthesoftcasebyparceldeliveryserviceorcargoshipment.Theprojectorinsidethe
softcasecouldbedamaged.
• Select[HIGH]inFanmodeifyoucontinuetousetheprojectorforconsecutivedays.(Fromthemenu,select
[SETUP] [OPTIONS(1)] [FANMODE] [HIGH].)→ → →
• Donottrytotouchtheventilationoutletontheleftfront(whenseenfromthefront)asitcanbecomeheatedwhile
theprojectoristurnedonandimmediatelyaftertheprojectoristurnedoff.
• DonotturnofftheACpowerfor60secondsafterthelampisturnedonandwhilethePOWERindicatorisblink-
ingblue.Doingsocouldcauseprematurelampfailure.
Remote Control Precautions
• Handletheremotecontrolcarefully.
• Iftheremotecontrolgetswet,wipeitdryimmediately.
• Avoidexcessiveheatandhumidity.
• Donotshort,heat,ortakeapartbatteries.
• Donotthrowbatteriesintore.
• Ifyouwillnotbeusingtheremotecontrolforalongtime,removethebatteries.
• Ensurethatyouhavethebatteries’polarity(+/−)alignedcorrectly.
• Donotusenewandoldbatteriestogether,orusedifferenttypesofbatteriestogether.
• Disposeofusedbatteriesaccordingtoyourlocalregulations.

v
Important Information
Note for US Residents
Thelampinthisproductcontainsmercury.PleasedisposeaccordingtoLocal,StateorFederalLaws.
Lamp Replacement
• Usethespeciedlampforsafetyandperformance.
• Toreplacethelamp,followallinstructionsprovidedonpage120.
• Besuretoreplacethelampandlterwhenthemessage[THE LAMP HAS REACHED THE END OF ITS USABLE
LIFE. PLEASE REPLACE THE LAMP AND FILTER.]appears.Ifyoucontinuetousethelampafterthelamphas
reachedtheendofitsusablelife,thelampbulbmayshatter,andpiecesofglassmaybescatteredinthelamp
case.Donottouchthemasthepiecesofglassmaycauseinjury.
Ifthishappens,contactyourdealerforlampreplacement.
A Lamp Characteristic
Theprojectorhasahigh-pressuremercurylampasalightsource.
Alamphasacharacteristicthatitsbrightnessgraduallydecreaseswithage.Alsorepeatedlyturningthelampon
andoffwillincreasethepossibilityofitslowerbrightness.
CAUTION:
• DONOTTOUCHTHELAMPimmediatelyafterithasbeenused.Itwillbeextremelyhot.Turntheprojectoroff
andthendisconnectthepowercord.Allowatleastonehourforthelamptocoolbeforehandling.
• Whenremovingthelampfromaceiling-mountedprojector,makesurethatnooneisundertheprojector.Glass
fragmentscouldfallifthelamphasbeenburnedout.
About High Altitude mode
•
Set[FANMODE]to[HIGHALTITUDE]whenusingtheprojectorataltitudesapproximately5500feet/1600metersor
higher.
Usingtheprojectorataltitudesapproximately5500feet/1600metersorhigherwithoutsettingto[HIGHALTITUDE]
cancausetheprojectortooverheatandtheprotectorcouldshutdown.Ifthishappens,waitacoupleminutesand
turnontheprojector.
• Usingtheprojectorataltitudeslessthanapproximately5500feet/1600metersandsettingto[HIGHALTITUDE]
cancausethelamptoovercool,causingtheimagetoicker.Switch[FANMODE]to[AUTO].
• Usingtheprojectorataltitudesapproximately5500feet/1600metersorhighercanshortenthelifeofopticalcom-
ponentssuchasthelamp.
About Copyright of original projected pictures:
Pleasenotethatusingthisprojectorforthepurposeofcommercialgainortheattractionofpublicattentioninavenue
suchasacoffeeshoporhotelandemployingcompressionorexpansionofthescreenimagewiththefollowingfunc-
tionsmayraiseconcernabouttheinfringementofcopyrightswhichareprotectedbycopyrightlaw.
[ASPECTRATIO],[KEYSTONE],Magnifyingfeatureandothersimilarfeatures.
Turkish RoHS information relevant for Turkish market
EEE Yönetmeliğine Uygundur.
Thisdeviceisnotintendedforuseinthedirecteldofviewatvisualdisplayworkplaces.Toavoidincommodingreec-
tionsatvisualdisplayworkplacesthisdevicemustnotbeplacedinthedirecteldofview.

vi
Table of Contents
Important Information ............................................................................................i
1. Introduction .......................................................................................................... 1
1What’sintheBox? ......................................................................................................... 1
IntroductiontotheProjector .......................................................................................... 2
CongratulationsonYourPurchaseoftheProjector ................................................. 2
Featuresyou’llenjoy: ............................................................................................... 2
Aboutthisuser’smanual .......................................................................................... 3
ComparativeTableofMainFeatures ....................................................................... 4
PartNamesoftheProjector .......................................................................................... 5
Front/Top .................................................................................................................. 5
Rear ......................................................................................................................... 6
TopFeatures ............................................................................................................ 8
TerminalPanelFeatures .......................................................................................... 9
PartNamesoftheRemoteControl ............................................................................. 10
BatteryInstallation ................................................................................................. 11
RemoteControlPrecautions .................................................................................. 11
OperatingRangeforWirelessRemoteControl ...................................................... 11
OperatingEnvironmentforSoftwareIncludedonCD-ROM ........................................ 12
OperatingEnvironment .......................................................................................... 13
2. Projecting an Image (Basic Operation) .............................................. 14
1FlowofProjectinganImage ........................................................................................ 14
ConnectingYourComputer/ConnectingthePowerCord ............................................. 15
TurningontheProjector .............................................................................................. 16
NoteonStartupscreen(MenuLanguageSelectscreen) ...................................... 17
SelectingaSource ...................................................................................................... 18
Selectingthecomputerorvideosource................................................................. 18
AdjustingthePictureSizeandPosition ....................................................................... 19
AdjusttheTiltFoot ................................................................................................. 20
Zoom ...................................................................................................................... 21
Adjustingfromthemenu ........................................................................................ 22
Focus ..................................................................................................................... 23
CorrectingKeystoneDistortionManually .................................................................... 24
Adjustingwithbuttonsonthecabinet .................................................................... 24
Adjustingwiththeremotecontrol ........................................................................... 25
OptimizingComputerSignalAutomatically ................................................................. 26
AdjustingtheImageUsingAutoAdjust .................................................................. 26
TurningUporDownVolume(notavailableonM420XV) ............................................. 26
TurningofftheProjector 7 .............................................................................................. 2
AfterUse...................................................................................................................... 28
3. Convenient Features ..................................................................................... 29
1TurningofftheImageandSound 9 ................................................................................ 2
FreezingaPicture 9 ....................................................................................................... 2
EnlargingaPicture ...................................................................................................... 29
ChangingEcoMode/CheckingEnergy-SavingEffect ................................................ 30

vii
Table of Contents
UsingEcoMode[ECOMODE] .............................................................................. 30
CheckingEnergy-SavingEffect[CARBONMETER] ............................................. 31
PreventingtheUnauthorizedUseoftheProjector[SECURITY] ................................. 32
UsingtheComputerCable(VGA)toOperatetheProjector(VirtualRemoteTool) ..... 35
OperatingYourComputer’sMouseFunctionsfromtheProjector’sRemoteControl
viatheUSBCable(RemoteMouseFunction) ....................................................... 41
ProjectingYourComputer’sScreenImagefromtheProjectorviatheUSBCable
(USBDisplay) ........................................................................................................ 42
ControllingtheProjectorbyUsinganHTTPBrowser ................................................. 44
ControllingtheProjectoroveraLAN(PCControlUtilityPro4) ................................... 50
ProjectingYourComputer’sScreenImagefromtheProjectoroveraLAN(Image
ExpressUtilityLite) ................................................................................................ 53
ProjectinganImagefromanAngle(GeometricCorrectionToolinImageExpress
UtilityLite) .............................................................................................................. 56
WhatyoucandowithGCT .................................................................................... 56
ProjectinganImagefromanAngle(GCT) ............................................................. 56
4. Using the Viewer ............................................................................................. 58
❶WhatyoucandowiththeViewer ................................................................................. 58
❷ProjectingimagesstoredinaUSBmemorydevice .................................................... 60
ConvertingPowerPointlestoSlides(ViewerPPTConverter3.0) ............................. 66
5. Using On-Screen Menu ................................................................................ 69
1UsingtheMenus .......................................................................................................... 69
MenuElements ............................................................................................................ 07
ListofMenuItems ....................................................................................................... 17
MenuDescriptions&Functions[SOURCE] ................................................................ 37
COMPUTER1 and 2 ............................................................................................. 37
HDMI ...................................................................................................................... 37
VIDEO .................................................................................................................... 37
S-VIDEO ................................................................................................................ 37
VIEWER ................................................................................................................. 37
NETWORK ............................................................................................................. 37
USBDISPLAY ........................................................................................................ 37
MenuDescriptions&Functions[ADJUST] .................................................................. 47
[PICTURE] ............................................................................................................. 47
[IMAGEOPTIONS] ................................................................................................ 77
MenuDescriptions&Functions[SETUP] .................................................................... 81
[GENERAL] ............................................................................................................ 81
[MENU] .................................................................................................................. 83
[INSTALLATION] .................................................................................................... 85
[OPTIONS(1)] ........................................................................................................ 87
[OPTIONS(2)] ........................................................................................................ 89
SettinguptheProjectorforaWiredLANConnection[WIREDLAN] ..................... 19
SettinguptheProjectorforaWirelessLANConnection(withtheoptionalUSB
WirelessLANUnitequipped)[WIRELESSLAN] ................................................... 29
MenuDescriptions&Functions[INFO.] ...................................................................... 49
[USAGETIME] ....................................................................................................... 49

viii
Table of Contents
[SOURCE] 9.............................................................................................................. 5
[WIREDLAN] ......................................................................................................... 59
[WIRELESSLAN] .................................................................................................. 59
[VERSION] ............................................................................................................. 69
[OTHERS] .............................................................................................................. 69
MenuDescriptions&Functions[RESET] .................................................................... 97
ReturningtoFactoryDefault[RESET] ................................................................... 97
6. Installation and Connections ................................................................... 89
1SettingUptheScreenandtheProjector ..................................................................... 89
SelectingaLocation 9............................................................................................... 8
ThrowDistanceandScreenSize ......................................................................... 101
MakingConnections .................................................................................................. 104
ConnectingYourComputer .................................................................................. 104
ConnectinganExternalMonitor .......................................................................... 106
ConnectingYourDVDPlayerorOtherAVEquipment .......................................... 107
ConnectingComponentInput .............................................................................. 108
ConnectingHDMIInput 9........................................................................................ 10
ConnectingtoaWiredLAN ................................................................................. 110
ConnectingtoaWirelessLAN(Optional:NP02LMseries) .................................. 111
AttachingtheOptionalCableCover(NP01CV) ................................................... 114
7. Maintenance .................................................................................................... 115
1CleaningtheFilters.................................................................................................... 115
CleaningtheLens 9...................................................................................................... 11
CleaningtheCabinet ................................................................................................. 119
ReplacingtheLampandtheFilters ........................................................................... 120
8. Appendix ............................................................................................................. 127
1Troubleshooting ......................................................................................................... 127
IndicatorMessages .............................................................................................. 127
CommonProblems&Solutions ........................................................................... 128
Ifthereisnopicture,orthepictureisnotdisplayedcorrectly. .............................. 129
Specications ............................................................................................................ 130
CabinetDimensions .................................................................................................. 136
PinAssignmentsofD-SubCOMPUTERInputConnector ........................................ 139
CompatibleInputSignalList ...................................................................................... 140
PCControlCodesandCableConnection ................................................................. 141
TroubleshootingCheckList ........................................................................................ 142
TravelCareGuide ....................................................................................................... 144
TCOCertication ....................................................................................................... 144
1
Projector
[M350XS/M300XS/M260XS/M300WS/
M260WS]
[M420X/M420XV]
1. Introduction
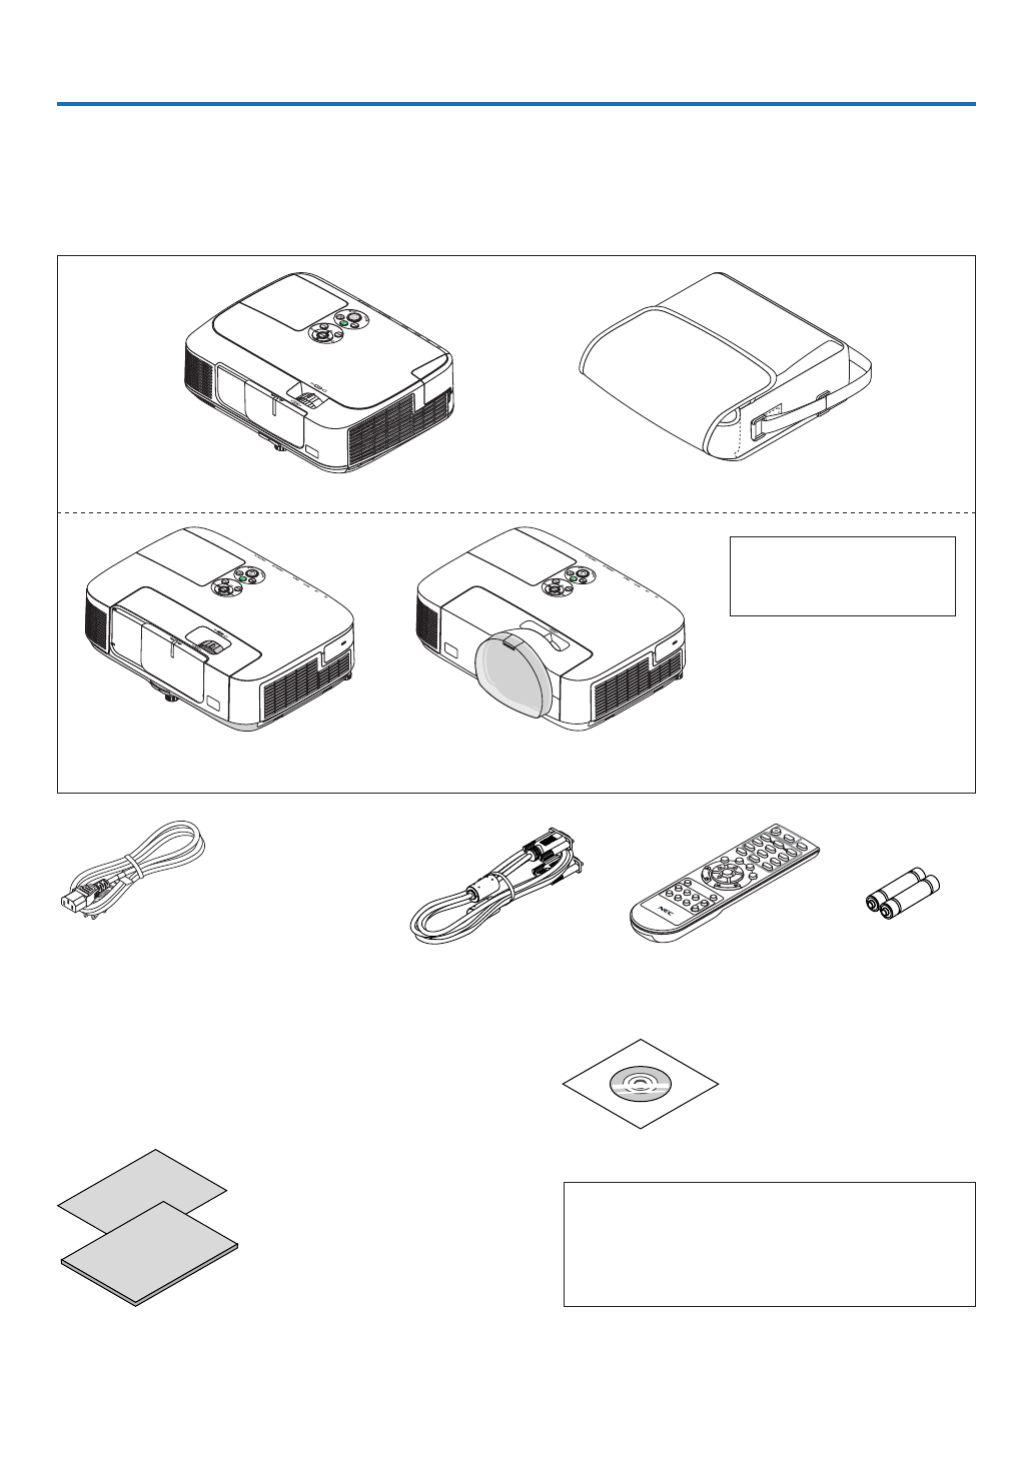
1 What’s in the Box?
Makesureyourboxcontainseverythinglisted.Ifanypiecesaremissing,contactyourdealer.
Pleasesavetheoriginalboxandpackingmaterialsifyoueverneedtoshipyourprojector.
Power cord
US
(7N080236: M300X/M260X/M300W/M260W)
(7N080240: M300XS/M300WS)
EU
(7N080022: M350X/M300X/M260X/M230X/
M300W/M260W/M420X/M420XV)
(7N080026: M350XS/M300XS/M260XS/
M300WS/M260WS)
Computer cable (VGA)
(7N520073)
NEC Projector CD-ROM
User’s manual (PDF) and the util-
ity software
(7N951543)
For North America only
Registrationcard
Limitedwarranty
For customers in Europe:
YouwillndourcurrentvalidGuaranteePolicyonourWebSite:
www.nec-display-solutions.com
The M420X/M420XV and
M350XS/M300XS/M260XS/
M300WS/M260WS do not come
with a soft case.
• ImportantInfomation(ForNorth
America: 7N8N1181) (For Other
countries than North America:
7N8N1181 and 7N8N1192)
• QuickSetupGuide(ForNorthAmer-
ica: 7N8N1201) (For Other countries
than North America: 7N8N1201 and
7N8N1211)
Remote control
(7N900922)
Batteries (AAA × 2)
Unlessotherwisedescribedintheuser’smanual,thedrawingsfortheprojectorcabinetshowexamplesoftheM350X.
Soft case
(24BS8121)
[M350X/M300X/M260X/M230X/M300W/M260W]

2
1. Introduction
Introduction to the Projector
Thissectionintroducesyoutoyournewprojectoranddescribesthefeaturesandcontrols.
Congratulations on Your Purchase of the Projector
Thisprojectorisoneoftheverybestprojectorsavailabletoday.Theprojectorenablesyoutoprojectpreciseimagesup
to300inches(110inchesonshort-throwmodels)across(measureddiagonally)fromyourPCorMacintoshcomputer
(desktopornotebook),VCR,DVDplayer,ordocumentcamera.
Youcanusetheprojectoronatabletoporcart,youcanusetheprojectortoprojectimagesfrombehindthescreen,
andtheprojectorcanbepermanentlymountedonaceiling* 1.Theremotecontrolcanbeusedwirelessly.
*1 Donotattempttomounttheprojectoronaceilingyourself.
Theprojectormustbeinstalledbyqualiedtechniciansinordertoensureproperoperationandreducetherisk
ofbodilyinjury.
Inaddition,theceilingmustbestrongenoughtosupporttheprojectorandtheinstallationmustbeinaccordance
withanylocalbuildingcodes.Pleaseconsultyourdealerformoreinformation.
Features you’ll enjoy:
• Quickstart(3seconds* 1),QuickPowerOff(0seconds),DirectPowerOff
3seconds* 1afterturningonthepower,theprojectorisreadytodisplayPCorvideoimages.
Theprojectorcanbeputawayimmediatelyaftertheprojectorispowereddown.Nocooldownperiodisrequired
aftertheprojectoristurnedofffromtheremotecontrolorcabinetcontrolpanel.
Theprojectorhasafeaturecalled“DirectPowerOff”.Thisfeatureallowstheprojectortobeturnedoff(evenwhen
projectinganimage)byusingtheMainPowerSwitchordisconnectingtheACpowersupply.
ToturnofftheACpowersupplywhentheprojectorispoweredon,useapowerstripequippedwithaswitchand
abreaker.
*1Thequickstarttimeisonlywhen[STANDBYMODE]issetto[NORMAL]intheon-screenmessage.
• 0.2W(100-130VAC)/0.4W(200-240VAC)instandbyconditionwithenergysavingtechnology
Selecting[POWER-SAVING]for[STANDBYMODE]fromthemenucanputtheprojectorinpower-savingmode
thatconsumesonly0.2W(100-130VAC)/0.4W(200-240VAC).
• CarbonMeter
Thisfeaturewillshowenergy-savingeffectintermsofCO 2emissionreduction(kg)whentheprojector’s[ECO
MODE]issetto[AUTOECO],[ECO1],or[ECO2]*
2.
TheamountofCO 2emissionreductionwillbedisplayedintheconrmationmessageatthetimeofpower-offand
intheINFOoftheon-screenmenu.
*2[ECO2]isavailableonM300X,M260X,andM260XSonly.
• Longerlamplifewithoutcleaningtheltersregularly
UsinginEcoModeallowsyoutoprolongtheprojector’slamplife.
Thetwo-layer,largeltersrequirenoregularcleaning.Filterreplacementisrequredonlyatthetimeofthelamp
replacement.
• Shortthrowdistances(M350XS/M300XS/M260XS/M300WS/M260WS)
Shortfocallensesprovideforalargerimageusingashorterthrowdistancewhencomparedtoatypicalprojector
lens.
• HDMIinputportprovidesdigitalsignal
TheHDMIinputprovidesHDCPcompatibledigitalsignals.TheHDMIinputalsosupportsaudiosignal.
• 10Wbuilt-inspeakerforanintegratedaudiosolution(notavailableonM420XV)
Powerful10wattmonauralspeakerprovidesvolumeneedforlargerooms.

3
1. Introduction
• ThesuppliedremotecontrolallowsyoutoassignaCONTROLIDtotheprojector
Multipleprojectorscanbeoperatedseparatelyandindependentlywiththesamesingleremotecontrolbyassigning
anIDnumbertoeachprojector.
• Autoverticalkeystonecorrection
AutoKeystonefeatureallowstheprojectortodetectitstiltandcorrectverticaldistortionautomatically.
• USBDisplay
UsingacommerciallyavailableUSBcable(compatiblewithUSB2.0specications)toconnectthecomputerwith
theprojectorallowsyoutosendyourcomputerscreenimagetotheprojectorwithouttheneedofatraditional
computercable(VGA).
• IntegratedRJ-45connectorforwirednetworkingcapabilityalongwithwirelessnetworkingcapabilities
AnRJ-45connectorisstandard.AnoptionalUSBWirelessLANUnitisrequiredforwirelessLANconnection.
• Softwareprograms(UserSupportware)containedinthesuppliedCD-ROM
ThesuppliedNECProjectorincludesfourprograms:VirtualRemoteTool,ImageExpressUtilityLite,PCControl
UtilityPro4,andViewerPPTConverter3.0.
• AUTOPOWERONandAUTOPOWEROFFfeatures
TheAUTOPOWERON(AC),AUTOPOWERON(COMP1),AUTOPOWEROFF,andOFFTIMERfeatureseliminate
theneedtoalwaysusethePOWERbuttonontheremotecontrolorprojectorcabinet.
• Preventingunauthorizeduseoftheprojector
Enhancedsmartsecuritysettingsforkeywordprotection,cabinetcontrolpanellock,securityslot,andsecurity
chainopeningtohelppreventunauthorizedaccess,adjustmentsandtheftdeterrence.
• HighresolutionuptoUXGA
Highresolutiondisplay-uptoUXGAcompatible,XGA(M350X/M300X/M260X/M230X/M420X/M420XV/M350XS/
M300XS/M260XS)/WXGA(M300W/M260W/M300WS/M260WS)nativeresolution.
About this user’s manual
Thefastestwaytogetstartedistotakeyourtimeanddoeverythingrightthersttime.Takeafewminutesnowto
reviewtheuser’smanual.Thismaysaveyoutimelateron.Atthebeginningofeachsectionofthemanualyou’llnd
anoverview.Ifthesectiondoesn’tapply,youcanskipit.

4
1. Introduction
Comparative Table of Main Features
Themainfeaturesvarydependingonthemodelasfollows.
Standard Models Standard Models
withWidePanel Short-ThrowModels
Short-Throw
ModelswithWide
Panel
M350X M300X M260X M230X M420X M420XV M300W M260W M350XS M300XS M260XS M300WS M260WS
NativeAspect
Ratio
4:3
Standard
16:10
Wide
4:3
Standard
16:10
Wide
NativeResolu-
tion(dots×
lines*1)
XGA(1024×768) WXGA(1280×
800) XGA(1024×768) WXGA(1280×
800)
ScreenSize 25" - 300" 60" - 110"
ThrowDistance 26–543inches/0.65–13.8m 25–542 inch-
es/0.6–13.8m
27–573inch-
es/0.69–14.6m 18-43inches/0.5-1.1m
Lightoutput*2*3
inOFFforECO
MODE
3500
lumens
3000
lumens
2600
lumens
2300
lumens 4200 lumens 3000
lumens
2600
lumens
3500
lumens
3000
lumens
2600
lumens
3000
lumens
2600
lumens
LampReplace-
ment Time
(average)
OFFforECOMODE/ONforECOMODE(H)
4000/
5000 5000/6000 3000/3500 4000/
5000
5000/
6000
3000/
3500
4000/
5000
5000/
6000
3000/
3500
4000/
5000
LampModel NP16LP NP15LP NP17LP NP16LP NP15LP NP17LP NP16LP NP15LP NP17LP NP16LP
LampWattage
(AC) 230 W 180 W 265 W 230 W 180 W 265 W 230 W 180 W 265 W 230 W
Zoom Usingthemanualzoomlever Usingthe[DIGITALZOOM]functionfromthe
menu
Focus Usingthemanualfocusring Usingthemanualfocuslever
Forfurtherdetailsonthespecications,seepages130 135 to .
*1 Effectivepixelsaremorethan99.99%.
*2 Thisisthelightoutputvalue(lumens)whenthe[PRESET]modeissetto[HIGH-BRIGHT].Ifanyothermodeis
selectedasthe[PRESET]mode,thelightoutputvaluemaydropslightly.
*3 CompliancewithISO21118-2005
TIP: The model name is located on the cabinet.
Model name

5
1. Introduction
Part Names of the Projector
Front/Top
[M350X/M300X/M260X/M230X/M300W/M260W]
[M420X/M420XV]
[M350XS/M300XS/M260XS/M300WS/M260WS]
Controls
( page )→8
Controls
( page )→8
Lens
Lens
Remote Sensor
( page )→11
Remote Sensor
( page )→11
Ventilation (inlet) / Filter Cover
( page , )→115 123
Ventilation (inlet) / Filter Cover
( page , )→117 125
Zoom Lever
( page )→21
Zoom Lever
( page )→21
Lens Cover
Lens Cover
Focus Ring
( page )→23
Focus Ring
( page )→23
Adjustable Tilt Foot
( page )→20
Adjustable Tilt Foot
( page )→20
Adjustable Tilt Foot Lever
( page )→20
Adjustable Tilt Foot Lever
( page )→20
Ventilation (outlet)
Heated air is exhausted from here.
Ventilation (outlet)
Heated air is exhausted from here.
Controls
( page )→8
Lens Cap
Ventilation (inlet) / Filter Cover
( page , )→117 125
Focus Lever
( page )→23
Remote Sensor
( page )→11
Lens
Adjustable Tilt Foot
( page )→20
Adjustable Tilt Foot Lever
( page )→20
Ventilation (outlet)
Heated air is exhausted from here.

6
1. Introduction
Rear
[M350X/M300X/M260X/M230X/M300W/M260W]
[M420X/M420XV]
AC Input
Connect the supplied power cord’s
three-pin plug here, and plug the
other end into an active wall outlet.
( page )→15
Port Cover for Optional USB
Wireless LAN Unit
When using the optional USB
Wireless LAN Unit, first remove
the cover. ( page )→111
Terminal Panel ( page )→9
MonauralSpeaker(10W)
Lamp Cover ( page )→121
Rear Foot ( page )→20
Built-in Security Slot ( )* Security chain opening
Attach an anti-theft device.
The security chain opening accepts
security wires or chains up to 0.18
inch/4.6 mm in diameter.
AC Input
Connect the supplied power cord’s
three-pin plug here, and plug the
other end into an active wall outlet.
( page )→15
Connection for cable cover (Left/
right)
Screw holes temporarily fixing
grooves for the optional cable cover
( page )→114
Port Cover for Optional USB
Wireless LAN Unit
When using the optional USB
Wireless LAN Unit, first remove
the cover. ( page )→111
Terminal Panel ( page )→9
MonauralSpeaker(10W)
(The M420XV does not come with
thespeaker.)
Lamp Cover ( page )→121
Rear Foot ( page )→20
Security chain opening
Attach an anti-theft device.
The security chain opening accepts
security wires or chains up to 0.18
inch/4.6 mm in diameter.
Built-in Security Slot ( )*
* ThissecurityslotsupportstheMicroSaver® Security System.

7
1. Introduction
Opening and closing the lens cover
Slidethelenscovertothelefttouncoverthelens.
Tocoverthelens,slidethelenscovertotheright.
NOTE:
• ThelenscoverworksinconjunctionwiththeAVmutefunction.Closingthelenscoverwillturnofftheimageandsound
duringnormalprojectoroperation;openingitwillrestoretheimageandsound.
Withthelenscoverclosedtheimageandsoundisturnedoff,howeverthelampisstilllit.Iftheprojectorstaysthiswayfor
about2hours,itwillturnoffautomatically.
• Donotpullthelenscoverwithexcessiveforceorapplystrongpressureineithertheupordowndirection.Doingsocan
causedamagetothelenscoverslidingmechanism!
[M350X/M300X/M260X/M230X/M300W/M260W/M420X/M420XV]
[M350XS/M300XS/M260XS/M300WS/M260WS]
AC Input
Connect the supplied power cord’s
three-pin plug here, and plug the
other end into an active wall outlet.
( page )→15
Connection for cable cover (Left/
right)
Screw holes temporarily fixing
grooves for the optional cable cover
( page )→114
Port Cover for Optional USB
Wireless LAN Unit
When using the optional USB
Wireless LAN Unit, first remove
the cover. ( page )→111
Terminal Panel ( page )→9
MonauralSpeaker(10W)
Lamp Cover ( page )→121
Rear Foot ( page )→20
Security chain opening
Attach an anti-theft device.
The security chain opening accepts
security wires or chains up to 0.18
inch/4.6 mm in diameter.
Built-in Security Slot ( )*
* ThissecurityslotsupportstheMicroSaver® Security System.

8
1. Introduction
Top Features
1/2
5
6
4
7
8 11
9
3
10
1. (POWER)Button( page )→16 2, 7
2. POWER Indicator ( page )→15 16 2 12, , 7, 7
3. STATUSIndicator( page )→127
4. LAMPIndicator( page )→120 12, 7
5. ECOButton( page )→30
6. SOURCEButton( page )→18
7. AUTOADJ.Button( page )→26
8. MENU Button ( page )→69
9. /Volume Buttons /KeystoneButtons
( page )→24 26,
10.ENTERButton( page )→69
11.EXITButton( page )→69

9
1. Introduction
Terminal Panel Features
1235613 12
8711 14910
4
1. COMPUTER1IN/ComponentInputConnector
(MiniD-Sub15Pin)( page )→104 108,
2. COMPUTER1AUDIOINMiniJack(StereoMini)
(→page )(notavailableonM420XV)104 10 108, 7,
3. COMPUTER2IN/ComponentInputConnector
(MiniD-Sub15Pin)( page )→104 108,
4. COMPUTER2AUDIOINMiniJack(StereoMini)
(→page )(notavailableonM420XV)104 10 108, 7,
5. HDMIINConnector(TypeA)
(→page )104 10, 9
6. USB(PC)Port(TypeB)
(→page )42 104,
7. MONITOROUT(COMP.1)Connector(MiniD-Sub
15Pin)( page )→106
8. AUDIOOUTMiniJack(StereoMini)( page )→106
(notavailableonM420XV)
9. S-VIDEOINConnector(MiniDIN4Pin)
(→page )107
10.VIDEOINConnector(RCA)( page )→107
11.VIDEO/S-VIDEOAUDIOINL/MONO,R(RCA)
(→page )(notavailableonM420XV)107
12.LANPort(RJ-45)( page )→110
13.USBPort(TypeA)( page )→60
14.PCCONTROL[PCCONTROL]Port(D-Sub9Pin)
(→page )141
UsethisporttoconnectaPCorcontrolsystem.This
enablesyoutocontroltheprojectorusingserialcommu-
nicationprotocol.Ifyouarewritingyourownprogram,
typicalPCcontrolcodesareonpage141.
10
1. Introduction
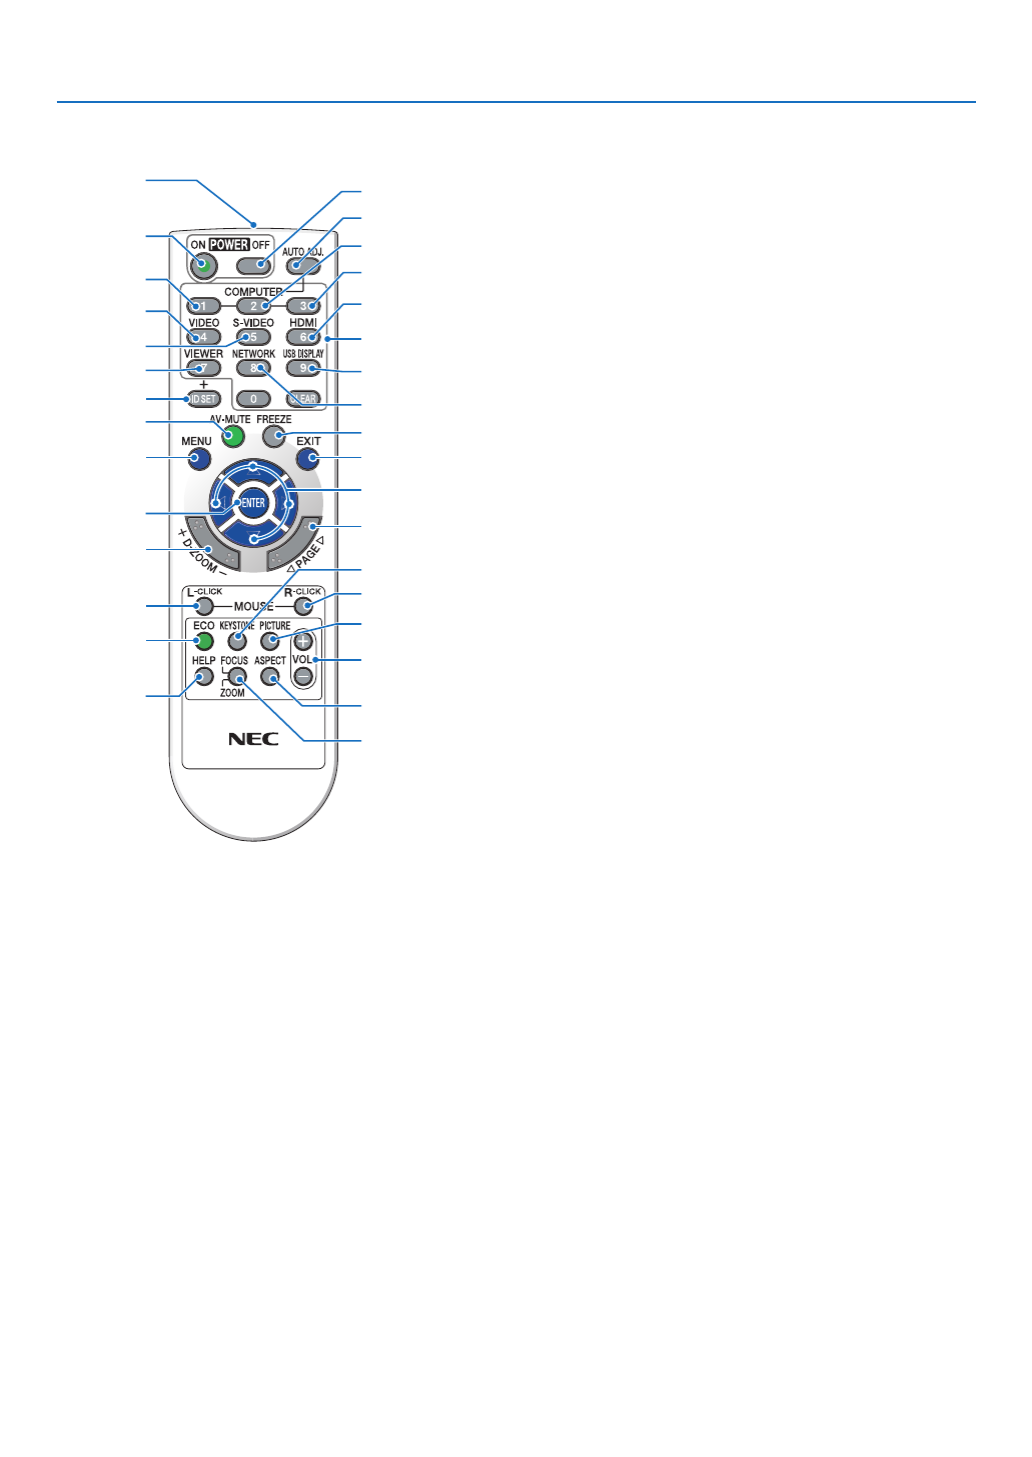
Part Names of the Remote Control
3
7
5
6
1
2
10
15
16
14
17
9
4
8
13
29
30
31
19
20
25
27
28
24
18
23
22
21
26
32
12
11
1. Infrared Transmitter
(→page )11
2. POWER ON Button
(→page )16
3. POWEROFFButton
(→page )27
4,5,6.COMPUTER1/2/3Button
(→page )18
(COMPUTER3buttonisnotavailable.)
7. AUTOADJ.Button
(→page )26
8. VIDEOButton
(→page )18
9. S-VIDEOButton
(→page )18
10.HDMIButton( page )→18
11.VIEWERButton( page )→18 60,
12.NETWORKButton( page )→18
13.USBDISPLAYButton( page )→18
14.IDSETButton
(→page )86
15.NumericKeypadButton/CLEARButton
(→page )86
16.FREEZEButton
(→page )29
17.AV-MUTEButton
(→page )29
18. MENU Button
(→page )69
19.EXITButton( page )→69
20. Button (→page )69
21. ENTER Button ( page )→69
22.D-ZOOM(+)(–)Button
(→page )29
23.MOUSEL-CLICKButton*
(→page )41
24.MOUSER-CLICKButton*
(→page )41
25.PAGE / Button*
(→page )41
26.ECOButton( page )→30
27.KEYSTONEButton
(→page )25
28. PICTURE Button
(→page )7 74, 6
29.VOL.(+)(–)Button
(→page )26
30.ASPECTButton
(→page )79
31.FOCUS/ZOOMButton
TheZOOMbuttonworksontheshort-throwmodels
only.TheFOCUSbuttondoesnotworkonthisseries
ofprojectors.
32.HELPButton
(→page )94
* ThePAGE /, ,MOUSEL-CLICKandMOUSER-CLICKbuttonsworkonlywhenaUSBcableisconnected
withyourcomputer..

14
Thissectiondescribeshowtoturnontheprojectorandtoprojectapictureontothescreen.
1 Flow of Projecting an Image
Step 1
• Connectingyourcomputer/Connectingthepowercord( page→15)
Step 2
• Turningontheprojector( page→16)
Step 3
• Selectingasource( page→18)
Step 4
• Adjustingthepicturesizeandposition( page→19)
• Correctingkeystonedistortion[KEYSTONE]( page→24)
Step 5
• Adjustingapictureandsound
- Optimizing a computer signal automatically ( page )→26
- Turning up or down volume ( page )→26
Step 6
• Makingapresentation
Step 7
• Turningofftheprojector( page→27)
Step 8
• Afteruse( page→28)
2. Projecting an Image (Basic Operation)

15
2. Projecting an Image (Basic Operation)
Connecting Your Computer/Connecting the Power Cord
1. Connectyourcomputertotheprojector.
This section will show you a basic connection to a computer. For information about other connections, see “6.
Installation and Connections” on page .104
Connect the computer cable (VGA) between the projector’s COMPUTER 1 IN connector and the computer’s port
(mini D-Sub 15 Pin). Turn two thumb screws of both connectors to fix the computer cable (VGA).
2. Connectthesuppliedpowercordtotheprojector.
First connect the supplied power cord’s three-pin plug to the AC IN of the projector, and then connect the other
plug of the supplied power cord in the wall outlet.
The projector’s power indicator will flash for a few seconds and then will light orange* (standby mode).
The STATUS indicator will also light green*.
* This will apply for both indicators when [NORMAL] is selected for [STANDBY MODE]. See the Power Indicator
section.( page ) →127
COMPUTER 1 IN
Makesurethattheprongsarefullyinsertedinto
both the AC IN and the wall outlet.
To wall outlet ←
CAUTION:
PartsoftheprojectormaybecometemporarilyheatediftheprojectoristurnedoffwiththePOWERbuttonorifthe
ACpowersupplyisdisconnectedduringnormalprojectoroperation.
Usecautionwhenpickinguptheprojector.

16
2. Projecting an Image (Basic Operation)
Standby Blinking PowerOn
Steady orange light Blinking blue light Steady blue light
Turning on the Projector
1. Uncover the lens by sliding the lens cover (M350X/
M300X/M260X/M230X/M300W/M260W/M420X/M420XV)
orremovingthelenscap(M350XS/M300XS/M260XS/
M300WS/M260WS)
[M350XS/M300XS/M260XS/M300WS/M260WS]
• Do not removethe lens cap bypulling on the string.
Doing so can cause mechanical damage to the part
around the lens.
2. Pressthe (POWER)buttonontheprojectorcabinet
orthePOWERONbuttonontheremotecontrol.
The POWER indicator will turn to blue and the projector
will become ready to use.
TIP:
• Whenthemessage“Projectorislocked!Enteryourpassword.”
isdisplayed,itmeansthatthe[SECURITY]featureisturnedon.
( page )→32
After you turn on your projector, ensure that the computer
or video source is turned on and that the lens cover is
open.
NOTE:Whennoinputsignalis present,theno-signalguidance is
displayed(factorymenusetting).
( page )→127
Lens cover
Lens cap

17
2. Projecting an Image (Basic Operation)
Note on Startup screen (Menu Language Select screen)
Whenyourstturnontheprojector,youwillgettheStartupmenu.Thismenugivesyoutheopportunitytoselectone
ofthe27menulanguages.
Toselectamenulanguage,followthesesteps:
1. Usethe buttontoselectoneofthe 27 , , or
languagesfromthemenu.
2. PresstheENTERbuttontoexecutetheselection.
After this has been done, you can proceed to the menu
operation.
Ifyouwant,youcanselectthemenulanguagelater.
( [LANGUAGE]onpage )→71 83 and
NOTE:
• Whenturningoffthepowersupplyandthenbackonbyusingapowerstriporbreaker.
Allowaminimumof1secondbetweenturningoffthemainpowersupplyandturningitbackonagain.
Failingtodosocouldresultinnopowertotheprojector.(Therewillbenostand-byLED)
Shouldthishappen,unplugthepowercordandplugitinagain.Turnonthemainpower.
• Ifoneofthefollowingthingshappens,theprojectorwillnotturnon.
• Iftheinternaltemperatureoftheprojectoristoohigh,theprojectordetectsabnormalhightemperature.Inthisconditionthe
projectorwillnotturnontoprotecttheinternalsystem.Ifthishappens,waitfortheprojector’sinternalcomponentstocool
down.
• Whenthelampreachesitsendofusablelife,theprojectorwillnotturnon.Ifthishappens,replacethelamp.
• IftheSTATUSindicatorlightsorangewiththepowerbuttonpressed,itmeansthatthe[CONTROLPANELLOCK]isturnedon.
Cancelthelockbyturningitoff.( page )→85
• Ifthelampfailstolight,andiftheSTATUSindicatorashesonandoffinacycleofsixtimes,waitafullminuteandthenturnon
thepower.
• WhilethePOWERindicatorisblinkingblueinshortcycles,thepowercannotbeturnedoffbyusingthepowerbutton.
• Immediatelyafterturningontheprojector,screenickermayoccur.Thisisnormal.Wait3to5minutesuntilthelamplightingis
stabilized.
• Whentheprojectoristurnedon,itmaytakesometimebeforethelamplightbecomesbright.
• Ifyouturnontheprojectorimmediatelyafterthelampisturnedofforwhenthetemperatureishigh,thefansrunwithoutdisplay-
inganimageforsometimeandthentheprojectorwilldisplaytheimage.
18
2. Projecting an Image (Basic Operation)
Selecting a Source
Selecting the computer or video source
NOTE:Turnonthecomputerorvideosourceequipmentconnectedtotheprojector.
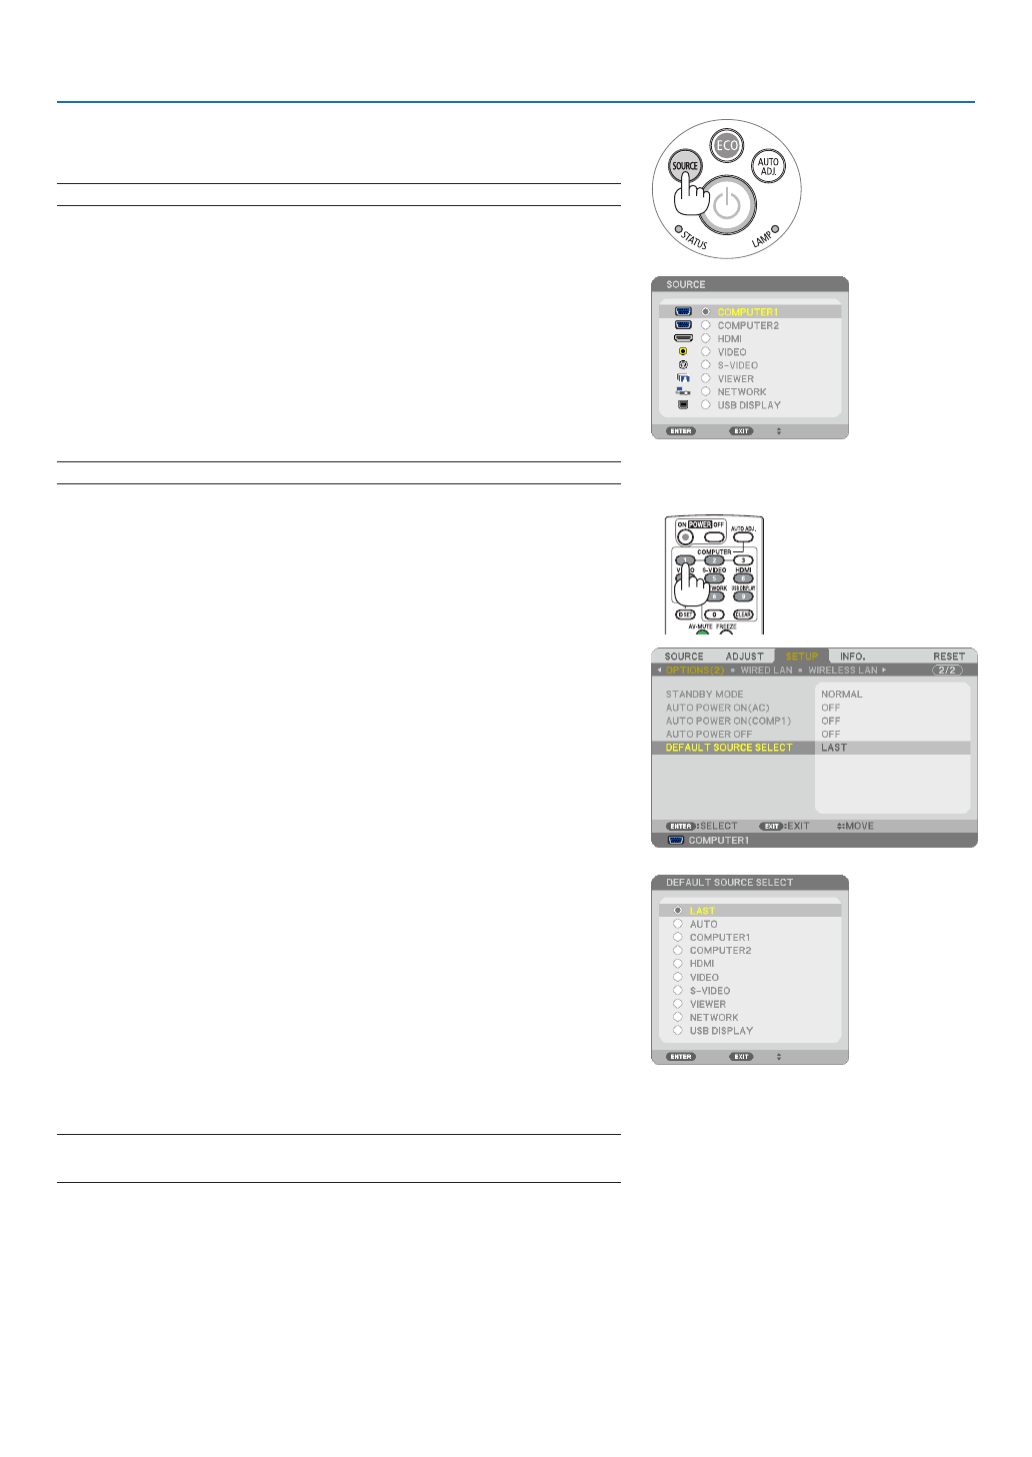
DetectingtheSignalAutomatically
PresstheSOURCEbuttononce.Theprojectorwillsearchfortheavailable
inputsourceanddisplayit.Theinputsourcewillchangeasfollows:
COMPUTER1 COMPUTER2 HDMI VIDEO S-VIDEO→ → → → →
VIEWER USBDISPLAY COMPUTER1→ → → ...
• WiththeSOURCEscreendisplayed,youcanpresstheSOURCE
buttonafewtimestoselecttheinputsource.
TIP:Ifnoinputsignalispresent,theinputwillbeskipped.
UsingtheRemoteControl
PressanyoneoftheCOMPUTER1,COMPUTER2,HDMI,VIDEO,S-
VIDEO,VIEWER,NETWORK,orUSBDISPLAYbuttons.
SelectingDefaultSource
Youcansetasourceasthedefaultsourcesothatitwillbedisplayed
eachtimetheprojectoristurnedon.
1. PresstheMENUbutton.
The menu will be displayed.
2. Pressthe buttontwicetoselect[SETUP]andpressthe but-
tonortheENTERbuttontoselect[GENERAL].
3.
Pressthe
buttonthreetimestoselect[OPTIONS(2)].
4. Pressthe buttonsixtimestoselect[DEFAULTSOURCESE -
LECT]andpresstheENTERbutton.
The [DEFAULT SOURCE SELECT] screen will be displayed.
(→ page )90
5. Selectasourceasthedefaultsource,andpresstheENTERbut-
ton.
6. PresstheEXITbuttonafewtimestoclosethemenu.
7. Restarttheprojector.
The source you selected in step 5 will be projected.
NOTE:Evenwhen[AUTO]isturnedon,the[NETWORK]willnotbeautomatically
selected.Tosetyournetworkasthedefaultsource,select[NETWORK].
TIP:
• WhentheprojectorisinStandbymode,applyingacomputersignalfroma
computerconnectedtotheCOMPUTER1INinputwillpowerontheprojector
andsimultaneouslyprojectthecomputer’simage.
([AUTOPOWERON(COMP1)] page )→90
• OnWindows7,acombinationoftheWindowsandPkeysallowsyoutosetup
externaldisplayeasilyandquickly.

19
2. Projecting an Image (Basic Operation)
Adjusting the Picture Size and Position
Usetheadjustabletiltfoot,thezoomfunctionorthefocusfunctiontoadjustthepicturesizeandposition.
In this chapter drawings and cables are omitted for clarity.
Adjustingthethrowangle(theheightofanimage)
[Tiltfoot]( page )→ 20
Adjustingtheleftandrighttiltofanimage
[Rearfoot]( page )→ 20
Finelyadjustingthesizeofanimage
[Zoomfunction]( page )→ 21
Adjustingthefocus
[Focusfunction]( page )→ 23
Adjustingthekeystonecorrection[KEYSTONE]*( page )→ 24
AutomaticKeystoneCorrectionfunctionisturnedonatthetimeofshipment.
Toperformkeystonecorrectionmanually,see“6.CorrectingKeystoneDistortionManually”onpage24.

21
2. Projecting an Image (Basic Operation)
Zoom
[M350X/M300X/M260X/M230X/M300W/M260W/M420X/M420XV]
UsetheZOOMlevertoadjusttheimagesizeonthescreen.
[M350XS/M300XS/M260XS/M300WS/M260WS]
Theimagesizecanbeadjustedelectronicallyfromthemenu.Todoso,followthestepsbelow.
AdjustingwiththeZOOMbuttonontheremotecontrol
1. PresstheZOOMbutton.
The DIGITAL ZOOM bar will be displayed.
2. Pressthe buttontoadjusttheimagesize.◀ ▶ or
3. PresstheEXITbutton.
The DIGITAL ZOOM bar will be closed.
Zoom Lever

22
2. Projecting an Image (Basic Operation)
Adjusting from the menu
1. PresstheMENUbutton.
The menu will be displayed.
2. Pressthe buttontoselect[SETUP]andpresstheENTERbutton.▶
The [GENERAL] tab will be highlighted.
3. Pressthe▼ button.
The [DIGITAL ZOOM] will be highlighted.
4. Usethe buttontoadjusttheimagesize.◀ ▶ or
5. Aftercompletingadjustment,presstheEXITbuttonfourtimes.
The menu will be closed.

23
2. Projecting an Image (Basic Operation)
Focus
[M350X/M300X/M260X/M230X/M300W/M260W/M420X/M420XV]
UsetheFOCUSringtoobtainthebestfocus.
[M350XS/M300XS/M260XS/M300WS/M260WS]
UsetheFOCUSlevertoobtainthebestfocus
Focus Ring
FOCUS lever
24
2. Projecting an Image (Basic Operation)
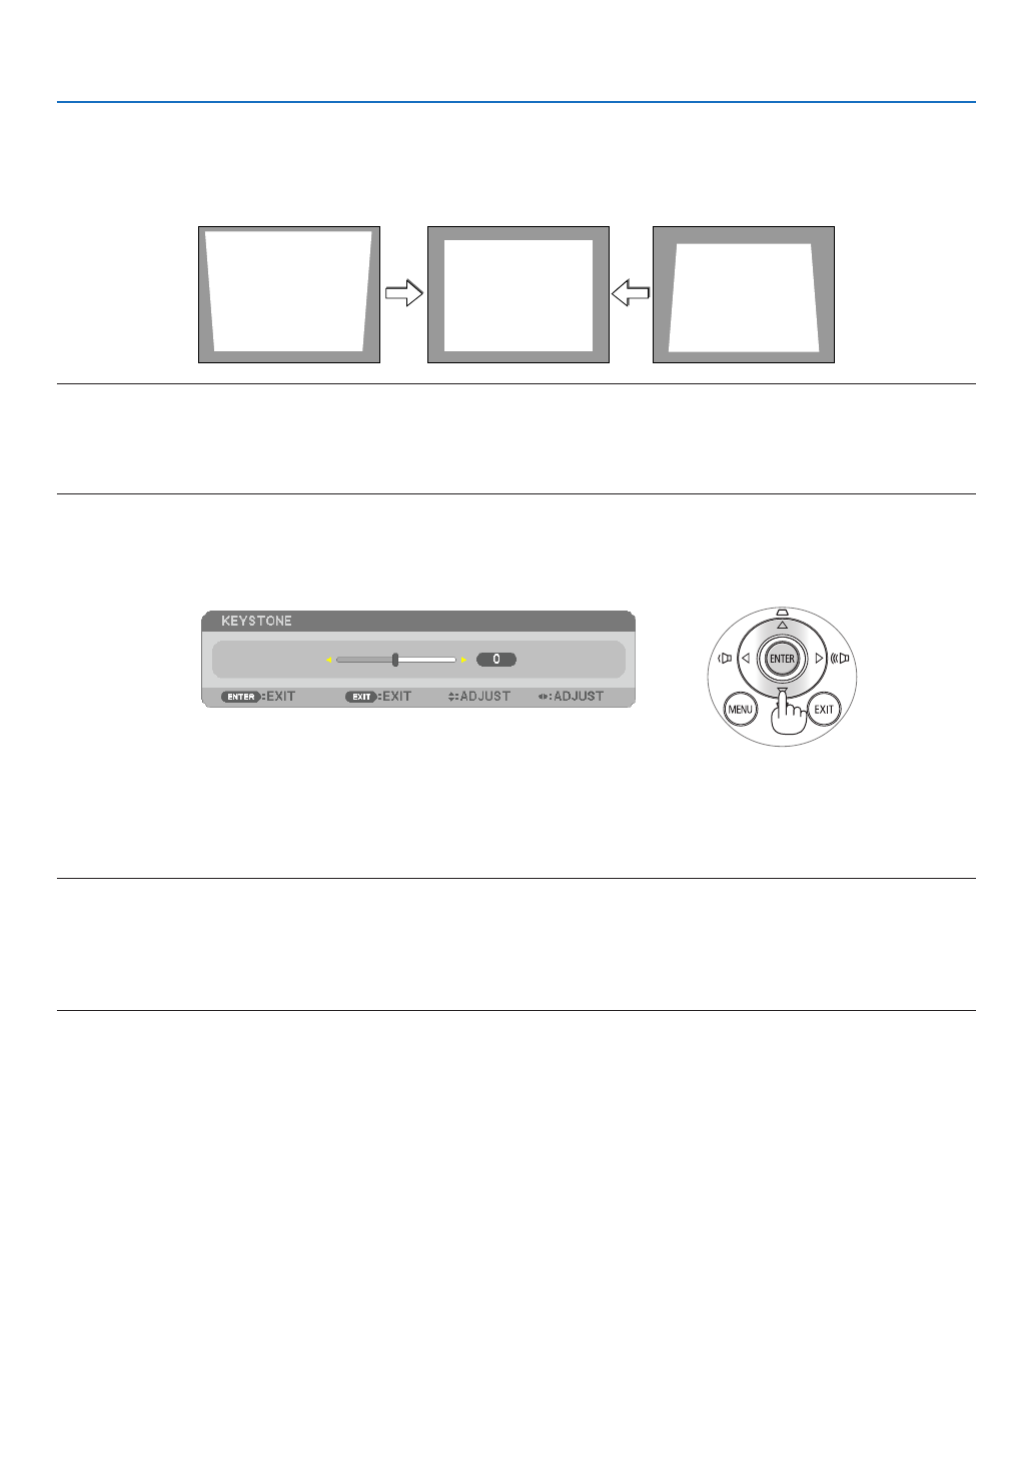
Correcting Keystone Distortion Manually
Ifthescreenistiltedvertically,keystonedistortionbecomeslarge.AutomaticKeystoneCorrection(AUTOKEYSTONE)
functionisturnedonatthetimeofshipment.Tocorrectkeystonedistortionmanually,proceedwiththefollowingsteps
tocorrectkeystonedistortion.
NOTE:
• TheKeystonecorrectioncancauseanimagetobeslightlyblurredbecausethecorrectionismadeelectronically.
• TheKeystonecorrectionrangecanbemadenarrower,dependingonasignaloritsaspectratioselection.
• YoumaynotgetthedesiredresultfromtheAutoKeystonecorrection,dependingonthepositionofthezoomlever.Ifthishap-
pens,performtheKeystonecorrectionmanually.
Adjusting with buttons on the cabinet
1. Pressthe buttonwithnomenusdisplayed. or
Thekeystonebarwillbedisplayed.
2. Usethe tocorrectthekeystonedistortion. or
Thekeystonebarwillbeclosedafteraperiodoftime.
3. PresstheENTERbutton.
Thekeystonebarwillbeclosed.
NOTE:
• Whenthemenuisdisplayed,theaboveoperationisnotavailable.Whenthemenuisdisplayed,presstheMENUbuttontoclose
themenuandstarttheKeystonecorrection.
Fromthemenu,select[SETUP] [GENERAL] [KEYSTONE].Thechangescanbesavedwith[KEYSTONESAVE].( page→ → →
81)
• Keystonecontrolisnotavailablewiththe or buttonwhenVIEWERisused.

25
2. Projecting an Image (Basic Operation)
Adjusting with the remote control
1. PresstheKEYSTONEbutton.
The Keystone bar will be displayed.
2. Usethe buttontocorrectthekeystonedistortion. or
Adjust so that the right and left sides are parallel.
3. PresstheEXITbutton.
The Keystone bar will be closed.

26
2. Projecting an Image (Basic Operation)
Optimizing Computer Signal Automatically
Adjusting the Image Using Auto Adjust
Optimizingacomputerimageautomatically.(COMPUTER1/COMPUTER2)
PresstheAUTOADJ.buttontooptimizeacomputerimageautomatically.
Thisadjustmentmaybenecessarywhenyouconnectyourcomputerforthersttime.
[Poor picture]
[Normal picture]
NOTE:
Somesignalsmaytaketimetodisplayormaynotbedisplayedcorrectly.
• IftheAutoAdjustoperationcannotoptimizethecomputersignal,trytoadjust[HORIZONTAL],[VERTICAL],[CLOCK],and[PHASE]
manually.( page , )→77 78
Turning Up or Down Volume (not available on M420XV)
Soundlevelfromthespeakercanbeadjusted.
TIP:Whennomenusappear,the and buttonsontheprojectorcabinetwork
asavolumecontrol.
NOTE:
• Volumecontrolisnotavailablewiththeorbuttonwhenanimageisenlarged
byusingtheD-ZOOM(+)buttonorwhenthemenuisdisplayed.
• Volume control is not available with the or buttonwhenVIEWER is
used.
TIP:The[BEEP]soundvolumecannotbeadjusted.Toturnoffthe[BEEP]sound,
fromthemenu,select[SETUP] [OPTIONS(1)] [BEEP] [OFF].→ → →
Increase volume
Decrease volume

27
2. Projecting an Image (Basic Operation)
Turning off the Projector
Toturnofftheprojector:
1. First,press the (POWER)buttonon theprojector
cabinetorthePOWEROFFbuttonontheremotecon-
trol.
The [POWER OFF / ARE YOU SURE? / CARBON SAV-
INGS- SESSION 0.000[g-CO2]] message will appear.
2. Secondly, press the ENTER button or press the
(POWER)orthePOWEROFFbuttonagain.
The lamp will turn off and the projector will go into standby
mode. When in standby mode, the POWER indicator will
light orange and the STATUS indicator will light green when
[NORMAL] is selected for [STANDBY MODE].
PowerOn
Steady blue light
Standby
Steady
orange light
CAUTION:
PartsoftheprojectormaybecometemporarilyheatediftheprojectoristurnedoffwiththePOWERbuttonorifthe
ACpowersupplyisdisconnectedduringnormalprojectoroperation.
Usecautionwhenpickinguptheprojector.
NOTE:
• Whilethepowerindicatorisblinkingblueinshortcycles,thepowercannotbeturnedoff.
• Youcannotturnoffthepowerfor60secondsimmediatelyafterturningitonanddisplayinganimage.
• DonotdisconnecttheACpowersupplytotheprojectorwithin10secondsofmakingadjustmentorsettingchangesandclosing
themenu.Doingsocancauselossofadjustmentsandsettings.

30
3. Convenient Features
Changing Eco Mode/Checking Energy-Saving Effect
Using Eco Mode [ECO MODE]
TheECOMODE(ECO1andECO2)increaseslamplife,whileloweringpowerconsumptionandcuttingdownonCO 2
emissions.
Fourbrightnessmodesofthelampcanbeselected:[OFF],[AUTOECO],[ECO1]and[ECO2]modes.
[ECOMODE] Description StatusofLAMPindicator
[OFF] Thisisthedefaultsetting(100%Brightness). Off
[AUTOECO] Lamp power consumption will be changed between
[OFF]and [ECO1]automatically accordingto picture
level
NOTE:Abrightgradationmaybelessvisibledependingon
theimage.
Steady
Greenlight
[ECO1] Lowlamppowerconsumption(approx.75%Brightness
onM350X/M300W/M420X/M420XV/M350XS/M300XS/
M300WS/M260WS and approx. 80% Brightness on
M300X/M260X/M230X/M260W/M260XS).
[ECO2](M300X,
M260X, and
M260XSonly)
Lowerlamppowerconsumptionthan[ECO1]mode(ap-
prox.50%BrightnessonM300X/M260X/M260XS)
Toturnonthe[ECOMODE],dothefollowing:
1. PresstheECOButtonontheremotecontroltodisplay[ECOMODE]screen.
2. PresstheECObuttonagaintoselectamodeyouwish.
• EachtimetheECObuttonispressed,thechoiceswillbechanged:
OFF AUTO ECO ECO1 ( ECO2) OFF→ → → →
• WhentheprojectorisinECOmode,theLAMPindicatorwilllightgreen.
TIP:
• TheleafsymbolatthebottomofthemenushowsthecurrentselectionofECOmode.
2. button.Pressthe
The area of the magnied image will be moved
3. PresstheD-ZOOM(−)button.
Each time the D-ZOOM (−) button is pressed, the image is reduced.
NOTE:
• Theimagewillbeenlargedorreducedatthecenterofthescreen.
• Displayingthemenuwillcancelthecurrentmagnication.
31
3. Convenient Features
NOTE:
• The[ECOMODE]canbechangedbyusingthemenu.
Select[SETUP] [GENERAL] [ECOMODE].→ →
• Thelampliferemainingandlamphoursusedcanbecheckedin[USAGETIME].Select[INFO.] [USAGETIME].→
• Theprojectorisalwaysin[ECO1]*for90secondsafterthelampisturnedonandwhilethePOWERindicatorisblinkingblue.
Thelampconditionwillnotbeaffectedevenwhen[ECOMODE]ischanged.
• Afteralapseof1minutefromwhentheprojectordisplaysno-signalguidance,ablue,blackorlogoscreen,[ECOMODE]will
automaticallyswitchto[ECO1]*.Theprojectorwillreturntothe[OFF]onceasignalisaccepted.
• Iftheprojectorisoverheatedin[OFF]mode,theremaybeacasewherethe[ECOMODE]automaticallychangesto[ECO1]*mode
toprotecttheprojector.Whentheprojectorisin[ECO1]*mode,thepicturebrightnessdecreases.Whentheprojectorcomes
backtonormaltemperature,the[ECOMODE]returnsto[OFF]mode.
Thermometersymbol[ ]indicatesthe[ECOMODE]isautomaticallysetto[ECO1]*modebecausetheinternaltemperatureis
toohigh.
*[ECO2]onM300X,M260X,andM260XSonly
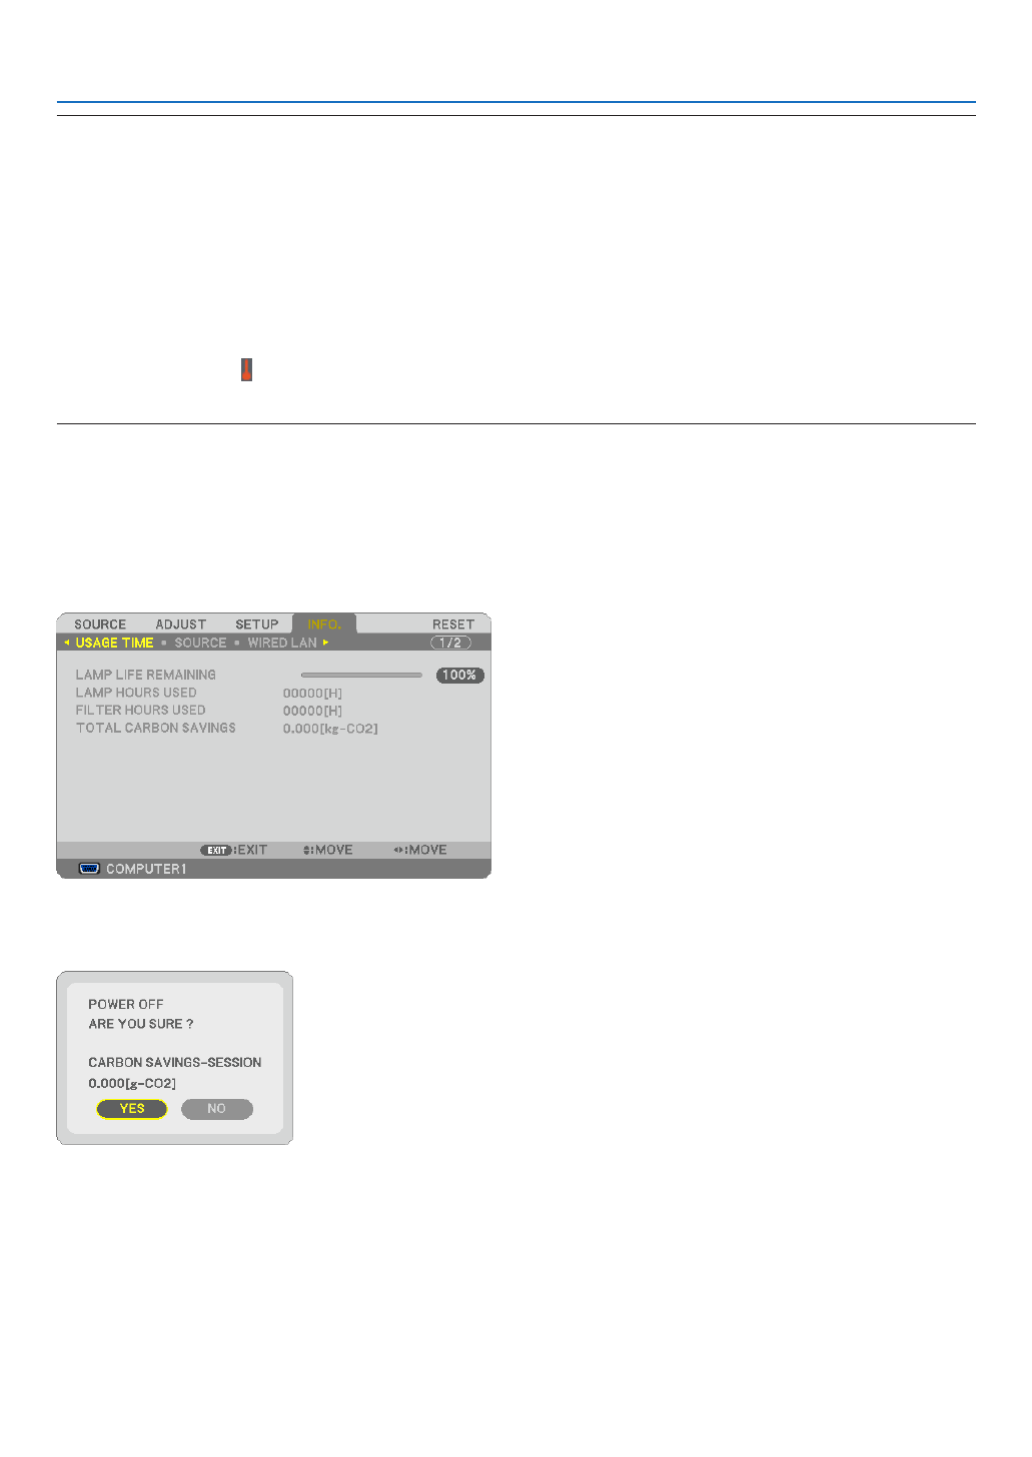
Checking Energy-Saving Effect [CARBON METER]
Thisfeaturewillshowenergy-savingeffectintermsofCO2emissionreduction(kg)whentheprojector’s[ECOMODE]
issetto[AUTOECO],[ECO1],or[ECO2].Thisfeatureiscalledas[CARBONMETER].
Therearetwomessages:[TOTALCARBONSAVINGS]and[CARBONSAVINGS-SESSION].The[TOTALCARBON
SAVINGS]messageshowsthetotalamountofCO
2emissionreductionfromthetimeofshipmentuptonow.Youcan
checktheinformationon[USAGETIME]from[INFO.]ofthemenu.( page )→94
The[CARBONSAVINGS-SESSION] messageshowstheamountof CO
2emissionreductionbetweenthetimeof
changingtoECOMODEimmediatelyafterthetimeofpower-onandthetimeofpower-off.The[CARBONSAVINGS-
SESSION]messagewillbedisplayedinthe[POWEROFF/AREYOUSURE?]messageatthetimeofpower-off.
TIP:
• TheformulaasshownbelowisusedtocalculatetheamountofCO 2emissionreduction.
AmountofCO2emissionreduction=(PowerconsumptioninOFFforECOMODE−PowerconsumptioninAUTOECO/ECO1/ECO2
forECOMODE)×CO2conversionfactor.*WhentheimageisturnedoffwiththeAVMUTEbuttonorwiththelenscoverclosed,
theamountofCO2emmissionreductionwillalsoincrease.
*CalculationforamountofCO2emissionreductionisbasedonanOECDpublication“CO2EmissionsfromFuelCombustion,2008
Edition”.
• The[TOTALCARBONSAVINGS]iscalculatedbasedonsavingsrecordedin15minutesintervals.
• Thisformulawillnotapplytothepowerconsumptionwhichisnotaffectedbywhether[ECOMODE]isturnedonoroff.
Produktspezifikationen
| Marke: | NEC |
| Kategorie: | Projektoren |
| Modell: | M300X |
Brauchst du Hilfe?
Wenn Sie Hilfe mit NEC M300X benötigen, stellen Sie unten eine Frage und andere Benutzer werden Ihnen antworten
Bedienungsanleitung Projektoren NEC

10 Juli 2024
9 Juli 2024
4 Juli 2024
Bedienungsanleitung Projektoren
- Projektoren Samsung
- Projektoren 3M
- Projektoren Acer
- Projektoren Sanyo
- Projektoren BenQ
- Projektoren Philips
- Projektoren Sony
- Projektoren Panasonic
- Projektoren Sharp
- Projektoren Mitsubishi
- Projektoren Salora
- Projektoren JVC
- Projektoren Optoma
- Projektoren Hitachi
- Projektoren Toshiba
- Projektoren Epson
- Projektoren ViewSonic
- Projektoren Dell
- Projektoren Ricoh
- Projektoren Barco
- Projektoren Bauer
- Projektoren Eiki
- Projektoren InFocus
- Projektoren Planar
Neueste Bedienungsanleitung für -Kategorien-

16 Oktober 2024

16 Oktober 2024

15 Oktober 2024

15 Oktober 2024
15 Oktober 2024

13 Oktober 2024
13 Oktober 2024

11 Oktober 2024

11 Oktober 2024

10 Oktober 2024