Motorola Lenovo K12 Bedienungsanleitung
Motorola
Mobiltelefon
Lenovo K12
Lesen Sie kostenlos die 📖 deutsche Bedienungsanleitung für Motorola Lenovo K12 (35 Seiten) in der Kategorie Mobiltelefon. Dieser Bedienungsanleitung war für 37 Personen hilfreich und wurde von 2 Benutzern mit durchschnittlich 4.5 Sternen bewertet
Seite 1/35

Tip: To best view this guide, download a PDF
reader app, then open the guide in the app.
User Guide

Hot topics
Contents
Hot topics
Get Started
First look
Insert the SIM and microSD cards
Power on
Sign in
Connect to Wi-Fi
Check your battery charge level
Navigate your phone
Improve battery life
Care for your phone
Learn the basics
Home screen
Help & more
Search
Notifications
Status icons
Volume
Do not disturb
Lock screen
Quick settings
Speak
Direct Share
Picture-in-Picture
Personalize your phone
Redecorate your home screen
Digital wellbeing & parental controls
Apps
Phone
Messages
Chrome™
Camera
Photos
Gmail
Duo
Calendar
More apps
Connect, share, pay & sync
Connect with Wi-Fi
Connect with Bluetooth wireless
Share files with your computer
Share your data connection
Print
Sync to the cloud
Cast your screen to a TV
Use a memory card
Airplane mode
Mobile network
Protect your phone
Screen lock
Your privacy
Screen pinning
Backup & restore
App safety
Data usage
Troubleshoot your phone
Restart or remove an app
Restart your phone
Check for software update
Reset
Stolen phone
Accessibility
Create a shortcut
Make your phone speak
Speak to your phone
Change your phone’s display
Change your phone’s sounds
Get more help
Where is my legal, safety, & regulatory
information?
Service & repairs
Copyright & trademarks
Hot topics
» Quick settings
» Personalize your phone
» Camera
» Protect your phone
» Speak
» Connect to Wi-Fi
» System navigation
Tip: To view all of these topics on your phone, swipe up from the home
screen and tap Device Help Learn> . For FAQs and other phone support, visit
http://support.lenovo.com.
To view the SAR and/or PD values for your phone, from the home screen, swipe
up and tap > Settings , then type .Regulatory labels
This product meets the applicable national or international RF exposure
guidance (SAR guideline) when used normally against your head or, when worn or
carried, at a distance of 5 mm from the body. To meet RF exposure guidelines during
body-worn operation, the device should be positioned at least this distance away from
the body. The SAR guideline includes a considerable safety margin designed to assure
the safety of all persons, regardless of age and health.
To view additional information, visit www.sar-tick.com.
Caution: Before using your phone, please read the legal information. Swipe up >
Settings About phone Legal information > > .

Get Started
Get Started
First look
Let’s get started. We’ll guide you through startup and tell you a bit about your phone’s
features.
Note: Certain apps and features may not be available in all countries.
Flash
Macro
Camera
Volume
Buttons
USB-C/Charger*
P er ow
Button
SIM &
microSD
Card Tray
Headset Jack
Front
Camera
Fingerprint
Sensor
Proximity
Sensor
Main
Camera
Google
Assistant
Button
Press:
Say a command
or ask a question.
Note:
T e may his featur
not be
available in
all languages.
Power button
Choose from these options:
» Power on/o: Press and hold the Power button, then tap Power o. When your
phone is o, press and hold the Power button to turn it on.
» Sleep/Wake up: To conserve battery power and prevent accidental touches, put the
touchscreen to sleep by pressing the Power button. Press it again to wake it up.
» Restart: To restart your phone, press and hold the Power button, then tap Restart.
Tip: see Protect your phone.
Volume buttons
To turn volume up or down:
» Music/video volume: Press the buttons when your phone is not ringing, or during a
song or video, to adjust media volume.
» Ringer volume: Press a volume button, then tap and slide the Ring volume bar.
Press a volume button when your phone is ringing to silence a call.
» Earpiece volume: Press the buttons during a call.
Tip: For more on volume control, see Volume.
Google Assistant button
Press the Google Assistant button, then speak a command or ask a question. For more
about this feature, see .
The Google Assistant™
*Your phone supports charging speeds up to 10W. To get the best charging
experience, you may purchase a 10W Motorola charger separately.

Get Started
Insert the SIM and microSD cards
To activate phone service, you might need to insert a SIM card (or two), or this may
have been done for you. You can also add a microSD card, which is optional and sold
separately.
Put in the cards
Caution: Make sure you use the correct size SIM card and don’t cut the SIM card.
1 Insert the SIM tool into the tray hole to pop out the tray.
2 Insert the SIM card(s) with the gold contacts down, then gently push the tray into the
slot. Add a microSD card for additional storage.
Note: microSD card is optional, sold separately.
SIM card insert graphic. After the battery is removed, the SIM card is inserted in the slot on the left with the clipped corner to the upper left. The SDcard is inserted in the right slot.
Nano SIM
SIM
or
SIM1
SIM2
One SIM model
Two SIM model
Power on
Press and hold the Power button, then follow the prompts to get started.
Power on graphic. Press and hold the Power button until the screen lights up.
Sign in
If you use Gmail™, you already have a Google™ account—if not, you can create an
account during setup. Signing into your Google account lets you access, sync, and
backup your stu. You can see your Google apps, contacts, calendar, photos, and more.
Tips
» To add, edit, or delete accounts, swipe up > > Settings Accounts.
» To set up email accounts, see .
Gmail
» For help with your Google account, visit www.google.com/accounts.
Connect to Wi-Fi
For faster Internet access and to conserve mobile data use, swipe the status bar down.
Touch and hold to choose a Wi-Fi network. For full instructions, see Connect with
Wi-Fi.
Note: This phone supports apps and services that may use a lot of data, so make sure
your data plan meets your needs. Contact your service provider for details.

Get Started
Check your battery charge level
Now is a good time to check if your phone needs to be charged. Swipe down on the
home screen to show battery charge level.
USB-C
Charge phone graphic. Plug in a charger to charge your phone fully.
To charge your phone, insert the charging cable that came with your phone into
the charging port (see for port location). Plug the other end into a power
First look
receptacle.
Note: Use of other chargers is not recommended.
Navigate your phone
Explore by touch
Use your fingers to find your way around:
» Tap: Choose an icon or option.
» Touch and hold: See more options.
» Drag: Move items on the home screen.
» Scroll through lists or between screens.Swipe:
» Pinch or double-tap: Zoom in and out on websites, photos, and maps.
» Twist: Twist a map with two fingers to rotate it, and pull two fingers down to tilt it.
» Split screen: Swipe up from the bottom of the screen and hold, then tap the icon at
the top of the screen and tap Split screen. Not all apps will work in split screen. To
close the split screen, drag the dividing line to the bottom of the screen.
» Menus: When you see , , or , you can tap it to open options for the current
screen.
» Close Keyboard: To close a keyboard, tap .
System navigation
Navigate using either gestures or buttons on the screen.
Navigation bar
Find it: Settings Gestures System navigation Gesture Swipe up > > System > > >
navigation
Navigation bar. To go to the home screen, swipe up from the bottom of the screen. To see your recent apps, swipe up from the bottom and hold. To go back a screen, swipe toward the middle from the left or right edge.
» Swipe up from the bottom of the screen. Go to the home screen:
» See recent apps: Swipe up from the bottom of the screen and hold. Tap an app to
reopen it. Tap the app icon to see app info or split the screen.
» Swipe toward the middle of the screen from the left or right edge.Go back a screen:
» Switch between apps: Swipe left or right across the bottom of the screen.
» Swipe up diagonally from the bottom corner of the Launch the Google Assistant:
screen to launch the Google Assistant. Learn more about .
The Google Assistant™
For Home screen,
swipe up.
To go back, swipe
toward the middle.
For cent apps, re
swipe up and hold.
To switch apps,
swipe left or right at
the bottom.
For Google
Assistant, swipe
up diagonally.

Get Started
Navigation buttons
Find it: Settings Gestures System navigation Swipe up > > System > > >
3-button navigation
» Back: Tap Back to go to the previous screen.
» Home: Tap Home to return to the home screen.
» Recents: Tap Recents to see your recent apps (or browser tabs), and tap an app
to reopen it. Double tap to quickly switch between your recent apps. To remove an
app from the recent list, swipe it up. To scroll the list, swipe right or left.
» Google Assistant: Touch and hold Home to launch the Google Assistant. Learn
more about The Google Assistant™.
Improve battery life
Your phone processes tons of information. Depending on what apps are in use, your
phone may use a lot of power.
When your phone is not in use for a period of time, unnecessary background processes
are shut down to optimize battery life.
» To see what’s using up battery power, swipe up > > > Settings Battery Menu
> .Battery usage
» To help improve battery life, swipe up > > >Settings Battery Battery Saver,
and turn it on. When on, your phone’s display changes to Dark theme.
» To limit battery use for apps that you don’t use often, swipe up > > Settings
Battery Adaptive Battery > , and turn it on.
Tip: To quickly open , swipe down twice on the status bar and tap Settings .
Battery Tips
To save even more battery life between charges, you could reduce:
» Widgets that stream information to your home screen, like news or weather.
» Unused accounts: Swipe up > > Settings Accounts.
» Recording or streaming videos or music.
Care for your phone
Tips
» When you’re near water, consider using a Bluetooth speaker to listen to music from
your phone while keeping it safe. For more, see Connect with Bluetooth wireless.
» Hold your phone firmly when using gestures to open the camera or to turn the
flashlight on/o. For more, see Gestures.
» Don’t leave your phone in a hot car on a sunny day. If you do accidentally do this, let
your phone cool o before powering up.
In case of water
Mobile devices marketed as water repellent are not waterproof. Avoid prolonged
exposure to water, and do not submerge in water. In the event your device is exposed
to water, dry your device and ports thoroughly with a soft, clean cloth. Water damage is
not covered by your warranty.
Tips to prevent damage to your phone:
» Dry your phone and ports thoroughly with a soft, clean cloth.
» Don’t try to charge your phone when it’s wet.
» Do not expose your phone to salt water or other liquids.
» Do not expose your phone to water at high pressure.
» Do not drop or puncture your device, as this could damage the water repellent
features.

Learn the basics
Clean your phone
To disinfect your phone:
» Use wipes or cloths moistened with isopropyl alcohol with a concentration of 70%
(specific for electro-electronic products).
» It is recommended that you turn your phone o to clean it.
» Avoid moisture in the phone’s openings, including the charging port, headset jack,
microphones, and speakers.
» Do not immerse the phone in cleaning agents, and do not use cleaning materials that
contain bleach or abrasive agents.
» Do not use sprays directly on the screen.
Learn the basics
Home screen
The home screen is what you see when you turn on your phone. From here you can
explore apps and more.
Note: Software updates may change the look of your home screen.
Home screen. At the top, tap the Google bar to type search options or tap the right hand microphone icon to speak a search. Icons at the top show notifications and phone status icons. Swipe up from center bottom to
get to your apps. App icons along the bottom are commonly used apps: phone, message, Google Chrome, Gallery, and camera.
Tips
» Swipe up to see all your apps.Open app list:
» Return home: To return to the home screen from any location, swipe up from the
navigation bar.
» To add a page, drag an app to the right side of the screen until you see a new Pages:
page. You can add multiple pages. To see other pages of shortcuts and widgets (if
11:35
pr 3
T
ue A
p
27°
Say “Hey Google”
Play StoreDuo PhotosGoogle
Swipe up to see
all your apps.
Search by typing, or
tap the microphone
and say a command.
Swipe down for
notifications and
settings.

Learn the basics
available), swipe the home screen left.
» Settings: To quickly open common settings, swipe the status bar down. To open
more settings, swipe the status bar down again and tap .
» Customization: To personalize your home screen and other features, see Personalize
your phone.
Help & more
Learn even more about your phone and get support.
Find it: Swipe up > Device Help
Tip: Some apps have their own help that’s specific to their features. Just tap the menu
inside the app for details.
Search
On the home screen, tap the Google Search box for a text search or tap to search by
voice.
When you type, suggestions appear below the search field:
» To search for a suggestion, tap it.
» To search for text in the search field, tap on the keyboard.
Tip: To close the keyboard, tap .
Note: For voice search, see .
Speak
Notifications
At the top of the screen, icons on the left notify you about new messages or events. If
you don’t know what an icon means, swipe the status bar down for details.
Tip: Getting too many notifications? Touch and hold a notification to see which app is
sending them to you. Then you can turn them o.
Notifications screen. Swipe down from the top of the home screen down to view notifications.
Tip: To quickly change common settings, swipe the status bar down. For more, see
Quick settings.
Smart reply
See suggestions based on notification content. For example, a text with an address may
show Google Maps as an option.
To turn o Smart reply, tap > Menu > > > Messages Settings Suggestions in chat
Smart Reply.
App notifications
You may see a notification dot on an app. This app notification, or badge,
tells you the app has an update or an announcement, such as a new email or
a missed call. Touch and hold the app for more information, options, or app
shortcuts.
ue, pr
Android Setup
Drive · Anna Pics
Google · 27°
Finish setting up your phone.
FINISH SETUP
1 file uploaded.
Vacation.png
Manage Clear all
Wed, Dec 4
Tip: Swipe left or right to rem e a ov
notification. Some notifications show
more options when you slide them
halfway.
Swipe down to see
your notifications.
Tap a notification to open it, or
choose an option, such as . Reply

Learn the basics
Status icons
Icons at the top right of the screen tell you about phone status:
Status Icons
Network strength Alarm set
/ Wi-Fi in range/connected Data Saver on
/ Bluetooth on/connected Battery Saver on
Airplane mode / Battery charging/full
Do not disturb
Volume
Press the side volume buttons up or down to select a ringer volume and see other
controls.
Volume screen. Press the Volume keys up or down to control the volume for Ring Notification, Media, and Alarm sounds. On screen, change the volume using slide bars.
Do not disturb
To turn o some or all sounds, swipe the status bar down, and touch and hold Do
not disturb. Select an option:
Show all volume controls.
Mut
e the ringer or set phone
to vibrate.
Slide the bar to
increase/decrease volume.
Mute the media player.
» See all exceptions: Select whether to hear alarms, media, or touch sounds.
» Restrict notifications: Set if you’d like to see notifications when Do not disturb mode
is on.
» Default duration: Set duration Do not disturb mode is on.
» Schedules: Turn on Do not disturb at specific times during the day or night, or sync
with your calendar.
Tip: Create an exception for repeat callers that allows a call to sound from the same
person within a 15 minute period, tap >Calls Allow repeat callers.
Lock screen
Your touchscreen is on when you need it and o when you don’t.
Lock screen showing access to voice control on the bottom left and camera on the bottom right. Swipe this screen up to unlock it.
» Press the Power button to turn the screen o and on.Screen o and on:
» Scr een lock: To unlock the main lock screen, swipe up from the bottom of the screen.
11:35
Tue, April 3
Add a lock screen message for
anyone who finds your phone.
T hank s f or fi n din g m y p h o ne !
Swipe up unlockto
your screen.
Learn the basics
To apply security to the lock screen (recommended), see . Screen lock
» Notifications: Double tap a notification to open it.
Tip: To prevent notifications from appearing in the lock screen, swipe up >
Settings Apps & notifications Notifications Notifications on lockscreen > > > >
Don’t show notifications.
» Lock screen message: To add a message to your lock screen, such as your name in
case your phone gets lost, swipe up > > >Settings Display Advanced Lock >
screen display Lock screen message > .
» Screen timeout: To change your timeout (screen locks automatically), swipe up >
> > Settings Display Advanced Screen timeout > .
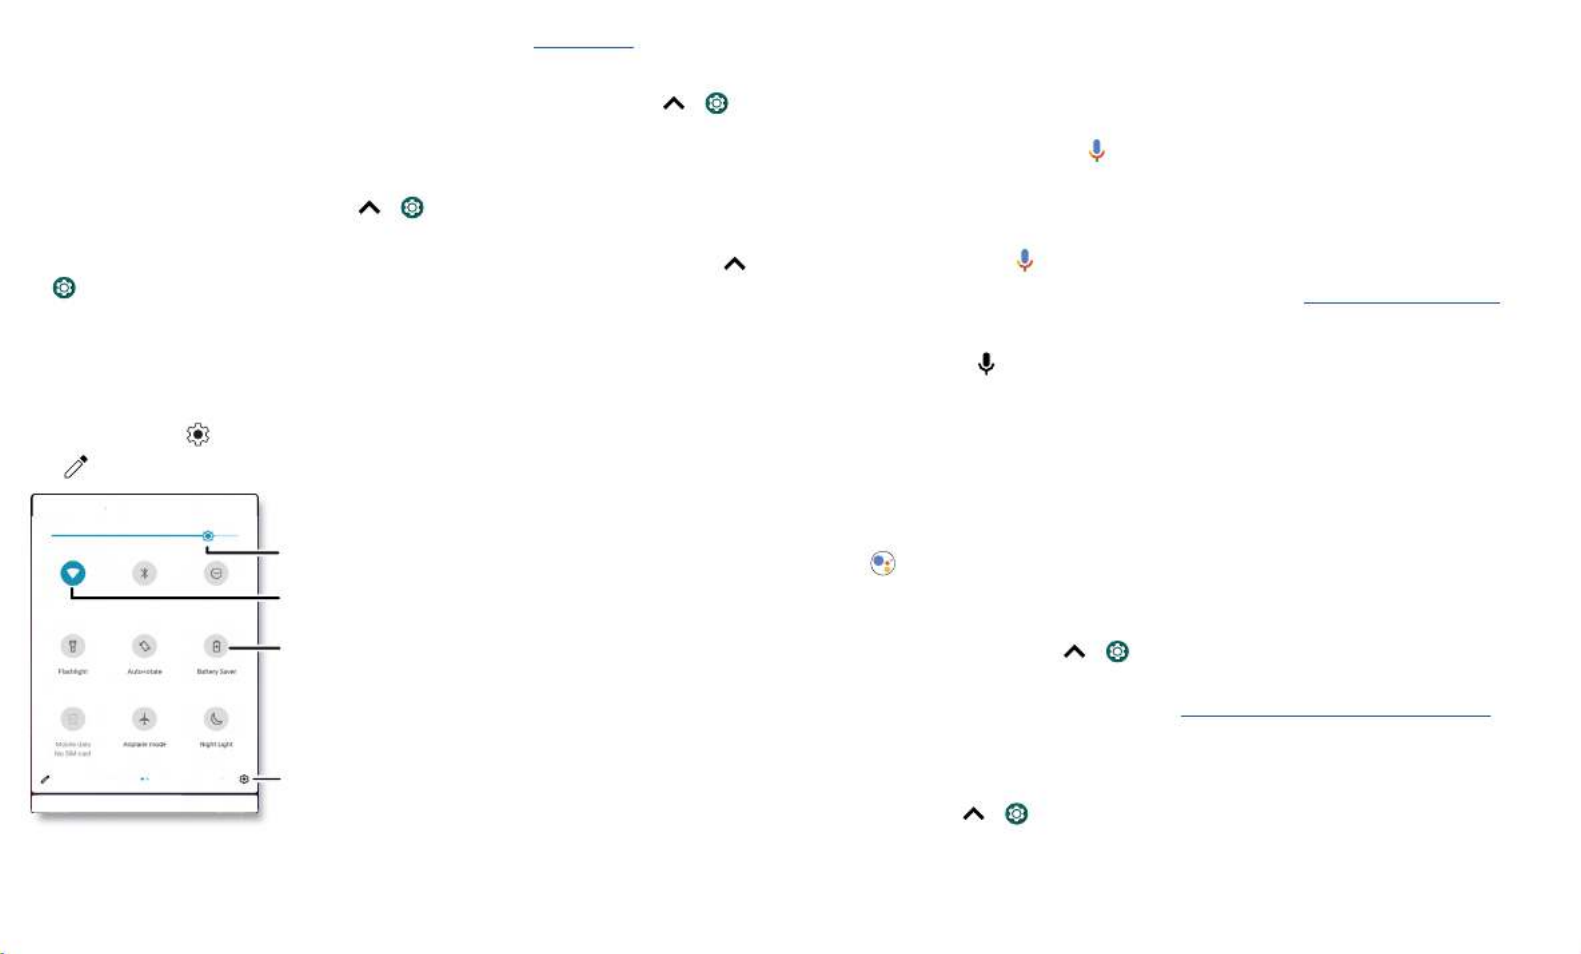
Quick settings
For quick access to Wi-Fi Bluetooth Airplane mode, , , brightness, and other settings,
swipe the status bar or lock screen down. Swipe down again for more settings. Tap an
icon to turn features on or o. Touch and hold an icon to see more options. For even
more settings, tap .
Tap to rearrange your settings and add or remove settings.
Quick Settings screen that shows options, such as Wi-Fi, Bluetooth, Airplane mode, Location and more. Customizable.
Your n
Turn Wi-Fi on/off.
See all phone settings.
Set screen brightness.
Tap an icon turn it on/off. to
Touch and hold see more to
options.
Speak
Google Voice™
Use Google voice commands to tell your phone what you want.
» Use voice to make a call: Tap on the home screen. Then say “Call” and then a
contact name or number. Or, say “Send text.”
Tip: If a contact has more than one number, you can say which number to call (for
example, “Call Joe Black Mobile”).
» Search by voice: Tap on the home screen to search by voice.
Note: To wake up your phone by saying “Hey Google,” see The Google Assistant™.
Voice to text
On a keyboard, tap , then speak your message or search text. You can also speak
punctuation.
The Google Assistant™
Note: This feature may not be available in all languages.
To open the Google Assistant:
» Press the Google Assistant button, then speak a command.
» Tap from the home screen or from your list of apps.
» Swipe up from the bottom corner of the screen, then speak or type a command.
Note: You can also say “Hey Google” or “Ok Google” to start the Google Assistant. To
turn this feature on, swipe up > > > Settings Google Account services Search, >
Assistant & Voice Voice Voice Match > > .
Tip: For more on the Google Assistant, visit https://support.google.com/assistant.
Gestures
Explore special gestures designed to save you time and make your day easier.
Find it: Swipe up > > > Settings System Gestures
» Swipe fingerprint for notifications: Swipe down on the fingerprint sensor to check
your notifications.

Learn the basics
» Jump to camera: Press the power button twice to quickly open the main camera.
» System navigation: Navigate using either gestures or buttons at the bottom of the
screen. For more, see System navigation.
» Lift to check phone: Lift your phone to check time, notifications, and other info.
» Prevent ringing: Press the Power and Volume Up buttons at the same time to switch
incoming calls to vibrate or mute.
» Fast flashlight: Turn the flashlight on/o with two chopping motions.
» Threefinger screenshot: Touch and hold the screen with three fingertips to capture
a screenshot.
Direct Share
In some apps, you can share something directly to a contact, app, or conversation.
Google Direct Share screen. Tap a contact to share an item. Swipe up to get more options.
Select the share option (usually by tapping ) within an app, then select a contact,
choose an app, or type a name or number to find a contact.
To use Bluetooth, or Nearby Share to share files, see Connect, share, pay & sync.
Picture-in-Picture
If you’re watching a video, on a video call, or using navigation, and you change screens,
your video continues to play in a small window on your screen.
Abe
Allie
Anna Medina Kevin Astrid nningFa
TO Type a name, phone number, or email
K
Michael
M
Nathan Mo
N
Create link dShare
album
Gmail Messages
Swipe up for more
share options.
Tap a contact to
share information.
» Tap twice to return to it.
» Tap the to close it.
» Swipe up from the bottom of the screen to put the video in a small window.
» Drag video around your screen.
Note: Not all apps support this feature.
Picture-in-Picture mode. Tap the video to open it on your screen.
29
January
29
Fri
10 AM
5 PM
4 PM
3 PM
2 PM
1 PM
12 PM
11 AM
Weekly Project Meeting
Start hangout with Alexis
https://plua.Google.com/hangouts
Pick up snacks for the party
Tap the video twice to return
to it.
Personalize your phone
» Add vibrate for calls: To make your phone vibrate, swipe up > > Settings
Sound Vibrate for calls and tap .
» Set a ringtone for a contact: Swipe up > , tap the contact, then tap Contacts
Menu > .Set ringtone
» Change language: Swipe up > > > > Settings System Languages & input
Languages.
» Adjust font size: Swipe up > > > Settings Display Advanced Font size > .
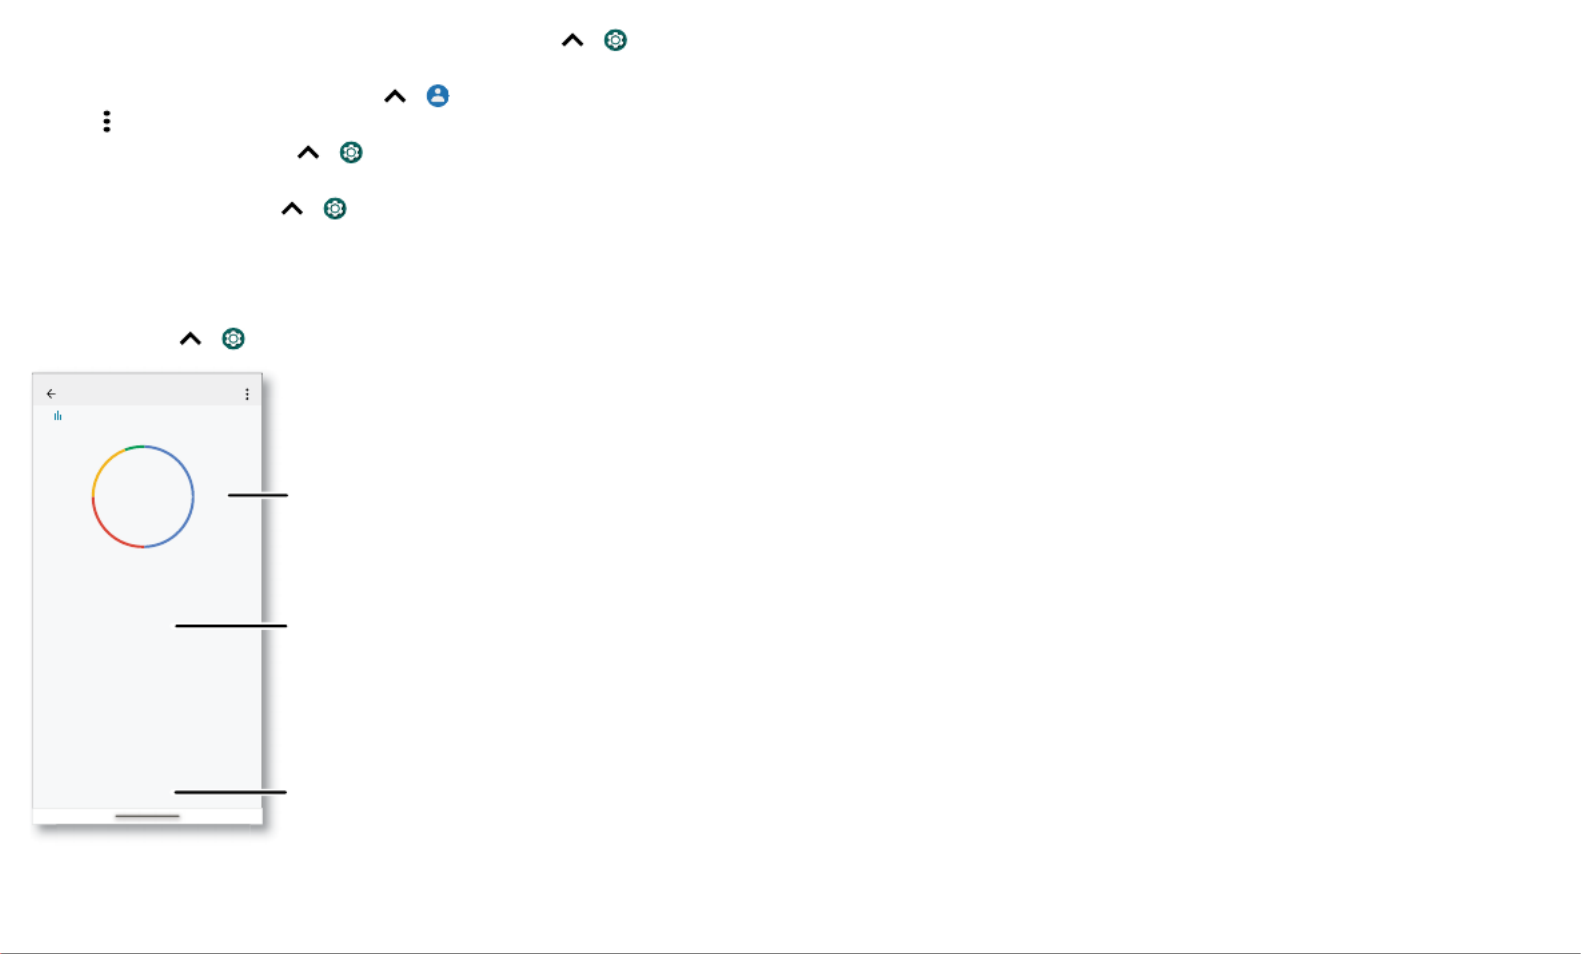
Digital wellbeing & parental controls
Set limits on how much time you spend on your phone, get a bedtime reminder, and
manage notifications.
Find it: Swipe up > >Settings Digital Wellbeing & parental controls
Digital wellbeing screen that shows options, such as Do Not Disturb and options for bedtime, app limits, and managing notifications.
WAYS TO DISCONNECT
Dashboard
Wind Down
Off
3
app t
i
mers se
t
REDUCE I ERRUPTIONSNT
Manage notifications
Do Not Disturb
Digital llbeing & parental co...We
Contacts
P
h
one
Camer
a
S
ett
i
ngs
3 12
Un
l
oc
k
s
N
oti
fi
cations
4 minutes
Today
Your Digital Wellbeing tools
Turn on Do Not Disturb.
Limit your app time, set a
bedtime, and more.
See a breakdown of how you
spend your time on your
phone.
To supervise this phone remotely, view and set screen time limits, and add restrictions
to services and apps, tap Set up parental controls.
Produktspezifikationen
| Marke: | Motorola |
| Kategorie: | Mobiltelefon |
| Modell: | Lenovo K12 |
Brauchst du Hilfe?
Wenn Sie Hilfe mit Motorola Lenovo K12 benötigen, stellen Sie unten eine Frage und andere Benutzer werden Ihnen antworten
Bedienungsanleitung Mobiltelefon Motorola

25 August 2024
25 August 2024
25 August 2024
16 August 2024
15 August 2024
15 August 2024
15 August 2024
14 August 2024
14 August 2024
13 August 2024
Bedienungsanleitung Mobiltelefon
- Mobiltelefon Samsung
- Mobiltelefon Acer
- Mobiltelefon Apple
- Mobiltelefon Asus
- Mobiltelefon Sanyo
- Mobiltelefon BenQ
- Mobiltelefon Gigabyte
- Mobiltelefon HP
- Mobiltelefon Medion
- Mobiltelefon Philips
- Mobiltelefon Panasonic
- Mobiltelefon LG
- Mobiltelefon AEG
- Mobiltelefon Siemens
- Mobiltelefon Denver
- Mobiltelefon Bush
- Mobiltelefon Telefunken
- Mobiltelefon Thomson
- Mobiltelefon Blaupunkt
- Mobiltelefon Sharp
- Mobiltelefon Mitsubishi
- Mobiltelefon Hisense
- Mobiltelefon Aiwa
- Mobiltelefon ARCHOS
- Mobiltelefon Mpman
- Mobiltelefon Polaroid
- Mobiltelefon Nokia
- Mobiltelefon Xiaomi
- Mobiltelefon Olympia
- Mobiltelefon Switel
- Mobiltelefon Akai
- Mobiltelefon Hyundai
- Mobiltelefon ITT
- Mobiltelefon Toshiba
- Mobiltelefon Allview
- Mobiltelefon Garmin
- Mobiltelefon GOCLEVER
- Mobiltelefon Casio
- Mobiltelefon Fysic
- Mobiltelefon Sencor
- Mobiltelefon Sony Ericsson
- Mobiltelefon ViewSonic
- Mobiltelefon Lupilu
- Mobiltelefon Tiny Love
- Mobiltelefon Dell
- Mobiltelefon Lenovo
- Mobiltelefon Razer
- Mobiltelefon Lava
- Mobiltelefon Sagem
- Mobiltelefon TELME
- Mobiltelefon Honor
- Mobiltelefon Alcatel
- Mobiltelefon Amplicomms
- Mobiltelefon Audioline
- Mobiltelefon Binatone
- Mobiltelefon Brondi
- Mobiltelefon Doro
- Mobiltelefon Emporia
- Mobiltelefon Hagenuk
- Mobiltelefon Profoon
- Mobiltelefon Swissvoice
- Mobiltelefon Tiptel
- Mobiltelefon Hammer
- Mobiltelefon InFocus
- Mobiltelefon NEC
- Mobiltelefon Huawei
- Mobiltelefon Energy Sistem
- Mobiltelefon Plum
- Mobiltelefon NGM
- Mobiltelefon Kyocera
- Mobiltelefon SPC
- Mobiltelefon HTC
- Mobiltelefon Auro
- Mobiltelefon Beafon
- Mobiltelefon BlackBerry
- Mobiltelefon Crosscall
- Mobiltelefon Cyrus
- Mobiltelefon Ericsson
- Mobiltelefon Kazam
- Mobiltelefon Palm
- Mobiltelefon Sonim
- Mobiltelefon ZTE
- Mobiltelefon Bixolon
- Mobiltelefon OnePlus
- Mobiltelefon Pantech
- Mobiltelefon Oppo
- Mobiltelefon CAT
- Mobiltelefon Realme
- Mobiltelefon Infinix
- Mobiltelefon Google
- Mobiltelefon Doogee
- Mobiltelefon GreatCall
- Mobiltelefon Hummer
- Mobiltelefon I.safe Mobile
- Mobiltelefon Logicom
- Mobiltelefon Maxcom
- Mobiltelefon Micromax
- Mobiltelefon O2
- Mobiltelefon Orange
- Mobiltelefon Oukitel
- Mobiltelefon Sunstech
- Mobiltelefon Teleline
- Mobiltelefon Ubiquio
- Mobiltelefon Benefon
- Mobiltelefon MyPhone
- Mobiltelefon BLU
- Mobiltelefon Amplicom
- Mobiltelefon Modu
- Mobiltelefon GSmart
- Mobiltelefon Bea-fon
- Mobiltelefon Innostream
- Mobiltelefon Syco
Neueste Bedienungsanleitung für -Kategorien-

30 November 2024
6 Oktober 2024

5 Oktober 2024

24 September 2024

18 September 2024
17 September 2024
16 September 2024
16 September 2024
15 September 2024
14 September 2024