LogiLink VG0002A Bedienungsanleitung
Lesen Sie kostenlos die đ deutsche Bedienungsanleitung fĂźr LogiLink VG0002A (2 Seiten) in der Kategorie Receiver. Dieser Bedienungsanleitung war fĂźr 2 Personen hilfreich und wurde von 2 Benutzern mit durchschnittlich 4.5 Sternen bewertet
Seite 1/2
1 2 3
1 2 3
4 5
4 5
5
Do not throw the appliance away with the normal household waste at the
end of its life, but hand it in at an oďŹcial collection point for recycling. By
doing this you will help to preserve the environment.
Geben Sie das Gerät am Ende der Lebensdauer nicht in den normalen
HausmĂźll. Bringen Sie es zum Recycling zu einer oďŹziellen
Sammelstelle. Auf diese Weise helfen Sie die Umwelt zu schonen.
1.0 Safety Instructions
1. Put the Device always on a stable and straight Surface. In case of falling, the
Device can be damaged.
2. Donât place the Device into direct Sunlight or in Places with high Temperature.
This can damage it or shorten his average useful Life.
3. Donât place the Device in the near of Heat Sources, like Radiators or other heat
producing Devices.
4. Donât expose the Device to Rain, Water, Wetness or high Humidity.
5. Donât place it in the Bathroom or the Kitchen in the near of a Sink. Avoid the direct
Contact with Water.
6. Donât try to open the Device.
Congratulations on the purchase of the VG0002A!
Read the instructions and warning references in this operating instructions carefully,
before you use the product for the ďŹrst time. During neglect it can come to damages
of the equipment.
2.0 Introduction
2.1 Product
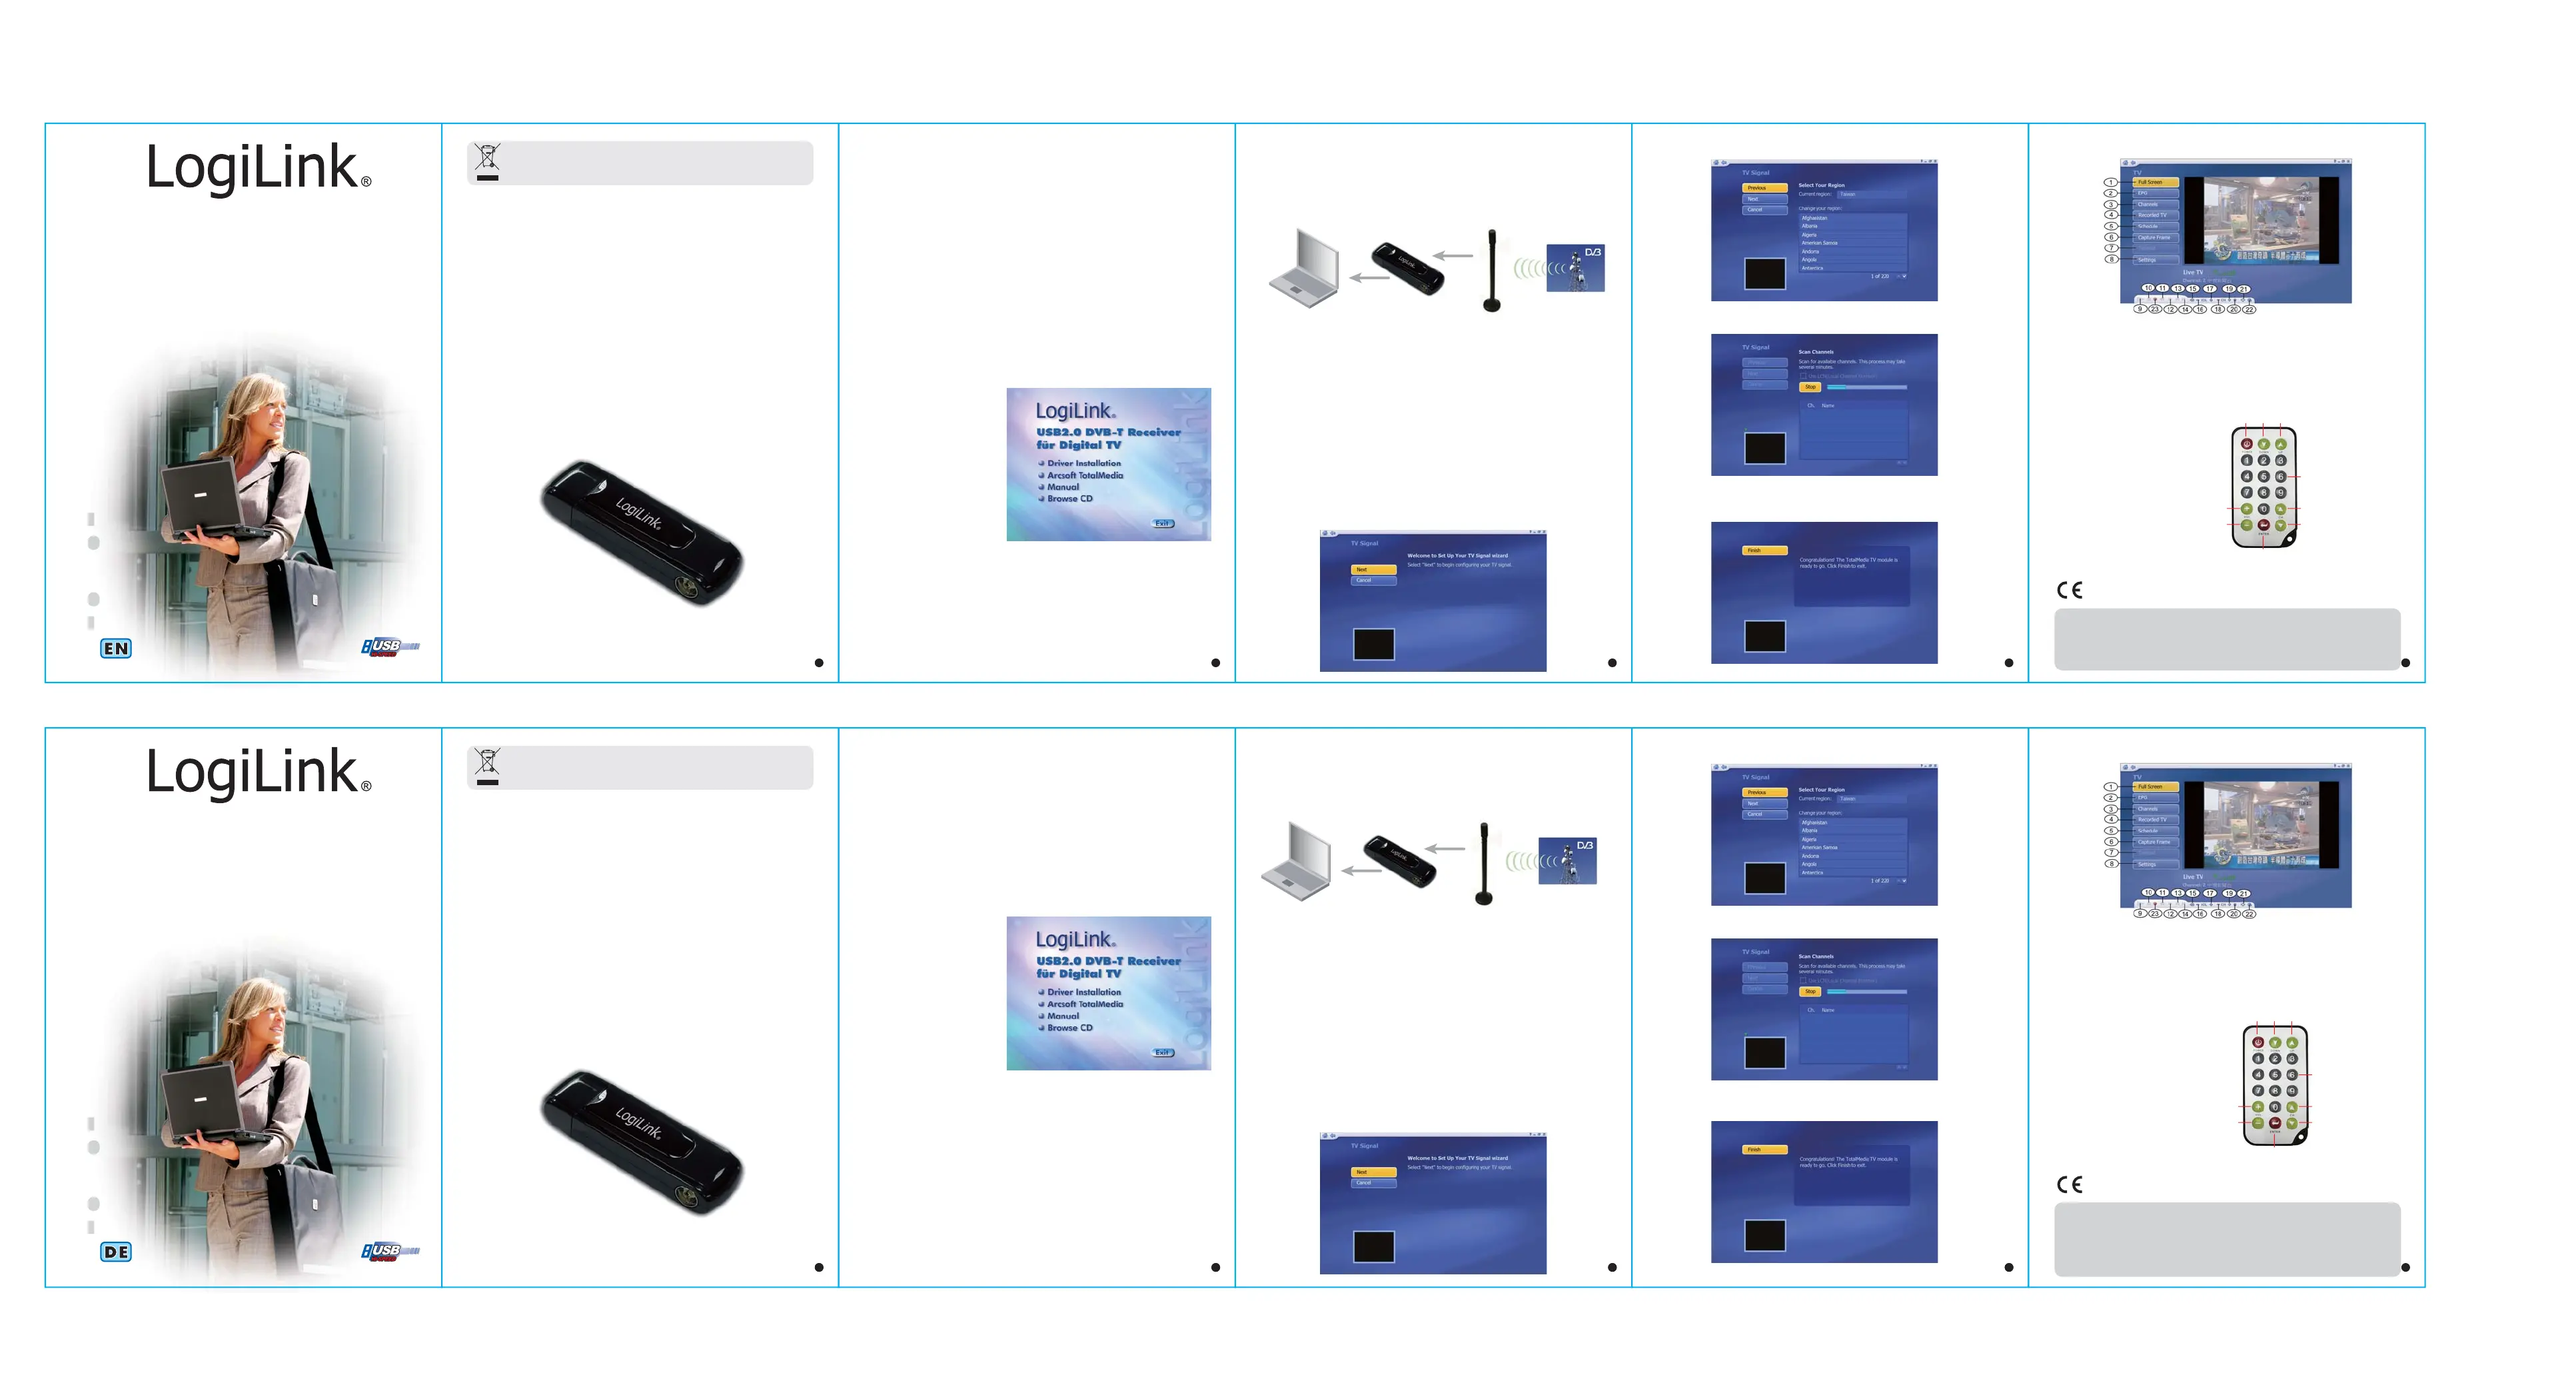
2.2 Package Contents:
⢠1 x Digital TV USB 2.0 device
⢠1 x Installation CD (Driver/Arcsoft TotalMedia/ Software Manual)
⢠1 x Quick Installation Guide
⢠1 x Portable Antenna
⢠1 x Remote Controller
2.3 System Requirements:
⢠Windows XP (SP2) / Vista
⢠Pentium4 1.6 GHz CPU
⢠512 MB RAM
⢠4 GB+ free hard drive space (For DVB-T TV recording and Time Shifting)
⢠16-bit color display at 1024 x 768
⢠DirectX 9.0
3.0 Installation
3.1 Software Installation
Please install following driver & software before you plug VG0002A into your PC or
NB.
⢠Driver Installation
⢠Arcsoft TotalMedia Software
Installation
⢠Manual (TotalMedia Help ďŹles
in Multi-Language)
1. Before using DVB-T USB device, please insert the Installation CD and install all
necessary driver and software.
2. If you are XP user, please make sure if you have installed âDirectX9.0â before. (If
you are VISTA user, the DirectX9.0 has been installed. You donât need to install it
again)
3. Install driver by clicking âdriver installationâ. You only need to follow the instruction
to ďŹnish the driver installation.
4. When driver is installed, please install Arcsoft TotalMedia for running DVB-T TV.
5. For TotalMedia application detail operation manual, please refer to TotalMedia
Help ďŹles. Click âManualâ and ďŹnd an appropriate language for TotalMedia
manual.
2. Select your region and press âNextâ
3. Press âStartâ to run the Channel scanning
4. When the scan is ďŹnished, please press âFinishâ to ďŹnalize the DVB-T TV program
scanning
4.3 TotalMedia Interface Interview
1. Full Screen 2. EPG 3. Channels
4. Recorded TV 5. Schedule 6. Capture Frame
7. Teletext 8. Settings 9. Playback
10. Stop 11. Backward 12. Forward
13. Skip to beginning 14. Skip to end 15. Volume Bar
16. Volume Down 17. Volume Up 18. Channel Down
19. Channel Up 20. My Favorite 21. Aspect Ratio
22. MTS 23. RECORD
4.4 Remote Controller
1. POWER
2. DOWN
3. UP
4. NUMBERS
5. VOLUME UP
6. VOLUME DOWN
7. ENTER
8. CHANNEL UP
9. CHANNEL DOWN
Note: The Remote Controller supports Total Media only.
The CE mark conďŹrmed that this product meets the main requirements of the
Directive 1999/5/CE of the European Parliament and the Council of Europe
concerning telecommunications and terminals regarding the Safety and health of
users and of electro-magnetic interference compliance. The CE has been
demonstrated. These statements are deposited by the manufacturer.
Das CE-Zeichen bestätigt, dass dieses Produkt die Hauptanforderungen der
Richtlinie 1999/5/CE des Europäischen Parlaments und des Europarates ßber
Telekommunikations- und Endgeräte bezßglich der Sicherheit und der
Gesundheit der Benutzer und hinsichtlich elektro- magnetischer StĂśrungen
einhält. Die CE Konformität wurde nachgewiesen. Die entsprechenden
Erklärungen sind beim Hersteller hinterlegt.
3.2 Hardware Install:
When driver and software are installed, please connect Digital TV USB Device to
USB port and portable antenna to the connector on device. For better TV signal
reception, please shift the portable antenna close to window as close as possible.
Note: the reception signal may be inďŹuent by the distance / obstacle objects, such
as buildings, mountain area. If the signal is not as good as expected, please
change the portable antenna to roof antenna for better reception.
Set up:
4.0 Total Media Software
4.1 Introduction:
1. Before launching TotalMedia, please make sure the Digital TV USB device has
been connected.
2. Total Media is a MCE like software, so when launched, you will see diďŹerent
features on the front panel.
3. Clicking âTVâ to watch DVB-T TV
Click âPictureâ to manage your picture
Click âVideoâ to watch video clips
Click âSetupâ to adjust diďŹerent parameter for functions.
4.2 Total Media DVB-T TV Scanning
For the ďŹrst time to use TotalMedia to watch DVB-T TV, the TV program scanning is
required. Please follow the following TV scanning process to run the TV program
scanning.
1. Press âNextâ to start the TV signal scanning
1 2 3 4
1.0 Sicherheitshinweise
Stellen Sie das Gerät immer auf eine stabile und gerade Fläche. Bei Stßrzen kann
es beschädigt werden.
Setzen Sie das Gerät nicht direktem Sonnenlicht oder hohen Temperaturen aus, da
dieses sonst ebenfalls beschädigt werden kann oder sich die Nutzungsdauer
verkĂźrzt.
Stellen Sie das Produkt nicht in der Nähe von Wärmequellen wie HeizkÜrpern oder
anderen Wärme erzeugenden Geräten auf.
Setzen Sie das Gerät nicht Regen, Wasser, Nässe oder hoher Luftfeuchtigkeit aus.
Stellen Sie es nicht im Badezimmer oder in der KĂźche neben einem Wasch- oder
Spßlbecken auf und vermeiden Sie auf alle Fälle direkten Kontakt mit Wasser.
Versuchen Sie nicht das Gerät zu ĂśďŹnen.
Herzlichen GlĂźckwunsch zum Kauf des VG0002A!
Lesen Sie die Anweisungen und Warnhinweise in dieser Bedienungsanleitung
sorgfältig durch, bevor Sie das Produkt zum ersten Mal verwenden. Bei
Nichtbeachtung kann es zu Beschädigungen des Gerätes kommen.
2.0 EinfĂźhrung
2.1 Produkt
2.2 Packungsinhalt
⢠1 x VG0002A USB DVB-T Dongle
⢠1 x Antenne
⢠1 x Fernbedienung
⢠1 x Bedienungsanleitung
⢠1 x CD (Treiber/Arcsoft TotalMedia/Software Manual)
2. Wählen Sie ihre entsprechende Region und fahren Sie mit âNextâ fort.
3. Starten Sie den Sendersuchlauf mit âStartâ.
4. Beenden Sie den automatischen Sendersuchlauf mit âFinishâ.
4.3 BenutzeroberďŹĂ¤che
1. Vollbild 2. EPG (elektr. Programmfßhrer) 3. Kanäle
4. aufgenommene Programme 5. Schedule
6. Schnappschuss 7. Teletext 8. Einstellungen
9. Wiedergabe 10. Stop 11. RĂźcklauf
12. Vorlauf 13. Suchlauf rßckwärts 14. Suchlauf vorwärts
15. Lautstärkeanzeige 16. Lautstärke - 17. Lautstärke +
18. Kanal vor 19. Kanal zurĂźck 20. Favoriten
21. Aspect Ratio 22. MTS 23. Aufnahme
4.4 Fernbedienung
1. An-/Aus Schalter
2. SoftwaremenĂź runter
3. SoftwaremenĂź hoch
4. ZiďŹerntasten
5. Lautstärke + 6. Lautstärke -
7. Enter 8. Kanal vor
9. Kanal zurĂźck
Hinweis: Die Fernbedienung unterstĂźtzt nur die Software Arcsoft Total Media.
2.3 Systemvoraussetzungen
⢠Windows 2000 (SP4) / XP (SP2) 32/64bit / Vista 32/64bit
⢠Pentium III 8000MHz (Pentium4 2.4GHz empfohlen)
⢠mind. 256 MB RAM (512 MB empfohlen)
⢠4 GB freier Speicherplatz (fßr Aufnahme und Time Shifting)
⢠16-bit Farbdisplay mit AuďŹĂśsung 1024 x 768
⢠DirectX 9.0
3.0 Installation
3.1 Software Installation
ACHTUNG !!! Installieren Sie den Treiber und die Software bevor Sie den VG0002A
mit ihrem PC verbinden.
CD Autostart - HauptmenĂź
1. Bevor Sie den VG0002A mit
Ihrem PC verbinden und
verwenden kĂśnnen, legen Sie
beiliegende CD in Ihr
CD/DVD-ROM Laufwerk und
installieren Sie den Treiber
und die Software.
2. Sofern Sie Windows XP nutzen, stellen Sie sicher das âDirectX9.0â bereits
installiert ist oder installieren Sie es im Vorfeld. Unter Windows Vista ist
âDirectX9.0â bereits standardmäĂig installiert.
3. Installieren Sie den Treiber durch Klicken auf âDriver Installationâ im CD
HauptmenĂź. Folgen Sie dann den Anweisungen um die Treiberinstallation fertig
zu stellen.
4. Installieren Sie nach der Treiberinstallation die Arcsoft Total Media Software um
den VG0002A nutzen zu kĂśnnen
5. FĂźr detaillierte Informationen lesen Sie auch das Handbuch der Software unter
âManualâ auf der CD. Sie kĂśnnen hier eine entsprechende Sprache auswählen.
3.2 Hardware Installation
Nach der Treiber- und Softwareinstallation kĂśnnen Sie nun die beiliegende Antenne
mit dem VG0002A und den VG0002A mit einem freien USB Port Ihres PCâs
verbinden. FĂźr einen besseren Empfang sollten Sie die Antenne so nah wie mĂśglich
ans Fenster stellen.
Hinweis: Informieren Sie sich Ăźber die DVB-T VerfĂźgbarkeit und das
Senderangebot in Ihrer Region. Die Ăbertragungsqualität hängt dann von
vielen Faktoren, wie z.B. Entfernung, Hindernisse wie Berge, Gebäude
u.ä., ab. Sollte das Signal schwächer als erwartet sein, so verbinden Sie
den VG0002A mit Ihrer Hausantenne um einen besseren Empfang zu
gewährleisten.
4.0 Total Media Software
4.1 EinfĂźhrung
1. Stellen Sie sicher, dass der VG0002A ordnungsgemäà mit dem PC verbunden ist,
bevor Sie die Software nutzen.
2. Arcsoft Total Media ist eine Universalsoftware die auĂer DVB-T noch andere,
verschiedene Features bietet.
3. âTVâ Nutzung von DVB-T
âPictureâ Bilderverwaltung
âVideoâ Videos ansehen
âSetupâ KonďŹgurationsmĂśglichkeiten
4.2 Inbetriebnahme
Bei der ersten Nutzung sollten Sie auf alle Fälle einen automatischen
Sendersuchlauf durchfĂźhren. Beachten Sie dazu folgende Anleitung.
1. Starten Sie das Programm fĂźr den Sendersuchlauf mit âNextâ.
1 2
7
3
4
8
9
5
6
1 2
7
3
4
8
9
5
6
Size: 105 x 148mm
1.0 Instrukcje z zakresu bezpieczeĹstwa
1. Urz dzenie powinno zawsze sta askim pod u. Upadek moÄ
Ä na stabilnym i pĹ Ĺ ĹźoĹźe
spowodowa dzenia.Ä uszkodzenie urzÄ
2. Nie wystawia dzenia na bezpo rednie dzia anie s ca, ani nie stawiaÄ urzÄ
Ĺ Ĺ Ĺ ĹoÄ w
miejscach gdzie nara one by oby na dzia anie wysokich temperatur. Wysoka Ĺź Ĺ Ĺ
temperatura mo e spowodowa dzenia lub znacznie skrĂłciĹź Ä uszkodzenie urzÄ
Ä
okres jego uĹźytkowania.
3. Nie nale y pozostawia dzenia w pobli a takich jak grzejniki czy Ĺź Ä urzÄ
Ĺź Ĺş Ĺu rĂłde ciepĹ
wydmuchy.
4. Nie nale y wystawia dzenia na dzia anie deszczu, wody, wilgoci ani Ĺź Ä urzÄ
Ĺ
wilgotnego powietrza.
5. Nie nale y pozostawia dzenia w kuchni czy azience w pobli u kranu. NaleĹź Ä urzÄ
Ĺ Ĺź Ĺźy
unika .Ä bezpoĹredniego kontaktu z wodÄ
6. Nie otwieraÄ obudowy urzÄ
dzenia.
Gratulujemy zakupu tunera VG0002A!
Przed rozpocz ciem korzystania z urz dzenia nale y starannie zapoznaÄ Ä
Ĺź Ä siÄ z
instrukcj aÄ
obsĹugi. NiewĹ Ĺciwe korzystanie z urzÄ
dzenia moĹźe prowadziÄ do jego
uszkodzenia
2.0 Informacje ogĂłlne
2.1 Produkt
1 2 31 2 3 4
Nie nale y wyrzuca urz dzenia do kosza na mieci, a gdy przestanie Ĺź Ä Ä
Ĺ
s u y nale y zwrĂłci je do oficjalnego odbiorcy tego typu odpadĂłw dla Ĺ Ĺź Ä Ĺź Ä
celĂłw recyclingu. Post puj c w ten sposĂłb pomagamy chroni rodowisko Ä Ä
Ä Ĺ
naturalne.
No tire el aparato fuera de la normal de residuos domĂŠsticos al final de
su vida, pero en parte, en un punto oficial de recogida para su reciclado.
De esta forma usted ayudarĂĄ a preservar el medio ambiente.
1 2 31 2 3 4 5
5
1 2
La marca CE confirma que este producto cumple los principales requisitos de la
Directiva 1999/5/CE del Parlamento Europeo y el Consejo de Europa relativas a
las telecomunicaciones y los terminales con respecto a la seguridad y la salud de
los usuarios y de electro-magnĂŠtico injerencia cumplimiento. El marcado "CE" se
ha demostrado. Estas declaraciones son depositados por el fabricante.
Znak CE potwierdza, Ĺźe niniejszy produkt spe nia g Ăłwne za enia dyrektywy Ĺ Ĺ Ĺ Ĺźo
1999/5/CE Parlamentu Europejskiego oraz Rady Europy w zakresie urzÄ
Ĺdze i
terminali telekomunikacyjnych zarĂłwno je li chodzi o bezpiecze stwo jak Ĺ Ĺ
zdrowie u ytkownika oraz spe nia wymogi zgodno ci interferencji Ĺź Ĺ Ĺ
elektromagnetycznej. Produkt posiada znak CE. Niniejsze o wiadczenie jest Ĺ
oĹwiadczeniem producenta.
2.2 Contenido del paquete:
⢠1 x TV Digital USB 2.0
⢠1 x CD de instalación (Conductor / Arcsoft TotalMedia / Manual del Software)
⢠1 x GuĂa de instalaciĂłn rĂĄpida
⢠1 x Portable Antenna
⢠1 x Mando a distancia
2.3 Requisitos del sistema:
⢠Windows XP (SP2) / Vista
⢠Pentium4 1.6 GHz CPU
⢠512 MB RAM
⢠4 GB + libres en disco duro (para DVB-T TV Tiempo de grabación y Shifting)
⢠16-bit de color en pantalla de 1024 x 768
⢠DirectX 9.0
3.0 InstalaciĂłn
3.1 InstalaciĂłn del software
Por favor, despuĂŠs de instalar el controlador y el software antes de conectar
VG0002A en su PC o NB.
⢠Instalación del controlador
⢠Instalación de software de
Arcsoft TotalMedia
⢠Manual (TotalMedia los
archivos de ayuda en varios
idiomas)
1. Antes de utilizar DVB-T USB,
por favor, inserte el CD de
instalaciĂłn e instalar todos
los controladores necesarios y el software.
2. Si usted es usuario de XP, por favor, asegĂşrese de si p2-ha instalado "DirectX9.0"
antes. (Si usted es usuario de VISTA, el DirectX9.0 se p2-ha instalado. No es
necesario instalarlo de nuevo)
3. Instalar el controlador haciendo clic en "instalaciĂłn del controlador". Usted sĂłlo
tiene que seguir las instrucciones para finalizar la instalaciĂłn del controlador.
4. Cuando se instale el controlador, por favor instale Arcsoft TotalMedia para el
funcionamiento de la DVB-T TV.
5. TotalMedia detalle para la aplicaciĂłn manual de manejo, por favor refiĂŠrase a los
archivos de ayuda TotalMedia. Haga clic en "Manual" y encontrar un lenguaje
apropiado para TotalMedia manual.
2. Seleccione su regiĂłn y pulse en "Next"
3. Pulse "Start" para ejecutar el escaneo de canales
4. Cuando la exploraciĂłn haya terminado, pulse en "Finish" para finalizar el DVB-T
TV del programa de exploraciĂłn
4.3 TotalMedia Interface Interview
1. Full Screen 2. EPG 3. Channels
4. Recorded TV 5. Schedule 6. Capture Frame
7. Teletext 8. Settings 9. Playback
10. Stop 11. Backward 12. Forward
13. Skip to beginning 14. Skip to end 15. Volume Bar
16. Volume Down 17. Volume Up 18. Channel Down
19. Channel Up 20. My Favorite 21. Aspect Ratio
22. MTS 23. RECORD
4.4 Mando a distancia
1. POWER
2. ABAJO
3. ARRIBA
4. NĂMEROS
5. VOLUME UP
6. VOLUME DOWN
7. ENTRAR
8. Canal Arrib
9. CANAL DE ABAJO
Nota: el control remoto total de los medios de comunicaciĂłn sĂłlo apoya.
3.2 InstalaciĂłn de hardware:
Cuando el controlador y el software instalado, por favor, conecte la televisiĂłn digital
para dispositivos USB y puerto USB portĂĄtil al conector de antena en el dispositivo.
Para una mejor recepciĂłn de seĂąal de TV, por favor, cambiar la antena portĂĄtil cerca
de la ventana lo mĂĄs cerca posible.
Nota: la recepciĂłn de seĂąal puede ser influyente en la distancia / obstĂĄculo objetos,
como edificios, zona de montaĂąa. Si la seĂąal no es tan buena como se
esperaba, por favor, cambiar la antena portĂĄtil para antena de techo para una
mejor recepciĂłn.
Set up:
4.0 Media total de Software
4.1 IntroducciĂłn:
1. Antes del lanzamiento de TotalMedia, por favor, asegĂşrese de que el dispositivo
USB de TV Digital se p2-ha conectado.
2. Total de los medios de comunicaciĂłn es un MCE como de software, asĂ que
cuando iniciĂł, verĂĄ distintas funciones en el panel frontal.
3. Al hacer clic en "TV" para ver DVB-T TV
Haga clic en " Picture" para gestionar su imagen
Haga clic en "VĂdeo" para ver clips de vĂdeo
Haga clic en "Setup" para ajustar los distintos parĂĄmetros para las funciones.
4.2 Media total DVB-T TV de escaneo
Por primera vez el uso TotalMedia para ver DVB-T TV, el programa de TV de
exploraciĂłn se requiere. Por favor siga el siguiente proceso de exploraciĂłn de TV
para ejecutar el programa de TV de exploraciĂłn.
1. Presione "Next" para iniciar la exploraciĂłn de seĂąal de TV
1.0 Instrucciones de seguridad
1. Coloque siempre el dispositivo en una superficie estable y recta. En caso de
caĂda, el dispositivo puede estar daĂąado.
2. No coloque el dispositivo en la luz directa del sol o en lugares con alta
temperatura. Esto puede daĂąar o reducir su promedio de vida Ăştil.
3. No coloque el dispositivo en la cerca de fuentes de calor, como radiadores u otros
artefactos que producen calor.
4. No exponga el dispositivo a la lluvia, el agua, la humedad o alta humedad.
5. No lo coloque en el baĂąo o la cocina en la cerca de un fregadero. Evite el
contacto directo con agua.
6. No intente abrir el dispositivo.
Enhorabuena por la compra de la VG0002A!
Lea las instrucciones de advertencia y las referencias en este manual de
instrucciones cuidadosamente antes de utilizar el producto por primera vez. Durante
el descuido puede llegar a los daĂąos del equipo.
2.0 IntroducciĂłn
2.1 Producto
1 2
7
3
4
8
9
5
6
2.2 zawartoĹÄ opakowania:
⢠Tuner Digital TV USB 2.0 (1 szt.)
⢠P yta instalacyjna CD (Sterowniki, Arcsoft TotalMedia, instrukcja) Ĺ
⢠Instrukcja instalacji (1 szt)
⢠Przeno na antena (1 szt.)Ĺ
⢠Pilot (1 szt.)
2.3 Wymagania systemowe:
⢠Windows XP (SP2) / Vista
⢠Pentium4 1.6 GHz CPU
⢠512 MB RAM
⢠4 GB+ wolnej przestrzeni na dysku (do nagrywania DVB-T TV oraz nagrywania z
przesuniÄciem czasowym)
⢠wy wietlacz kolorowy 16-bitowy o rozdzielczo ci 1024x768Ĺ Ĺ
⢠DirectX 9.0
3.0 Instalacja
3.1 Instalacja oprogramowania
Przed pod czeniem tunera do ĹÄ
komputera lub laptopa naleĹźy
zainstalowaÄ sterowniki i
oprogramowanie.
⢠Instalacja sterowników
⢠Instalacja oprogramowania
Arcsoft TotalMedia
⢠Instrukcja (Pliki pomocy
TotalMedia w wielu jÄzykach)
1. Przed rozpoczÄciem
korzystania z urz y wÄ
dzenia DVB-T USB naleĹź Ĺ Ĺź Ä Ĺ Äo y p yt instalacyjnÄ
i
zainstalowaÄ niezbÄdne sterowniki i oprogramowanie.
2. UĹźytkownicy XP muszÄ
dodatkowo zainstalowaÄ DirectX9.0. (Vista standardowo
posiada zainstalowany DirectX9.0)
3. Aby przystÄ
Äpi do instalacji naleĹźy kliknÄ
Ä na Driver installation/ instalacja
sterownikĂłw. Aby przeprowadziÄ instalacjÄ, nale y postĹź Ä Äpowa zgodnie z
podawanymi komunikatami.
4. Po zainstalowaniu sterownikĂłw nale y zainstalowaĹź Ä oprogramowanie Arcsoft
TotalMedia do obsĹugi DVB-T TV.
5. Instrukcje korzystania z aplikacji TotalMedia umieszczono w plikach pomocy
TotalMedia Help. Nale y klikn ytkowania oraz wybraĹź Ä
Ä na Manual/ Instrukcja uĹź Ä
odpowiedni jÄzyk.
2. WybraÄ region i kliknÄ
Ä na Next/ Dalej.
3. WcisnÄ
Ä Start aby rozpoczÄ
Ä skanowanie kanaĹĂłw.
4. Po zako y wcisnĹczeniu skanowania naleĹź Ä
Ä Finish/ ZakoĹcz by zakoĹ Äczy
program skanowania.
4.3 Interfejs aplikacji TotalMedia
1. PeĹny ekran (Full screen)
2. Elektroniczny Informator Programowy (EPG) 3. KanaĹy
4. Nagrane z telewizji 5. Plan dziaĹania
6. Zapisanie obrazu (funkcja Capture frame) 7. Tele text
8. Ustawienia 9. Odtwarzanie 10. Stop
11. Przewijanie w tyĹ 12. Przewijanie w przĂłd
13. PowrĂłt do pocz tku rozdziaÄ
Ĺu
14. Przej cie do ko ca rozdziaĹ Ĺ Ĺu 15. Regulacja gĹosu
16. Przyciszanie 17. Pog aĹ Ĺnianie 18. Poprzedni kanaĹ
19. Nast pny kanaÄ Ĺ 20. Ulubione 21. Ustawienie obrazu
22. MTS (obs uga d wiĹ Ĺş Äku) 23. Nagrywanie
4.4 Pilot
1. Zasilanie
2. W dóŠ3. W gĂłrÄ
4. Klawisze numeryczne
5. Pog aĹ Ĺnianie 6. Przyciszanie
7. ENTER
8. Nast pny kanaÄ Ĺ
9. Poprzedni kana Ĺ
Uwaga: Niniejszy pilot wspóŠĹÄ
pracuje wy cznie z TotalMedia.
3.2 Instalacja urzÄ
dzenia:
Po zainstalowaniu sterownikĂłw i oprogramowania, naleĹźy podĹÄ
Äczy tuner Digital TV
USB do portu USB oraz po . Dla lepszego odbioru, naleĹÄ
Äczy antenÄ Ĺźy umieĹ Äci
antenÄ w okolicy okna.
Uwaga: NaleĹź Ä Ä Ĺź ĹÄ Ĺ Ĺź Ä Ĺy pami ta , e jako sygna u mo e zosta zak Ăłcona przez zbyt
du oĹźÄ
odlegĹ ĹÄ pomiÄdzy antenÄ
a urzÄ
dzeniem, przeszkody (np. budynki),
okolice gĂłrzyste itp. Je li jakoĹ ĹÄ odbieranego przez antenÄ sygnaĹu nie
spe nĹnia oczekiwaĹ uĹźytkownika, naleĹźy zmieniÄ antenÄ przenoĹ Ä
na
anten .Ä dachowÄ
Ustawienie:
4.0 Oprogramowanie TotalMedia
4.1 Wprowadzenie
1. Przed uruchomieniem oprogramowania TotalMedia naleĹźy sprawdziÄ czy tuner
Digital TV USB zostaĹ podĹÄ
czony.
2. Oprogramowanie TotalMedia jest programem typu Media Center i po
uruchomieniu pojawia siÄ panel z szeregiem oferowanych funkcji.
3. Klikn dania DVB-T TV.Ä
Ä na TV by przejĹÄ do oglÄ
Klikn dzaÄ
Ä na Picture/ Obraz by zarzÄ
Ä obrazami.
KliknÄ
Ä na Video by obejrzeÄ klipy wideo.
KliknÄ
Ä na Setup/ ustawienia by przejĹÄ do regulacji ustawieĹ poszczegĂłlnych
parametrĂłw i funkcji.
4.2 Skanowanie kanaĹĂłw telewizyjnych przez Total Media
Przed pierwszym u yciem aplikacji TotalMedia oraz oglĹź Ä
daniem programĂłw przez
DVB-T, konieczne jest przeskanowanie kana Ăłw telewizyjnych. NaleĹ Ĺźy
przeprowadziÄ opisany
poniĹźej proces
skanowania kanaĹĂłw
korzystajÄ
c z
przeznaczonego do tego
celu programu.
1. Aby rozpoczÄ
Ä
skanowanie kanaĹĂłw
telewizyjnych naleĹźy
kliknÄ
Ä na Next/ Dalej.
123
4
8
9
5
6
7
Size: 105 x 148mm
Produktspezifikationen
Marke: | LogiLink |
Kategorie: | Receiver |
Modell: | VG0002A |
Brauchst du Hilfe?
Wenn Sie Hilfe mit LogiLink VG0002A benĂśtigen, stellen Sie unten eine Frage und andere Benutzer werden Ihnen antworten
Bedienungsanleitung Receiver LogiLink
20 August 2024
Bedienungsanleitung Receiver
- Receiver Asus
- Receiver Exibel
- Receiver Hama
- Receiver Audio-Technica
- Receiver Logitech
- Receiver Manhattan
- Receiver Nedis
- Receiver Philips
- Receiver Sandberg
- Receiver Sony
- Receiver Roland
- Receiver MX Onda
- Receiver Bosch
- Receiver Vox
- Receiver TechniSat
- Receiver Yamaha
- Receiver Velleman
- Receiver CSL
- Receiver Alecto
- Receiver Denver
- Receiver EMOS
- Receiver KĂśnig
- Receiver MarQuant
- Receiver Renkforce
- Receiver Bush
- Receiver Thomson
- Receiver Blaupunkt
- Receiver Kenwood
- Receiver Sharp
- Receiver Hilti
- Receiver Pyle
- Receiver Golden Age Project
- Receiver Aiwa
- Receiver AKG
- Receiver Auna
- Receiver Bose
- Receiver Bowers And Wilkins
- Receiver Caliber
- Receiver Maxview
- Receiver Denon
- Receiver Pioneer
- Receiver Jabra
- Receiver JBL
- Receiver JVC
- Receiver Klipsch
- Receiver Motorola
- Receiver Onkyo
- Receiver Sennheiser
- Receiver Shure
- Receiver Technics
- Receiver Vivanco
- Receiver Hifonics
- Receiver Megasat
- Receiver Smartwares
- Receiver Akai
- Receiver Dual
- Receiver Ferguson
- Receiver GoGEN
- Receiver Orava
- Receiver Strong
- Receiver Tascam
- Receiver Zoom
- Receiver Garmin
- Receiver Nexa
- Receiver Goobay
- Receiver Lindy
- Receiver Plantronics
- Receiver Fenton
- Receiver TOA
- Receiver Rotel
- Receiver Musway
- Receiver Tripp Lite
- Receiver Audio Pro
- Receiver Cabasse
- Receiver Harman Kardon
- Receiver Magnat
- Receiver Marmitek
- Receiver Marshall
- Receiver Naim
- Receiver Power Dynamics
- Receiver Samson
- Receiver Scosche
- Receiver Skytec
- Receiver Vonyx
- Receiver Peavey
- Receiver Marshall Electronics
- Receiver Sagem
- Receiver Simrad
- Receiver AVM
- Receiver Xoro
- Receiver Karma
- Receiver Reely
- Receiver Edision
- Receiver GigaBlue
- Receiver Humax
- Receiver Kathrein
- Receiver Metronic
- Receiver Xtrend
- Receiver Icom
- Receiver Alpine
- Receiver Rupert Neve Designs
- Receiver NAD
- Receiver Fender
- Receiver Renegade
- Receiver Ebode
- Receiver Vincent
- Receiver Vision
- Receiver Behringer
- Receiver Mackie
- Receiver Omnitronic
- Receiver MB Quart
- Receiver Marantz
- Receiver Monoprice
- Receiver Arcam
- Receiver Cambridge
- Receiver Crown
- Receiver Dynacord
- Receiver Ecler
- Receiver Luxman
- Receiver Monacor
- Receiver Rockford Fosgate
- Receiver TEAC
- Receiver Thorens
- Receiver Crunch
- Receiver Chamberlain
- Receiver JUNG
- Receiver Aplic
- Receiver InLine
- Receiver Sangean
- Receiver ClassĂŠ
- Receiver Optex
- Receiver Sherwood
- Receiver Jamo
- Receiver AXTON
- Receiver Clarion
- Receiver Mac Audio
- Receiver Kogan
- Receiver Humantechnik
- Receiver Skytronic
- Receiver Yaesu
- Receiver Audizio
- Receiver ESX
- Receiver Reloop
- Receiver Pinnacle
- Receiver Block
- Receiver Rega
- Receiver SYNQ
- Receiver Insignia
- Receiver DataVideo
- Receiver RCF
- Receiver Electro-Voice
- Receiver Cyrus
- Receiver Scansonic
- Receiver Sogo
- Receiver Delta Dore
- Receiver Salus
- Receiver Yorkville
- Receiver Elektrobock
- Receiver FiiO
- Receiver Boss
- Receiver IFM
- Receiver American Audio
- Receiver Anthem
- Receiver Roksan
- Receiver Engel Axil
- Receiver Alto
- Receiver Kopul
- Receiver Chord
- Receiver Kramer
- Receiver Hertz
- Receiver Pro-Ject
- Receiver Aeon Labs
- Receiver Vaddio
- Receiver Galaxy Audio
- Receiver HQ Power
- Receiver Ibiza Sound
- Receiver Kicker
- Receiver Warm Audio
- Receiver Polk
- Receiver Line 6
- Receiver Bogen
- Receiver DBX
- Receiver McIntosh
- Receiver Sonance
- Receiver Jensen
- Receiver JL Audio
- Receiver Pyle Pro
- Receiver PreSonus
- Receiver Qtx
- Receiver Hartke
- Receiver ART
- Receiver Deaf Bonce
- Receiver Fredenstein
- Receiver LD Systems
- Receiver RDL
- Receiver Audiolab
- Receiver Summit Audio
- Receiver Black Lion Audio
- Receiver Dreambox
- Receiver Bluesound
- Receiver GlobalSat
- Receiver Chandler
- Receiver DAP
- Receiver DAP Audio
- Receiver Denson
- Receiver DLS
- Receiver Focal
- Receiver Focusrite
- Receiver Formuler
- Receiver Fusion
- Receiver Graupner
- Receiver Ground Zero
- Receiver Helix
- Receiver Homecast
- Receiver Infinity
- Receiver JB Systems
- Receiver Koda
- Receiver Lanzar
- Receiver Legamaster
- Receiver Mercury
- Receiver Monitor Audio
- Receiver Mtx Audio
- Receiver Phoenix Gold
- Receiver REL Acoustics
- Receiver Selfsat
- Receiver Soundstream
- Receiver Steren
- Receiver Sunstech
- Receiver Terratec
- Receiver AMX
- Receiver Triax
- Receiver Velodyne
- Receiver Wharfedale
- Receiver Xsarius
- Receiver Zgemma
- Receiver Phonic
- Receiver Epcom
- Receiver Adastra
- Receiver Siig
- Receiver Amiko
- Receiver Mooer
- Receiver AudioControl
- Receiver MXL
- Receiver TV One
- Receiver StarTech.com
- Receiver Blackstar
- Receiver Smart-AVI
- Receiver QSC
- Receiver Dahua Technology
- Receiver Proel
- Receiver Niles
- Receiver Martin Logan
- Receiver Metra
- Receiver Kanto
- Receiver Sound Devices
- Receiver Speco Technologies
- Receiver IFi Audio
- Receiver Gefen
- Receiver Polsen
- Receiver Russound
- Receiver Vocopro
- Receiver SRS
- Receiver Astell&Kern
- Receiver IMG Stage Line
- Receiver Inovonics
- Receiver Mosconi
- Receiver Atlas Sound
- Receiver FBT
- Receiver CYP
- Receiver Amplicom
- Receiver Palmer
- Receiver Ampeg
- Receiver Avalon
- Receiver Bang Olufsen
- Receiver Lectrosonics
- Receiver ATen
- Receiver Eventide
- Receiver Laney
- Receiver SVS
- Receiver KanexPro
- Receiver Citronic
- Receiver Crest Audio
- Receiver Lab Gruppen
- Receiver SPL
- Receiver Parasound
- Receiver Apantac
- Receiver Brigmton
- Receiver MEE Audio
- Receiver Wet Sounds
- Receiver Pyramid
- Receiver Stewart
- Receiver Black Hydra
- Receiver Linn
- Receiver Roswell
- Receiver Music Hall
- Receiver Audac
- Receiver OSD Audio
- Receiver Match
- Receiver Audioengine
- Receiver Neets
- Receiver EA
- Receiver BZBGear
- Receiver Crestron
- Receiver PSSO
- Receiver HiFi ROSE
- Receiver Accell
- Receiver Ibanez
- Receiver Antelope Audio
- Receiver Pharos
- Receiver Kemo
- Receiver Audix
- Receiver Avantree
- Receiver PSB
- Receiver Extron
- Receiver Atlona
- Receiver Comtek
- Receiver JTS
- Receiver Redline
- Receiver Grace Design
- Receiver Ashdown Engineering
- Receiver Ram Audio
- Receiver Esoteric
- Receiver Xantech
- Receiver Wavtech
- Receiver Artsound
- Receiver Rolls
- Receiver Sonifex
- Receiver Advance Acoustic
- Receiver Kali Audio
- Receiver Revel
- Receiver WyreStorm
- Receiver Wireless Solution
- Receiver Manley
- Receiver Klark Teknik
- Receiver AVMATRIX
- Receiver Alfatron
- Receiver Mark Levinson
- Receiver CAD Audio
- Receiver Key Digital
- Receiver Sound Ordnance
- Receiver Majestic
- Receiver Ocean Matrix
- Receiver Markbass
- Receiver AmpliVox
- Receiver LEA
- Receiver Memphis Audio
- Receiver FiveO
- Receiver Televes
- Receiver Aquatic AV
- Receiver Ashly
- Receiver Fishman
- Receiver Integra
- Receiver Blustream
- Receiver CyberData Systems
- Receiver Williams Sound
- Receiver JETI
- Receiver SureCall
- Receiver WesAudio
- Receiver ANKARO
- Receiver NUVO
- Receiver Audiofrog
- Receiver Canyon
- Receiver Trace Elliot
- Receiver The T.amp
- Receiver Knoll
- Receiver MuxLab
- Receiver Hegel
- Receiver Triangle
- Receiver Whirlwind
- Receiver Camille Bauer
- Receiver Hughes & Kettner
- Receiver Palsonic
- Receiver Musical Fidelity
- Receiver Rexing
- Receiver A-NeuVideo
- Receiver Crest
- Receiver Primare
- Receiver C2G
- Receiver Fosi Audio
- Receiver S.M.S.L
- Receiver Advance
- Receiver AEA
- Receiver TechLogix Networx
- Receiver CE Labs
- Receiver Gold Note
- Receiver Audiotec Fischer
- Receiver Sinus Live
- Receiver Shinybow
- Receiver Shanling
- Receiver Fontastic
- Receiver BC Acoustique
- Receiver NuPrime
- Receiver Creek
- Receiver Valcom
- Receiver Intelix
- Receiver Madison
- Receiver Topp Pro
- Receiver Whistler
- Receiver Powersoft
- Receiver LinksPoint
- Receiver Modelcraft
- Receiver Simaudio
- Receiver TIC
- Receiver Mobile Crossing
- Receiver FSR
- Receiver Edwards Signaling
- Receiver Lyngdorf
- Receiver AudioSource
- Receiver Leema
- Receiver Quad
- Receiver IOTAVX
- Receiver Inter-M
- Receiver Soundtrack
- Receiver Canor
- Receiver Unison Research
- Receiver Clare Controls
- Receiver Loxjie
- Receiver Cayin
- Receiver Technical Pro
- Receiver VMV
- Receiver Bellari
- Receiver Comprehensive
- Receiver PureLink
- Receiver FoneStar
- Receiver Glemm
Neueste Bedienungsanleitung fĂźr -Kategorien-
4 Oktober 2024
4 Oktober 2024
4 Oktober 2024
4 Oktober 2024
4 Oktober 2024
3 Oktober 2024
3 Oktober 2024
3 Oktober 2024
3 Oktober 2024
3 Oktober 2024