Lexmark XS796 Bedienungsanleitung
Lesen Sie kostenlos die 📖 deutsche Bedienungsanleitung für Lexmark XS796 (36 Seiten) in der Kategorie Drucker. Dieser Bedienungsanleitung war für 37 Personen hilfreich und wurde von 2 Benutzern mit durchschnittlich 4.5 Sternen bewertet
Seite 1/36
Quick Reference
Learning about the printer
Understanding the printer control panel
13
4
5
6
7
8
9
2
Item Description
1Display Lets you view scanning, copying, faxing, and
printing options as well as status and error
messages
2Indicator light •Off—The power is off.
•Blinking green—The printer is warming up,
processing data, or printing.
•Solid green—The printer is on, but idle.
•Blinking red—Operator intervention is
needed.
Item Description
3Sleep Activates Sleep Mode or Hibernate Mode
The following are the statuses of the indicator
light and the Sleep button:
•Entering or waking from Sleep Mode—The
indicator light is illuminated solid green,
Sleep button is unilluminated.
•Operating in Sleep Mode—The indicator
light is illuminated solid green, Sleep button
is illuminated solid amber.
•Entering or waking from Hibernate Mode—
The indicator light is illuminated solid green,
Sleep button is illuminated blinking amber.
•Operating in Hibernate Mode—The
indicator light is unilluminated, Sleep
button is blinking amber in pulsing pattern.
4Keypad Lets you enter numbers, letters, or symbols on
the display
5Submit Lets you submit changes made in the printer
settings
6Stop/Cancel Stops all printer activity
Note: A list of option is displayed once
Stopped appears on the display.
7Home Lets you navigate back to the home screen
8Card reader Limits the use of certain printer functions to
authenticated users
Note: The card reader may not be available on
all printer models.
9USB port Lets you insert a USB flash drive to send data or
to save scanned images
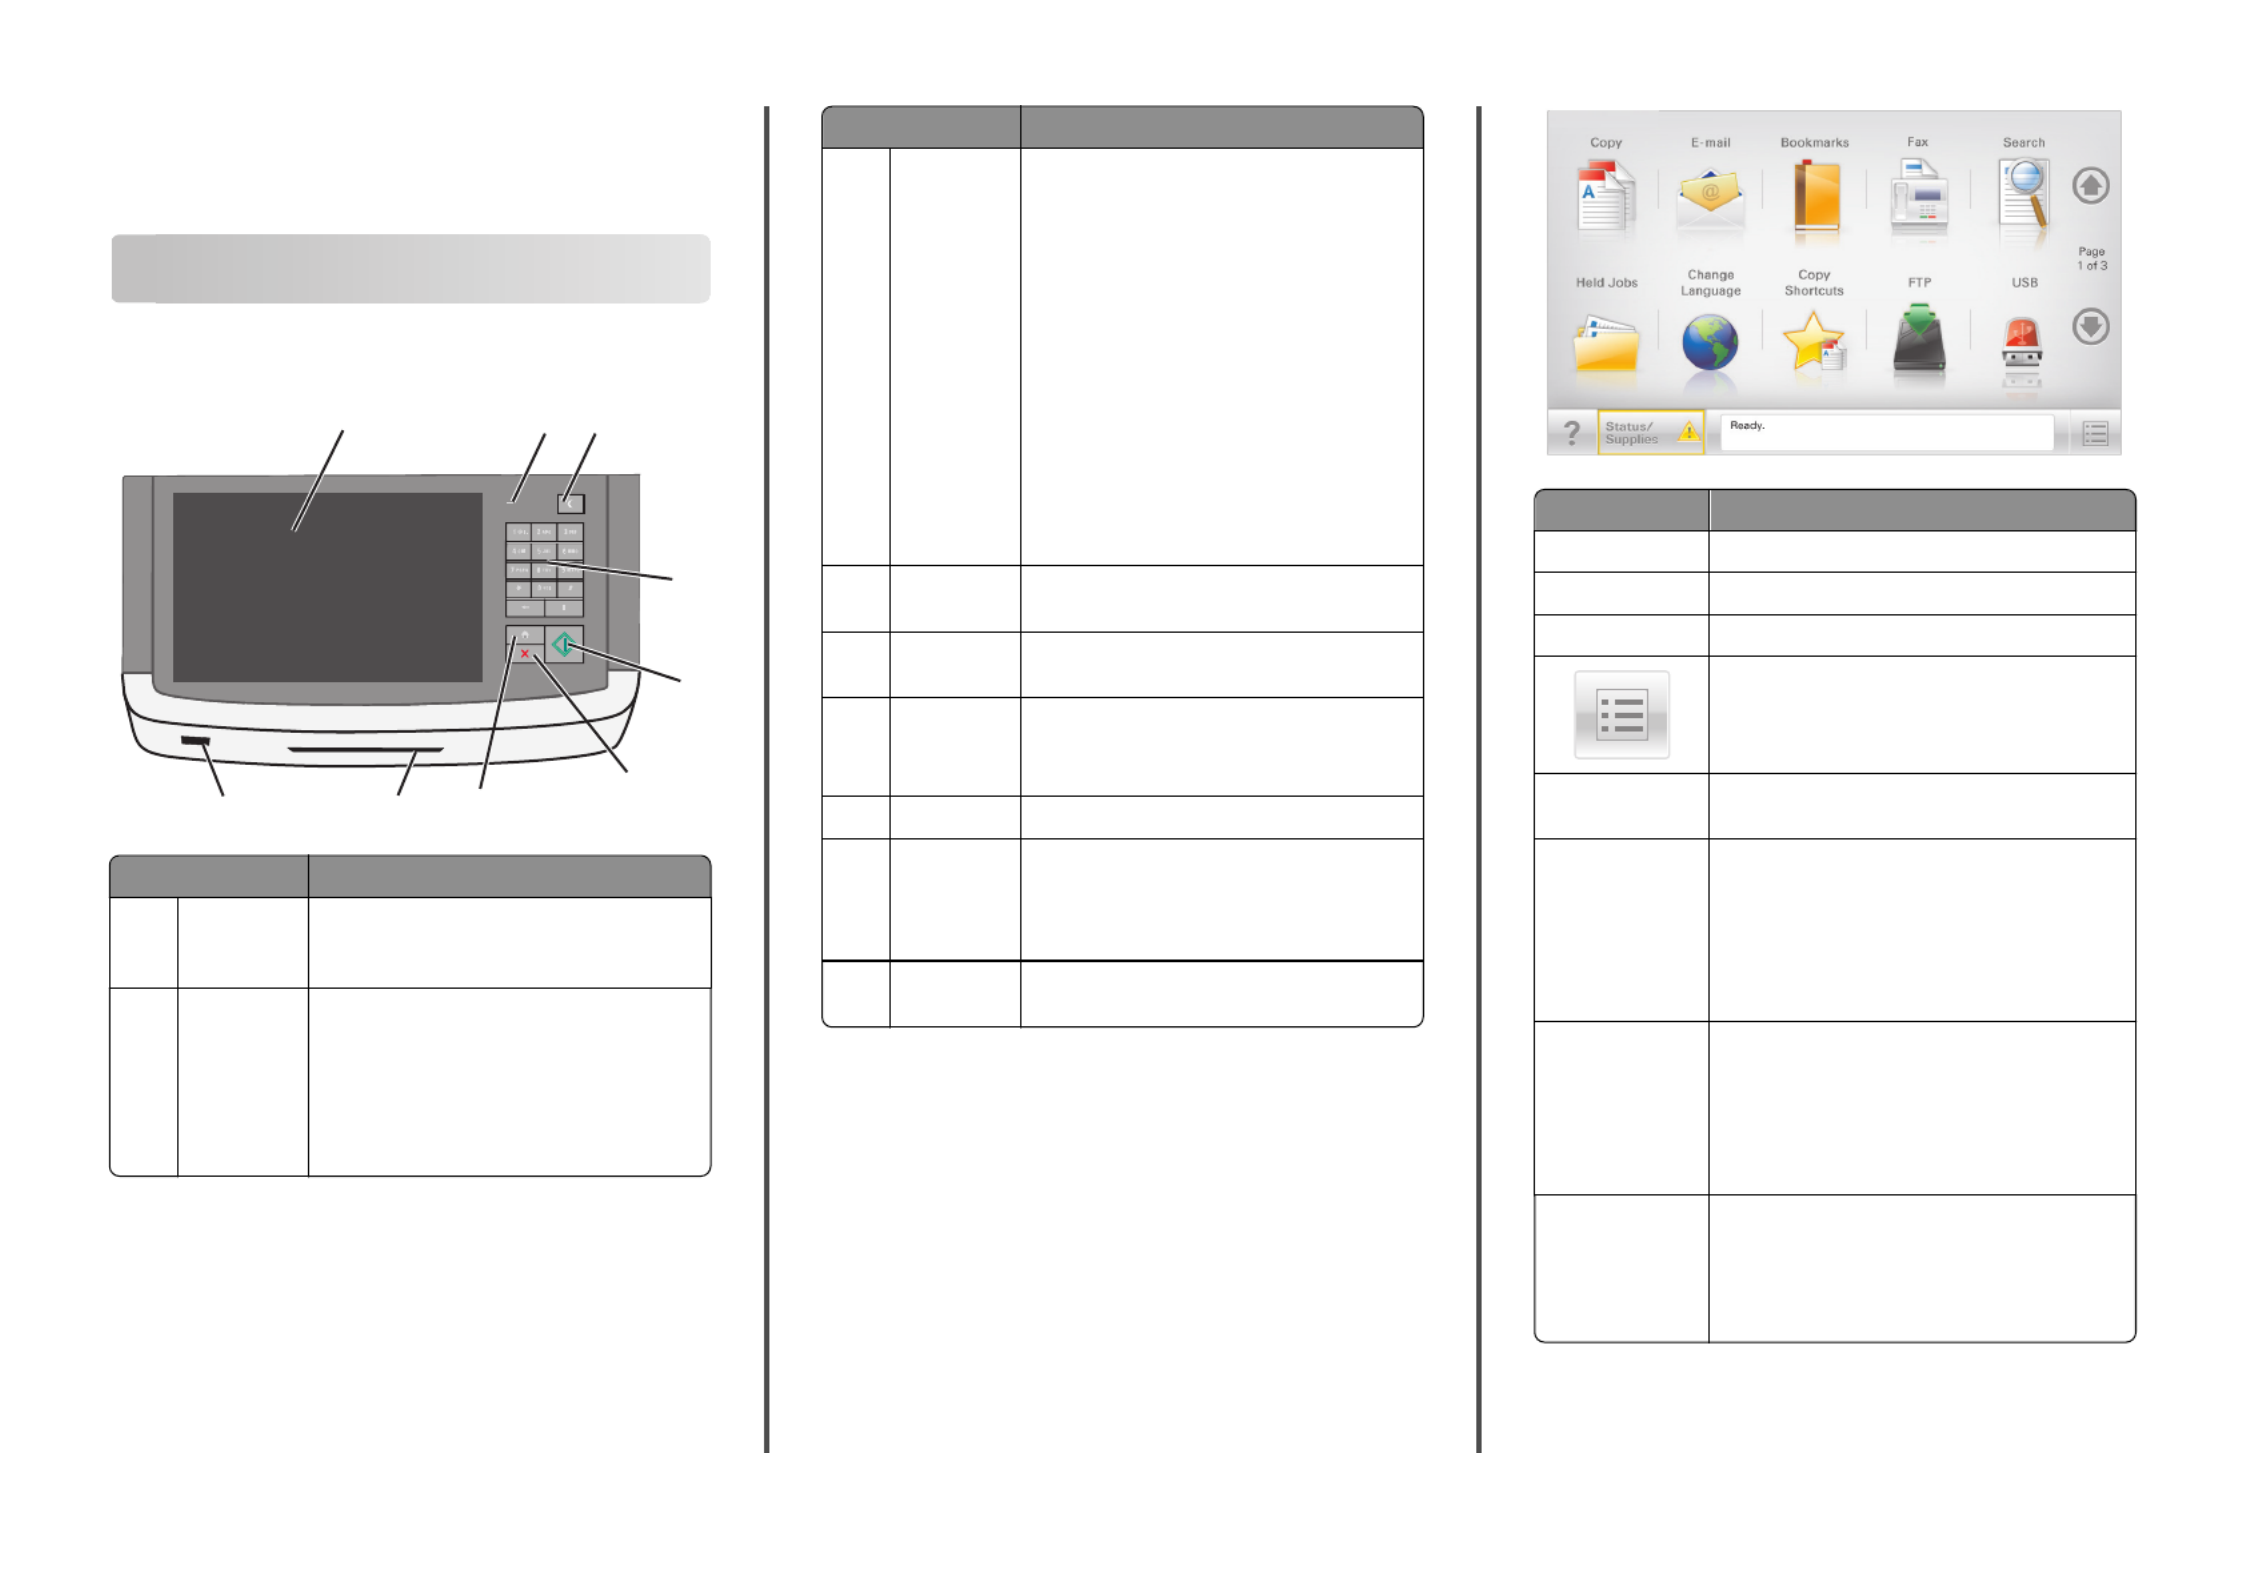
Understanding the home screen
When the printer is turned on, the display shows a basic screen,
referred to as the home screen. Touch the home screen buttons and
icons to initiate an action such as copying, faxing, or scanning; to open
the menu screen; or to respond to messages.
Note: Your home screen, icons, and buttons may vary depending on
your home screen customization settings, administrative setup, and
active embedded solutions.
Touch To
Copy Access the Copy menus and make copies.
E-mail Access the E-mail menus and send e‑mails.
Fax Access the Fax menus and send fax.
Access the printer menus.
Note: These menus are available only when the
printer is in the Ready state.
FTP Access the File Transfer Protocol (FTP) menus and
scan documents directly to an FTP server.
Status message bar •Show the current printer status such as Ready
or Busy.
•Show printer conditions such as Toner Low
or Cartridge Low.
•Show intervention messages so the printer can
continue processing.
Status/Supplies •Display a warning or error message whenever
the printer requires intervention to continue
processing.
•Access the messages screen for more
information on the message, and how to clear
it.
USB or USB
Thumbdrive
View, select, print, scan, or e‑mail photos and
documents from a flash drive.
Note: This button appears only when you return
to the home screen while a memory card or flash
drive is connected to the printer.
1


Touch To
Bookmarks Create, organize, and save a set of bookmarks
(URL) into a tree view of folders and file links.
Note: The tree view supports only bookmarks
created from this function, and not from any
other application.
Held Jobs Display all current held jobs.
Other buttons that may appear on the home screen:
Touch To
Search held jobs Search on any of the following items:
•User name for held or confidential
print jobs
•Job names for held jobs, excluding
confidential print jobs
•Profile names
•Bookmark container or print job
names
•USB container or print job names for
supported file types
Release Held Fax Access the list of held faxes.
Note: This button appears only when
there are held faxes with a scheduled
hold time previously set.
Lock Device Open a password entry screen. Enter the
correct password to lock the printer
control panel.
Note: This button appears only when
the printer is unlocked and password
has been set.
Unlock Device Open a password entry screen. Enter the
correct password to unlock the printer
control panel.
Note: This button appears only when
the printer is locked. The printer
control panel buttons and shortcuts
cannot be used while this appears.
Touch To
Cancel Jobs Open the Cancel Jobs screen. The Cancel
Jobs screen shows three headings: Print,
Fax, and Network.
The following options are available
under the Print, Fax, and Network
headings:
•Print job
•Copy job
•Fax profile
•FTP
•E-mail send
Each heading has a list of jobs shown in
a column under it which can show only
three jobs per screen. If more than three
jobs exist in a column, then an arrow
appears enabling you to scroll through
the jobs.
Change Language Launch the Change Language pop‑up
window that allows you to change the
primary language of the printer.
Using the touch-screen buttons
Note: Your home screen, icons, and buttons may vary depending on
your home screen customization settings and administrative setup.
Sample touch screen
Submit
Touch To
Submit Submit changes made in the printer settings.
Sample Copy Print a sample copy.
Right arrow Scroll to the right.
Left arrow Scroll to the left.
Home Return to the home screen.
Right increase Select a higher value.
Left decrease Select a lower value.
Exit Exit from the current screen.
Tips Open a context-sensitive Help dialog on the touch
screen.
2
Produktspezifikationen
| Marke: | Lexmark |
| Kategorie: | Drucker |
| Modell: | XS796 |
| Bildschirmdiagonale: | 10.2 Zoll |
| Marktpositionierung: | Business |
| Prozessortaktfrequenz: | 1200 MHz |
| Anrufer-Identifikation: | Ja |
| USB Anschluss: | Ja |
| WLAN: | Nein |
| Breite: | 558 mm |
| Tiefe: | 508 mm |
| Gewicht: | 66570 g |
| Produktfarbe: | Black, White |
| Höhe: | 825 mm |
| Eingebautes Display: | Ja |
| Anzahl USB 2.0 Anschlüsse: | 3 |
| Unterstützte Sicherheitsalgorithmen: | 802.1x RADIUS |
| Eingebauter Ethernet-Anschluss: | Ja |
| Display: | LCD |
| Unterstützte Bildformate: | TIF, JPG |
| RAM-Speicher: | 1024 MB |
| Integrierter Kartenleser: | Nein |
| RAM-Speicher maximal: | 2048 MB |
| Maximale Auflösung: | 1200 x 1200 DPI |
| Nachhaltigkeitszertifikate: | ENERGY STAR |
| Unterstützte Dokumentenformate: | |
| Standard-Schnittstellen: | USB 2.0, Ethernet |
| Druckgeschwindigkeit (Schwarz, normale Qualität, A4/US Letter): | 50 Seiten pro Minute |
| Drucktechnologie: | Laser |
| Drucken: | Farbdruck |
| Kopieren: | Farbkopieren |
| Gesamte Ausgabekapazität: | 500 Blätter |
| Gesamte Papierkapazität: | 650 Blätter |
| Schalldruckpegel (Druck): | 52 dB |
| Medientypen für das Papierfach: | Banner, Labels, Card stock, Envelopes, Plain paper, Glossy paper, Pre-Printed, Transparencies |
| ISO-A-Formate (A0...A9): | A4, A5 |
| Maximale Papiergröße der ISO A-Serie: | A4 |
| Scannen: | Farbscan |
| Faxen: | Farbfaxen |
| Druck der ersten Seite (Farbe, normal): | 8.5 s |
| Maximale Druckgröße: | 216 x 297 mm |
| Druckgeschwindigkeit (Farbe, normale Qualität, A4/US Letter): | 50 Seiten pro Minute |
| Druck der ersten Seite (Schwarz, normal): | 8 s |
| Zahl der Druckpatronen: | 1 |
| Druckfarben: | Black, Magenta, Cyan, Yellow |
| Art der Papierzuführung: | Papierfach |
| Maximale Papierkapazität: | 2650 Blätter |
| Nicht-ISO Druckmedienformate: | Letter (media size), Statement (140 x 216mm), Executive (184 x 267mm), Folio (media size) |
| Schallleistungspegel (Standby): | 27 dB |
| Kapazität des automatischen Dokumenteneinzugs (ADF): | 75 Blätter |
| JIS B-Seriengröße (B0...B9): | B5 |
| Umschlaggrößen: | 10, 7 3/4, C5, 9,B5, DL |
| Optische Scan-Auflösung: | 600 x 600 DPI |
| Scanner-Typ: | Flachbett- & ADF-Scanner |
| Duplex-Scan: | Ja |
| Max. Ausgabekapazität: | 1000 Blätter |
| Fax-Auflösung (schwarz): | 600 x 600 DPI |
| Max. Auflösung: | 600 x 600 DPI |
| Optionale Konnektivität: | Parallel, Serial (RS-232), Wireless LAN |
| Automatischer Dokumenteneinzug (ADF): | Ja |
| Faxweiterleitung: | Ja |
| AIO-Multitasking unterstützt: | Ja |
| Scan to: | USB, E-mail, FTP |
Brauchst du Hilfe?
Wenn Sie Hilfe mit Lexmark XS796 benötigen, stellen Sie unten eine Frage und andere Benutzer werden Ihnen antworten
Bedienungsanleitung Drucker Lexmark

13 Oktober 2024
11 Oktober 2024
16 September 2024
16 September 2024
16 September 2024
14 September 2024
14 September 2024
9 September 2024
3 September 2024
3 September 2024
Bedienungsanleitung Drucker
- Drucker Samsung
- Drucker Approx
- Drucker HP
- Drucker Sony
- Drucker Panasonic
- Drucker LG
- Drucker Roland
- Drucker Canon
- Drucker Velleman
- Drucker CSL
- Drucker Renkforce
- Drucker Thomson
- Drucker Sharp
- Drucker Mitsubishi
- Drucker Nilox
- Drucker Polaroid
- Drucker Xiaomi
- Drucker Olympia
- Drucker Seiko
- Drucker Toshiba
- Drucker Olympus
- Drucker Citizen
- Drucker Olivetti
- Drucker Epson
- Drucker Dell
- Drucker Lenovo
- Drucker MSI
- Drucker Honeywell
- Drucker OKI
- Drucker Brother
- Drucker Sagem
- Drucker Fujifilm
- Drucker Ricoh
- Drucker Datamax-O'neil
- Drucker Dymo
- Drucker Intermec
- Drucker Primera
- Drucker TSC
- Drucker Zebra
- Drucker Triumph-Adler
- Drucker Kodak
- Drucker Konica-Minolta
- Drucker Minolta
- Drucker TOMY
- Drucker Festo
- Drucker Frama
- Drucker NEC
- Drucker Ultimaker
- Drucker Fujitsu
- Drucker Huawei
- Drucker Testo
- Drucker Kogan
- Drucker Royal Sovereign
- Drucker D-Link
- Drucker Kyocera
- Drucker Star
- Drucker Xerox
- Drucker Digitus
- Drucker Bixolon
- Drucker Epson 7620
- Drucker Fichero
- Drucker GG Image
- Drucker Ibm
- Drucker Oce
- Drucker Paxar
- Drucker Toshiba TEC
- Drucker ZKTeco
- Drucker StarTech.com
- Drucker Bematech
- Drucker Pantum
- Drucker HiTi
- Drucker Panduit
- Drucker Posiflex
- Drucker Vupoint Solutions
- Drucker Brady
- Drucker Star Micronics
- Drucker Metapace
- Drucker DNP
- Drucker Godex
- Drucker Phoenix Contact
- Drucker Elite Screens
- Drucker Equip
- Drucker Argox
- Drucker Dascom
- Drucker EC Line
- Drucker Orient Technologies
- Drucker Evolis
- Drucker Fargo
- Drucker Microboards
- Drucker Builder
- Drucker DTRONIC
- Drucker Colop
- Drucker Raspberry Pi
- Drucker IDP
- Drucker Tally Dascom
- Drucker Custom
- Drucker Nisca
Neueste Bedienungsanleitung für -Kategorien-

25 November 2024
24 November 2024
24 November 2024
24 November 2024

16 Oktober 2024

15 Oktober 2024

15 Oktober 2024

15 Oktober 2024

14 Oktober 2024

14 Oktober 2024