HP LaserJet Pro M110we Bedienungsanleitung
Lesen Sie kostenlos die 📖 deutsche Bedienungsanleitung für HP LaserJet Pro M110we (106 Seiten) in der Kategorie Drucker. Dieser Bedienungsanleitung war für 6 Personen hilfreich und wurde von 2 Benutzern mit durchschnittlich 4.5 Sternen bewertet
Seite 1/106


HP LaserJet M109e-M112e series User Guide
SUMMAR
SUMMAR
SUMMAR
SUMMARSUMMARY
Y
Y
YY
This guide provides conguration, use, warranty, safety and environmental information.

HP comp
HP comp
HP comp
HP compHP company notic
any notic
any notic
any noticany notices
es
es
eses
Cop
Cop
Cop
CopCopyright and License
yright and License
yright and License
yright and Licenseyright and License
THE INFORMATION CONTAINED HEREIN IS
SUBJECT TO CHANGE WITHOUT NOTICE.
ALL RIGHTS RESERVED. REPRODUCTION,
ADAPTATION, OR TRANSLATION OF THIS
MATERIAL IS PROHIBITED WITHOUT PRIOR
WRITTEN PERMISSION OF HP, EXCEPT AS
ALLOWED UNDER THE COPYRIGHT LAWS. THE
ONLY WARRANTIES FOR HP PRODUCTS AND
SERVICES ARE SET FORTH IN THE EXPRESS
WARRANTY STATEMENTS ACCOMPANYING SUCH
PRODUCTS AND SERVICES. NOTHING HEREIN
SHOULD BE CONSTRUED AS CONSTITUTING AN
ADDITIONAL WARRANTY. HP SHALL NOT BE
LIABLE FOR TECHNICAL OR EDITORIAL ERRORS
OR OMISSIONS CONTAINED HEREIN.
© Copyright 2021 HP Development Company,
L.P.
Trademark Cr
Trademark Cr
Trademark Cr
Trademark CrTrademark Credits
edits
edits
editsedits
Microsoft® and Windows® are either registered
trademarks or trademarks of Microsoft
Corporation in the United States and/or other
countries.
Mac, macOS, iPadOS, and AirPrint are
trademarks of Apple Inc., registered in the U.S.
and other countries.
Google Play is a trademark of Google LLC.
ENERGY STAR® and the ENERGY STAR® mark
are registered trademarks owned by the U.S.
Environmental Protection Agency.
Safety informa
Safety informa
Safety informa
Safety informaSafety information
tion
tion
tiontion
Always follow basic safety precautions when
using this product to reduce risk of injury from
re or electric shock.
Read and understand all instructions in the
documentation that comes with the printer.
Observe all warnings and instructions marked on
the product.
Unplug this product from wall outlets before
cleaning.
Do not install or use this product near water, or
when you are wet.
Install the product securely on a stable surface.
Install the product in a protected location where
no one can step on or trip over the line cord, and
the line cord cannot be damaged.
If the product does not operate normally, see
Solve problems in this guide.
There are no user-serviceable parts inside. Refer
servicing to service personnel.qualied

T
T
T
TTabl
abl
abl
ablable o
e o
e o
e oe of c
f c
f c
f cf contents
ontents
ontents
ontentsontents
1 Get started
1 Get started
1 Get started
1 Get started1 Get started ...................................................................................................................................................................................................
...................................................................................................................................................................................................
...................................................................................................................................................................................................
......................................................................................................................................................................................................................................................................................................................................................................................................1
1
1
11
Printer views ...........................................................................................................................................................................................1
Printer front view...........................................................................................................................................................................1
Printer back view ...........................................................................................................................................................................1
Control panel features...........................................................................................................................................................................2
Print reports from control panel..........................................................................................................................................................4
Use the HP Smart app to print, scan, and manage...........................................................................................................................4
To install HP Smart and open the app .......................................................................................................................................4
Get more information about HP Smart......................................................................................................................................5
2 Connect y
2 Connect y
2 Connect y
2 Connect y2 Connect your printer...................................................................................................................................................................................
our printer...................................................................................................................................................................................
our printer...................................................................................................................................................................................
our printer...................................................................................................................................................................................our printer...................................................................................................................................................................................6
6
6
66
Requirements for HP+ printers............................................................................................................................................................6
Keep the printer connected to the Internet...............................................................................................................................6
Use Original HP cartridges ...........................................................................................................................................................6
Have an HP account ......................................................................................................................................................................6
Connect your printer to a Wi-Fi network using HP Smart................................................................................................................6
Connect your printer to a Wi-Fi network using Wi-Fi Protected Setup (WPS)..............................................................................7
Connect your printer to computer using a USB cable.......................................................................................................................7
Change wireless settings ......................................................................................................................................................................8
Turn on or the wireless capabilities of the printer..............................................................................................................8o
Restore network settings to default settings...........................................................................................................................8
Change the connection type.................................................................................................................................................................8
USB to a wireless connection (Windows 10/macOS)...............................................................................................................8
Wireless to a USB connection (Windows/macOS) ....................................................................................................................9
3 Load media
3 Load media
3 Load media
3 Load media3 Load media ...............................................................................................................................................................................................
...............................................................................................................................................................................................
...............................................................................................................................................................................................
.............................................................................................................................................................................................................................................................................................................................................................................................. 10
10
10
1010
Load paper ........................................................................................................................................................................................... 10
Load envelopes.................................................................................................................................................................................... 11
Load labels ........................................................................................................................................................................................... 12
4 Print
4 Print
4 Print
4 Print4 Print............................................................................................................................................................................................................
............................................................................................................................................................................................................
............................................................................................................................................................................................................
........................................................................................................................................................................................................................................................................................................................................................................................................................ 15
15
15
1515
Before you begin ................................................................................................................................................................................. 15
Print from a Windows computer....................................................................................................................................................... 15
Print documents......................................................................................................................................................................... 15
Manually print on both sides .................................................................................................................................................... 16
Print multiple pages per sheet................................................................................................................................................. 16
Print from a Mac computer................................................................................................................................................................ 17
Print documents......................................................................................................................................................................... 17
Manually print on both sides .................................................................................................................................................... 17
Print multiple pages per sheet................................................................................................................................................. 18
iii

Print with mobile devices ................................................................................................................................................................... 19
Print while connected to same Wi-Fi network....................................................................................................................... 19
Print without connecting to same Wi-Fi network (Wi-Fi Direct) ......................................................................................... 19
5
5
5
5 5 Congur
Congur
Congur
CongurCongure
e
e
ee yo
yo
yo
yo your printer
ur printer
ur printer
ur printerur printer .............................................................................................................................................................................
.............................................................................................................................................................................
.............................................................................................................................................................................
.......................................................................................................................................................................................................................................................................................................................................................... 21
21
21
2121
Congure the printer using the Embedded Web Server (EWS).................................................................................................... 21
Access the Embedded Web Server (EWS)............................................................................................................................... 21
Congure IP network settings.................................................................................................................................................. 23
Printer security features............................................................................................................................................................ 24
Energy-conservation settings.................................................................................................................................................. 24
Advanced conguration with HP Utility for macOS........................................................................................................................ 25
Open HP Utility............................................................................................................................................................................ 25
HP Utility features ...................................................................................................................................................................... 25
Update the rmware........................................................................................................................................................................... 26
Update the rmware using the Firmware Update Utility ..................................................................................................... 26
6 Supplies, acc
6 Supplies, acc
6 Supplies, acc
6 Supplies, acc6 Supplies, acces
es
es
esessories, and parts............................................................................................................................................................
sories, and parts............................................................................................................................................................
sories, and parts............................................................................................................................................................
sories, and parts............................................................................................................................................................sories, and parts............................................................................................................................................................ 28
28
28
2828
Order supplies, accessories, and parts ............................................................................................................................................ 28
Replace the toner cartridge............................................................................................................................................................... 28
Cartridge information................................................................................................................................................................ 29
Remove and replace the toner cartridge................................................................................................................................ 29
7 Solv
7 Solv
7 Solv
7 Solv7 Solve pr
e pr
e pr
e pre probl
obl
obl
obloblems.........................................................................................................................................................................................
ems.........................................................................................................................................................................................
ems.........................................................................................................................................................................................
ems.........................................................................................................................................................................................ems......................................................................................................................................................................................... 32
32
32
3232
Printer is unable to print..................................................................................................................................................................... 32
Check printer connection to the Internet................................................................................................................................ 32
Make sure to use Original HP cartridges................................................................................................................................. 32
Check the printer settings and status..................................................................................................................................... 32
Interpret control-panel light patterns.............................................................................................................................................. 33
Restore the factory-set defaults ...................................................................................................................................................... 34
A “Cartridge is low” or “Cartridge is very low” message appears ................................................................................................ 35
Change the “Very Low” settings............................................................................................................................................... 35
Printer does not pick up paper or misfeeds.................................................................................................................................... 35
The product does not pick up paper........................................................................................................................................ 35
The product picks up multiple sheets of paper..................................................................................................................... 36
Clear paper jams.................................................................................................................................................................................. 36
Jam locations .............................................................................................................................................................................. 36
Experiencing frequent or recurring paper jams?................................................................................................................... 37
Clear jams from the input tray ................................................................................................................................................. 37
Clear jams from inside the product ......................................................................................................................................... 39
Clear jams from the output areas............................................................................................................................................ 41
Improve print quality .......................................................................................................................................................................... 42
Update the printer rmware..................................................................................................................................................... 43
Print from a dierent software program................................................................................................................................ 43
Check the paper-type setting for the print job ...................................................................................................................... 43
Check toner-cartridge status.................................................................................................................................................... 44
Cartridge cleaning ...................................................................................................................................................................... 45
iv

Print a cleaning page ................................................................................................................................................................. 45
Visually inspect the toner cartridge......................................................................................................................................... 45
Check paper and the printing environment ........................................................................................................................... 45
Adjust Print Density.................................................................................................................................................................... 46
Troubleshoot print quality problems ............................................................................................................................................... 46
Solve wireless network problems..................................................................................................................................................... 52
Wireless connectivity checklist................................................................................................................................................. 52
The printer does not print after the wireless completes............................................................................. 53conguration
The printer does not print, and the computer has a third-party rewall installed .......................................................... 53
The wireless connection does not work after moving the wireless router or printer ..................................................... 53
Cannot connect more computers to the wireless printer .................................................................................................... 54
The wireless printer loses communication when connected to a VPN.............................................................................. 54
The network does not appear in the wireless networks list ............................................................................................... 54
The wireless network is not functioning................................................................................................................................. 54
Perform a wireless network diagnostic test .......................................................................................................................... 55
Reduce interference on a wireless network........................................................................................................................... 55
HP support ........................................................................................................................................................................................... 56
Contact HP................................................................................................................................................................................... 56
Register printer........................................................................................................................................................................... 57
Additional warranty options ..................................................................................................................................................... 57
Additional supplies and toner information............................................................................................................................. 57
Appendix A Printer
Appendix A Printer
Appendix A Printer
Appendix A Printer Appendix A Printer s
s
s
sspecications
pecications
pecications
pecicationspecications .............................................................................................................................................................
.............................................................................................................................................................
.............................................................................................................................................................
.......................................................................................................................................................................................................................................................................................................................... 58
58
58
5858
Technical ...................................................................................................................................................................... 58specications
System requirements ......................................................................................................................................................................... 58
Printer dimensions.............................................................................................................................................................................. 58
Power consumption, electrical and acoustic emissions ..................................................................................... 59specications,
Operating environment range........................................................................................................................................................... 59
Warning icons....................................................................................................................................................................................... 59
Laser Warning...................................................................................................................................................................................... 60
Appendix B Service and support
Appendix B Service and support
Appendix B Service and support
Appendix B Service and supportAppendix B Service and support...............................................................................................................................................................
...............................................................................................................................................................
...............................................................................................................................................................
.............................................................................................................................................................................................................................................................................................................................. 61
61
61
6161
HP limited warranty statement......................................................................................................................................................... 61
Country Terms.............................................................................................................................................................. 62Specic
UK, Ireland, and Malta................................................................................................................................................................ 64
Austria, Belgium, Germany, and Luxemburg ......................................................................................................................... 64
Belgium, France, and Luxemburg ............................................................................................................................................ 65
Italy............................................................................................................................................................................................... 66
Spain............................................................................................................................................................................................. 66
Denmark ...................................................................................................................................................................................... 67
Norway......................................................................................................................................................................................... 67
Sweden ........................................................................................................................................................................................ 67
Portugal ....................................................................................................................................................................................... 68
Greece and Cyprus ..................................................................................................................................................................... 68
Hungary ....................................................................................................................................................................................... 68
Czech Republic............................................................................................................................................................................ 69
v

Slovakia........................................................................................................................................................................................ 69
Poland .......................................................................................................................................................................................... 69
Bulgaria ........................................................................................................................................................................................ 70
Romania....................................................................................................................................................................................... 70
Belgium and the Netherlands .................................................................................................................................................. 70
Finland.......................................................................................................................................................................................... 71
Slovenia........................................................................................................................................................................................ 71
Croatia .......................................................................................................................................................................................... 71
Latvia............................................................................................................................................................................................ 71
Lithuania ...................................................................................................................................................................................... 72
Estonia ......................................................................................................................................................................................... 72
Russia........................................................................................................................................................................................... 72
HP's Premium Protection Warranty: LaserJet toner cartridge limited warranty statement ................................................... 72
Reminder on the use of non-Original HP supplies ........................................................................................................................ 73
HP anticounterfeit Web site............................................................................................................................................................... 73
Data stored on the toner cartridge................................................................................................................................................... 73
End User License Agreement ............................................................................................................................................................ 74
Customer self-repair warranty service ............................................................................................................................................ 78
Customer support ............................................................................................................................................................................... 79
Appendix C Envir
Appendix C Envir
Appendix C Envir
Appendix C EnvirAppendix C Environmental product st
onmental product st
onmental product st
onmental product stonmental product stewar
ewar
ewar
ewarewardship progr
dship progr
dship progr
dship progrdship program
am
am
amam ..................................................................................................................
..................................................................................................................
..................................................................................................................
.................................................................................................................................................................................................................................... 80
80
80
8080
Protecting the environment .............................................................................................................................................................. 80
Ozone production................................................................................................................................................................................ 80
Power consumption............................................................................................................................................................................ 80
Toner consumption ............................................................................................................................................................................. 80
Paper use.............................................................................................................................................................................................. 81
Plastics .................................................................................................................................................................................................. 81
HP LaserJet print supplies ................................................................................................................................................................. 81
Paper ..................................................................................................................................................................................................... 81
Material restrictions ............................................................................................................................................................................ 81
Battery information ............................................................................................................................................................................ 81
Disposal of waste equipment by users (EU, UK, and India) .......................................................................................................... 82
Electronic hardware recycling ........................................................................................................................................................... 82
Brazil hardware recycling information............................................................................................................................................. 82
Chemical substances .......................................................................................................................................................................... 83
Product Power Data per European Union Commission Regulation 1275/2008 and the UK Relevant Statutory
Requirements ............................................................................................................................................................................. 83
SEPA Ecolabel User Information (China).......................................................................................................................................... 83
The regulation of the implementation on China energy label for printer, fax, and copier....................................................... 83
Restriction on Hazardous Substances statement (India).............................................................................................................. 84
WEEE (Turkey)...................................................................................................................................................................................... 84
vi

Restriction on Hazardous Substances statement (Ukraine) ........................................................................................................ 84
Material Safety Data Sheet (MSDS) .................................................................................................................................................. 84
EPEAT .................................................................................................................................................................................................... 84
Substances Table (Taiwan)................................................................................................................................................................. 85
Substances Table (China) ................................................................................................................................................................... 86
For more information ......................................................................................................................................................................... 86
Appendix D Regul
Appendix D Regul
Appendix D Regul
Appendix D RegulAppendix D Regulatory information.........................................................................................................................................................
atory information.........................................................................................................................................................
atory information.........................................................................................................................................................
atory information.........................................................................................................................................................atory information......................................................................................................................................................... 88
88
88
8888
Regulatory statements ...................................................................................................................................................................... 88
Regulatory model numbers.............................................................................................................................. 88identication
FCC regulations ........................................................................................................................................................................... 88
European Union & United Kingdom Regulatory Notice........................................................................................................ 88
Canada - Industry Canada ICES-003 Compliance Statement ............................................................................................. 89
VCCI statement (Japan).............................................................................................................................................................. 89
EMC statement (Korea).............................................................................................................................................................. 89
Power cord instructions............................................................................................................................................................. 89
Notice to users in Japan about the power cord ..................................................................................................................... 90
Laser safety................................................................................................................................................................................. 90
Laser statement for Finland..................................................................................................................................................... 90
Nordic Statements (Denmark, Finland, Norway, Sweden)................................................................................................... 91
GS statement (Germany)........................................................................................................................................................... 91
Eurasian Conformity (Armenia, Belarus, Kazakhstan, Kyrgyzstan, Russia)...................................................................... 92
Wireless statements........................................................................................................................................................................... 92
FCC compliance statement—United States........................................................................................................................... 93
Australia statement ................................................................................................................................................................... 93
Belarus......................................................................................................................................................................................... 93
Brazil ANATEL statement .......................................................................................................................................................... 93
Canadian statements................................................................................................................................................................. 93
China CMIIT Wireless Statement............................................................................................................................................... 93
Exposure to Radio Frequency Radiation (Canada)................................................................................................................ 94
European Regulatory Notice..................................................................................................................................................... 94
Notice for use in Japan .............................................................................................................................................................. 94
Notice for use in Russia ............................................................................................................................................................. 94
Mexico statement....................................................................................................................................................................... 94
Taiwan statement....................................................................................................................................................................... 94
Thailand Wireless Statement.................................................................................................................................................... 94
Vietnam Telecom wireless marking for ICTQC Type approved products........................................................................... 95
Index
Index
Index
IndexIndex...............................................................................................................................................................................................................
...............................................................................................................................................................................................................
...............................................................................................................................................................................................................
.............................................................................................................................................................................................................................................................................................................................................................................................................................. 96
96
96
9696
vii

T
T
T
TTable 1-1
able 1-1
able 1-1
able 1-1able 1-1 Printer back view
Printer back view
Printer back view
Printer back viewPrinter back view
Featur
Featur
Featur
FeaturFeature
e
e
ee Description
Description
Description
DescriptionDescription
1 USB interface port
NO
NO
NO
NONOTE:
TE:
TE:
TE:TE: A label might be covering the USB port. After setup, you can remove the label and print using a USB connection, if
desired, but the printer must also still be connected to the Internet.
2 Power connection
C
C
C
CControl p
ontrol p
ontrol p
ontrol pontrol panel fe
anel fe
anel fe
anel feanel featur
atur
atur
aturatures
es
es
eses
Identify the buttons and lights on the printer control panel.
Icon
Icon
Icon
IconIcon
Name
Name
Name
NameName Description
Description
Description
DescriptionDescription
Wireless button and light Press this button to turn the wireless feature on or or to o, congure a Wi-Fi
Direct connection.
Press and hold this button to congure a WPS connection.
If the Wireless light is on, there is a stable wireless connection. If it is blinking,
there is currently no wireless connection, or there is either a WPS or Wi-Fi
Direct conguration process in progress. If it is blinking rapidly, there is an issue
with the wireless connection.
2 Chapter 1 Get started

Icon
Icon
Icon
IconIcon Name
Name
Name
NameName Description
Description
Description
DescriptionDescription
Attention light The Attention light blinks when the printer requires user attention. If the
Attention light is on, the printer is in an error state.
Power button/Ready light Use this button to turn the printer on or o.
The Ready light is on when the printer is ready to print. It blinks when the
printer is receiving print data and dims when the printer is in a low-power
state.
Resume/Cancel button Press this button for the following actions:
●If the printer is currently processing a job, with the Attention light and o
the Ready light blinking, press the button to cancel the print job.
●If the printer is in an error or prompt state, with the Ready light on
and the Attention light blinking, press the button to clear the error and
resume printing.
●In manual duplex mode, press this button to print the second side of the
page.
Control panel features 3

Print r
Print r
Print r
Print rPrint reports fr
eports fr
eports fr
eports freports from contr
om contr
om contr
om controm control p
ol p
ol p
ol pol panel
anel
anel
anelanel
This topic describes the printer reports and how to print.
T
T
T
TTable 1-2
able 1-2
able 1-2
able 1-2able 1-2 Print reports fr
Print reports fr
Print reports fr
Print reports frPrint reports from contr
om contr
om contr
om controm control panel
ol panel
ol panel
ol panelol panel
Printer r
Printer r
Printer r
Printer rPrinter report
eport
eport
eporteport How to print
How to print
How to print
How to printHow to print Description
Description
Description
DescriptionDescription
Conguration page
and network
summary page
(if networking is
supported)
1.
1.
1.
1.1. If the printer is in Sleep mode (the Ready light is on but dim),
press the Resume/Cancel button to wake up the printer.
2.
2.
2.
2.2. Press and hold the Resume/Cancel button on the
control panel until the Ready light begins blinking, and
then release the button.
Printer conguration page provides the
current printer information, cartridge status,
or recent events. It can also help
troubleshooting printer problems.
Wireless network
diagnostic test
report
1.
1.
1.
1.1. If the printer is in Sleep mode (the Ready light is on but dim),
press the Resume/Cancel button to wake up the printer.
2.
2.
2.
2.2. Press and hold the Wireless button for more than 10
seconds (but less than 20 seconds).
3.
3.
3.
3.3. When the Ready light starts blinking, release the button.
Wireless network diagnostic test report
shows the diagnostics results for the status
of the wireless network, wireless signal
strength, detected networks, and more.
Use the HP Smart app t
Use the HP Smart app t
Use the HP Smart app t
Use the HP Smart app tUse the HP Smart app to print, scan, and manag
o print, scan, and manag
o print, scan, and manag
o print, scan, and manago print, scan, and manage
e
e
ee
The HP Smart app can help you perform many dierent printer tasks, including the following:
●Set up and connect your printer.
●Print and scan documents and photos.
●Share documents through email and other applications.
●Manage printer settings, check printer status, print reports, and order supplies.
HP Smart is supported on mobile devices and computers running on Android OS 7.0 or later, iOS 12.0 or later,
iPadOS, Windows 10, and macOS 10.14 and later.
NO
NO
NO
NONOTE:
TE:
TE:
TE:TE: At this time, the HP Smart app might not be available in all languages. Some features are available only
on printers or models. HP Smart does not support all specic le formats. For more information, see Get more
information about HP Smart.
T
T
T
TTo instal
o instal
o instal
o instalo install HP Smart and open the app
l HP Smart and open the app
l HP Smart and open the app
l HP Smart and open the appl HP Smart and open the app
Complete the following steps to install and open HP Smart, connect your printer, and begin using the app.
1.
1.
1.
1.1. Visit to download and install HP Smart on your device.123.hp.com
NO
NO
NO
NONOTE:
TE:
TE:
TE:TE: iOS, iP
iOS, iP
iOS, iP
iOS, iPiOS, iPadOS, Andr
adOS, Andr
adOS, Andr
adOS, AndradOS, Android, Windows 10, and macO
oid, Windows 10, and macO
oid, Windows 10, and macO
oid, Windows 10, and macOoid, Windows 10, and macOS devices:
S devices:
S devices:
S devices:S devices: You can also download HP Smart from the
respective app stores for the device.
4 Chapter 1 Get started

2.
2.
2.
2.2. Open HP Smart after installation.
●iOS/iP
iOS/iP
iOS/iP
iOS/iPiOS/iPadOS
adOS
adOS
adOSadOS/
/
/
//Andr
Andr
Andr
AndrAndroid:
oid:
oid:
oid:oid: From the mobile device desktop or app menu, tap HP Smart.
●Windows 10:
Windows 10:
Windows 10:
Windows 10:Windows 10: From the computer desktop, click , and then select from the app list.
Start
Start
Start
StartStart HP Smart
HP Smart
HP Smart
HP SmartHP Smart
●macOS:
macOS:
macOS:
macOS:macOS: From the Launchpad, select HP Smart.
3.
3.
3.
3.3. Connect your printer wirelessly using HP Smart. See Connect your printer to a Wi-Fi network using HP
Smart.
4.
4.
4.
4.4. When prompted, create an HP account and register the printer.
Get mor
Get mor
Get mor
Get morGet more informa
e informa
e informa
e informae information about HP Smart
tion about HP Smart
tion about HP Smart
tion about HP Smarttion about HP Smart
To learn how to connect, print, and scan using HP Smart, visit the website for your device:
●iOS/iP
iOS/iP
iOS/iP
iOS/iPiOS/iPadOS
adOS
adOS
adOSadOS/
/
/
//Andr
Andr
Andr
AndrAndroid
oid
oid
oidoid: www.hp.com/go/hpsmart-help
●Windows 10
Windows 10
Windows 10
Windows 10Windows 10: www.hp.com/go/hpsmartwin-help
●macOS
macOS
macOS
macOSmacOS: www.hp.com/go/hpsmartmac-help
Get more information about HP Smart 5

C
C
C
CConnect y
onnect y
onnect y
onnect yonnect your print
our print
our print
our printour printer
er
er
erer
2
2
2
22
This section describes dierent ways to connect your printer.
Requir
Requir
Requir
RequirRequirements f
ements f
ements f
ements fements for HP+ print
or HP+ print
or HP+ print
or HP+ printor HP+ printers
ers
ers
ersers
This topic describes the requirements for HP+ printers.
Keep the print
Keep the print
Keep the print
Keep the printKeep the printer c
er c
er c
er cer connected t
onnected t
onnected t
onnected tonnected to the Internet
o the Internet
o the Internet
o the Interneto the Internet
HP+ printers are cloud-connected devices that must remain connected to the Internet in order to function. The
Internet connection enables the printer to deliver HP+ app features and specic rmware updates.
During setup, you must connect the printer to the Internet using a supported network connection. After setup,
you can print using a USB cable connection, if desired, but the printer must still be connected to the Internet.
Use Original HP cartridges
Use Original HP cartridges
Use Original HP cartridges
Use Original HP cartridgesUse Original HP cartridges
Original HP cartridges are cartridges manufactured and sold by HP in HP packaging. If non-Original HP oicial
supplies or relled cartridges are installed, HP+ printers will not operate as expected.
Have an HP ac
Have an HP ac
Have an HP ac
Have an HP acHave an HP acco
co
co
cocount
unt
unt
untunt
Create or sign into an HP account to manage your printer.
C
C
C
CConnect yo
onnect yo
onnect yo
onnect yoonnect your printer t
ur printer t
ur printer t
ur printer tur printer to a Wi-Fi network using HP Smart
o a Wi-Fi network using HP Smart
o a Wi-Fi network using HP Smart
o a Wi-Fi network using HP Smarto a Wi-Fi network using HP Smart
This topic describes how to connect your printer to a Wi-Fi network using HP Smart.
Install the HP Smart app on your computer or mobile device and use the app to set up or connect the printer to
your Wi-Fi network.
For information about HP Smart including where to download the app, see Use the HP Smart app to print, scan,
and manage.
1.
1.
1.
1.1. Make sure your computer or mobile device is connected to your Wi-Fi network. On your mobile device, turn
on Bluetooth and location services.
NO
NO
NO
NONOTE:
TE:
TE:
TE:TE: HP Smart uses Bluetooth for printer setup. It does not support Print using Bluetooth.
2.
2.
2.
2.2. If your printer Wi-Fi was previously turned make sure to turn it on. For more information about wireless o,
status, see Turn on or the wireless capabilities of the printero .
3.
3.
3.
3.3. If the printer is no longer in wireless setup mode, restore the printer network settings. See Restore network
settings to default settings.
4.
4.
4.
4.4. Open the HP Smart app on your computer or mobile device. See Use the HP Smart app to print, scan, and
manage.
6 Chapter 2 Connect your printer

5.
5.
5.
5.5. From HP Smart, click or tap the Plus icon or , and then choose the option to select or add a
Add Printer
Add Printer
Add Printer
Add PrinterAdd Printer
printer. If prompted, allow Bluetooth and location permissions.
Follow the instructions to add the printer to your network.
6.
6.
6.
6.6. When prompted, create or sign in to an HP account and register the printer.
NO
NO
NO
NONOTE:
TE:
TE:
TE:TE: When the printer is connected successfully, the Wireless light stops blinking and remains on.
C
C
C
CConnect yo
onnect yo
onnect yo
onnect yoonnect your print
ur print
ur print
ur printur printer t
er t
er t
er ter to a Wi-Fi network using Wi-Fi Pr
o a Wi-Fi network using Wi-Fi Pr
o a Wi-Fi network using Wi-Fi Pr
o a Wi-Fi network using Wi-Fi Pro a Wi-Fi network using Wi-Fi Pro
o
o
oot
t
t
ttect
ect
ect
ectected Setup
ed Setup
ed Setup
ed Setup ed Setup
(WPS)
(WPS)
(WPS)
(WPS)(WPS)
This topic describes how to connect your printer to a Wi-Fi network using WPS.
This wireless setup method can be used if your router has a WPS button. If the router does not have this button,
it is recommended that you connect the printer using the HP Smart app. See Connect your printer to a Wi-Fi
network using HP Smart.
1.
1.
1.
1.1. Make sure your router and printer are not too far from each other.
2.
2.
2.
2.2. Make sure your printer is in wireless setup mode. See Restore network settings to default settings.
3.
3.
3.
3.3. Press the WPS button on your router.
4.
4.
4.
4.4. Within two minutes, press and hold the Wireless button on the printer control panel for 5 seconds, and
then release the button.
5.
5.
5.
5.5. Wait while the printer automatically establishes the network connection. It takes up to two minutes. When
the network connection is established, the Wireless light stops blinking and remains on.
6.
6.
6.
6.6. Open the HP Smart app on your computer or mobile device. See Use the HP Smart app to print, scan, and
manage.
7.
7.
7.
7.7. From HP Smart, click or tap the Plus icon or , and then choose the option to select or add a
Add Printer
Add Printer
Add Printer
Add PrinterAdd Printer
printer.
Follow the instructions to add the printer to your network.
8.
8.
8.
8.8. When prompted, create or sign in to an HP account and register the printer.
C
C
C
CConnect yo
onnect yo
onnect yo
onnect yoonnect your print
ur print
ur print
ur printur printer t
er t
er t
er ter to c
o c
o c
o co comput
omput
omput
omputomputer using a USB cabl
er using a USB cabl
er using a USB cabl
er using a USB cabler using a USB cable
e
e
ee
This topic describes how to connect your printer using a USB cable.
NO
NO
NO
NONOTE:
TE:
TE:
TE:TE:
●Do not connect the printer with a USB cable when setting up for the time. HP+ printer will not work as rst
expected if USB is used for setting up for the rst time.
●To set up and use the printer, it must be connected to the Internet at all times.
See the requirements listed in Before you begin.
Connect your printer to a Wi-Fi network using Wi-Fi Protected Setup (WPS) 7

1.
1.
1.
1.1. If necessary, remove the label covering the USB port at the back of the printer.
2.
2.
2.
2.2. Connect the printer and computer using a USB cable.
3.
3.
3.
3.3. Open the HP Smart app on your computer. See .Use the HP Smart app to print, scan, and manage
4.
4.
4.
4.4. From HP Smart, click or tap the Plus icon or , and then choose the option to select or add a
Add Printer
Add Printer
Add Printer
Add PrinterAdd Printer
printer.
Follow the instructions to add the printer.
5.
5.
5.
5.5. When prompted, create or sign in to an HP account and register the printer.
Change wir
Change wir
Change wir
Change wirChange wirel
el
el
eleless settings
ess settings
ess settings
ess settingsess settings
You can set up and manage the wireless connection for your printer. This includes printing information about
network settings, turning the wireless function on or and restoring wireless settings.o,
T
T
T
TTurn on or
urn on or
urn on or
urn on or urn on or the wir
the wir
the wir
the wir the wireles
eles
eles
eleseless capabilities of the print
s capabilities of the print
s capabilities of the print
s capabilities of the prints capabilities of the printer
er
er
erer
o
o
o
oo
The blue Wireless light on the printer control panel is lit when the wireless capability of the printer is on.
Press the Wireless button to turn on or the printer wireless capabilities.o
Res
Res
Res
ResRestor
tor
tor
tortore network settings to def
e network settings to def
e network settings to def
e network settings to defe network settings to default settings
ault settings
ault settings
ault settingsault settings
When there is a wireless connectivity issue, you can restore wireless settings to default, and then reset up the
wireless connection between the printer and your device.
1.
1.
1.
1.1. If the printer is in Sleep mode (the Ready light is on but dim), press the Resume/Cancel button to wake
up the printer.
2.
2.
2.
2.2. Press and hold the Wireless button on the printer control panel for more than 20 seconds. When the
Attention light starts blinking, release the Wireless button.
3.
3.
3.
3.3. The printer restarts automatically. When the Wireless light starts blinking, the printer is in wireless setup
mode. You can now reset up a wireless connection between the printer and your device.
NO
NO
NO
NONOTE:
TE:
TE:
TE:TE: Use the HP Smart app to connect the printer wirelessly.
Change the c
Change the c
Change the c
Change the cChange the connection t
onnection t
onnection t
onnection tonnection type
ype
ype
ypeype
This topic describes how to change the way to connect your printer.
USB to a wir
USB to a wir
USB to a wir
USB to a wirUSB to a wirel
el
el
eleless c
ess c
ess c
ess cess connection (Windows 10/
onnection (Windows 10/
onnection (Windows 10/
onnection (Windows 10/onnection (Windows 10/macOS
macOS
macOS
macOSmacOS)
)
)
))
If you want to change the way the printer is connected from USB to a wireless connection, use the HP Smart app
to change the connection.
1.
1.
1.
1.1. Unplug the USB cable from the printer.
8 Chapter 2 Connect your printer

2.
2.
2.
2.2. Make sure your computer or mobile device is connected to your Wi-Fi network. On your mobile device, turn
on Bluetooth and location services.
3.
3.
3.
3.3. If your printer Wi-Fi was previously turned make sure to turn it on. For more information about wireless o,
status, see Turn on or the wireless capabilities of the printero .
4.
4.
4.
4.4. If the printer is no longer in wireless setup mode, restore the printer network settings. See Restore network
settings to default settings.
5.
5.
5.
5.5. Open the HP Smart app on your computer or mobile device. See Use the HP Smart app to print, scan, and
manage.
6.
6.
6.
6.6. When prompted, create or sign in to an HP account and register the printer.
7.
7.
7.
7.7. Follow the on-screen instructions to connect the printer to your Wi-Fi network.
Wir
Wir
Wir
WirWirel
el
el
eleless t
ess t
ess t
ess tess to a USB connection (Windo
o a USB connection (Windo
o a USB connection (Windo
o a USB connection (Windoo a USB connection (Windows/
ws/
ws/
ws/ws/macOS
macOS
macOS
macOSmacOS)
)
)
))
If you want to change the way the printer is connected from wireless to a USB connection, use the HP Smart app
to change the connection.
NO
NO
NO
NONOTE:
TE:
TE:
TE:TE: Always maintain an Internet connection. For the printer to work properly (whether you are using a Wi-
Fi, or USB connection), it must always be connected to the Internet. See Connect your printer to a Wi-Fi network
using HP Smart Printer is unable to print and .
1.
1.
1.
1.1. If necessary, remove the label covering the USB port at the back of the printer.
2.
2.
2.
2.2. Connect the printer and computer using a USB cable.
3.
3.
3.
3.3. Open the HP Smart app on your computer. See Use the HP Smart app to print, scan, and manage.
4.
4.
4.
4.4. From HP Smart, click or tap the Plus icon or , and then choose the option to select or add a
Add Printer
Add Printer
Add Printer
Add PrinterAdd Printer
printer. Follow the instructions to add the printer.
5.
5.
5.
5.5. When prompted, create or sign in to an HP account and register the printer.
Wireless to a USB connection (Windows/macOS) 9

Lo
Lo
Lo
LoLoad media
ad media
ad media
ad mediaad media
3
3
3
33
This section describes how to load media into the printer and to load an original on the scanner glass.dierent
Lo
Lo
Lo
LoLoad paper
ad paper
ad paper
ad paperad paper
This topic describes how to load paper into the input tray.
NO
NO
NO
NONOTE:
TE:
TE:
TE:TE: To avoid paper jams:
●Never add or remove paper from the tray during printing.
●When loading the tray, do not fan the paper.
●Use paper that is not wrinkled, folded, or damaged.
1.
1.
1.
1.1. Remove all the media from the input tray if any.
2.
2.
2.
2.2. Insert a stack of plain paper into the input tray with the top forward and the side to be printed on facing up.
Push the stack into the tray until it stops.
10 Chapter 3 Load media

3.
3.
3.
3.3. Slide the paper guides until they touch the edges of the media.
4.
4.
4.
4.4. Pull out the output tray extension.
Lo
Lo
Lo
LoLoad envel
ad envel
ad envel
ad envelad envelopes
opes
opes
opesopes
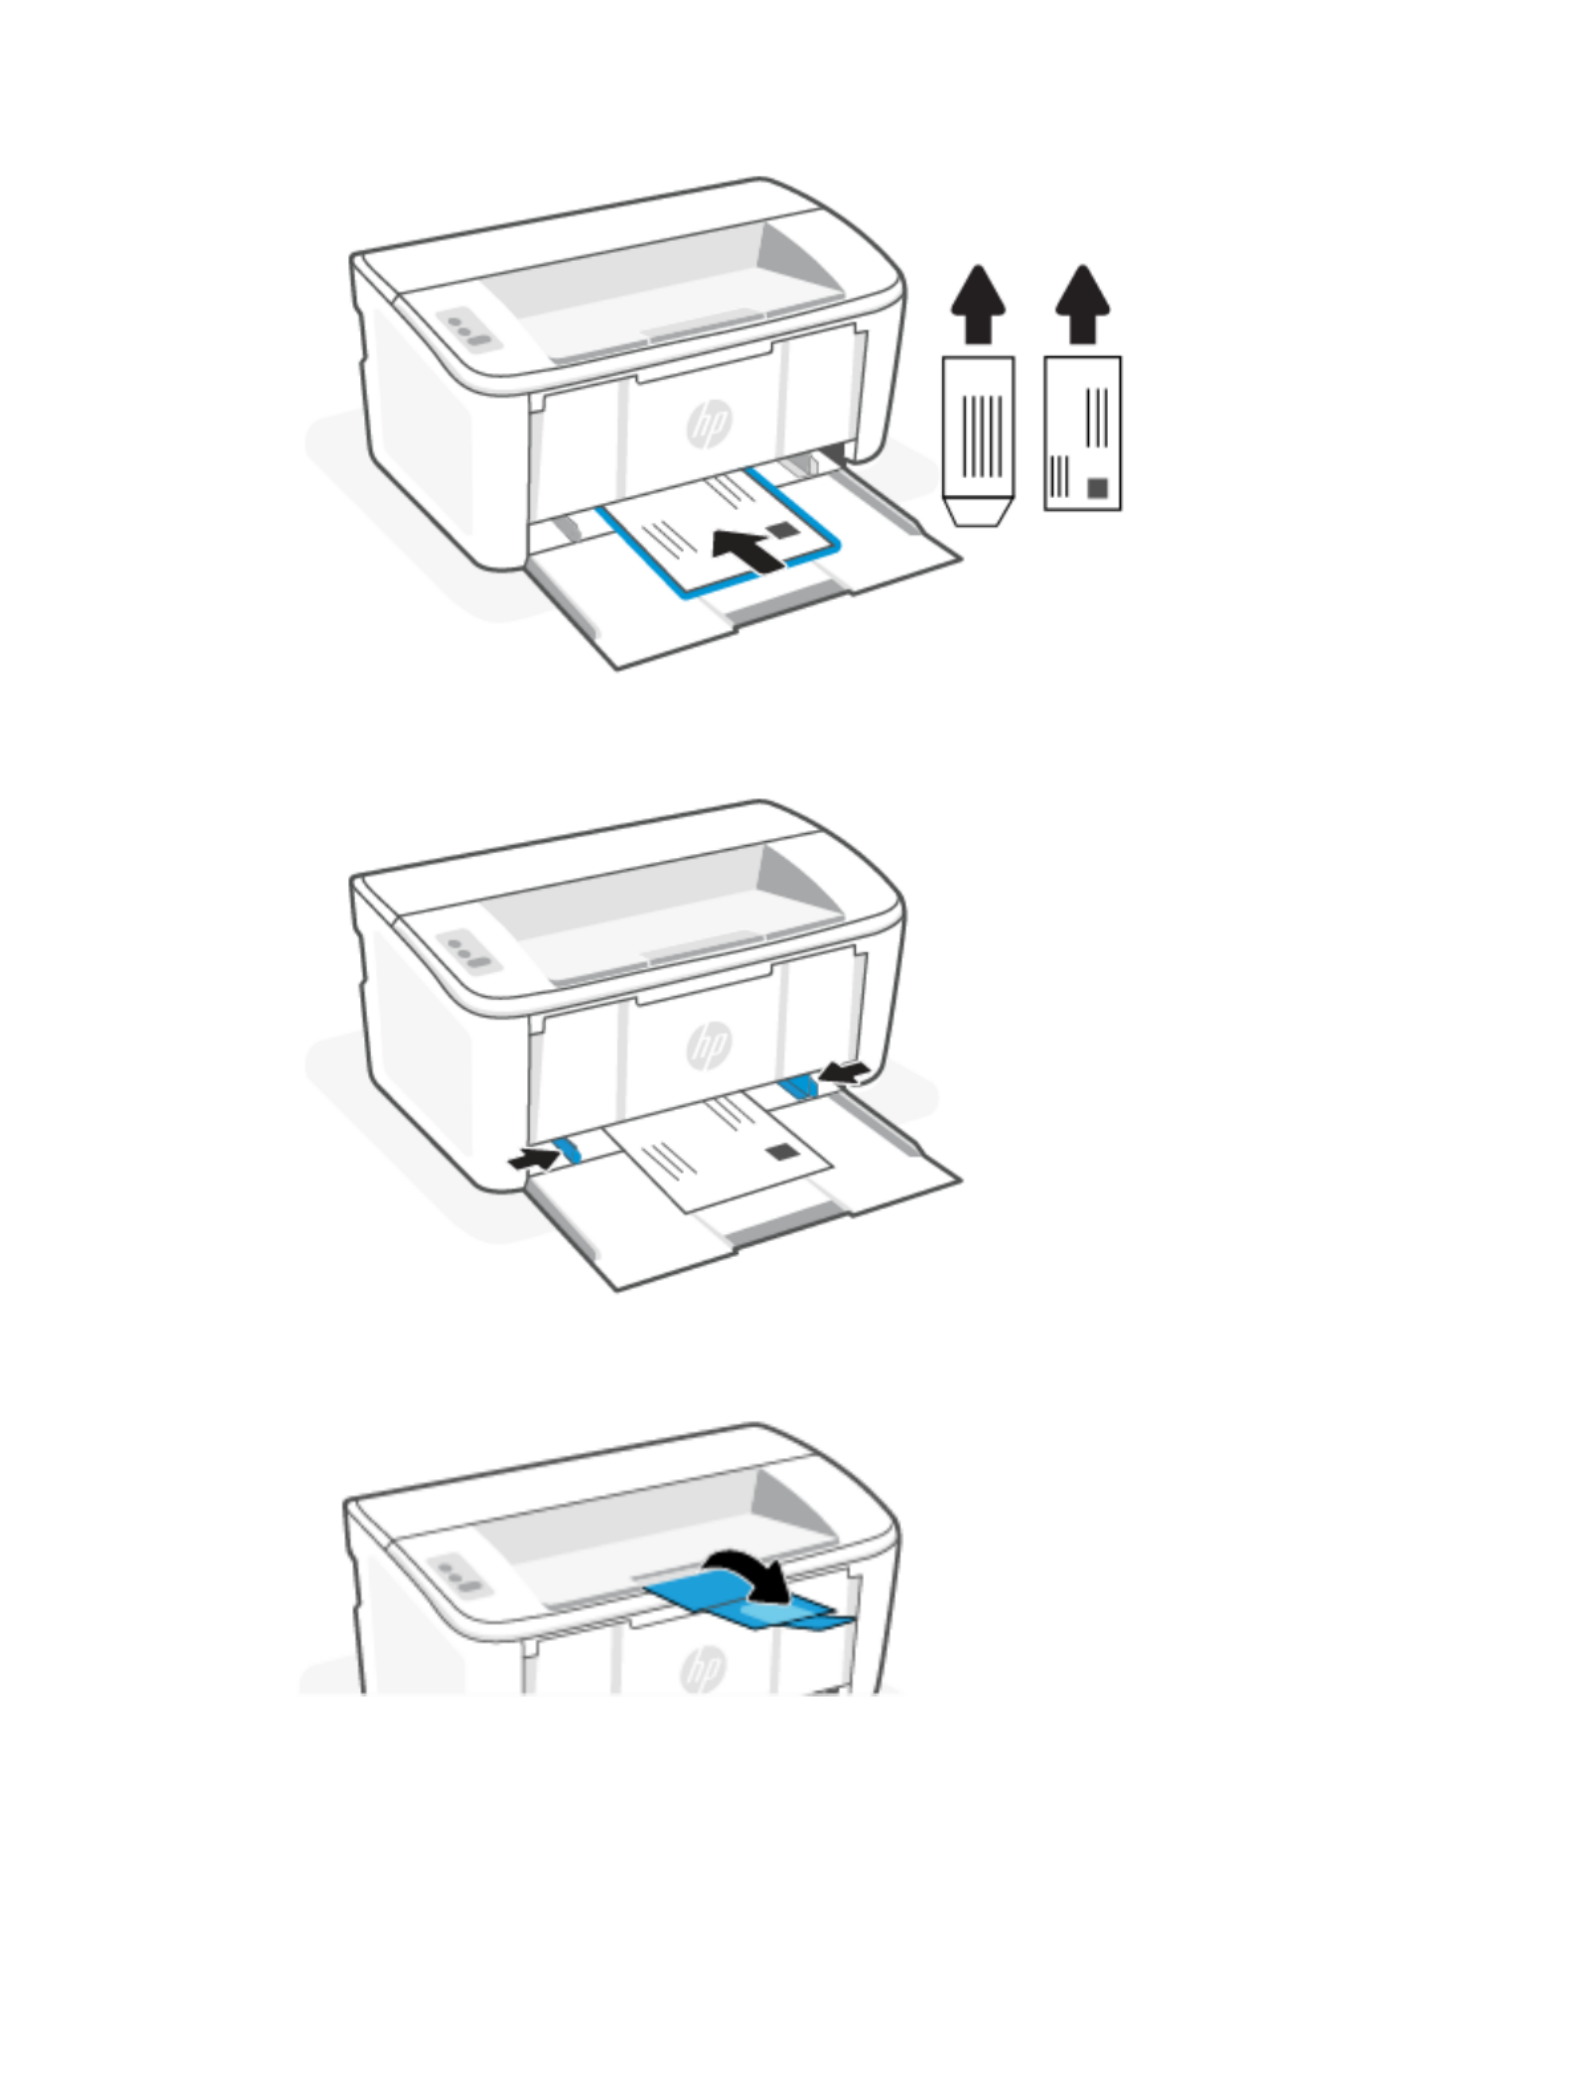
This topic describes how to load an envelope into the input tray.
For a list of supported sizes and tray capacity, visit www.hp.com/support/ljM109e. Click Pr
Pr
Pr
PrProduct Information
oduct Information
oduct Information
oduct Informationoduct Information, and
then select the product for your printer.specications
1.
1.
1.
1.1. Remove all the media from the input tray if any.
2.
2.
2.
2.2. Insert the envelope into the middle of the input tray with the short edge forward and the side to be printed
on facing up. Push the stack into the tray until it stops.
●If the envelope is on the short edge, position the envelope with the up and the short edge ap ap-side
without the toward the printer.ap
●If the envelope is on the long edge of the envelope, position the envelope with the down ap ap-side
and the short postage end toward the back of the input tray.
Load envelopes 11
3.
3.
3.
3.3. Slide the paper guides until they touch the edges of the media.
4.
4.
4.
4.4. Pull out the output tray extension.
Lo
Lo
Lo
LoLoad labels
ad labels
ad labels
ad labelsad labels
This topic describes how to load labels into the input tray.
12 Chapter 3 Load media

For a list of supported sizes and tray capacity, visit www.hp.com/support/ljM109e. Click , and
Product Information
Product Information
Product Information
Product InformationProduct Information
then select the product specications for your printer.
1.
1.
1.
1.1. Remove all the media from the input tray if any.
2.
2.
2.
2.2. Insert the sheet of labels into the middle of the input tray, with the top edge of the sheet toward the back of
the tray. The side to be printed on should face up.
3.
3.
3.
3.3. Slide the paper guides until they touch the edges of the media.
Load labels 13

4.
4.
4.
4.4. Pull out the output tray extension.
14 Chapter 3 Load media

Print
Print
Print
PrintPrint
4
4
4
44
This section describes how to print from dierent devices.
NO
NO
NO
NONOTE:
TE:
TE:
TE:TE: When the Attention and Ready lights are blinking, the printer is initializing, cleaning, or cooling down.
When the printer is cooling down print jobs might pause. Print jobs will continue when the engine is ready. This
might take several minutes.
To provide productive printing, this printer may automatically enter cool down mode under certain
environmental conditions when required.
Bef
Bef
Bef
BefBefor
or
or
orore yo
e yo
e yo
e yoe you begin
u begin
u begin
u beginu begin
Before you begin, follow these requirements to get the printer ready for use.
●Set up and connect your printer using the HP Smart app. See Use the HP Smart app to print, scan, and
manage Connect your printer to a Wi-Fi network using HP Smart and .
●Load paper in the input tray and open the output tray. See .Load media
●Always maintain an Internet connection. For the printer to work properly (whether you are using a Wi-Fi or
USB connection), it must always be connected to the Internet. See Connect your printer to a Wi-Fi network
using HP Smart Printer is unable to print and .
●Use only Original HP cartridges. The printer will not work as expected if non-Original HP cartridges or relled
cartridges are installed.
Print fr
Print fr
Print fr
Print frPrint from a Windows c
om a Windows c
om a Windows c
om a Windows com a Windows comp
omp
omp
ompomputer
uter
uter
uteruter
This topic describes how to print from a Windows computer.
Review the requirements listed in Before you begin.
Make sure you have installed the HP Smart app. See Use the HP Smart app to print, scan, and manage.
Make sure you have loaded media into the input tray. See Load media.
Print documents
Print documents
Print documents
Print documentsPrint documents
Use the option from a software application to select the printer and basic options for your print job.
Print
Print
Print
PrintPrint
1.
1.
1.
1.1. From the software program, select the option.
Print
Print
Print
PrintPrint
2.
2.
2.
2.2. Select the printer from the list of printers. To change settings, click the Pr
Pr
Pr
PrProperties
operties
operties
opertiesoperties Pref
Pref
Pref
PrefPreferenc
erenc
erenc
erencerences
es
es
eses or button to
open the print driver.
NO
NO
NO
NONOTE:
TE:
TE:
TE:TE: The name of the button varies for software programs.dierent
3.
3.
3.
3.3. Click the tabs in the print driver to congure the available options.
4.
4.
4.
4.4. Click the button to return to the dialog box. Select the number of copies to print from this screen.
OK
OK
OK
OKOK Print
Print
Print
PrintPrint
Print 15

5.
5.
5.
5.5. Click the button to print the job.
OK
OK
OK
OKOK
Manuall
Manuall
Manuall
ManuallManually print on bo
y print on bo
y print on bo
y print on boy print on both sides
th sides
th sides
th sidesth sides
You can print on both sides of the paper using a manual process. You will need to reload the pages for the second
side.
1.
1.
1.
1.1. From the software program, select the option.
Print
Print
Print
PrintPrint
2.
2.
2.
2.2. Select the printer from the list of printers, and then click the or
Properties
Properties
Properties
PropertiesProperties Pr
Pr
Pr
PrPreferenc
eferenc
eferenc
eferenceferences
es
es
eses button to open the
print driver.
NO
NO
NO
NONOTE:
TE:
TE:
TE:TE: The name of the button varies for software programs.dierent
3.
3.
3.
3.3. Click the tab.
Layout
Layout
Layout
LayoutLayout
4.
4.
4.
4.4. Select the Print on Both Sides Manuall
Print on Both Sides Manuall
Print on Both Sides Manuall
Print on Both Sides ManuallPrint on Both Sides Manually
y
y
yy OK
OK
OK
OKOK check box, and then click the button.
5.
5.
5.
5.5. In the dialog box, click the button to print the job. The printer will print the side of all the pages
Print
Print
Print
PrintPrint OK
OK
OK
OKOK rst
in the document rst.
6.
6.
6.
6.6. Go to the printer, and then remove any blank paper that is in the input tray.
7.
7.
7.
7.7. Retrieve the printed stack from the output bin, and place it with the printed-side facing down, top edge rst
in the input tray.
8.
8.
8.
8.8. At the computer, click the button to print the second side of the job.
OK
OK
OK
OKOK
9.
9.
9.
9.9. If the Attention light starts blinking, press the Resume/Cancel button to continue.
Print mul
Print mul
Print mul
Print mulPrint multipl
tipl
tipl
tipltiple pages per sheet
e pages per sheet
e pages per sheet
e pages per sheete pages per sheet
When you print from a software application using the option, you can select an option to print multiple
Print
Print
Print
PrintPrint
pages on a single sheet of paper. For example, you might want to do this if you are printing a very large
document and want to save paper.
1.
1.
1.
1.1. From the software program, select the option.
Print
Print
Print
PrintPrint
16 Chapter 4 Print

2.
2.
2.
2.2. Select the printer from the list of printers, and then click the Pr
Pr
Pr
PrProperties
operties
operties
opertiesoperties Pref
Pref
Pref
PrefPreferenc
erenc
erenc
erencerences
es
es
eses or button to open the
print driver.
NO
NO
NO
NONOTE:
TE:
TE:
TE:TE: The name of the button varies for software programs.dierent
3.
3.
3.
3.3. Click the tab.
Layout
Layout
Layout
LayoutLayout
4.
4.
4.
4.4. Select the correct number of pages per sheet from the drop-down list.
Pages per sheet
Pages per sheet
Pages per sheet
Pages per sheetPages per sheet
5.
5.
5.
5.5. Select the correct layout from the Pages per Sheet Lay
Pages per Sheet Lay
Pages per Sheet Lay
Pages per Sheet LayPages per Sheet Layout
out
out
outout drop-down list.
6.
6.
6.
6.6. If you want to add page borders, select the P
P
P
PPage Borders
age Borders
age Borders
age Bordersage Borders check box.
7.
7.
7.
7.7. Select the correct paper orientation option, and then click the button to close the or
OK
OK
OK
OKOK Properties
Properties
Properties
PropertiesProperties
Pref
Pref
Pref
PrefPreferenc
erenc
erenc
erencerences
es
es
eses dialog box.
8.
8.
8.
8.8. In the dialog box, click the button to print the job.
Print
Print
Print
PrintPrint OK
OK
OK
OKOK
Print fr
Print fr
Print fr
Print frPrint from a Mac comp
om a Mac comp
om a Mac comp
om a Mac compom a Mac computer
uter
uter
uteruter
This topic describes how to print from a Mac computer.
Review the requirements listed in Before you begin.
Make sure you have installed the HP Smart app. See Use the HP Smart app to print, scan, and manage.
Make sure you have loaded media into the input tray. See .Load media
If you have not added the printer to the system, follow these steps to enable printing rst.
1.
1.
1.
1.1. From the computer, open Sys
Sys
Sys
SysSystem Pref
tem Pref
tem Pref
tem Preftem Preferenc
erenc
erenc
erencerence
e
e
ee Print
Print
Print
PrintPrinters and Scanners
ers and Scanners
ers and Scanners
ers and Scannersers and Scanners, and select .
2.
2.
2.
2.2. Click the Add button/icon , select the printer from the printer list, and then click .
+
+
+
++ Add
Add
Add
AddAdd
Print documents
Print documents
Print documents
Print documentsPrint documents
Use the option from a software application to select the printer and basic options for your print job.
Print
Print
Print
PrintPrint
1.
1.
1.
1.1. Click the Fil
Fil
Fil
FilFile
e
e
ee Print
Print
Print
PrintPrint menu, and then click the option.
2.
2.
2.
2.2. Select the printer.
3.
3.
3.
3.3. Click or
Show Details
Show Details
Show Details
Show DetailsShow Details Co
Co
Co
CoCopies & Pages
pies & Pages
pies & Pages
pies & Pagespies & Pages, and then select other menus to adjust the print settings.
NO
NO
NO
NONOTE:
TE:
TE:
TE:TE: The name of the item varies for dierent software programs.
4.
4.
4.
4.4. Click the button.
Print
Print
Print
PrintPrint
Manuall
Manuall
Manuall
ManuallManually print on bo
y print on bo
y print on bo
y print on boy print on both sides
th sides
th sides
th sidesth sides
You can print on both sides of the paper using a manual process. You will need to reload the pages for the second
side.
NO
NO
NO
NONOTE:
TE:
TE:
TE:TE: This feature is available if you install the HP print driver. It might not be available if you are using
AirPrint.
1.
1.
1.
1.1. Click the menu, and then click the
File
File
File
FileFile Print
Print
Print
PrintPrint option.
Print from a Mac computer 17

2.
2.
2.
2.2. Select the printer.
3.
3.
3.
3.3. Click or
Show Details
Show Details
Show Details
Show DetailsShow Details Co
Co
Co
CoCopies & Pages
pies & Pages
pies & Pages
pies & Pagespies & Pages Manual Dupl
Manual Dupl
Manual Dupl
Manual DuplManual Duplex
ex
ex
exex, and then click the menu.
NO
NO
NO
NONOTE:
TE:
TE:
TE:TE: The name of the item varies for dierent software programs.
4.
4.
4.
4.4. Click the box, and select a binding option.
Manual Duplex
Manual Duplex
Manual Duplex
Manual DuplexManual Duplex
5.
5.
5.
5.5. Click the button.
Print
Print
Print
PrintPrint
6.
6.
6.
6.6. Go to the printer, and then remove any blank paper that is in the input tray.
7.
7.
7.
7.7. Retrieve the printed stack from the output bin, and place it with the printed-side facing down, top edge rst
in the input tray.
8.
8.
8.
8.8. If the Attention light starts blinking, press the Resume/Cancel button to continue.
Print mul
Print mul
Print mul
Print mulPrint multipl
tipl
tipl
tipltiple pages per sheet
e pages per sheet
e pages per sheet
e pages per sheete pages per sheet
When you print from a software application using the option, you can select an option to print multiple
Print
Print
Print
PrintPrint
pages on a single sheet of paper. For example, you might want to do this if you are printing a very large
document and want to save paper.
1.
1.
1.
1.1. Click the menu, and then click the
File
File
File
FileFile Print
Print
Print
PrintPrint option.
2.
2.
2.
2.2. Select the printer.
3.
3.
3.
3.3. Click or
Show Details
Show Details
Show Details
Show DetailsShow Details Co
Co
Co
CoCopies & Pages
pies & Pages
pies & Pages
pies & Pagespies & Pages Lay
Lay
Lay
LayLayout
out
out
outout, and then click the menu.
NO
NO
NO
NONOTE:
TE:
TE:
TE:TE: The name of the item varies for dierent software programs.
4.
4.
4.
4.4. From the P
P
P
PPages per Sheet
ages per Sheet
ages per Sheet
ages per Sheetages per Sheet drop-down list, select the number of pages that you want to print on each sheet.
5.
5.
5.
5.5. In the Layout Dir
Layout Dir
Layout Dir
Layout DirLayout Direction
ection
ection
ectionection area, select the order and placement of the pages on the sheet.
6.
6.
6.
6.6. From the Bor
Bor
Bor
BorBorders
ders
ders
dersders menu, select the type of border to print around each page on the sheet.
7.
7.
7.
7.7. Click the button.
Print
Print
Print
PrintPrint
18 Chapter 4 Print

Print with mobil
Print with mobil
Print with mobil
Print with mobilPrint with mobile devic
e devic
e devic
e device devices
es
es
eses
HP mobile printing solutions enable easy printing to the printer from mobile devices.
You can use the HP Smart app to print documents and photos from your mobile device, social media account, or
cloud storage. See .Use the HP Smart app to print, scan, and manage
You can also print directly from your mobile devices using AirPrint (iOS and iPadOS) or HP Print Service Plugin
(Android):
●iOS:
iOS:
iOS:
iOS:iOS: Devices running iOS 4.2 or later have AirPrint pre-installed.
●iPadOS:
iPadOS:
iPadOS:
iPadOS:iPadOS: Devices have AirPrint pre-installed.
●Android:
Android:
Android:
Android:Android: Download the HP Print Service Plugin from the Google Play Store or your favorite app store, and
then enable it on your device.
NO
NO
NO
NONOTE:
TE:
TE:
TE:TE: You can print using HP Smart or AirPrint/HP Print Service Plugin when the mobile device is on the same
network as the printer or a dierent network (using Wi-Fi Direct).
Print whil
Print whil
Print whil
Print whilPrint while connect
e connect
e connect
e connecte connected to same Wi-Fi network
ed to same Wi-Fi network
ed to same Wi-Fi network
ed to same Wi-Fi networked to same Wi-Fi network
You can print documents and photos from your mobile device when the device is on the same Wi-Fi network as
the printer.
Visit www.hp.com/go/mobileprinting for more information on mobile printing.
NO
NO
NO
NONOTE:
TE:
TE:
TE:TE: Make sure your mobile device and printer are connected to the same Wi-Fi network. See Connect your
printer to a Wi-Fi network using HP Smart.
Print without c
Print without c
Print without c
Print without cPrint without connecting to same Wi-Fi network (Wi-Fi Dir
onnecting to same Wi-Fi network (Wi-Fi Dir
onnecting to same Wi-Fi network (Wi-Fi Dir
onnecting to same Wi-Fi network (Wi-Fi Dironnecting to same Wi-Fi network (Wi-Fi Direct)
ect)
ect)
ect)ect)
With Wi-Fi Direct, you can directly connect your computer or mobile device to the printer and print wirelessly—
without connecting your computer or mobile device to an existing wireless network.
Visit www.hp.com/go/widirectprinting for more information on Wi-Fi Direct.
NO
NO
NO
NONOTE:
TE:
TE:
TE:TE:
●Make sure Wi-Fi Direct on your printer is turned on. To check, open the EWS (see Access the Embedded Web
Server (EWS)), click the tab, and then click the link in the left navigation pane.
Networking
Networking
Networking
NetworkingNetworking Wi-Fi Direct Setup
Wi-Fi Direct Setup
Wi-Fi Direct Setup
Wi-Fi Direct SetupWi-Fi Direct Setup
●Up to 5 computers and mobile devices can connect to the printer using Wi-Fi Direct connection.
Print with mobil
Print with mobil
Print with mobil
Print with mobilPrint with mobile device using Wi-Fi Dir
e device using Wi-Fi Dir
e device using Wi-Fi Dir
e device using Wi-Fi Dire device using Wi-Fi Direct
ect
ect
ectect
you can directly connect your mobile device to the printer with Wi-Fi Direct, and then print.
1.
1.
1.
1.1. On the mobile device, open the or the
Wi-Fi
Wi-Fi
Wi-Fi
Wi-FiWi-Fi Wi-Fi Dir
Wi-Fi Dir
Wi-Fi Dir
Wi-Fi DirWi-Fi Direct
ect
ect
ectect menu.
2.
2.
2.
2.2. From the list of available networks, select the printer name.
NO
NO
NO
NONOTE:
TE:
TE:
TE:TE: If the printer name does not display, you might be out of range of the Wi-Fi Direct signal. Move the
device closer to the printer.
Print with mobile devices 19

3.
3.
3.
3.3. If prompted, enter the Wi-Fi Direct password.
NO
NO
NO
NONOTE:
TE:
TE:
TE:TE: For Android devices that support Wi-Fi Direct, if the connection method is set to A
A
A
AAutomatic
utomatic
utomatic
utomaticutomatic, the
connection will occur automatically, without a password prompt. If the connection method is set to ,
Manual
Manual
Manual
ManualManual
you will need to either press the Wireless button on the printer to connect to an Android device, or
provide a personal number (PIN) — available on a printed report— to connect to Windows 10 identication
devices.
NO
NO
NO
NONOTE:
TE:
TE:
TE:TE: To access the Wi-Fi Direct password, from the Embedded Web Server, click the tab, and
Networking
Networking
Networking
NetworkingNetworking
then click .
Wi-Fi Direct Setup
Wi-Fi Direct Setup
Wi-Fi Direct Setup
Wi-Fi Direct SetupWi-Fi Direct Setup
4.
4.
4.
4.4. Open the document, and then select the option.
Print
Print
Print
PrintPrint
NO
NO
NO
NONOTE:
TE:
TE:
TE:TE: If the mobile device does not support printing, install the HP Smart app.
5.
5.
5.
5.5. Select the printer from the list of available printers, and then select .
Print
Print
Print
PrintPrint
After the print job is complete, some mobile devices need to be reconnected to the local network.
Enabl
Enabl
Enabl
EnablEnable or disabl
e or disabl
e or disabl
e or disable or disable Wi-Fi Direct
e Wi-Fi Direct
e Wi-Fi Direct
e Wi-Fi Directe Wi-Fi Direct
Wi-Fi Direct capabilities can be enabled or disabled from the HP Embedded Web Server (EWS).
1.
1.
1.
1.1. Open the HP Embedded Web Server. See Access the Embedded Web Server (EWS).
2.
2.
2.
2.2. On the tab, click the link in the left navigation pane.
Networking
Networking
Networking
NetworkingNetworking Wi-Fi Direct Setup
Wi-Fi Direct Setup
Wi-Fi Direct Setup
Wi-Fi Direct SetupWi-Fi Direct Setup
3.
3.
3.
3.3. Select the option, and then click
On
On
On
OnOn Appl
Appl
Appl
ApplApply
y
y
yy. Selecting the option disables Wi-Fi Direct printing.
O
O
O
OO
Change the Wi-Fi Dir
Change the Wi-Fi Dir
Change the Wi-Fi Dir
Change the Wi-Fi DirChange the Wi-Fi Direct name
ect name
ect name
ect nameect name
In environments where more than one model of the same printer is installed, it might be helpful to provide each
printer a unique Wi-Fi Direct name for easier printer for Wi-Fi Direct printing.identication
Follow this procedure to change the printer Wi-Fi Direct name using the HP Embedded Web Server (EWS):
1.
1.
1.
1.1. Open the HP Embedded Web Server. See Access the Embedded Web Server (EWS).
2.
2.
2.
2.2. On the tab, click the link in the left navigation pane.
Networking
Networking
Networking
NetworkingNetworking Wi-Fi Direct Setup
Wi-Fi Direct Setup
Wi-Fi Direct Setup
Wi-Fi Direct SetupWi-Fi Direct Setup
3.
3.
3.
3.3. In the
Wi-Fi Direct Name
Wi-Fi Direct Name
Wi-Fi Direct Name
Wi-Fi Direct NameWi-Fi Direct Name eld, enter the new name.
4.
4.
4.
4.4. Click Appl
Appl
Appl
ApplApply
y
y
yy.
20 Chapter 4 Print

C
C
C
CCongur
ongur
ongur
ongurongure
e
e
ee y
y
y
y your print
our print
our print
our printour printer
er
er
erer
5
5
5
55
This section describes how to congure your printer.
C
C
C
CCongur
ongur
ongur
ongurongure
e
e
ee the printer using the Embedded W
the printer using the Embedded W
the printer using the Embedded W
the printer using the Embedded W the printer using the Embedded Web Server (EWS
eb Server (EWS
eb Server (EWS
eb Server (EWSeb Server (EWS)
)
)
))
Use the HP Embedded Web Server to manage printing functions from your computer instead of the printer
control panel.
●View printer status information
●Determine the remaining life for all supplies and order new ones
●View and change tray congurations
●Receive of printer and supplies eventsnotication
●View and change network conguration
Ac
Ac
Ac
AcAcces
ces
ces
cescess the Embedded Web Serv
s the Embedded Web Serv
s the Embedded Web Serv
s the Embedded Web Servs the Embedded Web Server (EWS)
er (EWS)
er (EWS)
er (EWS)er (EWS)
The HP Embedded Web Server works when the printer is connected to an IP-based network. The HP Embedded
Web Server does not support IPX-based printer connections. You do not have to have Internet access to open and
use the HP Embedded Web Server.
When the printer is connected to the network, the HP Embedded Web Server is automatically available.
NO
NO
NO
NONOTE:
TE:
TE:
TE:TE: HP Device Toolbox is software used to connect to the HP Embedded Web Server when the printer is
connected to a computer via USB. It is available only if a full installation was performed when the printer was
installed on a computer. Depending on how the printer is connected, some features might not be available.
You can open EWS using one of the following methods.
Open the Embedded Web Serv
Open the Embedded Web Serv
Open the Embedded Web Serv
Open the Embedded Web ServOpen the Embedded Web Server using HP Smart (iOS, iP
er using HP Smart (iOS, iP
er using HP Smart (iOS, iP
er using HP Smart (iOS, iPer using HP Smart (iOS, iPadOS, Andr
adOS, Andr
adOS, Andr
adOS, AndradOS, Android, and Windows 10)
oid, and Windows 10)
oid, and Windows 10)
oid, and Windows 10)oid, and Windows 10)
You can open the Embedded Web Server from the HP Smart app.
1.
1.
1.
1.1. Open the HP Smart app on your computer or mobile device. See Use the HP Smart app to print, scan, and
manage.
2.
2.
2.
2.2. From HP Smart, select your printer, and then click or tap Advanc
Advanc
Advanc
AdvancAdvanced Settings
ed Settings
ed Settings
ed Settingsed Settings.
Open the Embedded Web Serv
Open the Embedded Web Serv
Open the Embedded Web Serv
Open the Embedded Web ServOpen the Embedded Web Server using an IP addres
er using an IP addres
er using an IP addres
er using an IP addreser using an IP address (Wi-Fi connection)
s (Wi-Fi connection)
s (Wi-Fi connection)
s (Wi-Fi connection)s (Wi-Fi connection)
Your printer must be connected to an IP-based network before you can access the Embedded Web Server.
An administrator password for access to the Embedded Web Server can be assigned to prevent unauthorized
users from changing the printer settings. Check with your administrator rst to see if you have access.
1.
1.
1.
1.1. Print a conguration page to determine the IP address or host name.
Congure your printer 21

a.
a.
a.
a.a. If the printer is in Sleep mode (the Ready light is on but dim), press the Resume/Cancel button to
wake up the printer.
b.
b.
b.
b.b. Press and hold the Resume/Cancel button on the control panel until the Ready light begins
blinking, and then release the button.
2.
2.
2.
2.2. Open a web browser, and in the address line, type the IP address or host name exactly as it displays on the
conguration page. Press the key on the computer keyboard. The Embedded Web Server opens.Enter
NO
NO
NO
NONOTE:
TE:
TE:
TE:TE: If the web browser displays a message indicating that accessing the website might not be safe,
select the option to continue to the website. Accessing this website will not harm the computer.
Open the Embedded Web Serv
Open the Embedded Web Serv
Open the Embedded Web Serv
Open the Embedded Web ServOpen the Embedded Web Server using an IP addres
er using an IP addres
er using an IP addres
er using an IP addreser using an IP address (Wi-Fi Direct c
s (Wi-Fi Direct c
s (Wi-Fi Direct c
s (Wi-Fi Direct cs (Wi-Fi Direct connection)
onnection)
onnection)
onnection)onnection)
You can open the Embedded Web Server from a web browser using the Wi-Fi Direct connection IP address.
1.
1.
1.
1.1. Make sure your device and the printer are connected using Wi-Fi Direct. See Print without connecting to
same Wi-Fi network (Wi-Fi Direct).
2.
2.
2.
2.2. Open a web browser, type the following IP address or hostname of the printer in the address bar, and then
click or tap .
Enter
Enter
Enter
EnterEnter
IP Addre
IP Addre
IP Addre
IP AddreIP Address:
ss:
ss:
ss: ss: 192.168.223.1
HP Embedded Web Serv
HP Embedded Web Serv
HP Embedded Web Serv
HP Embedded Web ServHP Embedded Web Server featur
er featur
er featur
er featurer features
es
es
eses
The following table describes the printer settings that you can congure with HP Embedded Web Server.
T
T
T
TTable 5-1
able 5-1
able 5-1
able 5-1able 5-1 HP Embedded Web Server f
HP Embedded Web Server f
HP Embedded Web Server f
HP Embedded Web Server fHP Embedded Web Server feature
eature
eature
eatureeatures
s
s
ss
T
T
T
TTab or section
ab or section
ab or section
ab or sectionab or section Description
Description
Description
DescriptionDescription
Home
Home
Home
HomeHome tab
Provides printer, status, and
conguration information.
●Device S
Device S
Device S
Device SDevice Status
tatus
tatus
tatustatus: Shows the printer status and shows the approximate percent life remaining
of HP supplies.
●Supplies Status
Supplies Status
Supplies Status
Supplies StatusSupplies Status: Shows the approximate percent life remaining of HP supplies. Actual supply
life remaining can vary. Consider having a replacement supply available to install when print
quality is no longer acceptable. The supply does not need to be replaced unless the print
quality is no longer acceptable.
●Device
Device
Device
Device Device C
C
C
CConguration
onguration
onguration
ongurationonguration: Shows the information found on the printer conguration page.
●Network Summary
Network Summary
Network Summary
Network SummaryNetwork Summary: Shows the information found on the printer network conguration page.
●Event Log
Event Log
Event Log
Event LogEvent Log: Shows a list of all printer events and errors.
●Open Sourc
Open Sourc
Open Sourc
Open SourcOpen Source Licenses
e Licenses
e Licenses
e Licensese Licenses: Shows a summary of the licenses for open source software
programs that can be used with the printer.
Syst
Syst
Syst
SystSystem
em
em
emem tab
Provides the ability to congure the
printer from your computer.
●Device Inf
Device Inf
Device Inf
Device InfDevice Information
ormation
ormation
ormationormation: Provides basic printer and company information.
●Paper Setup
Paper Setup
Paper Setup
Paper SetupPaper Setup: Change the default paper-handling settings for the printer.
●Energy Settings
Energy Settings
Energy Settings
Energy SettingsEnergy Settings: Change the default times for entering Sleep/Auto mode or automatic O
shut down.
●Syst
Syst
Syst
SystSystem Setup
em Setup
em Setup
em Setupem Setup: Change the system defaults for the printer.
22 Chapter 5 your printerCongure

T
T
T
TTable 5-1
able 5-1
able 5-1
able 5-1able 5-1 HP Embedded Web Server f
HP Embedded Web Server f
HP Embedded Web Server f
HP Embedded Web Server fHP Embedded Web Server featur
eatur
eatur
eatureatures
es
es
eses (continued)
(continued)
(continued)
(continued)(continued)
T
T
T
TTab or section
ab or section
ab or section
ab or sectionab or section Description
Description
Description
DescriptionDescription
●Supply Settings
Supply Settings
Supply Settings
Supply SettingsSupply Settings: Change the settings for Cartridge is l
Cartridge is l
Cartridge is l
Cartridge is lCartridge is low
ow
ow
owow alert and other supplies
information.
●Service
Service
Service
ServiceService: Start the Fuser or Cartridge Cleaning mode, turn Less P
Less P
Less P
Less PLess Paper Curl
aper Curl
aper Curl
aper Curlaper Curl Archive Print
Archive Print
Archive Print
Archive PrintArchive Print or on
or for printing, or change USB connection speed.o
●Administration
Administration
Administration
AdministrationAdministration: Set or change the printer password. Enable or disable printer features.
NO
NO
NO
NONOTE:
TE:
TE:
TE:TE: The Syst
Syst
Syst
SystSystem
em
em
emem tab can be password-protected. If this printer is on a network, always consult
with the administrator before changing settings on this tab.
Networking
Networking
Networking
NetworkingNetworking tab
(Network-connected printers only)
Provides the ability to change network
settings from your computer.
Network administrators can use this tab to control network-related settings for the printer when
it is connected to an IP-based network. It also allows the network administrator to set up Wi-Fi
Direct functionality. This tab does not appear if the printer is directly connected to a computer.
NO
NO
NO
NONOTE:
TE:
TE:
TE:TE: The tab can be password-protected. If this printer is on a network, always
Networking
Networking
Networking
NetworkingNetworking
consult with the administrator before changing settings on this tab.
Congur
Congur
Congur
CongurCongure
e
e
ee IP network settings
IP network settings
IP network settings
IP network settings IP network settings
Use the HP Embedded Web Server to change the printer name and network settings.
Printer sharing discl
Printer sharing discl
Printer sharing discl
Printer sharing disclPrinter sharing disclaimer
aimer
aimer
aimeraimer
HP does not support peer-to-peer networking, as the feature is a function of Microsoft operating systems and
not of the HP printer drivers.
Go to Microsoft at www.microsoft.com.
View or change network settings
View or change network settings
View or change network settings
View or change network settingsView or change network settings
Use the HP Embedded Web Server to view or change IP conguration settings.
1.
1.
1.
1.1. Open the HP Embedded Web Server. See Access the Embedded Web Server (EWS).
2.
2.
2.
2.2. Click the tab to obtain network information. Change settings as needed.
Networking
Networking
Networking
NetworkingNetworking
Rename the print
Rename the print
Rename the print
Rename the printRename the printer on a network
er on a network
er on a network
er on a networker on a network
Use the HP Embedded Web Server to rename the printer on a network so that it can be uniquely identied.
1.
1.
1.
1.1. Open the HP Embedded Web Server. See Access the Embedded Web Server (EWS).
2.
2.
2.
2.2. Open the Syst
Syst
Syst
SystSystem
em
em
emem tab.
3.
3.
3.
3.3. On the Device Inf
Device Inf
Device Inf
Device InfDevice Information
ormation
ormation
ormationormation page, the default printer name is in the De
De
De
DeDevice Descrip
vice Descrip
vice Descrip
vice Descripvice Description
tion
tion
tiontion You can change eld.
this name to uniquely identify this printer.
NO
NO
NO
NONOTE:
TE:
TE:
TE:TE: Completing the other elds on this page is optional.
4.
4.
4.
4.4. Click the Appl
Appl
Appl
ApplApply
y
y
yy button to save the changes.
Manuall
Manuall
Manuall
ManuallManually
y
y
y y congur
congur
congur
congurcongure
e
e
ee IPv4 T
IPv4 T
IPv4 T
IPv4 T IPv4 TCP
CP
CP
CPCP/IP par
/IP par
/IP par
/IP par/IP parameters
ameters
ameters
ametersameters
Use the Embedded Web Server to manually set an IPv4 address, subnet mask, and default gateway.
Congure IP network settings 23

1.
1.
1.
1.1. Open the HP Embedded Web Server. See Access the Embedded Web Server (EWS).
2.
2.
2.
2.2. Click the tab.
Networking
Networking
Networking
NetworkingNetworking
3.
3.
3.
3.3. In the area, select , and then edit the IPv4
IPv4
IPv4
IPv4
IPv4 IPv4 Conguration
Conguration
Conguration
CongurationConguration Manual IP
Manual IP
Manual IP
Manual IPManual IP conguration settings.
4.
4.
4.
4.4. Click the Appl
Appl
Appl
ApplApply
y
y
yy button.
Printer security f
Printer security f
Printer security f
Printer security fPrinter security fea
ea
ea
eaeatur
tur
tur
turtures
es
es
eses
The printer includes several security features to restrict who has access to conguration settings, to secure data,
and to prevent access to valuable hardware components.
Assign or change the sys
Assign or change the sys
Assign or change the sys
Assign or change the sysAssign or change the system p
tem p
tem p
tem ptem passwor
asswor
asswor
assworassword using the HP Embedded W
d using the HP Embedded W
d using the HP Embedded W
d using the HP Embedded Wd using the HP Embedded Web Server
eb Server
eb Server
eb Servereb Server
Assign an administrator password for access to the printer and the HP Embedded Web Server so that
unauthorized users cannot change the printer settings.
1.
1.
1.
1.1. Open the HP Embedded Web Server. See Access the Embedded Web Server (EWS).
2.
2.
2.
2.2. On the Syst
Syst
Syst
SystSystem
em
em
emem tab, click the Adminis
Adminis
Adminis
AdminisAdministration
tration
tration
trationtration link in the left navigation pane.
3.
3.
3.
3.3. In the area labeled Pr
Pr
Pr
PrProduct Security
oduct Security
oduct Security
oduct Securityoduct Security, enter the password in the Pas
Pas
Pas
PasPasswor
swor
swor
sworsword
d
d
dd eld.
4.
4.
4.
4.4. Re-enter the password in the C
C
C
CConrm
onrm
onrm
onrmonrm Pas
Pas
Pas
Pas Passwor
swor
swor
sworsword
d
d
dd eld.
5.
5.
5.
5.5. Click the Appl
Appl
Appl
ApplApply
y
y
yy button.
NO
NO
NO
NONOTE:
TE:
TE:
TE:TE: Make note of the password and store it in a safe place.
Ener
Ener
Ener
EnerEnergy-conservation settings
gy-conservation settings
gy-conservation settings
gy-conservation settingsgy-conservation settings
The printer includes several economy features to conserve energy and supplies.
Set the Sl
Set the Sl
Set the Sl
Set the SlSet the Sleep
eep
eep
eepeep/
/
/
//Auto
Auto
Auto
Auto Auto O
O
O
OO Aft
Aft
Aft
Aft After Inactivity setting
er Inactivity setting
er Inactivity setting
er Inactivity settinger Inactivity setting
Use the Embedded Web Server to set the amount of idle time before the printer enters sleep mode.
Complete the following procedure to change the Sleep/Auto After setting:O
1.
1.
1.
1.1. Open the HP Embedded Web Server. See Access the Embedded Web Server (EWS).
2.
2.
2.
2.2. Click the Syst
Syst
Syst
SystSystem
em
em
emem tab, and then select Ener
Ener
Ener
EnerEnergy Settings
gy Settings
gy Settings
gy Settingsgy Settings.
3.
3.
3.
3.3. From the Sl
Sl
Sl
SlSleep
eep
eep
eepeep/
/
/
//Auto
Auto
Auto
Auto Auto A
A
A
A After Inactivity
fter Inactivity
fter Inactivity
fter Inactivityfter Inactivity
O
O
O
OO drop-down, select the time for the delay.
4.
4.
4.
4.4. Click the Appl
Appl
Appl
ApplApply
y
y
yy button.
Set the Shut Down Aft
Set the Shut Down Aft
Set the Shut Down Aft
Set the Shut Down AftSet the Shut Down After Inactivity delay and
er Inactivity delay and
er Inactivity delay and
er Inactivity delay and er Inactivity delay and congur
congur
congur
congurcongure
e
e
ee the print
the print
the print
the print the printer t
er t
er t
er ter to use 1 watt or l
o use 1 watt or l
o use 1 watt or l
o use 1 watt or lo use 1 watt or le
e
e
eess o
ss o
ss o
ss oss of power
f power
f power
f powerf power
Use the Embedded Web Server to set the amount of time before the printer shuts down.
NO
NO
NO
NONOTE:
TE:
TE:
TE:TE: After the printer shuts down, the power consumption is 1 watt or less.
Complete the following procedure to change the Shut Down After Delay setting:
1.
1.
1.
1.1. Open the HP Embedded Web Server. See Access the Embedded Web Server (EWS).
24 Chapter 5 Congure your printer

2.
2.
2.
2.2. Click the Syst
Syst
Syst
SystSystem
em
em
emem tab, and then select Ener
Ener
Ener
EnerEnergy Settings
gy Settings
gy Settings
gy Settingsgy Settings.
3.
3.
3.
3.3. From the Shut Do
Shut Do
Shut Do
Shut DoShut Down After Inactivity
wn After Inactivity
wn After Inactivity
wn After Inactivitywn After Inactivity drop-down, select the time for the delay.
NO
NO
NO
NONOTE:
TE:
TE:
TE:TE: The default value is 4 ho
4 ho
4 ho
4 ho4 hours
urs
urs
ursurs.
4.
4.
4.
4.4. Click the Appl
Appl
Appl
ApplApply
y
y
yy button.
Set the Delay Shut Down setting
Set the Delay Shut Down setting
Set the Delay Shut Down setting
Set the Delay Shut Down settingSet the Delay Shut Down setting
Use the Embedded Web Server to select whether or not the printer delays shutting down after the power button
is pressed.
Complete the following procedure to change the Delay Shut Down setting:
1.
1.
1.
1.1. Open the HP Embedded Web Server. See Access the Embedded Web Server (EWS).
2.
2.
2.
2.2. Click the Syst
Syst
Syst
SystSystem
em
em
emem tab, and then select Ener
Ener
Ener
EnerEnergy Settings
gy Settings
gy Settings
gy Settingsgy Settings.
3.
3.
3.
3.3. Select or clear the Del
Del
Del
DelDelay when ports are active
ay when ports are active
ay when ports are active
ay when ports are activeay when ports are active option.
NO
NO
NO
NONOTE:
TE:
TE:
TE:TE: When this option is selected the printer will not shut down unless all ports are inactive. An active
network link will prevent the printer from shutting down.
Adv
Adv
Adv
AdvAdvanced
anced
anced
anced anced c
c
c
cconguration
onguration
onguration
ongurationonguration with HP Utility f
with HP Utility f
with HP Utility f
with HP Utility f with HP Utility for macOS
or macOS
or macOS
or macOSor macOS
Use the HP Utility to check printer status or to view or change printer settings from a computer.
You can use the HP Utility when the printer is connected with a USB cable or is connected to a TCP/IP-based
network.
Open HP Utility
Open HP Utility
Open HP Utility
Open HP UtilityOpen HP Utility
Follow these steps to open HP Utility.
1.
1.
1.
1.1. At the computer, open the folder.
Applications
Applications
Applications
ApplicationsApplications
2.
2.
2.
2.2. Select , and then select .
HP
HP
HP
HPHP HP Utility
HP Utility
HP Utility
HP UtilityHP Utility
HP Utility fe
HP Utility fe
HP Utility fe
HP Utility feHP Utility featur
atur
atur
aturatures
es
es
eses
The HP Utility toolbar includes these items:
●Device
Device
Device
DeviceDevices
s
s
ss: Click this button to show or hide Mac products found by the HP Utility.
●All Settings
All Settings
All Settings
All SettingsAll Settings: Click this button to return to the HP Utility main view.
●HP Support
HP Support
HP Support
HP SupportHP Support: Click this button to open a browser and go to the HP support website.
●Supplies
Supplies
Supplies
SuppliesSupplies: Click this button to open the HP SureSupply website.
●Registr
Registr
Registr
RegistrRegistration
ation
ation
ationation: Click this button to open the HP registration website.
●Recycling
Recycling
Recycling
RecyclingRecycling: Click this button to open the HP Planet Partners Recycling Program website.
HP Utility consists of pages that you open by clicking in the Al
Al
Al
AlAll Settings
l Settings
l Settings
l Settingsl Settings list. The following table describes the
tasks that you can perform with HP Utility.
Set the Delay Shut Down setting 25

T
T
T
TTable 5-2
able 5-2
able 5-2
able 5-2able 5-2 Settings availabl
Settings availabl
Settings availabl
Settings availablSettings available from HP Utility
e from HP Utility
e from HP Utility
e from HP Utilitye from HP Utility
Item
Item
Item
ItemItem Description
Description
Description
DescriptionDescription
Supplies Status
Supplies Status
Supplies Status
Supplies StatusSupplies Status Show the printer supplies status and gain access to links for ordering supplies online.
Device Inf
Device Inf
Device Inf
Device InfDevice Information
ormation
ormation
ormationormation Show information about the currently selected printer, including the printer Service ID (if
assigned), the rmware version (FW Version), the Serial Number, and the IP address.
Commands
Commands
Commands
CommandsCommands Send special characters or print commands to the printer after the print job.
NO
NO
NO
NONOTE:
TE:
TE:
TE:TE: This option is available only after you open the menu and select the
View
View
View
ViewView Show
Show
Show
Show Show
Advanced Op
Advanced Op
Advanced Op
Advanced OpAdvanced Options
tions
tions
tionstions item.
File Upl
File Upl
File Upl
File UplFile Upload
oad
oad
oadoad Transfer from the computer to the printer. You can upload the following types of les les:
●HP LaserJet printer command language (.PRN)
●Portable document format (.PDF)
●Postscript (.PS)
●Text (.TXT)
Power Manag
Power Manag
Power Manag
Power ManagPower Management
ement
ement
ementement Congure the printer economy settings.
Update Firmw
Update Firmw
Update Firmw
Update FirmwUpdate Firmware
are
are
areare Transfer a update to the printer.rmware le
NO
NO
NO
NONOTE:
TE:
TE:
TE:TE: This option is available only after you open the menu and select the
View
View
View
ViewView Show
Show
Show
Show Show
Advanced Op
Advanced Op
Advanced Op
Advanced OpAdvanced Options
tions
tions
tionstions item.
HP Connected
HP Connected
HP Connected
HP ConnectedHP Connected Access the HP Connected website.
Message C
Message C
Message C
Message CMessage Center
enter
enter
enterenter Display error events that have occurred with the printer.
Network Settings
Network Settings
Network Settings
Network SettingsNetwork Settings Congure the network settings, such as the IPv4 settings, IPv6 settings, Bonjour settings,
and other settings.
Supplies Management
Supplies Management
Supplies Management
Supplies ManagementSupplies Management Congure how the printer should behave when supplies are nearing the end of their
estimated life.
Trays
Trays
Trays
Trays Trays Congur
Congur
Congur
CongurConguration
ation
ation
ationation Change paper size and type for each of the trays.
Additional Settings
Additional Settings
Additional Settings
Additional SettingsAdditional Settings Open the HP Embedded Web Server (EWS) for the printer.
Pro
Pro
Pro
ProProxy Server Settings
xy Server Settings
xy Server Settings
xy Server Settingsxy Server Settings Congure a proxy server for the printer.
Updat
Updat
Updat
UpdatUpdate the
e the
e the
e the e the rmw
rmw
rmw
rmwrmwar
ar
ar
arare
e
e
ee
HP periodic printer updates. Follow these steps to update the printer oers rmware for a single printer.
Updat
Updat
Updat
UpdatUpdate the
e the
e the
e the e the rmw
rmw
rmw
rmwrmware
are
are
areare using the Firm
using the Firm
using the Firm
using the Firm using the Firmwar
war
war
warware Update Utility
e Update Utility
e Update Utility
e Update Utilitye Update Utility
Install the Firmware Update Utility to update the printer rmware.
Use these steps to manually download and install the Firmware Update Utility from HP.com.
NO
NO
NO
NONOTE:
TE:
TE:
TE:TE: This method is the only rmware update option available for printers connected to the computer via a
USB cable. It also works for printers connected to a network.
NO
NO
NO
NONOTE:
TE:
TE:
TE:TE: You must have a print driver installed in order to use this method.
26 Chapter 5 your printerCongure

1.
1.
1.
1.1. Go to www.hp.com/go/support, select your country/region or language, and then click the Software and
Software and
Software and
Software and Software and
Drivers
Drivers
Drivers
DriversDrivers link.
2.
2.
2.
2.2. Type the printer name in the search press the button, and then select the printer from the list eld, ENTER
of search results.
3.
3.
3.
3.3. Select the operating system.
4.
4.
4.
4.4. Under the Firmwar
Firmwar
Firmwar
FirmwarFirmware
e
e
ee section, locate the Firmw
Firmw
Firmw
FirmwFirmware Upda
are Upda
are Upda
are Updaare Update Utility
te Utility
te Utility
te Utilityte Utility.
5.
5.
5.
5.5. Click Downl
Downl
Downl
DownlDownload
oad
oad
oadoad Run
Run
Run
RunRun Run
Run
Run
RunRun, click , and then click again.
6.
6.
6.
6.6. When the utility launches, select the printer from the drop-down list, and then click Send Firmw
Send Firmw
Send Firmw
Send FirmwSend Firmware
are
are
areare.
NO
NO
NO
NONOTE:
TE:
TE:
TE:TE: To print a page to verify the installed conguration rmware version before or after the update
process, click Print
Print
Print
Print Print C
C
C
CCong
ong
ong
ongong.
7.
7.
7.
7.7. Follow the on-screen instructions to complete the installation, and then click the button to close the
Exit
Exit
Exit
ExitExit
utility.
Update the rmware using the Firmware Update Utility 27

Supplies, ac
Supplies, ac
Supplies, ac
Supplies, acSupplies, acc
c
c
ccessories, and p
essories, and p
essories, and p
essories, and pessories, and parts
arts
arts
artsarts
6
6
6
66
Order supplies or accessories, replace the toner cartridges, or remove and replace another part.
The printer only works with Original HP cartridges.
NO
NO
NO
NONOTICE:
TICE:
TICE:
TICE:TICE: If cartridges that are not Original HP cartridges are installed in this printer (including relled or non-
Original HP cartridges), the printer will not work as expected.
Or
Or
Or
OrOrder supplies, acc
der supplies, acc
der supplies, acc
der supplies, accder supplies, accessories, and p
essories, and p
essories, and p
essories, and pessories, and parts
arts
arts
artsarts
This topic describes how to order supplies, accessories, and parts.
T
T
T
TTabl
abl
abl
ablable 6-1
e 6-1
e 6-1
e 6-1e 6-1 Ordering op
Ordering op
Ordering op
Ordering opOrdering options and ref
tions and ref
tions and ref
tions and reftions and referenc
erenc
erenc
erencerences
es
es
eses
Option
Option
Option
OptionOption Refer
Refer
Refer
ReferReference
ence
ence
enceence
Order supplies and paper www.hp.com/go/suresupply
Order genuine HP parts or accessories www.hp.com/buy/parts
Order through service or support providers Contact an HP-authorized service or support provider.
Order using the HP Embedded Web Server (EWS) The EWS contains a link to the HP SureSupply website, which provides options
for purchasing Original HP supplies. To open EWS, see Access the Embedded Web
Server (EWS).
NO
NO
NO
NONOTE:
TE:
TE:
TE:TE: You can also order using the HP Smart app. For information about this app, see Use the HP Smart app
to print, scan, and manage.
T
T
T
TTabl
abl
abl
ablable 6-2
e 6-2
e 6-2
e 6-2e 6-2 Supplies and acc
Supplies and acc
Supplies and acc
Supplies and accSupplies and accessories information
essories information
essories information
essories informationessories information
Supplies
Supplies
Supplies
SuppliesSupplies Country
Country
Country
CountryCountry/Region
/Region
/Region
/Region/Region Description
Description
Description
DescriptionDescription Cartridge number
Cartridge number
Cartridge number
Cartridge numberCartridge number Part number
Part number
Part number
Part numberPart number
HP 141A Black Toner Cartridge North America, Australia, and
New Zealand
Standard-capacity
replacement black toner
cartridge
141A W1410A
HP 142A Black Toner Cartridge Europe Standard-capacity
replacement black toner
cartridge
142A W1420A
Repl
Repl
Repl
ReplReplace the t
ace the t
ace the t
ace the tace the toner cartridge
oner cartridge
oner cartridge
oner cartridgeoner cartridge
This section describes how to replace the cartridges.
The printer only works with Original HP cartridges.
NO
NO
NO
NONOTICE:
TICE:
TICE:
TICE:TICE: If cartridges that are not Original HP cartridges are installed in this printer (including relled or non-
Original HP cartridges), the printer will not work as expected.
28 Chapter 6 Supplies, accessories, and parts

Cartridge inform
Cartridge inform
Cartridge inform
Cartridge informCartridge information
ation
ation
ationation
Continue printing with the current cartridge until redistributing the toner no longer yields acceptable print quality.
To redistribute the toner, remove the toner cartridge from the printer and gently rock the cartridge back and forth
about its horizontal axis. For graphical representation, see cartridge replacement instructions. Reinsert the toner
cartridge into the printer and close the cover.
Remo
Remo
Remo
RemoRemove and r
ve and r
ve and r
ve and rve and repl
epl
epl
epleplac
ac
ac
acace the toner cartridge
e the toner cartridge
e the toner cartridge
e the toner cartridgee the toner cartridge
When a print cartridge approaches the end of useful life, you can continue printing with the current cartridge until
redistributing the toner no longer yields acceptable print quality, and then replace the cartridge.
1.
1.
1.
1.1. Open the print-cartridge door, and then remove the old print cartridge.
2.
2.
2.
2.2. Remove the new print cartridge from the packaging. Place the used print cartridge in the bag and box for
recycling.
Cartridge information 29

3.
3.
3.
3.3. Remove the orange cover from the print cartridge.
CAUTION:
CAUTION:
CAUTION:
CAUTION:CAUTION: To prevent damage to the print cartridge, hold the print cartridge at each end. Do not touch the
roller surface.
4.
4.
4.
4.4. Grasp both sides of the print cartridge and gently rock the print cartridge from side to side or six times ve
to distribute the toner evenly inside the cartridge.
30 Chapter 6 Supplies, accessories, and parts

5.
5.
5.
5.5. Bend the tab on the left side of the cartridge until the tab breaks loose, and then pull the tab until all the
tape is removed from the cartridge. Place the tab and tape in the print-cartridge box to return for recycling.
6.
6.
6.
6.6. Insert the print cartridge in the product, and then close the print-cartridge door.
CAUTION:
CAUTION:
CAUTION:
CAUTION:CAUTION: If toner gets on your clothing, wipe it with a dry cloth and wash the clothing in cold water. o
Hot water sets toner into the fabric.
Remove and replace the toner cartridge 31

Sol
Sol
Sol
SolSolv
v
v
vve pr
e pr
e pr
e pre probl
obl
obl
obloblems
ems
ems
emsems
7
7
7
77
This section suggests solutions to common problems.
You can also get help from the HP Smart app. HP Smart provides alerts for printer issues (jams and other
problems), links to help content, and options to contact support for additional assistance. For more information,
see Use the HP Smart app to print, scan, and manage.
If the suggestions do not solve the problems, try getting help using one of the support services, see HP support.
Print
Print
Print
PrintPrinter is unabl
er is unabl
er is unabl
er is unabler is unable to print
e to print
e to print
e to printe to print
This topic describes how to troubleshoot when the printer is unable to print.
Check printer c
Check printer c
Check printer c
Check printer cCheck printer connection to the Int
onnection to the Int
onnection to the Int
onnection to the Intonnection to the Internet
ernet
ernet
erneternet
Verify that the printer is connected to the Internet. If disconnected, the printer will not work as expected.
Your printer might be occasionally disconnected from the Internet (for example. power outage, network or router
issues or turning the printer when not in use). You might be able to print a limited number of pages while the o
printer is disconnected, but it is critical to reconnect the printer to continue printing.
Mak
Mak
Mak
MakMake sure t
e sure t
e sure t
e sure te sure to use Original HP cartridges
o use Original HP cartridges
o use Original HP cartridges
o use Original HP cartridgeso use Original HP cartridges
Check that you are using Original HP cartridges. Original HP cartridges are manufactured and sold by HP in oicial
HP packaging. HP+ printers require Original HP cartridges. If non-Original HP supplies or relled cartridges are
installed, HP+ printers will not operate as expected.
Check the printer settings and s
Check the printer settings and s
Check the printer settings and s
Check the printer settings and sCheck the printer settings and status
tatus
tatus
tatustatus
Check the printer settings and status to errors.nd
Print a conguration page to check information about printer errors:
1.
1.
1.
1.1. If the printer is in Sleep mode (the Ready light is on but dim), press the Resume/Cancel button to wake
up the printer.
2.
2.
2.
2.2. Press and hold the Resume/Cancel button on the control panel until the Ready light begins
blinking, and then release the button.
TIP:
TIP:
TIP:
TIP:TIP: To set up the printer wirelessly, see Connect your printer to a Wi-Fi network using HP Smart.
If you are still unable to print, visit the HP Support website www.hp.com/support/ljM109e.
32 Chapter 7 Solve problems

Int
Int
Int
IntInterpr
erpr
erpr
erprerpret c
et c
et c
et cet contr
ontr
ontr
ontrontrol
ol
ol
olol-panel light pa
-panel light pa
-panel light pa
-panel light pa-panel light patt
tt
tt
tttterns
erns
erns
ernserns
If the printer requires attention, light status appear on the control panel.dierent
T
T
T
TTabl
abl
abl
ablable 7-1
e 7-1
e 7-1
e 7-1e 7-1 Status
Status
Status
StatusStatus-light leg
-light leg
-light leg
-light leg-light legend
end
end
endend
Symbol for "light
Symbol for "light
Symbol for "light
Symbol for "light Symbol for "light Symbol for "light on"
Symbol for "light on"
Symbol for "light on"
Symbol for "light on"Symbol for "light on" Symbol for "light blinking (2 blink
Symbol for "light blinking (2 blink
Symbol for "light blinking (2 blink
Symbol for "light blinking (2 blinkSymbol for "light blinking (2 blinks per 3
s per 3
s per 3
s per 3 s per 3
o"
o"
o"
o"o"
seconds)"
seconds)"
seconds)"
seconds)"seconds)"
T
T
T
TTabl
abl
abl
ablable 7-2
e 7-2
e 7-2
e 7-2e 7-2 Contr
Contr
Contr
ContrControl-panel light patt
ol-panel light patt
ol-panel light patt
ol-panel light pattol-panel light patterns
erns
erns
ernserns
Light status
Light status
Light status
Light statusLight status Stat
Stat
Stat
StatState of the printer
e of the printer
e of the printer
e of the printere of the printer Action
Action
Action
ActionAction
The Attention light is blinking. The printer requires user attention. Depending on the printer state, check Table
7-3 Printer states and recommended actions for
recommended action to take.
The Attention and Ready lights are
on.
The printer has experienced a fatal error
from which it cannot recover.
1.
1.
1.
1.1. Turn the printer or disconnect the power o
cord from the printer.
2.
2.
2.
2.2. Wait 30 seconds, and then turn on the printer or
reconnect the power cord to the printer.
3.
3.
3.
3.3. Wait for the printer to initialize.
If the error persists, contact HP customer support.
The Attention and Ready lights are
blinking.
The printer is initializing, cleaning, or
cooling down.
It does not require any action.
The Attention light is blinking fast (4
blinks per 3 seconds).
●The printer doesn't print.
●The printer might not be connected
to the Internet. Or a problem might
have occurred with your HP account.
●Press the Resume/Cancel button to
continue printing or to print the information
page for further details.
●Check the HP Smart app on your mobile or
computer for details.
●Check your HP account and resolve the issue if
any.
T
T
T
TTabl
abl
abl
ablable 7-3
e 7-3
e 7-3
e 7-3e 7-3 Printer sta
Printer sta
Printer sta
Printer staPrinter states and r
tes and r
tes and r
tes and rtes and recommended actions
ecommended actions
ecommended actions
ecommended actionsecommended actions
Stat
Stat
Stat
StatState of the printer
e of the printer
e of the printer
e of the printere of the printer Action
Action
Action
ActionAction
The printer is in manual-feed mode. Load the correct paper type and size into the input tray. Press the Resume/
Cancel button to continue.
Interpret control-panel light patterns 33

T
T
T
TTable 7-3
able 7-3
able 7-3
able 7-3able 7-3 Printer sta
Printer sta
Printer sta
Printer staPrinter states and r
tes and r
tes and r
tes and rtes and recommended actions
ecommended actions
ecommended actions
ecommended actionsecommended actions (c
(c
(c
(c(continued)
ontinued)
ontinued)
ontinued)ontinued)
Stat
Stat
Stat
StatState of the printer
e of the printer
e of the printer
e of the printere of the printer Action
Action
Action
ActionAction
The printer is processing a manual duplex job. Load the pages into the input tray to print the second sides. Press the
Resume/Cancel button to continue.
The input tray is empty. Load the tray and press the Resume/Cancel button to continue.
NO
NO
NO
NONOTE:
TE:
TE:
TE:TE: Wireless models have a paper sensor and will continue
automatically after paper is loaded.
A door is open. Verify that the toner-cartridge door is fully closed.
The printer has failed to pick up a sheet of paper to process
a print job.
Verify that paper is correctly loaded, and then press the Resume/Cancel
button to continue.
Paper is jammed in the printer. Check for jams in the input tray, the output bin, and the toner cartridge
area. Clear the jam. See Clear paper jams. Press the Resume/Cancel
button to continue.
The toner cartridge is missing or incorrectly installed. Verify that all supplies are in place and installed correctly.
The toner cartridge is very low. Replace the toner cartridge. See Remove and replace the toner cartridge.
NO
NO
NO
NONOTE:
TE:
TE:
TE:TE: There will be no attention state if the printer is congured to
continue printing when the toner cartridge is very low.
The toner cartridge is incompatible with the printer, possibly
due to a missing or damaged memory chip.
Replace the toner cartridge. See Remove and replace the toner cartridge.
The toner cartridge has been protected on another printer. Replace the toner cartridge. See Remove and replace the toner cartridge.
The printer has detected an unauthorized toner cartridge. Replace the toner cartridge. See Remove and replace the toner cartridge.
The loaded paper is not the size needed for the print job. Replace the paper, or press the Resume/Cancel button to continue
with the size currently loaded.
The printer has experienced a general engine error. Press the Resume/Cancel button to continue.
If the error repeats, turn the printer. Wait 30 seconds, and then turn on o
the printer.
Incorrect rmware has been loaded. Press the Resume/Cancel button to continue, load the correct
rmware.
Re
Re
Re
ReRest
st
st
ststor
or
or
orore the fact
e the fact
e the fact
e the facte the factory-set defaul
ory-set defaul
ory-set defaul
ory-set defaulory-set defaults
ts
ts
tsts
Restoring the factory-set defaults returns all of the printer and network settings to the factory defaults. It will not
reset the page count.
CAUTION:
CAUTION:
CAUTION:
CAUTION:CAUTION: Restoring the factory-set defaults returns all of the settings to the factory defaults, and it also
deletes any pages that are stored in the memory.
1.
1.
1.
1.1. Open the HP Embedded Web Server. See Access the Embedded Web Server (EWS).
34 Chapter 7 Solve problems

2.
2.
2.
2.2. On the Syst
Syst
Syst
SystSystem
em
em
emem tab, click .
Service
Service
Service
ServiceService
3.
3.
3.
3.3. In the Res
Res
Res
ResRestore Def
tore Def
tore Def
tore Deftore Defaults
aults
aults
aultsaults area, click the R
R
R
RRestor
estor
estor
estorestore defaul
e defaul
e defaul
e defaule defaults
ts
ts
tsts button.
The printer automatically restarts.
A “Cartridge is l
A “Cartridge is l
A “Cartridge is l
A “Cartridge is lA “Cartridge is low” or “Cartridge is v
ow” or “Cartridge is v
ow” or “Cartridge is v
ow” or “Cartridge is vow” or “Cartridge is very l
ery l
ery l
ery lery low” mes
ow” mes
ow” mes
ow” mesow” message appe
sage appe
sage appe
sage appesage appears
ars
ars
arsars
Understand the cartridge-related messages and what actions to take.
Cartridge is lo
Cartridge is lo
Cartridge is lo
Cartridge is loCartridge is low
w
w
ww: The printer indicates when a cartridge level is low. Actual cartridge life remaining may vary.
Consider having a replacement available to install when print quality is no longer acceptable. The cartridge does
not need to be replaced now.
Continue printing with the current cartridge until redistributing the toner no longer yields acceptable print quality.
To redistribute the toner, remove the toner cartridge from the printer and gently rock the cartridge back and forth
about its horizontal axis. For graphical representation, see cartridge replacement instructions. Reinsert the toner
cartridge into the printer and close the cover.
Cartridge is very l
Cartridge is very l
Cartridge is very l
Cartridge is very lCartridge is very low
ow
ow
owow: The printer indicates when the cartridge level is very low. Actual cartridge life remaining
may vary. Consider having a replacement available to install when print quality is no longer acceptable. The
cartridge does not need to be replaced now unless the print quality is no longer acceptable.
Once an HP toner cartridge has reached V
V
V
VVery Low
ery Low
ery Low
ery Lowery Low, HP’s Premium Protection Warranty on that toner cartridge has
ended.
You can change the way the printer reacts when supplies reach the V
V
V
VVery Low
ery Low
ery Low
ery Lowery Low state. You do not have to
re-establish these settings when you install a new toner cartridge.
Change the “V
Change the “V
Change the “V
Change the “VChange the “Very Low” settings
ery Low” settings
ery Low” settings
ery Low” settingsery Low” settings
You can how the printer will notify you about very low cartridge levels.congure
1.
1.
1.
1.1. Open the HP Embedded Web Server. See Access the Embedded Web Server (EWS).
2.
2.
2.
2.2. Select the Syst
Syst
Syst
SystSystem
em
em
emem tab, and then select Suppl
Suppl
Suppl
SupplSupply Settings
y Settings
y Settings
y Settingsy Settings.
3.
3.
3.
3.3. Select one of the following options from the V
V
V
VVery Low Setting (B
ery Low Setting (B
ery Low Setting (B
ery Low Setting (Bery Low Setting (Black Cartridge):
lack Cartridge):
lack Cartridge):
lack Cartridge):lack Cartridge): drop-down list:
●Select the S
S
S
SStop
top
top
toptop option to set the printer to stop printing until you replace the cartridge.
●Select the C
C
C
CContinue
ontinue
ontinue
ontinueontinue option to set the printer to alert you that the cartridge is very low, but to continue
printing.
Print
Print
Print
PrintPrinter does not pick up p
er does not pick up p
er does not pick up p
er does not pick up per does not pick up paper or misf
aper or misf
aper or misf
aper or misfaper or misfeeds
eeds
eeds
eedseeds
The following solutions can help solve problems if the printer is not picking up paper from the tray or is picking up
multiple sheets of paper at one time. Either of these situations can result in paper jams.
The pr
The pr
The pr
The prThe product does not pick up paper
oduct does not pick up paper
oduct does not pick up paper
oduct does not pick up paperoduct does not pick up paper
If the product does not pick up paper from the tray, try these solutions.
1.
1.
1.
1.1. Open the product and remove any jammed sheets of paper.
2.
2.
2.
2.2. Load the tray with the correct size of paper for your job.
A “Cartridge is low” or “Cartridge is very low” message appears 35

Featur
Featur
Featur
FeaturFeature
e
e
ee Description
Description
Description
DescriptionDescription
1 Internal areas
2 Input tray
3 Output bin
NO
NO
NO
NONOTE:
TE:
TE:
TE:TE: Jams can occur in more than one location.
Experiencing fr
Experiencing fr
Experiencing fr
Experiencing frExperiencing frequent or recurring paper jams
equent or recurring paper jams
equent or recurring paper jams
equent or recurring paper jamsequent or recurring paper jams?
?
?
??
Follow these steps to solve problems with frequent paper jams. If the step does not resolve the problem rst
continue with the next step until you have resolved the problem.
1.
1.
1.
1.1. If paper has jammed in the printer, clear the jam and then print a conguration page to test the printer.
2.
2.
2.
2.2. Check that the tray is congured for the correct paper size and type. Adjust paper settings if necessary.
a.
a.
a.
a.a. Open the HP Embedded Web Server. See Access the Embedded Web Server (EWS).
b.
b.
b.
b.b. Syst
Syst
Syst
SystSystem
em
em
emem P
P
P
PPaper Setup
aper Setup
aper Setup
aper Setupaper SetupClick the tab, and then click the page.
c.
c.
c.
c.c. Select the type of paper that is in the tray.
d.
d.
d.
d.d. Select the size of paper that is in the tray.
3.
3.
3.
3.3. Turn the printer wait 30 seconds, and then turn it on again.o,
4.
4.
4.
4.4. Print a cleaning page to remove excess toner from inside the printer. See Print a cleaning page.
5.
5.
5.
5.5. Print a conguration page to test the printer.
a.
a.
a.
a.a. If the printer is in Sleep mode (the Ready light is on but dim), press the Resume/Cancel button to
wake up the printer.
b.
b.
b.
b.b. Press and hold the Resume/Cancel button on the control panel until the Ready light begins
blinking, and then release the button.
If none of these steps resolves the problem, the printer might need service. Contact HP customer support.
Cl
Cl
Cl
ClClear jams fr
ear jams fr
ear jams fr
ear jams frear jams from the input tray
om the input tray
om the input tray
om the input trayom the input tray
Use the following procedure to clear paper jams from the input tray.
CAUTION:
CAUTION:
CAUTION:
CAUTION:CAUTION: Do not use sharp objects, such as tweezers or needle-nose pliers, to remove jams. Damage caused
by sharp objects will not be covered by the warranty.
When removing jammed media, pull the jammed media straight away from the product. Pulling jammed media
out of the product at an angle can damage the product.
NO
NO
NO
NONOTE:
TE:
TE:
TE:TE: Depending on where the jam is located, some of the following steps might not be necessary.
Experiencing frequent or recurring paper jams? 37

1.
1.
1.
1.1. Open the print-cartridge door, and then remove the print cartridge.
2.
2.
2.
2.2. Remove the media stack from the input tray.
38 Chapter 7 Solve problems

1.
1.
1.
1.1. Open the print-cartridge door, and then remove the print cartridge.
CAUTION:
CAUTION:
CAUTION:
CAUTION:CAUTION: To prevent damage, do not expose the print cartridge to light. Cover it with a piece of paper.
2.
2.
2.
2.2. If you can see the jammed paper, carefully grasp the jammed paper, and slowly pull it out of the product.
40 Chapter 7 Solve problems

3.
3.
3.
3.3. Reinstall the print cartridge, and then close the print-cartridge door.
Cl
Cl
Cl
ClClear jams fr
ear jams fr
ear jams fr
ear jams frear jams from the outp
om the outp
om the outp
om the outpom the output ar
ut ar
ut ar
ut arut areas
eas
eas
easeas
Use the following procedure to check for paper in all possible jam locations in the output areas.
CAUTION:
CAUTION:
CAUTION:
CAUTION:CAUTION: Do not use sharp objects, such as tweezers or needle-nose pliers, to remove jams. Damage caused
by sharp objects will not be covered by the warranty.
1.
1.
1.
1.1. Open the print-cartridge door, and then remove the print cartridge.
Clear jams from the output areas 41

2.
2.
2.
2.2. Keep the print cartridge door open, and then with both hands, grasp the side of the jammed media that is
most visible (this includes the middle), and carefully pull it free from the product.
3.
3.
3.
3.3. Reinstall the print cartridge, and then close the print-cartridge door.
Impr
Impr
Impr
ImprImprov
ov
ov
ovove print quality
e print quality
e print quality
e print qualitye print quality
The following information provides troubleshooting steps to resolve print-quality problems, including the
following problems:
●Smears
42 Chapter 7 Solve problems

●Fuzzy print
●Dark print
●Light print
●Streaks
●Missing toner
●Scattered dots of toner
●Loose toner
●Skewed images
To resolve these or other print-quality problems, try the following solutions in the order presented.
For information about resolving specic image defects, see Troubleshoot print quality problems.
Updat
Updat
Updat
UpdatUpdate the printer
e the printer
e the printer
e the printer e the printer rmw
rmw
rmw
rmwrmwar
ar
ar
arare
e
e
ee
Try upgrading the printer rmware.
For more information, see Update the rmware.
Print fr
Print fr
Print fr
Print frPrint from a
om a
om a
om a om a so
so
so
so softwar
ftwar
ftwar
ftwarftware progr
e progr
e progr
e progre program
am
am
amam
dierent
dierent
dierent
dierentdierent
Try printing from a dierent software program. If the page prints correctly, the problem is with the software
program from which you were printing.
Check the paper
Check the paper
Check the paper
Check the paperCheck the paper-type setting f
-type setting f
-type setting f
-type setting f-type setting for the print job
or the print job
or the print job
or the print jobor the print job
Check the paper type setting when printing from a software program and the printed pages have smears, fuzzy
or dark print, curled paper, scattered dots of toner, loose toner, or small areas of missing toner.
Check the paper type setting on the printer
Check the paper type setting on the printer
Check the paper type setting on the printer
Check the paper type setting on the printerCheck the paper type setting on the printer
Check the paper type loaded to the input tray, and change the setting as needed.
1.
1.
1.
1.1. Check the printer input tray to see if it is loaded with the correct type of paper.
2.
2.
2.
2.2. Verify that the paper is correctly loaded. See .Load media
Check the paper type setting (Windows)
Check the paper type setting (Windows)
Check the paper type setting (Windows)
Check the paper type setting (Windows)Check the paper type setting (Windows)
Check the paper type setting for Windows, and change the setting as needed.
1.
1.
1.
1.1. From the software program, select the option.
Print
Print
Print
PrintPrint
2.
2.
2.
2.2. Select the printer, and then click the Pr
Pr
Pr
PrProperties
operties
operties
opertiesoperties Pref
Pref
Pref
PrefPreferenc
erenc
erenc
erencerences
es
es
eses or button.
3.
3.
3.
3.3. Click the Paper
Paper
Paper
PaperPaper/Quality
/Quality
/Quality
/Quality/Quality tab.
4.
4.
4.
4.4. From the P
P
P
PPaper T
aper T
aper T
aper Taper Type
ype
ype
ypeype drop-down list, select the option for the type of paper you are using, and click the OK
OK
OK
OK OK
button.
Update the printer rmware 43

5.
5.
5.
5.5. Click the button to close the
OK
OK
OK
OKOK Document Pr
Document Pr
Document Pr
Document PrDocument Properties
operties
operties
opertiesoperties dialog box. In the dialog box, click the button
Print
Print
Print
PrintPrint OK
OK
OK
OKOK
to print the job.
Check the paper type setting (macOS)
Check the paper type setting (macOS)
Check the paper type setting (macOS)
Check the paper type setting (macOS)Check the paper type setting (macOS)
Check the paper type setting for macOS, and change the setting as needed.
1.
1.
1.
1.1. Click the menu, and then click the option.
File
File
File
FileFile Print
Print
Print
PrintPrint
2.
2.
2.
2.2. In the menu, select the printer.
Printer
Printer
Printer
PrinterPrinter
3.
3.
3.
3.3. By default, the print driver displays the C
C
C
CCopies & Pag
opies & Pag
opies & Pag
opies & Pagopies & Pages
es
es
eses menu. Open the menus drop-down list, and then
click the menu.
Finishing
Finishing
Finishing
FinishingFinishing
4.
4.
4.
4.4. Select a type from the Media T
Media T
Media T
Media TMedia Type
ype
ype
ypeype drop-down list.
5.
5.
5.
5.5. Click the button.
Print
Print
Print
PrintPrint
Check toner
Check toner
Check toner
Check tonerCheck toner-cartridge status
-cartridge status
-cartridge status
-cartridge status-cartridge status
Follow these steps to check the estimated life remaining in the toner cartridges and if applicable, the status of
other replaceable maintenance parts.
St
St
St
StStep one: Find supplies inf
ep one: Find supplies inf
ep one: Find supplies inf
ep one: Find supplies infep one: Find supplies information on
ormation on
ormation on
ormation on ormation on congur
congur
congur
congurconguration
ation
ation
ationation page
page
page
page page
Supplies information is included on the conguration page.
1.
1.
1.
1.1. If the printer is in Sleep mode (the Ready light is on but dim), press the Resume/Cancel button to wake
up the printer.
2.
2.
2.
2.2. Press and hold the Resume/Cancel button on the control panel until the Ready light begins
blinking, and then release the button.
St
St
St
StStep two: Check supplie
ep two: Check supplie
ep two: Check supplie
ep two: Check supplieep two: Check supplies status
s status
s status
s statuss status
The conguration page contains information about the cartridges and other replaceable maintenance parts.
1.
1.
1.
1.1. Look at the conguration page to check the supplies status of the toner cartridges and if applicable, the
status of other replaceable maintenance parts.
Print quality problems can occur when using a toner cartridge that is at its estimated end of life. The
conguration page indicates when a supply level is very low.
Once an HP toner cartridge has reached Very Low, HP’s Premium Protection Warranty on that toner
cartridge has ended.
The toner cartridge does not need to be replaced now unless the print quality is no longer acceptable.
Consider having a replacement available to install when print quality is no longer acceptable.
If you determine that you need to replace a toner cartridge or other replaceable maintenance parts, the
conguration page lists the genuine HP part numbers.
2.
2.
2.
2.2. Check to see if you are using a genuine HP cartridge.
A genuine HP toner cartridge has “HP” on it, or has the HP logo on it. For more information on identifying HP
cartridges go to www.hp.com/go/learnaboutsupplies.
44 Chapter 7 Solve problems

Cartridge cl
Cartridge cl
Cartridge cl
Cartridge clCartridge cleaning
eaning
eaning
eaningeaning
During the printing process, cartridges might be contaminated by paper dust and cause print quality issues such
as background issues, vertical dark bands, or repetitive horizontal banding.
To improve the above mentioned print quality issues, start the Cartridge Cleaning mode to begin the cleaning
process. See Print a cleaning page.
Print a cl
Print a cl
Print a cl
Print a clPrint a cleaning pag
eaning pag
eaning pag
eaning pageaning page
e
e
ee
During the printing process, paper, toner, and dust particles can accumulate inside the printer and can cause
print-quality issues such as toner specks or spatter, smears, streaks, lines, or repeating marks.
Use the following procedure to print a cleaning page.
1.
1.
1.
1.1. Open the HP Embedded Web Server. See Access the Embedded Web Server (EWS).
2.
2.
2.
2.2. Click the Syst
Syst
Syst
SystSystem
em
em
emem tab, and then click .
Service
Service
Service
ServiceService
3.
3.
3.
3.3. In the Cartridge Cle
Cartridge Cle
Cartridge Cle
Cartridge CleCartridge Cleaning Mode
aning Mode
aning Mode
aning Modeaning Mode area, click to begin the cleaning process.
Start
Start
Start
StartStart
Visuall
Visuall
Visuall
VisuallVisually ins
y ins
y ins
y insy inspect the toner cartridge
pect the toner cartridge
pect the toner cartridge
pect the toner cartridgepect the toner cartridge
Follow these steps to inspect the toner cartridge.
1.
1.
1.
1.1. Remove the toner cartridges from the printer, and verify that the sealing tape has been removed.
2.
2.
2.
2.2. Check the memory chip for damage.
3.
3.
3.
3.3. Examine the surface of the green imaging drum.
CAUTION:
CAUTION:
CAUTION:
CAUTION:CAUTION: Do not touch the imaging drum. Fingerprints on the imaging drum can cause print-quality
problems.
4.
4.
4.
4.4. If you see any scratches, ngerprints, or other damage on the imaging drum, replace the toner cartridge.
5.
5.
5.
5.5. Reinstall the toner cartridge, and print a few pages to see if the problem has resolved.
Check paper and the printing envir
Check paper and the printing envir
Check paper and the printing envir
Check paper and the printing envirCheck paper and the printing environment
onment
onment
onmentonment
Using paper that does not meet HP might cause some print quality problems. The environment can specications
directly print quality. Follow these steps to check paper and the printing environment.aect
St
St
St
StStep one: Use paper tha
ep one: Use paper tha
ep one: Use paper tha
ep one: Use paper thaep one: Use paper that meets HP
t meets HP
t meets HP
t meets HP t meets HP specications
specications
specications
specicationsspecications
Some print-quality problems arise from using paper that does not meet HP specications.
●Always use a paper type and weight that this printer supports.
●Use paper that is of good quality and free of cuts, nicks, tears, spots, loose particles, dust, wrinkles, voids,
staples, and curled or bent edges.
●Use paper that has not been previously printed on.
●Use paper that does not contain metallic material, such as glitter.
●Use paper that is designed for use in laser printers. Do not use paper that is designed only for use in Inkjet
printers.
Cartridge cleaning 45
Produktspezifikationen
| Marke: | HP |
| Kategorie: | Drucker |
| Modell: | LaserJet Pro M110we |
Brauchst du Hilfe?
Wenn Sie Hilfe mit HP LaserJet Pro M110we benötigen, stellen Sie unten eine Frage und andere Benutzer werden Ihnen antworten
Bedienungsanleitung Drucker HP

27 September 2024
20 September 2024
20 September 2024
17 September 2024
15 September 2024
7 September 2024
3 September 2024
3 September 2024
3 September 2024
3 September 2024
Bedienungsanleitung Drucker
- Drucker Samsung
- Drucker Approx
- Drucker Sony
- Drucker Panasonic
- Drucker LG
- Drucker Roland
- Drucker Canon
- Drucker Velleman
- Drucker CSL
- Drucker Renkforce
- Drucker Thomson
- Drucker Sharp
- Drucker Mitsubishi
- Drucker Nilox
- Drucker Polaroid
- Drucker Xiaomi
- Drucker Olympia
- Drucker Seiko
- Drucker Toshiba
- Drucker Olympus
- Drucker Citizen
- Drucker Olivetti
- Drucker Epson
- Drucker Dell
- Drucker Lenovo
- Drucker MSI
- Drucker Honeywell
- Drucker OKI
- Drucker Brother
- Drucker Sagem
- Drucker Fujifilm
- Drucker Ricoh
- Drucker Datamax-O'neil
- Drucker Dymo
- Drucker Intermec
- Drucker Primera
- Drucker TSC
- Drucker Zebra
- Drucker Triumph-Adler
- Drucker Kodak
- Drucker Konica-Minolta
- Drucker Minolta
- Drucker TOMY
- Drucker Festo
- Drucker Frama
- Drucker NEC
- Drucker Ultimaker
- Drucker Fujitsu
- Drucker Huawei
- Drucker Testo
- Drucker Kogan
- Drucker Royal Sovereign
- Drucker D-Link
- Drucker Kyocera
- Drucker Lexmark
- Drucker Star
- Drucker Xerox
- Drucker Digitus
- Drucker Bixolon
- Drucker Epson 7620
- Drucker Fichero
- Drucker GG Image
- Drucker Ibm
- Drucker Oce
- Drucker Paxar
- Drucker Toshiba TEC
- Drucker ZKTeco
- Drucker StarTech.com
- Drucker Bematech
- Drucker Pantum
- Drucker HiTi
- Drucker Panduit
- Drucker Posiflex
- Drucker Vupoint Solutions
- Drucker Brady
- Drucker Star Micronics
- Drucker Metapace
- Drucker DNP
- Drucker Godex
- Drucker Phoenix Contact
- Drucker Elite Screens
- Drucker Equip
- Drucker Argox
- Drucker Dascom
- Drucker EC Line
- Drucker Orient Technologies
- Drucker Evolis
- Drucker Fargo
- Drucker Microboards
- Drucker Builder
- Drucker DTRONIC
- Drucker Colop
- Drucker Raspberry Pi
- Drucker IDP
- Drucker Tally Dascom
- Drucker Custom
- Drucker Nisca
Neueste Bedienungsanleitung für -Kategorien-

25 November 2024
24 November 2024
24 November 2024
24 November 2024

16 Oktober 2024

15 Oktober 2024

15 Oktober 2024

15 Oktober 2024

14 Oktober 2024

14 Oktober 2024