HP Color LaserJet Pro M182nw Bedienungsanleitung
Lesen Sie kostenlos die 📖 deutsche Bedienungsanleitung für HP Color LaserJet Pro M182nw (164 Seiten) in der Kategorie Drucker. Dieser Bedienungsanleitung war für 8 Personen hilfreich und wurde von 2 Benutzern mit durchschnittlich 4.5 Sternen bewertet
Seite 1/164

HP Color LaserJet Pro MFP M182-M185
www.hp.com/videos/LaserJet
www.hp.com/support/ljM182MFP
User Guide


HP Color LaserJet Pro MFP M182-M185
User Guide

Cop
Cop
Cop
CopCopyright and License
yright and License
yright and License
yright and Licenseyright and License
© Copyright 2019 HP Development Company,
L.P.
Reproduction, adaptation, or translation without
prior written permission is prohibited, except as
allowed under the copyright laws.
The information contained herein is subject to
change without notice.
The only warranties for HP products and
services are set forth in the express warranty
statements accompanying such products and
services. Nothing herein should be construed as
constituting an additional warranty. HP shall not
be liable for technical or editorial errors or
omissions contained herein.
Edition 3, 08/2019
Trademark Cr
Trademark Cr
Trademark Cr
Trademark CrTrademark Credits
edits
edits
editsedits
Adobe®, Adobe Photoshop®, Acrobat®, and
PostScript® are trademarks of Adobe Systems
Incorporated.
Apple and the Apple logo are trademarks of
Apple Inc., registered in the U.S. and other
countries.
macOS is a trademark of Apple Inc., registered in
the U.S. and other countries.
AirPrint is a trademark of Apple Inc., registered in
the U.S. and other countries.
iPad is a trademark of Apple Inc., registered in
the U.S. and other countries.
iPod is a trademark of Apple Inc., registered in
the U.S. and other countries.
iPhone is a trademark of Apple Inc., registered in
the U.S. and other countries.
Microsoft®, Windows®, Windows® XP, and
Windows Vista® are U.S. registered trademarks
of Microsoft Corporation.
UNIX® is a registered trademark of The Open
Group.

T
T
T
TTabl
abl
abl
ablable o
e o
e o
e oe of c
f c
f c
f cf contents
ontents
ontents
ontentsontents
1 Printer o
1 Printer o
1 Printer o
1 Printer o1 Printer overview ........................................................................................................................................................................................
verview ........................................................................................................................................................................................
verview ........................................................................................................................................................................................
verview ........................................................................................................................................................................................verview ........................................................................................................................................................................................ 1
1
1
1 1
Warning icons ............................................................................................................................................................................ 2
Printer views .............................................................................................................................................................................. 3
Printer front view ................................................................................................................................................. 3
Printer back view .................................................................................................................................................. 4
LED control-panel view ....................................................................................................................................... 5
2-line LCD control-panel view ............................................................................................................................ 6
Printer specications ................................................................................................................................................................ 8
Technical specications ....................................................................................................................................... 8
Supported operating systems ........................................................................................................................... 8
Mobile printing solutions .................................................................................................................................. 10
Printer dimensions ............................................................................................................................................ 11
Power consumption, electrical specications, and acoustic emissions .................................................... 12
Operating environmental range ...................................................................................................................... 12
Printer hardware setup and software installation ............................................................................................................ 13
2 Paper tr
2 Paper tr
2 Paper tr
2 Paper tr2 Paper trays ..............................................................................................................................................................................................
ays ..............................................................................................................................................................................................
ays ..............................................................................................................................................................................................
ays ..............................................................................................................................................................................................ays .............................................................................................................................................................................................. 15
15
15
15 15
Introduction ............................................................................................................................................................................. 16
Load Tray 1 ............................................................................................................................................................................. 16
Introduction ........................................................................................................................................................ 16
Tray 1 paper orientation ................................................................................................................................... 19
Load and print envelopes ..................................................................................................................................................... 22
Introduction ........................................................................................................................................................ 22
Print envelopes .................................................................................................................................................. 22
Envelope orientation ......................................................................................................................................... 22
Load and print labels ............................................................................................................................................................. 23
Introduction ........................................................................................................................................................ 23
Manually feed labels ......................................................................................................................................... 23
Label orientation ............................................................................................................................................... 23
ENWW iii

3 Supplies, acc
3 Supplies, acc
3 Supplies, acc
3 Supplies, acc3 Supplies, accessories, and parts ..........................................................................................................................................................
essories, and parts ..........................................................................................................................................................
essories, and parts ..........................................................................................................................................................
essories, and parts ..........................................................................................................................................................essories, and parts .......................................................................................................................................................... 25
25
25
25 25
Order supplies, accessories, and parts ............................................................................................................................... 26
Ordering .............................................................................................................................................................. 26
Supplies and accessories ................................................................................................................................. 26
Customer self-repair parts ............................................................................................................................... 26
Replace the toner cartridges ................................................................................................................................................ 28
Introduction ........................................................................................................................................................ 28
Remove and replace the toner cartridges ..................................................................................................... 30
4 Print ..........................................................................................................................................................................................................
4 Print ..........................................................................................................................................................................................................
4 Print ..........................................................................................................................................................................................................
4 Print ..........................................................................................................................................................................................................4 Print .......................................................................................................................................................................................................... 33
33
33
33 33
Print tasks (Windows) ............................................................................................................................................................ 34
How to print (Windows) .................................................................................................................................... 34
Manually print on both sides (Windows) ........................................................................................................ 34
Print multiple pages per sheet (Windows) .................................................................................................... 35
Select the paper type (Windows) .................................................................................................................... 35
Print tasks (macOS) ............................................................................................................................................................... 37
How to print (macOS) ........................................................................................................................................ 37
Automatically print on both sides (macOS) ................................................................................................... 37
Manually print on both sides (macOS) ........................................................................................................... 37
Print multiple pages per sheet (macOS) ........................................................................................................ 38
Select the paper type (macOS) ........................................................................................................................ 38
Additional print tasks ........................................................................................................................................ 38
Mobile printing ........................................................................................................................................................................ 39
Introduction ........................................................................................................................................................ 39
Wi-Fi Direct (wireless models only) ................................................................................................................ 39
Enable or disable Wi-Fi Direct ..................................................................................................... 40
Change the printer Wi-Fi Direct name ....................................................................................... 41
HP ePrint via email ............................................................................................................................................ 41
HP ePrint software ............................................................................................................................................ 42
AirPrint ................................................................................................................................................................. 42
Android embedded printing ............................................................................................................................. 43
5 Cop
5 Cop
5 Cop
5 Cop5 Copy ..........................................................................................................................................................................................................
y ..........................................................................................................................................................................................................
y ..........................................................................................................................................................................................................
y ..........................................................................................................................................................................................................y .......................................................................................................................................................................................................... 45
45
45
45 45
Make a copy ............................................................................................................................................................................. 46
Copy on both sides (duplex) ................................................................................................................................................. 48
Copy on both sides manually ........................................................................................................................... 48
6 Scan ..........................................................................................................................................................................................................
6 Scan ..........................................................................................................................................................................................................
6 Scan ..........................................................................................................................................................................................................
6 Scan ..........................................................................................................................................................................................................6 Scan .......................................................................................................................................................................................................... 49
49
49
49 49
Scan by using the HP Scan software (Windows) ............................................................................................................... 50
Scan by using the HP Smart Software (macOS) ................................................................................................................ 51
iv ENWW

7 F
7 F
7 F
7 F7 Fax ............................................................................................................................................................................................................. 53
ax ............................................................................................................................................................................................................. 53
ax ............................................................................................................................................................................................................. 53
ax ............................................................................................................................................................................................................. 53ax ............................................................................................................................................................................................................. 53
Set up to send and receive faxes ......................................................................................................................................... 54
Before starting ................................................................................................................................................... 54
Step 1: Identify the phone connection type .................................................................................................. 54
Step 2: Set up the fax ........................................................................................................................................ 55
Dedicated phone line .................................................................................................................... 55
Shared voice/fax line .................................................................................................................... 56
Shared voice/fax line with an answering machine .................................................................. 57
Step 3: Congure the fax time, date, and header ......................................................................................... 59
HP Fax Setup Wizard .................................................................................................................... 59
Printer control panel ..................................................................................................................... 59
HP Embedded Web Server (EWS) and HP Device Toolbox (Windows) ................................. 60
Step 4: Run a fax test ........................................................................................................................................ 61
Send a fax ................................................................................................................................................................................ 62
Fax from the atbed scanner .......................................................................................................................... 62
Fax from the document feeder (document feeder models only) .............................................................. 63
Use speed dials and group-dial entries ......................................................................................................... 63
Send a fax from the software .......................................................................................................................... 64
Send a fax from a third-party software program, such as Microsoft Word ............................................. 64
8 Manage the printer .................................................................................................................................................................................
8 Manage the printer .................................................................................................................................................................................
8 Manage the printer .................................................................................................................................................................................
8 Manage the printer .................................................................................................................................................................................8 Manage the printer ................................................................................................................................................................................. 65
65
65
65 65
Change the printer connection type (Windows) ................................................................................................................ 66
Advanced conguration with HP Embedded Web Server (EWS) and HP Device Toolbox (Windows) ....................... 67
Congure IP network settings .............................................................................................................................................. 70
Introduction ........................................................................................................................................................ 70
Printer sharing disclaimer ................................................................................................................................ 70
View or change network settings ................................................................................................................... 70
Rename the printer on a network ................................................................................................................... 71
Manually congure IPv4 TCP/IP parameters from the control panel ........................................................ 72
Printer security features ....................................................................................................................................................... 74
Introduction ........................................................................................................................................................ 74
Assign or change the system password using the Embedded Web Server ............................................. 74
Energy-conservation settings .............................................................................................................................................. 76
Introduction ........................................................................................................................................................ 76
Print with EconoMode ....................................................................................................................................... 76
Set the Sleep/Auto After Inactivity setting .............................................................................................. 76O
Set the Shut Down After Inactivity delay and congure the printer to use 1 watt or less of power .... 77
Set the Delay Shut Down setting .................................................................................................................... 79
HP Web Jetadmin ................................................................................................................................................................... 81
Update the rmware .............................................................................................................................................................. 82
Method one: Update the rmware using the control panel (2-line control panels only) ....................... 82
ENWW v

Method two: Update the rmware using the Firmware Update Utility ..................................................... 82
9 Solv
9 Solv
9 Solv
9 Solv9 Solve probl
e probl
e probl
e proble problems .......................................................................................................................................................................................
ems .......................................................................................................................................................................................
ems .......................................................................................................................................................................................
ems .......................................................................................................................................................................................ems ....................................................................................................................................................................................... 85
85
85
85 85
Customer support .................................................................................................................................................................. 86
Interpret control-panel light patterns (LED control panels only) ................................................................................... 87
Restore the factory-set defaults ......................................................................................................................................... 91
A “Cartridge is low” or “Cartridge is very low” message displays on the printer control panel or EWS ................... 93
Change the “Very Low” settings ...................................................................................................................... 93
For printers with fax capability ................................................................................................... 95
Order supplies .................................................................................................................................................... 95
Printer does not pick up paper or misfeeds ....................................................................................................................... 96
Introduction ........................................................................................................................................................ 96
The product does not pick up paper ............................................................................................................... 96
The product picks up multiple sheets of paper ............................................................................................ 96
The document feeder jams, skews, or picks up multiple sheets of paper ............................................... 96
Clear paper jams ..................................................................................................................................................................... 98
Introduction ........................................................................................................................................................ 98
Paper jam locations ........................................................................................................................................... 98
Experiencing frequent or recurring paper jams? .......................................................................................... 99
Clear paper jams in the document feeder (fw models only) .................................................................... 102
Clear paper jams in Tray 1 ............................................................................................................................. 105
Clear paper jams in the rear door and the fuser area ............................................................................... 106
Clear paper jams in the output bin ............................................................................................................... 108
Improve print quality ........................................................................................................................................................... 110
Introduction ...................................................................................................................................................... 110
Update the printer rmware .......................................................................................................................... 111
Print from a dierent software program ..................................................................................................... 111
Check the paper-type setting for the print job ........................................................................................... 111
Check the paper type setting on the printer .......................................................................... 111
Check the paper type setting (Windows) ................................................................................ 111
Check the paper type setting (macOS) ................................................................................... 111
Check toner-cartridge status ........................................................................................................................ 112
Print a cleaning page ...................................................................................................................................... 113
Visually inspect the toner cartridge or cartridges ...................................................................................... 115
Check paper and the printing environment ................................................................................................ 115
Step one: Use paper that meets HP specications ............................................................... 115
Step two: Check the environment ............................................................................................ 115
Step three: Set the individual tray alignment ........................................................................ 116
Try a print driver .............................................................................................................................. 117dierent
Check the EconoMode settings ..................................................................................................................... 117
Adjust Print Density ........................................................................................................................................ 118
vi ENWW

Calibrate the printer to align the colors ....................................................................................................... 119
Adjust color settings (Windows) ................................................................................................................... 120
Print and interpret the print quality page ................................................................................................... 121
Resolving print quality problems ...................................................................................................................................... 123
Introduction ...................................................................................................................................................... 123
Troubleshoot print quality problems ........................................................................................................... 123
Improve copy and scan image quality .............................................................................................................................. 131
Introduction ...................................................................................................................................................... 131
Check the scanner glass for dirt and smudges .......................................................................................... 131
Eliminate lines or streaks when using the document feeder .................................................................. 132
Check the paper settings ............................................................................................................................... 132
Check the image adjustment settings ......................................................................................................... 133
Optimize for text or pictures ......................................................................................................................... 135
Check the scanner resolution and color settings on the computer ........................................................ 136
Resolution and color guidelines ............................................................................................... 136
Color .............................................................................................................................................. 137
Edge-to-edge copying .................................................................................................................................... 137
Clean the pickup rollers and separation pad in the document feeder (fw models only) ..................... 138
Improve fax image quality .................................................................................................................................................. 139
Introduction ...................................................................................................................................................... 139
Check the scanner glass for dirt and smudges .......................................................................................... 139
Check the send-fax resolution settings ....................................................................................................... 139
Check the error-correction settings ............................................................................................................. 140
Check the t-to-page setting ........................................................................................................................ 140
Send to a dierent fax machine .................................................................................................................... 140
Check the sender's fax machine ................................................................................................................... 140
Solve wired network problems .......................................................................................................................................... 141
Introduction ...................................................................................................................................................... 141
Poor physical connection ............................................................................................................................... 141
The computer is using the incorrect IP address for the printer ............................................................... 141
The computer is unable to communicate with the printer ....................................................................... 142
The printer is using incorrect link and duplex settings for the network ................................................. 142
New software programs might be causing compatibility problems ....................................................... 142
The computer or workstation might be set up incorrectly ....................................................................... 142
The printer is disabled, or other network settings are incorrect ............................................................. 142
Solve wireless network problems (wireless models only) ............................................................................................ 143
Introduction ...................................................................................................................................................... 143
Wireless connectivity checklist ...................................................................................................................... 143
The printer does not print after the wireless conguration completes .................................................. 144
The printer does not print, and the computer has a third-party rewall installed ............................... 144
The wireless connection does not work after moving the wireless router or printer .......................... 144
ENWW vii

Cannot connect more computers to the wireless printer ......................................................................... 144
The wireless printer loses communication when connected to a VPN ................................................... 145
The network does not appear in the wireless networks list .................................................................... 145
The wireless network is not functioning ..................................................................................................... 145
Perform a wireless network diagnostic test ............................................................................................... 145
Reduce interference on a wireless network ................................................................................................ 146
Solve fax problems .............................................................................................................................................................. 147
Introduction ...................................................................................................................................................... 147
Fax troubleshooting checklist ....................................................................................................................... 147
Solve general fax problems ........................................................................................................................... 148
Faxes are sending slowly ........................................................................................................... 148
Fax quality is poor ...................................................................................................................... 149
Fax cuts or prints on two pages ......................................................................................... 149o
Index ...........................................................................................................................................................................................................
Index ...........................................................................................................................................................................................................
Index ...........................................................................................................................................................................................................
Index ...........................................................................................................................................................................................................Index ........................................................................................................................................................................................................... 151
151
151
151 151
viii ENWW

1
1
1
11 Print
Print
Print
PrintPrinter o
er o
er o
er oer overview
verview
verview
verviewverview
●Warning icons
●Printer views
●Printer specications
●Printer hardware setup and software installation
For mor
For mor
For mor
For morFor more information:
e information:
e information:
e information:e information:
The following information is correct at the time of publication. For current information, see www.hp.com/
support/ljM182MFP.
HP's all-inclusive help for the printer includes the following information:
●Install and congure
●Learn and use
●Solve problems
●Download software and rmware updates
●Join support forums
●Find warranty and regulatory information
ENWW 1
W
W
W
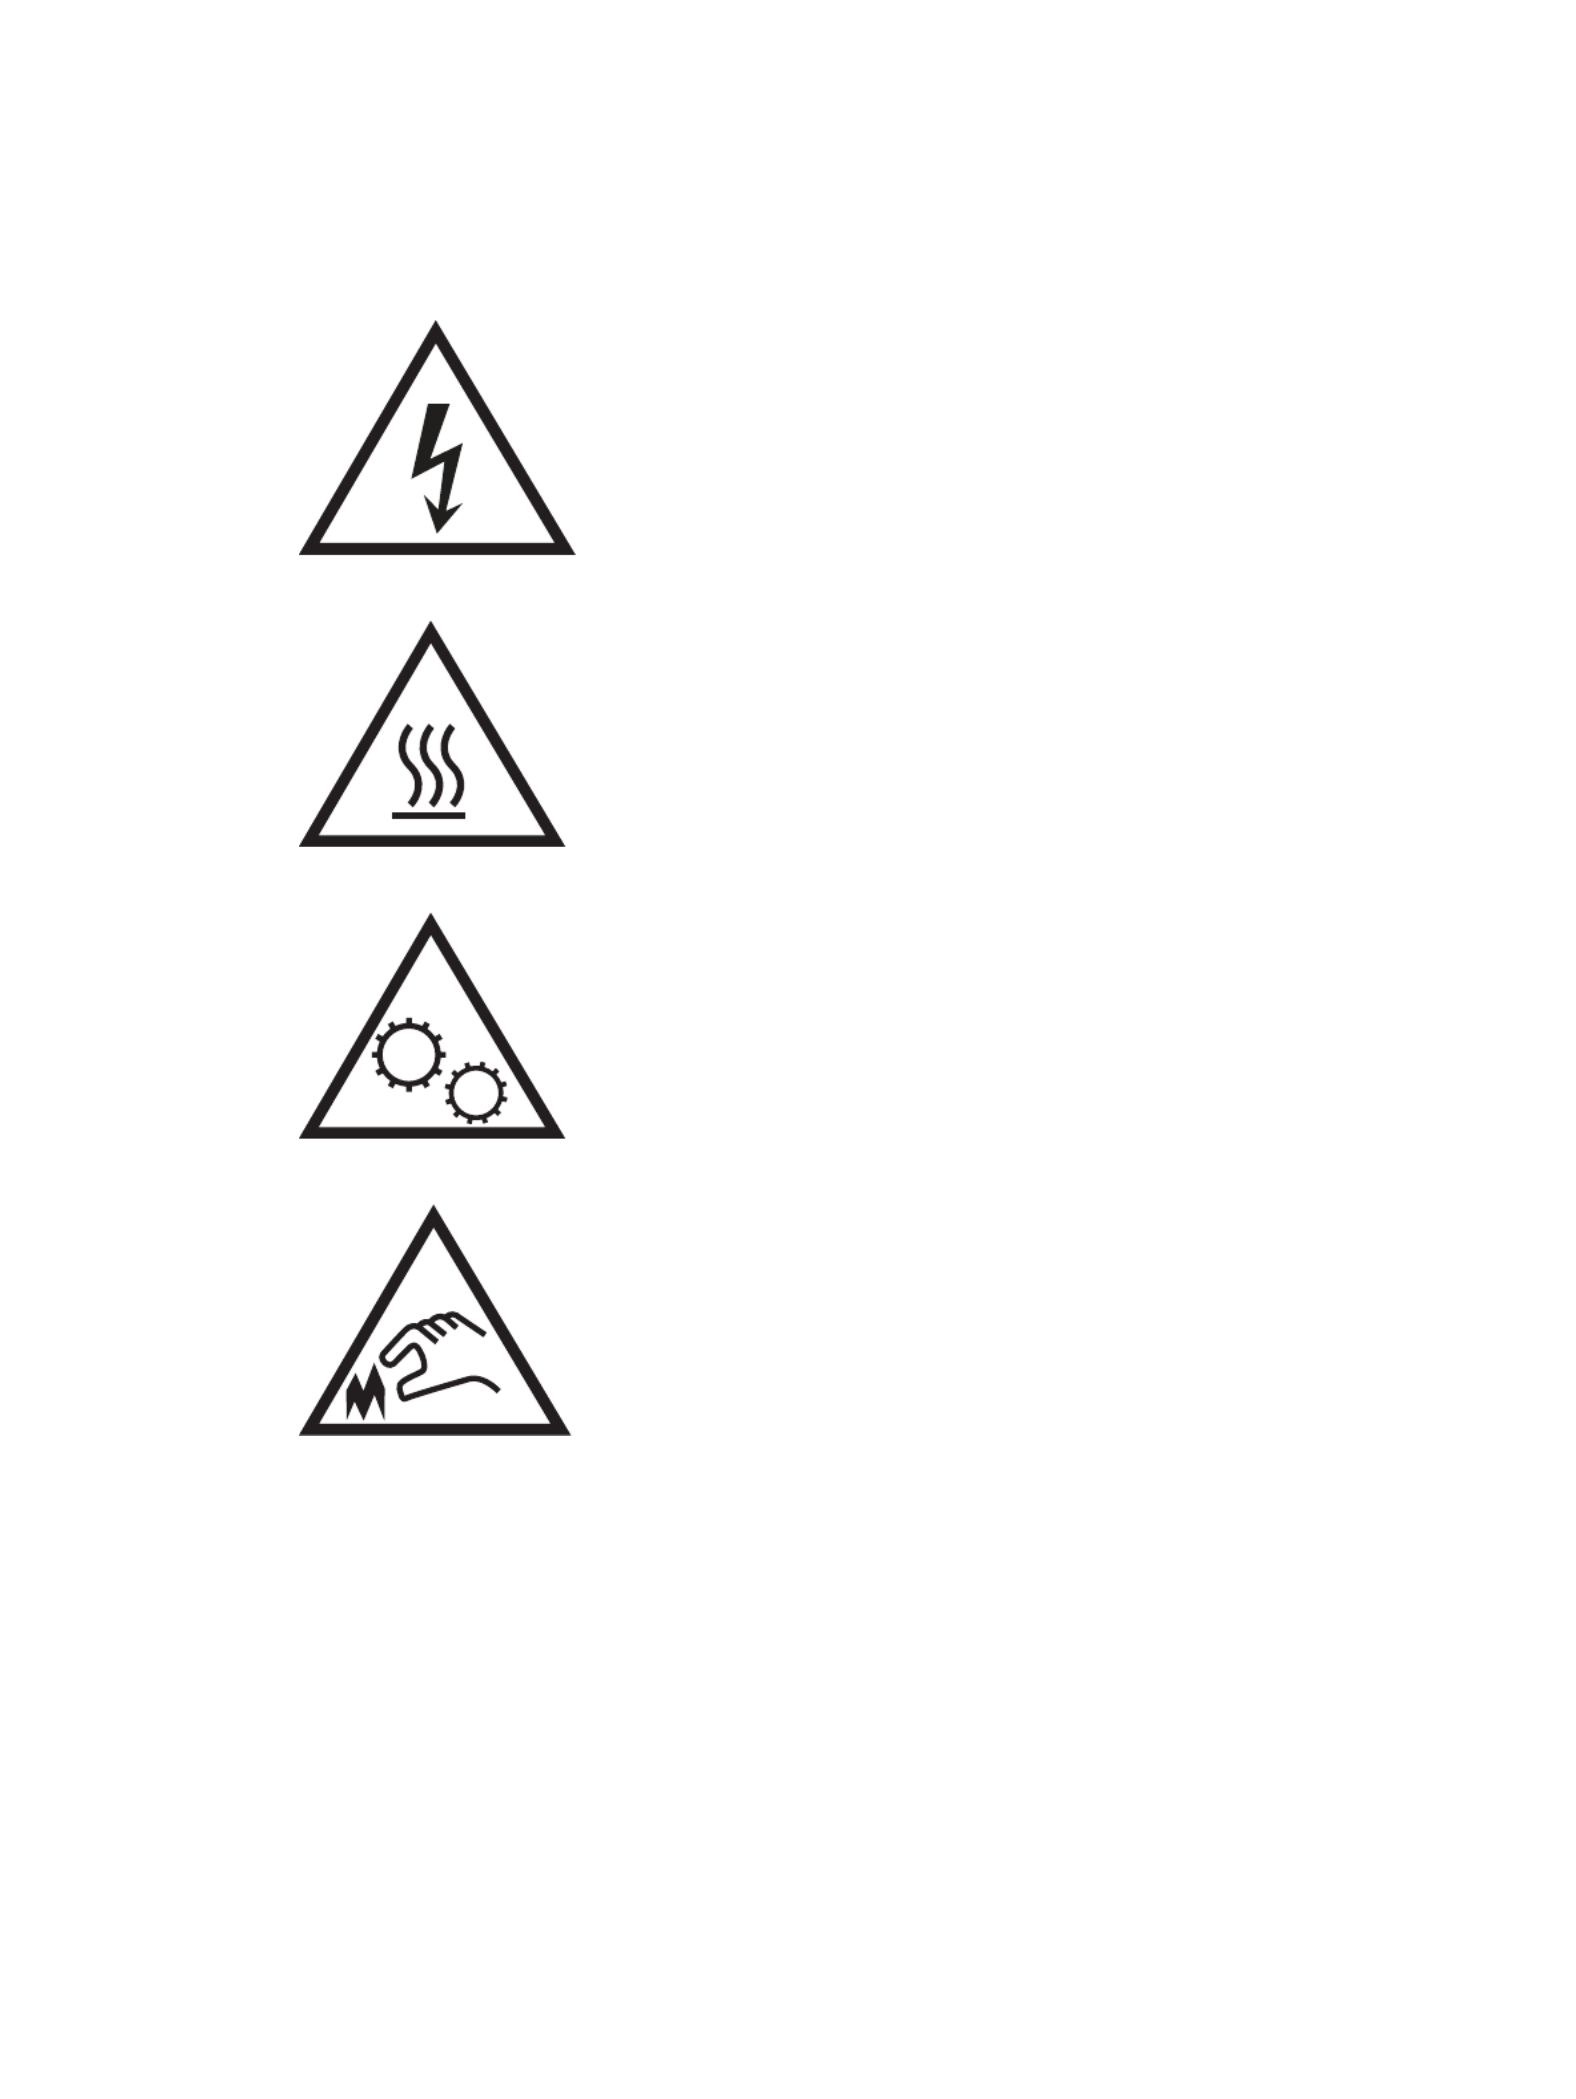
WWarning ic
arning ic
arning ic
arning icarning icons
ons
ons
onsons
Warning icon The following warning icons may appear on HP products. Apply appropriate caution denitions:
where applicable.
●
Caution: Electric shock
●
Caution: Hot surface
●
Caution: Keep body parts away from moving parts
●
Caution: Sharp edge in close proximity
2 Chapter 1 Printer overview ENWW

Print
Print
Print
PrintPrinter views
er views
er views
er viewser views
●Printer front view
●Printer back view
●LED control-panel view
●2-line LCD control-panel view
Printer fr
Printer fr
Printer fr
Printer frPrinter front vie
ont vie
ont vie
ont vieont view
w
w
ww
1
3
4
9
8
5
7
6
2
T
T
T
TTable 1-1
able 1-1
able 1-1
able 1-1able 1-1 Print
Print
Print
Print Printer fr
er fr
er fr
er frer front view
ont view
ont view
ont viewont view
Number
Number
Number
NumberNumber Description
Description
Description
DescriptionDescription
1 Scanner
2 Control panel (varies by model)
3 Output bin
4 Output bin extension
5 Front door (access to the toner cartridges)
6 Model number
7 Tray 1
8 Power button
9 Document feeder (fw models only)
ENWW Printer views 3
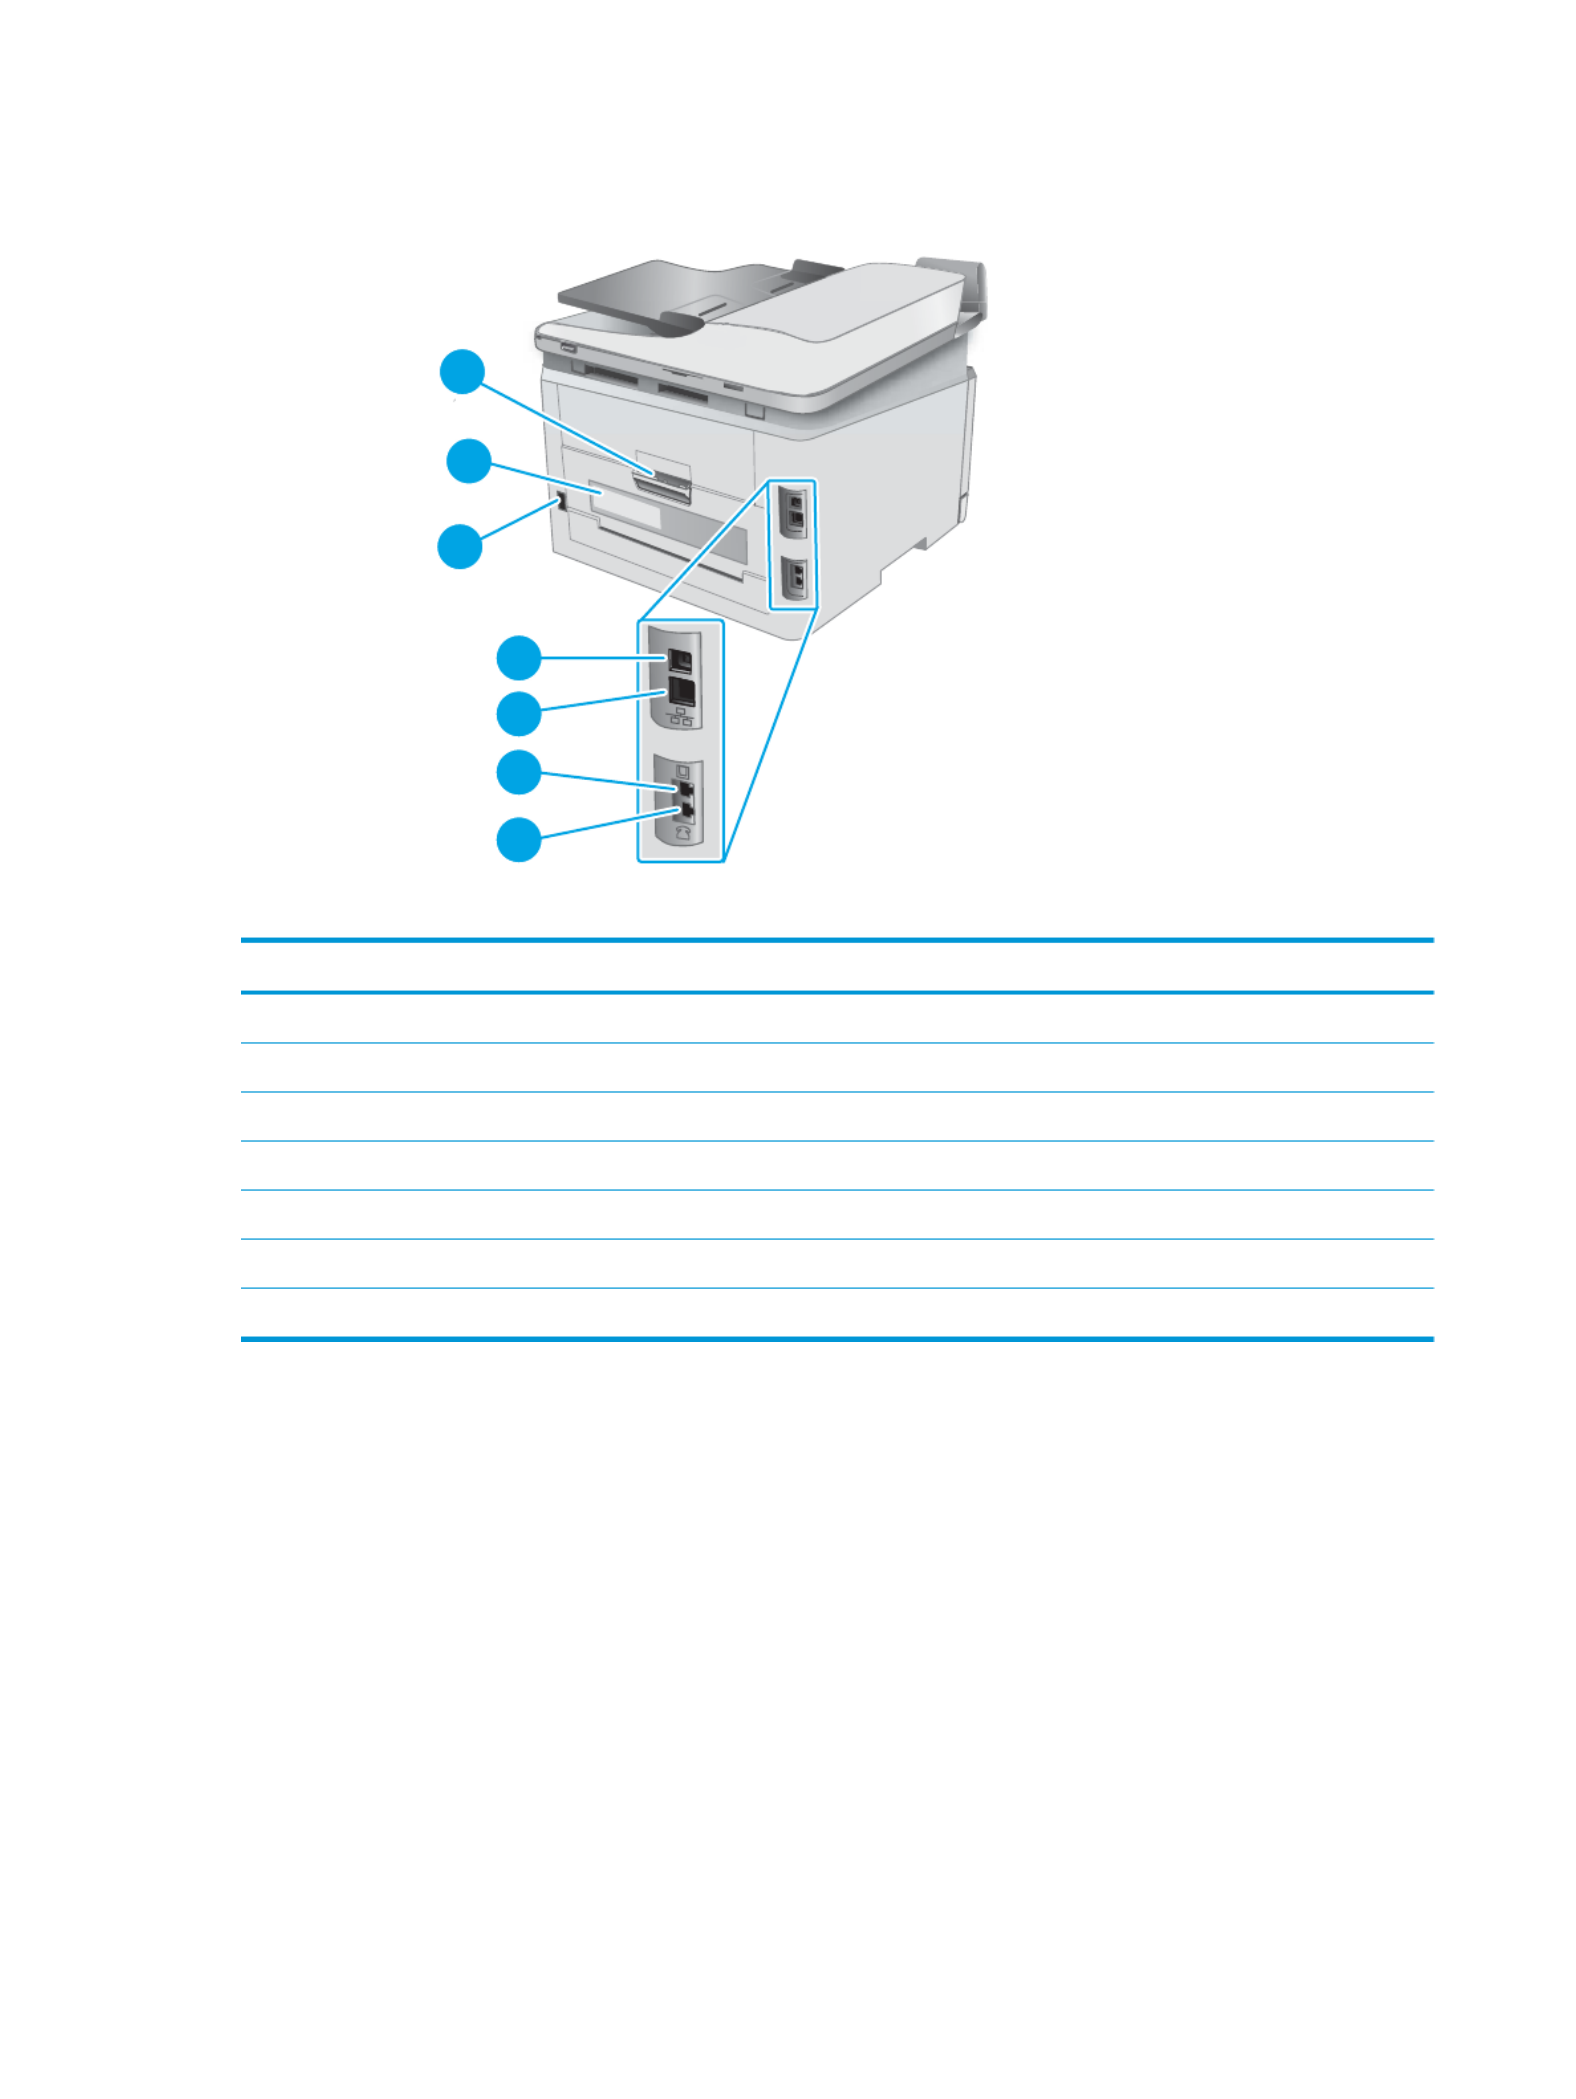
Printer b
Printer b
Printer b
Printer bPrinter back view
ack view
ack view
ack viewack view
3
5
4
6
7
2
1
T
T
T
TTable 1-2
able 1-2
able 1-2
able 1-2able 1-2 Print
Print
Print
Print Printer back view
er back view
er back view
er back viewer back view
Number
Number
Number
NumberNumber Description
Description
Description
DescriptionDescription
1 Rear door (access for clearing jams)
2 Serial number and product number label
3 Power connection
4 USB interface port
5 Ethernet port
6 Fax “line in” port for attaching the fax phone line to the printer (fax models only)
7 Telephone “line out” port for attaching an extension phone, answering machine, or other device (fax models only)
4 Chapter 1 Printer overview ENWW

2-line L
2-line L
2-line L
2-line L2-line LCD contr
CD contr
CD contr
CD contrCD control
ol
ol
olol-panel view
-panel view
-panel view
-panel view-panel view
1
2
6
5
7
9
10
11
12
15
17
18
16
13
3
4
8
14
T
T
T
TTabl
abl
abl
ablable 1-4
e 1-4
e 1-4
e 1-4e 1-4 2-line LCD c
2-line LCD c
2-line LCD c
2-line LCD c 2-line LCD control-panel vie
ontrol-panel vie
ontrol-panel vie
ontrol-panel vieontrol-panel view
w
w
ww
Number
Number
Number
NumberNumber Item
Item
Item
ItemItem Description
Description
Description
DescriptionDescription
1 2-line control panel display This screen displays menus and printer information.
2 Left arrow button Use this button to navigate through the menus or to decrease a value that appears on
the display.
3 button Use the button for the following actions:OK OK
●Open the control-panel menus.
●Open a submenu displayed on the control-panel display.
●Select a menu item.
●Clear some errors.
●Begin a print job in response to a control-panel prompt (for example, when the
message Pr
Pr
Pr
PrPress [
ess [
ess [
ess [ess [OK
OK
OK
OKOK] to continue
] to continue
] to continue
] to continue] to continue appears on the control-panel display).
4Right arrow button Use this button to navigate through the menus or to increase a value that appears on
the display.
5 Cancel button Use this button to cancel a print job or to exit the control panel menus.
6Start Mono Copy button Use this button to start a mono copy job.
7 Start Color Copy / Resume
button
Use this button to start a color copy job.
8Number of Copies button Use this button to set the number of copies to be produced.
6 Chapter 1 Printer overview ENWW

T
T
T
TTable 1-4
able 1-4
able 1-4
able 1-4able 1-4 2-line L
2-line L
2-line L
2-line L 2-line LCD control
CD control
CD control
CD controlCD control-panel view (
-panel view (
-panel view (
-panel view (-panel view (continued)
continued)
continued)
continued)continued)
Number
Number
Number
NumberNumber Item
Item
Item
ItemItem Description
Description
Description
DescriptionDescription
9Lighter/Darker button Use this button to adjust the darkness setting for the current copy job.
10 Copy Menu button Use this button to open the Copy menu.
11 Alphanumeric keypad Use the keypad to provide fax numbers.
12 Fax Redial button (fax
models only)
Use this button to recall the fax number used for the previous fax job.
13 Start Fax button (fax
models only)
Use this button to start a fax job.
14 Setup button Use this button to open the Setup menu.
15 Wireless button Use this button to access the wireless menu.
16 Back arrow button Use this button for the following actions:
●Exit the control-panel menus.
●Scroll back to a previous menu in a submenu list.
●Scroll back to a previous menu item in a submenu list (without saving changes
to the menu item).
17 Ready LED The Ready light glows without blinking when the printer is ready to print. It blinks
when the printer is receiving print data or canceling a print job.
18 Attention LED The Attention light blinks when the printer requires user attention, such as when the
printer runs out of paper or a toner cartridge needs to be changed. If the light glows
without blinking, the printer has experienced an error.
ENWW Printer views 7

T
T
T
TTable 1-5
able 1-5
able 1-5
able 1-5able 1-5 Sup
Sup
Sup
Sup Supported opera
ported opera
ported opera
ported operaported operating systems and print driv
ting systems and print driv
ting systems and print driv
ting systems and print drivting systems and print drivers (c
ers (c
ers (c
ers (cers (continued)
ontinued)
ontinued)
ontinued)ontinued)
Operating syst
Operating syst
Operating syst
Operating systOperating system
em
em
emem Print driver instal
Print driver instal
Print driver instal
Print driver instalPrint driver installed (
led (
led (
led (led (fr
fr
fr
frfrom the softwar
om the softwar
om the softwar
om the softwarom the software on
e on
e on
e on e on
the web)
the web)
the web)
the web)the web)
Note
Note
Note
NoteNotes
s
s
ss
Windows Vista®, 32-bit The “HP PCL.6” printer-specic print driver is
installed for this operating system as part of
the software installation.
Microsoft retired mainstream support for
Windows Vista in April 2012. HP will
continue to provide best support for eort
the discontinued Vista operating system.
Some features of the print driver are not
supported.
Windows 7, 32-bit and 64-bit The “HP PCL 6” printer-specic print driver is
installed for this operating system as part of
the software installation.
Windows 8, 32-bit and 64-bit The “HP PCL 6” printer-specic print driver is
installed for this operating system as part of
the software installation.
Windows 8 RT support is provided through
Microsoft IN OS Version 4, 32- bit driver.
Windows 8.1, 32-bit and 64-bit The “HP PCL-6” V4 printer-specic print
driver is installed for this operating system
as part of the software installation.
Windows 8.1 RT support is provided through
Microsoft IN OS Version 4, 32- bit driver.
Windows 10, 32-bit and 64-bit The “HP PCL-6” V4 printer-specic print
driver is installed for this operating system
as part of the software installation.
Windows Server 2008 SP2, 32-bit The “HP PCL.6” printer-specic print driver is
available for download from the printer-
support website. Download the driver, and
then use the Microsoft Add Printer tool to
install it.
Microsoft retired mainstream support for
Windows Server 2008 in January 2015. HP
will continue to provide best support eort
for the discontinued Server 2008 operating
system. Some features of the print driver
are not supported.
Windows Server 2008 SP2, 64-bit The “HP PCL 6” printer-specic print driver is
available for download from the printer-
support website. Download the driver, and
then use the Microsoft Add Printer tool to
install it.
Microsoft retired mainstream support for
Windows Server 2008 in January 2015. HP
will continue to provide best support eort
for the discontinued Server 2008 operating
system.
Windows Server 2008 R2, SP 1, 64-bit The “HP PCL 6” printer-specic print driver is
installed for this operating system as part of
the software installation.
Windows Server 2012, 64-bit The “HP PCL 6” printer-specic print driver is
installed for this operating system as part of
the software installation.
Windows Server 2012 R2, 64-bit The “HP PCL-6” printer-specic print driver is
installed for this operating system as part of
the software installation.
Windows 10 server (Server 2016), 32-bit
and 64-bit
The “HP PCL-6” printer-specic print driver is
installed for this operating system as part of
the software installation.
macOS v10.15 Catalina, macOS v10.14
Mojave, macOS v10.13 High Sierra, macOS
v10.12 Sierra
To install the print driver, download
HP Smart from 123.hp.com. Follow the
steps provided to install the printer software
and print driver.
NO
NO
NO
NONOTE:
TE:
TE:
TE:TE: For a current list of supported operating systems, go to for HP's all-www.hp.com/support/ljM182MFP
inclusive help for the printer.
ENWW Printer specications 9

Printer dimensions
Printer dimensions
Printer dimensions
Printer dimensionsPrinter dimensions
Figure 1-1
Figure 1-1
Figure 1-1
Figure 1-1Figure 1-1 Dimensions for the n and nw models
1
3
2
3
2
1
T
T
T
TTable 1-7
able 1-7
able 1-7
able 1-7able 1-7 Dimensions f
Dimensions f
Dimensions f
Dimensions f Dimensions for the n and nw models
or the n and nw models
or the n and nw models
or the n and nw modelsor the n and nw models
Dimension
Dimension
Dimension
DimensionDimension Printer full
Printer full
Printer full
Printer fullPrinter fully cl
y cl
y cl
y cly closed
osed
osed
osedosed Printer full
Printer full
Printer full
Printer fullPrinter fully open
y open
y open
y openy open
1. Height 292.6 mm (11.5 in) 545 mm (21.5 in)
2. Depth 380 mm (15 in) 855 mm (33.7 in)
3. Width 420 mm (16.5 in) 420 mm (16.5 in)
Weight (with cartridges) 15.7 kg (34.6 lb) 15.7 kg (34.6 lb)
Figure 1-2
Figure 1-2
Figure 1-2
Figure 1-2Figure 1-2 Dimensions for the fw models
1
1
3
3
2
2
ENWW Printer specications 11

T
T
T
TTable 1-8
able 1-8
able 1-8
able 1-8able 1-8 Dimensions f
Dimensions f
Dimensions f
Dimensions f Dimensions for the fw models
or the fw models
or the fw models
or the fw modelsor the fw models
Dimension
Dimension
Dimension
DimensionDimension Printer full
Printer full
Printer full
Printer fullPrinter fully closed
y closed
y closed
y closedy closed Printer full
Printer full
Printer full
Printer fullPrinter fully open
y open
y open
y openy open
1. Height 341.2 mm (13.4 in) 540 mm (21.3 in)
2. Depth 380 mm (15 in) 855 mm (33.7 in)
3. Width 420 mm (16.5 in) 457 mm (18 in)
Weight (with cartridges) 16.3 kg (35.9 lb) 16.3 kg (35.9 lb)
Po
Po
Po
PoPower consump
wer consump
wer consump
wer consumpwer consumption, el
tion, el
tion, el
tion, eltion, electrical
ectrical
ectrical
ectrical ectrical specica
specica
specica
specicaspecications,
tions,
tions,
tions,tions, and acous
and acous
and acous
and acous and acoustic emissions
tic emissions
tic emissions
tic emissionstic emissions
See for current information.www.hp.com/support/ljM182MFP
CAUTION:
CAUTION:
CAUTION:
CAUTION:CAUTION: Power requirements are based on the country/region where the printer is sold. Do not convert
operating voltages. This will damage the printer and void the printer warranty.
Operating envir
Operating envir
Operating envir
Operating envirOperating environmental r
onmental r
onmental r
onmental ronmental range
ange
ange
angeange
T
T
T
TTable 1-9
able 1-9
able 1-9
able 1-9able 1-9 Oper
Oper
Oper
Oper Operating environmental r
ating environmental r
ating environmental r
ating environmental rating environmental range
ange
ange
angeange
Environment
Environment
Environment
EnvironmentEnvironment Recommended
Recommended
Recommended
RecommendedRecommended All
All
All
AllAllowed
owed
owed
owedowed
Temperature 15° to 27°C (59° to 80.6°F) 10° to 32.5°C (50° to 90.5°F)
Relative humidity 30% to 70% relative humidity (RH) 10% to 80% (RH)
12 Chapter 1 Printer overview ENWW

Print
Print
Print
PrintPrinter har
er har
er har
er harer hardw
dw
dw
dwdwar
ar
ar
arare setup and so
e setup and so
e setup and so
e setup and soe setup and softwar
ftwar
ftwar
ftwarftware ins
e ins
e ins
e inse instal
tal
tal
taltalla
la
la
lalation
tion
tion
tiontion
For basic setup instructions, see the Setup Poster and Getting Started Guide that came with the printer. For
additional instructions, go to HP support on the Web.
Go to for HP's all-inclusive help for the printer. Find the following support:www.hp.com/support/ljM182MFP
●Install and congure
●Learn and use
●Solve problems
●Download software and rmware updates
●Join support forums
●Find warranty and regulatory information
ENWW Printer hardware setup and software installation 13

14 Chapter 1 Printer overview ENWW

2
2
2
22 P
P
P
PPaper trays
aper trays
aper trays
aper traysaper trays
●Introduction
●Load Tray 1
●Load and print envelopes
●Load and print labels
For mor
For mor
For mor
For morFor more information:
e information:
e information:
e information:e information:
The following information is correct at the time of publication. For current information, see www.hp.com/
support/ljM182MFP.
HP's all-inclusive help for the printer includes the following information:
●Install and congure
●Learn and use
●Solve problems
●Download software and rmware updates
●Join support forums
●Find warranty and regulatory information
ENWW 15

Intr
Intr
Intr
IntrIntroduction
oduction
oduction
oductionoduction
CAUTION:
CAUTION:
CAUTION:
CAUTION:CAUTION: Do not extend more than one paper tray at a time.
Do not use paper tray as a step.
Keep hands out of paper trays when closing.
All trays must be closed when moving the printer.
Lo
Lo
Lo
LoLoad Tray 1
ad Tray 1
ad Tray 1
ad Tray 1ad Tray 1
Intr
Intr
Intr
IntrIntroduction
oduction
oduction
oductionoduction
The following information describes how to load paper into Tray 1. This tray holds up to 150 sheets of 75 g/m2
(20 lb) paper.
NO
NO
NO
NONOTE:
TE:
TE:
TE:TE: To avoid paper jams:
●Never add or remove paper from the tray during printing.
●Before loading the tray, remove all of the paper from the input tray and straighten the stack.
●When loading the tray, do not fan the paper.
●Use paper that is not wrinkled, folded, or damaged.
1.
1.
1.
1.1. Open the tray.
NO
NO
NO
NONOTE:
TE:
TE:
TE:TE: Do not open this tray while it is in use.
16 Chapter 2 Paper trays ENWW

2.
2.
2.
2.2. Adjust the paper guides by squeezing the
adjustment latches and sliding the guides to the
size of the paper being used.
NO
NO
NO
NONOTE:
TE:
TE:
TE:TE: To load legal-size paper, extend the tray
front by pressing the blue latch and pulling the
front of the tray. When loaded with legal-size
paper, Tray 1 extends from the front of the printer
approximately 57.5 mm (2.2 in).
3.
3.
3.
3.3. Load the paper into the tray. For information about
how to orient the paper, see Tray 1 paper
orientation on page 19.
ENWW Load Tray 1 17
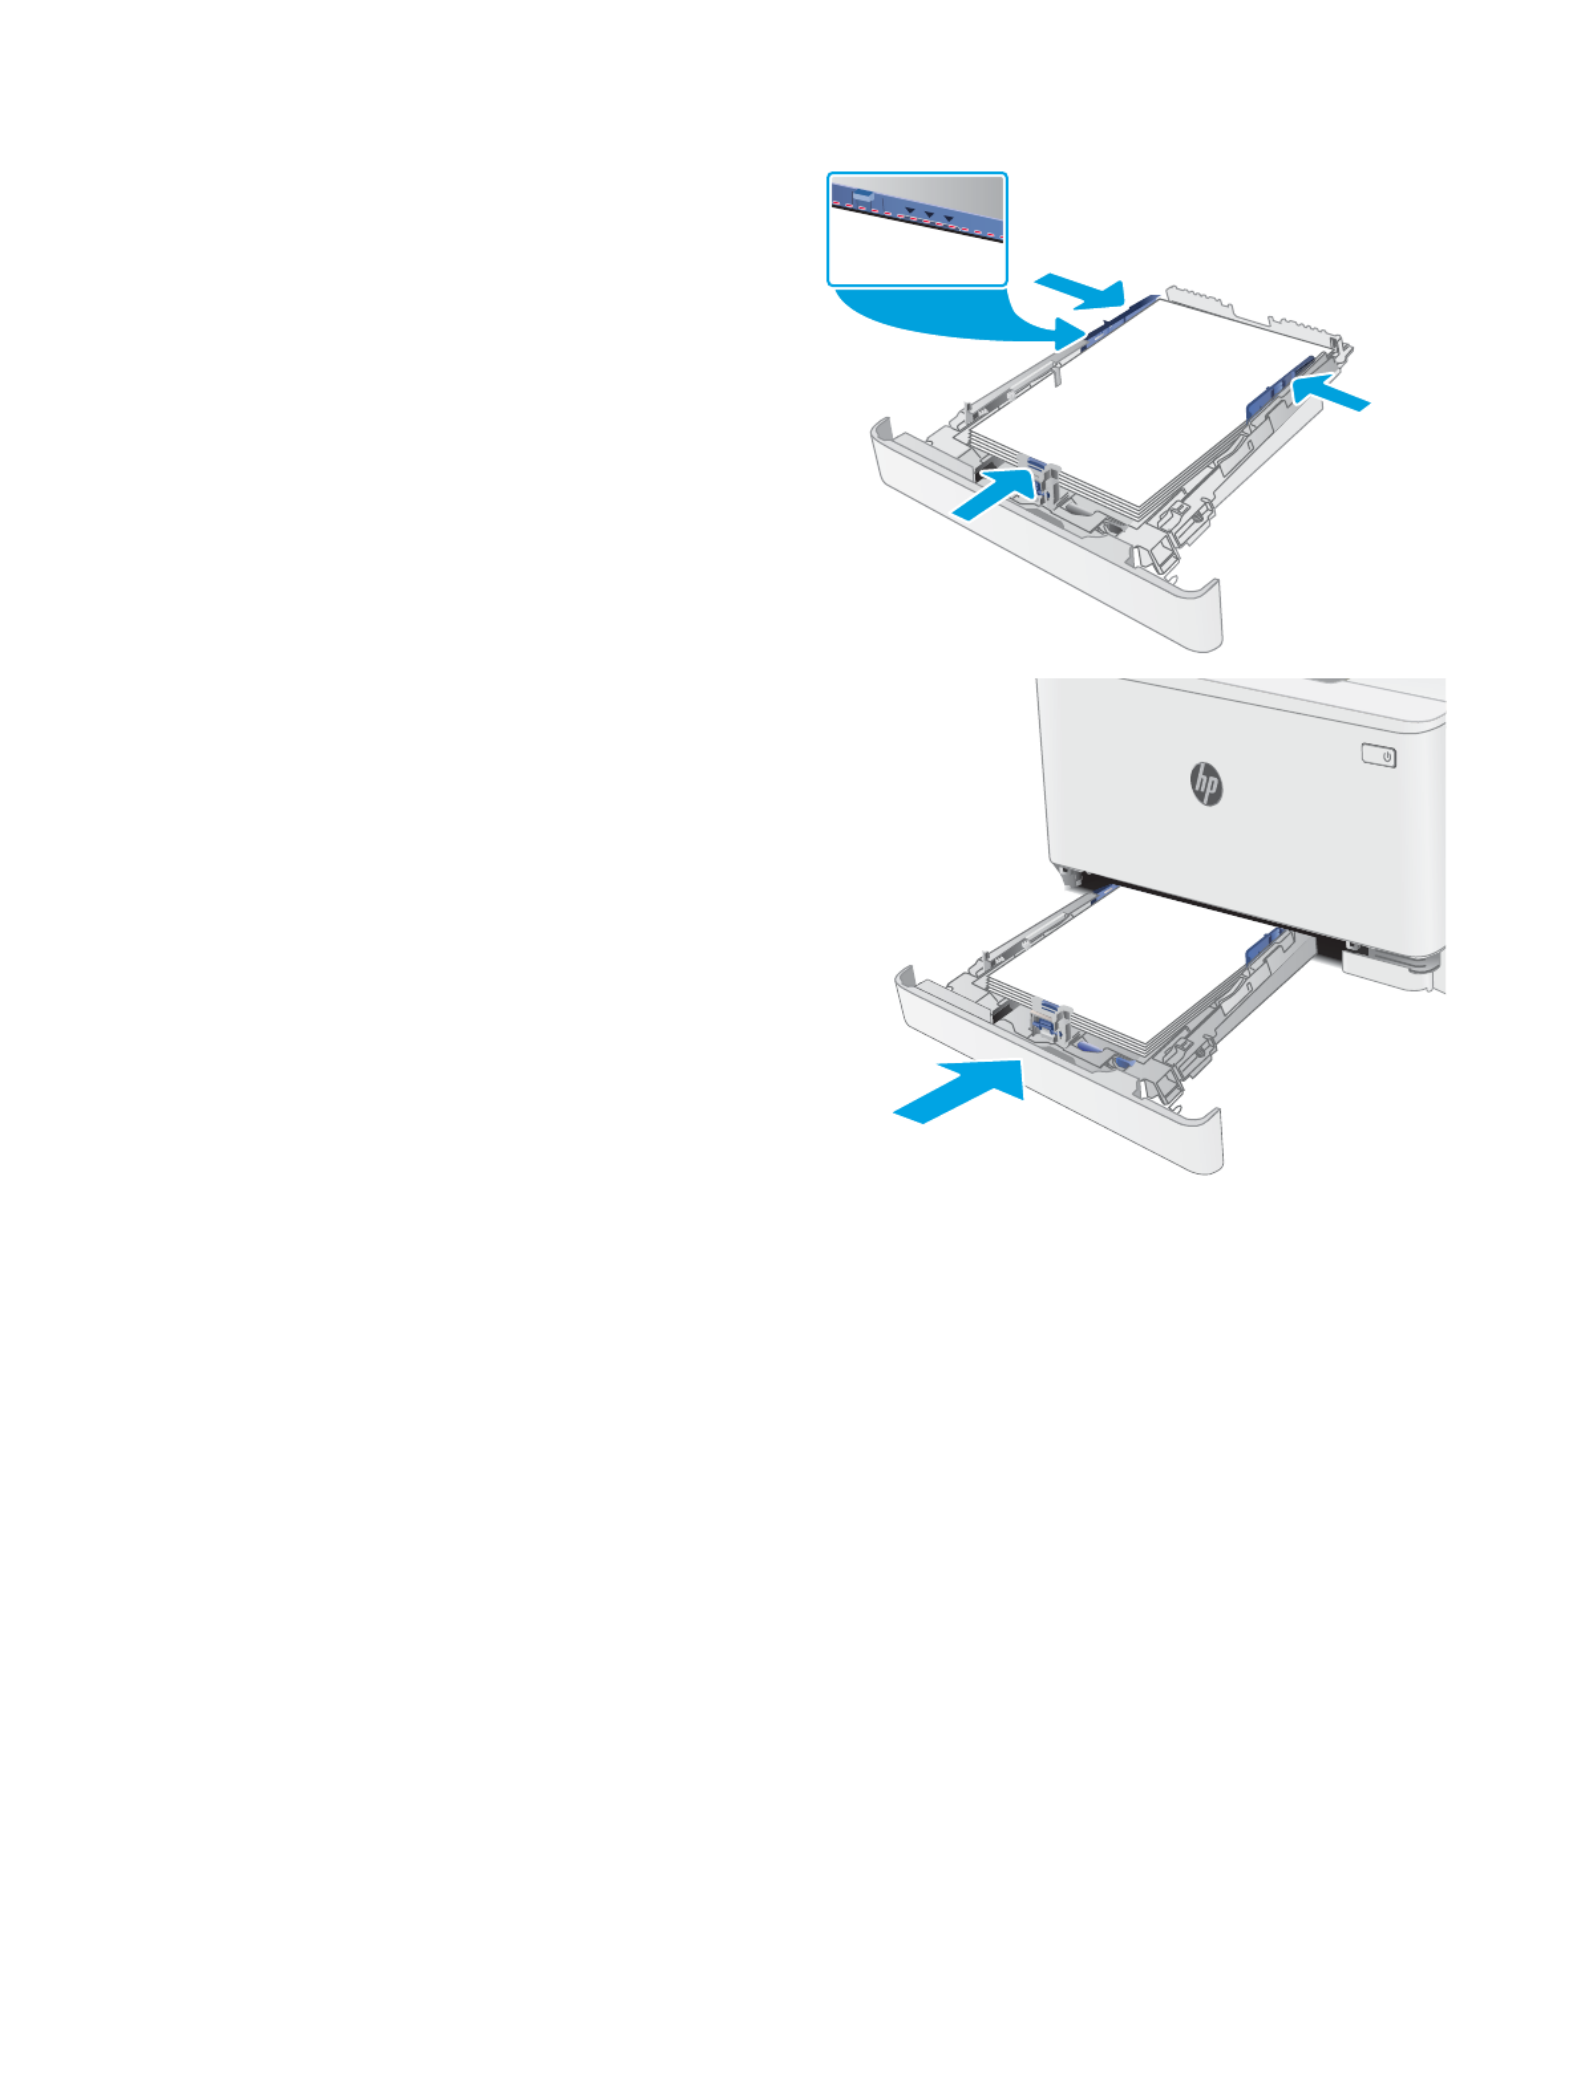
4.
4.
4.
4.4. Adjust the guides so that they lightly touch the
paper stack, but do not bend it.
NO
NO
NO
NONOTE:
TE:
TE:
TE:TE: Do not adjust the paper guides tightly
against the paper stack.
NO
NO
NO
NONOTE:
TE:
TE:
TE:TE: To prevent jams, adjust the paper guides
to the correct size and do not overll the tray.
5.
5.
5.
5.5. Close the tray.
18 Chapter 2 Paper trays ENWW

Tray 1 paper orienta
Tray 1 paper orienta
Tray 1 paper orienta
Tray 1 paper orientaTray 1 paper orientation
tion
tion
tiontion
When using paper that requires a orientation, load it according to the information in the following tables.specic
T
T
T
TTable 2-1
able 2-1
able 2-1
able 2-1able 2-1 L
L
L
L Letterhe
etterhe
etterhe
etterheetterhead or preprint
ad or preprint
ad or preprint
ad or preprintad or preprinted
ed
ed
eded
Image orientation
Image orientation
Image orientation
Image orientationImage orientation Output
Output
Output
OutputOutput Paper size
Paper size
Paper size
Paper sizePaper size How to l
How to l
How to l
How to lHow to load paper
oad paper
oad paper
oad paperoad paper
Portrait 1-sided printing Letter, Legal, Executive, (8.5 x 13), A4, Ocio
A6, B5 (JIS), B5 (ISO), Postcard #10,
Japanese Postcard (Postcard (JIS)), Double
Japan Postcard Rotated (Double Postcard
(JIS))
Face-up
Top edge toward the back of the tray
Portrait 2-sided printing Letter, Legal, Executive, (8.5 x 13), A4, Ocio
A6, B5 (JIS), B5 (ISO), Postcard #10,
Japanese Postcard (Postcard (JIS)), Double
Japan Postcard Rotated (Double Postcard
(JIS))
Face-down
Top edge toward the back of the tray
123
Landscape 1-sided printing A5 Face-up
Top edge toward the back of the tray
ENWW Load Tray 1 19

T
T
T
TTable 2-1
able 2-1
able 2-1
able 2-1able 2-1 L
L
L
L Letterhead or pr
etterhead or pr
etterhead or pr
etterhead or pretterhead or preprinted (
eprinted (
eprinted (
eprinted (eprinted (continued)
continued)
continued)
continued)continued)
Image orientation
Image orientation
Image orientation
Image orientationImage orientation Output
Output
Output
OutputOutput Paper size
Paper size
Paper size
Paper sizePaper size How to l
How to l
How to l
How to lHow to load paper
oad paper
oad paper
oad paperoad paper
Landscape 2-sided printing A5 Face-down
Top edge toward the back of the tray
Portrait 1-sided printing or 2-sided
printing
Letter, Legal, Executive, (8.5 x 13), A4, Ocio
A6, B5 (JIS), B5 (ISO), Postcard #10,
Japanese Postcard (Postcard (JIS)), Double
Japan Postcard Rotated (Double Postcard
(JIS))
Face-up
Holes toward the left side of the tray
Landscape 1-sided printing or 2-sided
printing
A5 Face-up
Holes toward the front of the tray
20 Chapter 2 Paper trays ENWW

T
T
T
TTable 2-2
able 2-2
able 2-2
able 2-2able 2-2 Pr
Pr
Pr
Pr Prepunched
epunched
epunched
epunchedepunched
Image orientation
Image orientation
Image orientation
Image orientationImage orientation Output
Output
Output
OutputOutput Paper size
Paper size
Paper size
Paper sizePaper size How to l
How to l
How to l
How to lHow to load paper
oad paper
oad paper
oad paperoad paper
Portrait 1-sided printing or 2-sided
printing
Letter, Legal, Executive, (8.5 x 13), A4, Ocio
A6, B5 (JIS), B5 (ISO), Postcard #10,
Japanese Postcard (Postcard (JIS)), Double
Japan Postcard Rotated (Double Postcard
(JIS))
Face-up
Holes toward the left side of the tray
Landscape 1-sided printing or 2-sided
printing
A5 Face-up
Holes toward the front of the tray
ENWW Load Tray 1 21

Lo
Lo
Lo
LoLoad and print envel
ad and print envel
ad and print envel
ad and print envelad and print envelopes
opes
opes
opesopes
Intr
Intr
Intr
IntrIntroduction
oduction
oduction
oductionoduction
The following information describes how to print and load envelopes. Tray 1 holds up to 5 envelopes.
To print envelopes using the manual feed option, follow these steps to select the correct settings in the print
driver, and then load the envelopes into the tray after sending the print job to the printer.
Print envel
Print envel
Print envel
Print envelPrint envelopes
opes
opes
opesopes
1.
1.
1.
1.1. From the software program, select the option.
Print
Print
Print
PrintPrint
2.
2.
2.
2.2. Select the printer from the list of printers, and then click or tap the Pr
Pr
Pr
PrProperties
operties
operties
opertiesoperties Pr
Pr
Pr
PrPrefer
efer
efer
efereferenc
enc
enc
encences
es
es
eses or button to
open the print driver.
NO
NO
NO
NONOTE:
TE:
TE:
TE:TE: The name of the button varies for dierent software programs.
NO
NO
NO
NONOTE:
TE:
TE:
TE:TE: To access these features from a Windows 8 or 8.1 Start screen, select , select , and
Devices
Devices
Devices
DevicesDevices Print
Print
Print
PrintPrint
then select the printer.
3.
3.
3.
3.3. Click or tap the Paper
Paper
Paper
PaperPaper/
/
/
//Quality
Quality
Quality
QualityQuality tab.
4.
4.
4.
4.4. In the Paper siz
Paper siz
Paper siz
Paper sizPaper size
e
e
ee drop-down list, select the correct size for the envelopes.
5.
5.
5.
5.5. In the drop-down list, select .
Paper type
Paper type
Paper type
Paper typePaper type Envelope
Envelope
Envelope
EnvelopeEnvelope
6.
6.
6.
6.6. In the Paper sour
Paper sour
Paper sour
Paper sourPaper source
ce
ce
cece drop-down list, select .
Manual feed
Manual feed
Manual feed
Manual feedManual feed
7.
7.
7.
7.7. Click the button to close the
OK
OK
OK
OKOK Document Pr
Document Pr
Document Pr
Document PrDocument Properties
operties
operties
opertiesoperties dialog box.
8.
8.
8.
8.8. In the dialog box, click the button to print the job.
Print
Print
Print
PrintPrint OK
OK
OK
OKOK
Envel
Envel
Envel
EnvelEnvelope orientation
ope orientation
ope orientation
ope orientationope orientation
T
T
T
TTabl
abl
abl
ablable
e
e
e e 2-3
2-3
2-3
2-32-3 Envel
Envel
Envel
Envel Envelope orientation
ope orientation
ope orientation
ope orientationope orientation
Tray
Tray
Tray
TrayTray Envel
Envel
Envel
EnvelEnvelope size
ope size
ope size
ope sizeope size How to l
How to l
How to l
How to lHow to load envel
oad envel
oad envel
oad enveload envelopes
opes
opes
opesopes
Tray 1 Envelope #10, Envelope Monarch,
Envelope B5, Envelope C5, Envelope DL
Face up
Short, postage end toward the back of the
tray
22 Chapter 2 Paper trays ENWW

Lo
Lo
Lo
LoLoad and print labels
ad and print labels
ad and print labels
ad and print labelsad and print labels
Intr
Intr
Intr
IntrIntroduction
oduction
oduction
oductionoduction
The following information describes how to print and load labels. Tray 1 holds up to 50 sheets of labels.
To print labels using the manual feed option, follow these steps to select the correct settings in the print driver,
and then load the labels into the tray after sending the print job to the printer. When using manual feed, the
printer waits to print the job until it detects that the tray has been opened.
Manuall
Manuall
Manuall
ManuallManually f
y f
y f
y fy feed l
eed l
eed l
eed leed labels
abels
abels
abelsabels
1.
1.
1.
1.1. From the software program, select the option.
Print
Print
Print
PrintPrint
2.
2.
2.
2.2. Select the printer from the list of printers, and then click or tap the Pr
Pr
Pr
PrProperties
operties
operties
opertiesoperties Pr
Pr
Pr
PrPrefer
efer
efer
efereferenc
enc
enc
encences
es
es
eses or button to
open the print driver.
NO
NO
NO
NONOTE:
TE:
TE:
TE:TE: The name of the button varies for dierent software programs.
NO
NO
NO
NONOTE:
TE:
TE:
TE:TE: To access these features from a Windows 8 or 8.1 Start screen, select Device
Device
Device
DeviceDevices
s
s
ss Print
Print
Print
PrintPrint, select , and
then select the printer.
3.
3.
3.
3.3. Click the Paper
Paper
Paper
PaperPaper/Quality
/Quality
/Quality
/Quality/Quality tab.
4.
4.
4.
4.4. In the Paper siz
Paper siz
Paper siz
Paper sizPaper size
e
e
ee drop-down list, select the correct size for the sheets of labels.
5.
5.
5.
5.5. In the drop-down list, select .
Paper type
Paper type
Paper type
Paper typePaper type Labels
Labels
Labels
LabelsLabels
6.
6.
6.
6.6. In the Paper sour
Paper sour
Paper sour
Paper sourPaper sourc
c
c
cce
e
e
ee drop-down list, select Manual f
Manual f
Manual f
Manual fManual feed
eed
eed
eedeed.
7.
7.
7.
7.7. Click the button to close the
OK
OK
OK
OKOK Document Pr
Document Pr
Document Pr
Document PrDocument Properties
operties
operties
opertiesoperties dialog box.
8.
8.
8.
8.8. In the dialog box, click the button to print the job.
Print
Print
Print
PrintPrint OK
OK
OK
OKOK
Label orientation
Label orientation
Label orientation
Label orientationLabel orientation
T
T
T
TTable
able
able
able able 2-4
2-4
2-4
2-42-4 Label orientation
Label orientation
Label orientation
Label orientation Label orientation
Tray
Tray
Tray
TrayTray How to l
How to l
How to l
How to lHow to load labels
oad labels
oad labels
oad labelsoad labels
Tray 1 Face-up
Top edge toward the back of the tray
ENWW Load and print labels 23

24 Chapter 2 Paper trays ENWW

3
3
3
33 Supplies, ac
Supplies, ac
Supplies, ac
Supplies, acSupplies, acc
c
c
ccessories, and p
essories, and p
essories, and p
essories, and pessories, and parts
arts
arts
artsarts
●Order supplies, accessories, and parts
●Replace the toner cartridges
For mor
For mor
For mor
For morFor more informa
e informa
e informa
e informae information:
tion:
tion:
tion:tion:
The following information is correct at the time of publication. For current information, see www.hp.com/
support/ljM182MFP.
HP's all-inclusive help for the printer includes the following information:
●Install and congure
●Learn and use
●Solve problems
●Download software and updatesrmware
●Join support forums
●Find warranty and regulatory information
ENWW 25

Or
Or
Or
OrOrder supplies, ac
der supplies, ac
der supplies, ac
der supplies, acder supplies, acc
c
c
cces
es
es
esessories, and parts
sories, and parts
sories, and parts
sories, and partssories, and parts
Or
Or
Or
OrOrdering
dering
dering
deringdering
T
T
T
TTable 3-1
able 3-1
able 3-1
able 3-1able 3-1 Or
Or
Or
Or Ordering
dering
dering
deringdering
Ordering op
Ordering op
Ordering op
Ordering opOrdering option
tion
tion
tiontion Ordering inf
Ordering inf
Ordering inf
Ordering infOrdering information
ormation
ormation
ormationormation
Order supplies and paper www.hp.com/go/suresupply
Order genuine HP parts or accessories www.hp.com/buy/parts
Order through service or support providers Contact an HP-authorized service or support provider.
Order using the HP Embedded Web Server (EWS) To access, in a supported Web browser on the computer, enter the printer IP
address or host name in the address/URL The EWS contains a link to eld.
the HP SureSupply Web site, which provides options for purchasing Original
HP supplies.
Supplies and ac
Supplies and ac
Supplies and ac
Supplies and acSupplies and acce
ce
ce
cecessories
ssories
ssories
ssoriesssories
T
T
T
TTable 3-2
able 3-2
able 3-2
able 3-2able 3-2 North America, Latin America, Asia
North America, Latin America, Asia
North America, Latin America, Asia
North America, Latin America, Asia North America, Latin America, Asia P
P
P
PPacic
acic
acic
acicacic Countrie
Countrie
Countrie
Countrie Countries/Regions, and Japan
s/Regions, and Japan
s/Regions, and Japan
s/Regions, and Japans/Regions, and Japan
Item
Item
Item
ItemItem Description
Description
Description
DescriptionDescription Cartridge number
Cartridge number
Cartridge number
Cartridge numberCartridge number Part number
Part number
Part number
Part numberPart number
HP 215A Black Original LaserJet Toner
Cartridge
Standard-capacity replacement black toner
cartridge
215A W2310A
HP 215A Cyan Original LaserJet Toner
Cartridge
Standard-capacity replacement cyan toner
cartridge
215A W2311A
HP 215A Yellow Original LaserJet Toner
Cartridge
Standard-capacity replacement yellow toner
cartridge
215A W2312A
HP 215A Magenta Original LaserJet
Toner Cartridge
Standard-capacity replacement magenta toner
cartridge
215A W2313A
T
T
T
TTable 3-3
able 3-3
able 3-3
able 3-3able 3-3 Eur
Eur
Eur
Eur Europe, Rus
ope, Rus
ope, Rus
ope, Rusope, Russia, CIS, Middl
sia, CIS, Middl
sia, CIS, Middl
sia, CIS, Middlsia, CIS, Middle East, and Africa
e East, and Africa
e East, and Africa
e East, and Africae East, and Africa
Item
Item
Item
ItemItem Description
Description
Description
DescriptionDescription Cartridge number
Cartridge number
Cartridge number
Cartridge numberCartridge number P
P
P
PPart number
art number
art number
art numberart number
HP 216A Black Original LaserJet Toner
Cartridge
Standard-capacity replacement black toner
cartridge
216A W2410A
HP 216A Cyan Original LaserJet Toner
Cartridge
Standard-capacity replacement cyan toner
cartridge
216A W2411A
HP 216A Yellow Original LaserJet Toner
Cartridge
Standard-capacity replacement yellow toner
cartridge
216A W2412A
HP 216A Magenta Original LaserJet
Toner Cartridge
Standard-capacity replacement magenta toner
cartridge
216A W2413A
Cust
Cust
Cust
CustCustomer sel
omer sel
omer sel
omer selomer self
f
f
ff-repair parts
-repair parts
-repair parts
-repair parts-repair parts
Customer Self-Repair (CSR) parts are available for many HP LaserJet printers to reduce repair time. More
information about the CSR program and can be found at benets www.hp.com/go/csr-support and
www.hp.com/go/csr-faq.
26 Chapter 3 Supplies, accessories, and parts ENWW

Repl
Repl
Repl
ReplReplac
ac
ac
acace the toner cartridge
e the toner cartridge
e the toner cartridge
e the toner cartridgee the toner cartridges
s
s
ss
Intr
Intr
Intr
IntrIntroduction
oduction
oduction
oductionoduction
This printer indicates when the toner cartridge level is low. The actual toner cartridge life remaining can vary.
Consider having a replacement cartridge available to install when print quality is no longer acceptable.
To purchase cartridges or check cartridge compatibility for the printer, go to HP SureSupply at www.hp.com/go/
suresupply. Scroll to the bottom of the page and verify that the country/region is correct.
The printer uses four colors and has a dierent toner cartridge for each color: yellow (Y), magenta (M), cyan (C),
and black (K). The toner cartridges are inside the front door.
T
T
T
TTable 3-5
able 3-5
able 3-5
able 3-5able 3-5 North America, Latin America, Asia
North America, Latin America, Asia
North America, Latin America, Asia
North America, Latin America, Asia North America, Latin America, Asia P
P
P
PPacic
acic
acic
acicacic Countries/R
Countries/R
Countries/R
Countries/R Countries/Regions, and Japan
egions, and Japan
egions, and Japan
egions, and Japanegions, and Japan
Item
Item
Item
ItemItem Description
Description
Description
DescriptionDescription Cartridge number
Cartridge number
Cartridge number
Cartridge numberCartridge number Part number
Part number
Part number
Part numberPart number
HP 215A Black Original LaserJet
Toner Cartridge
Standard-capacity replacement black toner
cartridge
215A W2310A
HP 215A Cyan Original LaserJet
Toner Cartridge
Standard-capacity replacement cyan toner
cartridge
215A W2311A
HP 215A Yellow Original LaserJet
Toner Cartridge
Standard-capacity replacement yellow
toner cartridge
215A W2312A
HP 215A Magenta Original LaserJet
Toner Cartridge
Standard-capacity replacement magenta
toner cartridge
215A W2313A
T
T
T
TTable 3-6
able 3-6
able 3-6
able 3-6able 3-6 Eur
Eur
Eur
Eur Europe, Russia, CIS
ope, Russia, CIS
ope, Russia, CIS
ope, Russia, CISope, Russia, CIS, Middle E
, Middle E
, Middle E
, Middle E, Middle East, and Africa
ast, and Africa
ast, and Africa
ast, and Africaast, and Africa
Item
Item
Item
ItemItem Description
Description
Description
DescriptionDescription Cartridge number
Cartridge number
Cartridge number
Cartridge numberCartridge number Part number
Part number
Part number
Part numberPart number
HP 216A Black Original LaserJet
Toner Cartridge
Standard-capacity replacement black toner
cartridge
216A W2410A
HP 216A Cyan Original LaserJet
Toner Cartridge
Standard-capacity replacement cyan toner
cartridge
216A W2411A
HP 216A Yellow Original LaserJet
Toner Cartridge
Standard-capacity replacement yellow
toner cartridge
216A W2412A
HP 216A Magenta Original LaserJet
Toner Cartridge
Standard-capacity replacement magenta
toner cartridge
216A W2413A
Do not remove the toner cartridge from its package until it is time to install it.
CAUTION:
CAUTION:
CAUTION:
CAUTION:CAUTION: To prevent damage to the toner cartridge, do not expose it to light for more than a few minutes.
Cover the green imaging drum if the toner cartridge must be removed from the printer for an extended period of
time.
The following illustration shows the toner-cartridge components.
28 Chapter 3 Supplies, accessories, and parts ENWW
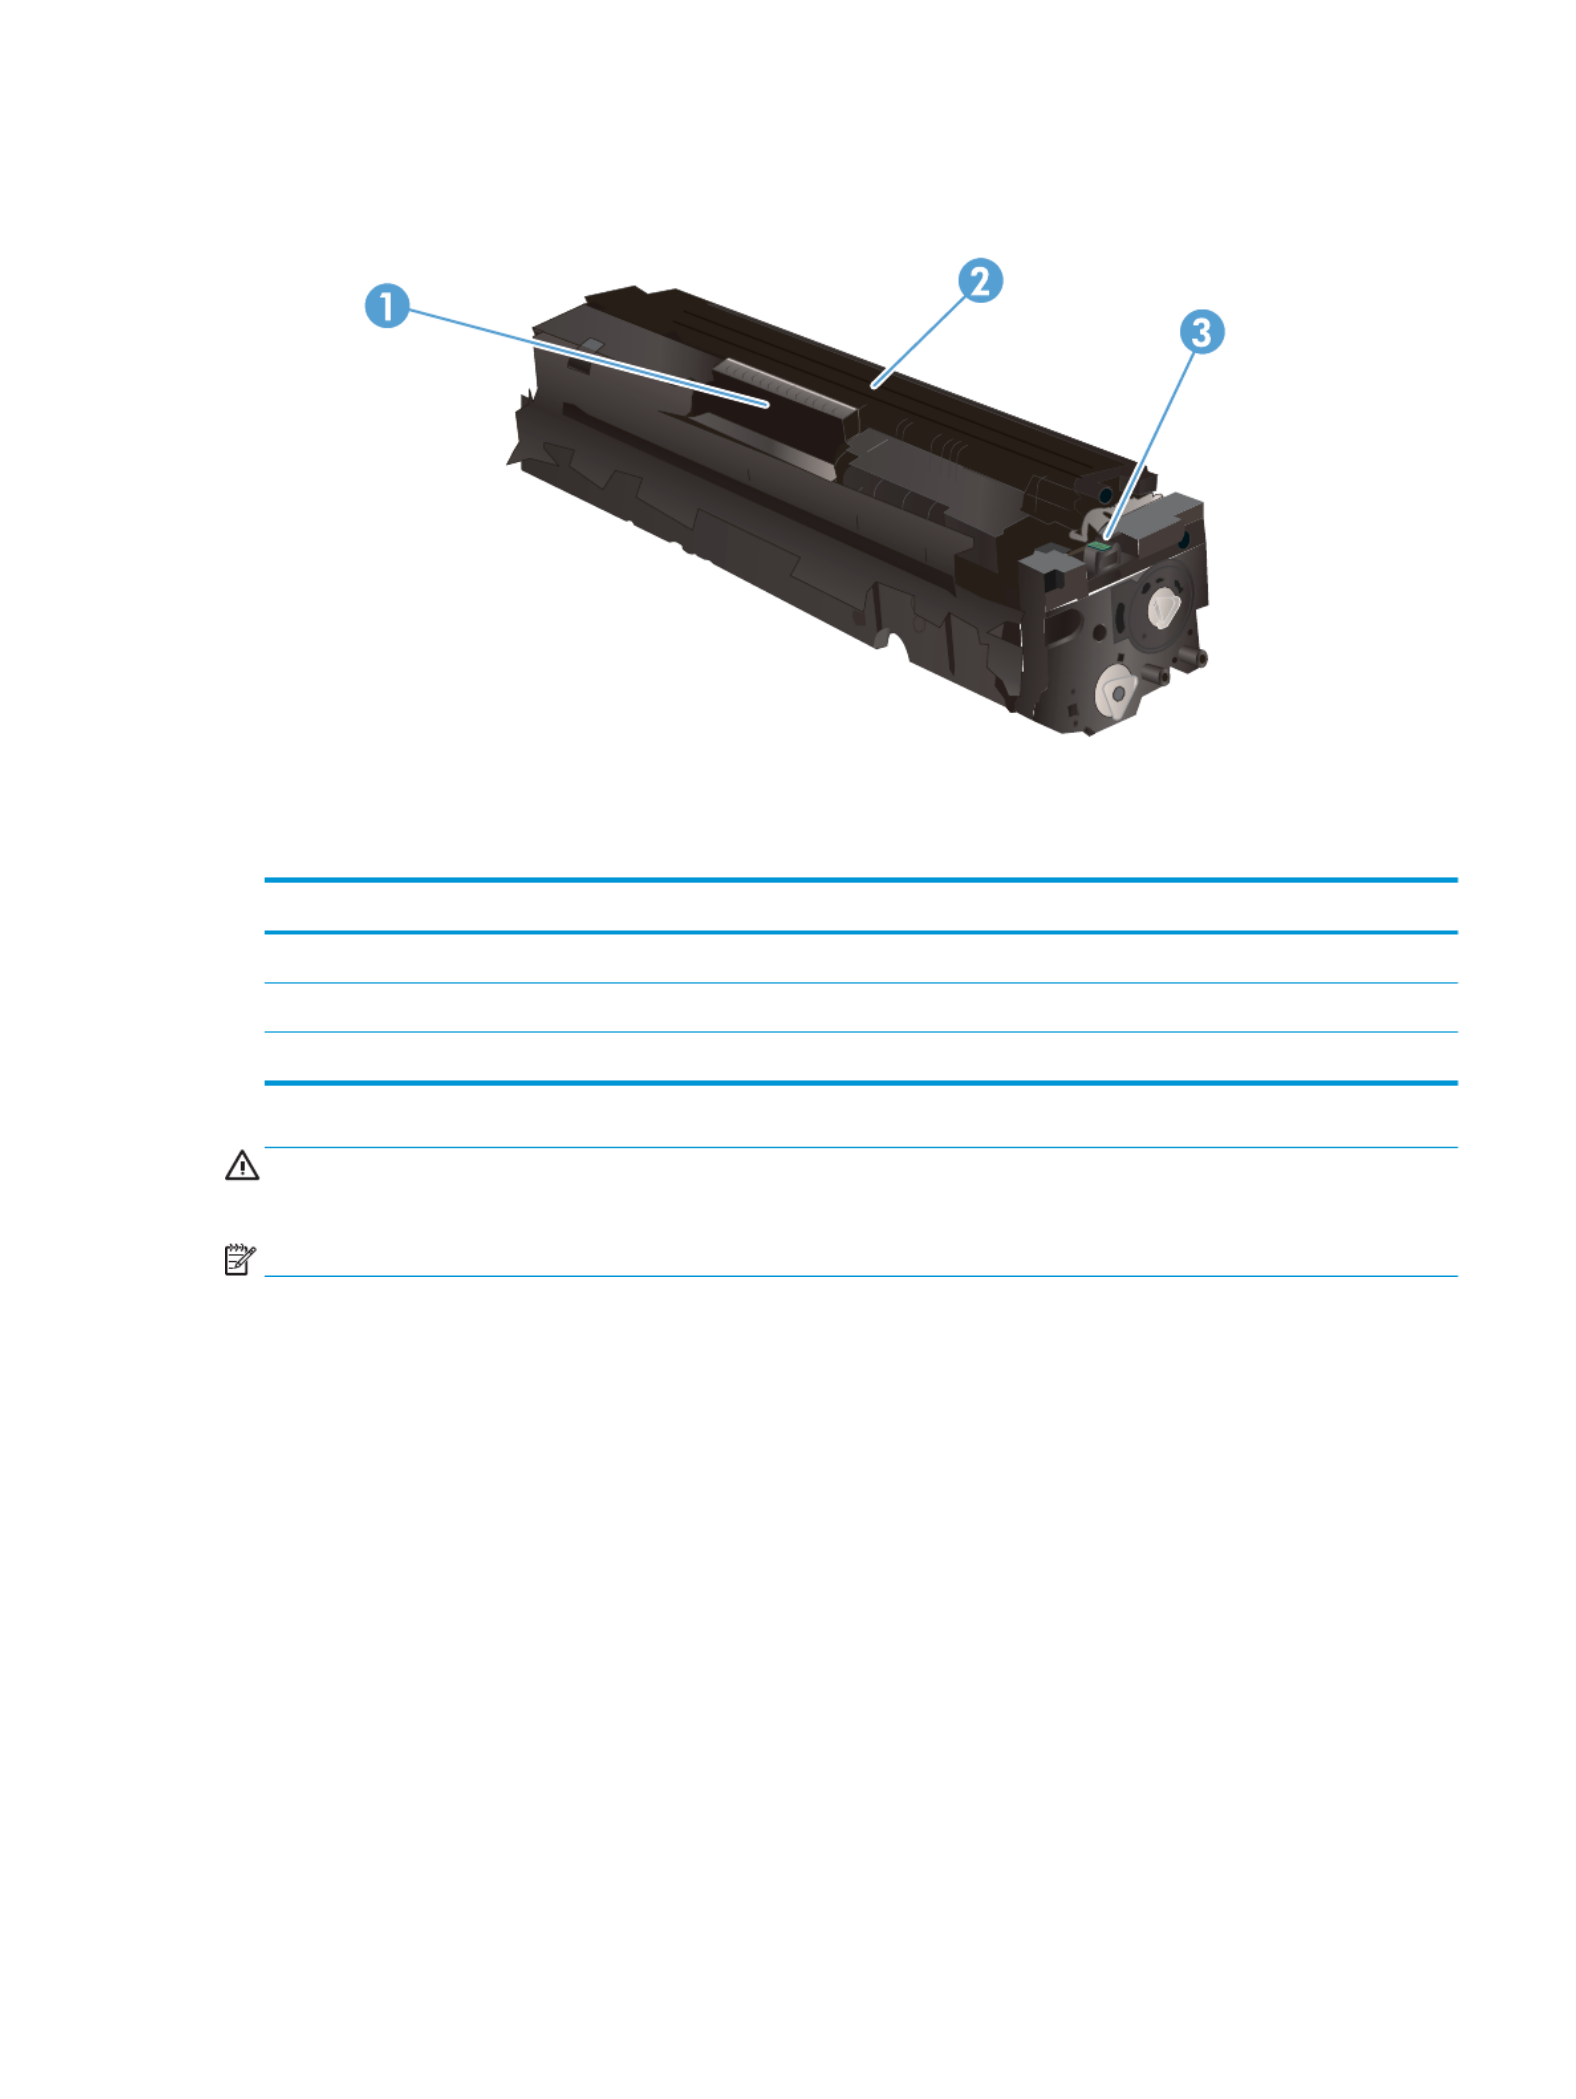
T
T
T
TTable 3-7
able 3-7
able 3-7
able 3-7able 3-7 T
T
T
T Toner
oner
oner
oneroner-cartridge components
-cartridge components
-cartridge components
-cartridge components-cartridge components
Number
Number
Number
NumberNumber Description
Description
Description
DescriptionDescription
1 Handle
2 Imaging drum
3 Memory chip
CAUTION:
CAUTION:
CAUTION:
CAUTION:CAUTION: If toner gets on clothing, wipe it by using a dry cloth and wash the clothes in cold water. Hot water o
sets toner into fabric.
NO
NO
NO
NONOTE:
TE:
TE:
TE:TE: Information about recycling used toner cartridges is in the toner cartridge box.
ENWW Replace the toner cartridges 29

Remo
Remo
Remo
RemoRemove and r
ve and r
ve and r
ve and rve and repl
epl
epl
epleplace the t
ace the t
ace the t
ace the tace the toner cartridges
oner cartridges
oner cartridges
oner cartridgesoner cartridges
1.
1.
1.
1.1. Open the front door.
2.
2.
2.
2.2. Grasp the blue handle on the toner cartridge
drawer, and then pull out the drawer.
3.
3.
3.
3.3. Grasp the handle on the toner cartridge, and then
pull the toner cartridge straight up to remove it.
30 Chapter 3 Supplies, accessories, and parts ENWW

4.
4.
4.
4.4. Remove the new toner cartridge package from the
box, and then pull the release tab on the
packaging.
5.
5.
5.
5.5. Remove the toner cartridge from the opened
packaging shell. Save all packaging for recycling
the used toner cartridge.
NO
NO
NO
NONOTE:
TE:
TE:
TE:TE: Avoid touching the green imaging drum.
Fingerprints on the imaging drum can cause print
defects.
6.
6.
6.
6.6. Holding the toner on both ends, gently rock the
toner cartridge end to end to distribute the toner
evenly inside the cartridge.
ENWW Replace the toner cartridges 31

7.
7.
7.
7.7. Install the new toner cartridge. Make sure that the
color chip on the cartridge matches the color chip
on the drawer.
NO
NO
NO
NONOTE:
TE:
TE:
TE:TE: Avoid touching the green imaging drum.
Fingerprints on the imaging drum can cause print
defects.
8.
8.
8.
8.8. Close the toner cartridge drawer.
9.
9.
9.
9.9. Close the front door.
32 Chapter 3 Supplies, accessories, and parts ENWW

4
4
4
44 Print
Print
Print
PrintPrint
●Print tasks (Windows)
●Print tasks (macOS)
●Mobile printing
For mor
For mor
For mor
For morFor more inform
e inform
e inform
e informe information:
ation:
ation:
ation:ation:
The following information is correct at the time of publication. For current information, see www.hp.com/
support/ljM182MFP.
HP's all-inclusive help for the printer includes the following information:
●Install and congure
●Learn and use
●Solve problems
●Download software and rmware updates
●Join support forums
●Find warranty and regulatory information
ENWW 33

Print tasks (Windo
Print tasks (Windo
Print tasks (Windo
Print tasks (WindoPrint tasks (Windows)
ws)
ws)
ws)ws)
How t
How t
How t
How tHow to print (Windows
o print (Windows
o print (Windows
o print (Windowso print (Windows)
)
)
))
The following procedure describes the basic printing process for Windows.
1.
1.
1.
1.1. From the software program, select the option.
Print
Print
Print
PrintPrint
2.
2.
2.
2.2. Select the printer from the list of printers. To change settings, click the Pro
Pro
Pro
ProProperties
perties
perties
pertiesperties Pref
Pref
Pref
PrefPrefer
er
er
ererences
ences
ences
encesences or button to
open the print driver.
NO
NO
NO
NONOTE:
TE:
TE:
TE:TE: The name of the button varies for dierent software programs.
NO
NO
NO
NONOTE:
TE:
TE:
TE:TE: In Windows 10, 8.1, and 8, these applications will have a dierent layout with dierent features
from what is described below for desktop applications. To access the print feature from a Start screen app,
complete the following steps:
●Windows 10:
Windows 10:
Windows 10:
Windows 10:Windows 10: Select , and then select the printer.
Print
Print
Print
PrintPrint
●Windows 8.1 or 8:
Windows 8.1 or 8:
Windows 8.1 or 8:
Windows 8.1 or 8:Windows 8.1 or 8: Select Devic
Devic
Devic
DevicDevices
es
es
eses, select , and then select the printer.
Print
Print
Print
PrintPrint
For the HP PCL-6 V4 driver, the HP Smart application downloads additional driver features when Mor
Mor
Mor
MorMore
e
e
e e
settings
settings
settings
settingssettings is selected.
NO
NO
NO
NONOTE:
TE:
TE:
TE:TE: For more information, click the Help button (?) in the print driver.
3.
3.
3.
3.3. Click the tabs in the print driver to congure the available options. For example, set the paper orientation
on the tab, and set the paper source, paper type, paper size, and quality settings on the
Finishing
Finishing
Finishing
FinishingFinishing Paper
Paper
Paper
PaperPaper/
/
/
//
Quality
Quality
Quality
QualityQuality tab.
4.
4.
4.
4.4. Click the button to return to the dialog box. Select the number of copies to print from this screen.
OK
OK
OK
OKOK Print
Print
Print
PrintPrint
5.
5.
5.
5.5. Click the button to print the job.
Print
Print
Print
PrintPrint
Manuall
Manuall
Manuall
ManuallManually print on both sides (Windows)
y print on both sides (Windows)
y print on both sides (Windows)
y print on both sides (Windows)y print on both sides (Windows)
Use this procedure for printers that do not have an automatic duplexer installed or to print on paper that the
duplexer does not support.
1.
1.
1.
1.1. From the software program, select the option.
Print
Print
Print
PrintPrint
2.
2.
2.
2.2. Select the printer from the list of printers, and then click the Pr
Pr
Pr
PrProperties
operties
operties
opertiesoperties Pr
Pr
Pr
PrPrefer
efer
efer
efereferenc
enc
enc
encences
es
es
eses or button to open the
print driver.
NO
NO
NO
NONOTE:
TE:
TE:
TE:TE: The name of the button varies for dierent software programs.
NO
NO
NO
NONOTE:
TE:
TE:
TE:TE: In Windows 10, 8.1, and 8, these applications will have a dierent layout with dierent features
from what is described below for desktop applications. To access the print feature from a Start screen app,
complete the following steps:
●Windows 10:
Windows 10:
Windows 10:
Windows 10:Windows 10: Select , and then select the printer.
Print
Print
Print
PrintPrint
●Windows 8.1 or 8:
Windows 8.1 or 8:
Windows 8.1 or 8:
Windows 8.1 or 8:Windows 8.1 or 8: Select Devic
Devic
Devic
DevicDevices
es
es
eses, select , and then select the printer.
Print
Print
Print
PrintPrint
For the HP PCL-6 V4 driver, the HP Smart application downloads additional driver features when Mor
Mor
Mor
MorMore
e
e
e e
settings
settings
settings
settingssettings is selected.
3.
3.
3.
3.3. Click the tab.
Finishing
Finishing
Finishing
FinishingFinishing
34 Chapter 4 Print ENWW

4.
4.
4.
4.4. Select Print on bo
Print on bo
Print on bo
Print on boPrint on both sides (manuall
th sides (manuall
th sides (manuall
th sides (manuallth sides (manually)
y)
y)
y)y) OK
OK
OK
OKOK, and then click to close the Document Pr
Document Pr
Document Pr
Document PrDocument Properties
operties
operties
opertiesoperties dialog.
5.
5.
5.
5.5. In the dialog, click to print the side of the job.
Print
Print
Print
PrintPrint Print
Print
Print
PrintPrint rst
6.
6.
6.
6.6. Retrieve the printed stack from the output bin, and place it in Tray 1.
7.
7.
7.
7.7. If prompted, select the appropriate control panel button to continue.
Print mul
Print mul
Print mul
Print mulPrint multipl
tipl
tipl
tipltiple pages per sheet (Windo
e pages per sheet (Windo
e pages per sheet (Windo
e pages per sheet (Windoe pages per sheet (Windows)
ws)
ws)
ws)ws)
1.
1.
1.
1.1. From the software program, select the option.
Print
Print
Print
PrintPrint
2.
2.
2.
2.2. Select the printer from the list of printers, and then click the Pr
Pr
Pr
PrProperties
operties
operties
opertiesoperties Pr
Pr
Pr
PrPrefer
efer
efer
efereferences
ences
ences
encesences or button to open the
print driver.
NO
NO
NO
NONOTE:
TE:
TE:
TE:TE: The name of the button varies for software programs.dierent
NO
NO
NO
NONOTE:
TE:
TE:
TE:TE: In Windows 10, 8.1, and 8, these applications will have a dierent dierent layout with features
from what is described below for desktop applications. To access the print feature from a Start screen app,
complete the following steps:
●Windows 10:
Windows 10:
Windows 10:
Windows 10:Windows 10: Select , and then select the printer.
Print
Print
Print
PrintPrint
●Windows 8.1 or 8:
Windows 8.1 or 8:
Windows 8.1 or 8:
Windows 8.1 or 8:Windows 8.1 or 8: Select , select , and then select the printer.
Devices
Devices
Devices
DevicesDevices Print
Print
Print
PrintPrint
For the HP PCL-6 V4 driver, the HP Smart application downloads additional driver features when More
More
More
More More
settings
settings
settings
settingssettings is selected.
3.
3.
3.
3.3. Click the tab.
Finishing
Finishing
Finishing
FinishingFinishing
4.
4.
4.
4.4. Select the number of pages per sheet from the drop-down list.
Pages per sheet
Pages per sheet
Pages per sheet
Pages per sheetPages per sheet
5.
5.
5.
5.5. Select the correct Print p
Print p
Print p
Print pPrint page borders
age borders
age borders
age bordersage borders P
P
P
PPage order
age order
age order
age orderage order Orientation
Orientation
Orientation
OrientationOrientation, , and options. Click to close the
OK
OK
OK
OKOK Document
Document
Document
Document Document
Properties
Properties
Properties
PropertiesProperties dialog.
6.
6.
6.
6.6. In the dialog, click to print the job.
Print
Print
Print
PrintPrint Print
Print
Print
PrintPrint
Sel
Sel
Sel
SelSelect the paper type (Windows)
ect the paper type (Windows)
ect the paper type (Windows)
ect the paper type (Windows)ect the paper type (Windows)
1.
1.
1.
1.1. From the software program, select the option.
Print
Print
Print
PrintPrint
2.
2.
2.
2.2. Select the printer from the list of printers, and then click or tap the Pr
Pr
Pr
PrProperties
operties
operties
opertiesoperties Pr
Pr
Pr
PrPrefer
efer
efer
efereferences
ences
ences
encesences or button to
open the print driver.
NO
NO
NO
NONOTE:
TE:
TE:
TE:TE: The name of the button varies for software programs.dierent
NO
NO
NO
NONOTE:
TE:
TE:
TE:TE: In Windows 10, 8.1, and 8, these applications will have a dierent dierent layout with features
from what is described below for desktop applications. To access the print feature from a Start screen app,
complete the following steps:
●Windows 10:
Windows 10:
Windows 10:
Windows 10:Windows 10: Select , and then select the printer.
Print
Print
Print
PrintPrint
●Windows 8.1 or 8:
Windows 8.1 or 8:
Windows 8.1 or 8:
Windows 8.1 or 8:Windows 8.1 or 8: Select , select , and then select the printer.
Devices
Devices
Devices
DevicesDevices Print
Print
Print
PrintPrint
For the HP PCL-6 V4 driver, the HP Smart application downloads additional driver features when More
More
More
More More
settings
settings
settings
settingssettings is selected.
3.
3.
3.
3.3. Click the Paper
Paper
Paper
PaperPaper/
/
/
//Quality
Quality
Quality
QualityQuality tab.
ENWW Print tasks (Windows) 35

4.
4.
4.
4.4. Select the option for the type of paper you are using, and then click .
OK
OK
OK
OKOK
5.
5.
5.
5.5. Click to close the
OK
OK
OK
OKOK Document Pr
Document Pr
Document Pr
Document PrDocument Properties
operties
operties
opertiesoperties dialog.
6.
6.
6.
6.6. In the dialog, click to print the job.
Print
Print
Print
PrintPrint Print
Print
Print
PrintPrint
36 Chapter 4 Print ENWW

Print tasks (macO
Print tasks (macO
Print tasks (macO
Print tasks (macOPrint tasks (macOS)
S)
S)
S)S)
How t
How t
How t
How tHow to print (macOS)
o print (macOS)
o print (macOS)
o print (macOS)o print (macOS)
The following procedure describes the basic printing process for macOS.
1.
1.
1.
1.1. Click the Fil
Fil
Fil
FilFile
e
e
ee Print
Print
Print
PrintPrint menu, and then click the option.
2.
2.
2.
2.2. Select the printer.
3.
3.
3.
3.3. Click or
Show Details
Show Details
Show Details
Show DetailsShow Details Co
Co
Co
CoCopies & Pages
pies & Pages
pies & Pages
pies & Pagespies & Pages, and then select other menus to adjust the print settings.
NO
NO
NO
NONOTE:
TE:
TE:
TE:TE: The name of the item varies for dierent software programs.
4.
4.
4.
4.4. Click the button.
Print
Print
Print
PrintPrint
Aut
Aut
Aut
AutAutomaticall
omaticall
omaticall
omaticallomatically print on bo
y print on bo
y print on bo
y print on boy print on both sides (macOS
th sides (macOS
th sides (macOS
th sides (macOSth sides (macOS)
)
)
))
NO
NO
NO
NONOTE:
TE:
TE:
TE:TE: This information applies to printers that include an automatic duplexer.
NO
NO
NO
NONOTE:
TE:
TE:
TE:TE: This feature is available if you install the HP print driver. It might not be available if you are using AirPrint.
1.
1.
1.
1.1. Click the File
File
File
FileFile menu, and then click the option.
Print
Print
Print
PrintPrint
2.
2.
2.
2.2. Select the printer.
3.
3.
3.
3.3. Click or
Show Details
Show Details
Show Details
Show DetailsShow Details Co
Co
Co
CoCopies & Pages
pies & Pages
pies & Pages
pies & Pagespies & Pages Lay
Lay
Lay
LayLayout
out
out
outout, and then click the menu.
NO
NO
NO
NONOTE:
TE:
TE:
TE:TE: The name of the item varies for dierent software programs.
4.
4.
4.
4.4. Select a binding option from the T
T
T
TTwo-
wo-
wo-
wo-wo-Sided
Sided
Sided
SidedSided drop-down list.
5.
5.
5.
5.5. Click the button.
Print
Print
Print
PrintPrint
Manuall
Manuall
Manuall
ManuallManually print on bo
y print on bo
y print on bo
y print on boy print on both sides (macOS
th sides (macOS
th sides (macOS
th sides (macOSth sides (macOS)
)
)
))
NO
NO
NO
NONOTE:
TE:
TE:
TE:TE: This feature is available if you install the HP print driver. It might not be available if you are using AirPrint.
1.
1.
1.
1.1. Click the File
File
File
FileFile menu, and then click the option.
Print
Print
Print
PrintPrint
2.
2.
2.
2.2. Select the printer.
3.
3.
3.
3.3. Click or
Show Details
Show Details
Show Details
Show DetailsShow Details Co
Co
Co
CoCopies & Pages
pies & Pages
pies & Pages
pies & Pagespies & Pages Manual Dupl
Manual Dupl
Manual Dupl
Manual DuplManual Duplex
ex
ex
exex, and then click the menu.
NO
NO
NO
NONOTE:
TE:
TE:
TE:TE: The name of the item varies for dierent software programs.
4.
4.
4.
4.4. Click the box, and select a binding option.
Manual Duplex
Manual Duplex
Manual Duplex
Manual DuplexManual Duplex
5.
5.
5.
5.5. Click the button.
Print
Print
Print
PrintPrint
6.
6.
6.
6.6. Go to the printer, and remove any blank paper that is in Tray 1.
7.
7.
7.
7.7. Retrieve the printed stack from the output bin and place it with the printed-side facing down in the input
tray.
8.
8.
8.
8.8. If prompted, touch the appropriate control panel button to continue.
ENWW Print tasks (macOS) 37

Print mul
Print mul
Print mul
Print mulPrint multipl
tipl
tipl
tipltiple pages per sheet (m
e pages per sheet (m
e pages per sheet (m
e pages per sheet (me pages per sheet (macOS)
acOS)
acOS)
acOS)acOS)
1.
1.
1.
1.1. Click the menu, and then click the option.
File
File
File
FileFile Print
Print
Print
PrintPrint
2.
2.
2.
2.2. Select the printer.
3.
3.
3.
3.3. Click or
Show Details
Show Details
Show Details
Show DetailsShow Details Co
Co
Co
CoCopies & Pages
pies & Pages
pies & Pages
pies & Pagespies & Pages Lay
Lay
Lay
LayLayout
out
out
outout, and then click the menu.
NO
NO
NO
NONOTE:
TE:
TE:
TE:TE: The name of the item varies for dierent software programs.
4.
4.
4.
4.4. From the P
P
P
PPages per Sheet
ages per Sheet
ages per Sheet
ages per Sheetages per Sheet drop-down list, select the number of pages that you want to print on each sheet.
5.
5.
5.
5.5. In the Layout Dir
Layout Dir
Layout Dir
Layout DirLayout Direction
ection
ection
ectionection area, select the order and placement of the pages on the sheet.
6.
6.
6.
6.6. From the Bor
Bor
Bor
BorBorders
ders
ders
dersders menu, select the type of border to print around each page on the sheet.
7.
7.
7.
7.7. Click the button.
Print
Print
Print
PrintPrint
Sel
Sel
Sel
SelSelect the paper type (macOS)
ect the paper type (macOS)
ect the paper type (macOS)
ect the paper type (macOS)ect the paper type (macOS)
1.
1.
1.
1.1. Click the File
File
File
FileFile menu, and then click the option.
Print
Print
Print
PrintPrint
2.
2.
2.
2.2. Select the printer.
3.
3.
3.
3.3. Click or
Show Details
Show Details
Show Details
Show DetailsShow Details Co
Co
Co
CoCopies & Pages
pies & Pages
pies & Pages
pies & Pagespies & Pages Media & Quality
Media & Quality
Media & Quality
Media & QualityMedia & Quality P
P
P
PPaper
aper
aper
aperaper/
/
/
//Quality
Quality
Quality
QualityQuality, and then click the menu or the menu.
NO
NO
NO
NONOTE:
TE:
TE:
TE:TE: The name of the item varies for dierent software programs.
4.
4.
4.
4.4. Select from the or
Media & Quality
Media & Quality
Media & Quality
Media & QualityMedia & Quality Paper
Paper
Paper
PaperPaper/
/
/
//Quality
Quality
Quality
QualityQuality options.
NO
NO
NO
NONOTE:
TE:
TE:
TE:TE: This list contains the master set of options available. Some options are not available on all printers.
●Media T
Media T
Media T
Media TMedia Type
ype
ype
ypeype: Select the option for the type of paper for the print job.
●Print Quality
Print Quality
Print Quality
Print QualityPrint Quality: Select the resolution level for the print job.
●Edge-
Edge-
Edge-
Edge-Edge-T
T
T
TTo-Edge Printing
o-Edge Printing
o-Edge Printing
o-Edge Printingo-Edge Printing: Select this option to print close to the paper edges.
5.
5.
5.
5.5. Click the button.
Print
Print
Print
PrintPrint
Additional print tasks
Additional print tasks
Additional print tasks
Additional print tasksAdditional print tasks
Go to .www.hp.com/support/ljM182MFP
Instructions are available for performing print tasks, such as the following:specic
●Create and use printing shortcuts or presets
●Select the paper size, or use a custom paper size
●Select the page orientation
●Create a booklet
●Scale a document to a paper sizet specic
●Print the or last pages of the document on rst dierent paper
●Print watermarks on a document
38 Chapter 4 Print ENWW

Mobil
Mobil
Mobil
MobilMobile printing
e printing
e printing
e printinge printing
Intr
Intr
Intr
IntrIntroduction
oduction
oduction
oductionoduction
HP multiple mobile and ePrint solutions to enable easy printing to an HP printer from a laptop, tablet, oers
smartphone, or other mobile device. To see the full list and to determine the best choice, go to www.hp.com/go/
LaserJetMobilePrinting.
NO
NO
NO
NONOTE:
TE:
TE:
TE:TE: Update the printer rmware to ensure all mobile printing and ePrint capabilities are supported.
●Wi-Fi Direct (wireless models only)
●HP ePrint via email
●HP ePrint software
●AirPrint
●Android embedded printing
Wi-Fi Dir
Wi-Fi Dir
Wi-Fi Dir
Wi-Fi DirWi-Fi Direct (wirel
ect (wirel
ect (wirel
ect (wirelect (wireless models onl
ess models onl
ess models onl
ess models onless models only)
y)
y)
y)y)
Wi-Fi Direct enables printing from a wireless mobile device without requiring a connection to a network or the
Internet.
NO
NO
NO
NONOTE:
TE:
TE:
TE:TE: Not all mobile operating systems are currently supported by Wi-Fi Direct.
NO
NO
NO
NONOTE:
TE:
TE:
TE:TE: For non-Wi-Fi Direct capable mobile devices, the Wi-Fi Direct connection only enables printing. After
using Wi-Fi Direct to print, you must reconnect to a local network in order to access the Internet.
To access the printer Wi-Fi Direct connection, complete the following steps:
1.
1.
1.
1.1. On the printer control panel, press the Setup button .
2.
2.
2.
2.2. Open the following menus:
a.
a.
a.
a.a. Network Setup
b.
b.
b.
b.b. Wi-Fi Direct
c.
c.
c.
c.c. Connection Method
3.
3.
3.
3.3. Choose one of the following connection methods:
●Automatic: Choosing this option sets the password to 12345678.
●Manual: Choosing this option generates a secure, randomly generated password.
4.
4.
4.
4.4. On the mobile device, open the or
Wi-Fi
Wi-Fi
Wi-Fi
Wi-FiWi-Fi Wi-Fi Dir
Wi-Fi Dir
Wi-Fi Dir
Wi-Fi DirWi-Fi Direct
ect
ect
ectect menu.
5.
5.
5.
5.5. From the list of available networks, select the printer name.
NO
NO
NO
NONOTE:
TE:
TE:
TE:TE: If the printer name does not display, you might be out of range of the Wi-Fi Direct signal. Move the
device closer to the printer.
6.
6.
6.
6.6. If prompted, enter the Wi-Fi Direct password, or select on the printer control panel.OK
ENWW Mobile printing 39

Change the printer Wi-Fi Dir
Change the printer Wi-Fi Dir
Change the printer Wi-Fi Dir
Change the printer Wi-Fi DirChange the printer Wi-Fi Direct name
ect name
ect name
ect nameect name
Follow this procedure to change the printer Wi-Fi Direct name using the HP Embedded Web Server (EWS):
St
St
St
StStep one: Open the HP Embedded Web Server
ep one: Open the HP Embedded Web Server
ep one: Open the HP Embedded Web Server
ep one: Open the HP Embedded Web Serverep one: Open the HP Embedded Web Server
1.
1.
1.
1.1. On the printer control panel, press the Setup button . Open the menu, select Network Setup Show IP
Address Yes, and then select . Return to the Home screen to view the IP address.
2.
2.
2.
2.2. Open a web browser, and in the address line, type the IP address or host name exactly as it displays on the
printer control panel. Press the key on the computer keyboard. The EWS opens.Enter
NO
NO
NO
NONOTE:
TE:
TE:
TE:TE: If the web browser displays a message indicating that accessing the website might not be safe,
select the option to continue to the website. Accessing this website will not harm the computer.
St
St
St
StStep two: Change the Wi-Fi Direct name
ep two: Change the Wi-Fi Direct name
ep two: Change the Wi-Fi Direct name
ep two: Change the Wi-Fi Direct nameep two: Change the Wi-Fi Direct name
1.
1.
1.
1.1. Click the tab.
Networking
Networking
Networking
NetworkingNetworking
2.
2.
2.
2.2. On the left navigation pane, click the link.
Wi-Fi Direct Setup
Wi-Fi Direct Setup
Wi-Fi Direct Setup
Wi-Fi Direct SetupWi-Fi Direct Setup
3.
3.
3.
3.3. In the
Wi-Fi Direct Name
Wi-Fi Direct Name
Wi-Fi Direct Name
Wi-Fi Direct NameWi-Fi Direct Name eld, enter the new name.
4.
4.
4.
4.4. Click Appl
Appl
Appl
ApplApply
y
y
yy.
HP ePrint via email
HP ePrint via email
HP ePrint via email
HP ePrint via emailHP ePrint via email
Use HP ePrint to print documents by sending them as an email attachment to the printer's email address from
any email-enabled device.
To use HP ePrint, the printer must meet these requirements:
●The printer must be connected to a wired or wireless network and have Internet access.
●HP Web Services must be enabled on the printer, and the printer must be registered with HP Connected.
Follow this procedure to enable HP Web Services and register with HP Connected:
1.
1.
1.
1.1. On the printer control panel, press the Setup button . Open the menu, select Network Setup Show
IP Address Yes, and then select . Return to the Home screen to view the IP address.
2.
2.
2.
2.2. Open a web browser, and in the address line, type the IP address or host name exactly as it displays
on the printer control panel. Press the key on the computer keyboard. The EWS opens.Enter
NO
NO
NO
NONOTE:
TE:
TE:
TE:TE: If the web browser displays a message indicating that accessing the website might not be
safe, select the option to continue to the website. Accessing this website will not harm the computer.
3.
3.
3.
3.3. HP Web Service
HP Web Service
HP Web Service
HP Web ServiceHP Web Services
s
s
ss Enabl
Enabl
Enabl
EnablEnable
e
e
eeClick the tab, and then click . The printer enables Web Services, and then
prints an information page.
The information page contains the printer code necessary to register the HP printer at HP Connected.
4.
4.
4.
4.4. Go to www.hpconnected.com to create an HP ePrint account and complete the setup process.
ENWW Mobile printing 41

HP ePrint softwar
HP ePrint softwar
HP ePrint softwar
HP ePrint softwarHP ePrint software
e
e
ee
The HP ePrint software makes it easy to print from a Windows or Mac desktop or laptop computer to any HP
ePrint-capable printer. This software makes it easy to HP ePrint-enabled printers that are registered to your nd
HP Connected account. The target HP printer can be located in the oice or at locations across the globe.
●Windows:
Windows:
Windows:
Windows:Windows: After installing the software, open the option from within your application, and then select
Print
Print
Print
PrintPrint
HP ePrint
HP ePrint
HP ePrint
HP ePrintHP ePrint from the installed printers list. Click the button to
Properties
Properties
Properties
PropertiesProperties congure print options.
●macOS:
macOS:
macOS:
macOS:macOS: After installing the software, select , , and then select the arrow next to (in the bottom
File
File
File
FileFile Print
Print
Print
PrintPrint PDF
PDF
PDF
PDFPDF
left of the driver screen). Select .
HP ePrint
HP ePrint
HP ePrint
HP ePrintHP ePrint
For Windows, the HP ePrint software supports TCP/IP printing to local network printers on the network (LAN or
WAN) to products that support UPD PostScript®.
Windows and macOS both support IPP printing to LAN or WAN network-connected products that support ePCL.
Windows and macOS also both support printing PDF documents to public print locations and printing using HP
ePrint via email through the cloud.
Go to www.hp.com/go/eprintsoftware for drivers and information.
NO
NO
NO
NONOTE:
TE:
TE:
TE:TE: For Windows, the name of the HP ePrint Software print driver is HP ePrint + JetAdvantage.
NO
NO
NO
NONOTE:
TE:
TE:
TE:TE: The HP ePrint software is a PDF utility for macOS, and is not technically a print driver.workow
NO
NO
NO
NONOTE:
TE:
TE:
TE:TE: HP ePrint Software does not support USB printing.
AirPrint
AirPrint
AirPrint
AirPrintAirPrint
Direct printing using Apple’s AirPrint is supported for iOS and from Mac computers running macOS 10.7 Lion and
newer. Use AirPrint to print directly to the printer from an iPad, iPhone (3GS or later), or iPod touch (third
generation or later) in the following mobile applications:
●Mail
●Photos
●Safari
●iBooks
●Select third-party applications
To use AirPrint, the printer must be connected to the same network (sub-net) as the Apple device. For more
information about using AirPrint and about which HP printers are compatible with AirPrint, go to
www.hp.com/go/MobilePrinting.
NO
NO
NO
NONOTE:
TE:
TE:
TE:TE: Before using AirPrint with a USB connection, verify the version number. AirPrint versions 1.3 and earlier
do not support USB connections.
42 Chapter 4 Print ENWW

Andr
Andr
Andr
AndrAndroid embedded printing
oid embedded printing
oid embedded printing
oid embedded printingoid embedded printing
HP's built-in print solution for Android and Kindle enables mobile devices to automatically and print to HP nd
printers that are either on a network or within wireless range for Wi-Fi Direct printing.
The print solution is built into the many versions of the operating system.
NO
NO
NO
NONOTE:
TE:
TE:
TE:TE: If printing is not available on your device, go to the Google Play > Android apps and install the HP Print
Service Plugin.
For more information on how to use Android embedded printing and which Android devices are supported, go to
www.hp.com/go/LaserJetMobilePrinting.
ENWW Mobile printing 43

44 Chapter 4 Print ENWW

5
5
5
55 C
C
C
CCop
op
op
opopy
y
y
yy
●Make a copy
●Copy on both sides (duplex)
For mor
For mor
For mor
For morFor more information:
e information:
e information:
e information:e information:
The following information is correct at the time of publication. For current information, see www.hp.com/
support/ljM182MFP.
HP's all-inclusive help for the printer includes the following information:
●Install and congure
●Learn and use
●Solve problems
●Download software and rmware updates
●Join support forums
●Find warranty and regulatory information
ENWW 45

Mak
Mak
Mak
MakMake a c
e a c
e a c
e a ce a cop
op
op
opopy
y
y
yy
NO
NO
NO
NONOTE:
TE:
TE:
TE:TE: The steps vary according to the type of control panel.
1 2
T
T
T
TTabl
abl
abl
ablable 5-1
e 5-1
e 5-1
e 5-1e 5-1 Contr
Contr
Contr
Contr Control panels
ol panels
ol panels
ol panelsol panels
Number
Number
Number
NumberNumber Description
Description
Description
DescriptionDescription
1 LED control panel
2 2-line control panel
LED contr
LED contr
LED contr
LED contrLED control panels:
ol panels:
ol panels:
ol panels:ol panels:
1.
1.
1.
1.1. Load the document on the scanner glass according to the indicators on the printer.
2.
2.
2.
2.2. Press the Copy Menu button to choose any of the following copy settings.
●Select the Number of Copies setting, and then use the arrow keys to adjust the number of copies.
●Select the Lighter/Darker setting, and then use the arrow keys to adjust the darkness setting for the
current copy job.
●Select the Enlarge/Reduce setting, and then use the arrow keys to adjust the size percentage of the
copy job.
3.
3.
3.
3.3. Press the Start Mono Copy button or the Start Color Copy / Resume button to start copying.
2-line contr
2-line contr
2-line contr
2-line contr2-line control panels:
ol panels:
ol panels:
ol panels:ol panels:
1.
1.
1.
1.1. Load the document on the scanner glass according to the indicators on the printer.
2.
2.
2.
2.2. Press the Copy Menu button .
3.
3.
3.
3.3. To optimize copy quality for types of documents, use the arrow keys to select the dierent Optimize menu,
and then press the button. The following copy-quality settings are available:OK
●Auto Select: Use this setting when you are not concerned about the quality of the copy. This is the
default setting.
●Mixed: Use this setting for documents that contain a mixture of text and graphics.
●Text: Use this setting for documents that contain mostly text.
●Picture: Use this setting for documents that contain mostly graphics.
46 Chapter 5 Copy ENWW

C
C
C
CCop
op
op
opopy on bo
y on bo
y on bo
y on boy on both sides (
th sides (
th sides (
th sides (th sides (dupl
dupl
dupl
duplduplex)
ex)
ex)
ex)ex)
Co
Co
Co
CoCopy on bo
py on bo
py on bo
py on bopy on both sides manual
th sides manual
th sides manual
th sides manualth sides manually
ly
ly
lyly
1.
1.
1.
1.1. Place the document face-down on the scanner glass with the upper-left corner of the page in the upper-
left corner of the glass. Close the scanner.
2.
2.
2.
2.2. Press the Start Copy button to start copying.
3.
3.
3.
3.3. Retrieve the printed page from the output bin, and place it with the printed-side facing down, top edge rst
in the input tray.
4.
4.
4.
4.4. Flip the original document on the scanner glass to copy the second side.
5.
5.
5.
5.5. Press the Start Copy button to start copying.
6.
6.
6.
6.6. Repeat this process until you have copied all of the pages.
48 Chapter 5 Copy ENWW

6
6
6
66 Scan
Scan
Scan
ScanScan
●Scan by using the HP Scan software (Windows)
●Scan by using the HP Smart Software (macOS)
For mor
For mor
For mor
For morFor more inform
e inform
e inform
e informe information:
ation:
ation:
ation:ation:
The following information is correct at the time of publication. For current information, see www.hp.com/
support/ljM182MFP.
HP's all-inclusive help for the printer includes the following information:
●Install and congure
●Learn and use
●Solve problems
●Download software and rmware updates
●Join support forums
●Find warranty and regulatory information
ENWW 49
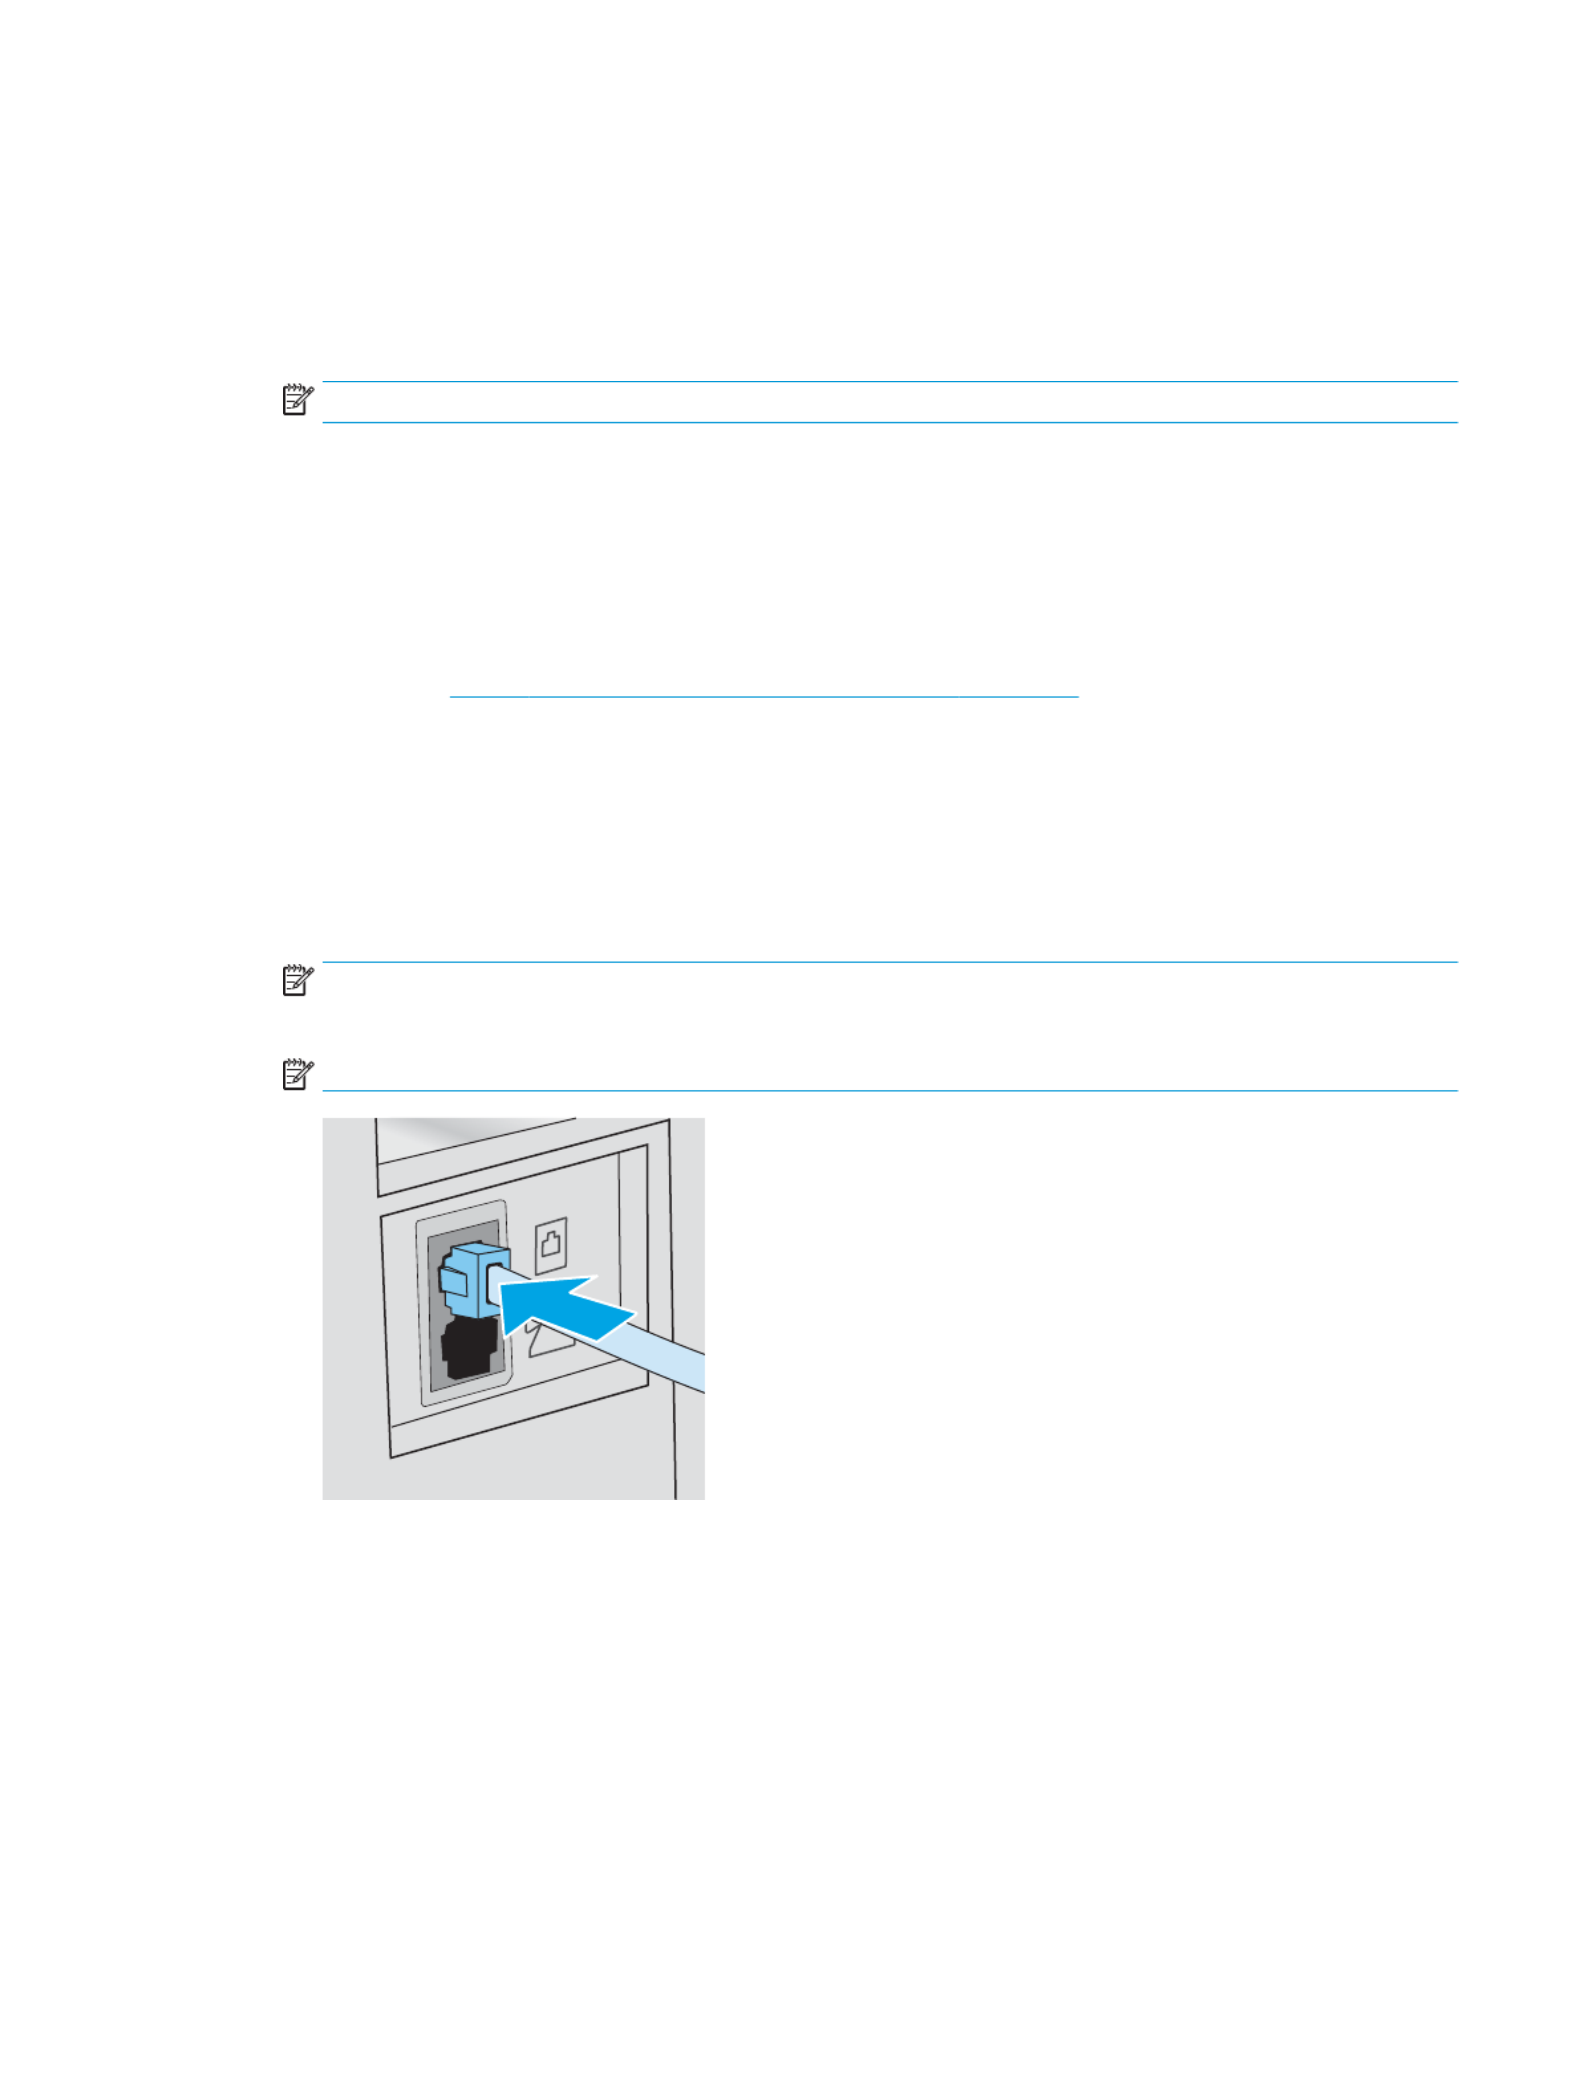
c.
c.
c.
c.c. Select the Fax Setup menu.
d.
d.
d.
d.d. Select the Basic Setup menu.
e.
e.
e.
e.e. Select the setting, and then select the Answer Mode Automatic option.
5.
5.
5.
5.5. Set the printer to check for a dial tone before sending a fax.
NO
NO
NO
NONOTE:
TE:
TE:
TE:TE: This prevents the printer from sending a fax while someone is on the telephone.
a.
a.
a.
a.a. From the control panel, open the menu.Setup
b.
b.
b.
b.b. Select the Fax Setup menu.
c.
c.
c.
c.c. Select the Advanced Setup menu.
d.
d.
d.
d.d. Select the Detect Dial Tone setting, and then select .On
6.
6.
6.
6.6. Continue to Step 3: Congure the fax time, date, and header on page 59.
Shared v
Shared v
Shared v
Shared vShared voic
oic
oic
oicoice/f
e/f
e/f
e/fe/fax line with an answering machine
ax line with an answering machine
ax line with an answering machine
ax line with an answering machineax line with an answering machine
Follow these steps to set up the printer on a shared voice/fax line with an answering machine.
1.
1.
1.
1.1. Disconnect any devices that are connected to the telephone jack.
2.
2.
2.
2.2. Connect the telephone cable to the fax port on the printer and to the telephone jack on the wall.
NO
NO
NO
NONOTE:
TE:
TE:
TE:TE: Some countries/regions might require an adapter for the telephone cable that came with the
printer.
NO
NO
NO
NONOTE:
TE:
TE:
TE:TE: On some printers, the fax port might be above the phone port. Refer to the icons on the printer.
3.
3.
3.
3.3. Remove the plug from the telephone line out port on the rear of the printer.
ENWW Set up to send and receive faxes 57
Produktspezifikationen
| Marke: | HP |
| Kategorie: | Drucker |
| Modell: | Color LaserJet Pro M182nw |
Brauchst du Hilfe?
Wenn Sie Hilfe mit HP Color LaserJet Pro M182nw benötigen, stellen Sie unten eine Frage und andere Benutzer werden Ihnen antworten
Bedienungsanleitung Drucker HP

27 September 2024
20 September 2024
20 September 2024
17 September 2024
15 September 2024
7 September 2024
3 September 2024
3 September 2024
3 September 2024
3 September 2024
Bedienungsanleitung Drucker
- Drucker Samsung
- Drucker Approx
- Drucker Sony
- Drucker Panasonic
- Drucker LG
- Drucker Roland
- Drucker Canon
- Drucker Velleman
- Drucker CSL
- Drucker Renkforce
- Drucker Thomson
- Drucker Sharp
- Drucker Mitsubishi
- Drucker Nilox
- Drucker Polaroid
- Drucker Xiaomi
- Drucker Olympia
- Drucker Seiko
- Drucker Toshiba
- Drucker Olympus
- Drucker Citizen
- Drucker Olivetti
- Drucker Epson
- Drucker Dell
- Drucker Lenovo
- Drucker MSI
- Drucker Honeywell
- Drucker OKI
- Drucker Brother
- Drucker Sagem
- Drucker Fujifilm
- Drucker Ricoh
- Drucker Datamax-O'neil
- Drucker Dymo
- Drucker Intermec
- Drucker Primera
- Drucker TSC
- Drucker Zebra
- Drucker Triumph-Adler
- Drucker Kodak
- Drucker Konica-Minolta
- Drucker Minolta
- Drucker TOMY
- Drucker Festo
- Drucker Frama
- Drucker NEC
- Drucker Ultimaker
- Drucker Fujitsu
- Drucker Huawei
- Drucker Testo
- Drucker Kogan
- Drucker Royal Sovereign
- Drucker D-Link
- Drucker Kyocera
- Drucker Lexmark
- Drucker Star
- Drucker Xerox
- Drucker Digitus
- Drucker Bixolon
- Drucker Epson 7620
- Drucker Fichero
- Drucker GG Image
- Drucker Ibm
- Drucker Oce
- Drucker Paxar
- Drucker Toshiba TEC
- Drucker ZKTeco
- Drucker StarTech.com
- Drucker Bematech
- Drucker Pantum
- Drucker HiTi
- Drucker Panduit
- Drucker Posiflex
- Drucker Vupoint Solutions
- Drucker Brady
- Drucker Star Micronics
- Drucker Metapace
- Drucker DNP
- Drucker Godex
- Drucker Phoenix Contact
- Drucker Elite Screens
- Drucker Equip
- Drucker Argox
- Drucker Dascom
- Drucker EC Line
- Drucker Orient Technologies
- Drucker Evolis
- Drucker Fargo
- Drucker Microboards
- Drucker Builder
- Drucker DTRONIC
- Drucker Colop
- Drucker Raspberry Pi
- Drucker IDP
- Drucker Tally Dascom
- Drucker Custom
- Drucker Nisca
Neueste Bedienungsanleitung für -Kategorien-

25 November 2024
24 November 2024
24 November 2024
24 November 2024

16 Oktober 2024

15 Oktober 2024

15 Oktober 2024

15 Oktober 2024

14 Oktober 2024

14 Oktober 2024