Garmin BC 20 Bedienungsanleitung
Garmin
Rückfahrkamera
BC 20
Lesen Sie kostenlos die 📖 deutsche Bedienungsanleitung für Garmin BC 20 (38 Seiten) in der Kategorie Rückfahrkamera. Dieser Bedienungsanleitung war für 25 Personen hilfreich und wurde von 2 Benutzern mit durchschnittlich 4.5 Sternen bewertet
Seite 1/38

BC™ 20 Wireless Backup Camera Installation Instructions.............................................................. 2
BC™ 20 Wireless Backup Camera Installation Instructions.............................................................. 4
BC™ 20 Wireless Backup Camera Installation Instructions.............................................................. 7
BC™ 20 Wireless Backup Camera Installation Instructions............................................................ 10
BC™ 20 Wireless Backup Camera Installation Instructions............................................................ 13
BC™ 20 Wireless Backup Camera Installation Instructions............................................................ 16
BC™ 20 Wireless Backup Camera Installation Instructions............................................................ 19
BC™ 20 Wireless Backup Camera Installation Instructions............................................................ 22
BC™ 20 Wireless Backup Camera Installation Instructions............................................................ 25
BC™ 20 Wireless Backup Camera Installation Instructions............................................................ 28
BC™ 20 Wireless Backup Camera Installation Instructions............................................................ 31
BC™ 20 Wireless Backup Camera Installation Instructions............................................................ 34
Garmin International, Inc.
1200 East 151st Street
Olathe, Kansas 66062, USA
Garmin (Europe) Ltd.
Liberty House, Hounsdown Business Park
Southampton, Hampshire, SO40 9LR UK
Garmin Corporation
No. 68, Zhangshu 2nd Road, Xizhi Dist.
New Taipei City, 221, Taiwan (R.O.C.)
Garmin® and the Garmin logo are trademarks of Garmin Ltd. or its subsidiaries, registered in the USA and other countries. BC™ is a
trademark of Garmin Ltd. or its subsidiaries. These trademarks may not be used without the express permission of Garmin.
December 2013 190-01600-90_0D Printed in Taiwan
BC™ 20 Wireless Backup Camera
Installation Instructions
WARNING
See the guide in the Important Safety and Product Information
GPS device product box for product warnings and other
important information.
Garmin® strongly recommends having an experienced installer
with the proper knowledge of electrical systems install the
device. Incorrectly wiring the power cable can result in damage
to the vehicle or the battery and can cause bodily injury.
When connecting the power cable, do not remove the in-line
fuse holder. To prevent the possibility of injury or product
damage caused by fire or overheating, the appropriate fuse
must be in place as indicated in the product specifications. In
addition, connecting the power cable without the appropriate
fuse in place will void the product warranty.
CAUTION
Always wear safety goggles, ear protection, and a dust mask
when drilling, cutting, or sanding.
NOTICE
When drilling or cutting, always check what is on the opposite
side of the surface.
These installation instructions do not apply to a specific vehicle
type, and are meant as a guide when installing this product on
your vehicle. For questions specific to your vehicle, you should
contact the vehicle manufacturer.
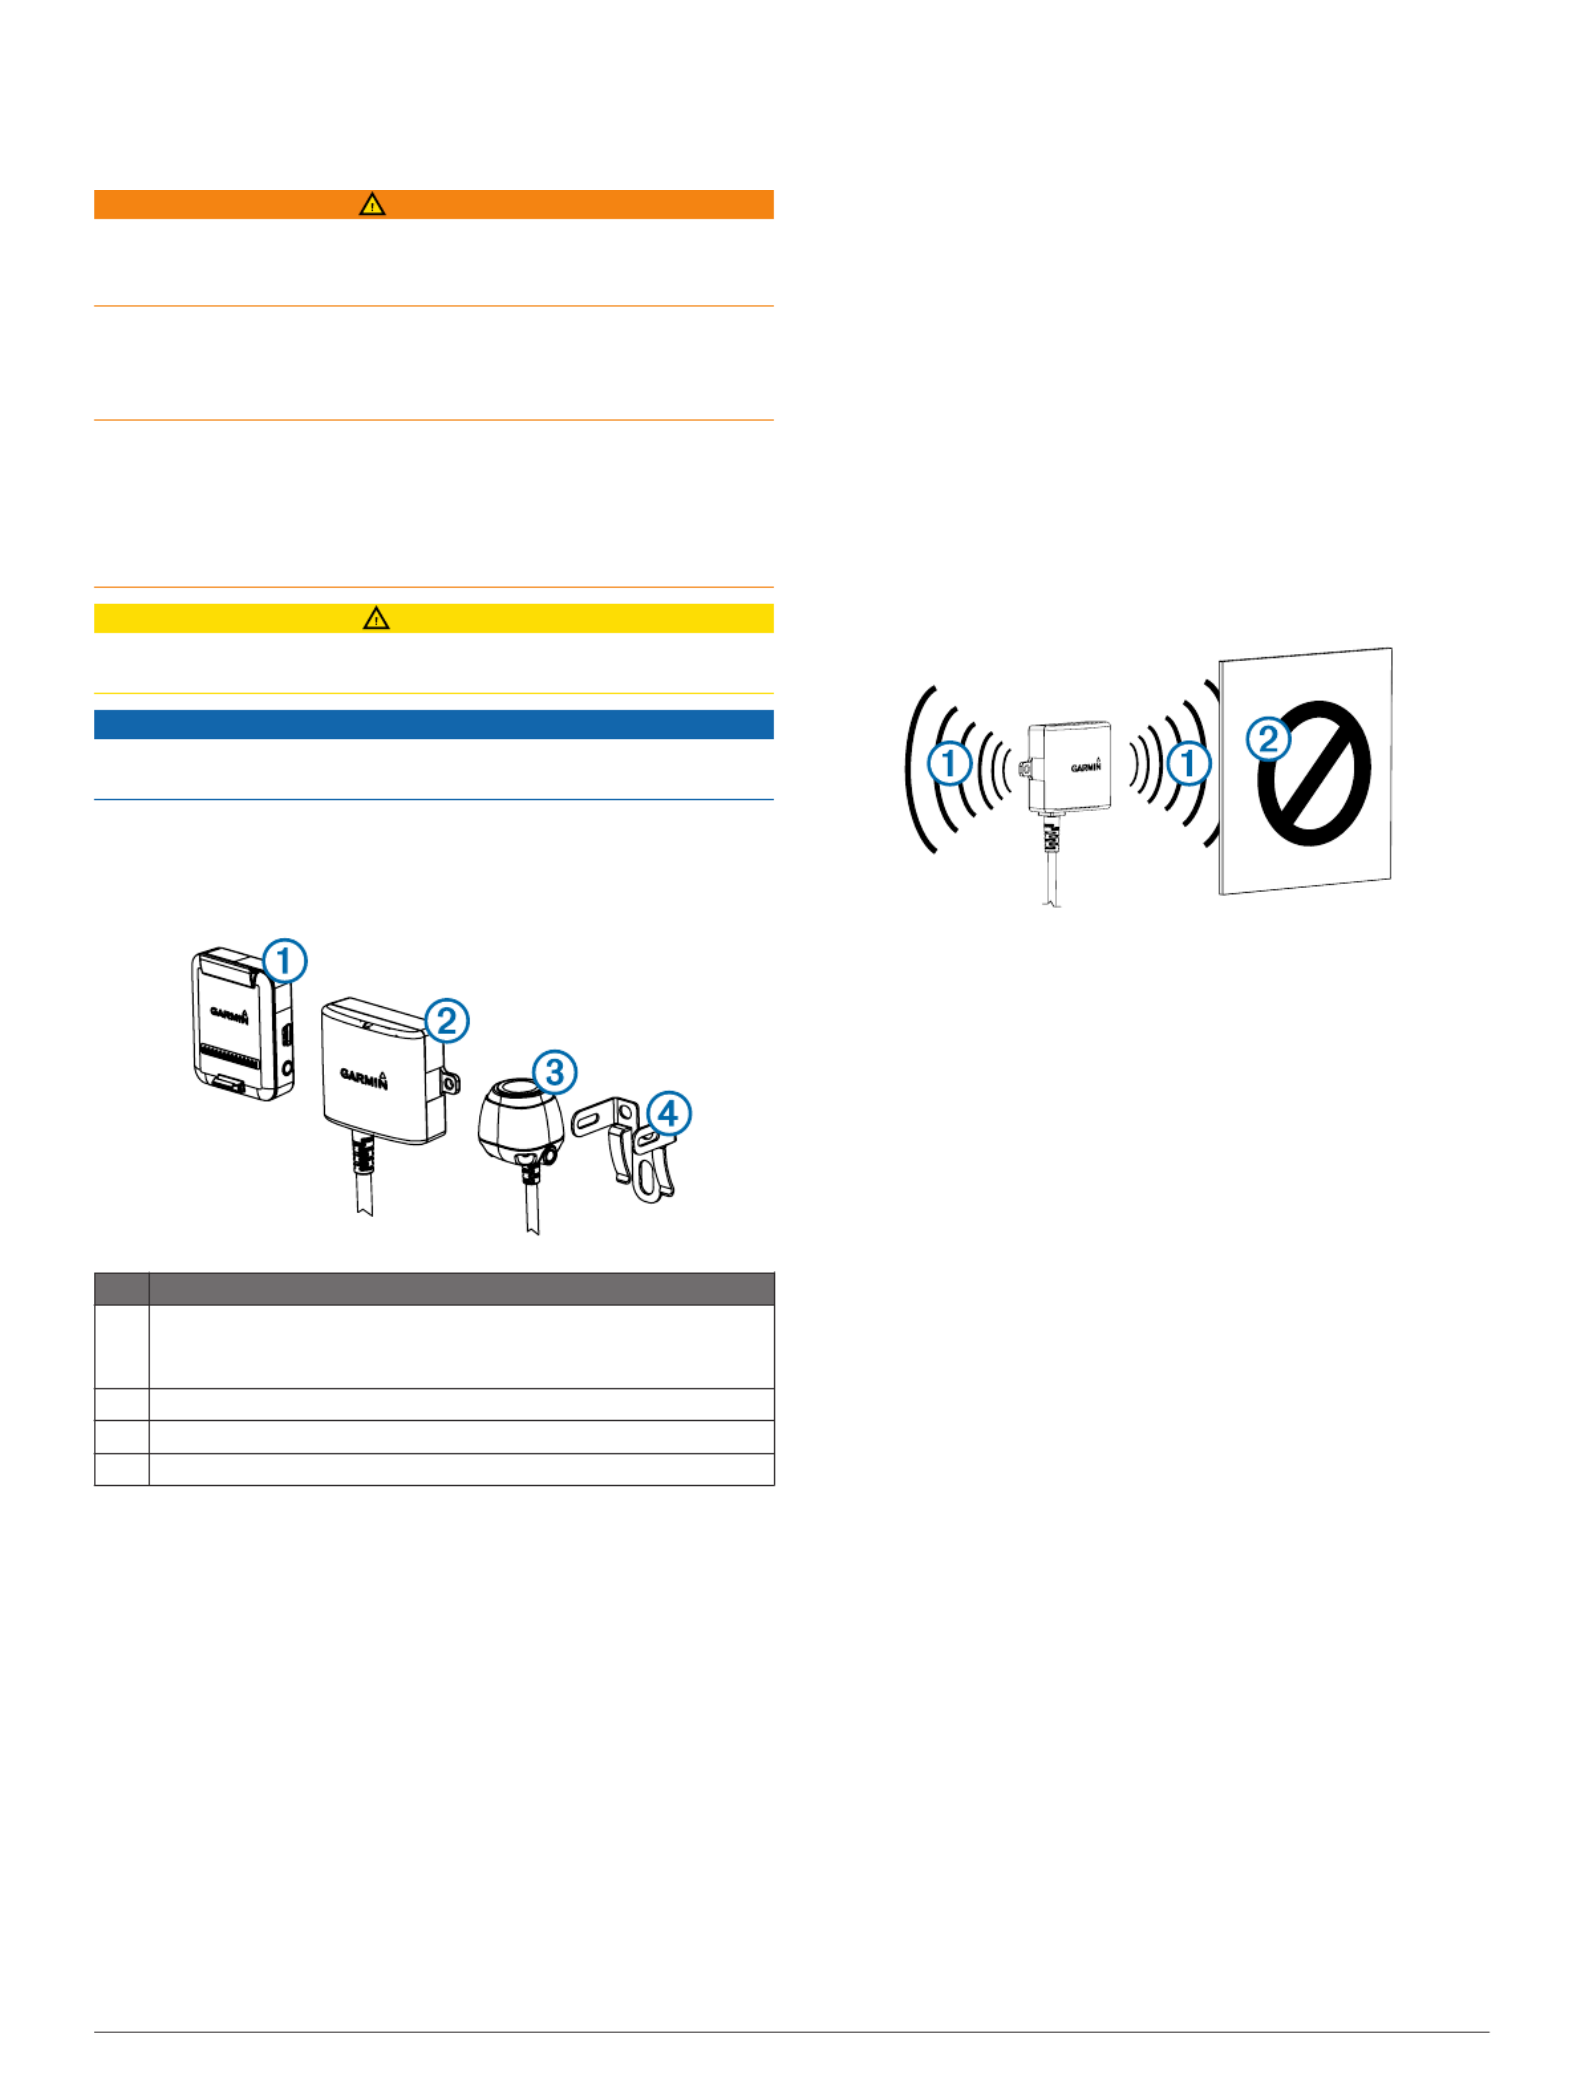
Item Description
ÀWireless camera PND mount
The PND device must be powered through this mount to
communicate with the camera.
ÁTransmitter
ÂCamera
ÃCamera mounting bracket
Tools Needed
• Drill and 0.36 in. (9.09 mm, or size T) drill bit
• #2 Phillips screwdriver
• Screws, bolts, or cable ties (to secure the transmitter)
• Solderless wire-splice connector or solder and heat-shrink
tubing
• RV sealant (optional)
Camera Mounting Considerations
When selecting a location to mount the camera, observe these
considerations.
• You should test a mounting location before you permanently
mount the camera.
• Installing the camera higher on the back of the vehicle
provides a better viewing angle.
• The included bracket can be clipped onto a license plate or
other similar surface, or it can be fastened to the back of the
vehicle using the included self-tapping, panhead screws.
Transmitter Location and Wiring
Considerations
When selecting a location to install the wireless transmitter,
observe these considerations.
• You should test a proposed installation location before you
permanently install the transmitter.
• Although the transmitter can reliably transmit the video signal
over approximately 45 ft. (13.5 m), the location of the
transmitter can affect this range.
◦ The closer you install the transmitter to the wireless
camera PND mount, the more reliable the signal.
◦ The transmitter provides the best signal when either flat
surface À is pointing toward the wireless camera PND
mount.
◦ Dense metal or appliances Á in the path of the transmitter
greatly reduce the transmission distance.
◦ The fewer solid objects that exist between the path of the
transmitter and the device, the more reliable the signal.
• If the distance between the camera and the transmitter
exceeds the length of the included cable, additional
extension cables can be used. A 50 ft. (15 m) extension
cable can be purchased, and more than one extension cable
can be installed. See your Garmin dealer or go to
www.garmin.com for more information.
• The fuse holder located near the transmitter is not
waterproof. Installing the fuse holder in a location that is
exposed to the elements is not recommended.
• The connector between the camera and the transmitter is not
waterproof. If you make this connection in a location exposed
to the elements, you must make sure that the connection is
waterproof.
Testing the Camera and Transmitter
Location
1Temporarily secure the camera in the preferred mounting
location.
2Temporarily place the transmitter in the preferred installation
location, and connect it to power and to the camera.
TIP: If you do not want to splice into the wiring of your
vehicle for this test, you can connect the transmitter and
camera to a 12 Vdc battery.
3Test the transmitter for correct operation by applying power
to the PND device using the wireless camera PND mount.
If you do not see video on the device at the preferred
installation location, move the transmitter to another location
and test it again.
4Repeat steps 2–3 until the transmitter operates correctly.
5Test the camera view by observing the video on the device.
6If the camera does not provide the optimal view for your
vehicle, move it to another location and test it again.
2

7Repeat steps 5–6 until the camera mounting location
provides the optimal view for your vehicle.
TIP: Make note of which direction is up when you are testing
the camera view to ensure correct permanent installation.
Mounting the Camera
Before you permanently mount the camera, you should test the
mounting location for the optimal view for your vehicle (Testing
the Camera and Transmitter Location).
If you have already connected the camera to the bracket, you
must first disassemble it.
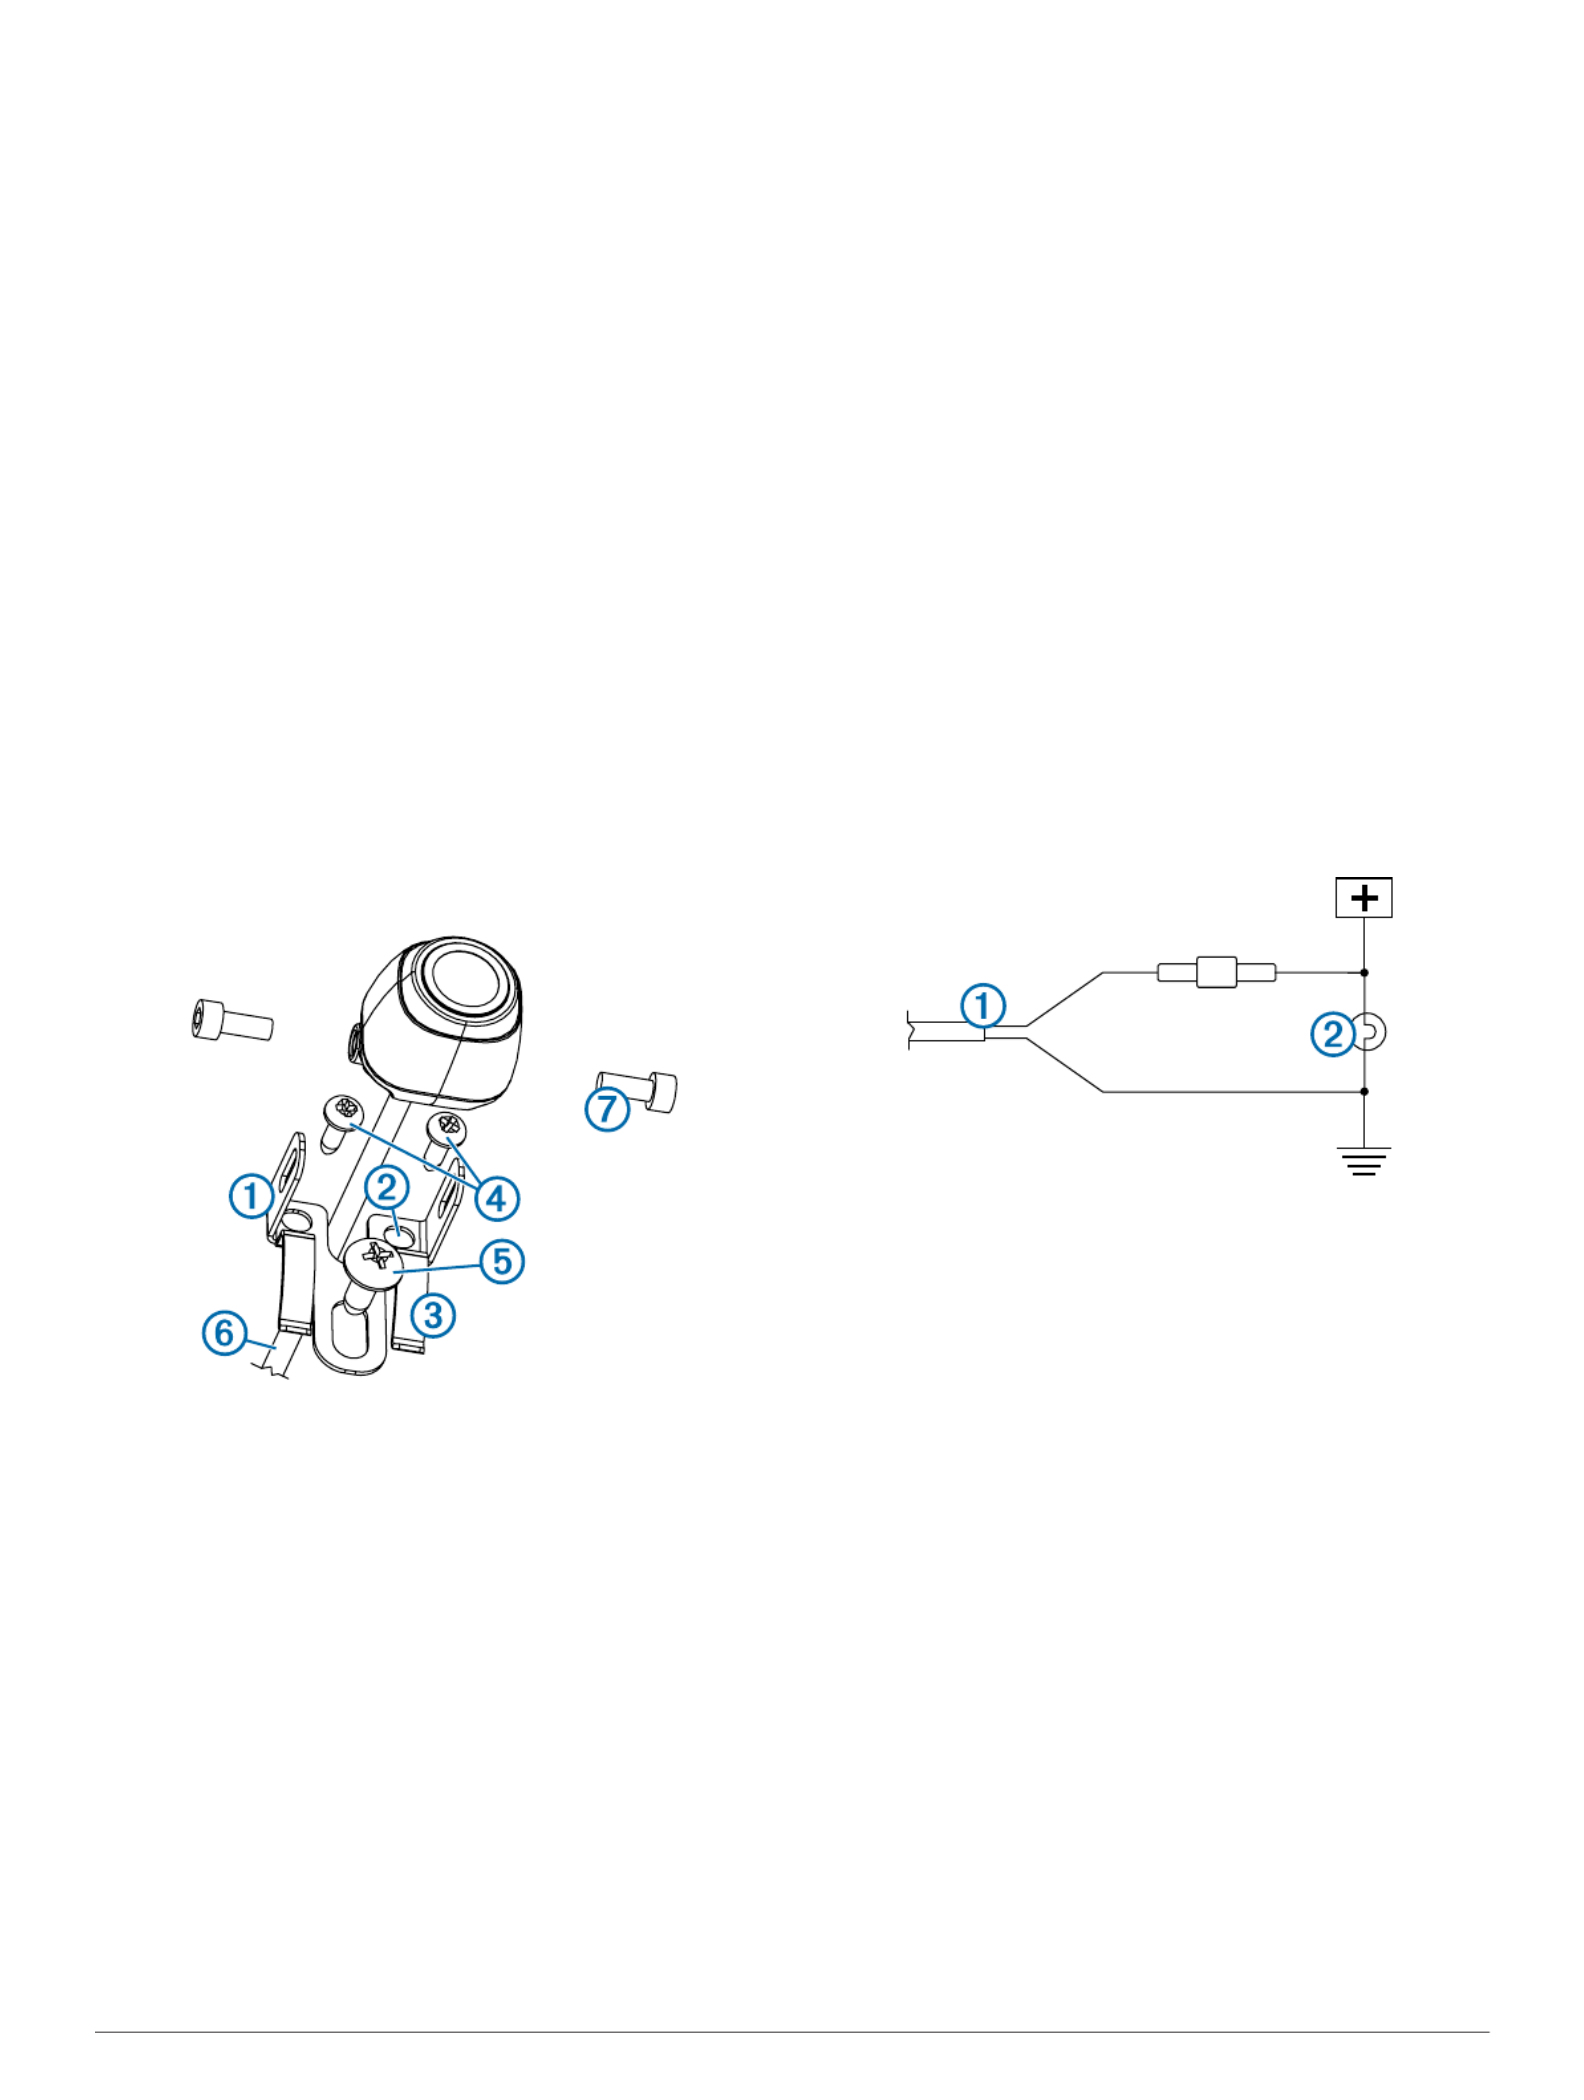
1Place the bracket À in the mounting location.
2Select an option:
• If you are mounting the bracket directly on the surface of
your vehicle, mark the locations of the two holes on the
bracket Á.
• If you are installing the bracket on a license plate, remove
one of the license plate screws and clip the bracket in
place so the hole on the bracket
 lines up with the hole
on the license plate.
3Secure the bracket to the vehicle using either the included
self-tapping screws à or the license-plate screw you
removed in step 2 Ä.
4Place the camera in the bracket, and determine the best
place for the camera cable Å to enter the vehicle.
5Using an appropriate drill bit, drill a hole for the camera cable
to enter the vehicle.
6Feed the camera cable through the hole and route it to the
transmitter location.
15 m (50 ft.) extension cables can be purchased separately,
if needed.
7Secure the camera in the bracket using the included hex
bolts Æ.
8Adjust the angle of the camera and tighten the hex bolts
using the included hex key.
9Apply RV sealant around the cable where it enters the
vehicle (optional).
Installing the Transmitter
Before you permanently install the transmitter, you must test the
installation location for correct operation (Testing the Camera
and Transmitter Location).
1Secure the transmitter to the installation location using
hardware appropriate for the location, such as screws, bolts,
or cable ties.
The fuse holder located near the transmitter is not
waterproof. Installing the fuse holder in a location that is
exposed to the elements is not recommended.
2Connect the camera and transmitter cables.
The connector between the camera and the transmitter is not
waterproof. If you make this connection in a location exposed
to the elements, you must make sure that the connection is
waterproof.
3Connect the power cable À from the transmitter to a 12–
24 VDC power source, preferably a reverse lamp
Á, using a
solderless wire-splice connector (not included).
NOTE: Connecting the transmitter to an always-on
12-24 VDC source (such as a running lamp) instead of a
reverse lamp requires you to manually switch power to the
transmitter. The transmitter may drain your vehicle battery if
it is left on.
4If you did not use a solderless wire-splice connector, solder
and heat-shrink the electrical connections to protect them
from the elements.
Using the Camera
The camera shows video on the device in different ways,
depending on how you connected the power to the transmitter.
1Select an option to show video:
• If you connected the transmitter to a reverse lamp
(recommended), place the vehicle into reverse. The
device automatically shows video from the backup
camera.
• If you connected the transmitter to a running lamp or other
steady 12 VDC source, select the camera icon on the
device to show video from the backup camera.
2Select an option to resume normal device operation:
• If you connected the transmitter to a reverse lamp
(recommended), take the vehicle out of reverse. The
device automatically resumes normal operation.
• If you connected the transmitter to a running lamp or other
steady 12 VDC source, select the camera icon on the
device to resume normal operation.
Aligning the Guidance Lines
Guidance lines provide a visual representation of the vehicle's
path when in reverse. For best reference, they should be
aligned to reflect the outside edges of the vehicle.
1Position the vehicle with one side closely aligned to a curb,
driveway, or parking stall lines.
You may want to position the vehicle in the center of a
parking stall, and then pull forward into the next stall. This
allows you to use the parking stall lines in the rear of the
vehicle as reference points for alignment.
The curb, driveway, or parking stall lines should be clearly
visible on the device.
2From the camera view, select > .Adjust
3

3Use the arrows in the corners of the screen to move the
guidance lines to match the angle and position of the curb,
driveway, or parking stall lines.
The guidance lines should appear directly on top of your
reference points.
4Use the arrows in the center of the screen to move the
guidance lines up or down.
The red section of the guidance lines should be aligned with
the rear of your vehicle.
5If necessary, reposition the vehicle with the other side closely
aligned to a curb, driveway, or parking stall lines, and repeat
the alignment process.
You should attempt to keep the guidance lines symmetrical,
even if your vehicle is not in perfect alignment with the curb,
driveway, or parking stall lines.
6Select when alignment is complete.
Showing or Hiding Guidance Lines
1Select .
2Select an option:
• To show the guidance lines on the screen, select Show
Lines.
• To hide the guidance lines on the screen, select Hide
Lines.
Restoring Alignment
You can reset the guidance lines to their default settings.
1Select > .Restore
2Select .Yes
Pairing the Transmitter and Device Mount
The transmitter and wireless camera PND mount come paired
from the factory. If the transmitter and the PND mount are
properly installed and you are not receiving video, you can try to
re-pair the transmitter and the PND mount.
1Verify there is no power to the transmitter by placing the
vehicle in park or turning off the applicable steady power
source.
2Turn on the PND device connected to the wireless camera
PND mount.
3On the wireless camera PND mount, hold until PAIR Start
Pairing appears on the PND device.
If does not appear on the PND device, make Start Pairing
sure the wireless camera PND mount is correctly connected
to power.
4Apply power to the transmitter by placing the vehicle in
reverse or turning on the applicable steady power source.
After approximately five seconds, appears on Pairing OK
the PND device.
5Power cycle both the wireless camera PND mount and the
transmitter by turning them both off and then back on again.
6If the transmitter and wireless camera PND device mount do
not pair successfully, repeat steps 1–4.
Specifications
Specification Value
Camera sensor 1/3.7-type CMOS
Camera resolution 640 × 480
Camera angle (vertical) 115°
Camera angle (horizontal) 140°
Camera and transmitter input voltage 9–28 VDC
Fuse 500 mA, fast-blow
Camera and transmitter current usage 150 mA @ 12 VDC
Camera and transmitter waterproof rating IEC 60529 IPX7
Camera temperature range -40° to 185°F (-40° to 85°C)
Transmitter and PND mount temperature
range
-4° to 158°F (-20° to 70°C)
Wireless transmission type 2.4 GHz ISM radio band
Wireless transmission distance 45 ft. (13.5 m)
4

BC™ 20 Wireless Backup Camera
Installation Instructions
AVERTISSEMENT
Consultez le guide Informations importantes sur le produit et la
sécurité inclus dans l'emballage du GPS pour prendre
connaissance des avertissements et autres informations sur le
produit.
Garmin vous recommande fortement de faire installer l'appareil
par un technicien expérimenté, disposant des connaissances
appropriées en matière de circuits électriques. Le raccordement
incorrect du câble d'alimentation peut endommager le véhicule
ou la batterie et entraîner des blessures corporelles.
Lorsque vous connectez le câble d'alimentation, ne retirez pas
le porte-fusible en ligne. Pour éviter de vous blesser ou
d'endommager votre produit en exposant la batterie au feu ou à
une chaleur extrême, le fusible approprié doit être placé comme
indiqué dans les caractéristiques techniques du produit. De
plus, la connexion du câble d'alimentation en l'absence du
fusible approprié annulerait la garantie du produit.
ATTENTION
Portez toujours des lunettes de protection, un équipement
antibruit et un masque anti-poussière lorsque vous percez,
coupez ou poncez.
AVIS
Lorsque vous percez ou coupez, commencez toujours par
vérifier la nature de la face opposée de l'élément.
Ces instructions d'installation sont universelles et se proposent
d'accompagner l'installation du produit sur votre véhicule, quel
que soit son modèle. Pour toutes questions sur votre véhicule,
veuillez contacter votre concessionnaire.
Elément Description
ÀSupport de l'appareil de navigation avec caméra sans fil
L'appareil de navigation doit être alimenté via ce support afin
de communiquer avec la caméra.
ÁEmetteur
ÂCaméra
ÃSupport de fixation de la caméra
Outils requis
• Perceuse et foret de 9,09 mm ou taille T (0,36 pouce)
• Tournevis cruciforme numéro 2
• Vis, écrous ou attaches de câbles (pour fixer l'émetteur)
• Clip pour câbles ne nécessitant pas de soudure ou fer à
souder et tube thermorétrécissable
• Mastic adapté aux véhicules de loisir (facultatif)
Considérations relatives au montage de la
caméra
Au moment de choisir un emplacement de montage de la
caméra, tenez compte des remarques suivantes.
• Testez un emplacement de montage avant d'installer la
caméra de manière définitive.
• Installez la caméra en hauteur à l'arrière du véhicule pour
bénéficier d'un angle de vue optimal.
• Le support de fixation fourni peut être clipsé à une plaque
d'immatriculation ou à un support similaire, ou bien attaché à
l'arrière du véhicule à l'aide des vis à tête cylindrique plate
autoperceuses fournies.
Emplacement de l'émetteur et
considérations relatives au câblage
Au moment de choisir un emplacement d'installation de
l'émetteur sans fil, tenez compte des remarques suivantes.
• Testez l'emplacement d'installation proposé avant d'installer
l'émetteur de manière définitive.
• Bien que l'émetteur puisse transmettre de manière fiable le
signal vidéo à une distance de 13,5 m (45 pieds) environ,
l'emplacement de l'émetteur peut affecter cette portée.
◦ La fiabilité du signal dépend de la proximité de l'émetteur
par rapport au support de l'appareil de navigation avec
caméra sans fil.
◦ L'émetteur restitue un signal optimal quand il est posé sur
une surface plane À orientée vers le support de l'appareil
de navigation avec caméra sans fil.
◦ La présence de métal dense ou d'autres appareils
Á sur
le chemin emprunté par l'émetteur dégrade
considérablement la distance de transmission.
◦ Pour obtenir un signal fiable, évitez au maximum la
présence d'obstacles sur le chemin emprunté par
l'émetteur jusqu'à l'appareil.
• Si la distance qui sépare la caméra de l'émetteur dépasse la
longueur du câble fourni, vous pouvez utiliser des câbles
d'extension. Il est possible d'acheter un câble d'extension de
15 m (50 pieds) et d'installer plusieurs câbles d'extension.
Contactez votre revendeur Garmin ou visitez le site
www.garmin.com pour obtenir plus d'informations.
• Le porte-fusible situé près de l'émetteur n'est pas étanche. Il
n'est pas recommandé d'installer le porte-fusible à un
emplacement non protégé des éléments extérieurs.
• Le connecteur entre la caméra et l'émetteur n'est pas
étanche. Si vous effectuez le branchement à un
emplacement non protégé des éléments extérieurs, vous
devez vous assurer que la connexion est étanche.
Test de l'emplacement de la caméra et de
l'émetteur
1Installez la caméra de manière temporaire à l'emplacement
de votre choix.
2Placez l'émetteur de manière temporaire à l'emplacement de
votre choix et reliez-le à l'alimentation ainsi qu’à la caméra.
ASTUCE : si vous ne souhaitez pas vous raccorder à votre
véhicule pour ce test, vous pouvez relier l'émetteur et la
caméra à une batterie de 12 V c.c.
5
3Vérifiez le bon fonctionnement de l´émetteur en alimentant
l'appareil de navigation avec le support de l'appareil de
navigation avec caméra sans fil.
Si le flux vidéo n'apparaît pas sur l'appareil à votre
emplacement d'installation préféré, déplacez l'émetteur et
réalisez un autre test.
4Répétez les étapes 2 et 3 tant que l'émetteur ne fonctionne
pas correctement.
5Testez l'angle de vue de la caméra en observant la vidéo sur
l'appareil.
6Si la caméra ne fournit pas un angle de vue optimal pour
votre véhicule, déplacez-la et réalisez un autre test.
7Répétez les étapes 5 et 6 jusqu'à trouver un emplacement
d'installation qui offre un angle de vue optimal pour votre
véhicule.
ASTUCE : quand vous testez l'angle de vue de la caméra,
prenez note de la direction vers le haut pour ne pas vous
tromper lorsque vous l'installerez de manière définitive.
Montage de la caméra
Avant d'installer la caméra de manière définitive, testez
l'emplacement de montage pour obtenir l'angle de vue optimal
suivant votre véhicule (Test de l'emplacement de la caméra et
de l'émetteur).
Si vous avez déjà relié la caméra au support de fixation,
commencez par la démonter.
1Placez le support de fixation À à l'emplacement
d'installation.
2Sélectionnez une option :
• Si vous montez le support à même le véhicule, marquez
les emplacements des deux trous sur le support
Á.
• Si vous installez le support sur une plaque
d'immatriculation, retirez l'une des vis de la plaque
d'immatriculation et clipsez le support à l'emplacement
prévu de sorte que le trou du support
 soit aligné avec le
trou de la plaque d'immatriculation.
3Fixez le support au véhicule à l'aide des vis autoperceuses
à ou de la vis de la plaque d'immatriculation que vous avez
retirée à l'étape 2 Ä.
4Placez la caméra dans le support de fixation et trouvez le
meilleur endroit pour faire passer le câble de la caméra
Å
dans le véhicule.
5A l'aide d'un foret adapté, percez un trou afin de faire passer
le câble de la caméra dans le véhicule.
6Faites passer le câble de la caméra dans le trou et
acheminez-le jusqu'à l'emplacement de l'émetteur.
Des extensions de câble de 15 m (50 pieds) sont disponibles
à la vente, au besoin.
7Fixez bien la caméra dans le support à l'aide des écrous
hexagonaux fournis Æ.
8Ajustez l'angle de la caméra et serrez les écrous
hexagonaux à l'aide de la clé Allen fournie.
9Appliquez du mastic adapté aux véhicules de loisir (facultatif)
autour du câble, à son point d'entrée dans le véhicule.
Installation de l'émetteur
Avant d'installer l'émetteur de manière définitive, veuillez vérifier
son bon fonctionnement à cet emplacement (Test de
l'emplacement de la caméra et de l'émetteur).
1Lors de l'installation de l'émetteur, veuillez utiliser un matériel
adapté à cet emplacement, comme des vis, des écrous ou
des attaches de câbles.
Le porte-fusible situé près de l'émetteur n'est pas étanche. Il
n'est pas recommandé d'installer le porte-fusible à un
emplacement non protégé des éléments extérieurs.
2Reliez la caméra aux câbles de l'émetteur.
Le connecteur entre la caméra et l'émetteur n'est pas
étanche. Si vous effectuez le branchement à un
emplacement non protégé des éléments extérieurs, vous
devez vous assurer que la connexion est étanche.
3Reliez le câble d'alimentation À de l'émetteur à une source
d'alimentation de 12–24 V c.c., de préférence aux feux de
marche arrière Á, à l'aide d'un clip pour câbles ne
nécessitant pas de soudure (non fourni).
REMARQUE : si vous reliez l'émetteur à une source
d'alimentation permanente de 12-24 V c.c. (aux feux de
circulation, par exemple) et non pas aux feux de marche
arrière, vous devrez allumer et éteindre l'émetteur
manuellement. Si vous le laissez allumé en permanence,
l'émetteur risque de décharger la batterie de votre véhicule.
4Si vous n'avez pas utilisé un clip pour câbles ne nécessitant
pas de soudure, soudez les connexions électriques et
utilisez le tube thermorétrécissable pour les protéger des
éléments extérieurs.
Utilisation de la caméra
Suivant la façon dont vous aurez relié l'alimentation à
l'émetteur, la caméra affichera un signal vidéo sur l'appareil de
différentes façons.
1Sélectionnez une option d'affichage vidéo :
• Si vous avez relié l'émetteur à un feu de marche arrière
(recommandé), passez en marche arrière. L'appareil
diffuse automatiquement la vidéo depuis la caméra de
recul.
• Si vous avez relié l'émetteur à un feu de circulation ou à
une autre source d'alimentation stable de 12 V c.c.,
sélectionnez l'icône de caméra sur l'appareil pour diffuser
la vidéo depuis la caméra de recul.
6
Produktspezifikationen
| Marke: | Garmin |
| Kategorie: | Rückfahrkamera |
| Modell: | BC 20 |
Brauchst du Hilfe?
Wenn Sie Hilfe mit Garmin BC 20 benötigen, stellen Sie unten eine Frage und andere Benutzer werden Ihnen antworten
Bedienungsanleitung Rückfahrkamera Garmin

30 Juni 2024
1 April 2024
23 Februar 2024
5 September 2023
Bedienungsanleitung Rückfahrkamera
- Rückfahrkamera AEG
- Rückfahrkamera Maginon
- Rückfahrkamera Conrad
- Rückfahrkamera MarQuant
- Rückfahrkamera Kenwood
- Rückfahrkamera Trebs
- Rückfahrkamera Dometic
- Rückfahrkamera Pyle
- Rückfahrkamera Pioneer
- Rückfahrkamera Waeco
- Rückfahrkamera XOMAX
- Rückfahrkamera Beeper
- Rückfahrkamera Alpine
- Rückfahrkamera Pro User
- Rückfahrkamera XZENT
- Rückfahrkamera Clarion
- Rückfahrkamera Audiovox
- Rückfahrkamera DNT
- Rückfahrkamera Tracer
- Rückfahrkamera Hikvision
- Rückfahrkamera Furrion
- Rückfahrkamera Luis
- Rückfahrkamera Mobiset
- Rückfahrkamera Valeo
- Rückfahrkamera VDO Dayton
- Rückfahrkamera Veise
- Rückfahrkamera CRUX
- Rückfahrkamera Valueline
- Rückfahrkamera Camos
- Rückfahrkamera CARMATRIX
- Rückfahrkamera Boyo
- Rückfahrkamera AutoXtreme
Neueste Bedienungsanleitung für -Kategorien-

19 September 2024

7 September 2024
7 September 2024
7 September 2024
7 September 2024
5 September 2024
3 September 2024
2 September 2024
2 September 2024
2 September 2024