Epson Pro L1715S Bedienungsanleitung
Epson
Videostrahl
Pro L1715S
Lesen Sie kostenlos die 📖 deutsche Bedienungsanleitung für Epson Pro L1715S (301 Seiten) in der Kategorie Videostrahl. Dieser Bedienungsanleitung war für 20 Personen hilfreich und wurde von 2 Benutzern mit durchschnittlich 4.5 Sternen bewertet
Seite 1/301

Pro L1490U/L1490UNL/L1495U/
L1495UNL/ L1500UH/L1500UHNL/
L1505UH/L1505UHNL/L1715SNL/
L1750UNL/L1755UNL User's Guide


3
Contents
Pro L1490U/L1490UNL/L1495U/L1495UNL/L1500UH/ L1500UHNL/L1505UH/L1505UHNL/
L1715SNL/L1750UNL/L1755UNL User's Guide....................................................................................... 11
Introduction to Your Projector ................................................................................................................. 12
Projector Features.............................................................................................................................. 12
Product Box Contents.................................................................................................................... 13
Additional Components ................................................................................................................ 14
Additional Projector Software and Manuals................................................................................... 16
Optional Equipment and Replacement Parts................................................................................. 17
Warranty and Registration Information.......................................................................................... 19
Notations Used in the Documentation................................................................................................ 19
Where to Go for Additional Information .............................................................................................. 19
Projector Part Locations ..................................................................................................................... 20
Projector Parts - Front/Top ............................................................................................................ 20
Projector Parts - Rear .................................................................................................................... 21
Projector Parts - Interface Ports .................................................................................................... 22
Projector Parts - Base.................................................................................................................... 23
Projector Parts - Control Panel ...................................................................................................... 24
Projector Parts - Remote Control................................................................................................... 25
Setting Up the Projector ........................................................................................................................... 28
Projector Placement........................................................................................................................... 28
Projector Setup and Installation Options ....................................................................................... 28
Projection Distance........................................................................................................................ 31
Projector Connections........................................................................................................................ 35
Connecting to Video Sources ........................................................................................................ 35
Connecting to an HDMI Video Source ...................................................................................... 35
Connecting to a Component-to-BNC Video Source.................................................................. 36
Connecting to a Component Video Source............................................................................... 37
Connecting to an SDI Video Source.......................................................................................... 37
Connecting to a Video Source for Sound .................................................................................. 38
Connecting to Computer Sources.................................................................................................. 39

4
Connecting to a Computer for VGA Video................................................................................. 39
Connecting to a Computer for HDMI Video and Audio.............................................................. 40
Connecting to a Computer for DVI-D Video .............................................................................. 41
Connecting to a Computer for 5 BNC Video.............................................................................. 41
Connecting to a Computer for Sound........................................................................................ 42
Connecting to an HDBaseT Transmitter ....................................................................................... 42
Connecting to an External Computer Monitor................................................................................ 43
Connecting to External Speakers .................................................................................................. 44
Attaching and Removing a Lens......................................................................................................... 45
Attaching a Lens ........................................................................................................................... 45
Removing a Lens .......................................................................................................................... 48
Attaching and Removing the Cable Cover.......................................................................................... 49
Attaching and Removing the Cable Clip............................................................................................. 51
Installing Batteries in the Remote Control .......................................................................................... 52
Using the Projector on a Network ............................................................................................................ 54
Wired Network Projection................................................................................................................... 54
Connecting to a Wired Network ..................................................................................................... 54
Selecting Wired Network Settings ................................................................................................. 55
Wireless Network Projection .............................................................................................................. 58
Installing the Wireless LAN Module ............................................................................................... 58
Using a QR Code to Connect a Mobile Device .............................................................................. 61
Using Quick Wireless Connection (Windows)................................................................................ 63
Selecting Wireless Network Settings Manually.............................................................................. 64
Wireless LAN Menu Settings .................................................................................................... 67
Selecting Wireless Network Settings in Windows.......................................................................... 68
Selecting Wireless Network Settings on Mac ................................................................................ 69
Setting Up Wireless Network Security ........................................................................................... 69
Setting Up Projector Network E-Mail Alerts ........................................................................................ 71
Network Projector E-mail Alert Messages ..................................................................................... 73
Selecting Other Network Settings....................................................................................................... 73
Controlling a Networked Projector Using a Web Browser .................................................................. 74
Web Control Options ..................................................................................................................... 76
Viewing an Image Capture of the Displayed Image from a Remote Location ............................... 82

5
Crestron RoomView Support.............................................................................................................. 86
Setting Up Crestron RoomView Support ....................................................................................... 87
Controlling a Networked Projector Using Crestron RoomView...................................................... 88
Using Basic Projector Features ............................................................................................................... 90
Turning On the Projector .................................................................................................................... 90
Using the Home Screen................................................................................................................. 92
Turning Off the Projector .................................................................................................................... 94
Selecting the Language for the Projector Menus................................................................................ 94
Resizing the Image with the Zoom Button .......................................................................................... 95
Focusing the Image Using the Focus Buttons .................................................................................... 96
Focusing the Image When Using an Optional Short Throw Lens .................................................. 97
Setting the Lens Type ........................................................................................................................ 99
Setting the Screen Type..................................................................................................................... 99
Adjusting the Image Position Using Lens Shift ................................................................................. 100
Adjusting the Image Position Using Screen Position........................................................................ 105
Displaying a Test Pattern ................................................................................................................. 106
Available Test Pattern Image Adjustments .................................................................................. 107
Adjusting the Image Height .............................................................................................................. 108
Image Shape.................................................................................................................................... 109
Correcting Image Shape with H/V Keystone................................................................................ 110
Correcting Image Shape with Quick Corner ................................................................................ 113
Correcting Image Shape with Curved Surface ............................................................................ 115
Correcting Image Shape with Corner Wall................................................................................... 119
Correcting Image Shape with Point Correction............................................................................ 124
Selecting an Image Source .............................................................................................................. 126
Remote Control Operation ............................................................................................................... 128
Projection Modes ............................................................................................................................. 130
Changing the Projection Mode Using the Remote Control .......................................................... 130
Changing the Projection Mode Using the Menus......................................................................... 131
Image Aspect Ratio.......................................................................................................................... 132
Changing the Image Aspect Ratio ............................................................................................... 132
Available Image Aspect Ratios .................................................................................................... 133
Color Mode....................................................................................................................................... 134

6
Changing the Color Mode............................................................................................................ 134
Available Color Modes................................................................................................................. 135
Adjusting the Brightness................................................................................................................... 136
Constant Brightness Usage Hours .............................................................................................. 139
Turning On Automatic Luminance Adjustment ................................................................................. 141
Controlling the Volume with the Volume Buttons.............................................................................. 142
Setting the Date and Time................................................................................................................ 143
Date and Time Settings ............................................................................................................... 144
Adjusting Projector Features ................................................................................................................. 146
Shutting Off the Picture and Sound Temporarily .............................................................................. 146
Stopping Video Action Temporarily .................................................................................................. 147
Zooming Into and Out of Images ...................................................................................................... 148
Projector Security Features.............................................................................................................. 149
Password Security Types ............................................................................................................ 149
Setting a Password ................................................................................................................. 150
Selecting Password Security Types........................................................................................ 151
Entering a Password to Use the Projector............................................................................... 152
Saving a User's Logo Image to Display................................................................................... 153
Locking the Projector's Buttons ................................................................................................... 155
Unlocking the Projector's Buttons ........................................................................................... 157
Locking the Remote Control Buttons .......................................................................................... 157
Installing a Security Cable ........................................................................................................... 158
Projecting Two Images Simultaneously............................................................................................ 159
Input Sources for Split Screen Projection .................................................................................... 161
Using Advanced Image Adjustment Features .................................................................................. 161
Using Frame Interpolation .......................................................................................................... 162
Using 4K Enhancement............................................................................................................... 163
Creating Image Presets............................................................................................................... 165
Using MPEG Noise Reduction..................................................................................................... 166
Adjusting Scaled Resolution Images (Super-resolution) ............................................................. 168
Adjusting Detail Enhancement .................................................................................................... 169
Adjusting the Color Convergence (Panel Alignment)................................................................... 170
Adjusting the Color Tone (Color Uniformity) ................................................................................ 172

7
Running Light Source Calibration................................................................................................ 174
Using Multiple Projectors ................................................................................................................. 175
Multiple Projector Adjustment Overview ...................................................................................... 176
Projector Identification System for Multiple Projector Control...................................................... 177
Setting the Projector ID........................................................................................................... 178
Setting the Remote Control ID ................................................................................................ 178
Tiling Images into One Image...................................................................................................... 180
Configuring Tiling Automatically.............................................................................................. 180
Configuring Tiling Manually..................................................................................................... 183
Blending the Image Edges .......................................................................................................... 185
Adjusting the Black Level ............................................................................................................ 187
Matching Tint and Brightness (Screen Matching) ....................................................................... 191
Matching the Screens Automatically....................................................................................... 192
Matching the Screens Manually ............................................................................................. 193
Scaling an Image......................................................................................................................... 195
Enabling Protocol Emulation ............................................................................................................ 197
Viewing 3D Images ......................................................................................................................... 198
Saving Settings to Memory and Using Saved Settings .................................................................... 198
Saving a Scheduled Event ............................................................................................................... 201
Viewing Scheduled Events.......................................................................................................... 201
Editing a Scheduled Event........................................................................................................... 202
Copying Menu Settings Between Projectors .................................................................................... 203
Saving Settings to a USB Flash Drive.......................................................................................... 204
Transferring Settings from a USB Flash Drive............................................................................. 206
Saving Settings to a Computer .................................................................................................... 207
Transferring Settings from a Computer ....................................................................................... 209
Adjusting the Menu Settings .................................................................................................................. 212
Using the Projector's Menus............................................................................................................. 212
Image Quality Settings - Image Menu .............................................................................................. 214
Input Signal Settings - Signal Menu.................................................................................................. 217
Projector Feature Settings - Settings Menu...................................................................................... 220
Projector Setup Settings - Extended Menu....................................................................................... 224
Projector Network Settings - Network Menu..................................................................................... 231

8
Projector Information Display - Info Menu ........................................................................................ 233
Event ID Code List....................................................................................................................... 235
Projector Reset Options - Reset Menu............................................................................................. 237
Maintaining and Transporting the Projector ......................................................................................... 239
Projector Maintenance ..................................................................................................................... 239
Cleaning the Lens........................................................................................................................ 239
Cleaning the Projector Case........................................................................................................ 240
Air Filter and Vent Maintenance .................................................................................................. 240
Cleaning the Air Filter.............................................................................................................. 241
Replacing the Air Filter............................................................................................................ 244
Replacing the Remote Control Batteries ..................................................................................... 247
Transporting the Projector................................................................................................................ 249
Solving Problems .................................................................................................................................... 250
Projection Problem Tips ................................................................................................................... 250
Projector Light Status....................................................................................................................... 251
Viewing the Status Display............................................................................................................... 254
Projector Status Display Messages............................................................................................. 256
Using the Projector Help Displays .................................................................................................... 260
Solving Image or Sound Problems................................................................................................... 260
Solutions When No Image Appears............................................................................................. 261
Solutions When "No Signal" Message Appears........................................................................... 262
Displaying From a PC Laptop ................................................................................................. 262
Displaying From a Mac Laptop ............................................................................................... 263
Solutions When "Not Supported" Message Appears ................................................................... 263
Solutions When Only a Partial Image Appears............................................................................ 264
Solutions When the Image is Not Rectangular ............................................................................ 264
Solutions When the Image Contains Noise or Static ................................................................... 265
Solutions When the Image is Fuzzy or Blurry .............................................................................. 265
Solutions When the Image Brightness or Colors are Incorrect .................................................... 266
Solutions to Sound Problems ...................................................................................................... 267
Solving Projector or Remote Control Operation Problems ............................................................... 268
Solutions to Projector Power or Shut-Off Problems..................................................................... 268
Solutions to Problems with the Remote Control........................................................................... 269

9
Solutions to Password Problems................................................................................................. 270
Solving Network Problems ............................................................................................................... 270
Solutions When Wireless Authentication Fails ............................................................................ 271
Solutions When You Cannot Access the Projector Through the Web ......................................... 271
Solutions When the Image Contains Static During Network Projection ....................................... 272
Solutions When Network Alert E-Mails are Not Received............................................................ 272
Where to Get Help............................................................................................................................ 272
Technical Specifications ........................................................................................................................ 274
General Projector Specifications ...................................................................................................... 274
Projector Light Source Specifications............................................................................................... 277
Remote Control Specifications ......................................................................................................... 277
Projector Dimension Specifications.................................................................................................. 278
Projector Electrical Specifications .................................................................................................... 278
Projector Environmental Specifications............................................................................................ 280
Projector Safety and Approvals Specifications................................................................................. 280
Supported Video Display Formats.................................................................................................... 281
Notices ..................................................................................................................................................... 284
Recycling.......................................................................................................................................... 284
Important Safety Information............................................................................................................ 284
Important Safety Instructions............................................................................................................ 284
Laser Safety Information ............................................................................................................. 287
Laser Light Source Warning ....................................................................................................... 290
Restriction of Use ........................................................................................................................ 291
List of Safety Symbols (corresponding to IEC60950-1 A2)............................................................... 292
FCC Compliance Statement............................................................................................................. 295
Binding Arbitration and Class Waiver ............................................................................................... 296
Trademarks ...................................................................................................................................... 299
Copyright Notice............................................................................................................................... 300
A Note Concerning Responsible Use of Copyrighted Materials................................................... 300
Copyright Attribution.................................................................................................................... 301


11
Pro L1490U/L1490UNL/L1495U/L1495UNL/L1500UH/
L1500UHNL/L1505UH/L1505UHNL/
L1715SNL/L1750UNL/L1755UNL User's Guide
Welcome to the Pro
L1490U/L1490UNL/L1495U/L1495UNL/L1500UH/L1500UHNL/L1505UH/L1505UHNL/L1715SNL/L175
0UNL/L1755UNL User's Guide.
For a printable click PDF copy of guide, this here.

12
Introduction to Your Projector
Refer to these sections to learn more about your projector and this manual.
Projector Features
Notations Used in the Documentation
Where to Go for Additional Information
Projector Part Locations
Projector Features
Your projector includes these special features:
Bright, high-resolution projection system
• Pro L1490U/L1490UNL/L1495U/L1495UNL: Up to 9000 lumens of brightness (white light output and
color light output)
Pro L1500UH/L1500UHNL/L1505UH/L1505UHNL: Up to 12000 lumens of brightness (white light
output and color light output)
Pro L1715SNL/L1750UNL/L1755UNL: Up to 15000 lumens of brightness (white light output and color
light output)
Note: Color brightness (color light output) and white brightness (white light output) will vary depending
on usage conditions. Color light output measured in accordance with IDMS 15.4; white light output
measured in accordance with ISO 21118.
Note: Some lenses will not support the maximum brightness level of the Pro
L1715SNL/L1750UNL/L1755UNL. Visit (U.S.) orepson.com/lenssupport epson.com/soutienobjectifs
(Canada) for details.
• Pro
L1490U/L1490UNL/L1495U/L1495UNL/L1500UH/L1500UHNL/L1505UH/L1505UHNL/L1750UNL/L1
755UNL: Native resolution of 1920 × 1200 pixels (WUXGA)
Pro L1715SNL: Native resolution of 1400 × 1050 pixels (SXGA+)
Flexible connectivity
• Wired and wireless (optional) network support for projection, monitoring, and control via remote
network computer

13
• Variety of connection methods for a computer or video device including HDMI, BNC, DVI-D, SDI (not
available for Pro L1715SNL), and HDBaseT
• Ports for connecting an external monitor and external speakers
Easy-to-use setup and operation features
• Interchangeable bayonet lens options available
• Project images side by side from two separate input sources
• Create one large seamless display when projecting from multiple projectors using Edge Blending
• Epson's Instant Off and Direct Power On features for quick setup and shut down
• Support for Crestron RoomView network monitoring systems
• Network message broadcast system to project timely messages to all networked projectors (Windows
only)
Product Box Contents
Additional Components
Additional Projector Software and Manuals
Optional Equipment and Replacement Parts
Warranty and Registration Information
Parent topic: Introduction to Your Projector
Product Box Contents
Save all the packaging in case you need to ship the projector. Always use the original packaging (or
equivalent) when shipping.

14
Make sure your projector box included all of these parts:
1 Projector with standard zoom lens and lens cap
2 Cable cover
3 Cable clip
4 Lens connector cap
5 Remote control
6 Remote control batteries (two AA alkaline)
7 Power cord
Parent topic: Projector Features
Additional Components
Depending on how you plan to use the projector, you may need to obtain additional components.
Note: To connect a Mac that does not include a compatible video output port, you need to obtain an
adapter that allows you to connect to an input port on the projector. Contact Apple for compatible
15
adapter options. To connect a smartphone or tablet, you may need to obtain an adapter that allows you
to connect to the projector. This allows you to mirror your smartphone or tablet screens, watch movies,
and more. Contact your device manufacturer for compatible adapter options.
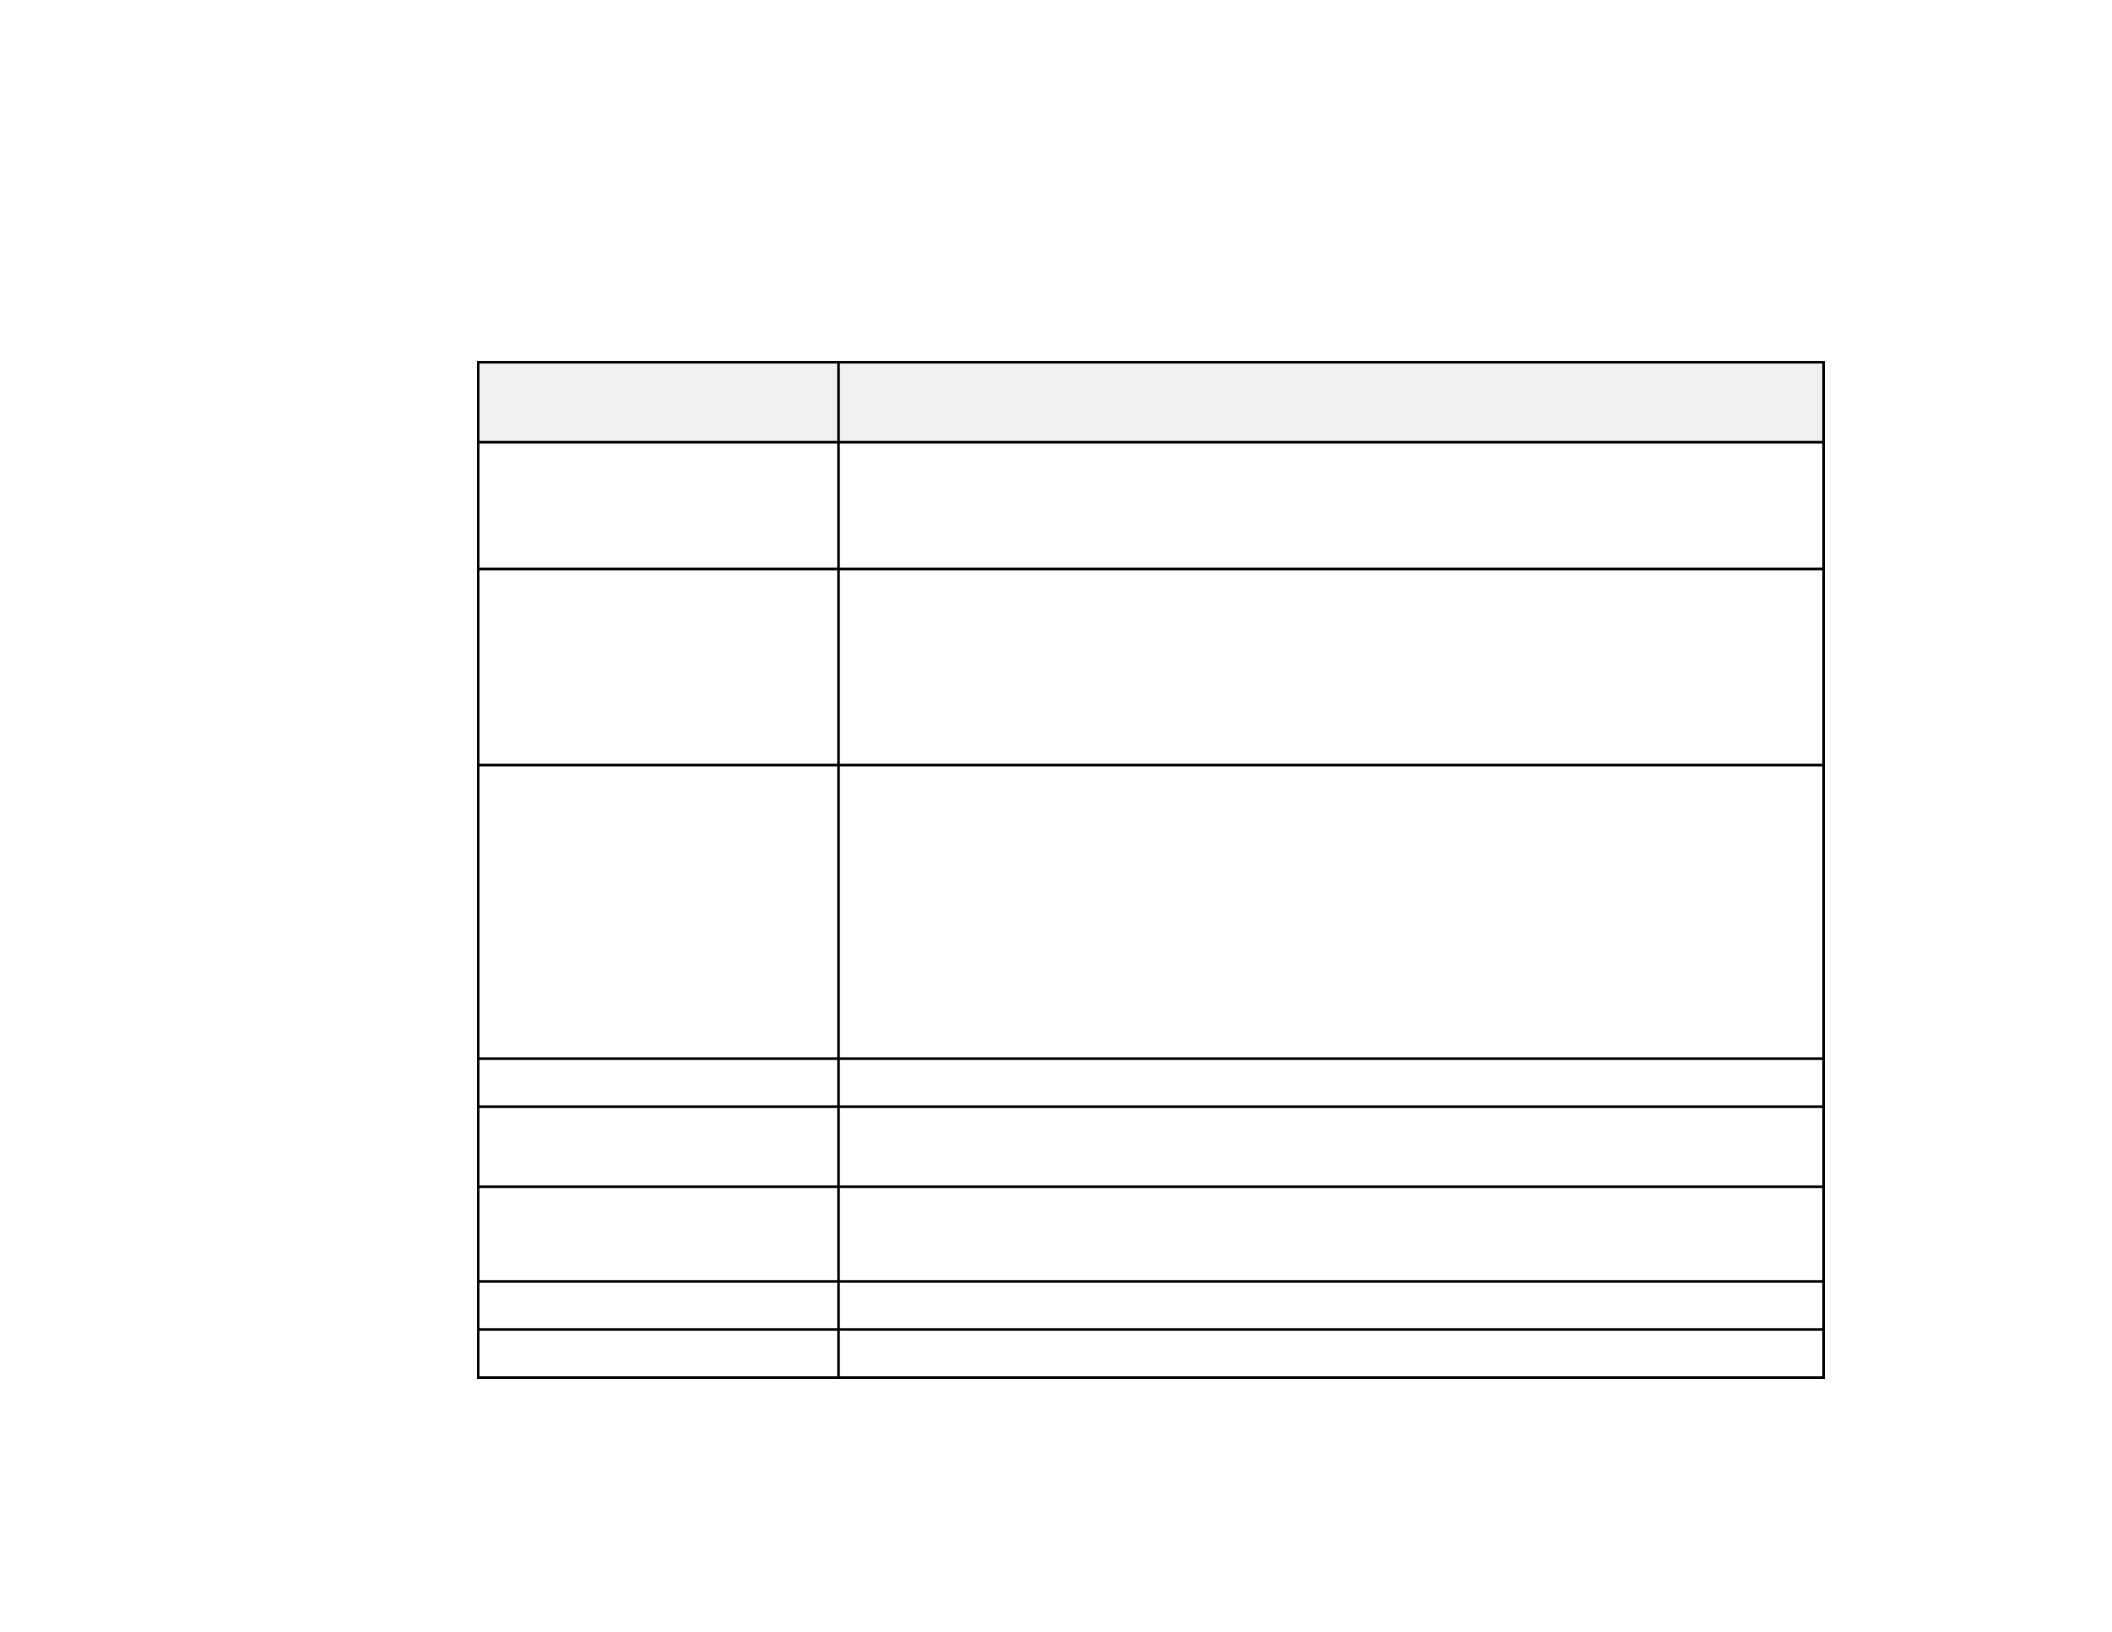
Unless listed as available from Epson in this table, see your local computer or electronics dealer for
purchase information.
Signal or connection
type
Additional component necessary
Component video Component-to-BNC or D-sub, 15-pin, component-to-VGA video cable or
adapter
Available for purchase from Epson or an authorized Epson reseller.
HDMI Compatible HDMI cable
Available for purchase from Epson or an authorized Epson reseller.
Note: Older Mac computers (2009 and earlier) may not support HDMI
audio.
3D Three compatible HDMI cables, a splitter that supports 3D signals, and a
silver screen (recommended gain: 2.3 to 2.7)
You can purchase HDMI cables from Epson or an authorized Epson
reseller.
Note: If your video source is a 3D Blu-ray disc, you also need a Blu-ray
player that supports 3D playback. See your local computer or electronics
dealer for purchase information.
Audio from certain ports Commercially available audio cable compatible with your device
VGA To connect a computer through its VGA port to the projector's VGA video
port, you need a VGA computer cable.
BNC VGA-to-5-BNC cable or adapter
Available for purchase from Epson or an authorized Epson reseller.
DVI-D Compatible DVI-D cable
HDBaseT Compatible 100Base-TX LAN cable

16
Signal or connection
type
Additional component necessary
SDI
(not available for Pro
L1715SNL)
Compatible BNC video cable
Parent topic: Projector Features
Related concepts
Projector Connections
Additional Projector Software and Manuals
After connecting and setting up the projector, install the projector software. You may need to install it
from a software CD, if included, or download the software and manuals as necessary.
You can install the projector software programs listed here and view their manuals for instructions on
using them.
Note: If you still need help after checking this manual and the sources listed here, you can use the
Epson PrivateLine Support service to get help fast. For details, see "Where to Get Help."
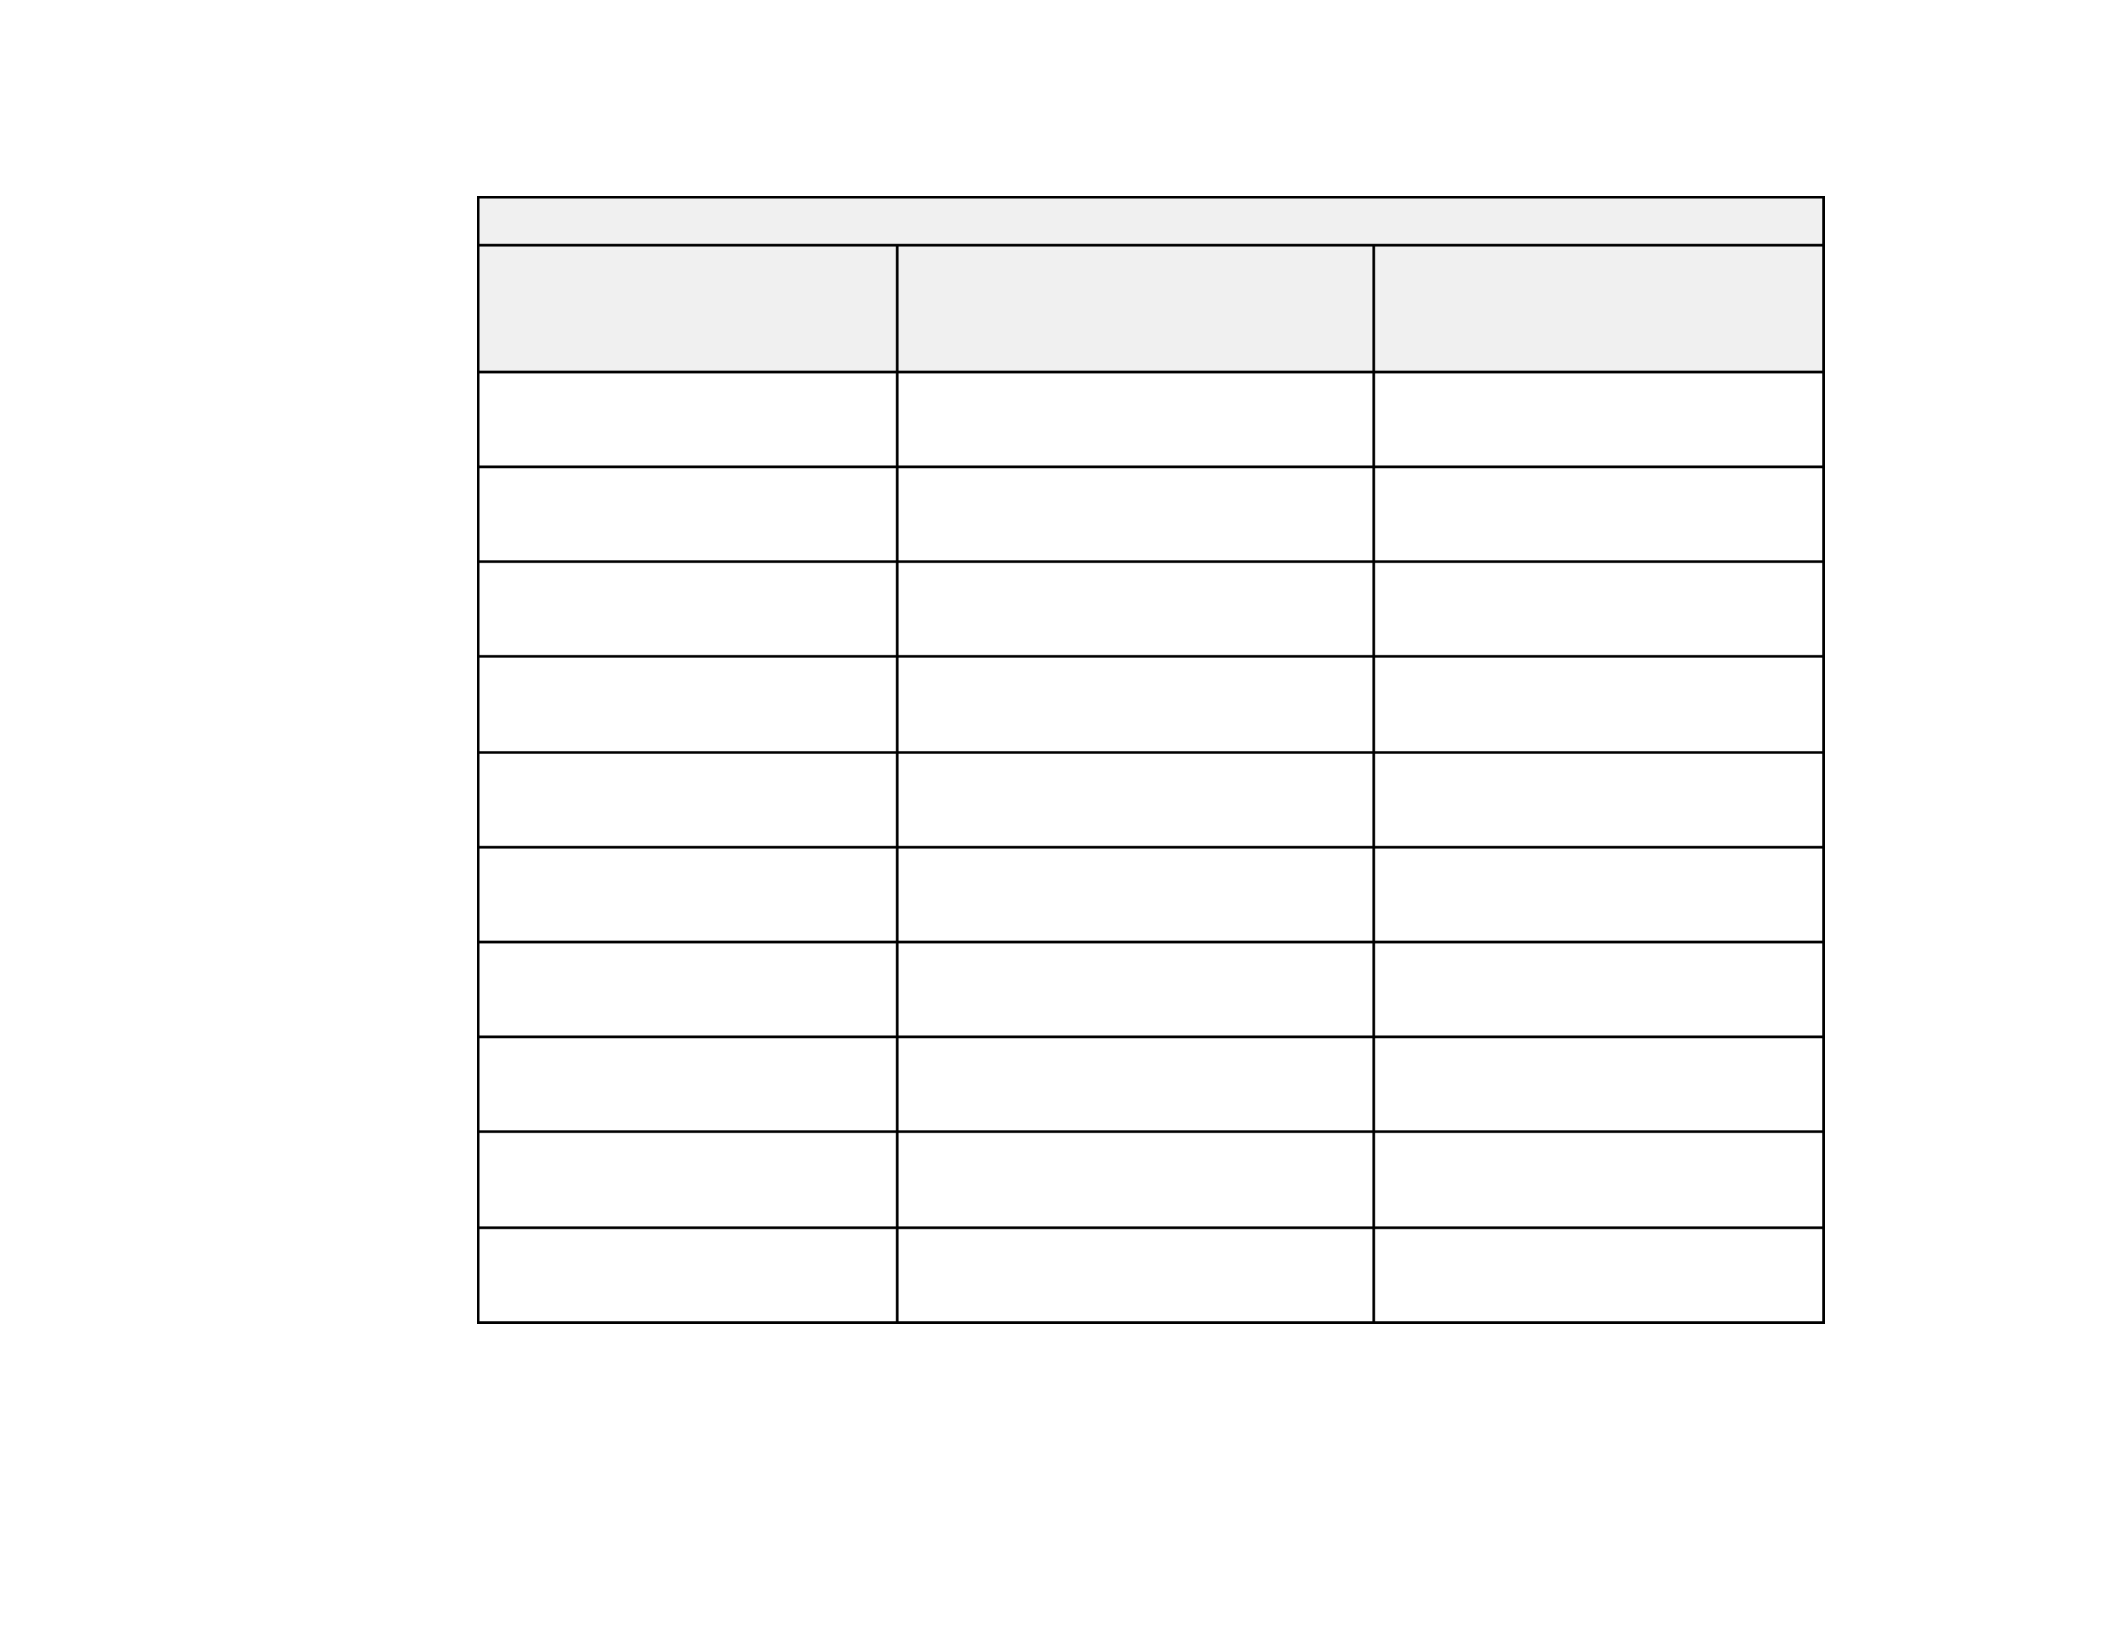
Projector software Manual Description
Epson Projector
Management (Windows
only)
Epson Projector
Management Operation
Guide
Lets you monitor and control your projector
through the network.
You can download the latest software and
documentation from the Epson web site. Go to
epson.com/support epson.ca/support(U.S.) or
(Canada) and select your projector.
Epson iProjection
(Windows/Mac)
Epson iProjection
Operation Guide
(Windows/Mac)
Lets you project the computer screens of
users over a network.
You can download the latest software and
documentation from the Epson web site. Go to
epson.com/support epson.ca/support(U.S.) or
(Canada) and select your projector.

17
Projector software Manual Description
EasyMP Network Updater
(Windows only)
EasyMP Network Updater
Operation Guide
Lets you update firmware for a projector over a
wired LAN.
You can download the latest software and
documentation from the Epson web site. Go to
epson.com/support epson.ca/support(U.S.) or
(Canada) and select your projector.
Epson iProjection app Instructions are included
with the app
Lets you project from an iOS device, Android
device, or Chromebook if your projector is
connected to a network that includes a
wireless access point.
Visit (U.S.) orepson.com/iprojection
epson.ca/iprojection (Canada) for more
information.
Epson Projector
Professional Tool
Epson Projector
Professional Tool
Operation Guide
Lets you manage multiple Epson projectors
simultaneously
You can download the latest software and
documentation from the Epson web site. Go to
epson.com/support epson.ca/support(U.S.) or
(Canada) and select your projector.
—Open Source Software
License
You can download this document from the
Epson web site. Go to epson.com/support
(U.S.) or (Canada) andepson.ca/support
select your projector.
Parent topic: Projector Features
Optional Equipment and Replacement Parts
You can purchase screens, other optional accessories, and replacement parts from an Epson authorized
reseller. To find the nearest reseller, call 800-GO-EPSON (800-463-7766) in the U.S. or 800-807-7766 in
Canada. Or you can purchase online at (U.S. sales) or (Canadian sales).epsonstore.com epsonstore.ca
Epson offers the following optional accessories and replacement parts for your projector:
Option or part Part number
Air filter (ELPAF51) V13H134A51

18
Option or part Part number
Wireless LAN module (ELPAP10) V12H731P02
HDBaseT Transmitter (ELPHD01) V12H547020
Replacement remote control 158279900
Remote control cable set (ELPKC28) V12H005C28
Passive 3D glasses for adults (ELPGS02A; Pro
L1490U/L1490UNL/L1495U/L1495UNL/L1500UH/L1500UHNL/L150
5UH/L1505UHNL only)
V12H541A20
Passive 3D glasses for children (ELPGS02B; Pro
L1490U/L1490UNL/L1495U/L1495UNL/L1500UH/L1500UHNL/L150
5UH/L1505UHNL only)
V12H541B20
Passive 3D Polarizer (ELPPL01; Pro
L1490U/L1490UNL/L1495U/L1495UNL/L1500UH/L1500UHNL/L150
5UH/L1505UHNL only)
V12H618A01
Low ceiling mount (ELPMB47) V12H802010
High ceiling mount (ELPMB48) V12H803010
Ultra short throw zoom lens (ELPLX02) V12H004X02
Short-throw #1 zoom lens (ELPLU03) V12H004U03
Short-throw #2 zoom lens (ELPLU04) V12H004U04
Wide-throw #1 zoom lens (ELPLW05) V12H004W05
Wide-throw #2 zoom lens (ELPLW06) V12H004W06
Middle-throw #2 zoom lens (ELPLM15; standard zoom lens) V12H004M0F
Middle-throw #3 zoom lens (ELPLM10) V12H004M0A
Middle-throw #4 zoom lens (ELPLM11) V12H004M0B
Long-throw zoom lens (ELPLL08) V12H004L08
Note: The following older lenses are also supported: ELPLU02, ELPLR04, ELPLW04, ELPLS04,
ELPLM06, ELPLM07, ELPLL07.
Parent topic: Projector Features

19
Warranty and Registration Information
Your projector comes with a basic warranty that lets you project with confidence. For details, see the
warranty that came with your projector.
In addition, Epson offers free Extra Care Road Service. In the unlikely event of an equipment failure, you
won’t have to wait for your unit to be repaired. Instead, Epson will ship you a replacement unit anywhere
in the United States, Canada, or Puerto Rico. See the Extra Care Road Service brochure for details.
Note: Availability varies by region.
Register your product online at this site: .epson.com/webreg
Registering also lets you receive special updates on new accessories, products, and services.
Parent topic: Projector Features
Notations Used in the Documentation
Follow the guidelines in these notations as you read your documentation:
• must be followed carefully to avoid bodily injury.Warnings
• must be observed to avoid damage to your equipment.Cautions
• contain important information about your projector.Notes
• contain additional projection information.Tips
Parent topic: Introduction to Your Projector
Where to Go for Additional Information
Need quick help on using your projector? Here's where to look for help:
• Built-in help system
Press the button on the remote control or projector, select , and press to get quickHome Help Enter
solutions to common problems.
• (U.S.), (Canada), or (Caribbean)epson.com/support epson.ca/support epson.com.jm/support
View FAQs (frequently asked questions) and e-mail your questions to Epson technical support 24
hours a day.
• If you still need help after checking this manual and any other sources listed here, you can use the
Epson PrivateLine Support service to get help fast. For details, see "Where to Get Help."
Parent topic: Introduction to Your Projector
20
Related references
Where to Get Help
Related tasks
Using the Projector Help Displays
Projector Part Locations
Check the projector part illustrations to learn about the parts on your projector.
Projector Parts - Front/Top
Projector Parts - Rear
Projector Parts - Interface Ports
Projector Parts - Base
Projector Parts - Control Panel
Projector Parts - Remote Control
Parent topic: Introduction to Your Projector
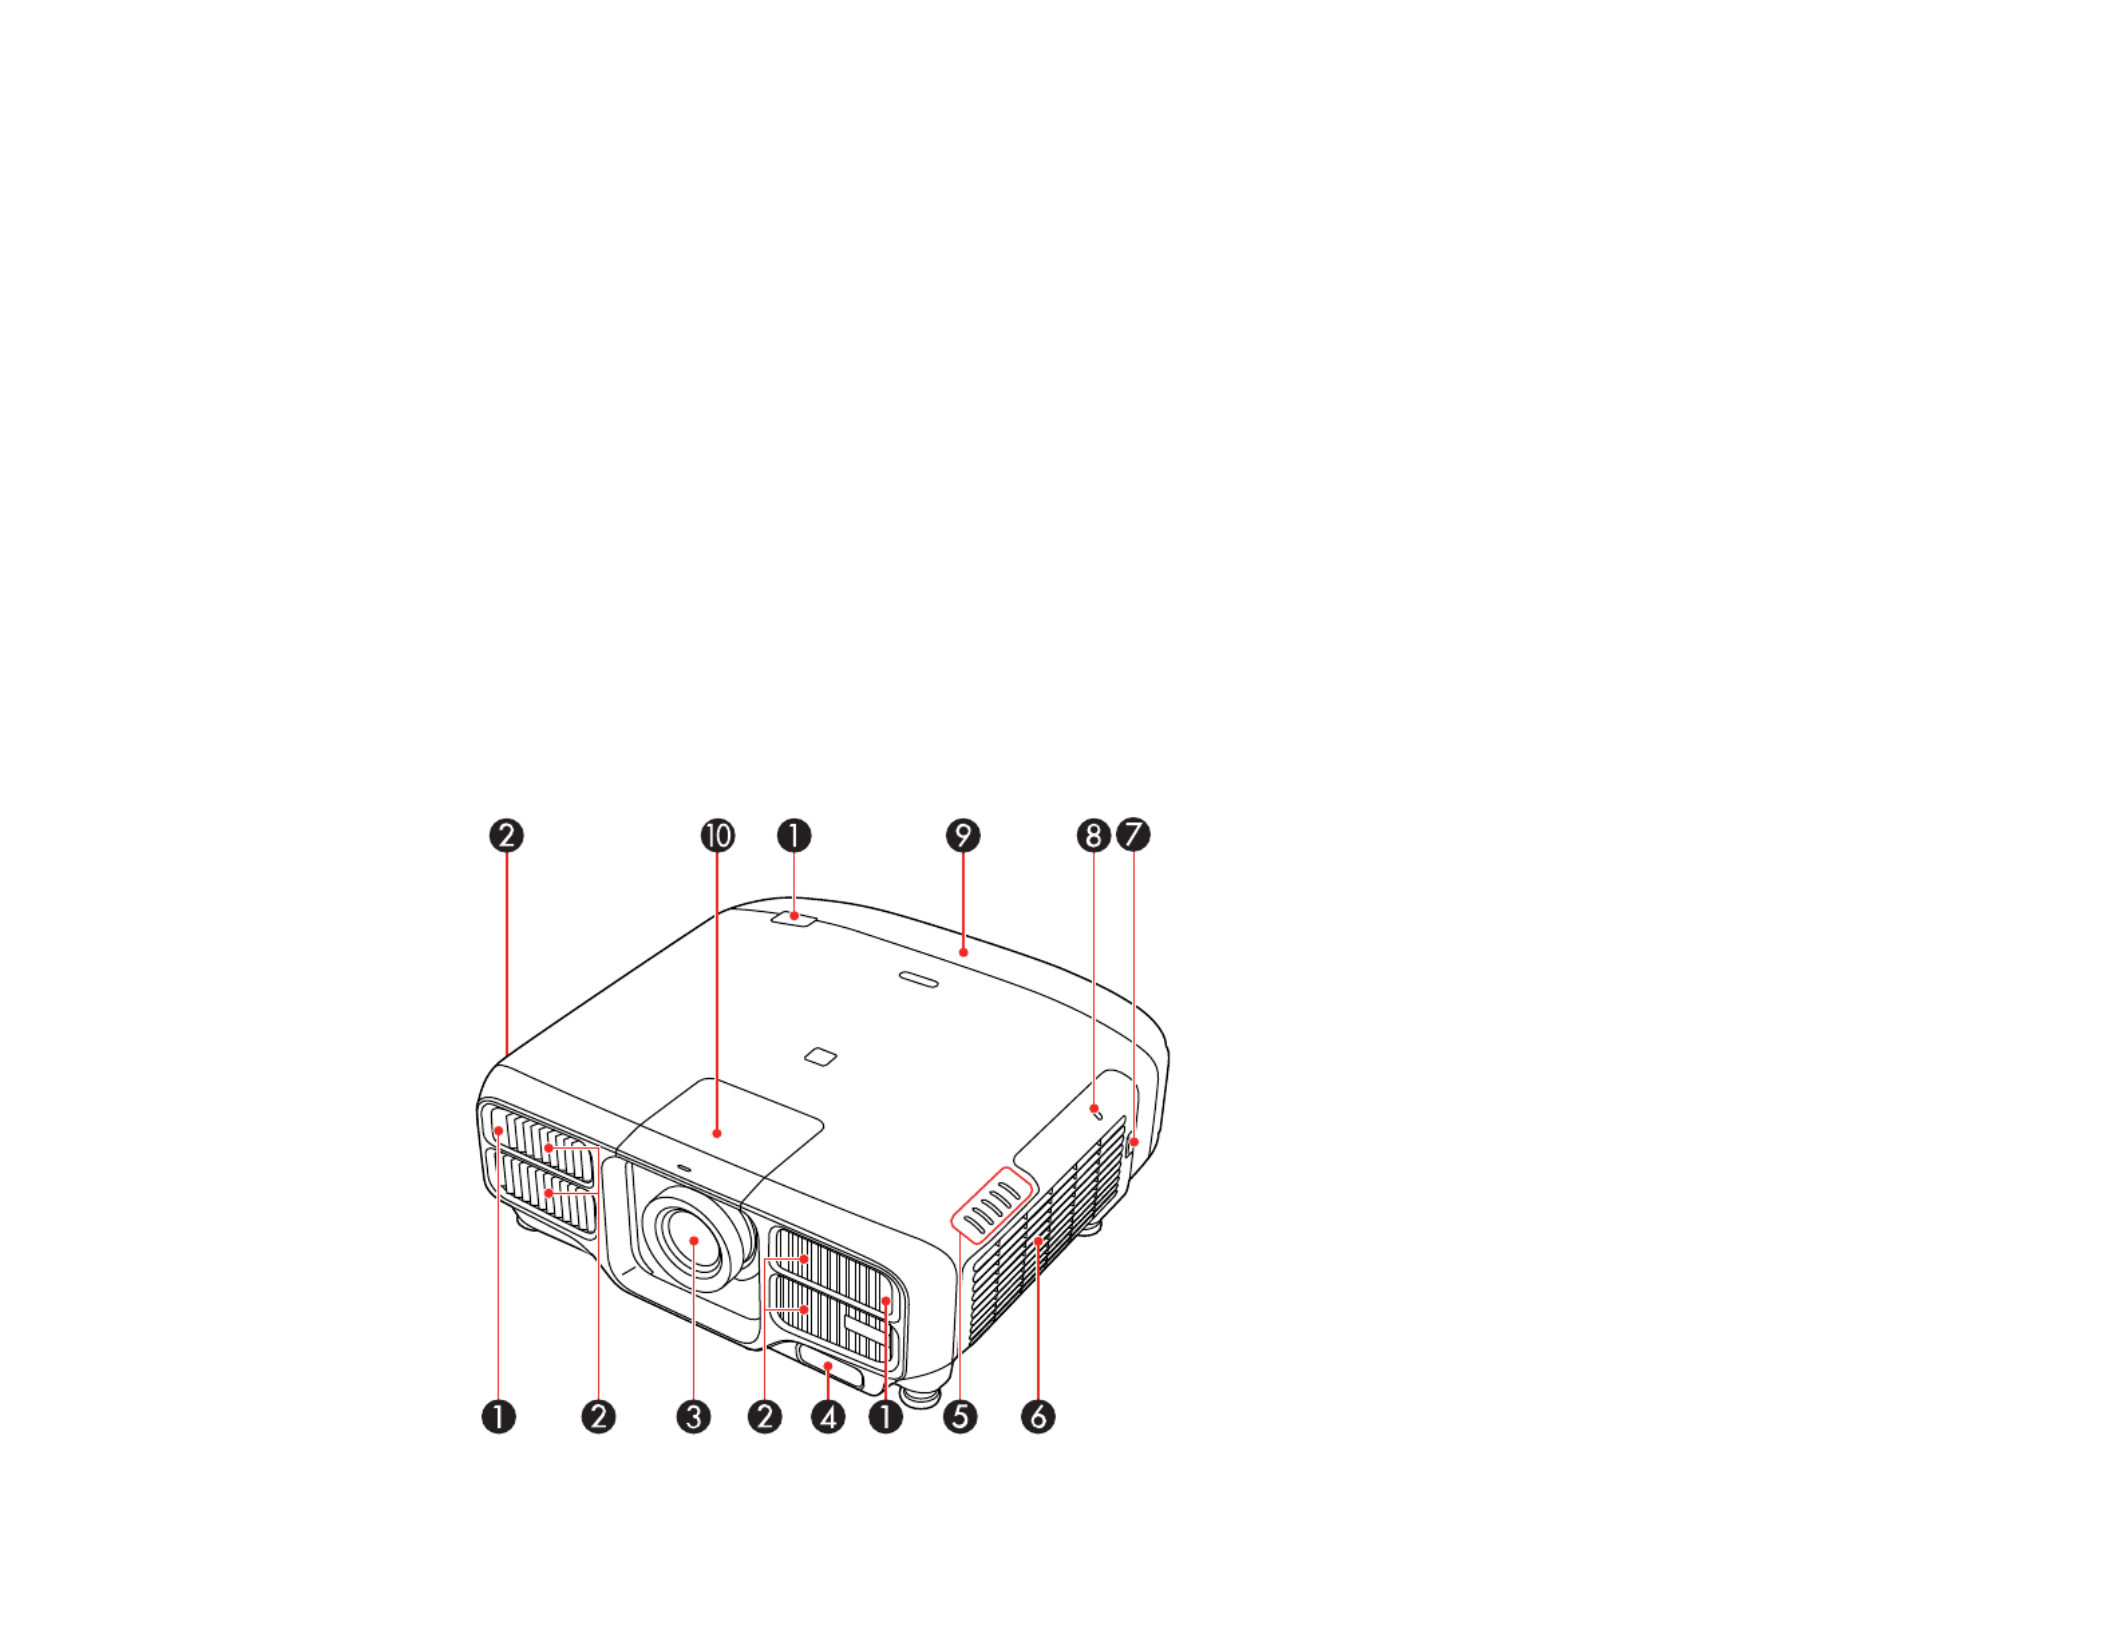
Projector Parts - Front/Top

21
1 Remote receiver
2 Air intake vents
3 Projection lens
4 Built-in camera
5 Projector status lights
6 Air filter cover/intake vent
7 Air filter cover latch
8 Wireless LAN module indicator light
9 Cable cover
10 Lens replacement cover
Parent topic: Projector Part Locations
Projector Parts - Rear
1 Air exhaust vents
2 Control panel
3 Kensington security slot
4 AC input
5 Cable clip slot

22
6 Interface ports
7 Cable cover screw holes
Parent topic: Projector Part Locations
Projector Parts - Interface Ports
1 portsBNC
2 portComputer
3 portAudio3
4 portAudio1
5 portMonitor Out
6 portAudio Out
7 portAudio2
8 Cable clip slot
9 portRS-232C
10 portRemote
11 port (not available for Pro L1715SNL)SDI

23
12 portService
13 portHDMI
14 portDVI-D
15 portHDBaseT
16 Network portLAN
Parent topic: Projector Part Locations
Projector Parts - Base
1 Front adjustable feet
2 Rear feet
3 Security cable attachment point

24
4 Mounting bracket holes
Parent topic: Projector Part Locations
Projector Parts - Control Panel
1 button (turns on the projector)On
2 button (searches for connected sources)Source Search
3 button (accesses projector menu system)Menu
4 button (selects options)Enter
5 Left arrow button and displays the Control Panel Lock screen
6 Down arrow button and displays a test pattern
7 button (turns the video and audio on or off)A/V Mute
8 button (displays the lens shift, zoom, focus, and distortion adjustment screens; hold for 3Lens
seconds to return the lens to the home position)
9 Right arrow button and displays the Info menu
10 Up arrow button and displays screen adjustment options
11 button (cancels/exits functions)Esc

25
12 button (turns off the projector)Standby
Parent topic: Projector Part Locations
Projector Parts - Remote Control
1 button (turns on the projector)On
2 button (turns off the projector)Standby

26
3 Source buttons (select an image source)
4 button (selects the image aspect ratio)Aspect
5 button (automatically adjusts computer images)Auto
6 button (stops video action)Freeze
7 button (displays a test pattern)Test Pattern
8 button (adjusts the image position)Lens Shift
9 button (changes the image size)Zoom
10 button (accesses projector menu system)Menu
11 Arrow buttons (move through on-screen options and move pointer)
12 Enter button (selects options and left mouse button)
13 button (turns the video and audio on or off)A/V Mute
14 up and down buttons (scroll through image files when projecting from a computer over aPage
network connection)
15 up and down buttons (adjust volume)Volume
16 button (displays the Info menu)i
17 , , and buttons (open menu assigned by user)User1 User2 User3
18 Numeric buttons (enter numbers)
19 button (hold down and use numeric keys to select projector to control)ID
20 switch (controls one or all projectors)ID
21 Remote port (connects to a remote control cable)
22 button (displays the Home screen)Home
23 button (hold down and use numeric keys to enter numbers)Num
24 button (corrects image distortion)Geometry
25 button (saves and applies presets)Memory
26 buttons (zoom into and out of the image)E-Zoom +/–
27 button (resets settings to their default values in the projector menu system)Default
28 button (cancels/exits functions and right mouse button)Esc
29 button (adjusts the image focus)Focus

27
30 button (splits the screen between two inputs)Split
31 button (selects display modes)Color Mode
32 button (searches for connected sources)Search
33 Light button (lights up the remote control buttons temporarily)
34 Indicator light (lights up when the remote control is in use)
35 Remote control signal emitter (emits remote control signals)
Parent topic: Projector Part Locations

28
Setting Up the Projector
Follow the instructions in these sections to set up your projector for use.
Projector Placement
Projector Connections
Attaching and Removing a Lens
Attaching and Removing the Cable Cover
Attaching and Removing the Cable Clip
Installing Batteries in the Remote Control
Projector Placement
You can place the projector on almost any flat surface to project an image.
You can also install the projector in a ceiling mount if you want to use it in a fixed location.
Keep these considerations in mind as you select a projector location:
• Place the projector on a sturdy, level surface or install it using a compatible mount.
• Leave plenty of space around and under the projector for ventilation, and do not place it on top of or
next to anything that could block the vents.
• Position the projector within reach of a grounded electrical outlet or extension cord.
Projector Setup and Installation Options
Projection Distance
Parent topic: Setting Up the Projector
Projector Setup and Installation Options
You can set up or install your projector in the following ways:

29
Front
Rear
Front ceiling

30
Rear ceiling
Caution: Be sure to leave the following amount of space around the projector to avoid blocking the air
exhaust and intake vents.
1 19.7 inches (50 cm)
2 31.5 inches (80 cm)
3 15.7 inches (40 cm)

31
You can mount the projector to the ceiling at any horizontal or vertical angle.
If you are installing multiple projectors next to each other, be sure to leave at least 20 inches (50 cm) of
space between the projectors. Also, make sure heated air from an exhaust vent does not go into the air
intake vent of another projector.
If you project from the ceiling or from the rear, select the correct setting and, if necessary,Projection
turn on the setting and adjust the setting.Inv Direction Button OSD Rotation
Parent topic: Projector Placement
Related references
Projector Setup Settings - Extended Menu
Projection Distance
The distance at which you place the projector from the screen determines the approximate size of the
image. The image size increases the farther the projector is from the screen, but can vary depending on
the zoom factor, aspect ratio, and other settings.
Note: Image sizes over 500" may result in a loss of image detail.

32
Use the tables here to determine approximately how far to place the projector from the screen based on
the size of the projected image. (Conversion figures may have been rounded up or down.) You can also
use the Projection Distance Calculator (U.S.), (Canada), or (Caribbean).here here here
1 Projection distance
2 Distance from the center of the lens to the base of the image (varies depending on vertical lens
shift)
3 Center of lens

33
Pro
L1490U/L1490UNL/L1495U/L1495UNL/L1500UH/L1500UHNL/L1505UH/L1505UHNL/L1750UNL/L17
55UNL (Standard Zoom Lens)
16:10 Aspect Ratio Image or Screen
Screen or image size Projection distance (1)
Wide to Tele (Minimum to
Maximum)
Vertical lens shift (2)
Top to bottom
60 inches 78 to 128 inches
(199 to 326 cm)
–35 to 3.2 inches
(–89 to 8 cm)
80 inches 105 to 172 inches
(268 to 438 cm)
–46.7 to 4.3 inches
(–119 to 11 cm)
100 inches 133 to 216 inches
(337 to 549 cm)
–58.3 to 5.3 inches
(–148 to 14 cm)
120 inches 160 to 260 inches
(406 to 661 cm)
–70 to 6.4 inches
(–178 to 16 cm)
150 inches 201 to 326 inches
(509 to 828 cm)
–87.5 to 8 inches
(–222 to 20 cm)
200 inches 269 to 436 inches
(682 to 1106 cm)
–116.7 to 10.7 inches
(–296 to 27 cm)
300 inches 404 to 655 inches
(1027 to 1663 cm)
–175 to 16 inches
(–444 to 41 cm)
500 inches 676 to 1093 inches
(1717 to 2777 cm)
–291.7 to 26.7 inches
(–741 to 68 cm)
800 inches 1084 to 1752 inches
(2753 to 4449 cm)
-466.5 to 42.5 inches
(-1185 to 108 cm)
1000 inches 1356 to 2190 inches
(3443 to 5563 cm)
-583.4 to 53.1 inches
(-1482 to 135 cm)
34
Pro L1715SNL (Standard Zoom Lens)
4:3 Aspect Ratio Image or Screen
Screen or image size Projection distance (1)
Wide to Tele (Minimum to
Maximum)
Vertical lens shift (2)
Top to bottom
60 inches 76 to 125 inches
(193 to 318 cm)
–37.8 to 1.8 inches
(–96 to 5 cm)
80 inches 103 to 168 inches
(260 to 427 cm)
–50.4 to 2.4 inches
(–128 to 6 cm)
100 inches 129 to 211 inches
(328 to 536 cm)
–63.0 to 3 inches
(–160 to 8 cm)
120 inches 155 to 254 inches
(395 to 644 cm)
–75.6 to 3.6 inches
(–192 to 9 cm)
150 inches 195 to 318 inches
(496 to 808 cm)
–94.5 to 4.5 inches
(–240 to 11 cm)
200 inches 261 to 425 inches
(663 to 1079 cm)
–126 to 6 inches
(–320 to 15 cm)
300 inches 393 to 639 inches
(999 to 1623 cm)
–189 to 9 inches
(–480 to 23 cm)
500 inches 658 to 1067 inches
(1671 to 2710 cm)
–315 to 15 inches
(–800 to 38 cm)
800 inches 1090 to 1709 inches
(2678 to 4342 cm)
503.9 to 24 inches
(-1280 to 61 cm)
1000 inches 1319 to 2137 inches
(3350 to 5429 cm)
629.9 to 29.9 inches
(-1600 to 76 cm)
Parent topic: Projector Placement

35
Projector Connections
See these sections to connect the projector to a variety of projection sources.
Caution: High Altitude ModeIf you will use the projector at altitudes above 4921 feet (1500 m), turn on
to ensure the projector's internal temperature is regulated properly.
Connecting to Video Sources
Connecting to Computer Sources
Connecting to an HDBaseT Transmitter
Connecting to an External Computer Monitor
Connecting to External Speakers
Parent topic: Setting Up the Projector
Related references
Projector Setup Settings - Extended Menu
Connecting to Video Sources
Follow the instructions in these sections to connect video devices to the projector.
Connecting to an HDMI Video Source
Connecting to a Component-to-BNC Video Source
Connecting to a Component Video Source
Connecting to an SDI Video Source
Connecting to a Video Source for Sound
Parent topic: Projector Connections
Connecting to an HDMI Video Source
If your video source has an HDMI port, you can connect it to the projector using an optional HDMI cable.
The HDMI connection provides the best image quality.
1. Connect the HDMI cable to your video source's HDMI output port.
36
2. Connect the other end to the projector's port.HDMI
Parent topic: Connecting to Video Sources
Related references
Projector Setup Settings - Extended Menu
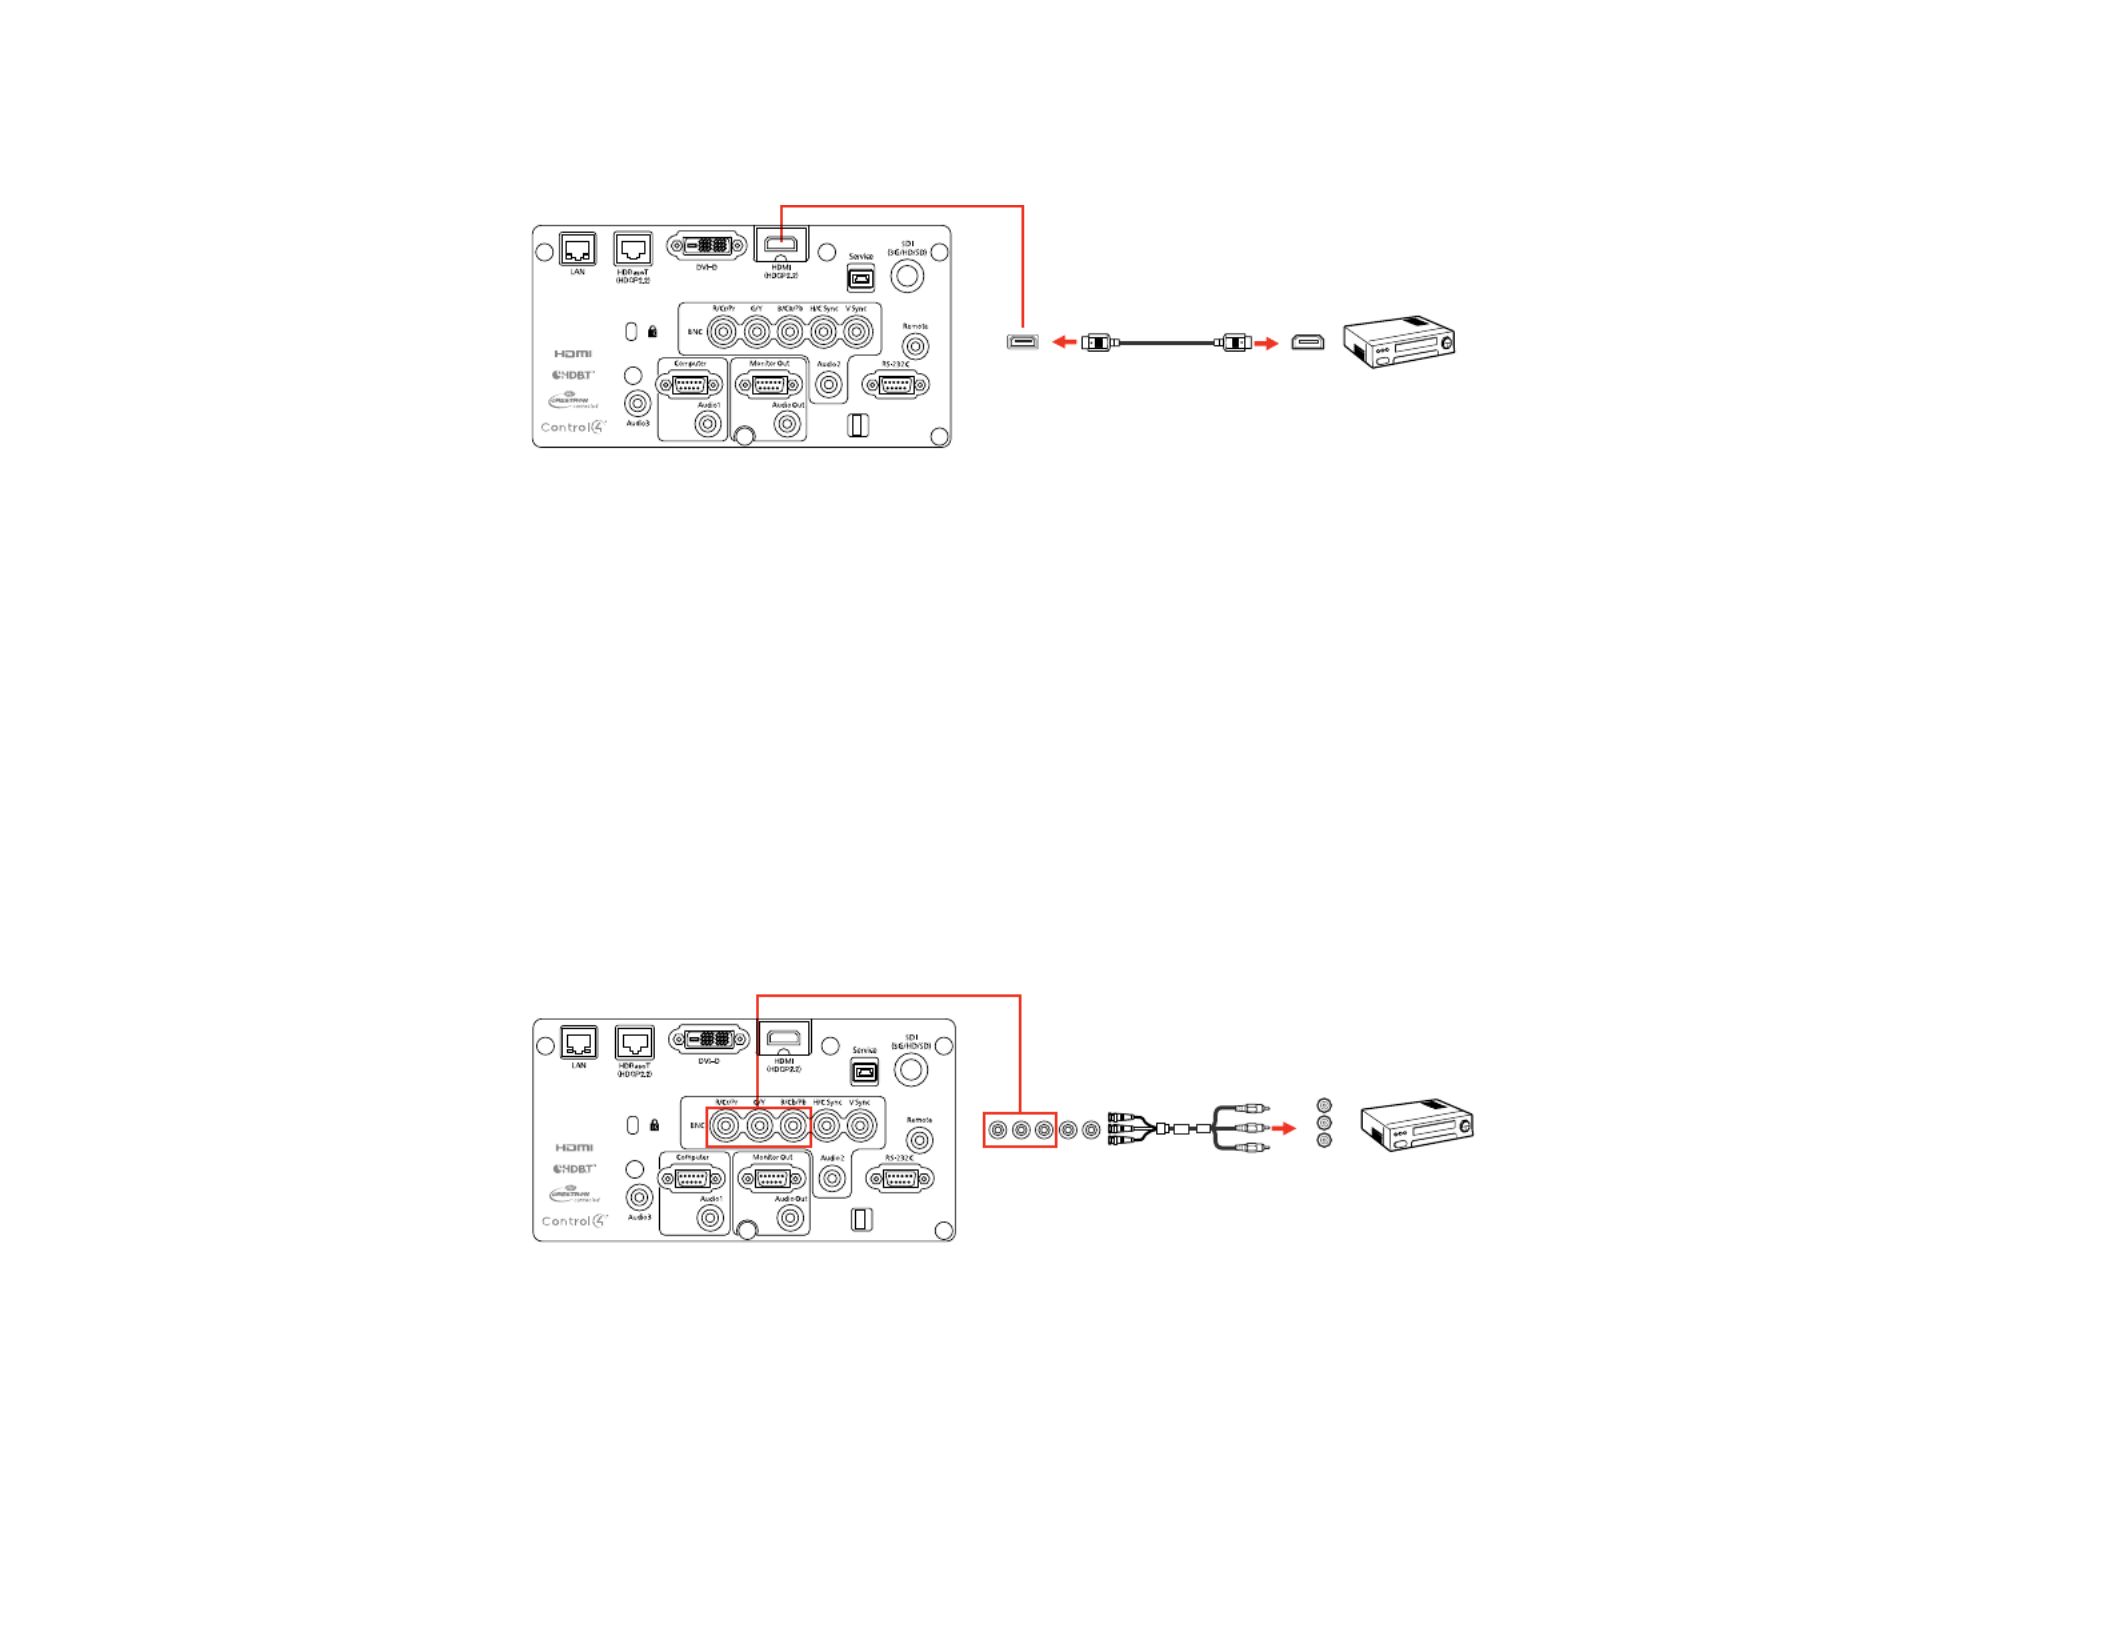
Connecting to a Component-to-BNC Video Source
If your video source has component video ports, you can connect it to the projector using an optional
component-to-BNC video cable. Depending on your component ports, you may need to use an adapter
cable along with a component video cable.
1. Connect the component connectors to your video source's color-coded component video output
ports, usually labeled , , or , , . If you are using an adapter, connect these connectorsY Pb Pr Y Cb Cr
to your component video cable.
2. Connect the BNC connectors to the projector's , , ports.R/Cr/Pr G/Y B/Cb/Pb
Parent topic: Connecting to Video Sources

37
Connecting to a Component Video Source
If your video source has component video ports, you can connect it to the projector using an optional
component-to-VGA video cable. Depending on your component ports, you may need to use an adapter
cable along with a component video cable.
1. Connect the component connectors to your video source's color-coded component video output
ports, usually labeled , , or , , . If you are using an adapter, connect these connectorsY Pb Pr Y Cb Cr
to your component video cable.
2. Connect the VGA connector to a port on the projector.Computer
3. Tighten the screws on the VGA connector.
If your image colors appear incorrect, you may need to change the setting in the projector'sInput Signal
Signal menu.
Parent topic: Connecting to Video Sources
Related references
Input Signal Settings - Signal Menu
Connecting to an SDI Video Source
If your video source has an SDI port, you can connect it to the projector using an optional BNC video
cable
(Pro
L1490U/L1490UNL/L1495U/L1495UNL/L1500UH/L1500UHNL/L1505UH/L1505UHNL/L1750UNL/L175
5UNL).
1. Connect the BNC video cable to your video source's SDI output port.

38
2. Connect the other end to the projector's port.SDI
Parent topic: Connecting to Video Sources
Connecting to a Video Source for Sound
If you connected external speakers to the projector, you can connect your video source to the projector
with an audio cable to play sound.
Note: SDIIf you connected your video source to the projector's port
(Pro
L1490U/L1490UNL/L1495U/L1495UNL/L1500UH/L1500UHNL/L1505UH/L1505UHNL/L1750UNL/L175
5UNL), audio output is not supported.
Note: If you connected your video source to the projector using an HDMI cable, the audio signal is
transferred with the video signal; you do not need an additional cable for sound. If you have problems
hearing audio through the HDMI connection, you can play sound through an audio cable instead by
following the steps described here.
1. Connect one end of a 3.5 mm stereo mini-jack audio cable to your video source's audio-out port.

39
2. Connect the other end of the cable to the projector's port that corresponds to theAudio Computer
or port you are using for video. If you are projecting video through the projector's port,BNC HDMI
connect the end of your audio cable to the port.Audio3
Note: Audio3 Audio3 HDMI Audio OutputIf you connected to the port, select for the setting in the
Extended menu.
Parent topic: Connecting to Video Sources
Related tasks
Connecting to External Speakers
Connecting to Computer Sources
Follow the instructions in these sections to connect a computer to the projector.
Connecting to a Computer for VGA Video
Connecting to a Computer for HDMI Video and Audio
Connecting to a Computer for DVI-D Video
Connecting to a Computer for 5 BNC Video
Connecting to a Computer for Sound
Parent topic: Projector Connections
Connecting to a Computer for VGA Video
You can connect the projector to your computer using a VGA computer cable.
Note: To connect a Mac that includes only a Mini DisplayPort, Thunderbolt port, or Mini-DVI port for
video output, you need to obtain an adapter that allows you to connect to the projector's VGA video port.
Contact Apple for compatible adapter options.

40
1. If necessary, disconnect your computer's monitor cable.
2. Connect the VGA computer cable to your computer's monitor port.
3. Connect the other end to a port on the projector.Computer
4. Tighten the screws on the VGA connector.
Parent topic: Connecting to Computer Sources
Related tasks
Connecting to a Computer for Sound
Connecting to a Computer for HDMI Video and Audio
If your computer has an HDMI port, you can connect it to the projector using an optional HDMI cable.
Note: To connect a Mac that includes only a Mini DisplayPort, Thunderbolt port, or Mini-DVI port for
video output, you need to obtain an adapter that allows you to connect to the projector's port.HDMI
Contact Apple for compatible adapter options. Older Mac computers (2009 and earlier) may not support
audio through the port.HDMI
1. Connect the HDMI cable to your computer's HDMI output port.
2. Connect the other end to the projector's port.HDMI

41
Parent topic: Connecting to Computer Sources
Connecting to a Computer for DVI-D Video
If your computer has a DVI-D connector, you can connect it to the projector using an optional DVI-D
cable.
1. Connect the DVI-D cable to your computer's DVI-D connector.
2. Connect the other end to the projector's connector.DVI-D
Parent topic: Connecting to Computer Sources
Related tasks
Connecting to a Computer for Sound
Connecting to a Computer for 5 BNC Video
You can connect the projector to your computer using an optional VGA-to-5-BNC cable.
1. Connect the VGA connector to your computer's monitor port.
2. Connect the 5 BNC connectors to the projector's ports.BNC
Parent topic: Connecting to Computer Sources

42
Related tasks
Connecting to a Computer for Sound
Connecting to a Computer for Sound
If you connected external speakers to the projector, you can connect your computer to the projector with
an audio cable to play sound.
1. Connect one end of a 3.5 mm stereo mini-jack audio to your laptop's headphone or audio-out jack, or
your desktop's speaker or audio-out port.
2. Connect the other end to the port that corresponds to the or port you areAudio Computer BNC
using. If you are projecting video through the projector's port, connect the end of your audioDVI-D
cable to the port.Audio3
Parent topic: Connecting to Computer Sources
Related tasks
Connecting to External Speakers
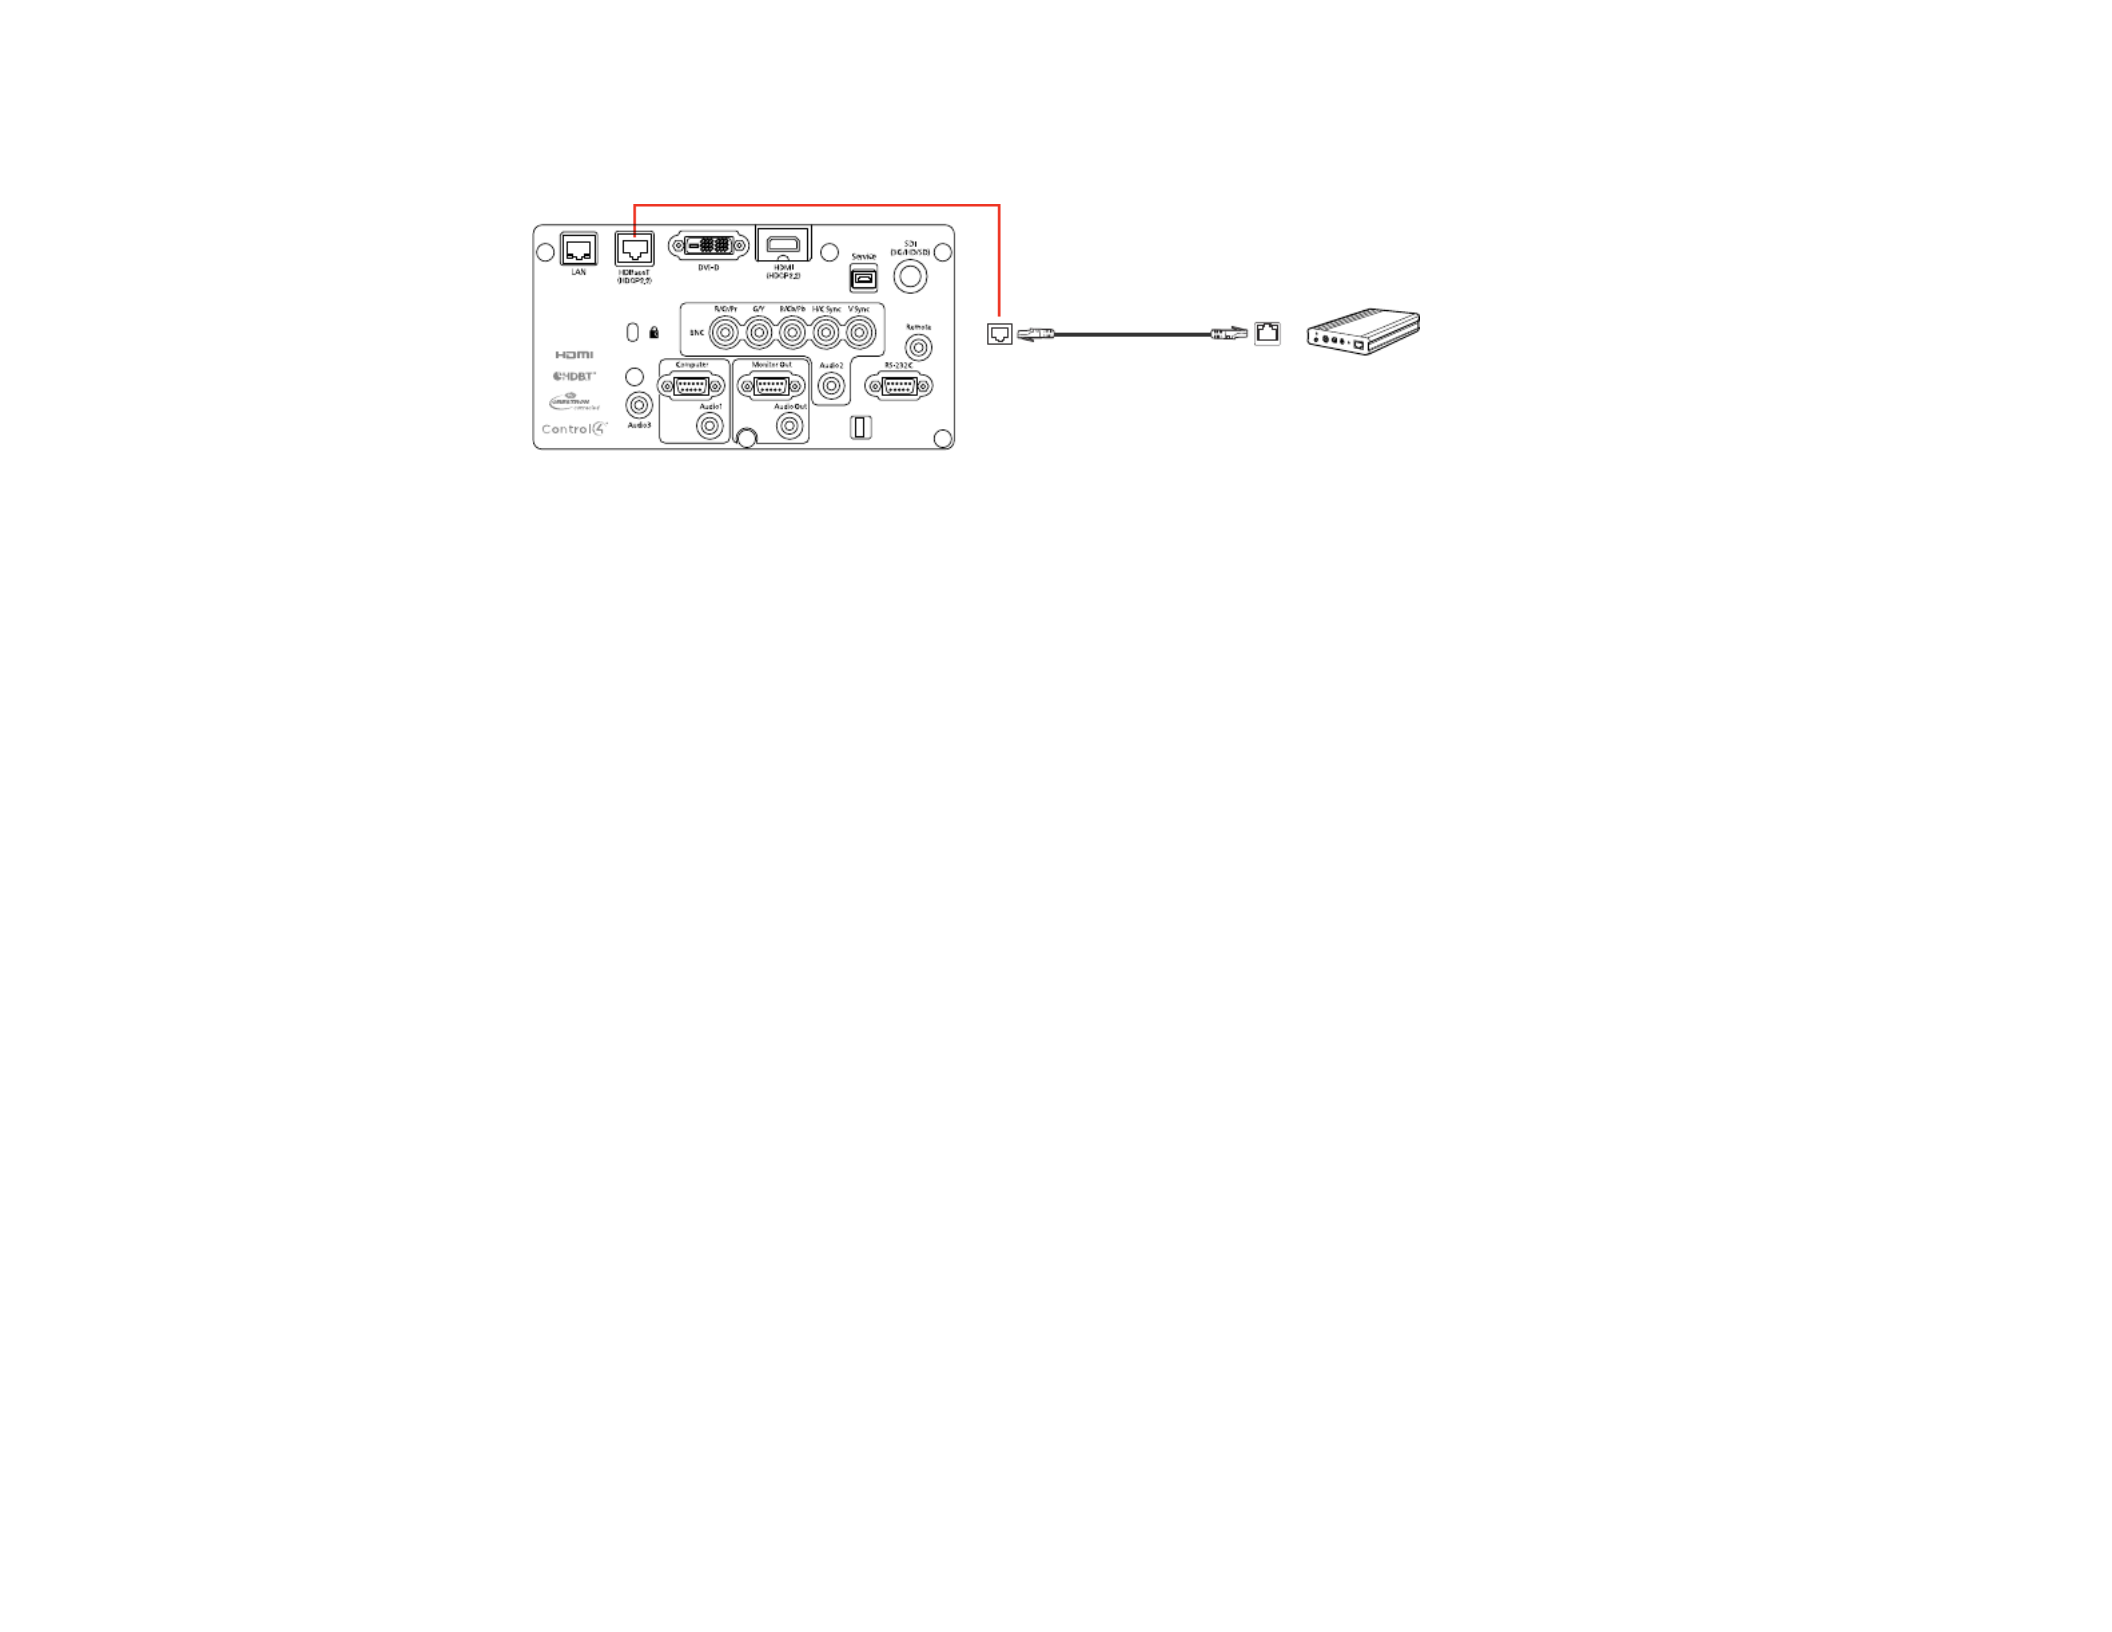
Connecting to an HDBaseT Transmitter
To send an HDMI or RS-232C signal over a long distance, you can connect the projector to an optional
HDBaseT transmitter using a 100Base-TX network cable. This is useful when you want to send a signal
to or control the projector from a remote location, such as in a hall or event site, since you can use a
network cable up to 328 feet (100 m) in length. To ensure proper data transmission, use a Category 5e
STP cable or better.
1. Turn off the projector and HDBaseT transmitter.
Note: Make sure the projector and HDBaseT transmitter are turned off when connecting or
disconnecting a network cable between the two devices.
2. Connect one end of the network cable to the port on the transmitter.HDBaseT
43
3. Connect the other end to the projector's port.HDBaseT
Note: See the documentation that came with the HDBaseT transmitter for instructions on connecting
it to your video device or computer.
4. Turn on the projector and HDBaseT transmitter.
Note: OnTo enable communication from the Ethernet and serial ports on the transmitter, select as the
Control Communications setting in the projector's Extended menu. Turning on this setting disables the
projector's , , and ports. If you connected an Extron XTP transmitter or switcher toLAN RS-232C Remote
the projector's port, select as the setting in the projector's Extended menu.HDBaseT On Extron XTP
Parent topic: Projector Connections
Related references
Projector Setup Settings - Extended Menu
Connecting to an External Computer Monitor
If you connected a computer to the projector's port, you can also connect an external monitorComputer
to the projector. This lets you see your presentation on the external monitor even when the projected
image is not visible.
If you want to output images to an external monitor when the projector is turned off, you need to select
Communication On Standby Mode Always On A/V Outputas the setting and as the setting in the
projector's Extended menu.
Note: Monitors that use a refresh rate less than 60 Hz may not be able to display images correctly.
1. Make sure your computer is connected to the projector's or port.Computer BNC

44
2. Connect the external monitor's cable to your projector's port.Monitor Out
Note: Monitor OutIf you do not see an image on the external monitor, you may need to change the
setting in the Extended menu.
Parent topic: Projector Connections
Related references
Projector Setup Settings - Extended Menu
Connecting to External Speakers
To enhance the sound from your presentation, you can connect the projector to external self-powered
speakers. You can control the volume using the projector's remote control.
You can also connect the projector to an amplifier with speakers.
If you want to output audio from the external speakers when the projector is turned off, you need to
select for the setting and for the setting inCommunication On Standby Mode Always On A/V Output
the projector's Extended menu.
1. Make sure your computer or video source is connected to the projector with both audio and video
cables as necessary.
2. Locate the appropriate cable to connect your external speakers, such as a stereo mini-jack-to-pin-
jack cable, or another type of cable or adapter.
3. Connect one end of the cable to your external speakers as necessary.

45
4. Connect the stereo mini-jack end of the cable to your projector's port.Audio Out
Parent topic: Projector Connections
Related references
Projector Setup Settings - Extended Menu
Attaching and Removing a Lens
Follow the instructions in these sections to attach or remove a compatible lens.
Attaching a Lens
Removing a Lens
Parent topic: Setting Up the Projector
Attaching a Lens
You can attach a compatible lens to the projector.
Caution: Unplug the power cord from the projector before attaching the lens. Avoid touching the lens
with your bare hands to prevent fingerprints on or damage to the lens surface.
1. Pull the lens cover off of the projector.

46
2. When using one of the following lenses, attach the lens connector cap: ELPLS04, ELPLU02,
ELPLR04, ELPLW04, ELPLM06, ELPLM07, or ELPLL07.
3. Slide the lock lever to the position (as shown) until you hear it click.Release
47
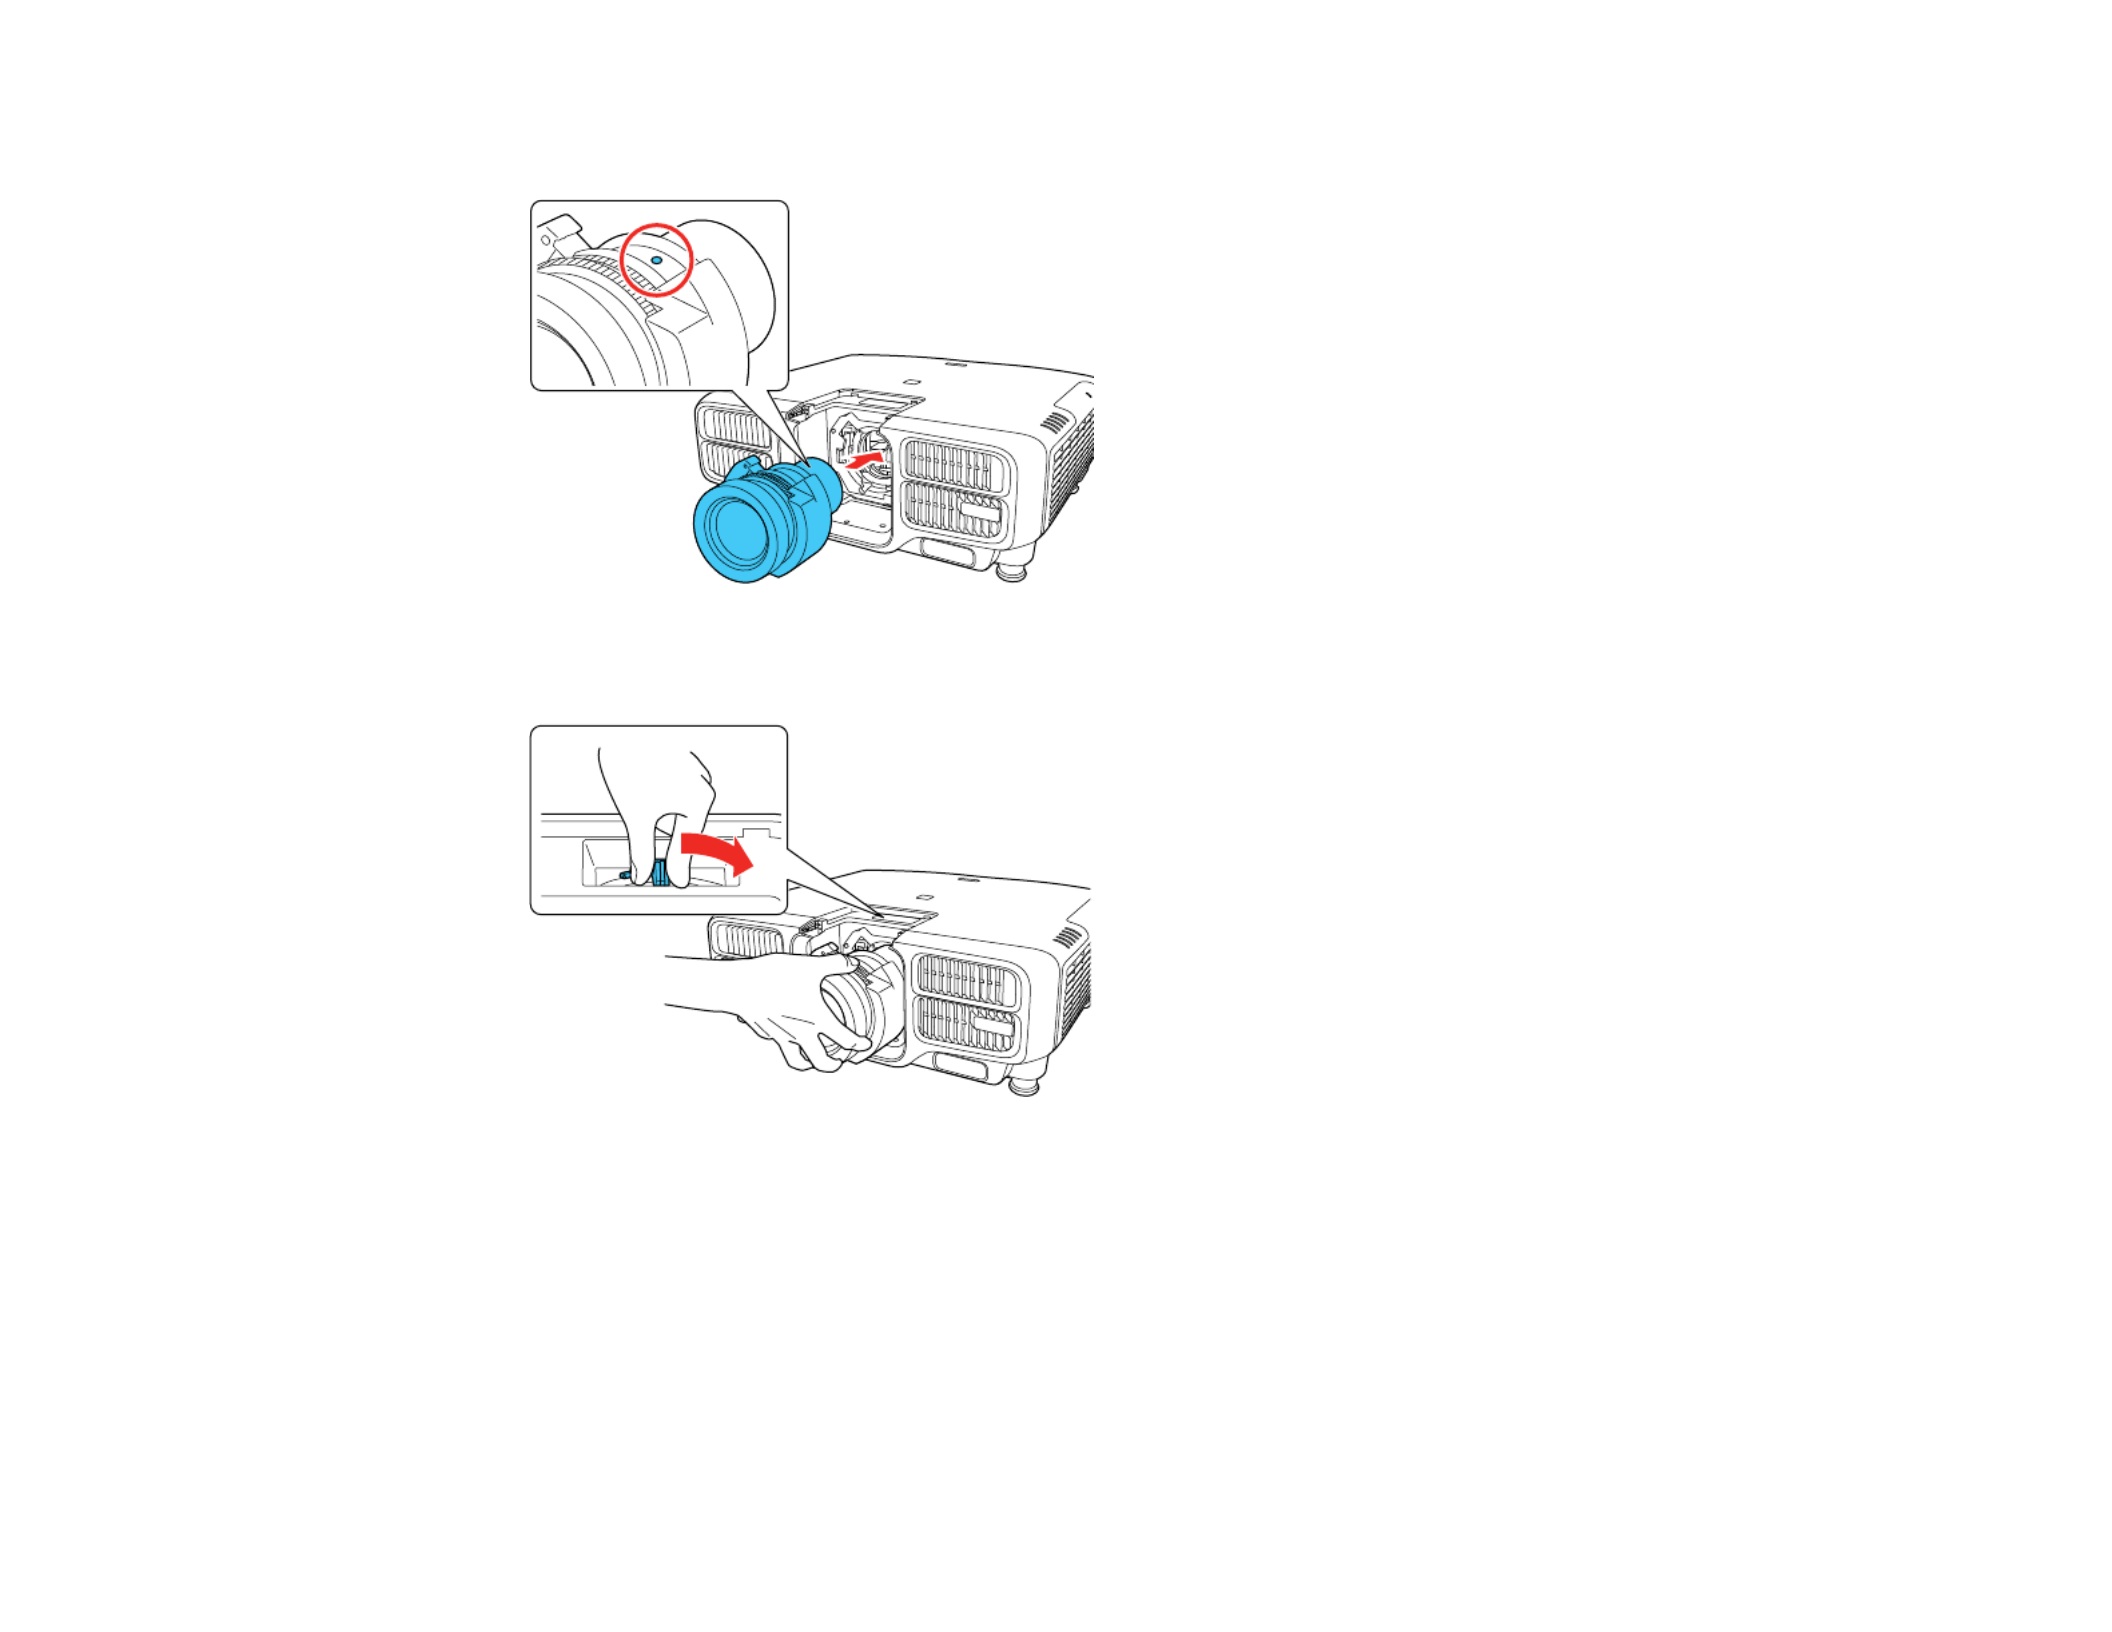
4. Insert the lens straight into the projector's lens socket with the white dot facing up.
5. Hold the lens firmly and slide the lock lever to the position (as shown) until it locks.Lock
48
6. Replace the lens cover.
7. If prompted, select to calibrate the lens.Yes
Note: Lens calibration helps the projector to correctly acquire the lens position and adjustment
range, and can take up to 100 seconds to complete. When calibration is finished, the lens returns to
the same position it was in before calibration. (ELPX02 returns to the standard position.)
8. When using one of the following lenses, select the lens type in the menu: ELPLS04,Extended
ELPLU02, ELPLR04, ELPLW04, ELPLM06, ELPLM07, or ELPLL07.
Parent topic: Attaching and Removing a Lens
Related tasks
Setting the Lens Type
Removing a Lens
You can remove a lens to replace it with a different lens.
Caution: Remove the lens only when necessary and make sure the front of the projector is not facing up
when you remove the lens. This prevents dirt or dust from entering the projector and lowering the
projection quality. Avoid touching the lens with your bare hands to prevent fingerprints on or damage to
the lens surface.
1. Center the lens using the (remote control) or (control panel) button.Lens Shift Lens
2. Turn off the projector and unplug the power cord.
49
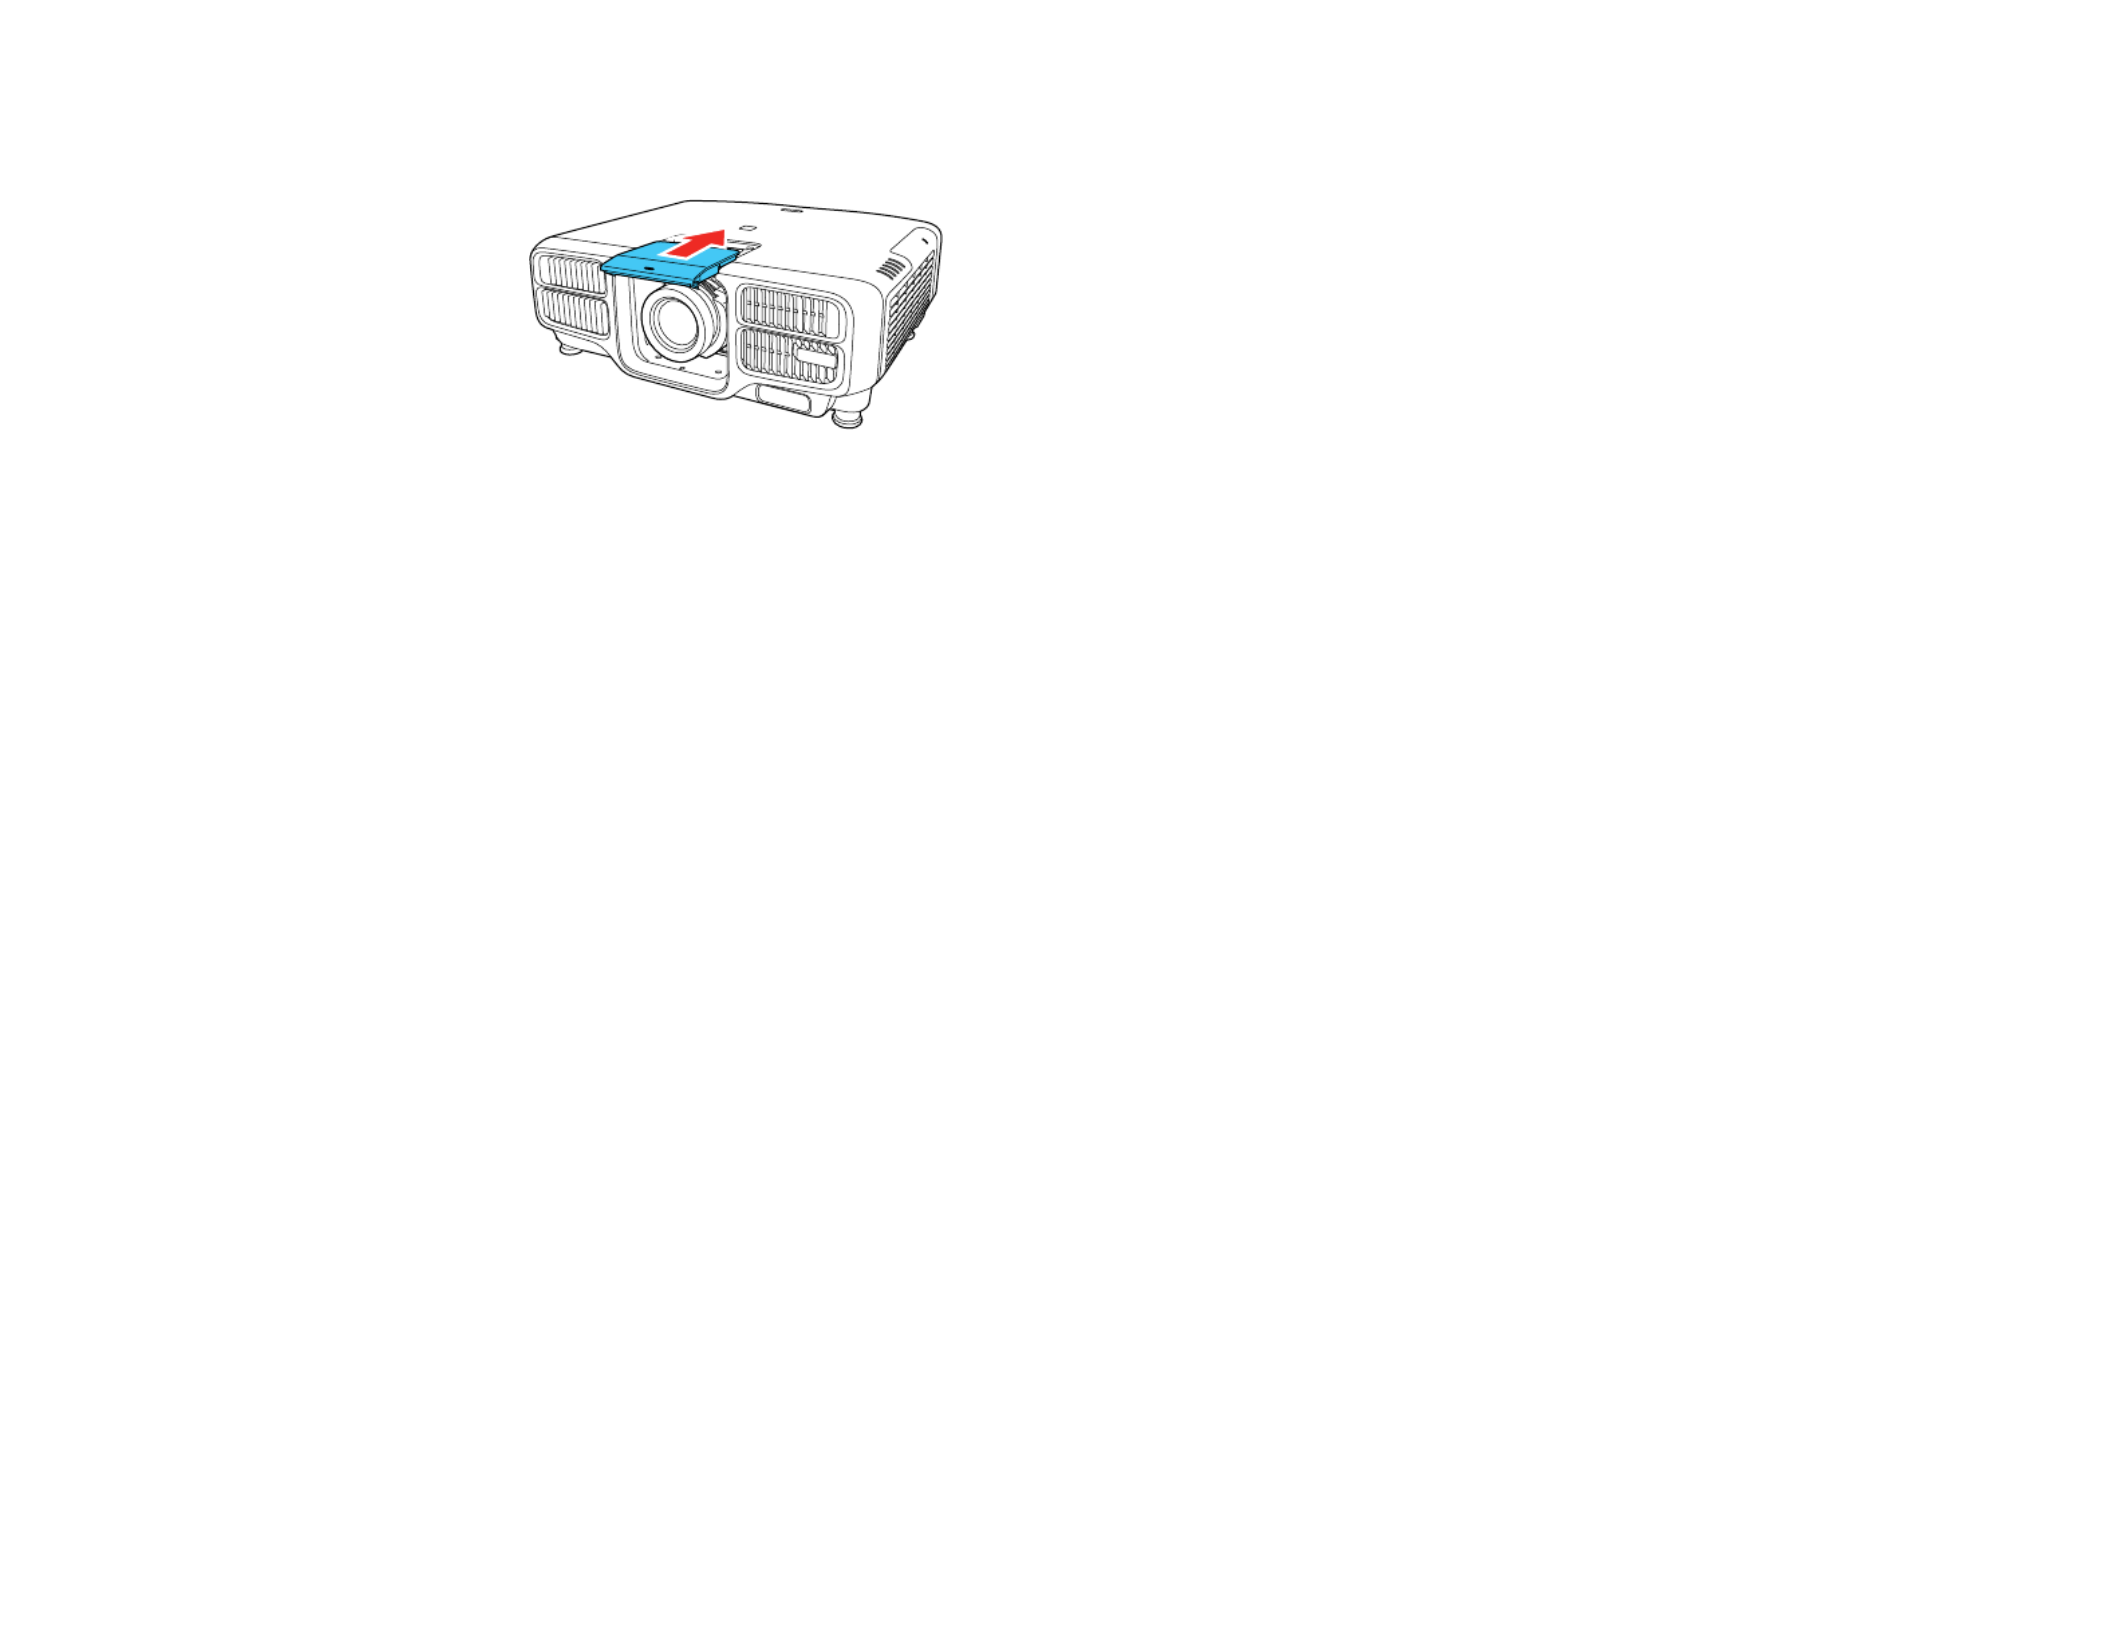
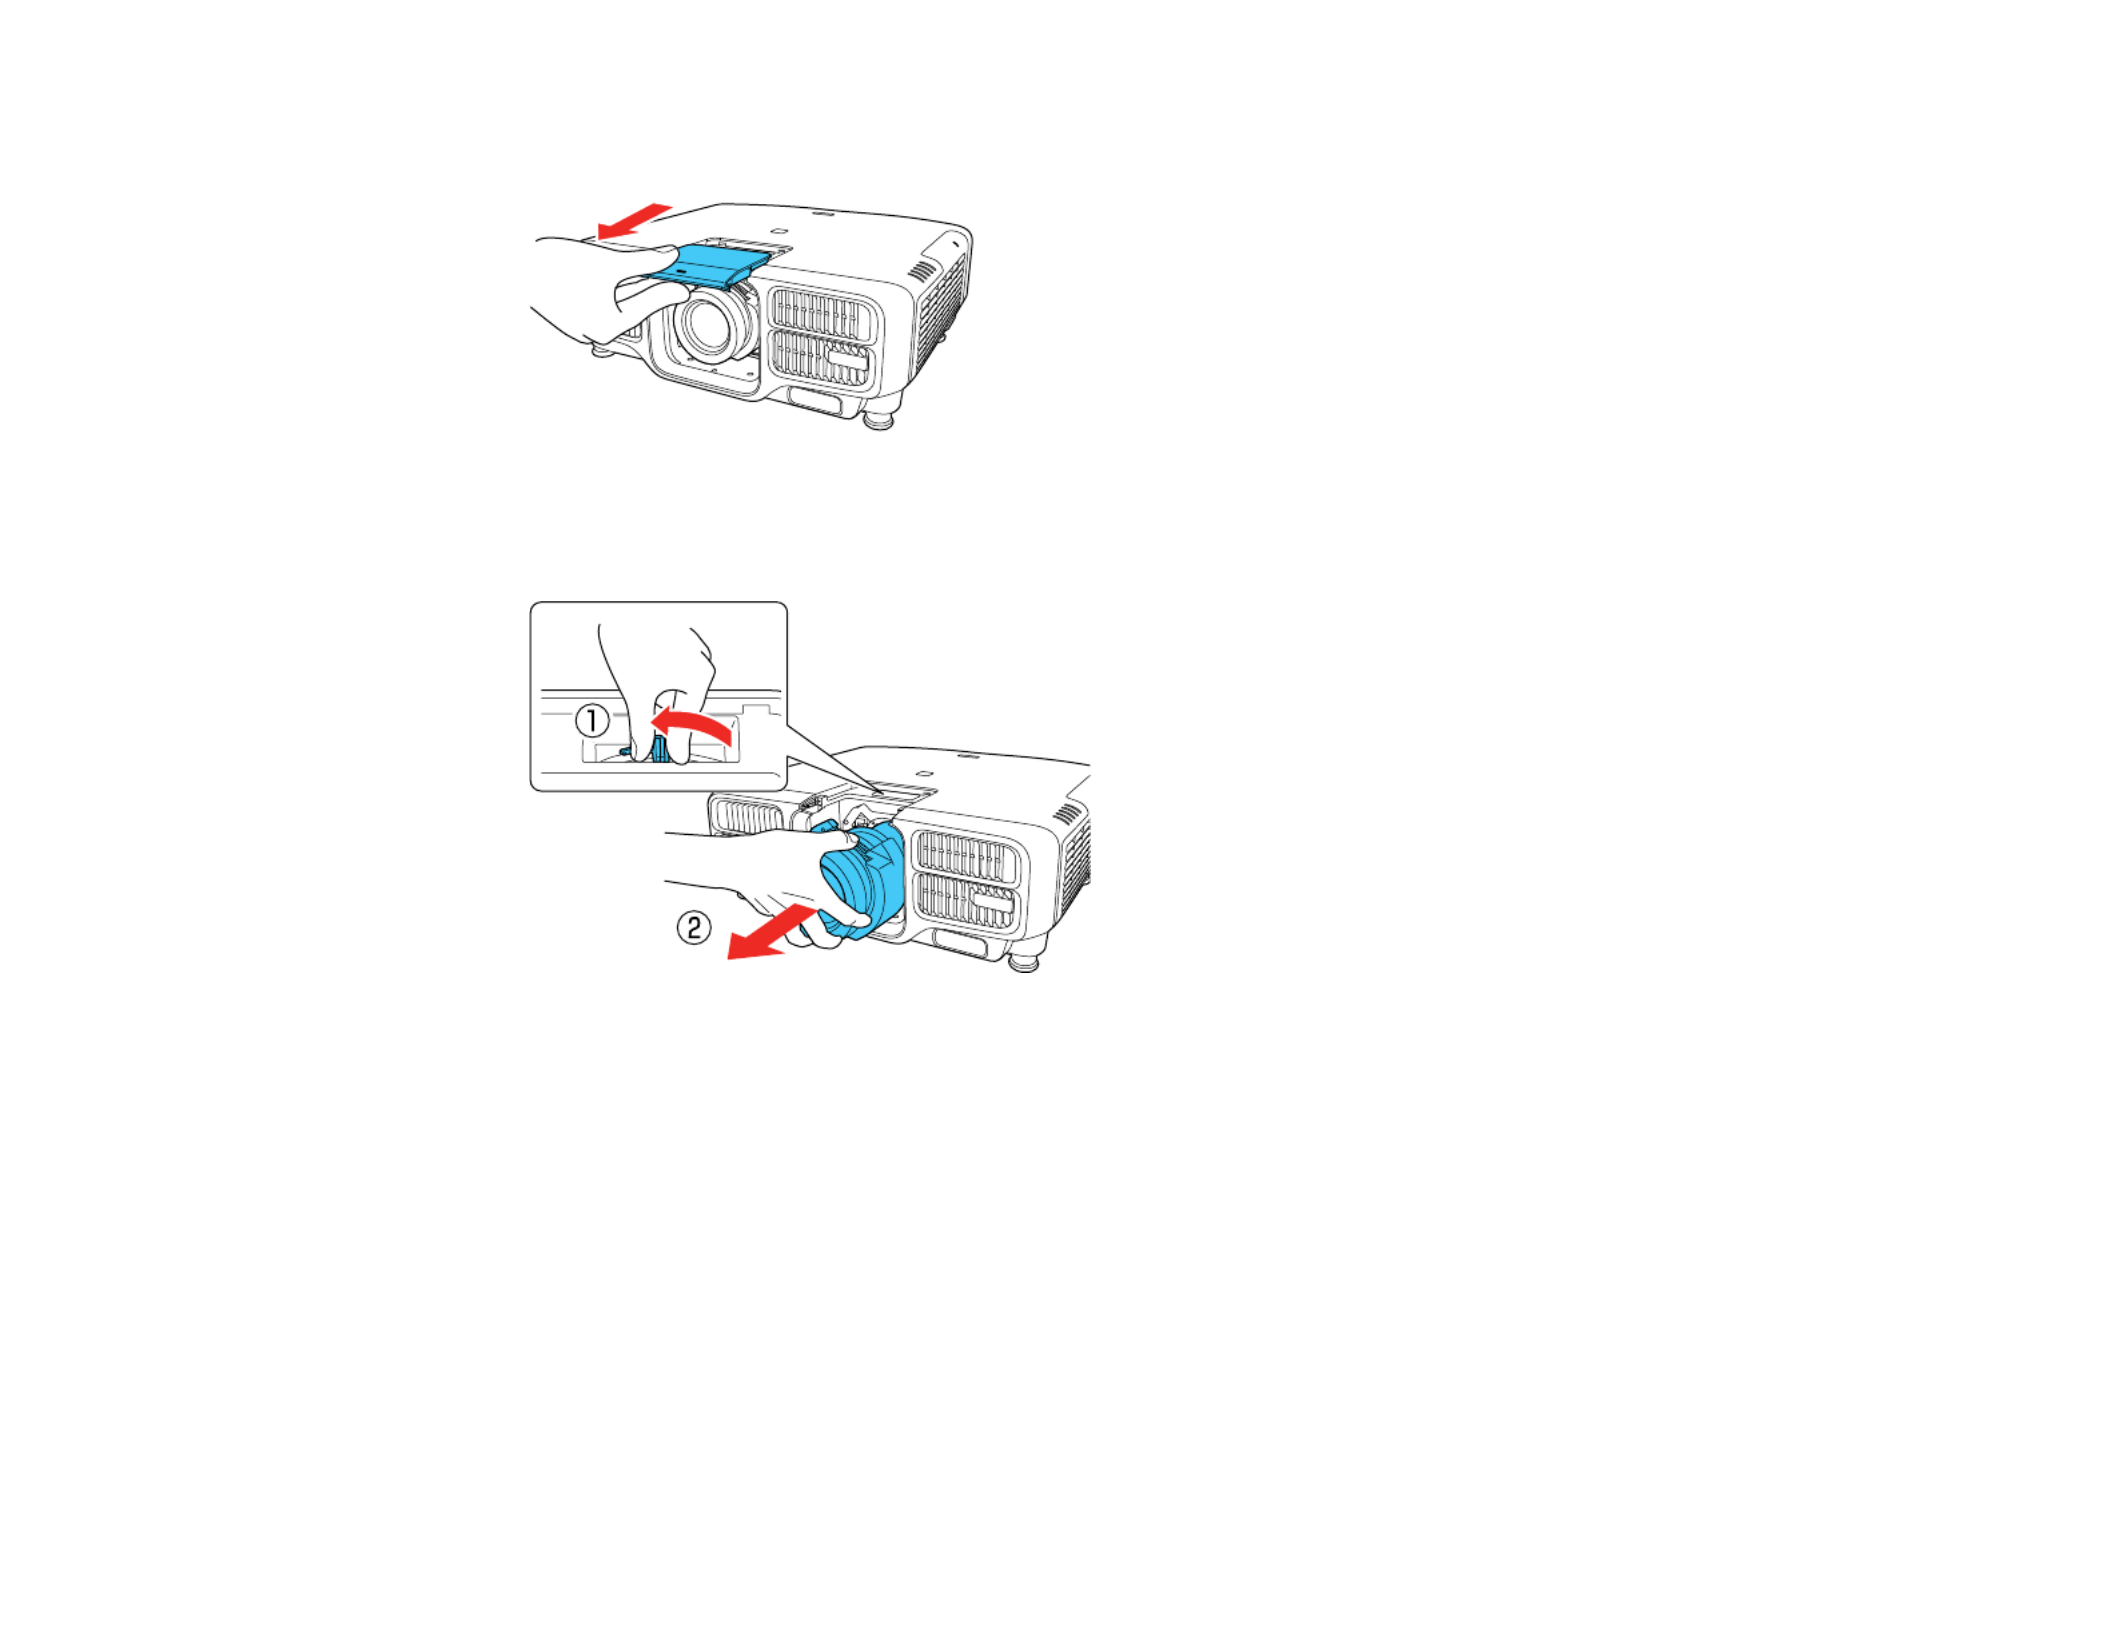
3. Pull the lens cover off of the projector.
4. Hold the lens firmly as you slide the lock lever to the position (as shown) until you hear itRelease
click.
5. Gently pull the lens straight out of the projector.
Parent topic: Attaching and Removing a Lens
Attaching and Removing the Cable Cover
You can attach the cable cover that came with your projector to hide the attached cables from view.

50
1. Bundle the cables together using a band or other fastener (not provided).
Caution: Do not bundle the power cord to the other cables. Otherwise, a fire may occur.
2. Place the cable cover on the projector as shown, guiding the cables through the notch on the base of
the cable cover.

51
3. Tighten both cable cover screws.
To remove the cover, loosen both screws and pull the cover off of the projector.
Parent topic: Setting Up the Projector
Attaching and Removing the Cable Clip
You can install the cable clip that came with your projector to provide additional support to the power
cable.
1. Connect the power cable to the projector.
2. Insert the end of the cable clip anchor into the cable clip slot near the power inlet.

52
3. Place the open cable clip around the power cable, but don't lock it into place.
4. Slide the cable clip onto the anchor and lock the clip onto the power connector as shown.
To remove the cable clip, open the clip and disconnect the power cable. Then pinch the sides of the
cable clip anchor and carefully remove it from the cable clip slot.
Parent topic: Setting Up the Projector
Installing Batteries in the Remote Control
The remote control uses the two AA batteries that came with the projector.
Caution: Use only the type of batteries specified in this manual. Do not install batteries of different types,
or mix new and old batteries.
1. Remove the battery cover.

53
2. Insert the batteries with the and ends facing as shown.+ –
3. Replace the battery cover and press it down until it clicks into place.
Warning: Dispose of used batteries according to local regulations. Do not expose batteries to heat
or flame. Keep batteries out of the reach of children; they are choking hazards and are very
dangerous if swallowed.
Parent topic: Setting Up the Projector

54
Using the Projector on a Network
Follow the instructions in these sections to set up your projector for use on a network.
Wired Network Projection
Wireless Network Projection
Setting Up Projector Network E-Mail Alerts
Selecting Other Network Settings
Controlling a Networked Projector Using a Web Browser
Crestron RoomView Support
Wired Network Projection
You can project through a wired network. To do this, you connect the projector to your network with an
Ethernet cable, and then set up your projector and computer for network projection.
After connecting and setting up the projector, install the projector software. You may need to install it
from a software CD, if included, or download the software and manuals as necessary.
Note: If your projector is connected via a LAN (Ethernet) cable to a network that includes a wireless
access point, you can connect to the projector wirelessly through the access point using the Epson
network software.
Connecting to a Wired Network
Selecting Wired Network Settings
Parent topic: Using the Projector on a Network
Related references
Additional Projector Software and Manuals
Connecting to a Wired Network
To connect the projector to a wired local area network (LAN), use a 100Base-TX or 10Base-T network
cable. To ensure proper data transmission, use a Category 5 shielded cable or better.
1. Connect one end of the network cable to your network hub, switch, or router.

55
2. Connect the other end of the cable to the projector's port.LAN
Parent topic: Wired Network Projection
Selecting Wired Network Settings
Before you can project from computers, tablets, or smartphones over your network, you must select the
network settings for the projector using its menu system.
Note: LANMake sure you already connected the projector to your wired network using the port.
1. Turn on the projector.
2. Press the button.Menu
3. Select the menu and press .Network Enter

56
4. Select and press .Network Configuration Enter
5. Select the menu and press .Basic Enter
6. Select the following basic options as necessary:
• lets you enter a name up to 16 alphanumeric characters long to identify theProjector Name
projector over the network.
• lets you enter a password up to 32 alphanumeric characters long for using thePJLink Password
PJLink protocol for projector control.
• lets you enter a password up to 8 alphanumeric characters long for accessingRemote Password
the Remote screen in Epson Web Control. (Default user name is ; defaultEPSONREMOTE
password is .)guest
• lets you enter a password up to 8 alphanumeric characters long forWeb Control Password
accessing Epson Web Control. (Default user name is ; default password is .)EPSONWEB admin
• lets you enter a password up to 4 numbers long for accessing the projectorModerator Password
as a moderator with the Epson iProjection (Windows/Mac) software or the Epson iProjection app.
• lets you turn on a security password to prevent access to the projector byProjector Keyword
anyone not in the room with it. The projector displays a random keyword that you must enter from
a computer using the Epson iProjection (Windows/Mac) software or an iOS or Android device
using the Epson iProjection app.
• lets you display a keyword on the projected image when accessing theDisplay Keyword
projector from a computer using the Epson iProjection (Windows/Mac) software or an iOS or
Android device using the Epson iProjection app.
57
• lets you select how the projector displays network information. You can selectDisplay LAN Info
an option to display a QR code that lets you quickly connect your iOS or Android devices using the
Epson iProjection app.
Note: Use the displayed keyboard to enter the name, passwords, and keyword. Press the arrow
buttons on the remote control to highlight characters and press to select them.Enter
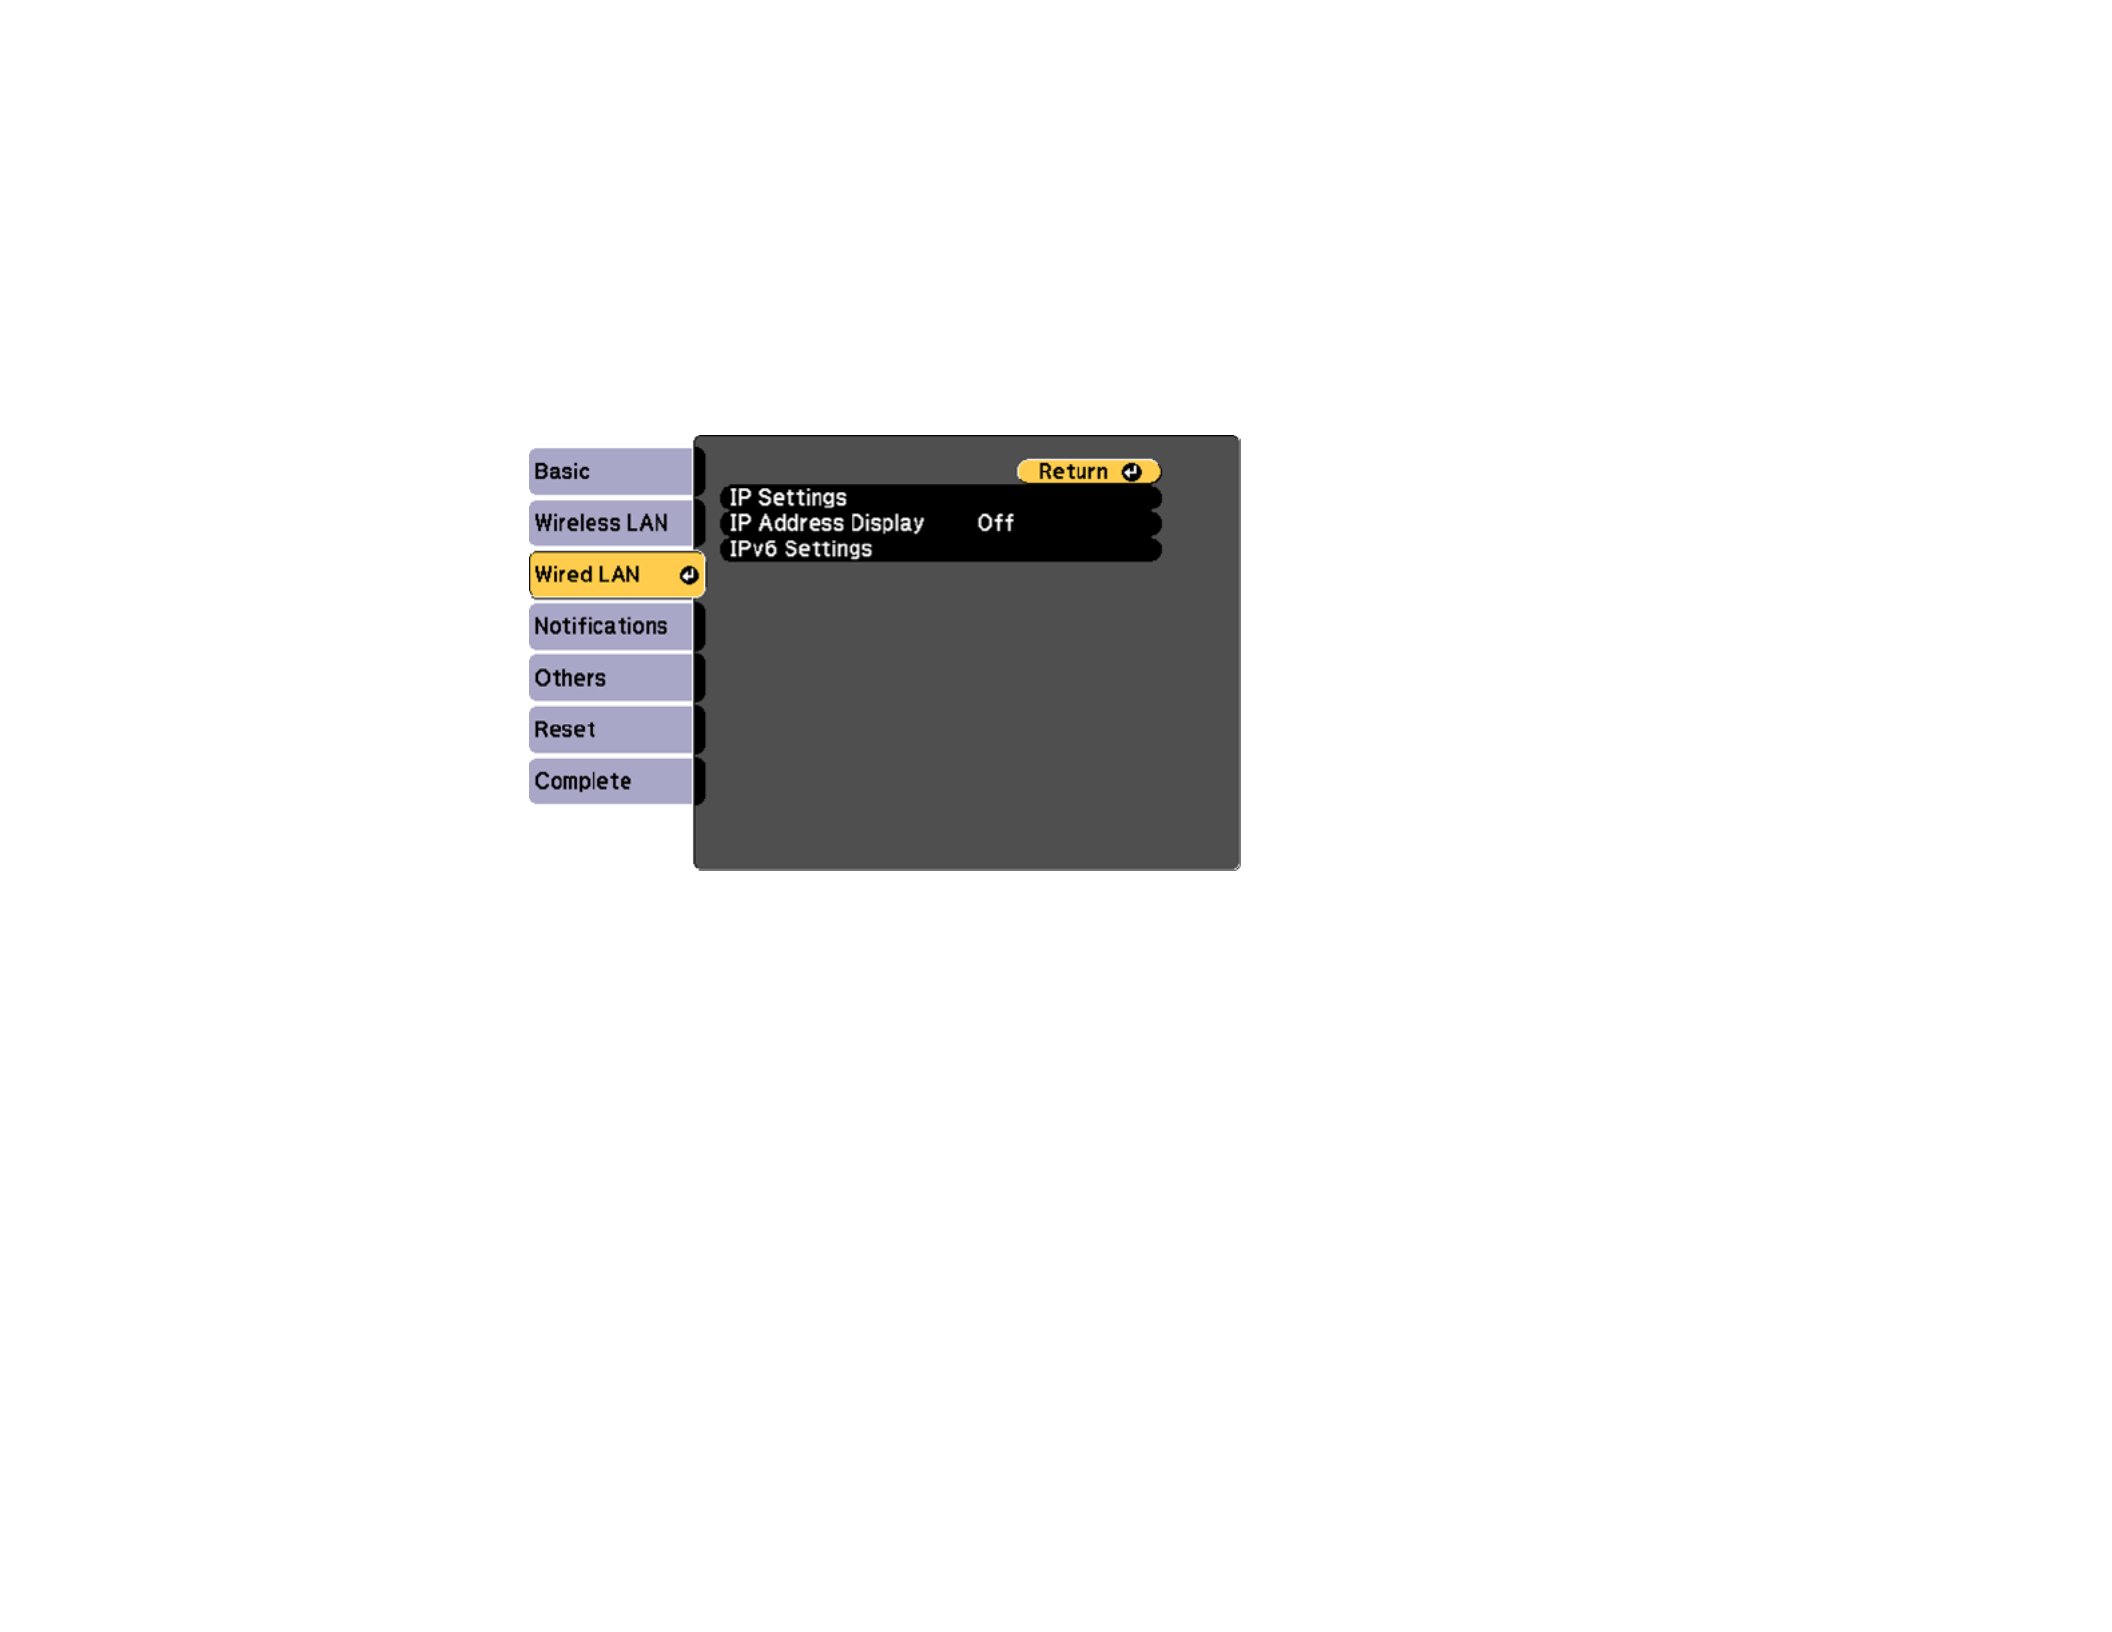
7. Select the menu and press .Wired LAN Enter
8. Select your IP Settings as necessary:
• If your network assigns addresses automatically, turn on the setting.DHCP
• If you must set addresses manually, turn off and enter the projector's ,DHCP IP Address Subnet
Mask Gateway Address, and as needed.
Note: To highlight the numbers you want from the displayed keyboard, press the arrow buttons on
the remote control. To select a highlighted number, press .Enter
9. To prevent display of the IP address on the standby screen, turn off .IP Address Display
10. To connect the projector to the network using IPv6, select as the option. ThenOn IPv6 Settings
select the and settings as necessary.Auto Configuration Use Temporary Address
11. When you finish selecting settings, select and follow the on-screen instructions to saveComplete
your settings and exit the menus.

58
Parent topic: Wired Network Projection
Wireless Network Projection
You can project over a wireless network. To do this, you must set up your projector and computer for
wireless projection.
Note: The Epson 802.11b/g/n wireless LAN module is not included with your projector and is optional.
After connecting and setting up the projector, install the projector software. You may need to install it
from a software CD, if included, or download the software and manuals as necessary.
Note: If your projector is connected via a LAN cable to a network that includes a wireless access point,
you can connect to the projector wirelessly through the access point using the Epson network software.
Installing the Wireless LAN Module
Using a QR Code to Connect a Mobile Device
Using Quick Wireless Connection (Windows)
Selecting Wireless Network Settings Manually
Selecting Wireless Network Settings in Windows
Selecting Wireless Network Settings on Mac
Setting Up Wireless Network Security
Parent topic: Using the Projector on a Network
Related references
Additional Projector Software and Manuals
Optional Equipment and Replacement Parts
Installing the Wireless LAN Module
To use the projector over a wireless network, install the optional Epson 802.11b/g/n wireless LAN
module. Do not install any other type of wireless LAN module.
Caution: Never remove the module while its indicator light is on or flashing, or while you are projecting
wirelessly. You may damage the module or lose data.
1. Turn off the projector and unplug the power cord.
59
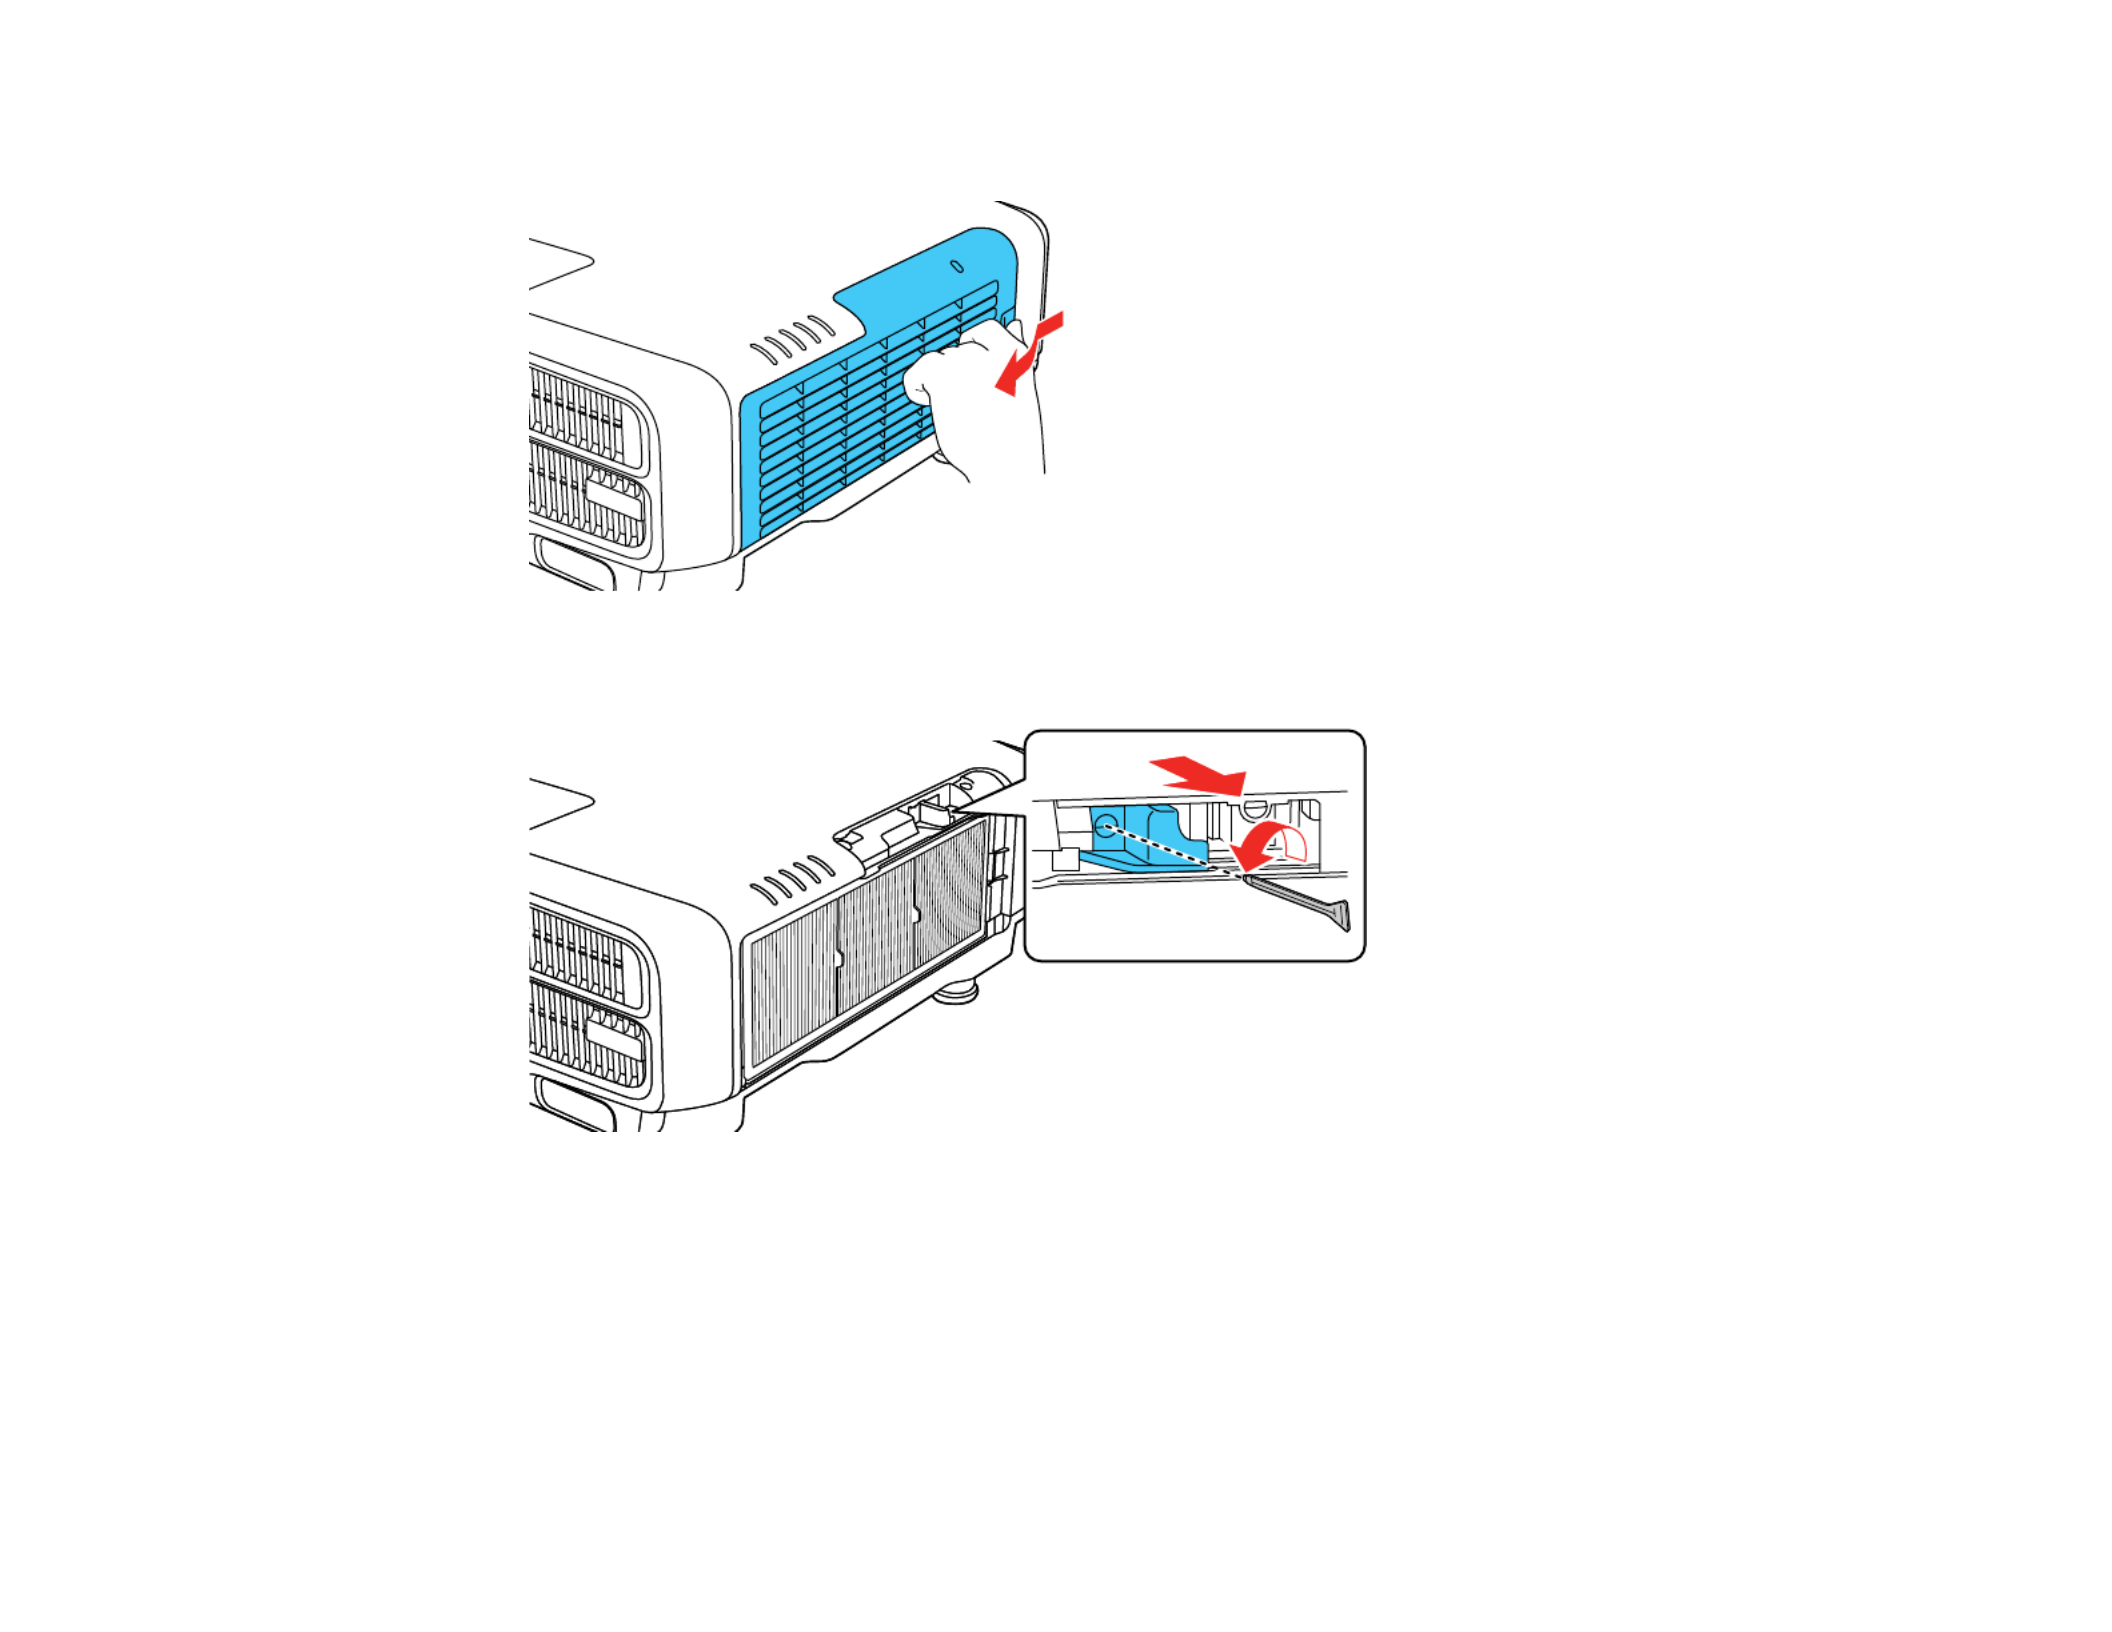
2. Slide the air filter cover latch and open the air filter cover.
3. Remove the screw securing the wireless LAN module stopper, then remove the stopper.

60
4. Insert the wireless LAN module into the port.
5. Replace the wireless LAN module stopper and secure it using the screw you removed.
6. Close the air filter cover.
7. Plug in and turn on the projector.
Parent topic: Wireless Network Projection
Related references
Optional Equipment and Replacement Parts

61
Using a QR Code to Connect a Mobile Device
After you select the wireless network settings for your projector, you can display a QR code on the
screen and use it to connect a mobile device using the Epson iProjection app.
Note: Make sure you have installed the latest version of Epson iProjection on your device. Visit
epson.com/iprojection epson.ca/iprojection(U.S.) or (Canada) for more information.
1. Press the button.Menu
2. Select the menu and press .Network Enter
3. Select and press .Network Configuration Enter

62
4. Select the menu and press .Basic Enter
5. Set the setting to .Display LAN Info Text & QR Code
6. Select and follow the on-screen instructions to save your settings and exit the menus.Complete
7. Do one of the following:
• Press the button on the remote control.LAN
• Select in the projector's Network menu.Display the QR Code
• Press the button on the remote control and select on the HomeHome Display the QR Code
screen.
Your projector displays the QR code on the projection surface.
Note: LAN EnterIf you do not see the QR code after pressing the button, press to display it.
8. Start Epson iProjection on your mobile device.
9. Use the QR code reader feature to read the QR code and connect your device to the projector. Visit
epson.com/iprojection epson.ca/iprojection(U.S.) or (Canada) for instructions.
Parent topic: Wireless Network Projection

63
Using Quick Wireless Connection (Windows)
You can create a Quick Wireless Connection USB Key to quickly connect the projector to a Windows
computer wirelessly. Then you can project your presentation and remove the key when you are done.
Note: A USB flash drive is not included with your projector.
1. Create a Quick Wireless Connection USB Key with a USB flash drive and the Epson iProjection
(Windows/Mac) software.
Note: See the for instructions.Epson iProjection Operation Guide (Windows/Mac)
2. Turn on the projector.
3. Press the button on the remote control.LAN
You see the LAN standby screen.
4. Verify that an SSID and IP address are displayed.
5. Remove the wireless LAN module from the projector.
6. Insert the USB key into the same port used for the wireless LAN module.
You see a projected message that the network information update is complete.
7. Remove the USB key.
8. Reinsert the wireless LAN module into the projector.
9. Insert the USB key into a USB port on your computer.
Note: Run MPPLaunch.exeIn Windows Vista, if you see the AutoPlay window, select , then select
Allow on the next screen.
10. Follow the on-screen instructions to install the Epson iProjection (Windows/Mac) software.
Note: YesIf you see a Windows Firewall message, click to disable the firewall. You need
administrator authority to install the software. If it is not installed automatically, double-click
MPPLaunch.exe in the USB key.
After a few minutes, your computer image is displayed by the projector. If it does not appear, press
the or button on your remote control or restart your computer.LAN Source Search
11. Run your presentation as necessary.

64
12. When you finish projecting wirelessly, select the option in the WindowsSafely Remove Hardware
taskbar, then remove the USB key from your computer.
Note: You can share the USB key with other computers without disconnecting your computer. You
may need to restart your computer to reactivate your wireless LAN connection.
Parent topic: Wireless Network Projection
Selecting Wireless Network Settings Manually
Before you can project from your wireless network, you must select the network settings for the projector
using its menu system.
1. Turn on the projector.
2. Press the button.Menu
3. Select the menu and press .Network Enter
4. Select and press .Network Configuration Enter
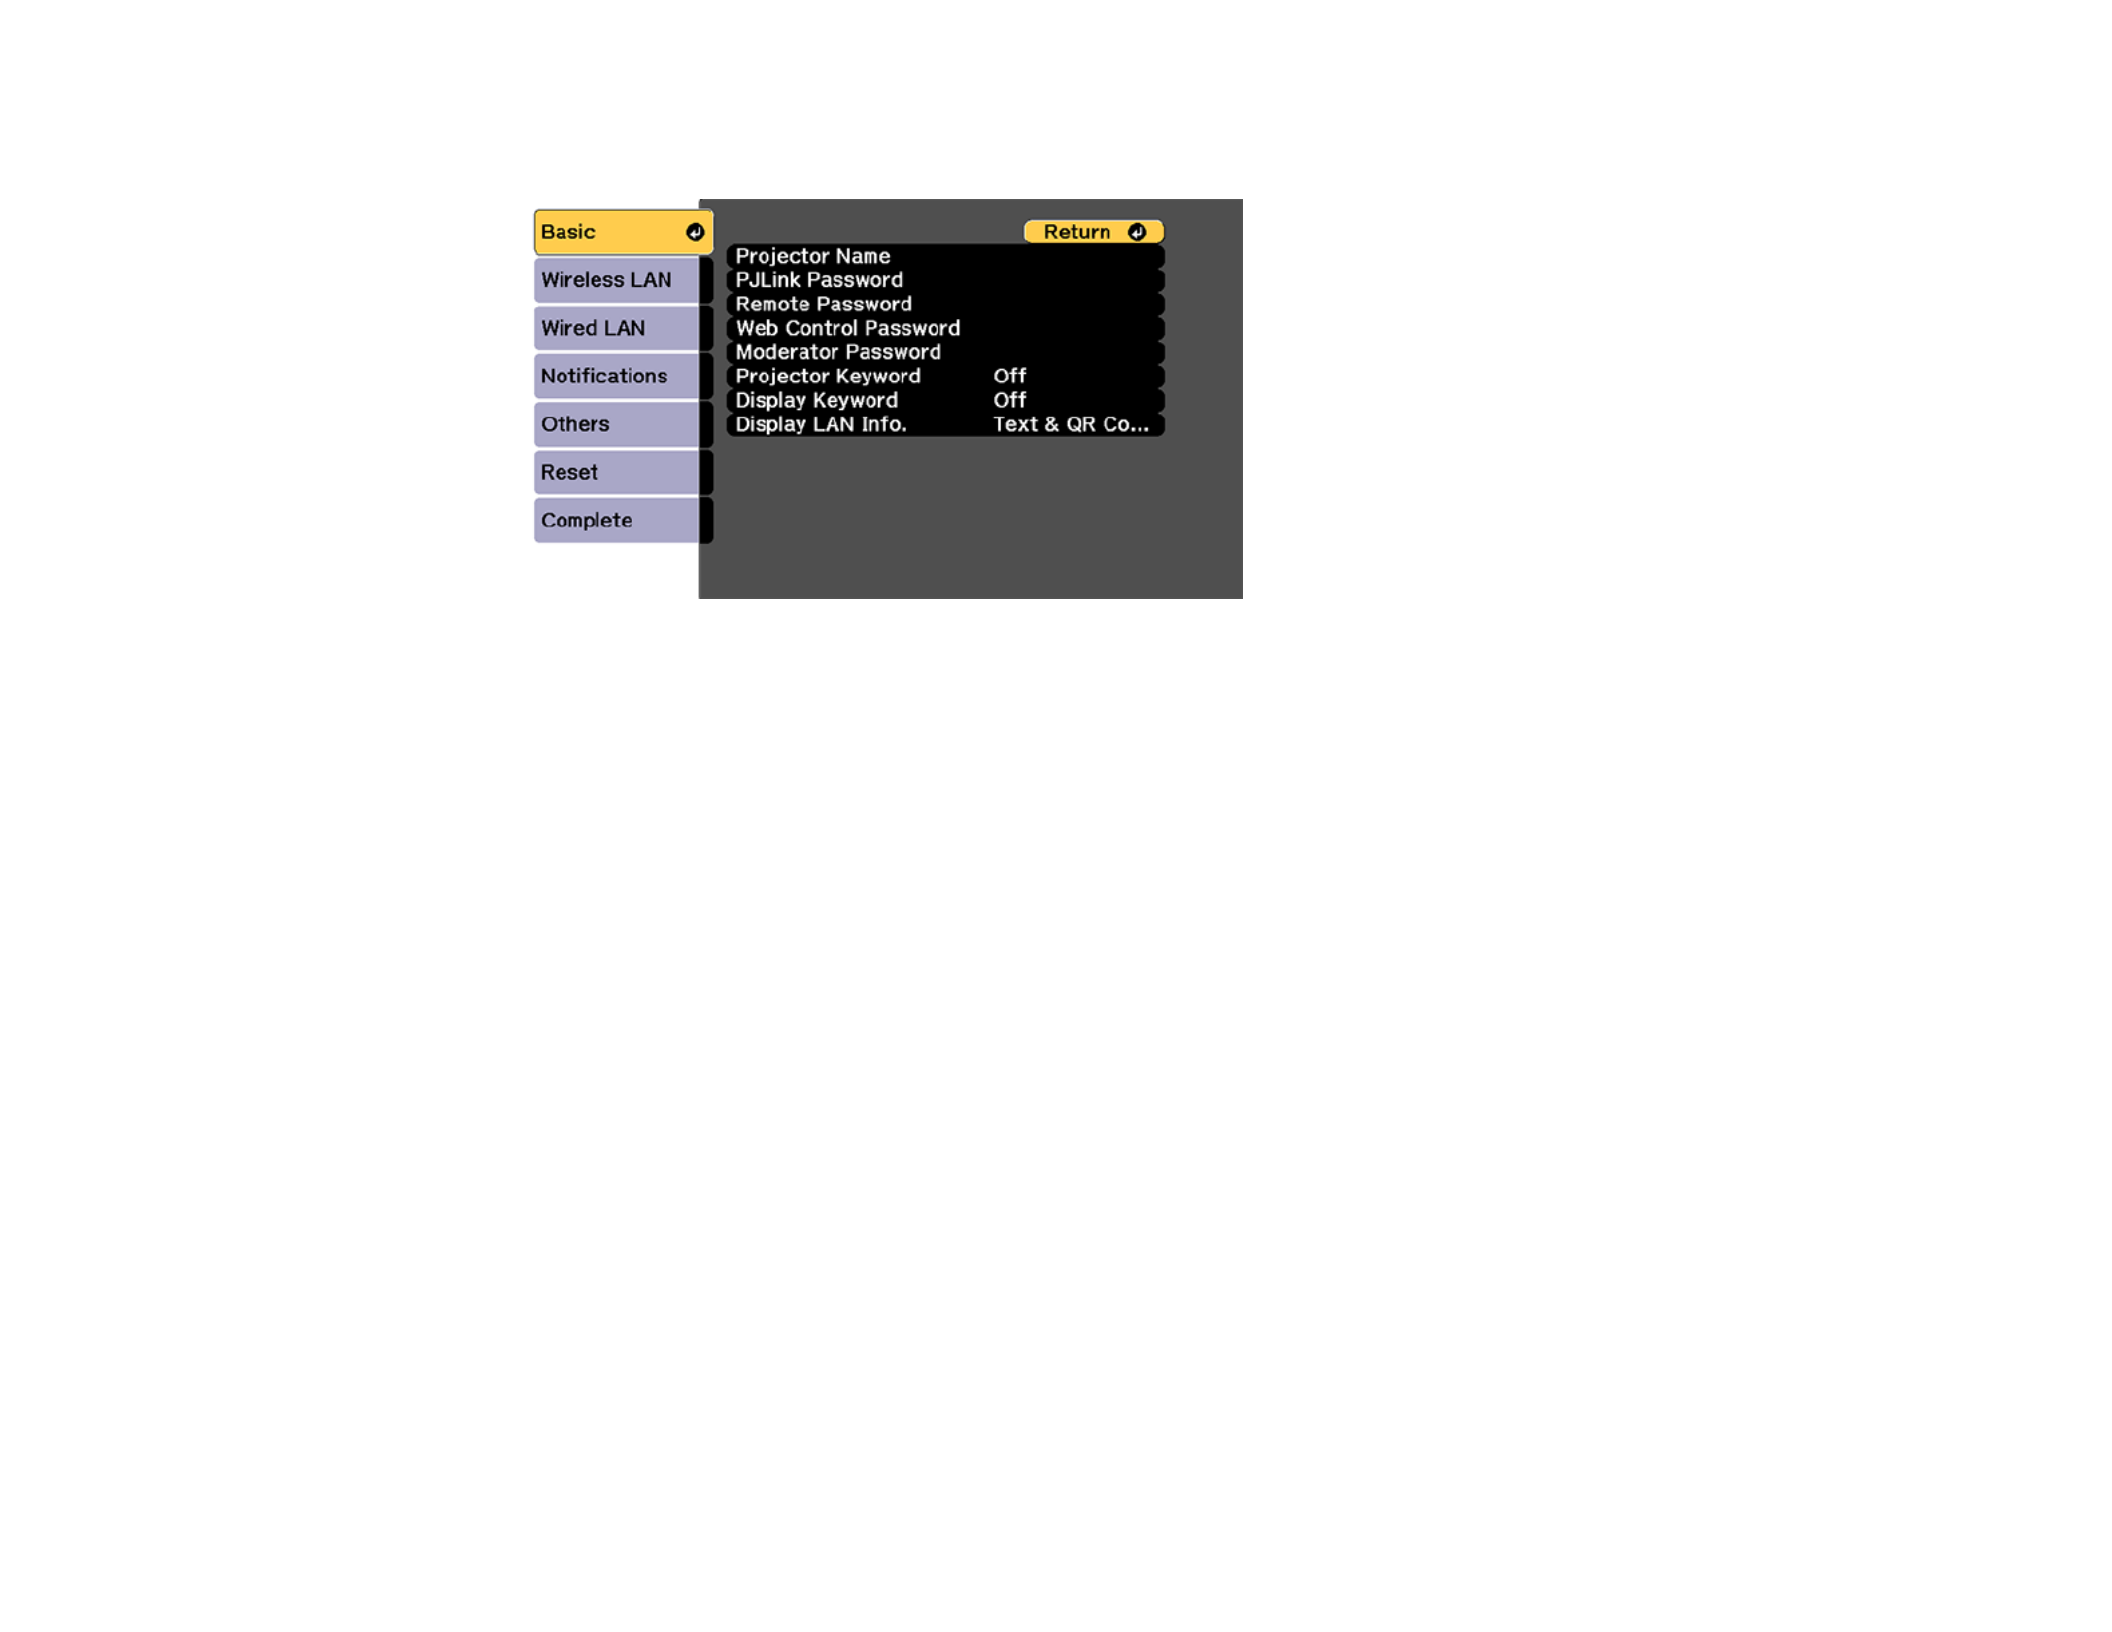
65
5. Select the menu and press .Basic Enter
6. Select the following basic options as necessary:
• lets you enter a name up to 16 alphanumeric characters long to identify theProjector Name
projector over the network.
• lets you enter a password up to 32 alphanumeric characters long for using thePJLink Password
PJLink protocol for projector control.
• lets you enter a password up to 8 alphanumeric characters long for accessingRemote Password
the Remote or Basic Control screen on a smartphone or tablet.
• lets you enter a password up to 8 alphanumeric characters long forWeb Control Password
accessing the projector over the web. (Default user name is ; default password isEPSONWEB
admin.)
• lets you enter a password up to 4 numbers long for accessing the projectorModerator Password
as a moderator with the Epson iProjection (Windows/Mac) software or the Epson iProjection app.
• lets you turn on a security password to prevent access to the projector byProjector Keyword
anyone not in the room with it. The projector displays a random keyword that you must enter from
a computer using the Epson iProjection (Windows/Mac) software or an iOS or Android device
using the Epson iProjection app.
• lets you display a keyword on the projected image when accessing theDisplay Keyword
projector from a computer using the Epson iProjection (Windows/Mac) software or an iOS or
Android device using the Epson iProjection app.

66
• lets you select how the projector displays network information. You can selectDisplay LAN Info
an option to display a QR code that lets you quickly connect your iOS or Android devices with the
Epson iProjection app.
Note: Use the displayed keyboard to enter the name, passwords and keyword. Press the arrow
buttons on the remote control to highlight characters and press to select them.Enter
7. Select the menu and press .Wireless LAN Enter
8. Select the settings on the menu as necessary for your network.Wireless LAN
9. When you finish selecting settings, select and follow the on-screen instructions to saveComplete
your settings and exit the menus.
After you complete the wireless settings for your projector, you need to select the wireless network on
your computer, or iOS or Android device.
Wireless LAN Menu Settings
Parent topic: Wireless Network Projection

67
Wireless LAN Menu Settings
Setting Options Description
Connection Mode Quick
Advanced
Selects the type of wireless
connection:
Quick: lets you connect to
multiple smartphones, tablets, or
computers directly
Advanced: lets you connect to
multiple smartphones, tablets, or
computers via a wireless network
access point
Search Access Point To Search View Search for available wireless
network access points in
Advanced connection mode
SSID Up 32 alphanumeric characters Sets the SSID (network name) of
the wireless LAN system the
projector is connecting to
Security Open
WPA2-PSK
WPA/WPA2-PSK
WPA2-EAP
WPA/WPA2-EAP
Selects the type of wireless
security used in the wireless
network (some options are only
available when the Connection
Mode setting is set to
Advanced)
Passphrase Between 8 to 63 alphanumeric
characters
Enter a paraphrase for the
wireless network
EAP Method EAP Type
User name
Password
Client Certificate
Verify Server Cert.
CA certificate
RADIUS Serv.Name
Sets the EAP settings for WPA2-
EAP and WPA/WPA2-EAP
security

68
Setting Options Description
Channel 1ch
6ch
11ch
In connection mode,Quick
selects the frequency band
(channel) used by the wireless
LAN
IP Settings DHCP
IP Address
Subnet Mask
Gateway Address
Turns on DHCP if your network
assigns addresses automatically;
set to to manually enter theOff
network's ,IP Address Subnet
Mask Gateway Address, and
(some options are only available
when the Connection Mode
setting is set to )Advanced
SSID Display On
Off
Selects whether to display the
SSID on the network standby
screen
IP Address Display On
Off
Selects whether to display the IP
address on the network standby
screen
IPv6 Settings IPv6
Auto Configuration
Use Temporary Address
Selects the IPv6 settings when
you connect the projector to the
network using IPv6
Parent topic: Selecting Wireless Network Settings Manually
Selecting Wireless Network Settings in Windows
Before connecting to the projector, select the correct wireless network on your computer.
1. To access your wireless utility software, access the Desktop and double-click the network icon on
the Windows taskbar.
2. Do one of the following:
• If your projector is set up on an existing network (Advanced mode), select the network name
(SSID).
• If your projector is configured for Quick mode, select the projector's SSID.
3. Click .Connect

69
Parent topic: Wireless Network Projection
Selecting Wireless Network Settings on Mac
Before connecting to the projector, select the correct wireless network on your Mac.
1. Click the AirPort icon on the menu bar at the top of the screen.
2. Make sure AirPort is turned on, then do one of the following:
• If your projector is set up on an existing network (Advanced mode), select the network name
(SSID).
• If your projector is configured for Quick mode, select the projector's SSID.
Parent topic: Wireless Network Projection
Setting Up Wireless Network Security
You can set up security for your projector to use on a wireless network. Set up one of the following
security options to match the settings used on your network:
• WPA2-PSK (Advanced connection mode)
• WPA2-EAP (Advanced and Quick connection mode)
• WPA/WPA2-PSK (Advanced connection mode)
• WPA/WPA2-EAP (Advanced connection mode)
Note: Contact your network administrator for guidance on entering the correct information.
1. If you want to set up WPA2-EAP or WAP/WAP2-EAP security, make sure your digital certificate file
is compatible with projector registration and placed directly on the USB storage device.
2. Press the button.Menu

70
3. Select the menu and press .Network Enter
4. Select and press .Network Configuration Enter
5. Select the menu and press .Wireless LAN Enter
6. Set the setting to match your network settings.Security
7. Do one of the following depending on the network security setting you selected:
• or : Select and follow the on-screen instructions to saveWPA2-PSK WPA/WPA2-PSK Complete
your settings and exit the menus. Skip the remaining steps.
• or : Select and press .WPA2-EAP WPA/WPA2-EAP EAP Method Enter

71
8. Select your authentication protocol as the setting.EAP Type
9. To import your certification, select the certificate type (either or )Client Certificate CA certificate
and press .Enter
Note: You can also register a digital certificate from your web browser. Make sure to register just
once or the certificate may not install correctly.
10. Select and press .Register Enter
11. Follow the on-screen instructions to connect a USB storage device to the projector's USB port.
12. Press to display the certificate list.Enter
13. Select the certificate to import from the displayed list.
You see a message to enter the certificate password.
14. Enter a password and press .Enter
You see a completion message after the certificate is imported.
15. Set the following EAP settings as necessary:
• lets you enter a user name up to 64 alphanumeric characters long. To enter more thanUser name
32 characters, use your web browser.
• lets you enter a password up to 64 alphanumeric characters long when using thePassword
PEAP, EAP-FAST, or LEAP protocols. To enter more than 32 characters, use your web browser.
• lets you select whether or not to verify the server certificate when a CAVerify Server Cert.
certificate has been set.
• lets you enter the server name to be verified.RADIUS Serv.Name
16. When you finish selecting settings, select and follow the on-screen instructions to saveComplete
your settings and exit the menus.
Parent topic: Wireless Network Projection
Setting Up Projector Network E-Mail Alerts
You can set up the projector to send you an e-mail alert over the network if there is a problem with the
projector.
1. Press the button.Menu
2. Select the menu and press .Network Enter
3. Select and press .Network Configuration Enter

72
4. Select the menu and press .Notifications Enter
5. Turn on .Mail Notification
6. Enter the IP address for the setting.SMTP Server
Note: Do not use these addresses: 127.x.x.x or 224.0.0.0 through 255.255.255.255 (where x is a
number from 0 to 255).
7. Select a number for the SMTP server setting, from 1 to 65535 (default is 25).Port Number
8. Enter the sender's email address as the setting.From
9. Choose an field, enter the e-mail address, and select the alerts you want to receive there.Address
Repeat for up to three addresses. Your e-mail address can be up to 32 alphanumeric characters
long.
10. If you are using the PJLink protocol for projector control, turn on the setting andPJLink Notification
enter the IP address where you want to receive PJLink notifications as the Notified IP Address
setting.
11. When you finish selecting settings, select and follow the on-screen instructions to saveComplete
your settings and exit the menus.
Note: If a critical problem causes a projector to shut down, you may not receive an e-mail alert.
Network Projector E-mail Alert Messages

73
Parent topic: Using the Projector on a Network
Network Projector E-mail Alert Messages
When a problem occurs with a networked projector, and you selected to receive e-mail alerts, you
receive an e-mail containing the following information:
• The email address entered as the settingFrom
• on the subject lineEpson Projector
• The name of the projector experiencing a problem
• The IP address of the affected projector
• Detailed information about the problem
Note: If a critical problem causes a projector to shut down, you may not receive an e-mail alert.
Parent topic: Setting Up Projector Network E-Mail Alerts
Selecting Other Network Settings
You can select optional network settings on the Others menu.
1. Press the button.Menu
2. Select the menu and press .Network Enter
3. Select and press .Network Configuration Enter
4. Select the menu and press .Others Enter

74
5. If you want to use the Secure HTTP protocol to encrypt communication when using Web Control,
turn on the setting and import the web server certificate using theSecure HTTP Web Server Cert.
setting.
6. If available, select the setting for your network.Priority Gateway
7. If your network environment uses an AMX controller, turn on the setting toAMX Device Discovery
allow the projector to be detected.
8. If your network environment uses a Crestron RoomView controller, turn on the Crestron RoomView
setting to allow the projector to be detected.
Note: Enabling Crestron RoomView disables the Epson Message Broadcast feature in the EasyMP
Monitor software.
9. If your network environment uses a Control4 or Control4 SDDP controller, turn on the Control4
SDDP setting to allow the projector to be detected.
10. If you want to control the projector using Art-Net (an Ethernet communication protocol based on
TCP/IP), turn on the setting.Art-Net
11. If you want this projector to receive broadcasted messages over the network, turn on the Message
Broadcasting setting. Administrators can broadcast messages over the network using the Epson
Projector Management software (Windows only).
12. When you finish selecting settings, select and follow the on-screen instructions to saveComplete
your settings and exit the menus.
Parent topic: Using the Projector on a Network
Controlling a Networked Projector Using a Web Browser
Once you have connected your projector to your network, you can select projector settings and control
projection using a compatible web browser. This lets you access the projector remotely.
Note: The web setup and control features support Microsoft Internet Explorer 9.0 or later, and Safari on
networks that do not use a proxy server for connection. You cannot select all of the projector menu
settings or control all projector functions using a web browser.
Note: Communication OnIf you set Standby Mode to , you can use a web browser to select settings
and control projection even if the projector is in standby mode.
1. Make sure the projector is turned on.
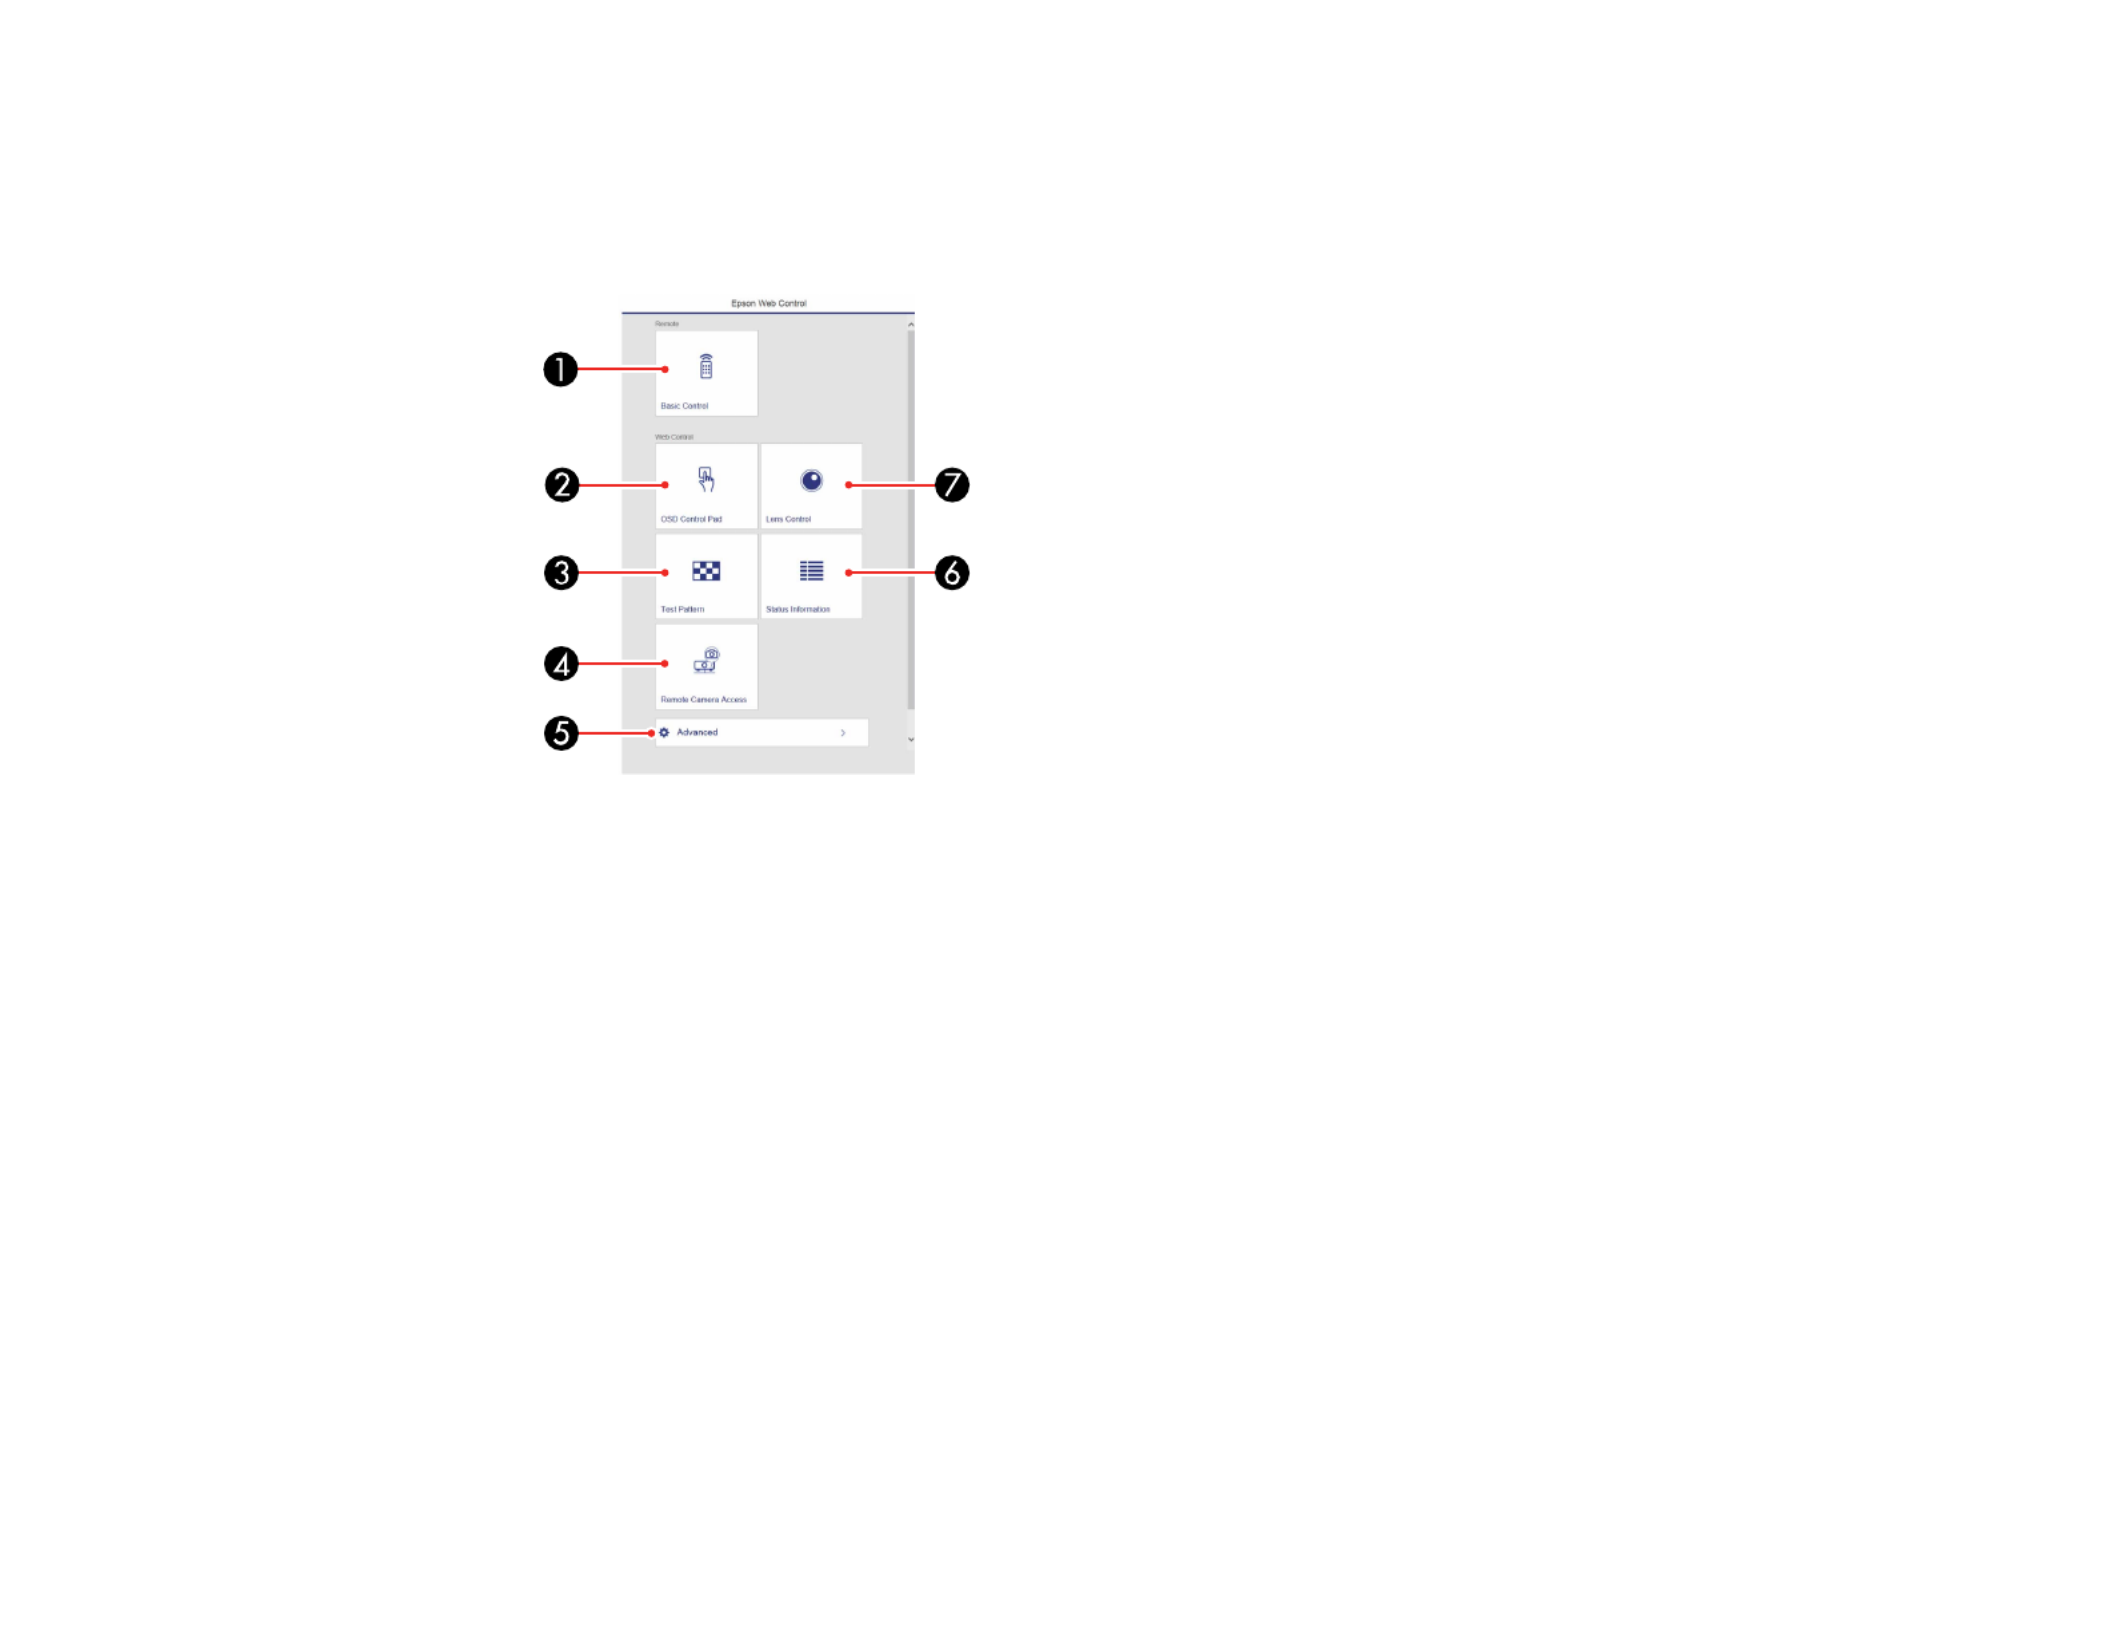
75
2. Start your web browser on a computer or device connected to the network.
3. Type the projector's IP address into the browser's address box and press the computer's key.Enter
You see the Epson Web Control screen.
1 Select to control the projector remotely.Basic Control
2 Select to change the projector's menu settings.OSD Control Pad
3 Select to display a test patternTest Pattern
4 Select to take an image capture of the displayed image from aRemote Camera Access
remote location
5 Select to open the advanced menu screen.Advanced
6 Select to view the projector's status.Status Information
7 Select to adjust the lens (focus, zoom, and lens shift).Lens Control
4. Select the option corresponding to the projector function you want to control.
Web Control Options
Viewing an Image Capture of the Displayed Image from a Remote Location
Parent topic: Using the Projector on a Network
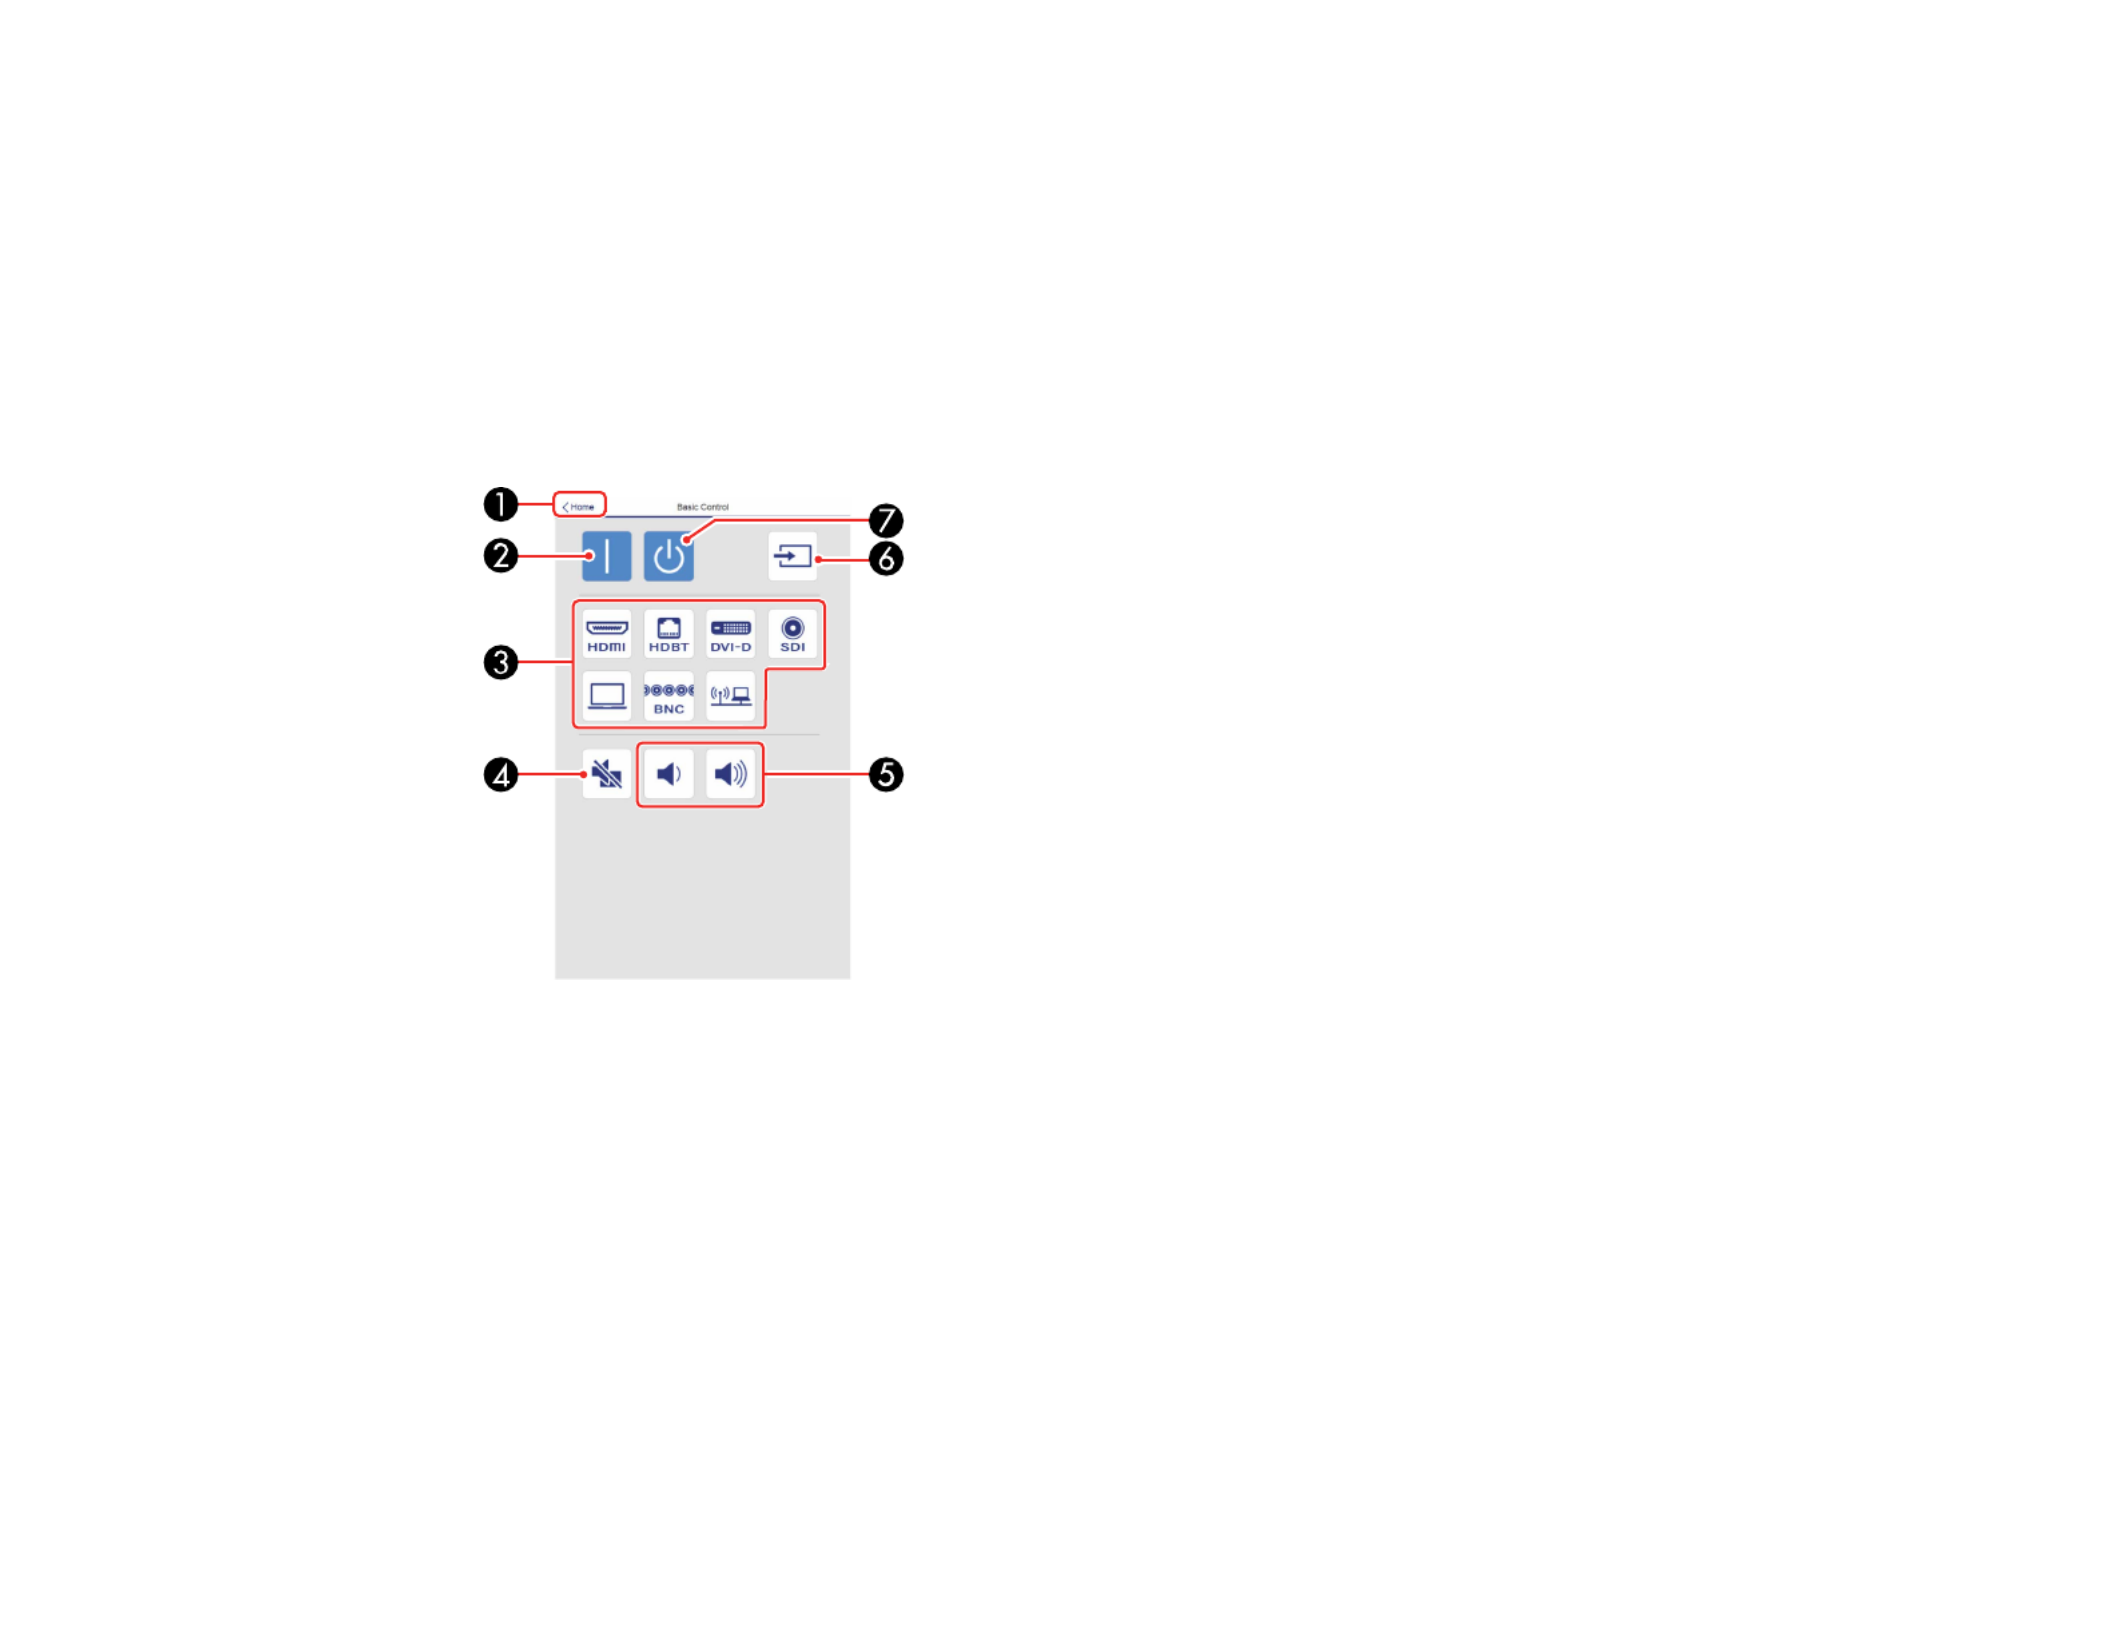
76
Related references
Projector Setup Settings - Extended Menu
Web Control Options
Basic Control
Note: OnIf the Remote Password is set to , you need to enter your user name and password. (The
default username is and the default password is ).EPSONREMOTE guest
1 Returns to the Home screen
2 Turns on the projector
3 Input source selection controls
4 button controlA/V Mute
5 button controlsVolume
6 Searches for sources
7 Turns off the projector

77
OSD Control Pad
1 Returns to the Home screen
2 Displays the projector's setting menus
3 Use your finger or mouse to navigate the menus
4 Returns settings to their default values
5 Returns to the previous menu
6 Displays help topics
Note: You cannot change some settings using Epson Web Control.

78
Lens Control
Focus/Distortion screen
1 Returns to the Home screen
2 Focus adjustment slider
3 Focus adjustment buttons
4 Distortion adjustment slider (not available for ELPLU02)
5 Distortion adjustment buttons (not available for ELPLU02)
6 Displays the Focus/Distortion screen
7 Displays the Zoom screen
8 Displays the Lens Shift screen
9 Displays the Test Pattern screen
10 Displays the Memory screen
Zoom screen

79
Note: Zoom is not available for the ELPLX02 and ELPLR04 lenses.
1 Zoom adjustment slider
2 Zoom adjustment buttons
Lens Shift screen
1 The blue square displays the current image position and the red square displays the new image
position

80
2 Displays the vertical image position; select to change the value
3 Moves the image position up, down, left, or right
4 Moves the lens to the home position
5 Displays the horizontal image position; select to change the value
Test Pattern screen
1 Displays available test patterns; select to project a test pattern
2 Turns off test pattern display

81
Memory screen
1 Overwrites your current settings with saved settings
2 Saves your current settings to memory
3 Displays a list of saved memories
4 Erases a saved memory
5 Renames a saved memory
Status Information screen

82
1 Returns to the Home screen
2 Displays a list of monitored settings
3 Displays the setting status
4 Select to view different status information
Remote Camera Access screen
1 Displays the image you captured using the buttonShoot
2 Takes a picture of the projected image using the camera on the front of the projector
3 Adjusts the image exposure
4 Zooms in or out on the image you captured
Parent topic: Controlling a Networked Projector Using a Web Browser
Viewing an Image Capture of the Displayed Image from a Remote Location
You can take an image capture of the projected image and view it from a remote location using the
projector's built-in camera.
Note the following when using this feature:
• This feature is not supported with the ELPLX02 lens.
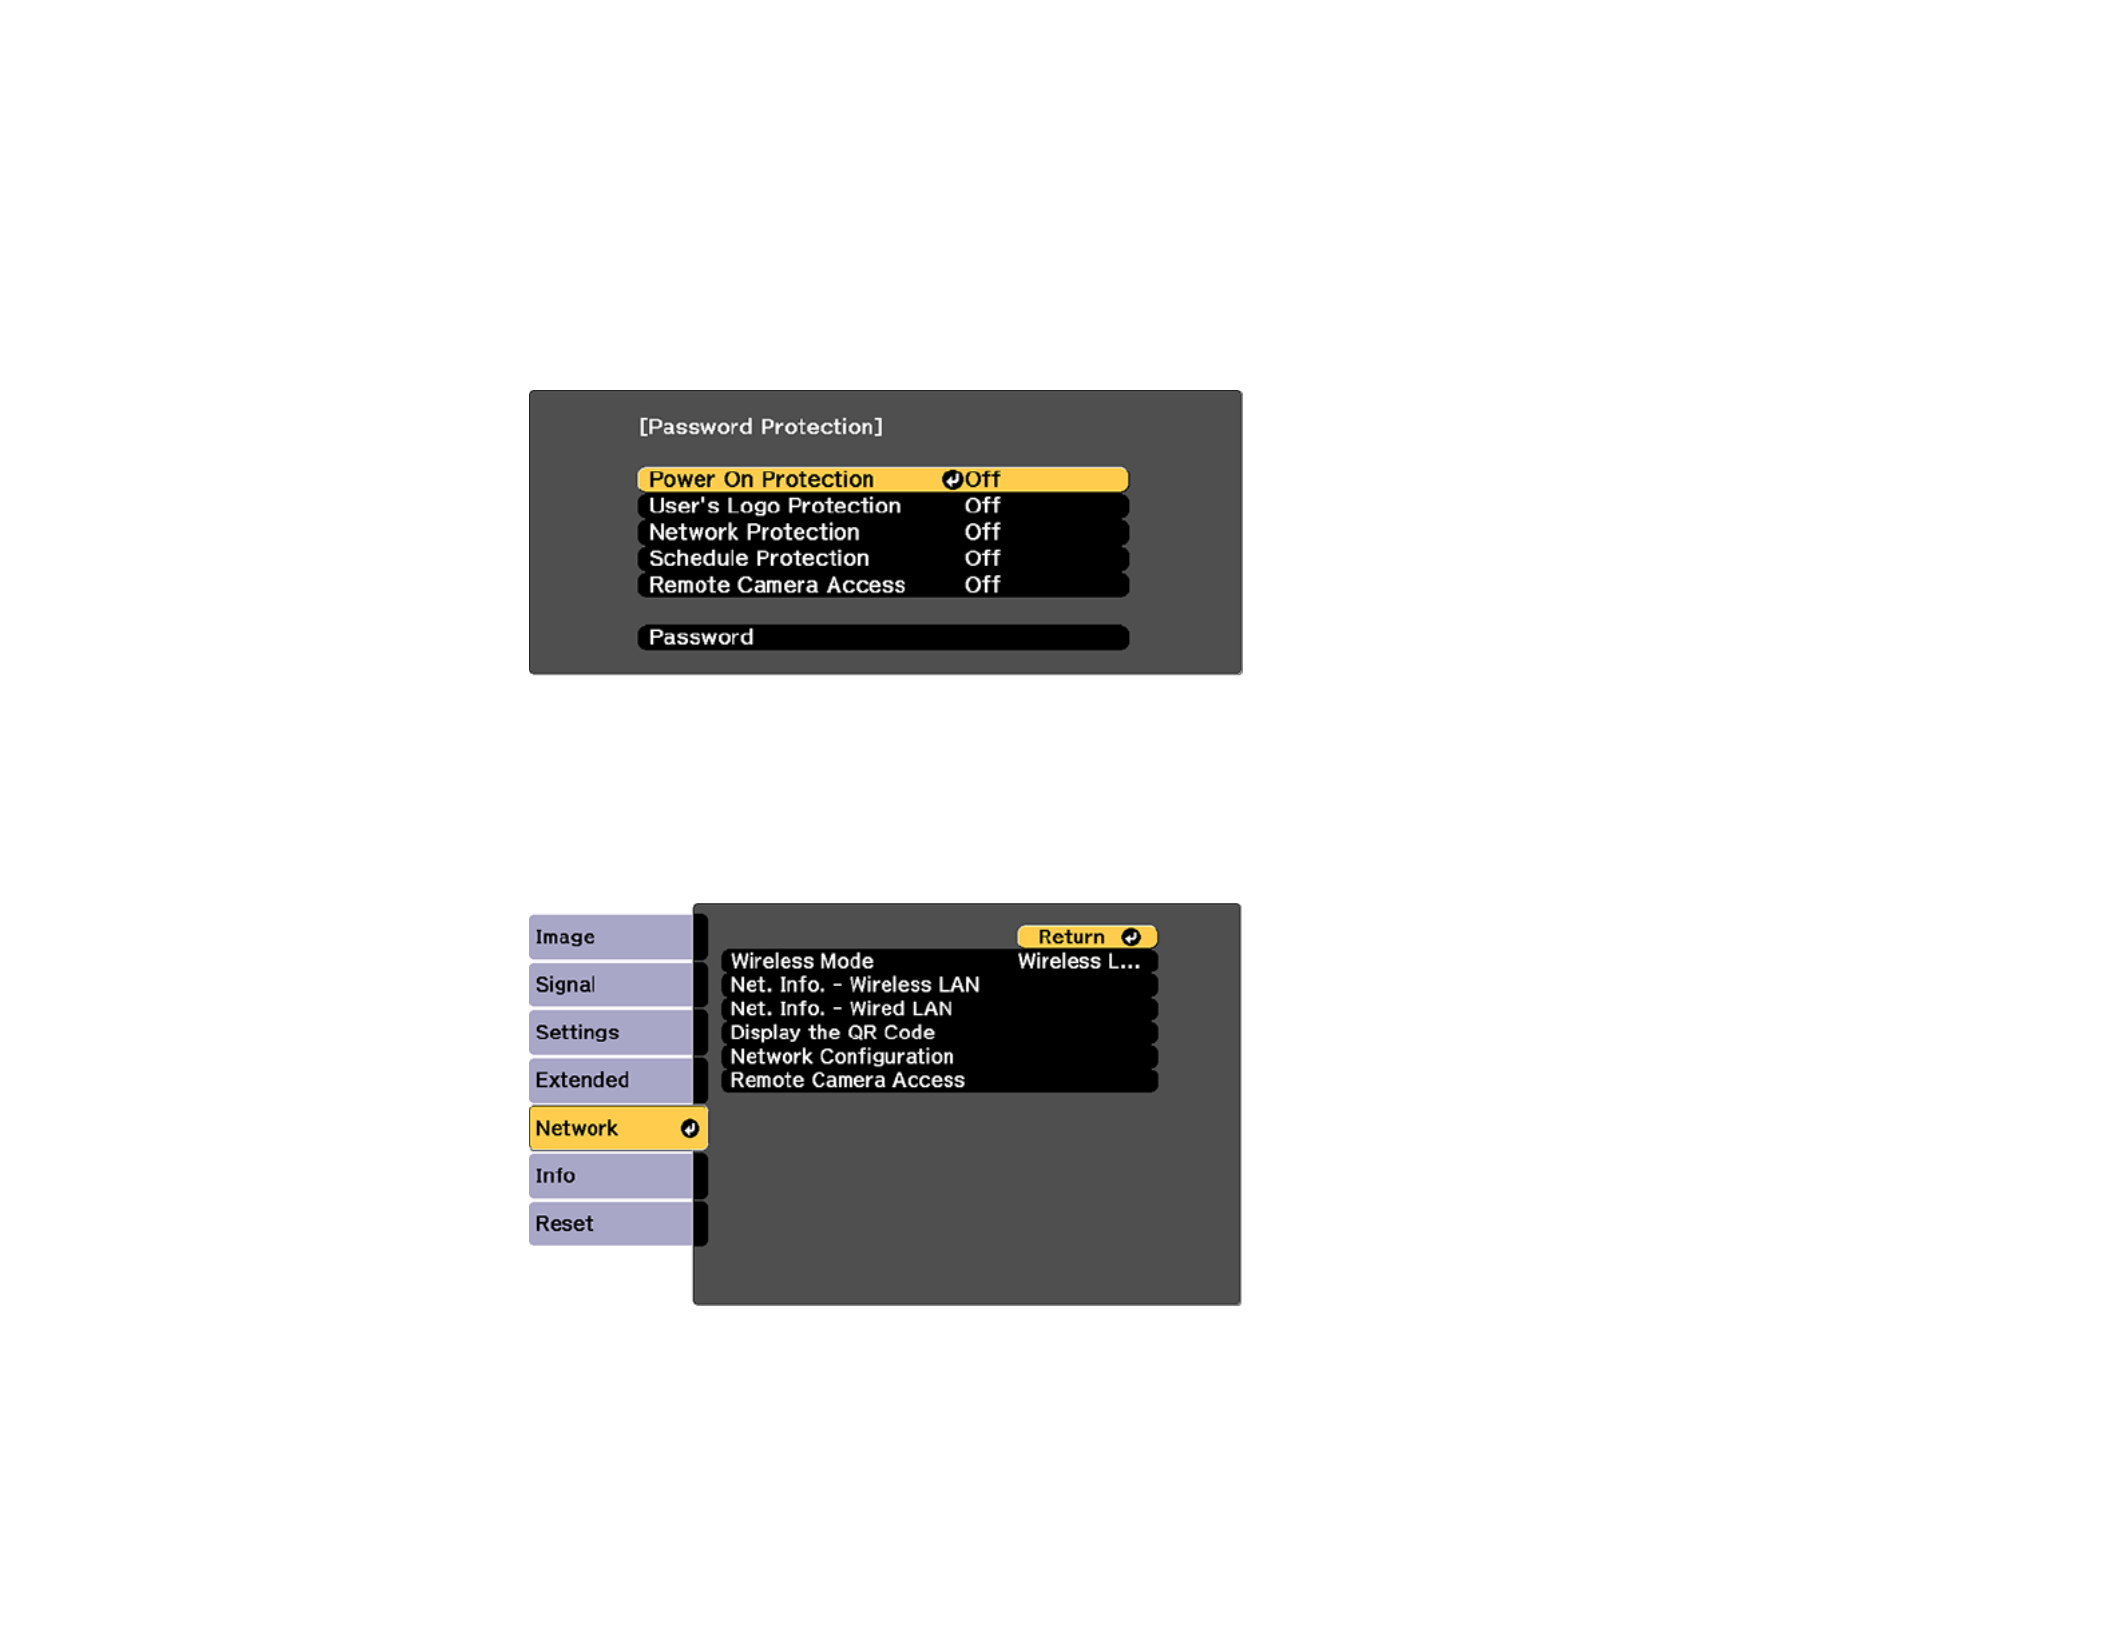
83
• This feature is not supported when performing the following functions: Tiling, Screen Matching, Color
Calibration, Lens Calibration, Message Broadcasting in the Epson Projector Management software.
• Using this feature will cancel the following functions: Split Screen, A/V Mute, display of the Home
screen, On-Screen Display.
1. Hold down the button on the remote control for about five seconds or until you see thisFreeze
menu.
2. Make sure the setting is set to then exit the menu.Remote Camera Access Off,
3. Press the button.Menu
4. Select the menu and press .Network Enter
5. Make sure the setting is enabled by selecting > >Secure HTTP Network Configuration Others
Secure HTTP On> , then return to the Network menu.

84
6. Select on the Network menu and press .Remote Camera Access Enter
You see a screen like this:
7. Select as the setting.On Remote Camera Access
8. Select the setting and enter a password up to 32 alphanumeric characters long.Password
9. Open a web browser on a computer or mobile device connected to the projector over a network
connection.
10. Enter the projector's IP address in your browser's address box to connect to Epson Web Control.

85
You see a screen like this:
Note: Net. Info. - Wireless LAN Net. Info. -You can view the projector's IP address by selecting or
Wired LAN on the Network menu.
11. Select .Remote Camera Access
Note: You may need to log in to access some of the options on the Epson Web Control screen. If
you see a log in window, enter your user name and password. (The default user name is
EPSONWEB adminand the default password is .)

86
12. Click to take a capture of the projected image.Shoot
Note: If you see a password screen, enter the password you selected in step 8. You cannot capture
warning or caution messages.
The projector displays a message on the projection screen for several seconds while it takes an
image capture. When finished, the captured image is displayed in the area above the button.Shoot
Parent topic: Controlling a Networked Projector Using a Web Browser
Crestron RoomView Support
If you are using the Crestron RoomView network monitoring and control system, you can set up your
projector for use on the system. Crestron RoomView lets you control and monitor your projector using a
web browser.
Note: You cannot use the Epson Web Control feature or the Message Broadcasting tool for Epson
Projector Management when you use Crestron RoomView.
For additional information on Crestron RoomView, contact Crestron.
Setting Up Crestron RoomView Support
Controlling a Networked Projector Using Crestron RoomView

87
Parent topic: Using the Projector on a Network
Setting Up Crestron RoomView Support
To set up your projector for monitoring and control using a Crestron RoomView system, make sure your
computer and projector are connected to the network.
Note: If you want to use the Crestron RoomView system when the projector is turned off, you need to
adjust the settings in the Extended menu.Standby Mode
1. Press the button.Menu
2. Select the menu and press .Network Enter
3. Select and press .Network Configuration Enter
4. Select the menu and press .Others Enter
5. Set the setting to to allow the projector to be detected.Crestron RoomView On
Note: Enabling Crestron RoomView disables the Epson Message Broadcasting feature in the Epson
Projector Management software.
6. When you finish selecting settings, select and follow the on-screen instructions to saveComplete
your settings and exit the menus.
7. Turn off the projector, then turn it on again to enable the setting.

88
Parent topic: Crestron RoomView Support
Related references
Projector Setup Settings - Extended Menu
Controlling a Networked Projector Using Crestron RoomView
Once you have set up your projector to use Crestron RoomView, you can control and monitor projection
using a compatible web browser.
1. Start your web browser on a computer connected to the network.
2. Type the projector's IP address into the browser's address box and press the computer's key.Enter
You see this screen:
3. Select the input source that you want to control in the Sources List box. You can scroll through
available sources using the up and down arrows in the box.
4. To control projection remotely, click the on-screen buttons that correspond to the projector's remote
control buttons. You can scroll through button options at the bottom of the screen.
Note: These on-screen buttons do not directly correspond to the projector's remote control buttons:
• acts as the buttonOK Enter
• displays the projector's menuMenu
5. To view information about the projector, click the tab.Info

89
6. To change projector, Crestron, and password settings, click the tab, select settings on theTools
displayed screen, and click .Send
7. When you finish selecting settings, click to exit the program.Exit
Parent topic: Crestron RoomView Support

90
Using Basic Projector Features
Follow the instructions in these sections to use your projector's basic features.
Turning On the Projector
Turning Off the Projector
Selecting the Language for the Projector Menus
Resizing the Image with the Zoom Button
Focusing the Image Using the Focus Buttons
Setting the Lens Type
Setting the Screen Type
Adjusting the Image Position Using Lens Shift
Adjusting the Image Position Using Screen Position
Displaying a Test Pattern
Adjusting the Image Height
Image Shape
Selecting an Image Source
Remote Control Operation
Projection Modes
Image Aspect Ratio
Color Mode
Adjusting the Brightness
Turning On Automatic Luminance Adjustment
Controlling the Volume with the Volume Buttons
Setting the Date and Time
Turning On the Projector
Turn on the computer or video equipment you want to use before you turn on the projector so it can
display the image source.
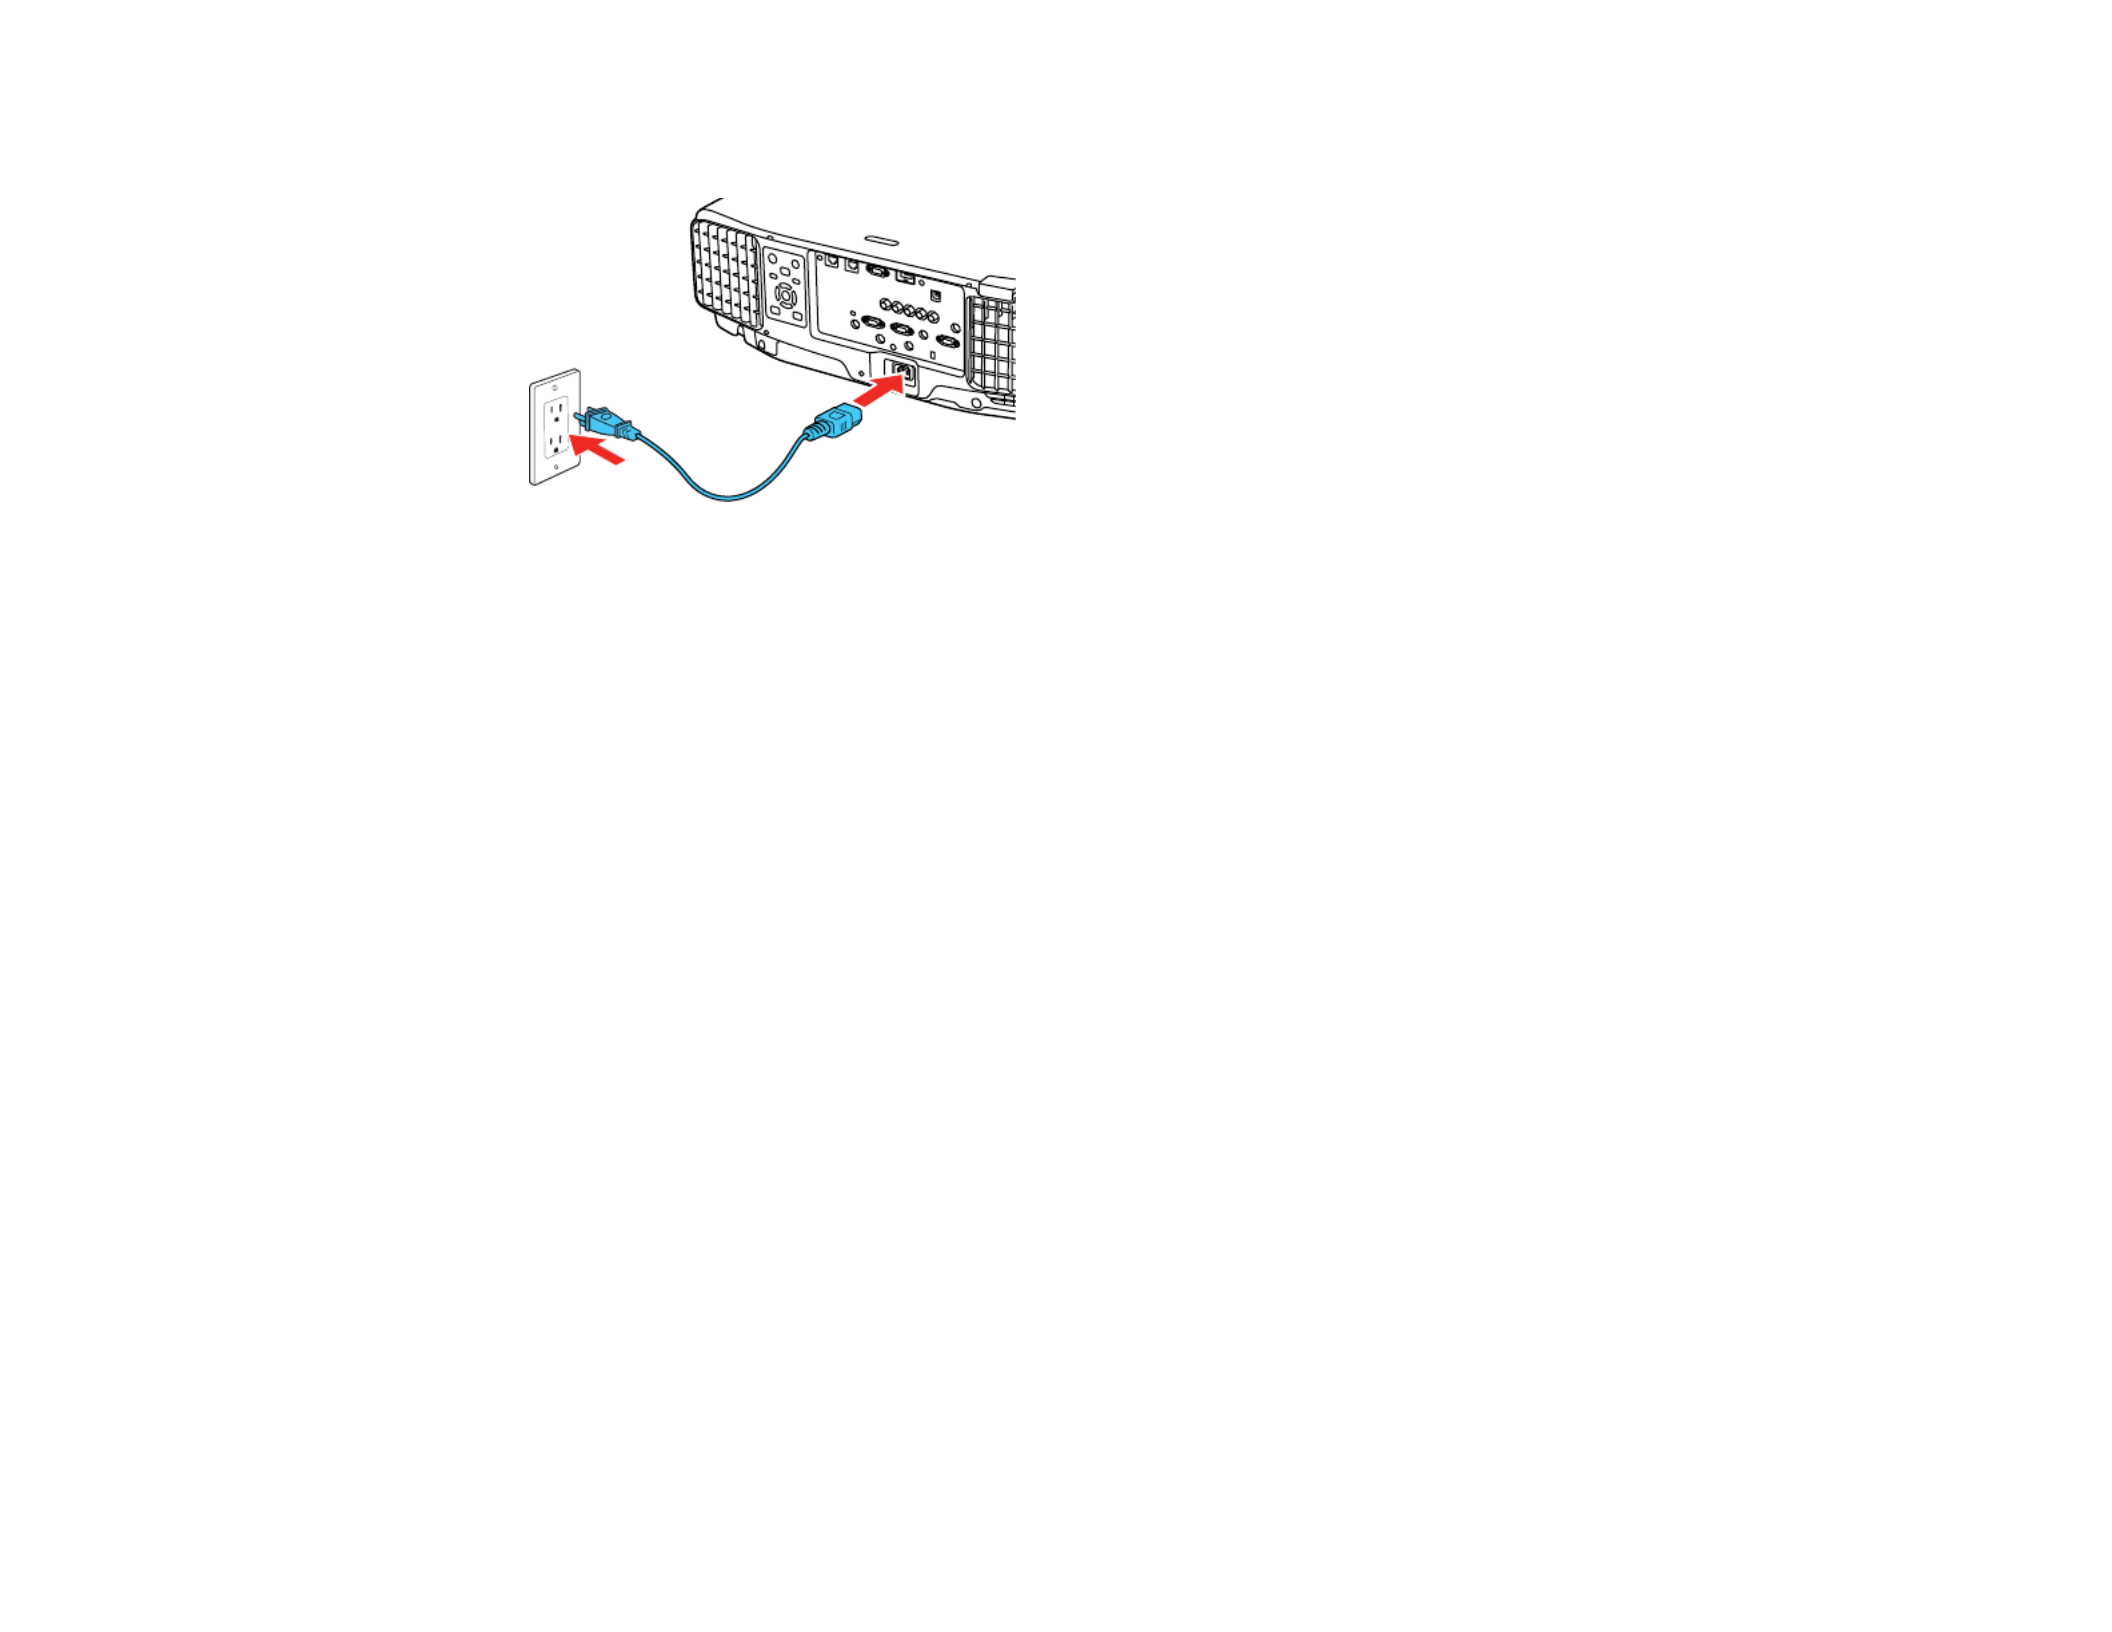
91
1. Connect the power cord to the projector's power inlet.
2. Plug the power cord into an electrical outlet.
The projector's On/Standby light turns blue. This indicates that the projector is receiving power.
Note: Direct Power OnWith turned on, the projector turns on as soon as you plug it in.
3. Press the button on the projector or remote control to turn on the projector.On
The projector beeps and the Status light flashes blue as the projector warms up. After about 30
seconds, the Status light stops flashing and turns blue.
Warning: Never look into the projector lens when the laser is on. This can damage your eyes and is
especially dangerous for children and pets.
Caution: Make sure no objects are blocking the light from the projector lens. Objects blocking the
lens for an extended time can melt and light that is reflected back into the lens can cause the
projector to malfunction.
If you do not see a projected image right away, try the following:
• Make sure the lens cap is off.
• Turn on the connected computer or video device.
• Insert a DVD or other video media and press the play button, if necessary.
• Press the button on the projector or the button on the remote control to detectSource Search Search
the video source.

92
Note: Auto Source SearchIf the setting in the Extended menu is enabled, the projector automatically
detects the input signal when you turn it on.
• Change the screen output from the computer when using a laptop.
• Press the button for the video source on the remote control.
• If the Home screen is displayed, select the source you want to project.
Using the Home Screen
Parent topic: Using Basic Projector Features
Related references
Projector Setup Settings - Extended Menu
Related tasks
Turning Off the Projector
Using the Home Screen
You can select input sources and other frequently used options from the Home screen.
1. To display the Home screen, do one of the following:
• Press the button on the remote control.Home
• Turn on the projector with the setting enabled.Home Screen Auto Disp
• Turn on the projector when no signal is received from the selected input source.

93
2. Press the arrow buttons on the remote control or control panel to navigate the screen, and press
Enter to select an option.
1 Select the video source you want to project
2 Display the QR code
3 Display the Help screen
4 Display the projector's menus
5 Select customizable menu options
6 Select to change the Light Source Mode
7 Select to change the Color Mode
Note: Custom Function 1 CustomYou can select the customizable menu options using the and
Function 2 settings in the Extended menu.
3. Press the button to hide the Home screen.Home
Parent topic: Turning On the Projector
Related references
Projector Setup Settings - Extended Menu

94
Turning Off the Projector
Before turning off the projector, shut down any computer connected to it so you can see the computer
display during shutdown.
Note: Turn off this product when not in use to prolong the life of the projector. Laser life will vary
depending upon mode selected, environmental conditions, and usage. Brightness decreases over time.
1. Press the button on the projector or remote control.Standby
The projector displays a shutdown confirmation screen.
2. Press the button on the projector or remote control again. (To leave it on, press any otherStandby
button.)
The projector beeps twice, the laser turns off, and the Status light turns off.
Note: With Epson's Instant Off technology, there is no cool-down period so you can pack up the
projector for transport right away (if necessary).
3. To transport or store the projector, make sure the Status light is off, then unplug the power cord.
Parent topic: Using Basic Projector Features
Related tasks
Turning On the Projector
Selecting the Language for the Projector Menus
If you want to view the projector's menus and messages in another language, you can change the
Language setting.
1. Turn on the projector.

95
2. Press the button.Menu
3. Select the menu and press .Extended Enter
4. Select the setting and press .Language Enter
5. Select the language you want to use and press .Enter
6. Press or to exit the menus.Menu Esc
Parent topic: Using Basic Projector Features
Resizing the Image with the Zoom Button
You can adjust the size of the image using the zoom buttons. Zoom is not available for the ELPLX02 and
ELPLR04 lenses.
Note: Wait 20 minutes after turning on the projector before setting the focus, zoom, and lens shift for
maximum accuracy.
1. Turn on the projector and display an image.

96
2. Press the button on the control panel repeatedly until the zoom adjustment screen appears, orLens
press the button on the remote control.Zoom
3. Press and hold the arrow buttons on the projector's control panel or remote control to resize the
image.
4. Press the button when finished.Esc
Parent topic: Using Basic Projector Features
Focusing the Image Using the Focus Buttons
You can adjust the sharpness of the projected image using the focus buttons.
Note: Wait 20 minutes after turning on the projector before setting the focus, zoom, and lens shift for
maximum accuracy. If you installed any of the following lenses, see the link below on focusing with a
short throw lens instead: ELPLX02, ELPLU03, ELPLU04, ELPLW05, or ELPLU02.
1. Turn on the projector and display an image.

97
2. Press the button on the control panel repeatedly until the focus adjustment screen appears, orLens
press the button on the remote control.Focus
3. Press and hold the arrow buttons on the projector's control panel or remote control to adjust the
focus.
4. Press the button when finished.Esc
Focusing the Image When Using an Optional Short Throw Lens
Parent topic: Using Basic Projector Features
Related tasks
Focusing the Image When Using an Optional Short Throw Lens
Focusing the Image When Using an Optional Short Throw Lens
If you installed an optional short throw lens (ELPLX02, ELPLU03, ELPLU04, ELPLW05, or ELPLU02),
you may need to first focus on the center of your screen and then correct any distortion in the
surrounding area.
1. Turn on the projector and display an image.
2. Press the button on the remote control or press the button on the control panelFocus Lens
repeatedly until the focus adjustment screen appears.

98
3. Press the left or right arrow buttons until the center of the image is focused.
4. Press the button on the remote control or press the button on the control panelFocus Lens
repeatedly until the distortion adjustment screen appears.
5. Press the left or right arrow buttons until the edges of the image are also focused.

99
Note: If you installed the optional ELPLU02 short throw lens and you see a message prompting you
to manually adjust the image distortion, manually rotate the distortion ring counterclockwise. Adjust
the focus and then rotate the distortion ring again to correct image distortion.
Parent topic: Focusing the Image Using the Focus Buttons
Setting the Lens Type
If you installed one of the following lenses, you need to select the model number for the lens: ELPLS04,
ELPLU02, ELPLR04, ELPLW04, ELPLM06, ELPLM07, or ELPLL07.
1. Turn on the projector and display an image.
2. Press the button.Menu
3. Select the menu and press .Extended Enter
4. Select > > .Operation Advanced Lens Type
5. Select your lens model number and press .Enter
6. Press the button to exit.Menu
Parent topic: Using Basic Projector Features
Setting the Screen Type
You can use the Screen Type setting to match the aspect ratio of the displayed image to the screen you
are using.
1. Turn on the projector and display an image.
2. Press the button.Menu

100
3. Select the menu and press .Extended Enter
4. Select > > .Display Screen Screen Type
You see this screen:
5. Select your screen's aspect ratio and press .Enter
6. Press the button to exit.Menu
7. Adjust the aspect ratio for the projected image, if necessary.
Parent topic: Using Basic Projector Features
Related concepts
Image Aspect Ratio
Adjusting the Image Position Using Lens Shift
If you cannot install the projector directly in front of the screen, you can adjust the position of the
projected image using the lens shift feature.
Note: Wait 20 minutes after turning on the projector before setting the focus, zoom, and lens shift for
maximum accuracy. Lens shift is not supported for the ELPLR04 lens.
1. Turn on the projector and display an image.

101
2. Press the arrow buttons to adjust the position of the projected image as necessary.
Pro
L1490U/L1490UNL/L1495U/L1495UNL/L1500UH/L1500UHNL/L1505UH/L1505UHNL/L1750UNL/
L1755UNL - ELPLU03 or ELPLW05 lens
1 Center of lens
2 Projected image when lens shift is set to the home position
3 Maximum range: V × 24%
Note: You cannot move the image upward when the lens is shifted horizontally all the way.

102
Pro
L1490U/L1490UNL/L1495U/L1495UNL/L1500UH/L1500UHNL/L1505UH/L1505UHNL/L1750UNL/
L1755UNL - ELPLU04, ELPLW06, ELPLM10, ELPLM11, ELPLM15, or ELPLL08 lens
1 Center of lens
2 Projected image when lens shift is set to the home position
3 Maximum range: V × 60%
4 Maximum range when the lens is shifted horizontally all the way: V × 31%
Pro
L1490U/L1490UNL/L1495U/L1495UNL/L1500UH/L1500UHNL/L1505UH/L1505UHNL/L1750UNL/
L1755UNL - ELPLX02 lens
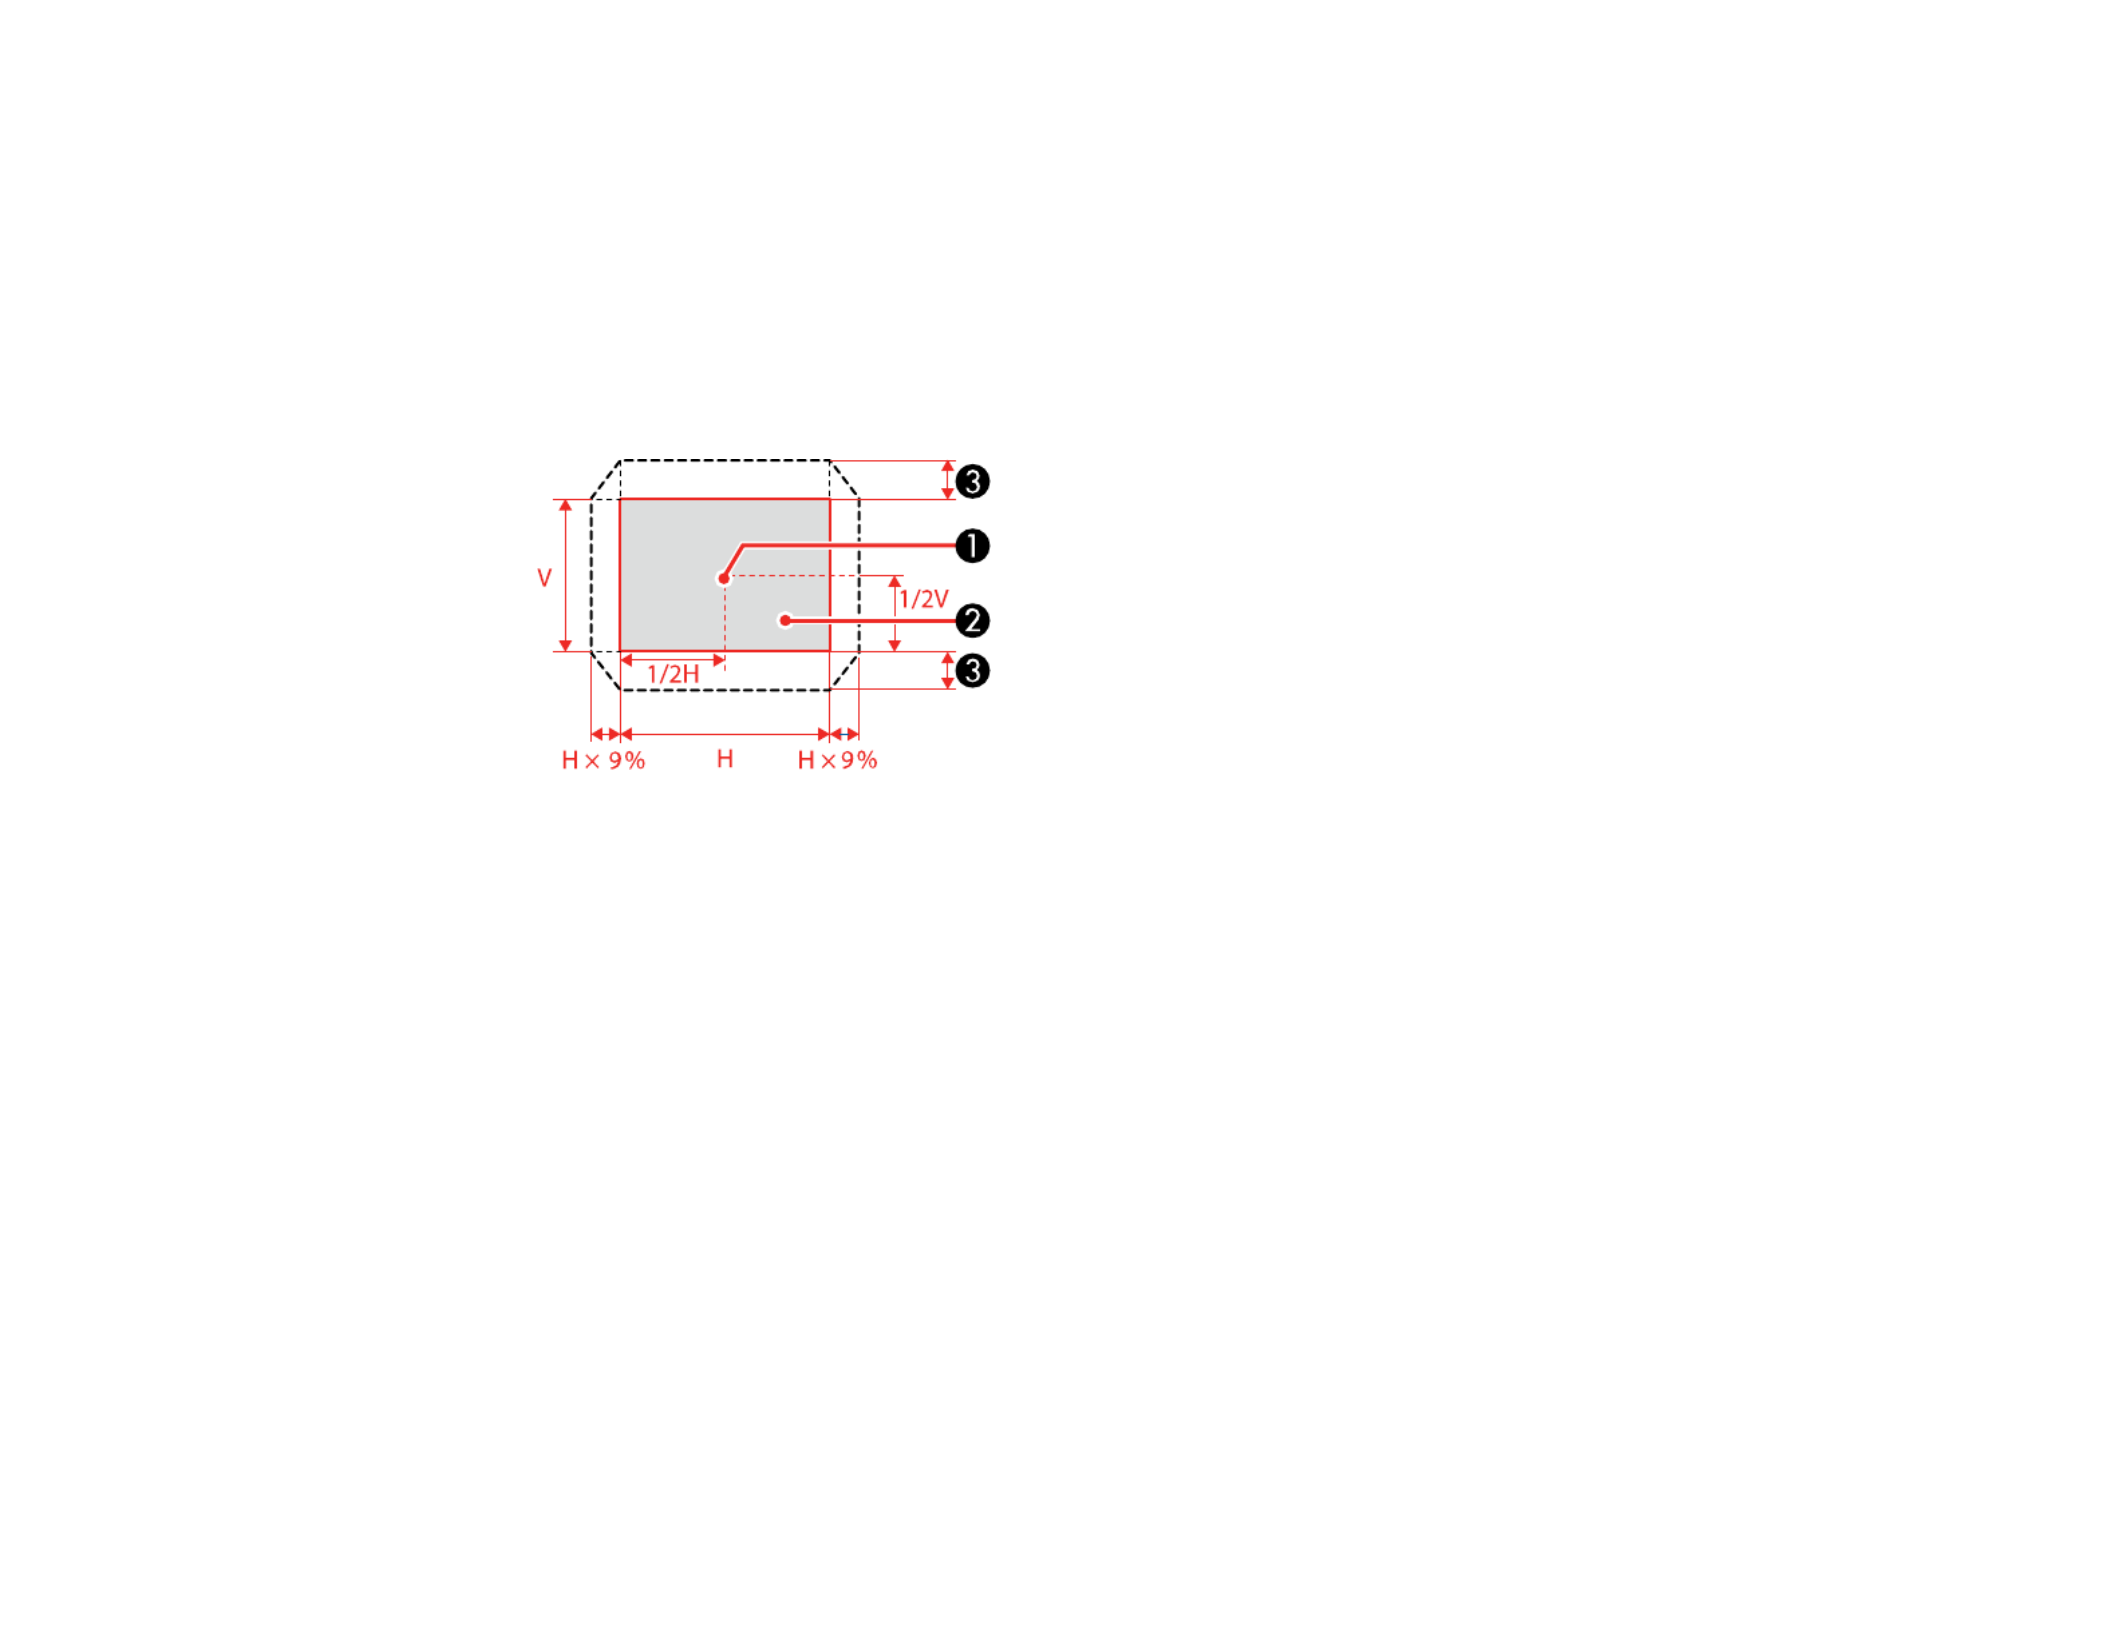
103
1 Center of lens
2 Projected image when lens shift is set to the home position
3 Maximum range: V × 20% (top); V × 5% (bottom)
Note: You cannot move the image upward when the lens is shifted horizontally all the way.
Pro L1715SNL - ELPLU03 or ELPLW05 lens
1 Center of lens
2 Projected image when lens shift is set to the home position
3 Maximum range: V × 16%
Note: You cannot move the image upward when the lens is shifted horizontally all the way.

104
Pro L1715SNL - ELPLU04, ELPLW06, ELPLM10, ELPLM11, ELPLM15, or ELPLL08 lens
1 Center of lens
2 Projected image when lens shift is set to the home position
3 Maximum range: V × 55%; maximum range when performing screen matching or color
calibration: V × 45% (ELPLU04)
Maximum range when the lens is shifted horizontally all the way: V × 32%
Pro L1715SNL - ELPLX02 lens

105
1 Center of lens
2 Projected image when lens shift is set to the home position
3 Maximum range: V × 5%
Note: You cannot move the image upward when the lens is shifted horizontally all the way.
3. When you are finished, press the button on the control panel or remote control.Esc
Note: When adjusting the image height, position the image lower than where you want it to be and then
move it up. This will help prevent the image from moving down after adjustment. The image is clearest
when the lens is at the home position. To move the lens to the home position, press and hold the Lens
Shift Lensbutton on the remote control or the button on the control panel for at least three seconds.
Parent topic: Using Basic Projector Features
Adjusting the Image Position Using Screen Position
You can adjust the image position if there are margins between the edge of the image and the projected
screen frame.
Note: Screen Type 16:10You cannot adjust the screen position if the setting is set to for a WUXGA
projector model or for a SGA+ projector model.4:3
1. Turn on the projector and display an image.
2. Press the button.Menu
3. Select the menu and press .Extended Enter
4. Select > > .Display Screen Screen Position

106
5. Use the arrow buttons on the remote control or projector to adjust the position of the image.
6. When you are finished, press the button.Menu
Parent topic: Using Basic Projector Features
Related tasks
Setting the Screen Type
Displaying a Test Pattern
You can display a test pattern to adjust the projected image without connecting a computer or video
device.
Note: Screen TypeThe test pattern's shape is determined by the setting. Be sure to set the correct
screen type before adjusting with the test pattern.
1. Turn on the projector.
2. Press the button on the remote control or the down arrow button on the control panel.Test Pattern

107
3. Press the left or right arrow button on the remote control or press on the control panel to cycleEnter
through the available test patterns.
4. Adjust the image as necessary.
5. Press the to clear the test pattern.Esc
Available Test Pattern Image Adjustments
Parent topic: Using Basic Projector Features
Related tasks
Setting the Screen Type
Available Test Pattern Image Adjustments
You can adjust the following settings while the test pattern is displayed.
Menu Settings
Image Color Mode
White Balance
Advanced
• Gamma 1
• RGBCMY
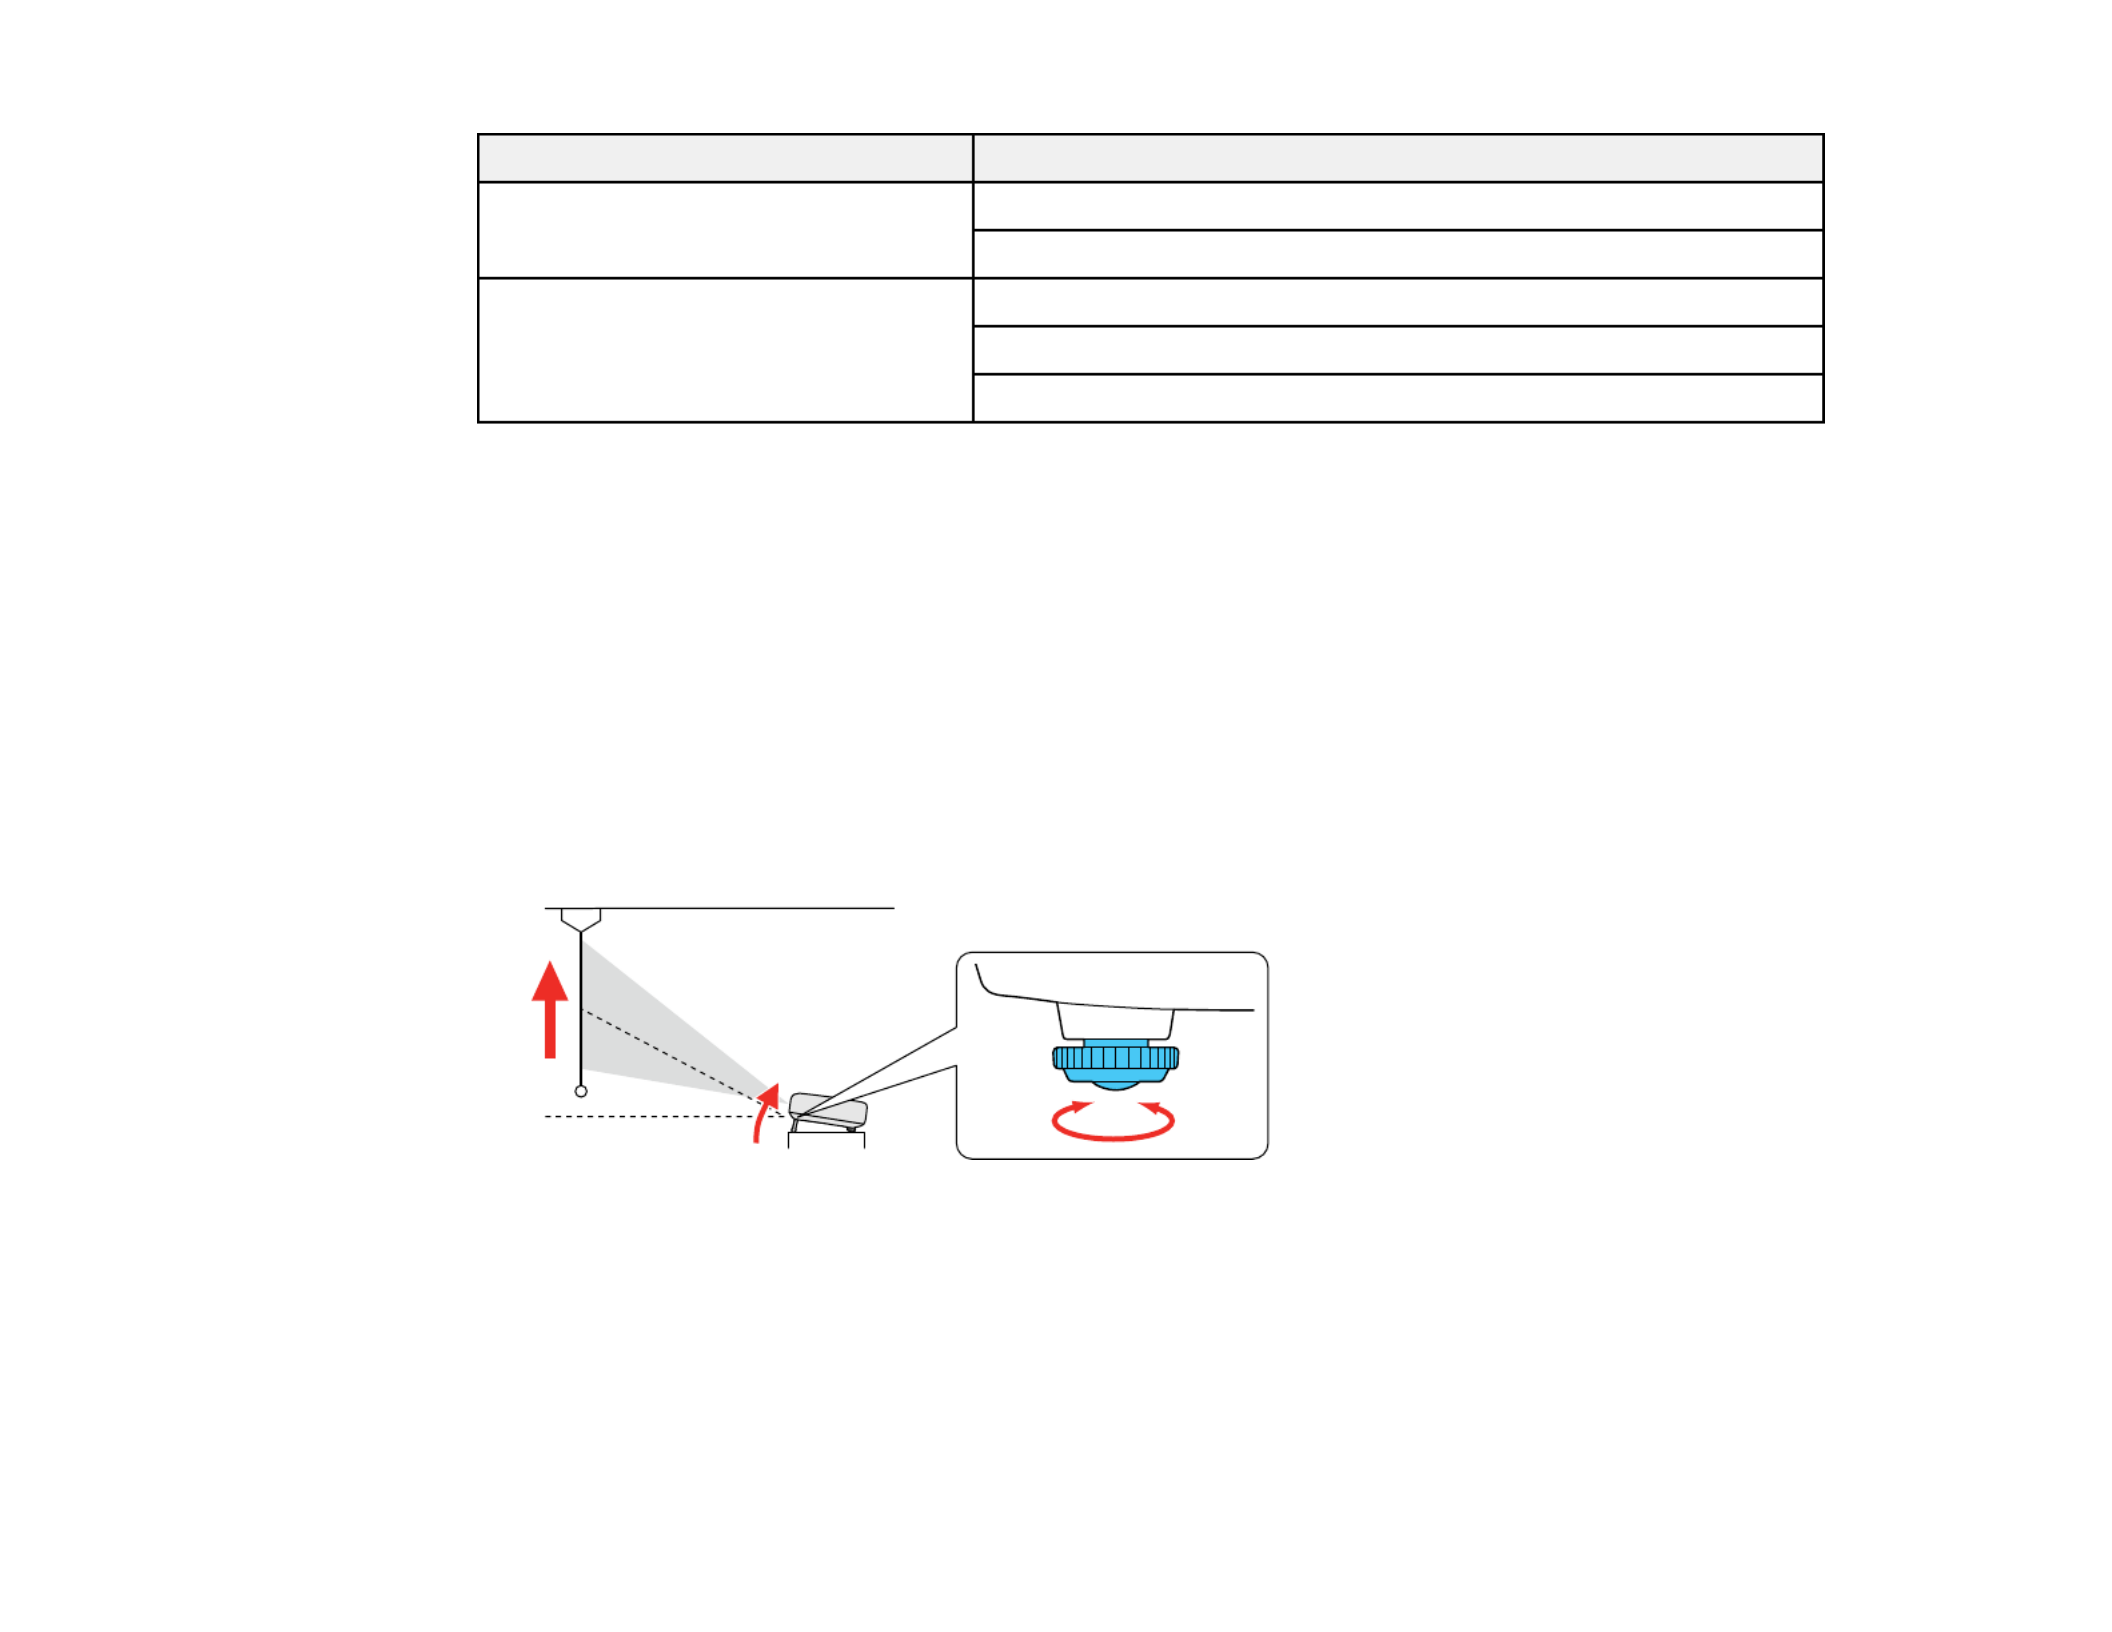
108
Menu Settings
Settings Geometry Correction
Brightness Settings
Extended Display 2
Color Calibration
Multi-Projection 3
1Except for custom settingsGamma
2Except for the , , and settingsScreen Panel Alignment Color Uniformity
3Except for the , , , and settingsBlack Level Scale Color Uniformity Color Adjustment
Parent topic: Displaying a Test Pattern
Adjusting the Image Height
If you are projecting from a table or other flat surface, and the image is too high or low, you can adjust
the image height using the projector's adjustable feet.
1. Turn on the projector and display an image.
2. To adjust the image height, rotate the front foot to extend or retract it.

109
3. If the image is tilted, rotate the rear feet to adjust their height.
If the projected image is unevenly rectangular, you need to adjust the image shape.
Parent topic: Using Basic Projector Features
Related concepts
Image Shape
Image Shape
You can project an evenly rectangular image by placing the projector directly in front of the center of the
screen and keeping it level. If you place the projector at an angle to the screen, or tilted up or down, or off
to the side, you may need to correct the image shape for the best display quality.
Correcting Image Shape with H/V Keystone
Correcting Image Shape with Quick Corner
Correcting Image Shape with Curved Surface
Correcting Image Shape with Corner Wall
Correcting Image Shape with Point Correction
Parent topic: Using Basic Projector Features

110
Correcting Image Shape with H/V Keystone
You can use the projector's setting to correct the shape of an image that is unevenlyH/V Keystone
rectangular on the sides.
Note: You cannot combine H/V Keystone correction with other image shape correction methods.
1. Turn on the projector and display an image.
Note: You can display a pattern to aid in adjusting the projected image using the Settings menu.
Note: Test PatternYou can also display a pattern to aid in adjusting the projected image using the
button on the remote control.
2. Press the button.Menu

111
3. Select the menu and press .Settings Enter
4. Select the setting and press .Geometry Correction Enter
Note: GeometryYou can also access the geometric adjustment screen by pressing the button on
the remote control or the up arrow button on the control panel.
5. Select the setting and press . Then press again.H/V-Keystone Enter Enter
You see the H/V-Keystone adjustment screen:

112
6. Use the arrow buttons on the projector or the remote control to select between vertical and
horizontal keystone or balance correction and to adjust the image shape as necessary.
V-Keystone
V-Balance
H-Keystone
H-Balance

113
7. When you are finished, press .Esc
After correction, your image is slightly smaller.
Parent topic: Image Shape
Related references
Projector Feature Settings - Settings Menu
Related tasks
Displaying a Test Pattern
Correcting Image Shape with Quick Corner
You can use the projector's Quick Corner setting to correct the shape and size of an image that is
unevenly rectangular on all sides.
1. Turn on the projector and display an image.
Note: You can display a pattern to aid in adjusting the projected image using the Settings menu.
Note: Test PatternYou can also display the pattern by pressing the button on the remote control.
2. Press the button.Menu
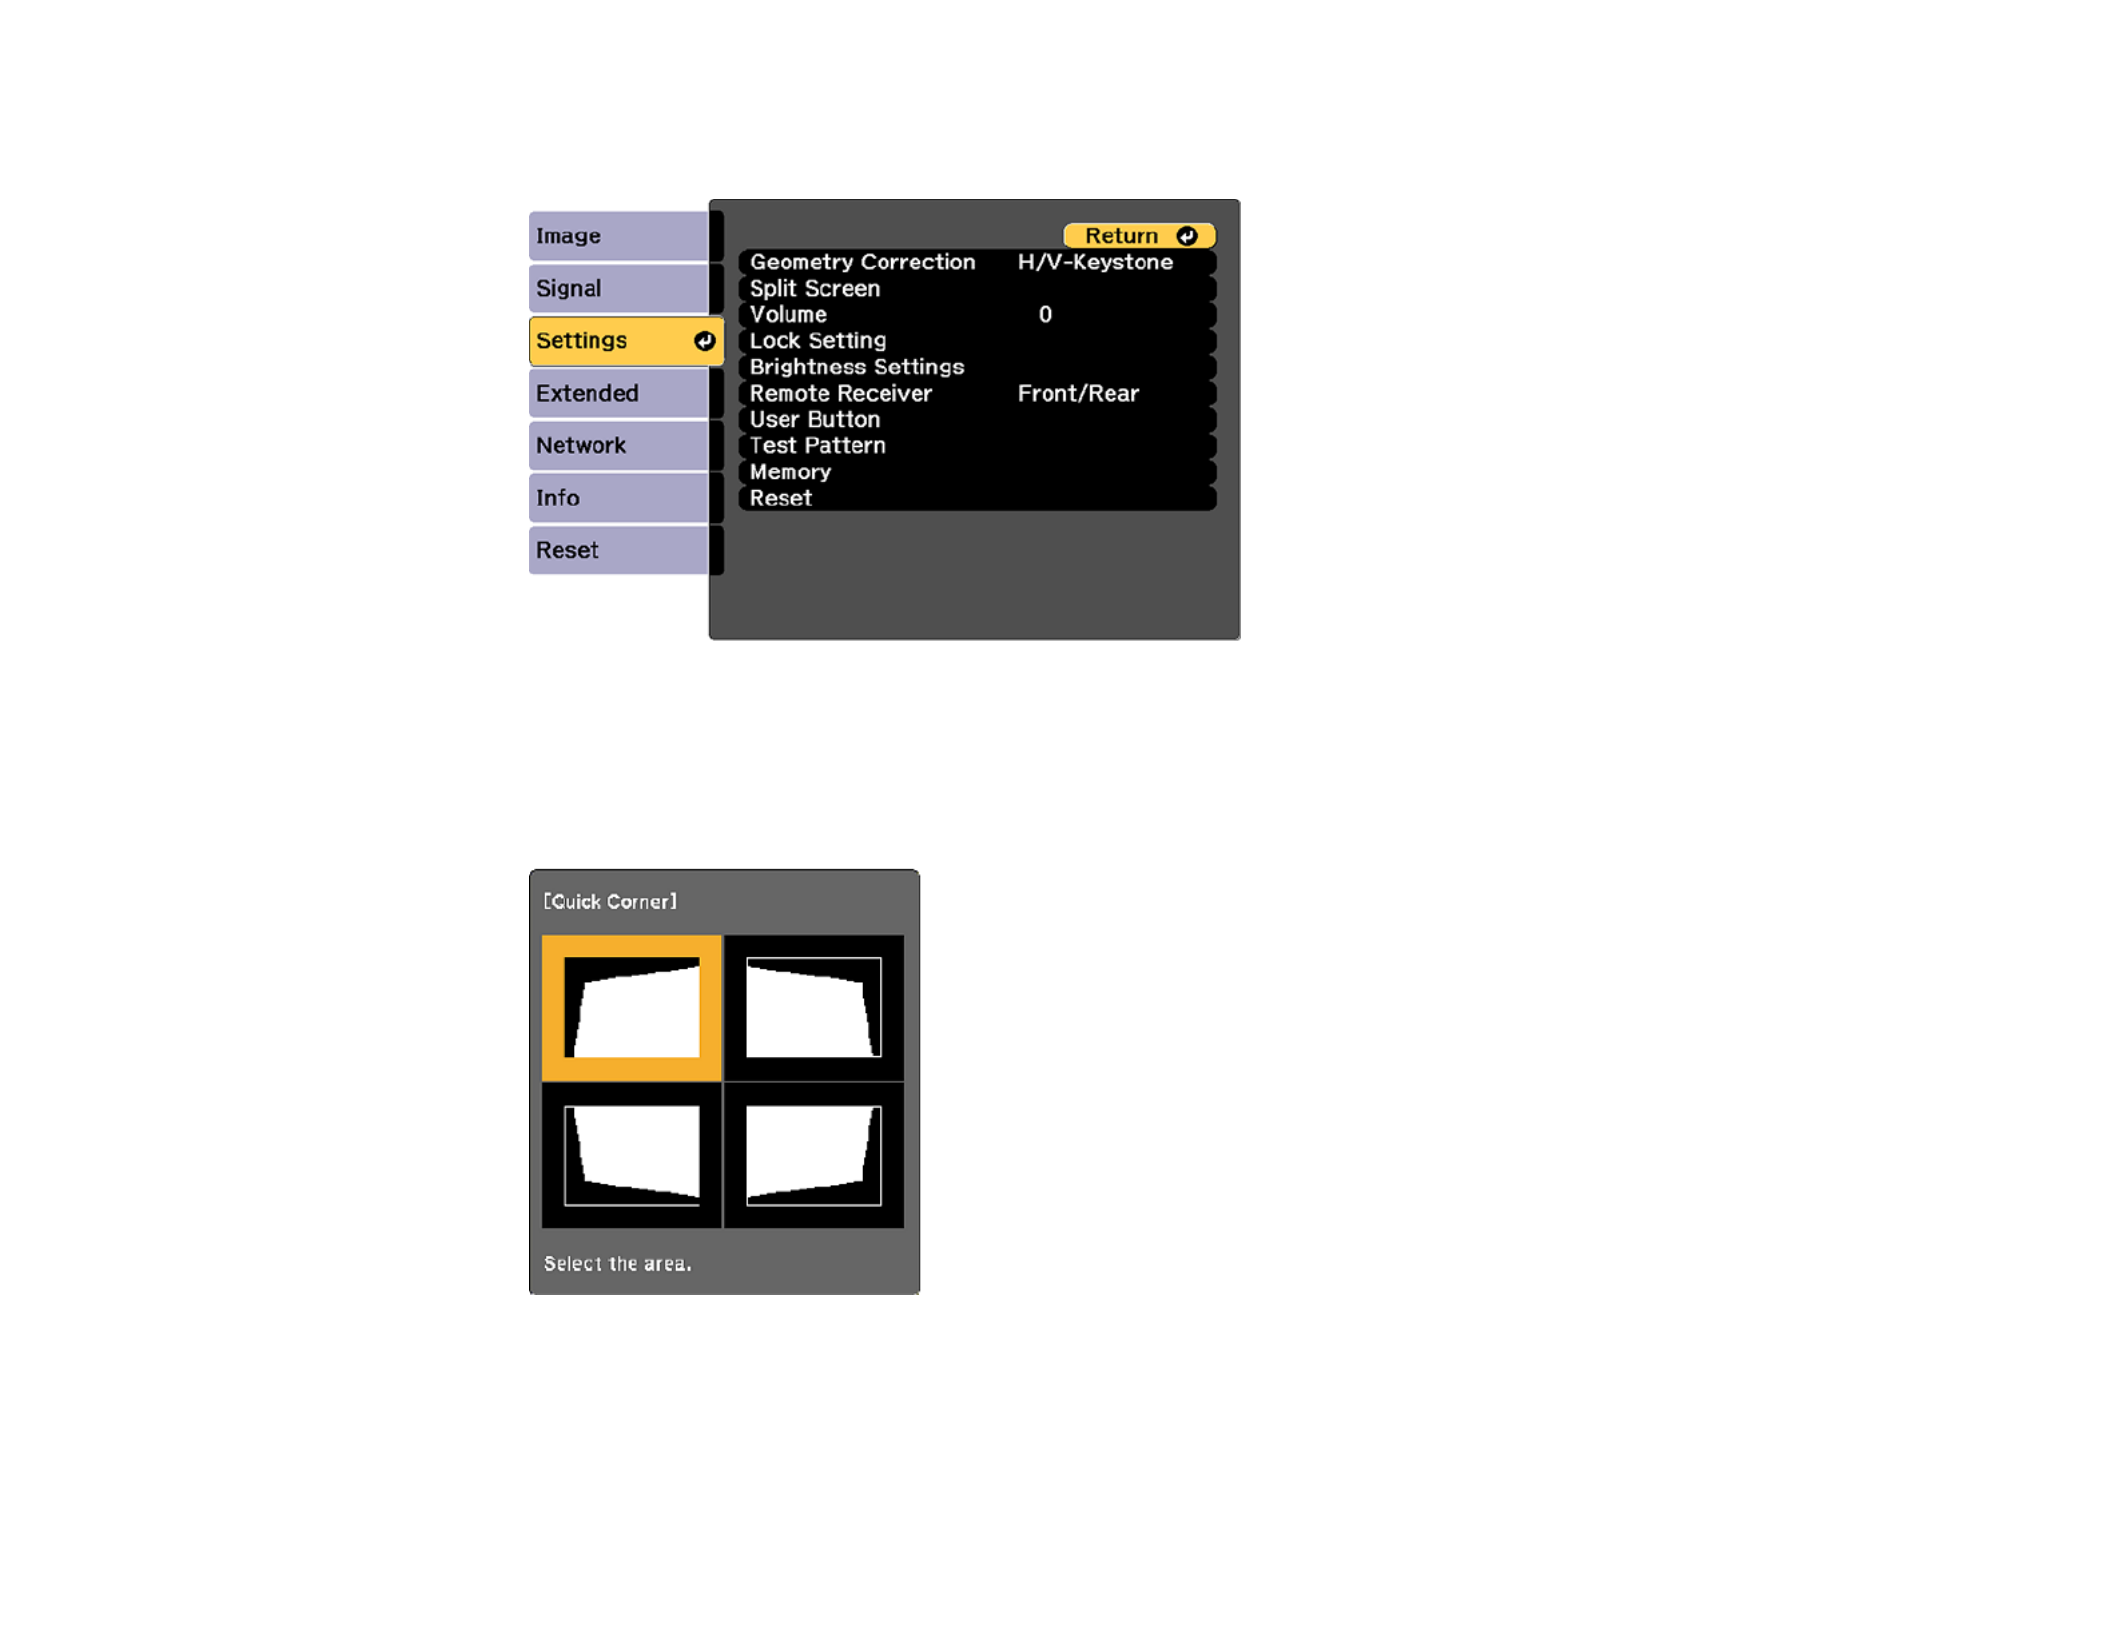
114
3. Select the menu and press .Settings Enter
4. Select the setting and press .Geometry Correction Enter
5. Select the setting and press . Then press again.Quick Corner Enter Enter
You see the Quick Corner adjustment screen:
Note: EscTo reset your adjustments, press and hold the button for at least 2 seconds to display a
reset screen. Then select .Yes
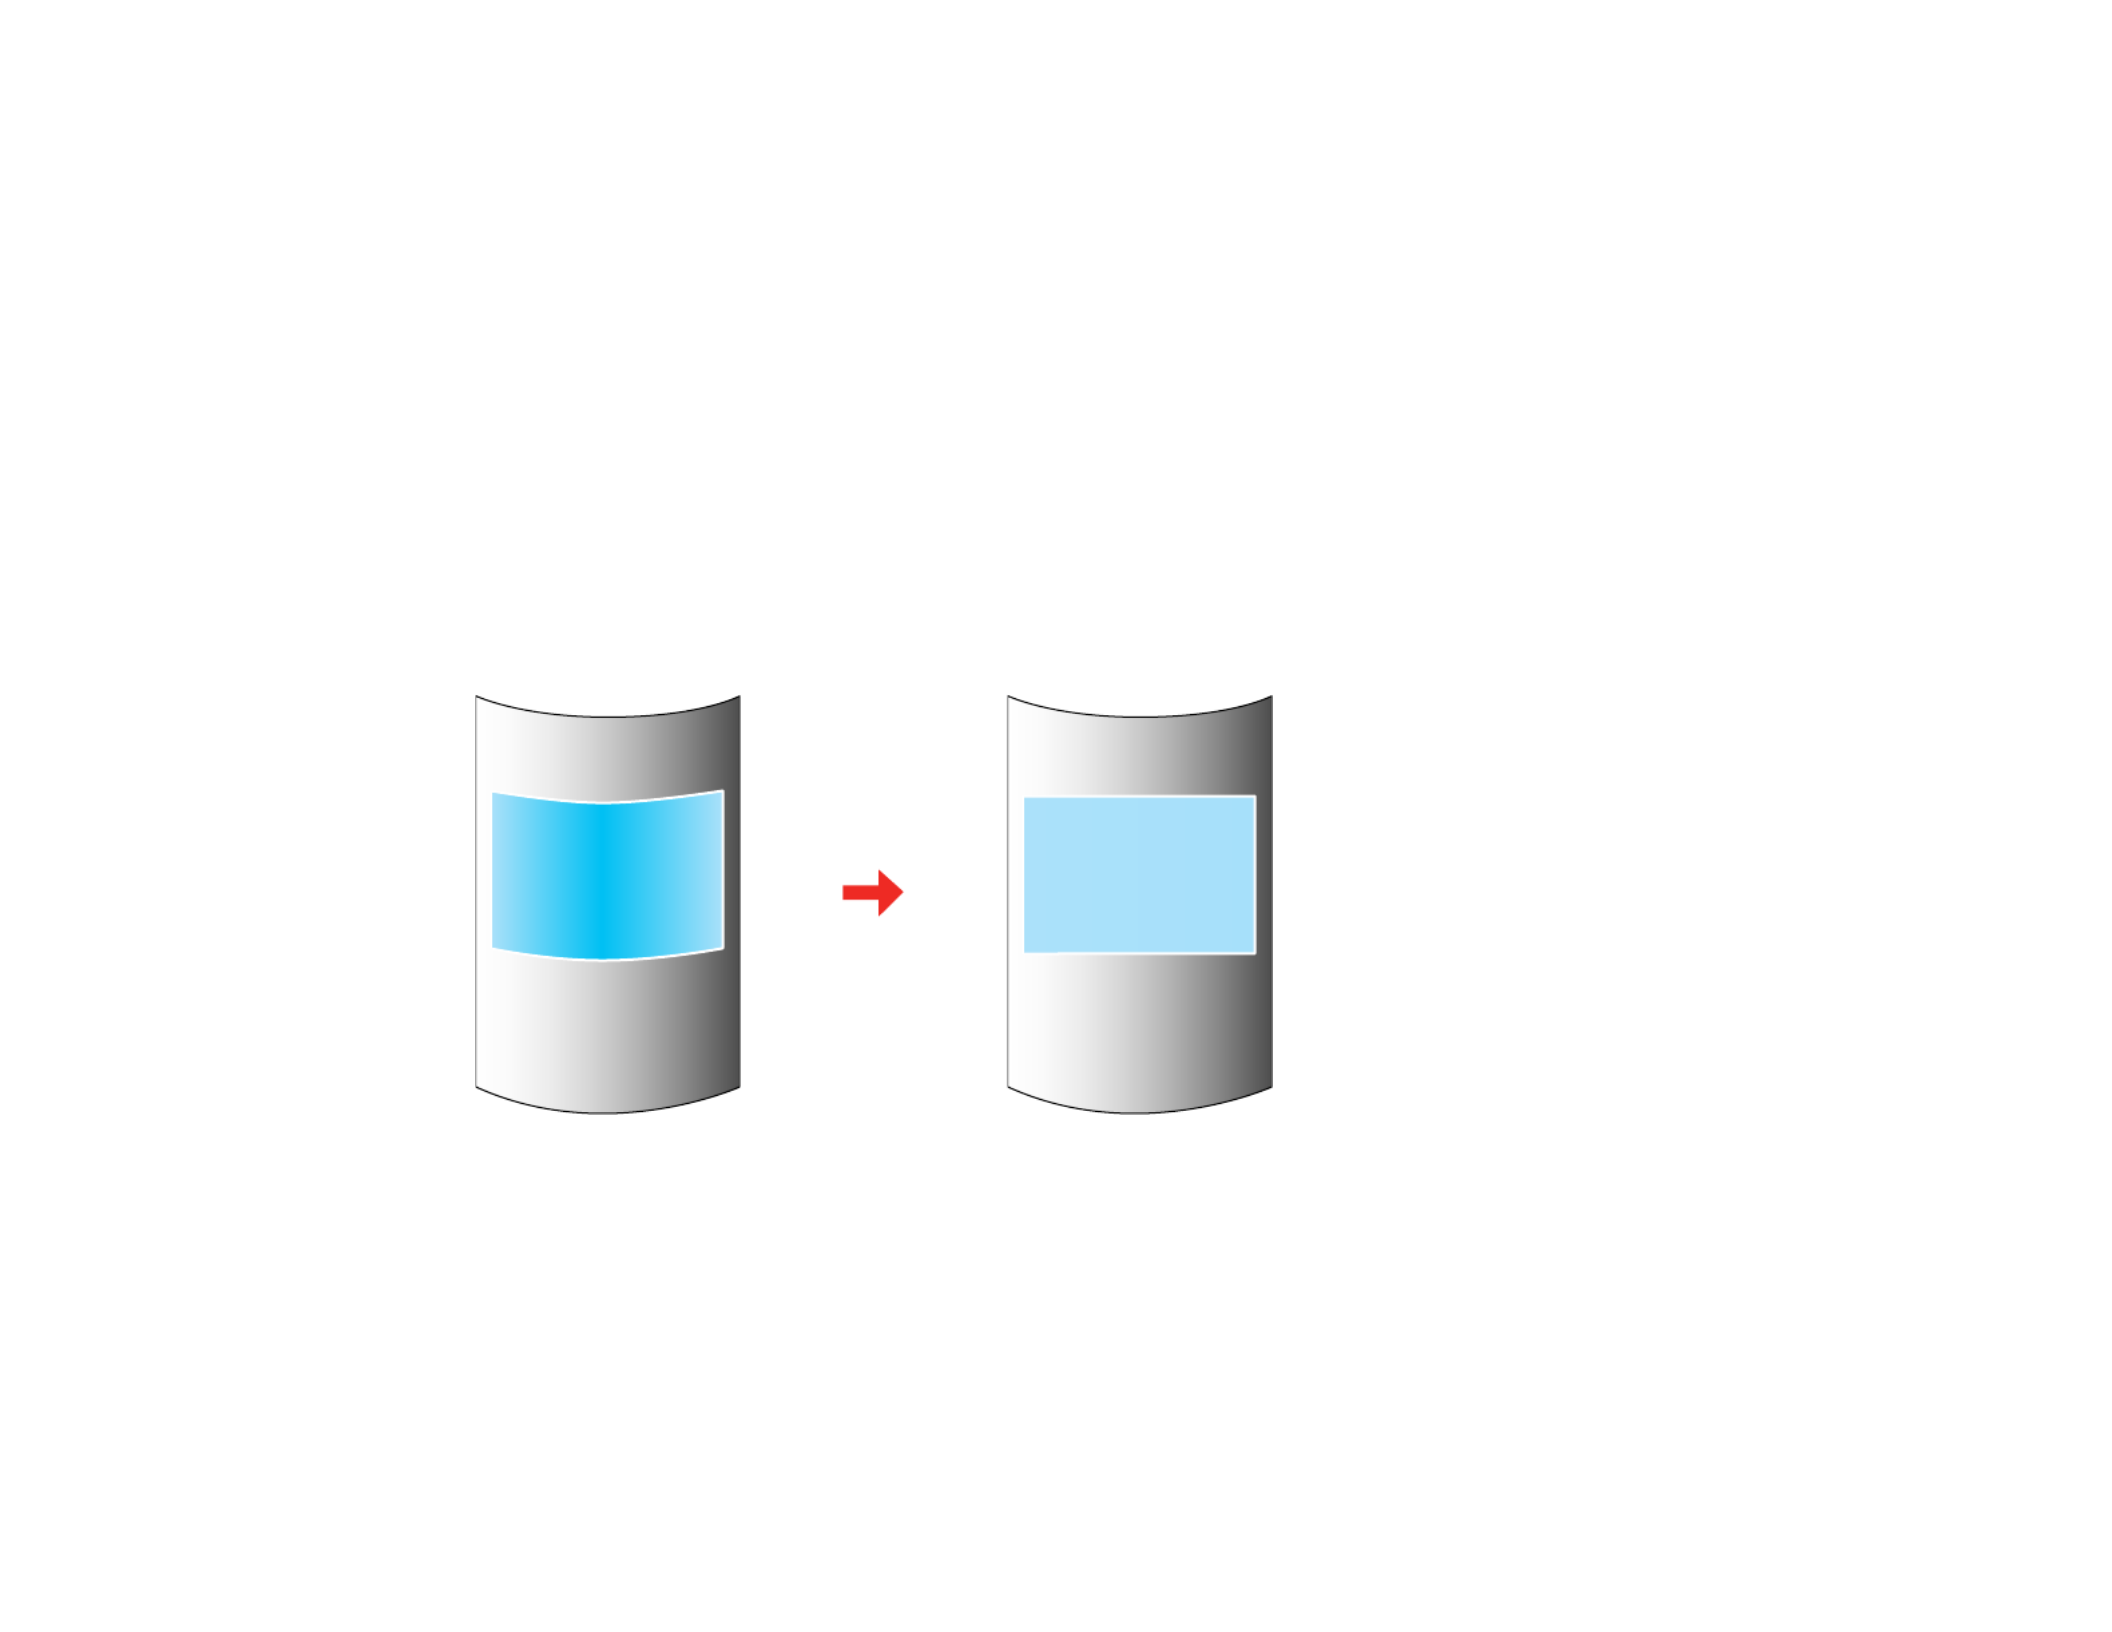
115
6. Use the arrow buttons on the projector or remote control to select the corner of the image you want
to adjust. Then press .Enter
7. Press the arrow buttons to adjust the image shape as necessary.
8. When you are finished, press .Esc
Parent topic: Image Shape
Related references
Projector Feature Settings - Settings Menu
Related tasks
Displaying a Test Pattern
Correcting Image Shape with Curved Surface
You can use the projector's Curved Surface setting to adjust the shape of an image projected on a
curved surface.
Note: For the best results, project from the front of the screen onto a surface with a uniform arc radius
and with the lens in the home position. The image may not be evenly focused throughout even after
performing the steps here. If you see a 4K Enhancement message, select to disable the 4KYes
Enhancement feature.
1. Turn on the projector and display an image.
Note: You can display a pattern to aid in adjusting the projected image using the Settings menu.

116
Note: Test PatternYou can also display a pattern to aid in adjusting the projected image using the
button on the remote control.
2. Press the button.Menu
3. Select the menu and press .Settings Enter
4. Select the setting and press .Geometry Correction Enter
5. Select the setting and press .Curved Surface Enter
Note: EnterIf you see a confirmation message, press .
You see this screen:
6. Select the setting and press .Correct Shape Enter

117
7. Use the arrow buttons on the projector or the remote control to select the area you want to adjust.
Then press .Enter
Note: EscTo reset your adjustments, press and hold the button for at least 2 seconds to display a
reset screen. Then select .Yes
8. Use the arrow buttons on the projector to adjust the image shape.
Note: If the adjustment triangle turns gray, you cannot adjust the shape any further in that direction.
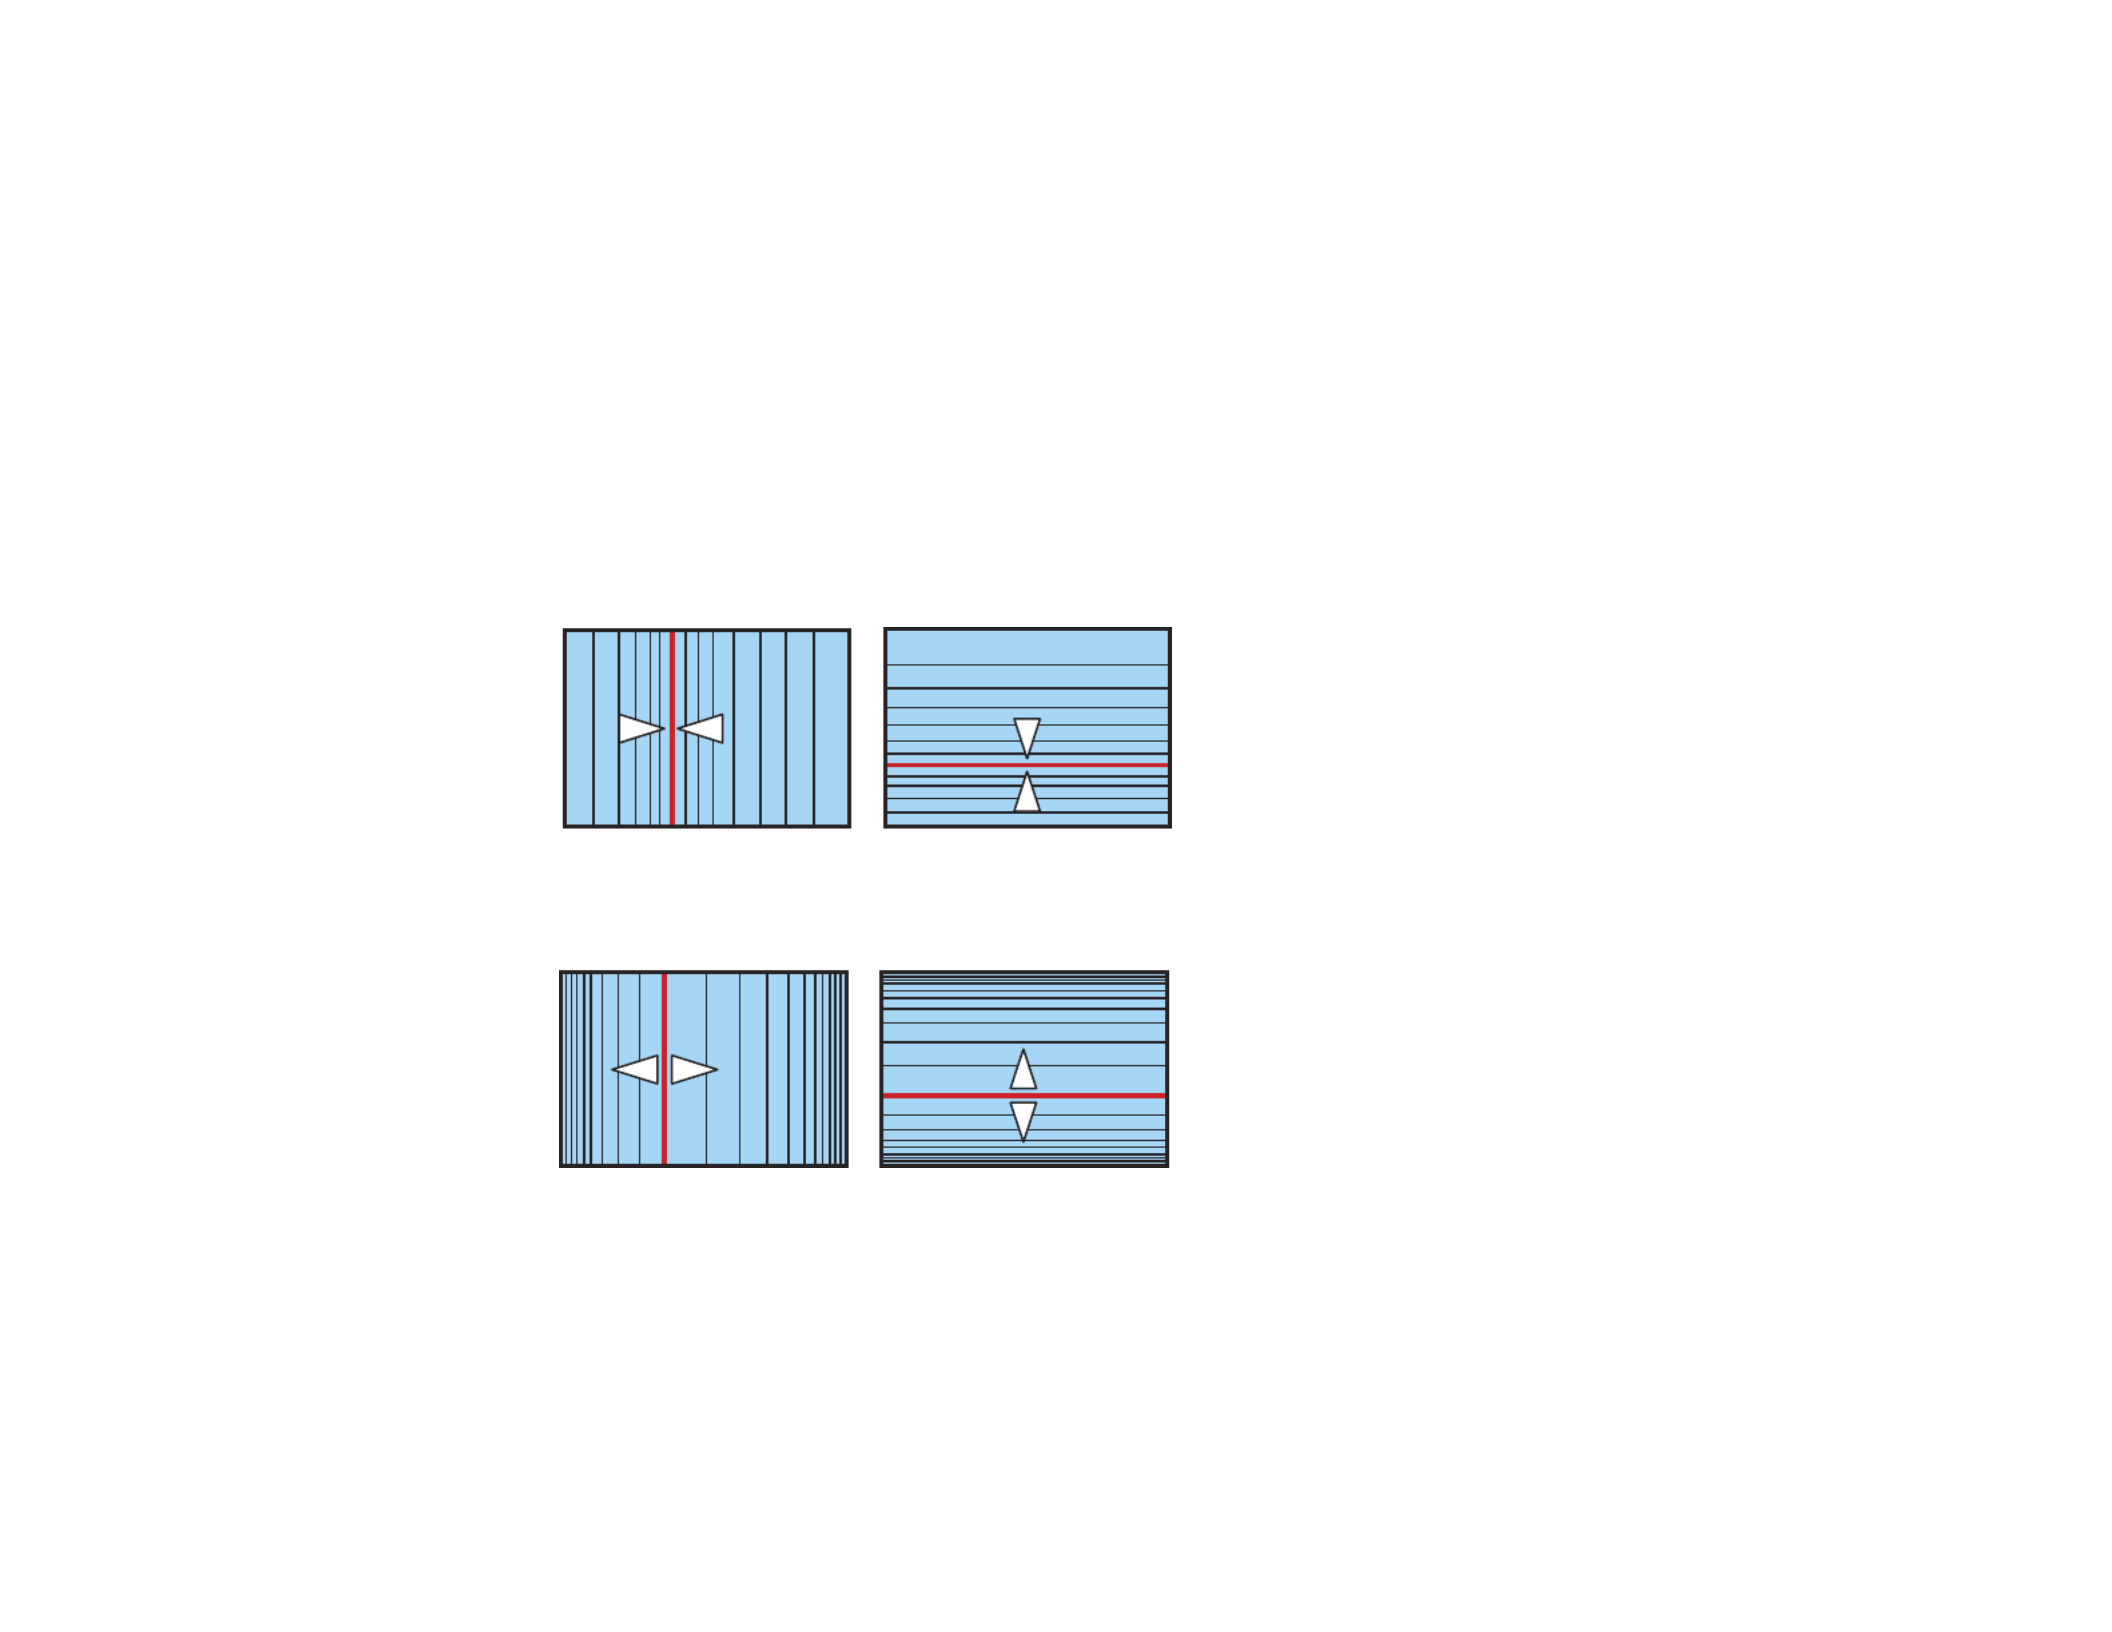
118
9. Press the button to return to the Curved Surface menu screen.Esc
10. Repeat the previous three steps as necessary to adjust other image areas.
If the image expands or contracts, continue with the next step to adjust the linearity.
11. Select one of the following from the Curved Surface menu screen:
• : Adjusts horizontal expansion or contraction.Horizontal Linearity
• : Adjusts vertical expansion or contraction.Vertical Linearity
12. Select a displayed line to use as a baseline and press .Enter
The selected baseline flashes red and white.
13. Adjust the linearity by doing one of the following:
• Press the left arrow button to contract the distance between the lines closest to the baseline.
• Press the right arrow button to expand the distance between the lines closest to the baseline.
14. When you are finished, press the button.Menu
Note: Quick CornerIf necessary, you can adjust the image tilt using the setting, then fine-tune your
adjustments using the setting.Point Correction
Parent topic: Image Shape

119
Related references
Projector Feature Settings - Settings Menu
Related tasks
Displaying a Test Pattern
Correcting Image Shape with Quick Corner
Correcting Image Shape with Point Correction
Correcting Image Shape with Corner Wall
You can use the projector's Corner Wall setting to adjust the shape of an image projected on a surface
with right angles, such as a rectangular pillar or the corner of a room.
Note: For the best results, project from the front of the screen onto a right-angled surface and with the
lens in the home position. The image may not be evenly focused throughout even after performing the
steps here. If you see a 4K Enhancement message, select to disable the 4K Enhancement feature.Yes
Corner Wall is not supported for the ELPLX02 lens.
1. Turn on the projector and display an image.
Note: You can display a pattern to aid in adjusting the projected image using the Settings menu.
Note: Test PatternYou can also display a pattern to aid in adjusting the projected image using the
button on the remote control.
2. Press the button.Menu

120
3. Select the menu and press .Settings Enter
4. Select the setting and press .Geometry Correction Enter
5. Select the setting and press .Corner Wall Enter
Note: EnterIf you see a confirmation message, press .
You see this screen:
6. Select the setting and press .Corner Type Enter

121
7. Select one of the following:
• when the surfaces line up horizontallyHorizontal Corner
• when the surfaces line up verticallyVertical Corner
8. Press the button to return to the Corner Wall menu screen.Esc
9. Select the setting and press .Correct Shape Enter
10. Adjust the projector's position and use lens shift to center the image over the point where the two
surfaces meet. (The rest of these steps show Horizontal Corner as the selected Corner Type but the
steps are the same for Vertical Corner.)

122
Note: EnterYou can press to show or hide the image and grid to check the results.
11. Press the arrow buttons on the projector or the remote control to select the area you want to adjust.
Then press .Enter
• For horizontal corners, adjust the top area using the lowest point (indicated by the blue arrow) as
your reference. Adjust the lower area using the highest point (indicated by the pink arrow) as your
reference.

123
• For vertical corners, adjust the left and right areas using the points nearest the center of the image
as your reference points.
Note: EscTo reset your adjustments, press and hold the button for at least 2 seconds to display a
reset screen. Then select .Yes
12. Press and hold the arrow buttons on the projector or remote control to adjust the image shape.
13. Repeat the previous two steps as necessary to adjust other image areas.
If the image expands or contracts, continue with the next step to adjust the linearity.
14. Press the button to return to the Corner Wall screen.Esc
15. Select the setting and press .Linearity Enter
16. Adjust the linearity by doing the following as necessary:
• Press and hold the left arrow button to contract the distance between the lines closest to the left or
top of the image.
• Press and hold the right arrow button to contract the distance between the lines closest to the right
or bottom of the image.
17. When you are finished, press the button.Menu

124
Note: Quick CornerIf necessary, you can adjust the image tilt using the setting, then fine-tune your
adjustments using the setting.Point Correction
Parent topic: Image Shape
Related references
Projector Feature Settings - Settings Menu
Related tasks
Displaying a Test Pattern
Correcting Image Shape with Quick Corner
Correcting Image Shape with Point Correction
Correcting Image Shape with Point Correction
You can use the projector's Point Correction feature to fine-tune the image shape using points on a grid.
This is useful for adjusting overlapping areas in multiple projected images that do not line up correctly.
Note: You can move the points on the grid between 0.5 to 32 pixels for WUXGA models or 0.5 to 27
pixels for SXGA+ models in any direction. If you see a 4K Enhancement message, select to disableYes
the 4K Enhancement feature.
1. Turn on the projector and display an image.
Note: You can display a pattern to aid in adjusting the projected image using the Settings menu.
Note: Test PatternYou can also display a pattern to aid in adjusting the projected image using the
button on the remote control.
2. Press the button.Menu
3. Select the menu and press .Settings Enter
4. Select the setting and press .Geometry Correction Enter
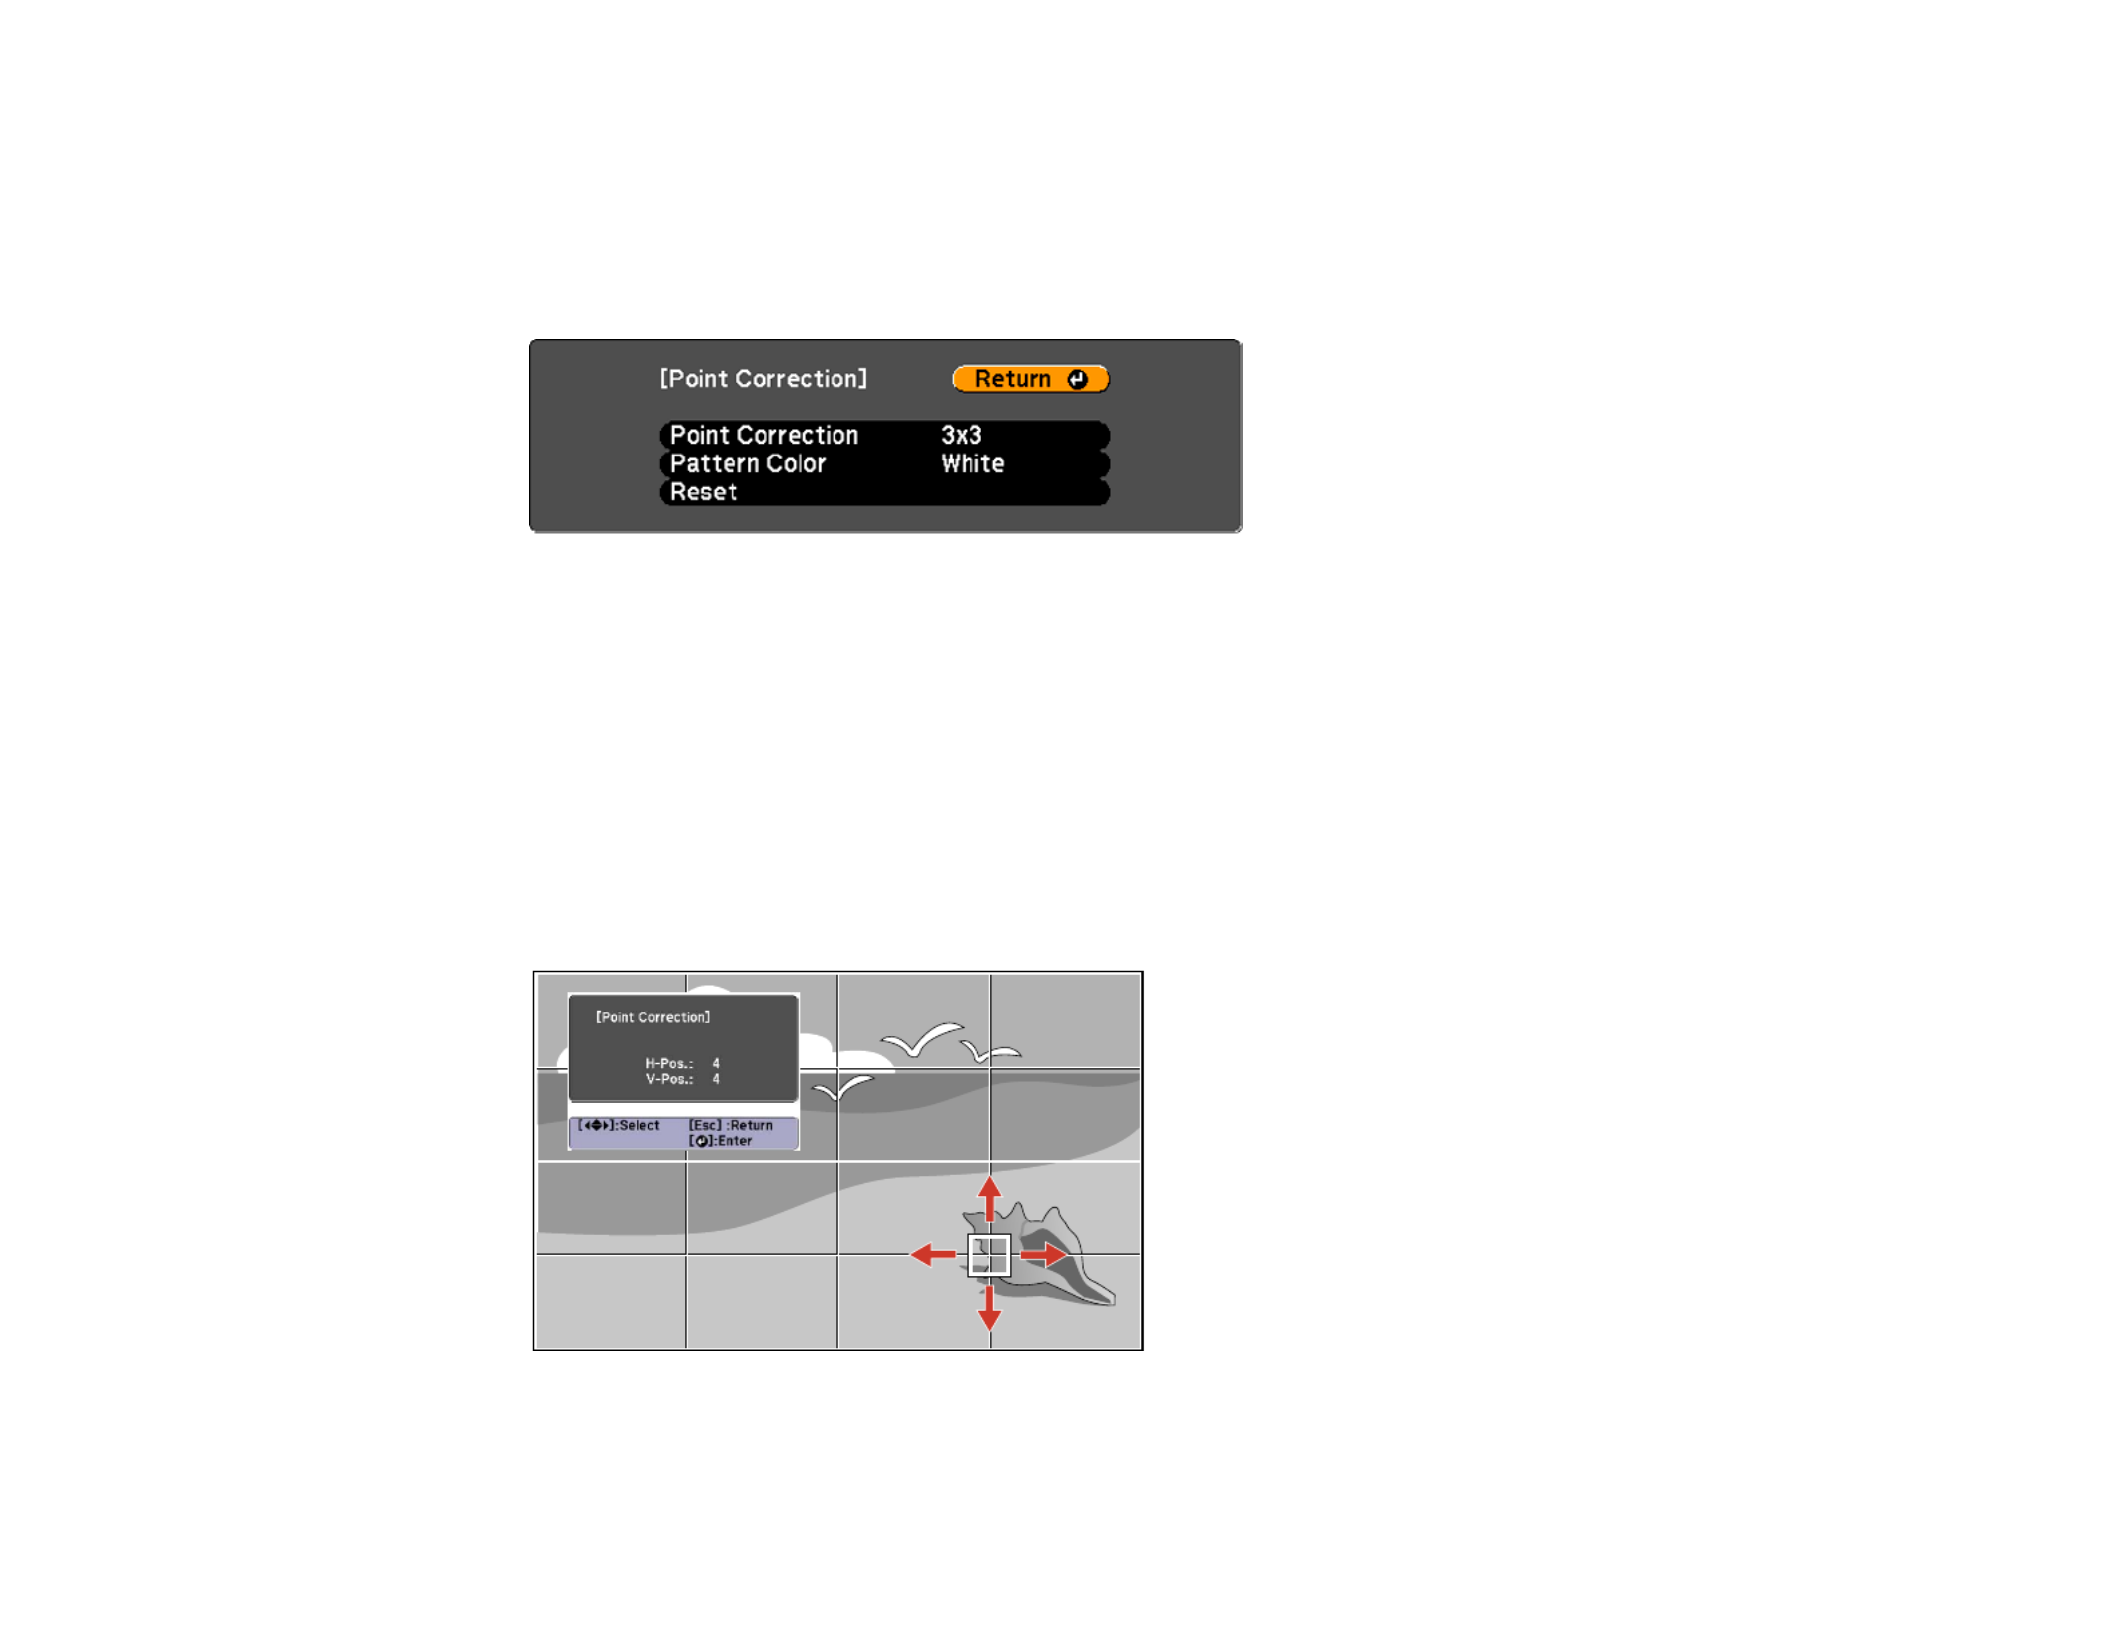
125
5. Select the setting and press .Point Correction Enter
Note: EnterIf you see a confirmation message, press .
You see this screen:
6. Select the setting and press .Point Correction Enter
7. Select the number of grid lines to display and press .Enter
Note: Pattern ColorIf you need to change the color of the grid lines, select the setting and select a
suitable color.
8. Press the arrow buttons on the projector or remote control to move to the point on the grid that you
want to adjust. Then press .Enter
The box changes from a single line to a double-lined square.
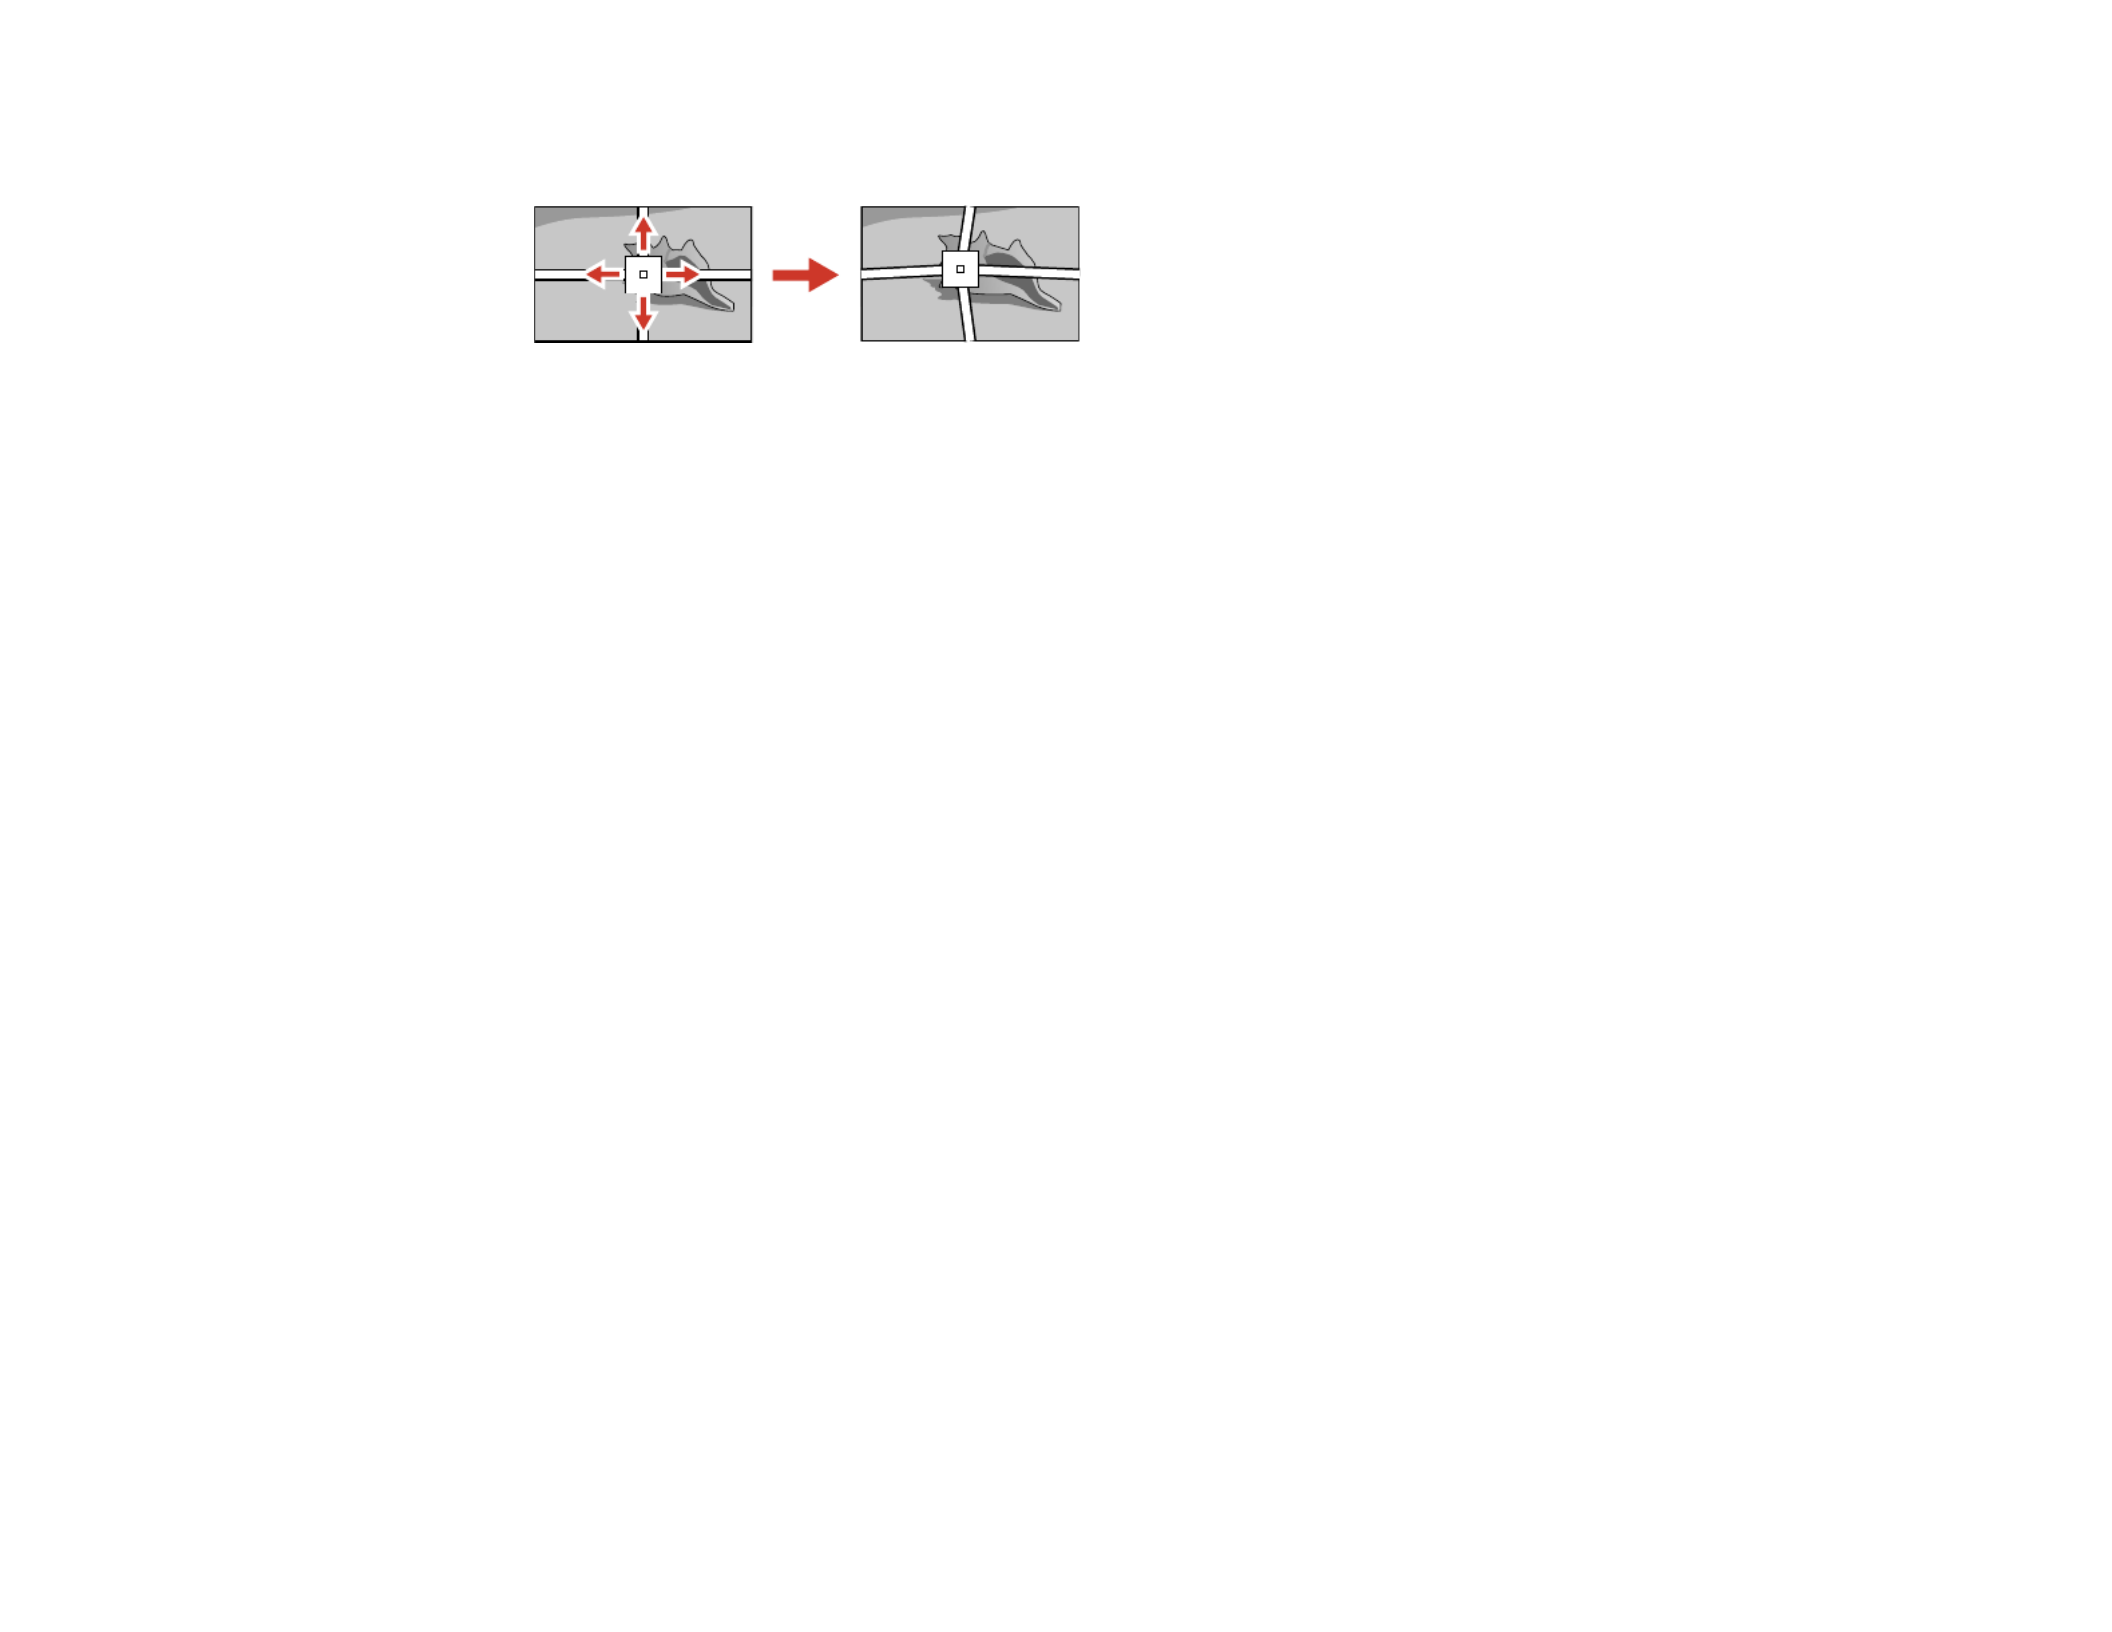
126
9. Press the arrow buttons to correct the image shape in all necessary directions.
Note: EnterYou can press to show or hide the image and grid to check the results.
10. Press to return to the previous screen and select another point to correct, if necessary.Esc
11. When you are finished, press the button.Menu
Note: Corner WallIf necessary, you can fine-tune your image adjustments using the setting.
Parent topic: Image Shape
Related references
Projector Feature Settings - Settings Menu
Related tasks
Displaying a Test Pattern
Selecting an Image Source
If you connected multiple image sources to the projector, such as a computer and DVD player, you may
want to switch from one image source to the other.
Note: Auto Source SearchIf you turned on the setting in the Extended menu, the projector
automatically switches to another detected image source if the signal to the current image source is lost.
1. Make sure the connected image source you want to use is turned on.
2. For video image sources, insert a DVD or other video media and press its play button, if necessary.
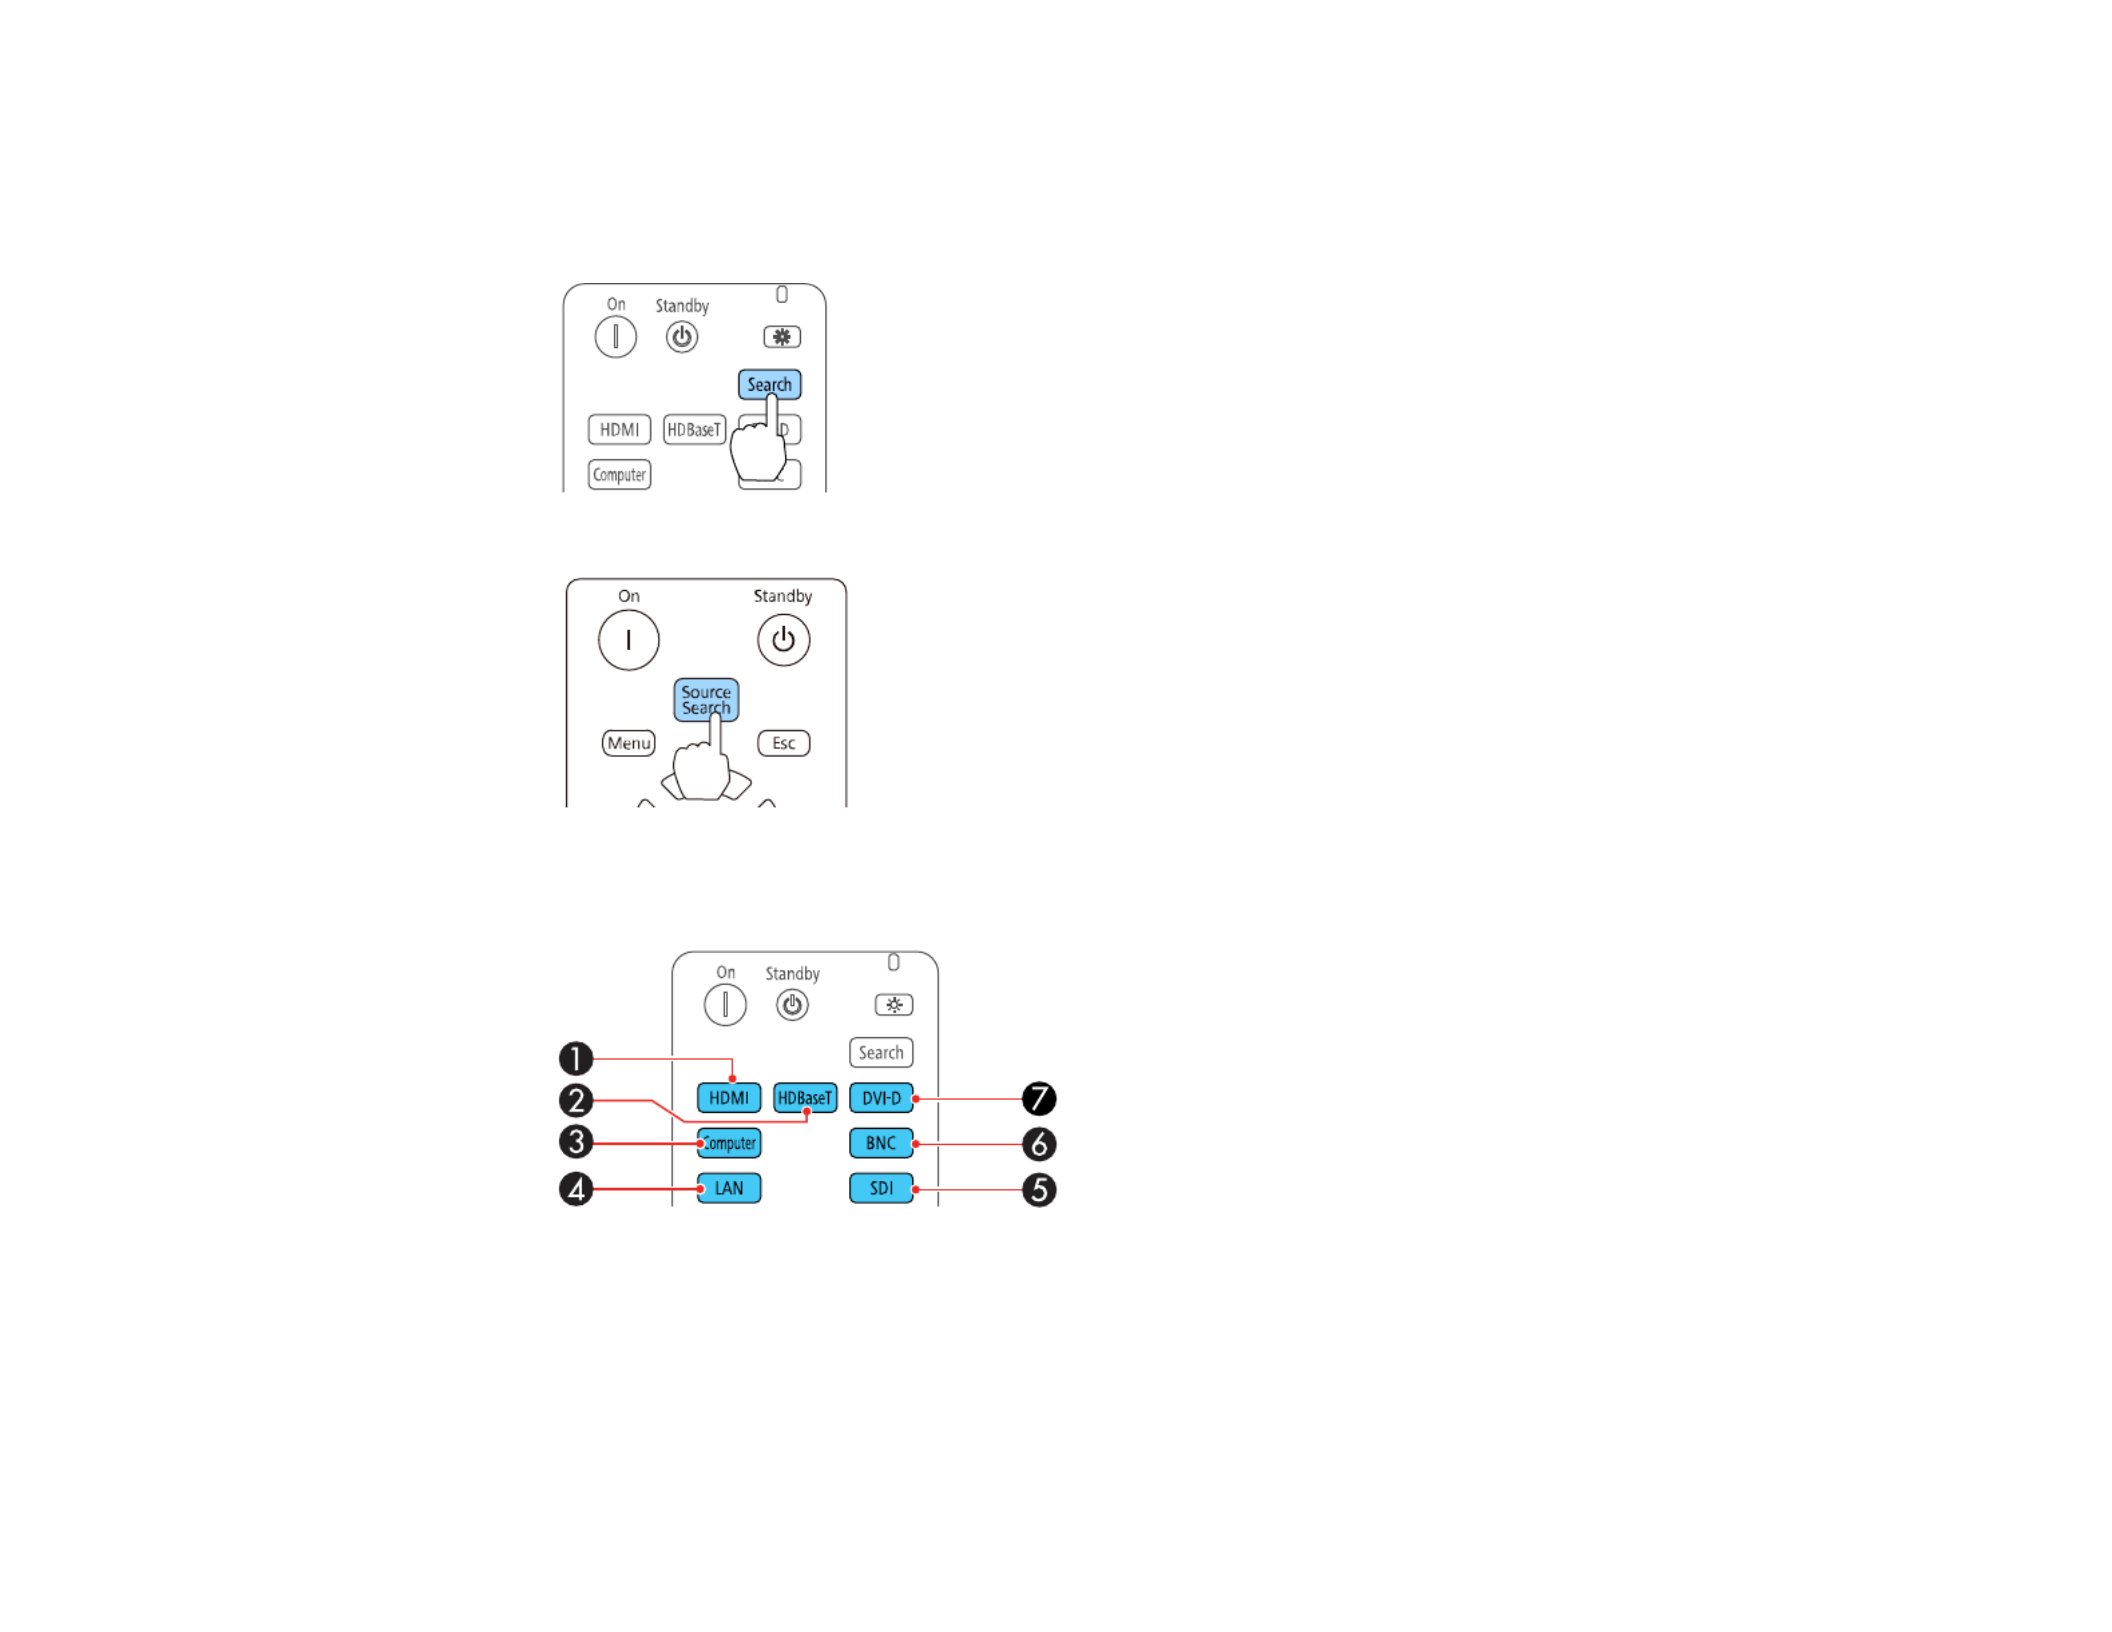
127
3. Do one of the following:
• Press the button on the projector or the button on the remote control untilSource Search Search
you see the image from the source you want.
• Press the button for the source you want on the remote control.
1 HDMI port source
2 HDBaseT port source
3 Computer port source

128
4 Network port source
5 SDI port source (not supported for Pro L1715SNL)
6 BNC port source
7 DVI-D port source
• Press the button on the remote control and select your image source.Home
Parent topic: Using Basic Projector Features
Related references
Projector Setup Settings - Extended Menu
Remote Control Operation
The remote control lets you control the projector from almost anywhere in the room, up to 98.4 feet
(30 m) away. You can point it at the front or rear of the projector.
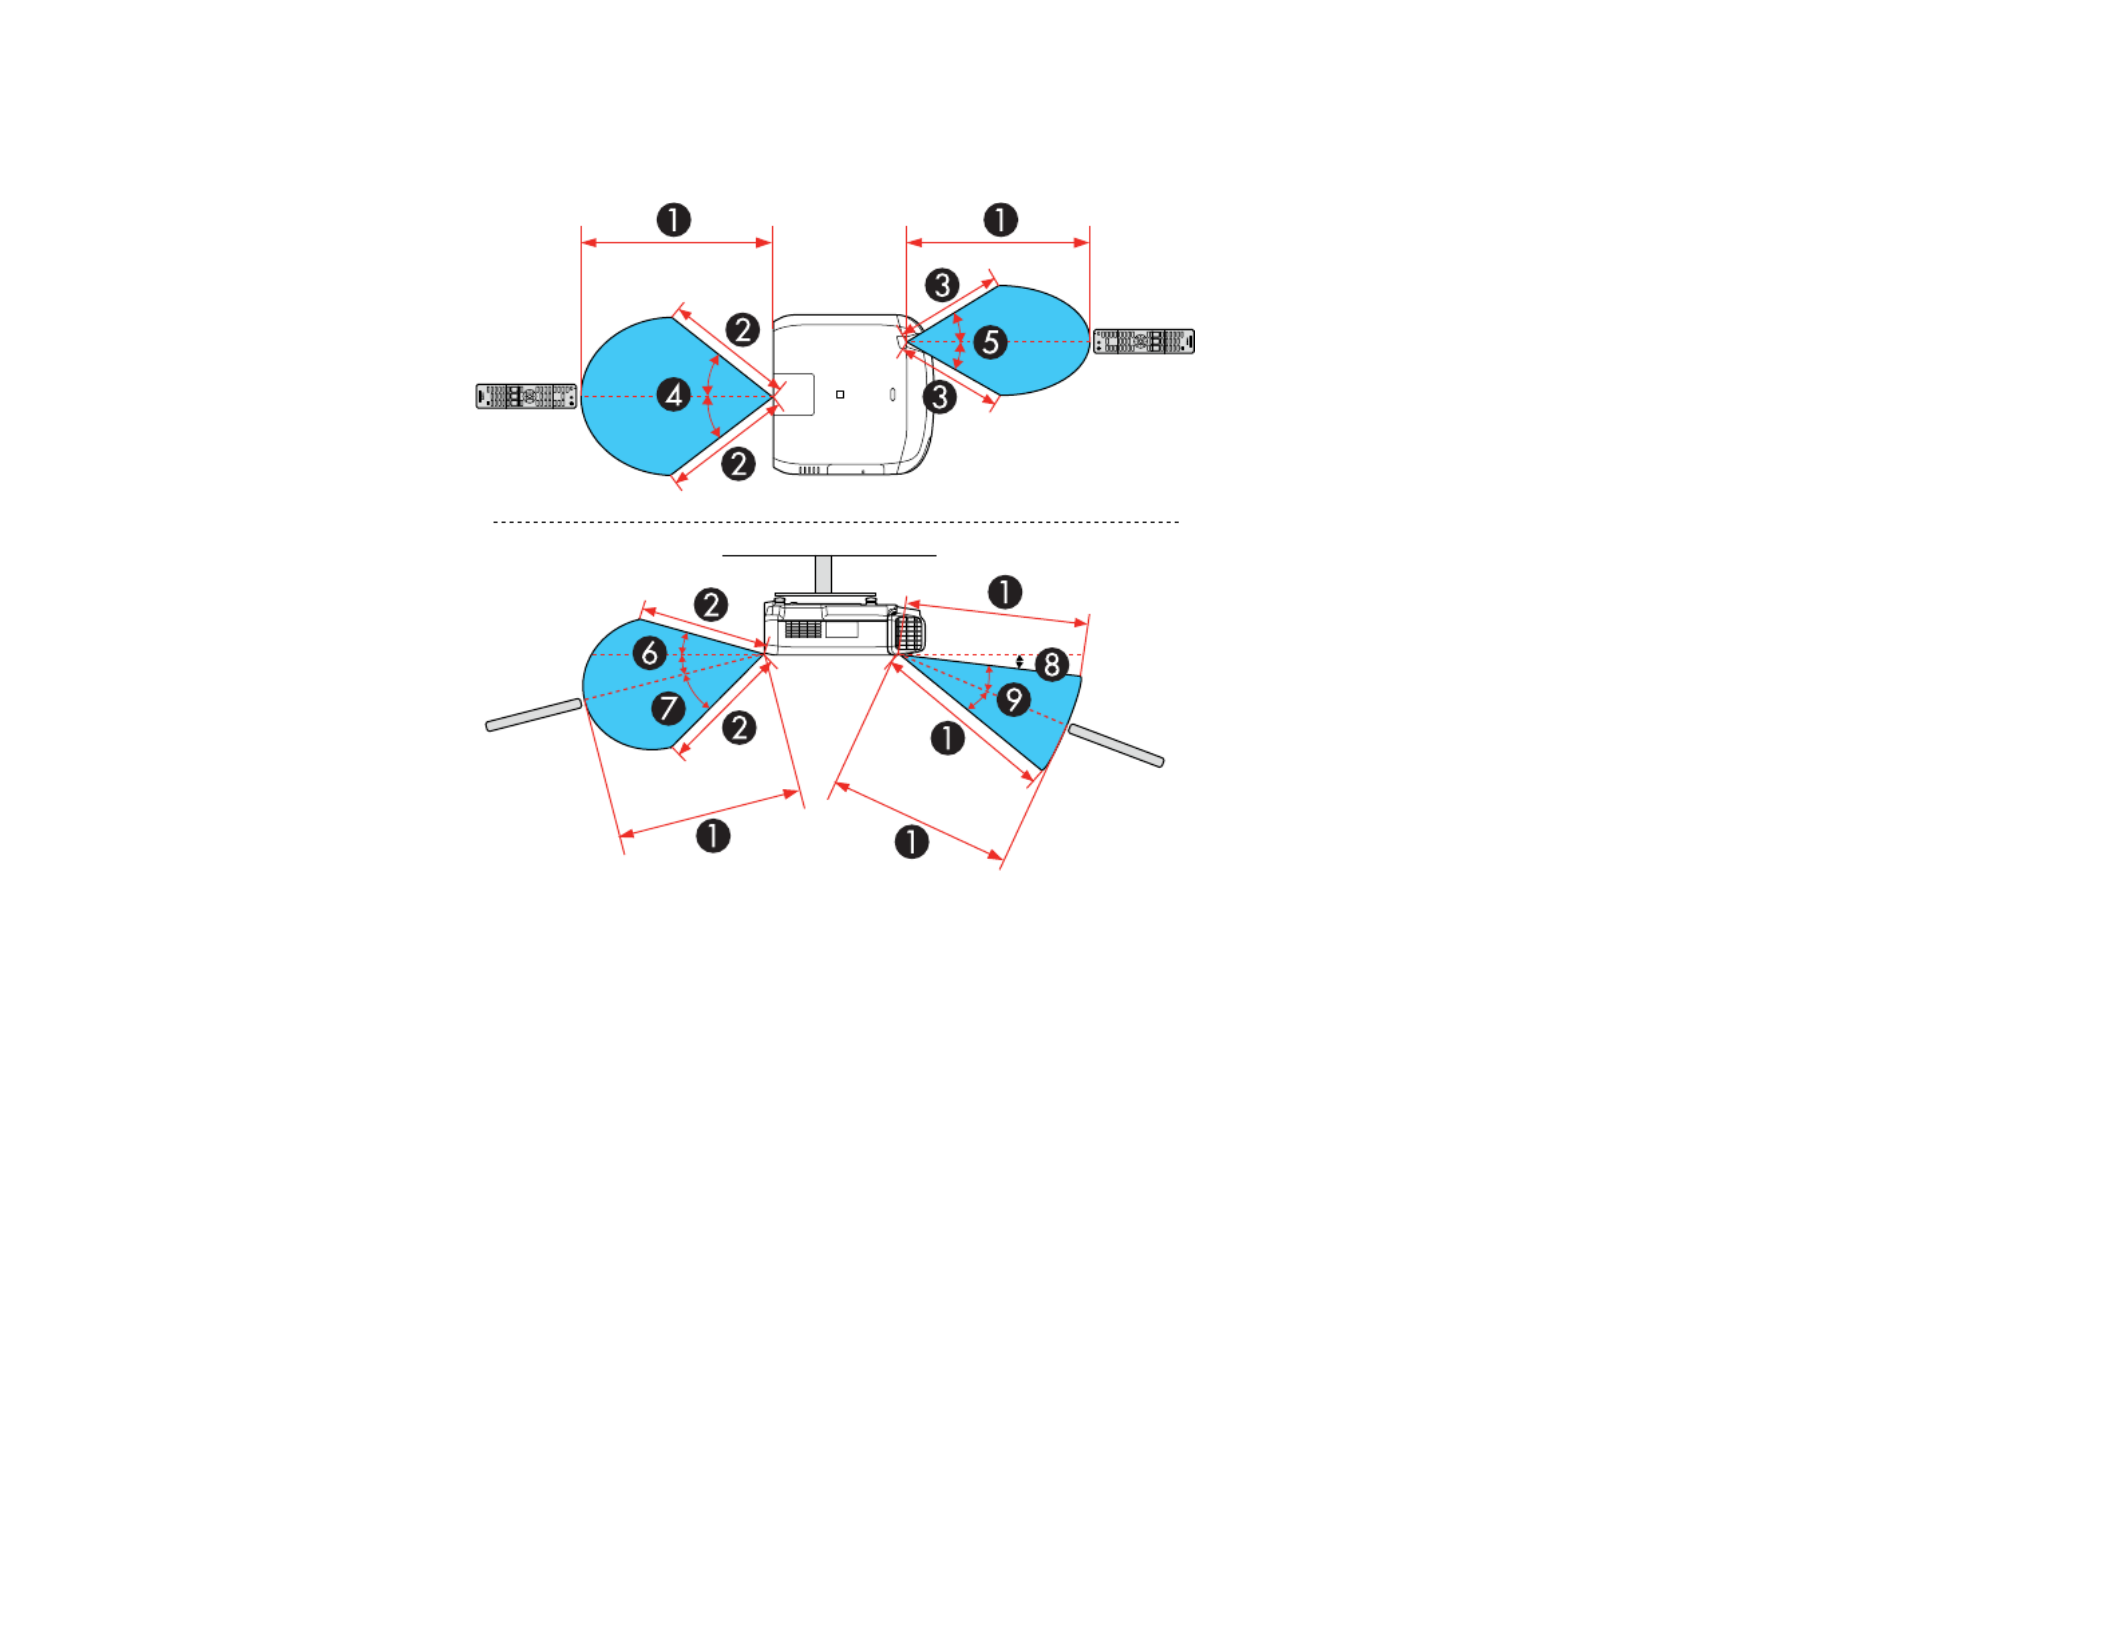
129
Make sure that you aim the remote control at the projector's receivers within the angles listed here.
1 98.4 feet (30 m)
2 82.0 feet (25 m)
3 65.6 feet (20 m)
4 ±60°
5 ±30°
6 ±15°
7 30°
8 10°
9 ±20°

130
Note: Avoid using the remote control in conditions with bright fluorescent lights or in direct sunlight, or
the projector may not respond to commands. If you will not use the remote control for a long time,
remove the batteries.
Parent topic: Using Basic Projector Features
Related tasks
Replacing the Remote Control Batteries
Projection Modes
Depending on how you positioned the projector, you may need to change the projection mode so your
images project correctly.
• (default setting) lets you project from a table in front of the screen.Front
• flips the image over top-to-bottom to project upside-down from a ceiling or wall mount.Front/Ceiling
• flips the image horizontally to project from behind a translucent screen.Rear
• flips the image over top-to-bottom and horizontally to project from the ceiling and behindRear/Ceiling
a translucent screen.
Note: To view 3D images, you must project onto the front of a silver screen designed for passive 3D
images (Pro L1490U/L1490UNL/L1495U/L1495UNL/L1500UH/L1500UHNL/L1505UH/L1505UHNL).
Changing the Projection Mode Using the Remote Control
Changing the Projection Mode Using the Menus
Parent topic: Using Basic Projector Features
Changing the Projection Mode Using the Remote Control
You can change the projection mode to flip the image over top-to-bottom.
1. Turn on the projector and display an image.
2. Hold down the button on the remote control for 5 to 10 seconds.A/V Mute

131
The image disappears briefly and reappears flipped top-to-bottom.
3. To change projection back to the original mode, hold down the button for 5 to 10 secondsA/V Mute
again.
Parent topic: Projection Modes
Changing the Projection Mode Using the Menus
You can change the projection mode to flip the image over top-to-bottom and/or left-to-right using the
projector menus.
1. Turn on the projector and display an image.
2. Press the button.Menu
3. Select the menu and press .Extended Enter
4. Select the setting and press .Projection Enter
5. Select a projection mode and press .Enter
6. Press or to exit the menus.Menu Esc
Parent topic: Projection Modes

132
Image Aspect Ratio
The projector can display images in different width-to-height ratios called aspect ratios. Normally the
input signal from your video source determines the image's aspect ratio. However, for certain images
you can change the aspect ratio to fit your screen by pressing a button on the remote control.
If you always want to use a particular aspect ratio for a certain video input source, you can select it using
the projector's menus.
Changing the Image Aspect Ratio
Available Image Aspect Ratios
Parent topic: Using Basic Projector Features
Related references
Image Quality Settings - Image Menu
Changing the Image Aspect Ratio
You can change the aspect ratio of the displayed image to resize it.
Note: Screen TypeSet the setting in the projector's Extended menu before changing the aspect ratio.
1. Turn on the projector and switch to the image source you want to use.
2. Press the button on the remote control.Aspect
The shape and size of the displayed image changes, and the name of the aspect ratio appears
briefly on the screen.
3. To cycle through the available aspect ratios for your input signal, press the buttonAspect
repeatedly.
Note: ResolutionIf you are projecting from a computer and parts of the image are cut off, set the
setting to or in the Signal menu.Wide Normal

133
Parent topic: Image Aspect Ratio
Related references
Input Signal Settings - Signal Menu
Related tasks
Setting the Screen Type
Available Image Aspect Ratios
You can select the following image aspect ratios, depending on the selected Screen Type setting and
the input signal from your image source.
Note: Black bands and cropped or stretched images may project in certain aspect ratios, depending on
the aspect ratio and resolution of your input signal.
Screen Type setting Available aspect ratios
4:3 Auto, Normal, 4:3, 16:9, H-Zoom, V-Zoom,Native*
16:9 Auto, Normal, Full, H-Zoom, V-Zoom, Native
16:10 Auto, Normal, 16:9, Full, H-Zoom, V-Zoom, Native
*Available only when projecting computer images or from sources connected to the portHDMI
Aspect ratio setting Description
Auto Automatically sets the aspect ratio according to the input signal.
Normal Displays images in the same aspect ratio of the input signal.
4:3 Displays images at a 4:3 aspect ratio.
16:9 Displays images at a 16:9 aspect ratio.
Full Displays images using the full size of the projection area, but does
not maintain the aspect ratio.
H-Zoom
V-Zoom
Displays images using the full width (H-Zoom) or full height (V-
Zoom) of the projection area and maintains the aspect ratio of the
image. Areas that exceed the edges of the projected screen are not
projected.

134
Aspect ratio setting Description
Native Displays images as is (aspect ratio and resolution are maintained).
Areas that exceed the edges of the projected screen are not
projected.
Parent topic: Image Aspect Ratio
Related tasks
Setting the Screen Type
Color Mode
The projector offers different Color Modes to provide optimum brightness, contrast, and color for a
variety of viewing environments and image types. You can select a mode designed to match your image
and environment, or experiment with the available modes.
If you always want to use a particular color mode for a certain video input source, you can select it using
the projector menus.
Changing the Color Mode
Available Color Modes
Parent topic: Using Basic Projector Features
Related references
Image Quality Settings - Image Menu
Changing the Color Mode
You can change the projector's Color Mode using the remote control to optimize the image for your
viewing environment.
1. Turn on the projector and switch to the image source you want to use.
2. If you are projecting from a DVD player or other video source, insert a disc or other video media and
press the play button, if necessary.

135
3. Press the button on the remote control to change the Color Mode.Color Mode
The image appearance changes and the name of the Color Mode appears briefly on the screen.
4. To cycle through all the available Color Modes for your input signal, press the buttonColor Mode
repeatedly.
Parent topic: Color Mode
Available Color Modes
You can set the projector to use these Color Modes, depending on the input source you are using:
Color Mode Description
Dynamic Best for projecting in a bright room
Presentation Best for color presentations in a bright room
Natural Best for projecting still pictures such as photos
Cinema Best for movies projected in a dark room
BT.709 Best for watching digital TV or Blu-ray discs; produces images that
conform to the ITU-R BT.709 standard
DICOM SIM* Best for projecting X-ray photographs and other medical images
Multi-Projection Best for projecting from multiple projectors (reduces the color tone
difference between images)
* Available only when inputting RGB signals
Note: DICOM SIMThe Color Mode is for reference purposes only and should not be used to make
medical diagnoses.
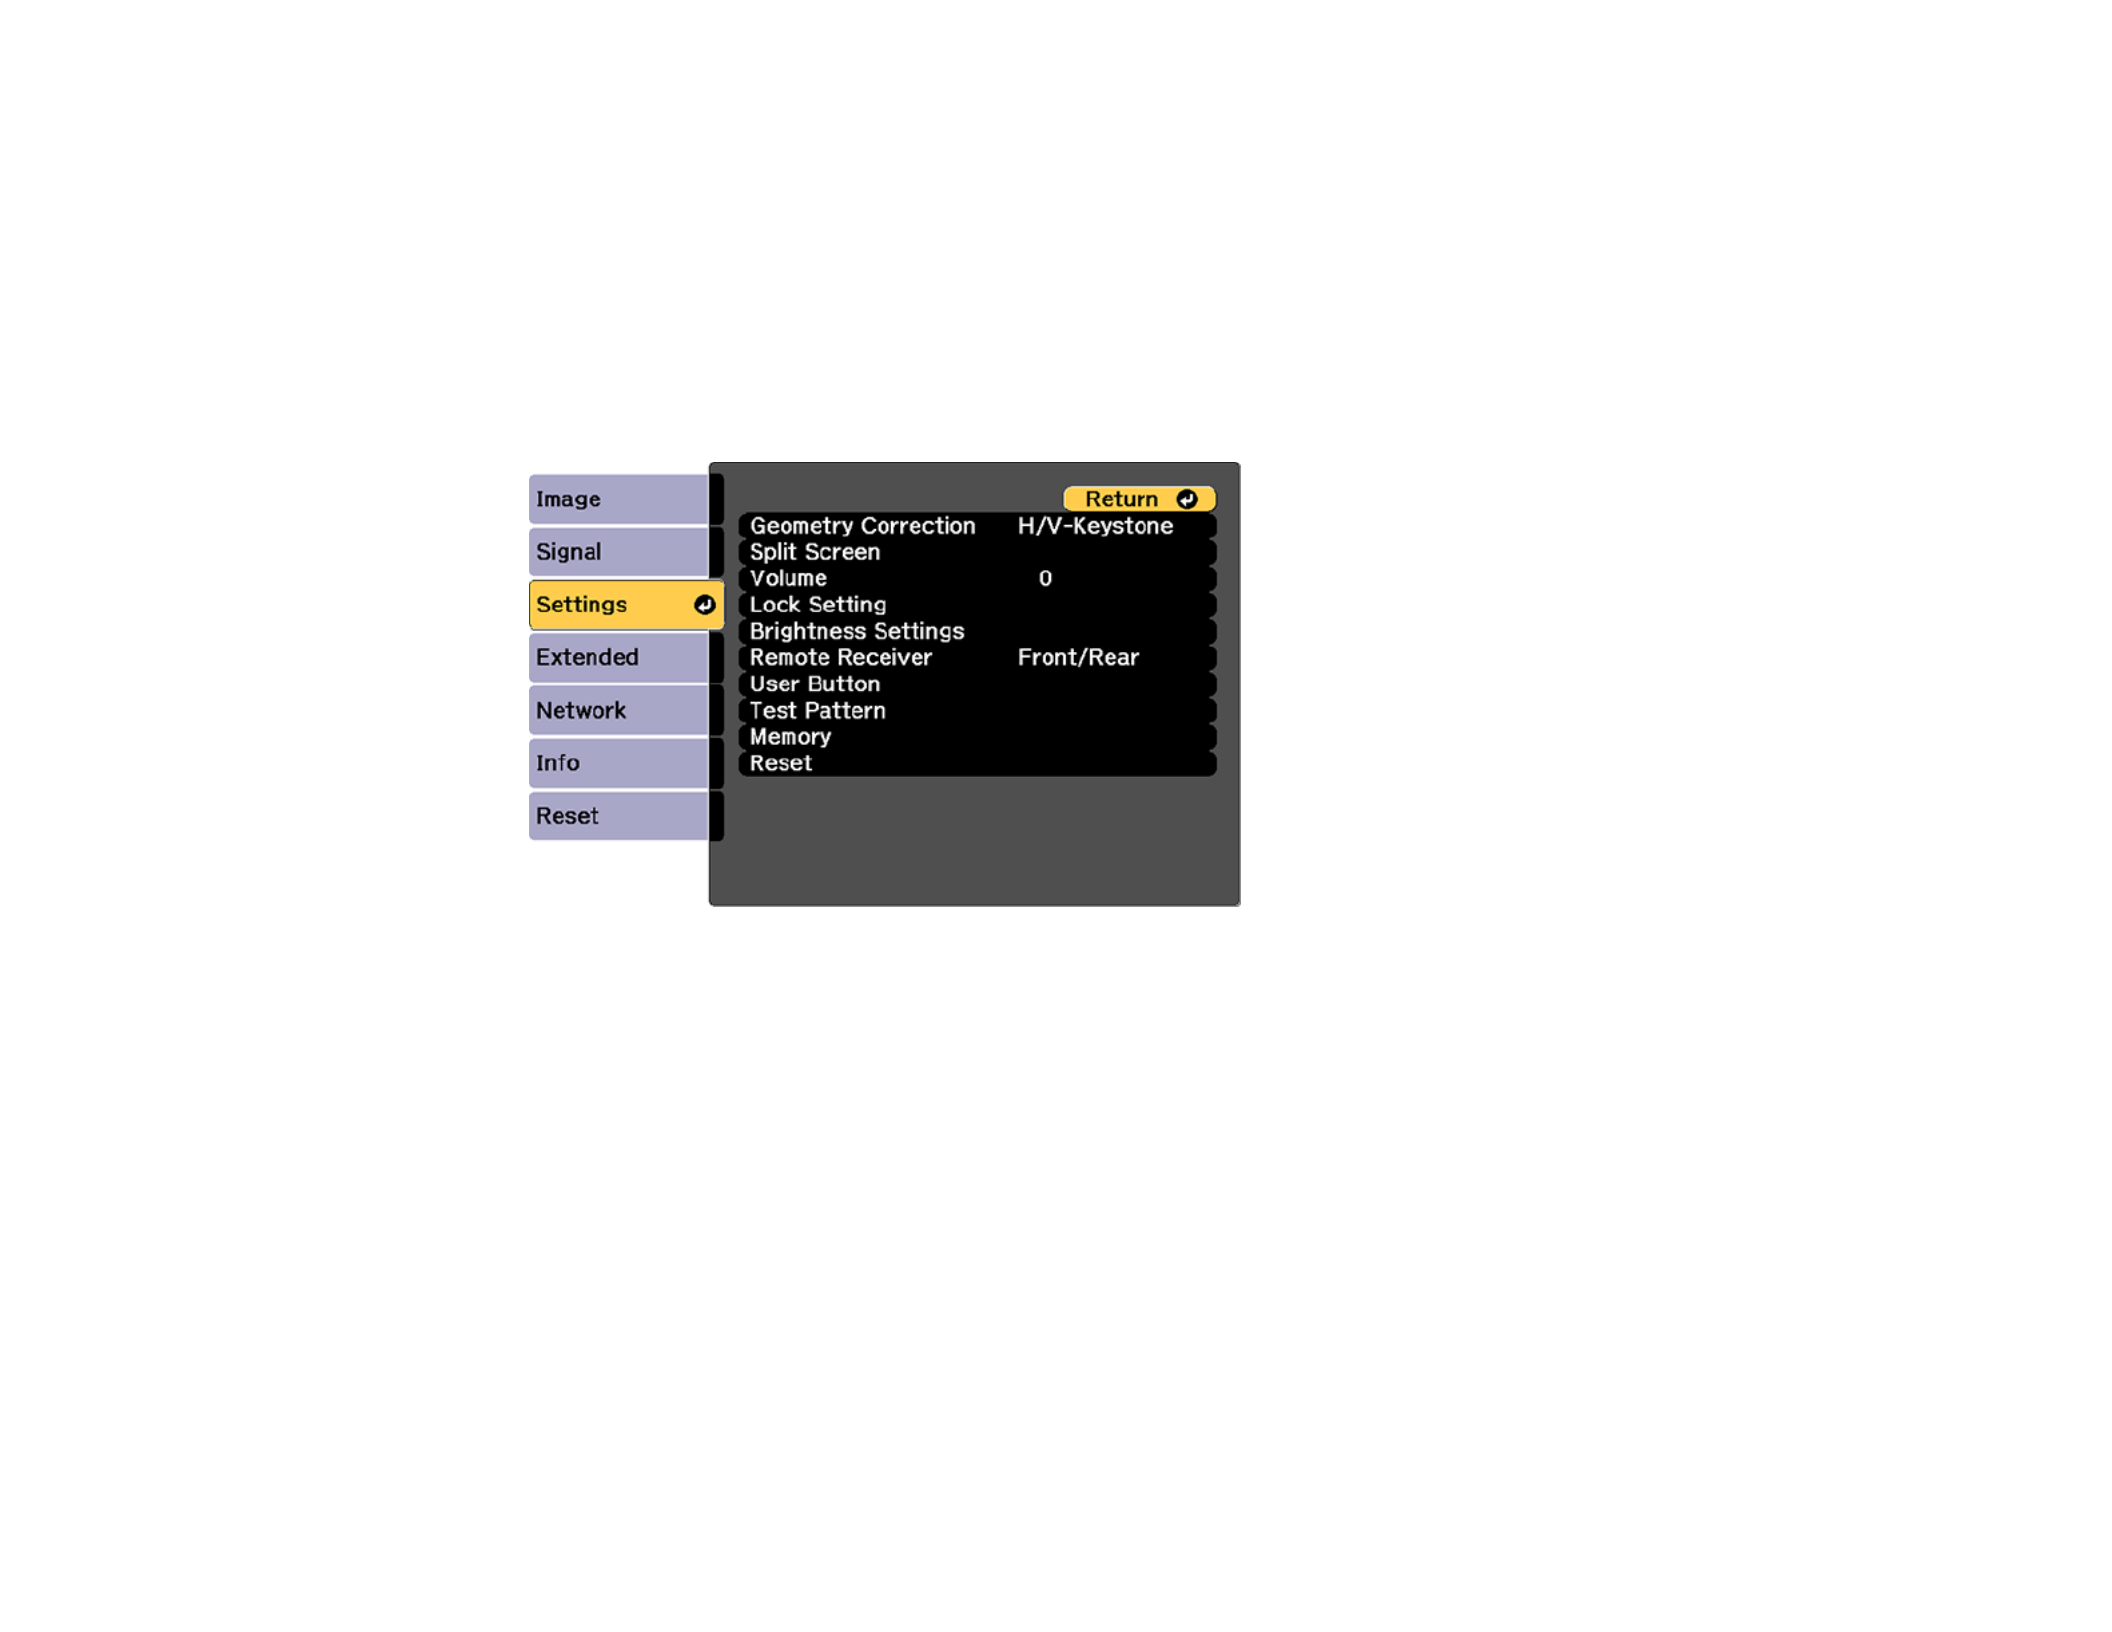
136
Parent topic: Color Mode
Adjusting the Brightness
You can adjust the brightness of your projector's light source.
1. Turn on the projector and switch to the image source you want to use.
2. Press the button.Menu
3. Select the menu and press .Settings Enter
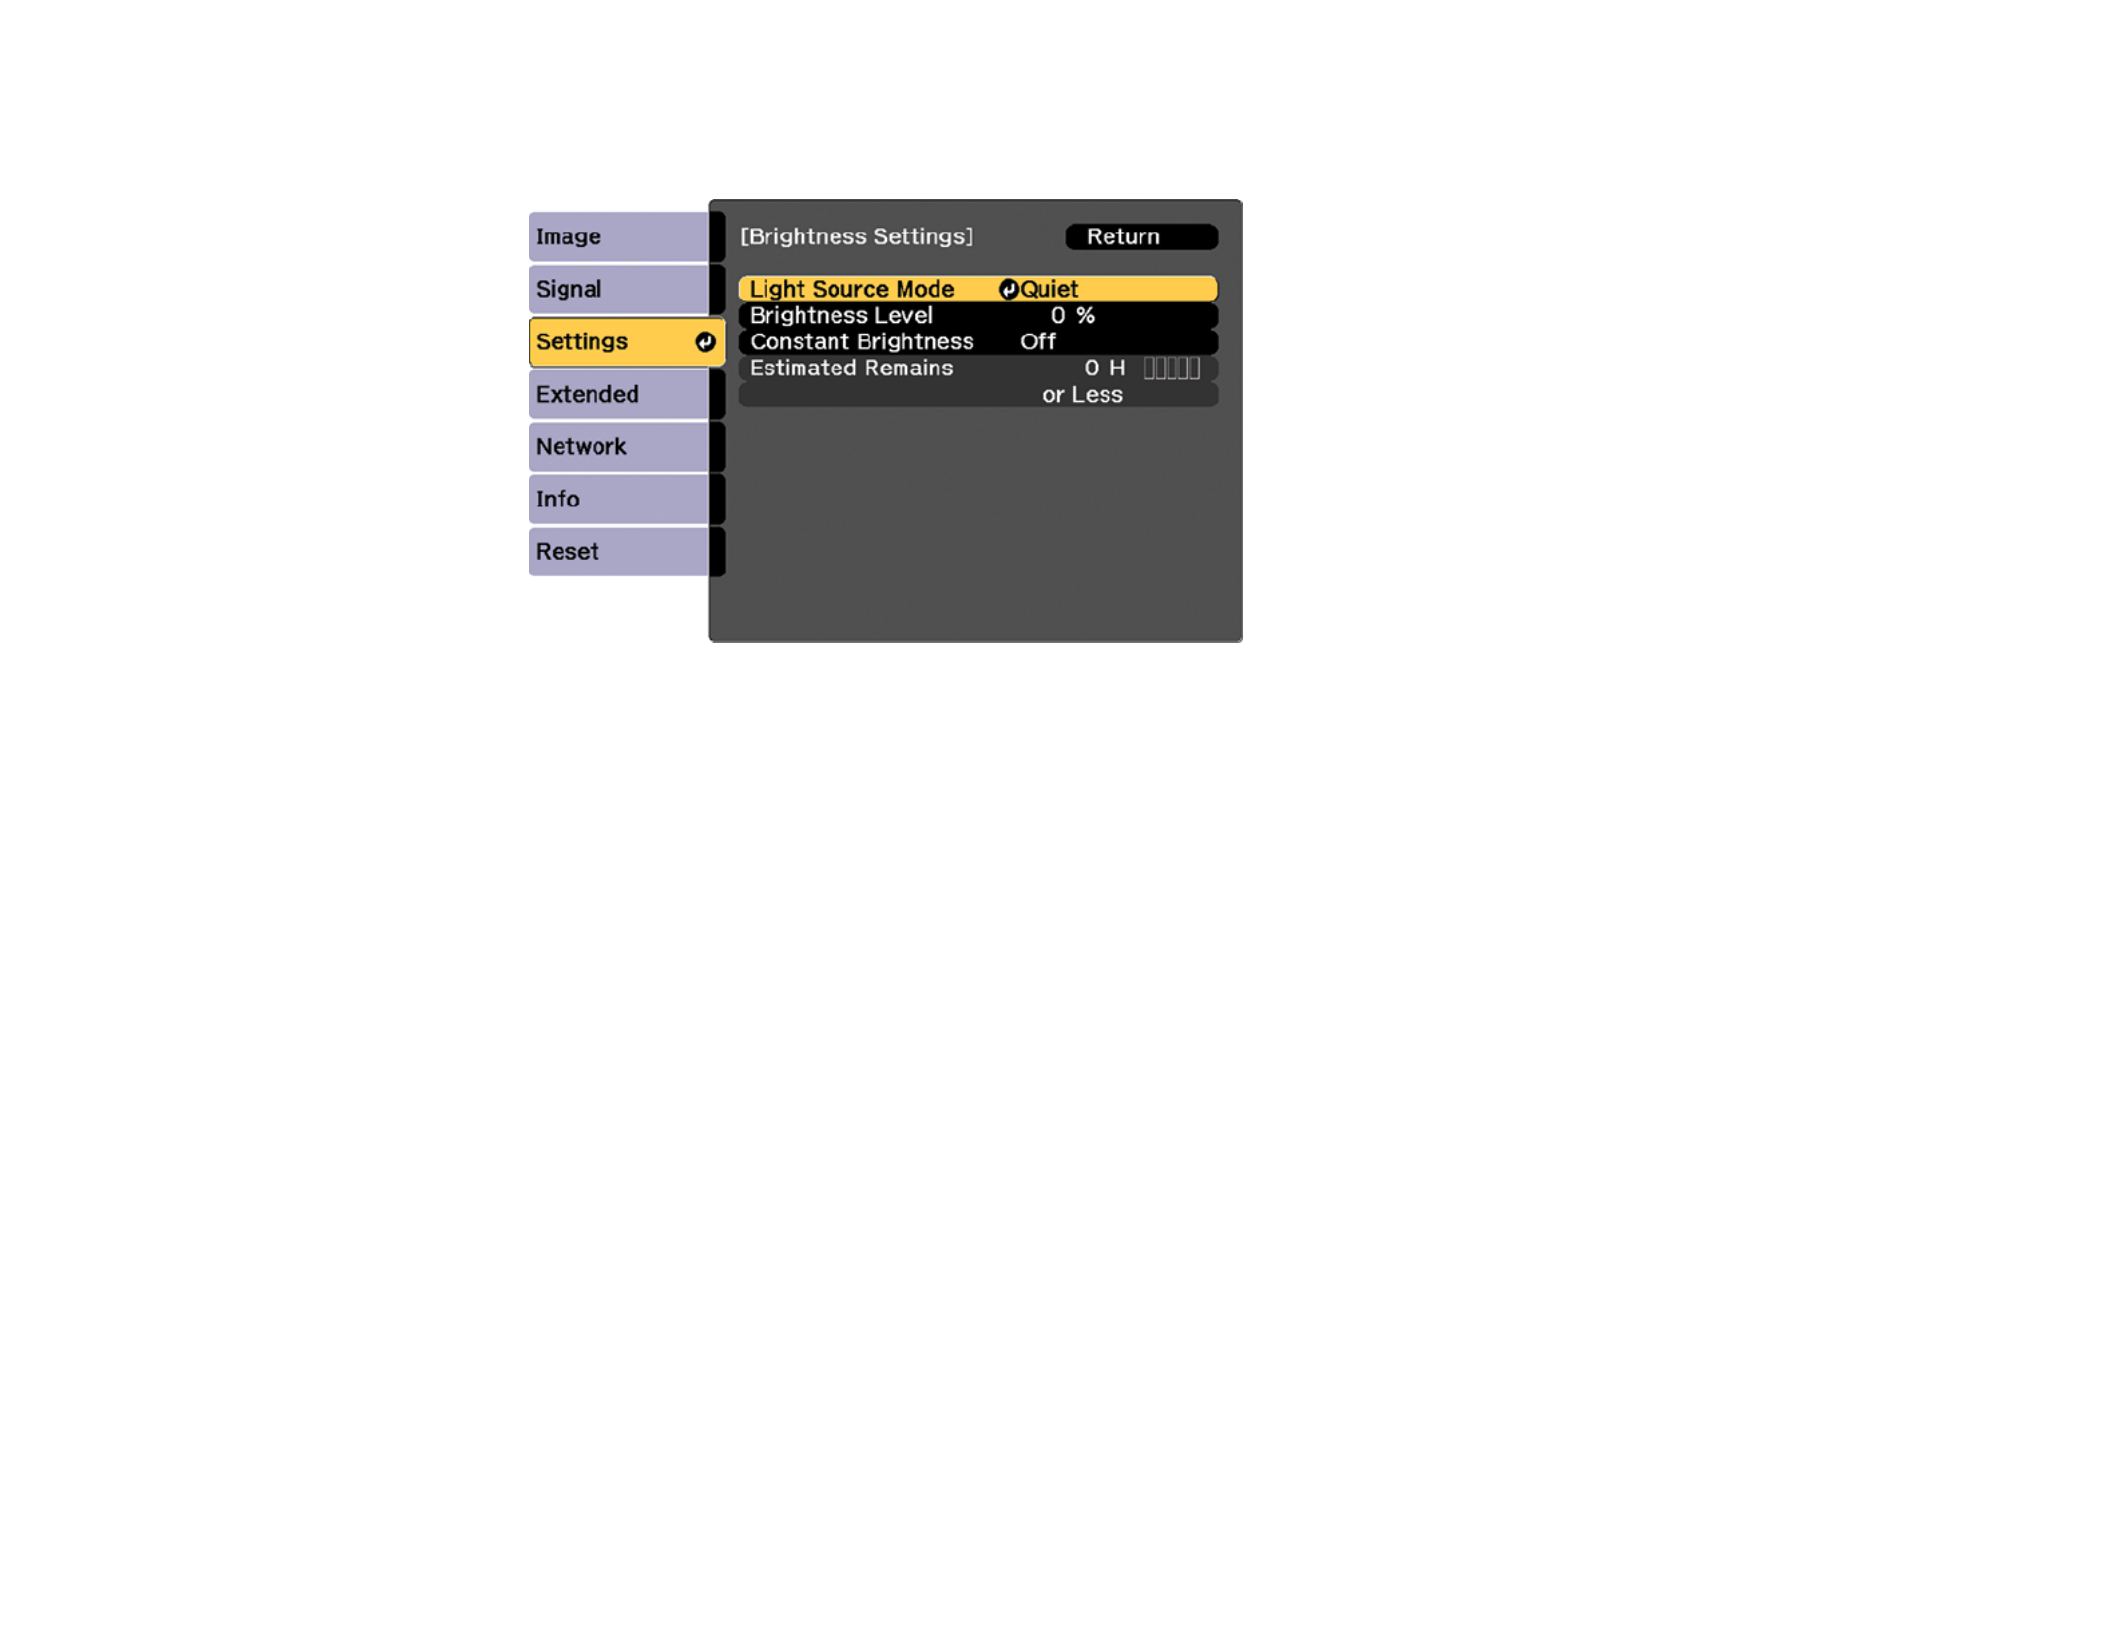
137
4. Select the setting and press .Brightness Settings Enter
5. Select the setting and press .Light Source Mode Enter
6. Select one of the following options:
• : Sets brightness to the maximum level (ideal for conference rooms, auditoriums, andNormal
lecture halls)
• : Sets brightness to 70% and reduces fan noise (ideal for libraries, theaters, museums, andQuiet
art galleries)
• : Sets brightness to 70% and extends the life expectancy of the light source (ideal forExtended
darker environments with ambient light, such as museums and art galleries, where a reduced
maintenance cycle is desired)
• : Allows you to select a custom brightness level between 30 to 100%Custom
Note: Some lenses will not support the maximum brightness level of the Pro
L1715SNL/L1750UNL/L1755UNL and you may not be able to select or adjust some of the options
on this screen. Visit (U.S.) or (Canada) for details.epson.com/lenssupport epson.ca/soutienobjectifs
7. If you selected , select from the Brightness Settings screen and use theCustom Brightness Level
left and right arrow buttons to select the brightness.

138
8. If you selected and want to maintain consistent brightness, turn on theCustom Constant
Brightness setting.
Note: Constant Brightness Light Source ModeIf you turn on , you cannot change the and
Brightness Level Constant Brightness Brightness Levelsettings. If you turn off , the setting
changes according to the status of the light source.
9. Press or to exit the menus.Menu Esc
Note: If you use the projector continuously for more than 24 hours, or regularly turn it off by shutting off
the power outlet, schedule periodic events from the Extended menu.Light Source Calibration
Otherwise, the setting may not work properly.Constant Brightness
Constant Brightness Usage Hours
Parent topic: Using Basic Projector Features
Related references
Projector Setup Settings - Extended Menu
Related tasks
Saving a Scheduled Event
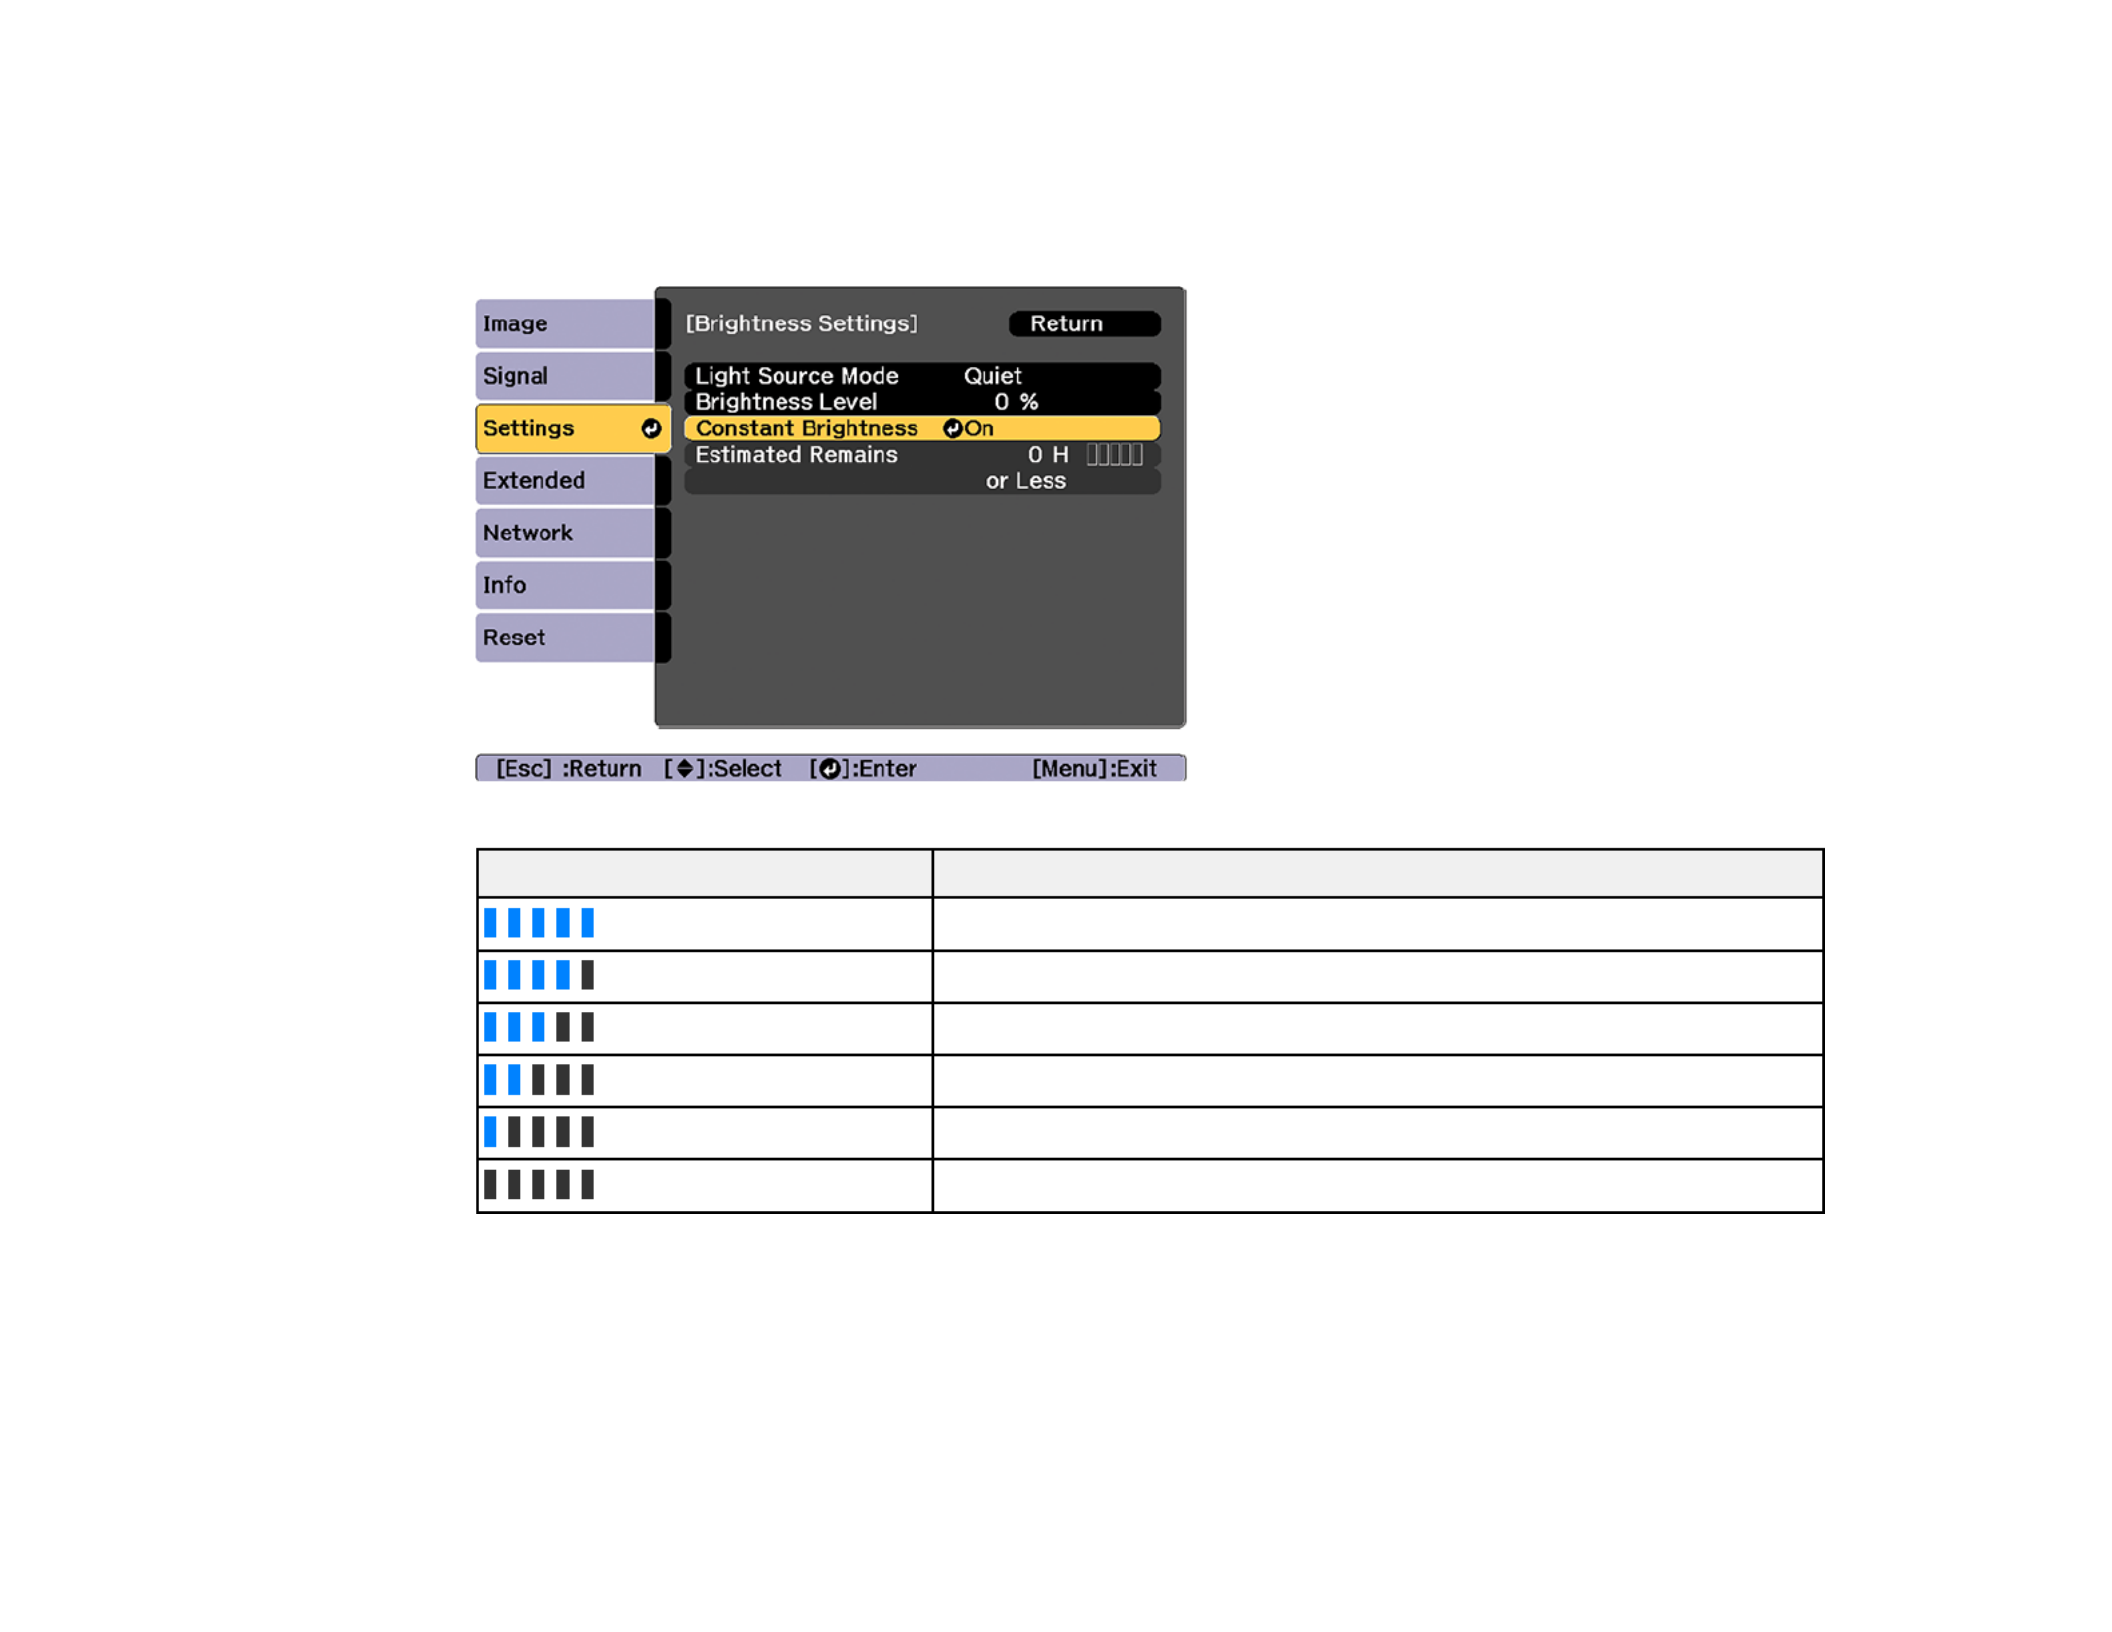
139
Constant Brightness Usage Hours
If you turn on the setting, the number of hours the projector can maintain constantConstant Brightness
brightness is displayed as the setting.Estimated Remains
Display level Estimated remaining hours
10000 or more hours
8000 to 9999 hours
6000 to 7999 hours
4000 to 5999 hours
2000 to 3999 hours
0 to 1999 hours
Light source life span
The estimated life span of the light source varies depending on the setting andBrightness Level
whether the setting is on or off.Constant Brightness

140
Constant Brightness off
1 Brightness level
2 Time before the brightness of the light source is reduced by half (approximate)
Brightness Level setting Hours
100% 20000 hours
90% 21000 hours
80% 24000 hours
70% 30000 hours
60% 37000 hours
50% 47000 hours
40% 61000 hours
30% 71000 hours
Constant Brightness on
1 Brightness level
2 Time the projector can maintain constant brightness (approximate)

141
Brightness Level setting Hours
90% 6000 hours
80% 10000 hours
70% 19000 hours
60% 29000 hours
50% 41000 hours
40% 56000 hours
30% 78000 hours
Note: The light source usage hours vary depending upon environmental conditions and usage. The
hours listed here are an approximate and are not guaranteed. After 20000 hours of use, you may need to
replace parts in the projector. If is turned on, and you have exceeded the usageConstant Brightness
hours listed here, you may not be able to select a high setting.Brightness Level
Parent topic: Adjusting the Brightness
Turning On Automatic Luminance Adjustment
In the and color modes, you can turn on the setting toDynamic Cinema Dynamic Contrast
automatically optimize the image luminance. This improves the image contrast based on the brightness
of the content you project.
1. Turn on the projector and switch to the image source you want to use.
2. Press the button.Menu
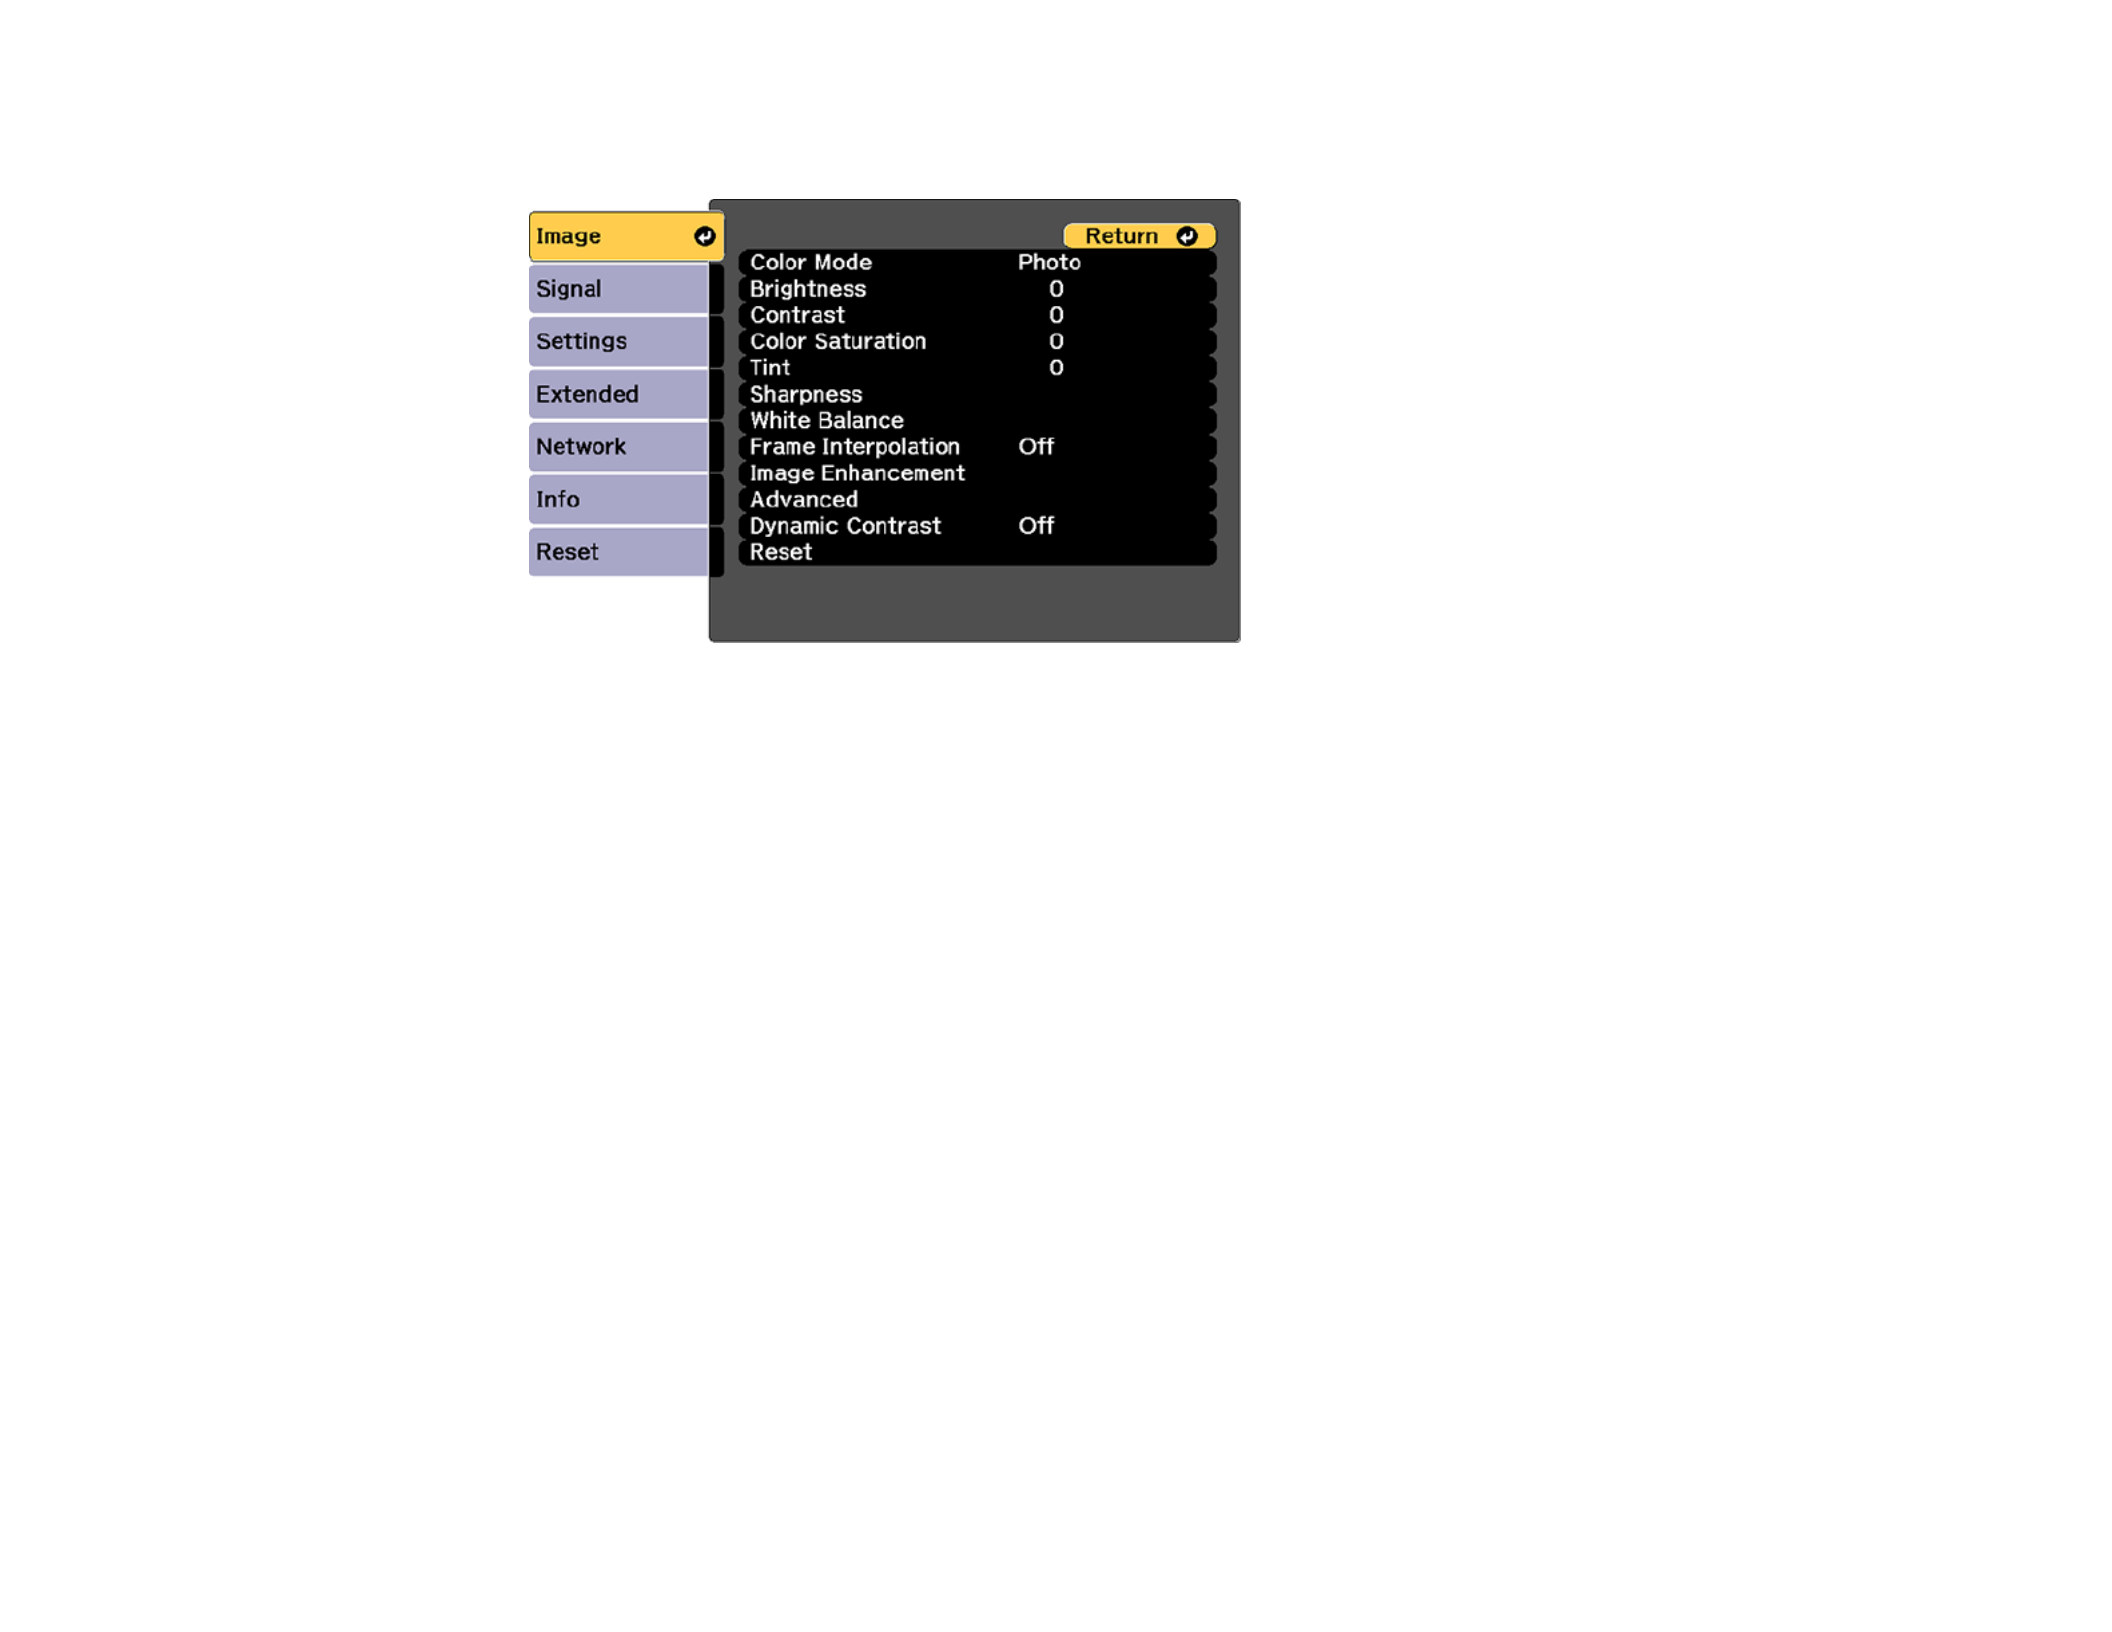
142
3. Select the menu and press .Image Enter
4. Select the setting, choose one of the following options, and press :Dynamic Contrast Enter
• to adjust brightness at the standard speed.Normal
• to adjust brightness as soon as the scene changes.High Speed
5. Press or to exit the menus.Menu Esc
Parent topic: Using Basic Projector Features
Controlling the Volume with the Volume Buttons
You can use the buttons on the remote control to adjust the volume as you project aVolume
presentation with audio. The volume buttons control any external speakers you connected to the
projector.
You must adjust the volume separately for each connected input source.
1. Turn on the projector and start a presentation that includes audio.

143
2. To lower or raise the volume, press the buttons on the remote control.Volume
A volume gauge appears on the screen.
3. To set the volume to a specific level for an input source, use the projector menus.
Parent topic: Using Basic Projector Features
Related references
Projector Feature Settings - Settings Menu
Related tasks
Connecting to External Speakers
Setting the Date and Time
You can set the date and time for the projector.
Note: Schedule ProtectionIf the setting in the Password Protection screen is enabled, you cannot
change the date and time settings.
1. Press the button.Menu
2. Select the menu and press .Extended Enter
3. Select the setting and press .Operation Enter
4. Select the setting and press .Date & Time Enter

144
You see a screen like this:
5. Select your date and time settings. Then select and press to confirm your changes.Set Enter
6. When you are finished, press the button to exit.Menu
Date and Time Settings
Parent topic: Using Basic Projector Features
Related concepts
Password Security Types
Date and Time Settings
Settings Options Description
Date & Time Date
Time
Time Difference (UTC)
Adjusts the projector's date and time
settings
Date Timeand : sets the date and time
Time Difference (UTC): sets the time
difference from Coordinated Universal
Time

145
Settings Options Description
Daylight Saving Time Daylight Saving Time
DST Start
DST End
DST Adjustment (min)
Adjusts the daylight saving time
settings
Daylight Saving Time: enables or
disables daylight saving time
DST Start DST Endand : sets the date
and time to start or end daylight saving
time
DST Adjustment (min): sets the
difference between standard and
daylight saving time
Internet Time Internet Time
Internet Time Server
Automatically adjusts the time through
an Internet connection
Internet Time: turn on this setting to
update the date and time automatically
through an Internet time server
Internet Time Server: sets the IP
address for the Internet time server
Parent topic: Setting the Date and Time

146
Adjusting Projector Features
Follow the instructions in these sections to use your projector's feature adjustments.
Shutting Off the Picture and Sound Temporarily
Stopping Video Action Temporarily
Zooming Into and Out of Images
Projector Security Features
Projecting Two Images Simultaneously
Using Advanced Image Adjustment Features
Using Multiple Projectors
Enabling Protocol Emulation
Viewing 3D Images
Saving Settings to Memory and Using Saved Settings
Saving a Scheduled Event
Copying Menu Settings Between Projectors
Shutting Off the Picture and Sound Temporarily
You can temporarily turn off the projected picture and sound if you want to redirect your audience's
attention during a presentation. Any sound or video action continues to run, however, so you cannot
resume projection at the point that you stopped it.
If you want to display an image such as a company logo or picture when the presentation is stopped, you
can set up this feature using the projector's menus.
Note: If the picture and sound are off for more than 2 hours, the power automatically turns off. You can
disable the setting in the Extended Menu to turn off this feature.A/V Mute Timer
1. Press the button on the remote control to temporarily stop projection and mute any sound.A/V Mute

147
2. To turn the picture and sound back on, press the button again.A/V Mute
Note: Fade-out Fade-inTo fade the image in and out when you use A/V Mute, turn on the and/or
settings in the Extended menu.
Note: A/V Mute A/V Mute ReleaseIf you selected as the setting in the Extended menu, you can still
control the projector while A/V Mute is enabled.
Parent topic: Adjusting Projector Features
Related references
Projector Setup Settings - Extended Menu
Stopping Video Action Temporarily
You can temporarily stop the action in a video or computer presentation and keep the current image on
the screen. Any sound or video action continues to run, however, so you cannot resume projection at the
point that you stopped it.
1. Press the button on the remote control to stop the video action.Freeze
2. To restart the video action in progress, press again.Freeze
Parent topic: Adjusting Projector Features

148
Zooming Into and Out of Images
You can draw attention to parts of a presentation by zooming into a portion of the image and enlarging it
on the screen.
Note: ScaleThis feature is unavailable if the setting in the Signal menu is enabled. If you see a 4K
Enhancement message, select to disable the 4K Enhancement feature.Yes
1. Press the button on the remote control.E-Zoom +
You see a crosshair on the screen indicating the center of the zoom area.
2. Use the following buttons on the remote control to adjust the zoomed image:
• Use the arrow buttons to position the crosshair in the image area you want to zoom into.
• Press the button repeatedly to zoom into the image area, enlarging it as necessary.E-Zoom +
• To pan around the zoomed image area, use the arrow buttons.
• To zoom out of the image, press the button as necessary.E-Zoom –
• To return to the original image size, press .Esc
Parent topic: Adjusting Projector Features

149
Related references
Input Signal Settings - Signal Menu
Projector Security Features
You can secure your projector to deter theft or prevent unintended use by setting up the following
security features:
• Password security to prevent the projector from being turned on, and prevent changes to the startup
screen and other settings.
• Button lock security to block operation of the projector using the buttons on the control panel or remote
control.
• Security cabling to physically cable the projector in place.
Password Security Types
Locking the Projector's Buttons
Locking the Remote Control Buttons
Installing a Security Cable
Parent topic: Adjusting Projector Features
Password Security Types
You can set up these types of password security using one shared password:
• password prevents anyone from using the projector without first entering aPower On Protection
password.
• password prevents anyone from changing the custom screen the projectorUser's Logo Protection
can display when it turns on. The presence of the custom screen discourages theft by identifying the
projector’s owner.
• password prevents anyone from changing the network settings in the projectorNetwork Protection
menus.
• password prevents anyone from changing the projector's time or scheduleSchedule Protection
settings.
• password prevents anyone from changing the projector'sRemote Camera Access Remote Camera
Access setting in the Network menu.
Note: Additional security measures are available for the Remote Camera Access feature. Contact
Epson for details.

150
Setting a Password
Selecting Password Security Types
Entering a Password to Use the Projector
Saving a User's Logo Image to Display
Parent topic: Projector Security Features
Setting a Password
To use password security, you must set a password.
Note: 0000The default password is set to .
1. Hold down the button on the remote control for about five seconds or until you see thisFreeze
menu.
2. Press the down arrow to select and press .Password Enter
You see the prompt "Change the password?".
3. Select and press .Yes Enter

151
4. Press and hold down the button on the remote control and use the numeric buttons to set aNum
four-digit password.
The password displays as **** as you enter it. Then you see the confirmation prompt.
5. Enter the password again.
You see the message "Password accepted."
6. Press to return to the menu.Esc
7. Make a note of the password and keep it in a safe place in case you forget it.
Parent topic: Password Security Types
Selecting Password Security Types
After setting a password, you see this menu, allowing you to select the password security types you want
to use.

153
1. Press and hold down the button on the remote control while you enter the password using theNum
numeric buttons.
Note: 0000The default password is .
The password screen closes.
2. If the password is incorrect, the following may happen:
• You see a "wrong password" message and a prompt to try again. Enter the correct password to
proceed.
• If you enter an incorrect password several times in succession, the projector displays a request
code and a message to contact Epson Support. Do not attempt to enter the password again.
When you contact Epson Support, provide the displayed request code and proof of ownership for
assistance in unlocking the projector.
Parent topic: Password Security Types
Saving a User's Logo Image to Display
You can transfer an image to the projector and then display it whenever the projector turns on. You can
also display the image when the projector is not receiving an input signal or when you temporarily stop
projection (using the A/V Mute feature). This transferred image is called the User's Logo screen.
The image you select as the User's Logo can be a photo, graphic, or company logo, which is useful in
identifying the projector's owner to help deter theft. You can prevent changes to the User's Logo by
setting up password protection for it.
1. Display the image you want to project as the User's Logo.
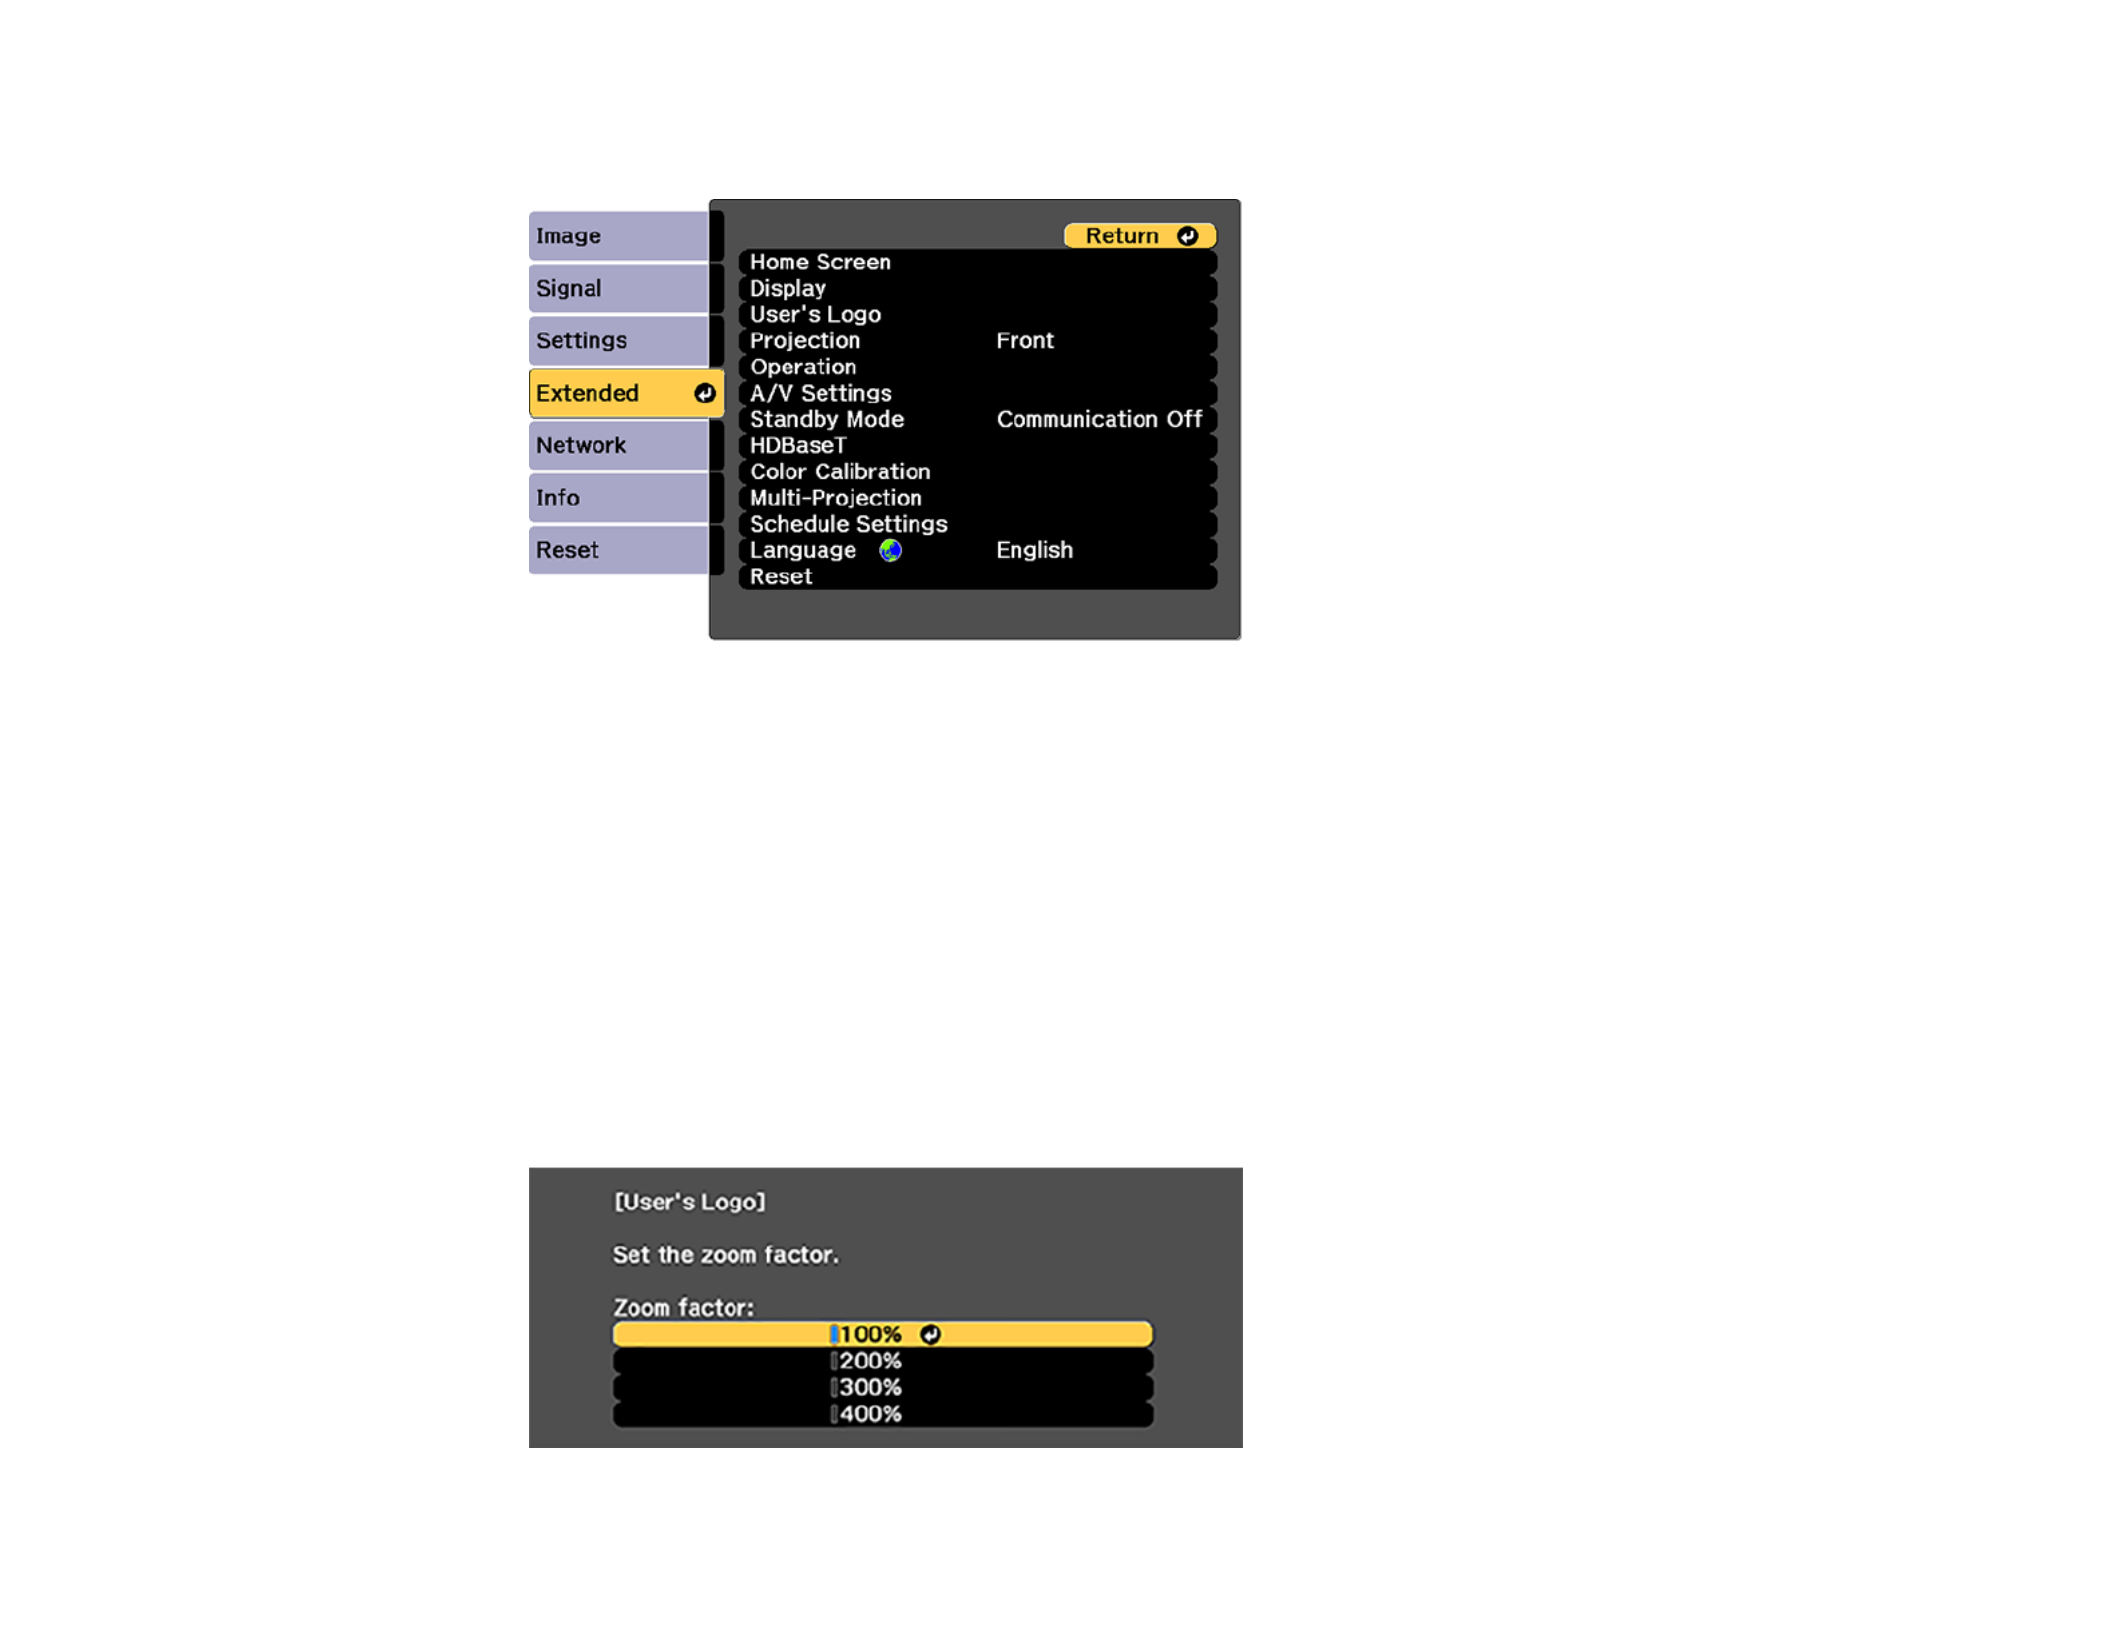
154
2. Press the button, select the menu, and press .Menu Extended Enter
3. Select the setting and press .User's Logo Enter
You see a prompt asking if you want to use the displayed image as a user's logo.
4. Select and press .Yes Enter
You see a selection box overlaying your image.
5. Use the arrow buttons on the remote control to surround the image area you want to use as the
User's Logo and press .Enter
You see a prompt asking if you want to select this image area.
6. Select and press . (If you want to change the selected area, select , press , andYes Enter No Enter
repeat the last step.)
You see the User's Logo zoom factor menu.

155
7. Select a zoom percentage and press .Enter
You see a prompt asking if you want to save the image as the User's Logo.
8. Select and press .Yes Enter
You see a completion message.
9. Press to exit the message screen.Esc
10. Select the menu and press .Extended Enter
11. Select and press .Display Enter
12. Select when you want to display the User's Logo screen:
• To display it whenever there is no input signal, select and set it to .Display Background Logo
• To display it whenever you turn the projector on, select and set it to .Startup Screen On
• To display it whenever you press the button, select and set it to .A/V Mute A/V Mute Logo
To prevent anyone from changing the User's Logo settings without first entering a password, set a
password and enable User's Logo security.
Parent topic: Password Security Types
Locking the Projector's Buttons
You can lock the buttons on the projector's control panel to prevent anyone from using the projector. You
can lock all the buttons or all the buttons except the power button.
1. Press the button.Menu

156
2. Select the menu and press .Settings Enter
3. Select and press .Lock Setting Enter
4. Select the setting and press .Control Panel Lock Enter
Note: You can also press the left arrow button on the control panel to display the Control Panel Lock
screen.
5. Select one of these lock types and press :Enter
• To lock all of the projector's buttons, select .Full Lock
• To lock all buttons except the power button, select .Partial Lock
You see a confirmation prompt.
6. Select and press .Yes Enter
Unlocking the Projector's Buttons
Parent topic: Projector Security Features
Related tasks
Unlocking the Projector's Buttons
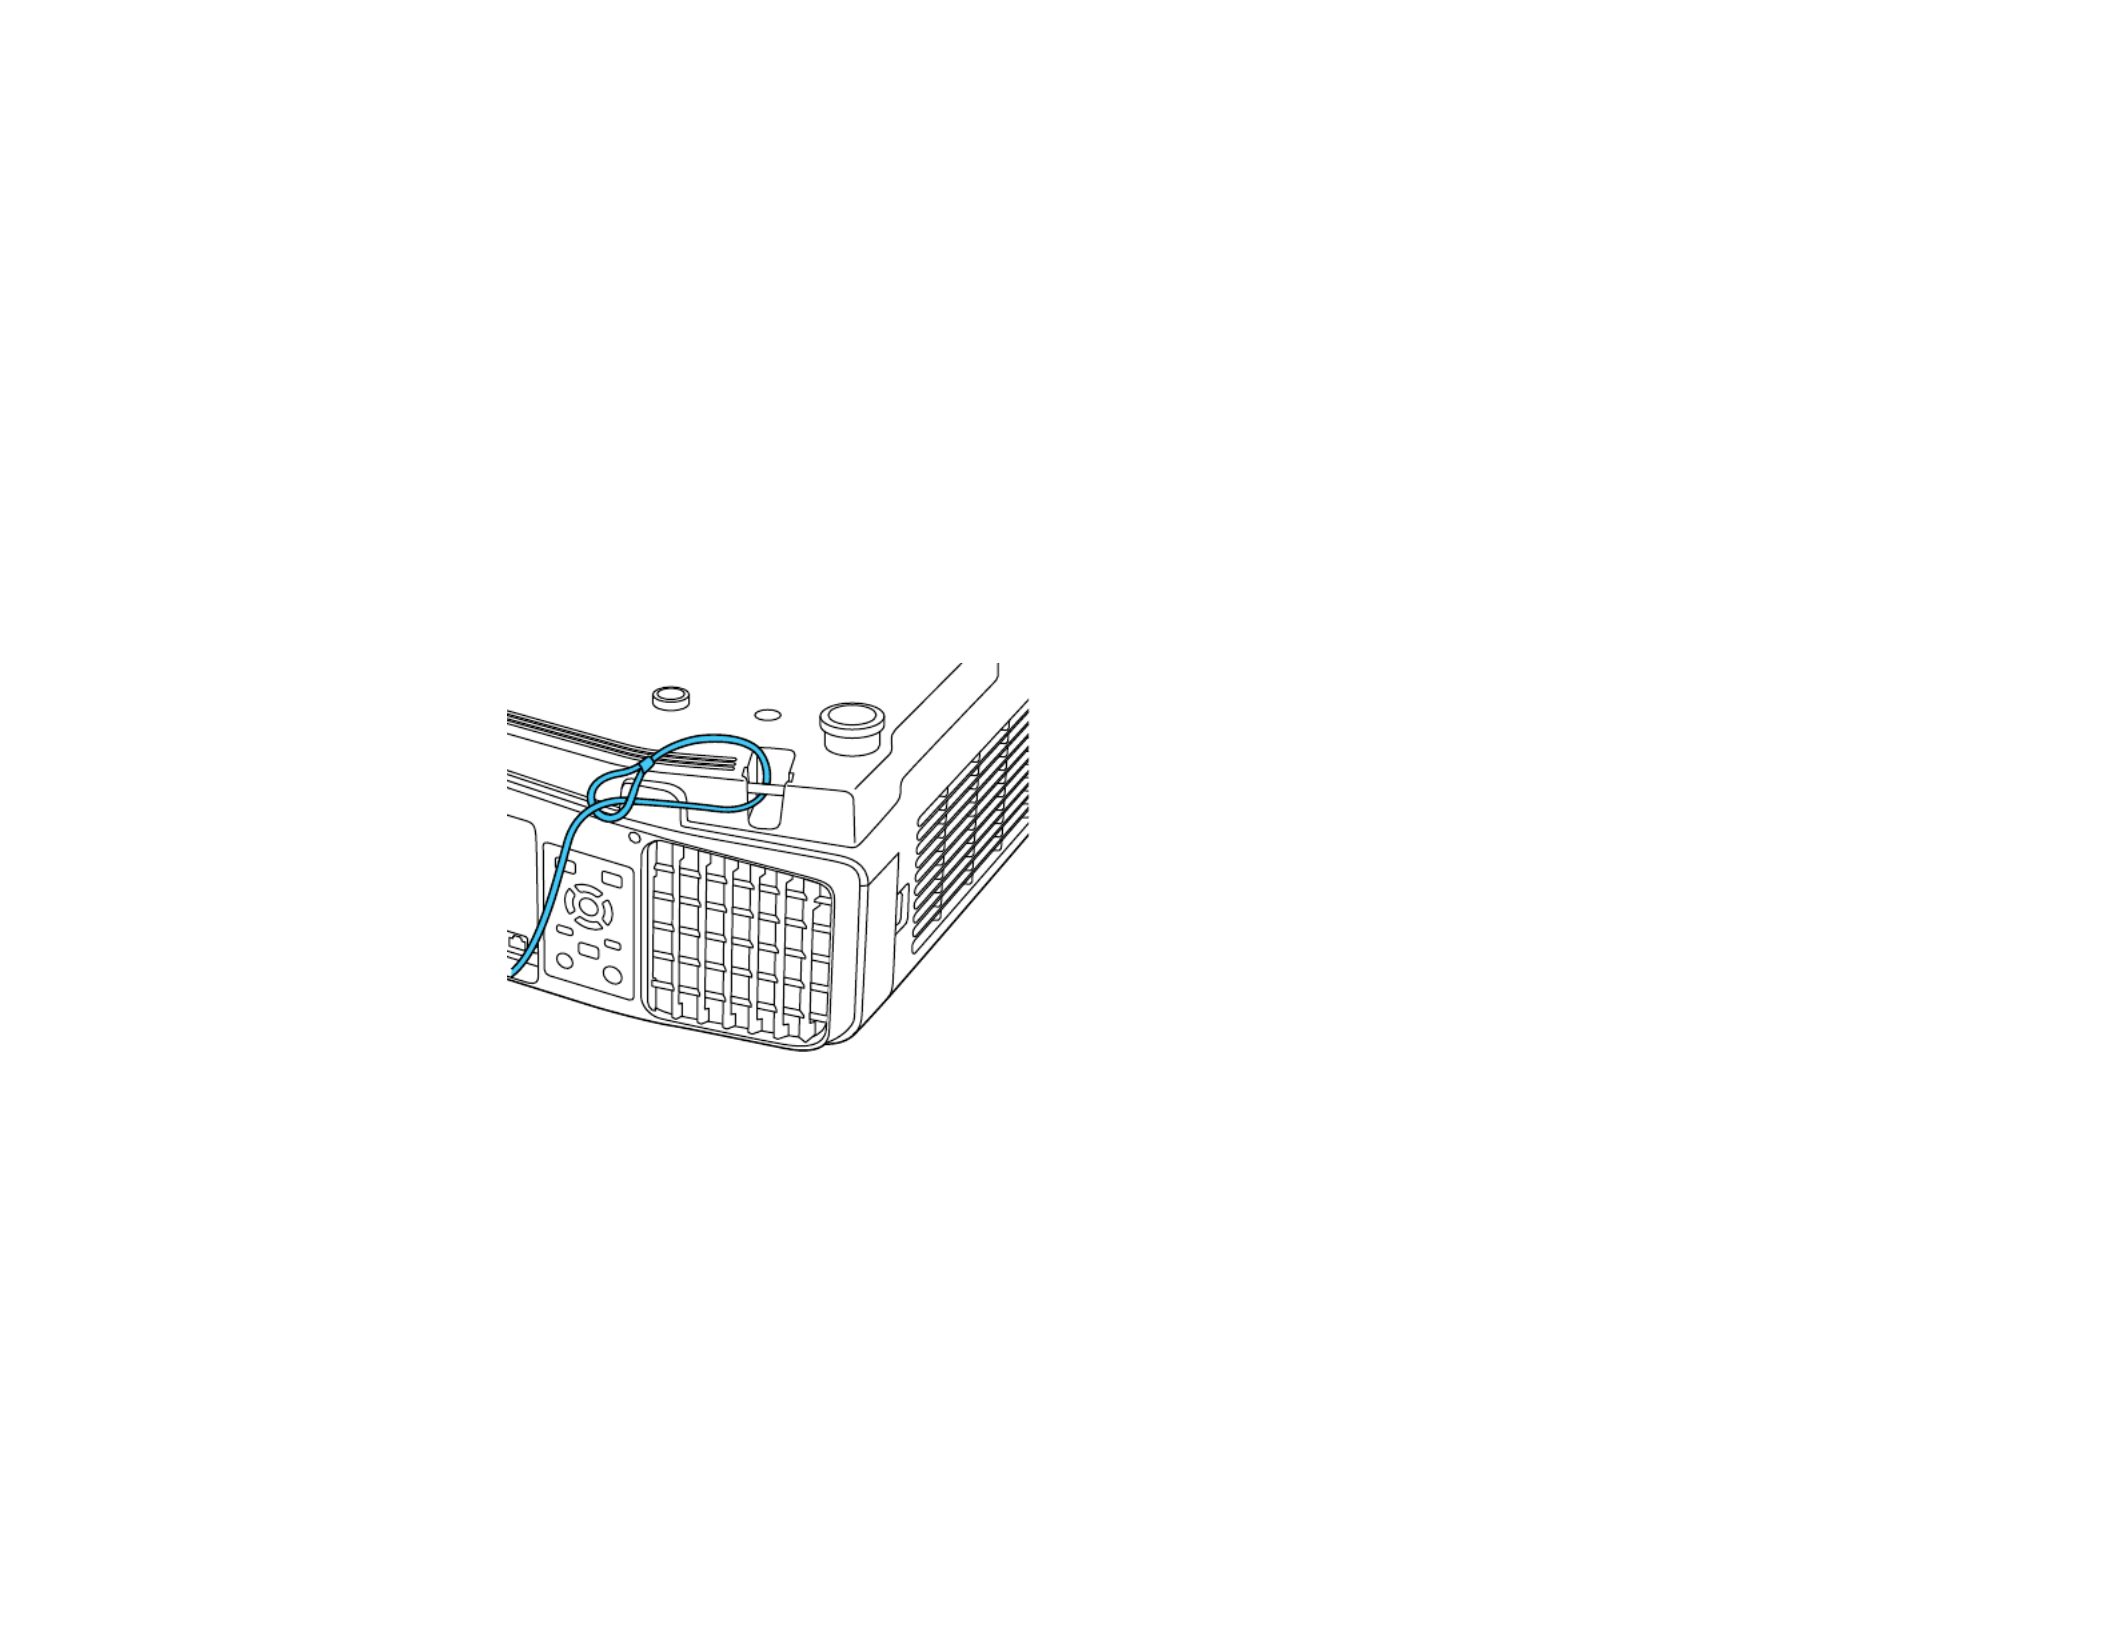
158
Note: Remote ReceiverIf you lock the remote control buttons, you can still reset the setting in the
Settings menu to the default settings.
Parent topic: Projector Security Features
Related references
Projector Feature Settings - Settings Menu
Installing a Security Cable
You can install two types of security cables on the projector to deter theft.
• Use the security slot on the projector to attach a Kensington lock. See your local computer or
electronics dealer for purchase information.
• Use the security cable attachment point on the projector to attach a wire cable and secure it to a room
fixture or heavy furniture.
Note: Do not pass drop-prevention cables through the security cable attachment point when mounting
the projector on a wall or ceiling.
Parent topic: Projector Security Features

159
Projecting Two Images Simultaneously
You can use the split screen feature to simultaneously project two images from different image sources
next to each other. You can control the split screen feature using the remote control or the projector
menus.
Note: While you use the split screen feature, other projector features may not be available and some
settings may be automatically applied to both images.

160
1. Press the button on the remote control.Split
The currently selected input source moves to the left side of the screen.
2. Press the button.Menu
You see this screen:
3. To select an input source for the other image, select the setting, press , select theSource Enter
input source, select , and press . (You can also change image sources, if necessary.)Execute Enter
4. To switch the images, select the setting and press .Swap Screens Enter
5. To change the image sizes, select the setting, press , select a sizing option,Screen Size Enter
press , and press to exit.Enter Menu
Note: Depending on the video input signals, the images may not appear at the same size even if you
choose the setting.Equal

161
6. To choose the audio you want to hear, select the setting, press , select anAudio Source Enter
audio option, press , and press to exit.Enter Menu
7. To exit the split screen feature, press the or button.Split Esc
Input Sources for Split Screen Projection
Parent topic: Adjusting Projector Features
Input Sources for Split Screen Projection
You can choose from the input source combinations listed here for split screen projection.
Note: Input signals exceeding WUXGA are not supported. If you see a 4K Enhancement message,
select to disable the 4K Enhancement feature.Yes
Left Screen Right Screen
HDMI HDBaseT DVI-D SDI* Computer BNC LAN
HDMI —
HDBaseT —
DVI-D —
SDI* — — — —
Computer — — — —
BNC — — — —
LAN — — — —
* Pro
L1490U/L1490UNL/L1495U/L1495UNL/L1500UH/L1500UHNL/L1505UH/L1505UHNL/L1750UNL/L175
5UNL only
Parent topic: Projecting Two Images Simultaneously
Using Advanced Image Adjustment Features
Follow the instructions in these sections to use your projector's advanced image adjustments.
Using Frame Interpolation
Using 4K Enhancement

162
Creating Image Presets
Using MPEG Noise Reduction
Adjusting Scaled Resolution Images (Super-resolution)
Adjusting Detail Enhancement
Adjusting the Color Convergence (Panel Alignment)
Adjusting the Color Tone (Color Uniformity)
Running Light Source Calibration
Parent topic: Adjusting Projector Features
Using Frame Interpolation
You can use the projector's Frame Interpolation feature to smooth fast-moving video by comparing
consecutive image frames and inserting an intermediate image frame between them.
You cannot use this feature in any of the following conditions:
• You are using the E-Zoom feature
• The image signal exceeds WUXGA
• You turned on the , , or settings4K Enhancement Edge Blending Scale
• You selected or as the settingFast 1 Fast 2 Image Processing
• You selected as the settingV-Zoom Aspect
1. Press the button.Menu
2. Select the setting and press .Frame Interpolation Enter

163
You see a screen like this:
3. Select the level of interpolation and press .Enter
4. When you are finished, press the button.Menu
Note: Frame InterpolationIf your resulting images contain noise, turn off the setting.
Parent topic: Using Advanced Image Adjustment Features
Related references
Image Quality Settings - Image Menu
Projector Feature Settings - Settings Menu
Projector Setup Settings - Extended Menu
Using 4K Enhancement
Using the projector's 4K Enhancement Technology, you can receive 4K (3840 × 2160 pixel) signals and
project ultra high-definition images. This technology shifts each pixel diagonally by 0.5 pixel to double
the image resolution.
1. Press the button.Menu

164
You see a screen like this:
2. Select the setting and press .Image Enhancement Enter
3. Select the setting and press .4K Enhancement Enter
4. Select one of the following options and press :Enter
• to disable 4K enhancement when projecting from computers or multiple projectorsOff
• to enhance a signal with a resolution of 1080i/1080p/WUXGA or higherFull HD
• to enhance a signal with a resolution exceeding WUXGA; when projecting a high-WUXGA+
resolution movie, select along with an appropriate settingWUXGA+ Image Preset Mode
Note: Full HD WUXGA+ EdgeIf you select or , the following adjustment settings are canceled:
Blending Scale Curved Surface Point Correction Corner Wall, , , , and .
5. Press or to exit the menus.Menu Esc
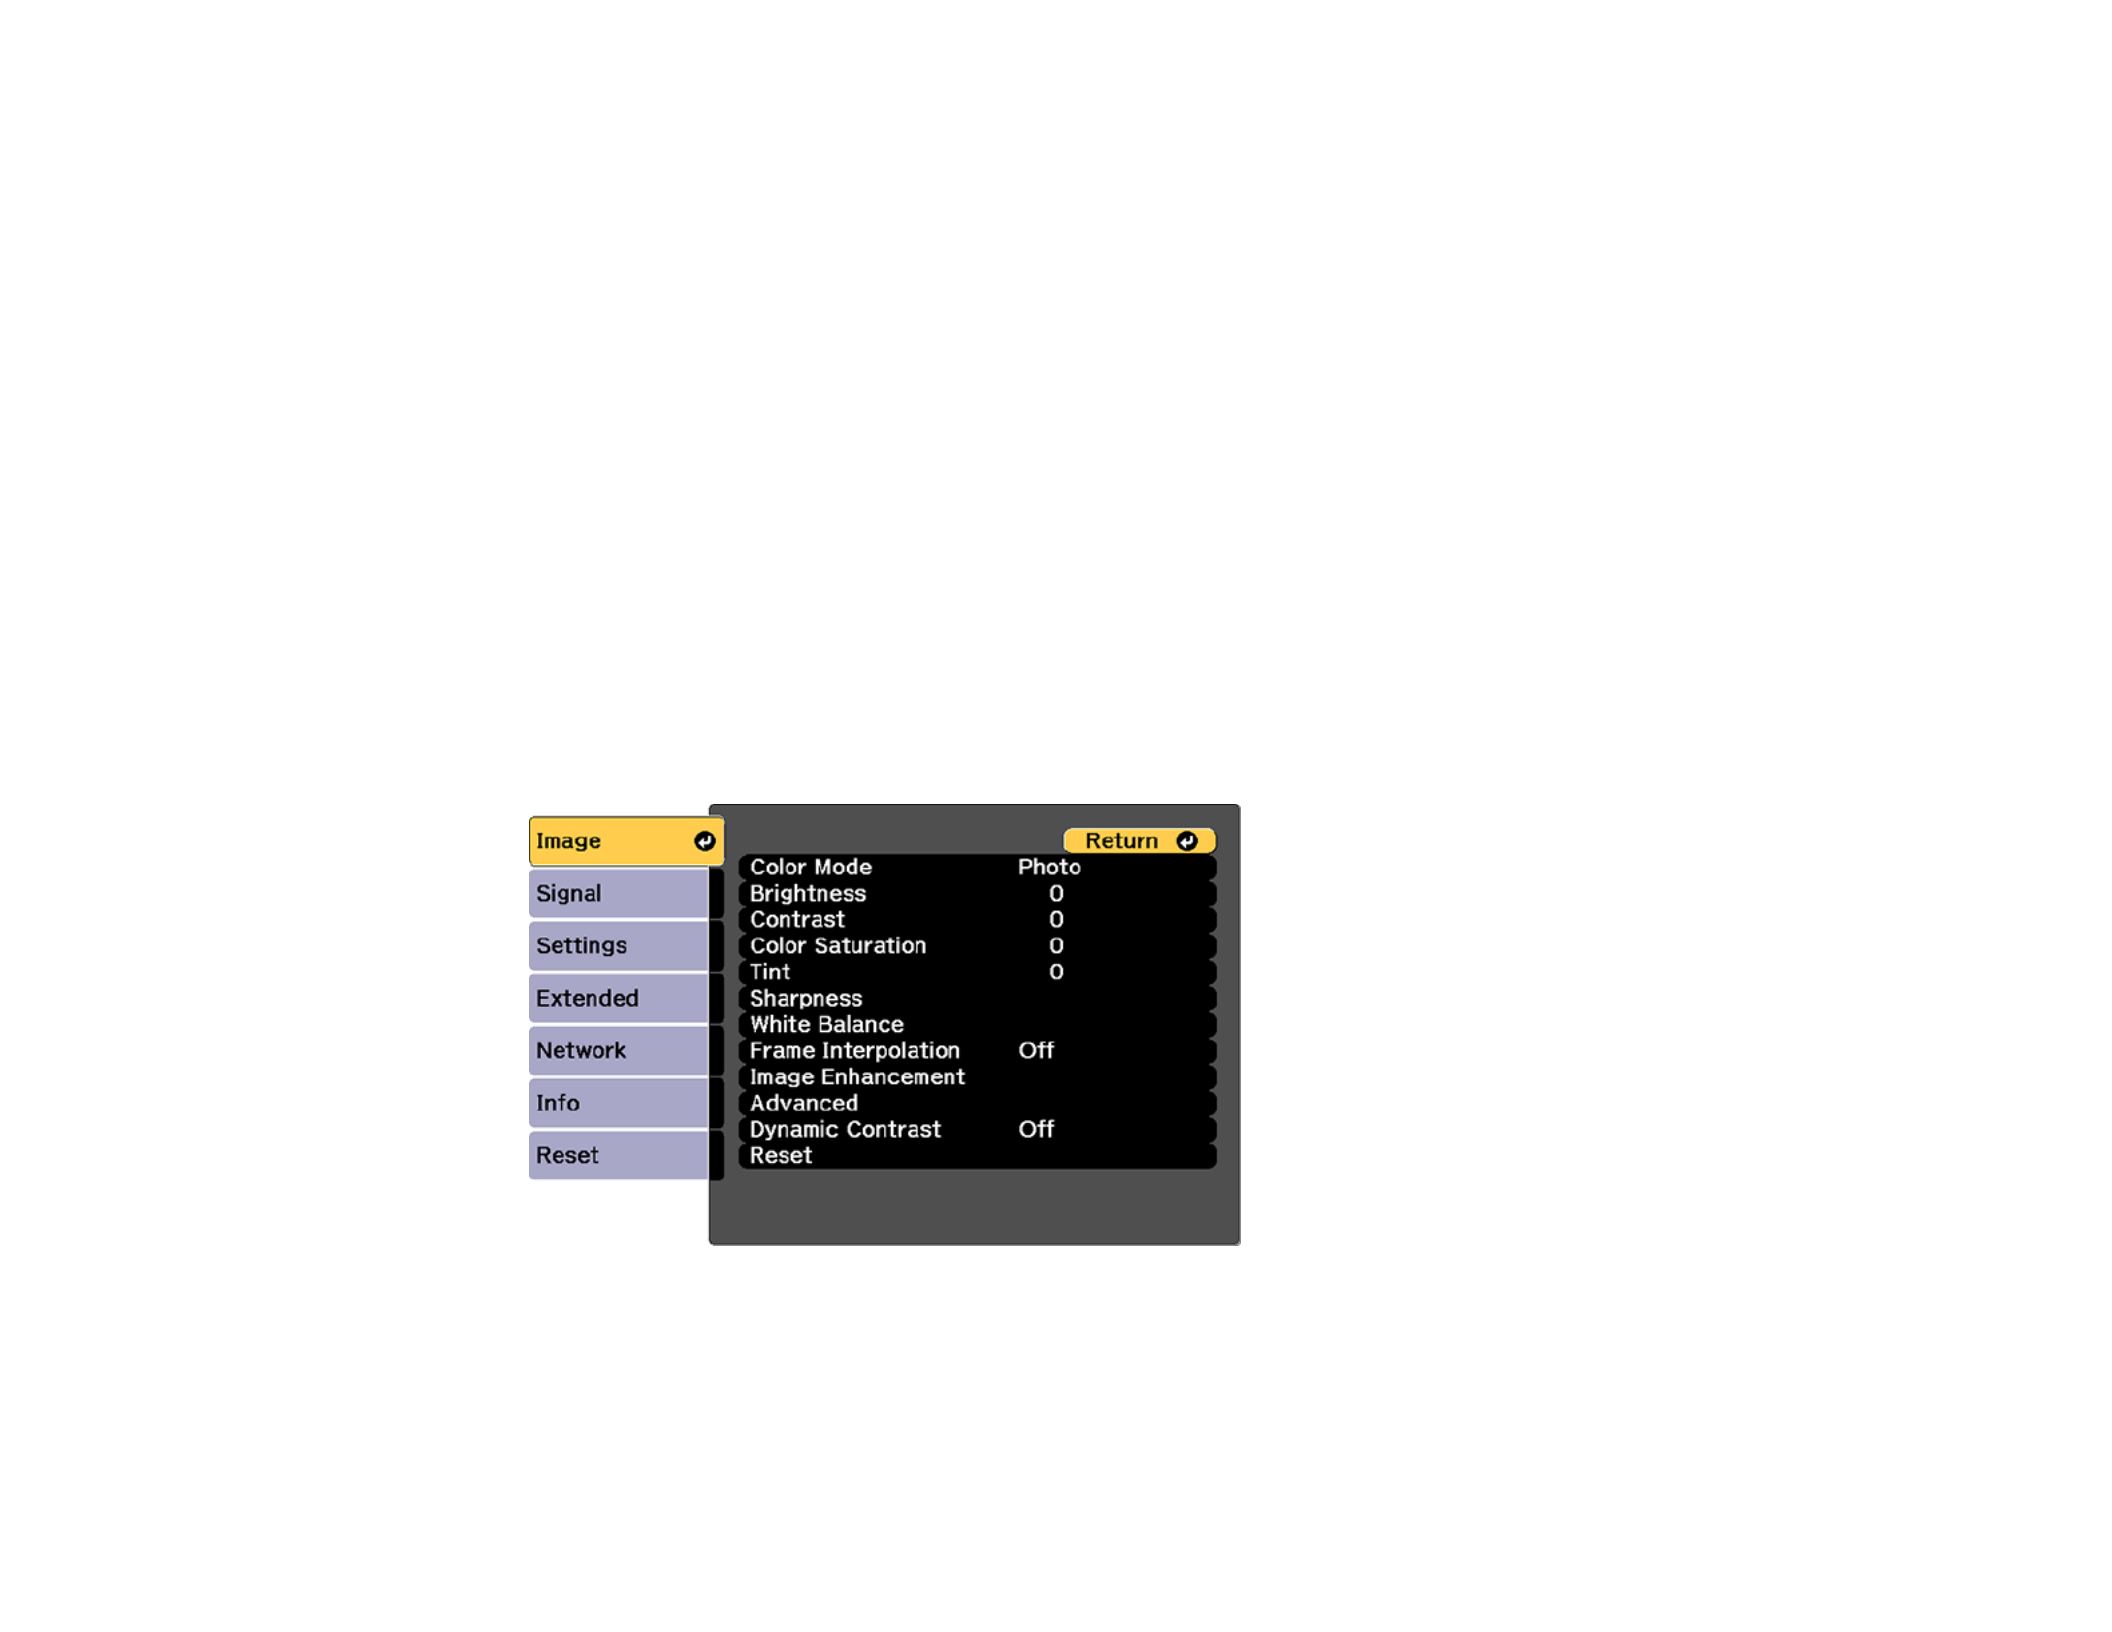
165
Parent topic: Using Advanced Image Adjustment Features
Related references
Projector Feature Settings - Settings Menu
Projector Setup Settings - Extended Menu
Creating Image Presets
You can quickly optimize your projected image by selecting image adjustment settings and saving them
as a preset you can reuse later.
You can save the following settings in a preset:
• Noise Reduction
• MPEG Noise Reduction
• Super-resolution
• Detail Enhancement
1. Press the button.Menu
You see a screen like this:
2. Select the setting and press .Image Enhancement Enter

166
3. Select the setting and press .Image Preset Mode Enter
4. Select one of the presets and press .Enter
Note: If you select a previously used preset, your new adjustments overwrite the old ones.
5. Press to return to the Image Enhancement menu.Esc
6. Fine-tune the following settings:
• Noise Reduction
• MPEG Noise Reduction
• Super-resolution
• Detail Enhancement
7. Press or to exit the menus.Menu Esc
The currently selected will be updated with the current settings.Image Preset Mode
Parent topic: Using Advanced Image Adjustment Features
Related references
Image Quality Settings - Image Menu
Using MPEG Noise Reduction
If you are projecting MPEG movies, you can reduce dots and block noise by adjusting the MPEG Noise
Reduction setting.
You cannot use this feature in any of the following conditions:
• The image signal exceeds WUXGA
• You turned on the setting4K Enhancement
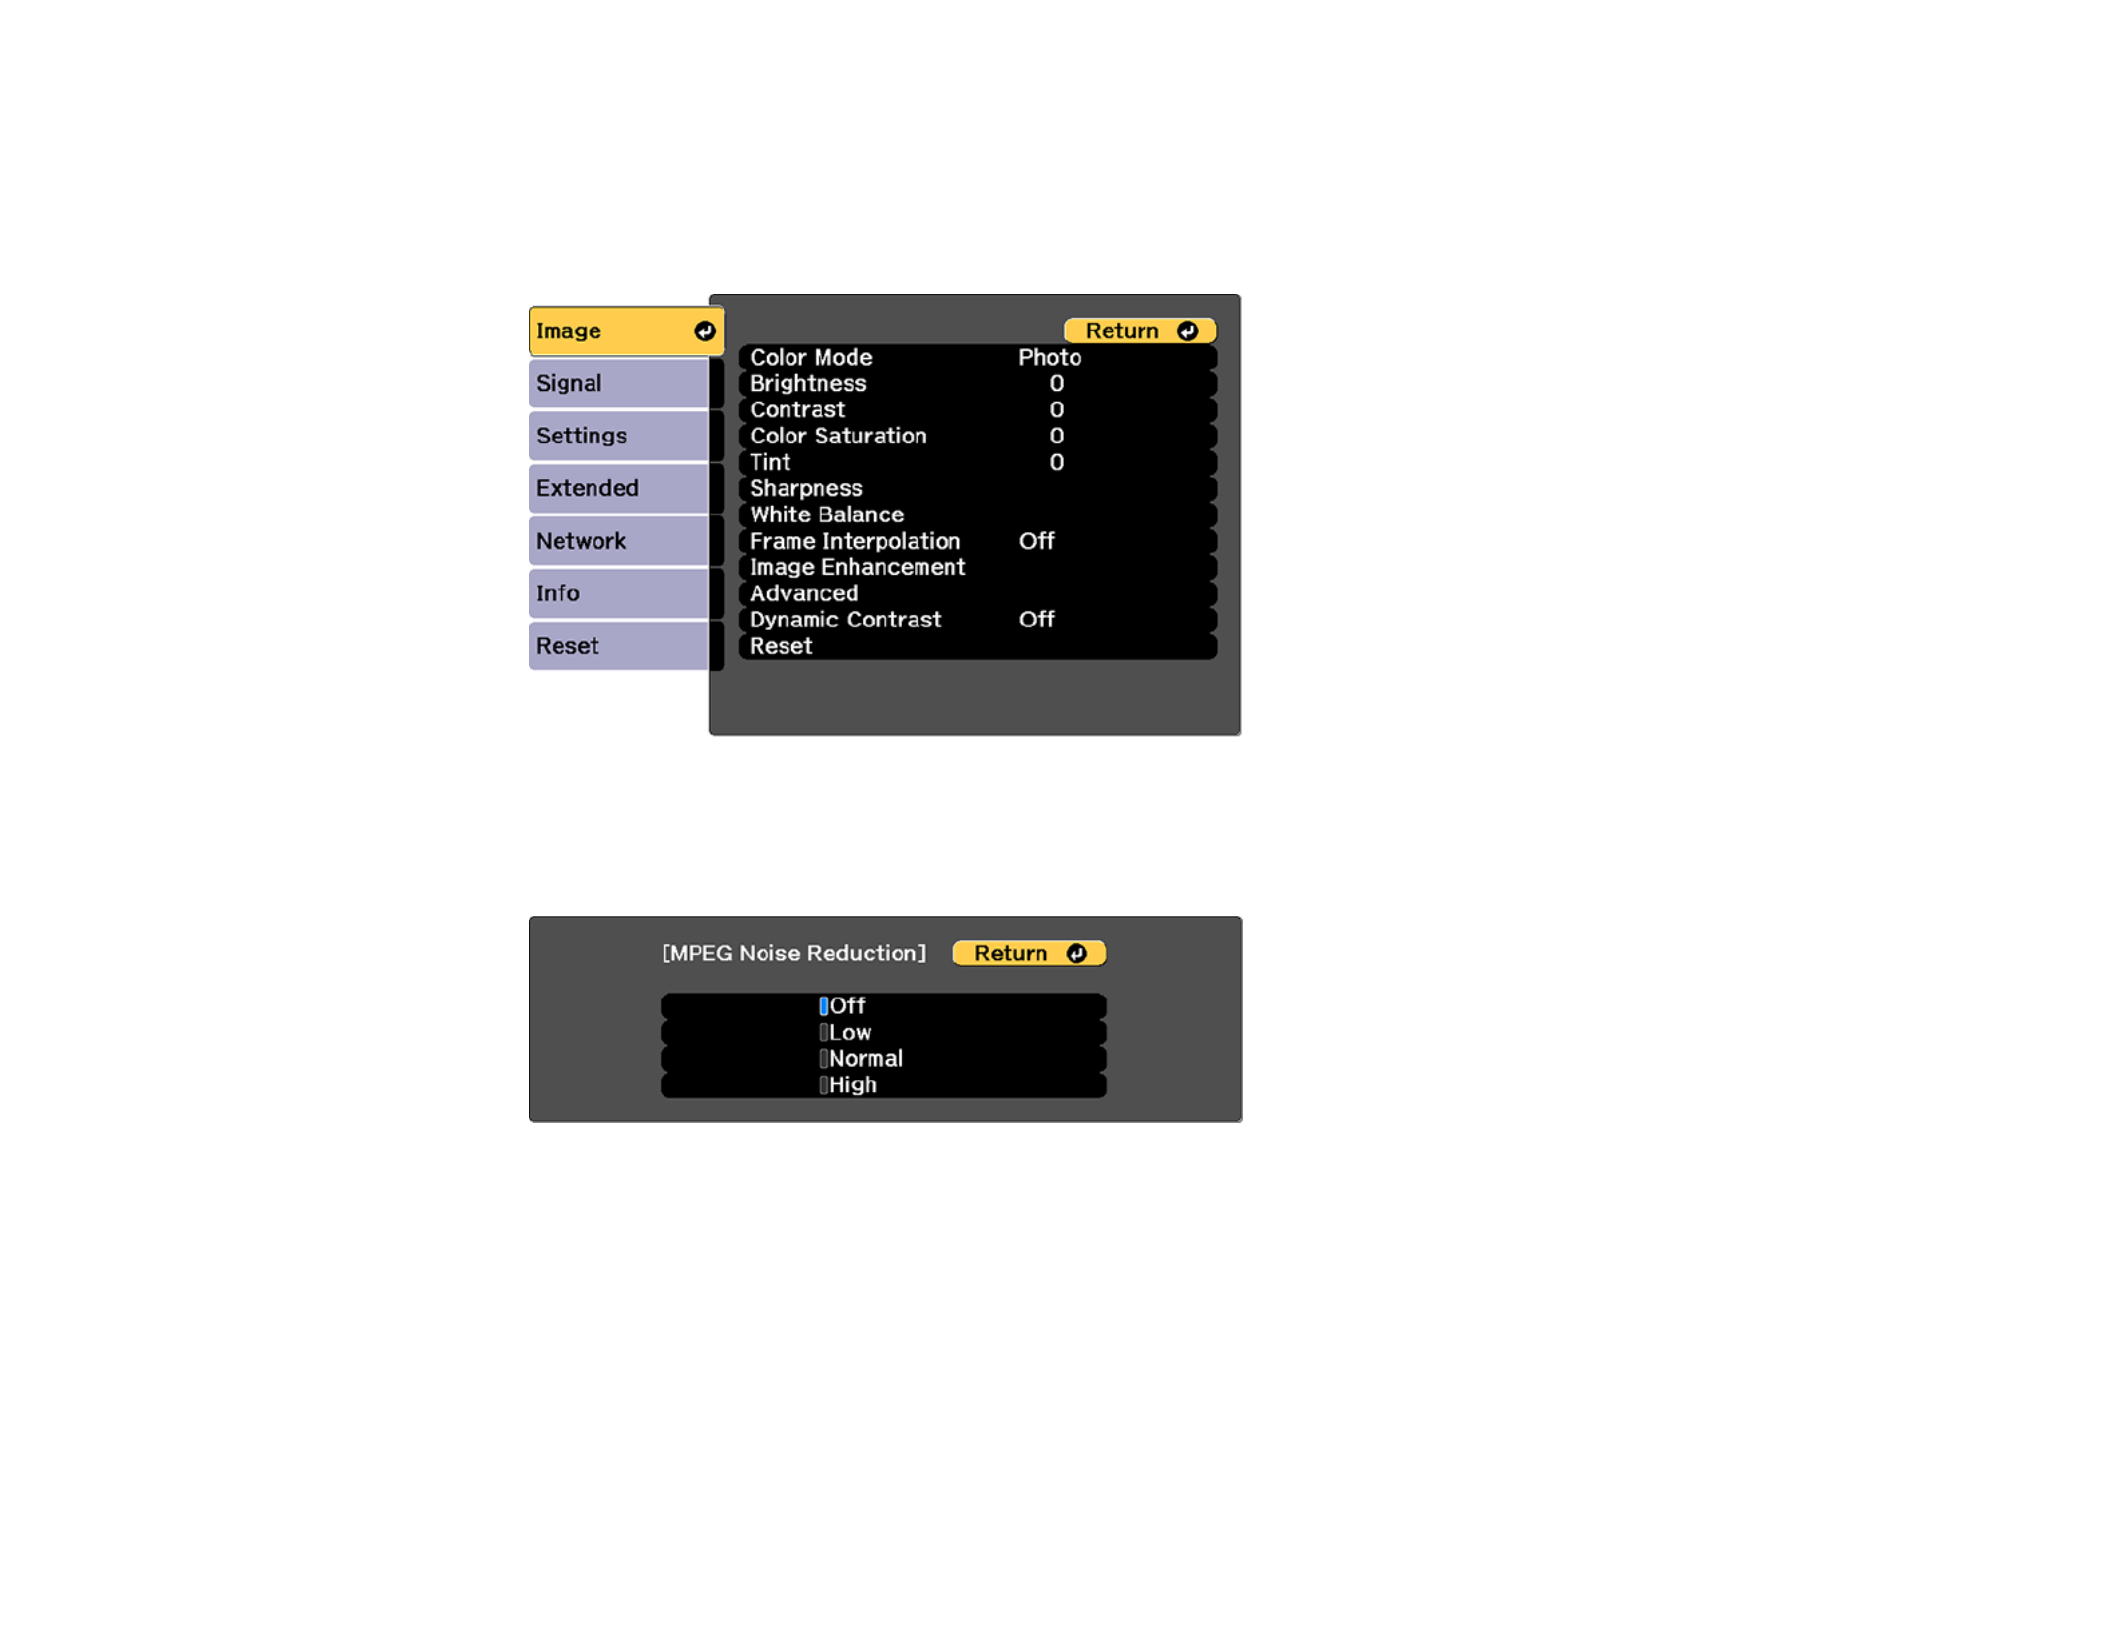
167
• You turned off the settingImage Preset Mode
1. Press the button.Menu
You see a screen like this:
2. Select the setting and press .Image Enhancement Enter
3. Select the setting and press .MPEG Noise Reduction Enter
4. Select the level of noise reduction and press .Enter
5. Press or to exit the menus.Menu Esc
Parent topic: Using Advanced Image Adjustment Features
Related tasks
Using 4K Enhancement

168
Adjusting Scaled Resolution Images (Super-resolution)
You can sharpen blurry, low-resolution images that had their resolution scaled up for projection using the
Super-resolution setting.
1. Turn on the projector and switch to the image source you want to use.
2. Press the button.Menu
You see a screen like this:
3. Select the setting and press .Image Enhancement Enter
4. Select the setting and press .Super-resolution Enter
5. Adjust each of the following options as necessary:
• to enhance fine details such as hair and fabric patternsFine Line Adjust
• to enhance the outline, background, and main parts of an imageSoft Focus Detail
Note: Higher values increase the intensity of the effect.

169
6. Press or to exit the menus.Menu Esc
Parent topic: Using Advanced Image Adjustment Features
Adjusting Detail Enhancement
You can enhance the contrast in detailed areas of an image to create a more textured look.
1. Turn on the projector and switch to the image source you want to use.
2. Press the button.Menu
You see a screen like this:
3. Select the setting and press .Image Enhancement Enter
4. Select the setting and press .Detail Enhancement Enter
5. Adjust each of the following options as necessary:
• to adjust the image contrastStrength

170
• to adjust the enhanced area of the imageRange
Note: Higher values increase the intensity of the effect.
6. Press or to exit the menus.Menu Esc
Parent topic: Using Advanced Image Adjustment Features
Adjusting the Color Convergence (Panel Alignment)
You can use the Panel Alignment feature to manually adjust the color convergence (the alignment of the
red, green and blue colors) in the projected image.
Note: Allow your projector to warm up for at least 10 to 15 minutes and make sure the image is in focus
before you use the Panel Alignment feature. The projected image size should be at least 60 inches
(152 cm) diagonally and the projection surface should not be colored or textured; otherwise the
adjustment grids are difficult to align.
1. Press the button.Menu
2. Select the menu and press .Extended Enter
3. Select the setting and press .Display Enter
4. Select the setting and press .Panel Alignment Enter
5. Press and select .Enter On

171
6. Press .Esc
7. Select the setting and choose one of the following:Select Color
• to adjust the red color convergenceR
• to adjust the blue color convergenceB
Note: You can adjust only the red or blue color convergence; you cannot adjust the standard green
color panel.
8. Select the setting and press .Pattern Color Enter
9. Select the pattern you want to use and press .Esc
10. Select and press twice.Start Adjustments Enter
You see this screen:
11. Use the arrow buttons on the remote control to adjust the color alignment in the corner of the screen
highlighted by the orange box.
12. Press the button to move to the next corner of the screen.Enter
13. When you are finished adjusting each corner of the screen, press .Enter

172
You see this screen:
14. Do one of the following:
• If your projector's panel alignment is now correct, select and press to return to theExit Enter
Panel Alignment menu.
• If your projector needs additional panel alignment, select andSelect intersection and adjust
press . Use the arrow keys on the remote control to highlight the corner of any box on theEnter
screen that is misaligned and press to adjust the color convergence. Repeat this step asEnter
necessary.
Parent topic: Using Advanced Image Adjustment Features
Adjusting the Color Tone (Color Uniformity)
You can use the Color Uniformity feature to manually adjust the color tone balance in the projected
image.
1. Press the button.Menu

173
2. Select the menu and press .Extended Enter
3. Select the setting and press .Display Enter
4. Select the setting and press .Color Uniformity Enter
You see this screen:
5. Press and select .Enter On
6. Press .Esc

175
2. Select the menu and press .Reset Enter
You see a screen like this:
3. Select and press .Light Source Calibration Enter
4. Select any of the following:
• To run the light source calibration now, select .Run Now
• To automatically run the light source calibration every 100 hours of projector usage, select Run
Periodically.
• To schedule automatic calibration, select .Schedule Settings
• To see the last time the projector performed a calibration, select .Last Run
5. When you are finished, select and press the button to return to the Reset menu.Return Enter
Parent topic: Using Advanced Image Adjustment Features
Related tasks
Saving a Scheduled Event
Using Multiple Projectors
You can combine the projected images from two or more projectors to create one large image. Follow
the instructions in these sections to set up and project from multiple projectors.
Multiple Projector Adjustment Overview
Projector Identification System for Multiple Projector Control

176
Tiling Images into One Image
Blending the Image Edges
Adjusting the Black Level
Matching Tint and Brightness (Screen Matching)
Scaling an Image
Parent topic: Adjusting Projector Features
Multiple Projector Adjustment Overview
If you are combining images from multiple projectors on a network, you can assign one projector as the
"master" and automatically adjust all the images to match the "master" image. If the projectors are not
connected to a network, you can match each projector's images manually.
Note: Make sure all networked projectors are connected using LAN cables and have been assigned an
IP address. Also disable the and settings on each projector so they do4K Enhancement Sleep Mode
not turn off during adjustment.
1. Turn on all the projectors.
2. To select a master projector for automatic adjustment, select for theCustom Light Source Mode
setting and set the setting to the maximum value for all projectors. The projectorBrightness Level
with the darkest projected image is the master projector.
3. Do one of the following:
• For automatic adjustment, set an ID for the master projector and the remote control.
• For manual adjustment, set an ID for each projector and the remote control.
4. Adjust each projector's physical position and angle to the screen.
5. Do one of the following:
• For automatic adjustment, configure tiling automatically.
• For manual adjustment, configure tiling manually.
6. Adjust the image aspect ratio for each projector.
7. Adjust the position of the image for each projector using lens shift.
8. Adjust the zoom and focus for each projector.
9. Adjust small differences in the images using the setting.Point Correction
10. Adjust the edges of the images using the and settings.Edge Blending Black Level

177
11. Adjust the brightness and tint of the images using the setting.Screen Matching
12. Select sections of the images using the setting.Scale
Parent topic: Using Multiple Projectors
Related concepts
Wired Network Projection
Projector Identification System for Multiple Projector Control
Projector Placement
Image Aspect Ratio
Related references
Projector Feature Settings - Settings Menu
Related tasks
Turning On the Projector
Adjusting the Image Position Using Lens Shift
Adjusting the Image Position Using Screen Position
Resizing the Image with the Zoom Button
Focusing the Image Using the Focus Buttons
Correcting Image Shape with Point Correction
Blending the Image Edges
Adjusting the Black Level
Scaling an Image
Related topics
Tiling Images into One Image
Matching Tint and Brightness (Screen Matching)
Projector Identification System for Multiple Projector Control
You can operate multiple projectors using one remote control for more elaborate presentations. To do
this, you assign an identification number to each projector and to the remote control. Then you can
operate all the projectors at once or individually.
Setting the Projector ID
Setting the Remote Control ID
Parent topic: Using Multiple Projectors
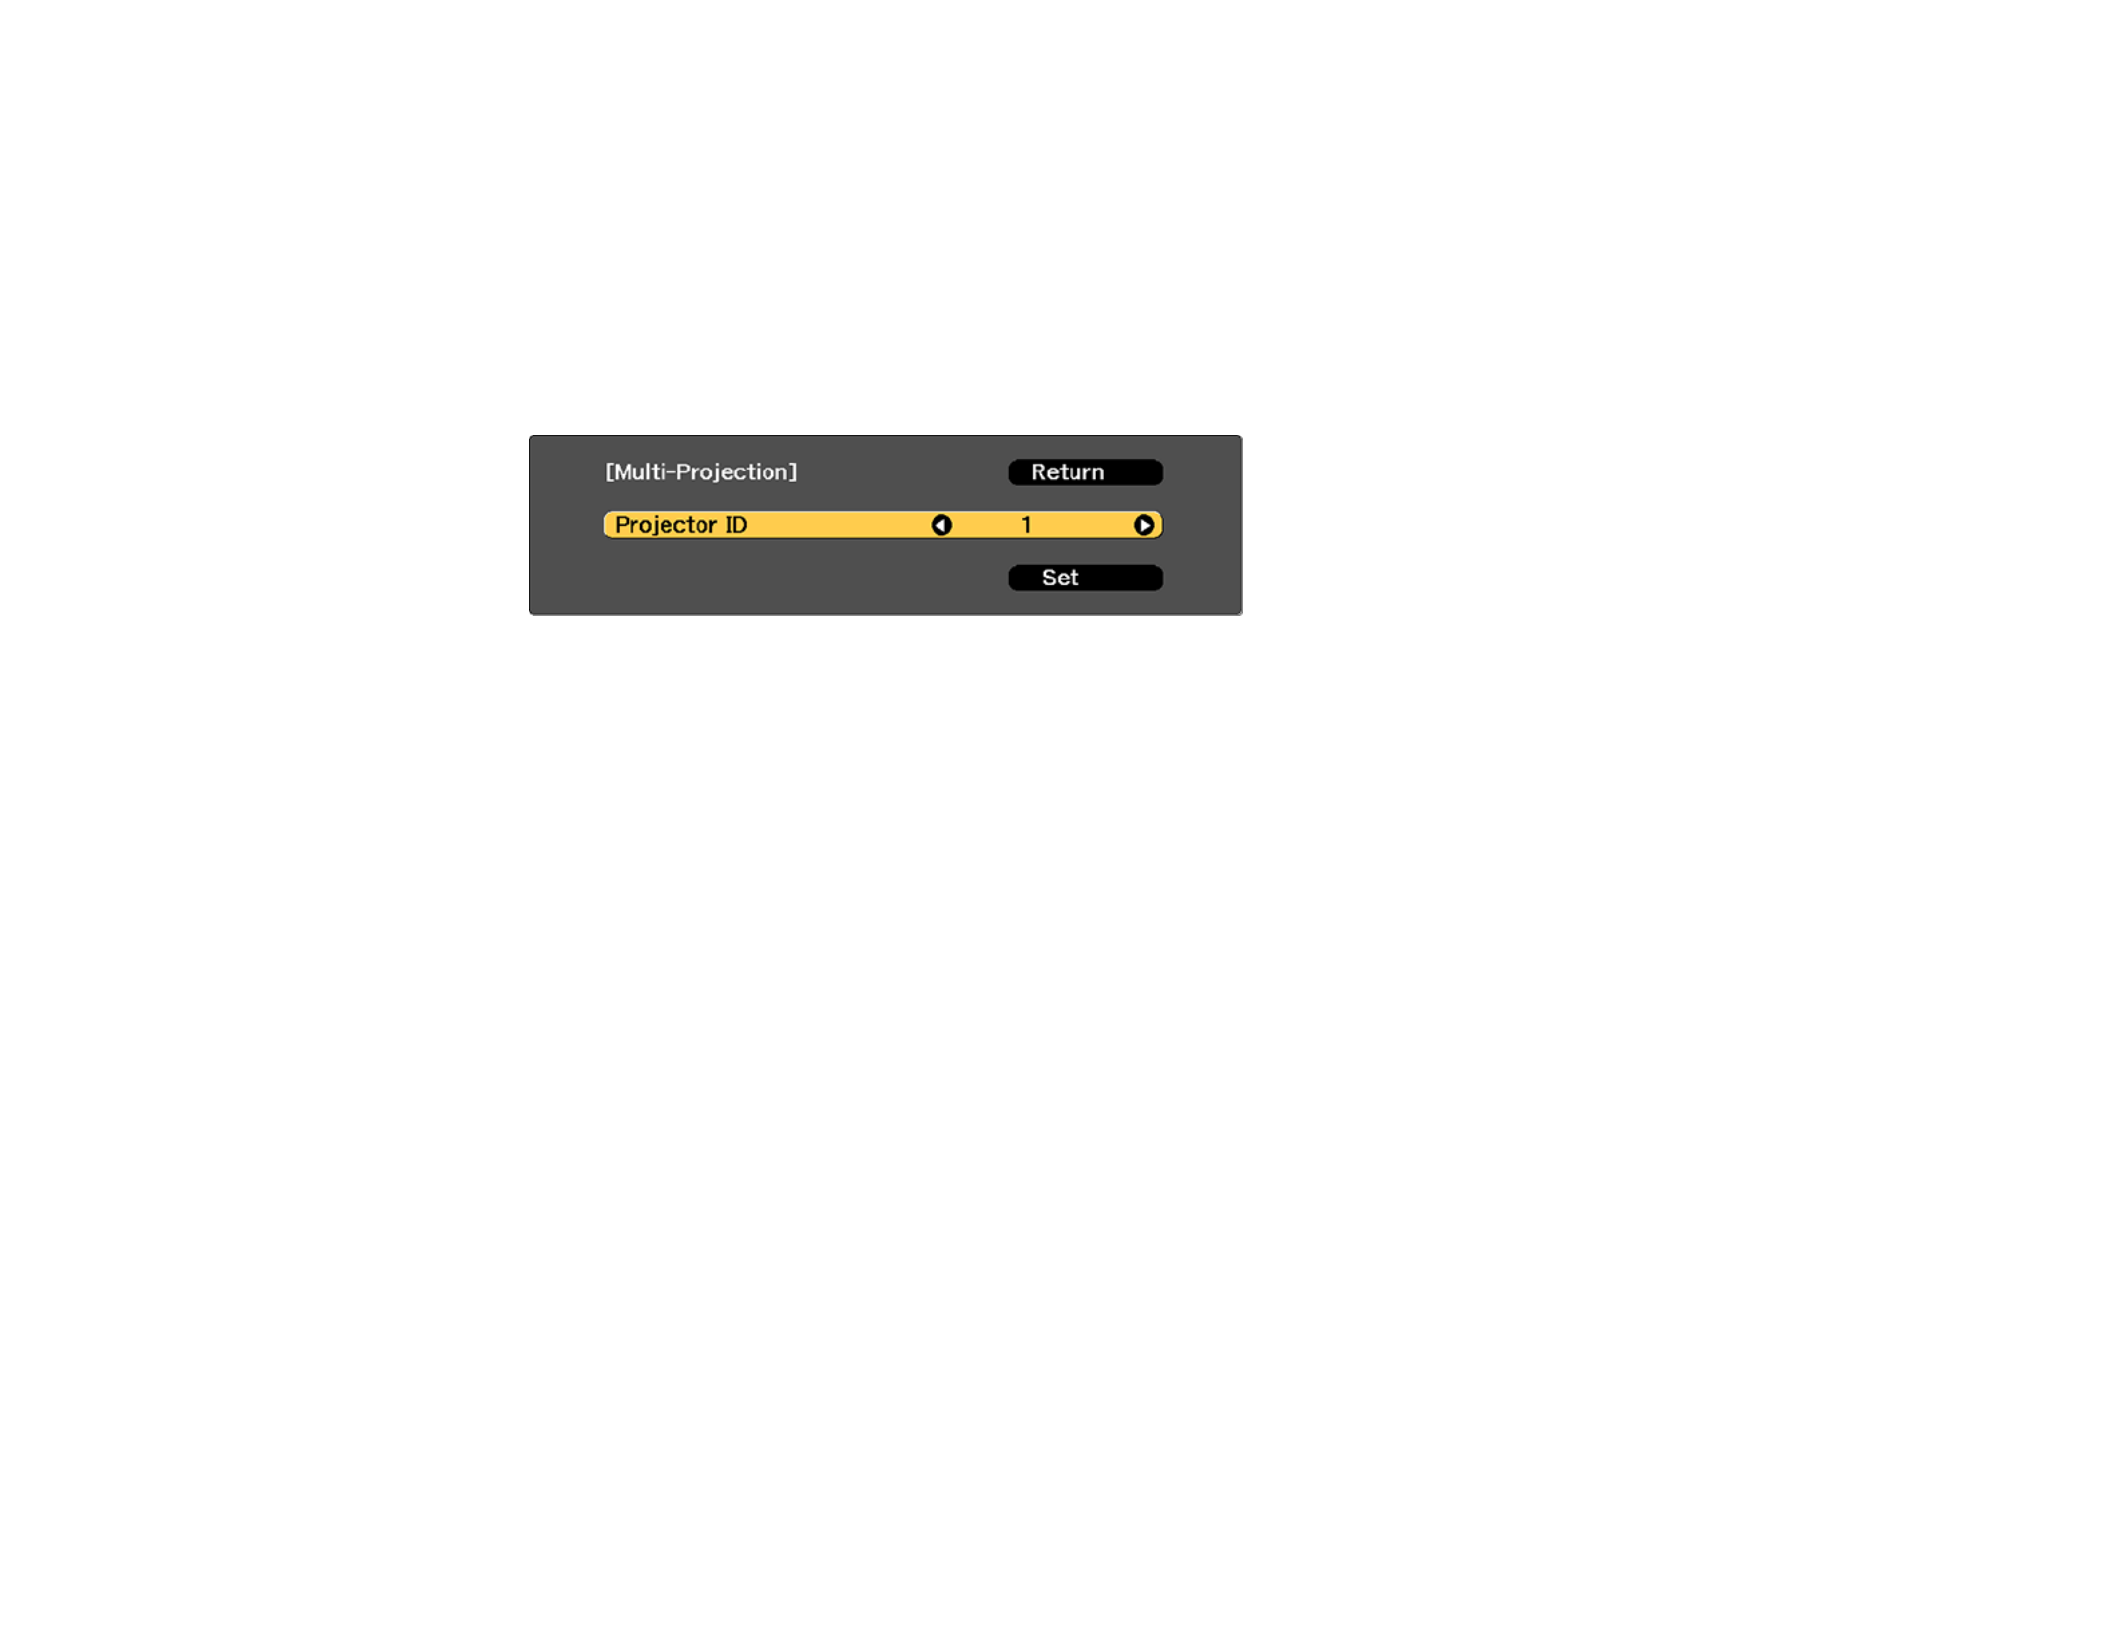
178
Setting the Projector ID
If you want to control multiple projectors from a remote control, give each projector a unique ID.
1. Press the button.Menu
2. Select the menu and press .Extended Enter
3. Select the setting and press .Multi-Projection Enter
4. Select and press .Projector ID Enter
5. Press the left or right arrow buttons on the remote control to select the identification number you
want to use for the projector. Then select and press .Set Enter
Repeat these steps for all the other projectors you want to operate from one remote control.
Note: ID HomeIf you don't know the projector's ID, hold down the button and press the button to
temporarily display the projector's ID on the screen.
Parent topic: Projector Identification System for Multiple Projector Control
Setting the Remote Control ID
The remote control's ID is set to by default so it can operate any compatible projector. If you want to set0
the remote control to operate only a particular projector, you need to set the remote control's ID to match
the projector's ID.
1. Turn on the projector you want the remote control to operate with exclusively.

179
2. Set the remote control switch to .ID On
3. Hold down the button on the remote control while you press the numeric button that matches theID
projector's ID. Then release the buttons.
Note: ID HomeIf you don't know the projector's ID, hold down the button and press the button to
temporarily display the projector's ID on the screen. If the batteries are left out of the remote control
for an extended period, the remote control ID returns to its default setting.
Parent topic: Projector Identification System for Multiple Projector Control

180
Tiling Images into One Image
You can project the same image from up to nine projectors to create one large image using the Tiling
feature.
Note: Before tiling, make sure the displayed images from your projectors are rectangular, correctly
sized, and focused.
Configuring Tiling Automatically
Configuring Tiling Manually
Parent topic: Using Multiple Projectors
Configuring Tiling Automatically
If your projectors are on a network and you have identified a master projector, you can configure tiling
automatically.
1. Turn on the projector.
Note: Make sure nothing is blocking the built-in camera on the front of the projector.
2. Press the button.Menu
3. Select the menu and press .Extended Enter
4. Select and press .Multi-Projection Enter
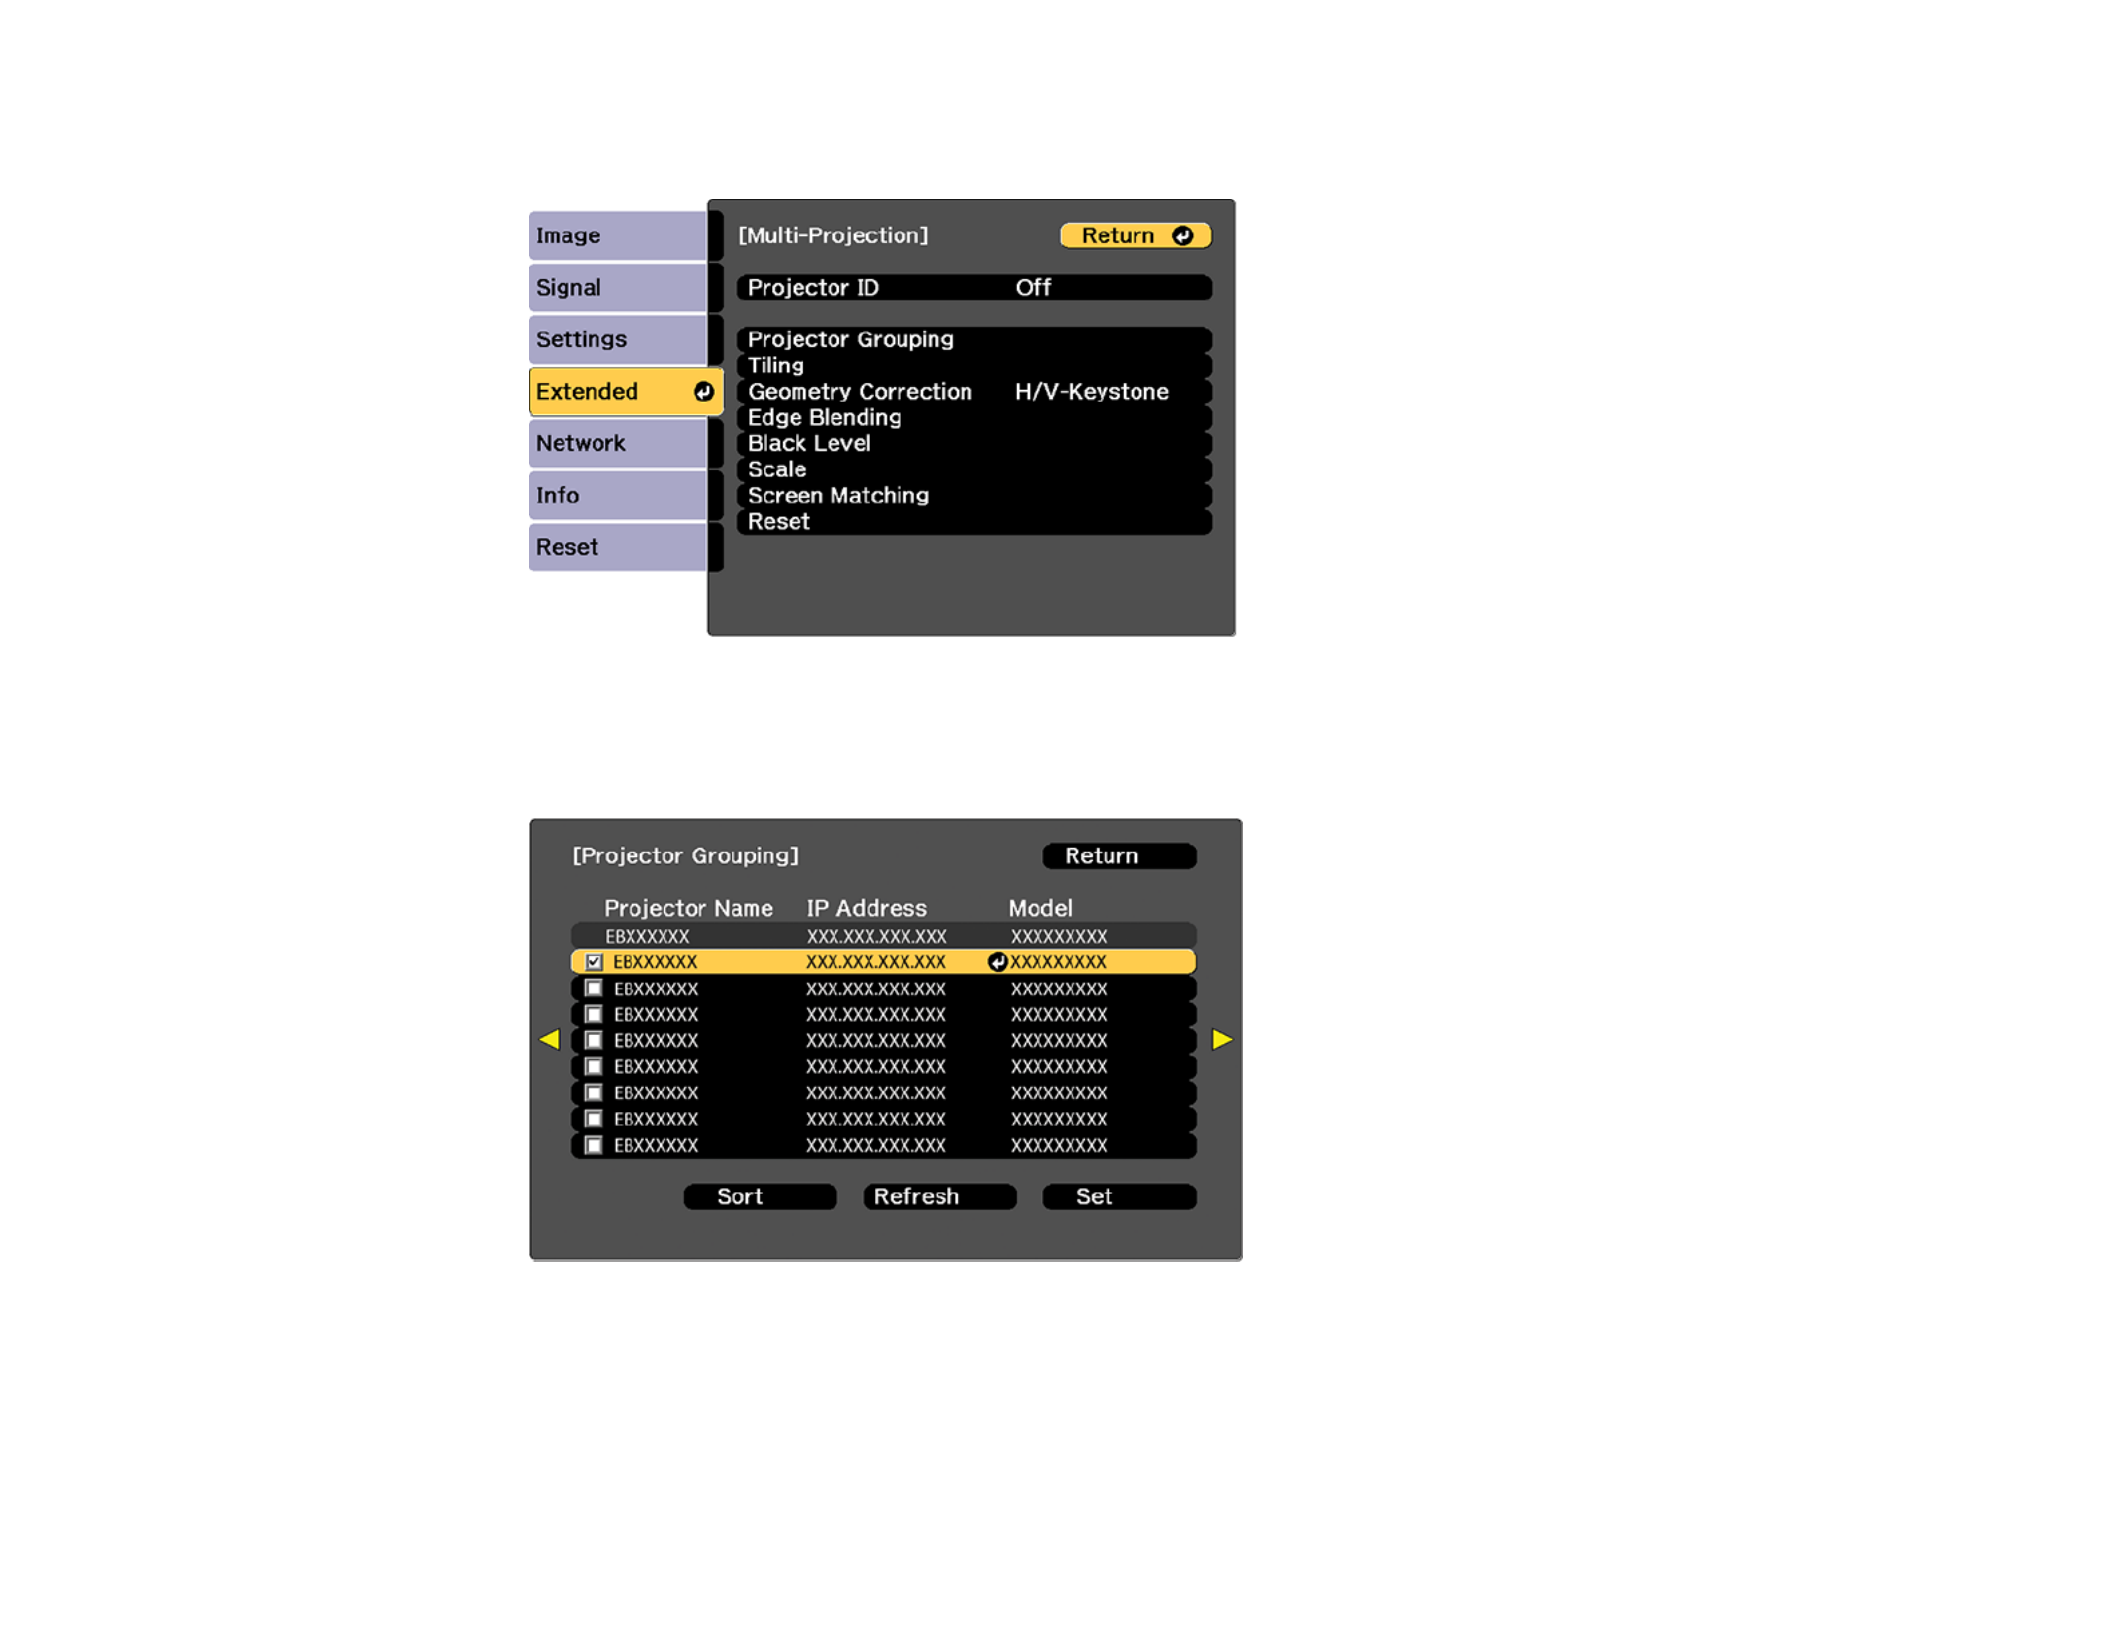
181
You see this screen:
5. Select and press .Projector Grouping Enter
You see a screen like this:
6. Press the up or down arrow buttons to highlight a projector and press to place a checkmarkEnter
next to each projector you want to use for tiling. Then select and press .Set Enter
7. Select and press .Tiling Enter

182
8. Select again and press .Tiling Enter
9. Select and press .Auto Esc
10. Select and press .Location Setup Enter
The projected images are positioned automatically.
11. When you see the message to assign projector IDs, select .Yes
When setup is complete, you see a screen like this:
Note: ManualIf any of the images are not positioned correctly, select in step 9 to locate the image
manually.
12. Select the input signal to display an image.
After performing the steps here, adjust the images for any gaps and differences in color.

183
Note: Do not change any of the projector names or IP addresses, or the images will not be adjusted
automatically.
Parent topic: Tiling Images into One Image
Related references
Projector Parts - Front/Top
Related tasks
Configuring Tiling Manually
Configuring Tiling Manually
If your projectors are not on a network or you were unsuccessful tiling the images automatically, you can
configure tiling manually.
1. Turn on the projector.
2. Press the button.Menu
3. Select the menu and press .Extended Enter
4. Select > > .Multi-Projection Tiling Layout
5. Select the number of rows and columns you are setting up as the and settings. ThenRow Column
select and press .Set Enter
6. Repeat the previous steps with each projector you are setting up before continuing with the next
step.
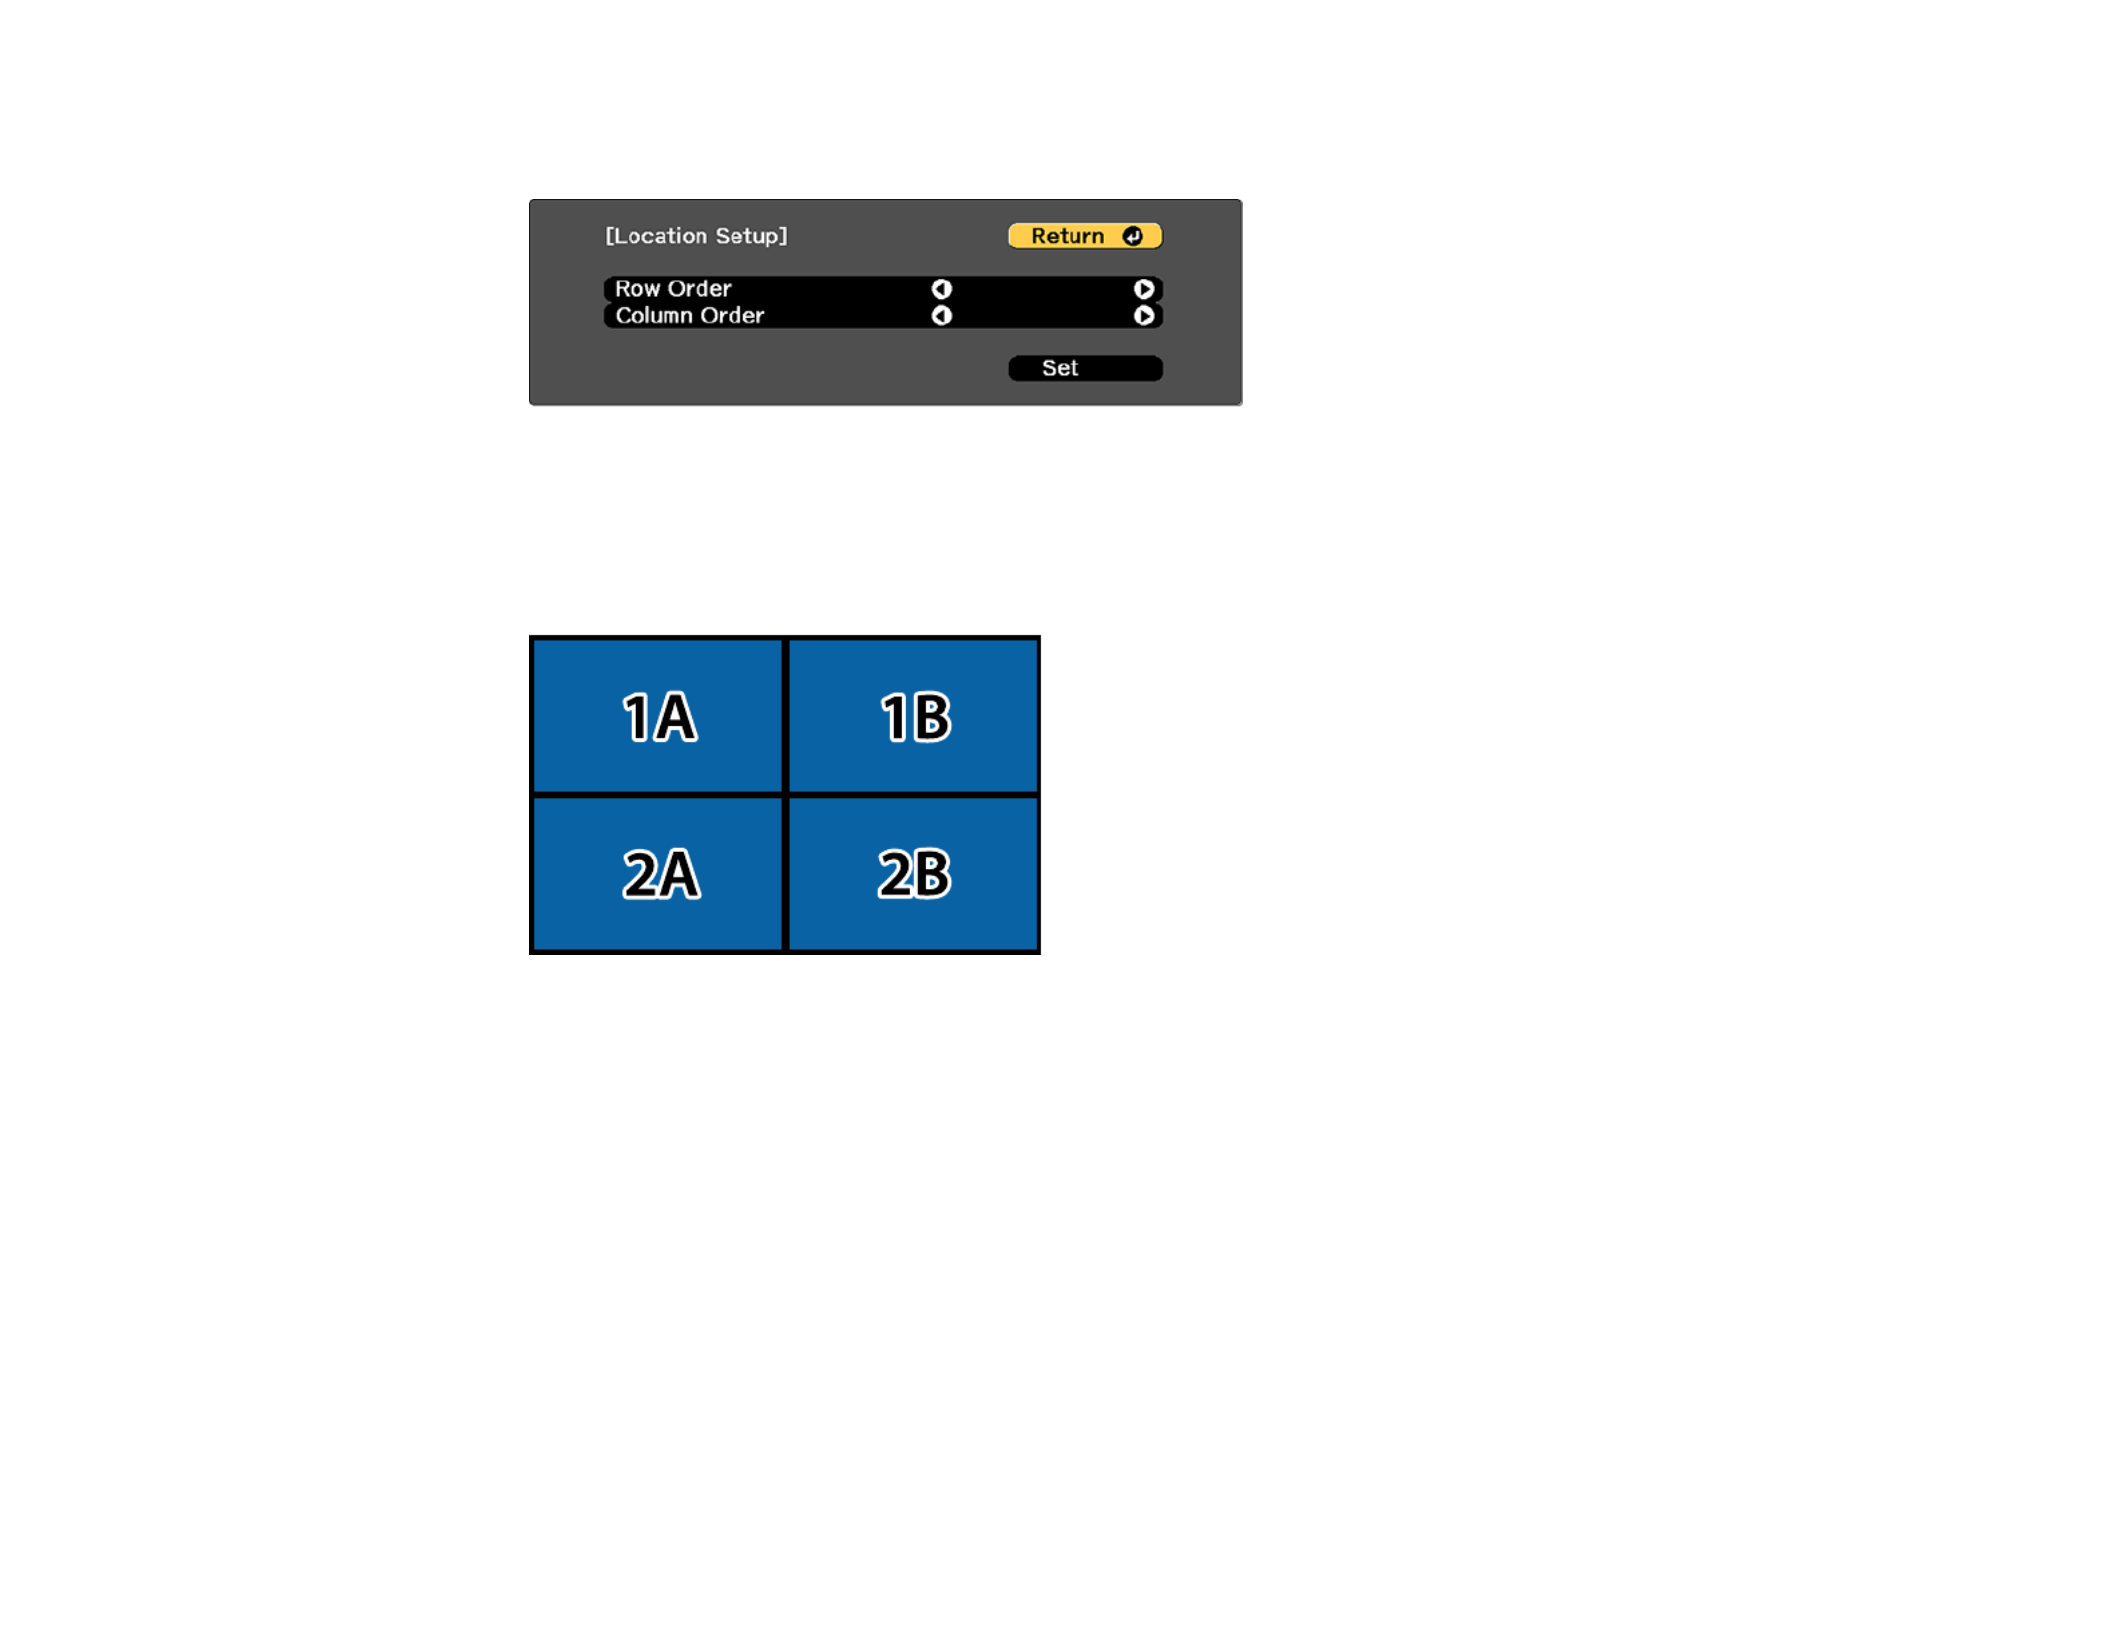
184
7. Select and press .Location Setup Enter
8. Select the position of each projected image as follows:
• to layout the screens from top to bottom in sequential order, starting with at the topRow Order 1
• to layout the screens from left to right, starting with on the leftColumn Order A
9. Repeat the previous step with each projector you are setting up before continuing with the next step.
10. Select the input signal to display an image.
After performing the steps here, adjust the images for any gaps and differences in color.
Parent topic: Tiling Images into One Image

185
Blending the Image Edges
You can use the projector's Edge Blending feature to create a seamless image from multiple projectors.
1. Press the button.Menu
2. Select the menu and press .Extended Enter
3. Select the setting and press .Multi-Projection Enter
4. Select the setting and press .Edge Blending Enter
You see this screen:
5. Turn on the , , and settings.Edge Blending Guide Display Pattern Guide
Note: Guide ColorsIf the projected guide is unclear, try changing the setting.
6. Select the edge you want to blend on each projector and press .Enter

186
You see a screen like this:
7. Select the setting and select .Blending On
8. Select the setting and adjust the point where edge blending begins.Blend Start Position
9. Select the setting and use the arrow buttons to select the width of the blended area soBlend Range
that the displayed guides are at the edges of the overlapping area between the two images.
10. Press to go back to the previous screen.Esc
11. Select the setting and select a gradient for the shaded area on the projectors.Blend Curve
12. When the edges are blended, turn off the and settings to check theGuide Display Pattern Guide
final settings.
13. When you are finished, press the button.Menu
Parent topic: Using Multiple Projectors

187
Adjusting the Black Level
When two images overlap, the overlapping area can appear differently from the areas that do not
overlap. You can use the projector's Black Level setting to make the difference less noticeable.
Note: Geometry CorrectionYou may not be able to adjust the black levels correctly if the settings are
set too high. The brightness and tone of the overlapping areas may differ from the rest of the image even
after adjusting the black level.
1. Press the button.Menu
2. Select the menu and press .Extended Enter
3. Select the setting and press .Multi-Projection Enter
4. Select the setting and press .Black Level Enter

188
You see this screen:
5. Select the setting and press .Color Adjustment Enter
You see a screen based on the , , , and settings youTop Edge Bottom Edge Right Edge Left Edge
selected for the setting.Edge Blending
Note: Color Adjustment Start AutoThe setting is automatically adjusted when selecting
Adjustment in the Screen Matching screen.

189
6. Select the area you want to adjust and press .Enter
Note: The area you selected is displayed in orange. Adjust overlapping areas starting with the
brightest areas first. For example, adjust area 2 to match area 1, then adjust area 3 to match area 2.
7. Adjust the brightness and tone of the areas that do not overlap to match the areas that overlap using
the displayed adjustment sliders.
8. Repeat the previous two steps as needed until all areas match.
9. If the tone of some areas do not match, you can adjust them using the setting.Area Correction
Continue with the next step. Otherwise, press the button to exit.Menu
10. Press the button to return to the Black Level screen.Esc
11. Select the setting and press .Area Correction Enter
12. Select the setting and press .Start Adjustments Enter

190
You see a screen with boundary lines indicating areas that are overlapping. The boundary lines are
based on the , , , and settings you selected for theTop Edge Bottom Edge Right Edge Left Edge
Edge Blending setting.
13. Use the arrow buttons to select a boundary line and press .Enter
You see a screen like this displaying the points you can use to set the adjustment range:
14. Use the arrow buttons to adjust the boundary line position and press the button.Enter
15. Use the arrow buttons to select an adjustment point and press the button.Enter
The selected point turns orange.

191
16. Use the arrow buttons to move the point.
17. To move another point, press the button and repeat the previous two steps.Esc
18. To move another boundary line, press the button repeatedly until you can select a boundaryEsc
line.
19. When you are finished, press the button.Menu
Note: Top Edge Bottom Edge Right Edge Left Edge BlackChanging the , , , or settings resets the
Level setting to its default value.
Parent topic: Using Multiple Projectors
Related references
Projector Setup Settings - Extended Menu
Matching Tint and Brightness (Screen Matching)
You can adjust the tint and brightness of multiple projectors so they match better. You can also schedule
automatic adjustments to the tint and brightness.
Note: Wait 20 minutes after turning on the projector before using the Screen Matching feature and
darken the room for maximum accuracy. Brightness decreases over time, so you may need to perform
Screen Matching again to correct large differences in brightness.
Matching the Screens Automatically
Matching the Screens Manually
Parent topic: Using Multiple Projectors

192
Related tasks
Saving a Scheduled Event
Matching the Screens Automatically
You can automatically correct the brightness and tint for multiple projectors based on the brightness and
tint settings you selected for the master projector.
Before you start, make sure of the following:
• Select for the setting and adjust the , ,Multi-Projection Color Mode Brightness Contrast Color
Saturation Tint White Balance Advanced, , , and settings in the Image menu, as necessary, on the
master projector.
• You are projecting on a matte white diffusion screen that is flat and even.
• The projected image is between 80 to 200 inches (203 to 508 cm) and is rectangular after tiling.
• All the projectors are connected to a network and the setting has been configured.Location Setup
• Nothing is blocking the built-in camera on the front of each projector.
Note: Auto adjustment is not available for the following lenses: ELPLX02, ELPLR04, ELPLL08, or
ELPLL07. After auto adjustment, the movement range for lens shift is reduced.
1. Press the button.Menu
2. Select the menu and press .Extended Enter
3. Select the setting and press .Multi-Projection Enter
4. Select the setting and press .Screen Matching Enter

193
5. Select press .Start Auto Adjustment Enter
When adjustment starts, you see an adjustment pattern. Adjustment is complete when you see a
displayed image.
After automatic adjustment, the and settings are returned to theirColor Uniformity Color Matching
default values.
Parent topic: Matching Tint and Brightness (Screen Matching)
Related concepts
Color Mode
Related references
Image Quality Settings - Image Menu
Projector Parts - Front/Top
Related tasks
Configuring Tiling Automatically
Multiple Projector Adjustment Overview
Matching the Screens Manually
You can manually correct the brightness and tint for multiple projectors.
1. Press the button.Menu
2. Select the menu and press .Extended Enter

194
3. Select the setting and press .Multi-Projection Enter
4. Select the setting and press .Screen Matching Enter
You see this screen:
5. Select the setting and press .Color Matching Enter
You see this screen:
6. Press the left or right arrow buttons to select a value for the setting.Adjustment Level
Note: There are eight adjustment levels ranging from white to black and you can adjust each level
individually.
7. Press the left or right arrow buttons to adjust the color tone for the , , and settings.Red Green Blue
8. Press the left or right arrow buttons to adjust the setting.Brightness
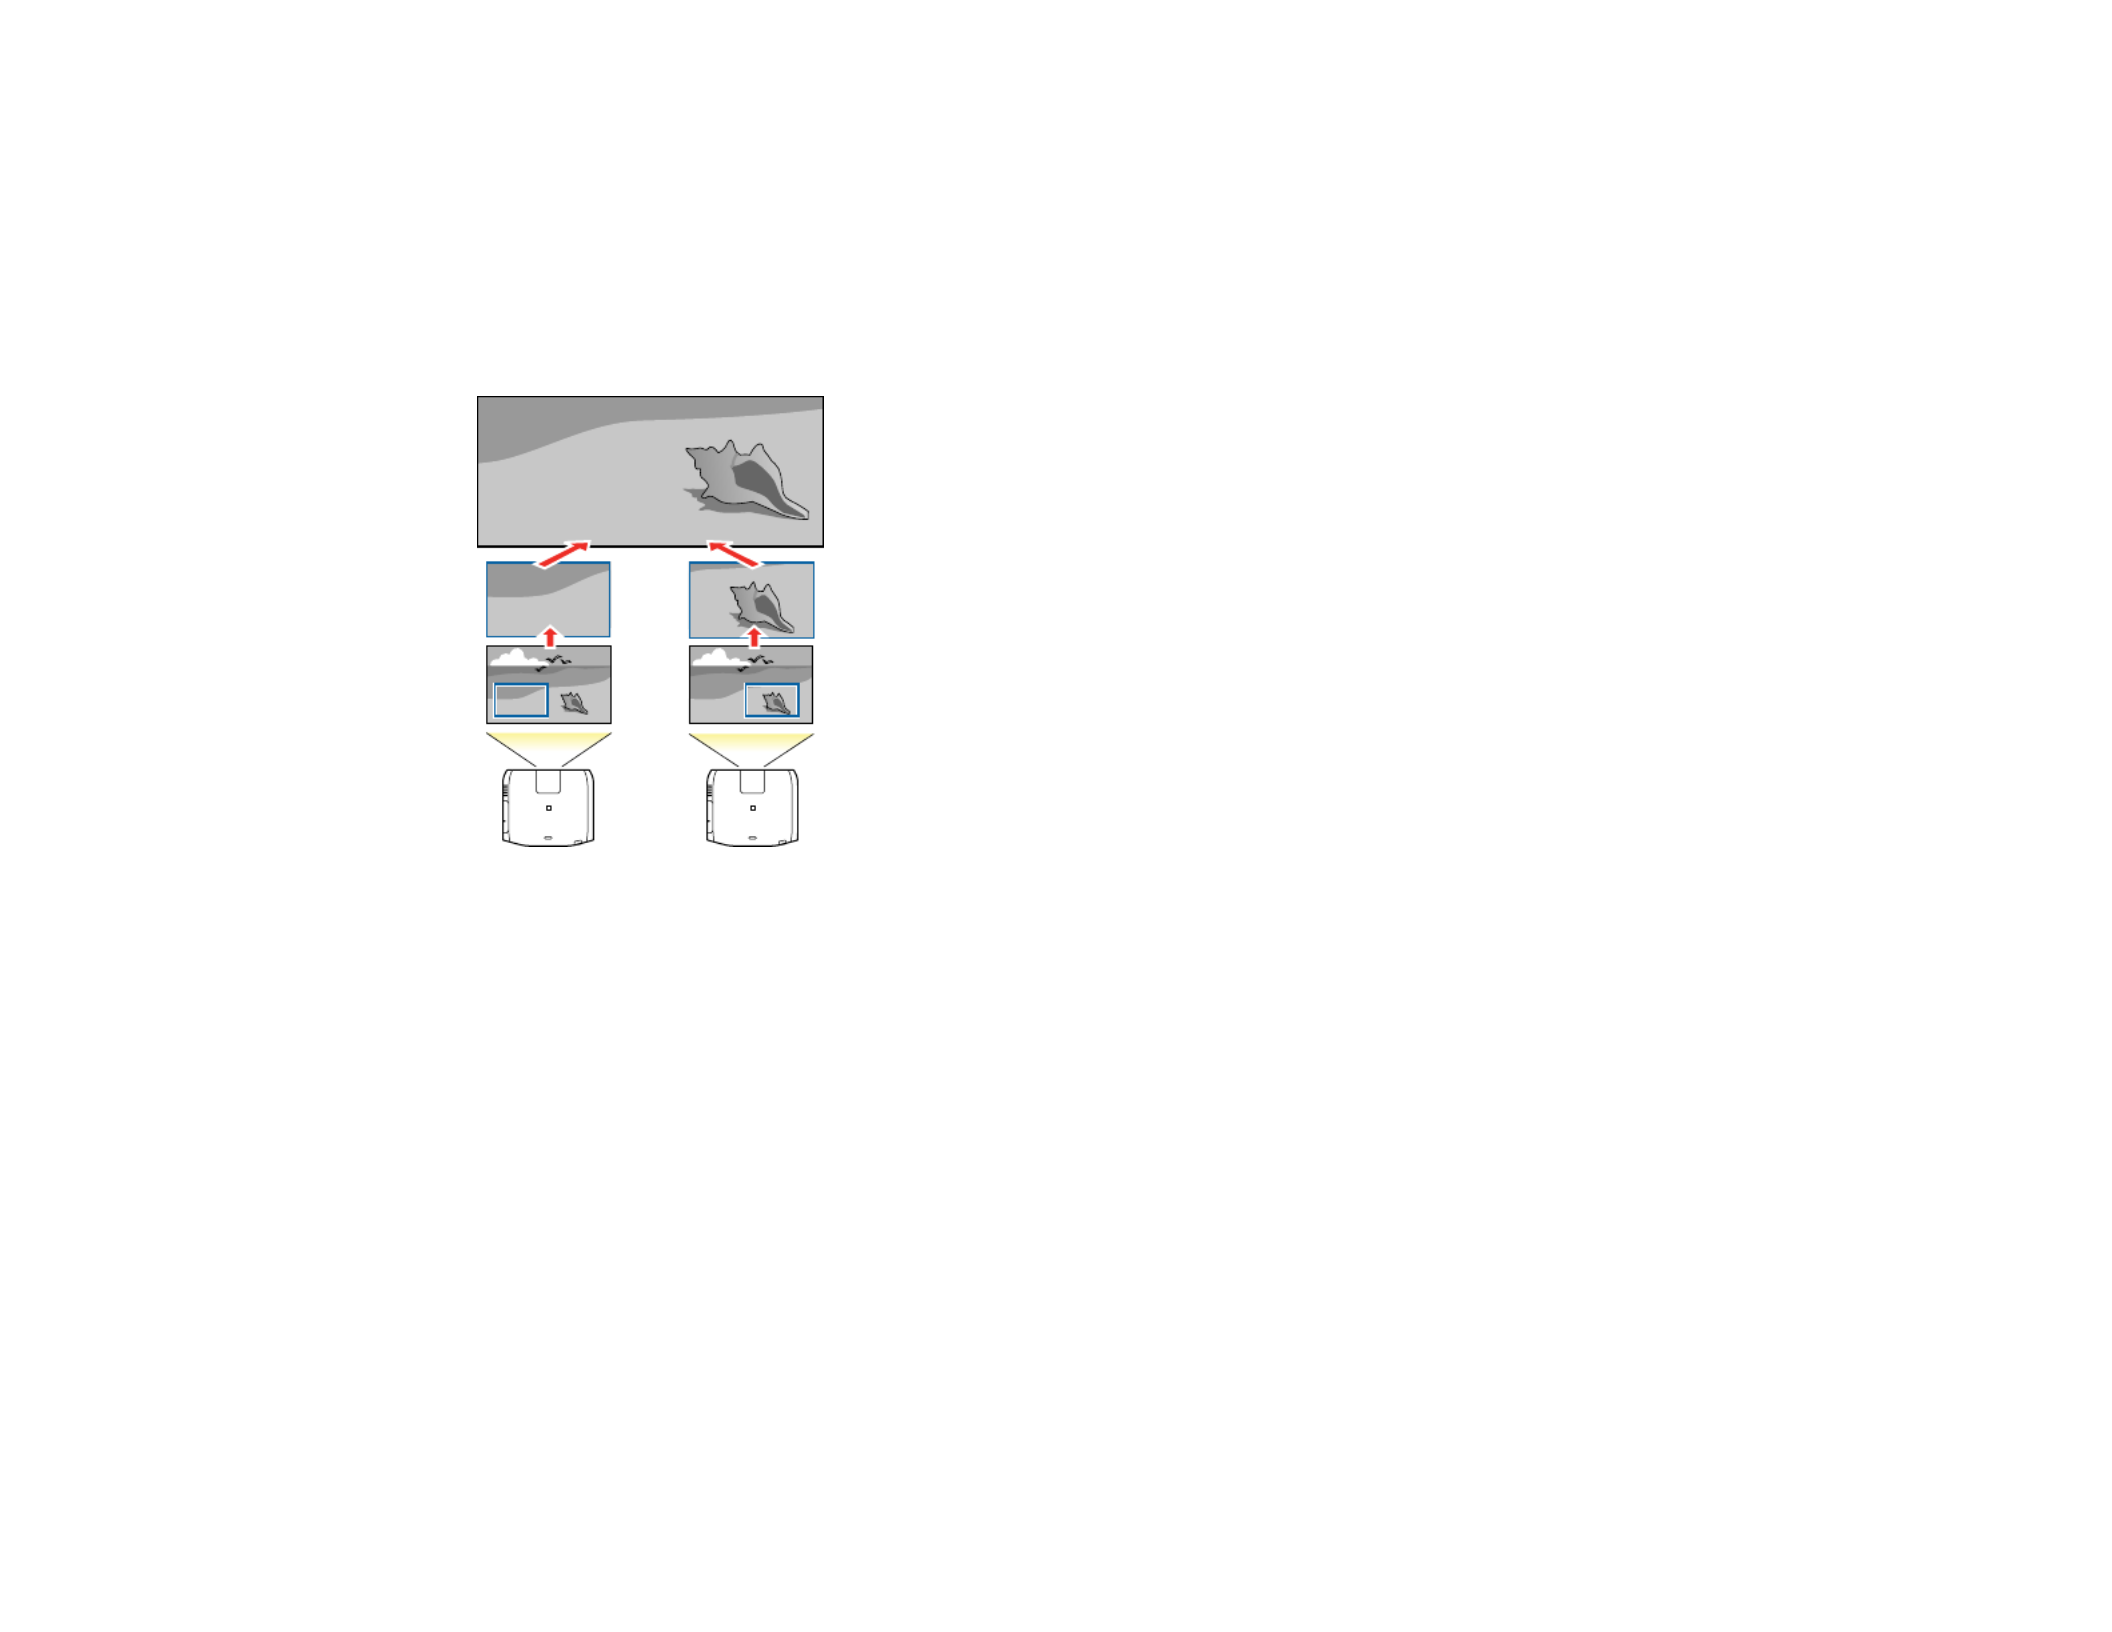
195
9. Repeat the previous three steps as necessary to adjust each adjustment level.
Parent topic: Matching Tint and Brightness (Screen Matching)
Scaling an Image
You can project the same image from multiple projectors and use the Scale feature to crop and combine
them into one large image.
1. Press the button.Menu
2. Select the menu and press .Extended Enter
3. Select the setting and press .Multi-Projection Enter
4. Select the setting and press .Scale Enter
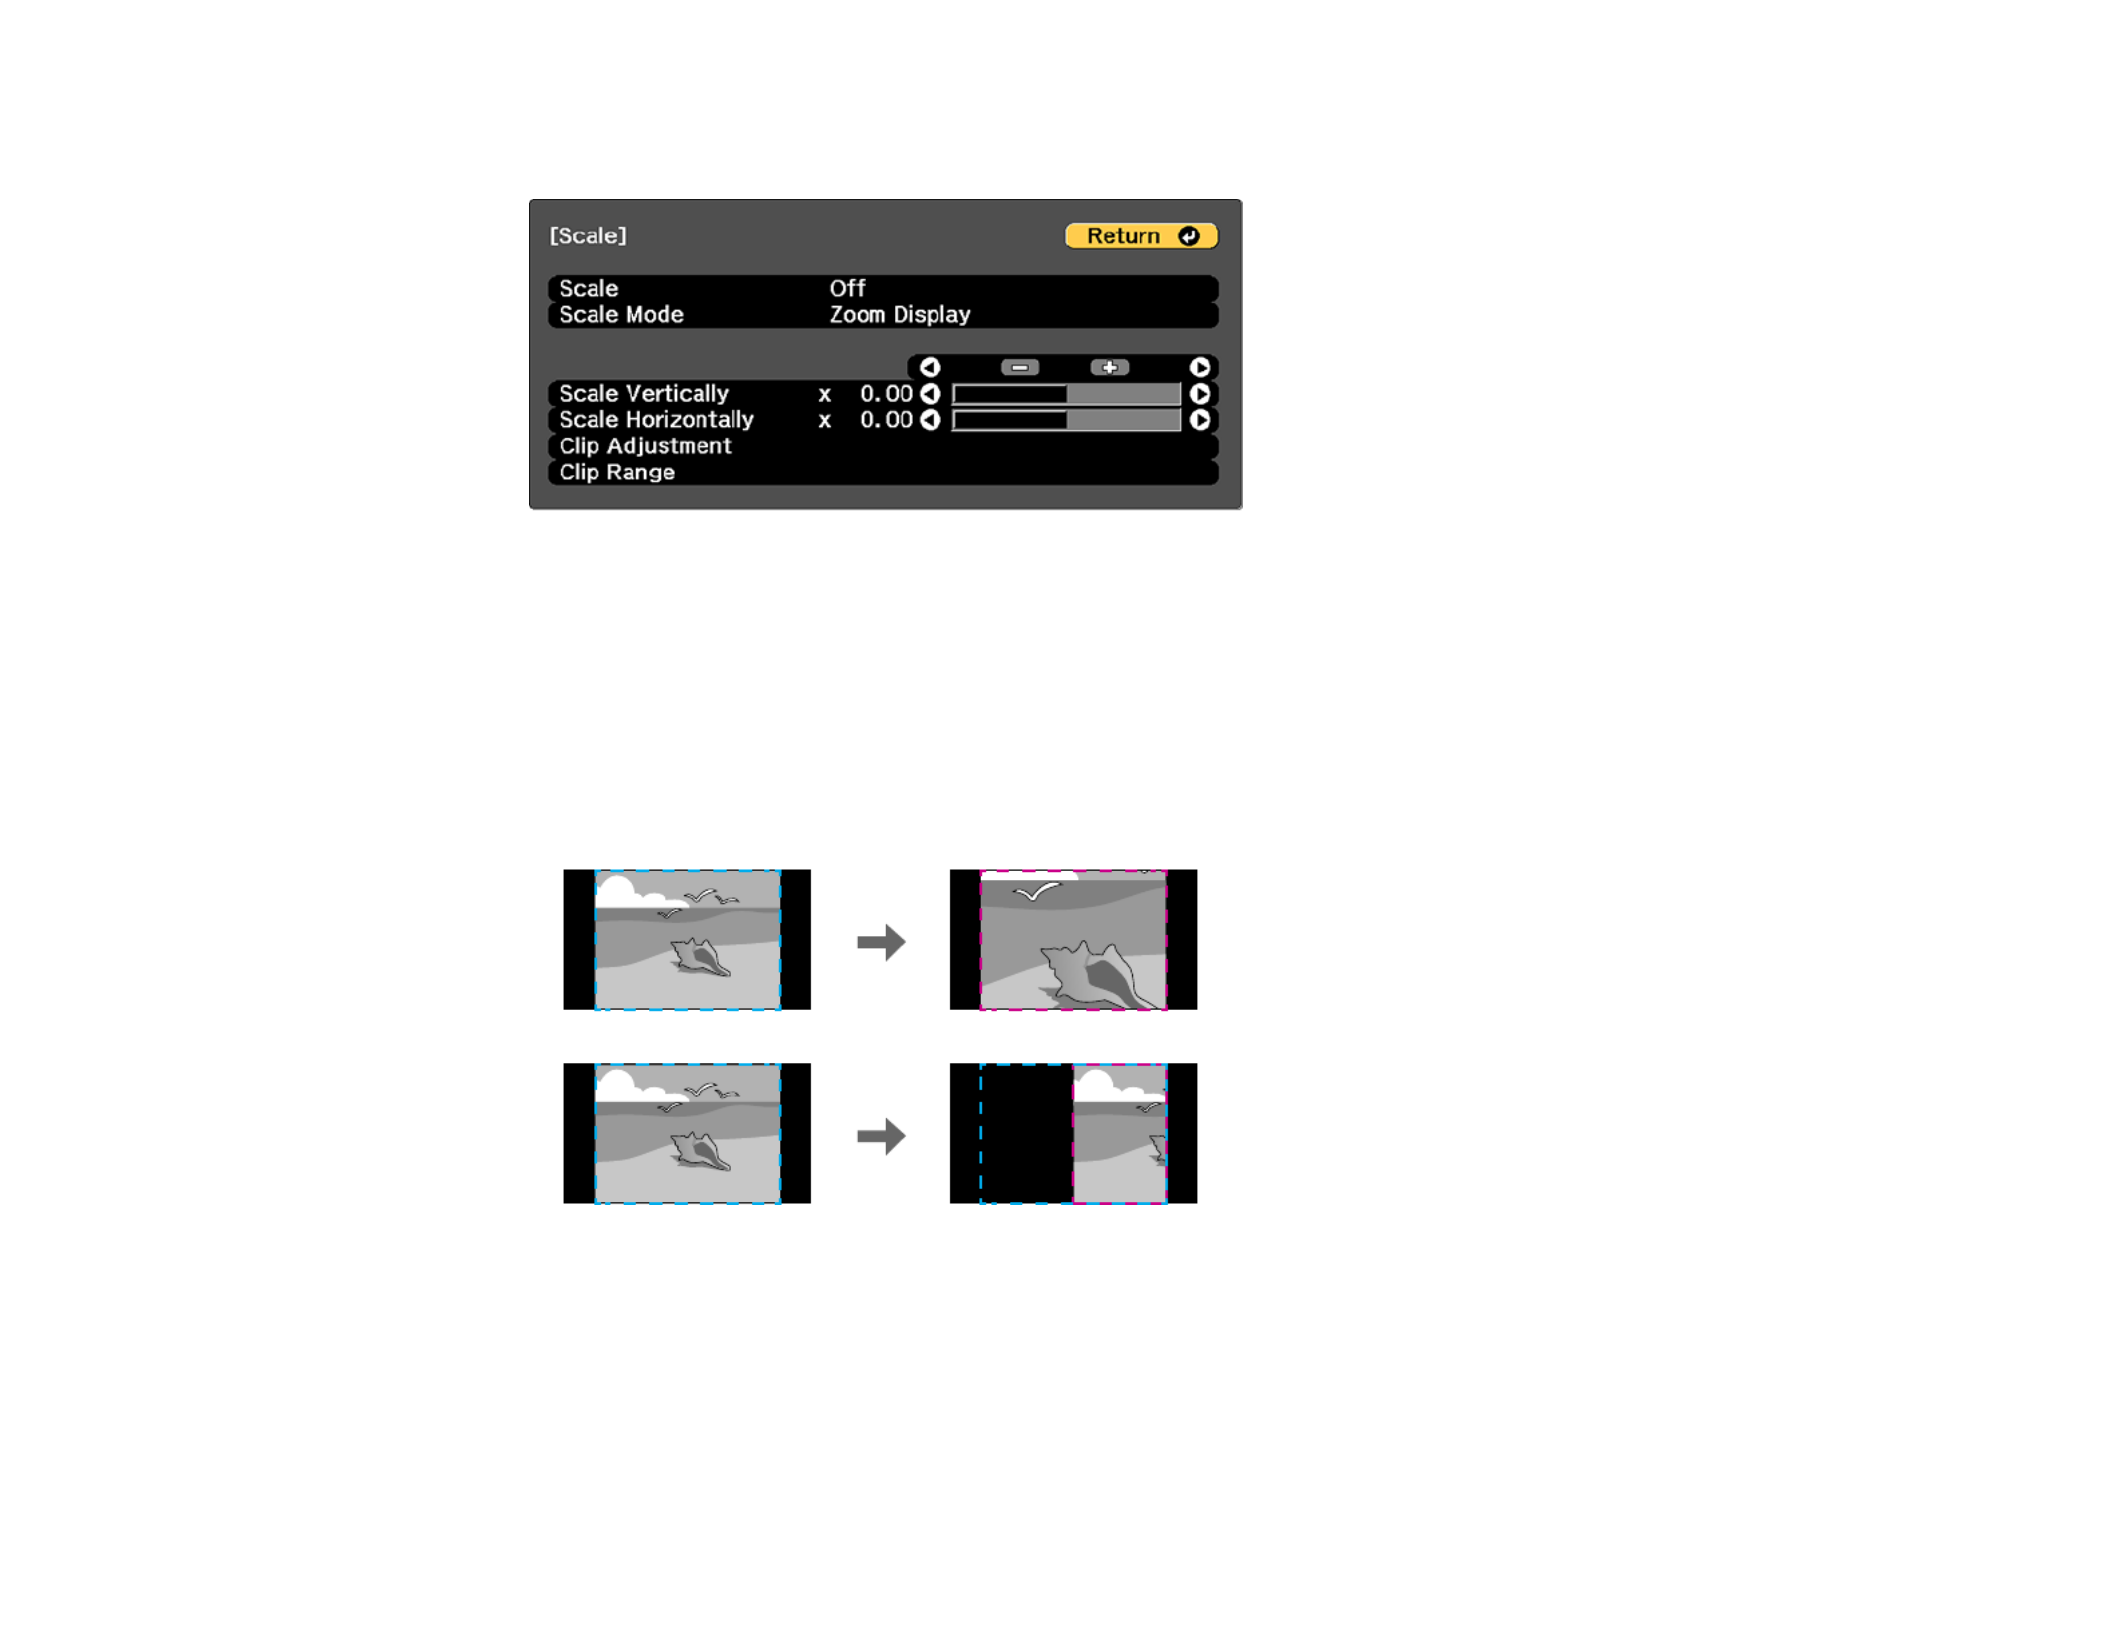
196
You see this screen:
5. Select one of the following as the setting:Scale
• to automatically adjust the clipped areas according to the andAuto Edge Blending Tiling
settings you selected
• to adjust the clipped areas manuallyManual
6. Select the setting and select one of these options:Scale Mode
• to maintain the image aspect ratio as you scale the imageZoom Display

198
4. Select one of the following and press :Enter
• for Panasonic projectorsType P
• for Mitsubishi projectorsType M
• for NEC projectorsType N
• for Sony projectorsType S
5. Turn the projector off and on again to enable the protocol emulation you selected.
Parent topic: Adjusting Projector Features
Viewing 3D Images
You can use two projectors to project and view passive 3D images (Pro
L1490U/L1490UNL/L1495U/L1495UNL/L1500UH/L1500UHNL/L1505UH/L1505UHNL).
The following optional items are required:
• Polarizer
• Passive 3D glasses
• A mount to stack the projectors
See the instructions supplied with the optional equipment for setup and use.
Parent topic: Adjusting Projector Features
Saving Settings to Memory and Using Saved Settings
You can save customized settings and then select the saved settings whenever you want to use them.
1. Turn on the projector and display an image.
2. Press the button.Menu
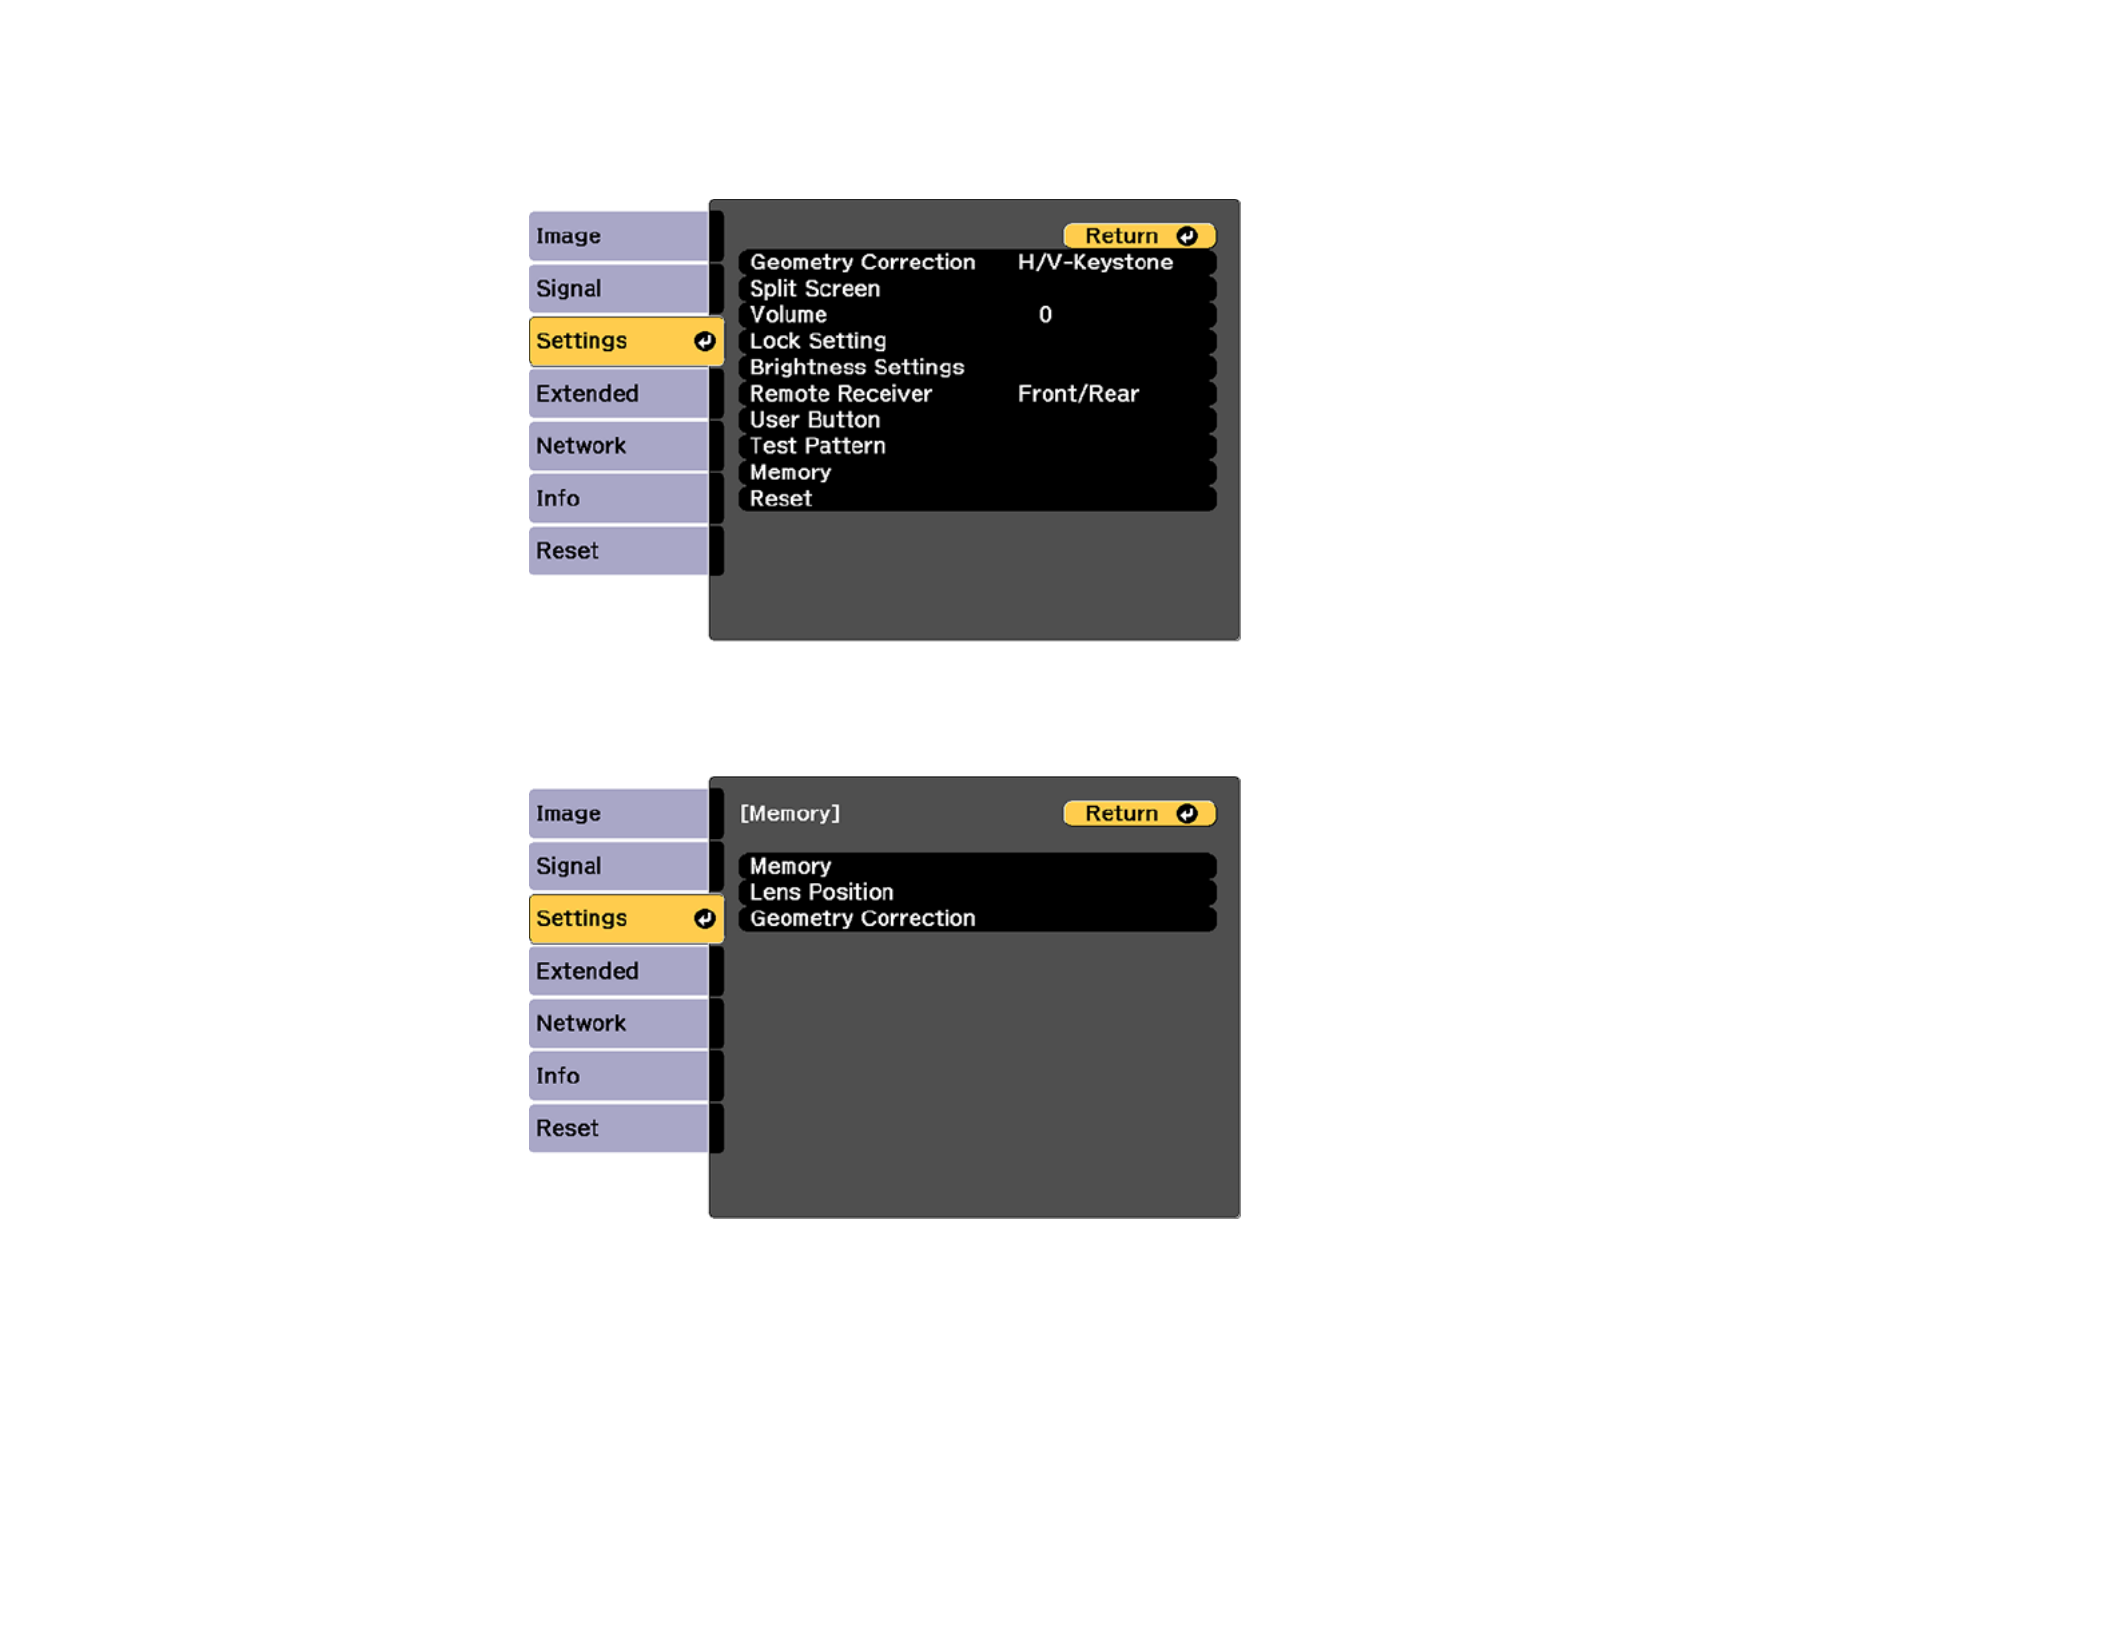
199
3. Select the menu and press .Settings Enter
4. Select the setting and press .Memory Enter
Note: MemoryYou can also access this screen by pressing the button on the remote control.
5. Select one of the following options:
• : Saves or loads various settings; you can save up to 10 different memoriesMemory

200
Note: ScaleThe following settings are saved: all settings from the Image menu, the setting from
the Signal menu, and the , , and settings from theEdge Blending Black Level Color Matching
Extended menu.
• : Saves or loads settings related to the lens such as the lens shift, focus, zoom, andLens Position
distortion adjustment settings; you can save up to 10 different memories
• : Saves or loads any adjustments made in theGeometry Correction Geometry Correction
setting in the Settings menu; you can save up to 3 different memories
You see this screen:
6. Select one of the following options:
• : Overwrites your current settings with saved settingsLoad Memory
• : Saves your current settings to memorySave Memory
Note: A memory name that has already been used is indicated by a mark. Saving over a
previously saved memory overwrites the settings with your current settings.
• : Erases the selected memory settingsErase Memory
• : Renames a saved memoryRename Memory
• : Resets the name and settings of a saved memoryReset Memory

201
Note: Reset All MemoriesTo reset all saved memories of all types, select in the Reset menu.
7. Press or to exit.Menu Esc
Parent topic: Adjusting Projector Features
Saving a Scheduled Event
You can select projector commands you want to perform and schedule them as an event.
You cannot schedule an event to occur at the following times:
• Five minutes before or after a Color Calibration event
• Five minutes before or 30 minutes after a Screen Matching event
Note: Light Source Calibration events do not start if the projector is used continuously for more than 24
hours, or regularly turned off by shutting off the power outlet. Set events toLight Source Calibration
occur only after 100 hours of projector usage.
1. Press the button.Menu
2. Select the menu and press .Extended Enter
3. Select the setting and press .Schedule Settings Enter
4. Select the menu and press .Schedule Enter
5. Select and press .Add New Enter
6. In the Event Settings section, select the events you want to have occur. (Select forNo Change
events that you do not want to occur.)
7. In the Date/Time Settings section, set the date and time for the scheduled events to occur.
8. When you are finished, select and press .Save Enter
9. To schedule more events, repeat the previous steps as necessary.
10. Select and select to save your changes.Setup complete Yes
Viewing Scheduled Events
Editing a Scheduled Event
Parent topic: Adjusting Projector Features
Viewing Scheduled Events
You can view any currently scheduled events.
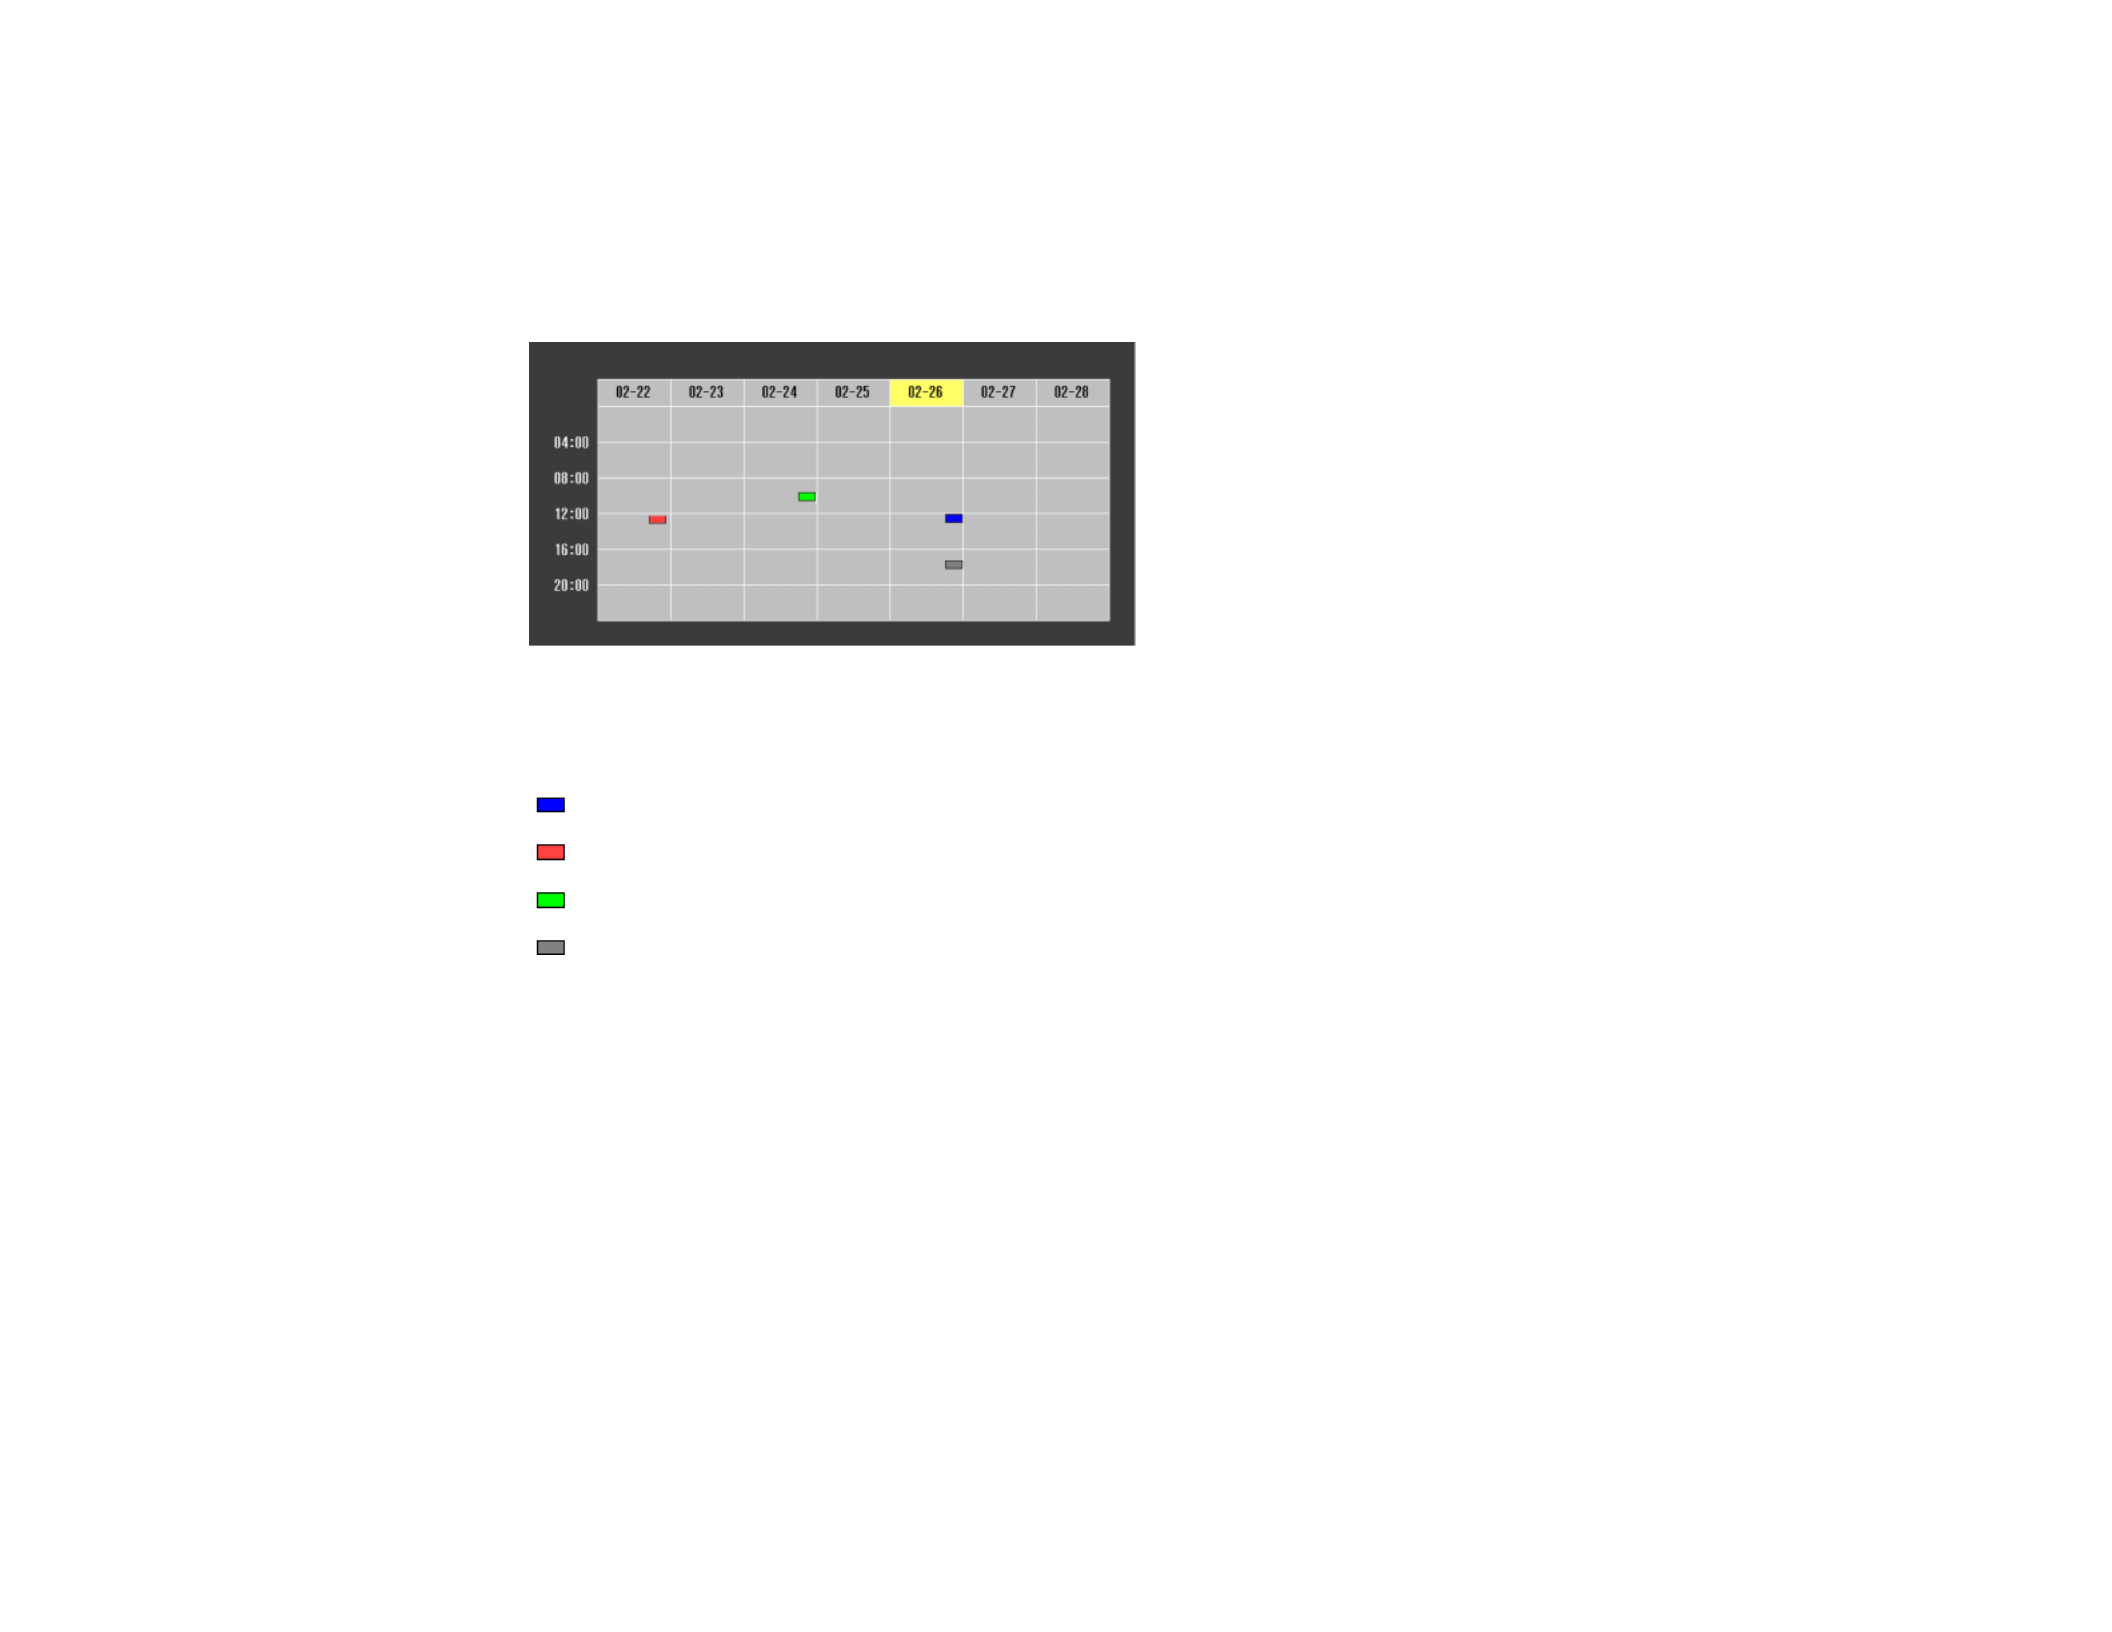
202
1. Press the button.Menu
2. Select the menu and press .Extended Enter
3. Select the setting and press .Schedule Settings Enter
You see a screen like this:
The colored boxes in the calendar indicate the following about the scheduled events:
One-time event
Recurring event
Communication is on/off
Event is invalid
Parent topic: Saving a Scheduled Event
Editing a Scheduled Event
You can edit any currently scheduled event.
1. Press the button.Menu
2. Select the menu and press .Extended Enter
3. Select the setting and press .Schedule Settings Enter

203
You see a screen like this:
4. Press the left or right arrow buttons to highlight the date on the calendar containing the scheduled
event you want to edit.
5. Press the up or down arrow buttons to highlight the event you want to edit, and press .Esc
6. Select one of the following:
• to enable or disable the selected event.On/Disabled
• to edit the settings for the selected event.Edit
• to delete the selected event.Clear
• to add a new scheduled event.Add New
7. When you are finished, select and press .Return Enter
8. Select and select to save your changes.Setup complete Yes
Note: Schedule Reset YesTo delete all scheduled events, select and select .
Parent topic: Saving a Scheduled Event
Copying Menu Settings Between Projectors
After you select menu settings for your projector, you can transfer them to another projector of the same
model.
Note: Copy the projector's settings before you adjust the projected image using the projector's Geometry
Correction settings. Any saved User's Logo setting on the projector will transfer to the other projector.

204
Caution: If the copy process fails due to a power failure, communication error, or for any other reason,
Epson will not be responsible for any repair costs incurred.
The following settings will not transfer between projectors:
• Info menu items
• Network menu settings other than those in the Notifications and Others menus
Note: In addition to the methods covered in this section, you can also copy and transfer settings to
multiple projectors over a network using the EasyMP Network Updater software. See the online EasyMP
Network Updater Operation Guide for instructions. You can download the latest software and
documentation from the Epson website.
Saving Settings to a USB Flash Drive
Transferring Settings from a USB Flash Drive
Saving Settings to a Computer
Transferring Settings from a Computer
Parent topic: Adjusting Projector Features
Related references
Projector Information Display - Info Menu
Projector Network Settings - Network Menu
Additional Projector Software and Manuals
Saving Settings to a USB Flash Drive
You can save the projector settings you want to transfer to a USB flash drive.
Note: Use an empty flash drive. If the drive contains other files, the transfer may not complete correctly.
The flash drive must use the FAT format and cannot have any security features.
1. Turn off the projector and unplug the power cord from the projector's power inlet.

205
2. Insert the flash drive into the wireless LAN module port.
Note: Connect the flash drive directly to the projector. Do not use a hub or your settings may not be
saved correctly.
3. Press and hold the button on the control panel or remote control as you connect the power cordEsc
to the projector's power inlet.
4. When the On/Standby and Status lights are blue, and the Laser and Temp lights are orange, release
the button.Esc
The lights flash to indicate that settings are transferring to the flash drive. When the lights stop
flashing, the On/Standby light turns blue and the projector enters standby mode.
Caution: Do not unplug the power cord or remove the flash drive while the lights are flashing. This
could damage the projector.

206
5. Once the projector enters standby mode, remove the flash drive.
Parent topic: Copying Menu Settings Between Projectors
Transferring Settings from a USB Flash Drive
After saving projector settings to a USB flash drive, you can transfer them to another projector of the
same model.
Note: Make sure the USB flash drive contains only a single settings transfer from another projector of
the same model. The settings are contained in a file called . If the drive contains otherpjconfdata.bin
files, the transfer may not complete correctly.
Do not adjust image settings on a projector until after you transfer settings to it. Otherwise, you may have
to repeat your adjustments.
1. Turn off the projector and unplug the power cord from the projector's power inlet.
2. Insert the flash drive into the wireless LAN module port.
Note: Connect the flash drive directly to the projector. Do not use a hub or your settings may not be
saved correctly.

207
3. Press and hold the button on the control panel or remote control as you connect the powerMenu
cord to the projector's power inlet.
4. When the On/Standby and Status lights are blue, and the Laser and Temp lights are orange, release
the button.Menu
The lights flash to indicate that settings are transferring to the projector. When the lights stop
flashing, the On/Standby light turns blue and the projector enters standby mode.
Caution: Do not unplug the power cord or remove the flash drive while the lights are flashing. This
could damage the projector.
5. Once the projector enters standby mode, remove the flash drive.
Parent topic: Copying Menu Settings Between Projectors
Saving Settings to a Computer
You can save the projector settings you want to transfer to a computer.
Your computer must be running one of the following operating systems:
• Windows Vista
• Windows 7
• Windows 8.x
• Windows 10
• OS X 10.7.x
• OS X 10.8.x
• OS X 10.9.x
• OS X 10.10.x
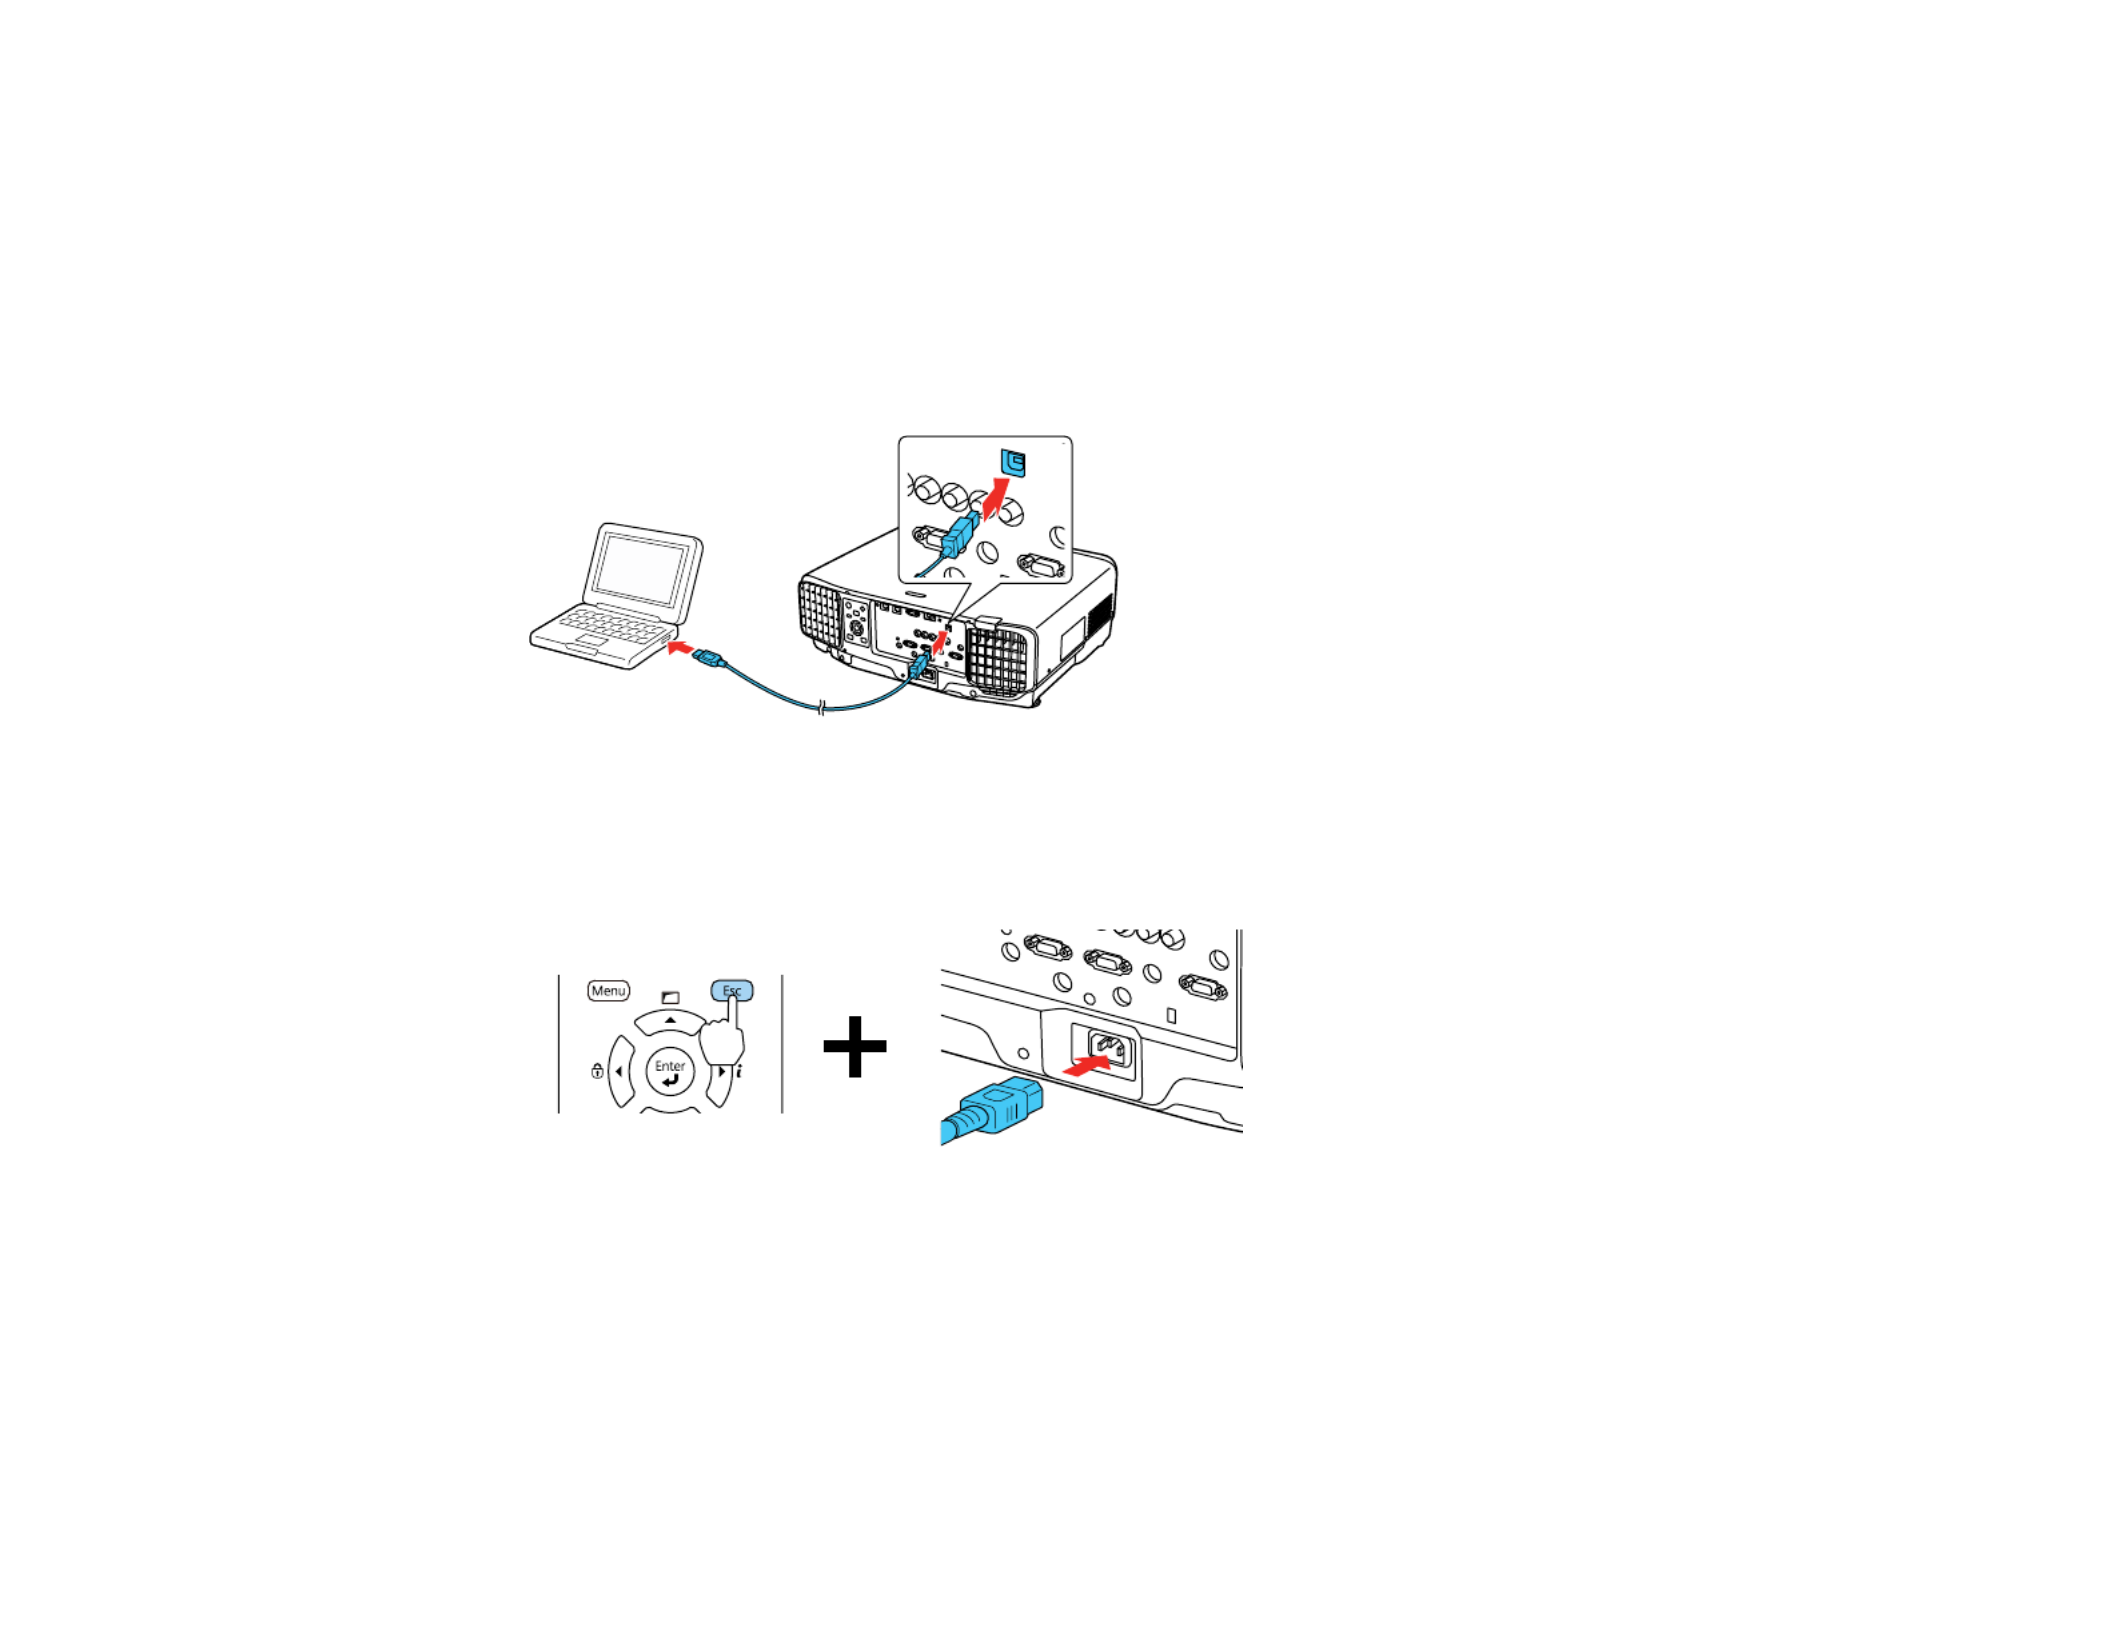
208
• OS X 10.11.x
• macOS 10.12.x
• macOS 10.13.x
• macOS 10.14.x
1. Turn off the projector and unplug the power cord from the projector's power inlet.
2. Connect a USB cable to your projector's port.Service
3. Connect the other end to any available USB port on your computer.
4. Press and hold the button on the control panel or remote control as you connect the power cordEsc
to the projector's power inlet.
5. When the On/Standby and Status lights are blue, and the Laser and Temp lights are orange, release
the button.Esc
The projector shows up as a removable disk on your computer.
6. Open the removable disk and copy the file to your computer.pjconfdata.bin

209
7. Once the file has copied, do one of the following:
• Open the , , , or utility.Windows: My Computer Computer Windows Explorer File Explorer
Right-click the name of your projector (listed as a removable disk) and select .Eject
• Drag the removable disk icon for your projector from the desktop into the trash.Mac:
The projector enters standby mode.
Parent topic: Copying Menu Settings Between Projectors
Transferring Settings from a Computer
After saving projector settings to a computer, you can transfer them to another projector of the same
model.
Your computer must be running one of the following operating systems:
• Windows Vista
• Windows 7
• Windows 8.x
• Windows 10
• OS X 10.7.x
• OS X 10.8.x
• OS X 10.9.x
• OS X 10.10.x
• OS X 10.11.x
• macOS 10.12.x
• macOS 10.13.x
• macOS 10.14.x
Do not adjust image settings on a projector until after you transfer settings to it. Otherwise, you may have
to repeat your adjustments.
1. Turn off the projector and unplug the power cord from the projector's power inlet.
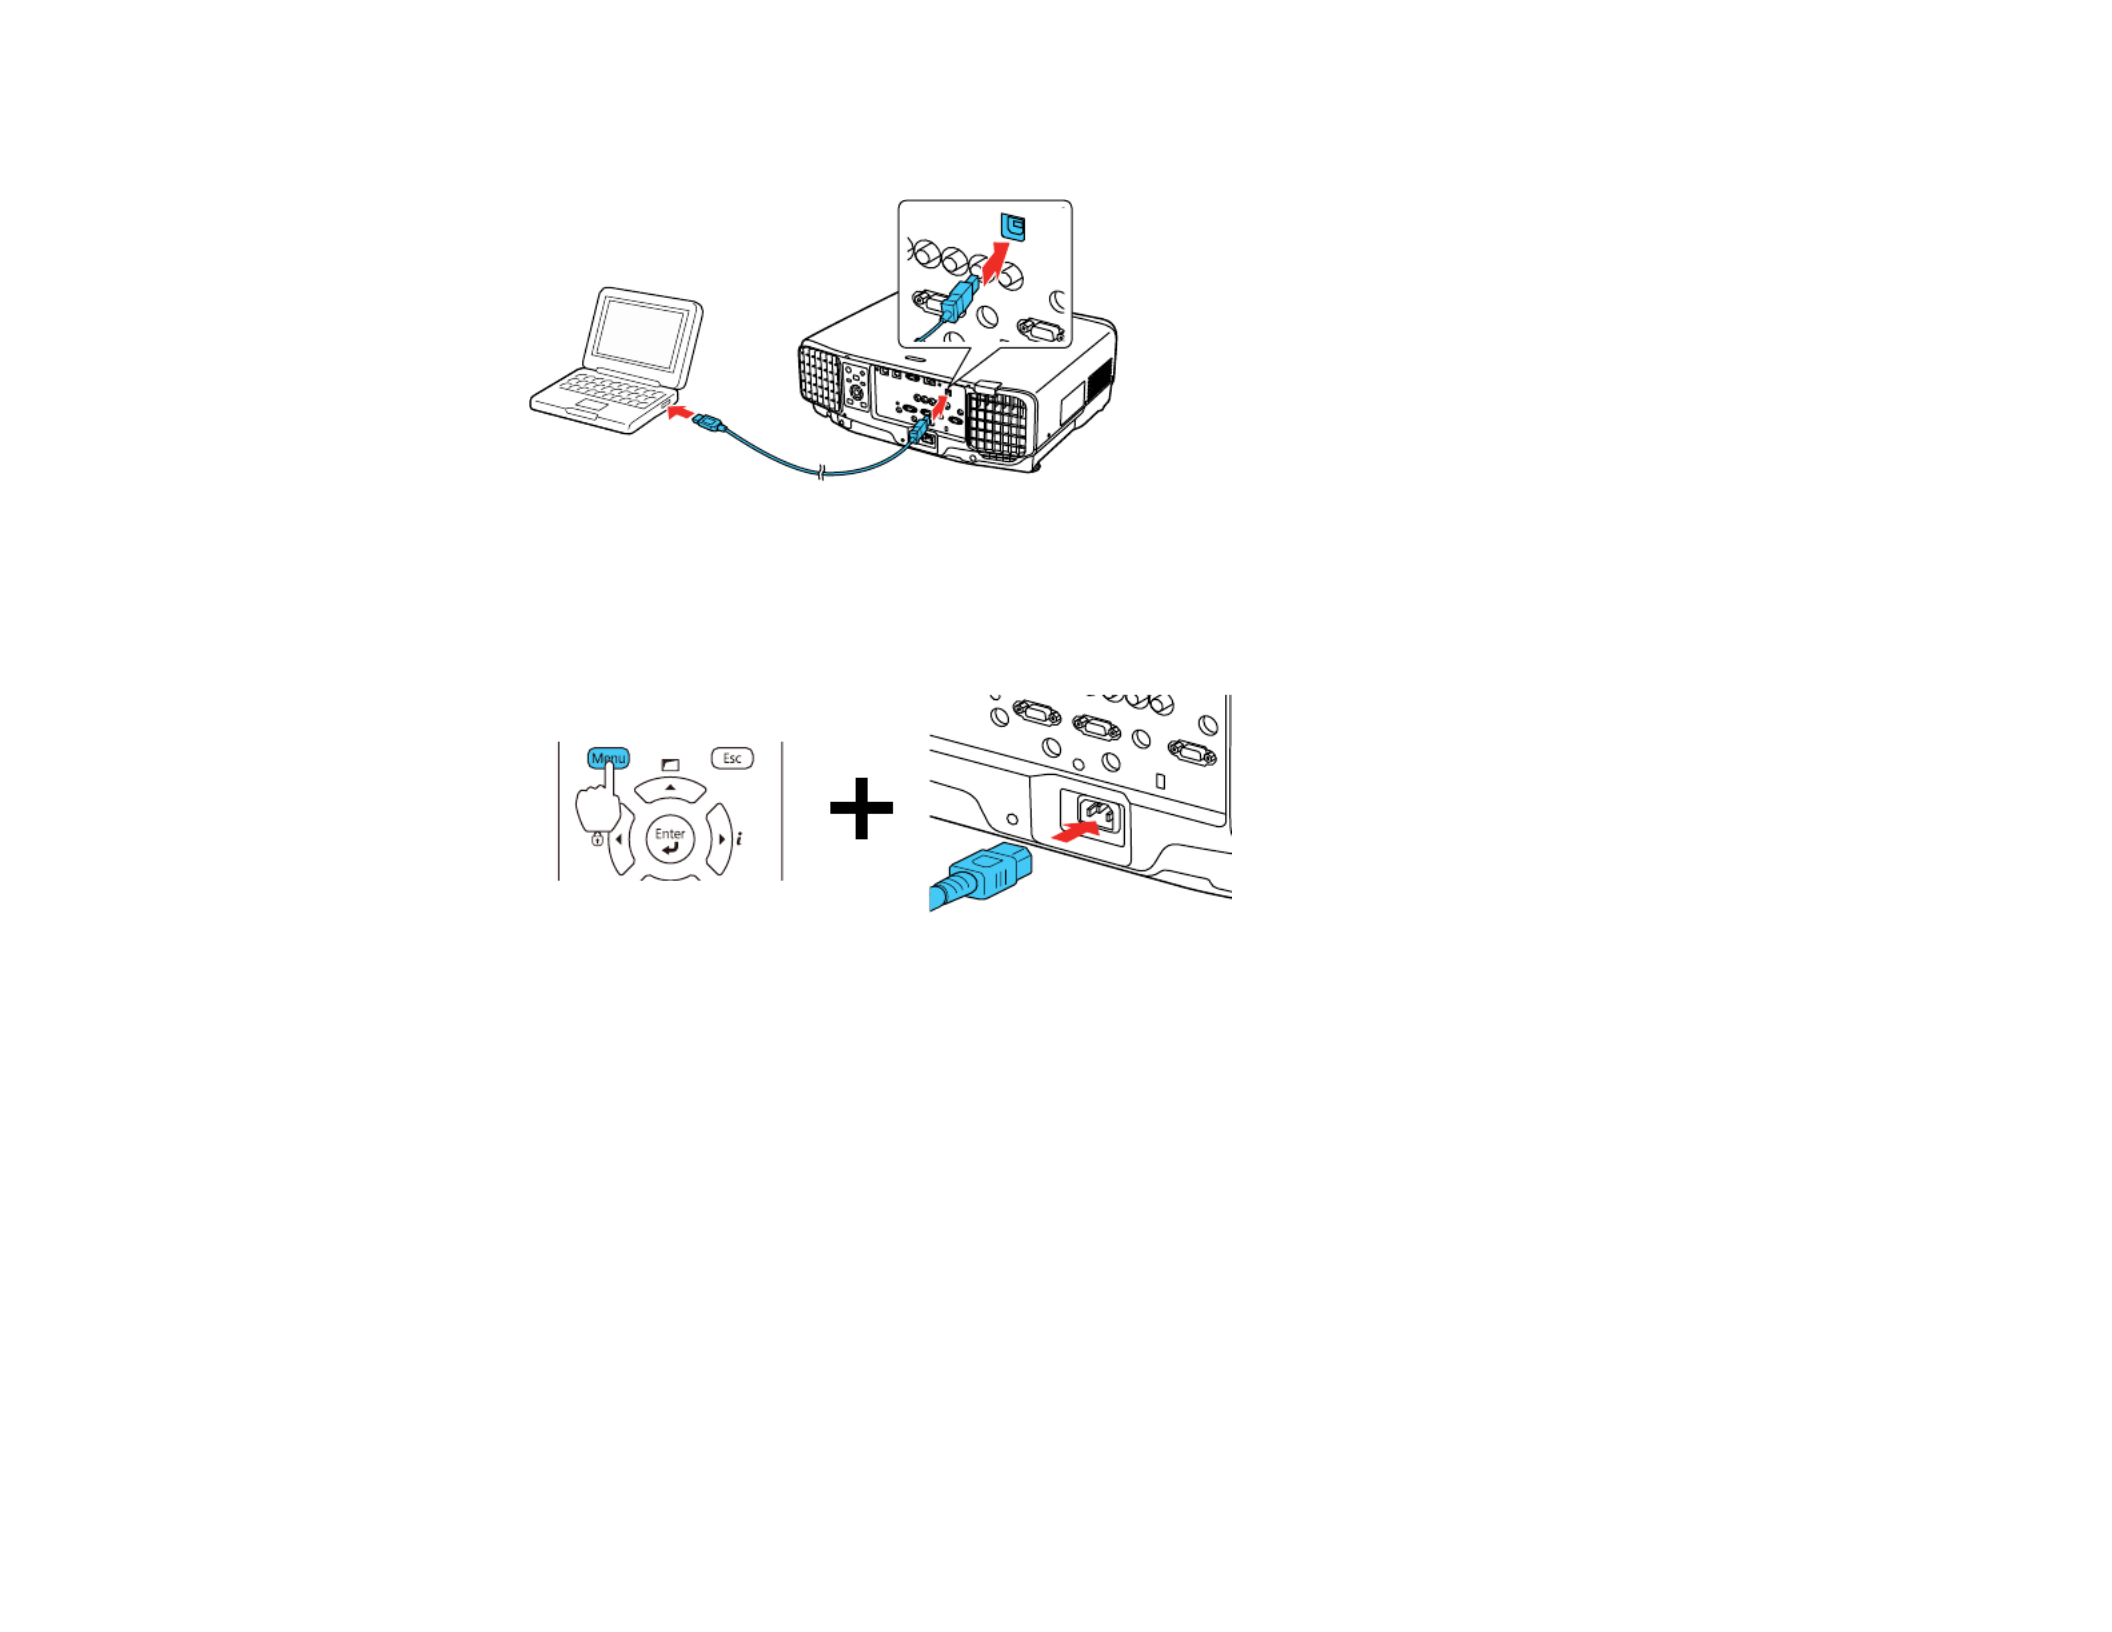
210
2. Connect a USB cable to your projector's port.Service
3. Connect the other end to any available USB port on your computer.
4. Press and hold the button on the control panel or remote control as you connect the powerMenu
cord to the projector's power inlet.
5. When the On/Standby and Status lights are blue, and the Laser and Temp lights are orange, release
the button.Menu
The projector shows up as a removable disk on your computer.
6. Copy the file from your computer to the removable disk.pjconfdata.bin
Note: Do not copy any other files to the removable disk.
7. Once the file has copied, do one of the following:
• Open the , , , or utility.Windows: My Computer Computer Windows Explorer File Explorer
Right-click the name of your projector (listed as a removable disk) and select .Eject
• Drag the removable disk icon for your projector from the desktop into the trash.Mac:

211
All the lights start flashing to indicate that the projector's settings are being updated. When the lights
stop flashing, the On/Standby light turns blue and the projector enters standby mode.
Caution: Do not unplug the power cord while the lights are flashing. This could damage the
projector.
Parent topic: Copying Menu Settings Between Projectors

212
Adjusting the Menu Settings
Follow the instructions in these sections to access the projector menu system and change projector
settings.
Using the Projector's Menus
Image Quality Settings - Image Menu
Input Signal Settings - Signal Menu
Projector Feature Settings - Settings Menu
Projector Setup Settings - Extended Menu
Projector Network Settings - Network Menu
Projector Information Display - Info Menu
Projector Reset Options - Reset Menu
Using the Projector's Menus
You can use the projector's menus to adjust the settings that control how your projector works. The
projector displays the menus on the screen.
1. Press the button on the control panel or remote control.Menu

213
You see the menu screen displaying the Image menu settings.
2. Press the up or down arrow button to move through the menus listed on the left. The settings for
each menu are displayed on the right.
Note: The available settings depend on the current input source, resolution, or other menu settings.
3. To change settings in the displayed menu, press .Enter
4. Press the up or down arrow button to move through the settings.
5. Change the settings using the buttons listed on the bottom of the menu screens.
6. To return all the menu settings to their default values, select .Reset
7. When you finish changing settings on a menu, press .Esc
8. Press or to exit the menus.Menu Esc
Parent topic: Adjusting the Menu Settings
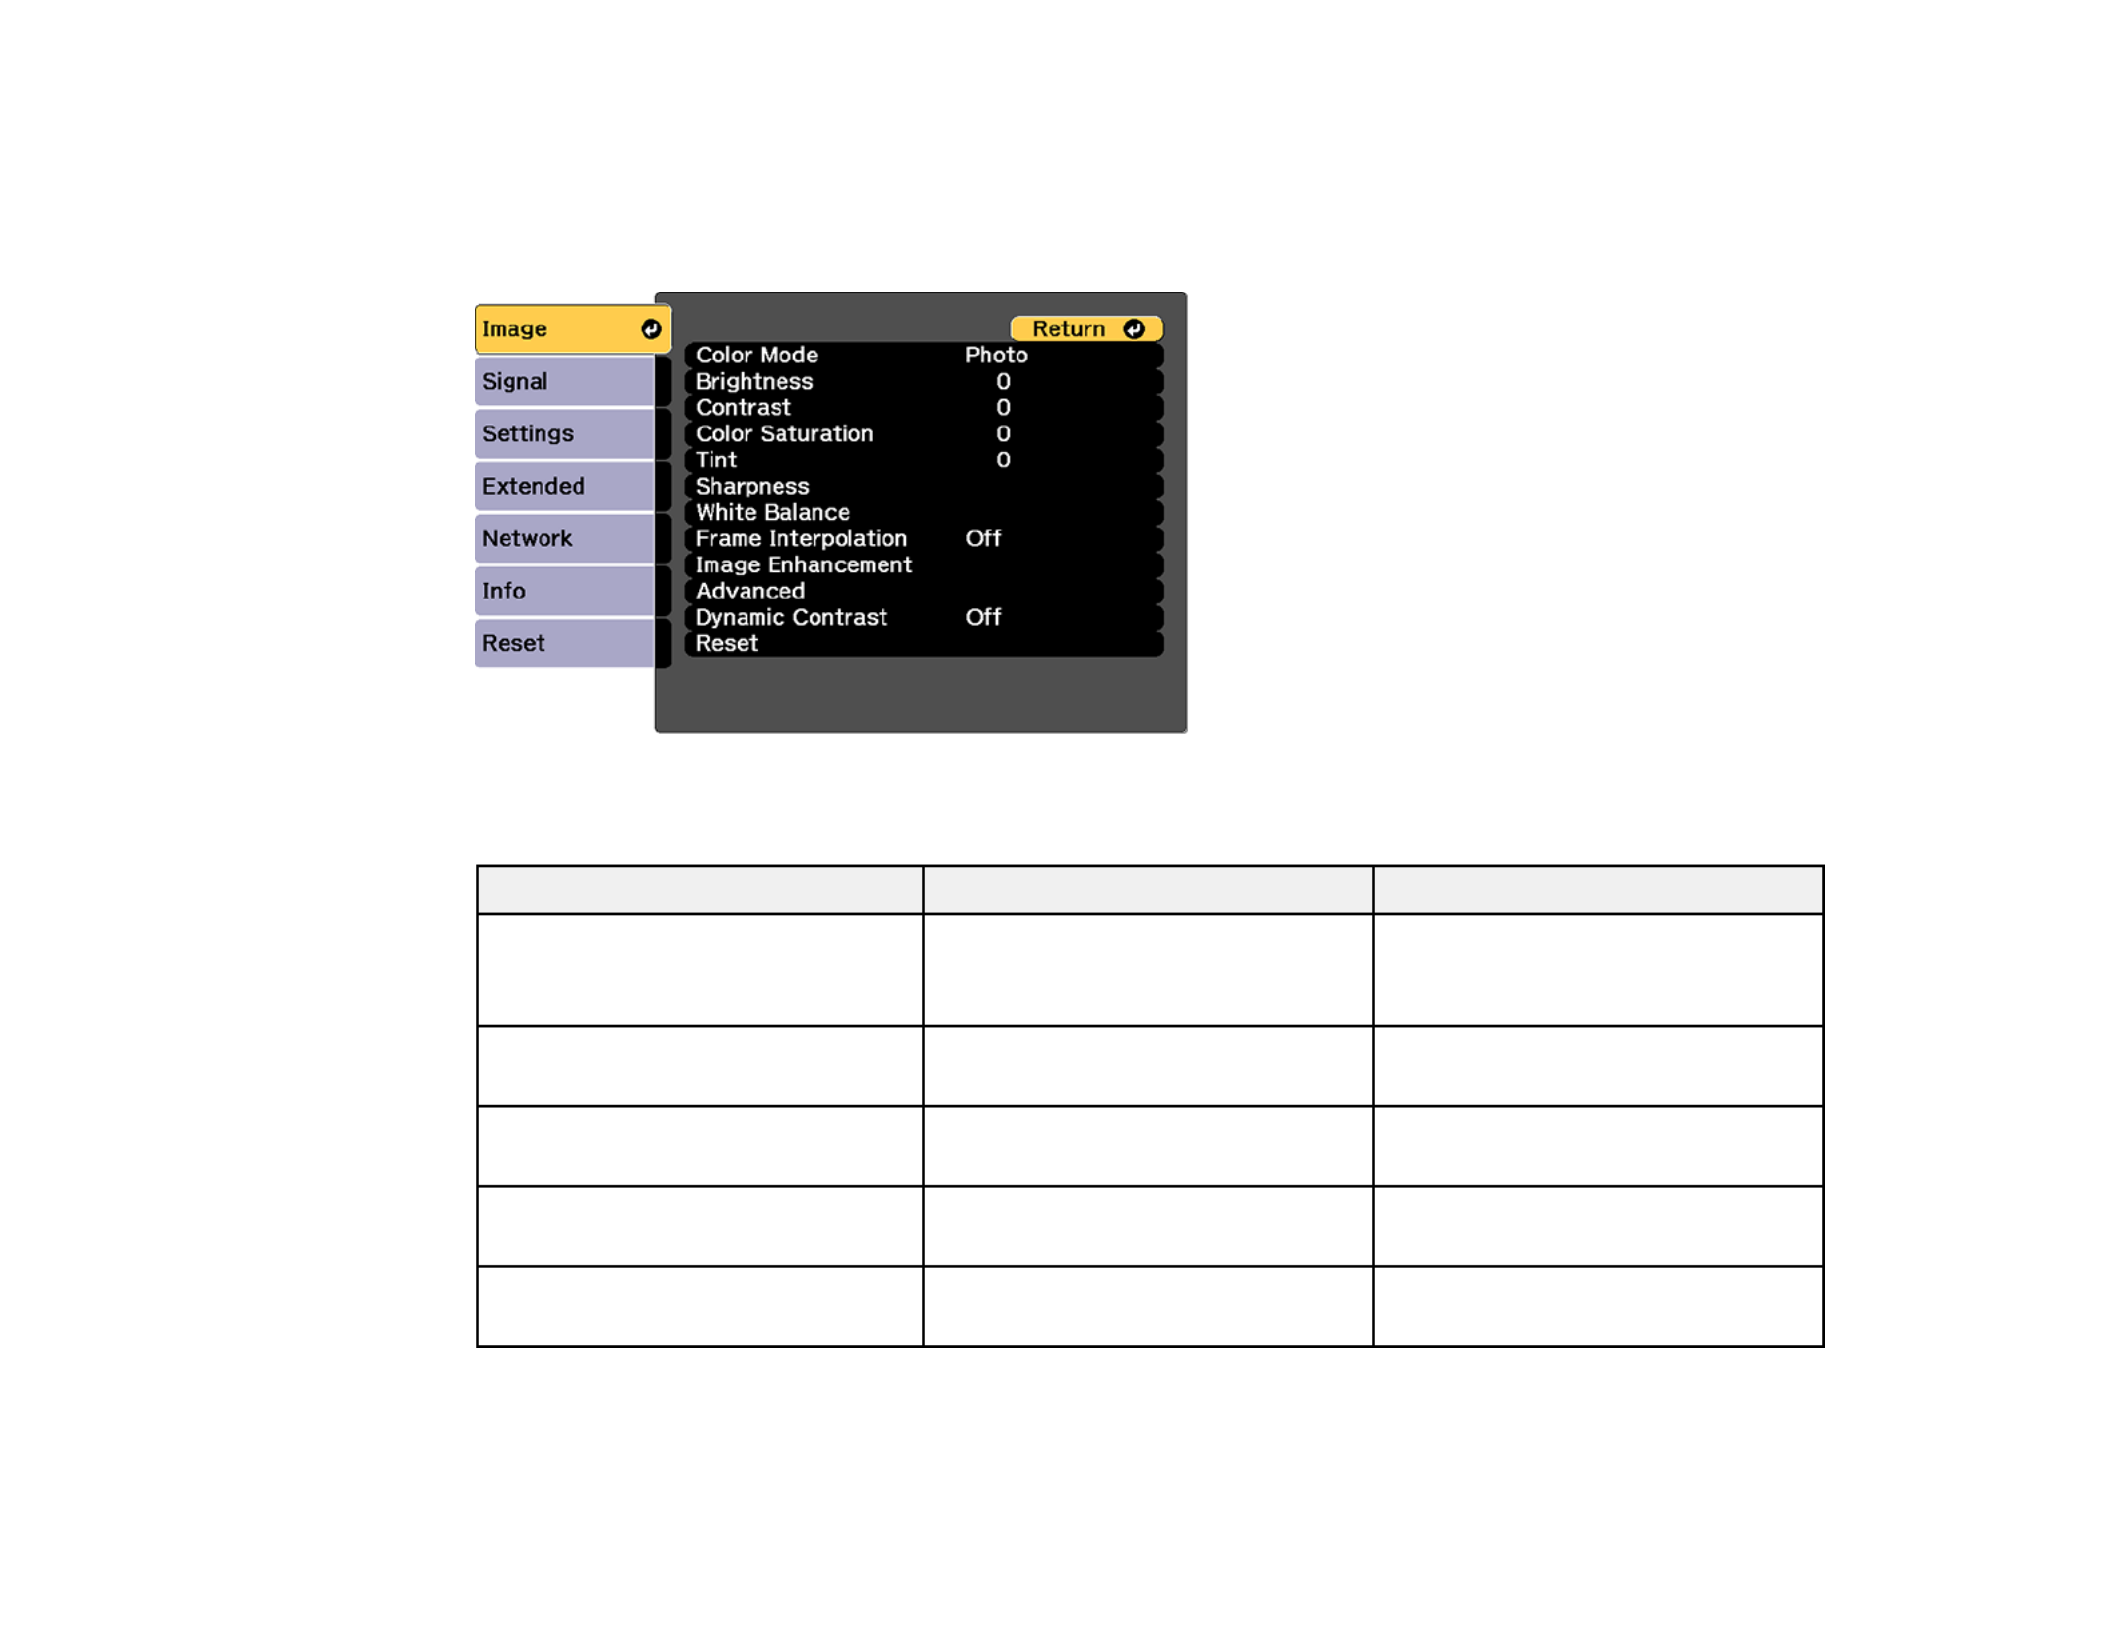
214
Image Quality Settings - Image Menu
Settings on the Image menu let you adjust the quality of your image for the input source you are currently
using. The available settings depend on the currently selected input source.
To change settings for an input source, make sure the source is connected and select that source.
Setting Options Description
Color Mode See the list of available Color
Modes
Adjusts the vividness of image
colors for various image types
and environments
Brightness Varying levels available Lightens or darkens the overall
image
Contrast Varying levels available Adjusts the difference between
light and dark areas of the image
Color Saturation Varying levels available Adjusts the intensity of the image
colors
Tint Varying levels available Adjusts the balance of green to
magenta tones in the image

215
Setting Options Description
Sharpness Standard
Thin Line Enhancement
Thick Line Enhancement
Adjusts the sharpness of image
details
Standard: adjusts the overall
image sharpness
Thin Line Enhancement:
enhances fine details such as
hair and fabric patterns
Thick Line Enhancement:
enhances the outline,
background, and main parts of an
image to make them more clear
White Balance Color Temp.
G-M Correction
Offset R/G/B
Gain R/G/B
Adjusts the overall tint of the
image
Color Temp.: sets the color tone
based on color temperature
G-M Correction: higher values
tint the image blue and lower
values tint the image red
Offset R/G/B Gain R/G/Band :
lets you adjust the offset and gain
of each color R (red), G (green),
and B (blue) individually
Frame Interpolation Off
Low
Normal
High
Smooths fast moving video by
comparing consecutive frames
and inserting an intermediate
frame between them
216
Setting Options Description
Image Enhancement 4K Enhancement Accepts 4K signals and
enhances the output of 1080p
signals
Image Preset Mode Selects the image enhancement
settings saved in advance
Noise Reduction Reduces flickering in analog
images
MPEG Noise Reduction Reduces the noise or artifacts
seen in MPEG video
Super resolution Sharpens blurred images
resulting from increasing
resolution
Detail enhancement Enhances details to create clear
outlines
Range: higher settings increase
the affected area around the
outline
Strength: higher settings create
a stronger effect
Advanced Gamma Adjusts the gamma levels of the
image. Select toCustomized
adjust the gamma while viewing
the image or a graph.
RGBCMY Adjusts the hue, saturation, and
brightness for each color
Deinterlacing Sets whether to convert
interlaced-to-progressive signals
for certain video image types
Off: for fast-moving video images
Video: for most video images
Film/Auto: for movies, computer
graphics, and animation

218
To change settings for an input source, make sure the source is connected and select that source.
Setting Options Description
Resolution Auto
Normal
Wide
Manual
Sets the input signal resolution
from an analog RGB computer
connection
Auto: detects the resolution
automatically
Normal: for 4:3 or 5:4 screens
Wide: for widescreen
Manual: allows you to specify a
resolution
Aspect See the list of available aspect
ratios
Sets the aspect ratio (width-to-
height ratio) for the selected input
source
Tracking Varying levels available Adjusts signal to eliminate
vertical stripes in images from an
analog RGB computer
connection
Sync. Varying levels available Adjusts signal to eliminate
fuzziness or flickering in images
from an analog RGB computer
connection
Position Up, down, left, right Adjusts the image location on the
screen
Auto Setup On
Off
Automatically optimizes image
quality from an analog RGB
computer connection (when On)
Blanking Up, down, left, right Hides an area of the projected
image that you select using the
arrow buttons
219
Setting Options Description
Advanced Video Range Sets the video range to match
the setting of the device
connected to the , ,HDMI DVI-D
HDBaseT SDI, or (not available
for Pro L1715SNL) input ports
Input Signal Specifies the signal type from
input sources connected to
computer ports
Auto: detects signals
automatically
RGB: corrects color for
computer/RGB video inputs
Component: corrects color for
component video inputs
Image Processing Adjusts how images are
processed
Fast: to display images quicker
Fine: to display images in higher
quality
EDID Describes the projector's display
capabilities to devices connected
to the , ,HDMI HDBaseT DVI-D
input ports
DDC Buffer If you are projecting using an
HDMI or DVI extension cable and
the image is not displayed
correctly, enabling this setting
may improve image quality
Scale Various scale options When using multiple projectors to
project one image, adjusts the
scale of the image displayed by
each projector
Parent topic: Adjusting the Menu Settings

220
Related references
Available Image Aspect Ratios
Projector Feature Settings - Settings Menu
Options on the Settings menu let you customize various projector features.

221
Setting Options Description
Geometry Correction H/V-Keystone
Quick Corner
Curved Surface
Corner Wall
Point Correction
Memory
Adjusts the projected image
shape
H/V Keystone: lets you manually
correct the angles of the
horizontal and vertical sides
Quick Corner: select to adjust
the position of the four corners
Curved Surface: select to adjust
the image when projecting on a
curved surface
Corner Wall: select to adjust the
image when projecting on a
surface with a right angle
Point Correction: select to
display a grid and finely adjust
the image position
Memory: select to save
adjustment value of the
geometric correction and load it
when needed
Split Screen — Divides the viewing area
horizontally and displays two
images side-by-side; while in
Split Screen mode, press Menu
to display the Split Screen
options or to cancel splitEsc
screen display
Volume Varying levels available Adjusts the volume of external
speakers connected to the
projector

222
Setting Options Description
Lock Setting Control Panel Lock
Lens Lock
Controls projector button locking
to secure the projector
Control Panel Lock:
• : locks all buttonsFull Lock
• : locks all buttonsPartial Lock
except the power button
• : no buttons lockedOff
Lens Lock: locks the focus,
zoom, and lens shift settings
223
Setting Options Description
Brightness Settings Light Source Mode
Brightness Level
Constant Brightness
Estimated Remains
Selects the brightness mode of
the projector
Light Source Mode: sets the
brightness for the light source
• : maximum brightnessNormal
• : 70% brightness withQuiet
reduced fan noise
• : 70% brightnessExtended
and extends the life
expectancy of the light source
• : select a customCustom
brightness level and enable
use of next three settings
Brightness Level: select the
Custom brightness level you
want
Constant Brightness: maintains
a constant brightness (if this
setting is enabled, you cannot
change the Light Source Mode
and settings)Brightness Level
Estimated Remains: displays
how long the projector can
maintain constant brightness (if
that setting is selected)
Remote Receiver Front/Rear
Front
Rear
Off
Limits reception of remote control
signals by the selected receiver;
Off turns off all receivers
User Button User1
User2
User3
Assigns a menu option to the
User1 User2 User3, , and
buttons on the remote control for
one-touch access

224
Setting Options Description
Test Pattern — Displays a test pattern to assist in
adjusting the image; press the
left or right arrow buttons on the
remote control or on theEnter
control panel to cycle through the
available test patterns, or toEsc
cancel pattern display
Memory Load Memory
Save Memory
Erase Memory
Rename Memory
Save customized sets of settings
to memory
Parent topic: Adjusting the Menu Settings
Projector Setup Settings - Extended Menu
Settings on the Extended menu let you customize various projector setup features that control its
operation.

225
Setting Options Description
Home Screen — Adjust settings on the Home
Screen
Display Display— See the settings table in
this topic
User's Logo — Creates a screen that the
projector displays to identify itself
and enhance security
Projection Front
Front/Ceiling
Rear
Rear Ceiling
Selects the way the projector
faces the screen so the image is
oriented correctly
Operation Operation— See the settings table
in this topic
A/V Settings A/V Output
Monitor Out
Audio Settings
Selects various audio and video
output settings
A/V Output: select to output
audio and video to an external
device when the projector is in
standby mode (Standby Mode
must be turned on to use this
setting)
Monitor Out: select the image
source to output to an external
device when the projector is in
standby mode; when set to ,Auto
selects output from the
Computer BNCor port
depending on which was used
when the projector went into
standby mode
Audio Settings: selects audio
source to output

228
Setting Options Description
Multi-Projection Projector ID
Projector Grouping
Tiling
Geometry Correction
Edge Blending
Black Level
Scale
Screen Matching
Select various options when
projecting from multiple
projectors
Projector ID: sets the projector
to a particular ID number which
allows you to use a remote
control to individually control
projectors
Projector Grouping: lets you
select the projectors being used
to project one image
Tiling: sets the number of split
screens and the position of each
image
Geometry Correction: corrects
image distortion
Edge Blending: blends the
border between multiple images
to create a seamless screen
Black Level: adjusts the
brightness and tone differences
in overlapping images
Scale: adjusts the scale of the
images
Screen Matching: adjusts the
tint and brightness of the images
Schedule Settings Various scheduling options Lets you schedule various
projector tasks
Language Various languages available Selects the language for
projector menu and message
displays (not changed by Reset
option)
Display settings

231
Setting Description
AC Voltage Monitoring If you select On for this setting and the projector is turned off by
any method other than pressing the power button, a power
supply voltage warning message is displayed the next time the
projector is turned on
Lens Type Select the model number for the attached lens when using the
following lenses: ELPLS04, ELPLU02, ELPLR04, ELPLW04,
ELPLM06, ELPLM07, ELPLL07
Parent topic: Adjusting the Menu Settings
Projector Network Settings - Network Menu
Settings on the Network menu let you view network information and set up the projector for monitoring
and control over a network.
Setting Options Description
Wireless Mode Wireless LAN On
Off
Enable or disable wireless
communication

232
Setting Options Description
Net. Info - Wireless LAN Connection mode
Wireless LAN Sys.
Antenna level
Projector Name
SSID
DHCP
IP Address
Subnet Mask
Gateway Address
MAC Address
Region Code
IPv6 Address (Manual)
IPv6 Address (Auto)
Displays wireless network status
and details
Net. Info - Wired LAN Projector Name
DHCP
IP Address
Subnet Mask
Gateway Address
MAC Address
IPv6 Address (Manual)
IPv6 Address (Auto)
Displays wired network status
and details
Display the QR Code — Displays the QR Code
Network Configuration Accesses additional network
menus
Configures your network settings
Remote Camera Access — Configures remote camera
access settings
Parent topic: Adjusting the Menu Settings

233
Projector Information Display - Info Menu
You can display information about the projector and input sources by viewing the Info menu. However,
you cannot change any settings in the menu.
Note: The total operating timer does not register any hours until you have used the projector for at least
10 hours. Available settings depend on the current input source.
234
Setting Options Description
Projector Info Total Op. Time Displays the number of hours the
projector has been used in its
operating life
Operation Hours Displays the number of hours the
projector has been used since it was
turned on
Source Displays the name of the port to which
the current input source is connected
Input Signal Displays the input signal setting of the
current input source
Resolution Displays the resolution of the current
input source
Refresh Rate Displays the refresh rate of the current
input source
Sync Info Displays information that may be
needed by a service technician
Status Displays information about projector
problems that may be needed by a
service technician
Serial Number Displays the projector's serial number
Lens Type Displays the model number of the
installed lens
Event ID Displays the Event ID number
corresponding to a specific projector
problem; see the list of Event ID
codes
HDBaseT Signal Level Displays the image signal information
from the HDBaseT port

235
Setting Options Description
Light Source Info Light Source Hours Displays the number of operating
hours for each of the projector's Light
Source Mode settings
Estimated Remains Constant BrightnessIf the setting is
enabled, displays the remaining
number of hours the projector can
maintain constant brightness
Version Main
Video2
Displays the projector's firmware
information
Status Information — Displays basic status information
Voltage Warning Info — Displays a power voltage warning
Temp Warning Info — Displays various high temperature
warnings
Event ID Code List
Parent topic: Adjusting the Menu Settings
Event ID Code List
If the option on the Info menu displays a code number, check this list of Event ID codes for theEvent ID
solution to the projector problem associated with the code.
Event ID code Cause and solution
0432 Turn the projector off and then on again.
0435
0434 Unstable network communication. Check the network communication status, wait a
few moments, and try connecting to the network again.
0481
0482
0485
0433 Cannot display the transferred images. Restart the network software.
0484 Communication with computer was disconnected. Restart the network software.

236
Event ID code Cause and solution
0483 The network software quit unexpectedly. Check the network communication status,
then turn the projector off and then on again.
04FE
0479 A projector system error has occurred. Turn the projector off and then on again.
04FF
0891 Cannot find an access point with the same SSID. Set your computer, access point,
and projector to the same SSID.
0892 The WPA/WPA2 authentication type does not match. Make sure the wireless
network security settings are correct.
0893 The TKIP/AES encryption type does not match. Make sure the wireless network
security settings are correct.
0894 Communication with unauthorized access point was disconnected. Contact your
network administrator.
0898 Failed to acquire DHCP. Make sure the DHCP server is operating correctly. If you
are not using DHCP, turn off the setting in the Network menus.DHCP
0899 Communication error. Turn the projector off and then on again.
089A The projector's EAP authentication type does not match the network. Check the
wireless LAN security settings and make sure that the security certificate is installed
correctly.
089B EAP server authentication failed. Check the wireless LAN security settings and
make sure that the security certificate is installed correctly.
089C EAP client authentication failed. Check the wireless LAN security settings and make
sure that the security certificate is installed correctly.
089D Key exchange failed. Check the wireless LAN security settings and make sure that
the security certificate is installed correctly.
0920 The internal power supply that saves your clock settings is running low. Contact
Epson for help.
Parent topic: Projector Information Display - Info Menu

238
• Color Calibration
• Projector Grouping
• Screen Matching
• EDID
• Light Source Info
• Operation Hours
Parent topic: Adjusting the Menu Settings
Related tasks
Running Light Source Calibration

239
Maintaining and Transporting the Projector
Follow the instructions in these sections to maintain your projector and transport it from place to place.
Projector Maintenance
Transporting the Projector
Projector Maintenance
Your projector needs little maintenance to keep working at its best.
You may need to clean the lens periodically, and clean the air filter and air vents to prevent the projector
from overheating due to blocked ventilation.
The only parts you should replace are the air filter and remote control batteries. If any other part needs
replacing, contact Epson or an authorized Epson servicer.
This projector uses a sealed laser light source which does not need servicing and cannot be replaced.
Warning: Before cleaning any part of the projector, turn it off and unplug the power cord. Never open
any cover on the projector, except as specifically explained in this manual. Dangerous electrical voltages
in the projector can injure you severely.
Warning: Do not try to service this product yourself, except as specifically explained in this manual.
Refer all other servicing to qualified servicers.
Cleaning the Lens
Cleaning the Projector Case
Air Filter and Vent Maintenance
Replacing the Remote Control Batteries
Parent topic: Maintaining and Transporting the Projector
Cleaning the Lens
Clean the projector's lens periodically, or whenever you notice dust or smudges on the surface.
• To remove dust or smudges, gently wipe the lens with lens-cleaning paper.

240
• To remove stubborn smudges, moisten a soft, lint-free cloth with lens cleaner and gently wipe the
lens. Do not spray any liquid directly on the lens.
Warning: Do not use a lens cleaner that contains flammable gas. The high heat generated by the
projector may cause a fire.
Caution: Do not use glass cleaner or any harsh materials to clean the lens and do not subject the lens
to any impacts; you may damage it. Do not use canned air, or the gases may leave a residue. Avoid
touching the lens with your bare hands to prevent fingerprints on or damage to the lens surface.
Parent topic: Projector Maintenance
Cleaning the Projector Case
Before cleaning the projector case, turn off the projector and unplug the power cord.
• To remove dust or dirt, use a soft, dry, lint-free cloth.
• To remove stubborn dirt, use a soft cloth moistened with water and mild soap. Do not spray liquid
directly on the projector.
Caution: Do not use wax, alcohol, benzine, paint thinner, or other chemicals to clean the projector
case. These can damage the case. Do not use canned air, or the gases may leave a flammable
residue.
Parent topic: Projector Maintenance
Air Filter and Vent Maintenance
Regular filter maintenance is important to maintaining your projector. Your Epson projector is designed
with an easily accessible, user-replaceable filter to protect your projector and make regular maintenance
simple. Filter maintenance intervals will depend on the environment.
If regular maintenance is not performed, your Epson projector will notify you when the temperature
inside the projector has reached a high level. Do not wait until this warning appears to maintain your
projector filter as prolonged exposure to high temperatures may reduce the life of your projector or laser.
Damage due to the failure to properly maintain the projector or its filter may not be covered by the
projector's Limited Warranty.
Cleaning the Air Filter
Replacing the Air Filter
Parent topic: Projector Maintenance

241
Related references
Projector Light Status
Cleaning the Air Filter
You need to clean the projector's air filter in the following situations:
• The filter or vents get dusty.
• You see a message telling you to clean it.
• The projector's Filter light is orange or flashes orange.
1. Turn off the projector, wait for the projector to beep, and unplug the power cord.
2. Slide the air filter cover latch and open the air filter cover.

242
3. Pull the air filter out of the projector.
4. Tap each side of the air filter 4 to 5 times to shake off any excess dust.
Caution: Do not use excessive force when tapping the air filter, or it may crack and become
unusable. Do not rinse the air filter in water, or use any detergent or solvent to clean it. Do not use
canned air; the gases may leave a residue, or push dust and debris into the projector's optics or
other sensitive areas.

243
5. Vacuum the front of the air filter (the side with the tabs) to remove any remaining dust.
Note: If dust is difficult to remove or the air filter is damaged, replace the air filter.
6. Place the air filter back in the projector as shown and push gently until it clicks into place.

249
Transporting the Projector
The projector contains precision parts, some of which are glass. Follow the guidelines here to transport,
ship, or store the projector safely.
Caution: Use two or more people to unpack or lift the projector.
1. Remove any equipment connected to the projector.
2. Do one of the following:
• If you are using the standard zoom lens, keep it installed on the projector. Move the lens to the
home position and attach the protective lens pad that was included with the projector.
• If you are using an optional lens, remove it from the projector.
• If the projector did not come with a lens, attach the cover that was included with the projector to
the lens mount.
3. Do one of the following:
• When transporting the projector a long distance or as checked luggage, pack it in a firm box with
cushioning around it and mark the box "Fragile."
• When shipping the projector for repairs, place it in its original packing materials, if possible, or use
equivalent materials with cushioning around the projector. Mark the box "Fragile."
Note: Epson shall not be liable for any damages incurred during transportation.
Parent topic: Maintaining and Transporting the Projector
Related tasks
Adjusting the Image Position Using Lens Shift
Related topics
Attaching and Removing a Lens

252
On/Standby
(power) light
Status
light
Laser
light
Temp light Filter
light
Status and solution
Blue Flashing
blue
Off Off Off Cooling down; all buttons are
disabled
Flashing blue Varies Varies Flashing
orange
Varies High temperature warning; if the
temperature gets too high, projection
will automatically stop
• Make sure that the vents and air
filter are not clogged with dust or
obstructed by nearby objects
• Clean or replace the air filter
Off Flashing
blue
Orange Orange Off Lens Shift error; turn off the
projector, unplug it from the electrical
outlet, and contact Epson for help
Off Flashing
blue
Flashing
orange
Off Off Internal error; turn off the projector,
unplug it from the electrical outlet,
and contact Epson for help
Off Flashing
blue
Off Orange Off Projector is too hot (overheating) and
projection stops; leave it for about
five minutes to cool down
• Make sure that the vents and air
filter are not clogged with dust or
obstructed by nearby objects
• Clean or replace the air filter
• Make sure the environmental
temperature is not too hot
• If operating the projector at high
altitude, turn on High Altitude
Mode
• If the problem persists, unplug the
projector and contact Epson for
help

255
3. Select and press .Status Information Enter
4. Press the left or right arrow buttons to view different categories of information.
• : The projector's operating statusStatus Information
• : Input signal informationSource
• : Input digital signal informationSignal Information
• : Wired LAN settingsNetwork Wired
• : Wireless LAN settingsNetwork Wireless
256
• : Operating time for the projector and light sourceMaintenance
Projector Status Display Messages
Parent topic: Solving Problems
Projector Status Display Messages
Categories on the status display screens let you view information about the projector and its operation.
Status Information category
Information Description
System See the System status information table at the end
of this topic
Source Displays the source currently being used
On-Screen Display Displays the settings for on-screen displays. When
turned off, menus or messages are not displayed
on the projected images
A/V Mute Displays the A/V Mute status
Air Temp Displays the environmental temperature
Temp Level
AC Voltage Displays warnings and errors that have occurred
when the setting is turnedAC Voltage Monitoring
on
Laser Status Displays the operating status of the light source
Source category
Information Description
Source Displays the source currently being used
Resolution Displays the resolution of the current input signal
Video Signal Displays the current input video signal
Color Space Displays the color space of the current input signal
H-Frequency Displays the horizontal frequency of the current
input signal

257
Information Description
V-Frequency Displays the vertical frequency of the current input
signal
Sync Polarity Displays the sync polarity
Sync Mode Displays the sync type
Detected Mode Displays the detected mode of the current input
signal
Video Level Displays the video level of the projector
Signal Information category
Information Description
5V Detect Displays the detection results of 5V signals
TMDS Clock Displays the TMDS frequency of the current input
signal
TMDS H-Frequency Displays the horizontal frequency of the current
input signal
TMDS V-Frequency Displays the vertical frequency of the current input
signal
DetChg 5CFHMP123 Displays the factors of signal changes
Stable Time Displays the amount of operating time since the
input source was determined
HDCP Status Displays the HDCP status
HDCP Ver Displays the HDCP version
AVI Info VIC Displays the VIC information (AVI) of the current
input signal
AVI InfoChecksum Displays the checksum result for AVI
Signal Mode Displays the signal mode
Pixel Encoding Displays the color space information (AVI) of the
current input signal

271
Solutions When Wireless Authentication Fails
Solutions When You Cannot Access the Projector Through the Web
Solutions When the Image Contains Static During Network Projection
Solutions When Network Alert E-Mails are Not Received
Parent topic: Solving Problems
Solutions When Wireless Authentication Fails
If you cannot authenticate a wireless connection, try the following solutions:
• If the wireless settings are correct, but authentication fails, you may need to update the Date & Time
settings in the Extended menu, if available.
• Make sure the setting is set to .Wireless Mode Wireless Lan On
• Check the Security settings and passphrase in the Network Configuration menu.
• Check the Event ID number displayed in the Info menu and check the link below to identify the
problem.
Parent topic: Solving Network Problems
Related references
Projector Setup Settings - Extended Menu
Event ID Code List
Related tasks
Setting Up Wireless Network Security
Solutions When You Cannot Access the Projector Through the Web
If you are unable to access the projector through a web browser, make sure you are using the correct ID
and password, which are case sensitive.
• For the user ID, enter . (You cannot change the user ID.)EPSONWEB
• For the password, enter the password set in the projector's Network menu. The default password is
admin.
• Make sure you have access to the network the projector is on.
Note: The user ID and password are case sensitive.
Parent topic: Solving Network Problems

272
Related concepts
Password Security Types
Related tasks
Controlling a Networked Projector Using a Web Browser
Solutions When the Image Contains Static During Network Projection
If the projected image contains static during network projection, try the following solutions:
• Check for any obstacles between the access point, the computer, the mobile device, and the projector.
If necessary, change their positions to improve communication. Also make sure that they are not too
far apart; move them closer together and try to connect again.
• If the wireless connection is slow or your projected image contains noise, check for interference from
other equipment, such as a Bluetooth device or microwave. Move the interfering device farther away
or expand your wireless bandwidth.
• If the connection speed declines, reduce the number of connected devices.
Parent topic: Solving Network Problems
Solutions When Network Alert E-Mails are Not Received
If you do not receive an e-mail alerting you to problems with a projector over the network, try the
following solutions:
• Make sure the projector is turned on and connected to the network correctly. (If an error shut down the
projector, it cannot send an e-mail.)
• Make sure you set up the projector e-mail alert settings correctly on the projector's network
Notifications menu or in the network software.
• Set the setting to so the network software can monitor theStandby Mode Communication On
projector in standby mode.
Parent topic: Solving Network Problems
Related references
Projector Setup Settings - Extended Menu
Projector Network Settings - Network Menu
Where to Get Help
If you need to contact Epson for technical support services, use the following support options.

280
Projector Environmental Specifications
Note: Specifications are based on having the standard zoom lens (ELPLM15) installed.
Temperature Operating:
Up to 4921 feet (1500 m): 32 to 122 °F (0 to 50 °C)
4921 feet (1500 m) to 10000 feet (3048 m) with High Altitude Mode
enabled: 32 to 113 °F (0 to 45 °C)
Brightness automatically dims at these altitudes/operating
temperatures:
Up to 4921 feet (1500 m): 104 °F (40 °C)
4921 feet (1500 m) to 10000 feet (3048 m): 95 °F (35 °C)
Storage:
14 to 140 °F (–10 to 60 °C)
Humidity (relative, non-
condensing)
Operating: 20 to 80%
Storage: 10 to 90%
Operating altitude Up to 4921 feet (1500 m)
Up to 10000 feet (3048 m) with High Altitude Mode enabled
Parent topic: Technical Specifications
Projector Safety and Approvals Specifications
United States FCC Part 15 Class B
UL60950-1 2nd edition (cTUVus Mark)
Canada ICES-003 Class B
CSA C22.2 No. 60950-1-07 (cTUVus Mark)
Parent topic: Technical Specifications

285
• Do not place your hand or any object near the projection window. The high temperature of this area
could cause burns, fire, or other damage.
• Do not place the projector on an unstable cart, stand, or table.
• If the projector is mounted on a ceiling or wall, it should be installed by qualified technicians using
mounting hardware designed for use with this projector.
• When installing or adjusting a ceiling or wall mount, do not use adhesives to prevent the screws from
loosening and do not use oils or lubricants. This may cause the projector case to crack and the
projector to fall from its ceiling mount. This could cause serious injury to anyone under the mount and
could damage the projector.
• Do not use the projector near water, sources of heat, high-voltage electrical wires, or sources of
magnetic fields.
• Use the type of power source indicated on the projector. Use of a different power source may result in
fire or electric shock. If you are not sure of the power available, consult your dealer or power company.
• Place the projector near a wall outlet where the plug can be easily unplugged.
• Take the following precautions when handling the plug: Do not hold the plug with wet hands. Do not
insert the plug into a dusty outlet. Insert the plug firmly into the outlet. Do not pull the power cord when
disconnecting the plug; always be sure to hold the plug when disconnecting it. Do not overload wall
outlets, extension cords, or power strips. Failure to comply with these precautions could result in fire or
electric shock.
• Do not place the projector where the cord can be walked on. This may result in fraying or damage to
the plug.
• Unplug the projector from the wall outlet and allow to cool before cleaning. Use a dry cloth (or, for
stubborn dirt or stains, a moist cloth that has been wrung dry) for cleaning. Do not use liquid or aerosol
cleaners, any sprays containing flammable gas, or solvents such as alcohol, paint thinner, or benzine.
• Do not block the slots and openings in the projector case. They provide ventilation and prevent the
projector from overheating. Do not operate the projector on a sofa, rug, or other soft surface, or set it
on top of loose papers. Do not cover the projector with a blanket, curtain, or tablecloth. If you are
setting up the projector near a wall, leave at least 7.9 inches (20 cm) of space between the wall and
the projector.
• Do not operate the projector in a closed-in cabinet unless proper ventilation is provided.
• Never allow objects of any kind to enter any openings in the projector. Do not leave objects, especially
flammable objects, near the projector. Never spill liquid of any kind into the projector.
• If you are using two or more projectors side-by-side, leave at least 20 inches (50 cm) of space
between the projectors to allow for proper ventilation.

287
• Do not place anything that can become warped or damaged by heat near the exhaust vents. Do not
bring your hands or face close to the vents while projection is in progress. Do not bring your face close
to the projector while it is in use.
• Before you move the projector, make sure its power is turned off, the plug is disconnected from the
outlet, and all cables are disconnected.
• Do not place the source of an open flame, such as a lit candle, on or near the projector.
• Do not block the lens during projection using a book or any other object. This could damage the
projector or cause a fire.
• Do not modify the power cord. Do not place heavy objects on top of the power cord or bend, twist, or
pull it excessively. Keep the power cord away from hot electrical appliances.
• Always attach the lens cover to the lens when not using the projector to prevent the lens from
becoming dirty or damaged.
Laser Safety Information
Laser Light Source Warning
Restriction of Use
Parent topic: Notices
Laser Safety Information
This projector is a Class 3R laser product that complies with the IEC60825-1 international standard for
lasers. Follow these safety instructions when using the projector.
• If an error occurs in the projector, turn off the power and unplug the projector immediately. Continuing
to use the projector could result in an electric shock, fire, or visual impairment. Contact Epson support.
• Do not attempt to disassemble or modify the projector. The projector contains a high-power laser
component. Serious injury could result.
• Do not look into the lens during projection. Also, do not look into the lens using optical devices, such
as a magnifying glass or telescope. This could cause visual impairment.
• When turning on the projector at a distance using the remote control, make sure no one is looking into
the lens.
• Do not allow small children to operate the projector. Children must be accompanied by an adult.
• Do not apply optical devices, such as a magnifying glass or reflector, to the projected image. Using the
projector may result in physical harm, fire, or an accident.
• Before using the projector, make sure there is nothing in the area that could reflect the projected
image.

288
• When disposing of the projector, do not disassemble it. Dispose of the projector in accordance with
your local or national laws and regulations.
Labels are attached to the projector to indicate it is a Class 3R product and complies with FDA
performance standards for laser products except for deviations pursuant to Laser Notice N. 50, dated
June 24, 2007:
•Inside
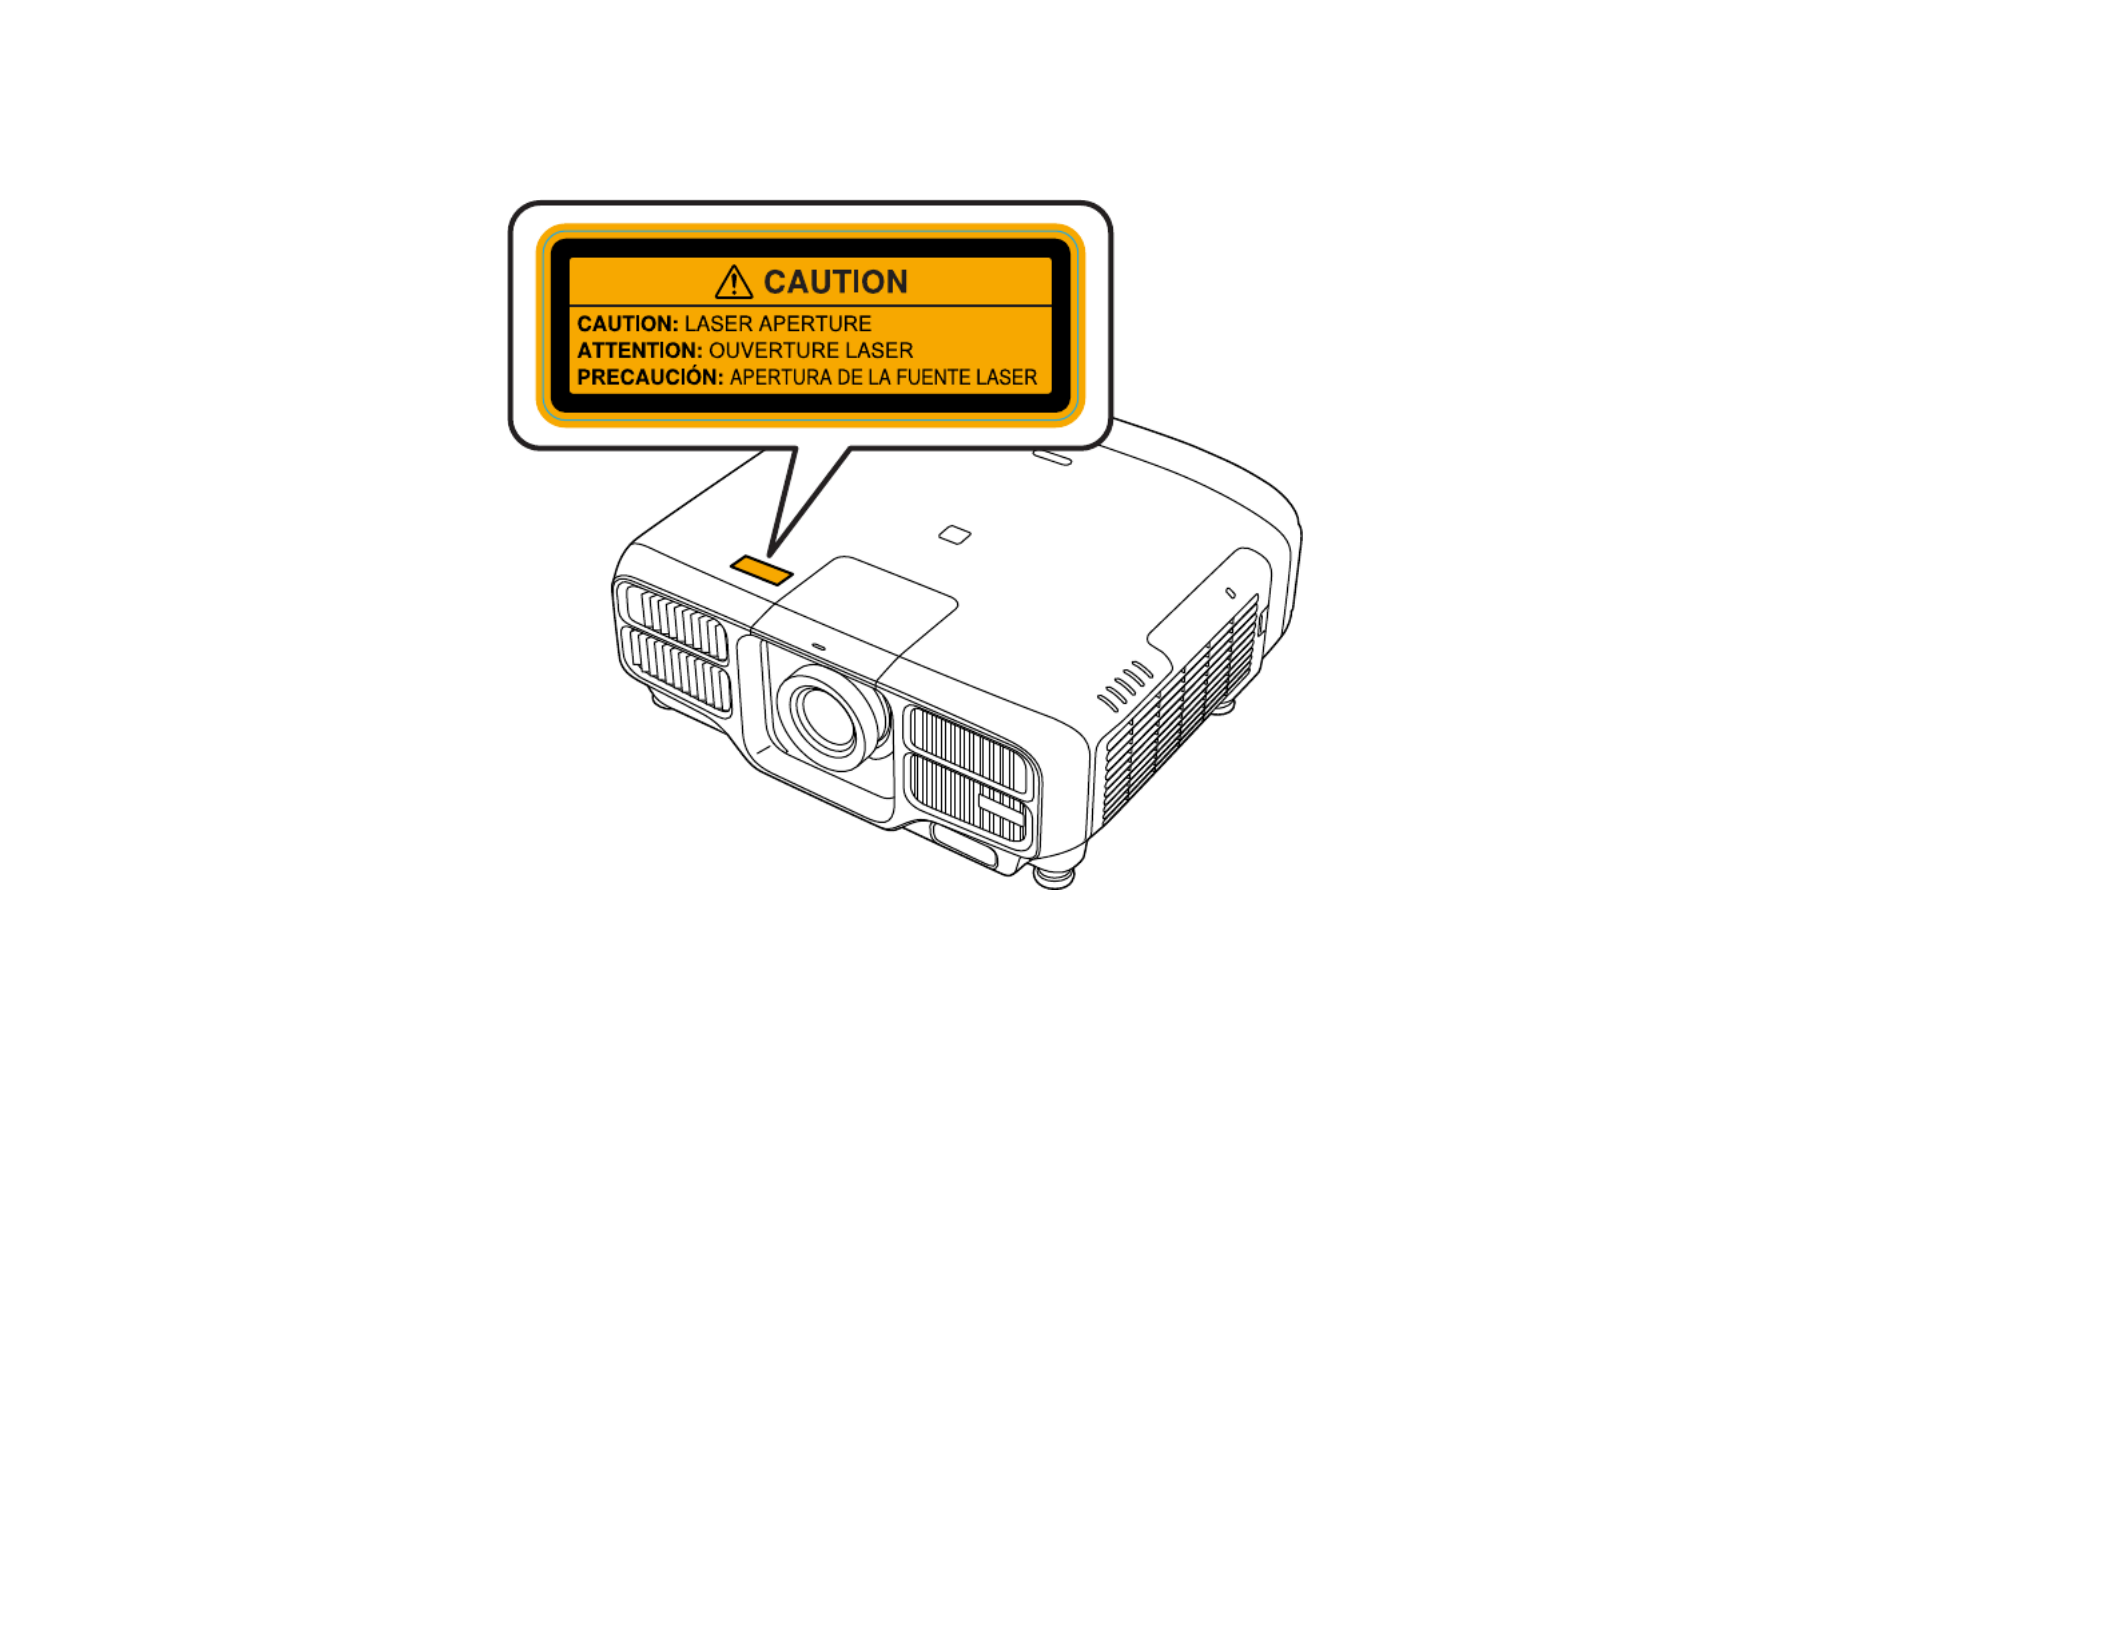
289
•Top

290
•Side
Parent topic: Important Safety Instructions
Laser Light Source Warning
Refer to the table here for the Exposure Hazard Values (EHV) in accordance with the IEC62471-2:2009
standard. The EHV indicates the hazard level for objects in front of the light source for 0.25 seconds at a
distance of 7.9 inches (20 cm). The higher the value, the greater the hazard level.
Lens Exposure Hazard Value
Pro
L1490U/L1490UNL/L1495U/L14
95UNL/L1500UH/L1500UHNL/
L1505UH/L1505UHNL
Pro L1715SNL/L1750UNL/
L1755UNL
ELPLS04 0.6 0.6

291
Lens Exposure Hazard Value
Pro
L1490U/L1490UNL/L1495U/L14
95UNL/L1500UH/L1500UHNL/
L1505UH/L1505UHNL
Pro L1715SNL/L1750UNL/
L1755UNL
ELPLM15 0.6 0.7
ELPLX02 <0.5 <0.5
ELPLU03 <0.5 <0.5
ELPLU02 <0.5 <0.5
ELPLU04 <0.5 <0.5
ELPLW04 <0.5 0.5
ELPLW05 <0.5 <0.5
ELPLW06 <0.5 0.5
ELPLW08 <0.5 <0.5
ELPLM06 0.7 0.7
ELPLM10 0.7 0.8
ELPLM07 0.7 0.7
ELPLM11 0.7 0.7
ELPLL07 0.7 0.7
ELPLL08 0.7 0.7
Parent topic: Important Safety Instructions
Restriction of Use
When this product is used for applications requiring high reliability/safety such as transportation devices
related to aviation, rail, marine, automotive; disaster prevention devices; various safety devices; or
functional/precision devices, you should use this product only after giving consideration to including fail-
safes and redundancies into your design to maintain safety and total system reliability.
Because this product was not intended for use in applications requiring extremely high reliability/safety
such as aerospace equipment, main communication equipment, nuclear power control equipment, or
Produktspezifikationen
| Marke: | Epson |
| Kategorie: | Videostrahl |
| Modell: | Pro L1715S |
Brauchst du Hilfe?
Wenn Sie Hilfe mit Epson Pro L1715S benötigen, stellen Sie unten eine Frage und andere Benutzer werden Ihnen antworten
Bedienungsanleitung Videostrahl Epson

21 Mai 2024
15 Mai 2024
14 Mai 2024
11 Mai 2024
11 Mai 2024
10 Mai 2024
5 Mai 2024
2 Mai 2024
Bedienungsanleitung Videostrahl
- Videostrahl Samsung
- Videostrahl Da-Lite
- Videostrahl 3M
- Videostrahl Acer
- Videostrahl Anker
- Videostrahl Asus
- Videostrahl Sanyo
- Videostrahl BenQ
- Videostrahl HP
- Videostrahl Philips
- Videostrahl Sony
- Videostrahl Panasonic
- Videostrahl LG
- Videostrahl Klarstein
- Videostrahl Canon
- Videostrahl Yamaha
- Videostrahl Technaxx
- Videostrahl Blaupunkt
- Videostrahl Sharp
- Videostrahl Pyle
- Videostrahl Mitsubishi
- Videostrahl Hisense
- Videostrahl Salora
- Videostrahl Polaroid
- Videostrahl JVC
- Videostrahl Krüger And Matz
- Videostrahl Optoma
- Videostrahl Xiaomi
- Videostrahl Stairville
- Videostrahl Smartwares
- Videostrahl Hitachi
- Videostrahl Toshiba
- Videostrahl Livoo
- Videostrahl Steinel
- Videostrahl Prixton
- Videostrahl Casio
- Videostrahl ViewSonic
- Videostrahl Dell
- Videostrahl Lenovo
- Videostrahl OKI
- Videostrahl Ricoh
- Videostrahl Smart
- Videostrahl Kodak
- Videostrahl Adj
- Videostrahl Eurolite
- Videostrahl Barco
- Videostrahl Bauer
- Videostrahl Eiki
- Videostrahl InFocus
- Videostrahl Nebula
- Videostrahl NEC
- Videostrahl Overmax
- Videostrahl Marantz
- Videostrahl Celexon
- Videostrahl Elmo
- Videostrahl D-Link
- Videostrahl Smart Tech
- Videostrahl ION
- Videostrahl Speaka
- Videostrahl Reflecta
- Videostrahl Derksen
- Videostrahl EasyMaxx
- Videostrahl Cameo
- Videostrahl Yaber
- Videostrahl Vivitek
- Videostrahl Emtec
- Videostrahl GPX
- Videostrahl La Vague
- Videostrahl Maxell
- Videostrahl Naxa
- Videostrahl Fun Generation
- Videostrahl Planar
- Videostrahl Celly
- Videostrahl Futurelight
- Videostrahl Tzumi
- Videostrahl Christie
- Videostrahl EKO
- Videostrahl Microtek
- Videostrahl Elite Screens
- Videostrahl ASK Proxima
- Videostrahl Vankyo
- Videostrahl AAXA Technologies
- Videostrahl Mimio
- Videostrahl DTS
Neueste Bedienungsanleitung für -Kategorien-

13 August 2024

9 August 2024
9 August 2024

25 Juni 2024
25 Juni 2024
25 Juni 2024
25 Juni 2024
25 Juni 2024
25 Juni 2024
25 Juni 2024