DataVideo PTC-285 Bedienungsanleitung
DataVideo
Überwachungskamera
PTC-285
Lesen Sie kostenlos die 📖 deutsche Bedienungsanleitung für DataVideo PTC-285 (123 Seiten) in der Kategorie Überwachungskamera. Dieser Bedienungsanleitung war für 25 Personen hilfreich und wurde von 2 Benutzern mit durchschnittlich 4.5 Sternen bewertet
Seite 1/123

PTC- 285

2
Table of Contents
TABLE OF CONTENTS ..................................................................................... 2
FCC COMPLIANCE STATEMENT ...................................................................... 5
WARNINGS AND PRECAUTIONS 5....................................................................
WARRANTY ................................................................................................... 7
STANDARD WARRANTY ........................................................................................ 7
T Y WHREE EAR ARRANTY ...................................................................................... 7
DISPOSAL 8......................................................................................................
1. PRODUCT OVERVIEW ............................................................................ 9
FEATURES .......................................................................................................... 9
2. LOCATION AND FUNCTION OF PARTS ................................................. 10
3. 14 BASIC SETUP .......................................................................................
3.1 P -O IOWER N NITIALIZATION ................................................................... 14
3.2 V OIDEO UTPUT ................................................................................... 14
HDMI Video OUT ...................................................................................... 16
3G-SDI Video Output ................................................................................ 16
4. REMOTE CONTROL AND ON-SCREEN MENU ........................................ 17
4.1 R CEMOTE ONTROL UNCTIONSF .............................................................. 17
4.2 OSD M ENU .......................................................................................21
4.3 PROFESSIONAL ARGON J EXPLANATIONS OF THE OSD M ENU ....................... 32
5. INSTRUCTION FOR INSTALLATION ....................................................... 33
6. NETWORK CONNECTION ..................................................................... 39
6.1 DHCP M ODE .....................................................................................40
6.2 STATIC IP ............................................................................................ 42
6.3 DVIP ................................................................................................43
7. HOW TO USE PTC- 285’S AI AUTO TRACKING ....................................... 46
7.1 HOW TO TURN ON THE AI AUTO RACKING UNCTION-T F .............................. 46
7.2 HOW TO TURN OFF THE UTOAI A -T FRACKING UNCTION .............................47
7.3 S -P SINGLE ERSON CENE UTOA -T MRACKING ODE ....................................... 48
7.4 MULTI ERSON CENE UTO-P S A -T MRACKING ODE ........................................ 49

3
8. WEB USER INTERFACE ......................................................................... 52
8.1 LIVE .................................................................................................. 52
8.2 VIDEO................................................................................................ 53
8.2.1 How to Connect the PTC-285 to a Datavideo Switcher aer a
60FPS/50FPS Video Streaming (Take the HS-1300 as an example) ........ 57
8.3 IMAGE ............................................................................................... 61
8.4 AUDIO ............................................................................................... 62
8.5 SYSTEM .............................................................................................. 64
8.6 NETWORK .......................................................................................... 66
8.7 INFORMATION ..................................................................................... 76
8.8 T CHE PTZ ONTROL REA OF THE EB A W UI ................................................ 78
9. HOW TO USE THE WEB UI TO SET AND CALL PRESETS ......................... 81
10. CONTROL THE CAMERA BY THE PTZ VIEW ASSIST APP .................... 82
11. 83DIP SWITCH SETTINGS ...........................................................................
11.1 WITCH DIP S SW1 ....................................................................................83
11.2 WITCH DIP S SW2 (IRID) ..........................................................................84
12. HOW TO PLAY THE RTSP STREAM BY THE VLC PLAYER ........................... 85
13. HOW TO PLAY THE MULTICAST BY THE VCL PLAYER .............................. 87
14. HOW TO STREAM TO FACEBOOK ........................................................... 88
15. HOW TO STREAM TO YOUTUBE ............................................................. 99
16 HOW TO DO THE SRT STREAMING BY THE VMIX SOFTWARE . ............... 103
17. REMOTE CONTROL PORT PINOUTS ............................................... 116
18. FIRMWARE UPDATE ...................................................................... 118
18.1 IRMWARE PDATE BY THE F U PTC-285 F IRMWARE PDATE OOLU T ..................... 118
18.2 F UIRMWARE PDATE BY THE LASH RIVEUSB F D ............................................ 122
19. FREQUENTLY-ASKED QUESTIONS .................................................. 125
20. DIMENSIONS ................................................................................. 127
21. SPECIFICATIONS ............................................................................ 128
SERVICE AND SUPPORT ............................................................................. 132

4
Disclaimer of Product and Services
The informaon oered in this instrucon manual is intended as a guide only.
At all mes, Datavideo Technologies will try to give correct, complete and
suitable informaon. However, Datavideo Technologies cannot exclude that
some informaon in this manual, from me to me, may not be correct or
may be incomplete. This manual may contain typing errors, omissions or
incorrect informaon. Datavideo Technologies always recommend that you
double check the informaon in this document for accuracy before making
any purchase decision or using the product. Datavideo Technologies is not
responsible for any omissions or errors, or for any subsequent loss or damage
caused by using the informaon contained within this manual. Further advice
on the content of this manual or on the product can be obtained by contacng
your local Datavideo Oce or dealer.

5
FCC Compliance Statement
This device complies with part 15 of the FCC rules. Operaon is subject to the
following two condions:
(1) This device may not cause harmful interference, and
(2) This device must accept any interference received, including interference
that may cause undesired operaon.
Warnings and Precauons
1. Read all of these warnings and save them for later reference.
2. Follow all warnings and instrucons marked on this unit.
3. Unplug this unit from the wall outlet before cleaning. Do not use
liquid or aerosol cleaners. Use a damp cloth for cleaning.
4. Do not use this unit in or near water.
5. Do not place this unit on an unstable cart, stand, or table. The unit
may fall, causing serious damage.
6. Slots and openings on the cabinet top, back, and boom are
provided for venlaon. To ensure safe and reliable operaon of this
unit, and to protect it from overheang, do not block or cover these
openings. Do not place this unit on a bed, sofa, rug, or similar surface,
as the venlaon openings on the boom of the cabinet will be
blocked. This unit should never be placed near or over a heat register
or radiator. This unit should not be placed in a built-in installation
unless proper venlaon is provided.
7. This product should only be operated from the type of power source
indicated on the marking label of the AC adapter. If you are not sure
of the type of power available, consult your Datavideo dealer or your
local power company.
8. Do not allow anything to rest on the power cord. Do not locate this
unit where the power cord will be walked on, rolled over, or
otherwise stressed.

6
9. If an extension cord must be used with this unit, make sure that the
total of the ampere rangs on the products plugged into the
extension cord do not exceed the extension cord’s rang.
10. Make sure that the total amperes of all the units that are plugged
into a single wall outlet do not exceed 15 amperes.
11. Never push objects of any kind into this unit through the cabinet
venlaon slots, as they may touch dangerous voltage points or short
out parts that could result in risk of re or electric shock. Never spill
liquid of any kind onto or into this unit.
12. Except as specically explained elsewhere in this manual, do not
aempt to service this product yourself. Opening or removing covers
that are marked “Do Not Remove” may expose you to dangerous
voltage points or other risks, and will void your warranty. Refer all
service issues to qualied service personnel.
13. Unplug this product from the wall outlet and refer to qualied service
personnel under the following condions:
a. When the power cord is damaged or frayed;
b. When liquid has spilled into the unit;
c. When the product has been exposed to rain or water;
d. When the product does not operate normally under normal
operang condions. Adjust only those controls that are covered
by the operang instrucons in this manual; improper adjustment
of other controls may result in damage to the unit and may oen
require extensive work by a qualied technician to restore the
unit to normal operaon;
e. When the product has been dropped or the cabinet has
been damaged;
f. When the product exhibits a disnct change in performance,
indicang a need for service.

7
Warranty
Standard Warranty
Datavideo equipment are guaranteed against any manufacturing
defects for one year from the date of purchase.
The original purchase invoice or other documentary evidence should
be supplied at the me of any request for repair under warranty.
The product warranty period begins on the purchase date. If the
purchase date is unknown, the product warranty period begins on
the thireth day aer shipment from a Datavideo ofce.
All non-Datavideo manufactured products (product without
Datavideo logo) have only one year warranty from the date of
purchase.
Damage caused by accident, misuse, unauthorized repairs, sand, grit
or water is not covered under warranty.
Viruses and malware infecons on the computer systems are not
covered under warranty.
Any errors that are caused by unauthorized third-party soware
installaons, which are not required by our computer systems, are
not covered under warranty.
All mail or transportaon costs including insurance are at the
expense of the owner.
All other claims of any nature are not covered.
All accessories including headphones, cables, and baeries are not
covered under warranty.
Warranty only valid in the country or region of purchase.
Your statutory rights are not aected.
Three Year Warranty
All Datavideo products purchased aer July 1st,
2017 are qualied for a free two years extension
to the standard warranty, providing the product is
registered with Datavideo within 30 days of
purchase.

8
Certain parts with limited lifeme expectancy such as LCD panels,
DVD drives, Hard Drive, Solid State Drive, SD Card, USB Thumb Drive,
Lighng, Camera module, PCIe Card are covered for 1 year.
The three-year warranty must be registered on Datavideo's ocial
website or with your local Datavideo oce or one of its authorized
distributors within 30 days of purchase.
Disposal
For EU Customers only - WEEE Marking
This symbol on the product or on its packaging indicates that
this product must not be disposed of with your other
household waste. Instead, it is your responsibility to dispose
of your waste equipment by handing it over to a designated
collecon point for the recycling of waste electrical and electronic equipment.
The separate collecon and recycling of your waste equipment at the me of
disposal will help to conserve natural resources and ensure that it is recycled
in a manner that protects human health and the environment. For more
informaon about where you can drop o your waste equipment for recycling,
please contact your local city oce, your household waste disposal service or
the shop where you purchased the product.

9
1. Product Overview
The PTC-285 series features a large 1/2.8" CMOS sensor, supports high-quality
2160p50/60 UHD video output, features 12x opcal zoom, 16x digital zooms
and supports versale outputs, including 3G-SDI, HDMI, IP stream, NDI (PTC-
285 NDI, oponal). The PTC-285 series is the ideal choice for taking your
remote camera producon to the next level.
Features
2160p50/59.94/60 PTZ camera
12x Opcal Zoom, 16x Digital Zoom
4K Video interfaces: HDMI, IP (H.264 & H.265)
2160p and 1080p (3G-SDI) Simultaneous video outp ut
RS-422 Serial Port Control
External audio input: 3.5mm audio in/line in (switchable on the web UI)
Friendly web UI
White color model available.

10
2. Locaon and Funcon of Parts
Front of Camera
1
Lens
Built-in 1/2.8 color camera with white balance ” 8.51M Pixel CMOS 4K
control, backlight compensaon, automac gain and etc.
2
Tally LED
Tally lamp will be turned ON upon receiving the ON signal.
3
Sensor for Remote Control
Remote control IR receiver

11
Rear of Camera
1
USB Port
This USB port is used for updang rmware. Users can save the latest
version of rmware in a USB ash drive and then insert it into this
interface for rmware updang.
Note: Aer inserng the USB ash drive, please remember to turn “ON”
the SETUP->USB UPGRADE from the OSD menu of the PTC- 5 camera. 28
2
Power Input
DC in socket connects the supplied 12V PSU. The connecon can be
secured by screwing the outer fastening ring of the DC In plug to the
socket.
3
4K HDMI OUT
The allows you to connect an external HDMI monitor via 4K HDMI OUT
an HDMI cable.

12
4
3G-SDI OUT
The allows you to connect an external monitor via an SDI 3G-SDI OUT
cable.
5
MIC IN/LINE IN
The 3.5mm audio input receives external audio.
6
RS-422 Interface (RJ- 45)
The RS-422 interface serves to connect external RS-422 devices. Use an
Ethernet cable to connect external RS-422 controllers. See “Secon 17
Remote Control Port Pinouts” for making the cable for the RS-422
interface.
7
IRID Interface
This interface allows users to use the DVIP Switch to control the
numbering of the camera on the remote controller. Users can use this
interface to set the camera to any number from No.1 to No. 4 in order
to use remote controller to control the camera.
8
DVIP/POE Interface
The DVIP interface allows users to control the PTC- camera by 285
Datavideo’s camera controller by using the DVIP Protocol which is
developed by Datavideo. Moreover, this interface can support the PoE
(Power over Ethernet) technology.

13
Boom of Camera
1
Tripod Screw Hole allows the user to mount the camera on the tripod.
2
Screw Hole
Screw holes for ceiling bracket mounng.
3
For Safety Rope
Ties safety rope for xing the camera to the ceiling.
4
DIP Switch
This DIP Switch allows users to adjust needed parameters such as
VISCA ID, resoluons, remote control protocol and video modes.

14
3. Basic Setup
3.1 Power-On Inializaon
As shown in the diagram below, aer you plug in the power cord, the tally
light in the front will start ashing red and will be OFF as soon as the power-
on inializaon is complete. The camera head should be at the HOME posion
with the lens facing front. If the power is inserted, the camera lens will go
back to the posion where the camera power is o last me.
3 Video Output .2
You are allowed to view the camera video via DVIP/POE port, 4K HDMI OUT
and 3G-SDI OUT.
DVIP/POE Port
Connect the DC 12 V power

15
Please follow following steps for viewing the camera video from the web UI.
Connect the -2 camera directly to your PC/Notebook PC PTC 85
1. Connect the PTC-285 to your PC or laptop by an Ethernet Cable.
2. Open the web UI by the connected PC or laptop and then please enter the
default IP address into the address bar of the web browser.
Note The default stac IP address of the PTC- is 192.168.100.88. : 285
3. The login page of the web UI will be opened, please enter the user name
and password (the default user name and password are admin/admin).
4. Open the preview window for previewing the video which is shot by the
camera.
Connect the PTC- camera to your PC or laptop by a router. 285
1. Please set the Ethernet IP address of your PC or laptop as 192.168.100.x(x
means 0-255) and it will be at the same local area network as the PTC-285 .
2. Please use an RJ-45 Ethernet cable to connect from the DVIP port on the
rear panel of the PTC- to the LAN port of a router. And then please use 285
another RJ-45 Ethernet cable to connect from the RJ-45 Ethernet port of your
PC or laptop to the LAN port of the same router.
3. Please open the web UI from the connected PC or laptop and then please
enter the default IP address of the camera into the address bar of the web
browser.
Note The default stac IP address of the PTC- is 192.168.100.88. : 285
4. The login page of the web UI will be opened, please enter the user name
and password (the default user name and password are admin/admin).
5. Click into the preview window on which the video will be displayed.
17
4. Remote Control and On-Screen Menu
The chapter 4 provides an overview of remote control funcons and OSD
menu.
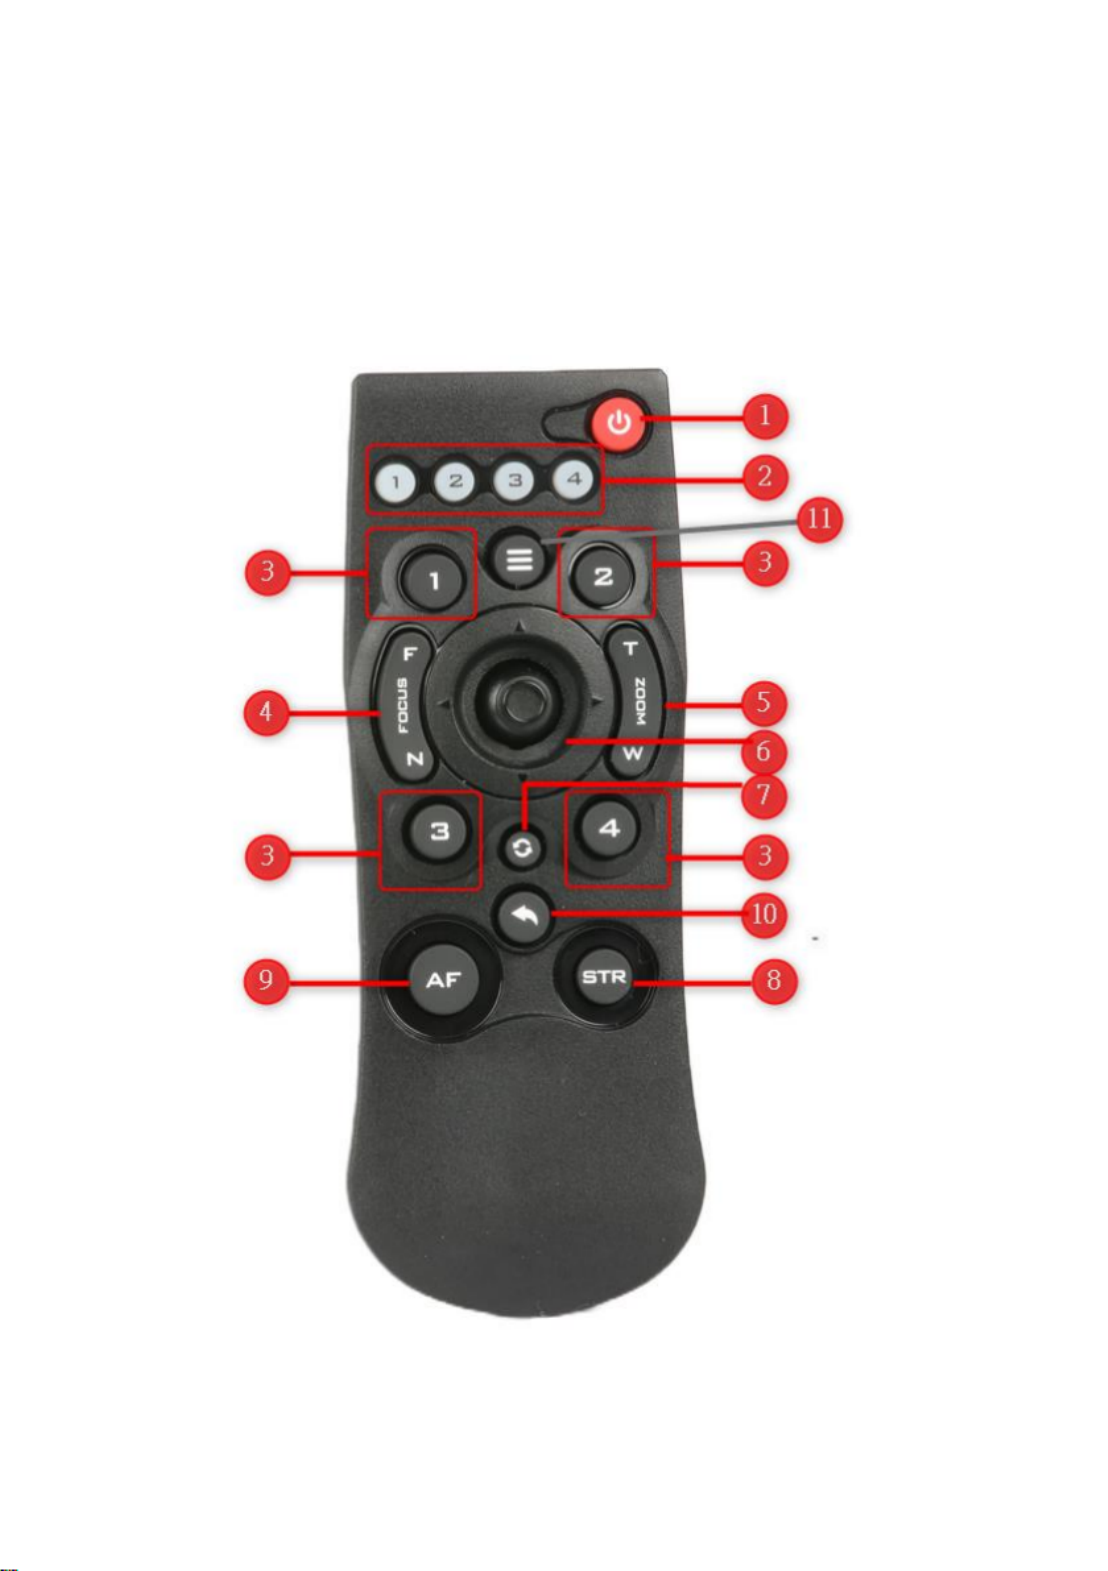
4 Remote Control Funcons .1

20
No
Funcon Keys
Descripons
b
STR Buon
STR Buon
Please press this buon and the “Preset 1 to Preset 4”
buons to save your desired Preset.
Aer you desired seng values and camera lens
posion are set, please press the “S ” buon and TR
then press the buon of your desired Preset number
from “Preset 1 to Preset 4”. Aer that, the Preset is
set successfully.
9
AF Auto Focus Buon
Auto Focus Buon
Please press this buon to turn on the Auto Focus funcon.
10
Back Buon
Back Buon
Please press the “Back” buon to turn the camera head
back to the “Home” posion. When the OSD menu is
opened, you can go back to the previous layer of the OSD
menu by pressing the “Back” buon.
11
Menu Buon
Menu Buon
Please press the “Menu” buon to open the OSD menu of
the PTC-285 camera on the external monitor.

22
Information
Restore
Default
Sub-Options
ARM
Restore?
Yes/No
SOC
Date
AF
Format
Model
IP
GateWay
NetMask
CTRL SRC
Produktspezifikationen
| Marke: | DataVideo |
| Kategorie: | Überwachungskamera |
| Modell: | PTC-285 |
Brauchst du Hilfe?
Wenn Sie Hilfe mit DataVideo PTC-285 benötigen, stellen Sie unten eine Frage und andere Benutzer werden Ihnen antworten
Bedienungsanleitung Überwachungskamera DataVideo

25 August 2024
25 August 2024
25 August 2024
25 August 2024
14 August 2024
14 August 2024
6 August 2024
4 August 2024
30 Juli 2024
Bedienungsanleitung Überwachungskamera
- Überwachungskamera Samsung
- Überwachungskamera Approx
- Überwachungskamera Belkin
- Überwachungskamera Sanyo
- Überwachungskamera Exibel
- Überwachungskamera Gembird
- Überwachungskamera Genius
- Überwachungskamera Hama
- Überwachungskamera LogiLink
- Überwachungskamera Logitech
- Überwachungskamera Manhattan
- Überwachungskamera Nedis
- Überwachungskamera Niceboy
- Überwachungskamera Philips
- Überwachungskamera Sony
- Überwachungskamera Trust
- Überwachungskamera Panasonic
- Überwachungskamera Clas Ohlson
- Überwachungskamera Profile
- Überwachungskamera ZyXEL
- Überwachungskamera Bosch
- Überwachungskamera Laserliner
- Überwachungskamera Buffalo
- Überwachungskamera Canon
- Überwachungskamera Velleman
- Überwachungskamera Powerfix
- Überwachungskamera Eminent
- Überwachungskamera Linksys
- Überwachungskamera Maginon
- Überwachungskamera Netgear
- Überwachungskamera Technaxx
- Überwachungskamera Alecto
- Überwachungskamera Denver
- Überwachungskamera EMOS
- Überwachungskamera Gira
- Überwachungskamera König
- Überwachungskamera MarQuant
- Überwachungskamera Renkforce
- Überwachungskamera Thomson
- Überwachungskamera Trevi
- Überwachungskamera Blaupunkt
- Überwachungskamera Schneider
- Überwachungskamera Trebs
- Überwachungskamera Pyle
- Überwachungskamera Topcom
- Überwachungskamera Pioneer
- Überwachungskamera JVC
- Überwachungskamera Motorola
- Überwachungskamera Xiaomi
- Überwachungskamera Abus
- Überwachungskamera Avidsen
- Überwachungskamera Elro
- Überwachungskamera EZVIZ
- Überwachungskamera Imou
- Überwachungskamera INSTAR
- Überwachungskamera Megasat
- Überwachungskamera Olympia
- Überwachungskamera Smartwares
- Überwachungskamera Switel
- Überwachungskamera Yale
- Überwachungskamera Ferguson
- Überwachungskamera Orion
- Überwachungskamera Gigaset
- Überwachungskamera Strong
- Überwachungskamera Toshiba
- Überwachungskamera Garmin
- Überwachungskamera Perel
- Überwachungskamera Netis
- Überwachungskamera Lindy
- Überwachungskamera Fenton
- Überwachungskamera Waeco
- Überwachungskamera Acme
- Überwachungskamera Burg Wächter
- Überwachungskamera Marmitek
- Überwachungskamera Marshall
- Überwachungskamera Honeywell
- Überwachungskamera B/R/K
- Überwachungskamera Marshall Electronics
- Überwachungskamera TRENDnet
- Überwachungskamera Targa
- Überwachungskamera First Alert
- Überwachungskamera AVerMedia
- Überwachungskamera Zebra
- Überwachungskamera TP-Link
- Überwachungskamera Flamingo
- Überwachungskamera Kodak
- Überwachungskamera Rollei
- Überwachungskamera IGet
- Überwachungskamera Adj
- Überwachungskamera Netatmo
- Überwachungskamera Duramaxx
- Überwachungskamera Ebode
- Überwachungskamera Xavax
- Überwachungskamera InFocus
- Überwachungskamera Overmax
- Überwachungskamera Monoprice
- Überwachungskamera Monacor
- Überwachungskamera JUNG
- Überwachungskamera Ednet
- Überwachungskamera AG Neovo
- Überwachungskamera Nest
- Überwachungskamera Edimax
- Überwachungskamera V-TAC
- Überwachungskamera Aritech
- Überwachungskamera Uniden
- Überwachungskamera Kogan
- Überwachungskamera Genie
- Überwachungskamera M-e
- Überwachungskamera Elmo
- Überwachungskamera Lumens
- Überwachungskamera Jablocom
- Überwachungskamera Conceptronic
- Überwachungskamera D-Link
- Überwachungskamera Eufy
- Überwachungskamera Stabo
- Überwachungskamera Friedland
- Überwachungskamera EVOLVEO
- Überwachungskamera SPC
- Überwachungskamera August
- Überwachungskamera Ring
- Überwachungskamera Digitus
- Überwachungskamera SereneLife
- Überwachungskamera Swann
- Überwachungskamera Vitek
- Überwachungskamera LevelOne
- Überwachungskamera Aida
- Überwachungskamera APC
- Überwachungskamera Beafon
- Überwachungskamera Chuango
- Überwachungskamera Cisco
- Überwachungskamera Grandstream
- Überwachungskamera Delta Dore
- Überwachungskamera EVE
- Überwachungskamera Defender
- Überwachungskamera Tenda
- Überwachungskamera Swisstone
- Überwachungskamera Foscam
- Überwachungskamera Ubiquiti Networks
- Überwachungskamera Kramer
- Überwachungskamera Vaddio
- Überwachungskamera Intellinet
- Überwachungskamera Reolink
- Überwachungskamera Swan
- Überwachungskamera Hikvision
- Überwachungskamera FLIR
- Überwachungskamera Furrion
- Überwachungskamera Arlo
- Überwachungskamera Nexxt
- Überwachungskamera Planet
- Überwachungskamera EnGenius
- Überwachungskamera Dörr
- Überwachungskamera Lorex
- Überwachungskamera Ikan
- Überwachungskamera Comtrend
- Überwachungskamera Somfy
- Überwachungskamera Dahua
- Überwachungskamera Dedicated Micros
- Überwachungskamera DIO
- Überwachungskamera EasyN
- Überwachungskamera Escam
- Überwachungskamera EverFocus
- Überwachungskamera Ganz
- Überwachungskamera GeoVision
- Überwachungskamera Hombli
- Überwachungskamera Home Protector
- Überwachungskamera Iiquu
- Überwachungskamera Indexa
- Überwachungskamera Interlogix
- Überwachungskamera KlikaanKlikuit
- Überwachungskamera Kompernass
- Überwachungskamera Mr Safe
- Überwachungskamera Naxa
- Überwachungskamera Nordval
- Überwachungskamera Notifier
- Überwachungskamera Oplink
- Überwachungskamera Provision ISR
- Überwachungskamera Quantum
- Überwachungskamera Raymarine
- Überwachungskamera Revo
- Überwachungskamera SAB
- Überwachungskamera Satel
- Überwachungskamera SecurityMan
- Überwachungskamera Sinji
- Überwachungskamera SMC
- Überwachungskamera Sonic Alert
- Überwachungskamera Sricam
- Überwachungskamera Steren
- Überwachungskamera Storage Options
- Überwachungskamera Tenvis
- Überwachungskamera Hive
- Überwachungskamera Ubiquiti
- Überwachungskamera Vivotek
- Überwachungskamera Woonveilig
- Überwachungskamera Y-cam
- Überwachungskamera ACTi
- Überwachungskamera AVer
- Überwachungskamera Epcom
- Überwachungskamera ZKTeco
- Überwachungskamera AirLive
- Überwachungskamera Mobotix
- Überwachungskamera Dahua Technology
- Überwachungskamera Speco Technologies
- Überwachungskamera 3xLOGIC
- Überwachungskamera Atlantis Land
- Überwachungskamera CRUX
- Überwachungskamera Pentatech
- Überwachungskamera Summer Infant
- Überwachungskamera Illustra
- Überwachungskamera Surveon
- Überwachungskamera Avigilon
- Überwachungskamera Brilliant
- Überwachungskamera Hanwha
- Überwachungskamera Lanberg
- Überwachungskamera Verint
- Überwachungskamera Axis
- Überwachungskamera EtiamPro
- Überwachungskamera MEE Audio
- Überwachungskamera Advantech
- Überwachungskamera Chacon
- Überwachungskamera Alula
- Überwachungskamera EKO
- Überwachungskamera IOIO
- Überwachungskamera KJB Security Products
- Überwachungskamera BZBGear
- Überwachungskamera Adesso
- Überwachungskamera Brickcom
- Überwachungskamera Insteon
- Überwachungskamera Aigis
- Überwachungskamera Pelco
- Überwachungskamera ORNO
- Überwachungskamera Atlona
- Überwachungskamera Linear PRO Access
- Überwachungskamera Laxihub
- Überwachungskamera Valueline
- Überwachungskamera Aqara
- Überwachungskamera Tecno
- Überwachungskamera Lutec
- Überwachungskamera Brinno
- Überwachungskamera Night Owl
- Überwachungskamera WyreStorm
- Überwachungskamera Exacq
- Überwachungskamera Equip
- Überwachungskamera AVMATRIX
- Überwachungskamera UniView
- Überwachungskamera Alfatron
- Überwachungskamera Syscom
- Überwachungskamera BLOW
- Überwachungskamera Videotec
- Überwachungskamera DSC
- Überwachungskamera AViPAS
- Überwachungskamera Milestone Systems
- Überwachungskamera Inkovideo
- Überwachungskamera Hamlet
- Überwachungskamera Mobi
- Überwachungskamera Infortrend
- Überwachungskamera VideoComm
- Überwachungskamera Kguard
- Überwachungskamera Boyo
- Überwachungskamera HiLook
- Überwachungskamera Mach Power
- Überwachungskamera Canyon
- Überwachungskamera Digital Watchdog
- Überwachungskamera Ernitec
- Überwachungskamera Ikegami
- Überwachungskamera Gewiss
- Überwachungskamera Weldex
- Überwachungskamera Costar
- Überwachungskamera Sentry360
- Überwachungskamera ALC
- Überwachungskamera Spyclops
- Überwachungskamera Compro
- Überwachungskamera IDIS
- Überwachungskamera I3International
- Überwachungskamera B & S Technology
- Überwachungskamera Qian
- Überwachungskamera Accsoon
- Überwachungskamera Control4
- Überwachungskamera Petcube
- Überwachungskamera Apeman
- Überwachungskamera ATN
- Überwachungskamera IC Intracom
- Überwachungskamera POSline
- Überwachungskamera Watec
- Überwachungskamera ETiger
- Überwachungskamera Videcon
- Überwachungskamera BirdDog
- Überwachungskamera Topica
- Überwachungskamera Rostra
- Überwachungskamera Caddx
- Überwachungskamera Whistler
- Überwachungskamera ClearView
- Überwachungskamera Beseye
- Überwachungskamera IMILAB
- Überwachungskamera CNB Technology
- Überwachungskamera Tapo
- Überwachungskamera Securetech
- Überwachungskamera NetMedia
- Überwachungskamera Nivian
- Überwachungskamera Guardzilla
- Überwachungskamera Blink
- Überwachungskamera Zavio
- Überwachungskamera Campark
- Überwachungskamera IPX
- Überwachungskamera Annke
- Überwachungskamera AVTech
- Überwachungskamera Vimtag
- Überwachungskamera Security Labs
- Überwachungskamera Seneca
- Überwachungskamera Vosker
- Überwachungskamera Owltron
- Überwachungskamera Enabot
- Überwachungskamera Luis Energy
- Überwachungskamera Sir Gawain
- Überwachungskamera VisorTech
- Überwachungskamera Milesight
- Überwachungskamera GVI Security
- Überwachungskamera Conbrov
- Überwachungskamera HuddleCamHD
- Überwachungskamera Setti+
- Überwachungskamera BIRDFY
- Überwachungskamera I-PRO
- Überwachungskamera DVDO
- Überwachungskamera TCP
Neueste Bedienungsanleitung für -Kategorien-
15 Oktober 2024

15 Oktober 2024
14 Oktober 2024
14 Oktober 2024

13 Oktober 2024
13 Oktober 2024
13 Oktober 2024
11 Oktober 2024
11 Oktober 2024
11 Oktober 2024