D-Link DIR-2660 Bedienungsanleitung
Lesen Sie kostenlos die 📖 deutsche Bedienungsanleitung für D-Link DIR-2660 (83 Seiten) in der Kategorie Router. Dieser Bedienungsanleitung war für 16 Personen hilfreich und wurde von 2 Benutzern mit durchschnittlich 4.5 Sternen bewertet
Seite 1/83

INSTRUCTION MANUAL
MH-486-5
NOTE : Read safety instructions carefully and understand them before using.
Retain this Instruction Manual for future reference.

i
For the sewing machine, automatic machine and ancillary devices (hereinafter collectively referred to as
"machine"), it is inevitable to conduct sewing work near moving parts of the machine. This means that there
is always a possibility of unintentionally coming in contact with the moving parts. Operators who actually
operate the machine and maintenance personnel who are involved in maintenance and repair of the machine
are strongly recommended to carefully read to fully understand the following SAFETY PRECAUTIONS
before using/maintaining the machine. The content of the SAFETY PRECAUTIONS includes items which
are not contained in the specications of your product.
The risk indications are classied into the following three dierent categories to help understand the meaning
of the labels. Be sure to fully understand the following description and strictly observe the instructions.
Warning label
❶
❷
❸
❶ • There is the possibility that slight to serious injury or death may be caused.
• There is the possibility that injury may be caused by touching moving part.
❷ • To perform sewing work with safety guard.
• To perform sewing work with safety cover.
• To perform sewing work with safety protection device.
❸ • Be sure to turn the power OFF before carrying out "machine-head threading",
"needle changing", "bobbin changing" or "cleaning".
Electrical-shock
danger label
DANGER :
This indication is given where there is an immediate danger of death or serous injury if the person in charge or any third
party mishandles the machine or does not avoid the dangerous situation when operating or maintaining the machine.
WARNING :
This indication is given where there is a potentiality for death or serious injury if the person in charge or any third
party mishandles the machine or does not avoid the dangerous situation when operating or maintaining the machine.
CAUTION :
This indication is given where there is a danger of medium to minor injury if the person in charge or any third par-
ty mishandles the machine or does not avoid the dangerous situation when operating or maintaining the machine.
Items requiring special attention.
Pictorial warning indication
There is a risk of injury if contact-
ing a moving section.
Pictorial warning
indication
Be aware that holding the sewing
machine during operation can
hurt your hands.
There is a risk of electrical shock if
contacting a high-voltage section.
There is a risk of entanglement in
the belt resulting in injury.
There is a risk of a burn if contact-
ing a high-temperature section.
There is a risk of injury if you
touch the button carrier.
Be aware that eye deciency can
be caused by looking directly at the
laser beam.
Indication label
The correct direction is indicated.
There is a risk of contact between
your head and the sewing ma-
chine.
Connection of a earth cable is
indicated.
TO ENSURE SAFE USE OF YOUR SEWING MACHINE
( I ) Explanation of risk levels
(II)
Explanation of pictorial warning indications and warning labels
ii
SAFETY PRECAUTIONS
1. Whenit necessarytoopenthecontrolboxcontainingelectricalparts,besuretoturnthepoweris
offandwaitforveminutesormorebeforeopeningthecoverinordertopreventaccidentleadingto
electricalshock.
Accidentmeans"tocause
personalinjuryordeathor
damagetoproperty."
DANGER
CAUTION
Basicprecaution
1. Besuretoreadtheinstructionmanualandotherexplanatorydocumentssuppliedwithaccessoriesof
themachinebeforeusingthemachine.Carefullykeeptheinstructionmanualandtheexplanatorydocu-
mentsathandforquickreference.
2. Thecontentofthissectionincludesitemswhichare containedinthespecicationsofyourproduct.not
3. Besuretowearsafetygogglestoprotectagainstaccidentcausedbyneedlebreakage.
4. Thosewhouseaheartpacerhavetousethemachineafterconsultationwithamedicalspecialist.
Safetydevicesandwarninglabels
1. Besuretooperatethemachineafterverifyingthatsafetydevice(s)iscorrectlyinstalledinplaceand
worksnormallyinordertopreventaccidentcausedbylackofthedevice(s).
2. Ifanyofthesafetydevicesisremoved,besuretoreplaceitandverifythatitworksnormallyinorderto
preventaccidentthatcanresultinpersonalinjuryordeath.
3. Besuretokeepthewarninglabelsadheredonthemachineclearlyvisibleinordertopreventaccident
thatcanresultinpersonalinjuryordeath.Ifanyofthelabelshasstainedorcomeunstuck,besureto
changeitwithanewone.
Applicationandmodication
1. Neverusethemachineforanyapplicationotherthanitsintendedoneandinanymannerotherthanthat
prescribedintheinstructionmanualinordertopreventaccidentthatcanresultinpersonalinjuryor
death.JUKIassumesnoresponsibilityfordamagesorpersonalinjuryordeathresultingfromtheuseof
themachineforanyapplicationotherthantheintendedone.
2. Nevermodifyandalterthemachineinordertopreventaccidentthatcanresultinpersonalinjuryor
death.JUKIassumesnoresponsibilityfordamagesorpersonalinjuryordeathresultingfromthema-
chinewhichhasbeenmodiedoraltered.
Educationandtraining
1. Inordertopreventaccidentresultingfromunfamiliaritywiththemachine,themachinehastobeused
onlybytheoperatorwhohasbeentrained/educatedbytheemployerwithrespecttothemachineoper-
ationandhowtooperatethemachinewithsafetytoacquireadequateknowledgeandoperationskill. To
ensuretheabove,theemployerhastoestablishaneducation/trainingplanfortheoperatorsandedu-
cate/trainthembeforehand.
Itemsforwhichthepowertothemachinehastobeturnedoff
Turningthepoweroff: Turningthepowerswitchoff,thenremovingthepowerplugfromtheoutlet.
Thisappliestothefollowing.
1. Besuretoimmediatelyturnthepoweroffifanyabnormalityorfailureisfoundorinthecaseofpower
failureinordertoprotectagainstaccidentthatcanresultinpersonalinjuryordeath.
2. Toprotectagainstaccidentresultingfromabruptstartofthemachine,besuretocarryoutthefollow-
ingoperationsafterturningthepoweroff.Forthemachineincorporatingaclutchmotor,inparticular,
besuretocarryoutthefollowingoperationsafterturningthepoweroffandverifyingthatthemachine
stopscompletely.
2-1. For example, threading the parts such as the needle, looper, spreader etc. which have to be thread -
ed,orchangingthebobbin.
2-2. Forexample,changingoradjustingallcomponentpartsofthemachine.
2-3. Forexample,wheninspecting,repairingorcleaningthemachineorleavingthemachine.
3. Besuretoremovethepowerplugbyholdingtheplugsectioninsteadofthecordsectioninordertopre-
ventelectrical-shock,earth-leakageorreaccident.
4. Besuretoturnthepoweroffwheneverthemachineisleftunattendedbetweenworks.
5. Besuretoturnthepoweroffinthecaseofpowerfailureinordertopreventaccidentresultingofbreak-
ageofelectricalcomponents.

2
ENGLISH
OPTION 2 WEB BROWSER SETUP
1 /
Install the antennas. If the antennas are already fixed, position your
router near your Internet-connected modem and computer. Keep
the router in an open area for better wireless coverage.
2 /
Plug an Ethernet cable from your modem into the port labeled
INTERNET on the router.
Note: If your router does not have a port labeled as INTERNET, plug the Ethernet
cable into LAN Port 1.
ModemModem
LAN
Port 1
Internet
3 /
Plug the router into a power source to power on the router. Make
sure that the power button is in the ON configuration.

3
ENGLISH
ENJOY!
You’re all good to go! Connect devices to your network using the
Wi-Fi Name (SSID) and password that you created during the setup
process.
Connect your computer to the Wi-Fi name and password printed
on the Quick Installation Card, or on the device label on the bottom
of the device.
Type http://dlinkrouter.local./ into the address bar of a web
browser. Follow the on-screen instructions to complete the setup.
4 /
Wait for the 2.4 GHz and 5 GHz wireless LEDs to turn on.
Note: If your router does not have 2.4 and 5G wireless LEDs, refer to
the User Manual for LED behaviour.
5 /
6 /
http://dlinkrouter.local./ II
2.4 5G

4
ENGLISH
FREQUENTLY ASKED QUESTIONS
Why can’t I access the web-based conguration utility?
Verify that http://dlinkrouter.local./ is correctly entered into the browser.
At this stage, you are not connecting to a website, nor do you have to be
connected to the Internet. The device has the utility built-in to a ROM chip in
the device itself. Your computer must be connected to the router’s network
and in the same IP subnet to connect to the web-based utility.
Why can’t I access the Internet?
Verify that your router is working by rebooting the router. If you still can not
connect to the Internet, contact your Internet service provider.
What do I do if I forgot my device password / my wireless network
password?
If you forgot your password, you must reset your router. This process will
change all your settings back to the factory defaults.
How do I restore the router to its factory default settings?
Locate the reset button on the rear panel of the unit. With the router powered
on, use a paper clip to hold the button down for 10 seconds. Release the
button and the router will go through its reboot process.
For technical support, product documentation and other information,
please visit our website.
https://eu.dlink.com/support
5
DEUTSCH
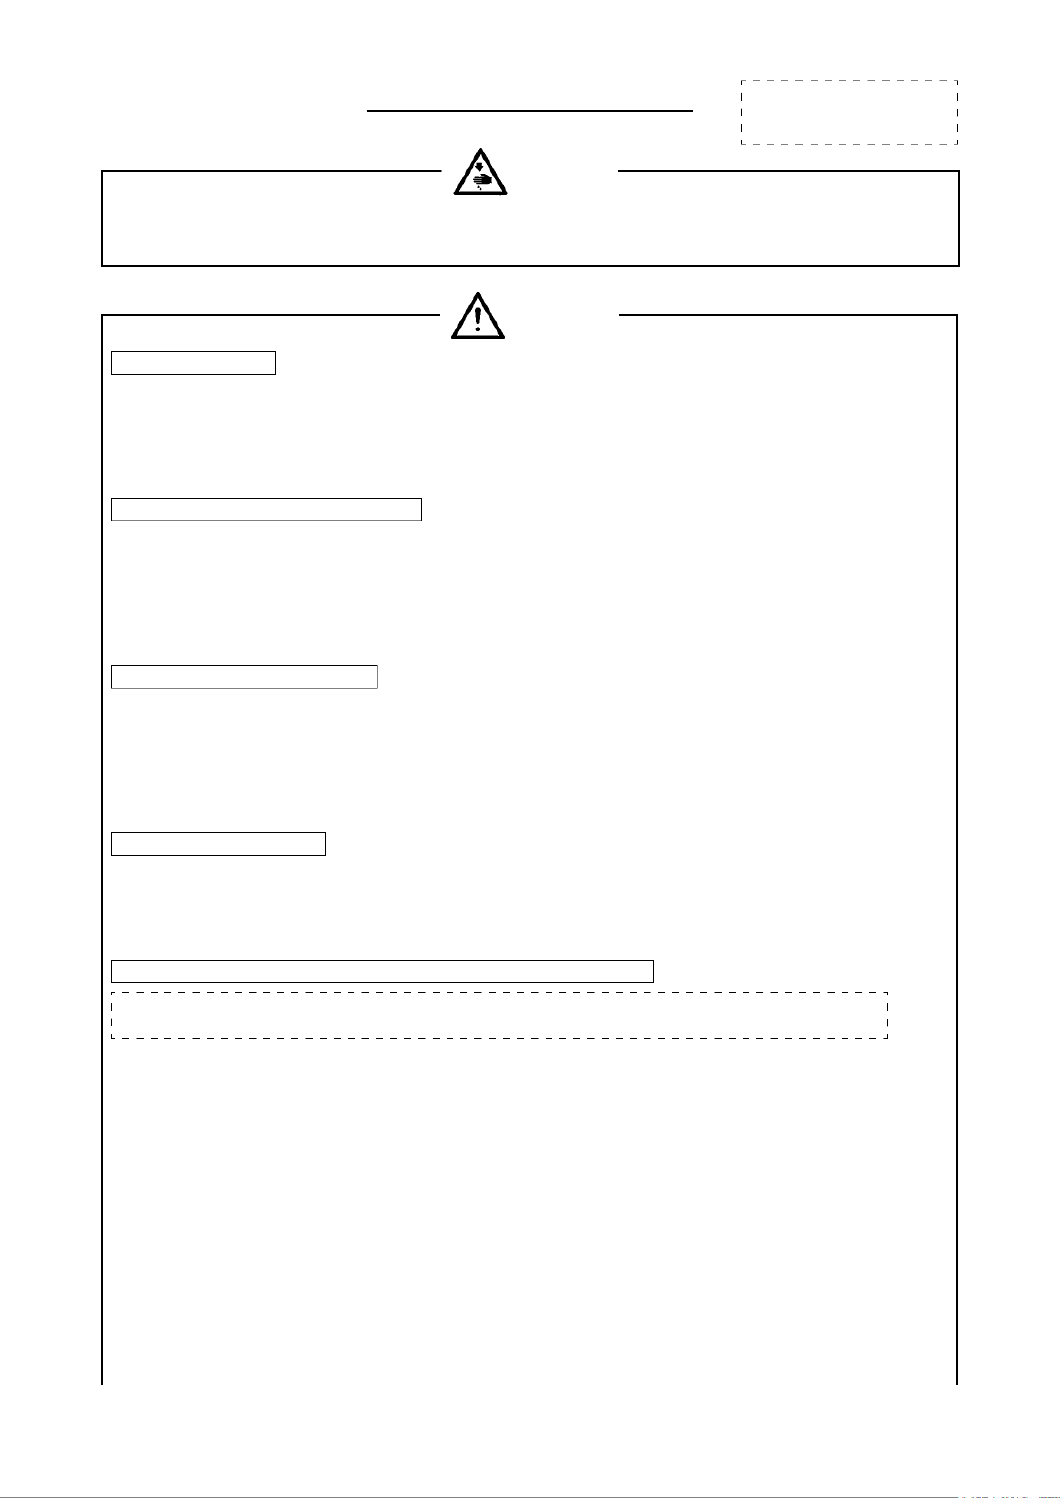
Scannen Sie den obigen QR-Code, um die D-Link Wi-Fi App aus dem App
Store oder von Google Play herunterzuladen und zu starten.
Anmerkung: Für Informationen zu Geräteanforderungen und Kompatibilität siehe den jeweiligen
App-Store. Es werden nicht alle D-Link-Produkte von der D-Link Wi-Fi App unterstützt.
1 /
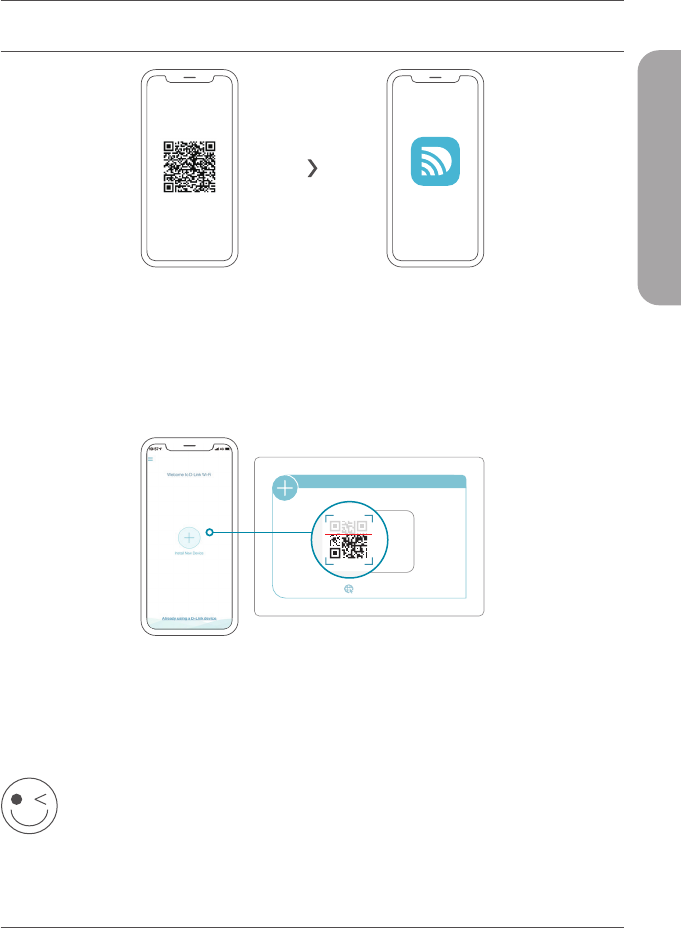
Tippen Sie auf Install New Device (Neues Gerät installieren). Tippen Sie
auf Scan the QR code (QR-Code scannen). Scannen Sie den auf der Ihrem
Produkt beiliegenden Installationskarte aufgedruckten Code. Folgen Sie den
Anweisungen auf dem Bildschirm, um die Einrichtung abzuschließen.
2 /
OPTION 1 EINRICHTUNG MITTELS DLINK WIFI APP
INSTALLATIONSKARTE
www.dlink.com
Modellname: GERÄT
WLAN-Name: d-link-XXXX
Kennwort: XXXXXXXX
Seriennr.: 123456789
VIEL SPASS!
Sie können loslegen! Verbinden Sie Geräte unter Verwendung des
Wi-Fi-Namens (SSID) und des Kennworts, das Sie während des
Einrichtungsverfahrens erstellt haben, mit Ihrem Netzwerk.
D-Link Wi-FI

6
DEUTSCH
OPTION 2 EINRICHTUNG IM WEBBROWSER
1 /
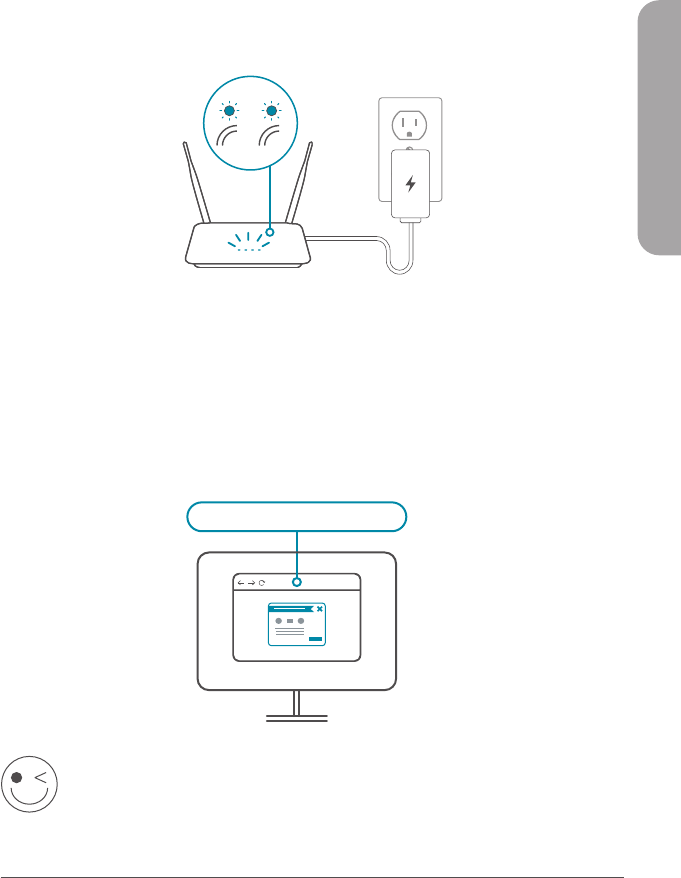
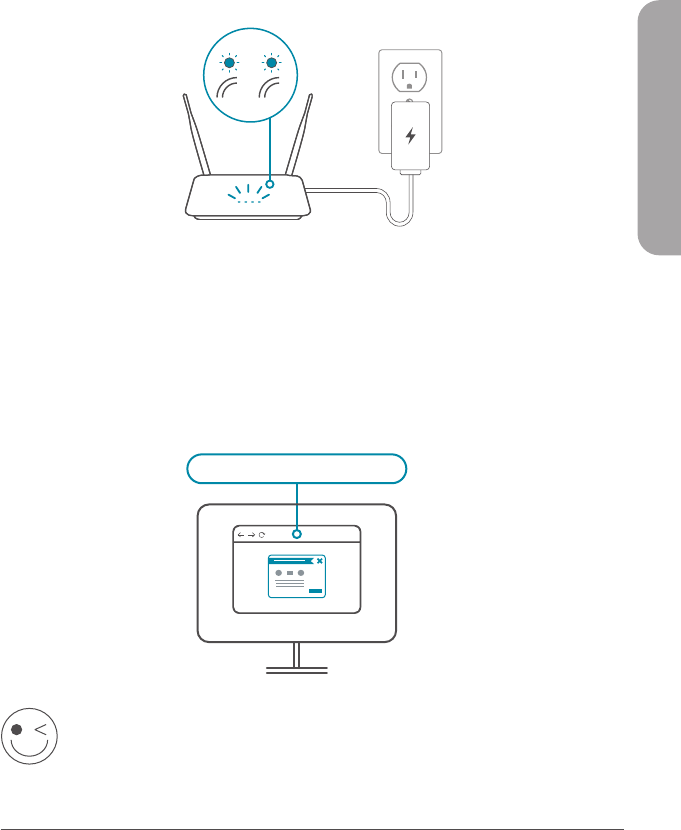
Montieren Sie die Antennen. Wenn die Antennen bereits befestigt sind,
stellen Sie Ihren Router in der Nähe Ihres mit dem Internet verbundenen
Modems und Computers auf. Um eine bessere drahtlose Abdeckung
zu erzielen, stellen Sie den Router in einem leicht zugänglichen und
offenen Bereich auf.
2 /
Verbinden Sie ein Ethernet-Kabel von Ihrem Modem mit dem
INTERNET-Anschluss Ihres Routers.
Anmerkung: Wenn Ihr Router keinen INTERNET-Anschluss hat, stecken Sie das
Ethernet-Kabel in LAN-Port 1 ein.
ModemModem
LAN-
Port 1
Internet
3 /
Verbinden Sie den Router mit einer Steckdose und schalten Sie ihn
ein. Stellen Sie sicher, dass der Netzschalter in der Position ON (EIN)
steht.
7
DEUTSCH
VIEL SPASS!
Sie können loslegen! Verbinden Sie Geräte unter Verwendung des
Wi-Fi-Namens (SSID) und des Kennworts, das Sie während des
Einrichtungsverfahrens erstellt haben, mit Ihrem Netzwerk.
Verbinden Sie Ihren Computer mit dem auf der Installationskarte
oder der Unterseite des Geräts abgedruckten WLAN-Namen und
Kennwort.
Geben Sie http://dlinkrouter.local./ in die Adresszeile eines
Webbrowsers ein. Folgen Sie den Anweisungen auf dem
Bildschirm, um die Einrichtung abzuschließen.
4 /
Warten Sie, bis die LEDs für 2,4 GHz und 5 GHz WLAN zu leuchten
beginnen.
Anmerkung: Wenn Ihr Router keine LEDs für 2,4 und 5G WLAN hat,
siehe das Benutzerhandbuch für eine Erläuterung der LEDs.
5 /
6 /
http://dlinkrouter.local./ II
2,4 5 G

8
DEUTSCH
HÄUFIG GESTELLTE FRAGEN
Warum habe ich keinen Zugri auf das webbasierte
Kongurationsprogramm?
Vergewissern Sie sich, dass Sie http://dlinkrouter.local./ korrekt in den Browser
eingegeben haben. In diesem Schritt verbinden Sie sich mit keiner Website und
benötigen auch keine Internetverbindung. Bei dem Gerät ist das Hilfsprogramm
im ROM-Chip des Geräts selbst integriert. Ihr Computer muss mit dem Router-
Netzwerk verbunden sein und sich im selben IP-Subnetz befinden, um eine
Verbindung mit dem webbasierten Hilfsprogramm herzustellen.
Warum kann ich nicht auf das Internet zugreifen?
Vergewissern Sie sich, dass Ihr Router korrekt funktioniert, indem Sie ihn neu
starten. Wenn Sie weiterhin keine Internetverbindung herstellen können, wenden
Sie sich an Ihren Internet-Serviceanbieter.
Was soll ich tun, wenn ich mein Gerätekennwort/WLAN-Kennwort vergessen
habe?
Wenn Sie Ihr Kennwort vergessen haben, müssen Sie Ihren Router
zurücksetzen. Dieser Vorgang setzt alle Ihre Einstellungen auf die werkseitigen
Standardeinstellungen zurück.
Wie kann ich den Router auf werkseitige Standardeinstellungen
zurücksetzen?
Suchen Sie die Reset-Taste auf der Rückseite des Geräts. Halten Sie die Taste bei
eingeschaltetem Router mit einer Büroklammer 10 Sekunden lang gedrückt.
Ziehen Sie den spitzen Gegenstand aus dem Rücksetzloch. Es folgt der Neustart
des Routers.
Technischen Support, Produktdokumentation und weitere Informationen
nden Sie auf unserer Website.
https://eu.dlink.com/support

9
FRANÇAIS
Balayez le code QR ci-dessus pour télécharger l'application D-Link Wi-Fi à
partir de l'App Store ou de Google Play et lancez-la.
Remarque: Vérifiez sur l'App Store les exigences et la compatibilité des appareils. Tous les
produits D-Link ne sont pas pris en charge par l'application Wi-Fi D-Link.
1 /
Appuyez sur Install New Device (Installer un nouveau périphérique).
Appuyez sur Scan the QR code (Balayer le code QR). Balayez le code sur la
carte d'installation rapide fournie dans l'emballage de votre produit. Suivez les
instructions à l'écran pour terminer la configuration.
2 /
OPTION 1
CONFIGURATION DE L'APPLICATION WIFI DLINK
CARTE D’INSTALLATION RAPIDE
www.dlink.com
Nom du modèle:
PÉRIPHÉRIQUE
Nom Wi-Fi: d-link-XXXX
Mot de passe: XXXXXXXX
N/S: 123456789
AMUSEZVOUS!
Vous êtes prêt à y aller ! Connectez les périphériques à votre réseau
en utilisant le nom Wi-Fi (SSID) et le mot de passe que vous avez
créés au cours du processus de configuration.
D-Link Wi-FI

10
FRANÇAIS
OPTION 2 CONFIGURATION DU NAVIGATEUR WEB
1 /
Installez les antennes. Si les antennes sont déjà fixées, placez votre routeur
près de votre modem et de votre ordinateur connectés à Internet. Laissez
le routeur dans une zone ouverte pour obtenir une meilleure couverture
sans fil.
2 /
Branchez un câble Ethernet de votre modem sur le port INTERNET
du routeur.
Remarque : Si votre routeur ne dispose pas d’un port étiqueté INTERNET,
branchez le câble Ethernet sur le port LAN 1.
ModemModem
Port
LAN 1
Internet
3 /
Branchez le routeur sur une source d'alimentation pour le mettre
sous tension. Assurez-vous que le bouton d'alimentation est dans la
configuration ON.

11
FRANÇAIS
AMUSEZVOUS!
Vous êtes prêt à y aller ! Connectez les périphériques à votre réseau
en utilisant le nom Wi-Fi (SSID) et le mot de passe que vous avez
créés au cours du processus de configuration.
Connectez votre ordinateur au nom et au mot de passe Wi-Fi
imprimés sur la carte d'installation rapide ou sur l'étiquette située
en bas de l'appareil.
Tapez http://dlinkrouter.local./ dans la barre d'adresse d'un navigateur
Web. Suivez les instructions à l'écran pour terminer la configuration.
4 /
Attendez que les voyants sans fil 2.4 GHz et 5 GHz s’allument.
Remarque: Si votre routeur ne dispose pas de voyants sans fil 2.4 et 5G,
reportez-vous au Guide de l'utilisateur pour connaître le comportement
des voyants.
5 /
6 /
http://dlinkrouter.local./ II
2,4 5G

12
FRANÇAIS
QUESTIONS FRÉQUEMMENT POSÉES
Pourquoi n’ai-je pas accès à l’utilitaire de conguration Web?
Vérifiez que http://dlinkrouter.local./ est correctement entré dans le navigateur. À
ce stade, vous ne vous connectez pas à un site Web et ne devez pas non plus être
connecté à Internet. L’utilitaire est intégré dans une puce ROM du périphérique
lui-même. Votre ordinateur doit être connecté au réseau du routeur et au même
sous-réseau IP pour pouvoir se connecter à l’utilitaire Web.
Pourquoi ne puis-je pas accéder à Internet?
Vérifiez que votre routeur fonctionne en le redémarrant. Si vous ne pouvez toujours
pas vous connecter à Internet, contactez votre fournisseur de services Internet.
Que dois-je faire si j'ai oublié le mot de passe de mon appareil/mon mot de
passe du réseau sans l?
Si vous oubliez votre mot de passe, vous devez réinitialiser votre routeur. Cette
procédure réinitialise tous vos paramètres.
Comment restaurer les paramètres d'usine du routeur?
Localisez le bouton de réinitialisation sur le panneau arrière de l'appareil. Avec le
routeur sous tension, utilisez une attache trombone pour maintenir le bouton
enfoncé pendant 10 secondes. Relâchez-le pour que le routeur réalise la procédure
de réinitialisation.
Pour obtenir une assistance technique, une documentation sur le produit et
d’autres informations, visitez notre site Web.
https://eu.dlink.com/support

13
ESPAÑOL
Escanee el código QR anterior para descargar la aplicación D-Link Wi-Fi desde
App Store o desde Google Play e iníciela.
Nota: Verifique en la App Store los requisitos del dispositivo y la compatibilidad. No todos los
productos D-Link admiten la aplicación D-Link Wi-Fi.
1 /
Pulse Instalar nuevo dispositivo. Pulse Escanear el código QR. Escanee el código
que aparece en la Tarjeta de instalación rápida proporcionada en el embalaje del
producto. Siga las instrucciones en pantalla para completar la instalación.
2 /
OPCIÓN 1 INSTALACIÓN DE LA APLICACIÓN DLINK WIFI
TARJETA DE INSTALACIÓN RÁPIDA
www.dlink.com
Nombre de modelo:
DISPOSITIVO
Nombre Wi-Fi: d-link-XXXX
Contraseña: XXXXXXXX
N/S: 123456789
DISFRUTE!
¡Ya puede comenzar! Conecte los dispositivos a la red con el
nombre de Wi-Fi (SSID) y la contraseña que ha creado durante el
proceso de configuración.
D-Link Wi-FI

14
ESPAÑOL
OPCIÓN 2 INSTALACIÓN DEL NAVEGADOR WEB
1 /
Instale las antenas. Si las antenas ya están colocadas, sitúe el router
cerca del módem conectado a Internet. Mantenga el router en una
zona abierta para conseguir una mejor cobertura inalámbrica.
2 /
Conecte un cable Ethernet del módem al puerto que lleva la etiqueta
INTERNET del router.
Nota: Si el router no incluye un puerto con la etiqueta INTERNET, conecte el
cable Ethernet al puerto de LAN 1.
MódemMódem
Puerto de
LAN 1
Internet
3 /
Conecte el router a una toma de alimentación para encenderlo.
Asegúrese de que el botón de encendido se encuentre en la posición
"On".
15
ESPAÑOL
DISFRUTE!
¡Ya puede comenzar! Conecte los dispositivos a la red con el
nombre de Wi-Fi (SSID) y la contraseña que ha creado durante el
proceso de configuración.
Conecte el ordenador a la red Wi-Fi con el nombre y la contraseña
que aparecen en la Tarjeta de instalación rápida o bien en la
etiqueta del dispositivo situada en la parte inferior del mismo.
Escriba http://dlinkrouter.local./ en la barra de direcciones de un
navegadores web. Siga las instrucciones en pantalla para completar la
instalación.
4 /
Espere a que los LED 2.4 GHz y 5 GHz inalámbricos se enciendan.
Nota: Si el router no tiene los LED inalámbricos 2.4 y 5G, consulte
en el Manual del usuario el significado de los LED.
5 /
6 /
http://dlinkrouter.local./ II
2.4 5G

16
ESPAÑOL
PREGUNTAS MÁS FRECUENTES
¿Por qué no puedo acceder a la utilidad de conguración basada en Web?
Verifique que http://dlinkrouter.local./ esté correctamente escrito en el
navegador. En este momento. no se está conectando a un sitio web ni tiene que
estar conectado a Internet. El dispositivo lleva incorporada la utilidad en un chip de
ROM en el propio dispositivo. El ordenador debe estar conectado a la red del router
y en la misma subred IP para conectarse a la utilidad basada en web.
¿Por qué no puedo acceder a Internet?
Compruebe que el router funciona reiniciándolo. Si sigue sin poderse conectar a
Internet, contacte con su proveedor de servicios de Internet.
¿Qué puedo hacer si olvido la contraseña del dispositivo o de la red
inalámbrica?
Si ha olvidado su contraseña, debe reiniciar el enrutador. Este proceso devolverá
todos los parámetros a los valores predeterminados de fábrica.
¿Cómo puedo restablecer la conguración predeterminada de fábrica del
router?
Localice el botón de reinicio en la parte posterior de la unidad. Con el router
encendido, utilice un clip sujetapapeles para mantener pulsado el botón durante
10 segundos. Suelte el botón y el router llevará a cabo el proceso de reinicio.
Para recibir asistencia técnica, la documentación del producto y otra
información, visite nuestro sitio web.
https://eu.dlink.com/support

19
ITALIANO
FATTO!
Adesso è possibile usare il router. Collegare i dispositivi alla rete
utilizzando il Nome Wi-Fi (SSID) e la password creati durante il
processo di configurazione.
Connettere il computer con il nome Wi-Fi e la password riportati
sulla scheda di installazione rapida o sull'etichetta posta alla base
del dispositivo.
Digitare http://dlinkrouter.local./ nella barra degli indirizzi di un
browser Web. Per completare la configurazione, seguire le istruzioni
sulla schermata.
4 /
Attendere l'accensione dei LED wireless 2.4 GHz e 5 GHz.
Nota: se il router non dispone di LED wireless 2.4 e 5G, consultare il
manuale utente per informazioni sul funzionamento dei LED.
5 /
6 /
http://dlinkrouter.local./ II
2.4 5G

20
ITALIANO
DOMANDE FREQUENTI
Perché non è possibile accedere all'utilità di congurazione basata sul
Web?
Verificare che http://dlinkrouter.local./ sia stato inserito correttamente. In
questa fase, non viene eseguita la connessione al sito Web né è necessario
essere connessi a Internet. Il dispositivo presenta l'utilità integrata su un chip
ROM nel dispositivo stesso. Il computer deve essere collegato alla rete del
router e nella stessa subnet IP per collegarsi all’utilità basata sul Web.
Perché non è possibile accedere a Internet?
Verificare che il router funzioni riavviandolo. Se non è ancora possibile
connettersi a Internet, contattare il provider dei servizi Internet.
Cosa fare se si dimentica la password del dispositivo / o la password
della rete wireless?
Se si dimentica la password, è necessario reimpostare il router. Questa
procedura consentirà di ripristinare le impostazioni predefinite.
Come è possibile ripristinare le impostazioni predenite del router?
Individuare il pulsante di ripristino posto sul pannello posteriore dell'unità.
Con il router acceso, utilizzare una graffetta per tenere premuto il pulsante per
10 secondi. Rilasciare il pulsante. Il router verrà riavviato.
Per l'assistenza tecnica, i documenti del prodotto e altre informazioni,
consultare il sito Web.
https://eu.dlink.com/support
Produktspezifikationen
| Marke: | D-Link |
| Kategorie: | Router |
| Modell: | DIR-2660 |
| USB Anschluss: | Ja |
| WLAN-Standards: | 802.11a, 802.11b, 802.11g, Wi-Fi 4 (802.11n), Wi-Fi 5 (802.11ac) |
| Breite: | 222.92 mm |
| Tiefe: | 176.58 mm |
| Gewicht: | 610 g |
| Produkttyp: | Tabletop-Router |
| Produktfarbe: | Schwarz |
| Höhe: | 65 mm |
| Energiequelle: | AC |
| AC Eingangsspannung: | 100 - 240 V |
| AC Eingangsfrequenz: | 50 - 60 Hz |
| Anzahl USB 2.0 Anschlüsse: | 1 |
| Betriebstemperatur: | 0 - 40 °C |
| Relative Luftfeuchtigkeit in Betrieb: | 10 - 90 % |
| Verpackungsbreite: | 280 mm |
| Verpackungstiefe: | 330 mm |
| Verpackungshöhe: | 125 mm |
| Paketgewicht: | 1235 g |
| Netzstandard: | IEEE 802.11a, IEEE 802.11ac, IEEE 802.11b, IEEE 802.11g, IEEE 802.11n, IEEE 802.1Q, IEEE 802.1p, IEEE 802.3ab, IEEE 802.3u |
| Unterstützte Sicherheitsalgorithmen: | WPA, WPA2, WPS |
| Quality of Service (QoS) Support: | Ja |
| Schnittstellentyp Ethernet-LAN: | Gigabit Ethernet |
| Zertifizierung: | FCC, IC, CE |
| Anzahl Ethernet-LAN-Anschlüsse (RJ-45): | 5 |
| Warentarifnummer (HS): | 85176990 |
| Ethernet LAN Datentransferraten: | 10,100,1000 Mbit/s |
| Anzahl der Antennen: | 4 |
| Temperaturbereich bei Lagerung: | -20 - 65 °C |
| Luftfeuchtigkeit bei Lagerung: | 5 - 95 % |
| Ausgangsstrom: | 2 A |
| Ausgangsspannung: | 12 V |
| USB 3.2 Gen 1 (3.1 Gen 1) Anzahl der Anschlüsse vom Typ A: | 1 |
| Top WLAN-Standard: | Wi-Fi 5 (802.11ac) |
| Palettenlänge (brutto): | 1200 mm |
| Palettenbreite (brutto): | 1100 mm |
| Ethernet-WAN: | Ja |
| DSL-WAN: | Nein |
| SIM-Karten-Slot: | Nein |
| 3G/4G USB Modem-Kompatibilität: | Nein |
| WLAN-Band: | Dual-Band (2,4 GHz/5 GHz) |
| WLAN Datentransferrate (max.): | 2532 Mbit/s |
| WLAN-Datenübertragungsrate (erstes Band): | 800 Mbit/s |
| WLAN-Datenübertragungsrate (zweites Band): | 1732 Mbit/s |
| 3G: | Nein |
| 4G: | Nein |
| DMZ-Unterstützung: | Ja |
| Firewall: | Ja |
| Antennen-Design: | Extern |
| WAN-Verbindungstyp: | RJ-45 |
| Versandkartonsbreite: | 297 mm |
| Versandkartonslänge: | 531 mm |
| Versandkartonshöhe: | 361 mm |
| Gewicht (innerer) Versandkarton: | 5940 g |
| Menge pro Versandkarton: | 4 Stück(e) |
| Nettogewicht Versandkarton: | 4940 g |
| Palettenbruttogewicht (Luft): | 162560 g |
| Anzahl der Kartons pro Palette (Luft): | 24 Stück(e) |
| Anzahl pro Palette (Luft): | 96 Stück(e) |
| Palettenhöhe (Luft): | 1218 mm |
| Palettenbruttogewicht (Meer): | 257600 g |
| Anzahl der Kartons pro Palette (See): | 40 Stück(e) |
| Anzahl pro Palette (See): | 160 Stück(e) |
| Palettenhöhe (See): | 1940 mm |
| Ethernet/LAN: | Ja |
Brauchst du Hilfe?
Wenn Sie Hilfe mit D-Link DIR-2660 benötigen, stellen Sie unten eine Frage und andere Benutzer werden Ihnen antworten
Bedienungsanleitung Router D-Link

1 Dezember 2024
1 Dezember 2024
16 Oktober 2024
15 Oktober 2024
15 Oktober 2024
25 September 2024
25 September 2024
25 September 2024
24 September 2024
24 September 2024
Bedienungsanleitung Router
- Router Acer
- Router Anker
- Router Apple
- Router Approx
- Router Asus
- Router Belkin
- Router BenQ
- Router Exibel
- Router Gembird
- Router Gigabyte
- Router Hama
- Router HP
- Router LogiLink
- Router Manhattan
- Router Medion
- Router Sweex
- Router Trust
- Router Clas Ohlson
- Router Cotech
- Router Makita
- Router Roland
- Router ZyXEL
- Router Bosch
- Router Alfa
- Router Siemens
- Router Buffalo
- Router TechniSat
- Router Allnet
- Router Devolo
- Router Eminent
- Router Linksys
- Router Netgear
- Router Telekom
- Router König
- Router Renkforce
- Router Thomson
- Router Black And Decker
- Router Skil
- Router Kenwood
- Router Schneider
- Router DeWalt
- Router Einhell
- Router Festool
- Router Topcom
- Router Nilox
- Router Motorola
- Router Nokia
- Router Vivanco
- Router Xiaomi
- Router EZVIZ
- Router Hikoki
- Router Hitachi
- Router Strong
- Router TCL
- Router Metabo
- Router Zoom
- Router Güde
- Router Netis
- Router Aruba
- Router Lindy
- Router Thrustmaster
- Router MSI
- Router Mercusys
- Router Razer
- Router TRENDnet
- Router Sagem
- Router Sigma
- Router Western Digital
- Router AVM
- Router Milan
- Router Zebra
- Router EnVivo
- Router TP-Link
- Router Kathrein
- Router Silverline
- Router Holzmann
- Router Alcatel
- Router Vtech
- Router Black Box
- Router Techly
- Router Barco
- Router Hercules
- Router Milwaukee
- Router Toolcraft
- Router Huawei
- Router JUNG
- Router Nest
- Router Edimax
- Router DrayTek
- Router Eumex
- Router Technicolor
- Router Totolink
- Router Kogan
- Router Peak
- Router Sagemcom
- Router Conceptronic
- Router T-Mobile
- Router I-Tec
- Router QNAP
- Router Icidu
- Router Vodafone
- Router Powerplus
- Router Digitus
- Router Lancom
- Router LevelOne
- Router Beafon
- Router Phicomm
- Router ZTE
- Router Cisco
- Router Sonos
- Router Tenda
- Router Kasda
- Router Foscam
- Router Ubiquiti Networks
- Router Synology
- Router Kopul
- Router Kramer
- Router Intellinet
- Router Asrock
- Router AJA
- Router Hikvision
- Router Patton
- Router Nexxt
- Router Planet
- Router AT&T
- Router EnGenius
- Router Mikrotik
- Router Teltonika
- Router Porter-Cable
- Router Google
- Router Comtrend
- Router Davolink
- Router Digi
- Router Digiconnect
- Router KPN
- Router Leoxsys
- Router Media-tech
- Router Mercku
- Router On Networks
- Router PENTAGRAM
- Router Proximus
- Router Sitecom
- Router SMC
- Router T-com
- Router Tele 2
- Router Telstra
- Router Ubee
- Router United Telecom
- Router UPC
- Router Verizon
- Router Wintec
- Router Wisetiger
- Router Zolid
- Router Vimar
- Router Cudy
- Router Siig
- Router Moxa
- Router RGBlink
- Router Iogear
- Router StarTech.com
- Router Kraun
- Router AirLive
- Router Smart-AVI
- Router Dahua Technology
- Router ModeCom
- Router Gefen
- Router Atlantis Land
- Router BT
- Router Cradlepoint
- Router Multitech
- Router Arris
- Router ATen
- Router KanexPro
- Router SPL
- Router Advantech
- Router RAVPower
- Router Digicom
- Router Juniper
- Router BZBGear
- Router Brickcom
- Router 3Com
- Router Kiloview
- Router B&B Electronics
- Router Eero
- Router Atlona
- Router Xantech
- Router WyreStorm
- Router AVMATRIX
- Router Alfatron
- Router Key Digital
- Router Rosewill
- Router HiRO
- Router Ocean Matrix
- Router Hamlet
- Router AVPro Edge
- Router Blustream
- Router Dovado
- Router Readynet
- Router Accelerated
- Router Mach Power
- Router ComNet
- Router MuxLab
- Router EXSYS
- Router Avenview
- Router Netcomm
- Router Allied Telesis
- Router A-NeuVideo
- Router Sixnet
- Router OneAccess
- Router Hawking Technologies
- Router Cambium Networks
- Router Lantronix
- Router Sabrent
- Router F-Secure
- Router Keewifi
- Router Shinybow
- Router Starlink
- Router Keenetic
- Router Lumantek
- Router Actiontec
- Router Billion
- Router LTS
- Router Intelix
- Router Arcadyan
- Router 7inova
- Router Nexaira
- Router FSR
- Router Amped Wireless
- Router Ruckus Wireless
- Router Premiertek
- Router GL.iNet
- Router Edgewater
- Router Milesight
- Router PulseAudio
- Router Predator
- Router Comprehensive
- Router Digitalinx
- Router Luxul
- Router Silentwind
- Router Keezel
Neueste Bedienungsanleitung für -Kategorien-

3 Dezember 2024

2 Dezember 2024
2 Dezember 2024
2 Dezember 2024
2 Dezember 2024

30 November 2024
29 November 2024
26 November 2024
25 November 2024
25 November 2024