Cybernet iOne C22 Bedienungsanleitung
Lesen Sie kostenlos die 📖 deutsche Bedienungsanleitung für Cybernet iOne C22 (40 Seiten) in der Kategorie Desktop. Dieser Bedienungsanleitung war für 14 Personen hilfreich und wurde von 2 Benutzern mit durchschnittlich 4.5 Sternen bewertet
Seite 1/40

LC
D
D
-PC
Use
r
C22
r
Gu
i
Ser
i
i
de
i
es

FCC-B
the limit
s
designe
installat
not inst
a
interfer
e
will not
o
to radio
on, the
u
measur
e
R
I
n
C
r
e
C
Notice
1
Notice
2
Trade
m
A
ll trad
e
Intel® i
s
Windo
w
A
ward
®
A
MI® is
Radio F
r
s
for a clas
d to provid
i
on. This e
q
a
lled and u
s
e
nce to rad
o
ccur in a
p
or televisi
o
u
ser is enc
e
s listed b
e
R
eorient or
n
crease th
e
C
onnect th
e
e
ceiver is
c
C
onsult the
1
The
c
resp
o
equi
p
2
Shiel
to co
m
arks
e
marks are
s
a register
e
s® 7/Vist
a
is a regist
e
a register
e
r
equenc
y
s
B digital
d
e
reasona
b
q
uipment g
e
s
ed in acc
o
i
o commun
p
articular i
n
o
n receptio
n
o
uraged to
e
low.
relocate th
e
e
distance
b
e
equipme
n
c
onnected.
dealer o
r
a
c
hanges or
o
nsible for
c
p
ment.
d
ed interfa
c
m
ply with t
the prope
r
e
d tradem
a
/XP/NT/20
e
red trade
m
e
d tradem
a
y
Interfer
e
This equi
p
d
evice, pur
s
b
le protecti
o
e
nerates u
s
o
rdance wi
t
ications. H
stallation.
n
, which ca
try to corr
e
e
receiving
b
etween th
t into an o
u
a
n experie
n
modificati
o
c
omplianc
e
c
e cables
a
h
e emissio
ties of thei
r
a
rks of Inte
l
0
0/98/95 a
r
m
ark of Ph
o
rk of Amer
i
e
nce Stat
e
p
ment has
s
uant to p
a
o
n against
s
es and ca
n
t
h the instr
u
owever, th
e
I
f this equi
p
n be deter
m
e
ct the inte
antenna.
e equipme
n
u
tlet on a c
i
ced radio/
t
o
ns not ex
p
e
could voi
d
a
nd A.C. p
o
n limits.
r
respectiv
e
l
Corporati
o
r
e register
e
o
enix Tech
ican Mega
t
e
ment
been teste
a
rt 15 of th
e
harmful int
n
radiate r
a
u
ction man
u
e
re is no g
u
p
ment doe
s
m
ined by t
u
rference b
y
nt and rec
e
ircuit differ
e
elevision t
e
p
ressly app
d
the user'
s
o
wer cord, i
e
owners.
o
n.
e
d tradema
r
nologies L
t
t
rends Inc
d and foun
FCC rule
s
erference i
a
dio freque
n
ual, may c
a
u
arantee t
h
s
cause ha
r
u
rning the
e
y
one or m
o
e
iver.
e
nt from th
a
e
chnician f
o
roved by t
h
s
authority
t
f any, mus
t
r
ks of Micr
o
t
d.
d to compl
y
s
. These li
m
n a reside
n
n
cy energy
a
use harm
f
h
at interfer
e
r
mful interf
e
e
quipment
o
o
re of the
a
t to which
o
r help.
h
e party
t
o operate
t
t
be used i
n
o
soft Corp
o
y
with
m
its are
n
tial
and, if
ul
e
nce
e
rence
o
ff and
the
t
he
n
order
ration.

Safe
1.
Al
2. K
e
3. L
a
4. T
h
e
q
5. C
o
b
e
6. P
l
pl
7.
Al
8.
Al
9. N
e
s
h
10. D
o
c
o
11. T
h
c
o
p
r
12. D
o
13.
W
m
C
a
AN
G
14. If
s
e
15. D
o
m
DO NO
T
STORA
EQUIP
M
CAUTI
O
same o
r
ty Ins
t
ways read
e
ep this eq
a
y this equi
h
e opening
q
uipment f
r
o
nfirm the
v
e
fore conn
e
ace the po
a
ce anythi
n
ways unpl
u
l cautions
a
e
ver pour
a
h
ock.
o
not disa
b
o
nnected t
o
h
e Optical
S
o
ntrols or a
r
ohibited.
o
not touc
h
W
hen installi
etal shield
a
ble distrib
N
SI/NF PA
rounding o
f
any of the
f
e
rvice pers
o
The po
w
Liquid h
a
The equ
i
The equ
i
the Use
r
The equ
i
The equ
i
o
not atte
m
odification
T
LEAVE
T
G
E TEMP
E
M
ENT.
O
N: Dange
r
r
equivalen
t
ructio
the safety
uipment a
w
pment on
a
s on the e
n
om overhe
v
oltage of
t
e
cting the
e
wer cord i
n
n
g over th
e
u
g the Po
w
a
nd warnin
a
ny liquid i
n
le the prot
e
o
a ground
e
S
torage de
d
justment
s
the Laser
ng the coa
is reliably
c
ution syste
70, the N
a
f
Outer Co
n
f
ollowing s
o
nnel:
er cord or
a
s penetra
t
i
pment ha
s
i
pment ha
s
's Guide.
i
pment ha
s
i
pment ha
s
m
pt to remo
v
should be
HIS EQUI
P
E
RATURE
r
of explosi
o
t
type reco
ns
instruction
s
w
ay from h
u
a
reliable fl
a
n
closure ar
e
ating. DO
N
he power
s
e
quipment
t
n
such a w
a
power co
r
er Cord b
e
gs on the
e
n
to the ope
e
ctive grou
e
d main so
c
vices are
c
or perfor
m
lens insid
e
x
ial cable t
o
c
onnected
t
ms should
a
tional Elec
t
n
ductive S
h
i
tuations a
r
p
lug is da
m
ed into the
been exp
o
not worke
been dro
p
obvious si
v
e or upgr
a
c
onducted
P
MENT IN
ABOVE 5
0
o
n if batter
y
m
mended
ii
s
carefully.
u
midity.
a
t surface
b
e
for air co
N
OT COV
E
s
ource and
t
o the pow
e
a
y that it c
a
d.
fore inserti
e
quipment
s
ning. Thi
s
nding pin f
r
c
ket/outlet.
lassified a
s
m
ance of pr
the optica
o
the TV T
u
t
o a protec
t
be ground
e
t
rical Code
h
ield of a C
o
r
ise, have t
h
m
aged.
equipmen
t
o
sed to mo
d
well or y
o
p
ped and d
a
gns of bre
a
a
de any co
m
by service
AN UNCO
° C (122°
F
y
is incorre
b
y the ma
n
b
efore sett
n
vection h
e
E
R THE O
P
adjust ac
c
e
r inlet.
a
nnot be st
e
ng any ad
d
s
hould be
n
s
will caus
e
r
om the pl
u
s
Class 1 L
ocedures
o
l storage d
u
ner, it is n
ive earthin
g
e
d (earthe
d
(NEC ), in
oaxial Cab
he equipm
e
t
.
isture.
o
u cannot
g
a
maged.
a
kage.
m
ponent b
y
personnel
.
N
DITIONE
F
). IT MA
Y
ctly replac
e
ufacturer.
ng it up.
e
nce prote
c
P
ENINGS.
ordingly to
e
pped on.
d
-on card
o
n
oted.
damage
a
u
g. The eq
aser prod
u
o
ther than t
rive.
ecessary t
o
g
system o
d
) in accord
particular,
le.
e
nt checke
g
et it worki
n
y
yourself,
a
.
D ENVIR
O
Y
DAMAG
E
e
d. Replac
e
c
t the
110/220V
Do not
r module.
a
nd/or elec
t
uipment m
cts. Use
o
hose spec
i
o
ensure th
f the buildi
n
ance with
Section 82
d by autho
n
g accordi
n
a
ny install
a
O
NMENT
W
THE
e
only with
rical
u
st be
f
fied is
at the
n
g.
0.93,
rized
n
g to
a
tion or
W
ITH A
the

iv
TABLE OF CONTENTS
FCC-B Radio Frequency Interference Statement ...................................................................... i
Trademarks ................................................................................................................................... i
Safety Instructions ...................................................................................................................... ii
WEEE Statement ........................................................................................................................ iii
Introduction ................................................................................................................................. 1
LCD-PC C22 Series Specifications ............................................................................................ 1
Processor Support .................................................................................................................. 1
Motherboard Core Logic ...................................................................................................... .. 1
Memory Support ...................................................................................................................... 1
Networking ............................................................................................................................... 1
Audio ......................................................................................................................................... 1
Hard Disk Drive ........................................................................................................................ 2
Mounting ................................................................................................................................... 2
LCD Panel ................................................................................................................................. 2
Expansion Slots ....................................................................................................................... 2
Front Lower Right Bezel ......................................................................................................... 2
Right Side Bezel ....................................................................................................................... 2
Left Side Bezel ......................................................................................................................... 2
Bottom I/O Panel ..................................................................................................................... 3
Power Supply ........................................................................................................................... 3
Dimensions .............................................................................................................................. 3
Power Management .................................................................................................................... 8
Waking the System Up .......................................................................................................... 10
Energy Saving Tips ............................................................................................................... 10
C22 Series Overview……...…………..…………………………………...…………………………11
On Screen Display Buttons………………………………………………………………………….14
On Screen Display Usage ..................................................................................................... 15
System Assembly ..................................................................................................................... 20
Necessary Tools ...................................................................................................................
20
Orientation of Key Parts ........................................................................................................ 21
C22 Series Disassembly ....................................................................................................... 22
Installing the CPU .................................................................................................................. 24
Installing the CPU Heat Sink ................................................................................................. 25

v
Installing the Memory Module DDR3 SO-DIMM .................................................................. 26
Installing the Hard Disk Drive ............................................................................................... 27
Installing the Optical Disk Drive ........................................................................................... 28
Installing the Mini-PCIe Card (Optional) .............................................................................. 30
Installing the Cover ............................................................................................................... 31
Cybernet Recycling SOP…………………………………………………………………………….33
Figures
Figure 1: Front View with Optional Webcam………….…………………………….....……..……11
Figure 2: Left side view with Optical Drive……………………………………………....…..…….12
Figure 3: Side USB Ports and optional card reader.…………………………………......………13
Figure 4: Touch Panel and Power Button………..……..………………..……………….....……..13
Figure 5: On Screen Display Buttons…………………...…..…………..…………….…..…………14
Figure 6: On Screen Display Icons……………………...…..…………..…………….…..………...15
Figure 7: Back view….. ......................................................................................................... …18
Figure 8: Bottom Panel I/O Ports ............................................................................................. 18
Figure 9: Ctrl+Alt+Del button .................................................................................................. 19
Figure 10: CPU Heat Sink Ventilation Fan .............................................................................. 19
Figure 11: System Fans, CPU Heat Sink Fan and Ventilation............................................... 21
Figure 12: Open system .......................................................................................................... 23
Figure 13: Open system with GPU ......................................................................................... 23

C22 Series
Page 1
Introduction
Congratulations for purchasing the C22 Series. The LCD-PC C22 Series is your best
Slim LCD PC choice. With the fantastic appearance and small form factor, it can easily
be set anywhere. The feature packed platform also gives you an exciting PC experience.
C22 Series Specifications
Processor Support
4th generation Intel® Core™ i3 i5 and Core™ i7 in the LGA1150 package up to 35W
(Max 65W for IGD version).
Motherboard Core Logic
Intel® H81 Express chipset (Haswell)
Memory Support
DDR3 1333/1600 MHz SO-DIMM SDRAM (Un-buffered Non-ECC)
2 DDR3 1333/1600 MHz SO-DIMM slots (8GB Max) with 1.5V.
Video & Graphics
Intel® integrated H81 Chipset with Intel® HD Graphics
Intel GMA HD/Intel Clear Video HD Technology
Built-in support for 1080p HD video playback, HDMI 1.4 & Blu-ray 3D support
Supports Microsoft® DirectX 11.1, OpenCL 1.2 and OpenGL 4.0.
DVMT allocated as needed from 128MB to 1.70GB
Maximum display resolution 2560 x 1600.
Video & Graphics for dedicate Nvidia GPU
Onboard NVIDIA GeForce N14M-GE GPU
2.0GB sDDR3 128-bit RAM
1080p HD video playback, HDMI 1.4 & Blu-ray 3D support.
Supports Microsoft® DirectX 11, Shader Model 5.0 and OpenGL 4.1
Maximum display resolution 2560 x 1600.
Networking
Supports 2 PCI Express LAN 10/100/1000 Fast Ethernet by Intel I217V Clarkville-V and
Realtek RTL8111G
Audio
2 internal speakers with 78dB+/-3dB @ 2.0W
HD Audio Codec Realtek® ALC892 Flexible 10-channel audio with jack sensing,
Compliant with Azalia 1.0 Spec

C22 Series
Page 2
Hard Disk Drive
Optional two 2.5” SATA III Hard Disk Drive or SATA SSD - Any Capacity
RFID Reader
Optional one 125KHz or one 13.56MHz.
Wall Mount
Support 75x75mm / 100x100mm VESA mounting hole, using M4 screw. The 75x75mm
can support max screw length of 12mm; and 100x100mm can support max screw length
of 16mm.
Swivel Stand
System Base enables left/right rotation up to 60 degrees, tilt from -5 to 60 degrees.
LCD Panel
21.5" LED widescreen 16:9 format display (1920x1080).
Optional Touch Screen
Ten-finger Multi-touch P-cap solution.
Webcam
Optional 3.0 Megapixel Camera
Expansion Slots
Two mini-PCIe (One full size and one half size)
Wireless
Optional 802.11 b/g/n + Bluetooth or 802.11 a/b/g/n + Bluetooth
Front Lower Right Bezel
Power On/Off Buttons
Display On/Off Adjust and also function as Menu Button
Contrast Adjust
Brightness Adjust
Right Side Bezel
Two USB 2.0 ports (for mouse and keyboard)
Optional card reader
Left Side Bezel
Optional one optical tray type disk drive – 2.5” slim or optional one additional 2.5” SATAII
HDD/SSD.

C22 Se
r
Botto
m
1 Ctrl+
A
1 DC/IN
2 USB2
HDMI-I
N
Mic in
4 TV Tu
A
udio L
e
Powe
r
120 Wa
t
DC Out
p
Intern
a
Option
a
Dime
n
598mm
598mm
r
ies
m
I/O Pa
n
A
lt+Del butt
o
port, 1 H
D
.0 ports, 2
N
port, 1 R
e
ner ports -
e
ft & Audi
o
Supply
t
t Power A
d
p
ut: 19V,
6
a
l Batter
y
a
l battery
sions
(H) x 420
m
(H) x 377
m
n
e
l
o
n
D
MI-OUT p
o
USB3.0 p
o
e
altek LAN
Optional
w
Right),
d
apter,
A
C
6
.32A or 1
2
y
to last 2
0
m
m (W) x 2
6
m
m (W) x 5
5
o
rt, 1 DP p
o
rts, 1 Seri
a
port, 1 Inte
w
ith TV Tun
Input: 100
~
V, 10.00A
0
mins de
p
6
2 mm (D)
5
mm (D) (
Page 3
o
rt
a
l port, 1 C
M
l LAN port,
er (COAX
~
240V
A
C,
120
W
p
ending
o
(with stan
d
w
ithout sta
M
OS clear
3 Audio ja
c
Cable In,
R
2A, 50-60
W
Max.
o
n syste
m
d
)
a
nd)
button, 1 1
c
ks – Line
i
R
CA Comp
o
Hz
m
usage/l
o
394 port, 1
i
n, Line Ou
t
o
site Vide
o
o
ading.
t
and
In,

C22 Series
Page 4
Intended use
The C22 Series is designed for general pc application purpose for hospital environment
and for diagnosis. It could be used for Radiology, PACS (Picture Archiving
Communication Systems), LIS (Lab Information Systems) and Electronic Record
purpose. It shall not be used for life-supporting system.
WARNING: Critical diagnostic decision must not be based solely on images displayed by
this device.
Unpacking
After opening the carton, there is the LCD PC with an accessory box. Check carefully to
see if there are any damages or missing parts.
Read the Manual
Please read this manual carefully and remember to keep this manual for future reference.
Safety Instructions & Cleaning
This product has undergone various tests in order to comply with safety standards.
Inappropriate use or open the housing may be dangerous. Please remember to follow the
instructions below to ensure your safety during the installation and operating process.
Transporting & Placement of unit
1. When moving the unit on a cart; be very cautious. Quick stops, excessive forces and
uneven surfaces may cause the cart to overturn thus risking the unit to fall to the
ground.
2. If the LCD PC unit does fall to the ground, immediately turn the power off and
disconnect cords. Then contact a service technician for repairs. Continual use of
the unit may result cause a fire or electric shock. Also, do not repair the unit on your own.
3. Having two or more people transporting the LCD PC unit is recommended. In addition,
when installing the unit by suspending it also requires two or more people.
4. Before suspending the unit, make sure the material used for suspension is sturdy and
stable. If not properly suspended, the LCD PC unit may fall and cause serious injury to
people standing nearby as well as to the unit itself.
5. If the user wishes to mount the LCD PC unit, remember to use only the mounting
hardware recommended by the manufacturer.

C22 Series
Page 5
Electrical and Power Source Related
1. This LCD PC unit must operate on a power source as shown on the specification label.
If you are not sure what type of power supply used in the area, consult your dealer or local
power supplier.
2. The power cords must not be damaged. Applied pressure, added heat, and tugging
may damage the power cord.
3. The power cord must be routed properly when setup takes place. We advise that this
aspect measure is to prevent people from stepping on the cords or while the unit is
suspended to prevent flying objects from getting tangled with the unit.
4. Do not overload the AC outlets or extension cords. Electrical shocks or fires may occur
from overloading.
5. Do not touch the power source during a thunderstorm.
6. If your hands are wet, do not touch the plug.
7. Use your thumb and index finger, grip firmly on the power cord to disconnect from the
electrical socket. By pulling the power cord, may result in damaging it.
8. If the unit is not going to be in use for an extended period of time, remember to
disconnect the unit.
9. The LCD PC unit uses 19V DC output from an adapter. Connect the unit to a power
source with the same numerical value as indicated. Please use only the power cord
provided by the dealer to ensure safety and EMC compliance.
WARNING: To avoid risk of electric shock, this equipment must only be connected to a
supply mains with protective earth.
Various Factors of Environment
1. Operating Temperature: 0°C to 40°C ; Non-operating temperature: -20°C to 60°C.
2. Operating Humidity (Non-Condensing): 10% to 90%. Non-operating Humidity
(Non-condensing): 10% to 90%.
3.Do not insert objects into the openings.
4. Do not have liquids seep into the internal areas of the LCD PC unit.
5. Having liquids seep in or inserting objects into the unit may result in electric shocks

C22 Series
Page 6
from taking and/or short circuiting the internal parts.
6. Do not place the LCD PC unit in the presence of high moisture areas.
7. Do not install the LCD PC unit in a wet environment.
8. Do not place unit near heat generating sources.
9. Do not place the unit in a location where it will come in contact with fumes or steam.
10. Remember to keep the LCD PC unit away from the presence of dust.
11. If water has flow in or seep in, immediately disconnect the open frame unit. Then
contact a service technician for repairs.
Ventilation Spacing
1. Do not cover or block the openings on the top and back sides of the LCD PC unit.
Inadequate ventilation may cause overheating thus reducing the lifespan of the unit.
2. Unless proper ventilation is present, do not place unit in an enclosed area; such as a
built-in shelf. Keep a minimum distance of 10 cm between the LCD PC unit and wall.
Cleaning the unit
1. Remember to turn off the power source and to unplug the cord from the outlet before
cleaning the unit.
2. Carefully dismount the unit or bring the unit down from suspension to clean.
3. Please use a dry soft cloth to clean the unit.
4. Take a dry cloth and wipe the unit dry. Remember to avoid having liquids seep into the
internal components and areas of the LCD PC unit.
Servicing, Repairing, Maintenance & Safety Checks
1. If the unit is not functioning properly, observe the performance level of the LCD PC
closely to determine what type of servicing is needed.
2. Do not attempt to repair the LCD PC unit on your own. Disassembling the cover
exposes users’ to high voltages and other dangerous conditions. Notify and request a
qualified service technician for servicing the unit.
3. To avoid risk of electric shock, this equipment must only be connected to a supply
mains with protective earth.
r
ies
of the foll
o
o
ntact a qu
a
u
id was sp
i
unit is soa
k
u
nit is dro
p
m
oke or str
a
e
power co
r
n
the functi
o
n
replacem
e
a
ns use re
p
e
ristics and
ult in starti
n
o
wing situa
t
a
lied servi
lled on the
k
ed with liq
u
ped or da
m
a
nge odor i
s
r
d or plug i
s
o
ns of the
u
e
nt parts a
r
p
lacement
p
performa
n
n
g a fire, el
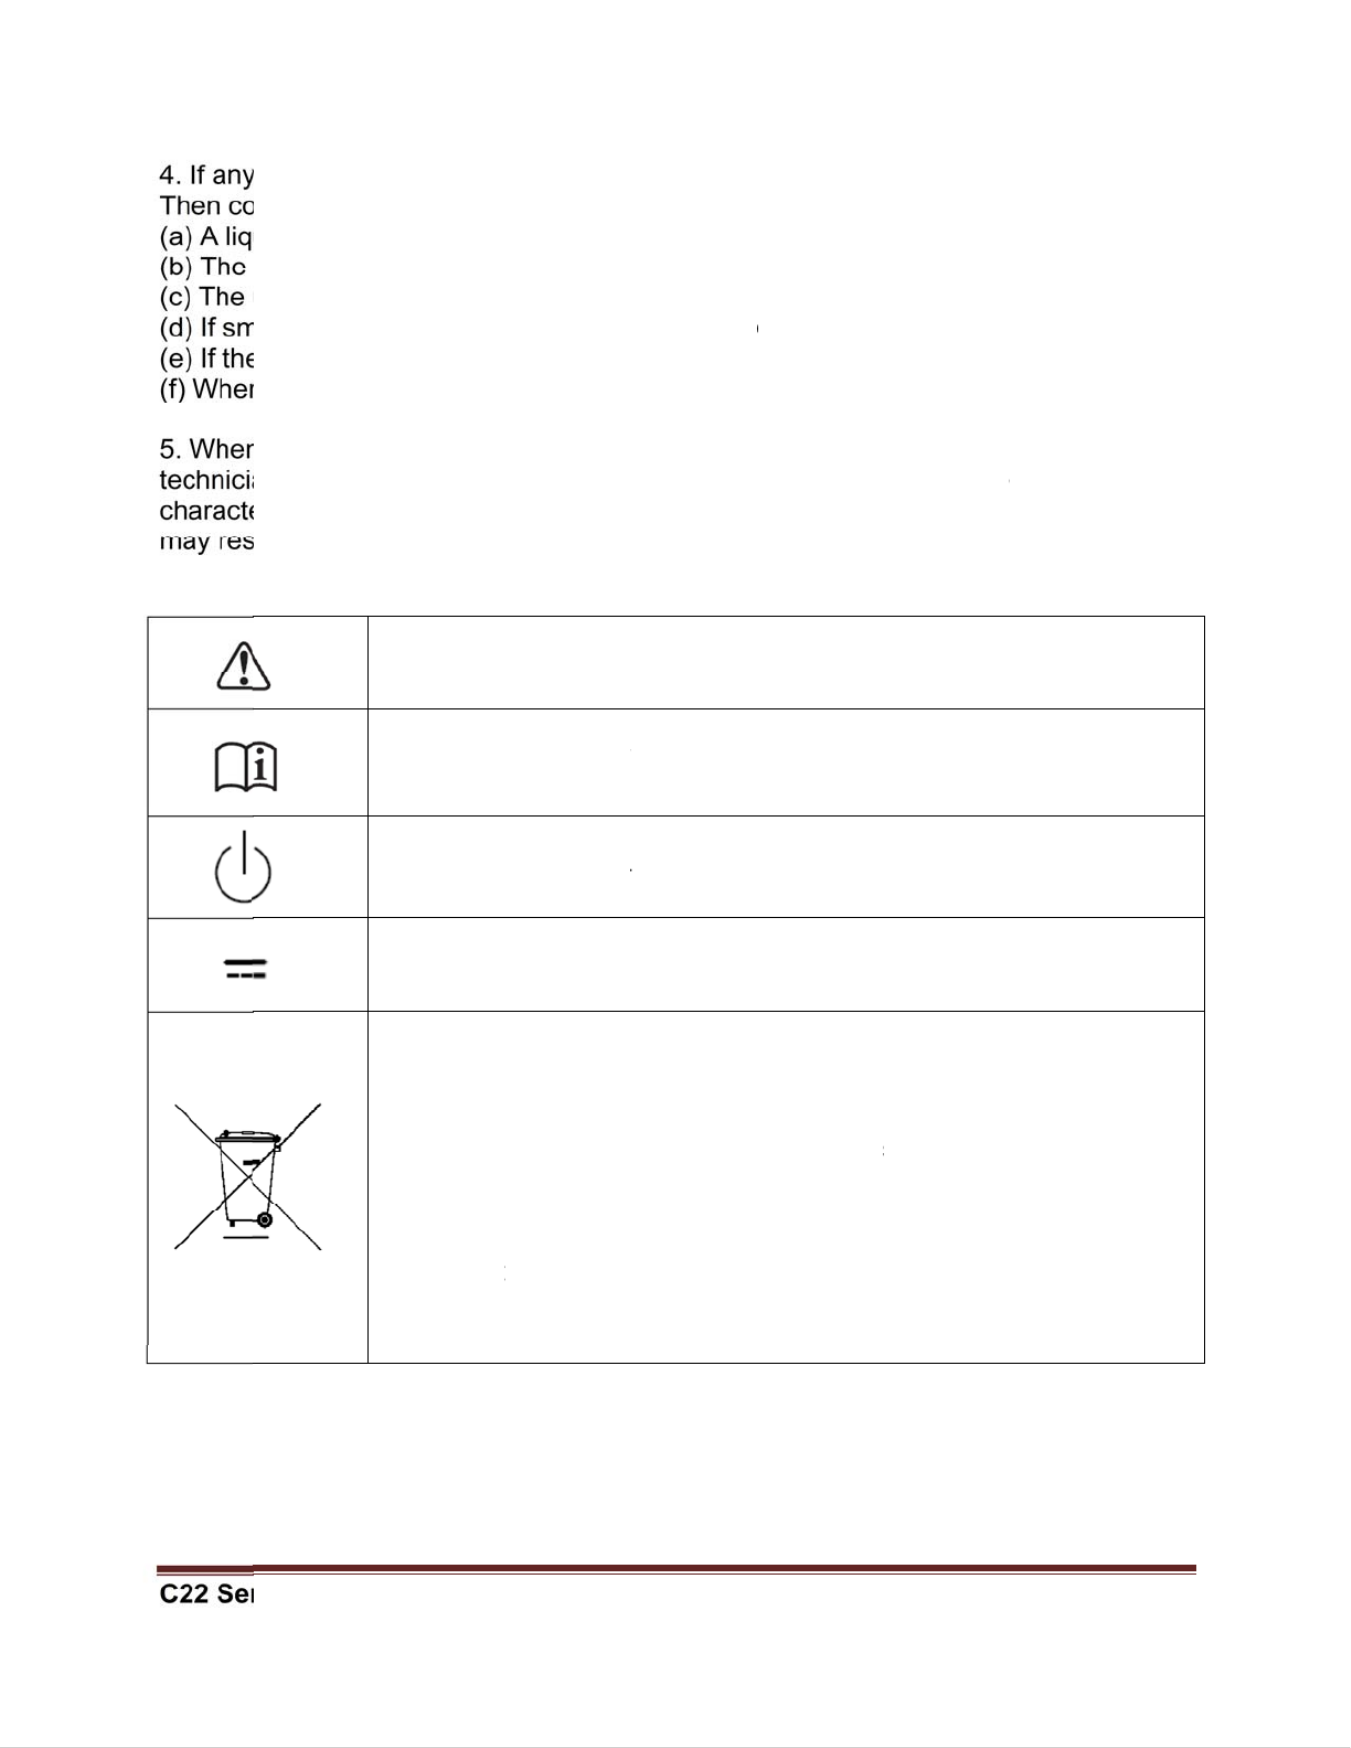
ISO 7000-
0
ISO 7000-
1
for use.
IEC 60417
IEC 60417
EU-wide l
e
that waste
must be di
s
includes m
power cor
d
please foll
o
where you
agreemen
t
electronic
p
Member S
t
t
ions occur
c
e technici
a
unit or obj
e
u
ids.
m
aged.
s
flowing o
u
s
damaged
.
u
nit are dy
s
r
e needed
f
p
arts speci
f
n
ce as the
o
ectrical sh
o
0
434: Caut
1
641: Follo
-5009: re
a
-5031: Dir
e
e
gislation,
a
electrical
a
s
posed of
s
onitors an
d
d
s. When y
o
o
w the gui
d
purchased
s made be
t
p
roducts o
n
t
ates.
Page 7
turn the p
o
a
n.
e
cts have f
a
u
t of the op
.
s
functional.
f
or the LC
D
f
ied by the
o
riginal par
t
o
ck and/or
o
i
on, consul
t
w
operatin
g
dy to use.
e
ct current.
a
s impleme
n
a
nd electro
n
s
eparately
f
d
electrical
a
o
u need to
d
ance of yo
the produ
c
t
ween you
r
n
ly applies
t
o
we
r
sourc
e
a
llen into t
h
erating uni
t
D
PC unit,
m
manufactu
r
t
s. If unaut
h
o
ther dang
e
t
ACCOM
P
g
instructio
n
ted in ea
c
n
ic product
s
f
rom norm
a
a
ccessorie
dispose of
ur local au
t
c
t, or if app
r
self. The
m
t
o the curr
e
e
off and u
n
h
e unit.
t
.
m
ake sure
s
r
er, or thos
h
orized pa
r
e
rs.
P
ANYING
D
ns o
r
Cons
c
h Member
s
carrying
t
a
l househol
s, such as
your pane
l
t
hority, or
a
licable, foll
o
m
ark on ele
c
e
nt Europe
a
n
plug the u
s
ervice
e
with the
s
ts are use
d
D
OCUMEN
T
ult instructi
State, req
u
t
he mark (l
e
d waste. T
h
signal cabl
e
l
PC produ
c
a
sk the sho
p
o
w any
c
trical and
a
n Union
nit.
s
ame
d
it
T
S.
ons
u
ires
e
ft)
h
is
e
s or
c
ts,
p
Produktspezifikationen
| Marke: | Cybernet |
| Kategorie: | Desktop |
| Modell: | iOne C22 |
Brauchst du Hilfe?
Wenn Sie Hilfe mit Cybernet iOne C22 benötigen, stellen Sie unten eine Frage und andere Benutzer werden Ihnen antworten
Bedienungsanleitung Desktop Cybernet

17 August 2024
Bedienungsanleitung Desktop
- Desktop Samsung
- Desktop Acer
- Desktop Apple
- Desktop Asus
- Desktop BenQ
- Desktop Gigabyte
- Desktop HP
- Desktop Medion
- Desktop Microsoft
- Desktop Sharkoon
- Desktop Sony
- Desktop LG
- Desktop Sharp
- Desktop WOOOD
- Desktop Haier
- Desktop TrekStor
- Desktop Optoma
- Desktop PEAQ
- Desktop Toshiba
- Desktop Mio
- Desktop ViewSonic
- Desktop Dell
- Desktop LC-Power
- Desktop Lenovo
- Desktop MSI
- Desktop JYSK
- Desktop Tripp Lite
- Desktop Razer
- Desktop ELO
- Desktop Targa
- Desktop Xoro
- Desktop Vtech
- Desktop Parisot
- Desktop Wehkamp
- Desktop Supermicro
- Desktop Faytech
- Desktop InFocus
- Desktop NEC
- Desktop Seagate
- Desktop Fujitsu
- Desktop Maxdata
- Desktop Packard Bell
- Desktop Kogan
- Desktop ZTE
- Desktop Atari
- Desktop Kramer
- Desktop Asrock
- Desktop ECS
- Desktop Promethean
- Desktop Vorago
- Desktop Emachines
- Desktop Ibm
- Desktop MP
- Desktop ONYX
- Desktop Alienware
- Desktop Zotac
- Desktop Intel
- Desktop Moxa
- Desktop VXL
- Desktop Planar
- Desktop Shuttle
- Desktop Altra
- Desktop Axis
- Desktop Advantech
- Desktop Elitegroup
- Desktop BDI
- Desktop Bestar
- Desktop Pelco
- Desktop Foxconn
- Desktop System76
- Desktop NComputing
- Desktop Aopen
- Desktop Smart Things
- Desktop Zoostorm
- Desktop Dell Wyse
- Desktop MvixUSA
- Desktop AIS
- Desktop Wyse
Neueste Bedienungsanleitung für -Kategorien-
30 November 2024

15 Oktober 2024

14 Oktober 2024
12 Oktober 2024
11 Oktober 2024

9 Oktober 2024

9 Oktober 2024

7 Oktober 2024
4 Oktober 2024
4 Oktober 2024