Canon Pixma TS8000 Bedienungsanleitung
Lesen Sie kostenlos die 📖 deutsche Bedienungsanleitung für Canon Pixma TS8000 (100 Seiten) in der Kategorie Drucker. Dieser Bedienungsanleitung war für 28 Personen hilfreich und wurde von 2 Benutzern mit durchschnittlich 4.5 Sternen bewertet
Seite 1/100

Aloitusopas
Før du begynder
Komme i gang
Uppstartsguide
Ξεκινώντας
Guía de inicio
Para Começar
Guida Rapida
Aan de Slag-gids
Inbetriebnahme
Démarrage
Getting Started

1
2
Tulostimen asennus sivu1 ............................................................................
Yhdistäminen tietokoneeseen ja älypuhelimeen/tablet-tietokoneeseen .....sivu5
Kun tulostin aloittaa tulostuksen, käyttöpaneeli avautuu ja paperin luovutustaso tulee ulos automaattisesti. Pidä
tulostimen edusta vapaana.
Installation af printeren side1 ........................................................................
Tilslutning med computer og smartphone/tablet side5 ..................................
Når printeren starter udskrivning, åbnes kontrolpanel automatisk, og udbakken til papir kommer ud. Sørg for, at
der ikke er nogen genstande på den forreste del af printeren.
Installere skriveren side 1 .............................................................................
Koble til datamaskin og smarttelefon/nettbrett side 5 ...................................
Når skriveren starter å skrive ut, åpnes betjeningspanelet automatisk, og papirutmatingsbrettet kommer ut.
Sørg for at det ikke er noen hindringer foran skriveren.
Installera skrivaren sida1 ..............................................................................
Ansluta med dator och smarttelefon/surfplatta sida5 ....................................
När skrivaren börjar skriva ut öppnas manöverpanelen automatiskt och utmatningsfacket skjuts ut. Se till att det
inte nns några hinder vid skrivarens front.
Εγκατάσταση του εκτυπωτή σελίδα1 ............................................................
Σύνδεση με υπολογιστή και Smartphone/Tablet σελίδα5 ..............................
Όταν ο εκτυπωτής αρχίζει την εκτύπωση, ανοίγει αυτόματα ο πίνακας λειτουργίας και βγαίνει προς τα έξω η
θήκη εξόδου χαρτιού. Φροντίστε να μην υπάρχουν εμπόδια μπροστά από τον εκτυπωτή.
Instalación de la impresora.............................................................página 1
Conexión con el ordenador y con el teléfono inteligente o la tableta página 5 ....
Cuando la impresora empieza a imprimir, se abre automáticamente el panel de control y se extrae la bandeja
de salida del papel. Mantenga la parte frontal de la impresora libre.
Instalando a impressora página 1 .................................................................
Conectando a um computador e smartphone/tablet página 5 ......................
Quando a impressora começa a imprimir, o painel de controle é aberto automaticamente e a bandeja de saída
do papel sai. Mantenha a frente da impressora livre de obstáculos.
Installazione della stampante pagina 1 .........................................................
Connessione con computer e smartphone/tablet pagina 5 ...........................
Quando la stampante inizia a stampare, il pannello dei comandi e il vassoio di uscita della carta si aprono
automaticamente. Mantenere libera l'area davanti alla stampante.
De printer installeren pagina 1 ......................................................................
Verbinden met een computer en smartphone/tablet.......................pagina 5
Het bedieningspaneel en de papieruitvoerlade worden automatisch geopend wanneer het afdrukken wordt
gestart. Zorg dat er zich geen voorwerpen vóór de printer bevinden.
Installation des Druckers Seite1 ...................................................................
Herstellen einer Verbindung mit einem Computer und Smartphone/Tablet .... Seite5
Wenn der Druckvorgang beginnt, wird das Bedienfeld automatisch geöffnet und das Papierausgabefach fährt
aus. Achten Sie darauf, dass sich keine Gegenstände vor dem Drucker benden.
Installation de l'imprimante page1 .................................................................
Connexion avec un ordinateur et un smartphone ou une tablette page5 ......
Lorsque l'imprimante commence à imprimer, le panneau de contrôle s'ouvre automatiquement et le bac de
sortie papier sort. Veillez à ce qu'aucun obstacle ne soit placé devant l'imprimante.
Installing the Printer page1 ............................................................................
Connecting with Computer and Smartphone/Tablet page5 ...........................
When the printer starts printing, automatically the operation panel opens and the paper output tray comes out.
Keep the front of the printer clear.

1
ENGLISH
1. Installing the Printer
For the procedure with icon, you can watch the video
tutorials for installing the printer by accessing the following
URL or scanning the QR codes.
Watch the
movie
Checking Included Items
CD-ROM for
computer
(Windows)
Manuals
Removing Packing Materials/Turning
on the Printer
You can watch the procedure on a movie by scanning
the QR codes.
Android iOS
1 Remove the packing materials (such as tape and
protective lm on the touch screen) from outside
the printer.
Using the printer with the protective lm attached
may cause malfunction.
2 a Hook the hollows on the both sides of
the printer with your ngers and open the
scanning unit / cover.
b Remove the orange tape and discard it.
a
b
3
LIFT UP the scanning unit / cover, and then close
it.
4 a Connect the power cord.
b Lift the operation panel.
c Press the button.ON
Do not connect a USB cable yet.
b
a
c
5 Drag the screen and tap the language to select.
6 Read the messages and follow the on-screen
instructions.
7 Read the messages and tap .OK
2
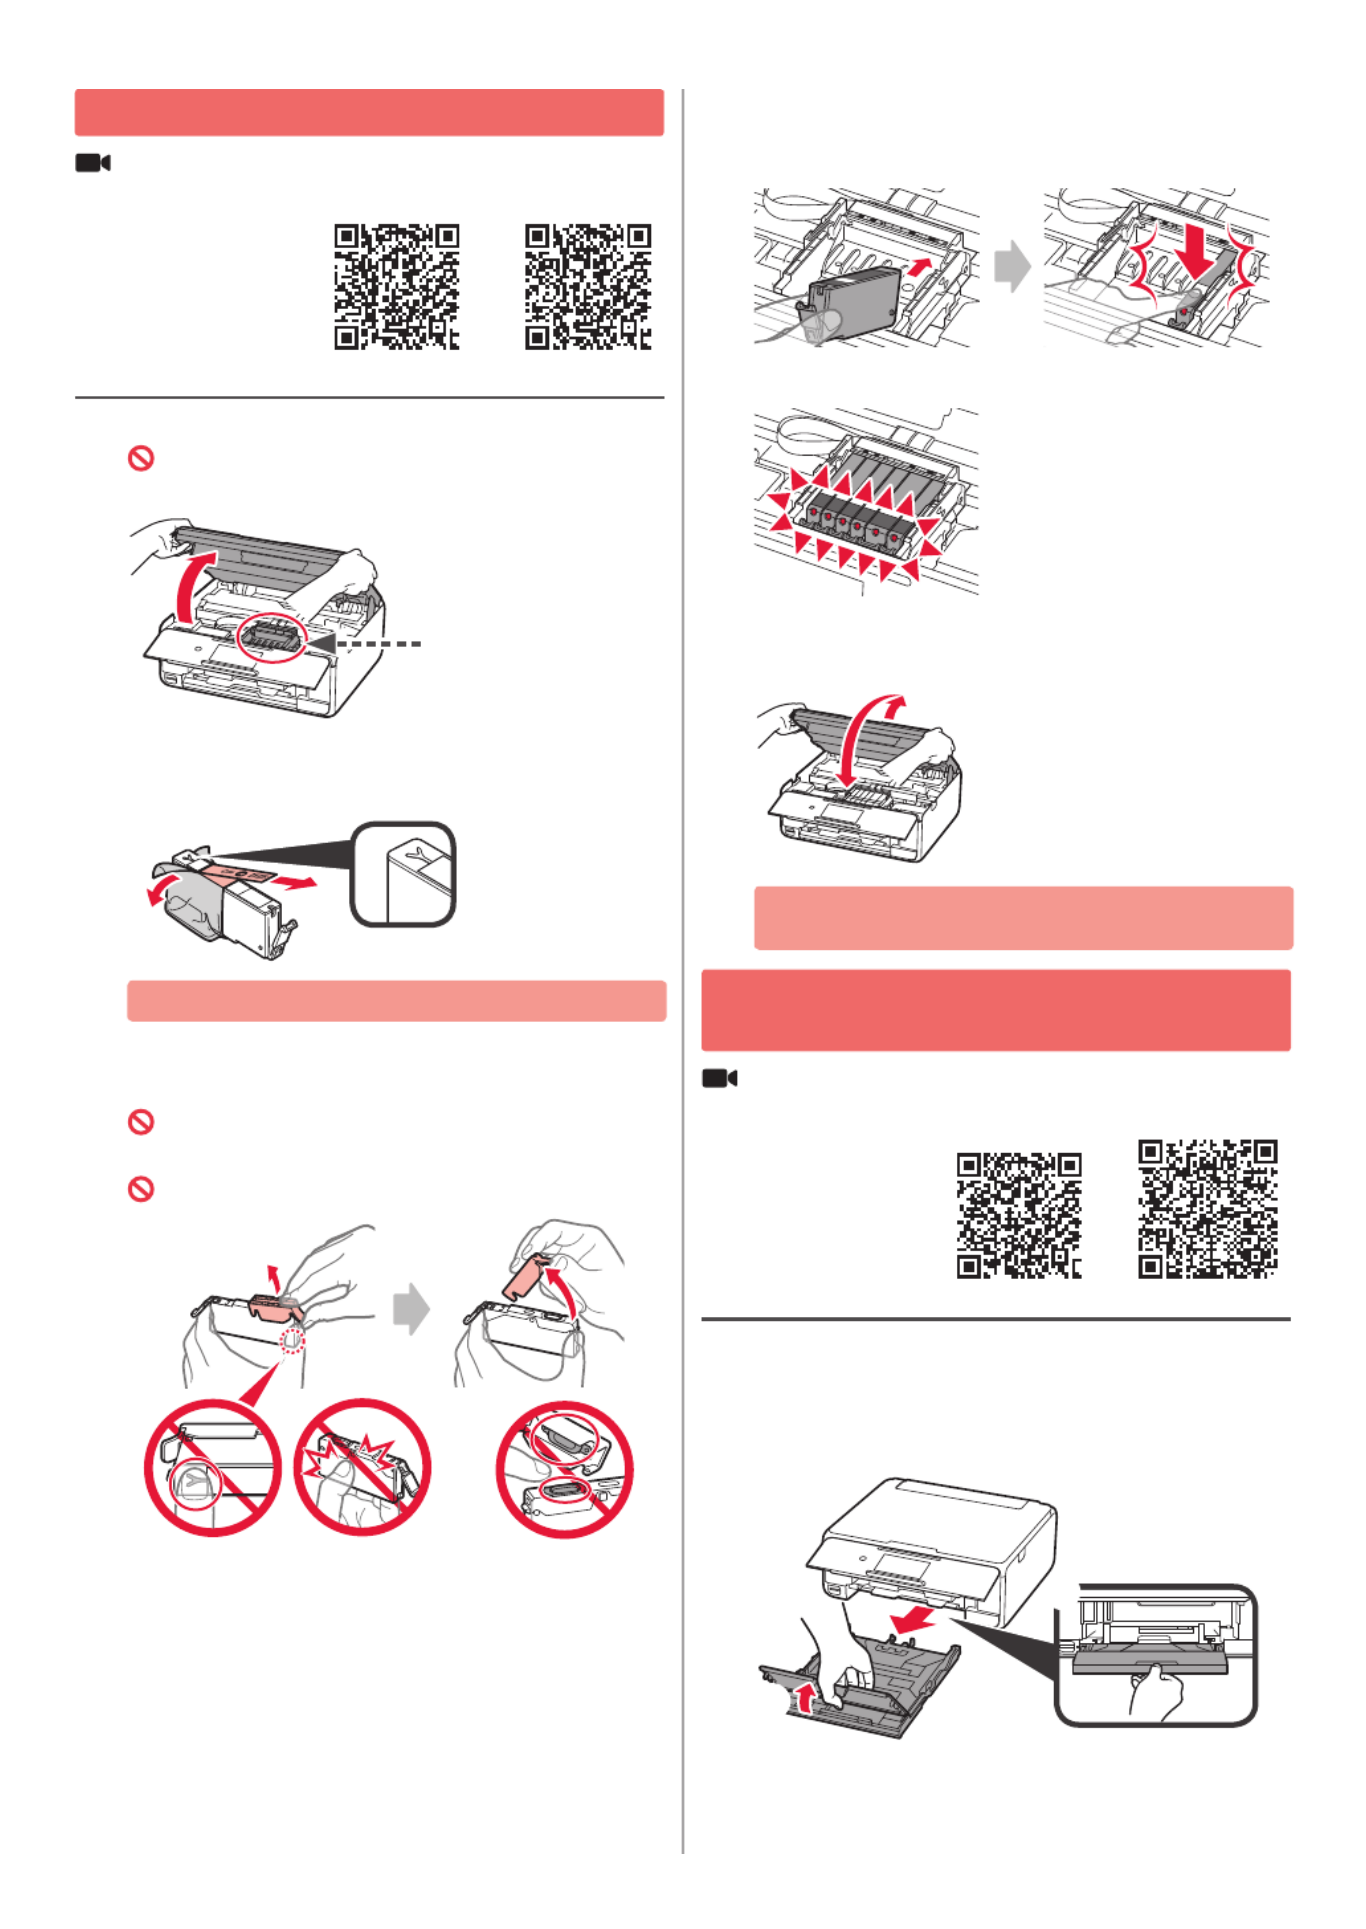
Installing the Ink Tank
You can watch the procedure on a movie by scanning
the QR codes.
Android iOS
1 Open the scanning unit / cover.
Do not touch the print head holder (A) until it
stops.
(A)
2 a Remove the orange tape.
b Remove the protective wrap.
a
b
Remove the orange tape completely.
3 Hook the orange cap with your nger to remove it
GENTLY.
(A) Do not push the both sides of the ink tank with
the Y-shape air hole blocked.
(B) Do not touch.
(A) (B)
4
Insert the ink tank into the print head holder and
push it down rmly until it snaps into place.
After the lamp lights up, install the next ink tank.
5 Check that all lamps are lit.
6 LIFT UP the scanning unit / cover, and then close
it.
If an error message appears, make sure the ink
tanks are installed correctly.
Loading Paper / Aligning the Print
Head
You can watch the procedure on a movie by scanning
the QR codes.
Android iOS
To obtain better print result, print a pattern for print head
alignment and scan it.
1 a Pull out the cassette.
b Remove the cassette cover.
a
b

3
ENGLISH
2
a Pull out the cassette forward while pressing
the lock on the cassette.
b Open the paper guides, and then align the
guide in front with the mark of LTR or A4.
a
b
3 a Load several sheets of plain paper with the
print side facing down.
b Slide the right paper guide to align it with the
side of the paper stack.
c Align the paper stack with the paper guide in
front.
a
b
c
4 a Attach the cassette cover.
b Insert the cassette.
b
a
5 Read the messages and tap .OK
6 When the pattern for print head alignment is
printed, tap .Yes
7
Follow the on-screen instructions to load the
pattern on the platen glass.
8 Close the document cover, and then follow the on-
screen instructions to tap .OK
9 If the following screen appears, tap .OK
The print head alignment is now
complete.
4
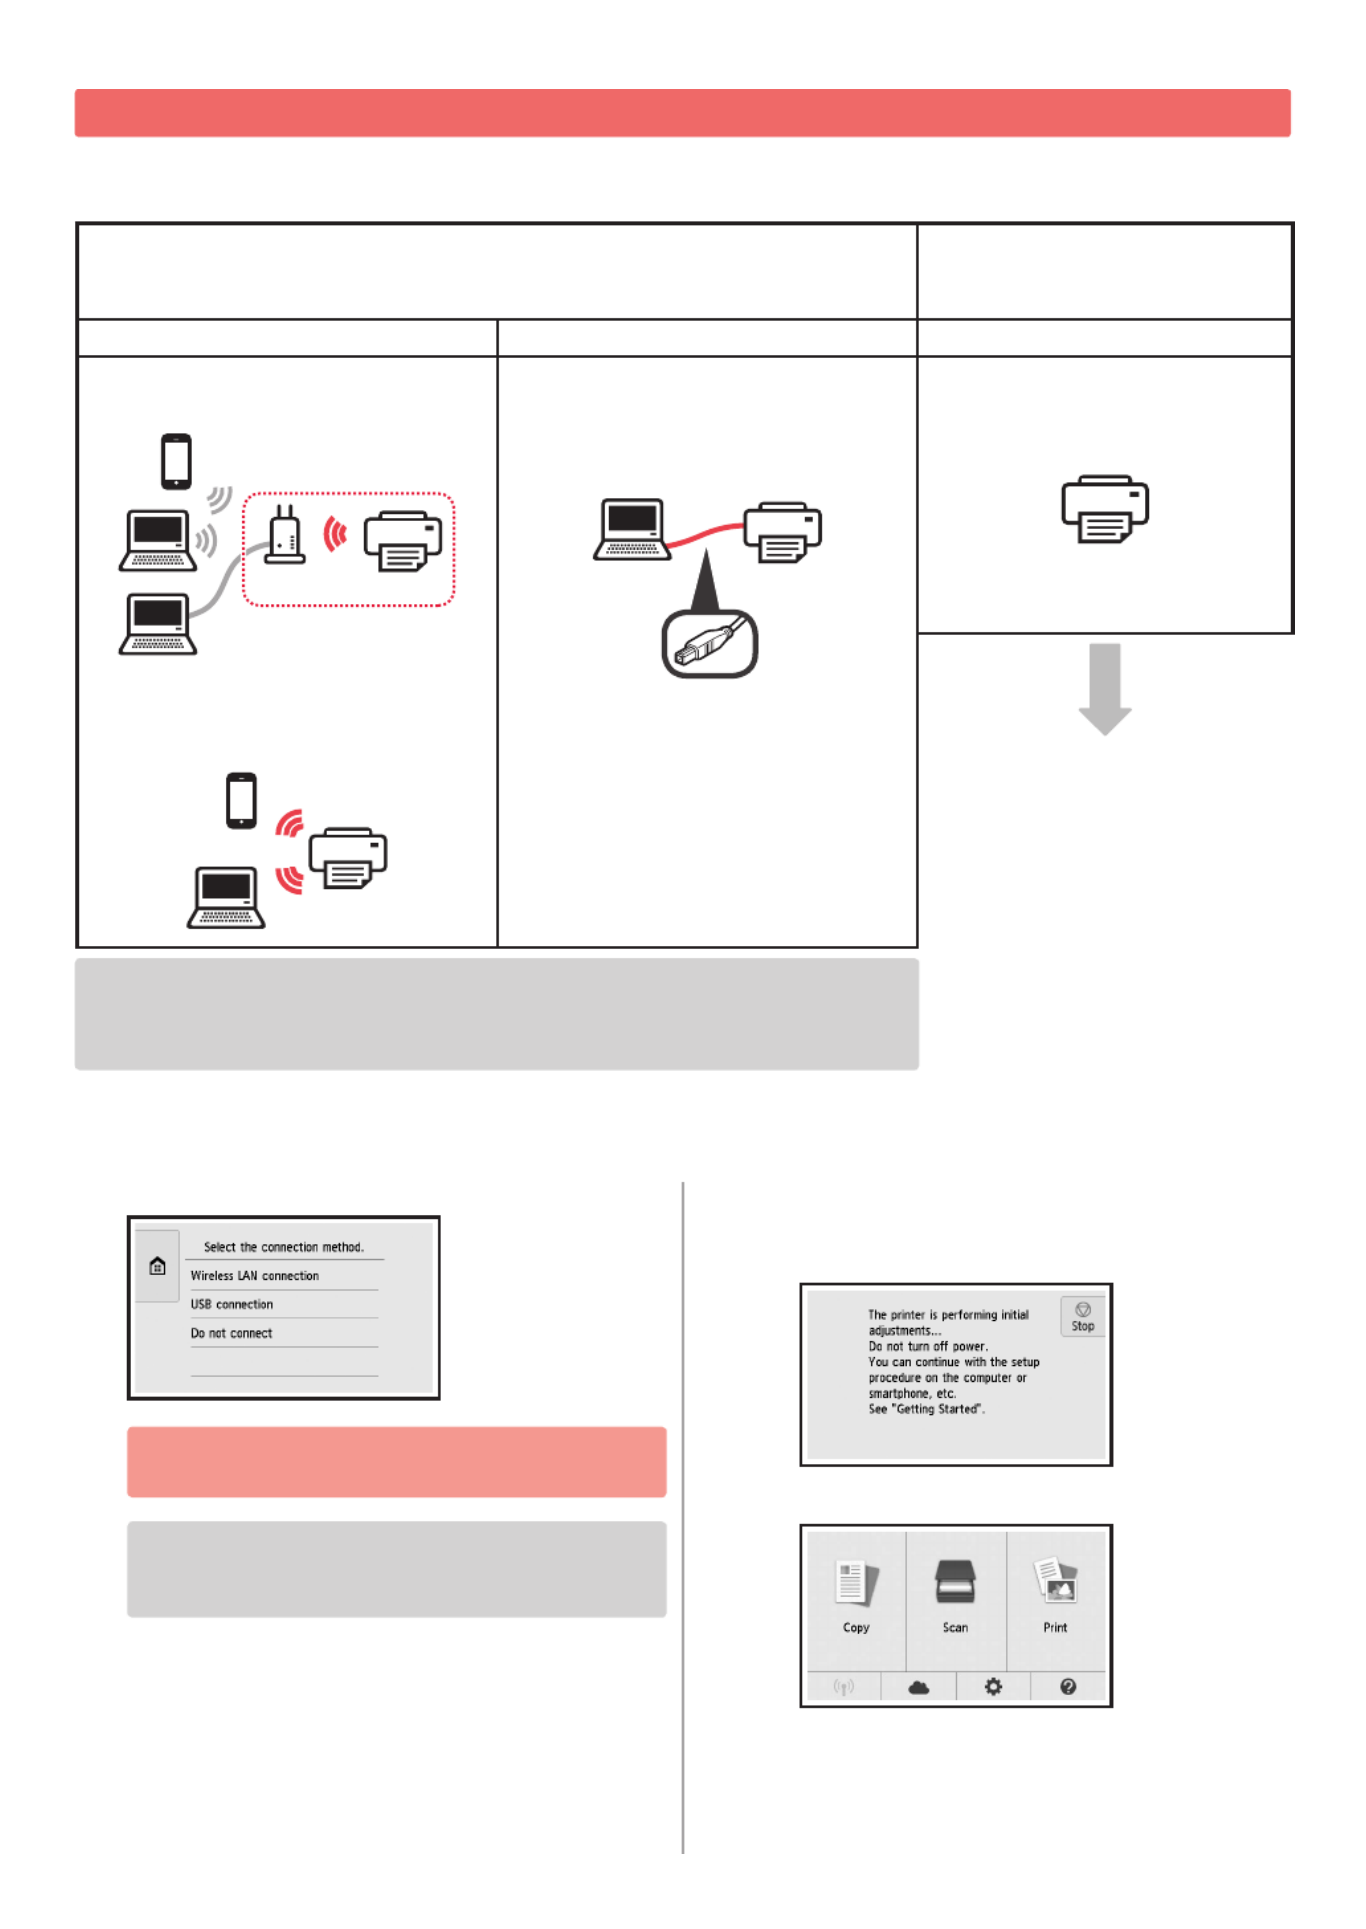
Selecting a Printer Connection Method
The connection method varies depending on how you use the printer. Select a printer connection method according to the
table below. In the following description, smartphones and tablet devices are collectively described as smartphone.
Using the printer with your computer or smartphone connected Using the printer without
connecting any other devices
Wireless LAN connection USB connection Do not connect
Connecting the printer to your computer
or smartphone via a wireless router
router
Connecting the printer to your computer
or smartphone directly without a
wireless router *
USB cable
Tap on the Do not connect
connection method selecting
screen. The setup is now complete.
* You may not connect your smartphone to the Internet wirelessly during connecting the
printer to the smartphone directly. In that case, you may be charged depending on the
contract with your service provider.
* Up to 5 devices can be connected to the printer via wireless LAN connection directly.
1 Tap your printer connection method.
Follow the on-screen instructions to proceed
with the setup.
Users who select USB connection:
Do not connect a USB cable until you are
instructed.
2 If the following screen appears, proceed to the
next page.
■If you select :Wireless LAN connection
■If you select :USB connection

5
ENGLISH
Connecting with Computer
You need connection setup for each computer. Proceed
with the setup from step 1 for each computer.
The followings describe the procedures for Windows and
Mac OS.
If you use a computer except for Windows or Mac OS
such as Chrome OS, access "http://canon.com/ijsetup",
and then follow the instructions on the Canon website to
set up your computer.
1 Select one of the following steps or to start
up the setup le.
Accessing the Canon website
aVisit the Canon website below and click .Set Up
Follow the on-screen instructions to proceed
with the setup.
bIf the following screen appears, click .Download
cStart up the downloaded le.
Using the Setup CD
aInsert the setup CD into your computer.
When using Windows 10, Windows 8.1 or Windows 8:
bClick or on the taskbar.File Explorer
cSelect or on the left side of the This PC Computer
opened window.
dDouble-click the CD-ROM icon on the right side
of the window.
* If the contents of the CD-ROM appear, double-click
MSETUP4.EXE.
2 Click .Start Setup
Follow the on-screen instructions to proceed
with the setup.
You can set up your smartphone in the middle
of the steps.
On the following screen, click to Instructions
proceed with setup of your smartphone.
* Depending on your settings, the screen above may
not appear. In that case, proceed to "Connecting with
Smartphone" on page 6 after nishing the connection
to your computer.
3 If the following screen appears, click .Exit
The connection with your computer
is now complete. You can print from
your computer.
2. Connecting with Computer and Smartphone/Tablet
If you connect the printer to both your computer and your smartphone, connect it to the
computer rst.
To connect the printer only to your smartphone, proceed to "Connecting with
Smartphone" on page 6.
Produktspezifikationen
| Marke: | Canon |
| Kategorie: | Drucker |
| Modell: | Pixma TS8000 |
Brauchst du Hilfe?
Wenn Sie Hilfe mit Canon Pixma TS8000 benötigen, stellen Sie unten eine Frage und andere Benutzer werden Ihnen antworten
Bedienungsanleitung Drucker Canon

12 Oktober 2024
10 Oktober 2024
4 Oktober 2024
3 Oktober 2024
2 Oktober 2024
22 September 2024
17 September 2024
16 September 2024
16 September 2024
5 September 2024
Bedienungsanleitung Drucker
- Drucker Samsung
- Drucker Approx
- Drucker HP
- Drucker Sony
- Drucker Panasonic
- Drucker LG
- Drucker Roland
- Drucker Velleman
- Drucker CSL
- Drucker Renkforce
- Drucker Thomson
- Drucker Sharp
- Drucker Mitsubishi
- Drucker Nilox
- Drucker Polaroid
- Drucker Xiaomi
- Drucker Olympia
- Drucker Seiko
- Drucker Toshiba
- Drucker Olympus
- Drucker Citizen
- Drucker Olivetti
- Drucker Epson
- Drucker Dell
- Drucker Lenovo
- Drucker MSI
- Drucker Honeywell
- Drucker OKI
- Drucker Brother
- Drucker Sagem
- Drucker Fujifilm
- Drucker Ricoh
- Drucker Datamax-O'neil
- Drucker Dymo
- Drucker Intermec
- Drucker Primera
- Drucker TSC
- Drucker Zebra
- Drucker Triumph-Adler
- Drucker Kodak
- Drucker Konica-Minolta
- Drucker Minolta
- Drucker TOMY
- Drucker Festo
- Drucker Frama
- Drucker NEC
- Drucker Ultimaker
- Drucker Fujitsu
- Drucker Huawei
- Drucker Testo
- Drucker Kogan
- Drucker Royal Sovereign
- Drucker D-Link
- Drucker Kyocera
- Drucker Lexmark
- Drucker Star
- Drucker Xerox
- Drucker Digitus
- Drucker Bixolon
- Drucker Epson 7620
- Drucker Fichero
- Drucker GG Image
- Drucker Ibm
- Drucker Oce
- Drucker Paxar
- Drucker Toshiba TEC
- Drucker ZKTeco
- Drucker StarTech.com
- Drucker Bematech
- Drucker Pantum
- Drucker HiTi
- Drucker Panduit
- Drucker Posiflex
- Drucker Vupoint Solutions
- Drucker Brady
- Drucker Star Micronics
- Drucker Metapace
- Drucker DNP
- Drucker Godex
- Drucker Phoenix Contact
- Drucker Elite Screens
- Drucker Equip
- Drucker Argox
- Drucker Dascom
- Drucker EC Line
- Drucker Orient Technologies
- Drucker Evolis
- Drucker Fargo
- Drucker Microboards
- Drucker Builder
- Drucker DTRONIC
- Drucker Colop
- Drucker Raspberry Pi
- Drucker IDP
- Drucker Tally Dascom
- Drucker Custom
- Drucker Nisca
Neueste Bedienungsanleitung für -Kategorien-

25 November 2024
24 November 2024
24 November 2024
24 November 2024

16 Oktober 2024

15 Oktober 2024

15 Oktober 2024

15 Oktober 2024

14 Oktober 2024

14 Oktober 2024