Canon Ixus 230 HS Bedienungsanleitung
Lesen Sie kostenlos die đź“– deutsche Bedienungsanleitung fĂĽr Canon Ixus 230 HS (212 Seiten) in der Kategorie Kamera. Dieser Bedienungsanleitung war fĂĽr 14 Personen hilfreich und wurde von 2 Benutzern mit durchschnittlich 4.5 Sternen bewertet
Seite 1/212
![](https://manualstech.ams3.cdn.digitaloceanspaces.com/html/nl/canon/ixus-230-hs/html/bg1.png)
Camera User Guide
ENGLISH
• Make sure you read this guide, including the “Safety
Precautions” section, before using the camera.
• Reading this guide will help you learn to use the camera
properly.
• Store this guide safely so that you can use it in the future.
COPY
![](https://manualstech.ams3.cdn.digitaloceanspaces.com/html/nl/canon/ixus-230-hs/html/bg2.png)
2
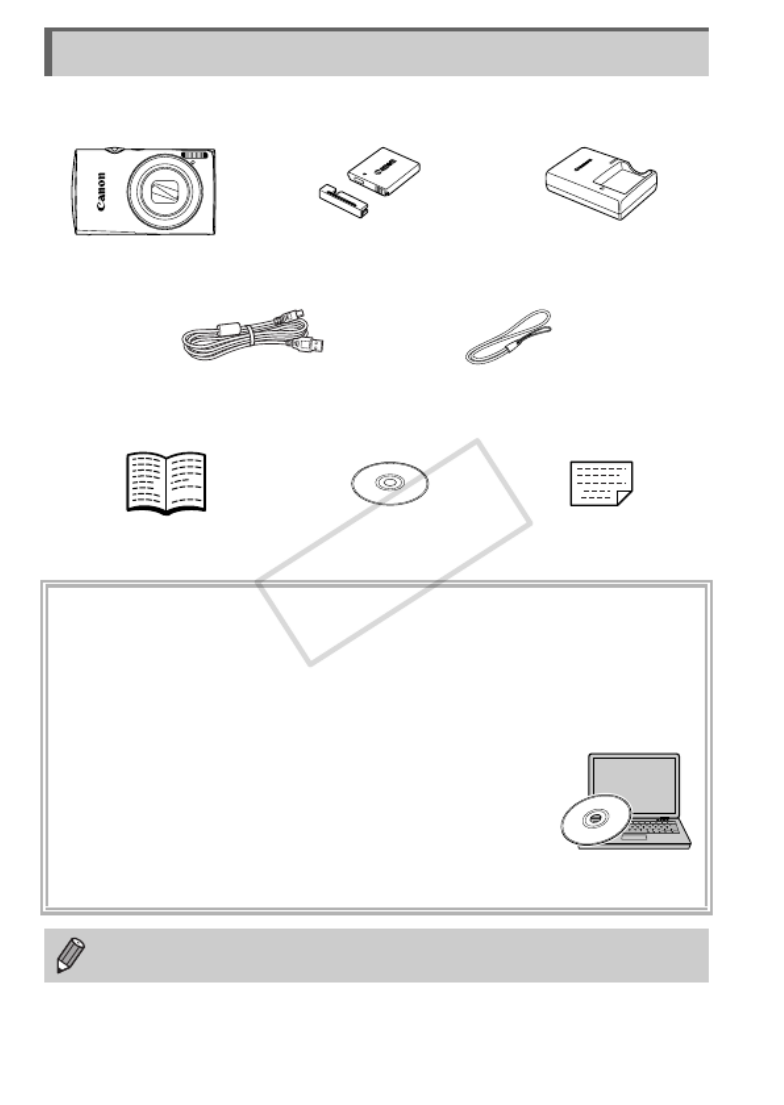
Check if the following items are included in your camera package.
If anything is missing, contact the retailer where you purchased the camera.
Checking the Package Contents
Using the PDF Manuals
The following PDF manuals are included in the Readme folder of the CD-
ROM:
When the software is installed on your computer, the PDF manuals will be
copied to the computer and you can refer to them by clicking the shortcuts
on the desktop.
•Camera User Guide (This Guide)
Once you have mastered the basics, use the
camera’s many features to shoot more challenging
photos.
•Software Guide
Read when you want to use the included software.
•A memory card is not included (p. 16).
•Adobe Reader is required to view the PDF manuals.
Battery Pack NB-4L
(with Terminal Cover)
Camera
Battery Charger
CB-2LV/CB-2LVE
Interface Cable
IFC-400PCU
Wrist Strap
WS-DC11
Warranty Card
Getting Started DIGITAL CAMERA
Solution Disk
COPY
![](https://manualstech.ams3.cdn.digitaloceanspaces.com/html/nl/canon/ixus-230-hs/html/bg3.png)
3
•Take some initial test shots and play them back to make sure the images
were recorded correctly. Please note that Canon Inc., its subsidiaries and
affiliates, and its distributors are not liable for any consequential damages
arising from any malfunction of a camera or accessory, including memory
cards, that results in the failure of an image to be recorded or to be
recorded in a way that is machine readable.
•The images recorded with this camera are intended for personal use. Do
not record images that infringe upon copyright laws without the prior
permission of the copyright holder. Please be advised that in certain cases
the copying of images from performances, exhibitions, or commercial
properties by means of a camera or other device may contravene copyright
or other legal rights even if the image was shot for personal use.
•This camera’s warranty is only effective in the country of sale. If there is a
problem with the camera while abroad, please return it to the country of
sale before proceeding with a warranty claim to a Canon Customer
Support Help Desk. For Canon Customer Support contacts, please see the
customer support list supplied with your camera.
•The LCD monitor is produced with extremely high-precision manufacturing
techniques. More than 99.99% of the pixels operate to specification, but
occasionally non-performing pixels may appear as bright or dark dots. This
is not a malfunction and has no effect on the recorded image.
•The LCD monitor may be covered with a thin plastic film for protection
against scratches during shipment. If covered, remove the film before
using the camera.
•Please take care when operating the camera for an extended period as the
camera body may become warm. This is not a malfunction.
Read This First
COPY
![](https://manualstech.ams3.cdn.digitaloceanspaces.com/html/nl/canon/ixus-230-hs/html/bg4.png)
4
4Shoot
zShoot, leaving it to the camera to make settings (Auto mode) ..... 26
zFocus on faces ................................................................. 26, 62, 92
zShoot in places where I cannot use the flash (turn off the flash) .. 52
zTake pictures with me in them too (self-timer)........................ 55, 75
zInsert the date and time into my shots.......................................... 54
zShoot a movie clip just before taking a picture ............................. 72
What Do You Want to Do?
I w P
At the Beach
(p. 63)
Against Snow
(p. 63)
Portraits
(p. 62)
Take good people shots
O
Foliage
(p. 63)
Shoot various other scenes
t
Fireworks
(p. 64)
V
Kids and Pets
(p. 62)
Shoot with special effects
Facial Expressions
(p. 79)
Low Light
(p. 63)
Night Scenes
(p. 63)
Miniature Effect
(p. 66)
Fish-eye Effect
(p. 66)
Vivid Colors (p. 65) Poster Effect
(p. 65)
Monochrome
(p. 68)
Toy Camera Effect
(p. 67)
COPY
![](https://manualstech.ams3.cdn.digitaloceanspaces.com/html/nl/canon/ixus-230-hs/html/bg5.png)
What Do You Want to Do?
5
1View
zLook at my pictures ...................................................................... 29
zAutomatically play back pictures (slideshow) ............................. 117
zLook at my pictures on a TV....................................................... 170
zLook at my pictures on a computer .............................................. 34
zQuickly search pictures .............................................................. 114
zErase pictures....................................................................... 30, 128
EShoot/View Movies
zShoot movies ........................................................................ 31, 103
zView movies ................................................................................. 33
z
Shoot fast moving subjects and play them back in slow motion
... 106
cPrint
zPrint pictures............................................................................... 142
Save
zSave images to a computer.......................................................... 34
3Other
zTurn off sounds............................................................................. 46
zUse the camera abroad ........................................................ 16, 164
zUnderstand what is displayed on the screen .............................. 183
COPY
![](https://manualstech.ams3.cdn.digitaloceanspaces.com/html/nl/canon/ixus-230-hs/html/bg6.png)
6
Checking the Package Contents .......2
Read This First ..................................3
What Do You Want to Do? ................4
Table of Contents ..............................6
Conventions Used in This Guide .......9
Safety Precautions...........................10
1
Getting Started .................13
Charging the Battery........................14
Compatible Memory Cards
(Sold Separately)...........................16
Inserting the Battery and
Memory Card.................................17
Setting the Date and Time ...............20
Setting the Display Language..........22
Formatting Memory Cards...............23
Pressing the Shutter Button.............25
Taking Pictures (Smart Auto)...........26
Viewing Images ...............................29
Erasing Images................................30
Shooting Movies ..............................31
Viewing Movies................................33
Transferring Images to a Computer
for Viewing.....................................34
2
Learning More ..................39
Components Guide..........................40
Screen Display.................................42
Indicator ...........................................43
FUNC. Menu – Basic Operations ....44
MENU – Basic Operations...............45
Changing the Sound Settings ..........46
Adjusting the Screen Brightness......48
Returning the Camera to Default
Settings..........................................49
Power Saving Function
(Auto Power Down)....................... 50
Clock Function ................................ 50
3
Shooting with Commonly
Used Functions ................51
Turning the Flash Off ...................... 52
Zooming In More Closely on
Subjects (Digital Zoom)................. 53
Inserting the Date and Time............ 54
Using the Self-Timer ....................... 55
Changing the Aspect Ratio ............. 58
Changing the Recording Pixel
Setting (Image Size) ..................... 59
Changing the Compression Ratio
(Image Quality) ............................. 59
4
Adding Effects and
Shooting in Various
Conditions ........................61
Shooting in Various Conditions ....... 62
Adding Effects and Shooting........... 65
Making Short Movies Automatically
(Movie Digest)............................... 72
Detecting a Face and Shooting
(Smart Shutter) ............................. 73
Shooting Long Exposures............... 77
High-Speed Continuous Shooting
(High-speed Burst)........................ 78
Capturing the Best Facial
Expressions (Best Image
Selection) ...................................... 79
Shooting Stitch Assist Images......... 80
Table of Contents
COPY
![](https://manualstech.ams3.cdn.digitaloceanspaces.com/html/nl/canon/ixus-230-hs/html/bg7.png)
Table of Contents
7
5
Choosing Settings
Yourself.............................81
Shooting in Program AE ................. 82
Adjusting the Brightness
(Exposure Compensation)............ 83
Turning the Flash On ...................... 83
Adjusting the White Balance........... 84
Changing the ISO Speed................ 85
Correcting the Brightness and
Shooting (i-Contrast)..................... 86
Continuous Shooting....................... 87
Changing the Tone of an Image
(My Colors) ................................... 88
Shooting Close-ups (Macro) ........... 90
Shooting Far Away Subjects
(Infinity) ......................................... 90
Changing the AF Frame Mode........ 92
Choosing the Subject to Focus On
(Tracking AF) ................................ 94
Magnifying the Focal Point.............. 95
Shooting with the AF Lock .............. 96
Shooting with Servo AF .................. 97
Changing the Metering Method....... 98
Shooting with the AE Lock .............. 99
Shooting with the FE Lock .............. 99
Shooting with Slow Synchro ......... 100
Red-Eye Correction ...................... 101
Checking for Shut Eyes ................ 102
6
Using Various Functions for
Shooting Movies ............103
Shooting Various Kinds of
Movies ........................................ 104
Shoot Movies That Look Like a
Miniature Model
(Miniature Effect)......................... 105
Shooting Super Slow Motion
Movies ......................................... 106
Changing the Image Quality.......... 108
Using the Wind Filter..................... 109
Other Shooting Functions..............110
Editing ........................................... 111
7
Using Various Playback and
Editing Functions........... 113
Quickly Searching Images............. 114
Viewing Images in Filtered
Playback...................................... 115
Viewing Slideshows....................... 117
Checking the Focus....................... 119
Magnifying Images ........................ 120
Viewing Each Image in a Group.... 121
Displaying Various Images
(Smart Shuffle)............................ 123
Changing Image Transitions ......... 124
Protecting Images ......................... 124
Erasing Images .............................128
Tagging Images as Favorites ........ 130
Organizing Images by Category
(My Category) ............................. 132
Rotating Images ............................ 135
Resizing Images ............................ 136
Trimming ....................................... 137
Adding Effects with the My Colors
Function ...................................... 138
Correcting the Brightness
(i-Contrast) ..................................139
Correcting the Red-Eye Effect....... 140
COPY
![](https://manualstech.ams3.cdn.digitaloceanspaces.com/html/nl/canon/ixus-230-hs/html/bg8.png)
Table of Contents
8
8
Printing............................141
Printing Images..............................142
Choosing Images for Printing
(DPOF) ........................................149
Choosing Images for a
Photobook ...................................154
9
Customizing Camera
Settings ........................... 157
Changing Camera Settings............158
Changing Shooting Function
Settings........................................165
Changing Playback Function
Settings........................................168
10
Useful Information .........169
Viewing Images on a TV ............... 170
Using Household Power................ 174
Using an Eye-Fi Card.................... 175
Troubleshooting ............................ 177
List of Messages That Appear
on the Screen.............................. 180
Information Displayed
on the Screen.............................. 183
Functions and Menu Lists ............. 188
Handling Precautions .................... 197
Specifications ................................ 198
Accessories................................... 202
Separately Sold Accessories ........ 203
Index ............................................. 205
COPY
![](https://manualstech.ams3.cdn.digitaloceanspaces.com/html/nl/canon/ixus-230-hs/html/bg9.png)
9
•Icons are used in the text to represent the camera buttons and switches.
•Language that displays on the screen appears inside [ ] (square brackets).
•The directional buttons and FUNC./SET button are represented by the
following icons.
•: Things you should be careful about
•: Troubleshooting tips
•: Hints for getting more out of your camera
•: Supplemental information
•(p. xx): Reference pages (“xx” stands for a page number)
•This guide assumes all functions are at their default settings.
•The various types of memory cards that can be used in this camera are
collectively referred to as memory cards in this guide.
Conventions Used in This Guide
Right Button
FUNC./SET ButtonUp Button
Left Button
Down Button
COPY
![](https://manualstech.ams3.cdn.digitaloceanspaces.com/html/nl/canon/ixus-230-hs/html/bga.png)
10
•Before using the product, please ensure that you read the safety precautions described
below. Always ensure that the product is used correctly.
•The safety precautions noted on the following pages are intended to prevent injuries to
yourself and other persons, or damage to the equipment.
•Be sure to also check the guides included with any separately sold accessories you
use.
Safety Precautions
Warning Denotes the possibility of serious injury or death.
•Do not trigger the flash in close proximity to people’s eyes.
Exposure to the intense light produced by the flash could damage eyesight. In particular,
remain at least 1 meter (39 inches) away from infants when using the flash.
•Store this equipment out of the reach of children and infants.
Strap: Putting the strap around a child’s neck could result in asphyxiation.
•Use only recommended power sources.
•Do not attempt to disassemble, alter or apply heat to the product.
•Avoid dropping or subjecting the product to severe impacts.
•To avoid the risk of injury, do not touch the interior of the product if it has been
dropped or otherwise damaged.
•Stop using the product immediately if it emits smoke, a strange smell, or
otherwise behaves abnormally.
•Do not use organic solvents such as alcohol, benzine, or thinner to clean the
product.
•Do not let the product come into contact with water (e.g. sea water) or other
liquids.
•Do not allow liquids or foreign objects to enter the camera.
This could result in electrical shock or fire.
If liquids or foreign objects come into contact with the camera interior, immediately turn
the camera off and remove the battery.
If the battery charger becomes wet, unplug it from the outlet and consult your camera
distributor or a Canon Customer Support Help Desk.
•Use only the recommended battery.
•Do not place the battery near or in direct flame.
•Unplug the power cord periodically, and using a dry cloth, wipe away any dust
and dirt that has collected on the plug, the exterior of the power outlet, and the
surrounding area.
•Do not handle the power cord with wet hands.
•Do not use the equipment in a manner that exceeds the rated capacity of the
electrical outlet or wiring accessories. Do not use if the power cord or plug are
damaged, or not fully plugged into the outlet.
•Do not allow dirt or metal objects (such as pins or keys) to contact the terminals
or plug.
The battery may explode or leak, resulting in electrical shock or fire. This could cause
injury and damage the surroundings. In the event that a battery leaks and the battery
electrolyte contacts eyes, mouth, skin or clothing, immediately flush with water.
COPY
![](https://manualstech.ams3.cdn.digitaloceanspaces.com/html/nl/canon/ixus-230-hs/html/bgb.png)
Safety Precautions
11
•Turn the camera off in places where camera use is prohibited.
The electromagnetic waves emitted by the camera may interfere with the operation of
electronic instruments and other devices. Exercise adequate caution when using the
camera in places where use of electronic devices is restricted, such as inside airplanes
and medical facilities.
•Do not play the supplied CD-ROM(s) in any CD player that does not support data
CD-ROMs.
It is possible to suffer hearing loss from listening with headphones to the loud sounds of
a CD-ROM played on an audio CD player (music player). Additionally, this could damage
the speakers.
Caution Denotes the possibility of injury.
•When holding the camera by the strap, be careful not to bang it, subject it to
strong impacts or shocks, or let it get caught on other objects.
•Be careful not to bump or push strongly on the lens.
This could lead to injury or damage the camera.
•Be careful not to subject the screen to strong impacts.
If the screen cracks, injury may result from the broken fragments.
•When using the flash, be careful not to cover it with your fingers or clothing.
This could result in burns or damage to the flash.
•Avoid using, placing or storing the product in the following places:
- Places subject to strong sunlight
- Places subject to temperatures above 40 °C (104 °F)
- Humid or dusty areas
These could cause leakage, overheating or an explosion of the battery, resulting in
electrical shock, fire, burns or other injuries.
High temperatures may cause deformation of the camera or battery charger casing.
•The slideshow transition effects may cause discomfort when viewed for
prolonged periods.
Caution Denotes the possibility of damage to the equipment.
•Do not aim the camera at bright light sources (such as the sun on a clear day).
Doing so may damage the image sensor.
•When using the camera on a beach or at a windy location, be careful not to allow
dust or sand to enter the camera.
This may cause the product to malfunction.
COPY
![](https://manualstech.ams3.cdn.digitaloceanspaces.com/html/nl/canon/ixus-230-hs/html/bgc.png)
Safety Precautions
12
•In regular use, small amounts of smoke may be emitted from the flash.
This is due to the high intensity of the flash burning dust and foreign materials stuck to the
front of the unit. Please use a cotton swab to remove dirt, dust or other foreign matter from
the flash to prevent heat build-up and damage to the unit.
•Remove and store the battery when you are not using the camera.
If the battery is left inside the camera, damage caused by leakage may occur.
•Before you discard the battery, cover the terminals with tape or other insulators.
Contacting other metal materials may lead to fire or explosions.
•Unplug the battery charger from the power outlet after charging is complete, or
when you are not using it.
•Do not place anything, such as cloth on top of the battery charger while it is
charging.
Leaving the unit plugged in for a long period of time may cause it to overheat and distort,
resulting in fire.
•Do not place the battery near pets.
Pets biting the battery could cause leakage, overheating or explosion, resulting in fire or
damage.
•Do not sit down with the camera in your pocket.
Doing so may cause malfunctions or damage the screen.
•When putting the camera in your bag, ensure that hard objects do not come into
contact with the screen.
•Do not attach any hard objects to the camera.
Doing so may cause malfunctions or damage the screen.
COPY
![](https://manualstech.ams3.cdn.digitaloceanspaces.com/html/nl/canon/ixus-230-hs/html/bgd.png)
13
Getting Started
This chapter explains preparations before shooting, how to shoot in
A mode, and then how to view and erase the images you take. The
latter part of this chapter explains how to shoot and view movies and
transfer images to a computer.
Attaching the Strap/Holding the Camera
•Attach the included strap and wrap it around your wrist to avoid dropping
the camera during use.
•Keep your arms tight against your body while holding the camera firmly by
the sides when shooting. Be sure that your fingers do not block the flash.
1
Strap
COPY
![](https://manualstech.ams3.cdn.digitaloceanspaces.com/html/nl/canon/ixus-230-hs/html/bge.png)
14
Use the included charger to charge the battery. Be sure to charge the battery
as it is not charged at the time of purchase.
Remove the cover.
Insert the battery.
zAlign the S marks on the battery and
charger, then insert the battery by sliding it
in ( ) and down ( ).
Charge the battery.
zFor CB-2LV: Flip out the plug ( ) and
plug the charger into a power outlet ( ).
zFor CB-2LVE: Plug the power cord into
the charger, then plug the other end into a
power outlet.
XThe charge lamp lights orange and
charging starts.
XThe charge lamp will light green when
charging has finished. Charging takes
approx. 1 hour and 30 minutes.
Remove the battery.
zUnplug the battery charger from the power
outlet, then remove the battery by sliding it
in ( ) and up ( ).
Charging the Battery
CB-2LV
CB-2LVE
To protect the battery and prolong its life, do not charge it for longer than
24 hours continuously.
COPY
![](https://manualstech.ams3.cdn.digitaloceanspaces.com/html/nl/canon/ixus-230-hs/html/bgf.png)
Charging the Battery
15
Number of Possible Shots/Shooting and Playback Times
*1 The number of shots that can be taken is based on the Camera & Imaging Products
Association (CIPA) measurement standard.
*2 Times are based on default settings, starting and stopping shooting, turning the camera on
and off, and operations such as using the zoom.
*3 Times are based on repeatedly shooting until the maximum clip length is reached or recording
stops automatically.
• Under some shooting conditions, the number of possible shots and shooting time may
be less than mentioned above.
Battery Charge Indicator
An icon or message will appear on the screen indicating the battery’s charge
state.
Number of Shots* 1Approx. 210
Movie Shooting Time* 2Approx. 40 minutes
Continuous
Shooting* 3Approx. 1 hour 10 minutes
Playback Time Approx. 4 hours
Display Summary
Sufficient charge.
Slightly depleted, but sufficient.
(Blinking red) Nearly depleted. Charge the battery.
“Change the battery pack.” Depleted. Charge the battery.
What if...
•What if the battery develops a bulge?
This is a normal characteristic of the battery and does not indicate a problem.
However, if the battery bulges to the point where it will no longer fit into the
camera, please contact a Canon Customer Support Help Desk.
•What if the battery is quickly depleted even after charging?
The battery has reached the end of its life span. Purchase a new battery.
COPY
![](https://manualstech.ams3.cdn.digitaloceanspaces.com/html/nl/canon/ixus-230-hs/html/bg10.png)
Compatible Memory Cards (Sold Separately)
16
The cards below can be used without restrictions on their capacities.
•SD memory cards*
•SDHC memory cards*
•SDXC memory cards *
•Eye-Fi cards
* This memory card complies with SD standards. Some cards may not operate properly
depending on the brand of card used.
This product is not guaranteed to support Eye-Fi card functions (including
wireless transfer). In case of an issue with an Eye-Fi card, please check with
the card manufacturer.
Also note that an approval is required to use Eye-Fi cards in many countries
or regions. Without approval, use of the card is not permitted. If it is unclear
whether the card has been approved for use in the area, please check with
the card manufacturer.
Using the battery and charger effectively
•Charge the battery on the day, or the day before, it will be
used.
Charged batteries continue to discharge naturally even if
they are not used.
Attach the cover to a charged battery so that the mark is
visible.
•How to store the battery for long periods:
Deplete and remove the battery from the camera. Attach the terminal cover and
store the battery. Storing a battery for long periods of time (about a year) without
depleting it may shorten its life span or affect its performance.
•The battery charger can also be used when abroad.
The charger can be used in regions that have 100 – 240 V (50/60 Hz) AC power.
If the plug does not fit the outlet, use a commercially available plug adapter. Do
not use electrical transformers for foreign travel as they will cause damage.
Compatible Memory Cards (Sold
Separately)
Depending on your computer’s OS version, SDXC memory cards may not
be recognized even when using a commercially available card reader. Check
to make sure that your OS supports SDXC memory cards beforehand.
About Eye-Fi Cards
COPY
![](https://manualstech.ams3.cdn.digitaloceanspaces.com/html/nl/canon/ixus-230-hs/html/bg11.png)
17
Insert the included battery and a memory card (sold separately).
Check the card’s write-protect tab.
zIf the memory card has a write-protect tab,
you will not be able to record images if the
tab is in the locked position. Slide the tab
up until you hear a click.
Open the cover.
zSlide the cover ( ) and open it ( ).
Insert the battery.
zPress the battery lock in the direction of the
arrow, then insert the battery as shown
until it locks into place with a click.
zBe sure to insert the battery in the correct
direction or it will not properly lock into
place.
Insert the memory card.
zInsert the memory card as shown until it
locks into place with a click.
zBe sure the memory card is oriented
correctly. Inserting the memory card in the
wrong direction could damage the camera.
Inserting the Battery and Memory Card
Terminals Battery
Lock
Terminals
COPY
![](https://manualstech.ams3.cdn.digitaloceanspaces.com/html/nl/canon/ixus-230-hs/html/bg12.png)
Inserting the Battery and Memory Card
18
Close the cover.
zClose the cover ( ), and press downward
as you slide it until it clicks into place ( ).
Remove the battery.
zOpen the cover and press the battery lock
in the direction of the arrow.
The battery will pop up.
Remove the memory card.
zPush the memory card in until you hear a
click, then slowly release it.
The memory card will pop up.
What if [Memory card locked] appears on the screen?
If the write-protect tab is in the locked position, [Memory card locked] will appear
on the screen and you will not be able to take or erase images.
Removing the Battery and Memory Card
COPY
![](https://manualstech.ams3.cdn.digitaloceanspaces.com/html/nl/canon/ixus-230-hs/html/bg13.png)
Inserting the Battery and Memory Card
19
Number of Shots per Memory Card
• Values are based on the default settings.
• The number of shots that can be taken will vary depending on camera settings, the
subject and the memory card used.
Memory Card 4 GB 16 GB
Number of Shots Approx. 1231 Approx. 5042
Can you check the number of shots that can be taken?
You can check the number of shots that can be
taken when the camera is in a Shooting mode
(p. 26).
COPY
![](https://manualstech.ams3.cdn.digitaloceanspaces.com/html/nl/canon/ixus-230-hs/html/bg15.png)
Setting the Date and Time
21
You can change the current date and time settings.
Display the menu.
zPress the n button.
Choose [Date/Time].
zMove the zoom lever to choose the 3 tab.
zPress the op buttons to choose [Date/
Time], then press the m button.
Change the date and time.
zFollow Step 2 on p. 20 to adjust the
settings.
zPress the n button to close the menu.
Daylight saving time settings
If you choose in Step 2 on p. 20 and press the op buttons to choose ,
you will set the time to daylight saving (1 hour ahead).
Changing the Date and Time
Date/Time battery
•The camera has a built-in date/time battery (backup battery) that allows the
date/time settings to be retained for about 3 weeks after the battery pack has
been removed.
•By inserting a charged battery or connecting an AC adapter kit (sold separately,
p. 203) the date/time battery can be charged in about 4 hours even if the camera
is not turned on.
•If the date/time battery is depleted, the Date/Time screen will appear when you
turn the camera on. Follow the steps on p. 20 to set the date and time.
COPY
![](https://manualstech.ams3.cdn.digitaloceanspaces.com/html/nl/canon/ixus-230-hs/html/bg16.png)
22
You can change the language that displays on the screen.
Enter Playback mode.
zPress the 1 button.
Display the settings screen.
zPress and hold the m button, then
immediately press the n button.
Set the display language.
zPress the opqr buttons to choose a
language, then press the m button.
Once the display language has been set,
the settings screen will close.
Setting the Display Language
What if the clock appears when the m button is pressed?
The clock will appear if too much time passes between pressing the m button
and the n button in Step 2. If the clock appears, press the m button to
remove the clock and repeat Step 2.
You can also change the display language by pressing the n button
to choose [Language ] in the 3 tab.
COPY
![](https://manualstech.ams3.cdn.digitaloceanspaces.com/html/nl/canon/ixus-230-hs/html/bg17.png)
23
Before you use a new memory card or one that has been formatted in other
devices, you should format the card with this camera.
Formatting (initializing) a memory card erases all data on the memory card.
As you cannot retrieve the erased data, exercise adequate caution before
formatting the memory card.
Before formatting an Eye-Fi card (p. 175), be sure to install the software
contained on the card to a computer.
Display the menu.
zPress the n button.
Choose [Format].
zMove the zoom lever to choose the 3 tab.
zPress the op buttons to choose [Format],
then press the m button.
Choose [OK].
zPress the qr buttons to choose [OK], then
press the m button.
Formatting Memory Cards
COPY
![](https://manualstech.ams3.cdn.digitaloceanspaces.com/html/nl/canon/ixus-230-hs/html/bg18.png)
Formatting Memory Cards
24
Format the memory card.
zPress the op buttons to choose [OK],
then press the m button to start
formatting.
zWhen formatting ends, [Memory card
formatting complete] appears on the
screen. Press the m button.
Formatting or erasing data on a memory card merely changes the file
management information on the card and does not ensure its contents are
completely erased. Be careful when transferring or disposing of a memory
card. When disposing of a memory card, take precautions such as
physically destroying the card to prevent personal information leaks.
•The total capacity of the memory card displayed in the formatting screen
may be less than indicated on the memory card.
•Perform a low-level format (p. 159) of the memory card when the camera
does not operate properly, the recording/reading speed of a memory card
has dropped, when continuous shooting speed slows down, or when
movie recording stops suddenly.
COPY
![](https://manualstech.ams3.cdn.digitaloceanspaces.com/html/nl/canon/ixus-230-hs/html/bg19.png)
25
To take images that are in focus, be sure to first press the shutter button
lightly (halfway) to focus, then press fully to shoot.
Press halfway (Press lightly to focus).
zPress lightly until the camera beeps twice
and AF frames appear where the camera
focused.
Press fully (Press fully to shoot).
The camera plays the shutter sound and
takes the shot.
zSince the shot is being taken while the
shutter sound plays, be careful not to move
the camera.
Pressing the Shutter Button
Does the length of the shutter sound change?
•Since the time required to shoot differs depending on the scene you want to
take, the length of the shutter sound may change.
•If the camera or subject moves while the shutter sound is playing, the recorded
image may be blurry.
If you shoot without pressing the shutter button halfway, the image may not
be in focus.
COPY
![](https://manualstech.ams3.cdn.digitaloceanspaces.com/html/nl/canon/ixus-230-hs/html/bg1a.png)
26
Since the camera can determine the subject and shooting conditions, you can
let it automatically select the best settings for the scene and just shoot.
Turn on the camera.
zPress the power button.
The start-up screen will appear.
Enter A mode.
zSet the mode switch to A.
zWhen you point the camera toward the
subject, the camera will make a slight
noise as it determines the scene.
The icon for the determined scene, and the
IS mode icon will appear in the upper right
of the screen (pp. 184, 185).
The camera will focus on detected
subjects and display frames on them.
Compose the shot.
zMoving the zoom lever toward i
(telephoto) will zoom in on your subject,
making it appear larger. Moving the lever
toward j (wide angle) will zoom out from
your subject, making it appear smaller.
(The zoom bar showing the zoom position
appears on the screen.)
Focus.
zPress the shutter button halfway to focus.
Taking Pictures (Smart Auto)
Zoom Bar
COPY
![](https://manualstech.ams3.cdn.digitaloceanspaces.com/html/nl/canon/ixus-230-hs/html/bg1b.png)
Taking Pictures (Smart Auto)
27
When the camera focuses, it will beep
twice and AF frames will appear where the
camera focused.
Several AF frames will appear when the
camera focuses on more than 1 point.
Shoot.
zPress the shutter button fully to shoot.
The camera will play the shutter sound and
shoot. The flash will automatically fire in
low light conditions.
The image will appear on the screen for
approximately 2 seconds.
zYou can take a second picture even while
an image is displayed by pressing the
shutter button again.
AF Frame
What if...
•What if the color and brightness of the images do not turn out as
expected?
The scene icon (p. 184) that appears on the screen may not match the actual
scene, and you may not obtain the expected results. If this happens, try
shooting in G mode (p. 81).
•What if white and gray frames appear when you point the camera toward
a subject?
A white frame appears on the face or subject that the camera detected as the
main subject, while gray frames appear on other detected faces. The frames will
follow the subjects within a certain range.
If the subject moves, however, the gray frames will disappear, leaving only the
white frame.
•What if a frame does not appear on the subject you want to shoot?
The subject may not be detected, and frames may appear on the background.
If this happens, try shooting in G mode (p. 81).
COPY
![](https://manualstech.ams3.cdn.digitaloceanspaces.com/html/nl/canon/ixus-230-hs/html/bg1c.png)
Taking Pictures (Smart Auto)
28
•What if a blue frame appears when you press the shutter button halfway?
A blue frame appears when a moving subject is detected; the focus and
exposure will continuously adjust (Servo AF).
•What if a flashing appears?
Attach the camera to a tripod so that the camera does not move and blur the
image.
•What if the camera does not play any sounds?
You may have been pressing the p button while turning on the camera, which
will turn off all sounds except for warning sounds. To turn the sounds on, press
the n button to choose [Mute] in the 3 tab, then press the qr buttons to
choose [Off].
•What if the image comes out dark even if the flash fired when shooting?
The subject is too far away for the flash to reach. The effective flash range is
approximately 50 cm – 4.0 m (1.6 – 13 ft.) at maximum wide angle (j), and
approximately 50 cm – 2.0 m (1.6 – 6.6 ft.) at maximum telephoto (i).
•What if the camera beeps once when the shutter button is pressed
halfway?
Your subject may be too close. When the camera is at maximum wide angle
(j), move about 1 cm (0.4 in.) or more away from your subject and shoot.
Move about 1 m (3.3 ft.) or more away when the camera is at maximum
telephoto (i).
•What if the lamp lights when the shutter button is pressed halfway?
To reduce red-eye and to assist in focusing, the lamp may light when shooting
in low light conditions.
•What if the h icon blinks when you try to shoot?
The flash is charging. You can shoot when recharging ends.
Icons that appear on the screen
The icon for the determined scene, and the IS mode icon will appear on the
screen. For details on the icons that appear, see “Scene Icons” (p. 184) and “IS
Mode Icons” (p. 185).
Choosing the subject to focus on (Tracking AF)
After pressing the o button and displaying , point the camera so that is
on the subject you want to focus on. Press and hold the shutter button halfway to
display a blue frame where focus and exposure will be maintained (Servo AF).
Press the shutter button fully to shoot.
COPY
![](https://manualstech.ams3.cdn.digitaloceanspaces.com/html/nl/canon/ixus-230-hs/html/bg1d.png)
29
You can view the images you have taken on the screen.
Enter Playback mode.
zPress the 1 button.
The last image you took will appear.
Choose an image.
zPressing the q button will cycle through
the images from newest to oldest.
zPressing the r button will cycle through
the images from oldest to newest.
zPressing and holding the qr buttons will
display images in a line letting you quickly
search them. Pressing the m button
restores single image playback (p. 114).
zThe lens will retract after approximately 1
minute elapses.
zPressing the 1 button again while the
lens is retracted will turn the camera off.
Viewing Images
Switching to Shooting mode
Pressing the shutter button halfway while in Playback mode switches the camera
to Shooting mode.
COPY
![](https://manualstech.ams3.cdn.digitaloceanspaces.com/html/nl/canon/ixus-230-hs/html/bg1e.png)
30
You can choose and erase images one at a time. Please note that erased
images cannot be recovered. Exercise adequate caution before erasing an
image.
Enter Playback mode.
zPress the 1 button.
XThe last image you took will appear.
Choose an image to erase.
zPress the qr buttons to display an image
to erase.
Erase the image.
zAfter pressing the m button, press the
op buttons to choose a, then press the
m button again.
zWhen [Erase?] appears on the screen,
press the qr buttons to choose [Erase],
then press the m button.
XThe displayed image will be erased.
zTo exit instead of erasing, press the qr
buttons to choose [Cancel], then press the
m button.
Erasing Images
COPY
![](https://manualstech.ams3.cdn.digitaloceanspaces.com/html/nl/canon/ixus-230-hs/html/bg1f.png)
31
The camera will determine the subject and shooting conditions, and select the
best settings for the scene.
The audio will record in stereo.
If you continue shooting for a long time, the camera may become warm. This
is not a malfunction.
Enter A mode and compose the
shot.
zFollow Steps 1 – 3 on p. 26 to compose the
shot.
zYou can check the amount of time you can
shoot on the screen.
Shoot.
zPress the movie button.
zBlack bars appear at the top and bottom of
the screen. These areas cannot be
recorded.
XThe camera will beep once, recording will
start, and [ Rec] and the elapsed time will
appear on the screen.
zOnce shooting begins, take your finger off
the movie button.
zIf you change the composition of your shot
during shooting, the focus, brightness and
tone will automatically adjust.
zDo not touch the microphones while
shooting.
zDo not press any buttons other than the
movie button while shooting. The sound
the buttons make will be recorded in the
movie.
Shooting Movies
Remaining Time
Elapsed Time
Microphones
COPY
![](https://manualstech.ams3.cdn.digitaloceanspaces.com/html/nl/canon/ixus-230-hs/html/bg20.png)
Shooting Movies
32
Stop shooting.
zPress the movie button again.
XThe camera will beep twice and stop
shooting the movie.
XShooting will automatically stop when the
memory card fills.
Shooting Time
• Maximum clip length is approx. 10 minutes.
• Recording may stop even if the maximum clip length has not been reached on some
memory cards. SD Speed Class 6 or higher memory cards are recommended.
Zooming while shooting
Moving the zoom lever while shooting will zoom in on or out from the subject.
However, operation sounds will be recorded.
•When the mode switch is set to A, the icon for the determined scene
will appear (p. 184). “When Moving” icons will not appear, however.
Under certain conditions, the icon that appears may not match the actual
scene.
•If you change the composition while shooting and the white balance is not
optimal, press the movie button to stop recording, then start recording
again (only when the image quality is set to (p. 108)).
•Movies can be shot by pressing the movie button even when the mode
switch is set to 4 (p. 103).
Memory Card 4 GB 16 GB
Shooting Time Approx. 14 min. 34 sec. Approx. 59 min. 40 sec.
COPY
![](https://manualstech.ams3.cdn.digitaloceanspaces.com/html/nl/canon/ixus-230-hs/html/bg21.png)
33
You can view the movies you have shot on the screen.
Enter Playback mode.
zPress the 1 button.
XThe last image you took will appear.
X appears on movies.
Choose a movie.
zPress the qr buttons to choose a movie,
then press the m button.
Play the movie.
zPress the op buttons to choose , then
press the m button.
XThe movie will play.
zPress the op buttons to adjust the volume.
zIf you press the m button, the movie will
pause and the movie control panel will
appear. Press the qr buttons to choose
, then press the m button to resume
playback.
XAfter the movie finishes, appears.
Viewing Movies
How can I play back movies on a computer?
Install the included software (p. 35).
•When watching a movie on a computer, frames may drop, it may not play
smoothly, and the audio may stop suddenly depending on the computer’s
capabilities. Use the supplied software to copy the movie back onto the memory
card, then play back the movie with the camera. If you connect the camera to a
TV, you can view images on the larger screen.
COPY
![](https://manualstech.ams3.cdn.digitaloceanspaces.com/html/nl/canon/ixus-230-hs/html/bg22.png)
34
You can use the included software to transfer images you have shot with the
camera to a computer for viewing. If you are already using software included
with another Canon-brand compact digital camera, install the software from
the included CD-ROM, overwriting your current installation.
Windows
* For Windows XP, Microsoft .NET Framework 3.0 or later (max. 500 MB) must be installed.
Installation may take some time depending on your computer’s capabilities.
Macintosh
Transferring Images to a Computer for
Viewing
System Requirements
OS
Windows 7 (Including SP1)
Windows Vista SP2
Windows XP SP3
Computer Model The above OS should be pre-installed on computers with built-in
USB ports.
CPU Pentium 1.3 GHz or higher (still images), Core 2 Duo 2.6 GHz or
higher (movies)
RAM
Windows 7 (64 bit): 2 GB or more
Windows 7 (32 bit), Windows Vista (64 bit, 32 bit): 1 GB or more (still
images), 2 GB or more (movies)
Windows XP: 512 MB or more (still images), 2 GB or more (movies)
Interface USB
Free Hard Disk
Space 420 MB or more*
Display 1,024 x 768 pixels or higher
OS Mac OS X (v10.5 – v10.6)
Computer Model The above OS should be pre-installed on computers with built-in
USB ports.
CPU Intel Processor (still images), Core 2 Duo 2.6 GHz or higher (movies)
RAM
Mac OS X v10.6: 1 GB or more (still images), 2 GB or more (movies)
Mac OS X v10.5: 512 MB or more (still images), 2 GB or more
(movies)
Interface USB
Free Hard Disk
Space 480 MB or more
Display 1,024 x 768 pixels or higher
COPY
![](https://manualstech.ams3.cdn.digitaloceanspaces.com/html/nl/canon/ixus-230-hs/html/bg23.png)
Transferring Images to a Computer for Viewing
35
Windows Vista and Mac OS X (v10.5) are used for these explanations.
Place the CD-ROM in the
computer’s CD-ROM drive.
zPlace the supplied CD-ROM (DIGITAL
CAMERA Solution Disk) (p. 2) into the
computer’s CD-ROM drive.
zWhen the CD-ROM is placed in a
Macintosh, a CD-ROM icon will appear on
the desktop. Double-click the icon to open
the CD-ROM, then double click when
it appears.
Install the software.
zFor Windows, click [Easy Installation], and
for Macintosh click [Install], then follow the
on-screen instructions to proceed with the
installation.
zIf the [User Account Control] window
appears in Windows, follow the on-screen
instructions to proceed.
Complete the installation.
zFor Windows, click [Restart] or [Finish],
then remove the CD-ROM when your
desktop screen appears.
zFor Macintosh, click [Finish] in the screen
that appears when the installation is
complete, then remove the CD-ROM when
your desktop screen appears.
Installing the Software
COPY
![](https://manualstech.ams3.cdn.digitaloceanspaces.com/html/nl/canon/ixus-230-hs/html/bg24.png)
Transferring Images to a Computer for Viewing
36
Connect the camera to the
computer.
zTurn off the camera.
zOpen the cover ( ) and insert the
included interface cable’s smaller plug
(p. 2) firmly into the camera terminal in the
direction shown ( ).
zInsert the interface cable’s larger plug into
the computer’s USB port. For details on
the computer’s USB port, refer to the user
guide provided with the computer.
Turn on the camera to open
CameraWindow.
zPress the 1 button to turn on the camera.
zFor Windows, click [Downloads Images
From Canon Camera using Canon
CameraWindow] when it appears on the
screen. CameraWindow will appear when
a connection is established between the
camera and computer.
zFor Macintosh, CameraWindow will
appear when a connection is established
between the camera and computer.
Transfer Images.
zClick [Import Images from Camera], and
then click [Import Untransferred Images].
XImages will transfer to the computer.
Images will be sorted by date and saved in
separate folders in the Pictures folder.
Transferring and Viewing Images
CameraWindow
COPY
![](https://manualstech.ams3.cdn.digitaloceanspaces.com/html/nl/canon/ixus-230-hs/html/bg25.png)
Transferring Images to a Computer for Viewing
37
zWhen image transfer is complete, close
CameraWindow and press the 1 button
to turn the camera off, then unplug the
cable.
zFor details on how to view images using a
computer, refer to the Software Guide.
•If CameraWindow does not appear even after following Step 2 for
Windows, click the [Start] menu and choose [All Programs], followed by
[Canon Utilities], [CameraWindow] and [CameraWindow].
•If CameraWindow does not appear even after following Step 2 for
Macintosh, click the CameraWindow icon on the Dock (the bar which
appears at the bottom of the desktop).
•For Windows 7, use the following steps to display CameraWindow.
Click on the task bar.
In the screen that appears, click the link to modify the program.
Choose [Downloads Images From Canon Camera using Canon
CameraWindow] and click [OK].
Double click .
•You can transfer images even without using the image transfer function
in the included software by simply connecting your camera to a computer.
There are, however, the following limitations.
-It may take a few minutes from when you connect the camera to the computer
until you can transfer images.
-Images shot in the vertical orientation may be transferred in the horizontal
orientation.
-Protection settings for images may be lost when transferred to a computer.
-There may be problems transferring images or image information correctly
depending on the version of the operating system in use, the file size, or the
software in use.
-Some functions in the included software may not be available, such as editing
movies, and transferring images to the camera.
COPY
![](https://manualstech.ams3.cdn.digitaloceanspaces.com/html/nl/canon/ixus-230-hs/html/bg26.png)
38
COPY
![](https://manualstech.ams3.cdn.digitaloceanspaces.com/html/nl/canon/ixus-230-hs/html/bg27.png)
39
Learning More
This chapter explains the parts of the camera and what appears on the
screen, as well as the basic operating instructions.
2
COPY
![](https://manualstech.ams3.cdn.digitaloceanspaces.com/html/nl/canon/ixus-230-hs/html/bg28.png)
40
Components Guide
Lens
Speaker
Zoom Lever
Shooting: i (Telephoto) / j (Wide
Angle) (pp. 26, 32, 53)
Playback: k (Magnify) / (Index) g
(pp. 114, 120)
Shutter Button (p. 25)
Power Button (p. 20)
Microphones (p. 31)
Lamp (pp. 55, 73, 74, 75, 165, 165)
Flash (pp. 52, 83, 100)
Tripod Socket
DC Coupler Terminal Cover (p. 174)
Memory Card / Battery Cover (p. 17)
COPY
![](https://manualstech.ams3.cdn.digitaloceanspaces.com/html/nl/canon/ixus-230-hs/html/bg29.png)
Components Guide
41
Mode Switch
Use the mode switch to change the Shooting mode.
Screen (LCD Monitor) (pp. 42, 183,
186)
Movie Button (pp. 31, 103)
Mode Switch
HDMI™ Terminal (p. 171)
Strap Mount (p. 13)
A/V OUT (Audio/Video Output) /
DIGITAL Terminal (pp. 36, 142, 170)
n Button (p. 45)
Indicator (p. 43)
1 (Playback) Button (pp. 29, 113)
m FUNC./SET Button (p. 44)
h r (Flash) (pp. 52, 83, 100) / Button
l p (Display) (p. 42) / Button
b o (Exposure Compensation) (p. 83) /
Button
e q (Macro) (p. 90) / Button
You can shoot with the best settings for the scene (p. 62) or
choose settings yourself to take various types of pictures
(p. 81).
You can leave it to the camera to select settings for fully
automatic shooting (p. 26).
COPY
![](https://manualstech.ams3.cdn.digitaloceanspaces.com/html/nl/canon/ixus-230-hs/html/bg2a.png)
42
You can change the screen display using the p button. Refer to p. 183 for
details on information that appears on the screen.
Shooting
Playback
Screen Display
Switching the Display
Information Display No Information Display
You can also switch the display by pressing the p button while the image
displays right after shooting. However, Simple Information Display is not
available. You can change the display that appears first by pressing the
n button, then choosing [Review info] in the 4 tab (p. 166).
Focus Check
Display (p. 119)
Detailed Information
Display
No Information
Display
Simple Information
Display
COPY
![](https://manualstech.ams3.cdn.digitaloceanspaces.com/html/nl/canon/ixus-230-hs/html/bg2b.png)
Indicator
43
Screen Display in Low Light Conditions
The display automatically brightens when shooting in low light conditions,
allowing you to check the composition (Night Display function). However, the
brightness of the image on the screen, and the brightness of the actual image
recorded may be different. Screen noise may appear and the movement of
the subject may appear somewhat rough on the screen. This has no effect on
the recorded image.
Overexposure Warning during Playback
In Detailed Information Display (p. 42), overexposed areas of the image flash
on the screen.
Histogram during Playback
zThe graph that appears in Detailed
Information Display (p. 186) is called the
histogram. The histogram shows the
distribution of brightness in an image
horizontally, and the amount of brightness
vertically, and in this way you can judge
the exposure.
The indicator on the back of the camera (p. 41) will light or blink depending
on the camera’s status.
BrightDark
High
Low
Indicator
Color Status Operation Status
Green
Lights When connected to a computer (p. 36), display off
Blinks During camera start-up, recording/reading/transmitting
image data, or when shooting long exposures (p. 77)
When the indicator blinks green, do not turn the camera off, open the
memory card slot/battery cover, shake or jolt the camera. These actions
may corrupt the image data or cause the camera or memory card to
malfunction.
COPY
![](https://manualstech.ams3.cdn.digitaloceanspaces.com/html/nl/canon/ixus-230-hs/html/bg2c.png)
44
Commonly used functions can be set with the FUNC. menu.
The menu items and options differ depending on the Shooting mode (pp. 190
– 191) or Playback mode (p. 196).
Display the FUNC. menu.
zPress the m button.
Choose a menu item.
zPress the op buttons to choose a menu
item, then press the m or r button.
zChoosing some menu items changes the
screen to display further menu options.
Choose an option.
zPress the op buttons to choose an
option.
zYou can also choose settings by pressing
the n button on options that display
.
zTo return to the menu items, press the q
button.
Complete the setting.
zPress the m button.
XThe shooting screen will reappear and the
setting you chose will display on the
screen.
FUNC. Menu – Basic Operations
Menu Items
Available Options
COPY
![](https://manualstech.ams3.cdn.digitaloceanspaces.com/html/nl/canon/ixus-230-hs/html/bg2d.png)
45
Various functions can be set from the menus. The menu items are organized
under tabs, such as for shooting (4) and playback (1). The options differ
depending on the Shooting mode and the Playback mode (pp. 192 – 196).
Display the menu.
zPress the n button.
Choose a tab.
zMove the zoom lever or press the qr
buttons to choose a tab.
Choose an item.
zPress the op buttons to choose an item.
zSome items require you to press the m or
r button to display a submenu in which
you change the setting.
Choose an option.
zPress the qr buttons to choose an option.
Complete the setting.
zPress the n button to restore the
normal screen.
MENU – Basic Operations
COPY
![](https://manualstech.ams3.cdn.digitaloceanspaces.com/html/nl/canon/ixus-230-hs/html/bg2e.png)
46
You can silence or adjust the volume of camera sounds.
Display the menu.
zPress the n button.
Choose [Mute].
zMove the zoom lever to choose the 3 tab.
zPress the op buttons to choose [Mute],
then press the qr buttons to choose [On].
zPress the n button to restore the
normal screen.
Changing the Sound Settings
Muting Sounds
•You can also mute camera sounds by holding down the p button and
turning the camera on.
•If you mute camera sounds, the sound will also be muted when playing
back movies (p. 33). If you press the o button while playing back a
movie, the sound will play back, and you can adjust the volume with the
op buttons.
COPY
![](https://manualstech.ams3.cdn.digitaloceanspaces.com/html/nl/canon/ixus-230-hs/html/bg2f.png)
Changing the Sound Settings
47
Display the menu.
zPress the n button.
Choose [Volume].
zMove the zoom lever to choose the 3 tab.
zPress the op buttons to choose
[Volume], then press the m button.
Adjust the volume.
zPress the op buttons to choose an item,
then press the qr buttons to adjust the
volume.
zPress the n button twice to restore
the normal screen.
Adjusting the Volume
COPY
![](https://manualstech.ams3.cdn.digitaloceanspaces.com/html/nl/canon/ixus-230-hs/html/bg30.png)
48
The screen brightness can be adjusted in 2 ways.
Display the menu.
zPress the n button.
Choose [LCD Brightness].
zMove the zoom lever to choose the 3 tab.
zPress the op buttons to choose [LCD
Brightness].
Adjust the brightness.
zPress the qr buttons to adjust the
brightness.
zPress the n button twice to restore
the normal screen.
zPress and hold the button for more than p
1 second.
XThe screen increases to maximum
brightness (The settings made in [LCD
Brightness] in the 3 tab will be disabled).
zPress and hold the p button again for
more than 1 second to return the screen to
the original brightness.
Adjusting the Screen Brightness
Using the Menu
Using the p Button
•The next time you turn on the camera, the screen will be at the brightness
setting chosen in the 3 tab.
•When you have [LCD Brightness] set to its highest setting in the 3 tab,
you cannot adjust the brightness with the p button.
COPY
![](https://manualstech.ams3.cdn.digitaloceanspaces.com/html/nl/canon/ixus-230-hs/html/bg31.png)
49
When you have mistakenly changed a setting, you can reset the camera to
the default settings.
Display the menu.
zPress the n button.
Choose [Reset All].
zMove the zoom lever to choose the 3 tab.
zPress the op buttons to choose [Reset
All], then press the m button.
Reset the settings.
zPress the qr buttons to choose [OK], then
press the m button.
XThe camera will reset to the default
settings.
Returning the Camera to Default Settings
Are there functions that cannot be reset?
•The [Date/Time] (p. 21), [Language ] (p. 22), the image registered in [Start-
up Image] (p. 160), [Time Zone] (p. 164) and [Video System] (p. 170) in the 3
tab.
•The recorded custom white balance data (p. 84).
•Colors that were chosen in Color Accent (p. 69) or Color Swap (p. 70).
•Shooting modes set when the mode switch was set to 4 (p. 61).
COPY
![](https://manualstech.ams3.cdn.digitaloceanspaces.com/html/nl/canon/ixus-230-hs/html/bg32.png)
50
To save battery power, the screen turns off, and the camera turns off
automatically when it is not operated for a certain time.
Power Saving during Shooting
The screen will turn off approximately 1 minute after you stop operating the
camera. After about 2 more minutes, the lens will retract and the camera will
turn off. When the screen has turned off but the lens has not yet retracted,
pressing the shutter button halfway (p. 25) turns on the screen and shooting
can continue.
Power Saving during Playback
The camera will turn off approximately 5 minutes after you stop operating the
camera.
You can check the current time.
zPress and hold the m button.
The current time appears.
zIf you hold the camera vertically while
using the clock function, it will switch to
vertical display. Press the qr buttons to
change the display color.
zPress the m button again to cancel the
clock display.
Power Saving Function (Auto Power
Down)
•You can turn off the power saving function (p. 163).
•You can adjust the time before the screen turns off (p. 163).
Clock Function
When the camera is off, press and hold the m button, then press the
power button to display the clock.
COPY
![](https://manualstech.ams3.cdn.digitaloceanspaces.com/html/nl/canon/ixus-230-hs/html/bg33.png)
51
Shooting with Commonly
Used Functions
This chapter explains how to use common functions, such as the self-
timer, and how to turn off the flash.
•This chapter assumes that the camera is set to A mode. When shooting
in another mode, check which functions are available in that mode (pp. 188
– 193).
3
COPY
![](https://manualstech.ams3.cdn.digitaloceanspaces.com/html/nl/canon/ixus-230-hs/html/bg34.png)
52
You can shoot with the flash turned off.
Press the r button.
Choose !.
zPress the qr buttons to choose !, then
press the m button.
Once set, ! will appear on the screen.
zTo turn the flash back on, follow the steps
above to choose .
Turning the Flash Off
What if a flashing appears?
When you press the shutter button halfway in low light conditions where camera
shake is likely, a flashing will appear on the screen. Attach the camera to a
tripod to prevent it from moving.
COPY
![](https://manualstech.ams3.cdn.digitaloceanspaces.com/html/nl/canon/ixus-230-hs/html/bg35.png)
53
You can use the digital zoom to zoom up to approximately 32x maximum, and
capture subjects that are too far away for the optical zoom to enlarge.
Move the zoom lever toward i.
zHold the lever until zooming stops.
Zooming stops at the largest possible
zoom factor without image deterioration.
The zoom factor will appear on the screen
when you release the zoom lever.
Move the zoom lever toward i
again.
The digital zoom will zoom in even further
on the subject.
Zooming In More Closely on Subjects
(Digital Zoom)
Zoom Factor
Turning off the digital zoom
To turn off the digital zoom, press the n button to choose [Digital Zoom] in
the 4 tab, then choose [Off].
•The focal lengths when using the optical zoom and digital zoom together
are as follows (all focal lengths are 35mm film equivalent):
28 – 896 mm (28 – 224 mm when using the optical zoom alone)
•Depending on the recording pixel setting (p. 59) and zoom factor, the
images may appear coarse (the zoom factor will appear in blue).
COPY
![](https://manualstech.ams3.cdn.digitaloceanspaces.com/html/nl/canon/ixus-230-hs/html/bg36.png)
54
You can insert the shooting date and time in the lower right corner of an
image. Once inserted, however, they cannot be deleted. Be sure to check
beforehand that the date and time are correctly set (p. 20).
Display the menu.
zPress the n button.
Choose [Date Stamp].
zMove the zoom lever to choose the 4 tab.
zPress the op buttons to choose [Date
Stamp].
Choose the setting.
zPress the qr buttons to choose [Date] or
[Date & Time].
zPress the n button to complete the
setting and restore the shooting screen.
Once set, [DATE] will appear on the
screen.
Shoot.
The shooting date or time will be recorded
in the image’s lower right corner.
zTo restore to the original setting, choose
[Off] in Step 3.
Inserting the Date and Time
You can insert and print the shooting date in images which do not have an
embedded date and time as follows. However, if you do this for images with
an embedded date and time, the date and time may be printed twice.
•Use the DPOF print settings (p. 149) to print.
•Use the included software to print.
Refer to the Software Guide for details.
•Print using printer functions (p. 142).
COPY
![](https://manualstech.ams3.cdn.digitaloceanspaces.com/html/nl/canon/ixus-230-hs/html/bg37.png)
55
The self-timer can be used to shoot a group photo that includes the
photographer. The camera will shoot approximately 10 seconds after the
shutter button is pressed.
Choose .
zAfter pressing the m button, press the
op buttons to choose , then press the
m button again.
Choose ].
zPress the op buttons to choose ], then
press the m button.
Once set, ] will appear on the screen.
Shoot.
zPress the shutter button halfway to focus
on the subject, then press it fully.
When the self-timer starts, the lamp blinks
and the self-timer sound plays.
Two seconds before the shutter releases,
the lamp and sound speed up (the lamp
remains lit when the flash will fire).
zTo cancel shooting with the self-timer after
the countdown has started, press the
n button.
zTo restore the original setting, choose
in Step 2.
Using the Self-Timer
COPY
![](https://manualstech.ams3.cdn.digitaloceanspaces.com/html/nl/canon/ixus-230-hs/html/bg38.png)
Using the Self-Timer
56
The camera will shoot approximately 2 seconds after the shutter button is
pressed, preventing any camera shake that occurs when pressing the shutter
button.
Choose [.
zFollow Steps 1 – 2 on p. 55 to choose [.
Once set, [ will appear on the screen.
zFollow Step 3 on p. 55 to shoot.
You can set the delay (0 – 30 seconds) and the number of shots (1 – 10
shots).
Choose $.
zFollow Steps 1 – 2 on p. 55 to choose $,
then press the n button.
Choose the settings.
zPress the op buttons to choose [Delay]
or [Shots].
zPress the qr buttons to choose a value,
then press the m button.
Once set, $ will appear on the screen.
zFollow Step 3 on p. 55 to shoot.
Using the Self-Timer to Prevent Camera Shake
Customizing the Self-Timer
COPY
![](https://manualstech.ams3.cdn.digitaloceanspaces.com/html/nl/canon/ixus-230-hs/html/bg39.png)
Using the Self-Timer
57
•When 2 or more shots are set, the exposure and white balance settings
are set with the first shot. If the flash fires or you set a high number of
shots, the shooting interval may take longer than usual. Shooting will stop
automatically if the memory card fills.
•When you set the delay for more than 2 seconds, the lamp and self-timer
sound speed up 2 seconds before the shutter releases (the lamp remains
lit when the flash will fire).
COPY
![](https://manualstech.ams3.cdn.digitaloceanspaces.com/html/nl/canon/ixus-230-hs/html/bg3a.png)
58
You can change the width to height ratio of an image.
Choose .
zAfter pressing the m button, press the
op buttons to choose , then press the
m button again.
Choose an option.
zPress the op buttons to choose an
option, then press the m button.
Once set, the aspect ratio of the screen will
change.
zTo restore the original setting, choose
in Step 2.
Changing the Aspect Ratio
The same aspect ratio as HD TVs, used for displaying on wide-screen HD TVs.
The same aspect ratio as 35mm film, used for printing out 5 x 7 in. or postcard
sized images.
The same aspect ratio as the screen of this camera, used for printing images on
3.5 x 5 in. to various A-sized papers.
A square-shaped aspect ratio.
The digital zoom (p. 53) is only available in the aspect ratio since
[Digital Zoom] is fixed to [Off] in all other ratios.
COPY
![](https://manualstech.ams3.cdn.digitaloceanspaces.com/html/nl/canon/ixus-230-hs/html/bg3b.png)
59
You can choose from 4 recording pixel settings.
Choose the recording pixel setting.
zAfter pressing the m button, press the
op buttons to choose , then press the
m button again.
Choose an option.
zPress the op buttons to choose an
option, then press the m button.
The setting will appear on the screen.
zTo restore to the original setting, choose
in Steps 1 – 2.
You can choose from the following 2 compression ratios (image quality):
(Fine), (Normal).
Choose the compression ratio
setting.
zAfter pressing the m button, press the
op buttons to choose , then press the
m button again.
Choose an option.
zPress the op buttons to choose an
option, then press the m button.
The setting will appear on the screen.
zTo restore the original setting, choose
in Steps 1 – 2.
Changing the Recording Pixel Setting
(Image Size)
Changing the Compression Ratio (Image
Quality)
COPY
Produktspezifikationen
Marke: | Canon |
Kategorie: | Kamera |
Modell: | Ixus 230 HS |
Brauchst du Hilfe?
Wenn Sie Hilfe mit Canon Ixus 230 HS benötigen, stellen Sie unten eine Frage und andere Benutzer werden Ihnen antworten
Bedienungsanleitung Kamera Canon
![Canon](/images/logos/canon.png)
3 Oktober 2024
![Canon](/images/logos/canon.png)
3 September 2024
![Canon](/images/logos/canon.png)
3 September 2024
![Canon](/images/logos/canon.png)
3 September 2024
![Canon](/images/logos/canon.png)
28 August 2024
![Canon](/images/logos/canon.png)
28 August 2024
![Canon](/images/logos/canon.png)
27 August 2024
![Canon](/images/logos/canon.png)
27 August 2024
![Canon](/images/logos/canon.png)
27 August 2024
![Canon](/images/logos/canon.png)
27 August 2024
Bedienungsanleitung Kamera
- Kamera Samsung
- Kamera Acer
- Kamera Sanyo
- Kamera BenQ
- Kamera Gembird
- Kamera HP
- Kamera Lexibook
- Kamera Logitech
- Kamera Medion
- Kamera Nedis
- Kamera Philips
- Kamera SilverCrest
- Kamera Sony
- Kamera Tevion
- Kamera Trust
- Kamera Panasonic
- Kamera Bosch
- Kamera Laserliner
- Kamera Powerfix
- Kamera Maginon
- Kamera Netgear
- Kamera Technaxx
- Kamera Bresser
- Kamera Denver
- Kamera König
- Kamera Trevi
- Kamera Blaupunkt
- Kamera Braun
- Kamera Pyle
- Kamera GE
- Kamera Lenco
- Kamera Creative
- Kamera Polaroid
- Kamera JVC
- Kamera Optoma
- Kamera Xiaomi
- Kamera EZVIZ
- Kamera Imou
- Kamera Hitachi
- Kamera Gigaset
- Kamera Olympus
- Kamera Prixton
- Kamera Bushnell
- Kamera Casio
- Kamera Epson
- Kamera ViewSonic
- Kamera Lenovo
- Kamera Scosche
- Kamera Marshall Electronics
- Kamera Exakta
- Kamera Fujifilm
- Kamera MINOX
- Kamera Nikon
- Kamera Ricoh
- Kamera Sigma
- Kamera AVerMedia
- Kamera TP-Link
- Kamera Vtech
- Kamera Kodak
- Kamera Alpine
- Kamera Agfa
- Kamera Easypix
- Kamera Hasselblad
- Kamera Konica-Minolta
- Kamera Leica
- Kamera Minolta
- Kamera Pentax
- Kamera Praktica
- Kamera Rollei
- Kamera SeaLife
- Kamera Traveler
- Kamera Netatmo
- Kamera Contax
- Kamera Cosina
- Kamera Fuji
- Kamera Konica
- Kamera Mamiya
- Kamera Yashica
- Kamera Aplic
- Kamera Akaso
- Kamera Nest
- Kamera Avaya
- Kamera Kogan
- Kamera Elmo
- Kamera Lumens
- Kamera Eufy
- Kamera Kyocera
- Kamera Cobra
- Kamera GoPro
- Kamera SPC
- Kamera Burris
- Kamera Celestron
- Kamera Levenhuk
- Kamera Ring
- Kamera SereneLife
- Kamera Swann
- Kamera Sygonix
- Kamera Aida
- Kamera HTC
- Kamera EVE
- Kamera Ozito
- Kamera Foscam
- Kamera ARRI
- Kamera Reolink
- Kamera Fluke
- Kamera Hikvision
- Kamera FLIR
- Kamera Azden
- Kamera Arlo
- Kamera Oregon Scientific
- Kamera General Electric
- Kamera Dörr
- Kamera Lorex
- Kamera Zorki
- Kamera Daitsu
- Kamera Emerson
- Kamera EverFocus
- Kamera HOLGA
- Kamera Joy-it
- Kamera Kyocera Yashica
- Kamera Leitz Focomat IIc
- Kamera Meade
- Kamera Moto Mods (Motorola)
- Kamera Silvergear
- Kamera Sinji
- Kamera SJCAM
- Kamera Spypoint
- Kamera Vivitar
- Kamera ZeissIkon
- Kamera Vimar
- Kamera Intel
- Kamera Dahua Technology
- Kamera AgfaPhoto
- Kamera Speco Technologies
- Kamera InfiRay
- Kamera Getac
- Kamera Cambo
- Kamera Hanwha
- Kamera Zenit
- Kamera General
- Kamera Fimi
- Kamera Runcam
- Kamera BZBGear
- Kamera Moultrie
- Kamera Argus
- Kamera Pelco
- Kamera Alcidae
- Kamera Brinno
- Kamera UniView
- Kamera Alfatron
- Kamera Videotec
- Kamera AViPAS
- Kamera Kobian
- Kamera Ansco
- Kamera Strex
- Kamera Hamilton Buhl
- Kamera Digital Watchdog
- Kamera MuxLab
- Kamera Ikegami
- Kamera KanDao
- Kamera Seek Thermal
- Kamera Z CAM
- Kamera Ikelite
- Kamera IOptron
- Kamera GoXtreme
- Kamera PatrolEyes
- Kamera Red Digital Cinema
- Kamera Watec
- Kamera Fantasea Line
- Kamera Ergoguys
- Kamera Videology
- Kamera Adeunis
- Kamera Hoppstar
- Kamera Camouflage
- Kamera HuddleCamHD
- Kamera AquaTech
- Kamera PTZ Optics
- Kamera Linhof
Neueste Bedienungsanleitung fĂĽr -Kategorien-
![Trust](/images/pdf_free.png)
15 Oktober 2024
![Bushnell](/images/logos/bushnell.png)
13 Oktober 2024
![Polaroid](/images/logos/polaroid.png)
9 Oktober 2024
![Fujifilm](/images/logos/fujifilm.png)
7 Oktober 2024
![Rollei](/images/pdf_free.png)
6 Oktober 2024
![Leica](/images/logos/leica.png)
5 Oktober 2024
![Rollei](/images/pdf_free.png)
5 Oktober 2024
![Kodak](/images/logos/kodak.png)
4 Oktober 2024
![Easypix](/images/pdf_free.png)
3 Oktober 2024
![Olympus](/images/logos/olympus.png)
3 Oktober 2024