Canon Bubble Jet S520 Bedienungsanleitung
Lesen Sie kostenlos die 📖 deutsche Bedienungsanleitung für Canon Bubble Jet S520 (186 Seiten) in der Kategorie Drucker. Dieser Bedienungsanleitung war für 9 Personen hilfreich und wurde von 2 Benutzern mit durchschnittlich 4.5 Sternen bewertet
Seite 1/186

User’s Guide
BUBBLE JET PRINTER
V1

1
Table of Contents
Table of Contents
Introduction .....................................................................................................4
How to Use This Manual ................................................................................5
Safety Precautions .........................................................................................7
Printer Parts and Their Functions .................................................................12
Front View ........................... ................................. .......................................13
Rear View .......................................... ................................. .........................14
Inside the Printer .........................................................................................15
Operation Panel ..........................................................................................16
Printer Driver Functions (Windows) .............................................................17
Opening the Printer Properties Dialog Box ..................................................18
Printer Properties Dialog Box Description ...................................................20
BJ Status Monitor Functions ........................................................................34
Canceling a Print Job ........................... ............................................ ...........37
Uninstalling Printer Drivers ..........................................................................38
Printer Driver Functions (Macintosh) ............................................................39
Description of Print Settings ........................................................................40
BJ Print Monitor ................................. ................................. .........................56
Canceling a Print Job ........................... ............................................ ...........58
Using the Printer with a Network .................................................................59

2
Table of Contents
Uninstalling Printer Drivers .......................................................................... 63
Routine Maintenance ....................................................................................64
When to Replace Ink Tank and Maintain Printhead ....................................65
Replacing an Ink Tank .................................................................................66
Printing the Nozzle Check Pattern ...............................................................71
Printhead Cleaning .......................................... ................................. ...........75
Printhead Deep Cleaning ............................................................................ 78
Cleaning the Printer .....................................................................................80
Transporting the Printer ........................ ............................................ ...........82
Printing Media ...............................................................................................86
Compatible Media Types .............................................................................87
Envelopes ............................ ................................. .......................................89
High Resolution Paper HR-101N ................................................................. 93
Glossy Photo Paper GP-301/GP-301N .......................................................95
High Gloss Photo Film HG-201 ...................................................................97
Glossy Photo Cards FM-101 .......................................................................99
Photo Paper Pro PR-101 ........................................................................... 101
Photo Paper Pro PC-101S ........................................................................104
Transparencies CF-102 .............................................................................106
T-Shirt Transfers TR-201 ................... ........... 108.............................................
Banner Paper ............................. ................................. ..............................110
Troubleshooting ..........................................................................................113
Cannot Install the Printer Driver ............................. .......................... .........114
Print Quality is Poor or Contains Errors .....................................................116
Printer Does Not Start or Stops During Print Jobs ....................................134

3
Table of Contents
Paper Does Not Feed Properly or Paper Jams ......................................... 140
The POWER Lamp Flashes Orange ......................................................... 143
An Error Message is Displayed on the Screen .......................................... 146
Problems Unique to Windows ...................................................................157
Problems Unique to the Macintosh ........................................................... 162
Appendix .....................................................................................................165
For Faster Printing ....................................................................................166
Specifications .............................................................................................169
Index ...........................................................................................................181

4
Introduction
Introduction
Thank you for purchasing the Canon S520 Bubble Jet Printer. This User’s Guide provides
complete explanations of the features and functions of the printer.
This guide uses the following symbols to indicate important information. Always observe
these instructions.
Warning
➤Instructions that, if ignored, could result in death or serious personal injury
caused by incorrect operation of the equipment.
These must be observed for safe operation.
Caution
➤Instructions that, if ignored, could result in personal injury or material
damage caused by incorrect operation of the equipment.
These must be observed for safe operation.
Important
➤Prohibited actions that, inadvertently performed, could result in equipment
damage, faults or impaired product quality.
These must be avoided for correct operation.
Information for Windows users only.
Information for Macintosh (USB users only).
Windows
Macintosh
5
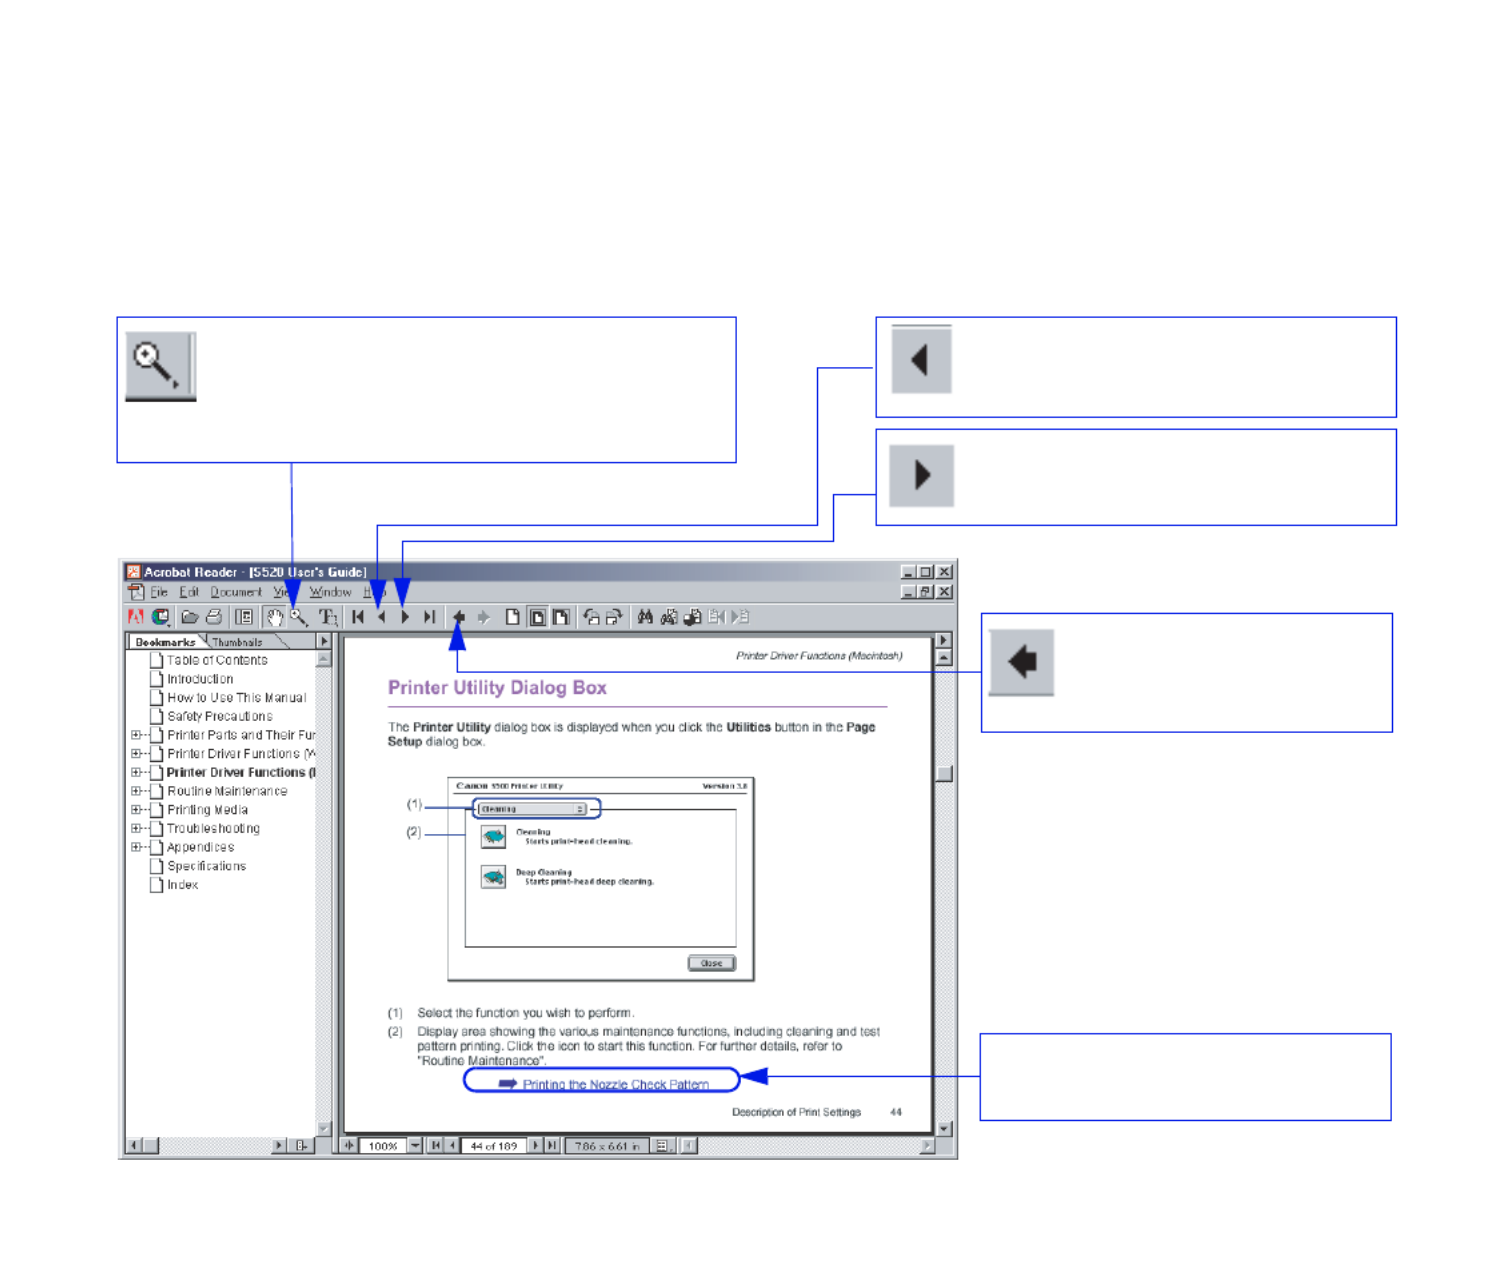
How to Use This Manual
How to Use This Manual
To view this User’s Guide, we recommend that you use Acrobat Reader 3.0 or later. The
screens shown below are for Acrobat Reader 4.0. Please note that screens displayed by
Acrobat Reader 3.0 or 5.0 are slightly different.
Use this button to enlarge the
viewing screen. Click this button in
the tool bar, then click within the
screen. Displays the next page.
Returns to the page
you were previously
viewing.
Click to jump straight to this
page.
Displays the previous page.
6
How to Use This Manual
Displays the table of contents.
Click the heading to jump to the topic.
Click the " " symbol to see the headings for each chapter.
Click the " " symbol to close the headings.
Use this button to
search for a word.
8
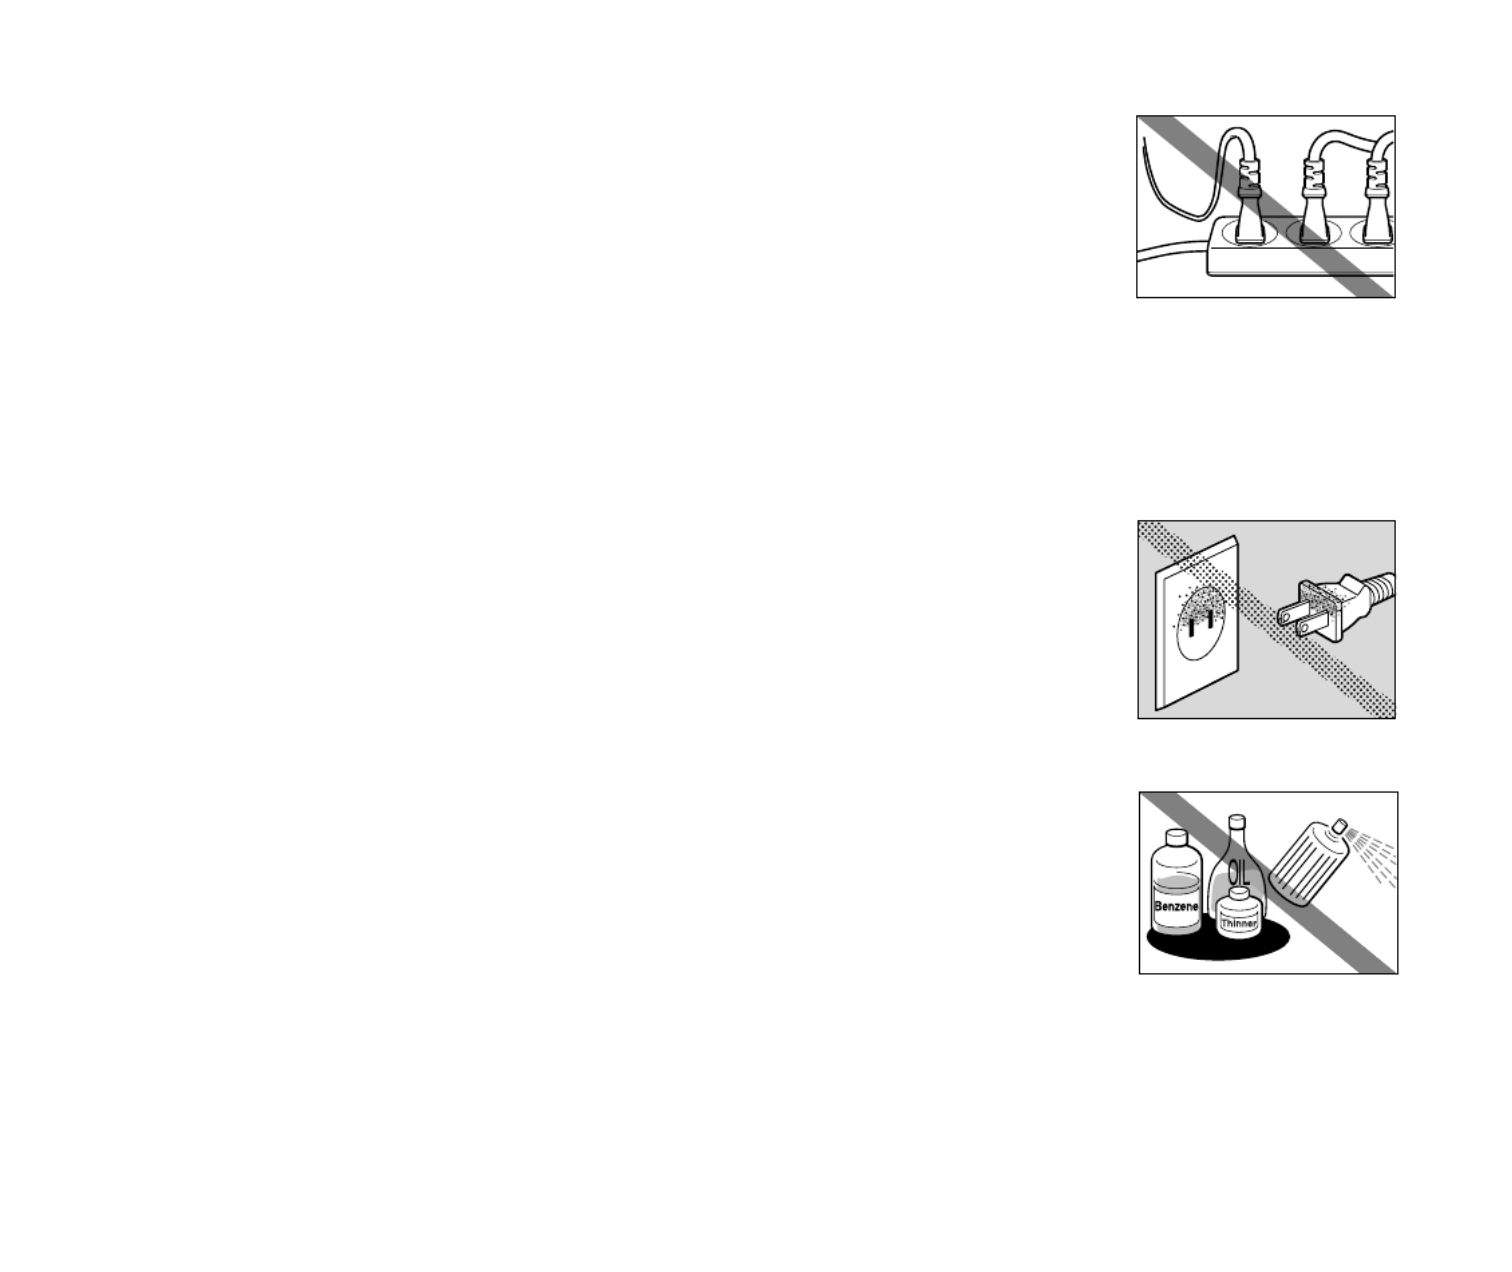
Safety Precautions
Never plug the printer into a power socket that is shared with other
equipment (extension lead, double adapter, etc.).
Never use the printer if the power cord is bundled or knotted.
If you detect smoke, unusual smells or strange noises around the printer, immediately
unplug the printer at the power supply and call for service.
Periodically, unplug the printer and use a dry cloth to wipe off any
dust or dirt that has collected on the plug and the power outlet. If the
printer is placed at a location exposed to a lot of dust, smoke or high
humidity, it may absorb moisture and cause insulation failure and fire.
■Cleaning the printer
Use a damp cloth to clean the printer. Never use flammable solvents
such as alcohol, benzene or thinners.
If flammable solvents come in contact with electrical components inside the printer,
it could cause a fire or electric shock.
Always unplug the printer from the power outlet before cleaning the printer.
If you accidentally switch the printer on while cleaning it, you could injure yourself or damage the printer.

9
Safety Precautions
■Maintaining the printer
Do not attempt to disassemble or modify the printer. There are no user-serviceable parts
inside the printer.
The printer contains high-voltage components. Never attempt any maintenance procedure not described in
this guide.
■Working around the printer
Do not use flammable sprays near the printer.
This could cause a fire or electric shock if the spray comes into contact with electrical components inside
the printer.
Never put your hands or fingers in the printer while it is printing.
Do not place metal objects (paper clips, staples, etc.) or containers of flammable
solvents (alcohol, thinners, etc.) on top of the printer.
If any foreign object (metal or liquid) falls into the printer, unplug the power cord and call
for service.
Caution
➤You may cause injury or damage the printer if you ignore any of these
safety precautions.

10
Safety Precautions
■Choosing a location
Do not install the printer in a location that is unstable or subject to excessive vibration.
Do not install the printer in a location that is very humid or dusty, in direct sunlight,
outdoors, or close to a heating source.
To avoid the risk of fire or electric shock, install the printer in a location with an ambient temperature range
of 41°F to 95°F (5°C to 35°C) and humidity of 10% to 90% (condensation free).
Do not place the printer on a thick rug or carpet.
Ensure that the area around the power outlet is kept clear at all times
so you can easily unplug the power cord if necessary.
When moving the printer, hold it at both ends.
■Power supply
Never remove the plug by pulling on the cord.

12
Printer Parts and Their Functions
Printer Parts and Their Functions
•Front View
•Rear View
•Inside the Printer
•Operation Panel

Front View 13
Printer Parts and Their Functions
Front View
Paper guide
When loading paper,
ensure that the left edge
touches this guide.
To move the paper guide,
pinch the guide and slide in
the appropriate direction.
Paper rest
Sheet feeder
Load paper here.
Paper feeds
automatically, one
sheet at a time.
Front cover
Open to replace the
ink tanks or remove
jammed paper.
Paper output tray
Operation panel
For details, refer to
"Operation Panel."

Rear View 14
Printer Parts and Their Functions
Rear View
USB port
Connects the printer to a
computer through a USB port.
Printer port (parallel)
Connects the printer to a
computer through a parallel port.

17
Printer Driver Functions (Windows)
Printer Driver Functions (Windows)
•Opening the Printer Properties Dialog Box
•Printer Properties Dialog Box Description
•BJ Status Monitor Functions
•Canceling a Print Job
•Uninstalling Printer Drivers

Opening the Printer Properties Dialog Box 18
Printer Driver Functions (Windows)
Opening the Printer Properties Dialog Box
The Printer Properties application, or dialog box can be opened from either within an
directly from the Windows Start menu.
■Opening the Printer Properties dialog box from your application program
This method is generally used just before printing. The to specify printer settings
operations may vary slightly depending upon your application program. This section
describes only the general procedure for opening the Printer Properties dialog box.
1In your application, select the command to print a document.
The Print dialog box can usually be opened by selecting Print from the File
menu.
2Ensure that Canon S520 is selected in the Name field, then click the
Properties button.
The Printer Properties dialog box opens.
Note ➤Depending upon your application program, the command and menu names
may differ, and there may be more steps involved in opening the Printer
Properties dialog box. For further details, see the user's manual for your
application.

Printer Properties Dialog Box Description 20
Printer Driver Functions (Windows)
Printer Properties Dialog Box Description
Note ➤The screens in this section refer to Windows Me/Windows 98/Windows 95
operation. The equivalent screens for Windows XP, Windows 2000 and
Windows NT 4.0 may look slightly different.
•Main Tab
•Page Setup Tab
•Stamp/Background
Tab (Not Available in
Windows NT 4.0)
•Effects Tab
•Profiles Tab
•Maintenance Tab

Printer Properties Dialog Box Description 21
Printer Driver Functions (Windows)
Main Tab
(1) Media Type
Ensure that this setting matches the type of media loaded in the printer.
(2) Print Quality
Select the print quality you require from among the different options. To select custom
Print Quality, select Custom, then click the Set button.
(6)
(5)
(4)
(1)
(2)
(3)

Printer Properties Dialog Box Description 23
Printer Driver Functions (Windows)
Page Setup Tab
(1) Page Size
Ensure that the correct paper size is selected.
(2) Orientation
Select landscape or portrait printing and ensure that it is the same orientation used in
the application.
(9)
(2)
(1)
(3)
(5)
(6)
(4)
(7)
(8)

Printer Properties Dialog Box Description 24
Printer Driver Functions (Windows)
(3) Printing Type
Select the printing method from among the following.
Normal-size Printing The document is printed according to the original
dimensions. This setting is usually selected by default.
Fit-to-Page Printing The document is automatically resized to fit the paper size.
When using this function, ensure that you correctly specify
the Page Size and the Printer Paper Size.
Scaled Printing The document is resized when printed. When this is
selected, you can specify the Printer Paper Size and
Scaling.
Page Layout Printing Pages are reduced and printed so that 2 to 16 document
pages fit on each printed page.
Booklet Printing The multi-page document is printed so that two pages of the
document fit on each printed page. The print order is set
automatically. After the document is printed, you can create
a booklet by folding and saddle-stitching the document.
Poster Printing This enlarges and splits the print image across several
sheets of paper. The printed sheets can then be assembled
to make a large poster. (Not available in Windows NT 4.0)
Banner Printing Select this when printing on banner paper.
(4) Borderless Printing
The image is printed on the entire paper surface so that no margins are left on the four
sides of the paper. The media types available for Borderless Printing are PR-101 and
GP-301/GP-301N. For all other media types, the print quality may decrease.
(5) Amount of Extension
When you select Borderless Printing, the sections that extend beyond the paper are
not printed because the image is enlarged to a size slightly larger than the paper size.

Printer Properties Dialog Box Description 25
Printer Driver Functions (Windows)
You can use the slider to adjust how much the image extends beyond the paper. It is
recommended that you normally set the slider to the right end. If you move the slider
to the left to reduce the extension amount, a border may appear.
(6) Duplex Printing
The document is printed on both sides of the paper. After printing one side, turn the
ejected page over and print on the other side.
(7) Reverse Order
Prints the document starting with the last page.
(8) Collate
Select to print multiple copies of the document one copy at a time.
(9) Preview Area
Verify the overall layout, stamps, background and other settings to be applied to the
print job.

Printer Properties Dialog Box Description 28
Printer Driver Functions (Windows)
Effects Tab
(1) Simulate Illustration
This function lets you apply graphic effects to a color image without affecting the
original document. Select the check box, then adjust the brightness of the image with
the Contrast slider.
(6)
(1)
(2)
(5)
(3)
(4)

Printer Properties Dialog Box Description 29
Printer Driver Functions (Windows)
(2) Monochrome Effects
Prints a color image in a single color. Select the check box, then choose a color or use
a custom color using Select Color.
(3) Vivid Photo
By using this function, you can reproduce breathtaking sceneries in which colors,
especially blues and greens, appear even more vibrant. A major feature of this
function is its ability to create vivid backgrounds for fields, trees, oceans, and sky,
while maintaining the natural skin tones of people who appear in the images.
(4) Image Optimizer
Improves the contours and jaggedness that occur when photographic or graphic
image data is enlarged within an application.
(5) Photo Optimizer PRO
Optimizes the color for images taken from a digital camera or scanner. It is especially
effective for images affected by color imbalance and over or under exposure.
When printing several images on one page, optimization is usually applied to each
image according to its requirements. However, if the image data has been
manipulated using cut and paste, rotation or other such operations, group optimization
of all images on the page is recommended. In such cases, select the Apply
Throughout Page check box.
(6) Preview Area

Printer Properties Dialog Box Description 30
Printer Driver Functions (Windows)
Profiles Tab
(1) Printing Profiles
This list displays the print settings currently registered in the Profiles tab.
The Current Settings profile contains the settings currently specified on the Main,
Page Setup and Effects tabs. The Default Settings profile contains the factory
default settings.
(1)
(4)
(2)
(3)
(6)
(5)

Printer Properties Dialog Box Description 31
Printer Driver Functions (Windows)
(2) Details
Displays all the printer settings selected in Printing Profiles.
(3) Description
Displays a description of the printer settings selected in Printing Profiles. You can
enter the description when saving the printer settings.
(4) Add to Profiles
Click to save the settings currently specified on the Main, Page Setup and Effects
tabs. Select Current Settings in the Printing Profiles list, then click this button. The
Add to Profiles dialog box appears.
(5) Retrieve from Profiles
Click to activate registered printer settings. The contents of the Main, Page Setup and
Effects tabs are changed by selecting the printer settings in Printing Profiles, then
clicking this button. This button is disabled when Current Settings is selected.
(6) Delete
Click to delete unwanted printer settings. Select the unwanted item in the Printing
Profiles list, then click Delete. Current Settings and Default Settings cannot be
deleted.
Printer Properties Dialog Box Description 32
Printer Driver Functions (Windows)
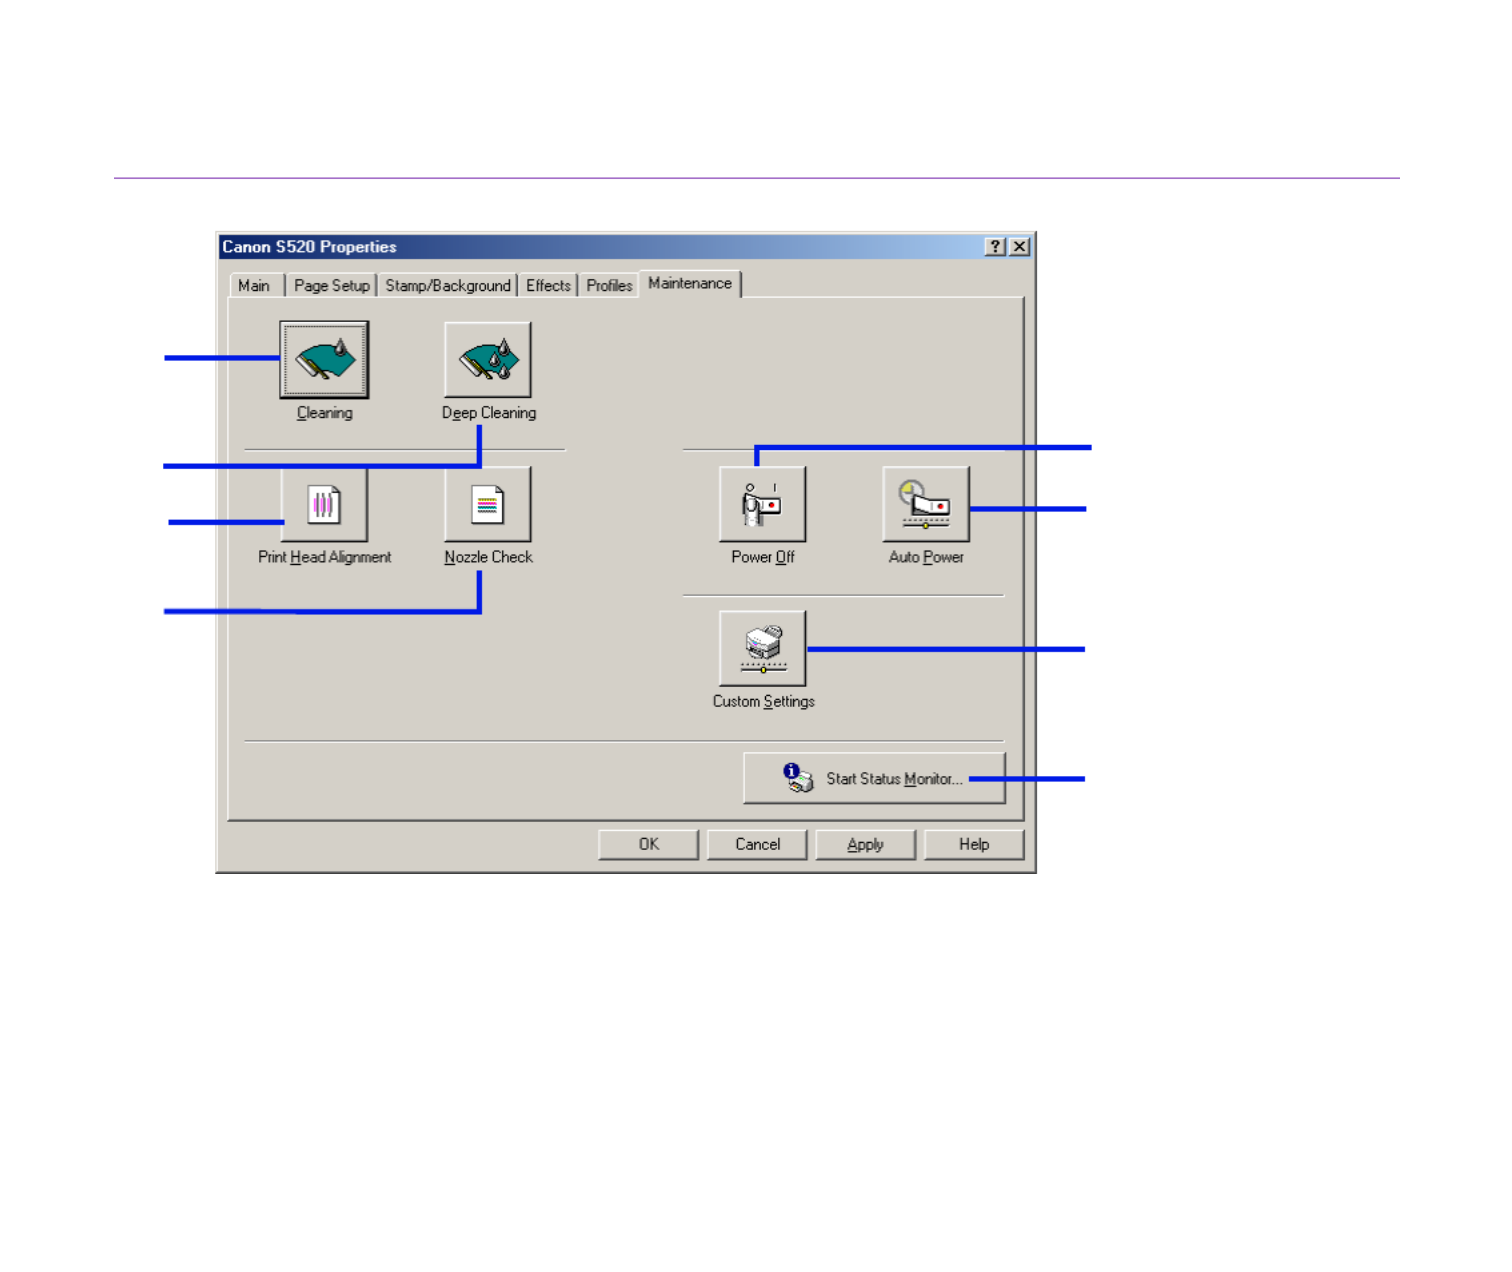
Maintenance Tab
(1) Cleaning
Click to start printhead cleaning.
(2) Deep Cleaning
Click to start printhead deep cleaning.
Use this function only if Cleaning has not improved print quality.
(1)
(2)
(4)
(5)
(7)
(8)
(6)
(3)

Printer Properties Dialog Box Description 33
Printer Driver Functions (Windows)
(3) Printhead Alignment
Click to start the printhead alignment procedure. For details on printhead alignment,
refer to the printed Quick Start Guide.
(4) Nozzle Check
Click to start a nozzle check pattern. The nozzle check pattern ensures that the
printhead nozzles are ejecting ink properly. For details, refer to “Examining the Nozzle
Check Pattern.”
(5) Power Off
Click to turn the printer off.
(6) Auto Power
Click to enable the printer to turn off automatically when no data is sent to the printer
for a certain period of time, and to automatically turn the printer on again when data is
sent to the printer.
(7) Custom Settings
Click to modify the printer mode. Change the settings in the Custom Settings dialog
box, then click Send to change printer mode.
(8) Start Status Monitor
Click to start the BJ Status Monitor, which checks and reports the printer status and
the progress of printing jobs.
BJ Status Monitor Functions 34
Printer Driver Functions (Windows)
BJ Status Monitor Functions
The BJ Status Monitor displays the status of the printer. If an error occurs, the status
monitor indicates the nature of the error and suggests an appropriate solution. The status
monitor also checks the ink tanks and displays a warning message when the ink is low.
■ Launching the BJ Status Monitor
The BJ Status Monitor launches automatically when data is sent to the printer. When
launched, the BJ Status Monitor appears as an icon on the taskbar.
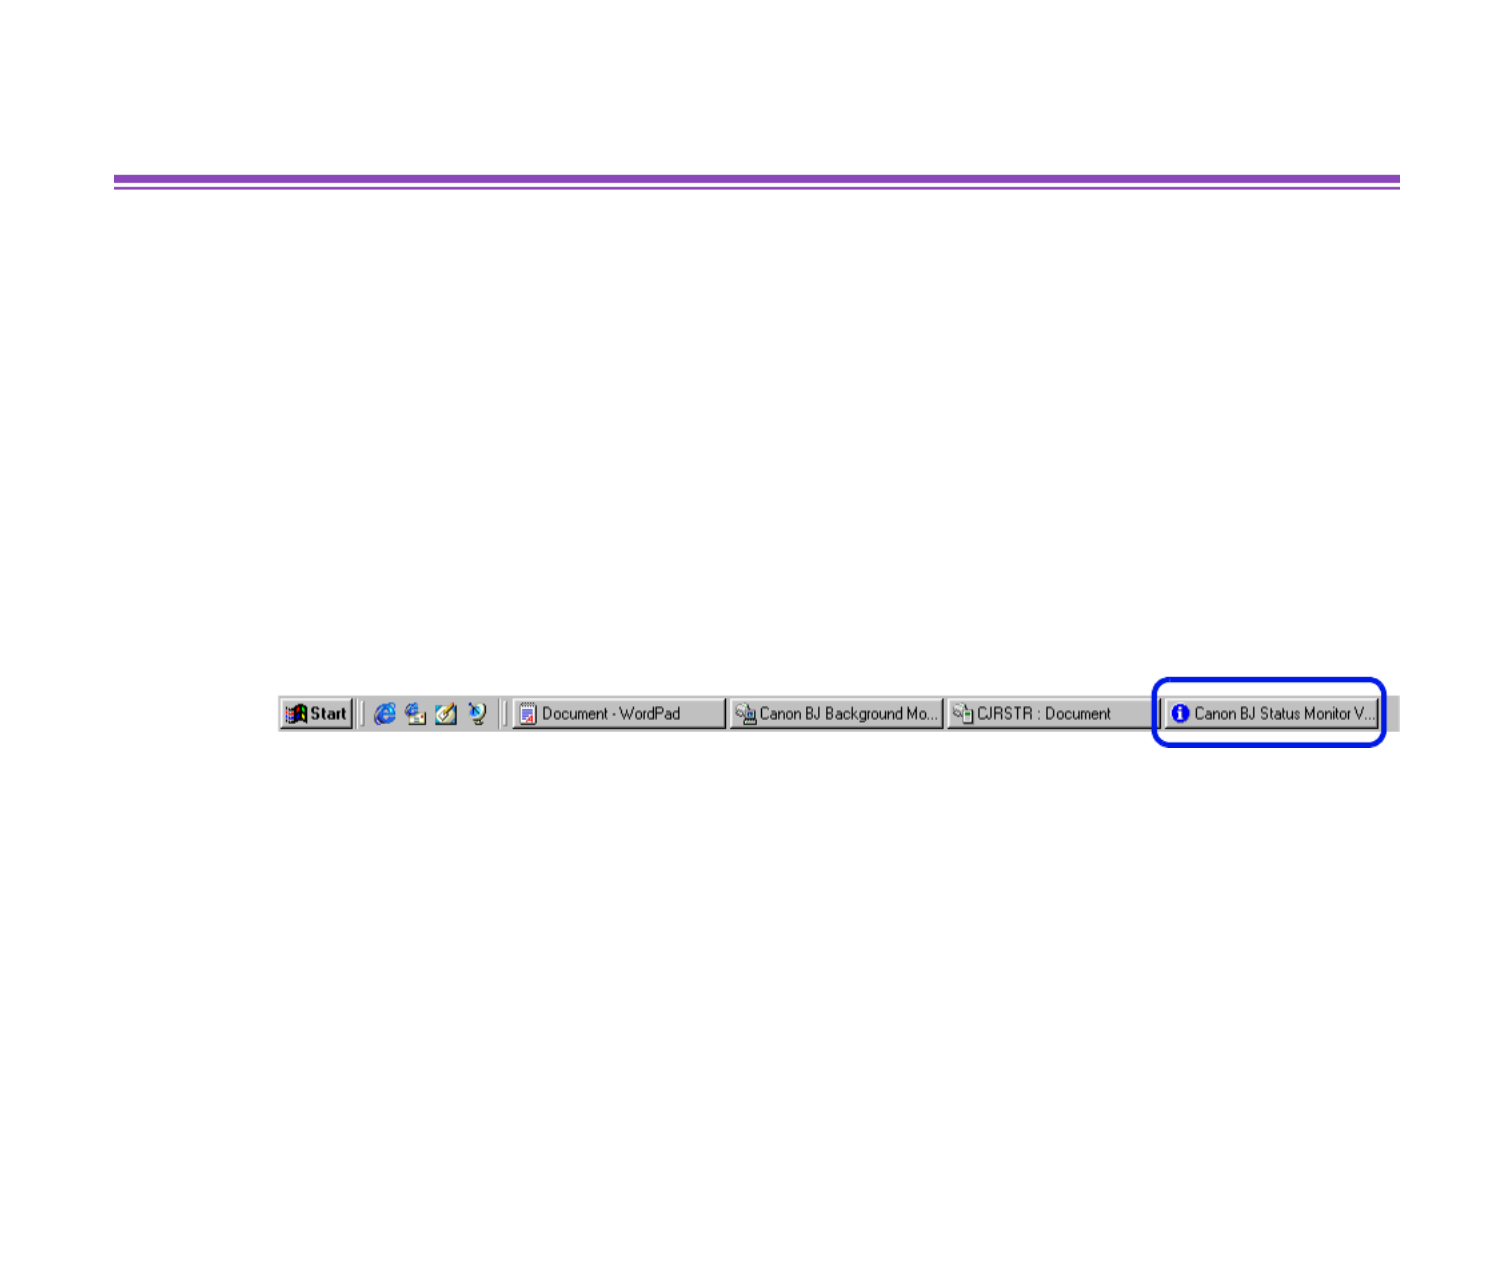
1Click the Canon BJ Status Monitor icon on the taskbar.
The BJ Status Monitor appears.

BJ Status Monitor Functions 36
Printer Driver Functions (Windows)
■ When errors occur or ink runs low
The BJ Status Monitor is automatically displayed when an error occurs, such as if the
printer runs out of paper or ink is low. In such cases, take the action described in the
Printer Status tab.
In Windows 95, Windows 98 or Windows Me, click the Guide tab and follow the
instructions on the screen.
Note ➤For details on the BJ Status Monitor, click the Help menu, then click the
topic of interest.
When paper has run out: When the ink level is low:

Canceling a Print Job 37
Printer Driver Functions (Windows)
Canceling a Print Job
To cancel the current print job, first open the BJ Status Monitor.
1Click the Canon BJ Status Monitor icon on the taskbar.
2Click Cancel Printing.
Note ➤If Cancel Printing is grayed out, press the RESUME/CANCEL button on
the printer to terminate the print job.

39
Printer Driver Functions (Macintosh)
Printer Driver Functions (Macintosh)
•Description of Print Settings
•BJ Print Monitor
•Canceling a Print Job
•Using the Printer with a Network
•Uninstalling Printer Drivers

Description of Print Settings 46
Printer Driver Functions (Macintosh)
(4) Details
Manually set the print quality and color settings in the Detailed Setting Dialog Box.
(This option is only available if Manual print mode is selected.)
(5) Options
Specify the output destination, print order and page layout for the document you are
printing.
(6) Apply
Allows you to register print settings or implement a previously saved print setting.
Produktspezifikationen
| Marke: | Canon |
| Kategorie: | Drucker |
| Modell: | Bubble Jet S520 |
Brauchst du Hilfe?
Wenn Sie Hilfe mit Canon Bubble Jet S520 benötigen, stellen Sie unten eine Frage und andere Benutzer werden Ihnen antworten
Bedienungsanleitung Drucker Canon

12 Oktober 2024
10 Oktober 2024
4 Oktober 2024
3 Oktober 2024
2 Oktober 2024
22 September 2024
17 September 2024
16 September 2024
16 September 2024
5 September 2024
Bedienungsanleitung Drucker
- Drucker Samsung
- Drucker Approx
- Drucker HP
- Drucker Sony
- Drucker Panasonic
- Drucker LG
- Drucker Roland
- Drucker Velleman
- Drucker CSL
- Drucker Renkforce
- Drucker Thomson
- Drucker Sharp
- Drucker Mitsubishi
- Drucker Nilox
- Drucker Polaroid
- Drucker Xiaomi
- Drucker Olympia
- Drucker Seiko
- Drucker Toshiba
- Drucker Olympus
- Drucker Citizen
- Drucker Olivetti
- Drucker Epson
- Drucker Dell
- Drucker Lenovo
- Drucker MSI
- Drucker Honeywell
- Drucker OKI
- Drucker Brother
- Drucker Sagem
- Drucker Fujifilm
- Drucker Ricoh
- Drucker Datamax-O'neil
- Drucker Dymo
- Drucker Intermec
- Drucker Primera
- Drucker TSC
- Drucker Zebra
- Drucker Triumph-Adler
- Drucker Kodak
- Drucker Konica-Minolta
- Drucker Minolta
- Drucker TOMY
- Drucker Festo
- Drucker Frama
- Drucker NEC
- Drucker Ultimaker
- Drucker Fujitsu
- Drucker Huawei
- Drucker Testo
- Drucker Kogan
- Drucker Royal Sovereign
- Drucker D-Link
- Drucker Kyocera
- Drucker Lexmark
- Drucker Star
- Drucker Xerox
- Drucker Digitus
- Drucker Bixolon
- Drucker Epson 7620
- Drucker Fichero
- Drucker GG Image
- Drucker Ibm
- Drucker Oce
- Drucker Paxar
- Drucker Toshiba TEC
- Drucker ZKTeco
- Drucker StarTech.com
- Drucker Bematech
- Drucker Pantum
- Drucker HiTi
- Drucker Panduit
- Drucker Posiflex
- Drucker Vupoint Solutions
- Drucker Brady
- Drucker Star Micronics
- Drucker Metapace
- Drucker DNP
- Drucker Godex
- Drucker Phoenix Contact
- Drucker Elite Screens
- Drucker Equip
- Drucker Argox
- Drucker Dascom
- Drucker EC Line
- Drucker Orient Technologies
- Drucker Evolis
- Drucker Fargo
- Drucker Microboards
- Drucker Builder
- Drucker DTRONIC
- Drucker Colop
- Drucker Raspberry Pi
- Drucker IDP
- Drucker Tally Dascom
- Drucker Custom
- Drucker Nisca
Neueste Bedienungsanleitung für -Kategorien-

25 November 2024
24 November 2024
24 November 2024
24 November 2024

16 Oktober 2024

15 Oktober 2024

15 Oktober 2024

15 Oktober 2024

14 Oktober 2024

14 Oktober 2024