Austrian Audio MiCreator Studio Bedienungsanleitung
Austrian Audio
Mikrofon
MiCreator Studio
Lesen Sie kostenlos die 📖 deutsche Bedienungsanleitung für Austrian Audio MiCreator Studio (21 Seiten) in der Kategorie Mikrofon. Dieser Bedienungsanleitung war für 16 Personen hilfreich und wurde von 2 Benutzern mit durchschnittlich 4.5 Sternen bewertet
Seite 1/21

User Manual
Introduction
MiCreator is a microphone system consisting of several microphones and accessories. Depending on
the application, you only need the main microphone, MiCreator Studio, or you can combine a
plurality of system MiCreator is also available as a devices to expand your application scenarios.
system set, in which you get MiCreator Studio and MiCreator Satellite including all necessary cables
combined in a practical case.
Since this is a manual for the entire system, you will find the appropriate section for your device(s) in
the table of contents.
Please read, comprehend and follow all instructions in this guide before using these devices.
• Please use these devices only for their intended purposes. Austrian Audio shall not assume
any liability for damage resulting from improper handling or misuse.
• Wearing headphones at full volume for long periods of time can damage your hearing.
• If a fault occurs, please stop using the devices.
• Always store the equipment in a dry and safe place.
• Do not operate the equipment outside the intended operating temperature range of 0 °C to
45 °C (32 °F – 113 °F).
• Do not use the devices in a damp or wet environment.
• Please do not drop.
• These devices are professional microphones; keep them away from small children.
• If you need to clean the devices, please use a soft, dry cloth.
• Do not use third-party accessories unless otherwise noted.
• Do not disassemble the devices, as there are no user serviceable parts inside.-
• The devices (MiCreator Studio + MiCreator Satellite) contain magnets for the
interchangeable cover plates.
Thank you very much for reading the notes so far and, of course, for placing your trust in Austrian
Audio.

Table of Contents
MiCreator Studio ..................................................................................................................................... 3
Controls and connections .................................................................................................................... 3
Switching on and off ............................................................................................................................ 3
Positioning and alignment ................................................................................................................... 4
Establishing the USB-C® connection.................................................................................................... 4
Plugging in headphones and starting up ............................................................................................. 5
Setting the monitoring (volume of the microphone signal in the headphones) 5 ................................
Adjusting the microphone gain ........................................................................................................... 6
Connecting other devices and adjusting the input gain ...................................................................... 6
Additional input gain for signal transmission via the USB- C® connection .......................................... 8
Interchangeable cover plate.............................................................................................................. 10
Transport of the MiCreator Studio .................................................................................................... 10
Technical specifications ..................................................................................................................... 11
MiCreator Satellite ................................................................................................................................ 12
Connections ....................................................................................................................................... 12
Positioning and alignment ................................................................................................................. 12
Plugging in headphones and starting up ........................................................................................... 13
Adjusting microphone and headphone gain ..................................................................................... 13
Interchangeable cover plate.............................................................................................................. 14
Transport of the MiCreator Satellite ................................................................................................. 14
Technical specifications ..................................................................................................................... 15
- MiCreator Y Lav .................................................................................................................................... 16
Positioning and alignment ................................................................................................................. 16
Plugging in headphones and starting up ........................................................................................... 16
Adjusting the microphone gain ......................................................................................................... 16
Transport of the MiCreator Y- Lav...................................................................................................... 17
Technical specifications ..................................................................................................................... 18
Troubleshooting .................................................................................................................................... 19
MiCreator Studio ............................................................................................................................... 19
MiCreator Satellite ............................................................................................................................ 19
MiCreator Y- Lav................................................................................................................................. 19
Legal information .................................................................................................................................. 20
MiCreator Studio
MiCreator -Studio is a studio microphone with USB C® connection to the partner device (such as
computer, tablet, mobile phone, etc.).
In addition to a primary headphone output, MiCreator Studio has another jack that can be used both
as a second headphone output o connect the included instrument cable to record two signals or t
simultaneously.
Alternatively, MiCreator Satellite or MiCreator Y-Lav can be connected to this socket see the –
corresponding sections for more information.
Note: The microphone can also be powered by a USB power adapter (not included) and used as an
analogue microphone.
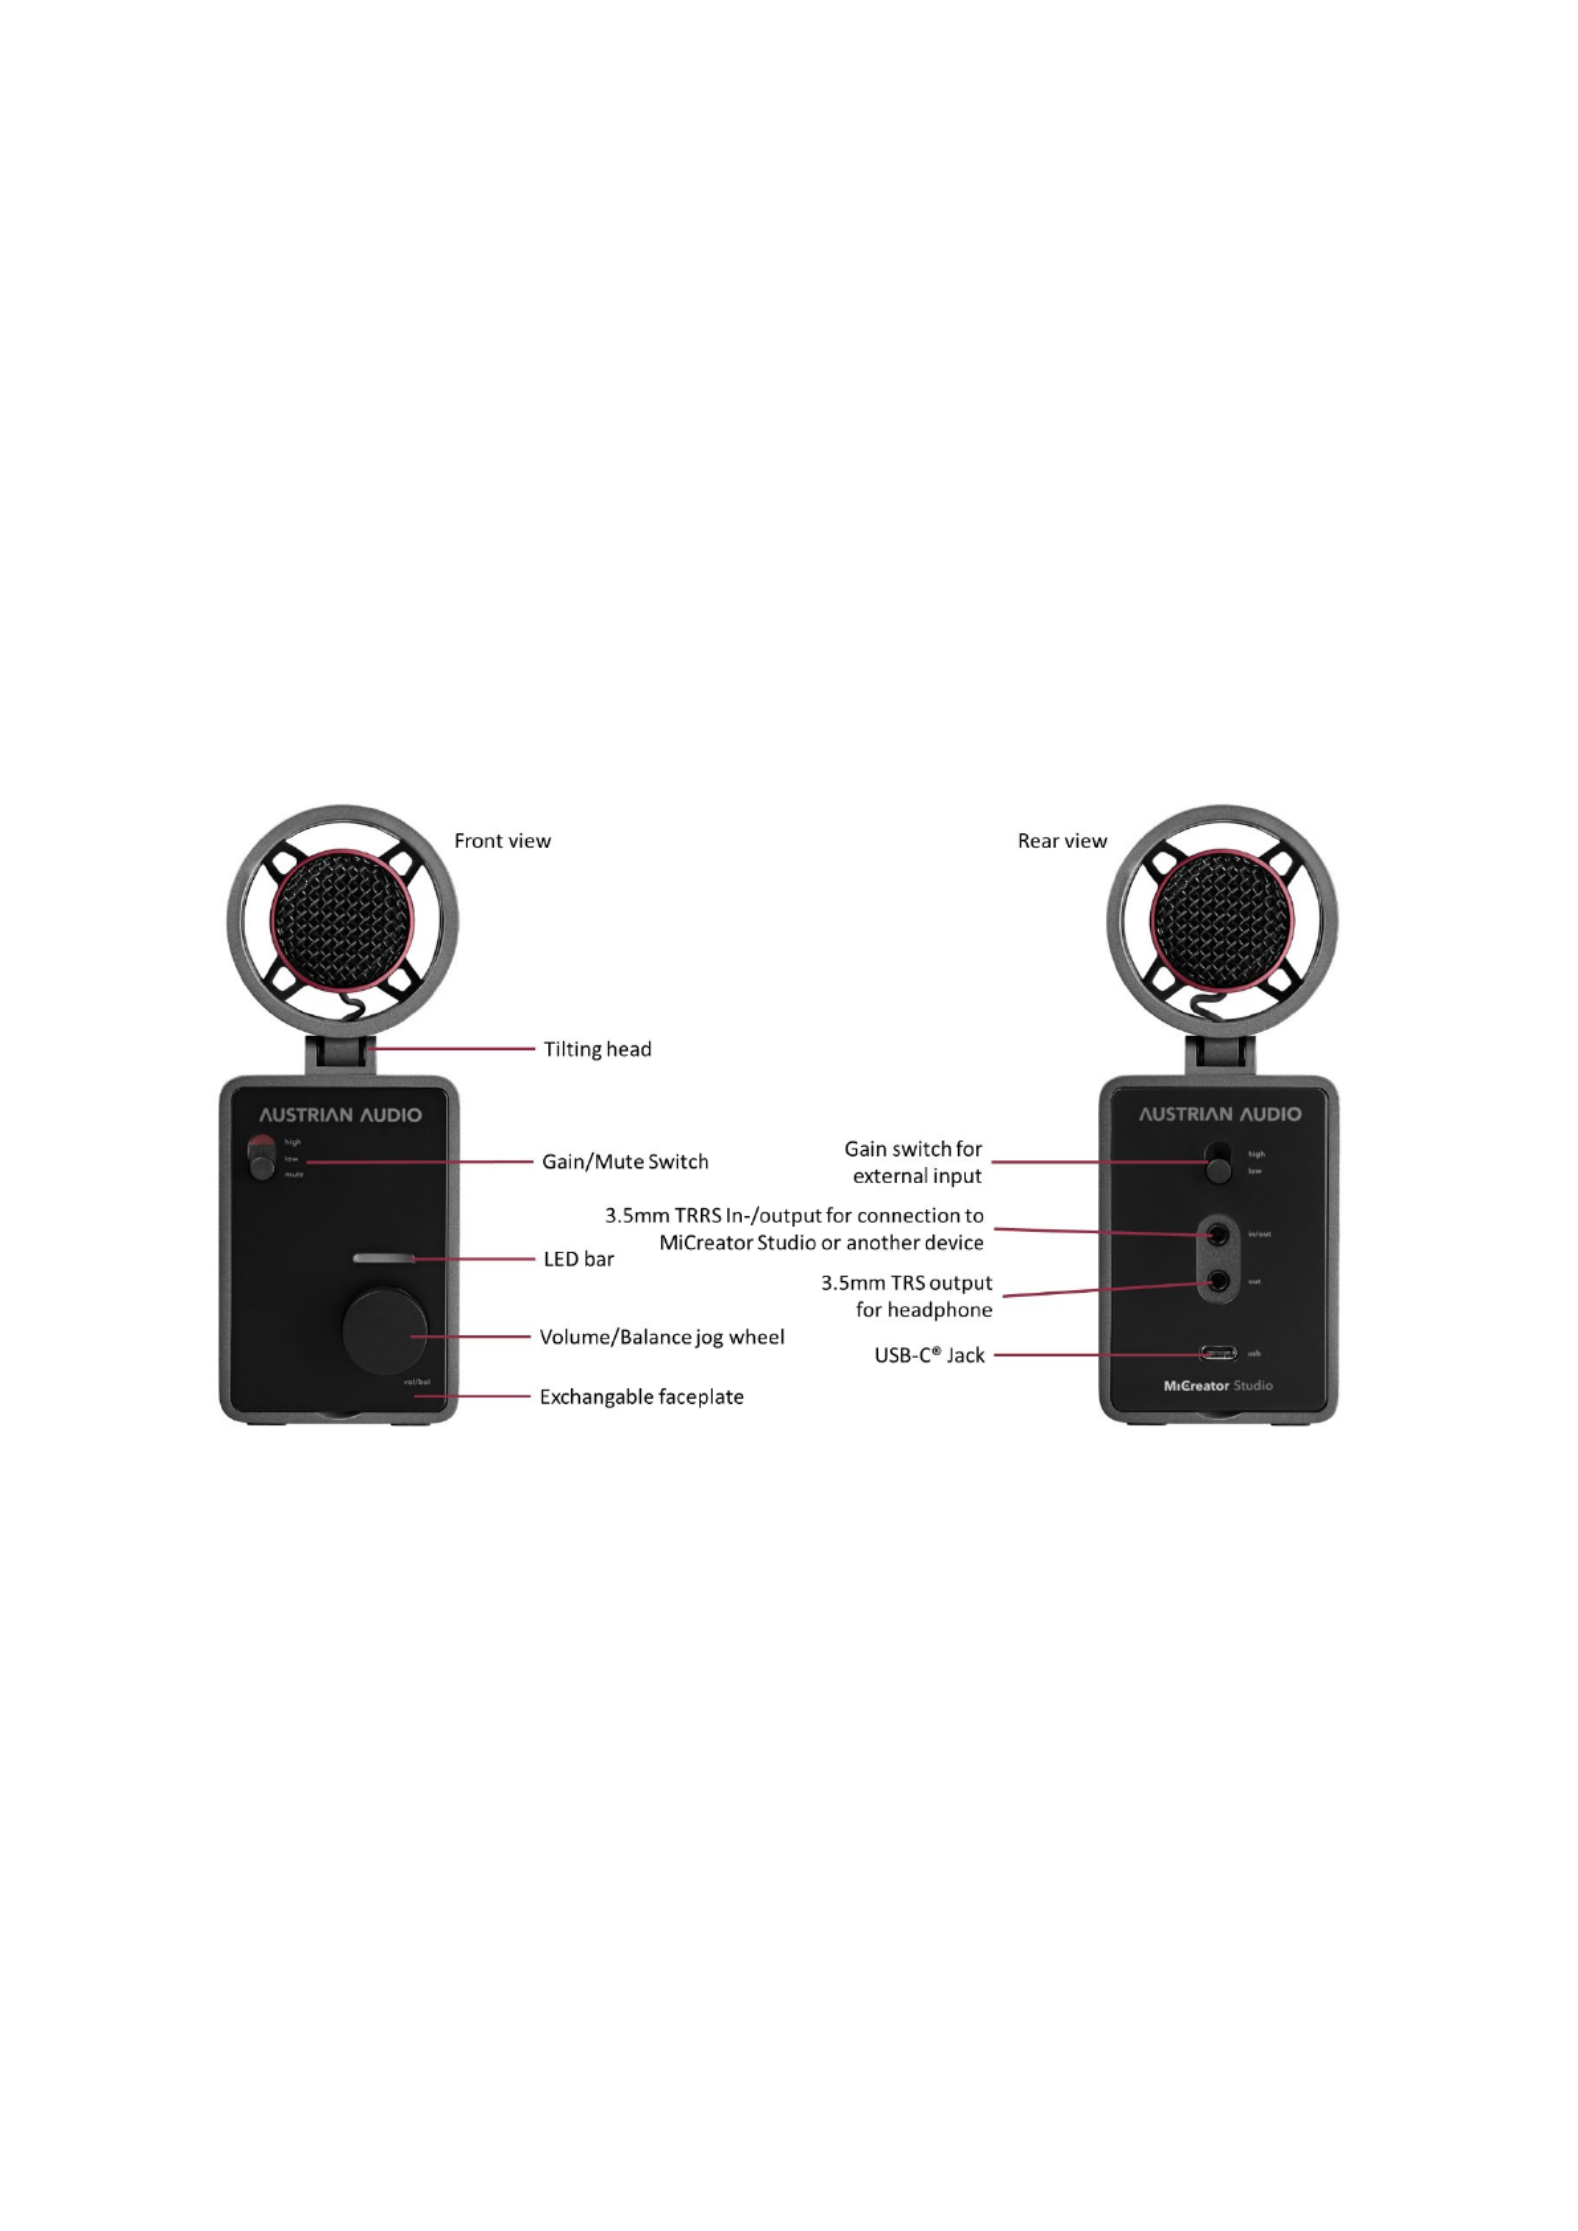
Controls and connections
Switching on and off
The device does not have an on/off switch but starts automatically as soon as it is powered by the
USB-C® socket (5V, 250mA). When starting, a red light animation is briefly visible on the LED bar. The
LED bar then switches to volume mode (green).
Produktspezifikationen
| Marke: | Austrian Audio |
| Kategorie: | Mikrofon |
| Modell: | MiCreator Studio |
Brauchst du Hilfe?
Wenn Sie Hilfe mit Austrian Audio MiCreator Studio benötigen, stellen Sie unten eine Frage und andere Benutzer werden Ihnen antworten
Bedienungsanleitung Mikrofon Austrian Audio

31 August 2024
31 August 2024
26 Januar 2024
26 Januar 2024
26 Januar 2024
26 Januar 2024
26 Januar 2024
Bedienungsanleitung Mikrofon
- Mikrofon Connect IT
- Mikrofon Gembird
- Mikrofon Hama
- Mikrofon HyperX
- Mikrofon Audio-Technica
- Mikrofon Logitech
- Mikrofon Manhattan
- Mikrofon Manta
- Mikrofon Nacon
- Mikrofon Nedis
- Mikrofon NGS
- Mikrofon Niceboy
- Mikrofon Philips
- Mikrofon Sandberg
- Mikrofon Sharkoon
- Mikrofon Sony
- Mikrofon T'nB
- Mikrofon Trust
- Mikrofon Panasonic
- Mikrofon Roland
- Mikrofon Canon
- Mikrofon Yamaha
- Mikrofon Yealink
- Mikrofon Neumann
- Mikrofon Technaxx
- Mikrofon Day
- Mikrofon Denver
- Mikrofon König
- Mikrofon Renkforce
- Mikrofon Telefunken
- Mikrofon Thomson
- Mikrofon Trevi
- Mikrofon Blaupunkt
- Mikrofon Triton
- Mikrofon Pyle
- Mikrofon Golden Age Project
- Mikrofon AKG
- Mikrofon Auna
- Mikrofon Beyerdynamic
- Mikrofon Bose
- Mikrofon Lenco
- Mikrofon Creative
- Mikrofon Jabra
- Mikrofon JBL
- Mikrofon Sennheiser
- Mikrofon Shure
- Mikrofon Livoo
- Mikrofon Max
- Mikrofon Olympus
- Mikrofon Tascam
- Mikrofon Zoom
- Mikrofon Bigben
- Mikrofon Plantronics
- Mikrofon Turtle Beach
- Mikrofon Fenton
- Mikrofon OneConcept
- Mikrofon TOA
- Mikrofon American DJ
- Mikrofon Gemini
- Mikrofon Power Dynamics
- Mikrofon Razer
- Mikrofon Samson
- Mikrofon Skytec
- Mikrofon Vonyx
- Mikrofon Peavey
- Mikrofon Marshall Electronics
- Mikrofon Karma
- Mikrofon Atlas
- Mikrofon DJI
- Mikrofon AVerMedia
- Mikrofon President
- Mikrofon Phonak
- Mikrofon Vtech
- Mikrofon Easypix
- Mikrofon Rollei
- Mikrofon Genesis
- Mikrofon Techly
- Mikrofon NZXT
- Mikrofon Behringer
- Mikrofon IMG Stageline
- Mikrofon Mackie
- Mikrofon Numark
- Mikrofon Omnitronic
- Mikrofon ESI
- Mikrofon Marantz
- Mikrofon Monoprice
- Mikrofon Monacor
- Mikrofon TEAC
- Mikrofon Hohner
- Mikrofon United
- Mikrofon Reloop
- Mikrofon TC Helicon
- Mikrofon Majority
- Mikrofon RCF
- Mikrofon Electro-Voice
- Mikrofon Joby
- Mikrofon Tracer
- Mikrofon Boss
- Mikrofon American Audio
- Mikrofon Godox
- Mikrofon Alto
- Mikrofon Kopul
- Mikrofon Chord
- Mikrofon GVM
- Mikrofon Saramonic
- Mikrofon Peerless-AV
- Mikrofon Vaddio
- Mikrofon JLab
- Mikrofon Galaxy Audio
- Mikrofon HQ Power
- Mikrofon Countryman
- Mikrofon Blue Microphones
- Mikrofon Warm Audio
- Mikrofon Speed-Link
- Mikrofon Line 6
- Mikrofon Bogen
- Mikrofon Nuance
- Mikrofon Radial Engineering
- Mikrofon DPA
- Mikrofon Azden
- Mikrofon Sven
- Mikrofon Pyle Pro
- Mikrofon PreSonus
- Mikrofon Qtx
- Mikrofon Hähnel
- Mikrofon ART
- Mikrofon Senal
- Mikrofon Rode
- Mikrofon LD Systems
- Mikrofon Dörr
- Mikrofon IK Multimedia
- Mikrofon Midas
- Mikrofon Simplecom
- Mikrofon Ambient Recording
- Mikrofon Apogee
- Mikrofon TeachLogic
- Mikrofon Krom
- Mikrofon Elgato
- Mikrofon Chandler
- Mikrofon DAP
- Mikrofon DAP Audio
- Mikrofon IDance
- Mikrofon JB Systems
- Mikrofon Joy-it
- Mikrofon M-Audio
- Mikrofon Neewer
- Mikrofon ONYX
- Mikrofon Pure Acoustics
- Mikrofon Sonuus
- Mikrofon Steren
- Mikrofon Harley Benton
- Mikrofon Wharfedale
- Mikrofon Universal Audio
- Mikrofon Aston
- Mikrofon Singing Machine
- Mikrofon Epcom
- Mikrofon Adastra
- Mikrofon Clockaudio
- Mikrofon ITek
- Mikrofon Tula
- Mikrofon MXL
- Mikrofon APart
- Mikrofon Fun Generation
- Mikrofon Blue
- Mikrofon Hollyland
- Mikrofon Celly
- Mikrofon Proel
- Mikrofon Speco Technologies
- Mikrofon Polsen
- Mikrofon Vocopro
- Mikrofon Aluratek
- Mikrofon Comica
- Mikrofon IMG Stage Line
- Mikrofon Atlas Sound
- Mikrofon Eikon
- Mikrofon DB Technologies
- Mikrofon Palmer
- Mikrofon ViolaWave
- Mikrofon BOYA
- Mikrofon Audient
- Mikrofon Lectrosonics
- Mikrofon Konig & Meyer
- Mikrofon Sanken
- Mikrofon Citronic
- Mikrofon SPL
- Mikrofon Brigmton
- Mikrofon Axis
- Mikrofon Nady
- Mikrofon Xtreme
- Mikrofon Audac
- Mikrofon Vexus
- Mikrofon Crestron
- Mikrofon PSSO
- Mikrofon Synco
- Mikrofon Antelope Audio
- Mikrofon Catchbox
- Mikrofon Bontempi
- Mikrofon Audix
- Mikrofon Kurzweil
- Mikrofon Lewitt
- Mikrofon JTS
- Mikrofon Gravity
- Mikrofon Shadow
- Mikrofon Schertler
- Mikrofon Artsound
- Mikrofon Rolls
- Mikrofon Kali Audio
- Mikrofon The T.bone
- Mikrofon Manley
- Mikrofon Thronmax
- Mikrofon Klark Teknik
- Mikrofon AVMATRIX
- Mikrofon ANT
- Mikrofon Schoeps
- Mikrofon CAD Audio
- Mikrofon SE Electronics
- Mikrofon NOX
- Mikrofon Ultimate Support
- Mikrofon Deity
- Mikrofon Majestic
- Mikrofon Point Source Audio
- Mikrofon AmpliVox
- Mikrofon Earthworks
- Mikrofon Relacart
- Mikrofon Auray
- Mikrofon Mars Gaming
- Mikrofon Fishman
- Mikrofon Eurosound
- Mikrofon Aston Microphones
- Mikrofon Williams Sound
- Mikrofon Easyrig
- Mikrofon Mojave
- Mikrofon JZ Microphones
- Mikrofon Soundsation
- Mikrofon ENDORFY
- Mikrofon B-Band
- Mikrofon Perfect Choice
- Mikrofon TIE Audio
- Mikrofon Fluid
- Mikrofon AMT
- Mikrofon Xvive
- Mikrofon Lauten Audio
- Mikrofon White Shark
- Mikrofon Moza
- Mikrofon Nowsonic
- Mikrofon AEA
- Mikrofon Neat
- Mikrofon Antelope
- Mikrofon Prodipe
- Mikrofon Valcom
- Mikrofon IC Intracom
- Mikrofon Oktava
- Mikrofon Sontronics
- Mikrofon Anywhere Cart
- Mikrofon Owl Labs
- Mikrofon Klover
- Mikrofon Intricon
- Mikrofon Royer Labs
- Mikrofon Miktek
- Mikrofon Stageclix
- Mikrofon Townsend Labs
- Mikrofon Sabian
- Mikrofon SmallRig
- Mikrofon Lorgar
- Mikrofon Scope Labs
- Mikrofon Mirfak Audio
- Mikrofon CKMOVA
- Mikrofon DOCKIN
- Mikrofon Tonor
- Mikrofon MILAB
- Mikrofon Switchcraft
- Mikrofon Tonsil
- Mikrofon Sescom
- Mikrofon Sonic Presence
- Mikrofon Movo
- Mikrofon PureLink
- Mikrofon Isovox
- Mikrofon Glemm
- Mikrofon Røde
Neueste Bedienungsanleitung für -Kategorien-
15 Oktober 2024

13 Oktober 2024

13 Oktober 2024
12 Oktober 2024
9 Oktober 2024
9 Oktober 2024
8 Oktober 2024
8 Oktober 2024
8 Oktober 2024
7 Oktober 2024